


Novell®
www.novell.com
Domain Services for Windows Administration Guide
Open Enterprise Server
novdocx (en) 7 January 2010
AUTHORIZED DOCUMENTATION
2.0 SP2
November 16 2009
OES 2 SP2: Domain Services for Windows Administration Guide

Legal Notices
Novell, Inc. makes no representations or warranties with respect to the contents or use of this documentation, and
specifically disclaims any express or implied warranties of merchantability or fitness for any particular purpose.
Further, Novell, Inc. reserves the right to revise this publication and to make changes to its content, at any time,
without obligation to notify any person or entity of such revisions or changes.
Further, Novell, Inc. makes no representations or warranties with respect to any software, and specifically disclaims
any express or implied warranties of merchantability or fitness for any particular purpose. Further, Novell, Inc.
reserves the right to make changes to any and all parts of Novell software, at any time, without any obligation to
notify any person or entity of such changes.
Any products or technical information provided under this Agreement may be subject to U.S. export controls and the
trade laws of other countries. You agree to comply with all export control regulations and to obtain any required
licenses or classification to export, re-export or import deliverables. You agree not to export or re-export to entities on
the current U.S. export exclusion lists or to any embargoed or terrorist countries as specified in the U.S. export laws.
You agree to not use deliverables for prohibited nuclear, missile, or chemical biological weaponry end uses. Please
refer to www.novell.com/info/exports/ for more information on exporting Novell software. Novell assumes no
responsibility for your failure to obtain any necessary export approvals.
Copyright © 2009 Novell, Inc. All rights reserved. No part of this publication may be reproduced, photocopied,
stored on a retrieval system, or transmitted without the express written consent of the publisher.
novdocx (en) 7 January 2010
Novell, Inc. has intellectual property rights relating to technology embodied in the product that is described in this
document. In particular, and without limitation, these intellectual property rights may include one or more of the U.S.
patents listed at http://www.novell.com/company/legal/patents/ and one or more additional patents or pending patent
applications in the U.S. and in other countries.
Novell, Inc.
404 Wyman Street, Suite 500
Waltham, MA 02451
U.S.A.
www.novell.com
Online Documentation: To access the online documentation for this and other Novell products, and to get
updates, see www.novell.com/documentation.

Novell Trademarks
For a list of Novell trademarks, see the Novell Trademark and Service Mark list (http://www.novell.com/company/
legal/trademarks/tmlist.html).
Third-Party Materials
All third-party trademarks are the property of their respective owners.
novdocx (en) 7 January 2010

novdocx (en) 7 January 2010
4 OES 2 SP2: Domain Services for Windows Administration Guide

Contents
About This Guide 11
1Overview 13
1.1 Features and Benefits . . . . . . . . . . . . . . . . . . . . . . . . . . . . . . . . . . . . . . . . . . . . . . . . . . . . . . . 13
1.2 Architectural Overview . . . . . . . . . . . . . . . . . . . . . . . . . . . . . . . . . . . . . . . . . . . . . . . . . . . . . . . 14
1.3 Basic Directory Services Concepts . . . . . . . . . . . . . . . . . . . . . . . . . . . . . . . . . . . . . . . . . . . . . 16
1.3.1 Domains, Trees, and Forests . . . . . . . . . . . . . . . . . . . . . . . . . . . . . . . . . . . . . . . . . . 16
1.3.2 Naming . . . . . . . . . . . . . . . . . . . . . . . . . . . . . . . . . . . . . . . . . . . . . . . . . . . . . . . . . . . 16
1.3.3 Security Model . . . . . . . . . . . . . . . . . . . . . . . . . . . . . . . . . . . . . . . . . . . . . . . . . . . . . . 16
1.3.4 Groups . . . . . . . . . . . . . . . . . . . . . . . . . . . . . . . . . . . . . . . . . . . . . . . . . . . . . . . . . . . . 17
1.4 Key Differences Between the DSfW LDAP Server and the eDirectory Server. . . . . . . . . . . . . 17
2What’s New 19
novdocx (en) 7 January 2010
3 Use-Cases 21
3.1 Authenticating to Applications That Require Active Directory-Style Authentication . . . . . . . . . 21
3.1.1 Users Located in the DSfW Forest and Accessing Applications Hosted in the Active
Directory Tree . . . . . . . . . . . . . . . . . . . . . . . . . . . . . . . . . . . . . . . . . . . . . . . . . . . . . 21
3.1.2 Users and Applications Hosted in the DSfW Forest . . . . . . . . . . . . . . . . . . . . . . . . . 22
3.2 Working With Windows Systems Without Novell Client . . . . . . . . . . . . . . . . . . . . . . . . . . . . . . 22
3.3 Leveraging an Existing eDirectory Setup . . . . . . . . . . . . . . . . . . . . . . . . . . . . . . . . . . . . . . . . . 23
3.4 Interoperability Between Active Directory and eDirectory . . . . . . . . . . . . . . . . . . . . . . . . . . . . 23
4 Deployment Scenarios 25
4.1 Deploying DSfW in a Non-Name-Mapped Setup . . . . . . . . . . . . . . . . . . . . . . . . . . . . . . . . . . . 25
4.1.1 Deploying as a Single Domain. . . . . . . . . . . . . . . . . . . . . . . . . . . . . . . . . . . . . . . . . . 25
4.1.2 Deploying as Multiple Domains in a Forest . . . . . . . . . . . . . . . . . . . . . . . . . . . . . . . . 25
4.2 Deploying DSfW in a Name-Mapped Setup . . . . . . . . . . . . . . . . . . . . . . . . . . . . . . . . . . . . . . 27
5 Planning for DSfW 29
5.1 Server Requirements for Installing DSfW. . . . . . . . . . . . . . . . . . . . . . . . . . . . . . . . . . . . . . . . . 29
5.2 Scalability Guidelines . . . . . . . . . . . . . . . . . . . . . . . . . . . . . . . . . . . . . . . . . . . . . . . . . . . . . . . . 29
5.3 Deciding Between Name-Mapped or Non-Name-Mapped Installation. . . . . . . . . . . . . . . . . . . 30
5.3.1 Impact of a Name Mapped / Non-Name-Mapped setup on a Tree . . . . . . . . . . . . . . 32
5.4 Meeting the Installation Requirements. . . . . . . . . . . . . . . . . . . . . . . . . . . . . . . . . . . . . . . . . . . 32
5.4.1 Installation Prerequisites For a Non-Name-Mapped Setup . . . . . . . . . . . . . . . . . . . . 32
5.4.2 Installation Prerequisites for a Name-Mapped Setup . . . . . . . . . . . . . . . . . . . . . . . . 35
5.5 Supported Installation Scenarios . . . . . . . . . . . . . . . . . . . . . . . . . . . . . . . . . . . . . . . . . . . . . . . 39
5.6 Unsupported Service Combinations. . . . . . . . . . . . . . . . . . . . . . . . . . . . . . . . . . . . . . . . . . . . . 39
5.6.1 Installing Other Products in the DSfW Partition . . . . . . . . . . . . . . . . . . . . . . . . . . . . . 39
5.7 Administrative Tools. . . . . . . . . . . . . . . . . . . . . . . . . . . . . . . . . . . . . . . . . . . . . . . . . . . . . . . . . 40
5.7.1 Windows Administration Tools. . . . . . . . . . . . . . . . . . . . . . . . . . . . . . . . . . . . . . . . . . 40
5.7.2 Linux Administration Tools. . . . . . . . . . . . . . . . . . . . . . . . . . . . . . . . . . . . . . . . . . . . . 40
5.8 Utilities Not Supported in DSfW . . . . . . . . . . . . . . . . . . . . . . . . . . . . . . . . . . . . . . . . . . . . . . . . 40
5.9 Limitation with NETBIOS Names . . . . . . . . . . . . . . . . . . . . . . . . . . . . . . . . . . . . . . . . . . . . . . . 40
Contents 5

6 Installing Domain Services for Windows 41
6.1 Prerequisites for Installation. . . . . . . . . . . . . . . . . . . . . . . . . . . . . . . . . . . . . . . . . . . . . . . . . . . 41
6.2 Installation Scenarios . . . . . . . . . . . . . . . . . . . . . . . . . . . . . . . . . . . . . . . . . . . . . . . . . . . . . . . . 41
6.2.1 Installing DSfW in a Non-Name-Mapped Setup . . . . . . . . . . . . . . . . . . . . . . . . . . . . 41
6.2.2 Installing DSfW in a Name-Mapped Setup . . . . . . . . . . . . . . . . . . . . . . . . . . . . . . . . 71
6.3 Using a Container Admin to Install and Configure DSfW. . . . . . . . . . . . . . . . . . . . . . . . . . . . 101
7 Provisioning Domain Services for Windows 103
7.1 What Is Provisioning? . . . . . . . . . . . . . . . . . . . . . . . . . . . . . . . . . . . . . . . . . . . . . . . . . . . . . . 103
7.2 Features and Capabilities of the Provisioning Wizard . . . . . . . . . . . . . . . . . . . . . . . . . . . . . . 103
7.3 Provisioning Wizard Interface . . . . . . . . . . . . . . . . . . . . . . . . . . . . . . . . . . . . . . . . . . . . . . . . 104
7.4 Using the Wizard to Provision the DSfW Server . . . . . . . . . . . . . . . . . . . . . . . . . . . . . . . . . . 106
7.5 Provisioning Tasks . . . . . . . . . . . . . . . . . . . . . . . . . . . . . . . . . . . . . . . . . . . . . . . . . . . . . . . . . 107
7.5.1 Provisioning Precheck . . . . . . . . . . . . . . . . . . . . . . . . . . . . . . . . . . . . . . . . . . . . . . . 107
7.5.2 Configure DNS. . . . . . . . . . . . . . . . . . . . . . . . . . . . . . . . . . . . . . . . . . . . . . . . . . . . . 108
7.5.3 Configure SLAPI Plug-Ins . . . . . . . . . . . . . . . . . . . . . . . . . . . . . . . . . . . . . . . . . . . . 108
7.5.4 Create Domain Partition . . . . . . . . . . . . . . . . . . . . . . . . . . . . . . . . . . . . . . . . . . . . . 108
7.5.5 Add Domain Replica . . . . . . . . . . . . . . . . . . . . . . . . . . . . . . . . . . . . . . . . . . . . . . . . 109
7.5.6 Add Domain Objects . . . . . . . . . . . . . . . . . . . . . . . . . . . . . . . . . . . . . . . . . . . . . . . . 109
7.5.7 Create Configuration Partition . . . . . . . . . . . . . . . . . . . . . . . . . . . . . . . . . . . . . . . . 109
7.5.8 Create Schema Partition . . . . . . . . . . . . . . . . . . . . . . . . . . . . . . . . . . . . . . . . . . . . . 109
7.5.9 Add Configuration Objects. . . . . . . . . . . . . . . . . . . . . . . . . . . . . . . . . . . . . . . . . . . . 110
7.5.10 Add Domain Controller . . . . . . . . . . . . . . . . . . . . . . . . . . . . . . . . . . . . . . . . . . . . . . 110
7.5.11 Assign Rights . . . . . . . . . . . . . . . . . . . . . . . . . . . . . . . . . . . . . . . . . . . . . . . . . . . . . 110
7.5.12 Restart DSfW Services . . . . . . . . . . . . . . . . . . . . . . . . . . . . . . . . . . . . . . . . . . . . . . 110
7.5.13 Set Credentials for Accounts . . . . . . . . . . . . . . . . . . . . . . . . . . . . . . . . . . . . . . . . . . 111
7.5.14 Enable Kerberos . . . . . . . . . . . . . . . . . . . . . . . . . . . . . . . . . . . . . . . . . . . . . . . . . . . 111
7.5.15 Samify Objects. . . . . . . . . . . . . . . . . . . . . . . . . . . . . . . . . . . . . . . . . . . . . . . . . . . . . 111
7.5.16 Establish Trust . . . . . . . . . . . . . . . . . . . . . . . . . . . . . . . . . . . . . . . . . . . . . . . . . . . . . 111
7.5.17 Update Service Configuration . . . . . . . . . . . . . . . . . . . . . . . . . . . . . . . . . . . . . . . . . 111
7.5.18 Cleanup . . . . . . . . . . . . . . . . . . . . . . . . . . . . . . . . . . . . . . . . . . . . . . . . . . . . . . . . . . 111
7.6 Provisioning Tasks for Name-Mapped and Non-Name-Mapped Scenarios. . . . . . . . . . . . . . 111
7.7 Logging . . . . . . . . . . . . . . . . . . . . . . . . . . . . . . . . . . . . . . . . . . . . . . . . . . . . . . . . . . . . . . . . . 114
7.8 Troubleshooting . . . . . . . . . . . . . . . . . . . . . . . . . . . . . . . . . . . . . . . . . . . . . . . . . . . . . . . . . . . 115
7.8.1 Troubleshooting Provisioning Tasks . . . . . . . . . . . . . . . . . . . . . . . . . . . . . . . . . . . . 115
7.9 Executing Provisioning Tasks Manually . . . . . . . . . . . . . . . . . . . . . . . . . . . . . . . . . . . . . . . . . 123
novdocx (en) 7 January 2010
8 Verifying DSfW Installation 125
8.1 Verifying the Installation . . . . . . . . . . . . . . . . . . . . . . . . . . . . . . . . . . . . . . . . . . . . . . . . . . . . . 125
9 Upgrading DSfW 127
9.1 Upgrading DSfW to OES 2 SP2. . . . . . . . . . . . . . . . . . . . . . . . . . . . . . . . . . . . . . . . . . . . . . . 127
9.1.1 Prerequisite . . . . . . . . . . . . . . . . . . . . . . . . . . . . . . . . . . . . . . . . . . . . . . . . . . . . . . . 127
9.1.2 Limitations . . . . . . . . . . . . . . . . . . . . . . . . . . . . . . . . . . . . . . . . . . . . . . . . . . . . . . . . 127
9.2 Upgrading from OES 1.0 Linux . . . . . . . . . . . . . . . . . . . . . . . . . . . . . . . . . . . . . . . . . . . . . . . 127
9.3 Migrating Data to a Domain Services for Windows Server . . . . . . . . . . . . . . . . . . . . . . . . . . 127
9.4 Limitations . . . . . . . . . . . . . . . . . . . . . . . . . . . . . . . . . . . . . . . . . . . . . . . . . . . . . . . . . . . . . . . 128
6 OES 2 SP2: Domain Services for Windows Administration Guide

10 Running Domain Services for Windows in a Virtualized Environment 129
11 Logging In from a Windows Workstation 131
11.1 Joining a Windows Workstation to a DSfW Domain. . . . . . . . . . . . . . . . . . . . . . . . . . . . . . . . 131
11.2 Logging In to a DSfW Domain . . . . . . . . . . . . . . . . . . . . . . . . . . . . . . . . . . . . . . . . . . . . . . . . 134
11.3 Logging Out . . . . . . . . . . . . . . . . . . . . . . . . . . . . . . . . . . . . . . . . . . . . . . . . . . . . . . . . . . . . . . 134
11.4 Limitations . . . . . . . . . . . . . . . . . . . . . . . . . . . . . . . . . . . . . . . . . . . . . . . . . . . . . . . . . . . . . . . 134
11.4.1 Joining a Workstation that Has Novell Client Installed . . . . . . . . . . . . . . . . . . . . . . 135
11.4.2 Error while Joining a Workstation to a Domain . . . . . . . . . . . . . . . . . . . . . . . . . . . . 135
12 Creating Users 137
12.1 Creating Users in iManager . . . . . . . . . . . . . . . . . . . . . . . . . . . . . . . . . . . . . . . . . . . . . . . . . . 137
12.2 Creating Users in MMC . . . . . . . . . . . . . . . . . . . . . . . . . . . . . . . . . . . . . . . . . . . . . . . . . . . . . 139
12.3 Limitations . . . . . . . . . . . . . . . . . . . . . . . . . . . . . . . . . . . . . . . . . . . . . . . . . . . . . . . . . . . . . . . 140
12.3.1 Moving User Objects Across Containers . . . . . . . . . . . . . . . . . . . . . . . . . . . . . . . . . 140
12.3.2 Primary Group Appears Twice in the memberOf Properties Page . . . . . . . . . . . . . 140
12.3.3 Adding Newly Created Users to a Group gives Error Message. . . . . . . . . . . . . . . . 140
12.3.4 Dynamic Groups Is Not Supported in DSfW . . . . . . . . . . . . . . . . . . . . . . . . . . . . . . 140
12.3.5 Security Filter Not Working in Win7 . . . . . . . . . . . . . . . . . . . . . . . . . . . . . . . . . . . . . 140
novdocx (en) 7 January 2010
13 Understanding DNS in Relation to DSfW 141
13.1 DSfW and DNS . . . . . . . . . . . . . . . . . . . . . . . . . . . . . . . . . . . . . . . . . . . . . . . . . . . . . . . . . . . 141
13.1.1 Limitations . . . . . . . . . . . . . . . . . . . . . . . . . . . . . . . . . . . . . . . . . . . . . . . . . . . . . . . . 142
13.2 Understanding DNS Settings in the DSfW Environment . . . . . . . . . . . . . . . . . . . . . . . . . . . . 142
13.2.1 General DNS Settings . . . . . . . . . . . . . . . . . . . . . . . . . . . . . . . . . . . . . . . . . . . . . . . 142
13.2.2 Configuring a Domain Controller as a Primary DNS Server . . . . . . . . . . . . . . . . . . 143
13.2.3 Configuring a Domain Controller by Using an Existing DNS Server . . . . . . . . . . . . 143
13.3 Setting Up a Windows DNS Server for DSfW . . . . . . . . . . . . . . . . . . . . . . . . . . . . . . . . . . . . 144
13.4 Migrating DNS to Another Domain Controller . . . . . . . . . . . . . . . . . . . . . . . . . . . . . . . . . . . . 144
13.5 Restarting DNS . . . . . . . . . . . . . . . . . . . . . . . . . . . . . . . . . . . . . . . . . . . . . . . . . . . . . . . . . . . 145
14 Managing Group Policy Settings 147
14.1 Configuring Group Policies . . . . . . . . . . . . . . . . . . . . . . . . . . . . . . . . . . . . . . . . . . . . . . . . . . 147
14.2 Group Policy Objects . . . . . . . . . . . . . . . . . . . . . . . . . . . . . . . . . . . . . . . . . . . . . . . . . . . . . . . 149
14.2.1 GPO Account Policies . . . . . . . . . . . . . . . . . . . . . . . . . . . . . . . . . . . . . . . . . . . . . . 149
14.2.2 gpo2nmas . . . . . . . . . . . . . . . . . . . . . . . . . . . . . . . . . . . . . . . . . . . . . . . . . . . . . . . . 150
14.2.3 Enforcing Computer Configuration and User Configuration . . . . . . . . . . . . . . . . . . 150
14.2.4 Troubleshooting . . . . . . . . . . . . . . . . . . . . . . . . . . . . . . . . . . . . . . . . . . . . . . . . . . . . 151
14.3 Sysvol. . . . . . . . . . . . . . . . . . . . . . . . . . . . . . . . . . . . . . . . . . . . . . . . . . . . . . . . . . . . . . . . . . . 151
14.3.1 sysvolsync Utility . . . . . . . . . . . . . . . . . . . . . . . . . . . . . . . . . . . . . . . . . . . . . . . . . . . 151
14.4 Limitations with Group Policy Management . . . . . . . . . . . . . . . . . . . . . . . . . . . . . . . . . . . . . . 152
14.4.1 Users Cannot Log In if They Are Moved From a Non-Domain Partition to a DSfW
Domain Partition . . . . . . . . . . . . . . . . . . . . . . . . . . . . . . . . . . . . . . . . . . . . . . . . . . . 152
14.4.2 Members of GroupPolicy Creator Owner group cannot change the active DFS
Referral . . . . . . . . . . . . . . . . . . . . . . . . . . . . . . . . . . . . . . . . . . . . . . . . . . . . . . . . . . 152
14.4.3 Ignore Warnings while Backing up Group Policies . . . . . . . . . . . . . . . . . . . . . . . . . 152
14.4.4 WMI Filters Cannot be Applied for Processing GPOs . . . . . . . . . . . . . . . . . . . . . . . 153
15 Managing Trust Relationships in Domain Services for Windows 155
15.1 What is a Trust? . . . . . . . . . . . . . . . . . . . . . . . . . . . . . . . . . . . . . . . . . . . . . . . . . . . . . . . . . . . 155
Contents 7

15.2 Cross-Forest Trust Relationships. . . . . . . . . . . . . . . . . . . . . . . . . . . . . . . . . . . . . . . . . . . . . . 156
15.2.1 Creating a Cross-forest Trust between Active Directory and Domain Services for
Windows Forests . . . . . . . . . . . . . . . . . . . . . . . . . . . . . . . . . . . . . . . . . . . . . . . . . . . 156
15.2.2 Shortcut Trusts . . . . . . . . . . . . . . . . . . . . . . . . . . . . . . . . . . . . . . . . . . . . . . . . . . . . 187
15.3 Limitations with Cross-Forest Trust . . . . . . . . . . . . . . . . . . . . . . . . . . . . . . . . . . . . . . . . . . . . 188
16 Providing Access to Server Data 189
16.1 Accessing Files by Using Native Windows Methods . . . . . . . . . . . . . . . . . . . . . . . . . . . . . . . 189
16.1.1 Prerequisites . . . . . . . . . . . . . . . . . . . . . . . . . . . . . . . . . . . . . . . . . . . . . . . . . . . . . . 189
16.1.2 Samba: A Key Component of DSfW . . . . . . . . . . . . . . . . . . . . . . . . . . . . . . . . . . . . 189
16.1.3 Samba in the DSfW Environment . . . . . . . . . . . . . . . . . . . . . . . . . . . . . . . . . . . . . . 190
16.1.4 Creating Samba Shares in iManager. . . . . . . . . . . . . . . . . . . . . . . . . . . . . . . . . . . . 191
16.1.5 Creating Samba Shares in the smb.conf File . . . . . . . . . . . . . . . . . . . . . . . . . . . . . 193
16.1.6 Assigning Rights to Samba Shares . . . . . . . . . . . . . . . . . . . . . . . . . . . . . . . . . . . . . 194
16.1.7 Adding a Network Place . . . . . . . . . . . . . . . . . . . . . . . . . . . . . . . . . . . . . . . . . . . . . 195
16.1.8 Adding a Web Folder . . . . . . . . . . . . . . . . . . . . . . . . . . . . . . . . . . . . . . . . . . . . . . . . 196
16.1.9 Mapping Drives to Shares . . . . . . . . . . . . . . . . . . . . . . . . . . . . . . . . . . . . . . . . . . . . 197
16.2 Accessing Files by Using the Novell Client for Windows . . . . . . . . . . . . . . . . . . . . . . . . . . . . 197
16.3 Accessing Files in Another Domain . . . . . . . . . . . . . . . . . . . . . . . . . . . . . . . . . . . . . . . . . . . . 197
novdocx (en) 7 January 2010
17 Printing in the Domain Services for Windows Environment 199
17.1 Setting Up iPrint . . . . . . . . . . . . . . . . . . . . . . . . . . . . . . . . . . . . . . . . . . . . . . . . . . . . . . . . . . . 199
17.2 Special Handling for iPrint on DSfW . . . . . . . . . . . . . . . . . . . . . . . . . . . . . . . . . . . . . . . . . . . 199
17.2.1 Secure and Non-Secure Printing . . . . . . . . . . . . . . . . . . . . . . . . . . . . . . . . . . . . . . . 199
17.2.2 Using a Common Driver Store in a DSfW partition . . . . . . . . . . . . . . . . . . . . . . . . . 200
17.3 iPrint Clustering in a DSfW Environment . . . . . . . . . . . . . . . . . . . . . . . . . . . . . . . . . . . . . . . . 200
17.3.1 iPrint Clustering on NSS Clusters . . . . . . . . . . . . . . . . . . . . . . . . . . . . . . . . . . . . . . 200
18 Flexible Single Master Operation (FSMO) Roles 201
18.1 FSMO Roles and Limitations . . . . . . . . . . . . . . . . . . . . . . . . . . . . . . . . . . . . . . . . . . . . . . . . . 201
18.1.1 RID Master. . . . . . . . . . . . . . . . . . . . . . . . . . . . . . . . . . . . . . . . . . . . . . . . . . . . . . . . 201
18.1.2 PDC Emulator Master . . . . . . . . . . . . . . . . . . . . . . . . . . . . . . . . . . . . . . . . . . . . . . . 201
18.1.3 Infrastructure Master . . . . . . . . . . . . . . . . . . . . . . . . . . . . . . . . . . . . . . . . . . . . . . . . 202
18.1.4 Schema Master . . . . . . . . . . . . . . . . . . . . . . . . . . . . . . . . . . . . . . . . . . . . . . . . . . . . 202
18.1.5 Domain Master . . . . . . . . . . . . . . . . . . . . . . . . . . . . . . . . . . . . . . . . . . . . . . . . . . . . 202
18.2 Transferring and Seizing FSMO Roles . . . . . . . . . . . . . . . . . . . . . . . . . . . . . . . . . . . . . . . . . 202
18.2.1 To Transfer the PDC Emulator Role from the First Domain Controller to a Subsequent
Domain Controller . . . . . . . . . . . . . . . . . . . . . . . . . . . . . . . . . . . . . . . . . . . . . . . . . . 203
18.2.2 To Seize PDC Emulator Role from First Domain Controller to an Another Domain
Controller (DNS is Functional) . . . . . . . . . . . . . . . . . . . . . . . . . . . . . . . . . . . . . . . . . 203
18.2.3 To Seize PDC Emulator Role from First Domain Controller to an Another Domain
Controller (DNS is Not Functional) . . . . . . . . . . . . . . . . . . . . . . . . . . . . . . . . . . . . . 203
18.2.4 Transferring the ADPH Master Role to Other Domain Controllers . . . . . . . . . . . . . 204
19 Troubleshooting 205
19.1 Troubleshooting DSfW . . . . . . . . . . . . . . . . . . . . . . . . . . . . . . . . . . . . . . . . . . . . . . . . . . . . . . 205
19.1.1 If Administrator and Default Group Objects are Accidentally Deleted . . . . . . . . . . 206
19.1.2 Tree Admin is Not Automatically Granted Rights for DSfW Administration . . . . . . . 207
19.1.3 DSfW Services Stop Working if the Concurrent LDAP Bind Limit is Set to 1 . . . . . 207
19.1.4 The Provision Utility Succeeds Only With the --locate-dc Option . . . . . . . . . . . . . . 207
19.1.5 Users Are Not Samified When the RID Master Role is Seized . . . . . . . . . . . . . . . . 207
19.1.6 Shared Volumes Are Not Accessible. . . . . . . . . . . . . . . . . . . . . . . . . . . . . . . . . . . . 208
8 OES 2 SP2: Domain Services for Windows Administration Guide

19.1.7 Users Cannot Join a Workstation to a Domain . . . . . . . . . . . . . . . . . . . . . . . . . . . . 208
19.1.8 Joining Multiple Workstations to the Domain at the Same Time Results in an Error 208
19.1.9 Requirements for Samba/CIFS Access to NSS volumes via DSfW . . . . . . . . . . . . 209
19.1.10 Identifying novell-named Error . . . . . . . . . . . . . . . . . . . . . . . . . . . . . . . . . . . . . . . . . 209
19.1.11 Login Failure . . . . . . . . . . . . . . . . . . . . . . . . . . . . . . . . . . . . . . . . . . . . . . . . . . . . . . 210
19.1.12 Unable to Connect to Legacy Applications . . . . . . . . . . . . . . . . . . . . . . . . . . . . . . . 210
19.1.13 User in a Domain Can Access Resources from Another Domain by Using the UID of the
Foreign User . . . . . . . . . . . . . . . . . . . . . . . . . . . . . . . . . . . . . . . . . . . . . . . . . . . . . . 210
19.1.14 Users Cannot Log In if They Are Moved From a Non-Domain Partition to a DSfW
Domain Partition . . . . . . . . . . . . . . . . . . . . . . . . . . . . . . . . . . . . . . . . . . . . . . . . . . . 210
19.1.15 Users Not Associated With a Universal Password Policy Cannot Log In if They Are
Moved From a Non-Domain Partition to a DSfW Domain Partition . . . . . . . . . . . . . 210
19.1.16 Child Domains Slow Down When the First Domain Controller is Not Functional . . 210
19.1.17 Making the DSfW Server work When The IP address is Changed . . . . . . . . . . . . . 211
19.1.18 Error Mapping SID to UID . . . . . . . . . . . . . . . . . . . . . . . . . . . . . . . . . . . . . . . . . . . . 211
19.1.19 After DSfW Installation, the Services are Not Working . . . . . . . . . . . . . . . . . . . . . . 211
19.2 Error Messages in Log Files . . . . . . . . . . . . . . . . . . . . . . . . . . . . . . . . . . . . . . . . . . . . . . . . . 211
19.2.1 ndsd Log File Error . . . . . . . . . . . . . . . . . . . . . . . . . . . . . . . . . . . . . . . . . . . . . . . . . 211
19.3 iPrint Issues . . . . . . . . . . . . . . . . . . . . . . . . . . . . . . . . . . . . . . . . . . . . . . . . . . . . . . . . . . . . . . 212
19.3.1 Driver Store Fails to Create . . . . . . . . . . . . . . . . . . . . . . . . . . . . . . . . . . . . . . . . . . 212
novdocx (en) 7 January 2010
A Executing Provisioning Tasks Manually 213
A.1 Exporting Passwords . . . . . . . . . . . . . . . . . . . . . . . . . . . . . . . . . . . . . . . . . . . . . . . . . . . . . . . 213
A.2 Provisioning Tasks . . . . . . . . . . . . . . . . . . . . . . . . . . . . . . . . . . . . . . . . . . . . . . . . . . . . . . . . . 213
A.2.1 Provisioning Precheck . . . . . . . . . . . . . . . . . . . . . . . . . . . . . . . . . . . . . . . . . . . . . . . 214
A.2.2 Configure DNS. . . . . . . . . . . . . . . . . . . . . . . . . . . . . . . . . . . . . . . . . . . . . . . . . . . . . 214
A.2.3 Configure SLAPI Plug-ins . . . . . . . . . . . . . . . . . . . . . . . . . . . . . . . . . . . . . . . . . . . . 214
A.2.4 Create Domain Partition . . . . . . . . . . . . . . . . . . . . . . . . . . . . . . . . . . . . . . . . . . . . . 215
A.2.5 Add Domain Replica . . . . . . . . . . . . . . . . . . . . . . . . . . . . . . . . . . . . . . . . . . . . . . . . 215
A.2.6 Add Domain Objects . . . . . . . . . . . . . . . . . . . . . . . . . . . . . . . . . . . . . . . . . . . . . . . . 215
A.2.7 Create Configuration Partition . . . . . . . . . . . . . . . . . . . . . . . . . . . . . . . . . . . . . . . . . 215
A.2.8 Create Schema Partition . . . . . . . . . . . . . . . . . . . . . . . . . . . . . . . . . . . . . . . . . . . . . 215
A.2.9 Add Configuration Objects . . . . . . . . . . . . . . . . . . . . . . . . . . . . . . . . . . . . . . . . . . . . 216
A.2.10 Add Domain Controller . . . . . . . . . . . . . . . . . . . . . . . . . . . . . . . . . . . . . . . . . . . . . . 216
A.2.11 Assign Rights. . . . . . . . . . . . . . . . . . . . . . . . . . . . . . . . . . . . . . . . . . . . . . . . . . . . . . 216
A.2.12 Restart DSfW Services . . . . . . . . . . . . . . . . . . . . . . . . . . . . . . . . . . . . . . . . . . . . . . 216
A.2.13 Set Credential for Accounts. . . . . . . . . . . . . . . . . . . . . . . . . . . . . . . . . . . . . . . . . . . 216
A.2.14 Enable Kerberos . . . . . . . . . . . . . . . . . . . . . . . . . . . . . . . . . . . . . . . . . . . . . . . . . . . 216
A.2.15 Samify Objects. . . . . . . . . . . . . . . . . . . . . . . . . . . . . . . . . . . . . . . . . . . . . . . . . . . . . 217
A.2.16 Establish Trust . . . . . . . . . . . . . . . . . . . . . . . . . . . . . . . . . . . . . . . . . . . . . . . . . . . . . 217
A.2.17 Update Service Configuration . . . . . . . . . . . . . . . . . . . . . . . . . . . . . . . . . . . . . . . . . 217
A.2.18 Cleanup . . . . . . . . . . . . . . . . . . . . . . . . . . . . . . . . . . . . . . . . . . . . . . . . . . . . . . . . . . 217
B Schema 219
B.1 Schema Objects. . . . . . . . . . . . . . . . . . . . . . . . . . . . . . . . . . . . . . . . . . . . . . . . . . . . . . . . . . . 219
B.1.1 Syntaxes . . . . . . . . . . . . . . . . . . . . . . . . . . . . . . . . . . . . . . . . . . . . . . . . . . . . . . . . . 222
B.1.2 Attribute Mappings . . . . . . . . . . . . . . . . . . . . . . . . . . . . . . . . . . . . . . . . . . . . . . . . . . 223
B.1.3 Special Attributes . . . . . . . . . . . . . . . . . . . . . . . . . . . . . . . . . . . . . . . . . . . . . . . . . . 224
B.1.4 Class Mappings . . . . . . . . . . . . . . . . . . . . . . . . . . . . . . . . . . . . . . . . . . . . . . . . . . . . 226
B.2 Extending the Third-Party Schema . . . . . . . . . . . . . . . . . . . . . . . . . . . . . . . . . . . . . . . . . . . . 226
B.3 Changing the PAS Status of an Attribute . . . . . . . . . . . . . . . . . . . . . . . . . . . . . . . . . . . . . . . 227
C Understanding DSfW in Relation to IDM and Samba 229
C.1 Understanding DSfW in Relation to Samba . . . . . . . . . . . . . . . . . . . . . . . . . . . . . . . . . . . . . . 229
Contents 9

C.2 Understanding DSfW in Relation to IDM . . . . . . . . . . . . . . . . . . . . . . . . . . . . . . . . . . . . . . . . 231
D Network Ports Used by DSfW 233
Glossary 235
E Documentation Updates 241
novdocx (en) 7 January 2010
10 OES 2 SP2: Domain Services for Windows Administration Guide

About This Guide
This documentation describes how to install, configure, and use Novell® Domain Services for
Windows on a Novell Open Enterprise Server (OES) 2 server.
This guide is divided into the following sections:
Chapter 1, “Overview,” on page 13
Chapter 2, “What’s New,” on page 19
Chapter 3, “Use-Cases,” on page 21
Chapter 4, “Deployment Scenarios,” on page 25
Chapter 5, “Planning for DSfW,” on page 29
Chapter 6, “Installing Domain Services for Windows,” on page 41
Chapter 7, “Provisioning Domain Services for Windows,” on page 103
Chapter 9, “Upgrading DSfW,” on page 127
Chapter 10, “Running Domain Services for Windows in a Virtualized Environment,” on
page 129
novdocx (en) 7 January 2010
Chapter 11, “Logging In from a Windows Workstation,” on page 131
Chapter 12, “Creating Users,” on page 137
Chapter 13, “Understanding DNS in Relation to DSfW,” on page 141
Chapter 14, “Managing Group Policy Settings,” on page 147
Chapter 15, “Managing Trust Relationships in Domain Services for Windows,” on page 155
Chapter 16, “Providing Access to Server Data,” on page 189
Chapter 17, “Printing in the Domain Services for Windows Environment,” on page 199
Chapter 18, “Flexible Single Master Operation (FSMO) Roles,” on page 201
Chapter 19, “Troubleshooting,” on page 205
Audience
This guide is intended for network installers and administrators.
Feedback
We want to hear your comments and suggestions about this manual and the other documentation
included with this product. Please use the User Comment feature at the bottom of each page of the
online documentation, or go to www.novell.com/documentation/feedback.html and enter your
comments there.
Documentation Updates
For the most recent version of the OES 2:Domain Services for Windows Administration Guide, see
the latest Novell Open Enterprise Server 2 documentation (http://www.novell.com/documentation/
oes2/index.html).
About This Guide 11

Additional Documentation
For information about security issues and recommendations for Novell®Domain Services for
Windows see OES 2: Novell Domain Services for Windows Security Guide
Documentation Conventions
In Novell documentation, a greater-than symbol (>) is used to separate actions within a step and
items in a cross-reference path.
®
A trademark symbol (
, TM, etc.) denotes a Novell trademark. An asterisk (*) denotes a third-party
trademark.
When a single pathname can be written with a backslash for some platforms or a forward slash for
other platforms, the pathname is presented with a backslash. Users of platforms that require a
forward slash, such as Linux* or UNIX*, should use forward slashes as required by your software.
novdocx (en) 7 January 2010
12 OES 2 SP2: Domain Services for Windows Administration Guide

1
Overview
Domain Services for Windows (DSfW) is a suite of technologies in Open Enterprise Server (OES) 2
SP1 and later versions that allows Microsoft* Windows users to access OES services through native
Windows and Active Directory* protocols. By allowing OES Linux servers to behave as if they
were Active Directory servers, this technology enables companies with Active Directory and
®
Novell
can work in a pure Windows desktop environment and still take advantage of some OES back-end
services and technology, without the need for a Novell Client
Administrators can use either Novell iManager or Microsoft Management Console (MMC) to
administer users and groups. Network administrators manage file systems using the native tools of
each server, and they can also centrally administer Samba shares on OES Linux/ DSfW servers by
using iManager.
Administrators can use MMC to create inter-domain trusts between DSfW domains and Active
Directory domains.
eDirectoryTM deployments to achieve better coexistence between the two platforms. Users
TM
on the desktop.
novdocx (en) 7 January 2010
1
TM
Users can access Novell Storage Services
or NTFS files on Windows servers that use CIFS shares. eDirectory users can also access shares in
trusted Active Directory forests.
Domain Services for Windows is not a meta-directory or a synchronization connector between
eDirectory and Active Directory. It does not do desktop emulation. Domain Services for Windows
can only run on SUSE Linux Enterprise deployments of Open Enterprise Server 2 SP1 and later.
Section 1.1, “Features and Benefits,” on page 13
Section 1.2, “Architectural Overview,” on page 14
Section 1.3, “Basic Directory Services Concepts,” on page 16
Section 1.4, “Key Differences Between the DSfW LDAP Server and the eDirectory Server,” on
page 17
(NSS) volumes on Linux servers by using Samba shares
1.1 Features and Benefits
DSfW is designed to simplify the network infrastructure in mixed Windows/OES 2 SP2 Linux
environments, thereby reducing costs and streamlining IT operations. Minimal changes are required
to the default authentication, authorization, and replication mechanisms in existing eDirectory and
Active Directory environments. DSfW enforces the Active Directory security model in eDirectory
and applies it to all users and groups within the DSfW domain, regardless of the tool used to create
the users and groups. Both Microsoft
in either the Active Directory or eDirectory environment remain securely accessible by eDirectory
users.
*
and Novell applications can be used unmodified. Resources
Specific benefits of DSfW include the following:
Clientless login and cross-platform file access for Windows users: From a standard
Windows workstation, users can authenticate to an OES 2 SP2 Linux server running eDirectory
without the need for the Novell Client software or multiple logins. After the Windows
Overview
13

workstations have joined the DSfW domain, authorized users can log in and access the file and
print services they are authorized to use, whether the services are provided by OES 2 SP2
Linux servers in the DSfW domain or Windows servers in a trusted Active Directory domain.
Unified repository of user account information: DSfW is not a directory synchronization
solution. Each user is represented by a single user account, and that account can reside in either
eDirectory or Active Directory. A single password is used to authenticate each user to resources
in either environment.
Support for cross-domain and cross-forest trust relationships: DSfW allows administrators
to create cross-domain and cross-forest trusts between a Windows 2003 Active Directory
domain/forest and a DSfW domain/forest. This allows authenticated and authorized DSfW
users to access data on servers in an Active Directory domain/forest.
Support for existing management tools: Administrators can use familiar tools for their
environment, such as iManager for OES 2 SP2 and Microsoft Management Console (MMC)
for Windows, thus eliminating the need for re-training.
Network administrators can manage file systems using the native tools of each server, as well
as centrally administer Samba shares on OES Linux/DSfW servers using iManager.
Administrators can use MMC to create one-way cross-forest trusts between DSfW domains
and Active Directory domains. For example, Windows server/workstation policy settings in the
domain Group Policies can be changed by using MMC.
Support for common authentication protocols and open standards: DSfW supports
common authentication protocols used in the Windows environment, including Kerberos*,
NTLM, and SSL/TLS.
Single Password to Login: One of the biggest benefits Domain Services for Windows
provides end users is it eliminates multiple logins if they need access to both Active Directoryand eDirectory-based services. The trust relationship between eDirectory and Active Directory
enables them to employ a single password for the services provided by either directory. From
an IT perspective, this also greatly simplifies user management as objects for those users only
need to be maintained in one directory repository instead of two.
novdocx (en) 7 January 2010
1.2 Architectural Overview
Figure 1-1 illustrates the components included in DSfW and how they interact.
14 OES 2 SP2: Domain Services for Windows Administration Guide
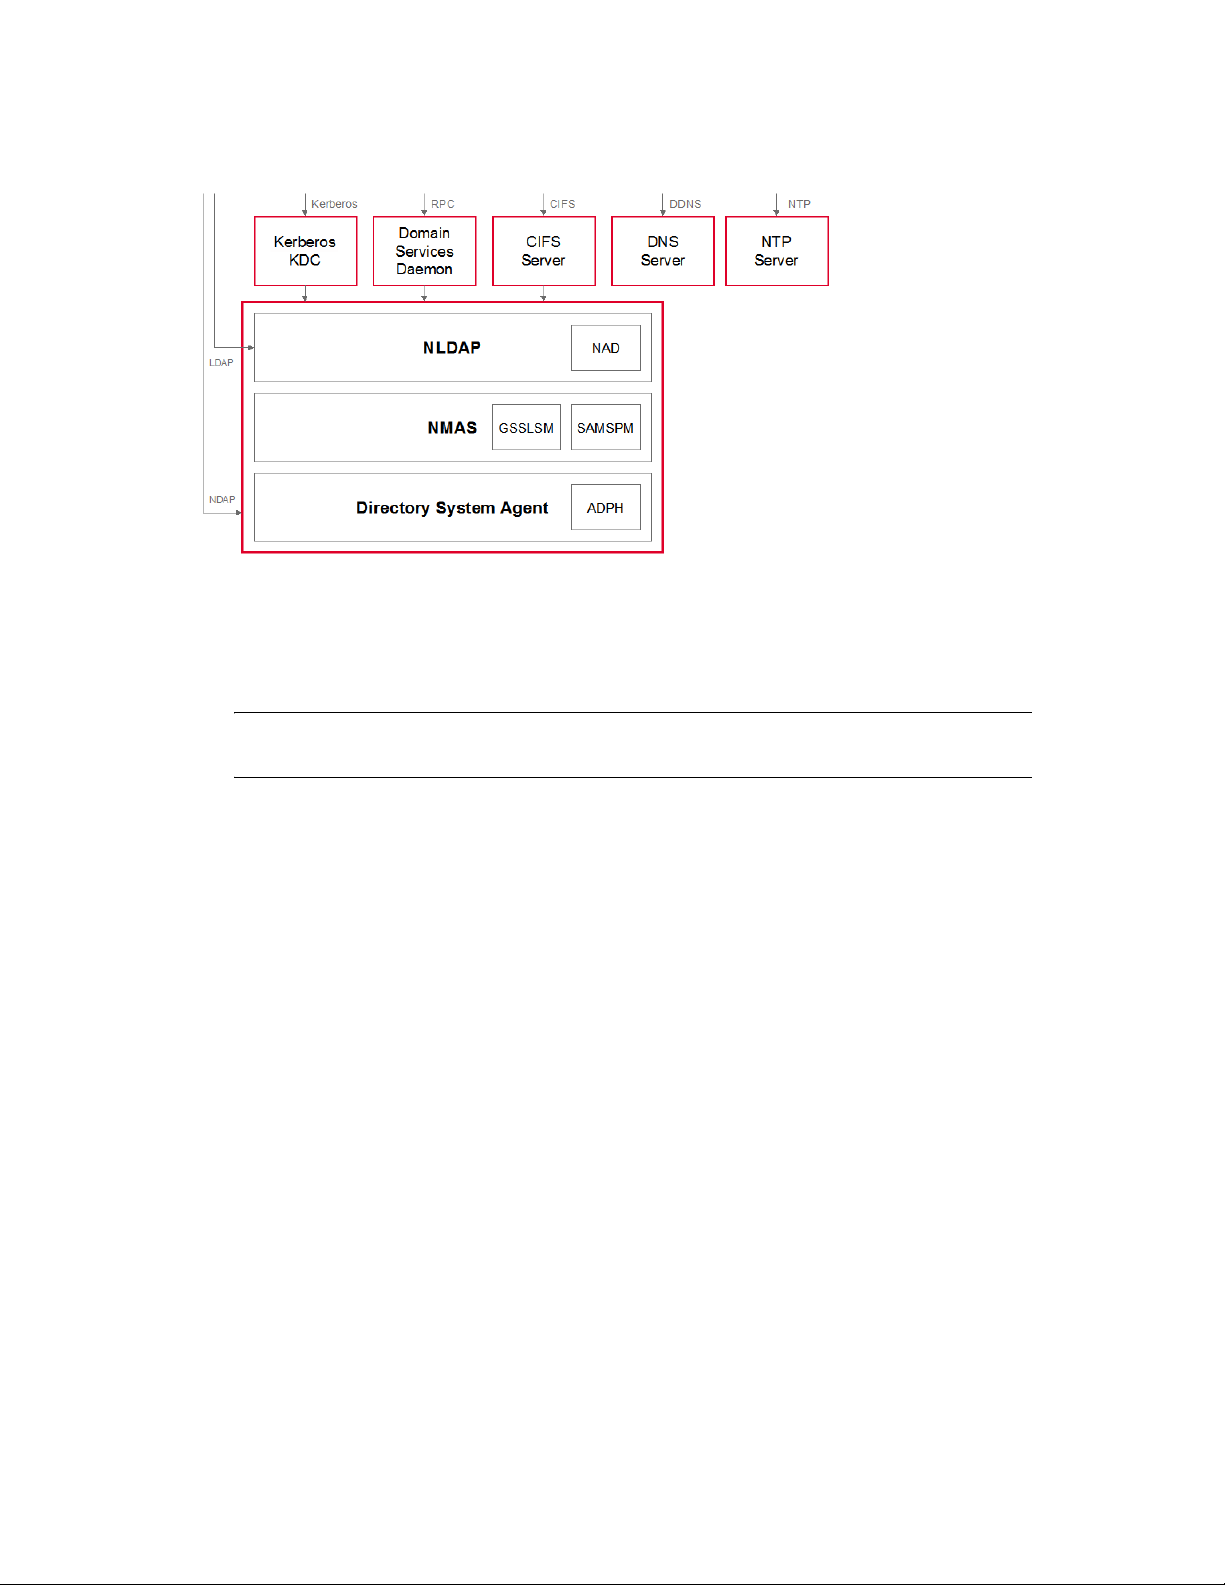
Figure 1-1 DSfW Components
DSfW is made up of the following technologies:
novdocx (en) 7 January 2010
eDirectory: eDirectory 8.8 SP2 and above supports DSfW.
Kerberos Key Distribution Center (KDC): Provides Active Directory-style authentication.
NOTE: This is a KDC specifically developed for DSfW. It is different from the Novell
Kerberos KDC (http://www.novell.com/documentation/kdc15/index.html).
NMAS Extensions: Provide support for GSS-API authentication mechanisms, and for
SAMSPM, to generate Active Directory-style credentials when a user’s Universal Password is
changed.
Active Directory Provisioning Handler (ADPH /Directory System Agent): Provides agent-
side support for the Active Directory information model, regardless of access protocol. It
enforces Active Directory security and information models, allocates Security Identifier (SIDs)
to users and groups, validates entries, and enables existing eDirectory users and groups to use
Active Directory and RFC 2307 authorization.
Domain Services Daemon: Provides support for Windows RPCs, including Local Security
Authority, Security Accounts Manager, and Net Logon.
NAD Virtualization Layer: Virtualizes the Active Directory information model within
eDirectory so that LDAP requests are handled appropriately.
CIFS: Provides file services and transport for DCE RPC over SMB. The services are provided
by the Samba 3.x software included with SUSE
DNS: The DNS server has been modified to support GSS-TSIG (Kerberos secured dynamic
®
Linux Enterprise Server 10 and OES 2.
updates).
NTP: The NTP server has been modified to support the secure signing of NTP responses.
Overview 15

1.3 Basic Directory Services Concepts
To effectively set up and work with DSfW, a basic understanding of both eDirectory and Active
Directory is required. This section briefly outlines helpful concepts and terminology.
Section 1.3.1, “Domains, Trees, and Forests,” on page 16
Section 1.3.2, “Naming,” on page 16
Section 1.3.3, “Security Model,” on page 16
Section 1.3.4, “Groups,” on page 17
1.3.1 Domains, Trees, and Forests
Domain: In Active Directory, a domain is a security boundary. A domain is analogous to a partition
in eDirectory.
Forest: A forest is a collection of Active Directory domains. A forest is analogous to a tree in
eDirectory. You can set up trust relationships to share authentication secrets between domains.
Each Active Directory server has a domain, a configuration, and a schema partition.
novdocx (en) 7 January 2010
Global Catalog: Global catalogs are special Active Directory domain controllers that store a
complete copy of all the Active Directory objects belonging to the host domain and a partial copy of
all other objects in the forest.
Federation can be accomplished through establishing cross-domain and cross-forest trusts.
1.3.2 Naming
Active Directory uses DC (domain class) naming at the root of a partition, while eDirectory supports
other naming attributes like Organization (O) and Organizational Unit (OU). For example, in
eDirectory a partition might be specified as:
ou=sales.o=company
In Active Directory, the partition is specified as:
dc=sales,dc=company
Every Active Directory domain maps to a DNS domain. The DNS domain name can be derived
from the Active Directory domain name. DSfW also follows this rule and supports mapping of
eDirectory partitions to DSfW domains.
For example, the
dc=sales,dc=company,dc=com
ou=sales.o=company
.
partition can be mapped to the DSfW domain
1.3.3 Security Model
The Active Directory security model is based on shared secrets. The authentication mechanism is
based on Kerberos. The domain controller contains all users’ Kerberos keys. The KDC, Remote
Procedure Call (RPC) server, and Directory System Agent (DSA) operate inside a “trusted
computing base” and have full access to all user information.
16 OES 2 SP2: Domain Services for Windows Administration Guide

Active Directory users and groups are identified by unique Security Identifiers. The SID consists of
domain-specific prefix, followed by an integer suffix or “relative ID” that is unique within the
domain.
For more information about Active Directory, see the Microsoft Active Directory Technical Library
(http://technet2.microsoft.com/windowsserver/en/technologies/featured/ad/default.mspx).
1.3.4 Groups
Active Directory supports universal, global, and local groups. DSfW supports the semantics of these
groups with different scopes when the group management is performed through MMC. However,
there are exceptions. For example, validation of group type transitions is not supported.
Groups can also contain other groups, which is known as Nesting. Other limitations largely result
from the way eDirectory supports nested groups. You cannot add a group from other domains as a
member of a group.
In addition eDirectory supports dynamic groups, because Active Directory does not support them,
dynamic groups are not supported in DSfW. All groups created by using iManager or MMC can be
used as security principals in an Access Control List in eDirectory. Token groups can only have
groups that are enabled as security groups through MMC.
novdocx (en) 7 January 2010
1.4 Key Differences Between the DSfW LDAP Server and the eDirectory Server
Table 1-1 Comparison of DSfW LDAP server and eDirectory server
Function DSfW LDAP Server eDirectory Server
LDAP Operations like Search and
Modify
Ports When DSfW server is configured
Semantic Controls LDAP requests along with LDAP
Uses Domain Name format. For
example: dc=eng, dc= novell.
LDAP requests, such as Search
and Modify, to a DSfW server on
port 389 or 636 uses domain
name format instead of
eDirectory X.500 format. LDAP
ports 1389 and 1636 are enabled
to support LDAP requests using
the traditional X.500 format and
to behave as eDirectory ports.
semantic controls
(2.16.840.1.113719.1.513.4.5)
allow LDAP requests to select
X.500 or the domain format.
Uses X.500 format. For example:
ou=eng, o=novell.
eDirectory uses ports 389 and
636 for communication purposes.
The format used is X.500.
No support for semantic controls
Overview 17

Function DSfW LDAP Server eDirectory Server
Schema Addition Attribute and class mappings are
changed for some object classes.
For example, User and Group
object classes are mapped to
user and group; server is mapped
to ndsServer User and Group
object classes are extended to
hold additional Active Directory
attributes. For more information,
Attribute Mappings and Class
Mappings.
novdocx (en) 7 January 2010
Search Search and Modify, to a DSfW
server on port 389 or 636 return
only those objects that exist in the
partition and do not search
beyond the partition boundary. An
LDAP referral is returned, but if
the calling LDAP application does
not support referrals, it fails to
search beyond the partition
boundary. A search request on
global catalog ports (3268, 3269)
spans partition boundaries and
searches the entire forest. The
result set contains only the
attributes marked as Partial
Attribute Set (PAS).
Multiple Instances Not supported. Supported.
Support for NT ACLs No support for NT ACLs. Directory objects are protected by
Domain Partition Every DSfW server has a unique
domain partition (required by the
Active Directory security model).
The search spans across
partitions.
proven eDirectory ACLs.
No concept of domain partition.
For both DSfW server and LDAP server, login authorization and auditing is performed by using
TM
NMAS
. Data on the wire is encrypted as mandated by the workstations. All keys, including
Kerberos and NTLM, are encrypted by using a per attribute NICI key.
18 OES 2 SP2: Domain Services for Windows Administration Guide

2
What’s New
This section describes additions to the Novell® Domain Services for Windows (DSfW) service for
the Novell Open Enterprise Server 2 SP2 Linux platform over the previous release:
DSfW Installation and configuration are now handled in a two-step process:
1. The YaST install prepares the server and the tree for domain users. This part of the process
features restructured installation screens.
2. A Provisioning Wizard, which is a separate utility that configures the DSfW server and
supporting services, and completes the installation process.
The SYSVOL is now located on every domain controller of each domain. This resolves the
limitation resulting from having the SYSVOL only on the first domain controller of the
domain.
Support for Upgrade to OES 2 SP2.
Support to join Windows 2003 server as a member server to the domain.
novdocx (en) 7 January 2010
2
What’s New
19

novdocx (en) 7 January 2010
20 OES 2 SP2: Domain Services for Windows Administration Guide

3
Domain Services
for Windows
Users
Cross–forest
trust
Active
Directory
Applications
Use-Cases
This section describes some common usage patterns that will help you in understanding the
possibilities and functionalities of DSfW.
Section 3.1, “Authenticating to Applications That Require Active Directory-Style
Authentication,” on page 21
Section 3.2, “Working With Windows Systems Without Novell Client,” on page 22
Section 3.3, “Leveraging an Existing eDirectory Setup,” on page 23
Section 3.4, “Interoperability Between Active Directory and eDirectory,” on page 23
3.1 Authenticating to Applications That Require Active Directory-Style Authentication
This use-case can be described using the following scenarios:
novdocx (en) 7 January 2010
3
Section 3.1.1, “Users Located in the DSfW Forest and Accessing Applications Hosted in the
Active Directory Tree,” on page 21
Section 3.1.2, “Users and Applications Hosted in the DSfW Forest,” on page 22
3.1.1 Users Located in the DSfW Forest and Accessing Applications Hosted in the Active Directory Tree
In this case DSfW is deployed as an interoperable solution for organizations that have both
eDirectory and Active Directory as part of their infrastructure. Most organizations use Active
Directory-enabled applications which means that the application vendor has tested and certified his
application against Active Directory for authentication and management.
By keeping the users in the DSfW forest and the applications in the Active Directory tree,
organizations have the following advantages:
Manageability is easier as the users reside on a single directory service and are not spread out.
The company need not invest in network resources that may be required if the users were
spread out.
Applications can continue to be certified by the vendors for Active Directory as they are hosted
on an Active Directory infrastructure. With the users residing on DSfW, there is no need to
certify applications.
Figure 3-1 DSfW users Accessing Resources on Active Directory
Use-Cases
21
3.1.2 Users and Applications Hosted in the DSfW Forest
W
Users
Applications
Domain Services
for Windows
eDirectory
The applications in this use case are hosted in the DSfW infrastructure along with the users. This
kind of deployment helps organizations to consolidate their Directory infrastructure.
While most of the application vendors specifically request Active Directory-support, as many
applications are LDAP-enabled, the applications work seamlessly on DSfW.
However, some of the applications that have Active Directory-specific schemas may need additional
effort in terms of schema extensions to work with DSfW.
Figure 3-2 Users and Applications in DSfW Forest
novdocx (en) 7 January 2010
3.2 Working With Windows Systems Without Novell Client
DSfW allows Microsoft Windows users to work in a pure Windows desktop environment and still
take advantage of some OES back-end services and technology, without the need for a Novell Client
on the desktop.
Administrators can either use Novell iManager or Microsoft Management Console (MMC) to
administer users and groups. Network administrators manage file systems using the native tools of
each server, as well as centrally administer Samba shares on OES Linux/DSfW servers using
iManager. Administrators can use MMC to create cross-forest trusts between DSfW domains and
Active Directory domains.
When deployed in an environment that also supports NetWare Core Protocol (NCP), DSfW supports
cross-protocol locking. Whether customers decide to use only Windows clients, NCP clients, or a
combination of both, access rights for files is enforced by the Novell Storage Services (NSS) file
system.
Novell Client does not need to be installed and managed as an extra software on the desktop. This
helps in streamlining user experiences in terms of login to the directory and single login facility to
both Active Directory applications and eDirectory services.
22 OES 2 SP2: Domain Services for Windows Administration Guide

Figure 3-3 Accessing applications without Novell Client
w
Server
Novell
Client
Before
Desktop
iManager
MMC
Server
w
Server
After
Desktop
iManager
MMC
Server
IMPORTANT: Do not install the Novell ClientTM for Windows on a workstation for which you plan
to provide native Windows access to DSfW servers. Novell Client access and native Windows
access to DSfW servers do not work well together on the same workstation. But if you already have
Novell Client installed on your workstation, we recommend that you follow the instructions in
Joining a Workstation that Has Novell Client Installed
novdocx (en) 7 January 2010
3.3 Leveraging an Existing eDirectory Setup
If you already have an eDirectory setup but want to install DSfW in your environment, it is
recommended you utilise the existing eDirectory setup and install DSfW in a container in the
existing eDirectory tree. This way you can utilise all the user information in the eDirectory
container. This kind of setup is known as a name-mapped setup.
For more details on name-mapped setup, see Section 5.4.2, “Installation Prerequisites for a Name-
Mapped Setup,” on page 35 and Section 4.2, “Deploying DSfW in a Name-Mapped Setup,” on
page 27
3.4 Interoperability Between Active Directory and eDirectory
Trust relationships are a key to managing Domain Services for Windows (DSfW). To facilitate
communication between Windows and Linux environments you can create a trust to access
resources from another domain. When a domain is installed, a trust is automatically established with
its parent domain.
To assist you in doing this, DSfW supports installing into a new eDirectory tree, an existing
eDirectory tree, or an existing forest, creating multiple DSfW domains, and setting up multiple
DSfW domain controllers within the same domain.
Figure 3-4 illustrates a typical deployment scenario in a mixed Novell/Microsoft environment.
Use-Cases 23
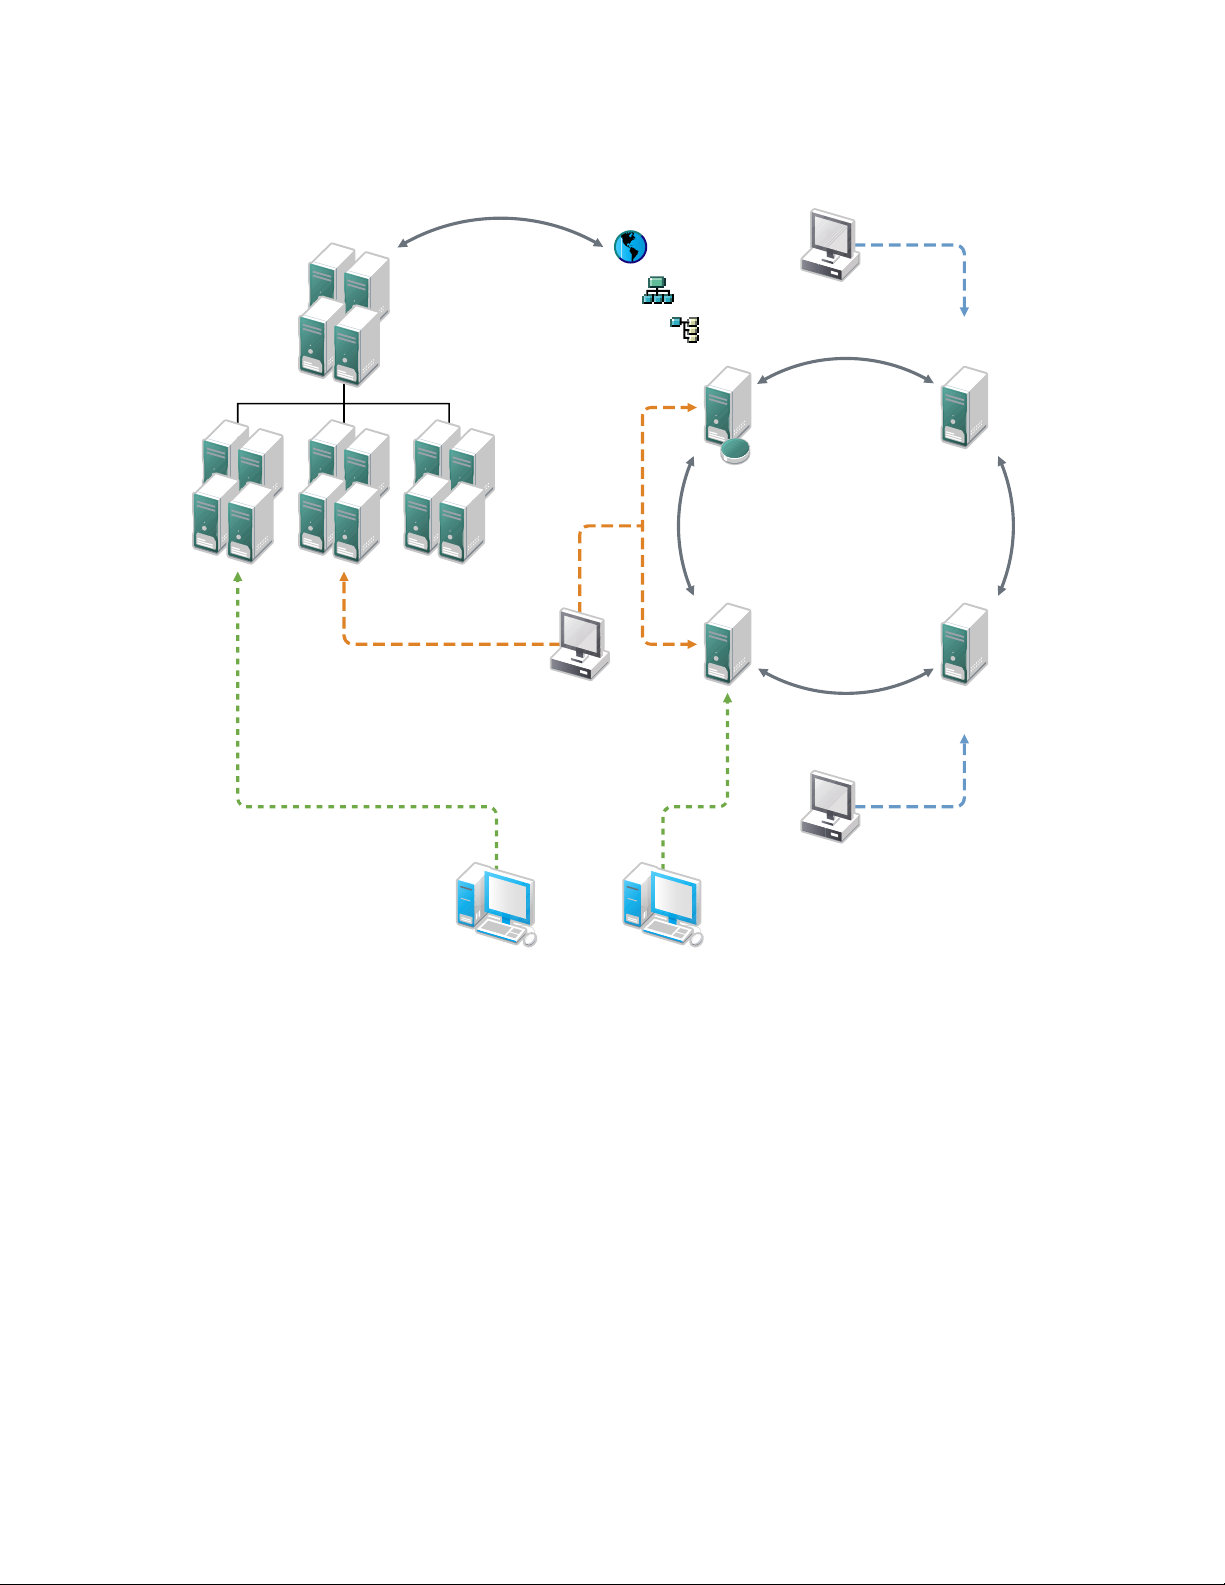
Figure 3-4 Cross-Forest Trust between Active Directory and DSfW
MMC
iManager
iManager
eDirectory
Replica Ring
Cross Forest Trust
Domain Services
for Windows
Master
Domain Services
for Windows
Server
eDirectory
8.8 SPx
eDirectory
8.8 SP2
MS Workstation MS Workstation
User
Add/Modify
User
Add/Modify
User B
Authenticates
User A
Authenticates
User
Add/Modify
Msforest.abc.com
User
Add/Modify
Organization
[ROOT]
Organiational
unit
novdocx (en) 7 January 2010
The diagram shows an Active Directory forest and a DSfW forest. Within the DSfW forest are two
DSfW servers, an eDirectory 8.8 SP2 server, and an eDirectory 8.8 SPx server, configured in the
same replica ring. Novell administrators can manage the domain by using iManager connected to
any of these servers, and a Microsoft administrator can use MMC connected to one of the DSfW
servers. The same set of users can access resources from the Active Directory forest through the
establishment of a cross-forest trust, which is a two-way, Kerberos-based, transitive trust between
the two forests.
Within the authentication/authorization boundary (realm) established by DSfW, eDirectory
replication can be used to expand the scope of users and groups that can access resources in a crossdomain and cross-forest scenario. In the example scenario shown above, users created in eDirectory
8.8 SP2 and above are replicated into the DSfW domain and can therefore access servers in the
Active Directory forest.
24 OES 2 SP2: Domain Services for Windows Administration Guide
4
dc=example, dc=com
Domain
Controllers
server 1 server 2 server 3 server 4 server 5
domain
Deployment Scenarios
This section describes deployment scenarios for name-mapped and non-name mapped scenarios:
Section 4.1, “Deploying DSfW in a Non-Name-Mapped Setup,” on page 25
Section 4.2, “Deploying DSfW in a Name-Mapped Setup,” on page 27
4.1 Deploying DSfW in a Non-Name-Mapped Setup
In case of installing DSfW in a non-name-mapped setup, you are setting up a new tree in a DSfW
forest. Here the tree structure overlaps with the DNS namespace. Before you start the process of
installation, ensure you have read and understood the details in Installation Prerequisites For a Non-
Name-Mapped Setup.
The scenarios explained here are only indicative of the various ways in which you can deploy DSfW
server in your environment.
novdocx (en) 7 January 2010
4
Section 4.1.1, “Deploying as a Single Domain,” on page 25
Section 4.1.2, “Deploying as Multiple Domains in a Forest,” on page 25
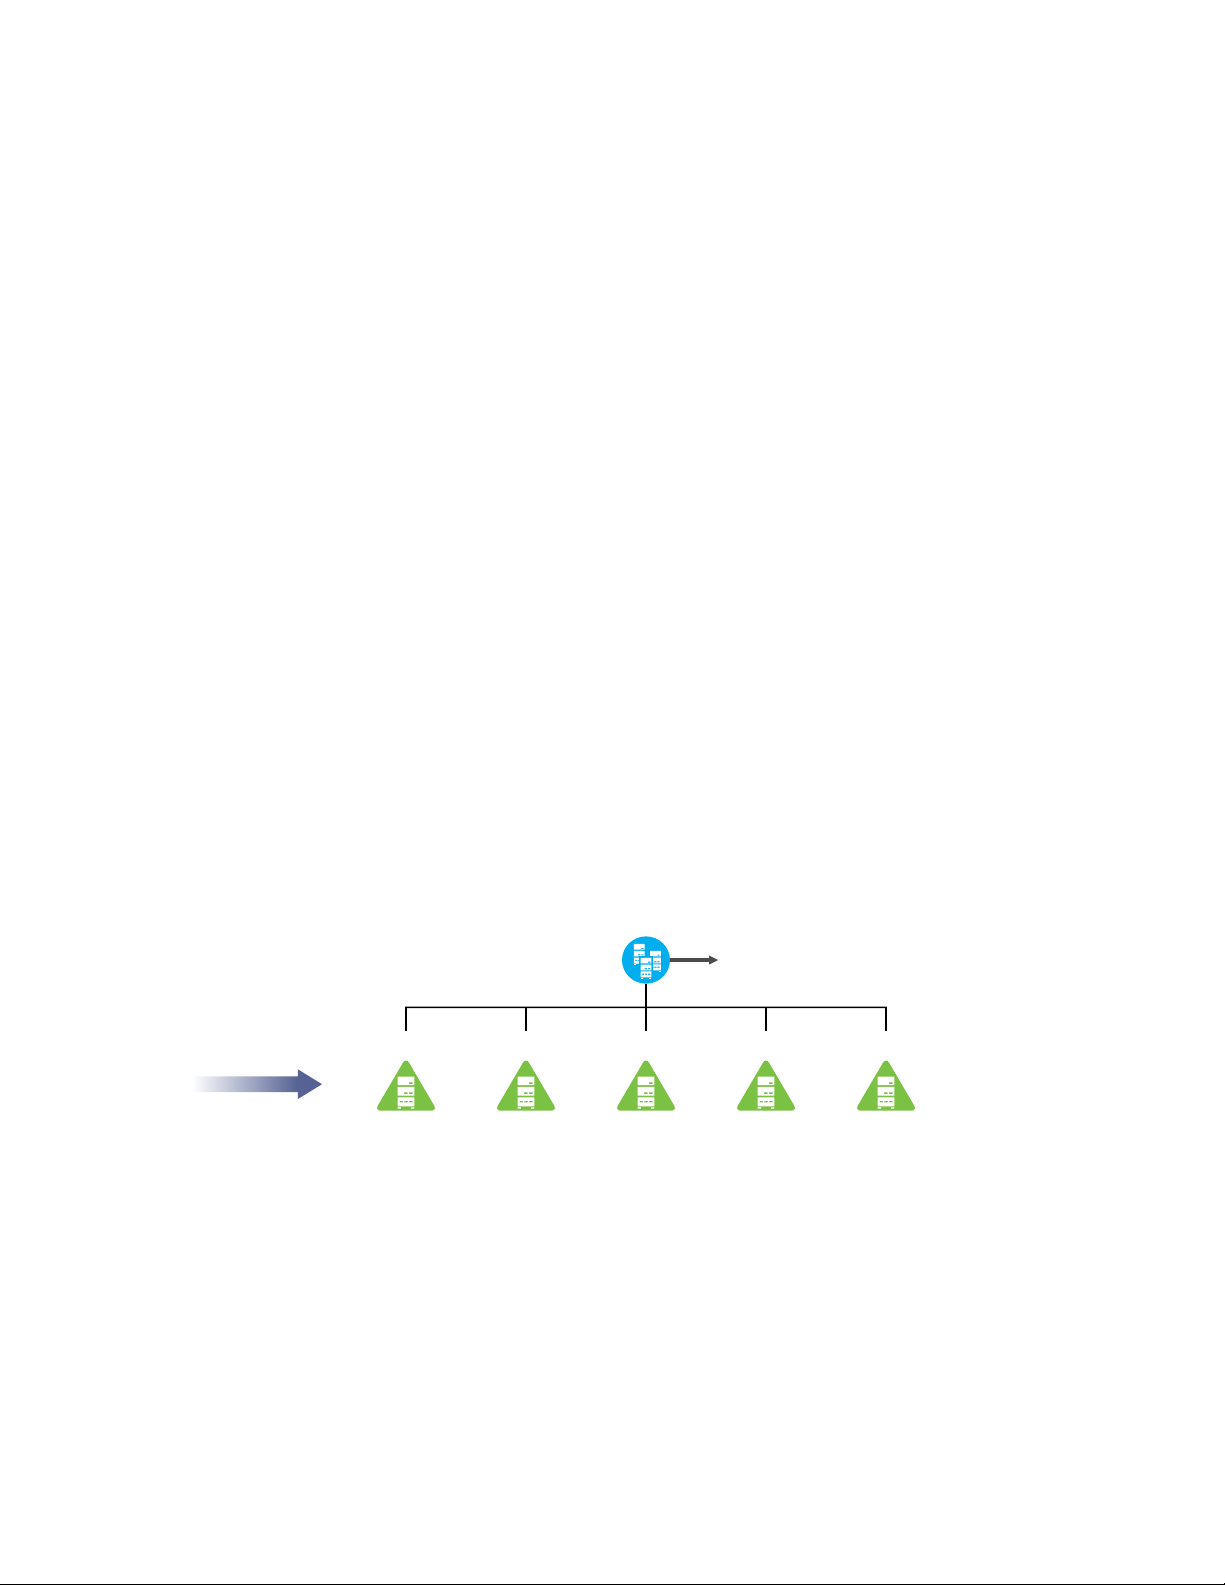
4.1.1 Deploying as a Single Domain
In this scenario, you have a single domain in the forest and have multiple DSfW servers acting as
domain controllers in the domain.
Figure 4-1 Deploying DSfW as a Single Domain
In Figure 4-1 the example.com domain is served by 5 domain controllers.
4.1.2 Deploying as Multiple Domains in a Forest
“Width” on page 26
“Depth” on page 26
“Depth and Width” on page 27
Deployment Scenarios
25
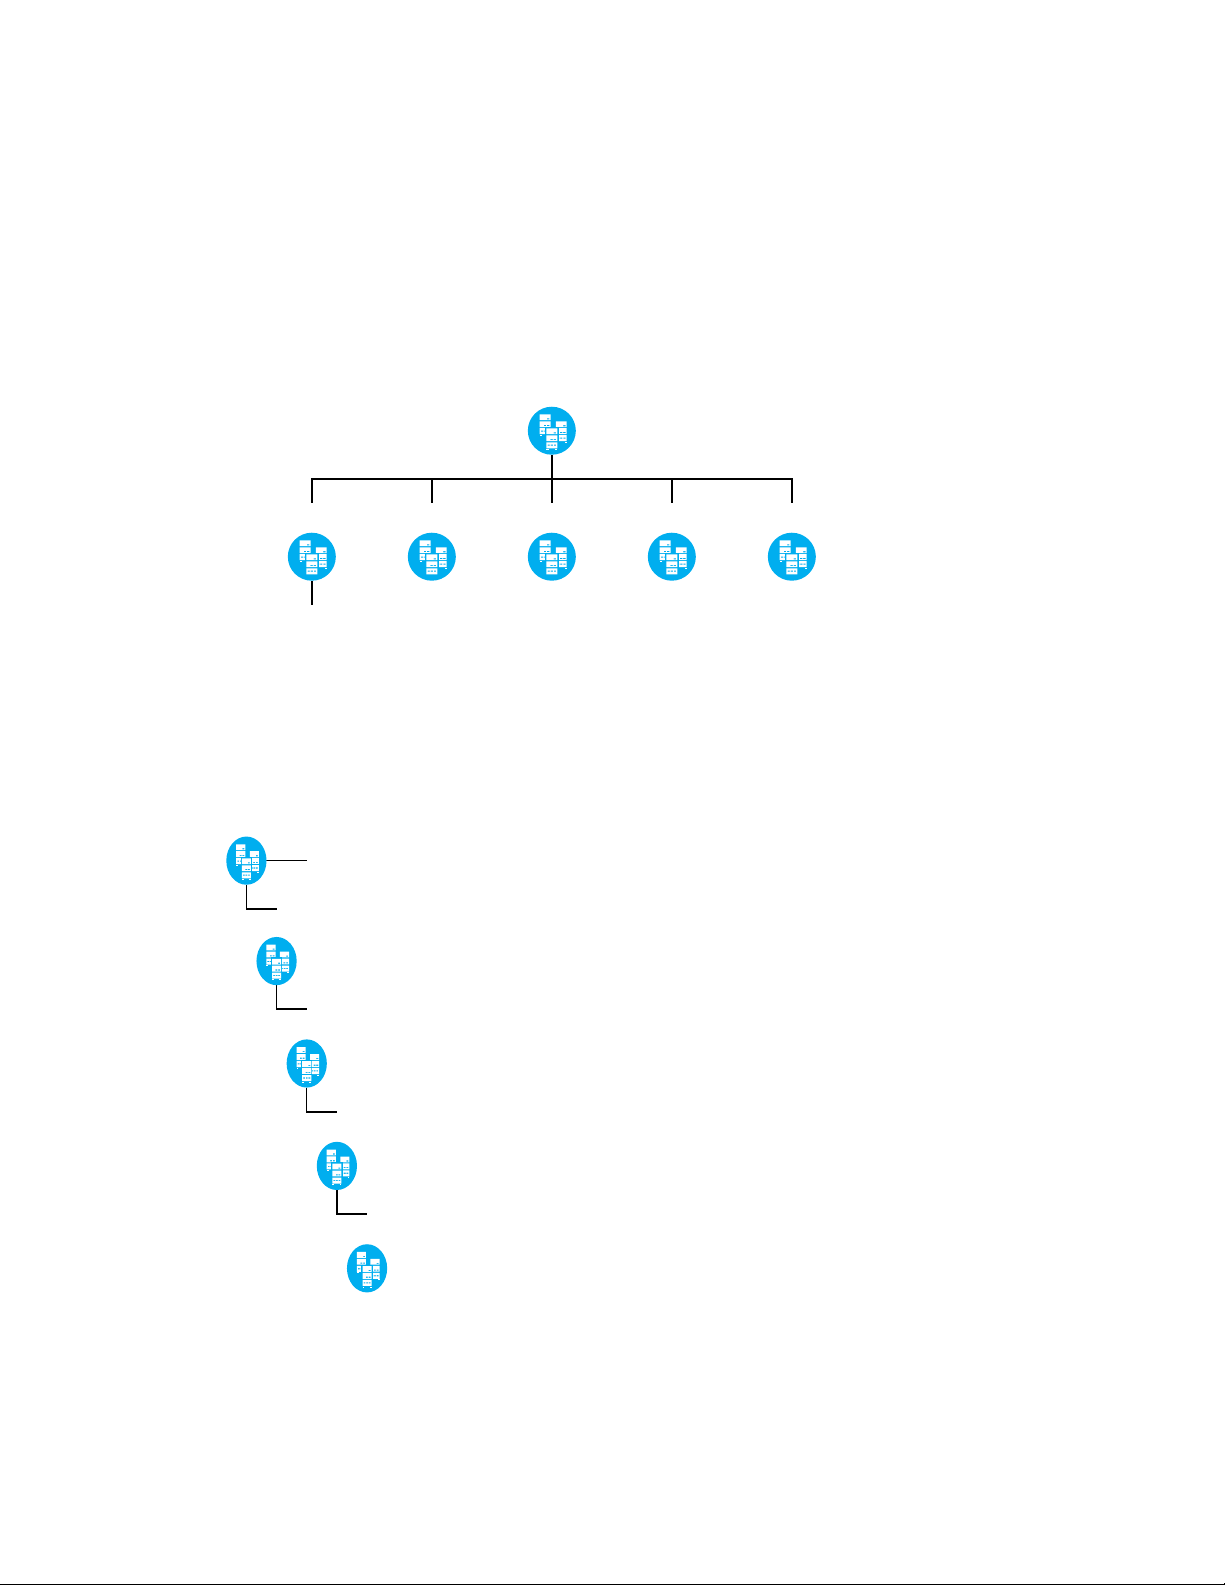
Width
example.com
America India Korea China Mexico
example.com
dc=america,dc=example,dc=.com
Example
dc=finance,dc=hr,dc=example,dc=com
dc=eng,dc=finance,dc=hr,dc=example,dc=com
dc=sales,dc=eng,dc=finance,dc=hr,dc=example,dc=com
dc=hr,dc=example,dc=com
dc=example,dc=com
In this scenario, the DSfW forest is spread out in an horizontal manner. You can have each branch
office of the company configured as a domain.
As represented in the figure, example.com is the first domain in the forest. It represents the head
office of the company and the branch offices are represented by domains, America, India, Korea,
China and Mexico.
Figure 4-2 Deploying DSfW in a Horizontally Spread Tree
novdocx (en) 7 January 2010
Depth
In this form of structuring, the tree is vertically structured and you can create domains corresponding
to each engineering and support function in the organization.
Figure 4-3 Deploying DSfW in a Vertically Structured Tree
26 OES 2 SP2: Domain Services for Windows Administration Guide

Depth and Width
dc=example,dc=com
Geographic
(Regional)
Geographic
(Location)
Operational
dc=amerc dc=pacrim dc=europe
dc=tkyo dc=hnkg
dc=chi dc=prv
dc=hr dc=sales
With this combination you get benefits of a tree that is spread both horizontally and vertically spread
out. This is best suited for organizations that have offices locally as well as globally and there is a
high requirement for load processing.
Figure 4-4 Deploying DSfW in a Combination Structure
novdocx (en) 7 January 2010
4.2 Deploying DSfW in a Name-Mapped Setup
If you already have an eDirectory setup but want to install DSfW in your environment, it is
recommended you utilise the existing eDirectory setup and install DSfW in a container in the
existing eDirectory tree. This way you can utilise all the user information in the eDirectory
container. This kind of setup is known as a name-mapped setup. Before you start the process of
installation, ensure you have read and understood the details in Installation Prerequisites for a
Name-Mapped Setup.
In Figure 4-5 DSfW is installed in eDirectory container Asia. The container Asia becomes part of
the DSfW domain. If you have name-mapped an existing partition to a domain, you cannot namemap the sibling partitions to create a domain. Using the example in Figure 4-5, if you have already
name-mapped the O=Asia partition, you cannot name-map the O=America or O=Europe partitions.
However, it is possible to map the partitions underneath O=Asia to a domain. So you can map the
OU=India partition to create a DSfW domain. But if you have already mapped O=Asia partition and
now want to map the OU=Delhi partition, it cannot be done without mapping the OU=India
partition. The boundaries of a domain are valid till it encounters another partition.
Installing DSfW in a tree root partition is not supported.
Deployment Scenarios 27
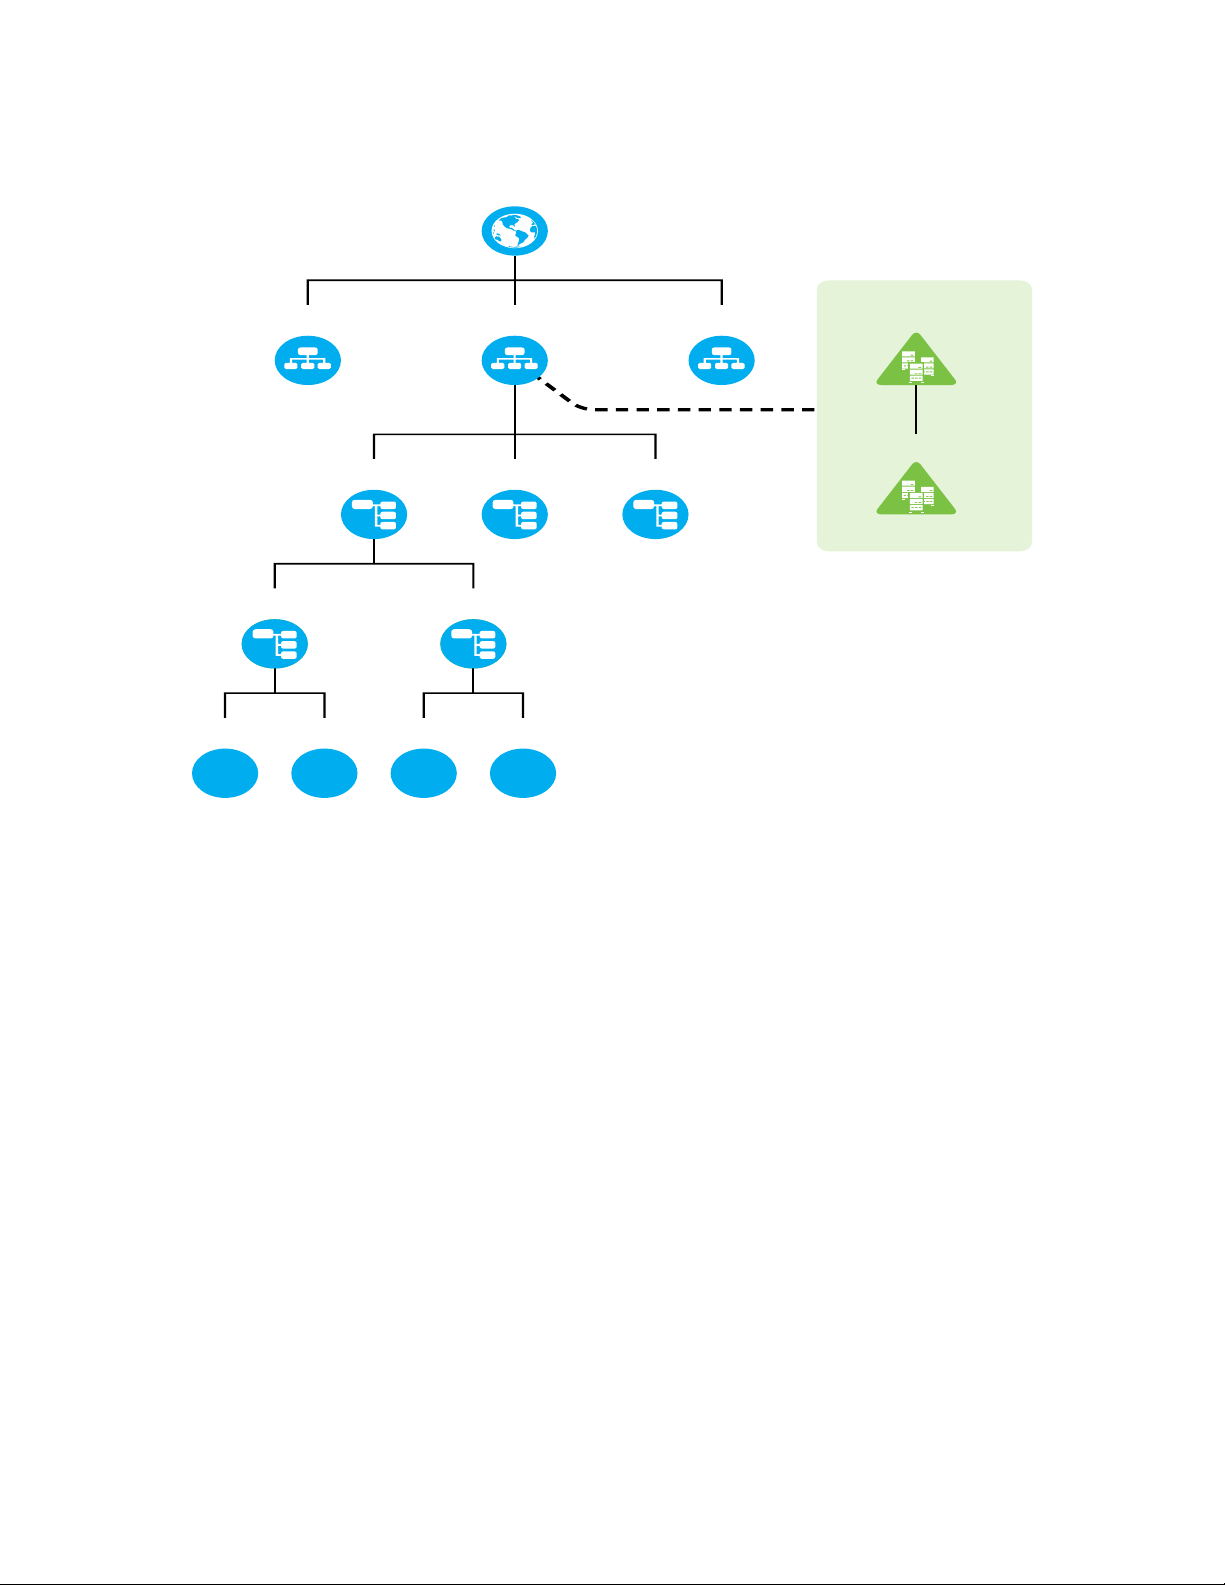
Figure 4-5 Deploying DSfW in an Existing eDirectory Tree
T=Global
T
ou ou ou
ooo
America Asia
China
Europe
India Japan
Delhi Bangalore
Sales Finance Sales Finance
ou
ou
dc
dc=com
dc=asia
dc
novdocx (en) 7 January 2010
28 OES 2 SP2: Domain Services for Windows Administration Guide

5
Planning for DSfW
This section describes requirements and guidelines for using the Novell® Domain Services for
Windows on a Novell Open Enterprise Server (OES) 2 server.
Section 5.1, “Server Requirements for Installing DSfW,” on page 29
Section 5.2, “Scalability Guidelines,” on page 29
Section 5.3, “Deciding Between Name-Mapped or Non-Name-Mapped Installation,” on
page 30
Section 5.4, “Meeting the Installation Requirements,” on page 32
Section 5.5, “Supported Installation Scenarios,” on page 39
Section 5.6, “Unsupported Service Combinations,” on page 39
Section 5.7, “Administrative Tools,” on page 40
Section 5.8, “Utilities Not Supported in DSfW,” on page 40
Section 5.9, “Limitation with NETBIOS Names,” on page 40
novdocx (en) 7 January 2010
5
5.1 Server Requirements for Installing DSfW
To install DSfW, you need a server that meets the system requirements for SUSE® Linux Enterprise
Server (SLES) 10 SP3 and Open Enterprise Server 2 SP2. For more information, see “Installing
OES 2 SP2” in the OES 2 SP2: Installation Guide
You should have access to the installation media for SLES 10 SP3 and OES2 SP2, either on physical
CD/DVD media or on a networked installation source server. For more information about installing
OES 2 SP2 from an installation source, see “Setting Up an Installation Source” in the OES 2 SP2:
Installation Guide
NOTE: Ensure that only root account is created during the SLES installation because administrator
or other Active Directory account names can conflict with the DSfW users.
5.2 Scalability Guidelines
The details presented below show the performance of a DSfW server during tests in a lab
environment. However, you can use these details to plan your production environment for DSfW.
Table 5-1 Scalability Guidelines
Forest Component Scale upto
Number of domains in a forest 10
Number of users per domain 5000
Number of client workstations per domain 1000
Number of simultaneous logins per domain 500
Planning for DSfW
29

Forest Component Scale upto
Number of domain controller per domain 5
novdocx (en) 7 January 2010
Number of simultaneous logins per domain
controller
Number of child domains at the same level (width) 5
Number of child domains(depth) 6
200
5.3 Deciding Between Name-Mapped or NonName-Mapped Installation
Name-Mapped Installation: Installing DSfW in a name-mapped setup means you are installing
DSfW in an existing eDirectory tree inside a specific container.
Before you install DSfW in an existing container, the container must be partitioned.In Figure 5-1 the
existing container Asia is mapped to create a DSfW forest. After the mapping, all of the containers
below the O= Asia container become part of the DSfW forest.
If you have mapped an existing container to a domain, you cannot map the sibling containers to
create a domain. Using the example in Figure 5-1, if you have already partitioned the O=Asia
container, you cannot partition the O=America or O=Europe containers.
However, it is possible to map the containers underneath O=Asia to a domain.
It is not possible to partition the root container and map it to create a DSfW forest.
30 OES 2 SP2: Domain Services for Windows Administration Guide

Figure 5-1 Name-Mapped Installation
T=Global
T
ou ou ou
ooo
America Asia
China
Europe
India Japan
Delhi Bangalore
Sales Finance Sales Finance
ou
ou
dc
dc=com
dc=asia
dc
o=acme
Geographic
(Regional)
Geographic
(Location)
Operational
dc=amerc dc=pacrim dc=europe
dc=tkyo dc=hnkg
dc=lon dc=par
dc=hr dc=sales
novdocx (en) 7 January 2010
Non-Name-Mapped: In case of installing DSfW in a non-name-mapped setup, you are setting up a
new tree in a DSfW forest. Here the tree structure overlaps with the DNS namespace.
Figure 5-2 Non-Name-Mapped Installation
Planning for DSfW 31

5.3.1 Impact of a Name Mapped / Non-Name-Mapped setup on a Tree
This section analyses the various options of setting up a DSfW tree and the associated limitations.
“Using a Pyramid Design” on page 32
“Using a Flat Design” on page 32
Using a Pyramid Design
With a forest designed in the form of a pyramid, managing and initiating changes to large groups,
and creating logical partitions are easier. This structure is best suited for large organizations with
operations spread out across the globe.
Using a Flat Design
The alternative to the pyramid design is a flat tree that places all objects at one level of the tree.
However, the flat tree design is not supported in DSfW.
novdocx (en) 7 January 2010
DSfW can have only one top level domain and all the other domains need to be organized
underneath the top level domain.
If you have mapped an existing container to a domain, you cannot map the sibling containers to
create a domain. It is also not possible to partition the root container and map it to create a DSfW
forest.
For more information, see Designing the eDirectory Tree (http://www.novell.com/documentation/
edir871/?page=/documentation/edir871/edir871/data/a2iiidp.html)
5.4 Meeting the Installation Requirements
Before you start the process of installation, ensure you have met the following prerequisites. These
steps can be used to validate the state of the system before beginning the installation process.
Section 5.4.1, “Installation Prerequisites For a Non-Name-Mapped Setup,” on page 32
Section 5.4.2, “Installation Prerequisites for a Name-Mapped Setup,” on page 35
5.4.1 Installation Prerequisites For a Non-Name-Mapped Setup
“Domain Name is Correct” on page 33
“eDirectory Version” on page 34
“DNS Server is Installed” on page 34
“Time is Synchronized” on page 34
“Schema is Synchronized” on page 35
“Servers in the Replica Ring are Synchronized” on page 35
32 OES 2 SP2: Domain Services for Windows Administration Guide

Domain Name is Correct
Before installing DSfW, ensure the domain name is entered correctly in YaST. To verify and correct
the domain name, do the following:
1 Open YaST>NetWork Configurations. Select the Hostname and Name Server option.
novdocx (en) 7 January 2010
2 Verify that the domain name is correct.
3 Select the Write Hostnames to /etc/hosts option to ensure that that changes you have made gets
added to the
/etc/hosts
files.
4 Verify that the Name Server 1 points to the local DNS server. For details see, “DNS Server is
Installed” on page 34.
Planning for DSfW 33

novdocx (en) 7 January 2010
IMPORTANT: In case of installation of a child domain, make sure you specify the name of
the parent domain in the Domain Search field for resolving hostnames.
5 Click OK to save the changes.
eDirectory Version
Before installing DSfW, ensure that the eDirectory version is 8.8 SP 2 or greater and that at least one
eDirectory server in the replica ring holds a writeable copy of the tree root replica.
DNS Server is Installed
Ensure that Novell DNS service is installed and the server is up and running to resolve name
resolution queries.
In case of a first domain installation, the
DNS server. Whereas if it is child domain installation, the
/etc/resolv.conf
/etc/resolv.conf
file must have an entry of the local
file must have the
entry of the parent DNS server.
Time is Synchronized
Ensure time is synchronized between all servers in the replica ring by executing the following
command:
ndscheck -a <bind dn> -w <password>
This command in addition to displaying partition and replica health also displays time difference
between servers in the replica ring.
34 OES 2 SP2: Domain Services for Windows Administration Guide

If you observe a time difference between the server, ensure that all the servers in the replica ring are
referencing the same NTP server. After this is done, restart the NTP server by using the
restart
command.
rcntp
Schema is Synchronized
Ensure schema is synchronized between all the servers in the replica ring by executing the following
command:
novdocx (en) 7 January 2010
ldapsearch -b cn=schema -s base -x attributetypes=<schema attribute>
Substitute the schema attribute value with the attribute you have used in the schema.
For example: l
This will return the schema entry of the attribute
dapsearch -b cn=schema -s base -x attributetypes
forcelogoff
indicating that the schema is
=forcelogoff
synchronized across all the servers in the replica ring.
Alternatively you can also use iMonitor to see if the schema is synchronized. For information on
using iMonitor, see Novell eDirectory Management Utilities (http://www.novell.com/
documentation/ndsedir86/?page=/documentation/ndsedir86/taoenu/data/a5hgofu.html)
Servers in the Replica Ring are Synchronized
Ensure all the servers in the replica ring are synchronized by executing the following command:
ndsstat -r
The
ndsstat
utility displays information related to eDirectory servers, such as the eDirectory tree
name, the fully distinguished server name, and the eDirectory version.
5.4.2 Installation Prerequisites for a Name-Mapped Setup
In case of a name-mapped installation, you are installing DSfW in an existing tree. To ensure the
installation does not encounter errors, make sure you meet the following prerequisites:
“Domain Name is Correct” on page 35
“eDirectory Version” on page 37
“Container is Partitioned” on page 37
“DNS Server is Installed” on page 37
“Time is Synchronized” on page 38
“Schema is Synchronized” on page 38
“Servers in the Replica Ring are Synchronized” on page 38
“Permissions for Objects” on page 38
“Container Names” on page 38
Domain Name is Correct
Before installing DSfW, ensure the domain name is entered correctly in YaST. To verify and correct
the domain name, do the following:
1 Open YaST>NetWork Configurations. Select the Hostname and Name Server option.
Planning for DSfW 35

novdocx (en) 7 January 2010
2 Verify that the domain name is correct.
3 Select the Write Hostnames to /etc/hosts option to ensure that that changes you have made gets
added to the
/etc/hosts
files.
4 Verify that the Name Server 1 points to the local DNS server. For details see, “DNS Server is
Installed” on page 34.
36 OES 2 SP2: Domain Services for Windows Administration Guide

novdocx (en) 7 January 2010
IMPORTANT: In case of installation of a child domain, make sure you specify the name of
the parent domain in the Domain Search field for resolving hostnames.
5 Click OK to save the changes.
eDirectory Version
Before installing DSfW, ensure that the eDirectory version is 8.8 SP 2 or greater and that at least one
eDirectory server in the replica ring holds a writeable copy of the tree root replica.
Container is Partitioned
The container in which you are installing DSfW must be partitioned.
NOTE: Ensure that the domain name that you are creating is same as the partition name. If the
names do not match, installation will fail.
DNS Server is Installed
Ensure that Novell DNS service is installed and the server is up and running to resolve name
resolution queries.
In case of a first domain installation, the
DNS server. Whereas if it is child domain installation, the
/etc/resolv.conf
/etc/resolv.conf
file must have an entry of the local
file must have the
entry of the parent DNS server
Planning for DSfW 37

Time is Synchronized
Ensure time is synchronized between all servers in the replica ring by executing the following
command:
ndscheck -a <bind dn> -w <password>
This command in addition to displaying partition and replica health also displays time difference
between servers in the replica ring.
If you observe a time difference between the server, ensure that all the servers in the replica ring are
referencing the same NTP server. After this is done, restart the NTP server using the
restart
command.
rcntp
Schema is Synchronized
Ensure the schema is synchronized between all the servers in the replica ring by executing the
following command:
novdocx (en) 7 January 2010
ldapsearch -b cn=schema -s base -x attributetypes=<schema attribute>
Substitute the schema attribute value with an attribute you have used in the schema.
For example:
This command returns the schema entry of the attribute
ldapsearch -b cn=schema -s base -x attributetypes
forcelogoff
indicating that the schema is
=forcelogoff
synchronized across all the servers in the replica ring.
Servers in the Replica Ring are Synchronized
Ensure all the servers in the replica ring are synchronized by executing the following command:
ndsstat -r
The
ndsstat
utility displays information related to eDirectory servers, such as the eDirectory tree
name, the fully distinguished server name, and the eDirectory version.
Permissions for Objects
When you are installing in a name-mapped setup, ensure that you have adequate permissions for the
following objects in the tree:
Container that is being provisioned
Permissions for DNS Locator and Group objects
Permissions to the Security container
Modify permissions to the NCP servers holding replica of the master server
Container Names
When you are installing DSfW, it creates few default containers. Make sure that the following
container names do not already exist under the domain partition:
cn=Computers
cn=Users
38 OES 2 SP2: Domain Services for Windows Administration Guide

ou=Domain Controllers
cn=DefaultMigrationContainer
cn=Deleted Objects
cn=ForeignSecurityPrincipals
cn=Infrastructure
cn=LostAndFound
cn=NTDS Quotas
cn=Program Data
cn=System
cn=Container
5.5 Supported Installation Scenarios
The following installation scenarios are supported:
Section 6.2.1, “Installing DSfW in a Non-Name-Mapped Setup,” on page 41
Section 6.2.2, “Installing DSfW in a Name-Mapped Setup,” on page 71
novdocx (en) 7 January 2010
5.6 Unsupported Service Combinations
IMPORTANT: Do not install any of the following service combinations on the same server as
DSfW. Although not all of the combinations cause pattern conflict warnings, Novell does not
support any of the following combinations:
File Server (SLES 10 - Samba)
Novell AFP
Novell Archive and Version Services
Novell CIFS
TM
TM
(NCS)
Novell Cluster Services
Novell FTP
Novell iFolder
Novell NetStorage
Novell Pre-Migration Server
Novell QuickFinder
Novell Samba
®
5.6.1 Installing Other Products in the DSfW Partition
Novell doesn't support installing other Novell products within a Domain Services for Windows
(DSfW) partition.
Planning for DSfW 39

Some products might be supported in name-mapped implementations of DSfW. Consult the product
documentation (http://www.novell.com/documentation) and the Novell Support site (http://
www.novell.com/support) for confirmation before attempting such installations.
You should assume that an installation is not supported unless these sources indicate otherwise.
NOTE: This section refers to Novell products that are not included with OES 2®, such as
GroupWise. It doesn’t apply to services included with OES 2, such as Novell iPrint.
Limitations for installing OES 2 services on the same server are outlined in Section 5.6,
“Unsupported Service Combinations,” on page 39.
5.7 Administrative Tools
The following administrative tools are supported in DSfW:
Section 5.7.1, “Windows Administration Tools,” on page 40
Section 5.7.2, “Linux Administration Tools,” on page 40
novdocx (en) 7 January 2010
5.7.1 Windows Administration Tools
From a Windows workstation the only tool supported to administer DSfW is Microsoft Management
Console (MMC).
5.7.2 Linux Administration Tools
From managing DSfW server, use iManager.
5.8 Utilities Not Supported in DSfW
The following eDirectory utilities are not supported on a DSfW server
ldif2dib - Utility to load data in to the eDirectory server
ndsmerge - Utility to merge two eDirectory trees.
5.9 Limitation with NETBIOS Names
The NETBIOS names are automatically configured from the DNS name you provide for the domain
during the DSfW installation. We recommend you to not change the NETBIOS name.
In case you need to change the NETBIOS names, avoid using the following names:
security
schema
linkengine
administrator
ndsschema
ndscontainer
40 OES 2 SP2: Domain Services for Windows Administration Guide

6
Installing Domain Services for
novdocx (en) 7 January 2010
Windows
This section describes how to install and configure DSfW using the YaST administrative tool. It
covers the following topics:
Section 6.1, “Prerequisites for Installation,” on page 41
Section 6.2, “Installation Scenarios,” on page 41
Section 6.3, “Using a Container Admin to Install and Configure DSfW,” on page 101
6.1 Prerequisites for Installation
Before you proceed with the installation, please review the details in “Planning for DSfW” on
page 29
6.2 Installation Scenarios
DSfW can be installed in the following scenarios :
Section 6.2.1, “Installing DSfW in a Non-Name-Mapped Setup,” on page 41
Section 6.2.2, “Installing DSfW in a Name-Mapped Setup,” on page 71
6
6.2.1 Installing DSfW in a Non-Name-Mapped Setup
“Installing a Forest Root Domain” on page 41
“Installing a Child Domain” on page 50
“Installing DSfW as a Subsequent Domain Controller in a Domain” on page 61
Installing a Forest Root Domain
Prerequisites: Before proceeding with this non-name-mapped installation, review Installation
Prerequisites For a Non-Name-Mapped Setup.
1 In the YaST install for OES from Software Selections page, select Novell Domain Services for
Windows pattern. Click Accept.
Ensure that Novell DNS is selected along with Novell Domain Services for Windows.
Pattern deployment provides patterns for different services. Selecting a pattern automatically
selects and installs its dependencies.
For information about the entire OES 2 Linux installation process, see the OES 2 SP2:
Installation Guide.
Installing Domain Services for Windows
41

2 On the first eDirectory configuration page in YaST, select the New Tree option. This indicates
that you are installing a new DSfW server in the forest:
novdocx (en) 7 January 2010
2a Select New Tree and specify a name for the tree. For example, DSfW-TREE.
2b Select Use eDirectory certificates for HTTPS Services if you want your OES services that
provide HTTPS connectivity to use the more secure eDirectory certificates instead of the
self-signed certificates created by YaST. This option is selected by default.
2c Select the Require TLS for Simple Binds with Password option if you want to disallow
clear passwords and other data.This option is selected by default.
2d Select Install SecretStore if you want to eliminate the need to remember or synchronize all
the multiple passwords required for accessing password-protected applications. This
option is selected by default.
2e Click Next to continue.
42 OES 2 SP2: Domain Services for Windows Administration Guide

3 Specify the eDirectory administrator password in both fields, then click Next.
novdocx (en) 7 January 2010
Installing Domain Services for Windows 43

4 Specify the settings to configure the local server in the eDirectory tree.
novdocx (en) 7 January 2010
4a Leave the location of the Directory Information Base (DIB) at the default setting.
4b Leave the iMonitor Port settings at the defaults unless you need to change them to avoid
port conflicts with other services.
4c Leave the Secure iMonitor Port settings at the defaults unless you need to change them to
avoid port conflicts with other services.
4d Click Next to continue.
5 Specify details for NTP and SLP.
44 OES 2 SP2: Domain Services for Windows Administration Guide

novdocx (en) 7 January 2010
5a Specify a reliable Network Time Protocol (NTP) provider. Novell eDirectory requires that
all servers in a tree be time-synchronized. In a single-server scenario, you can specify the
local machine as the NTP provider.
5b Specify details to configure SLP:
5b1 If you do not want to configure the Service Location Protocol, select the Do not
configure SLP option.
5b2 Select the Use multicast to access SLP option to request SLP information using
multicast packet.
5b3 If you have more than three servers in your eDirectory tree, and you already have a
Directory Agent running, select the Configure SLP to use an existing Directory Agent
option.
5b4 Select the Configure as Directory Agent option if you already have a DA running.
5c Click Next.
6 Select the authentication service you want to install.
Installing Domain Services for Windows 45

novdocx (en) 7 January 2010
Click Next.
7 Specify details to configure DSfW on eDirectory.
46 OES 2 SP2: Domain Services for Windows Administration Guide

novdocx (en) 7 January 2010
7a Select the New Domain Services for Windows forest option. This indicates that you are
installing a new DSfW forest.
7b The DNS Name for the New Domain is by default taken from the entry in the
/etc/hosts
file. In case you need to change the domain name, make sure you follow the instructions in
“Domain Name is Correct” on page 33.
7c We recommend you to leave the NetBIOS name setting at the default, then click Next to
continue.
For more information, see Section 5.9, “Limitation with NETBIOS Names,” on page 40
7d Click Next to continue.
8 Specify details to configure the DNS server.
Installing Domain Services for Windows 47

novdocx (en) 7 January 2010
8a Specify the following information:
Specify the context of the DNS service locator object (for example,
ou=OESSystemObjects,dc=dsfw,dc=com
Specify the context of the DNS Root ServerInfo object (for example,
ou=OESSystemObjects,dc=dsfw,dc=com
Specify the context of the DNS Services Group object (for example,
ou=OESSystemObjects,dc=dsfw,dc=com
).
).
).
8b Specify the fully distinguished, typeful name of the proxy user that will be used for DNS
Management. For example:
cn=dns-admin,dc=dsfw,dc=com
to authenticate to
eDirectory during runtime for accessing information for DNS. The user must have
eDirectory read, write, and browse rights under the specified context.
8c Specify the password of the proxy user that you specified for accessing DNS.
8d Use Secure LDAP Port option is selected by default to ensure that the data transferred by
this service is secure and private. If you deselect this option, the data transferred is in clear
text format.
8e Specify the Credential Storage Location as CASA.
8f Click Next to continue.
9 After the installation is completed, the OES Configuration Summary page is displayed. Review
the settings made earlier. Click Next.
48 OES 2 SP2: Domain Services for Windows Administration Guide

novdocx (en) 7 January 2010
10 This starts the DSfW installation.When the installation is complete, click Finish.
Installing Domain Services for Windows 49

This completes the process of DSfW installation. But the server is not ready for use till you
complete configuring DSfW and the supporting services through the process of provisioning.
11 To start provisioning, do one of the following:
From the terminal, run the
Launch YaST. The DSfW Provisioning Wizard is listed as an option.
/opt/novell/xad/sbin/provision_dsfw.sh
script.
To authenticate, enter the password of the current domain.
For more details on Provisioning, see “Provisioning Domain Services for Windows” on
page 103
12 The DSfW server is now ready for use. Verify that eDirectory and DSfW have been installed
and configured correctly by executing the instructions in Chapter 8, “Verifying DSfW
Installation,” on page 125.
novdocx (en) 7 January 2010
Installing a Child Domain
Prerequisites: Before proceeding with this non-name-mapped installation, review Installation
Prerequisites For a Non-Name-Mapped Setup
1 In the YaST install for OES from Software Selections page, select Novell Domain Services for
Windows pattern. Click Accept.
Ensure that Novell DNS is selected along with Novell Domain Services for Windows.
Pattern deployment provides patterns for different services. Selecting a pattern automatically
selects and installs its dependencies.
For information about the entire OES 2 Linux installation process, see the OES 2 SP2:
Installation Guide.
2 On the eDirectory configuration page in YaST, select the Existing Tree option. This indicates
that you are installing the server into an existing eDirectory tree:
50 OES 2 SP2: Domain Services for Windows Administration Guide

novdocx (en) 7 January 2010
2a Select Existing Tree and specify the name of the tree. For example, DSFW_TREE.
2b Select Use eDirectory certificates for HTTPS Services if you want your OES services that
provide HTTPS connectivity to use the more secure eDirectory certificates instead of the
self-signed certificates created by YaST.
2c Select the Require TLS for Simple Binds with Password option if you want to disallow
clear passwords and other data.
2d Select Install SecretStore if you want to eliminate the need to remember or synchronize all
the multiple passwords required for accessing password-protected applications.
2e Click Next to continue.
3 Specify information to access the existing eDirectory Tree.
Installing Domain Services for Windows 51

novdocx (en) 7 January 2010
3a Specify the IP address of the Forest Root Domain.
3b Do not change the NCP Port, LDAP Port and Secure LDAP Port information.
3c Specify the tree admin credentials for the administrator to log into the eDirectory tree.
3d Click Next.
52 OES 2 SP2: Domain Services for Windows Administration Guide

4 Select the settings for the local server configuration:
novdocx (en) 7 January 2010
4a Leave the location of the Directory Information Base (DIB) at the default setting.
4b Leave the iMonitor port settings at the defaults unless you need to change them to avoid
port conflicts with other services.
4c Leave the Secure iMonitor Port settings at the defaults unless you need to change them to
avoid port conflicts with other services.
4d Click Next to continue.
5 Specify details for NTP and SLP.
Installing Domain Services for Windows 53

novdocx (en) 7 January 2010
5a Specify a reliable Network Time Protocol (NTP) provider. Novell eDirectory requires that
all servers in a tree be time-synchronized. In a single-server scenario, you can specify the
local machine as the NTP provider.
5b Specify details to configure SLP:
5b1 If you do not want to configure the Service Location Protocol, select the Do not
configure SLP option.
5b2 Select the Use multicast to access SLP option to request SLP information using
multicast packet.
5b3 If you have more than three servers in your eDirectory tree, and you already have a
Directory Agent running, select the Configure SLP to use an existing Directory Agent
option.
5b4 Select the Configure as Directory Agent option if you already have a DA running.
5c Click Next.
6 Select the authentication service you want to install.
54 OES 2 SP2: Domain Services for Windows Administration Guide

novdocx (en) 7 January 2010
6a Click Next.
7 Specify details to configure DSfW on eDirectory.
Installing Domain Services for Windows 55

novdocx (en) 7 January 2010
7a Select the New Domain in an Existing Domain Services for Windows forest option. This
indicates that you are installing a new domain in an existing DSfW forest.
7b The DNS Name for the New Domain is by default taken from the entry in the
/etc/hosts
file. In case you need to change the domain name, make sure you follow the instructions in
“Domain Name is Correct” on page 33.
7c Select the Configure this machine to be a primary DNS server if you want the machine
being configured to function as a DNS server.
IMPORTANT: If you want to configure the child domain controller to act as a primary
DNS server, ensure the DNS servers of the forest root domain and the child domain
controller act as passive primary DNS servers of each other's zones, else the installation of
an subsequent domain controller to the child domain controller fails.
Also make sure you configure the forward lookup zone and the reverse lookup zone for
this DNS server. For more information, see “Zone Management” in the OES 2 SP2:
Novell DNS/DHCP Administration Guide for Linux.
7d We recommend you to leave the NetBIOS name setting at the default, then click Next to
continue.
For more information, see Section 5.9, “Limitation with NETBIOS Names,” on page 40
7e Click Next to continue.
8 Specify the name of the forest root domain in which you want to create the child domain.
56 OES 2 SP2: Domain Services for Windows Administration Guide

novdocx (en) 7 January 2010
9 Specify the IP address of the parent domain, the administrator name and password.
Installing Domain Services for Windows 57

10 This screen need to be used when you need to map a new domain to an existing eDirectory
container. As this is a non-name-mapped installation scenario, click Next to skip this screen.
novdocx (en) 7 January 2010
11 Specify details to configure DNS.
58 OES 2 SP2: Domain Services for Windows Administration Guide

novdocx (en) 7 January 2010
11a If you already have an DNS server configured in your tree, select the Get context
information from existing DNS Server option and provide the IP address of an existing
DNS server and select Retrieve.
This will fetch the contexts of the existing Locator and Group objects.
If you do not wish to use the existing contexts, you can manually enter the details.
11b Specify the context of the DNS Locator object.
11c Specify the context of the DNS Group object.
12 After the installation is completed, the OES Configuration Summary page is displayed. Review
the settings made earlier. Click Next.
Installing Domain Services for Windows 59

novdocx (en) 7 January 2010
13 This starts the DSfW installation.When the installation is complete, click Finish.
60 OES 2 SP2: Domain Services for Windows Administration Guide

This completes the process of DSfW installation. But the server is not ready for use till you
complete configuring DSfW and the supporting services through the process of provisioning.
14 To start provisioning, do one of the following : For details on Provisioning, see
From the terminal, run the
Launch YaST. The DSfW Provisioning Wizard is listed as an option.
/opt/novell/xad/sbin/provision_dsfw.sh
script.
To authenticate, enter the password of the current domain, the parent domain and the tree
admin.
For more details on Provisioning, see “Provisioning Domain Services for Windows” on
page 103.
15 The DSfW server is now ready for use. Verify that eDirectory and DSfW have been installed
and configured correctly by executing the instructions in Chapter 8, “Verifying DSfW
Installation,” on page 125.
novdocx (en) 7 January 2010
Installing DSfW as a Subsequent Domain Controller in a Domain
Prerequisites: Before proceeding with this non-name-mapped installation, review Installation
Prerequisites For a Non-Name-Mapped Setup
1 In the YaST install for OES from Software Selections page, select Novell Domain Services for
Windows pattern. Click Accept.
Ensure that Novell DNS is selected along with Novell Domain Services for Windows.
Pattern deployment provides patterns for different services. Selecting a pattern automatically
selects and installs its dependencies.
For information about the entire OES 2 Linux installation process, see the OES 2 SP2:
Installation Guide.
2 On the first eDirectory configuration page in YaST, select the Existing Tree option. This
indicates that you are an additional DSfW server (Domain Controller) in the forest:
Installing Domain Services for Windows 61

novdocx (en) 7 January 2010
2a Select Existing Tree and specify the name of the tree. For example, DSfW-TREE.
2b Select Use eDirectory certificates for HTTPS Services if you want your OES services that
provide HTTPS connectivity to use the more secure eDirectory certificates instead of the
self-signed certificates created by YaST.
2c Select the Require TLS for Simple Binds with Password option if you want to disallow
clear passwords and other data.
2d Select Install SecretStore if you want to eliminate the need to remember or synchronize all
the multiple passwords required for accessing password-protected applications.
2e Click Next to continue.
3 Specify information to access the existing eDirectory Tree.
62 OES 2 SP2: Domain Services for Windows Administration Guide

novdocx (en) 7 January 2010
3a Specify the IP address of the an existing eDirectory tree that holds read/write or master
replica of the partition.
3b Do not change the NCP Port, LDAP Port and Secure LDAP Port information.
3c Specify the tree admin credentials for the administrator to log into the eDirectory tree.
3d Click Next.
4 Specify the configuration for the local server in the eDirectory tree
Installing Domain Services for Windows 63

novdocx (en) 7 January 2010
4a Leave the location of the Directory Information Base (DIB) at the default setting.
4b Leave the iMonitor Port settings at the defaults unless you need to change them to avoid
port conflicts with other services.
4c Leave the Secure iMonitor Port settings at the defaults unless you need to change them to
avoid port conflicts with other services.
4d Click Next to continue.
5 Specify details for NTP and SLP.
64 OES 2 SP2: Domain Services for Windows Administration Guide

novdocx (en) 7 January 2010
5a Specify a reliable Network Time Protocol (NTP) provider. Novell eDirectory requires that
all servers in a tree be time-synchronized. In a single-server scenario, you can specify the
local machine as the NTP provider.
5b Specify details to configure SLP:
5b1 If you do not want to configure the Service Location Protocol, select the Do not
configure SLP option.
5b2 Select the Use multicast to access SLP option to request SLP information using
multicast packet.
5b3 If you have more than three servers in your eDirectory tree, and you already have a
Directory Agent running, select the Configure SLP to use an existing Directory Agent
option.
5b4 Select the Configure as Directory Agent option if you already have a DA running.
5c Click Next.
6 Select the authentication service you want to install.
Installing Domain Services for Windows 65

novdocx (en) 7 January 2010
6a Click Next.
7 Specify details to configure DSfW on eDirectory
7a Select the New Domain in an Existing Domain Services for Windows forest option. This
indicates that you are installing a new DSfW forest.
66 OES 2 SP2: Domain Services for Windows Administration Guide

novdocx (en) 7 January 2010
7b The configuration partition is forest-specific and by default the first domain controller of
every domain gets a replica. The subsequent domain gets the replica of this partition if you
select the Replicate schema and configuration Partitions option.
NOTE: We recommend that you select this option to replicate the schema and
configuration partition to the subsequent domain controller
8 Specify administrator name and forest root domain details
Installing Domain Services for Windows 67

novdocx (en) 7 January 2010
8a Specify the name of the forest root domain in which you want to create the domain
controller.
8b Specify the password for the domain administrator.
8c Click Next.
9 Specify details to configure DNS.
68 OES 2 SP2: Domain Services for Windows Administration Guide

novdocx (en) 7 January 2010
9a If you already have an DNS server configured in your tree, select the Get context
information from existing DNS Server option and provide the IP address of an existing
DNS server and select Retrieve.
This will fetch the contexts of the existing Locator and Group objects.
If you do not wish to use the existing contexts, you can manually enter the details.
9b Specify the context of the DNS Locator object.
9c Specify the context of the DNS Group object.
10 After the installation is completed, the OES Configuration Summary page is displayed. Review
the settings made earlier. Click Next.
Installing Domain Services for Windows 69

novdocx (en) 7 January 2010
11 This starts the DSfW installation.When the installation is complete, click Finish.
70 OES 2 SP2: Domain Services for Windows Administration Guide

This completes the process of DSfW installation. But the server is not ready for use till you
complete configure DSfW and the supporting services through the process of provisioning.
12 To start provisioning, do one of the following:
From the terminal, run the
Launch YaST. The DSfW Provisioning Wizard is listed as an option.
/opt/novell/xad/sbin/provision_dsfw.sh
script.
To authenticate, enter the password of the current domain.
For more details on Provisioning, see “Provisioning Domain Services for Windows” on
page 103
13 The DSfW server is now ready for use. Verify that eDirectory and DSfW have been installed
and configured correctly by executing the instructions in Chapter 8, “Verifying DSfW
Installation,” on page 125.
novdocx (en) 7 January 2010
6.2.2 Installing DSfW in a Name-Mapped Setup
“Installing a Forest Root Domain” on page 71
“Installing a Child Domain” on page 82
“Installing DSfW as a Subsequent Domain Controller in a Domain” on page 91
Installing a Forest Root Domain
Prerequisites: Before proceeding with this name-mapped installation, review Installation
Prerequisites for a Name-Mapped Setup
1 In the YaST install for OES from Software Selections page, select Novell Domain Services for
Windows pattern. Click Accept.
Ensure that Novell DNS is selected along with Novell Domain Services for Windows.
Pattern deployment provides patterns for different services. Selecting a pattern automatically
selects and installs its dependencies.
For information about the entire OES 2 Linux installation process, see the OES 2 SP2:
Installation Guide.
2 On the eDirectory configuration page in YaST, select the Existing Tree option. This indicates
that you are installing the server into an existing eDirectory tree:
Installing Domain Services for Windows 71

novdocx (en) 7 January 2010
2a Select Existing Tree and specify the name of the tree. For example, DSFW-TREE.
2b Select Use eDirectory certificates for HTTPS Services if you want your OES services that
provide HTTPS connectivity to use the more secure eDirectory certificates instead of the
self-signed certificates created by YaST.
2c Select the Require TLS for Simple Binds with Password option if you want to disallow
clear passwords and other data.
2d Select Install SecretStore if you want to eliminate the need to remember or synchronize all
the multiple passwords required for accessing password-protected applications.
2e Click Next to continue.
3 Specify information to access the existing eDirectory Tree.
72 OES 2 SP2: Domain Services for Windows Administration Guide

novdocx (en) 7 January 2010
3a Specify the IP address of the Forest Root Domain.
3b Do not change the NCP Port, LDAP Port and Secure LDAP Port information.
3c Specify the tree admin credentials for the administrator to log into the eDirectory tree.
3d Click Next.
Installing Domain Services for Windows 73

4 Select the settings for the local server configuration:
novdocx (en) 7 January 2010
4a Leave the location of the Directory Information Base (DIB) at the default setting.
4b Leave the iMonitor port settings at the defaults unless you need to change them to avoid
port conflicts with other services.
4c Leave the Secure iMonitor Port settings at the defaults unless you need to change them to
avoid port conflicts with other services.
4d Click Next to continue.
5 Specify details for NTP and SLP.
74 OES 2 SP2: Domain Services for Windows Administration Guide

novdocx (en) 7 January 2010
5a Specify a reliable Network Time Protocol (NTP) provider. Novell eDirectory requires that
all servers in a tree be time-synchronized. In a single-server scenario, you can specify the
local machine as the NTP provider.
5b Specify details to configure SLP:
5b1 If you do not want to configure the Service Location Protocol, select the Do not
configure SLP option.
5b2 Select the Use multicast to access SLP option to request SLP information using
multicast packet.
5b3 If you have more than three servers in your eDirectory tree, and you already have a
Directory Agent running, select the Configure SLP to use an existing Directory Agent
option.
5b4 Select the Configure as Directory Agent option if you already have a DA running.
5c Click Next.
6 Select the authentication service you want to install.
Installing Domain Services for Windows 75

novdocx (en) 7 January 2010
6a Click Next.
7 Specify details to configure DSfW on eDirectory.
76 OES 2 SP2: Domain Services for Windows Administration Guide

novdocx (en) 7 January 2010
7a Select the New Domain Services for Windows Forest option. This indicates that you are
installing a DSfW server in an existing forest.
7b The DNS Name for the New Domain is by default taken from the entry in the
/etc/hosts
file. In case you need to change the domain name, make sure you follow the instructions in
“Domain Name is Correct” on page 33.
7c We recommend you to leave the NetBIOS name setting at the default, then click Next to
continue.
For more information, see Section 5.9, “Limitation with NETBIOS Names,” on page 40
7d Click Next to continue.
Installing Domain Services for Windows 77

8 Specify the password for the domain administrator in both fields, then click Next.
novdocx (en) 7 January 2010
9 Specify details to map the existing eDirectory container to the new domain.
78 OES 2 SP2: Domain Services for Windows Administration Guide

novdocx (en) 7 January 2010
9a Enter the Fully Qualified Domain Name of the existing eDirectory container that you want
to be mapped to the new domain.
NOTE: The container that is being mapped should be partitioned.
9b Select the Migrate NKDC users to Domain Services for Windows domain option if you
want to migrate the users from existing Novell KDC realm to DSfW domain. This
facilitates the migration of existing eDirectory users who are using Novell KDC to the
DSfW domain users keeping Novell KDC security identities (security principals and
policies) intact. After the migration, the existing eDirectory users continue to use their
own security settings in DSfW kerberos environment.
9c Specify the name of the NKDC realm from where you want to migrate the users to DSfW
domain.
9d If you select the Retain existing Novell Password Policies on Users option the password
policies assigned to the users within the container that is mapped to the new domain does
not change. However the password policies outside the partition boundary is not carried
forward. You need to create a fresh password policy assigned to the partition root. For
details on creating a fresh password policy, see Creating Password Policies (http://
www.novell.com/documentation/password_management/pwm_administration/data/
an4bun5.html)
10 Specify details to configure the DNS server.
Installing Domain Services for Windows 79

novdocx (en) 7 January 2010
10a Specify the following information:
Specify the context of the DNS service locator object (for example,
ou=OESSystemObjects,dc=dsfw,dc=com
Specify the context of the DNS Root ServerInfo object (for example,
ou=OESSystemObjects,dc=dsfw,dc=com
Specify the context of the DNS group object (for example,
ou=OESSystemObjects,dc=dsfw,dc=com
).
).
).
10b Specify the fully distinguished, typeful name of the proxy user that will be used for DNS
Management. For example:
cn=dns-admin,dc=dsfw,dc=com
to authenticate to
eDirectory during runtime for accessing information for DNS. The user must have
eDirectory read, write, and browse rights under the specified context.
10c Specify the password of the eDirectory user that you specified for accessing DNS.
10d Use Secure LDAP Port option is selected by default to ensure that the data transferred by
this service is secure and private. If you deselect this option, the data transferred is in clear
text format.
10e Specify the Credential Storage Location as CASA.
10f Click Next to continue.
11 After the installation is completed, the OES Configuration Summary page is displayed. Review
the settings made earlier. Click Next.
80 OES 2 SP2: Domain Services for Windows Administration Guide

novdocx (en) 7 January 2010
12 This starts the DSfW installation.When the installation is complete, click Finish.
Installing Domain Services for Windows 81

This completes the process of DSfW installation. But the server is not ready for use till you
complete configure DSfW and the supporting services through the process of provisioning.
13 To start provisioning, do one of the following:
From the terminal, run the
Launch YaST. The DSfW Provisioning Wizard is listed as an option.
/opt/novell/xad/sbin/provision_dsfw.sh
script.
To authenticate, enter the password of the current domain and the tree admin.
For more details on Provisioning, see “Provisioning Domain Services for Windows” on
page 103
14 The DSfW server is now ready for use. Verify that eDirectory and DSfW have been installed
and configured correctly by executing the instructions in Chapter 8, “Verifying DSfW
Installation,” on page 125.
novdocx (en) 7 January 2010
Installing a Child Domain
Prerequisites: Before proceeding with this name-mapped installation, review Installation
Prerequisites for a Name-Mapped Setup
1 In the YaST install for OES from Software Selections page, select Novell Domain Services for
Windows pattern. Click Accept.
Ensure that Novell DNS is selected along with Novell Domain Services for Windows.
Pattern deployment provides patterns for different services. Selecting a pattern automatically
selects and installs its dependencies.
For information about the entire OES 2 Linux installation process, see the OES 2 SP2:
Installation Guide.
2 On the first eDirectory configuration page in YaST, select the Existing Tree option. This
indicates that you are installing the server into an existing eDirectory tree:
82 OES 2 SP2: Domain Services for Windows Administration Guide

novdocx (en) 7 January 2010
2a Select Existing Tree and specify the name of the tree. For example, DSfW-TREE.
2b Select Use eDirectory certificates for HTTPS Services if you want your OES services that
provide HTTPS connectivity to use the more secure eDirectory certificates instead of the
self-signed certificates created by YaST.
2c Select the Require TLS for Simple Binds with Password option if you want to disallow
clear passwords and other data.
2d Select Install SecretStore if you want to eliminate the need to remember or synchronize all
the multiple passwords required for accessing password-protected applications.
2e Click Next to continue.
3 Specify the existing eDirectory configuration details.
3a Specify the IP address of the Forest Root domain.
3b Do not change the NCP Port, LDAP Port and Secure LDAP Port information.
3c Specify the existing tree admin credentials.
3d Click Next.
4 Specify the configuration for the local server in the eDirectory tree
4a Leave the location of the Directory Information Base (DIB) at the default setting.
4b Leave the iMonitor Port settings at the defaults unless you need to change them to avoid
port conflicts with other services.
4c Leave the Secure iMonitor Port settings at the defaults unless you need to change them to
avoid port conflicts with other services.
4d Click Next to continue.
5 Specify details for NTP and SLP.
Installing Domain Services for Windows 83

novdocx (en) 7 January 2010
5a Specify a reliable Network Time Protocol (NTP) provider. Novell eDirectory requires that
all servers in a tree be time-synchronized. In a single-server scenario, you can specify the
local machine as the NTP provider.
5b Specify details to configure SLP:
5b1 If you do not want to configure the Service Location Protocol, select the Do not
configure SLP option.
5b2 Select the Use multicast to access SLP option to request SLP information using
multicast packet.
5b3 If you have more than three servers in your eDirectory tree, and you already have a
Directory Agent running, select the Configure SLP to use an existing Directory Agent
option.
5b4 Select the Configure as Directory Agent option if you already have a DA running.
5c Click Next.
6 Select the authentication service you want to install.
6a Click Next.
7 Specify details to configure DSfW on eDirectory.
84 OES 2 SP2: Domain Services for Windows Administration Guide

novdocx (en) 7 January 2010
7a Select the New Domain in an Existing Domain Services for Windows forest option. This
indicates that you setting up a new domain in an existing DSfW forest.
7b The DNS Name for the New Domain is by default taken from the entry in the
/etc/hosts
file. In case you need to change the domain name, make sure you follow the instructions in
“Domain Name is Correct” on page 33.
7c We recommend you to leave the NetBIOS name setting at the default, then click Next to
continue.
For more information, see Section 5.9, “Limitation with NETBIOS Names,” on page 40
7d Click Next to continue.
8 Specify details to configure the DSfW server.
IMPORTANT: A DSfW domain can only be created in Organization (O), Organizational Unit
(OU) and Domain Component (DC) containers. Installing a name-mapped domain to map
Country and Locality containers is not supported. However, you can map O and OU under
these containers.
Installing Domain Services for Windows 85

novdocx (en) 7 January 2010
8a Specify the name of the Forest Root Domain in which you want to create the child
domain.
8b Specify the parent domain in which you want to create the child domain.
8c Click Next.
9 Specify the information needed to identify the child domain you are creating.
86 OES 2 SP2: Domain Services for Windows Administration Guide

novdocx (en) 7 January 2010
9a Specify the IP Address, name and context for the administrator of the parent domain.
9b Specify the password for the administrator of the new child domain. Retype the password
to verify it.
9c Click Next.
10 Specify the information to map the new domain to an existing eDirectory container
Installing Domain Services for Windows 87

novdocx (en) 7 January 2010
10a If you want to map the new domain to an existing eDirectory container, select the Map the
New Domain to an Existing eDirectory Container option.
10b Specify the fully distinguished typeful name of the existing eDirectory container
10c Specify the name of the realm where you have existing Kerberos users.
10d If you select the Retain existing Novell Password Policies on Users option the password
policies assigned to the users within the container that is mapped to the new domain does
not change. However the password policies outside the partition boundary is not carried
forward. You need to create a fresh password policy assigned to the partition root. For
details, see Creating Password Policies (http://www.novell.com/documentation/
password_management/pwm_administration/data/an4bun5.html)
10e Click Next.
11 Specify details to configure DNS
88 OES 2 SP2: Domain Services for Windows Administration Guide

novdocx (en) 7 January 2010
11a If you already have an DNS server configured in your tree, select the Get context
information from existing DNS Server option and provide the IP address of an existing
DNS server and select Retrieve.
This will fetch the contexts of the existing Locator and Group objects.
If you do not wish to use the existing contexts, you can manually enter the details.
11b Specify the context of the DNS Locator object.
11c Specify the context of the DNS Group object.
12 After the installation is completed, the OES Configuration Summary page is displayed. Review
the settings made earlier. Click Next.
Installing Domain Services for Windows 89

novdocx (en) 7 January 2010
13 This starts the DSfW installation.When the installation is complete, click Finish.
90 OES 2 SP2: Domain Services for Windows Administration Guide

This completes the process of DSfW installation. But the server is not ready for use till you
complete configure DSfW and the supporting services through the process of provisioning.
14 To start provisioning, do one of the following:
From the terminal, run the
Launch YaST. The DSfW Provisioning Wizard is listed as an option.
/opt/novell/xad/sbin/provision_dsfw.sh
script.
To authenticate, enter the password of the current domain, the parent domain, and the tree/
container admin.
For more details on Provisioning, see “Provisioning Domain Services for Windows” on
page 103
15 The DSfW server is now ready for use. Verify that eDirectory and DSfW have been installed
and configured correctly by executing the instructions in Chapter 8, “Verifying DSfW
Installation,” on page 125.
novdocx (en) 7 January 2010
Installing DSfW as a Subsequent Domain Controller in a Domain
Prerequisites: Before proceeding with this non-name-mapped installation, review Installation
Prerequisites For a Non-Name-Mapped Setup
1 In the YaST install for OES from Software Selections page, select Novell Domain Services for
Windows pattern. Click Accept.
Ensure that Novell DNS is selected along with Novell Domain Services for Windows.
Pattern deployment provides patterns for different services. Selecting a pattern automatically
selects and installs its dependencies.
For information about the entire OES 2 Linux installation process, see the OES 2 SP2:
Installation Guide.
2 On the first eDirectory configuration page in YaST, select the Existing Tree option. This
indicates that you are installing the server into an existing eDirectory tree:
Installing Domain Services for Windows 91

novdocx (en) 7 January 2010
2a Select Existing Tree and specify the name of the tree. For example, DSfW-TREE.
2b Select Use eDirectory certificates for HTTPS Services if you want your OES services that
provide HTTPS connectivity to use the more secure eDirectory certificates instead of the
self-signed certificates created by YaST.
2c Select the Require TLS for Simple Binds with Password option if you want to disallow
clear passwords and other data.
2d Select Install SecretStore if you want to eliminate the need to remember or synchronize all
the multiple passwords required for accessing password-protected applications.
2e Click Next to continue.
3 Specify information to access the existing eDirectory Tree.
92 OES 2 SP2: Domain Services for Windows Administration Guide

novdocx (en) 7 January 2010
3a Specify the IP Address of the Forest Root domain.
3b Do not change the NCP Port, LDAP Port and Secure LDAP Port information.
3c Specify the tree admin credentials for the administrator to log into the eDirectory tree.
3d Click Next.
4 Specify the configuration for the local server in the eDirectory tree
Installing Domain Services for Windows 93

novdocx (en) 7 January 2010
4a Leave the location of the Directory Information Base (DIB) at the default setting.
4b Leave the iMonitor Port settings at the defaults unless you need to change them to avoid
port conflicts with other services.
4c Leave the Secure iMonitor Port settings at the defaults unless you need to change them to
avoid port conflicts with other services.
4d Click Next to continue.
5 Specify details for NTP and SLP.
94 OES 2 SP2: Domain Services for Windows Administration Guide

novdocx (en) 7 January 2010
5a Specify a reliable Network Time Protocol (NTP) provider. Novell eDirectory requires that
all servers in a tree be time-synchronized. In a single-server scenario, you can specify the
local machine as the NTP provider.
5b Specify details to configure SLP:
5b1 If you do not want to configure the Service Location Protocol, select the Do not
configure SLP option.
5b2 Select the Use multicast to access SLP option to request SLP information using
multicast packet.
5b3 If you have more than three servers in your eDirectory tree, and you already have a
Directory Agent running, select the Configure SLP to use an existing Directory Agent
option.
5b4 Select the Configure as Directory Agent option if you already have a DA running.
5c Click Next.
6 Select the authentication service you want to install.
Installing Domain Services for Windows 95

novdocx (en) 7 January 2010
6a Click Next.
7 Specify details to configure DSfW on eDirectory
7a Select the New Domain in an Existing Domain Services for Windows forest option. This
indicates that you are installing DSfW in an existing eDirectory tree.
96 OES 2 SP2: Domain Services for Windows Administration Guide

novdocx (en) 7 January 2010
7b The configuration partition is forest-specific and by default the first domain controller of
every domain gets a replica. The subsequent domain gets the replica of this partition if you
select the Replicate schema and configuration Partitions option.
NOTE: We recommend that you select this option to replicate the schema and
configuration partition to the subsequent domain controller
8 Specify administrator name and forest root domain details
Installing Domain Services for Windows 97

novdocx (en) 7 January 2010
8a Specify the name of the forest root domain in which you want to create the domain
controller.
8b Specify the password for the domain administrator.
8c Click Next.
9 Specify details to configure DNS.
98 OES 2 SP2: Domain Services for Windows Administration Guide

novdocx (en) 7 January 2010
9a If you already have an DNS server configured in your tree, select the Get context
information from existing DNS Server option and provide the IP address of an existing
DNS server and select Retrieve.
This will fetch the contexts of the existing Locator and Group objects.
If you do not wish to use the existing contexts, you can manually enter the details.
9b Specify the context of the DNS Locator object.
9c Specify the context of the DNS Group object.
10 After the installation is completed, the OES Configuration Summary page is displayed. Review
the settings made earlier. Click Next.
Installing Domain Services for Windows 99

novdocx (en) 7 January 2010
11 This starts the DSfW installation.When the installation is complete, click Finish.
100 OES 2 SP2: Domain Services for Windows Administration Guide
 Loading...