

Page 1

Novell®
www.novell.com
Administration Guide
iManager
novdocx (en) 22 June 2009
AUTHORIZED DOCUMENTATION
2.7.3
September 30, 2009
Novell iManager 2.7.3 Administration Guide
Page 2

Legal Notices
Novell, Inc. makes no representations or warranties with respect to the contents or use of this documentation, and
specifically disclaims any express or implied warranties of merchantability or fitness for any particular purpose.
Further, Novell, Inc. reserves the right to revise this publication and to make changes to its content, at any time,
without obligation to notify any person or entity of such revisions or changes.
Further, Novell, Inc. makes no representations or warranties with respect to any software, and specifically disclaims
any express or implied warranties of merchantability or fitness for any particular purpose. Further, Novell, Inc.
reserves the right to make changes to any and all parts of Novell software, at any time, without any obligation to
notify any person or entity of such changes.
Any products or technical information provided under this Agreement may be subject to U.S. export controls and the
trade laws of other countries. You agree to comply with all export control regulations and to obtain any required
licenses or classification to export, re-export or import deliverables. You agree not to export or re-export to entities on
the current U.S. export exclusion lists or to any embargoed or terrorist countries as specified in the U.S. export laws.
You agree to not use deliverables for prohibited nuclear, missile, or chemical biological weaponry end uses. See the
Novell International Trade Services Web page (http://www.novell.com/info/exports/) for more information on
exporting Novell software. Novell assumes no responsibility for your failure to obtain any necessary export
approvals.
novdocx (en) 22 June 2009
Copyright © 2009 Novell, Inc. All rights reserved. No part of this publication may be reproduced, photocopied,
stored on a retrieval system, or transmitted without the express written consent of the publisher.
Novell, Inc. has intellectual property rights relating to technology embodied in the product that is described in this
document. In particular, and without limitation, these intellectual property rights may include one or more of the U.S.
patents listed on the Novell Legal Patents Web page (http://www.novell.com/company/legal/patents/) and one or
more additional patents or pending patent applications in the U.S. and in other countries.
Novell, Inc.
404 Wyman Street, Suite 500
Waltham, MA 02451
U.S.A.
www.novell.com
Online Documentation: To access the latest online documentation for this and other Novell products, see
the Novell Documentation Web page (http://www.novell.com/documentation).
Page 3

Novell Trademarks
For Novell trademarks, see the Novell Trademark and Service Mark list (http://www.novell.com/company/legal/
trademarks/tmlist.html).
Third-Party Materials
All third-party trademarks are the property of their respective owners.
novdocx (en) 22 June 2009
Page 4

novdocx (en) 22 June 2009
4 Novell iManager 2.7.3 Administration Guide
Page 5

Contents
About This Guide 9
1Overview 11
1.1 What's New in iManager 2.7.3 (Field Patch 1) . . . . . . . . . . . . . . . . . . . . . . . . . . . . . . . . . . . . . 11
1.2 Additional Resources . . . . . . . . . . . . . . . . . . . . . . . . . . . . . . . . . . . . . . . . . . . . . . . . . . . . . . . . 12
2 Accessing iManager 13
2.1 Using a Supported Web Browser. . . . . . . . . . . . . . . . . . . . . . . . . . . . . . . . . . . . . . . . . . . . . . . 13
2.2 Accessing iManager. . . . . . . . . . . . . . . . . . . . . . . . . . . . . . . . . . . . . . . . . . . . . . . . . . . . . . . . . 13
2.2.1 Accessing Server-based iManager . . . . . . . . . . . . . . . . . . . . . . . . . . . . . . . . . . . . . . 13
2.2.2 Accessing iManager Workstation . . . . . . . . . . . . . . . . . . . . . . . . . . . . . . . . . . . . . . . 14
2.3 Access Modes . . . . . . . . . . . . . . . . . . . . . . . . . . . . . . . . . . . . . . . . . . . . . . . . . . . . . . . . . . . . . 14
2.4 Authenticating . . . . . . . . . . . . . . . . . . . . . . . . . . . . . . . . . . . . . . . . . . . . . . . . . . . . . . . . . . . . . 15
2.4.1 Tree Name Field . . . . . . . . . . . . . . . . . . . . . . . . . . . . . . . . . . . . . . . . . . . . . . . . . . . . 15
2.4.2 Logging in to a Server without a Replica . . . . . . . . . . . . . . . . . . . . . . . . . . . . . . . . . . 15
2.4.3 Unsuccessful Authentication . . . . . . . . . . . . . . . . . . . . . . . . . . . . . . . . . . . . . . . . . . . 15
2.4.4 Expired Password Information. . . . . . . . . . . . . . . . . . . . . . . . . . . . . . . . . . . . . . . . . . 16
2.4.5 Contextless Login Using Alternate Object Classes and/or Alternate Attributes. . . . . 16
novdocx (en) 22 June 2009
3 Navigating the iManager Interface 17
3.1 iManager Interface . . . . . . . . . . . . . . . . . . . . . . . . . . . . . . . . . . . . . . . . . . . . . . . . . . . . . . . . . . 17
3.1.1 Header Frame. . . . . . . . . . . . . . . . . . . . . . . . . . . . . . . . . . . . . . . . . . . . . . . . . . . . . . 18
3.1.2 Navigation Frame . . . . . . . . . . . . . . . . . . . . . . . . . . . . . . . . . . . . . . . . . . . . . . . . . . . 18
3.1.3 Content Frame. . . . . . . . . . . . . . . . . . . . . . . . . . . . . . . . . . . . . . . . . . . . . . . . . . . . . . 19
3.2 Special Characters. . . . . . . . . . . . . . . . . . . . . . . . . . . . . . . . . . . . . . . . . . . . . . . . . . . . . . . . . . 20
4 Browsing Objects 23
4.1 Using the Object View . . . . . . . . . . . . . . . . . . . . . . . . . . . . . . . . . . . . . . . . . . . . . . . . . . . . . . . 24
4.1.1 Tree . . . . . . . . . . . . . . . . . . . . . . . . . . . . . . . . . . . . . . . . . . . . . . . . . . . . . . . . . . . . . . 24
4.1.2 Browse. . . . . . . . . . . . . . . . . . . . . . . . . . . . . . . . . . . . . . . . . . . . . . . . . . . . . . . . . . . . 26
4.1.3 Search . . . . . . . . . . . . . . . . . . . . . . . . . . . . . . . . . . . . . . . . . . . . . . . . . . . . . . . . . . . . 27
4.2 Using the Object Selector . . . . . . . . . . . . . . . . . . . . . . . . . . . . . . . . . . . . . . . . . . . . . . . . . . . . 29
4.2.1 Browse. . . . . . . . . . . . . . . . . . . . . . . . . . . . . . . . . . . . . . . . . . . . . . . . . . . . . . . . . . . . 30
4.2.2 Search . . . . . . . . . . . . . . . . . . . . . . . . . . . . . . . . . . . . . . . . . . . . . . . . . . . . . . . . . . . . 30
5 Roles and Tasks 33
5.1 Navigating Roles and Tasks . . . . . . . . . . . . . . . . . . . . . . . . . . . . . . . . . . . . . . . . . . . . . . . . . . 33
5.1.1 Selecting and Filtering Objects . . . . . . . . . . . . . . . . . . . . . . . . . . . . . . . . . . . . . . . . . 33
5.2 Directory Administration . . . . . . . . . . . . . . . . . . . . . . . . . . . . . . . . . . . . . . . . . . . . . . . . . . . . . . 37
5.2.1 Copying an Object . . . . . . . . . . . . . . . . . . . . . . . . . . . . . . . . . . . . . . . . . . . . . . . . . . . 37
5.2.2 Creating an Object. . . . . . . . . . . . . . . . . . . . . . . . . . . . . . . . . . . . . . . . . . . . . . . . . . . 38
5.2.3 Deleting an Object . . . . . . . . . . . . . . . . . . . . . . . . . . . . . . . . . . . . . . . . . . . . . . . . . . . 38
5.2.4 Modifying an Object . . . . . . . . . . . . . . . . . . . . . . . . . . . . . . . . . . . . . . . . . . . . . . . . . . 38
5.2.5 Moving an Object. . . . . . . . . . . . . . . . . . . . . . . . . . . . . . . . . . . . . . . . . . . . . . . . . . . . 39
5.2.6 Renaming an Object . . . . . . . . . . . . . . . . . . . . . . . . . . . . . . . . . . . . . . . . . . . . . . . . . 39
Contents 5
Page 6

5.3 Groups . . . . . . . . . . . . . . . . . . . . . . . . . . . . . . . . . . . . . . . . . . . . . . . . . . . . . . . . . . . . . . . . . . . 39
5.3.1 Creating a Group . . . . . . . . . . . . . . . . . . . . . . . . . . . . . . . . . . . . . . . . . . . . . . . . . . . . 40
5.3.2 Deleting a Group . . . . . . . . . . . . . . . . . . . . . . . . . . . . . . . . . . . . . . . . . . . . . . . . . . . . 40
5.3.3 Modifying a Group . . . . . . . . . . . . . . . . . . . . . . . . . . . . . . . . . . . . . . . . . . . . . . . . . . . 40
5.3.4 Modifying Members of Group . . . . . . . . . . . . . . . . . . . . . . . . . . . . . . . . . . . . . . . . . . 41
5.3.5 Move Group . . . . . . . . . . . . . . . . . . . . . . . . . . . . . . . . . . . . . . . . . . . . . . . . . . . . . . . . 41
5.3.6 Rename Group . . . . . . . . . . . . . . . . . . . . . . . . . . . . . . . . . . . . . . . . . . . . . . . . . . . . . 41
5.3.7 Viewing My Groups . . . . . . . . . . . . . . . . . . . . . . . . . . . . . . . . . . . . . . . . . . . . . . . . . . 41
5.4 Help Desk. . . . . . . . . . . . . . . . . . . . . . . . . . . . . . . . . . . . . . . . . . . . . . . . . . . . . . . . . . . . . . . . . 41
5.4.1 Clearing a Lockout. . . . . . . . . . . . . . . . . . . . . . . . . . . . . . . . . . . . . . . . . . . . . . . . . . . 41
5.4.2 Creating a User . . . . . . . . . . . . . . . . . . . . . . . . . . . . . . . . . . . . . . . . . . . . . . . . . . . . . 42
5.4.3 Setting a Password . . . . . . . . . . . . . . . . . . . . . . . . . . . . . . . . . . . . . . . . . . . . . . . . . . 42
5.5 Partitions and Replicas . . . . . . . . . . . . . . . . . . . . . . . . . . . . . . . . . . . . . . . . . . . . . . . . . . . . . . 42
5.5.1 Creating a Partition . . . . . . . . . . . . . . . . . . . . . . . . . . . . . . . . . . . . . . . . . . . . . . . . . . 42
5.5.2 Merging a Partition. . . . . . . . . . . . . . . . . . . . . . . . . . . . . . . . . . . . . . . . . . . . . . . . . . . 43
5.5.3 Moving a Partition . . . . . . . . . . . . . . . . . . . . . . . . . . . . . . . . . . . . . . . . . . . . . . . . . . . 43
5.5.4 Viewing Replica Information . . . . . . . . . . . . . . . . . . . . . . . . . . . . . . . . . . . . . . . . . . . 43
5.5.5 Viewing Partition Information . . . . . . . . . . . . . . . . . . . . . . . . . . . . . . . . . . . . . . . . . . . 44
5.5.6 Using the Filtered Replica Wizard . . . . . . . . . . . . . . . . . . . . . . . . . . . . . . . . . . . . . . . 44
5.6 Rights . . . . . . . . . . . . . . . . . . . . . . . . . . . . . . . . . . . . . . . . . . . . . . . . . . . . . . . . . . . . . . . . . . . . 44
5.6.1 Modifying the Inherited Rights Filter . . . . . . . . . . . . . . . . . . . . . . . . . . . . . . . . . . . . . 45
5.6.2 Modifying Trustee Rights . . . . . . . . . . . . . . . . . . . . . . . . . . . . . . . . . . . . . . . . . . . . . . 45
5.6.3 Rights to Other Objects . . . . . . . . . . . . . . . . . . . . . . . . . . . . . . . . . . . . . . . . . . . . . . . 45
5.6.4 Viewing Effective Rights . . . . . . . . . . . . . . . . . . . . . . . . . . . . . . . . . . . . . . . . . . . . . . 46
5.7 Schema . . . . . . . . . . . . . . . . . . . . . . . . . . . . . . . . . . . . . . . . . . . . . . . . . . . . . . . . . . . . . . . . . . 46
5.7.1 Adding an Attribute . . . . . . . . . . . . . . . . . . . . . . . . . . . . . . . . . . . . . . . . . . . . . . . . . . 46
5.7.2 Viewing Attribute Information. . . . . . . . . . . . . . . . . . . . . . . . . . . . . . . . . . . . . . . . . . . 47
5.7.3 Viewing Class Information . . . . . . . . . . . . . . . . . . . . . . . . . . . . . . . . . . . . . . . . . . . . . 47
5.7.4 Creating an Attribute . . . . . . . . . . . . . . . . . . . . . . . . . . . . . . . . . . . . . . . . . . . . . . . . . 47
5.7.5 Creating a Class . . . . . . . . . . . . . . . . . . . . . . . . . . . . . . . . . . . . . . . . . . . . . . . . . . . . 48
5.7.6 Deleting an Attribute . . . . . . . . . . . . . . . . . . . . . . . . . . . . . . . . . . . . . . . . . . . . . . . . . 48
5.7.7 Deleting a Class. . . . . . . . . . . . . . . . . . . . . . . . . . . . . . . . . . . . . . . . . . . . . . . . . . . . . 48
5.7.8 Extending a Schema . . . . . . . . . . . . . . . . . . . . . . . . . . . . . . . . . . . . . . . . . . . . . . . . . 48
5.7.9 Extending an Object . . . . . . . . . . . . . . . . . . . . . . . . . . . . . . . . . . . . . . . . . . . . . . . . . 48
5.8 Users . . . . . . . . . . . . . . . . . . . . . . . . . . . . . . . . . . . . . . . . . . . . . . . . . . . . . . . . . . . . . . . . . . . . 49
5.8.1 Creating a User . . . . . . . . . . . . . . . . . . . . . . . . . . . . . . . . . . . . . . . . . . . . . . . . . . . . . 49
5.8.2 Deleting a User . . . . . . . . . . . . . . . . . . . . . . . . . . . . . . . . . . . . . . . . . . . . . . . . . . . . . 50
5.8.3 Disabling an Account . . . . . . . . . . . . . . . . . . . . . . . . . . . . . . . . . . . . . . . . . . . . . . . . . 50
5.8.4 Enabling an Account . . . . . . . . . . . . . . . . . . . . . . . . . . . . . . . . . . . . . . . . . . . . . . . . . 50
5.8.5 Modifying a User . . . . . . . . . . . . . . . . . . . . . . . . . . . . . . . . . . . . . . . . . . . . . . . . . . . . 50
5.8.6 Moving a User . . . . . . . . . . . . . . . . . . . . . . . . . . . . . . . . . . . . . . . . . . . . . . . . . . . . . . 51
5.8.7 Renaming a User. . . . . . . . . . . . . . . . . . . . . . . . . . . . . . . . . . . . . . . . . . . . . . . . . . . . 51
novdocx (en) 22 June 2009
6 Configuring and Customizing iManager 53
6.1 Role-Based Services . . . . . . . . . . . . . . . . . . . . . . . . . . . . . . . . . . . . . . . . . . . . . . . . . . . . . . . . 53
6.1.1 RBS Objects in eDirectory . . . . . . . . . . . . . . . . . . . . . . . . . . . . . . . . . . . . . . . . . . . . . 54
6.1.2 Installing RBS . . . . . . . . . . . . . . . . . . . . . . . . . . . . . . . . . . . . . . . . . . . . . . . . . . . . . . 56
6.1.3 Removing RBS . . . . . . . . . . . . . . . . . . . . . . . . . . . . . . . . . . . . . . . . . . . . . . . . . . . . . 56
6.2 RBS Configuration . . . . . . . . . . . . . . . . . . . . . . . . . . . . . . . . . . . . . . . . . . . . . . . . . . . . . . . . . . 57
6.2.1 The Role Tab . . . . . . . . . . . . . . . . . . . . . . . . . . . . . . . . . . . . . . . . . . . . . . . . . . . . . . . 58
6.2.2 The Task Tab. . . . . . . . . . . . . . . . . . . . . . . . . . . . . . . . . . . . . . . . . . . . . . . . . . . . . . . 60
6.2.3 The Property Book Tab . . . . . . . . . . . . . . . . . . . . . . . . . . . . . . . . . . . . . . . . . . . . . . . 61
6.2.4 The Module Tab. . . . . . . . . . . . . . . . . . . . . . . . . . . . . . . . . . . . . . . . . . . . . . . . . . . . . 63
6.2.5 The Category Tab . . . . . . . . . . . . . . . . . . . . . . . . . . . . . . . . . . . . . . . . . . . . . . . . . . . 64
6.2.6 Plug-In Studio . . . . . . . . . . . . . . . . . . . . . . . . . . . . . . . . . . . . . . . . . . . . . . . . . . . . . . 64
6.2.7 Editing Member Associations . . . . . . . . . . . . . . . . . . . . . . . . . . . . . . . . . . . . . . . . . . 66
6 Novell iManager 2.7.3 Administration Guide
Page 7

6.2.8 Editing Owner Collections . . . . . . . . . . . . . . . . . . . . . . . . . . . . . . . . . . . . . . . . . . . . . 67
6.3 RBS Reporting . . . . . . . . . . . . . . . . . . . . . . . . . . . . . . . . . . . . . . . . . . . . . . . . . . . . . . . . . . . . . 67
6.3.1 Creating Reports . . . . . . . . . . . . . . . . . . . . . . . . . . . . . . . . . . . . . . . . . . . . . . . . . . . . 67
6.3.2 Using Reports . . . . . . . . . . . . . . . . . . . . . . . . . . . . . . . . . . . . . . . . . . . . . . . . . . . . . . 68
6.4 iManager Server. . . . . . . . . . . . . . . . . . . . . . . . . . . . . . . . . . . . . . . . . . . . . . . . . . . . . . . . . . . . 71
6.4.1 Configure iManager . . . . . . . . . . . . . . . . . . . . . . . . . . . . . . . . . . . . . . . . . . . . . . . . . . 71
6.4.2 Security . . . . . . . . . . . . . . . . . . . . . . . . . . . . . . . . . . . . . . . . . . . . . . . . . . . . . . . . . . . 72
6.4.3 Look and Feel . . . . . . . . . . . . . . . . . . . . . . . . . . . . . . . . . . . . . . . . . . . . . . . . . . . . . . 73
6.4.4 Logging Events . . . . . . . . . . . . . . . . . . . . . . . . . . . . . . . . . . . . . . . . . . . . . . . . . . . . . 73
6.4.5 Redirection After Logout . . . . . . . . . . . . . . . . . . . . . . . . . . . . . . . . . . . . . . . . . . . . . . 74
6.4.6 Authentication . . . . . . . . . . . . . . . . . . . . . . . . . . . . . . . . . . . . . . . . . . . . . . . . . . . . . . 74
6.4.7 RBS . . . . . . . . . . . . . . . . . . . . . . . . . . . . . . . . . . . . . . . . . . . . . . . . . . . . . . . . . . . . . . 75
6.4.8 Plug-In Download . . . . . . . . . . . . . . . . . . . . . . . . . . . . . . . . . . . . . . . . . . . . . . . . . . . 76
6.4.9 Misc . . . . . . . . . . . . . . . . . . . . . . . . . . . . . . . . . . . . . . . . . . . . . . . . . . . . . . . . . . . . . . 76
6.5 Object Creation List . . . . . . . . . . . . . . . . . . . . . . . . . . . . . . . . . . . . . . . . . . . . . . . . . . . . . . . . . 77
6.5.1 Adding an Object Class to the Creation List . . . . . . . . . . . . . . . . . . . . . . . . . . . . . . . 77
6.5.2 Deleting an Object Class from the Creation List . . . . . . . . . . . . . . . . . . . . . . . . . . . . 77
6.6 Plug-In Module Installation. . . . . . . . . . . . . . . . . . . . . . . . . . . . . . . . . . . . . . . . . . . . . . . . . . . . 77
6.6.1 Available Novell Plug-in Modules . . . . . . . . . . . . . . . . . . . . . . . . . . . . . . . . . . . . . . . 78
6.6.2 Installed Novell Plug-in Modules . . . . . . . . . . . . . . . . . . . . . . . . . . . . . . . . . . . . . . . . 78
6.7 Downloading and Installing Plug-in Modules . . . . . . . . . . . . . . . . . . . . . . . . . . . . . . . . . . . . . . 79
6.7.1 If RBS is Configured . . . . . . . . . . . . . . . . . . . . . . . . . . . . . . . . . . . . . . . . . . . . . . . . . 79
6.7.2 Uninstalling a Plug-in Module . . . . . . . . . . . . . . . . . . . . . . . . . . . . . . . . . . . . . . . . . . 80
6.7.3 Customizing the Plug-In Download Location . . . . . . . . . . . . . . . . . . . . . . . . . . . . . . . 80
6.8 E-Mail Notification . . . . . . . . . . . . . . . . . . . . . . . . . . . . . . . . . . . . . . . . . . . . . . . . . . . . . . . . . . 81
6.8.1 Mail Server Configuration . . . . . . . . . . . . . . . . . . . . . . . . . . . . . . . . . . . . . . . . . . . . . 82
6.8.2 Task Event Notification . . . . . . . . . . . . . . . . . . . . . . . . . . . . . . . . . . . . . . . . . . . . . . . 82
6.9 Views . . . . . . . . . . . . . . . . . . . . . . . . . . . . . . . . . . . . . . . . . . . . . . . . . . . . . . . . . . . . . . . . . . . . 82
6.9.1 Showing and Hiding iManager Views . . . . . . . . . . . . . . . . . . . . . . . . . . . . . . . . . . . . 82
novdocx (en) 22 June 2009
7 Preferences 85
7.1 Manage Favorites . . . . . . . . . . . . . . . . . . . . . . . . . . . . . . . . . . . . . . . . . . . . . . . . . . . . . . . . . . 85
7.2 Object Selector. . . . . . . . . . . . . . . . . . . . . . . . . . . . . . . . . . . . . . . . . . . . . . . . . . . . . . . . . . . . . 85
7.3 Object View . . . . . . . . . . . . . . . . . . . . . . . . . . . . . . . . . . . . . . . . . . . . . . . . . . . . . . . . . . . . . . . 86
7.4 Set Initial View . . . . . . . . . . . . . . . . . . . . . . . . . . . . . . . . . . . . . . . . . . . . . . . . . . . . . . . . . . . . . 86
7.5 Language . . . . . . . . . . . . . . . . . . . . . . . . . . . . . . . . . . . . . . . . . . . . . . . . . . . . . . . . . . . . . . . . . 86
8 Troubleshooting 87
8.1 Authentication Issues . . . . . . . . . . . . . . . . . . . . . . . . . . . . . . . . . . . . . . . . . . . . . . . . . . . . . . . . 88
8.1.1 HTTP 404 Errors . . . . . . . . . . . . . . . . . . . . . . . . . . . . . . . . . . . . . . . . . . . . . . . . . . . . 88
8.1.2 HTTP 500 Errors . . . . . . . . . . . . . . . . . . . . . . . . . . . . . . . . . . . . . . . . . . . . . . . . . . . . 89
8.1.3 601 Error Messages . . . . . . . . . . . . . . . . . . . . . . . . . . . . . . . . . . . . . . . . . . . . . . . . . 89
8.1.4 622 Error Messages . . . . . . . . . . . . . . . . . . . . . . . . . . . . . . . . . . . . . . . . . . . . . . . . . 89
8.1.5 632 Error Messages . . . . . . . . . . . . . . . . . . . . . . . . . . . . . . . . . . . . . . . . . . . . . . . . . 89
8.1.6 634 Error Messages . . . . . . . . . . . . . . . . . . . . . . . . . . . . . . . . . . . . . . . . . . . . . . . . . 89
8.1.7 669 Error Messages . . . . . . . . . . . . . . . . . . . . . . . . . . . . . . . . . . . . . . . . . . . . . . . . . 90
8.2 Deleting and Re-creating User Accounts with the Same Name (Windows XP/2000) . . . . . . . 90
8.3 DNS 630 Error Message Appears When Creating a Property Book with Invalid Characters in
Name . . . . . . . . . . . . . . . . . . . . . . . . . . . . . . . . . . . . . . . . . . . . . . . . . . . . . . . . . . . . . . . . . . . . 90
8.4 eDirectory Maintenance Task Errors . . . . . . . . . . . . . . . . . . . . . . . . . . . . . . . . . . . . . . . . . . . . 90
8.5 Enabling Debug Messages for Install and Configure . . . . . . . . . . . . . . . . . . . . . . . . . . . . . . . . 91
8.6 History Does Not Automatically Sync Across Multiple Simultaneous User Logins . . . . . . . . . 91
Contents 7
Page 8

8.7 iManager Doesn't Work after Installing Groupwise 7.0 WebAccess (Windows Server 2000/
2003) . . . . . . . . . . . . . . . . . . . . . . . . . . . . . . . . . . . . . . . . . . . . . . . . . . . . . . . . . . . . . . . . . . . . 91
8.8 Missing Attribute, Object, or Value Errors . . . . . . . . . . . . . . . . . . . . . . . . . . . . . . . . . . . . . . . . 91
8.9 Missing Roles or Tasks in the Configure View. . . . . . . . . . . . . . . . . . . . . . . . . . . . . . . . . . . . . 92
8.9.1 Possible Missing Roles or Tasks . . . . . . . . . . . . . . . . . . . . . . . . . . . . . . . . . . . . . . . . 92
8.9.2 Possible Reasons Why You Are Not an Authorized User . . . . . . . . . . . . . . . . . . . . . 92
8.10 Performing a System Restore from Image Software . . . . . . . . . . . . . . . . . . . . . . . . . . . . . . . . 92
8.11 Running eDirectory and iManager on the Same Machine (Windows only) . . . . . . . . . . . . . . . 93
8.12 “Service Unavailable” Message Appears During Multiple Plug-In Installs . . . . . . . . . . . . . . . . 94
8.13 Tomcat . . . . . . . . . . . . . . . . . . . . . . . . . . . . . . . . . . . . . . . . . . . . . . . . . . . . . . . . . . . . . . . . . . . 94
8.13.1 Starting and Stopping Tomcat . . . . . . . . . . . . . . . . . . . . . . . . . . . . . . . . . . . . . . . . . . 94
8.13.2 Tomcat Ports . . . . . . . . . . . . . . . . . . . . . . . . . . . . . . . . . . . . . . . . . . . . . . . . . . . . . . . 94
8.14 “Unable to Determine Universal Password Status” Error . . . . . . . . . . . . . . . . . . . . . . . . . . . . . 95
8.15 iManager Workstation Does Not Display Information. . . . . . . . . . . . . . . . . . . . . . . . . . . . . . . . 95
8.16 Sometimes Refresh Button Does Not Function . . . . . . . . . . . . . . . . . . . . . . . . . . . . . . . . . . . . 96
8.17 iManager Plug-in Installation Hangs or Plug-ins Are Not Properly Installed . . . . . . . . . . . . . . 96
8.18 Login Issue with Respect to Tree IP Address Change . . . . . . . . . . . . . . . . . . . . . . . . . . . . . . . 97
8.19 Java Error Messages are Displayed After Closing the Browser of iManager Workstation. . . . 98
novdocx (en) 22 June 2009
9 Auditing iManager Events 99
9.1 Installing the IMAN_EN.LSC File in iManager . . . . . . . . . . . . . . . . . . . . . . . . . . . . . . . . . . . . . 99
9.2 Enabling Audit in iManager . . . . . . . . . . . . . . . . . . . . . . . . . . . . . . . . . . . . . . . . . . . . . . . . . . 100
9.3 Configuring Audit for iManager Instrumentation. . . . . . . . . . . . . . . . . . . . . . . . . . . . . . . . . . . 100
9.4 Configuring Audit for iManager Instrumentation with Third-Party Certificates . . . . . . . . . . . . 101
10 Best Practices and Common Questions 103
10.1 Backup and Restore Options . . . . . . . . . . . . . . . . . . . . . . . . . . . . . . . . . . . . . . . . . . . . . . . . . 103
10.2 Coexistence with previous versions of iManager 2.x and Role-Based Services . . . . . . . . . . 103
10.3 Collections . . . . . . . . . . . . . . . . . . . . . . . . . . . . . . . . . . . . . . . . . . . . . . . . . . . . . . . . . . . . . . . 104
10.4 Failed Installs . . . . . . . . . . . . . . . . . . . . . . . . . . . . . . . . . . . . . . . . . . . . . . . . . . . . . . . . . . . . . 104
10.4.1 Windows . . . . . . . . . . . . . . . . . . . . . . . . . . . . . . . . . . . . . . . . . . . . . . . . . . . . . . . . . 104
10.4.2 Linux . . . . . . . . . . . . . . . . . . . . . . . . . . . . . . . . . . . . . . . . . . . . . . . . . . . . . . . . . . . . 105
10.5 High Availability: Running iManager in a Clustered Environment . . . . . . . . . . . . . . . . . . . . . 105
10.6 Patching iManager . . . . . . . . . . . . . . . . . . . . . . . . . . . . . . . . . . . . . . . . . . . . . . . . . . . . . . . . . 106
10.7 Performance Tuning. . . . . . . . . . . . . . . . . . . . . . . . . . . . . . . . . . . . . . . . . . . . . . . . . . . . . . . . 106
10.7.1 Using Dynamic Groups with RBS . . . . . . . . . . . . . . . . . . . . . . . . . . . . . . . . . . . . . . 106
10.7.2 Role Assignments . . . . . . . . . . . . . . . . . . . . . . . . . . . . . . . . . . . . . . . . . . . . . . . . . . 106
10.8 iManager AppArmor Profile . . . . . . . . . . . . . . . . . . . . . . . . . . . . . . . . . . . . . . . . . . . . . . . . . . 107
A iManager Security Issues 109
A.1 Secure LDAP Certificates . . . . . . . . . . . . . . . . . . . . . . . . . . . . . . . . . . . . . . . . . . . . . . . . . . . 109
A.2 Self-Signed Certificates . . . . . . . . . . . . . . . . . . . . . . . . . . . . . . . . . . . . . . . . . . . . . . . . . . . . . 110
A.3 iManager Authorized Users and Groups . . . . . . . . . . . . . . . . . . . . . . . . . . . . . . . . . . . . . . . . 110
A.4 Preventing Username Discovery . . . . . . . . . . . . . . . . . . . . . . . . . . . . . . . . . . . . . . . . . . . . . . 111
A.5 Tomcat Settings . . . . . . . . . . . . . . . . . . . . . . . . . . . . . . . . . . . . . . . . . . . . . . . . . . . . . . . . . . . 111
A.6 Encrypted Attributes. . . . . . . . . . . . . . . . . . . . . . . . . . . . . . . . . . . . . . . . . . . . . . . . . . . . . . . . 112
A.7 Secure Connections. . . . . . . . . . . . . . . . . . . . . . . . . . . . . . . . . . . . . . . . . . . . . . . . . . . . . . . . 112
B Novell Plug-in Modules 113
8 Novell iManager 2.7.3 Administration Guide
Page 9

About This Guide
This guide describes how to administer Novell® iManager 2.7, and contains the following sections:
Chapter 1, “Overview,” on page 11
Chapter 2, “Accessing iManager,” on page 13
Chapter 3, “Navigating the iManager Interface,” on page 17
Chapter 4, “Browsing Objects,” on page 23
Chapter 5, “Roles and Tasks,” on page 33
Chapter 6, “Configuring and Customizing iManager,” on page 53
Chapter 7, “Preferences,” on page 85
Chapter 8, “Troubleshooting,” on page 87
Chapter 9, “Auditing iManager Events,” on page 99
Chapter 10, “Best Practices and Common Questions,” on page 103
novdocx (en) 22 June 2009
Audience
This guide is intended for network administrators.
Feedback
We want to hear your comments and suggestions about this manual and the other documentation
included with this product. Please use the User Comments feature at the bottom of each page of the
online documentation, or go to Novell Documentation Feedback (http://www.novell.com/
documentation/feedback.html) and enter your comments there.
Documentation Updates
For the most current version of the iManager 2.7 Administration Guide, see the English version of
the documentation at the iManager 2.7 documentation site (http://www.novell.com/documentation/
imanager27/index.html).
Additional Documentation
iManager 2.7 Installation Guide (http://www.novell.com/documentation/imanager27)
Tomcat servlet container (http://jakarta.apache.org/tomcat)
Java* Web site (http://java.sun.com)
eDirectory
eDirectory documentation (http://www.novell.com/documentation/edir88/index.html)
TM
home (http://www.novell.com/products/edirectory)
eDirectory Cool Solutions community (http://www.novell.com/coolsolutions/nds)
Novell Technical Services (http://support.novell.com)
About This Guide 9
Page 10

Documentation Conventions
In Novell documentation, a greater-than symbol (>) is used to separate actions within a step and
items in a cross-reference path.
®
A trademark symbol (
, TM, etc.) denotes a Novell trademark. An asterisk (*) denotes a third-party
trademark.
When a single pathname can be written with a backslash for some platforms or a forward slash for
other platforms, the pathname is presented with a backslash. Users of platforms that require a
forward slash, such as Linux or UNIX, should use forward slashes as required by your software.
novdocx (en) 22 June 2009
10 Novell iManager 2.7.3 Administration Guide
Page 11

1
Overview
Novell® iManager is a Web-based administration console that provides secure, customized access to
network administration utilities and content from virtually anywhere you have access to the Internet
and a Web browser.
iManager provides the following:
novdocx (en) 22 June 2009
1
Single point of administration for Novell eDirectory
Single point of administration for many other network resources
Management of many other Novell products using iManager plug-ins
Role-Based Services (RBS) for delegated administration
Because iManager is a Web-based tool, it enjoys several advantages over client-based administrative
tools:
Upgrade once, on the server, for all administrative users
Changes to iManager look, feel, and functionality are immediately available to all
administrative users
Do not need to open additional administrative ports for remote access. iManager leverages
standard HTTP ports (80/443)
Not necessary to download and maintain an administrative client
Not necessary to keep client software synchronized with changes to server software
TM
objects, schema, partitions, and replicas
1.1 What's New in iManager 2.7.3 (Field Patch 1)
Novell iManager 2.7.3 has the following new features:
Newly Supported Platform and Browser. In addition to the existing platforms and Web ,
iManager 2.7.3 FTF 1 supports Windows 7 (32-bit and 64-bit), Windows 2008 R2 platforms,
and Internet Explorer 8 (IE 8).
For more information on the supported platforms, refer to the iManager 2.7.3 Installation
Guide (http://www.novell.com/documentation/imanager27/).
“Hide” and “Show Hidden” Buttons in the Available Novell Plug-In Modules Page: The
Available Novell Plug-in Modules page now has Hide and Show Hidden buttons for hiding the
selected plug-in modules, and viewing/unhiding the hidden plug-in modules respectively.
Preferred Object Selection Method for a Task of a Property Book: In the Property Book
page, the user can now define/modify a preferred object selection method for an existing task.
For this, a new feature, Target Chooser Mode has been added to the Actions list.
Ability to Add Organizational Role to the Authorized Users and Groups List: In the
Security page of the Configure iManager window, the user can now add an organizational role
to the Authorized Users and Groups list so that all the members (users and groups) of the
organizational role become authorized users.
Overview
11
Page 12

iManager Caches Login Information for Faster Logins: iManager now caches the first-
time-login information with the tree name and uses that information in the subsequent logins.
This process makes the logins fast.
Ability to Configure the Proxy by Using DNS: The user can now configure a proxy also by
using DNS names. The proxy host field now accepts DNS names also.
1.2 Additional Resources
For more information on topics relevant to Novell iManager, refer to the following Web sites:
Tomcat servlet container (http://jakarta.apache.org/tomcat)
How to setup Tomcat to use a proxy (http://jakarta.apache.org/tomcat/tomcat-4.1-doc/proxy-
howto.html)
Java* Web site (http://java.sun.com)
Microsoft* Windows* Web Services (http://www.microsoft.com/technet/treeview/
default.asp?url=/technet/prodtechnol/iis/default.asp)
Novell eDirectory product home page (http://www.novell.com/products/edirectory)
Novell eDirectory product documentation (http://www.novell.com/documentation)
novdocx (en) 22 June 2009
Novell eDirectory Cool Solutions community (http://www.novell.com/coolsolutions/nds)
12 Novell iManager 2.7.3 Administration Guide
Page 13

2
Accessing iManager
You access Novell® iManager via a Web browser. This section includes the following topics:
Using a Supported Web Browser (page 13)
Accessing iManager (page 13)
Access Modes (page 14)
Authenticating (page 15)
2.1 Using a Supported Web Browser
For iManager access and complete use of all its features, use one of the following Web browsers.
Although you might be able to access iManager via a Web browser not listed, we do not guarantee or
support full functionality with any browser other than the following:
Microsoft IE 6 SP2 on Windows XP
Microsoft IE 7
Microsoft IE 8
novdocx (en) 22 June 2009
2
Firefox* 1.5.x, 2.x, or 3.0
In order for some iManager wizards and help to work, you must enable pop-up windows in your
Web browser. If you use an application that blocks pop-up windows, then disable the blocking
feature while working in iManager or allow pop-ups from the iManager host.
If you have configured your Web browser to not display Web site images, the iManager interface
may become garbled and unusable. In Firefox v1.5.x, for example, users can disable image loading
from Tools > Options > Content.
2.2 Accessing iManager
Accessing iManager varies based on the iManager version (server-based or workstation) and the
platform on which iManager is running.
For information on installing iManager, see “Installing a New Version of iManager” in the iManager
2.7 Installation Guide.
2.2.1 Accessing Server-based iManager
To access server-based iManager:
1 Enter one of the following in the Address (URL) field of a supported Web browser.
Because iManager 2.7 uses only Tomcat 5/5.5 for its Web server requirements, on platforms
other than Novell Open Enterprise Server 2 (OES 2) you must specify the Tomcat port as part
of the iManager URL. The default URL to start iManager 2.7 is as follows:
Secure URL:
https://<server ip address>:8443/nps/iManager.html
iManager 2.7 on the OES 2 platform, both Linux and NetWare, use the following default
iManager URL:
Accessing iManager
13
Page 14

novdocx (en) 22 June 2009
Secure URL:
https://<server ip address>/nps/iManager.html
Although slightly different iManager URLs might work on some platforms, Novell
recommends using these URLs for consistency.
2 Log in using your username, password and treename.
2.2.2 Accessing iManager Workstation
To access iManager Workstation:
1 Execute the appropriate iManager Workstation startup script.
Linux: Navigate to the
imanager/bin
directory and execute
./iManager.sh
.
NOTE: If you plan to run iManager Workstation as a non-root user in the future, do not run
iManager as root the first time.
Windows: Execute
imanager\bin\iManager.bat
.
2 Log in by using your username, password, and treename.
2.3 Access Modes
When you start iManager, you are granted an access mode based on the rights you've been assigned.
iManager has three access modes. The mode you are in is displayed on the iManager home page.
Unrestricted Access: This is the default mode before RBS is configured. It displays all of the roles
and tasks installed. Although all roles and tasks are visible, the authenticated user still needs the
necessary rights to use the tasks.
There is a setting that you can add to the
config.xml
file which forces Unrestricted Access, even if
Role-Based Services is installed. To force Unrestricted Access for all users, add this setting to
TOMCAT_HOME\webapps\nps\WEB-INF\config.xml
<setting>
<name><![CDATA[RBS.forceUnrestricted]]></name>
<value><![CDATA[true]]></value>
</setting>
, then restart Tomcat:
For information about restarting Tomcat, see “Starting and Stopping Tomcat” on page 94.
NOTE: When using iManager in Unrestricted mode, you typically see the following message on the
iManager Home Page:
Notice: Some of the roles and tasks are not available.
Clicking View Details might display a
Not supported by current authenticators
message
for several of the tasks, even though the tasks work correctly. This message is misleading, and
iManager removes these messages after you configure RBS.
Assigned Access: Displays only the roles and tasks assigned to the authenticated user. This mode
takes full advantage of the Role-Based Services technology.
14 Novell iManager 2.7.3 Administration Guide
Page 15

Collection Owner: Displays all of the roles and tasks installed in the collection. If you are a
collection owner, though you are not assigned specific roles, it allows you to use all the roles and
tasks in the collection. Role-Based Services must be installed in order to use this mode. Adding a
group or user as a collection owner does not assign any RBS rights. To assign rights you must make
explicit RBS role assignments or make trustee assignments.
NOTE: When collection is assigned to a group, all the members of that group get the collection
ownership. The collection owner sees all roles and tasks, regardless of role membership.
2.4 Authenticating
Be aware of the following issues related to iManager authentication:
Section 2.4.1, “Tree Name Field,” on page 15
Section 2.4.2, “Logging in to a Server without a Replica,” on page 15
Section 2.4.3, “Unsuccessful Authentication,” on page 15
Section 2.4.4, “Expired Password Information,” on page 16
novdocx (en) 22 June 2009
Section 2.4.5, “Contextless Login Using Alternate Object Classes and/or Alternate Attributes,”
on page 16
NOTE: If your network has more than three servers, or one or more servers that do not host
eDirectory
information, see the Novell Open Enterprise Server SLP documentation (http://www.novell.com/
documentation/oes/networking-protocols.html#slp).
TM
replicas, you must have SLP properly configured for iManager to log in. For more
2.4.1 Tree Name Field
If eDirectory is installed and running on another port besides the default port 524, you can use the IP
address or DNS name of the eDirectory server to log in if you also specify the port (for example,
127.0.0.1: 1080). If you use the tree name to log in, you do not have to specify a port.
Possible values for the Tree Name field are the tree name, the server IP address, and the server DNS
name. For best results, use the IP address.
2.4.2 Logging in to a Server without a Replica
If necessary, iManager can log in to the eDirectory tree using a server that does not host an
eDirectory replica. To do this, iManager maintains a connection cache with the information it needs
to successfully log in. To populate the connection cache, the first time you login to an eDirectory
tree with iManager you must log in to a server that hosts a replica.
Restarting Tomcat or the iManager server clears the connection cache, so the first time iManager
logs in following one of these events, you must log in to a server that hosts a replica.
2.4.3 Unsuccessful Authentication
Login failures occur for a variety of reasons. Authentication error messages are addressed in
“Authentication Issues” on page 88.
Accessing iManager 15
Page 16

For information about limiting the error messages that iManager displays upon a failed
authentication attempt, see “Preventing Username Discovery” on page 111.
2.4.4 Expired Password Information
If a password expires, the user sees a message to this effect. However, users might not be aware that
grace logins can be quickly consumed, depending on certain operations such as modifying a
dynamic group, simple find, and setting a simple password.
These operations consume additional grace logins each time a user performs a task. We highly
recommend that you encourage users to change their passwords the first time they are prompted.
2.4.5 Contextless Login Using Alternate Object Classes and/or Alternate Attributes
To enable contextless authentication using an alternate object type, do the following:
1 Open iManager and browse to Configure > iManager Server > Configure iManager >
Authentication.
If you do not see this task, you are not an authorized user. See “Authorized Users and Groups”
on page 72.
novdocx (en) 22 June 2009
2 Set Public Username and Password to a user that has rights to read the desired attributes.
3 Modify
TOMCAT_HOME\webapps\nps\WEB-INF\config.xml
to include a
<Setting>
property that lists the attributes you want to add to the contextless search, and then restart
Tomc at.
For information about restarting Tomcat, see “Starting and Stopping Tomcat” on page 94.
For example, the following XML adds the Alias and User objects to the contextless search:
<setting>
<name><![CDATA[Authenticate.Form.ContextlessLoginClass.NDAP.treename]]></
name>
<value><![CDATA[User]]></value>
<value><![CDATA[Alias]]></value>
</setting>
Similarly, the following XML allows users to log in with the CN or uniqueID attribute:
<setting>
<name><![CDATA[Authenticate.Form.ContextlessLoginSearchAttributes.NDAP.treena
me]]></name>
<value><![CDATA[CN]]></value>
<value><![CDATA[uniqueID]]></value>
</setting>
IMPORTANT:
In the sample code above, replace treename with the name of the appropriate directory tree in
lower case.
If you save any iManager Server settings from the Configure iManager task after editing the
config.xml file, verify that the treename is still in lowercase or customized contextless login
will fail.
16 Novell iManager 2.7.3 Administration Guide
Page 17
3
Navigating the iManager Interface
This section describes how to navigate through the Novell® iManager 2.7 interface.
Section 3.1, “iManager Interface,” on page 17
Section 3.2, “Special Characters,” on page 20
3.1 iManager Interface
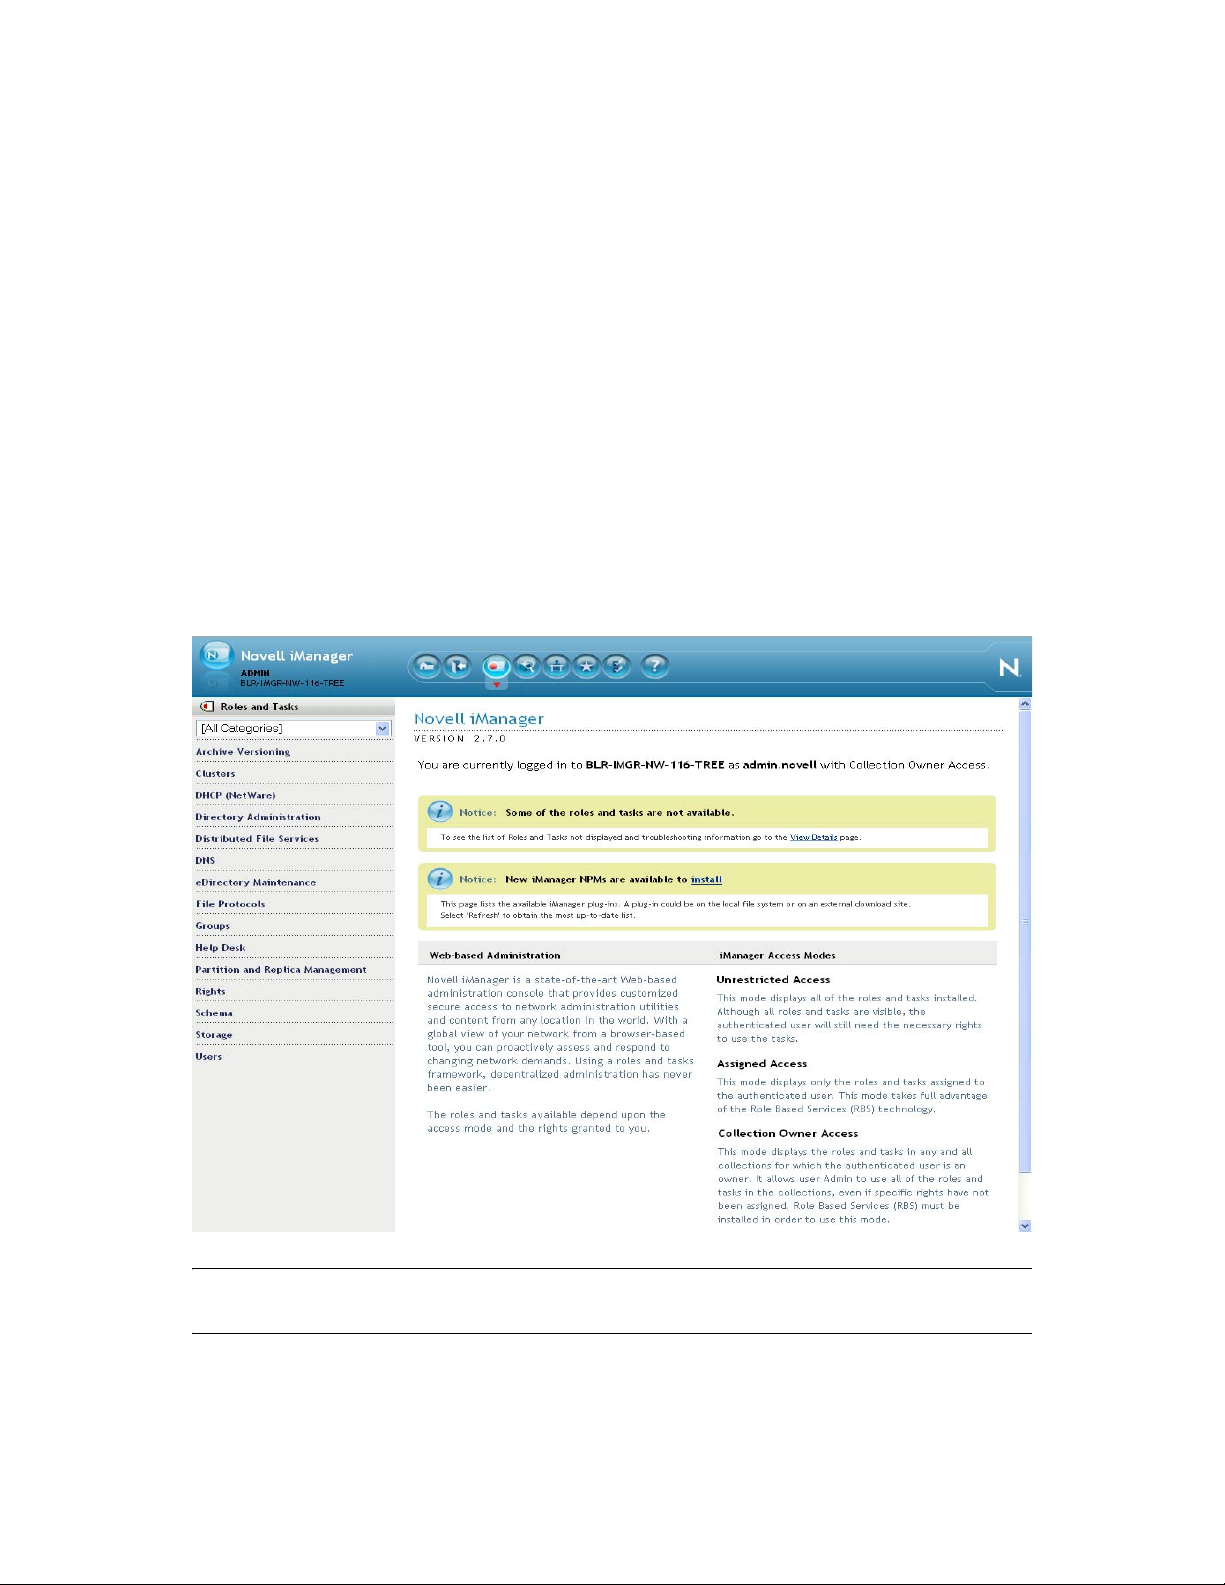
The iManager interface comprises three main regions, or frames.
Header Frame
Navigation Frame
Content Frame
Figure 3-1 iManager interface with default Roles and Tasks view
novdocx (en) 22 June 2009
3
NOTE: Use only the buttons within the interface when you are navigating in iManager. Do not use
the Web browser's navigation buttons (Back, Next, etc.)
To change the default view in Preferences, see “Set Initial View” on page 86.
Navigating the iManager Interface
17
Page 18
3.1.1 Header Frame
The Header frame is a largely static frame that occupies the top of the iManager interface. It
provides icons with which you can access iManager’s various views. A view is a combination of
Navigation and Content frames that deliver specific management functionality. For example, the
default Roles and Tasks view lets you select a given task in the Navigation frame, and then perform
the selected task in the Content frame.
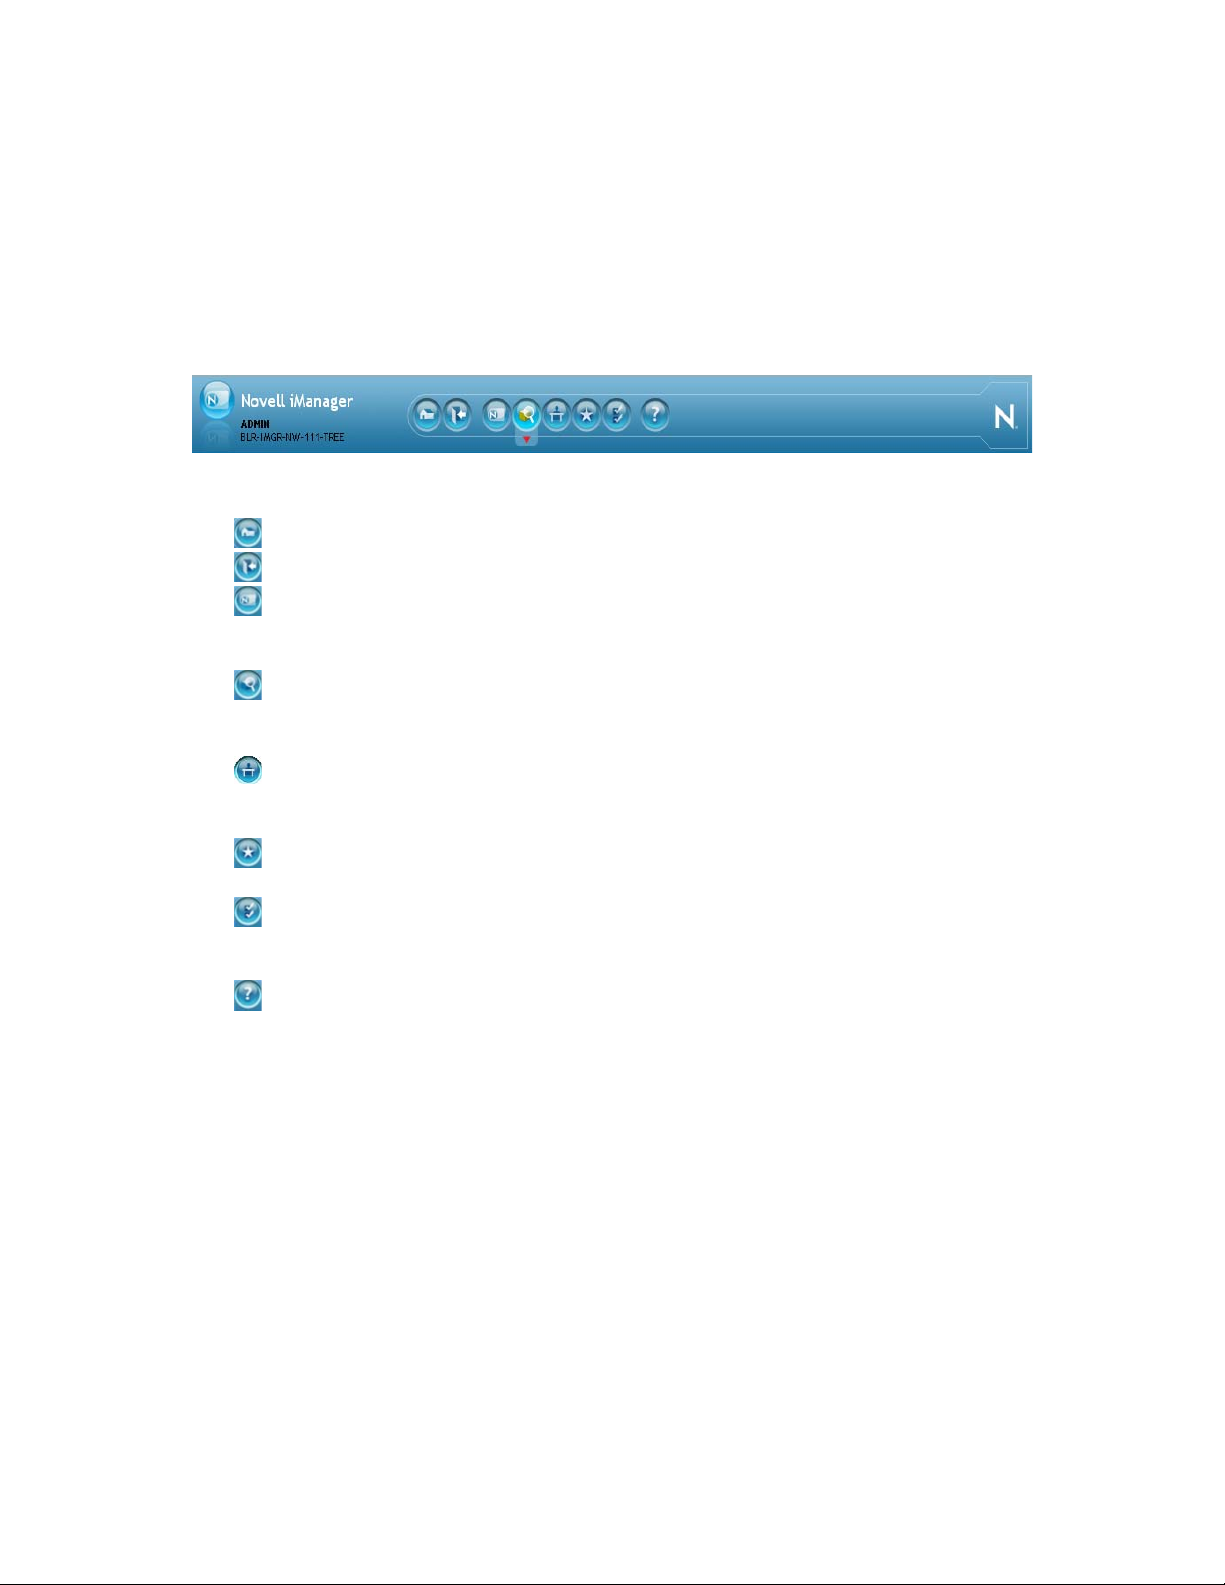
Figure 3-2 iManager Header frame
The iManager Header frame includes the following icons:
Home: Returns the Content frame to its default view (as in Figure 3-1).
Exit: Logs you out of eDirectory.
Roles and Tasks: This view displays all the tasks you are authorized to perform in the
Navigation frame. This is iManager’s default view. For more information, see Chapter 5,
“Roles and Tasks,” on page 33.
View Objects: This view contains browsing and searching functionality to find objects,
including a Tree View feature similar to that used in ConsoleOne
Chapter 4, “Browsing Objects,” on page 23.
Configure: This view contains Role-Based Services, iManager Server, Object Creation
List, Plug-in Installation, E-mail Notification, and Views, all of which you can configure as you
want.
Favorites: This view displays your most frequent tasks, selected from the Preferences >
Favorites page.
TM
. For more information, see
novdocx (en) 22 June 2009
Preferences: This view sets your preferences according to your most frequent tasks, how
the Object Selector displays, how your Object View displays, what view appears after logging
in to iManager, and what language iManager displays in.
Help: Displays applicable context-sensitive help information, as determined by the current
Content frame.
Additionally, the Header frame identifies the currently authenticated user and the treename to
iManager in the upper left.
For information on how to change iManager’s default view, see Chapter 6, “Configuring and
Customizing iManager,” on page 53.
3.1.2 Navigation Frame
The Navigation frame resides along the left side of the iManager UI. It displays task and
functionality options related to the currently selected view. For example, the default Roles and Tasks
view lists all the tasks your are authorized to perform. Tasks are organized into categories. The list of
categories and tasks varies based on the installed plug-ins and the rights granted to you as an
authenticated iManager user.
18 Novell iManager 2.7.3 Administration Guide
Page 19
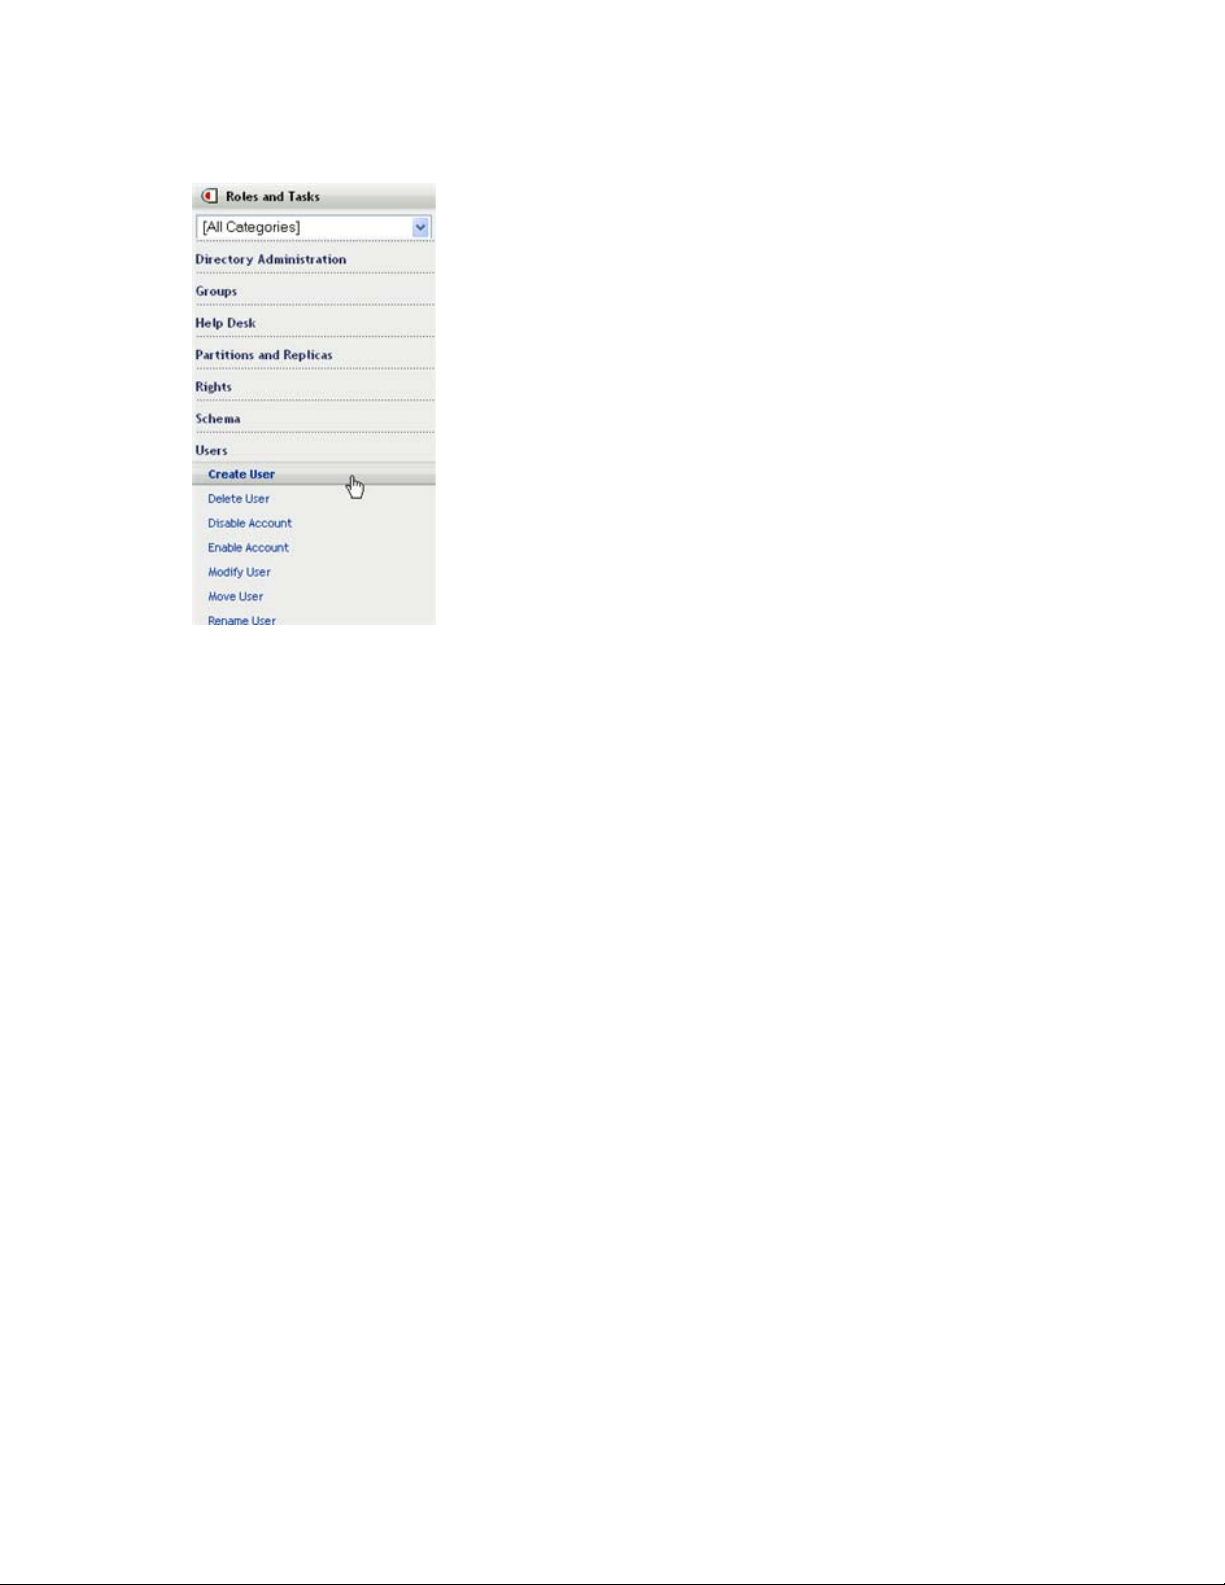
Figure 3-3 Contents of the Navigation frame when in the Roles and Tasks view
novdocx (en) 22 June 2009
The ordering of tasks within each category is determined by the author of the applicable iManager
plug-in. Base plug-in tasks (those that are included with iManager) typically display before tasks
from other plug-ins.
3.1.3 Content Frame
The Content frame provides the specific task or object interface, based on the current selection in the
Navigation frame.
Navigating the iManager Interface 19
Page 20
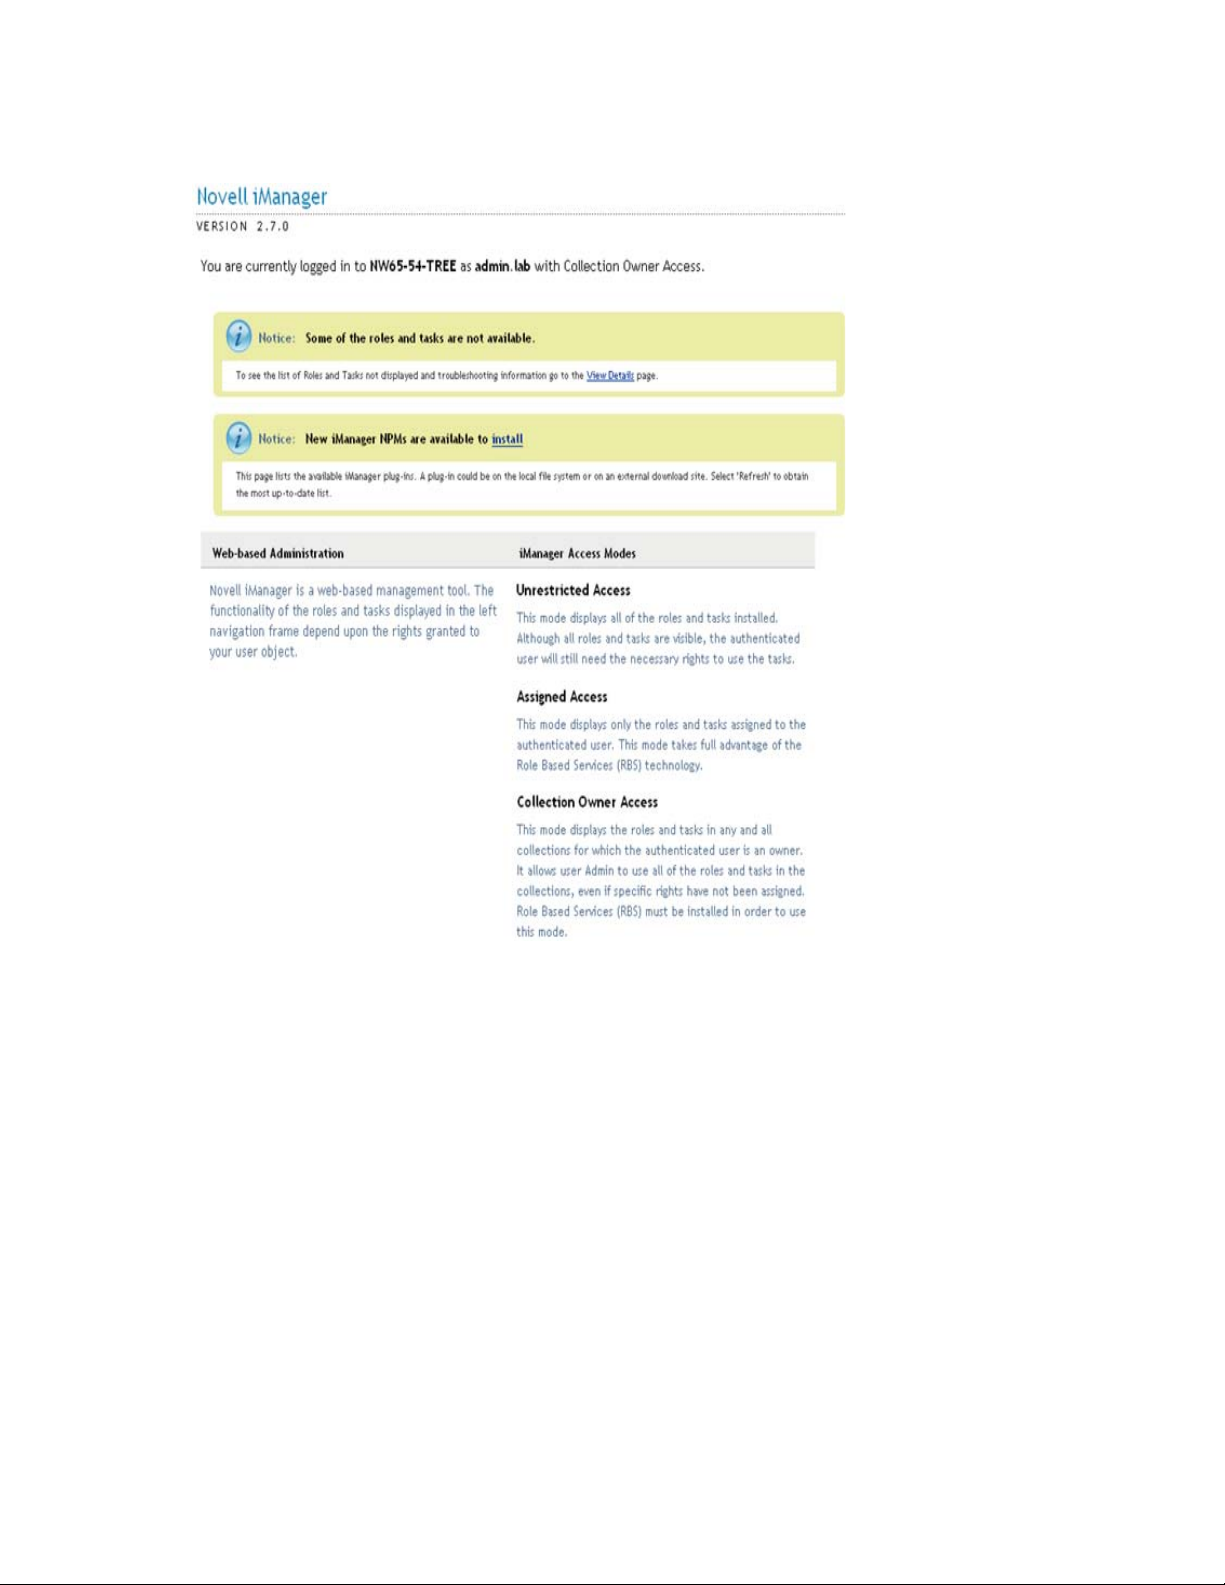
Figure 3-4 The default contents of the iManager Content view
novdocx (en) 22 June 2009
When a task is not selected, the Content frame displays the iManager homepage with general
information related to your iManager access rights.
3.2 Special Characters
In iManager, some characters have special significance and must be escaped with the backslash (\)
character:
NDAP (eDirectory):
Period (.)
Equal sign (=)
Plus sign (+)
Backslash (\)
LDAP:
DNs and = + \ @; < >
20 Novell iManager 2.7.3 Administration Guide
Page 21

Leading #
Leading or trailing spaces
For LDAP, any character can be specified with \xx. See RFC 2253 (http://www.faqs.org/rfcs/
rfc2253.html) for more information.
novdocx (en) 22 June 2009
Navigating the iManager Interface 21
Page 22

novdocx (en) 22 June 2009
22 Novell iManager 2.7.3 Administration Guide
Page 23

4
Browsing Objects
iManager lets you manipulate and manage directory objects. There are two paradigms for doing this.
First, you can browse for and select the objects with which you want to work, and then specify the
task you want to perform on those objects (object-then-task.) Second, you can select the task you
want to perform, and then specify the objects to which you want to apply the task (task-then-object.)
Either way of doing things is valid, and iManager lets you use the method with which you are most
comfortable.
iManager provides the Object View for those from the object-then-task school, and the Object
Selector for those from the task-then-object school. The Object Selector is used extensively in the
Roles and Tasks view. For more information, see Chapter 5, “Roles and Tasks,” on page 33.
This chapter includes the following sections:
Section 4.1, “Using the Object View,” on page 24
Section 4.2, “Using the Object Selector,” on page 29
novdocx (en) 22 June 2009
4
NOTE: iManager 2.7 now supports browsing and selecting objects in an NCP-enabled file system.
Access file system objects through Server and Volume objects in the directory tree.
The ability to browse and select file system objects is available from both the Object View and the
Object Selector. However, the actual tasks available for file system objects is provided by the NSS
iManager plug-in, which is available separately.
Regardless of the tool you are using, remember the following guidelines when specifying object
names:
If the following characters are part of a dotted eDirectory
(\). You don't need escape characters in most values, but you do need them when the name is a
distinguished name or relative distinguished name.
Period (.)
Equal sign (=)
Plus sign (+)
Backslash (\)
If the following characters are part of a name you want to specify in a search, escape them with
a backslash (\):
Asterisk (*)
Backslash (\)
®
name, escape them with a backslash
For example:
To search for all objects containing a period, use = *.* as the search filter
To search for all objects containing a plus, use = *+* as the search filter
To search for all objects containing a backslash, use = *\\* as the search filter
Browsing Objects
23
Page 24
4.1 Using the Object View
The Object view is designed to let you browse for and locate objects in the directory. Once you have
selected the objects with which you want to work, you can then specify the tasks to perform on those
objects. Open the Object view by selecting the View Objects icon in the Header frame.
The Object View includes the following tabs in the Navigation frame, each of which give you a
different way to browse for and locate directory objects:
Tree
Browse
Search
4.1.1 Tree
The Tree tab lets you browse a directory tree with a look and feel similar to ConsoleOneTM. Tree
view uses both the Navigation frame and the Content frame to provide its functionality.
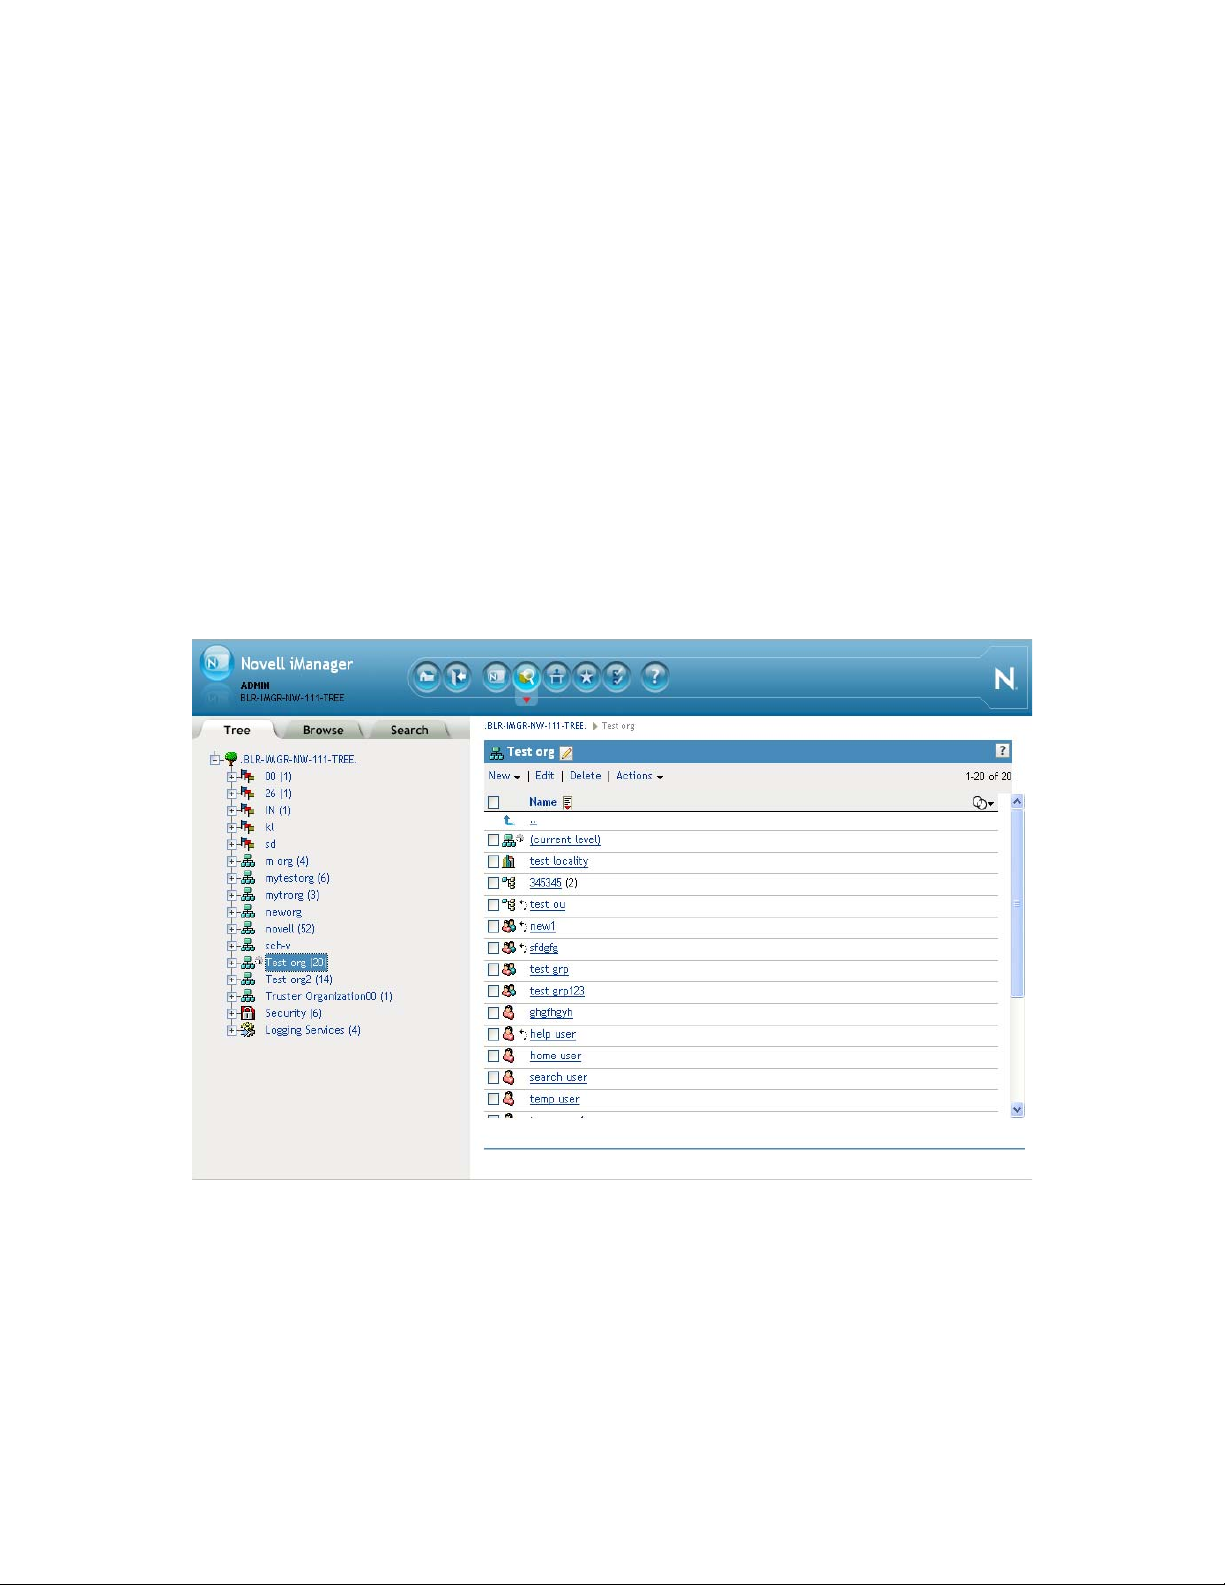
Figure 4-1 The Tree Tab in iManager’s Object View
novdocx (en) 22 June 2009
Tree View Navigation Frame
In the Tree view, the Navigation frame displays the directory structure in the familiar ConsoleOne
format. The Navigation frame displays Container, including Volume (file system), objects. Click on
the plus and minus icons to expand and collapse the container objects and browse the directory tree.
By default, Tree View displays up to 100 subordinate objects per container, but you can change this
setting in the Object View Preferences.
24 Novell iManager 2.7.3 Administration Guide
Page 25

Tree View Content Frame
Selecting one of the container objects in the Navigation frame causes the Content frame to display
all the objects in that container. The Content frame is where you actually manipulate directory
objects. The Content frame includes a header from which you can select from among several
available actions:
Bread Crumbs: At the very top of the Content frame, Tree view provides a bread crumb feature
that lets you navigate along the containers in the current context.
Title Bar: The Content frame’s title bar displays the name of the currently selected container object.
Click the Pencil icon to edit the properties of this container.
Object List Header: The object list header provides access to the following:
Menu Bar: The Content frame’s menu bar provides access to the object-related actions you can
perform. Options include the following:
New: Opens a dropdown menu of “create” tasks.
Edit: Opens the property book for the selected objects so you can modify their attributes.
Selecting multiple objects of the same type lets you set attributes for all the objects to the
same value.
novdocx (en) 22 June 2009
NOTE: You can also open a leaf object’s property book by selecting it in the object list.
Selecting a container object in the object list opens the selected container and displays all
that container’s subordinate. To edit the attributes of a container object, you must select its
checkbox, then click Edit.
Delete: Deletes the selected objects. To select an object to edit, select its checkbox in the
object list.
Actions: Opens a dropdown menu of supported tasks for the selected objects. To perform a
task, select it from the dropdown menu and provide the required information.
NOTE: If you have configured RBS, the Actions menu displays only those tasks in your
assigned roles.
Object Count: To the right of the menu bar, Tree view lists the number of objects in the current
page and the total number of objects in the selected container.
Select All: The checkbox in the header functions as a “select all” checkbox for the current page
of objects.
Sort: Directly above the Object list is a “Name” column heading and a sort icon . Click either
of these to toggle the object sort between ascending and descending alphabetical order.
Define Filter: At the far right of the header, under the object count, is the object filter icon .
Select this icon to create a filter that limits the objects displayed in the object list. You can filter
on object type and object name, as needed.
Select Show All Containers to display container objects in the Object List regardless of the
defined filter.
Select Advanced Filter to open the Advanced Filter dialog that lets you create a filter using
almost any object attribute. For more information, see “Advanced Selection” on page 34.
Browsing Objects 25
Page 26
NOTE: When a filter is active, the filter icon changes to a colored icon , and the filter
setting is listed next to the icon. If you configure an advanced filter, iManager displays a
checkmark icon next to the filter icon.
Object List: The Content frame’s object list displays all objects in the container currently selected
in the Navigation frame. By default, the object list displays 100 objects on a page, but you can
change this setting in the Object View Preferences.
To perform an action on an object, select its checkbox, then select the action from the Object List
header. Select the (current level) object to perform an action on the container in which you are
currently browsing.
Select the double-period object to navigate up one level to the parent container.
IMPORTANT: Tree view does not support selecting objects across multiple pages in the object list.
If you need to do this, use Object View’s Browse tab to perform the multiple object action. For more
information, see “Browse” on page 26.
novdocx (en) 22 June 2009
4.1.2 Browse
The Browse tab leverages a user interface and functionality similar to the Object Selector to provide
a directory browsing tool. For information on navigating the Browse user interface, see “Using the
Object Selector” on page 29.
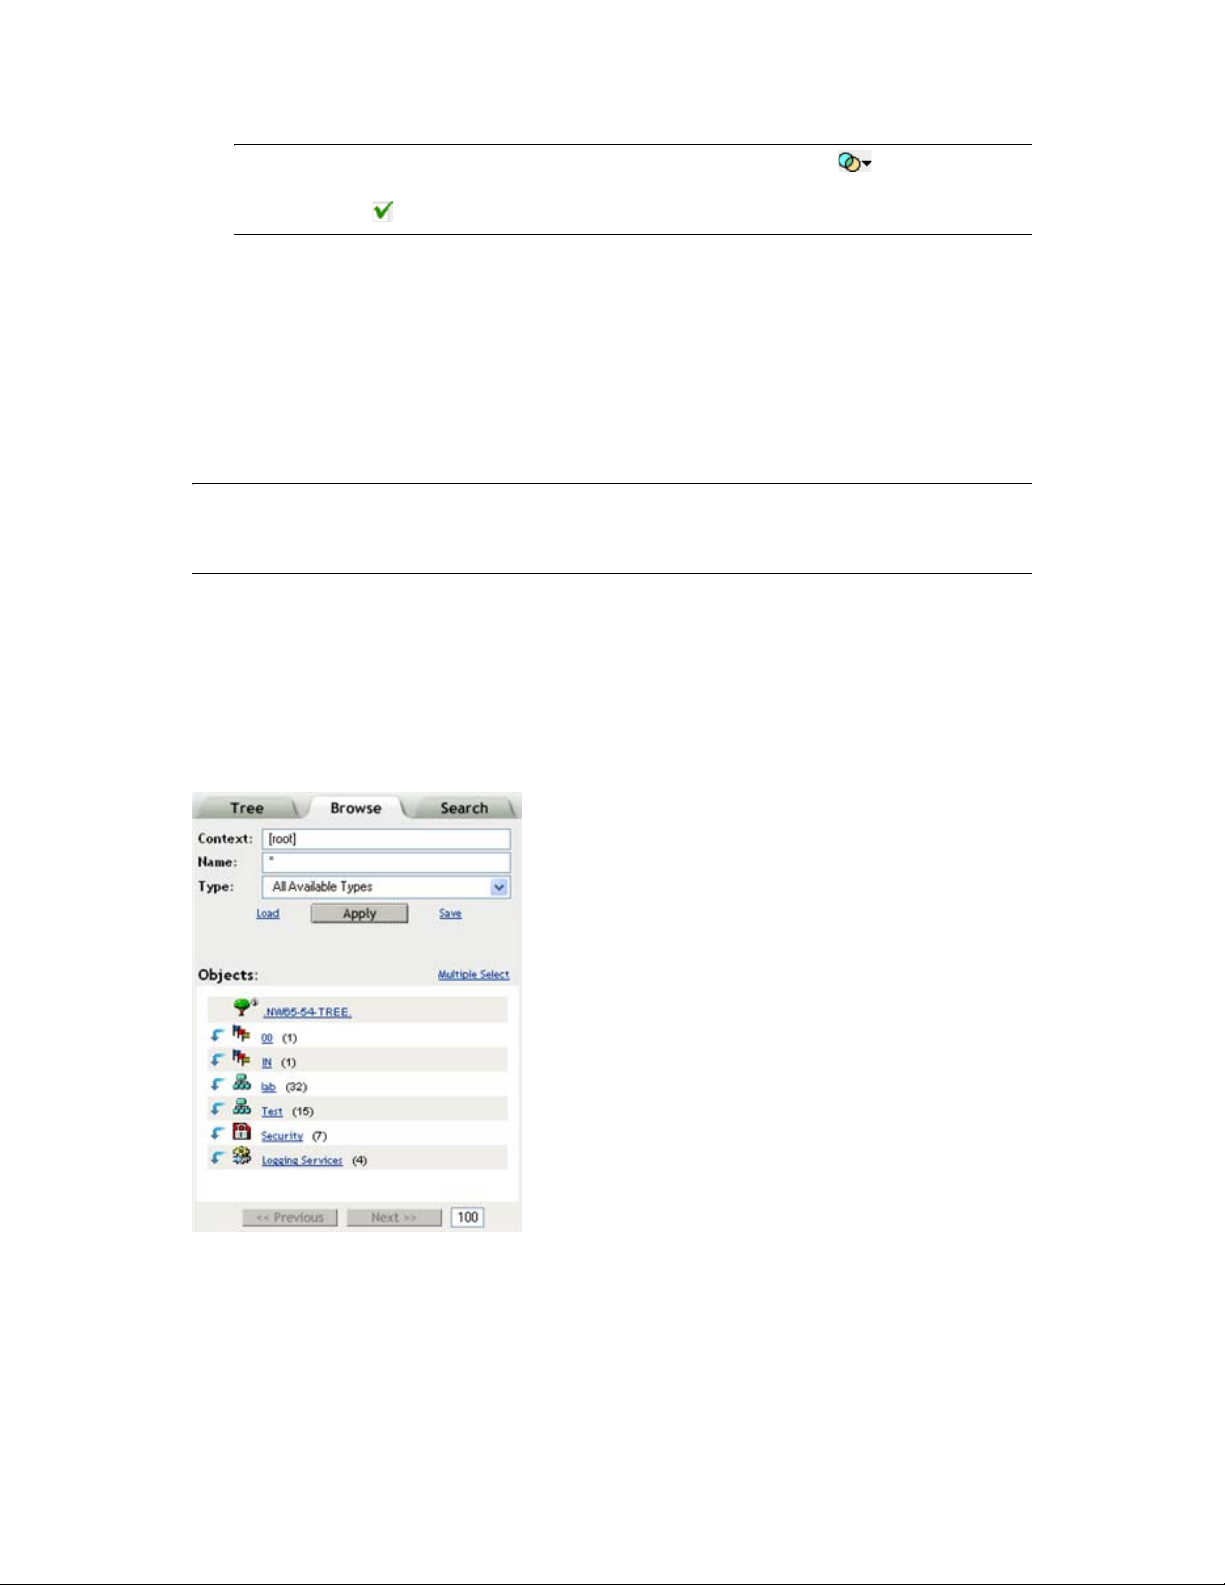
Figure 4-2 The Browse tab in iManager’s Object View
The Browse tab uses only the Navigation frame to provide its functionality. It includes the following
primary components:
Object Filter: Located at the top of the Navigation frame, the object filter lets you limit the objects
displayed in the object list. Once defined, click Apply to use the filter.
26 Novell iManager 2.7.3 Administration Guide
Page 27

IMPORTANT: The object filtering in the Browse tab only applies to directory objects. It does not
filter file system objects, even though they might be visible in the Browse tab.
The object filter uses the following fields:
Context: Displays only those objects in the specified context. This is identical to opening the
container from the object list.
Name: Displays only those objects that conform to the specified name filter. Use the asterisk
(*) wildcard to specify a partial name. For example: ldap*, *cert, *server*.
Type: Displays only those objects of the type specified.
NOTE: If you select a specific object type, a plus icon [+] appears that lets you open the
Advanced Selection tool, from which you can specify additional, attribute-level filter settings.
For more information, see “Advanced Selection” on page 34.
Load/Save: These two links let you load a previously defined filter definition and save the
current filter so it can be re-used, respectively.
Multiple Select / Single Select: Located above the right side of the object list, this link lets you
toggle between selecting a single object or multiple objects against which you want to perform a
task. The default option is Single Select. For more information, see “Selecting and Filtering
Objects” on page 33.
novdocx (en) 22 June 2009
Object List: Displays a list of directory objects, as defined by the criteria in the Object Filter. By
default, the object list displays 100 objects on a page, but you can change this value in the Object
View Preferences. Use the
Previous
and
Next
buttons to navigate between object pages. You can
navigate amongst the objects in the object list by doing the following:
Select the down arrow icon next to a container object to open that container and view its
objects in the object list.
Select the up arrow icon at the top of the object list to view the contents of the current
container’s parent. This moves you up one level in the directory tree.
Select an object, either container or leaf, to open a window with the available tasks for that type
of object. Selecting a task opens that tasks UI in the Content frame.
4.1.3 Search
The Search tab is similar to the Browse tab, but instead of displaying a tree structure in the
Navigation frame, it displays only those objects resulting from the specified search.
Browsing Objects 27
Page 28
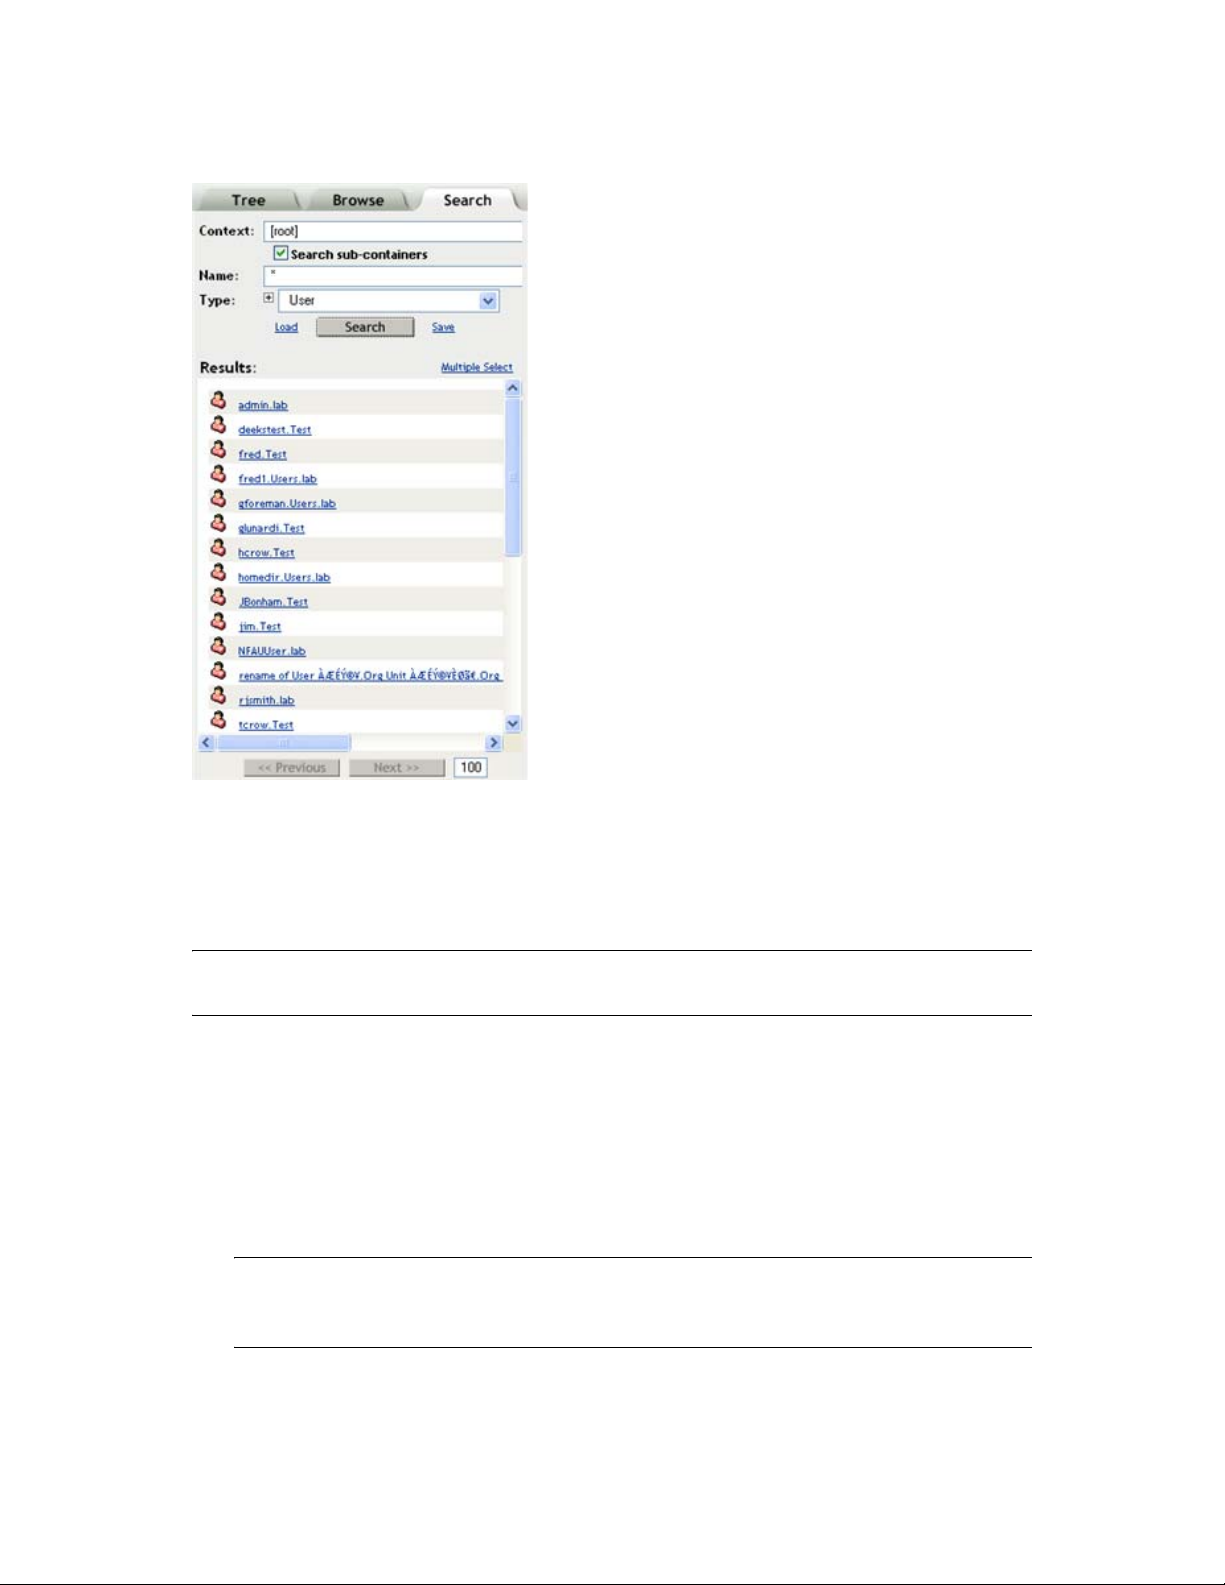
Figure 4-3 The Search tab in iManager’s Object view
novdocx (en) 22 June 2009
The Search tab uses only the Navigation frame to provide its functionality. It includes the following
primary components:
Object Search: Located at the top of the Navigation frame, the object search lets you define the
search criteria. Once defined, click Search to perform the specified search operation.
IMPORTANT: The object filtering in the Search tab only applies to directory objects. It does not
filter file system objects, even though they might be visible in the Search tab.
You can define your search using the following fields:
Context: Specifies the starting container for the search operation. If you want the search to
include subordinate containers, select Search sub-containers.
Name: Defines the object name filter for this search. Use the asterisk wildcard to specify a
partial name. For example: ldap*, *cert, *server*.
Type: Defines the object type filter for this search. iManager only displays objects of the
specified type.
NOTE: If you select a specific object type, a plus icon [+] appears that lets you open the
Advanced Selection tool, from which you can specify additional, attribute-level filter settings.
For more information, see “Advanced Selection” on page 34.
Load/Save: These links let you load a previously defined search definition and save the current
search so it can be re-used, respectively.
28 Novell iManager 2.7.3 Administration Guide
Page 29
Multiple Select / Single Select: Located above the right side of the results list, this link lets you
toggle between selecting a single object or multiple objects against which you want to perform a
task. The default option is Single Select. For more information, see “Selecting and Filtering
Objects” on page 33.
Results List: Displays the results of the search operation. By default, the object list displays 100
objects on a page, but you can change this value in the Object View Preferences. Use the
Next
and
open a window with the available tasks for that type of object. Selecting a task opens that tasks UI in
the Content frame.
NOTE: The Search tab does not let you navigate objects, such as opening container objects, in the
results list. If you want to be able to do this, use the Tree tab or the Browse tab.
buttons to navigate between results pages. Select an object, either container or leaf, to
Previous
4.2 Using the Object Selector
The Object Selector lets you select the objects with which you want to work in the current task.
iManager provides this tool in any situation where you are selecting a task or action before
specifying the objects to which the task or action is applied.
novdocx (en) 22 June 2009
Access the Object Selector by selecting the magnifying glass icon anywhere it appears in the
Content frame. The Object Selector opens in its own window on top of iManager.
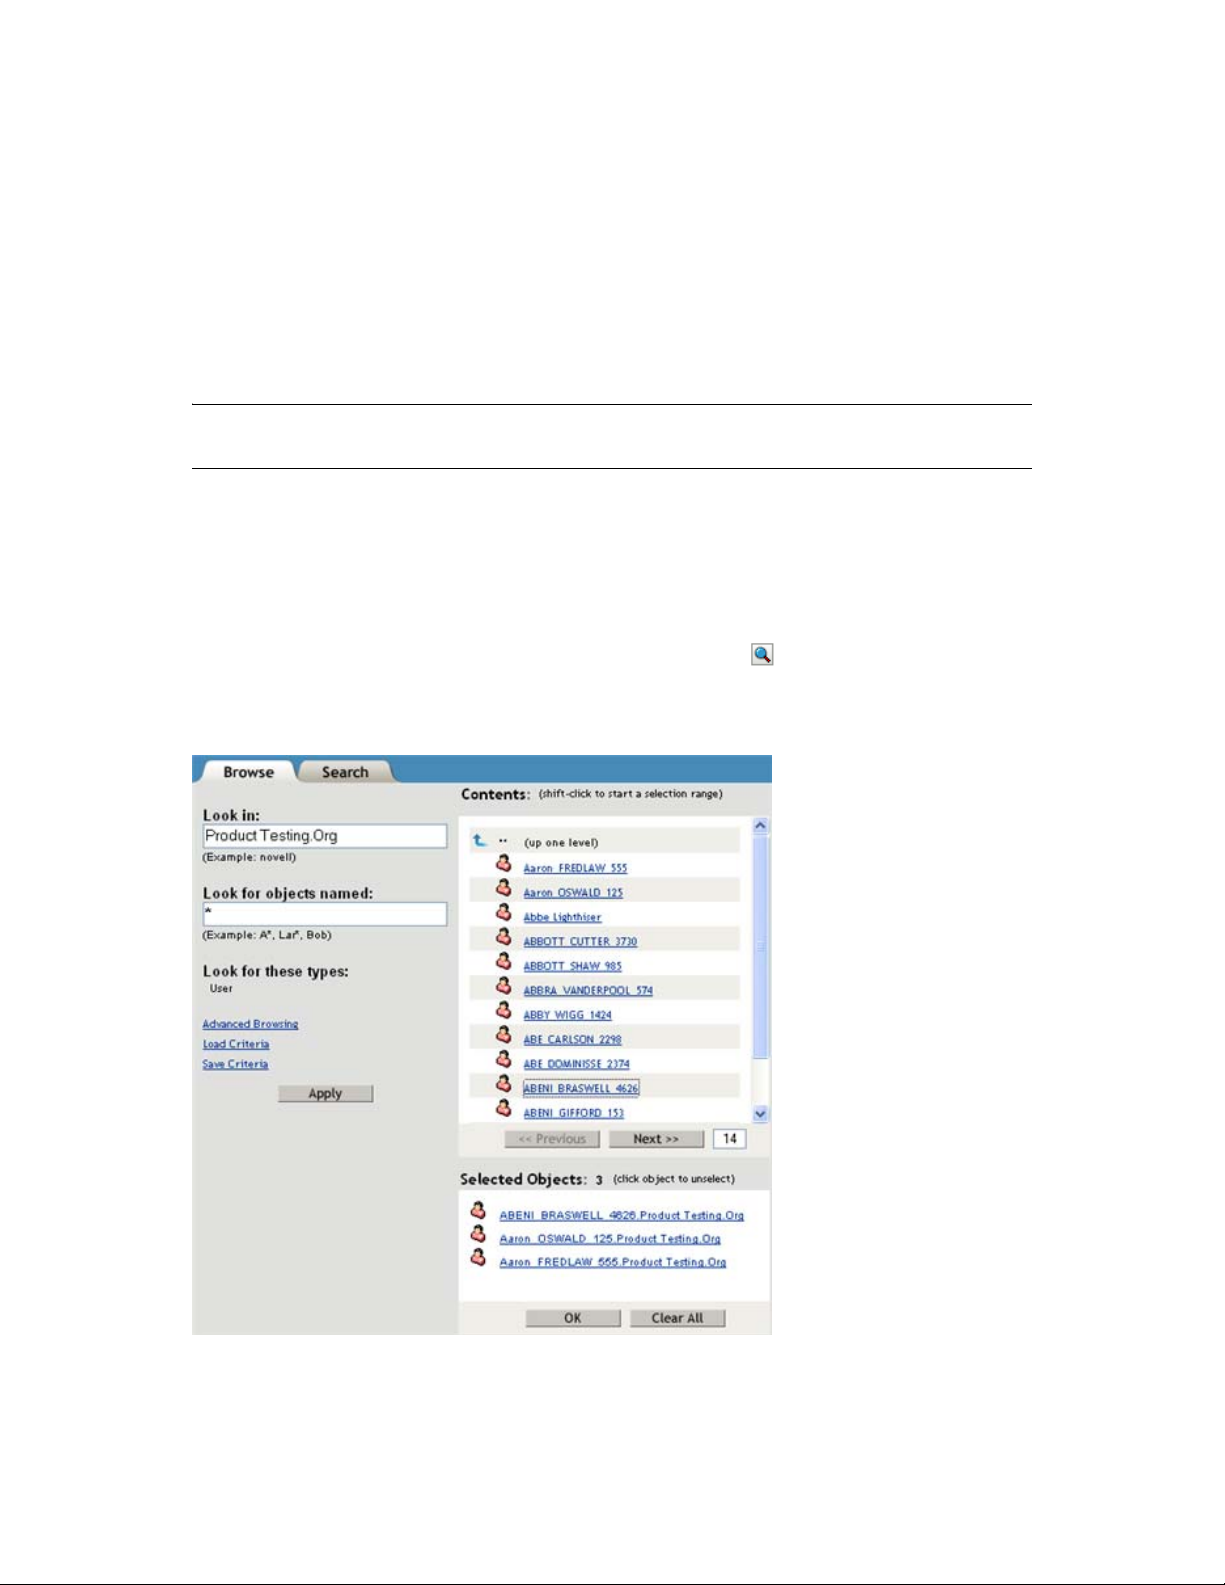
Figure 4-4 iManager’s Object Selector
Browsing Objects 29
Page 30

Object Selector includes two tabs for locating target objects for the tasks you want to perform:
Section 4.2.1, “Browse,” on page 30
Section 4.2.2, “Search,” on page 30
4.2.1 Browse
The Browse tab (default) lets you navigate the directory tree to search for the desired objects. It
includes the following primary components:
Object Filter: Located on the left side of the Object Selector, the object filter lets you limit the
objects displayed in the Contents list. Once defined, click Apply to use the filter. The object filter
uses the following fields:
Look in: Displays only those objects in the specified context. This is identical to opening the
container from the Contents list.
Look for objects named: Displays only those objects that conform to the specified name filter.
Use the asterisk (*) wildcard to specify a partial name. For example: ldap*, *cert, *server*.
Advanced Browsing: This link opens the Advanced Selection tool, from which you can specify
additional, attribute-level filter settings. For more information, see “Advanced Selection” on
page 34.
Load Criteria/Save Criteria: These two links let you load a previously defined filter definition
and save the current filter so it can be re-used, respectively.
novdocx (en) 22 June 2009
Contents List: Displays a list of directory objects, as defined by the criteria in the object filter. By
default, the object list displays 100 objects on a page, but you can change this number, if desired.
Use the
Previous
and
Next
buttons to navigate between object pages. You can navigate amongst
the objects in the Contents list by doing the following:
Select the down arrow icon next to a container object to open that container and view its
objects in the Contents list.
Select the up arrow icon at the top of the object list to view the contents of the current
container’s parent. This moves you up one level in the directory tree.
Selecting an object causes iManager to identify that object as one on which you want to
perform the current task.
Selected Objects: This component only appears when you are selecting multiple objects for the
current task. The Selected Objects field lists the objects currently selected for the task. Click OK
when the list is complete. Click Clear All if you want to empty the selected objects list and start
over.
For more information about selecting single or multiple objects for a task, see “Selecting and
Filtering Objects” on page 33.
4.2.2 Search
The Search tab lets you specify a search operation to perform on the directory tree and display the
results. It includes the following primary components:
30 Novell iManager 2.7.3 Administration Guide
Page 31

Object Search: Located on the left side of the Object Selector, the object search lets you define the
search criteria. Once defined, click Search to perform the specified search operation. You can define
your search using the following fields:
Start search in: Specifies the starting container for the search operation. If you want the search
to include subordinate containers, select
Search for objects named: Defines the object name filter for this search. Use the asterisk
Search sub-containers
.
wildcard to specify a partial name. For example: ldap*, *cert, *server*.
Advanced Browsing: This link opens the Advanced Selection tool, from which you can specify
additional, attribute-level search settings. For more information, see “Advanced Selection” on
page 34.
Load Criteria/Save Criteria: These two links let you load a previously defined search definition
and save the current filter so it can be re-used, respectively.
Multiple Select / Single Select: Located above the right side of the results list, this link lets you
toggle between selecting a single object or multiple objects against which you want to perform a
task. The default option is Single Select. For more information, see “Selecting and Filtering
Objects” on page 33.
novdocx (en) 22 June 2009
Results List: Displays the results of the search operation. By default, the results list displays 100
objects on a page, but you can change this number, if desired. Use the
Previous
and
Next
buttons
to navigate between results pages.
NOTE: The Search tab does not let you navigate objects, such as opening container objects, in the
results list. If you want to be able to do this, use Object Selector’s Browse tab.
Selected Objects: This component only appears when you are selecting multiple objects for the
current task. The Selected Objects field lists the objects currently selected for the task. Click OK
when the list is complete. Click Clear All if you want to empty the selected objects list and start
over.
For more information about selecting single or multiple objects for a task, see “Selecting and
Filtering Objects” on page 33.
Browsing Objects 31
Page 32

novdocx (en) 22 June 2009
32 Novell iManager 2.7.3 Administration Guide
Page 33

5
Roles and Tasks
Selecting the Roles and Tasks view in the Header frame displays all of iManager’s available roles
and tasks in the Navigation frame. iManager groups related roles and tasks into categories.
However, you can create custom category groups and assign roles and tasks to them. For more
information, see “The Category Tab” on page 64.
This section includes the following topics:
Section 5.1, “Navigating Roles and Tasks,” on page 33
Section 5.2, “Directory Administration,” on page 37
Section 5.3, “Groups,” on page 39
Section 5.4, “Help Desk,” on page 41
Section 5.5, “Partitions and Replicas,” on page 42
Section 5.6, “Rights,” on page 44
Section 5.7, “Schema,” on page 46
Section 5.8, “Users,” on page 49
novdocx (en) 22 June 2009
5
The first section in this chapter introduces Roles and Tasks navigation. The remaining sections
provide a detailed description of the tasks available in iManager’s core set of roles and tasks. For
information about the roles and tasks provided by a product-specific plug-in, consult that product’s
documentation.
In addition to the Roles and Tasks view, you can configure iManager’s Favorites view to display
your most frequently used tasks. For more information, see “Manage Favorites” on page 85.
5.1 Navigating Roles and Tasks
Navigating iManager’s tasks is a straight-forward process that includes the following general steps:
1 (Navigation frame) Open the category that contains the desired task.
2 (Navigation frame) Select the desired task from the category’s list of tasks.
3 (Content frame) Provide the necessary information to complete the task. When applicable, this
includes specifying those objects to which the task is applied.
For information about selecting objects to which the task will apply, see “Selecting and
Filtering Objects” on page 33.
4 (Content frame) Click OK to perform the task.
5.1.1 Selecting and Filtering Objects
For those tasks that can be applied to more than one object at a time (for example, Modify User),
iManager provides options, selectable in the Content frame, for locating the desired objects.
Roles and Tasks
33
Page 34
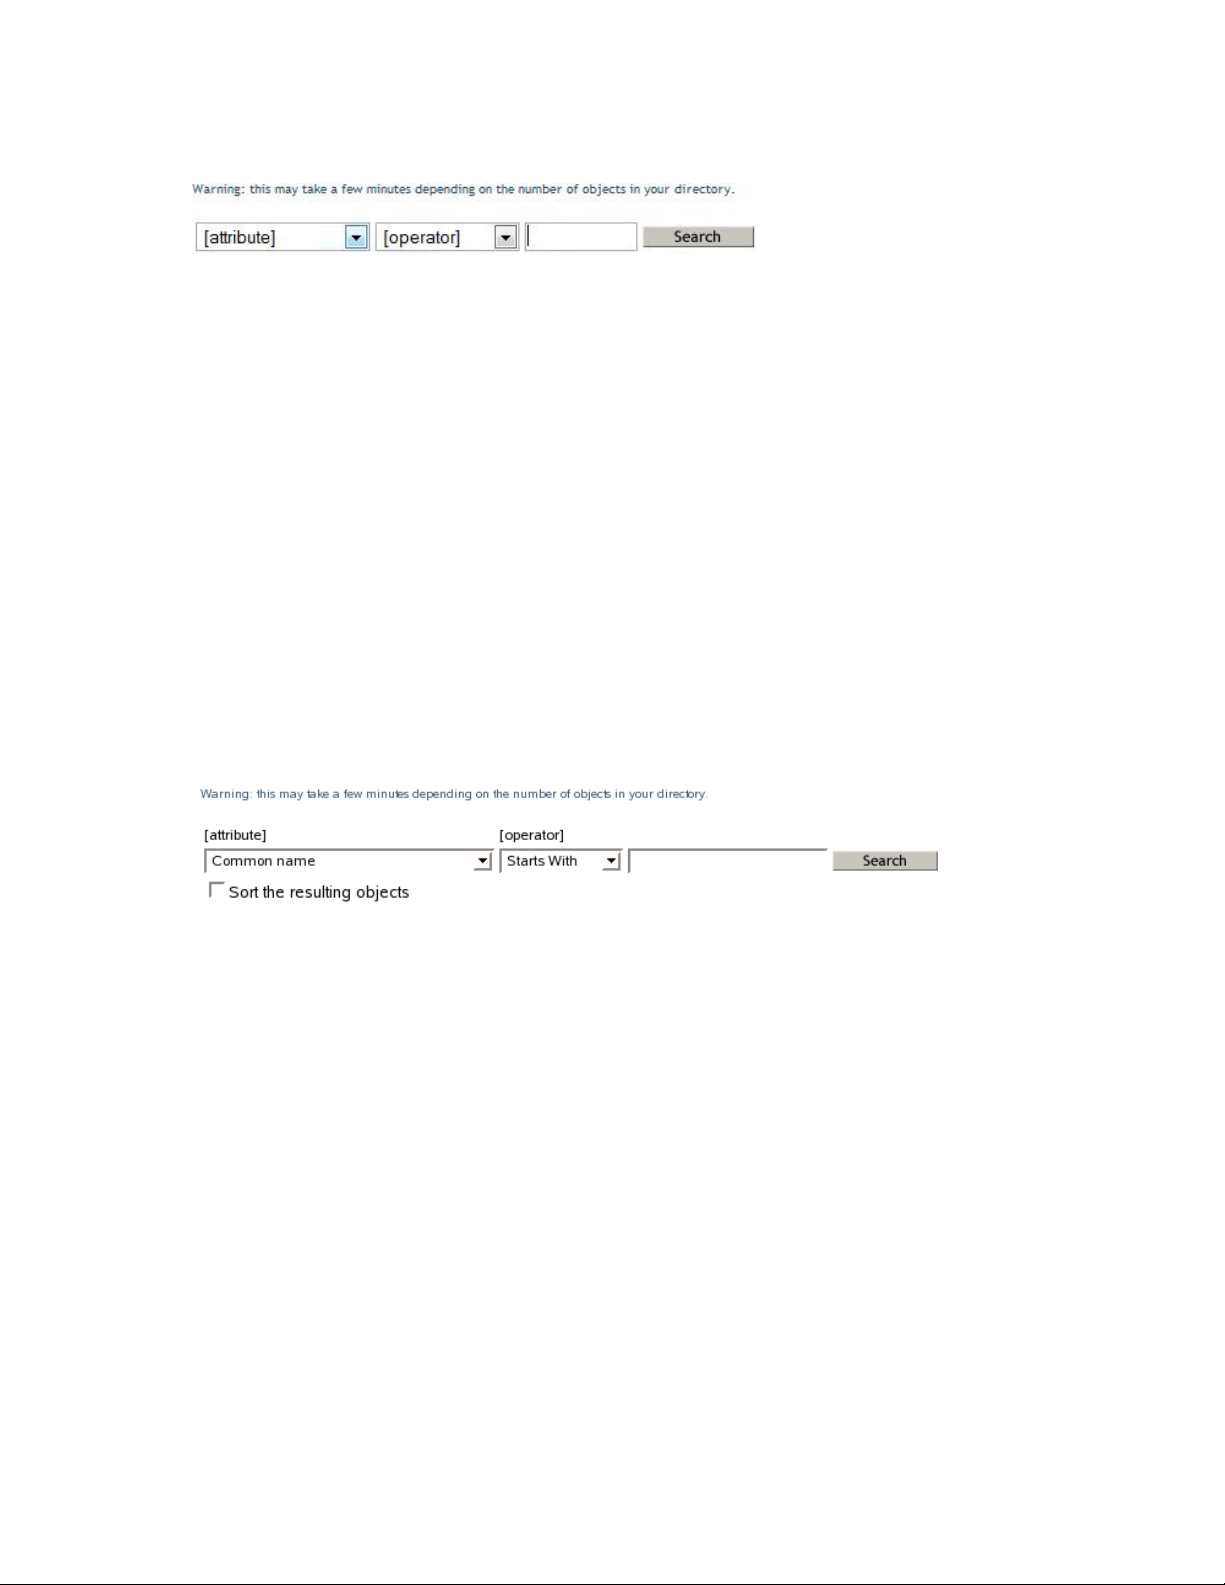
Figure 5-1 Object selection options in a task
Select a Single Object
This is the default object selection method. Select a Single Object lets you specify a single object to
which the task is applied. When using the Object Selector to locate the object, selecting an object
automatically closes the Object Selector and inserts the selected object in the task’s object name
field. For more information about the Object Selector, see “Using the Object Selector” on page 29.
Select Multiple Objects
Select Multiple Objects modifies the tasks object name field to accept a list of objects instead of
only one object. The Object Selector also runs in “multiple object” mode so that you can select more
than one object at a time. For more information about the Object Selector, see “Using the Object
Selector” on page 29.
novdocx (en) 22 June 2009
Simple Selection
Simple Selection opens a basic search tool in the Content frame. With this tool, you can search for
objects in the directory tree based on a specified property value.
Figure 5-2 Basic object filter in a task
The attribute list has a list of attributes on which you can perform the Search operation.
The operator list has a list of various operators to be used for the Search operation.
If you want the objects, which result after performing the search operation, to be sorted, select Sort
the resulting objects.
Simple Selection includes the following limitations:
Searches the entire directory tree
Does not support wildcards in the search criteria
Supports only “starts with” and “equals” filters for property values
Advanced Selection
Advanced Selection provides a more configurable environment for searching the directory for the
desired objects.
34 Novell iManager 2.7.3 Administration Guide
Page 35
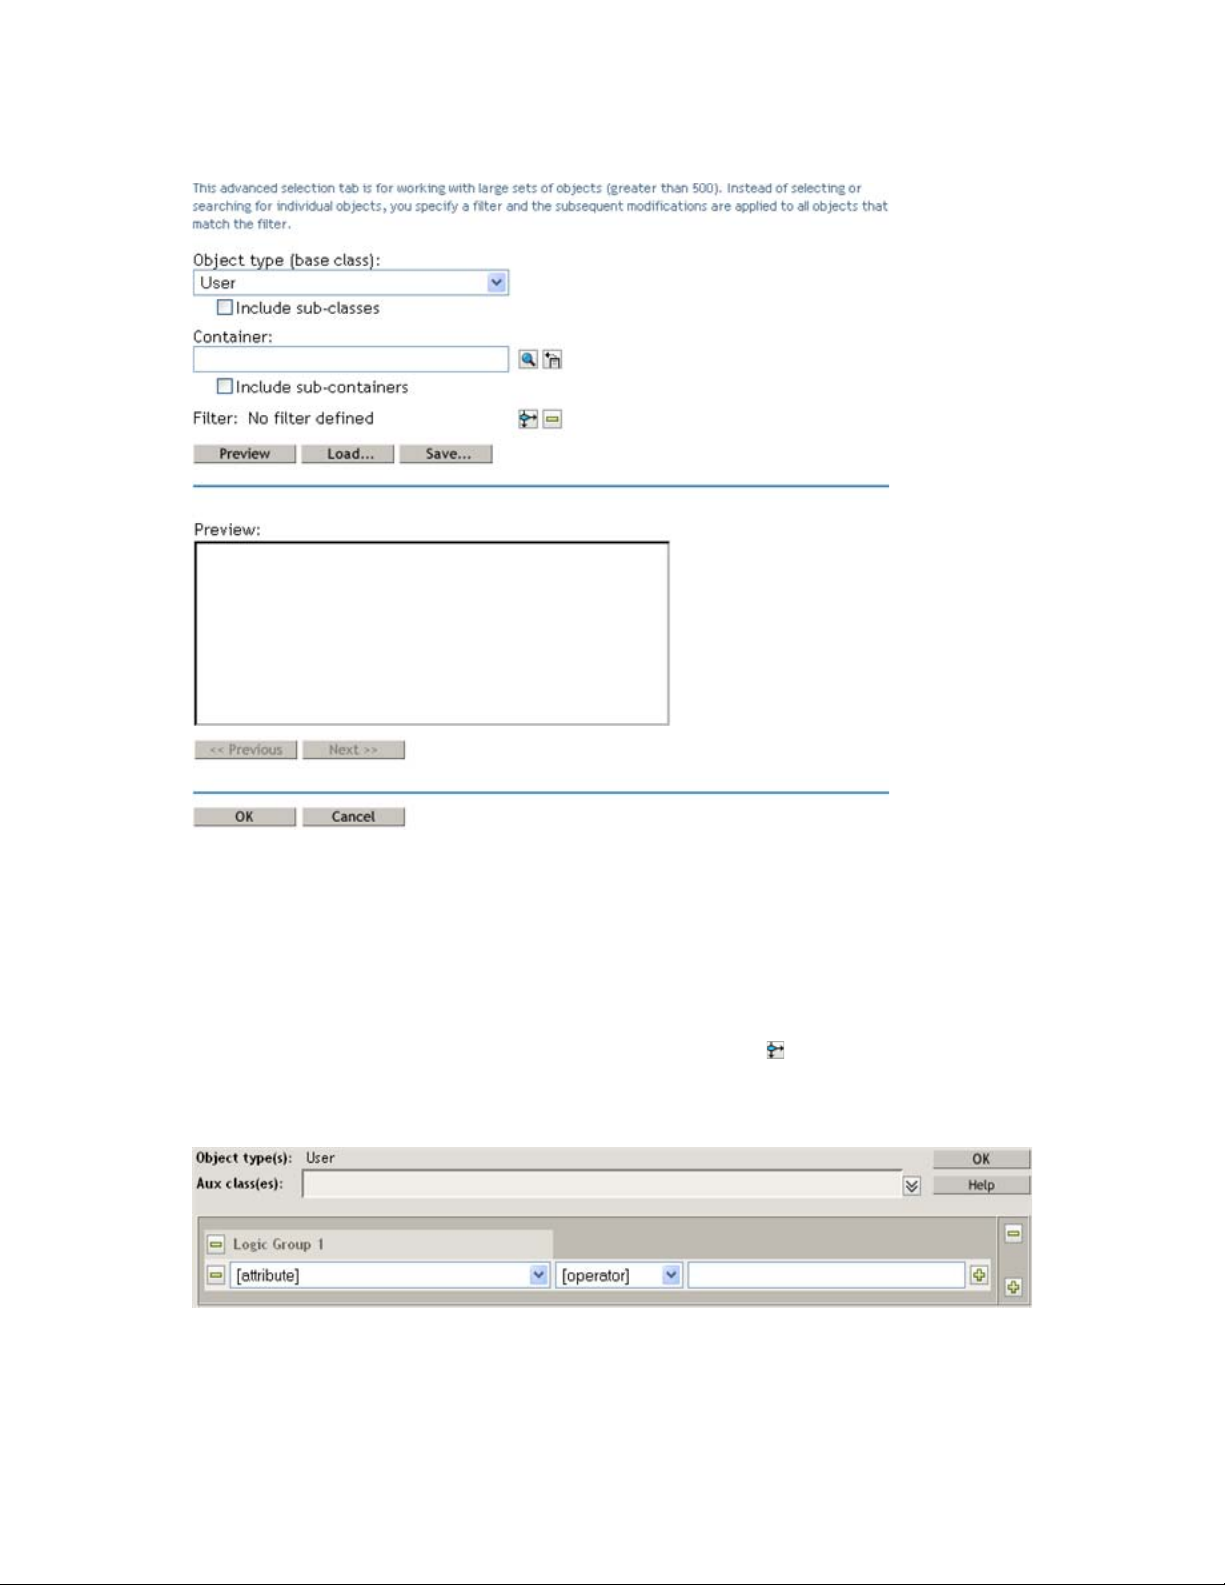
Figure 5-3 iManager’s Advanced Selection Interface
novdocx (en) 22 June 2009
Advanced Selection gives you more granular control over the object filter used during the search
operation. You can configure advanced selection options using the following fields:
Object Type: Specifies the object base class for which you are searching. For example, User.
Container: Specifies the container at which you want to start the search. To search subordinate
containers, select Include sub-containers.
Filter: Specifies a filter to apply to the search. Select the Filter icon to open a separate window
from which you can define the filter. Click OK when the filter is done.
Figure 5-4 iManager’s Advanced Filter dialog
The Filter interface includes the following fields:
Aux Classes: Specifies an Auxiliary Class to include in the search.
Roles and Tasks 35
Page 36
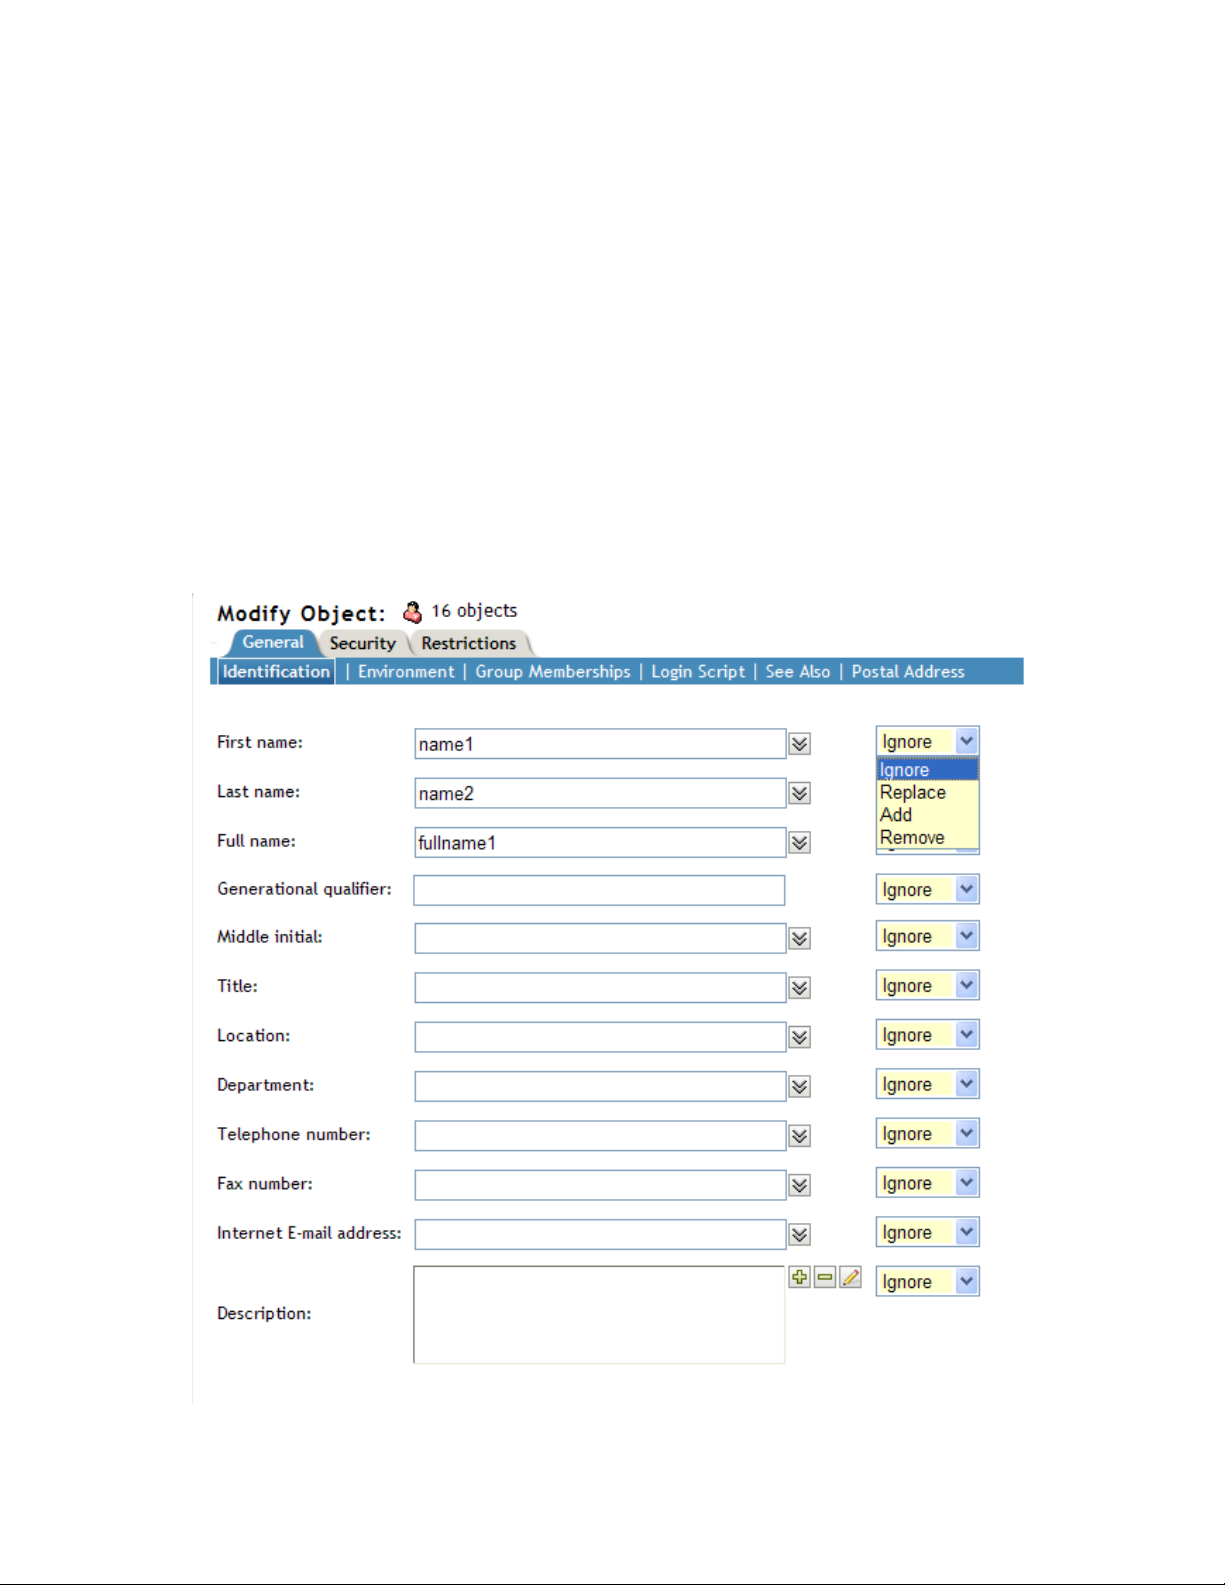
Attribute: Specifies an attribute (property) that you want to utilize as part of the filter.
Operator: Specifies the logical operator to apply to the filter. Options include
Va lu e: Specifies the attribute value you are using as a filter. You can use the asterisk (*) as a
wildcard to indicate part of a value. For example, smi*, *th, and *mit*.
Additionally, you can chain multiple attribute filters together into a filter group by using the + icon
to add a second attribute to the list. When using multiple attribute filters, link them together with a
logical AND or logical OR.
After you define a filer, click Preview, and click OK, the Modify Object screen is displayed. It
displays the attributes defined for the objects in the container. The common attribute values are
listed. For example, as per Figure 5-5 the First name, Last name, and Full name attributes have
common value (s) for all the objects in the specified container. The attributes whose fields are empty
indicate that those attributes doesnot hold a common value for all the objects. You can add values to
these attributes, as well.
Figure 5-5 The Modify Object Screen
novdocx (en) 22 June 2009
36 Novell iManager 2.7.3 Administration Guide
Page 37

You can do the following tasks to the attributes and all the objects in the container are updated:
Ignore: Is used not to update any changes to the objects.
Replace: Is used to replace an existing attribute value in the list. To replace, double-click the value,
make the changes, and press Enter. Then, click Replace.
Add: Is used to add values to an attribute. You can add more than one value to an attribute. For
example, you have more than one First Names for all the objects.
Remove: Is used to remove attribute values. To remove an attribute value (s):
1 If the attribute has more than one values, you must first hide the values that you do not want to
remove by pressing the Delete key on your keyboard. This is done because the Remove option
removes all the values listed. So, you must first hide the values that need not be removed.
Only the values that have to be deleted are displayed in the attribute list.
2 Click Remove from the drop-down list.
The specified values are deleted and the values that you hide are displayed in the list.
novdocx (en) 22 June 2009
5.2 Directory Administration
Directory administration involves the management of objects in your directory tree. You can create,
edit, and organize objects.
Section 5.2.1, “Copying an Object,” on page 37
Section 5.2.2, “Creating an Object,” on page 38
Section 5.2.3, “Deleting an Object,” on page 38
Section 5.2.4, “Modifying an Object,” on page 38
Section 5.2.5, “Moving an Object,” on page 39
Section 5.2.6, “Renaming an Object,” on page 39
For more information about eDirectoryTM objects, see the eDirectory Administration guide (http://
www.novell.com/documentation/edir88/index.html?page=/documentation/edir88/edir88/data/
fbabihje.html#fbabihje).
5.2.1 Copying an Object
You can either create a new object with the same attribute values as an existing object, or copy
attribute values from one object to another.
1 In Roles and Tasks, click Directory Administration > Copy Object.
2 In the Object to Copy From field, type the name and context of the object or use the Object
Selector to find it.
3 Select one of the following options:
Create New Object and Copy Attribute Values
Copy Attribute Values to an Existing Object
The attributes whose class is not extended by the copied object, are not copied.
Roles and Tasks 37
Page 38

4 Select Copy ACL Rights if you want to copy access control list (ACL) rights to this object.
This step might take additional processing time, depending on your system and networking
environment.
NOTE: The copy object operation does not copy the following object attributes:
ACL (unless you select Copy ACL Rights)
CN
DirXML-Associations
Equivalent To Me
Group Membership
Member
Security Equals
Any naming attribute
Any Read Only attribute
Any RBS attribute
novdocx (en) 22 June 2009
5.2.2 Creating an Object
1 In Roles and Tasks, click Directory Administration > Create Object.
2 Select the object class from the list that appears, then click OK.
3 Specify the requested information that appears according to the object class you selected, then
click OK.
If you are using a Mozilla browser, click the + symbol to add information instead of typing
directly in the field.
4 When the confirmation message appears, click OK, Repeat Task, or Modify.
5.2.3 Deleting an Object
1 In Roles and Tasks, click Directory Administration > Delete Object.
2 Type the name and context of the object, or use the Object Selector to find it, and click OK.
A confirmation message appears indicating the object was successfully deleted.
5.2.4 Modifying an Object
1 In Roles and Tasks, click Directory Administration > Modify Object.
2 Type the name and context of the object or use the Object Selector to find it, then click OK.
The Modify Object page displays pages with the selected object’s attributes.
3 Modify the object as desired, then click OK.
If you are using a Mozilla browser, click the + symbol to add information instead of typing
directly in the field.
38 Novell iManager 2.7.3 Administration Guide
Page 39

5.2.5 Moving an Object
1 In Roles and Tasks, select Directory Administration > Move Object.
Type the name and context of the object or use the Object Selector to find it, then click OK.
2 In the Move To field, select the container to which you want to move the object.
3 Select Create an Alias in Place of Moved Object to create an alias in an old location for each
object being moved.
4 Click OK.
A confirmation message appears indicating the move object operation was successful.
5.2.6 Renaming an Object
1 In Roles and Tasks, select Directory Administration > Rename Object.
2 Type the name and context of the object or use the search feature to find it.
Type only the name of the new object; do not include a context.
3 Select to save the old name, if you want to save it.
This saves the old name as an additional unofficial value of the Name property. Saving the old
name lets users search for the object based on that name. After renaming the object, you can
view the old name in the Other Name field on the object’s General Identification tab.
4 Select Create an Alias in Place of Renamed Object, if you want to create an alias for the object
being named.
novdocx (en) 22 June 2009
This allows any operations that are dependent on the old object name to continue uninterrupted
until you can update those operations to use the new object name.
5 Click OK.
A confirmation message appears indicating that the object renaming operation was successful.
5.3 Groups
Any user who creates a group automatically becomes the owner of the group. Available group
operations include the following:
Section 5.3.1, “Creating a Group,” on page 40
Section 5.3.2, “Deleting a Group,” on page 40
Section 5.3.3, “Modifying a Group,” on page 40
Section 5.3.4, “Modifying Members of Group,” on page 41
Section 5.3.5, “Move Group,” on page 41
Section 5.3.6, “Rename Group,” on page 41
Section 5.3.7, “Viewing My Groups,” on page 41
For more information about using and configuring Group objects, see the eDirectory Administration
guide (http://www.novell.com/documentation/edir88/index.html?page=/documentation/edir88/
edir88/data/fbabihje.html#fbacjdfg).
Roles and Tasks 39
Page 40

5.3.1 Creating a Group
1 In Roles and Tasks, select Groups > Create Group.
2 In the Create Group page, provide the required information, then click OK.
Select Dynamic Group to make the new group a dynamic group, of the class dynamicGroup.
Otherwise, the group is created as a static group, or the class Group.
Select Set Owner to make the creator of a group object the group owner. The group’s Owner
attribute is set to the DN of iManager’s logged-in user. Deselect Set Owner to leave the Owner
attribute undefined.
Select Nested Group to make the new group a nested group so that the group is created with
auxiliary class
NOTE: You can convert a static group to a dynamic group after the fact by using the
Modifying a Group option. This extends the selected Group object to belong to the
dynamicGroupAux class.
A group can be either nested or dynamic; it cannot be both. You cannot create a group that is
nested and dynamic.
You can convert a static group to a nested group by using the Modifying a Group option. This
makes the selected group object belong to the
nestedGroupAux
.
nestedGroupAux
class.
novdocx (en) 22 June 2009
5.3.2 Deleting a Group
1 In Roles and Tasks, select Groups > Delete Group.
2 In the Delete Group page, specify the name of the group object to delete, or use the Object
Selector to locate it, then click OK.
The Delete Group page lets you Select a single object, Select multiple objects, or use Advanced
Selection option to specify the object to delete.
5.3.3 Modifying a Group
1 In Roles and Tasks, select Groups > Modify Group.
2 In the Modify Group page, specify the name of a Group object, or use the Object Selector to
locate it, then click OK.
3 Make the desired changes to the Group object’s attributes, then click OK.
NOTE: If you modify a static group to be a dynamic group, and you are using RBS, you must
enable dynamicGroupAux class support. To do this, open Configure > iManager Server >
Configure iManager > RBS > Dynamic Group Search Type. Select
DynamicGroupObjects&AuxClasses from the drop-down menu, then click Save.
You cannot convert a dynamic group to a nested group and vice versa.
40 Novell iManager 2.7.3 Administration Guide
Page 41

5.3.4 Modifying Members of Group
This task lets you make simultaneous identical modifications to the attributes of all member objects
of a specified group.
1 In Roles and Tasks, select Groups > Modify Members of Group.
2 In the Modify Members of Group page, specify the name of a Group object, or use the Object
Selector to locate it, then click OK.
3 Make the desired changes to the member object’s attributes, then click OK.
5.3.5 Move Group
This link redirects you to the Move an Object task. For more information, see “Moving an Object”
on page 39.
5.3.6 Rename Group
This option is identical to the Rename an Object task. For more information, see “Renaming an
Object” on page 39.
novdocx (en) 22 June 2009
5.3.7 Viewing My Groups
This page displays the groups that you own. From it, you can create a new group, and edit or delete
an existing group.
5.4 Help Desk
Help Desk provides access to a limited number of user-related tasks. The user who owns this role
can do the following:
Section 5.4.1, “Clearing a Lockout,” on page 41
Section 5.4.2, “Creating a User,” on page 42
Section 5.4.3, “Setting a Password,” on page 42
For more information about User objects, see the eDirectory Administration guide (http://
www.novell.com/documentation/edir88/index.html?page=/documentation/edir88/edir88/data/
afxkmdi.html).
5.4.1 Clearing a Lockout
A user can be locked out for entering the wrong password too many times or trying to log in with an
expired password.
1 In Roles and Tasks, select Help Desk > Clear Lockout.
2 In the Clear Lockout page, specify the name of a User object, or use the Object Selector to
locate it, then click OK.
Roles and Tasks 41
Page 42

5.4.2 Creating a User
To create a new user object:
1 In Roles and Tasks, select Help Desk > Create User.
Fill out the necessary user information, as described in “Creating a User” on page 49.
5.4.3 Setting a Password
1 In Roles and Tasks, select Help Desk > Set Password.
2 In the Set Password page, specify the name of the User Object. Use the Object Selector to
browse for the User Object or use Simple Selection to search for it.
3 Specify the new password for the selected User object (twice), then click OK.
Select Set simple password to define a simple password, which is required for native file access
for Windows* and Macintosh* users. It is not necessary when Universal Password is enabled.
5.5 Partitions and Replicas
novdocx (en) 22 June 2009
Partition and replica operations let you manage eDirectory’s physical design and distribution across
your directory servers, and includes the following tasks:
Section 5.5.1, “Creating a Partition,” on page 42
Section 5.5.2, “Merging a Partition,” on page 43
Section 5.5.3, “Moving a Partition,” on page 43
Section 5.5.4, “Viewing Replica Information,” on page 43
Section 5.5.5, “Viewing Partition Information,” on page 44
Section 5.5.6, “Using the Filtered Replica Wizard,” on page 44
For information about partitions and replicas, see the eDirectory Administration guide (http://
www.novell.com/documentation/edir88/index.html?page=/documentation/edir88/edir88/data/
a2iiiik.html#a2iiiik).
5.5.1 Creating a Partition
Partitions create logical divisions of the eDirectory tree. For example, if you choose an
Organizational Unit and create it as a new partition, you split the Organizational Unit and all of its
subordinate objects from its parent partition. The Organizational Unit you choose becomes the root
of a new partition. The replicas of the new partition exist on the same servers as the replicas of the
parent, and objects in the new partition belong to the new partition’s root object.
1 In Roles and Tasks, select Partitions and Replicas > Create Partition.
2 In the Create Partition page, specify the container to use as the root of the new partition, or use
the Object Selector to locate it, then click OK.
A confirmation message appears indicating that the partition create operation was successful.
42 Novell iManager 2.7.3 Administration Guide
Page 43

5.5.2 Merging a Partition
Merging a partition effectively recombines it with its parent partition. Creating and merging
partitions is how you determine how the directory is logically divided.
1 In Roles and Tasks, select Partitions and Replicas > Merge Partition.
2 In the Merge Partition page, specify the partition to merge with its parent, or use the Object
Selector to locate it, then click OK.
To specify a partition, specify the Container object that acts as the partition root.
A confirmation message appears indicating that the partition create operation was successful.
5.5.3 Moving a Partition
Moving a partition lets you move a subtree in your directory tree. This is also known as a prune and
graft operation. You can only move partitions that have no subordinate partitions. If subordinate
partitions exist, you must first merge those partitions before performing the move operation.
When you move a partition, eDirectory changes all references to the partition Root object. Although
the object’s common name remains unchanged, the complete name of the container (and of all its
subordinates) changes.
novdocx (en) 22 June 2009
NOTE: When you move a partition, you must follow eDirectory containment rules. For example,
you cannot move an Organizational Unit directly under the root of the directory tree, because the
root’s containment rules permit only Locality, Country, or Organization objects, but not
Organizational Unit objects.
1 In Roles and Tasks, select Partitions and Replicas > Merge Partition.
2 In the Move partition page, specify the required information, then click OK.
The Object name field specifies the partition to move, or use the Object Selector to locate i
The Move to field specifies the Container object into which you want to move the
specified partition.
The Create an alias in place of moved object creates a pointer to the partition’s new
location. This allows any operations that are dependent on the old location to continue
uninterrupted until you can update those operations to reflect the new location. Users can
continue to log in to the network and find objects in the original directory location.
WARNING: Make sure your directory tree is synchronizing correctly before you move a partition.
If you have any errors in synchronization in either the partition you want to move or the destination
partition, do not perform a move partition operation. First, fix the synchronization errors. After
moving the partition, if you don’t want the partition to remain a partition, merge it with its parent
partition.
5.5.4 Viewing Replica Information
Viewing a replica tells you about its current state. An eDirectory replica can be in various states
depending on the partition or replication operations it is undergoing.
1 In Roles and Tasks, click Partitions and Replicas > Replica View.
Roles and Tasks 43
Page 44

2 In the Replica View page, specify the partition or server whose replica table you want to view,
then click OK.
A table appears listing the replica Partition, Type, Filter, and State. For information about
replica states, see the eDirectory Administration guide (http://www.novell.com/documentation/
edir88/index.html?page=/documentation/edir88/edir88/data/fbgeaaeg.html#a2iiikn).
5.5.5 Viewing Partition Information
1 In Roles and Tasks, select Partitions and Replicas > View Partition Information.
2 In the Partition Information page, specify the partition for which you want to view information,
then click OK.
To specify a partition, specify the Container object that acts as the partition root.
5.5.6 Using the Filtered Replica Wizard
Filtered replicas maintain a filtered subset of information from an eDirectory partition (objects or
object classes along with a filtered set of attributes and values for those objects). The Filtered
Replica Wizard steps you through the configuration of the filtered replicas on the selected server.
novdocx (en) 22 June 2009
1 In Roles and Tasks, select Partitions and Replicas > Filtered Replica Wizard.
2 Specify the name and context of the server on which you want to configure a filtered replica, or
use the Object Selector to find it, then click Next.
3 Click Define the Filter Set to specify the classes and attributes for a filter set on the selected
server, then click Next.
The replication filter contains the set of eDirectory classes and attributes you want to host on
this server’s set of filtered replicas.
4 Click Finish.
For more information about filtered replicas, see the eDirectory Administration guide (http://
www.novell.com/documentation/edir88/index.html?page=/documentation/edir88/edir88/data/
a5lhibw.html).
5.6 Rights
Rights refers to eDirectory trustee rights and trustees. When you create a tree, the default rights
assignments give your network generalized access and security. iManager lets you perform the
following rights-related tasks:
Section 5.6.1, “Modifying the Inherited Rights Filter,” on page 45
Section 5.6.2, “Modifying Trustee Rights,” on page 45
Section 5.6.3, “Rights to Other Objects,” on page 45
Section 5.6.4, “Viewing Effective Rights,” on page 46
For more information about eDirectory rights, see the eDirectory Administration guide (http://
www.novell.com/documentation/edir88/index.html?page=/documentation/edir88/edir88/data/
fbachifb.html).
44 Novell iManager 2.7.3 Administration Guide
Page 45

5.6.1 Modifying the Inherited Rights Filter
Both eDirectory and the NetWare file system provide an Inherited Rights Filter (IRF) mechanism to
block rights inheritance on individual subordinate items. One exception is that the Supervisor right
can’t be blocked in the NetWare file system.
For more information about Inherited Rights Filters, see the eDirectory Administration guide (http:/
/www.novell.com/documentation/edir88/index.html?page=/documentation/edir88/edir88/data/
fbachifb.html#a2iiidd).
1 In Roles and Tasks, select Rights > Modify Inherited Rights Filter.
2 Specify the full name of the object whose inherited rights filter you want to modify, or use the
Object Selector to find it, then click OK.
This displays a list of the inherited rights filters that have already been set on the object.
3 On the property page, edit the list of inherited rights filters as needed, then click OK.
To edit the list of filters, you must have the Supervisor or Access Control right to the ACL
property of the object. You can set filters that block inherited rights to the object as a whole, to
all the properties of the object, and to individual properties.
novdocx (en) 22 June 2009
5.6.2 Modifying Trustee Rights
A trustee is one object that has been granted explicit rights to another object in your directory tree.
To modify the trustee list for a given object:
1 In Roles and Tasks, select Rights > Modify Trustees.
2 Specify, or use the Object Selector to find, the name of the object whose trustee list you want to
view, then click OK.
This opens a list of the object’s currently assigned trustees.
3 Modify the trustee list as needed, then click OK.
Add a trustee by clicking Add Trustee.
Remove a trustee by selecting its check box and clicking Remove Selected.
Modify a trustee’s rights assignment by selecting the Assigned Rights link for that trustee.
5.6.3 Rights to Other Objects
This task allows you to view and modify the list of objects to which an object is a trustee.
1 In Roles and Tasks, select Rights > Rights To Other Objects.
2 In the Rights To Other Objects page, provide the required information, then click OK.
Specify the name of the object in Trustee name.
Specify the context in which you want to search for objects that have this trustee in
Context to search from.
Select Search entire subtree to search all containers under the specified context.
3 Modify the object list as needed, then click OK.
Add explicit rights to another object by clicking Add Object.
Roles and Tasks 45
Page 46

Remove explicit rights to an object by selecting its check box and clicking Remove
Selected.
Modify the explicit rights granted to an object by selecting the Assigned Rights link for
that object.
5.6.4 Viewing Effective Rights
Effective rights is the combination of explicit and inherited rights that an object has at any point in
the directory tree. To view an object’s effective rights to another object:
1 In Roles and Tasks, select Rights > View Effective Rights.
2 Specify, or use the Object Selector to find, the name of the trustee whose rights you want to
view, then click OK.
3 In the Object name field, specify the name of the object for which you want to calculate the
trustee’s effective rights.
eDirectory calculates the effective rights and displays them in the Effective Rights field.
4 Click Done when finished.
novdocx (en) 22 June 2009
5.7 Schema
The directory schema defines the types of objects that can be created in your tree (such as Users,
Printers, and Groups) and what information is required or optional at the time the object is created.
iManager provides the following schema-related tasks:
Section 5.7.1, “Adding an Attribute,” on page 46
Section 5.7.2, “Viewing Attribute Information,” on page 47
Section 5.7.3, “Viewing Class Information,” on page 47
Section 5.7.4, “Creating an Attribute,” on page 47
Section 5.7.5, “Creating a Class,” on page 48
Section 5.7.6, “Deleting an Attribute,” on page 48
Section 5.7.7, “Deleting a Class,” on page 48
Section 5.7.8, “Extending a Schema,” on page 48
Section 5.7.9, “Extending an Object,” on page 48
For more information about eDirectory schema, see the eDirectory Administration guide (http://
www.novell.com/documentation/edir88/index.html?page=/documentation/edir88/edir88/data/
a4a9bz0.html).
5.7.1 Adding an Attribute
You can add optional attributes to existing classes if your organization’s information needs change
or if you are preparing to merge trees. To add an attribute to an existing class:
NOTE: Mandatory attributes can be defined only while creating a class. (A mandatory attribute is
one that must be completed when an object is being created.)
1 In Roles and Tasks, select Schema > Add Attribute.
46 Novell iManager 2.7.3 Administration Guide
Page 47

2 Select the class you want to add an attribute to, then click OK.
3 Select the attributes you want to add, then click OK.
Select the desired attributes from the Available Optional Attributes list, then click the Right-
arrow to add these attributes to the Add These Optional Attributes list. Use the Left-arrow to
remove attributes from Add These Optional Attributes.
Objects you create of this class now have the properties you added. To set values for the added
properties, use the generic Other property page of the object.
5.7.2 Viewing Attribute Information
You can view an attribute’s structural details such as Syntax, flags and Classes that use the attribute.
To see an attribute’s information:
1 In Roles and Tasks, select Schema > Attribute Information.
2 Select the attribute for which you want to see information, then click View.
The Content frame displays information related to the selected attribute.
3 When finished, click Close.
novdocx (en) 22 June 2009
5.7.3 Viewing Class Information
The Class Information page displays information about the selected class and lets you add attributes.
During class creation, if the class is specified to inherit attributes from another class, the inherited
attributes are classified as they are in the parent class. For instance, if Object Class is a mandatory
attribute for the parent class, then it displays on this screen as a mandatory attribute for the selected
class.
To see a Class’s information:
1 In Roles and Tasks, select Schema > Class Information.
2 Select the class for which you want to see information, then click Vie w.
The Content frame displays information related to the selected class. To add an attribute to the
class, select Add a new attribute. To view the class’s parent class, select View superclass.
3 When finished, click Close.
5.7.4 Creating an Attribute
You can define your own custom types of attributes and add them as optional attributes to existing
object classes. However, you cannot add mandatory attributes to existing classes. To create an
attribute:
1 In Roles and Tasks, click Schema > Create Attribute.
2 Follow the steps in the Create Attribute Wizard to complete the attribute creation procedure.
Roles and Tasks 47
Page 48

5.7.5 Creating a Class
An auxiliary class is a set of properties (attributes) added to particular object rather than to an entire
class of objects. For example, an e-mail application could extend the schema of your eDirectory tree
to include an E-Mail Properties auxiliary class and then extend individual objects with those
properties as needed.
Using Schema Manager, you can define your own auxiliary classes. You can then extend individual
objects with the properties defined in your auxiliary classes. To create an auxiliary class:
1 In Roles and Tasks, click Schema > Create Class.
2 Follow the steps in the Create Class Wizard to define the new class.
5.7.6 Deleting an Attribute
You can delete unused attributes that aren’t part of the base schema of your eDirectory tree. This
might be useful after merging two directory trees, or if an attribute has become obsolete over time.
To delete an attribute:
novdocx (en) 22 June 2009
1 In Roles and Tasks, click Schema > Delete Attribute.
2 Select the attribute you want to delete, then click Delete.
Only attributes that you can delete are displayed.
5.7.7 Deleting a Class
You can delete unused classes that aren’t part of the base schema of your eDirectory tree. iManager
prevents you from deleting classes that are currently being used in locally replicated partitions. To
delete a class:
1 In Roles and Tasks, click Schema > Delete Class.
2 Select the class you want to delete, then click Delete.
Only classes that are allowed to be deleted are shown.
5.7.8 Extending a Schema
You can extend the schema of a tree by creating a new class or attribute. To extend the schema of
your eDirectory tree, you need Administrator/Supervisor right to the entire tree. To extend the
schema:
1 In Roles and Tasks, click Schema > Extend Schema.
2 Follow the ICE Wizard through the import, export, migration of data, or schema update and
compare operations.
5.7.9 Extending an Object
1 In Roles and Tasks, click Schema > Object Extensions.
2 Specify the name and context of the object you want to extend, then click OK.
48 Novell iManager 2.7.3 Administration Guide
Page 49

3 Depending on whether the auxiliary class that you want to use is already listed under Current
Auxiliary Class Extensions, click one of the following:
Ye s: Quit this procedure. See Modifying an Object’s Auxiliary Properties (http://
www.novell.com/documentation/edir88/index.html?page=/documentation/edir88/edir88/
data/fbbdchgh.html#a3olrac) in the eDirectory Administration Guide instead.
No: Click Add, select the auxiliary class, then click OK.
4 Click Close.
You can also add or remove auxiliary classes at once for multiple objects.
1 In Roles and Tasks, click Schema > Object Extensions.
2 Click the Select Multiple Objects tab.
2a Select the objects that you want to extend, then click OK.
The list of auxiliary class extensions is displayed which are common to all the selected
objects.
2b To add an auxiliary class, click Add, select the required auxiliary class, then click OK.
2c To delete an existing auxiliary class, select the class, then click Remove.
3 Click Close to exit the page.
novdocx (en) 22 June 2009
5.8 Users
Managing users and their network access is a central purpose of the directory. iManager provides the
following user-related tasks:
Section 5.8.1, “Creating a User,” on page 49
Section 5.8.2, “Deleting a User,” on page 50
Section 5.8.3, “Disabling an Account,” on page 50
Section 5.8.4, “Enabling an Account,” on page 50
Section 5.8.5, “Modifying a User,” on page 50
Section 5.8.6, “Moving a User,” on page 51
Section 5.8.7, “Renaming a User,” on page 51
For more information about user objects in the directory, see the eDirectory Administration guide
(http://www.novell.com/documentation/edir88/index.html?page=/documentation/edir88/edir88/
data/afxkmdi.html).
5.8.1 Creating a User
To create a new user object:
1 In Roles and Tasks, select User > Create User.
2 In the Create User page provide, at a minimum, the required user-related information, then
click OK.
Username
Last Name
Context
Roles and Tasks 49
Page 50

Password (twice)
IMPORTANT: If you fail to enter a password, you are prompted to either allow the user
to log in without a password (not recommended) or require a password for login.
Select Set simple password to define a simple password, which is required for native file access
for Windows* and Macintosh* users. It is not necessary when Universal Password is enabled.
Select Copy from template or user object to create a user based on an existing Template or User
object. When copying from a user object, iManager allows only a copy of the New Object NDS
rights instead of a copy of NDS rights, to prevent users from receiving the same rights as the
administrator.
Select Create home directory to specify a location for the user’s home directory, which is
created when the user object is created. If you specify a path that doesn't exist, a message
appears stating that the user's home directory has not been created.
5.8.2 Deleting a User
To delete a user object:
novdocx (en) 22 June 2009
1 In Roles and Tasks, select Users > Delete User.
2 Type the name and context of the object or use the search feature to find it, then click OK.
3 Click Delete.
A confirmation appears indicating the user object has been deleted.
5.8.3 Disabling an Account
To disable a user account, thereby preventing the user from authenticating to the directory:
NOTE: This only prevents a user from authenticating subsequent to disabling the account. If they
are logged in when the account is disabled, their access continues unchanged until they log out.
1 In Roles and Tasks, select Users > Disable Account.
2 Specify, or use the Object Selector to find, the name and context of the object, then click OK.
3 Click Disable.
5.8.4 Enabling an Account
To enable a previously disabled user account:
1 In Roles and Tasks, select Users > Enable Account.
2 Specify, or use the Object Selector to find, the name and context of the object, then click OK.
3 Click Enable.
5.8.5 Modifying a User
To modify an existing user object’s properties:
1 In Roles and Tasks, select Users > Modify User.
50 Novell iManager 2.7.3 Administration Guide
Page 51

2 Specify, or use the Object Selector to find, the name and context of the object, then click OK.
The Content frame displays the user object’s property book.
3 Make your changes, then click Apply or OK to save the changes.
5.8.6 Moving a User
To move a user object:
1 In Roles and Tasks, select Users > Move User.
2 Provide the required information, as described in “Moving an Object” on page 39.
5.8.7 Renaming a User
To rename a user object:
1 In Roles and Tasks, select Users > Rename User.
2 Provide the required information, as described in “Renaming an Object” on page 39.
novdocx (en) 22 June 2009
Roles and Tasks 51
Page 52

novdocx (en) 22 June 2009
52 Novell iManager 2.7.3 Administration Guide
Page 53

6
Configuring and Customizing
novdocx (en) 22 June 2009
iManager
This section describes the various features of Novell® iManager configuration. You configure
iManager from the Configure view. This section discusses the following topics:
Section 6.1, “Role-Based Services,” on page 53
Section 6.2, “RBS Configuration,” on page 57
Section 6.3, “RBS Reporting,” on page 67
Section 6.4, “iManager Server,” on page 71
Section 6.5, “Object Creation List,” on page 77
Section 6.6, “Plug-In Module Installation,” on page 77
Section 6.7, “Downloading and Installing Plug-in Modules,” on page 79
Section 6.8, “E-Mail Notification,” on page 81
Section 6.9, “Views,” on page 82
IMPORTANT: Using Role-Based Services is optional, although we recommend setting it up for the
optimal use of the iManager software. RBS must be configured in the eDirectory
use the Plug-In Studio.
®
Do not use Novell ConsoleOne
managed using only iManager.
to modify or delete any RBS objects. RBS objects should be
TM
tree in order to
6
If desired, you can prevent non-admin and non-collection-owner users from accessing iManager's
Configure view. For more information see the following topics:
iManager Views: “Views” on page 82.
User Preferences: Chapter 7, “Preferences,” on page 85.
Authorized Users: “Authorized Users and Groups” on page 72.
6.1 Role-Based Services
iManager gives you the ability to assign specific responsibilities to users and to present them with
the tools (and their accompanying rights) necessary to perform those sets of responsibilities. This
functionality is called Role-Based Services (RBS).
Role-Based Services is a set of extensions to the eDirectory schema. RBS defines several object
classes and attributes that provide a mechanism for administrators to grant a user access to
management tasks based on the user's role in the organization. This gives users access to only those
tasks that the users need to perform. RBS grants only the rights necessary to perform assigned tasks.
NOTE: Novell iManager Role-Based Services (RBS) grants rights based upon the Access Control
List (ACL) capability of Novell eDirectory. The ACLs allow a trustee to be granted rights to a
specific object or its subordinate objects. ACLs are not granted based upon specific object types.
Configuring and Customizing iManager
53
Page 54

Each Novell iManager task defines its applicable object types and necessary ACLs. However, these
ACLs allow the user to perform those operations with other object types through eDirectory APIs or
other tools such as Novell ConsoleOne or NWAdmin.
Use RBS to create specific roles within your organization; the roles contain tasks that an assigned
user can perform within iManager, such as creating a new user or changing a password. Tasks are
preassigned to roles but can be replaced, reassigned, or removed altogether.
Furthermore, users are associated with roles in a specified scope, which is a container in the tree in
which the user has the requisite permissions to perform a task. A role requires this threefold
association of role, members, and scope to be complete.
An RBS Role object creates an association between users and tasks. An administrator grants a user
access to a task by making the user a member of the role to which the task is assigned.
A user can be assigned to a role in the following ways:
Directly as a user
Through group and dynamic group assignments
If a user is a member of a group or a dynamic group that is assigned to a role, then the user has
access to the role.
novdocx (en) 22 June 2009
Through organizational role assignments
If a user is an occupant of a organizational role that is assigned a role, then the user has access
to the role.
Through container assignment
A User object has access to all of the roles that its parent container is assigned. This could also
include other containers up to the root of the tree.
A user can be associated with a role multiple times, each with a different scope.
6.1.1 RBS Objects in eDirectory
The following table lists the RBS objects. iManager extends the eDirectory schema to include these
objects when you install RBS. For more information, see “Installing RBS” on page 56.
Object Description
rbsCollection A container object that holds all RBS Role and Module objects.
rbsCollection objects are the uppermost containers for all RBS objects. A tree
can have any number of rbsCollection objects. These objects have owners,
which are users who have management rights over the collection.
rbsCollection objects can be created in any of the following containers:
Country
Domain
Locality
Organization
Organizational Unit
54 Novell iManager 2.7.3 Administration Guide
Page 55

Object Description
rbsRole Defining a role includes creating an rbsRole object and specifying the tasks that
the role can perform.
rbsRoles are container objects that can be created only in an rbsCollection
container.
Role members can be Users, Groups, Organizations, Organization Roles, or
Organizational Units, and role members are associated to a role in a specific
scope of the tree. The rbsTask and rbsBook objects are assigned to rbsRole
objects.
rbsTask A leaf object that holds a specific function, such as resetting login passwords.
rbsTask objects are located only in rbsModule containers.
novdocx (en) 22 June 2009
rbsBook
(aka Property
Book)
A book is a leaf object that displays a group of pages that allow a user to view or
modify the properties of an object or set of objects of the same type. Each page
of the book has a tab that you click, to view a different page.
A book object resides only in rbsModule containers and can be assigned to one
or more roles and to one or more object class types.
rbsScope A leaf object used for ACL assignments (instead of making assignments for each
User object). rbsScope objects represent the context in the tree where a role is
performed and are associated with rbsRole objects. They inherit from the Group
class. User objects are assigned to an rbsScope object. These objects have a
reference to the scope of the tree that they are associated with.
The objects are dynamically created when needed, then automatically deleted
when no longer needed. They are located only in rbsRole containers.
WARNING: Never change the configuration of an rbsScope object. Doing so has
serious consequences and could possibly break the system.
rbs Module Represents a container object that holds rbsTask and rbsBook objects.
rbsModule objects have a module name attribute that represents the name of the
product that defines the tasks or books (for example, eDirectory Maintenance
TM
Utilities, NMAS
Management, or Novell Certificate ServerTM Access).
rbsModule objects can be created only in rbsCollection containers.
rbs Category A category groups roles and tasks together which are specific to a particular
function. iManager has 14 default categories: Authentication & Passwords,
Collaboration, Directory, File Management, Identity Manager, Infrastructure,
Install & Upgrade, Network, Novell Audit, Printing, Security, Servers, Software
Licenses & Network, Usage, and Users & Groups.
The All Categories selection displays all available roles and tasks.
You can also create new categories and assign roles and tasks to them.
RBS objects reside in the eDirectory tree as depicted in the following figure:
Configuring and Customizing iManager 55
Page 56
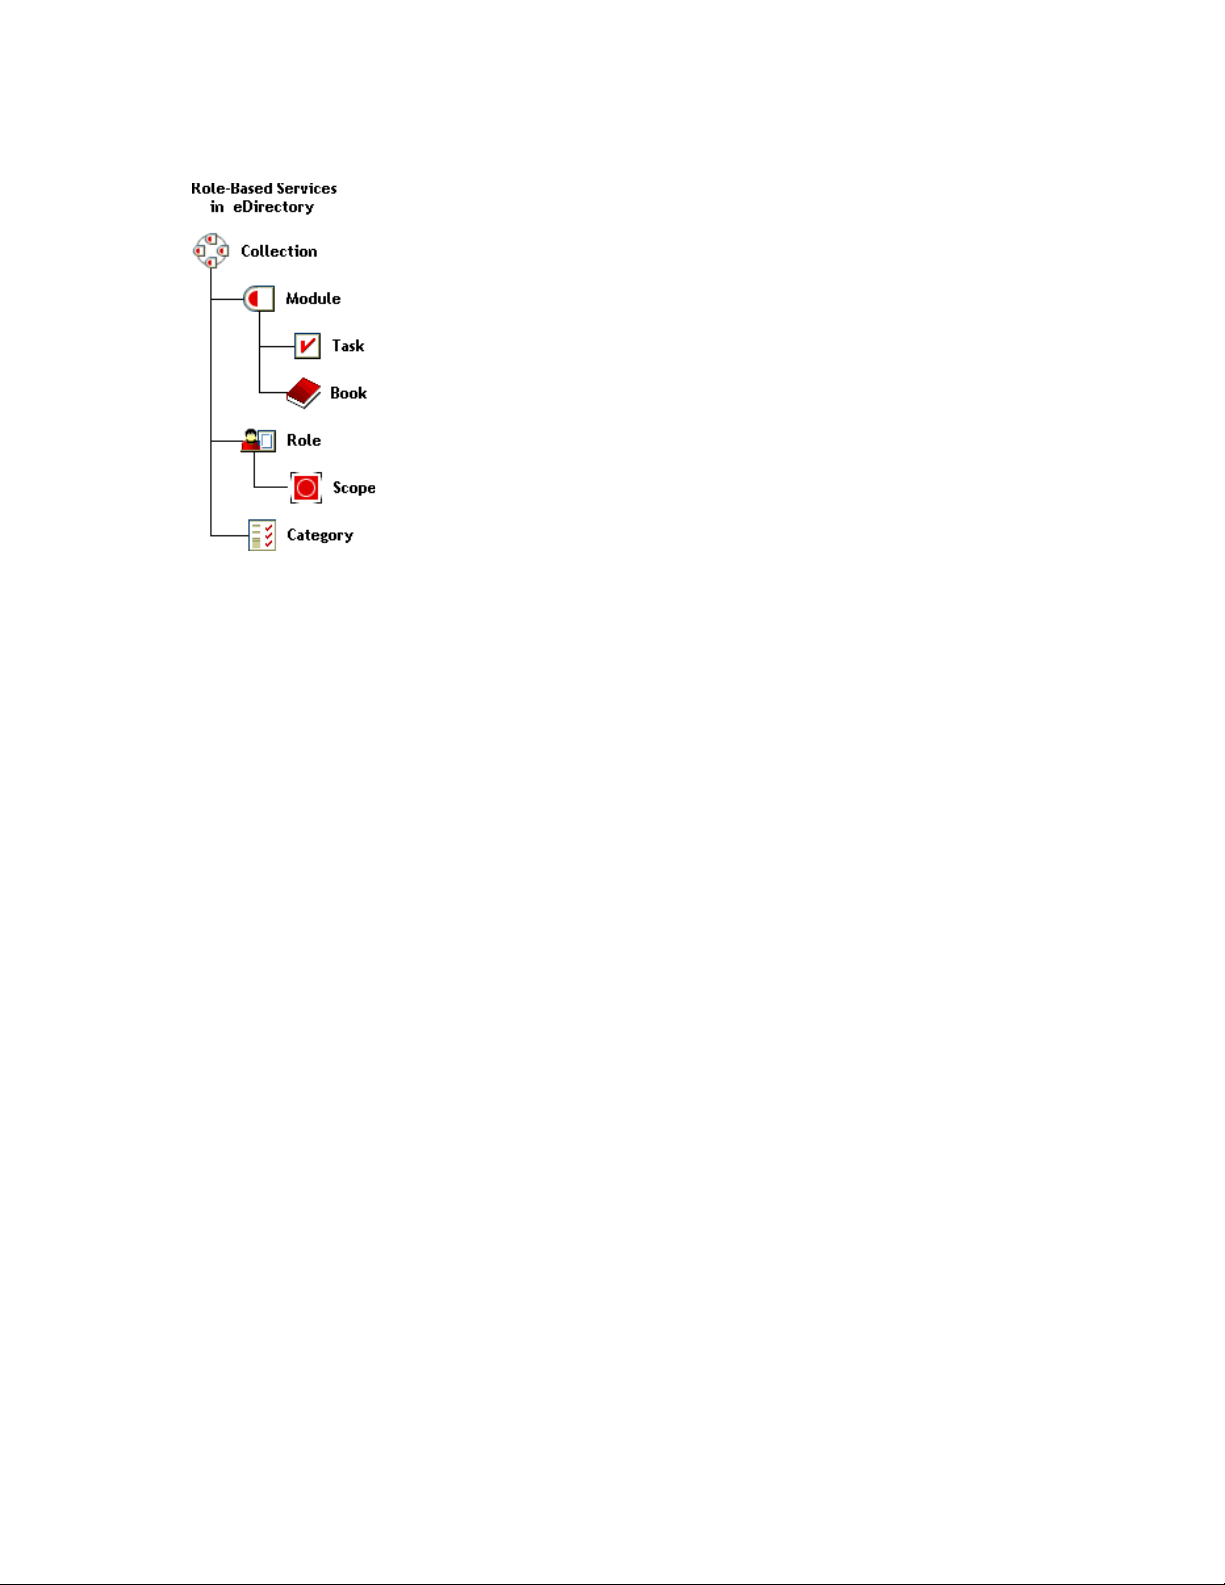
Figure 6-1 Role-Based Services in eDirectory
6.1.2 Installing RBS
novdocx (en) 22 June 2009
RBS is installed using the iManager Configuration Wizard.
1 In the Configure view, select Role Based Services > RBS Configuration.
2 Select Configure iManager.
3 Follow the on-screen instructions.
6.1.3 Removing RBS
If Role-Based Services is no longer needed in the tree, the RBS Collection object can be safely
deleted through iManager. Deleting the RBS collection automatically cleans up all user role
associations and scopes in the tree. Do not delete the RBS collection using other utilities, such as
ConsoleOne.
To remove Roll-based Services:
1 In the Configure view, select Role Based Services > RBS Configuration.
2 Select the collection to be deleted.
3 Click Delete.
After the RBS collection is deleted, all users logging in to iManager enter in Assigned Access mode
even though there is no RBS collection object in the tree.
To switch back to Unrestricted mode (the default mode):
1 In the Configure view, select iManager Server > Configure iManager.
2 Select the RBS tab.
3 Select the appropriate tree name in the RBS Tree List field, then click the minus button.
4 Click Save.
56 Novell iManager 2.7.3 Administration Guide
Page 57

NOTE: When using iManager in Unrestricted mode, you typically see the following message on the
iManager Home Page:
Clicking View Details might display a
for several of the tasks, even though the tasks work correctly. This message is misleading, and
iManager removes these messages after you configure RBS.
Notice: Some of the roles and tasks are not available.
Not supported by current authenticators
message
6.2 RBS Configuration
The RBS Configuration task provides complete control over RBS objects. It is a central place for
managing and configuring RBS objects. You can list and modify RBS objects by type. The task also
gives you useful information about the RBS system, such as the number of modules in a collection,
how many are installed, how many are not installed, and how many are outdated. Some tasks let you
operate on multiple objects simultaneously. For example, you can associate or disassociate multiple
members from a role at the same time.
From the Configure view, select Role-Based Services > RBS Configuration to open the RBS
Configuration page in the Content frame.
The page includes two tabs:
novdocx (en) 22 June 2009
iManager 2.x Collection: Displays current RBS collections.
iManager 1.x Collextions: Displays older RBS collections that you can either delete or migrate to
iManager 2.x. If you select Migrate, a wizard steps you through the migration process.
iManager displays only those collections you own, and includes the following information about
each collection:
Module: Indicates the number of modules on the Web server that you are logged in to.
Installed: Indicates the number of modules that are currently installed.
Outdated: Indicates the number of outdated modules currently installed.
Not-Installed: Indicates the number of modules that are available but not installed.
To work with a particular collection, select it from the list. This opens a collection-specific view, as
shown in Figure 6-2.
Configuring and Customizing iManager 57
Page 58
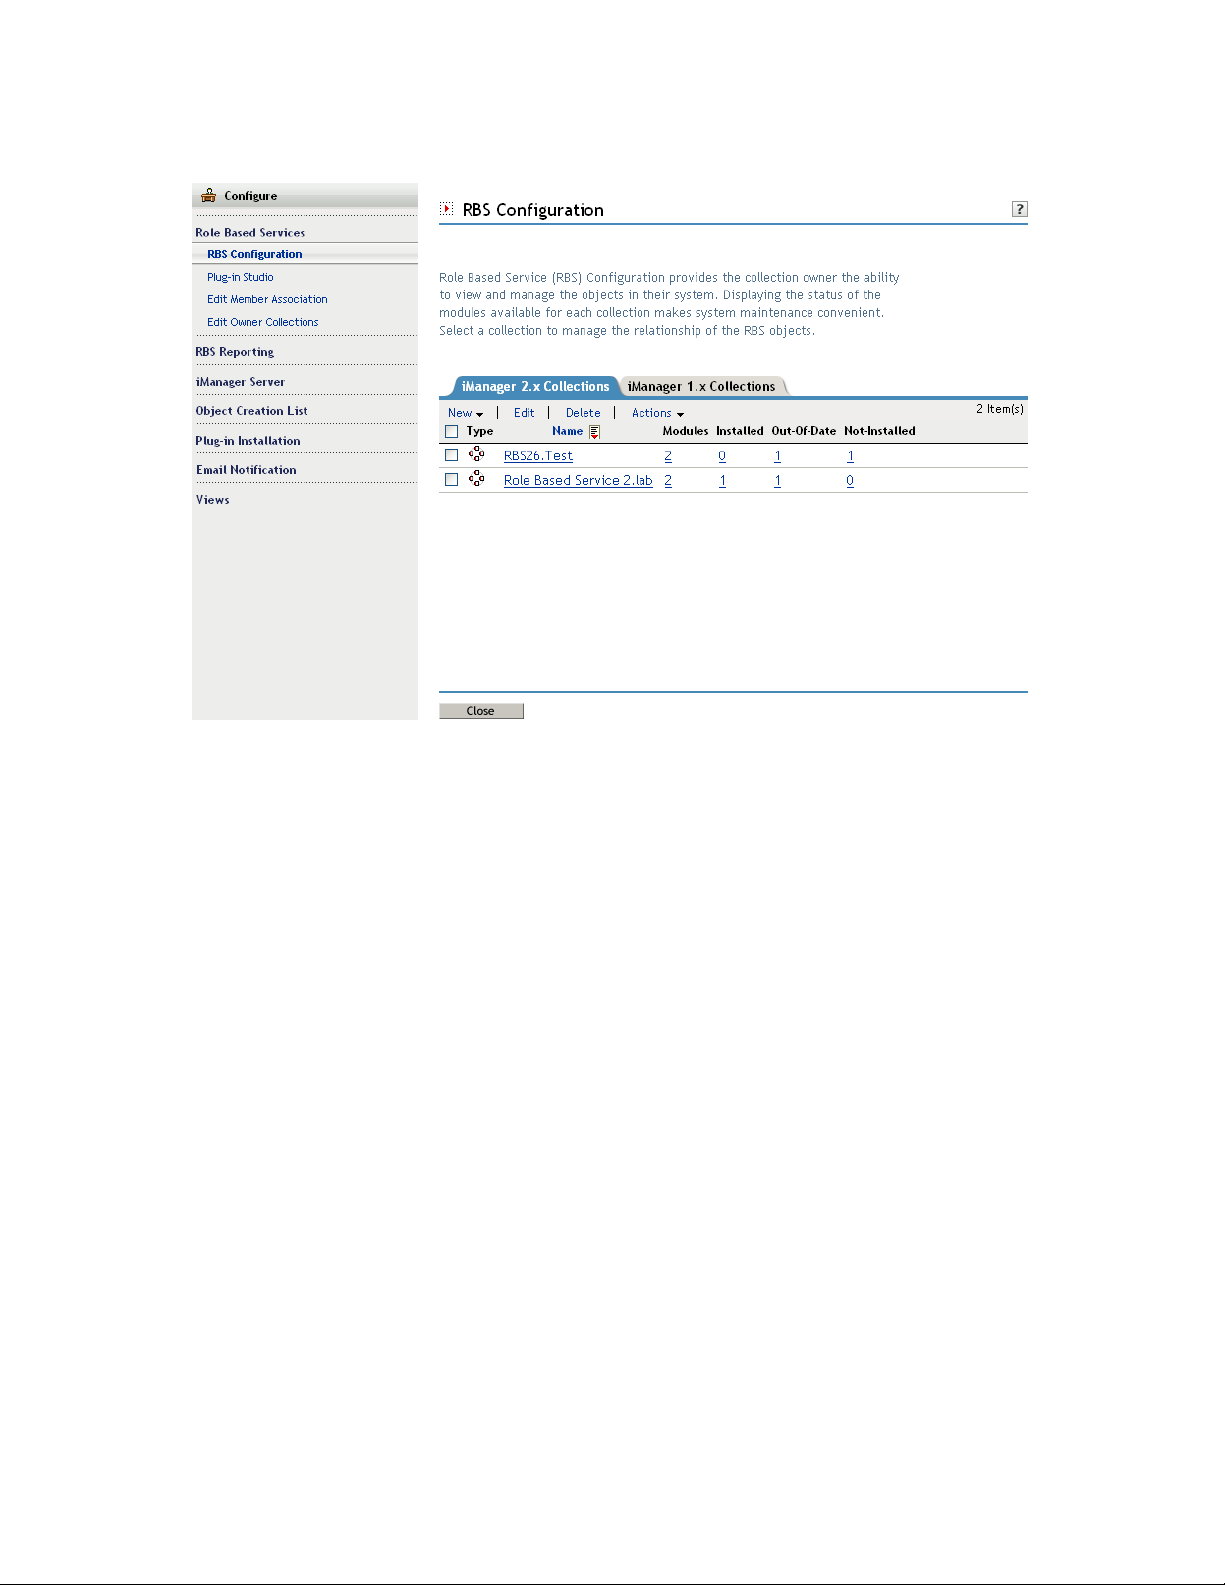
Figure 6-2 Working with RBS collections in iManager
novdocx (en) 22 June 2009
The remainder of this section describes the various tabs in the RBS Collection page as well as the
other RBS-related tasks in the Role Based Services category.
Section 6.2.1, “The Role Tab,” on page 58
Section 6.2.2, “The Task Tab,” on page 60
Section 6.2.3, “The Property Book Tab,” on page 61
Section 6.2.4, “The Module Tab,” on page 63
Section 6.2.5, “The Category Tab,” on page 64
Section 6.2.6, “Plug-In Studio,” on page 64
Section 6.2.7, “Editing Member Associations,” on page 66
Section 6.2.8, “Editing Owner Collections,” on page 67
6.2.1 The Role Tab
The RBS Collection Role tab lets you manage the RBS roles in the collection. From this tab you can
do the following:
“Create a New Role” on page 59
“Edit a Role” on page 59
“Delete a Role” on page 59
“Set a Member Association” on page 59
“Assign a Category” on page 60
“Add a Description to a Role” on page 60
58 Novell iManager 2.7.3 Administration Guide
Page 59

NOTE: To select a role, select the checkbox to the left of the role name.
Create a New Role
To create a new role in the collection:
1 In the Role tab, select New > iManager Role.
2 Complete the steps in the iManager Role Wizard.
The wizard steps you through naming the role; assigning tasks and categories to the role; and
assigning role members and scopes to the role.
Edit a Role
To edit an existing role in the collection:
1 In the Role tab, select the role, then click Edit.
The role's task list appears.
2 Add or remove a task from this page as needed, then click OK.
novdocx (en) 22 June 2009
Delete a Role
To delete a role in the collection:
1 In the Role tab select the role, then click Delete.
A message appears:
you want to continue?
This operation will delete all of the selected roles. Do
2 Click OK to delete the role.
Set a Member Association
To add a member to an existing role:
1 In the Role tab select the role, then select Actions > Member Associations.
2 Provide the required member information, then click Add.
Name: Specify, or use the Object Selector to find, the desired object to be a role member.
Scope: Specify, or use the Object Selector to find, the container that defines the scope
within which this member can perform the role.
3 In the members list, specify how you want rights related to this role assigned to the member,
then click OK.
Assign Rights: Instructs eDirectory to automatically grant the member rights necessary to
perform the assigned role. When not selected, the member is assigned the role but might
not have rights to perform all tasks associated with the role. The member’s rights
assignments are handled separately.
Inheritable: Select subtree to indicate that the member’s scope includes all sub-containers
in the specified context. Select base object to indicate that the member can perform the
role only in the specified container.
Configuring and Customizing iManager 59
Page 60

NOTE: If a user is a collection owner, and has a member association set, then he/she can manage all
the RBS objects within the defined scope. For a list of RBS objects in eDirectory and their
description, see Section 6.1.1, “RBS Objects in eDirectory,” on page 54.
Assign a Category
To add a category assignment to an existing role:
1 In the Role tab, select the role, then select Actions > Category Assignment.
The Category Assignment page appears.
2 Select a category, then click the right-arrow to assign it to the role.
3 Click OK.
Add a Description to a Role
To add a description to an existing role:
1 In the Role tab, select the role and click Actions > Description.
novdocx (en) 22 June 2009
2 Specify the description in the text box, then click OK.
6.2.2 The Task Tab
A task is a plug-in that performs a distinct management function, such as creating a user or setting a
password. iManager lists the tasks by group in the navigation area on the left side of the window.
The RBS Collection Task tab lets you do the following operations:
“Creating a New Task” on page 60
“Deleting a Task” on page 60
“Editing the Role Assignment of a Task” on page 61
“Adding a Description to a Task” on page 61
Creating a New Task
To create a new task:
1 In the Ta sk tab, select New > iManager Task.
2 Complete the steps in the Create iManager Task Wizard.
The wizard steps you through providing the necessary detail about the new task you are
creating.
For information on creating tasks in the Plug-in Studio, see “Creating a New Task from Plug-In
Studio” on page 65.
Deleting a Task
To delete an existing task:
1 In the Ta sk tab, select the task, then select Delete.
60 Novell iManager 2.7.3 Administration Guide
Page 61

novdocx (en) 22 June 2009
A message appears:
you want to continue?
This operation will delete all of the selected tasks. Do
2 Click OK.
Editing the Role Assignment of a Task
To edit the list of roles to which a task is assigned:
1 In the Ta sk tab, select the task, then select Actions > Role Assignment.
2 On the Edit Role Assignment page, add or remove roles from the Assigned Roles field, then
click OK.
Adding a Description to a Task
To add a description to an existing task:
1 In the Ta sk tab, select the task, then select Actions > Description.
2 Specify the description in the text box, then click OK.
6.2.3 The Property Book Tab
A property book displays the attributes of a specific object type that you can modify. These
properties are of an object or set of objects of the same type.
Property books can be assigned to roles and appear in the list of tasks for a role. For example, a
property book that modifies the attributes of User objects might have a page that lets you to specify
a user's login script. Another page could let you change a user's e-mail address and telephone
number.
Property book pages are similar to tasks. However, they are for displaying and modifying attributes
in a single view. For a more complex, wizard-like UI, you should create a task.
The RBS Collection Property Book tab lets you perform the following operations:
“Creating a New Property Book” on page 61
“Deleting a Property Book.” on page 62
“Editing the Role Assignment in a Property Book” on page 62
“Modifying the Page List for a Property Book” on page 62
“Modifying the Object Type Assignment of a Property Book” on page 62
“Adding/Modifying the Description of a Property Book” on page 62
“Defining/Modifying a Preferred Object Selection Method for a Task of a Property Book” on
page 63
Creating a New Property Book
To create a new property book:
1 In the Property Book tab, select New.
2 Complete the steps in the Create Property Book Wizard.
Configuring and Customizing iManager 61
Page 62

The wizard steps you through providing the necessary detail for the property book you are
creating.
IMPORTANT: In iManager, some characters have special significance and must be escaped
with the backslash (\) character. For more information, see Section 3.2, “Special Characters,”
on page 20.
Deleting a Property Book.
To delete a property book:
1 Under the Property Book tab, select the property book, then select Delete.
A message appears:
books. Do you want to continue?
This operation will delete all of the selected property
2 Click OK.
Editing the Role Assignment in a Property Book
To modify the list of roles to which a property book is assigned:
novdocx (en) 22 June 2009
1 Under the Property Book tab, select the property book, then select Actions > Role Assignment.
2 On the Edit Role Assignment page, add or remove roles from the Assigned Roles field, then
click OK.
Modifying the Page List for a Property Book
To modify the attribute pages associated with a property book:
1 Under the Property Book tab, select the property book, then select Actions > Page List.
2 On the Edit Page List page, add or remove roles from the Assigned Pages field. To change the
order of the pages, select a page and click Move Up or Move Down buttons.
Modifying the Object Type Assignment of a Property Book
To modify the list of object types associated with a property book:
1 Under the Property Book tab, select the property book, then select Actions > Object Type.
2 On the Edit Object Type page, add or remove roles from the Assigned Object Types field, then
click OK.
Adding/Modifying the Description of a Property Book
To add/modify a description to an existing task:
1 In the Property Book tab, select the property book, then select Actions > Description.
2 Specify/modify the description in the text box, then click OK.
62 Novell iManager 2.7.3 Administration Guide
Page 63

Defining/Modifying a Preferred Object Selection Method for a Task of a Property
Book
To define/modify a preferred object selection method for an existing task:
1 Under the Property Book tab, select the property book, then select Actions > Target Chooser
Mode.
2 From the Mode list, select the appropriate mode: single, multiple, simple, or advanced and click
OK.
A successful message is displayed. Click OK.
NOTE: For the changes to iManager Base Content module to take effect, restart Tomcat.
6.2.4 The Module Tab
The Module page lists the RBS modules currently installed on a selected collection. Each module
contains RBS property books and tasks. From this page, you can add (if you want to create a custom
property book) and delete modules, and also type a description for a selected plug-in module.
novdocx (en) 22 June 2009
The RBS Collection Module tab lets you perform the following operations:
“Adding a New Plug-in Module” on page 63
“Deleting an RBS Module” on page 63
“Adding a description” on page 63
Adding a New Plug-in Module
To add a new plug-in module:
1 In the Module tab, select New.
2 Specify the RBS module name and a destination context, then click OK.
iManager displays a message indicating the module has been added.
Deleting an RBS Module
To delete an existing plug-in module:
1 In the Module tab, select a module to delete, then select Delete.
2 Click OK to confirm the module deletion.
Adding a description
To add a description to an existing plug-in module:
1 In the Module tab, select a module, then select Actions > Description.
2 Specify the module description, then click OK.
Configuring and Customizing iManager 63
Page 64

6.2.5 The Category Tab
Categories group related roles and tasks together. The RBS Collection Category tab lets you perform
the following operations:
“Adding a New Category” on page 64
“Deleting a Category” on page 64
“Adding a Description” on page 64
Adding a New Category
To add a description to an existing plug-in module:
1 In the Category tab, select New.
This launches the Create Category Wizard.
2 Specify category name and description (optional), then click Next.
3 Select the roles to be associated with the new category, then click Next.
4 Review the new category summary, then click Finish.
novdocx (en) 22 June 2009
Deleting a Category
To delete an existing category:
1 In the Category tab, select a module to delete, then select Delete.
2 Click OK to confirm the category deletion.
Adding a Description
To add or modify the description of an existing category:
1 In the Category tab, select a category, then select Actions > Description.
2 Specify the category description, then click OK.
6.2.6 Plug-In Studio
Plug-In Studio offers a quick and easy way to streamline the tasks that you do several times a day.
Use Plug-in Studio to dynamically create tasks for your most frequently used operations. You can
also edit and delete tasks here.
For example, to modify a user, instead of selecting Modify Object, you can create a dynamic UI to
edit only the attributes you have selected, such as first name or title. Data is stored in the
TOMCAT_HOME/webapps/nps/portal/modules/custom
directory.
From the Plug-in Studio task, you can perform the following operations:
“Creating a New Task from Plug-In Studio” on page 65
“Editing a Task” on page 65
“Deleting a task” on page 65
“Copying Custom Tasks” on page 66
64 Novell iManager 2.7.3 Administration Guide
Page 65

“Exporting Custom Tasks” on page 66
“Importing Custom Tasks” on page 66
Creating a New Task from Plug-In Studio
To create a new task with Plug-In Studio:
1 In the Configure view, select Role-Based Services > Plug-in Studio.
2 Select New.
The Task Builder appears to help you build custom tasks and property pages.
3 Specify the object type and platform information, then click Next.
Available classes: Specify the object class associated with the new task.
Target device: Specify the platform on which the task is used. Typically, the default selection
(Default) works fine.
Plug-in type: Specify the type of task you are creating.
Add Auxiliary Classes: Select this option to add aux class support to the task.
4 In the Plug-in Fields screen, provide the necessary information, then click Install.
When you click Install, iManager dynamically builds the task’s
.xml
file,
.jsp
file, and the
Java files that execute the task, then it installs those files into the system.
Attributes: Select an attribute to associate with the task from the list of available attributes.
Double-click the attribute to move it to the Plug-in Fields field, using the default control.
novdocx (en) 22 June 2009
Controls: Displays the available controls for the attribute selected in the Attributes field.
Double-click a control to move the current attribute to the Plug-in Fields field, using the
selected control.
Plug-in Fields: Displays each attribute/control currently associated with the task. From this
field, you can remove attributes from the task, change the control associated with an attribute,
and modify the control properties for the attribute.
Plug-in Properties: Lets you specify a Plug-in ID, assign the task to an RBS collection, and
assign the task to a Role. The role you assign determines where this task appears in the Roles
and Tasks Navigation frame.
Editing a Task
To edit an existing plug-in with Plug-in Studio:
1 In the Configure view, select Role-Based Services > Plug-in Studio.
2 Select the task, then select Edit.
3 Modify the settings described in “Creating a New Task” on page 60, then click Install.
iManager displays a confirmation message indicating the plug-in was successfully created and
installed.
Deleting a task
To delete an existing plug-in with Plug-in Studio:
1 In the Configure view, select Role-Based Services > Plug-in Studio.
Configuring and Customizing iManager 65
Page 66

2 Select the plug-in from the list of installed custom plug-ins, then click Delete.
novdocx (en) 22 June 2009
A message appears:
3 Click OK to delete the plug-in.
iManager displays a confirmation message indicating the plug-in was successfully deleted.
Copying Custom Tasks
To copy an existing plug-in with Plug-in Studio:
1 In the Configure view, select Role-Based Services > Plug-in Studio.
2 Select the plug-in from the list of installed custom plug-ins, then click Actions > Copy.
3 Specify a name for the copied plug-in, then click OK.
Exporting Custom Tasks
Use this task to export your custom tasks, making them deployable to other iManager servers.
1 In the Configure view, select Role-Based Services > Plug-in Studio.
2 Select the custom plug-in to export, then click Actions > Export.
Importing Custom Tasks
Use this task to deploy an exported custom tasks onto multiple iManager servers.
Are you sure you want to delete this plug-in?
1 In the Configure view, select Role-Based Services > Plug-in Studio.
2 Select Actions > Import.
3 Specify, or use the Object Selector to find, the RBS collection into which you want to import
the custom plug-ins.
4 Specify, or browse to, the NPM file that you previously exported.
5 Click Import.
6.2.7 Editing Member Associations
There are two ways to associate members with roles:
Select a member, then assign it to a role within a scope as described in “Set a Member
Association” on page 59.
Select a role, then assign members and a scope to it as described below.
To assign an existing role to a selected member
1 In the Configure view, select Role Based Services > Edit Member Association.
2 Specify, or use the Object Selector to find, a member, then click OK.
A list appears displaying the roles to which this member is assigned.
3 Specify a role and role scope to add to this member, then click OK.
This data is saved to eDirectory. After login, the newly assigned role appears in the left column
of the member who owns it.
66 Novell iManager 2.7.3 Administration Guide
Page 67

6.2.8 Editing Owner Collections
Use this task to change the owner assigned to a collection.
1 In the Configure view, select Role Based Services > Edit Owner Collections.
2 Specify, or use the Object Selector to find, a collection owner, then click OK.
3 Add or remove collections this person can own, then click OK.
6.3 RBS Reporting
The RBS Reporting feature lets you generate reports about RBS objects in the directory and their
configuration. Reports are in chart format and can be exported to other formats and printed. RBS
Reporting generates the following reports:
Role Assignments Unassigned Tasks
Role Tasks Assignments Unassigned Categories
User Roles Assignments Custom Roles
novdocx (en) 22 June 2009
User Task Assignments Custom Tasks
Role Rights Assignments Custom Categories
Unassigned Roles Collections
6.3.1 Creating Reports
To create an RBS Report:
1 In the Configure view, select RBS Reporting.
Each type of report is implemented as a task.
2 Select the desired report, provide the necessary information, then click OK.
Each report requires that you provide some initial information, such as the roles for which you
want to generate a list of assigned members.
Configuring and Customizing iManager 67
Page 68
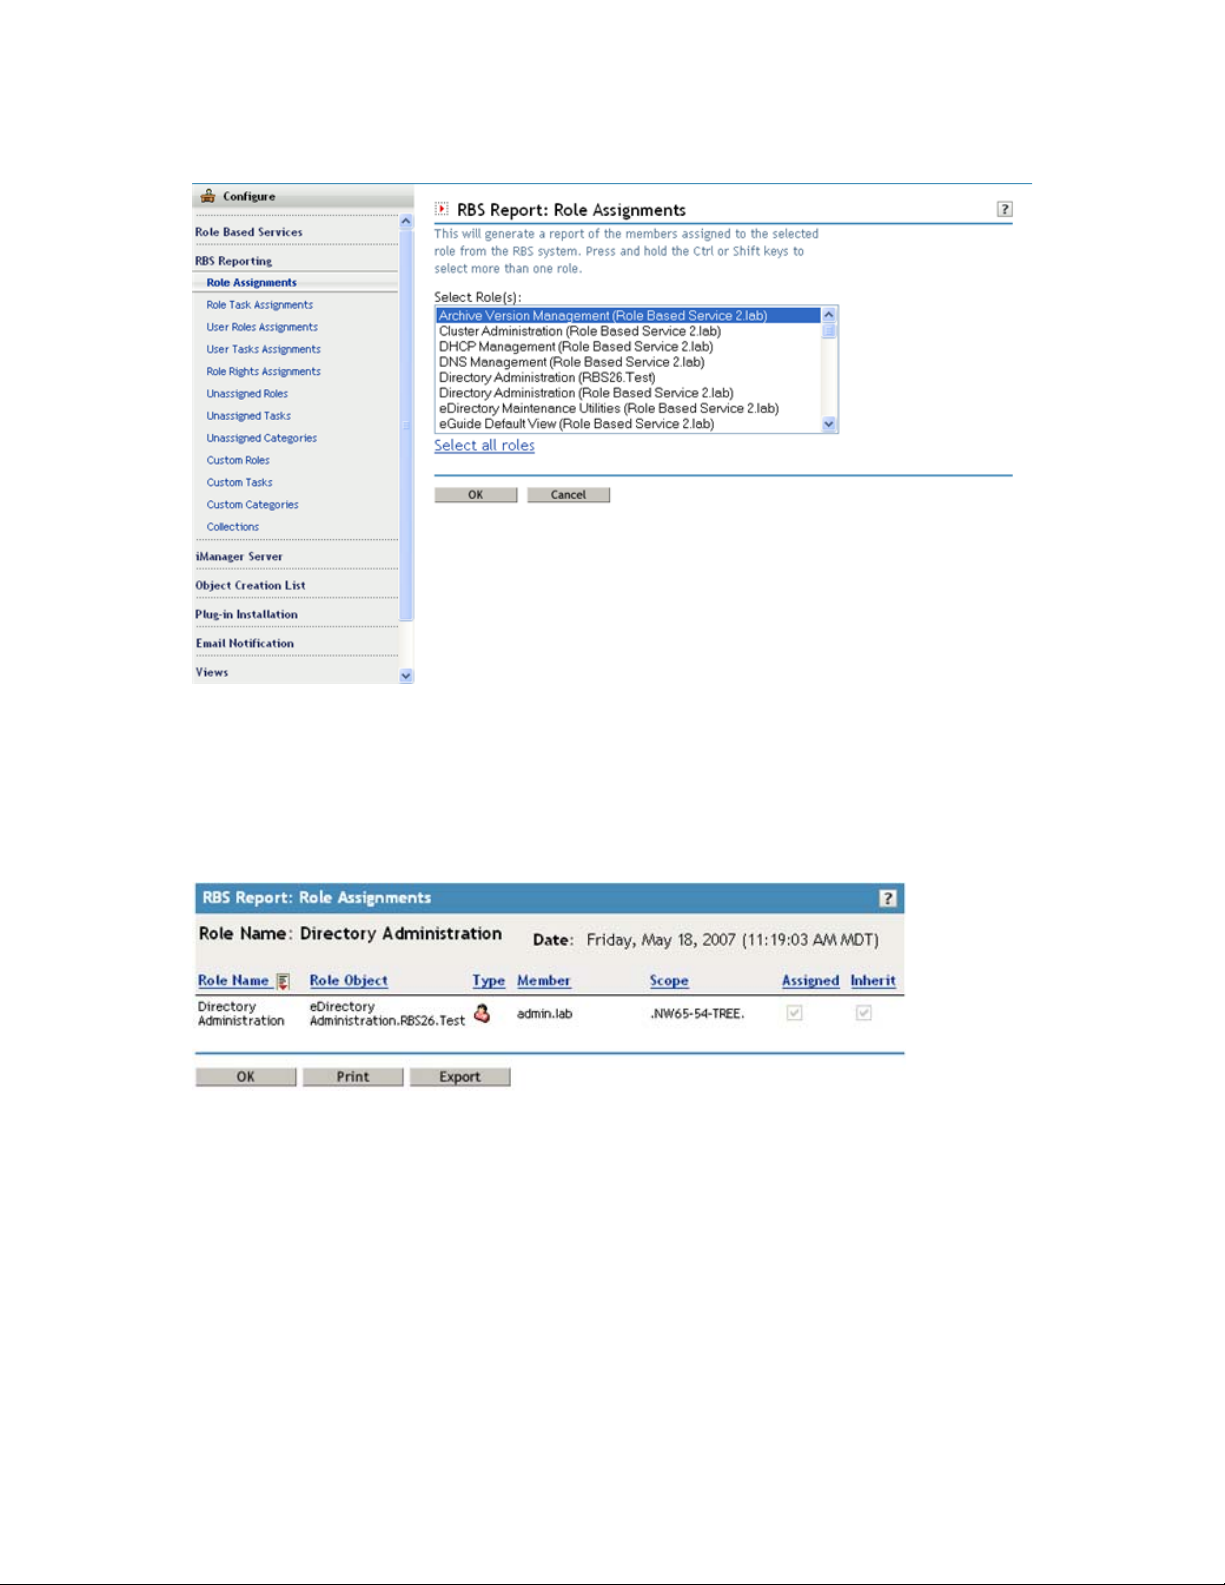
Figure 6-3 iManager Configure View Showing the Role Assignments Task
novdocx (en) 22 June 2009
6.3.2 Using Reports
The RBS Reporting tasks generate reports that you can sort, print, and export. The following figure
shows an example of an iManager report.
Figure 6-4 Members Assigned to a Role
Sorting Reports
By default, the items listed in a report are sorted alphabetically in ascending order on the first
column. To indicate the column in which items are sorted, iManager displays a small icon next to the
column name, and the icon indicates the sort order. To change the column in which items are sorted,
click the name of the column you want.To change the sort order, click the name of the column in
which items are currently sorted.
68 Novell iManager 2.7.3 Administration Guide
Page 69

Printing Reports
You can easily print RBS reports by clicking the Print button. This opens your browser's print dialog
box, where you can select a printer and other printing options. This feature prints only the browser
frame that contains the report and it prints the report as displayed in the frame, so you should make
sure the items are sorted in the order you want before you click Print.
Exporting Reports
You can export report data to XML, CSV, and plain text files to use in other applications such as
spreadsheets and databases. The export files contain only data and enough metadata to describe the
report columns. Other information, such as the report title and date, is not exported. Items in a report
are exported in the currently displayed sort order.
1 Click the Export button.
2 In the RBS Report Export window, select the format for the exported data, then click Export.
3 When your browser prompts you to open or save the file generated by iManager, select the
option you prefer and proceed as required by your browser.
The following are examples of XML, CSV, and plain text files exported from the same RBS report:
novdocx (en) 22 June 2009
XML:
<?xml version="1.0"?>
<rbs-report>
<rbs-report-header>
<user>admin.novell</user>
<report-time>Thursday, June 26, 2008 (10:33:17 AM IST)</report-time>
<selected-member-types>User, Group, Dynamic Group, Organizational Role,
Container</selected-member-types>
<dynamic-group>
<search-enabled>yes</search-enabled>
<role-search>parent sub-directory (novell)</role-search>
<search-for>Dynamic Group Objects</search-for>
</dynamic-group>
<container-role-search>up to parent (novell)</container-role-search>
</rbs-report-header>
<rbs-record>
<role-name>eDirectory Administration</role-name>
<role-object>eDirectory Administration.Role Based Service 2.novell</
role-object>
<member-type>User</member-type>
<member-object>admin.novell</member-object>
<scope>.MY_TREE.</scope>
<rights-assigned>true</rights-assigned>
<rights-inherit>true</rights-inherit>
</rbs-record>
<rbs-record>
<role-name>eDirectory Administration</role-name>
<role-object>eDirectory Administration.Role Based Service 2.novell</
role-object>
<member-type>User</member-type>
<member-object>jdoe.novell</member-object>
Configuring and Customizing iManager 69
Page 70

<scope>novell</scope>
<rights-assigned>true</rights-assigned>
<rights-inherit>true</rights-inherit>
</rbs-record>
</rbs-report>
CSV:
RBS Report Query Settings
User:,"admin.novell"
Date:,"Thursday, June 26, 2008 (10:33:17 AM IST)"
Types:,"User, Group, Dynamic Group, Organizational Role, Container"
Dynamic Group Search Settings:,
Search Enabled:,"yes"
Role Search:,"parent sub-directory (novell)"
Role Search:,"Dynamic Group Objects"
Container Role Search:,"up to parent (novell)"
RBS Report: User Roles Assignments
User,"Role Name","Role Object","Type","Member","Scope","Assigned","Inherit",
admin.novell,"Archive Version Management","Archive Version Management.Role
Based Service 2.novell","User","admin.novell",".BLR-ANILTREE.","true","true",
admin.novell,"DFS Management","DFS Management.RBS 270
akpal.08","User","admin.novell",".BLR-ANIL-TREE.","true","true",
admin.novell,"Directory Administration","eDirectory Administration.Role Based
Service 2.novell","User","admin.novell",".BLR-ANIL-TREE.","true","true",
admin.novell,"Directory Administration","eDirectory Administration.RBS 270
akpal.08","User","admin.novell",".BLR-ANIL-TREE.","true","true",
admin.novell,"eDirectory Maintenance Utilities","eDirectory Maintenance
Utilities.Role Based Service 2.novell","User","admin.novell",".BLR-ANILTREE.","true","true",
admin.novell,"File Protocols","File Protocols.RBS 270
akpal.08","User","admin.novell",".BLR-ANIL-TREE.","true","true",
admin.novell,"Groups","Group Management.Role Based Service
2.novell","User","admin.novell",".BLR-ANIL-TREE.","true","true",
admin.novell,"Groups","Group Management.RBS 270
akpal.08","User","admin.novell",".BLR-ANIL-TREE.","true","true",
admin.novell,"Help Desk","Help Desk Management.Role Based Service
2.novell","User","admin.novell",".BLR-ANIL-TREE.","true","true",
admin.novell,"Help Desk","Help Desk Management.RBS 270
akpal.08","User","admin.novell",".BLR-ANIL-TREE.","true","true",
admin.novell,"IDE Demo Role","IDE Demo Role.Role Based Service
2.novell","User","admin.novell",".BLR-ANIL-TREE.","true","true",
admin.novell,"Novell Certificate Access","Novell Certificate Access.RBS 270
akpal.08","User","admin.novell",".BLR-ANIL-TREE.","true","true",
admin.novell,"Novell Certificate Server Management","Novell Certificate Server
Management.RBS 270 akpal.08","User","admin.novell",".BLR-ANILTREE.","true","true",
admin.novell,"Partitions and Replicas","Partition and Replica Management.Role
Based Service 2.novell","User","admin.novell",".BLR-ANILTREE.","true","true",
admin.novell,"Partitions and Replicas","Partition and Replica Management.RBS
270 akpal.08","User","admin.novell",".BLR-ANIL-TREE.","true","true",
admin.novell,"QuickFinder Administration","QuickFinder Administration.RBS 270
akpal.08","User","admin.novell",".BLR-ANIL-TREE.","true","true",
admin.novell,"Rights","Rights Management.Role Based Service
2.novell","User","admin.novell",".BLR-ANIL-TREE.","true","true",
novdocx (en) 22 June 2009
70 Novell iManager 2.7.3 Administration Guide
Page 71

admin.novell,"Rights","Rights Management.RBS 270
akpal.08","User","admin.novell",".BLR-ANIL-TREE.","true","true",
admin.novell,"Schema","Schema Management.Role Based Service
2.novell","User","admin.novell",".BLR-ANIL-TREE.","true","true",
admin.novell,"Schema","Schema Management.RBS 270
akpal.08","User","admin.novell",".BLR-ANIL-TREE.","true","true",
admin.novell,"Storage Management","Storage Management.RBS 270
akpal.08","User","admin.novell",".BLR-ANILTREE.","true","true",admin.novell,"Users","User Management.Role Based Service
2.novell","User","admin.novell",".BLR-ANIL-TREE.","true","true",
admin.novell,"Users","User Management.RBS 270
akpal.08","User","admin.novell",".BLR-ANIL-TREE.","true","true",
Plain Text:
RBS Report Query Settings
User: admin.novell
Date: Thursday, June 26, 2008 (10:33:17 AM IST)
Types: User, Group, Dynamic Group, Organizational Role, Container
------------------------------------------------Dynamic Group Search Settings:
Search Enabled: yes
Role Search: parent sub-directory (novell)
Role Search: Dynamic Group Objects
Container Role Search: up to parent (novell)
------------------------------------------------Role Name: eDirectory Administration Role Object: eDirectory
Administration.Role Based Service 2.novell Type: User Member: jdoe.novell
Scope: novell Assigned: true Inherit: true
-------------------------------------------------
novdocx (en) 22 June 2009
6.4 iManager Server
If you do not see this task, you are not an authorized user. See “Authorized Users and Groups” on
page 72. This topic includes the following information:
Section 6.4.1, “Configure iManager,” on page 71
Section 6.4.2, “Security,” on page 72
Section 6.4.3, “Look and Feel,” on page 73
Section 6.4.4, “Logging Events,” on page 73
Section 6.4.5, “Redirection After Logout,” on page 74
Section 6.4.6, “Authentication,” on page 74
Section 6.4.7, “RBS,” on page 75
Section 6.4.8, “Plug-In Download,” on page 76
Section 6.4.9, “Misc,” on page 76
6.4.1 Configure iManager
There are three settings in the
when iManager creates an LDAP SSL connection:
config.xml
file that control the security and the certificates used
Configuring and Customizing iManager 71
Page 72

Security.Keystore.AutoUpdate: If the value of AutoUpdate is True, when a user successfully logs
in to iManager, the certificate from that eDirectory server might automatically be imported into the
iManager-specific keystore. Select the setting Auto Import Tree Certificate for Secure LDAP
(Configure iManager > Security).
Security.Keystore.UpdateAllowAll: When UpdateAllowAll is True, then any successful user login
imports/updates a certificate into the iManager certificate keystore. If the setting is false, only an
authorized user login imports/updates certificates.
Security.Keystore.Priority: The priority setting contains two words that define the search order for
certificates during a connection: system, and imanager.system uses the default JVM* keystore to
locate certificates when created the SSL context. If that fails, it then goes to the iManager keystore.
You can change the search order of system and iManager by removing either word from the entry.
To further tighten security, do not allow AutoUpdate and use only the system keystore. If you do
this, you must manually import the certificates that you want to reside in the default system keystore
by using the tools that come with Java. If you disable UpdateAllowAll, then certificate imports
occur only from a successful iManager authorized user login.
novdocx (en) 22 June 2009
6.4.2 Security
These settings affect your entire Web server configuration and are saved in the
You can either save as you go or click Save once after you have made all your changes.
Warn When Using a Nonsecure Connection
Select this option if you want users without a secure connection between the Web browser and the
Web server to receive the following warning:
You are using a non-secure connection
Enable Novell Audit
Make sure you have met the Novell Audit Prerequisites. Select the Enable Novell Audit option and
select specific iManager logging events, then click Save.
Auto Import Tree Certificate for Secure LDAP
Secure LDAP connections require a certificate. If you select this feature, the system automatically
imports a public tree certificate for secure LDAP.
Authorized Users and Groups
Authorized users and groups are those that iManager permits to perform its various administrative
tasks. Authorized user data is saved in
INF\configiman.properties
TOMCAT_HOME\webapps\nps\WEB-
. The iManager installation process creates this file only if
authorized user and group information is provided, but doing it, is not required. Failure to do it
results in iManager allowing any user to install iManager plug-ins and modify iManager server
settings (not recommended long-term.)
config.xml
file.
.
When a group or an organizational role is added to this list, all members of the group or the
organizational role become authorised users. Adding a nested group supports only first level of
members. But adding a dynamic group is not supported because it can have any type of objects as its
members.
72 Novell iManager 2.7.3 Administration Guide
Page 73

After installing iManager, you can add an authorized user, group, or organizational role by
specifying, or by using the Objector Selector icon next to the Authorized Users and Groups list.
Doing this modifies the
To designate all users of the tree as authorized users, type AllUsers.
NOTE: You can add and save only valid users to the Authorized Users and Groups list. If you add
invalid users and click Save, an error message, which says that the object is not found, is displayed.
If you add only invalid users to the list and click Save, the error message is displayed and the list of
invalid users is automatically replaced by AllUsers. If you do not want all the users of the tree to be
authorized users, remove AllUsers from the list, add desired valid users to the list, and click Save.
IMPORTANT: If you have installed iManager for the first time, the Authorized Users and Groups
list is empty. As an Admin user, you must immediately add users and groups to the list to make them
authorized, and to have rights to modify the list. Otherwise, a non-admin user might add users and
groups to the list by which he/she acquires the rights to modify the list. You (Admin) might lose the
rights to modify the list.
configiman.properties
file.
novdocx (en) 22 June 2009
For security-related information about the
Authorized Users and Groups” on page 110.
configiman.properties
file, see “iManager
6.4.3 Look and Feel
The Look and Feel tab lets you customize the appearance of the iManager interface. This
information is stored in
Title Bar Name
Specify your organization name in this text box. It then appears in the title bar of the Web browser in
place of the default text (Novell iManager).
Images
The Title bar contains three images: the header background image, the header filler image, and the
header branding image. Your own images must conform to the dimensions given in the interface.
Store these files in
respective text field.
Navigation Menu Colors
You can customize the color of the menu header and the background of the navigation menu on the
left.
TOMCAT_HOME\webapps\nps\WEB-INF\config.xml
nps/portal/modules/fw/images
. Specify the path of each image in its
.
You can type either color names or hexadecimal numbers. Entries do not need to be case sensitive.
Click Reset to return to default colors and images, or click Save to save the settings. to the
config.xml
file.
6.4.4 Logging Events
The Logging Events tab lets you configure iManager’s logging environment. There are two logging
settings:
Configuring and Customizing iManager 73
Page 74

Logging Level: Select the types of messages you want to log, from four options: No Logging,
Errors only, Errors and Warnings, and Errors, Warnings and Debug Information.
Select your logging output options.
Logging Output: Select the destination for logged messages, from three options: Send Log Output
to Standard Error Device, Send Log Output to Standard output Device, and Send Log Output to
Debug.html File.
The log file path and log file size both appear on this page. Select View to display the current log file
in HTML format. Select Clear to clear the current log file and reset the log file size to 0 (zero) bytes.
6.4.5 Redirection After Logout
The Redirection After Logout option allows you to specify the URL to be redirected to, after you log
out of iManager. If you have not selected this option, when you click Exit, you are logged out of
iManager. By default, the Login page is displayed.
Enable: Select this option to enable Redirection After Logout feature.
novdocx (en) 22 June 2009
URL: Specify the URL to be redirected to, after you log out of iManager.
6.4.6 Authentication
The Authentication tab configures iManager’s login page. It contains the following options:
Remember login credentials: When selected, users must only enter a password to log in.
Use Secure LDAP for auto-connection: When selected, iManager performs LDAP
communications using SSL. Some plug-ins, such as Dynamic Groups and NMAS
this option is not selected. This setting does not take effect until you log out of iManager.
Hide specific reason for login failure: When selected, iManager replaces authentication-related
eDirectory messages with a generic error message that reads:
Username or Password
. For more information, see “Preventing Username Discovery” on
Login Failure. Invalid
page 111.
Allow ‘Tree’ selection on Login page: When selected, iManager’s login page displays the Tree
field. If you do not select this option, you must have a default tree name specified or you cannot log
in.
Contextless Login: Contextless login allows users to log in with only username and password,
without knowing their entire User object context (for example, .admin.support.sales.novell.)
If there are multiple users with the same username in the tree, contextless login allows to log in by
using the first user account it finds with the supplied password within the container order list that the
user has specified. User can re-arrange and set the container order list.
TM
, do not work if
If there are multiple users with the same username in the tree, to log in with a specific username, a
user should provide full context when logging in, or limit the search containers that contextless login
searches.
Select Search from Root to perform the user search from the root of the directory tree. Select Search
Containers to specify one or more containers where User objects can be found.
74 Novell iManager 2.7.3 Administration Guide
Page 75

By default, iManager connects with public access, requiring no specific credentials. You can specify
a user with specific credentials to do the search for the contextless lookup. The iManager public user
is used if you don’t specify a user.
IMPORTANT: If you specify a public user, consider carefully the implications of password
expiration settings. If the password is set to expire for the public user, you do not have the
opportunity to change the password during login after it expires.
iManager Server Timeout Settings: If you want the iManager server to time out after a certain
period, specify the number of days, hours, and minutes in the respective fields, in the Authentication
page.
If you never want the server to time out, select the Never Timeout option.
Redirection After Logout: In the Authentication page, you have to enable this option if you want
to be redirected to a desired page after logging out of iManager. You have to specify the desired
URL in the URL: field. If you do not specify any URL, when you click Exit, you are logged out of
iManager. By default, the Login page is displayed.
novdocx (en) 22 June 2009
6.4.7 RBS
Role-Based Services (RBS) assigns the rights within eDirectory to perform tasks. When you assign
a role to a user, by default RBS assigns the rights necessary to perform the tasks included with that
role.
The RBS tab lets you configure the following settings:
Enable Dynamic Groups: When selected, RBS allows dynamic groups to be members of a role.
For more information about dynamic groups, see the eDirectory Administration guide (http://
www.novell.com/documentation/edir88/index.html?page=/documentation/edir88/edir88/data/
fbabihje.html#fbacjdfg).
Show Roles in Owned Collections: When selected, collection owners see all roles and tasks
whether they are members of them or not. Deselect this option to force collection owners to see only
their assigned roles.
Role Discovery Domain: Indicates where in the tree iManager is to search for roles that are
assigned to a member.
Parent, iManager searches for Dynamic Groups up to the parent container.
Partition, iManager searches for Dynamic Groups up to the first eDirectory partition.
Root, iManager searches for Dynamic Groups in the entire tree.
Dynamic Group Discovery Domain: Indicates where in the tree iManager is to search for
Dynamic Group membership. Role membership is then checked in the Dynamic Groups found.
Parent, iManager searches for roles in the user's parent container.
Partition, iManager searches for roles up to the first eDirectory partition.
Root, iManager searches for roles in the entire tree.
Configuring and Customizing iManager 75
Page 76

Dynamic Group Search Type: Selects which type of Dynamic Groups should be searched for role
membership.
Dynamic Groups only, searches for objects that are of the Dynamic Group class type.
Dynamic Group Objects and Aux classes, searches for objects that are either of the
dynamicGroup class type or have been extended with the dynamicGroupAux class. This
includes group objects that were later converted to Dynamic Groups.
RBS Tree List: Auto-populated with the eDirectory tree's name when a collection owner or a role
member authenticates. If RBS is removed from an eDirectory tree, remove that tree's entry in this
list in order to return to Unassigned Access mode.
6.4.8 Plug-In Download
The Plug-in Download tab lets you configure the following settings:
Query Novell download site for new Novell Plug-in Modules (NPM): Indicates that the
iManager Server should query the Novell Download site (http://download.novell.com/
index.jsp?product_id=&search=Search&build_type=SDBuildBean&families=&date_range=&key
words=iManager&x=23&y=4) for new plug-in modules (NPMs).
novdocx (en) 22 June 2009
Two radio buttons let you configure the query for every available NPM, or query only for updates to
already-installed NPMs.
Downloading Plug-In Modules from a Custom Site: You can download the plug-in modules from
a custom site by specifying the URL of the custom site in the Download URL field, in the Plug-in
Download page.
Downloading Plug-In Modules Through Proxy: If iManager Servers are running under the
firewall proxy, the client can access the Internet through a proxy server. Only HTTP Proxy is
supported. It is a Web proxy HTTP. To download the plug-ins, the user has to do the following in the
Plug-in Download page.
1. Select Enable Proxy.
2. Enter in the following fields:
Proxy Host: Specify the proxy host IP address in this field.
Proxy Port: Specify the proxy port number in this field.
Username: Specify the user name in this field.
Password: Specify the password in this field.
Retype Password: Specify the password that you have specified in the Password field, in
this field.
IMPORTANT: iManager 2.7 plug-ins are not compatible with previous versions of iManager.
Additionally, any custom plug-ins you want to use with iManager 2.7 must be re-compiled in the
iManager 2.7 environment.
6.4.9 Misc
The Misc tab lets you configure the following settings:
76 Novell iManager 2.7.3 Administration Guide
Page 77

Enable [this]: You can safely ignore this option. Enable [this] was added to iManager to allow some
internal teams to modify their own objects. [this] is an attribute in the tree that enables specific selfmanagement functionality. If [this] is enabled, all eDirectory servers in the tree must be version
8.6.2 or later.
eGuide URL: Specifies the URL to eGuide. This is used in the eGuide launch button in the header
and in the eGuide role and task management tasks. This must be a full URL, (for example, https://
my.dns.name/eGuide/servlet/eGuide) or the keyword EMFRAME_SERVER. Using
EMFRAME_SERVER causes eMFrame to look for eGuide on the same server on which eMFrame
is located.
For more information on eGuide, see the Novell eGuide documentation Web site (http://
www.novell.com/documentation/eguide212/index.html).
6.5 Object Creation List
When you create an object, a preconfigured list of object classes is registered with the Create Object
task. The Object Creation List Category contains the following tasks:
Section 6.5.1, “Adding an Object Class to the Creation List,” on page 77
Section 6.5.2, “Deleting an Object Class from the Creation List,” on page 77
novdocx (en) 22 June 2009
6.5.1 Adding an Object Class to the Creation List
Use this task to add more objects to the Object Creation List, which is the list of objects that can be
created in iManager, using the Directory Administration > Create Object task.
1 In the Configure view, select Object Creation List > Add Object Class to Creation List.
2 Select the object to add, then click Next.
.xml
3 Review the XML definition information, then click Finish to create the
file.
6.5.2 Deleting an Object Class from the Creation List
Use this task to delete an object from the Object Creation List, which is the list of objects that can be
created in iManager, using the Directory Administration > Create Object task.
1 In the Configure view, select Object Creation List > Delete Object Class from Creation List.
2 Select the object to delete, then click Next.
3 Review the XML definition information, then click Finish to delete the object from the Object
Creation List.
6.6 Plug-In Module Installation
If you do not see this role in your iManager interface, you are probably not an authorized user. See
“Authorized Users and Groups” on page 72.
There are two types of modules used in iManager:
Novell Plug-in Module (NPM): These are archives that contain the files for plug-ins to iManager.
When you install an NPM using the Available Novell Plug-in Modules task, you are installing a
plug-in to iManager to add to its functionality.
Configuring and Customizing iManager 77
Page 78

RBS Module: These are objects in eDirectory that contain RBS Tasks and RBS Book objects.
When Role-Based Services has been configured in an eDirectory tree, click Configure > RBS
Configuration to install the RBS Module after the NPM in order for the new tasks associated with
the plug-in to become available for use.
Module Installation relates to NPMs only. For information about installing NPMs during the
iManager installation process, see “Downloading and Installing Plug-Ins During Installation” in the
iManager 2.7 Installation Guide.
6.6.1 Available Novell Plug-in Modules
The Available Novell Plug-in Modules (NPM) page lists all the available NPMs contained in the
packages directory/download site. (See “Plug-In Download” on page 76.) The name, version, and
description of each module are in their respective manifest files.
You can hide the plug-ins by selecting the plug-in modules and clicking the Hide button. You can
also hide all the plug-in modules so that the Home page doesn't display the
are available to install
You can also view the list of the hidden plug-in modules by clicking the Show Hidden button. You
can unhide the hidden plug-in modules if required.
notice.
New iManager NPMs
novdocx (en) 22 June 2009
6.6.2 Installed Novell Plug-in Modules
This list contains the NPMs that have been installed in iManager. Each NPM is listed by name, local
version, and description found in the current manifest files.
iManager 2.7 does not include all plug-in modules as part of the base product. Most iManager 2.7
plug-ins must be downloaded separately. However, the following plug-ins are included in the
base.npm module that ships with iManager 2.7:
Directory Administration
Partitions and Replicas
Help Desk
Schema
Rights
Users
Groups
For more information, see Chapter 5, “Roles and Tasks,” on page 33.
IMPORTANT: To function properly, a plug-in module's version must be compatible with the
version of iManager on which it is running. Refer to the specific product documentation for
information about iManager version requirements for a particular plug-in module.
For example, iManager 2.7 plug-ins are not compatible with previous versions of iManager.
Additionally, any custom plug-ins you want to use with iManager 2.7 must be re-compiled in the
iManager 2.7 environment.
78 Novell iManager 2.7.3 Administration Guide
Page 79

6.7 Downloading and Installing Plug-in Modules
iManager 2.7 lets you download and install updates to existing and new plug-ins from within
iManager. iManager automatically queries the Novell Download Web site once a week for plug-ins.
NOTE: Plug-in modules are not replicated between iManager servers. We recommend that you
install the plug-in modules you want on each iManager server.
To download and install one or more plug-in modules:
1 Launch iManager and log in.
2 In the Configure view, select Plug-in Installation > Available Novell Plug-in Modules.
The Content frame lists all the available iManager plug-ins. iManager automatically checks the
Novell download site once a week for updated plug-ins. However, you can update the list at any
time by clicking the Refresh link.
3 (Optional) If you have downloaded a plug-in, or have one locally that you want to install, click
Add, then browse for the appropriate plug-in NPM file.
4 Click OK.
This returns you to the Available Novell Plug-in Modules page.
5 Select the plug-in you want, then click Install.
novdocx (en) 22 June 2009
The file location shows whether the plug-in is from Local Directory, or Novell Download site.
If you select at least one plug-in that has the File Location as Novell Downloads for
installation, the Novell iManager Plug-in Modules License Agreement page is displayed.
Select I Agree, then click OK to proceed with the installation.
NOTE: Installing a plug-in from the Novell download site can take several minutes, depending
on your connection speed and number of plug-ins being installed. A status bar indicates the
download time.
6 After the installation is completed, restart Tomcat.
Tomcat sometimes requires several minutes to fully initialize. Wait at least 5 minutes before
trying to log in to iManager.
For information about restarting Tomcat, see “Starting and Stopping Tomcat” on page 94.
7 Verify that the new Role appears in the Roles and Tasks page.
To add members to the new Role, use the Modify Member Association task.
6.7.1 If RBS is Configured
IMPORTANT: In order to reinstall an existing plug-in, you must first delete the rbsModule object
for that plug-in from eDirectory using the Module Configuration > Delete RBS Module task.
1 From the Configure view, select Role-Based Services > RBS Configuration.
The table on the 2.x Collections tab displays any out-of-date modules.
2 To update them, select the number in the Out-of-Date column for the Collection you want to
update.
Configuring and Customizing iManager 79
Page 80

The list of outdated modules is displayed.
3 Select the modules you want to update, then click Update at the top of the table.
6.7.2 Uninstalling a Plug-in Module
1 In the Configure view, select Plug-in Installation > Installed Novell Plug-in Modules.
2 Select the plug-in, then click Uninstall.
3 Restart Tomcat.
For information about restarting Tomcat, see “Starting and Stopping Tomcat” on page 94.
The steps for manually removing a plug-in module are available in TID #10096957 (http://
support.novell.com/cgi-bin/search/searchtid.cgi?/10096957.htm).
6.7.3 Customizing the Plug-In Download Location
You can create a plug-in download repository if a proxy server or firewall prevents iManager 2.7
from contacting the Novell download Web site. This lets you host plug-in modules on a local Web
server or a common file system location.
novdocx (en) 22 June 2009
The best way to do this is to use the XML descriptor file from the Novell download Web site (http://
www.novell.com/products/consoles/imanager/iman_mod_desc.xml) as a template. For more
information about the iManager descriptor file, see “Downloading and Installing Plug-Ins During
Installation” in the iManager 2.7 Installation Guide.
To set up a local plug-in repository, save the descriptor file locally; then open the file and copy the
URL for each plug-in module you want to make available locally, and paste it in a Web browser
address bar to download the file. After downloading all desired plug-in modules, edit the local copy
of the descriptor file to reflect the new URL for each downloaded plug-in module.
A plug-in module URL can be an HTTP link or a file system location. For example:
Windows File System
<url><![CDATA[file:///c:\iManager_plugins\NMAS.npm]]></url>
Linux File System
<url><![CDATA[file:///home/admin/iManager_plugins/NMAS.npm]]></url>
HTTP Link
<url><![CDATA[http://192.168.0.136/iManager_plugins/NMAS.npm]]></url>
Specifying a Local Descriptor File
You can specify a custom descriptor file either during the iManager 2.7 installation, or after
iManager 2.7 has been installed.
During the installation process, the iManager 2.7 plug-in download URL can be redirected to a
custom descriptor file. To do this, simply change the URL on the Select Plug-ins to Download and
Install page to the location of the custom descriptor file and click Go.
80 Novell iManager 2.7.3 Administration Guide
Page 81

novdocx (en) 22 June 2009
NOTE: If the message
No plug-ins found or server not available
appears in the Plug-in
download area, one or both of the following conditions can exist: There are no updated plug-ins
available on the Novell download site, or the connection to download. novell.com from the install
program was not successful. Verify your Internet connection.
When iManager 2.7 is installed, you can change the plug-in module download URL by modifying
<TOMCAT_HOME>\webapps\nps\WEB-INF\config.xml
. For example:
Windows File System
<setting>
<name><![CDATA[ModuleDownloadDescriptorURL]]></name>
<value><![CDATA[file:///c:\iManager_plugins\custom.xml]]></value>
</setting>
Linux File System
<setting>
<name><![CDATA[ModuleDownloadDescriptorURL]]></name>
<value><![CDATA[file:///home/admin/iManager_plugins/custom.xml]]></value>
</setting>
HTTP Link
<setting>
<name><![CDATA[ModuleDownloadDescriptorURL]]></name>
<value><![CDATA[http://192.168.0.136/iManager_plugins/custom.xml]]></value>
</setting>
IMPORTANT: If you use iManager Workstation to access a custom plug-in URL over an SSL
connection (HTTPS), make sure to import the target Web server’s certificate or you won’t be able to
set up a secure connection.
6.8 E-Mail Notification
This role enables you to select plug-in-specific tasks that users want to be notified of whenever that
specific task occurs. The tasks are set up by the plug-in itself. You decide whether or not to be
notified, and specify who should be notified of selected events. Your first task is to set up the mail
server.
TIP: Depending on what you select, you could receive a lot of e-mail!
Configuring and Customizing iManager 81
Page 82

6.8.1 Mail Server Configuration
The mail server configuration specifies the SMTP server settings for event notification.
1 In the Configure view, select Email Notification > Mail Server Configuration.
2 Specify the mail server settings, then click OK.
From Address: Specifies the address that appears in the From field of the iManager e-mail
message.
Primary Mail Server: Specifies an IP address or server name (for example: smtp.novell.com)
of a mail server. You must also provide the username and password for iManager to use to
access the SMTP server.
Seconday Mail Server: Specifies an optional backup mail server. Provide the same
information as that for the primary mail server.
6.8.2 Task Event Notification
novdocx (en) 22 June 2009
Plug-ins whose tasks are listed in their
1 In the Configure view, select Email Notification > Task Event Notification.
2 In the Email Address field, specify the E-mail addresses you want to receive this notification,
separated by commas.
3 Select an event.
The Task Event Properties screen appears.
4 Specify the e-mail subject and the E-mail message in the appropriate fields.
5 In the Additional Email Addresses field, type any additional e-mail addresses (separated by
commas) you want to notify.
6 Select Override Default and Notify Only These Addresses if you want the message to ignore the
E-mail list in step 2 and go only to the e-mail addresses specified on this page.
.xml
files automatically register task events on this page.
6.9 Views
If you do not see this role in your iManager interface, you are probably not an authorized user. See
“Authorized Users and Groups” on page 72.
iManager Views are management pages accessed from buttons in iManager’s Header frame. You
might want to prevent users from accessing certain views, such as View Objects or Configure.
By default, all views inherit the settings of the parent set.
6.9.1 Showing and Hiding iManager Views
1 In the Configure view, select Views > iManager Views.
2 Specify, or use the Object Selector to find, a container at which you want to restrict access to
Views, then click OK.
3 Specify the appropriate view settings, then click OK.
There are three view settings from which you can choose:
Do not set: Does not explicitly set the view state. This is the default setting.
82 Novell iManager 2.7.3 Administration Guide
Page 83

Hide: Hides the view.
Show: Displays the view.
Select Read parent containers of this object to use the settings of the object's parent container
for this object. When selected, the parent settings take precedence over the object’s local
settings.
novdocx (en) 22 June 2009
Configuring and Customizing iManager 83
Page 84

novdocx (en) 22 June 2009
84 Novell iManager 2.7.3 Administration Guide
Page 85

7
Preferences
The Preferences view lets you configure iManager settings related to the application’s look and feel.
It provides access to the following tasks:
Section 7.1, “Manage Favorites,” on page 85
Section 7.2, “Object Selector,” on page 85
Section 7.3, “Object View,” on page 86
Section 7.4, “Set Initial View,” on page 86
Section 7.5, “Language,” on page 86
7.1 Manage Favorites
Configures the Favorites view, which displays a custom set of often-used tasks together in a special
view.
novdocx (en) 22 June 2009
7
1 From the Preferences view, select Manage Favorites.
2 Select the desired tasks from the Tasks field and move them to the Favorites field.
Double click tasks to move them, or select them and use the arrow icons to move them.
Select Make favorites my initial view to use the Favorites view as your iManager “Home page”.
3 Click OK.
7.2 Object Selector
Configures the Object Selector settings:
Window Size: Specify Object Selector’s window width, height, and left column width, in pixels.
User-Specified Defaults: Specify Object Selector’s default settings, including
Startup Mode: Specifies whether the Browse tab or Search tab is displayed initially.
Results per Page: Specifies the number or results to display per page.
Starting Context: Specifies the default container to which Object Selector opens.
Search on Startup: Specifies initial search actions when Object Selector opens to the Search
tab.
Show Subordinate Count: Enables/disables displaying the total number of objects next to each
container object displayed in the Object Selector. When selected, iManager displays the
subordinate object count, in parentheses, next to the container name.
NOTE: The subordinate count does not take into account your assigned rights when
calculating the subordinate object count, so the number of objects you can see might differ
from the count specified.
Preferences
85
Page 86

7.3 Object View
Configures the Object View settings:
Column Width: Specifies Object View’s column width, in pixels.
Startup Mode: Specifies whether the Browse, Search, or Tree tab is displayed initially.
Selection Mode: Specifies Object View’s initial object selection mode: single object, or multiple
objects.
Navigation Pane (Left Side): Specifies the number of results to display in the Navigation frame.
This setting applies to all tabs in the Object View. Valid settings include 1 - 500.
Tree Content Pane (Right Side): Specifies the number of results to display one page in the Content
frame. This setting applies only to the Tree tab in the Object View. Valid settings include 1 - 500.
Starting Context: Specifies the default directory container to which Object View opens. You can
have it open to the last container used, or have it always open to the same container.
Search on Startup: Specifies initial search actions when Object View opens to the Search tab.
novdocx (en) 22 June 2009
Show Subordinate Count: Enables/disables displaying the total number of objects next to each
container object displayed in the Object Selector. When selected, iManager displays the subordinate
object count, in parentheses, next to the container name.
This applies to the Navigation frame in the Tree tab, and the results window in the Browse and
Search tabs in the Object View.
NOTE: The subordinate count does not take into account your assigned rights when calculating the
subordinate object count, so the number of objects you can see might differ from the count specified.
7.4 Set Initial View
Specifies the view that displays when you first log in to iManager. If nothing is selected, the Roles
and Tasks view defaults to the initial view.you select determines what appears after you log in to
iManager.
7.5 Language
Specifies the language in which you want iManager to display. You must select the check box to
remember the language will remember the language setting between iManager sessions. To make
the language setting permanent, set your preferred default language in the Web browser.
NOTE: Plug-ins cannot work properly if the first language (top position) listed in your Web
browser's Language setting is not set to a supported language for iManager.
To avoid problems, in your Web browser, click Too ls > Options > Languages or a sequence similar
to this, then set the first language preference in the list to a supported language.
86 Novell iManager 2.7.3 Administration Guide
Page 87

8
Troubleshooting
This section provides some troubleshooting tips resulting from Novell’s testing of iManager. These
tips are arranged alphabetically in the following topics:
Section 8.1, “Authentication Issues,” on page 88
Section 8.2, “Deleting and Re-creating User Accounts with the Same Name (Windows XP/
2000),” on page 90
Section 8.3, “DNS 630 Error Message Appears When Creating a Property Book with Invalid
Characters in Name,” on page 90
Section 8.4, “eDirectory Maintenance Task Errors,” on page 90
Section 8.5, “Enabling Debug Messages for Install and Configure,” on page 91
Section 8.6, “History Does Not Automatically Sync Across Multiple Simultaneous User
Logins,” on page 91
Section 8.7, “iManager Doesn't Work after Installing Groupwise 7.0 WebAccess (Windows
Server 2000/2003),” on page 91
Section 8.8, “Missing Attribute, Object, or Value Errors,” on page 91
Section 8.9, “Missing Roles or Tasks in the Configure View,” on page 92
novdocx (en) 22 June 2009
8
Section 8.10, “Performing a System Restore from Image Software,” on page 92
Section 8.11, “Running eDirectory and iManager on the Same Machine (Windows only),” on
page 93
Section 8.12, ““Service Unavailable” Message Appears During Multiple Plug-In Installs,” on
page 94
Section 8.13, “Tomcat,” on page 94
Section 8.14, ““Unable to Determine Universal Password Status” Error,” on page 95
Section 8.15, “iManager Workstation Does Not Display Information,” on page 95
Section 8.16, “Sometimes Refresh Button Does Not Function,” on page 96
Section 8.17, “iManager Plug-in Installation Hangs or Plug-ins Are Not Properly Installed,” on
page 96
Section 8.18, “Login Issue with Respect to Tree IP Address Change,” on page 97
Section 8.19, “Java Error Messages are Displayed After Closing the Browser of iManager
Workstation,” on page 98
Troubleshooting
87
Page 88

8.1 Authentication Issues
Authentication is a complex topic, and your existing network infrastructure can affect your ability to
successfully perform an initial iManager login. The following facts can help you minimize
authentication-related difficulties. For more information about authentication-related topics, see
Novell’s NMAS documentation (http://www.novell.com/documentation/nmas30/index.html) and
eDirectory documentation (http://www.novell.com/documentation/edir88/index.html).
iManager authentication is a platform-dependent operation, meaning that it functions
differently depending on the platform on which iManager is running
NetWare servers: When iManager runs on a NetWare server (including OES NetWare) it
utilizes eDirectory’s legacy authentication mechanism and the regular eDirectory password.
This mechanism does not support eDirectory’s Simple Password or Universal Password
options.
Linux and Windows servers: When iManager runs on a Linux or Windows server it utilizes
eDirectory’s legacy authentication mechanism and the regular eDirectory password. This
mechanism does not support eDirectory’s Simple Password or Universal Password options.
novdocx (en) 22 June 2009
iManager Workstation: iManager Workstation runs on a client workstation, either Linux or
Windows, and leverages the NMAS client that allows it to use Universal Password, if
configured.
iManager does not use LDAP for the initial iManager authentication process. It utilizes
eDirectory’s proprietary authentication protocol. However, following initial authentication,
iManager can, create LDAP connections to eDirectory as needed to support directory access for
the installed plug-ins that require LDAP access.
iManager does not support authenticating with eDirectory’s Simple Password.
You might encounter the following error messages when authenticating to iManager. Each error
message section discusses possible causes.
Section 8.1.1, “HTTP 404 Errors,” on page 88
Section 8.1.2, “HTTP 500 Errors,” on page 89
Section 8.1.3, “601 Error Messages,” on page 89
Section 8.1.4, “622 Error Messages,” on page 89
Section 8.1.5, “632 Error Messages,” on page 89
Section 8.1.6, “634 Error Messages,” on page 89
Section 8.1.7, “669 Error Messages,” on page 90
8.1.1 HTTP 404 Errors
If you receive a 404 error the first time you attempt to access iManager, you need to verify the ports
that Apache is running on. Depending on how you installed iManager and whether you chose to use
Apache or IIS, the configuration file locations vary. Apache uses either the
ssl.conf
88 Novell iManager 2.7.3 Administration Guide
file. Refer to the Microsoft documentation for information on IIS port settings.
httpd.conf
file or the
Page 89

8.1.2 HTTP 500 Errors
If you receive an internal server error or servlet container error (either unavailable or being
upgraded), iManager is having one of two problems with Tomcat:
Tomcat has not fully initialized after a reboot.
Tomcat has failed to start.
Wait a few minutes and try again to access iManager. If you still receive the same errors, verify the
status of Tomcat.
Checking the Status of Tomcat
1 Restart Tomcat.
For information about restarting Tomcat, see “Starting and Stopping Tomcat” on page 94.
2 Check the Tomcat logs for any errors.
novdocx (en) 22 June 2009
The log file is located in the
Windows platforms. On UNIX and Linux, the logs are named
localhost_log.date.txt
On NetWare, errors appear on the logger screen.
$tomcat_home$/logs
; on Windows, the log files are named
directory on the UNIX, Linux, and
catalina.out
stderr
and
or
stdout
.
8.1.3 601 Error Messages
The object name entered could not be found in the context specified.
Some possible causes:
Contextless login might be disabled.
Your User object might not be in the configured search containers list. Either ask your
administrator to add your user location to the contextless login search containers or log in with
a full context.
8.1.4 622 Error Messages
The NDS password has been disabled in the Universal Password policy. This may also manifest
itself with a 222 Error Message.
You can avoid this error with iManager Workstation by installing the NMAS client, which allows
iManager to utilize the Universal Password authentication mechanism rather than eDirectory’s
legacy authentication process.
8.1.5 632 Error Messages
This error is a system failure with several possible causes (http://www.novell.com/documentation/
nwec/nwec_enu/nwec_ids_t_err_system_failure.html).
8.1.6 634 Error Messages
The target server does not have a copy of what the source server is requesting, or the source server
has no objects that match the request and has no referrals on which to search for the object.
Troubleshooting 89
Page 90

Some possible causes:
novdocx (en) 22 June 2009
You entered an incorrect tree or IP address. If you are using the IP address, make sure you
include the port if eDirectory
iManager cannot locate your tree or IP address before timing out. If the tree name fails, use the
IP address.
TM
is installed on a nonstandard (524) port.
8.1.7 669 Error Messages
An invalid password was used, authentication failed, one server tried to synchronize with another
one but the target server’s database was locked, or a problem exists with the remote ID or public key.
Some possible causes:
You typed an incorrect password
There are multiple users with the same username in the tree. Contextless login tries to log in
using the first user account it finds with the supplied password. In this case, provide a full
context when you log in or limit the search containers that contextless login searches.
8.2 Deleting and Re-creating User Accounts with the Same Name (Windows XP/2000)
If you have deleted one or more Windows user accounts, and then re-created them with the same
name, do the following to use iManager Workstation with the re-created account:
1 Log in as a member of the Administrator group.
2 Take ownership of the
varies between Windows 2000 and Windows XP.
3 Delete the folder.
When the user next logs in, this folder is automatically recreated using NICI keys of the re-created
user account, and the user can then run iManager Workstation.
\system32\novell\nici\username
directory. The absolute path
8.3 DNS 630 Error Message Appears When Creating a Property Book with Invalid Characters in Name
If you create a Property Book and name it using special characters that are invalid, a DNS Error 603
message might be returned. For more information about naming a Property Book, see “Creating a
New Property Book” on page 61.
8.4 eDirectory Maintenance Task Errors
Running eDirectory Maintenance Tasks requires that Role-Based Services (RBS) must be
configured through iManager for the tree that is being administered. For RBS configuration
information, see Chapter 4, “Browsing Objects,” on page 23.
For additional information, see the Novell eDirectory documentation (http://www.novell.com/
documentation/lg/edir871/index.html?page=/documentation/lg/edir871/edir871/data/agabn4a.html).
90 Novell iManager 2.7.3 Administration Guide
Page 91

8.5 Enabling Debug Messages for Install and Configure
If installation fails, you must enable some debugging messages to help determine what is wrong.
Linux: Export LAX_DEBUG=true in the terminal session that you start the iManager
InstallAnywhere program from.
Windows: Hold the Ctrl key down as you start the iManager InstallAnywhere program and
continue holding it until the debugging screen appears.
8.6 History Does Not Automatically Sync Across Multiple Simultaneous User Logins
Using two instances of the same browser (such as two Firefox or two Mozilla browsers but not
Internet Explorer) avoids the problem. The history book is shared by the two instances.
8.7 iManager Doesn't Work after Installing
novdocx (en) 22 June 2009
Groupwise 7.0 WebAccess (Windows Server
2000/2003)
On Windows 2000 and 2003 Server with IIS 5 or 6, installing Groupwise 7.0 WebAccess to IIS
automatically installs Tomcat 5.5.
As the iManager installation begins, the iManager installer program detects that IIS and Tomcat are
available for use. The installer reports the inability to stop the iisadmin service. Near the end of the
install, the installer reports the inability to start Tomcat.
After the install is completed, Groupwise WebAccess still works, but iManager does not (HTTP
404: Page not found).
Workaround: Do not install iManager and Groupwise on the same server.
8.8 Missing Attribute, Object, or Value Errors
If you have a large installation with synchronization delays, you can force iManager to communicate
with the master replica. This ensures that you have access to any attributes, objects, or values that
have been recently added or modified. This is not recommended for regular use of iManager, but can
be helpful when you are experiencing synchronization delays.
To use this parameter when logging in to iManager, add
after you have loaded the login page. This setting can also be enabled in
TOMCAT_HOME\webapps\nps\WEB-INF\config.xml
servlet/webacc?taskId=fw.Startup&forceMaster=true
&forceMaster=true
. For example:
https://127.0.0.1/nps/
.
to the end of the URL
You must restart Tomcat after making any changes to the
restarting Tomcat, see “Starting and Stopping Tomcat” on page 94.
config.xml
file. For information about
Troubleshooting 91
Page 92

8.9 Missing Roles or Tasks in the Configure View
If the following Roles or Tasks are not present on the Configure view, you need to verify that you are
an authorized user. For more information, see “Authorized Users and Groups” on page 72.
8.9.1 Possible Missing Roles or Tasks
Configure iManager task
Object Creation List role
Plug-in Installation role
E-mail Notification role
Vie w role
8.9.2 Possible Reasons Why You Are Not an Authorized User
You renamed your tree.
novdocx (en) 22 June 2009
Edit the
Information entered during the iManager installation for the authorized user was incorrect.
Edit the
The
Delete the
information or log in to iManager and go to Configure view > iManager Server > Configure
iManger. On the Security page, add the Authorized Users for the system by browsing the tree,
or if you are sure of the full path to the user, you can manually enter it.
The permissions on the configiman.properties file have been changed to prevent iManager
from reading the file.
Change the permissions on the file to match the files in the same directory.
Your administrator has not added you as an authorized user.
Request to be added to the Authorized Users list. For more information, see “Authorized Users
and Groups” on page 72.
configiman.properties
configiman.properties
configiman.properties
configiman.properties
file and change the tree name for each user.
file and add the correct username including the tree name.
file is corrupted for some unknown reason.
file and either re-create the file with the correct
8.10 Performing a System Restore from Image Software
If you perform a system restore from image software such as Ghost, the
sys:\tomcat5\conf\NPS-APACHE.CONF
file could become truncated in the process.
If this file is truncated to
then stop and restart Tomcat.
For information about restarting Tomcat, see “Starting and Stopping Tomcat” on page 94.
92 Novell iManager 2.7.3 Administration Guide
NPS-APACHE~1.CON
or some other corrupt filename, rename the file and
Page 93

8.11 Running eDirectory and iManager on the Same Machine (Windows only)
If iManager was installed before eDirectory, you might experience any of the following errors when
using iManager, LDAP(S), or HTTP(S) to access eDirectory.
-340 error when trying to access encrypted attributes with iManager
LDAP : SSL_CTX_use_KMO failed. Error stack: error:1412D0D4:SSL
routines:SSL_CTX_use_KMO:read wrong packet type (err = -1418)
HTTP : 0016 TLS operation failed, err: 1, result: -1 --
HTTP : -- error:1408A0C1:SSL routines:SSL3_GET_CLIENT_HELLO:no shared cipher
HTTP : 0017 TLS operation failed, err: 1, result: -1 --
HTTP : -- error:1406B0BD:SSL routines:GET_CLIENT_MASTER_KEY:no p
rivatekey
HTTP : Unable to access server certificate and key, handshakes will fail
HTTP : -- error:1412D0D4:SSL routines:SSL_CTX_use_KMO:read wrong packet type
Limber : Error while setting NCP Key Material Name SSL CertificateDNS to
server, Err: failed, -340 (0xfffffeac)...
Limber : Error During syncKeyMaterialInfo -340 (0xfffffeac)
--
novdocx (en) 22 June 2009
It could be that eDirectory’s initial system configuration has not occurred. The user who installed
eDirectory and the user who is running the eDirectory server must coordinate the eDirectory
configuration. Generally, eDirectory is installed as administrator and is run as SYSTEM. You can
manually correct this issue, but an understanding of eDirectory, iManager, NICI, and other currently
installed products is necessary. You must determine if the following steps are safe to perform. You
should also check the product’s documentation and dependencies to see if any long-term encrypted
data or secrets are used.
If eDirectory and iManager are installed on the same physical machine, you can manually configure
eDirectory after eDirectory installation.
NOTE: You should not do this if eDirectory was installed at a previous time and has been
successfully running on the current machine.
1 Log in as an administrator.
2 Stop the eDirectory server and the Tomcat service.
Also stop any other service that may be using NICI.
3 Take ownership of the
%systemroot%\system32\novell\NICI\SYSTEM
directory.
Do this from the file properties' Security > Advanced Options.
4 Save the contents of the
5 Delete the contents of the
6 Copy the contents of
%systemroot%\system32\novell\NICI\SYSTEM
7 You can reset the permissions of
SYSTEM
%systemroot%\system32\novell\NICI\Administrator
directory in a backup directory.
SYSTEM
directory.
%systemroot%\system32\novell\NICI\SYSTEM
to
and its
contents so that only SYSTEM has access.
8 Restart the NDS Server and Tomcat services and any other service you may have stopped.
Troubleshooting 93
Page 94

8.12 “Service Unavailable” Message Appears During Multiple Plug-In Installs
This situation occurs when you select several plug-ins to install, all at the same time. While the plugin installation continues over several minutes, the browser page times out and returns a 503 Error.
Although you probably don't need to do anything but wait, you can monitor plug-in installations
through the Tomcat log files or on the NetWare logger screen.
8.13 Tomcat
The following general Tomcat information can be useful in your troubleshooting efforts.
8.13.1 Starting and Stopping Tomcat
The following tables describe how to start and stop Tomcat on the platforms supported by iManager
2.7.
novdocx (en) 22 June 2009
Table 8-1 Stopping and Starting Tomcat
Platform Restart Command
Linux Enter
NetWare
iManager
Workstation
Windows Stop and start the Tomcat service.
®
6.5 Enter
/etc/init.d/novell-tomcat5 stop
/etc/init.d/novell-tomcat5 start
TC5STOP
TOMCAT5
Shut down and restart iManager Workstation.
to stop Tomcat. Wait at least one minute, then enter
to start Tomcat again.
, then enter
.
8.13.2 Tomcat Ports
If you experience port conflicts while upgrading to iManager 2.7, or need to know the ports that
Tomcat is using, consult the platform-specific information in this section.
NetWare
View Tomcat ports in the
Linux
sys:\tomcat\5.0\conf\server.xml
file.
View Tomcat ports in the
/var/opt/novell/tomcat5/conf/server.xml
The non-SSL port section of the file begins with
Connector
Connector
94 Novell iManager 2.7.3 Administration Guide
on port n, while the SSL port section begins with
on port n.
file.
Define a non-SSL Coyote HTTP/1.1
Define an SSL Coyote HTTP/1.1
Page 95

Windows
Windows allows for relocation of all files. If you accept the defaults in the iManager installation,
look for Tomcat configuration files in the
If you can't find a configuration file, search the Windows registry for the Tomcat settings.
rootdir\novell\tomcat5\conf\server.xml
file.
8.14 “Unable to Determine Universal Password Status” Error
If an eDirectory for UNIX server is configured to use SSL for LDAP communications, you might
receive the following error when you select the option in iManager to set a Simple Password:
Unable to determine universal password status
novdocx (en) 22 June 2009
To resolve this error, run the
server. This utility lets you install login methods into eDirectory from a UNIX machine and is
required to run the Universal Password feature. The nmasinst utility is located in the directory.
For more information, see the Universal Password Deployment Guide (http://www.novell.com/
documentation/lg/nw65/universal_password/data/front.html).
/usr/bin/nmasinst/nmasinst
utility on the eDirectory for UNIX
8.15 iManager Workstation Does Not Display Information
iManager workstation might not display error messages, and load pages such as Tree View, Object
Browse, Create Objects, and page after clicking the Refresh button. This happens when the
XULRunner browser cache contains old data of the previous build of iManager 2.7 workstation.
Work around: You must manually clear the data from browser cache.
For Windows:
1. Exit iManager.
2. Browse for
(the path varies depending on the configuration and OS).
3. Delete all the data from the
4. Restart iManager.
For Linux:
1. Exit iManager.
C:\Users\<username>\AppData\<Profile>\Mozilla\eclipse\Cache
Cache
directory.
2. Browse for one of the following:
/root/.mozilla/eclipse/Cache
/$HOME/.mozilla/eclipse/Cache
3. Delete all the data from the
4. Restart iManager.
Cache
(for root user)
(for non root user)
directory.
Troubleshooting 95
Page 96

8.16 Sometimes Refresh Button Does Not Function
Sometimes the Refresh button in various pages does not function when you click it.
Work around:
1. Log out from iManager.
2. Clear the browser’s cache.
For Internet Explorer,
1. Click Tools > Internet Options. The Internet Options dialog box is displayed.
2. Under the General tab, under Browsing history, click Delete.
For Mozilla,
1. Click Tools > Clear Private Data.... The Clear Private Data dialog box is displayed.
2. Select Cache and click Clear Private Data Now.
3. Log in to iManager.
novdocx (en) 22 June 2009
8.17 iManager Plug-in Installation Hangs or Plugins Are Not Properly Installed
When you install iManager plug-ins, sometimes either the installation hangs or the plug-ins are not
properly installed.
Work around
For iManager Standalone:
1. Log out from iManager.
2. Clear the browser’s cache.
For Internet Explorer, do the following:
1. Click Tools > Internet Options. The Internet Options dialog box is displayed.
2. Under the General tab, under Browsing history, click Delete.
For Mozilla, do the following:
1. Click Tools > Clear Private Data.... The Clear Private Data dialog box is displayed.
2. Select Cache and click Clear Private Data Now.
3. Log in to iManager.
4. Re-install the plug-ins.
For iManager workstation:
For Windows:
1. Exit iManager.
2. Browse for
(the path varies depending on the configuration and OS).
96 Novell iManager 2.7.3 Administration Guide
C:\Users\<username>\AppData\<Profile>\Mozilla\eclipse\Cache
Page 97

novdocx (en) 22 June 2009
3. Delete all the data from the
Cache
directory.
4. Restart iManager.
For Linux:
1. Exit iManager.
2. Browse for one of the following:
/root/.mozilla/eclipse/Cache
/$HOME/.mozilla/eclipse/Cache
3. Delete all the data from the
Cache
(for root user)
(for non root user)
directory.
4. Restart iManager.
8.18 Login Issue with Respect to Tree IP Address Change
Consider the following scenario:
1. Your IP address is <xxx.xx.xx.xx>, you have configured eDirectory on it, and your tree name is
<XXX_TREE>.
2. You have login cache; it maps <XXX_TREE> to <xxx.xx.xx.xx>.
3. Because of network movement, you have got a new IP address <yyy.yy.yy.yy>, configured
eDirectory on it, and the tree name remains same (<XXX_TREE>).
4. Another user has taken your previous IP address <xxx.xx.xx.xx>, and configured a new
eDirectory tree <YYY_TREE>.
Now, if you log in to iManager with <XXX_TREE> tree name, you would log in to <YYY_TREE>
because <XXX_TREE> maps to <xxx.xx.xx.xx>, but <xxx.xx.xx.xx> is currently configured with
<YYY_TREE>.
Work around:
For Windows,
1. Go to
2. Open
3. In the file, search for the
...\Program Files\Novell\Tomcat\webapps\nps\WEB-INF\
config.xml
file.
Cached-Tree
setting and delete your
Tree Name
.
value from the
setting.
4. Delete the setting that starts with your tree name.
For Linux,
1. Go to
2. Open
3. In the file, search for the
/var/opt/novell/iManager/nps/WEB-INF
config.xml
file.
Cached-Tree
setting and delete your
.
Tree Name
value from the
setting.
4. Delete the setting that starts with your tree name.
Troubleshooting 97
Page 98

8.19 Java Error Messages are Displayed After Closing the Browser of iManager Workstation
After logging out of iManager, when you close the browser, the following java error message is
displayed.
#
# An unexpected error has been detected by Java Runtime Environment:
#
# SIGSEGV (0xb) at pc=0x8e4c6944, pid=4106, tid=3085011872
#
# Java VM: Java HotSpot(TM) Server VM (11.3-b02 mixed mode linux-x86)
# Problematic frame:
# C [libmozjs.so+0x2944] strftime+0x2944
novdocx (en) 22 June 2009
Work around: Ignore the error message and the
affect the iManager workstation.
hs_err_pid####.log
files because they don’t
98 Novell iManager 2.7.3 Administration Guide
Page 99

9
Auditing iManager Events
Use Novell® Audit for auditing iManager events. For more information, see the Novell Audit 2.0
Administration Guide (http://www.novell.com/documentation/novellaudit20/index.html).
Novell Audit has the following prerequisites:
A server (NetWare
2.0.x.
Novell Audit Platform Agent installed on the iManager server or iManager Workstation
desktop and configured to point to the Secure Logging Server.
Novell Audit captures data about the following events:
Added authorized user
Successful login
Successful NPM install
Startup iManager
®
, Solaris*, Windows*, Linux*) in your directory tree with Novell Audit
novdocx (en) 22 June 2009
9
Failed SSL connection
Logout
Changed configuration
Failed login
Failed NPM install
Shutdown iManager
The
IMAN_EN.LSC
installed via the Novell Audit process. It can also be installed manually by using the Novell Audit
iManager plug-in as described in the following section.
file which contains this data is distributed under
nps/support/audit
and is
9.1 Installing the IMAN_EN.LSC File in iManager
Install Novell Audit before you install the
1 Log in to iManager.
2 Click Roles and Tasks -> Auditing and Logging -> Logging Server Options.
3 Browse to and select the Logging Server object, then click OK.
4 Click Log Applications -> Applications.
5 Click the Applications Actions link, then click New.
IMAN_EN.LSC
file.
6 Click OK to create a new Log Application in the container.
7 Specify a Log Application name.
8 To im por t the
TOMCAT_HOME\webapps\nps\support\audit
The new log application should now appear under the Applications container.
IMAN _EN.LSC
file, click Browse and select the file found in the
directory, then click OK.
Auditing iManager Events
99
Page 100

9.2 Enabling Audit in iManager
1 Log in to iManager.
2 Click Configure > iManager Server > Configure iManager. The Configure iManager page is
displayed.
3 Click the Security tab, select Enable Novell Audit, select the events you want to record, then
click Save.
9.3 Configuring Audit for iManager Instrumentation
novdocx (en) 22 June 2009
1 If you have not installed
2 Log in to iManager.
3 Click Configure > Plug-in Installation > Available Novell Plug-in Modules.
4 Click Add.
5 Select
6 Restart Tomcat.
7 Import Nsure® Audit formatting file that allows the audit server to format logging events.
8 In iManager, click Roles and Tasks > Auditing and Logging > Logging Server Options.
9 Browse for the Logging Server object and click OK. Logging Server Options: page is
10 Click the Log Applications tab.
11 Select Container Name, then under Application Actions Menu, click New. The New Log
12 Specify a name for the Log Application Name (for example, iManagerInst).
naudit.npm
1. Locate the IMAN_EN.lsc file from one of the following locations where iManager server
is installed.
Sys:\tomcat\5.0\webapps\nps\support\audit
Files\Novell\Tomcat\webapps\nps\support\audit
/var/opt/novell/tomcat5/webapps/nps/support/audit
2. Copy this file to a temporary location on the local machine.
displayed.
Application dialog box is displayed.
naudit.npm
from the local directory and click Install.
, follow from Step 2. Otherwise, go to Step 7.
(for NetWare)
(for Windows)
(for Linux)
C:\Program
13 Browse for the
7.1), then click OK to save the new Log Application object.
14 In the Logging Server Options: page, under Applications, click the Log Application Name
(which you have specified in Step 12) link. The Modify Object: page is displayed.
15 Click Configure > Events.
16 Select iManager Events from the Not grouped list, click Apply, then click OK.
17 Restart/Reload the Audit Secure Logging Server for the changes to take effect.
18 Click Configure > iManager Server > Configure iManager. The Configure iManager page is
displayed.
19 Select Enable Novell Audit to log any events that you select.
100 Novell iManager 2.7.3 Administration Guide
IMAN_EN.lsc
file on the local machine or from the server location (see Step
 Loading...