

Page 1

ZeRO SL MkII
USER GUIDE – FIRMWARE VERSION 1.0
Rev- 01
1
Page 2

ContEntS
IntRoDUCtIon .................................................................................. 5
HARDWARE oVERWIEW ...................................................................... 6
ASSIGN ABLE CONT ROLS .................................................................6
NON-ASSIGNABLE CONTROLS .........................................................7
REAR PANEL CONNECT IONS ............................................................8
POW ER-UP CALIBRATION .................................................................8
ZERo SL MkII SEtUP EX AMPLES ........................................................ 9
SOFTWARE CONTROL ......................................................................9
HARDWARE CON TROL .....................................................................9
ZERO SL MKII AS MIDI INTERFACE .................................................. 9
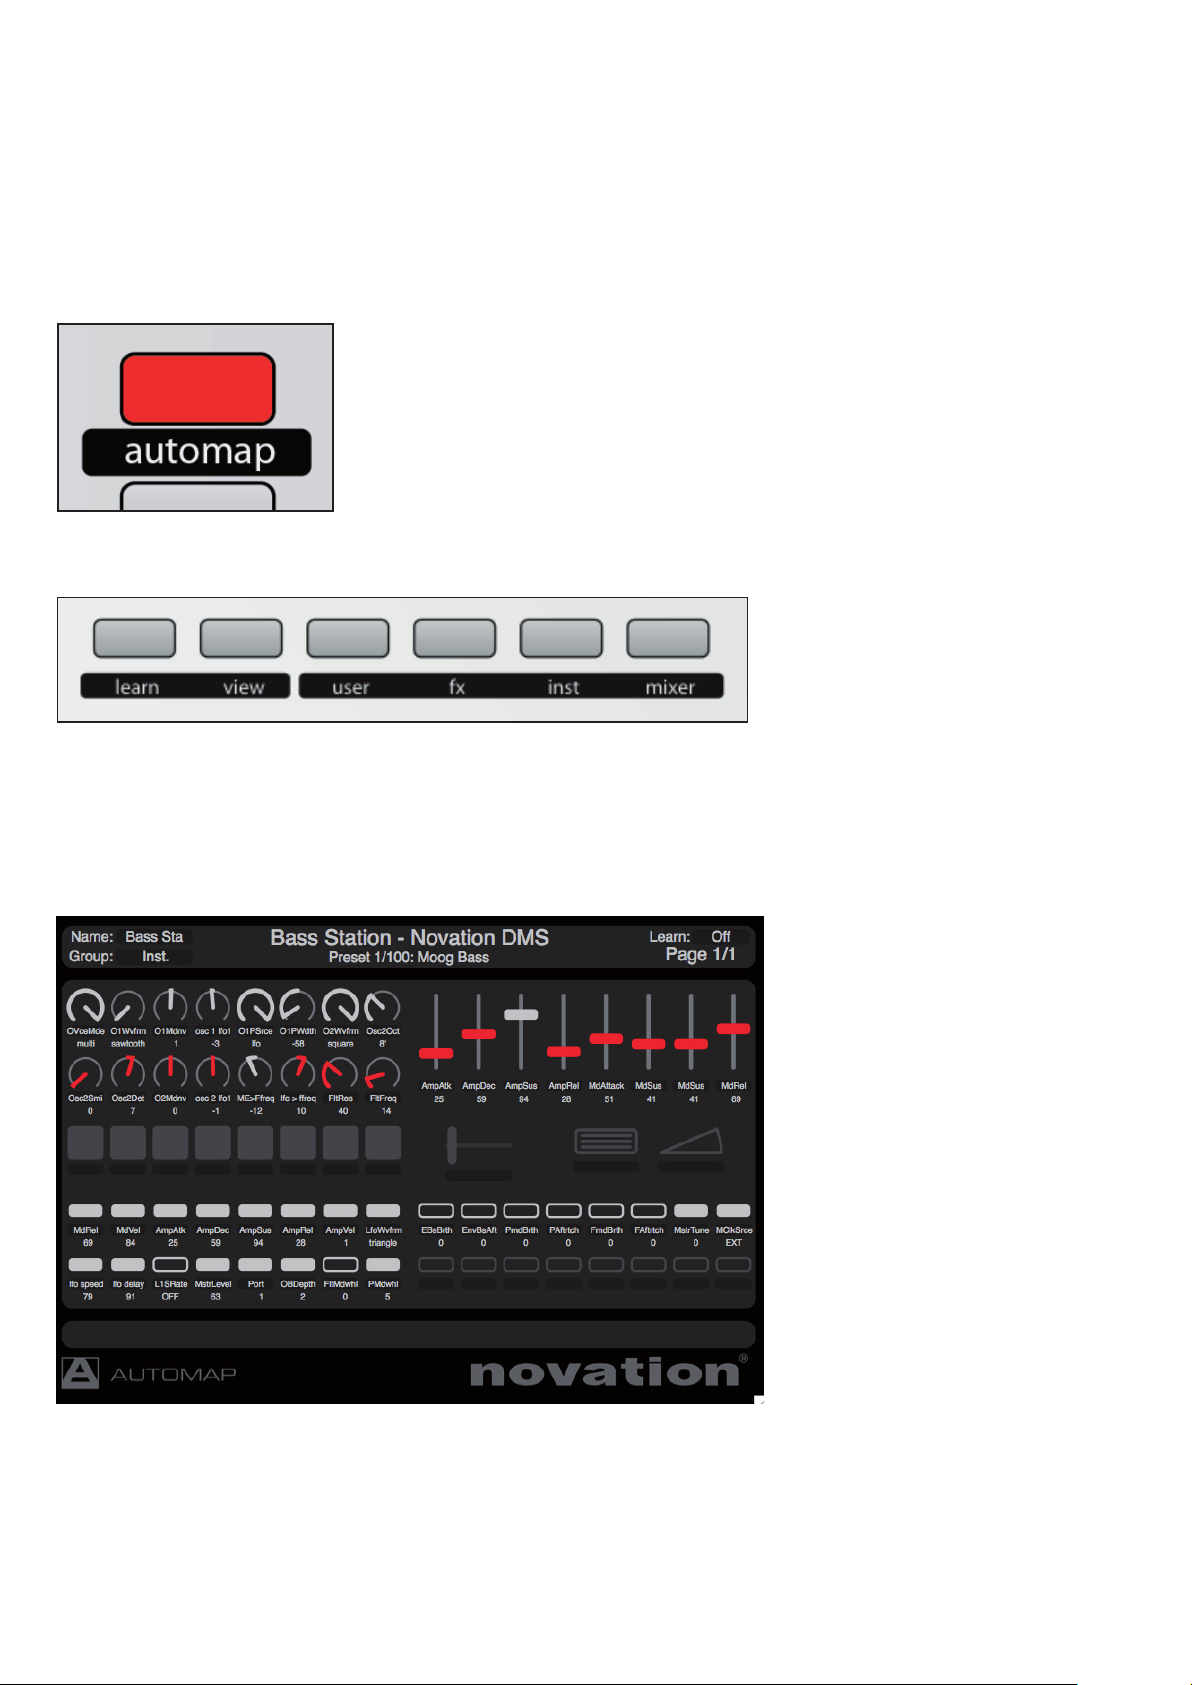
AUtoMAP MoDE VS ADVAnCED MoDE ............................................ 10
AUtoMAP MoDE .............................................................................. 11
SELECTING AUTOMAP MODE ......................................................... 11
AUTOMAP MODE - SYST EM BUTT ONS ........................................... 11
AUTOMAP TEMPLATE OVERVIEW ................................................... 12
SPEED DIAL .................................................................................. 12
PORTS .......................................................................................... 13
SOF TWARE SET-UP EX A MPLES ...................................................... 14
AUTOMAP FOR HA RDWARE CON TROL ........................................... 15
ADVAnCED MoDE ............................................................................ 16
SELECTING TEMPLATES ................................................................. 16
ADVANCED MODE TEMPL ATE OVERVIEW ........................................ 17
SPEED DIAL .................................................................................. 17
HARDWARE CON TROL ................................................................... 18
SOF TWARE & HARDWARE CONTROL .............................................. 18
SPECI AL TEMPL ATES FOR ABL ET ON LIVE & RE ASON ...................... 19
MEnU oVERVIEW ............................................................................. 20
NAVIGATING THE MENUS ...............................................................20
SAVING/ WRI TING CHANGES ...........................................................20
SELEC TING ...................................................................................20
HIERARCH Y OF SETT INGS ..............................................................20
QUICk MEnU .................................................................................... 21
BANK & P ROGRAM CHANGE OU TPUT ............................................21
PROGRAM CHANNEL .....................................................................21
DRUM PADS TRANSPOSE ..............................................................21
TEMPO SETT INGS ......................................................................... 21
EDIt MEnU BUt ton ......................................................................... 22
tEMPL AtE EDIt MEnU ...................................................................... 22
POT PICK-UP .................................................................................22
TEMPLATE ROUTING SUB MENU ....................................................22
PROGRAM CHANNEL & POR T ....................................................22
COMMON CHANNEL & PORT ....................................................22
2
Page 3

TEMPLATE GROUPING SUB MENU ..................................................23
CONTROL EDIT OVERVIE W .............................................................23
GLoBA L MEnU BUt ton ................................................................... 24
oPtIonS SUB MEnU ........................................................................ 24
MEMORY P ROTECT .......................................................................24
POT PICK-UP .................................................................................24
DISPL AY TIME ...............................................................................24
KEEP VALUES ................................................................................ 24
TOUCH SELEC T .............................................................................24
TRA NSPORT .................................................................................24
CONTROL PEDAL ........................................................................... 24
StARt-UP SUB MEnU ....................................................................... 25
START UP MODE ...........................................................................25
AUTOMATIC DEMONSTRATION .......................................................25
RoUtInG SUB MEnU ........................................................................ 25
USB1 TO .......................................................................................25
MIDI IN TO .....................................................................................25
MIDI CLOCK SETT INGS ...................................................................25
PROGRAM CHANGE INPUT CHANNEL & PORT .................................26
SEnD & RECEIV E SUB MEnU ............................................................ 26
TEMPLATE DUMP ..........................................................................26
SEND GLOBAL S ............................................................................26
OS RECEIVE & SEND ......................................................................26
DRUMPADS CALIBRATION ..............................................................26
WRItInG GLoBAL SEttInGS ............................................................. 27
tRAnSPoRt ..................................................................................... 27
CREAtInG & EDItInG ADVAnCED MoDE tEMPLAtES ........................ 28
MIDI MESSAGE ASSIGNMENT TABLE ..............................................28
ContRoL CHAnGE (CC ) ................................................................... 28
DISPL AY TY PE ...............................................................................28
ADDItIonAL oPtIonS foR EnCoDERS onLy .............................. 29
REL 1 & 2 .....................................................................................29
14-BIT 0-16K .................................................................................29
APOT ............................................................................................29
CONTROL L ABEL ...........................................................................29
VALUE R ANGE ...............................................................................29
ADDItIonAL oPtIonS foR BUttonS onLy ................................ 30
DISPL AY TY PE ...............................................................................30
BUT TON TY PE:..............................................................................30
NORMAL .......................................................................................30
M O M E N TA R Y ................................................................................30
TOGGLE ........................................................................................30
STEP ............................................................................................30
3
Page 4

GEnERA L ContRoL EDIt SEt tInGS ................................................. 30
CONTROL EDIT POR T & CHA NNEL SE T TINGS ..................................30
CC NUM ........................................................................................31
CONTROL EDIT PO T PICK-UP MODE ................................................ 31
non-REGIStERED PARAMEtER nUMBER (nRPn ) .............................. 31
REGIStERED PAR AMEtER nUMBER ( RPn) ........................................ 31
SyStEM EXCLUSIVE ( SySEX) ........................................................... 32
MIDI MACHInE ContRoL ( MMC) ....................................................... 32
notE on / off ................................................................................. 33
BAnk CHAnGE ................................................................................. 33
PRoGRAM CHAnGE .......................................................................... 33
DRUM PAD notE ............................................................................. 34
SyStEM REAL tIME ......................................................................... 34
tEMPL AtE CHAnGE MESSAGE ......................................................... 34
4
Page 5

IntRoDUCtIon
Welcome to the ZeRO SL MkII Guide.
This guide will introduce you to the ZeRO SL MkII hardware and give you information on choosing how best to use the ZeRO
SL MkII for your sof tware and / or hardware studio set-up, take you through the ZeRO SL MkIIs Menu system and give
detailed information on creating your own templates.
There is a separate User Guide for the Automap Software which is included on installation CD or can be downloaded from
our website: www.novationmusic.com/support
Automap sof tware is a new and exciting way to control your favourite music software applications. It operates the same
way for all Novation Automap hardware (Products) so if you are using the ZeRO SL MkII for Automap control of software
then you should only need to read the first few chapters of this guide to familiarise yourself with the hardware.
Detailed information on installing, setting up, and operating Automap software can be found in the Automap User Guide.
Instructions on setting up your DAW software for use with Automap is found in the Automap software itself by clicking the
DAW set-up guide button for detailed instructions.
For additional information, up to date support articles and a form to contact our Technical Support Team please visit the
Novation Answerbase at: www.novationmusic.com/answerbase
5
Page 6
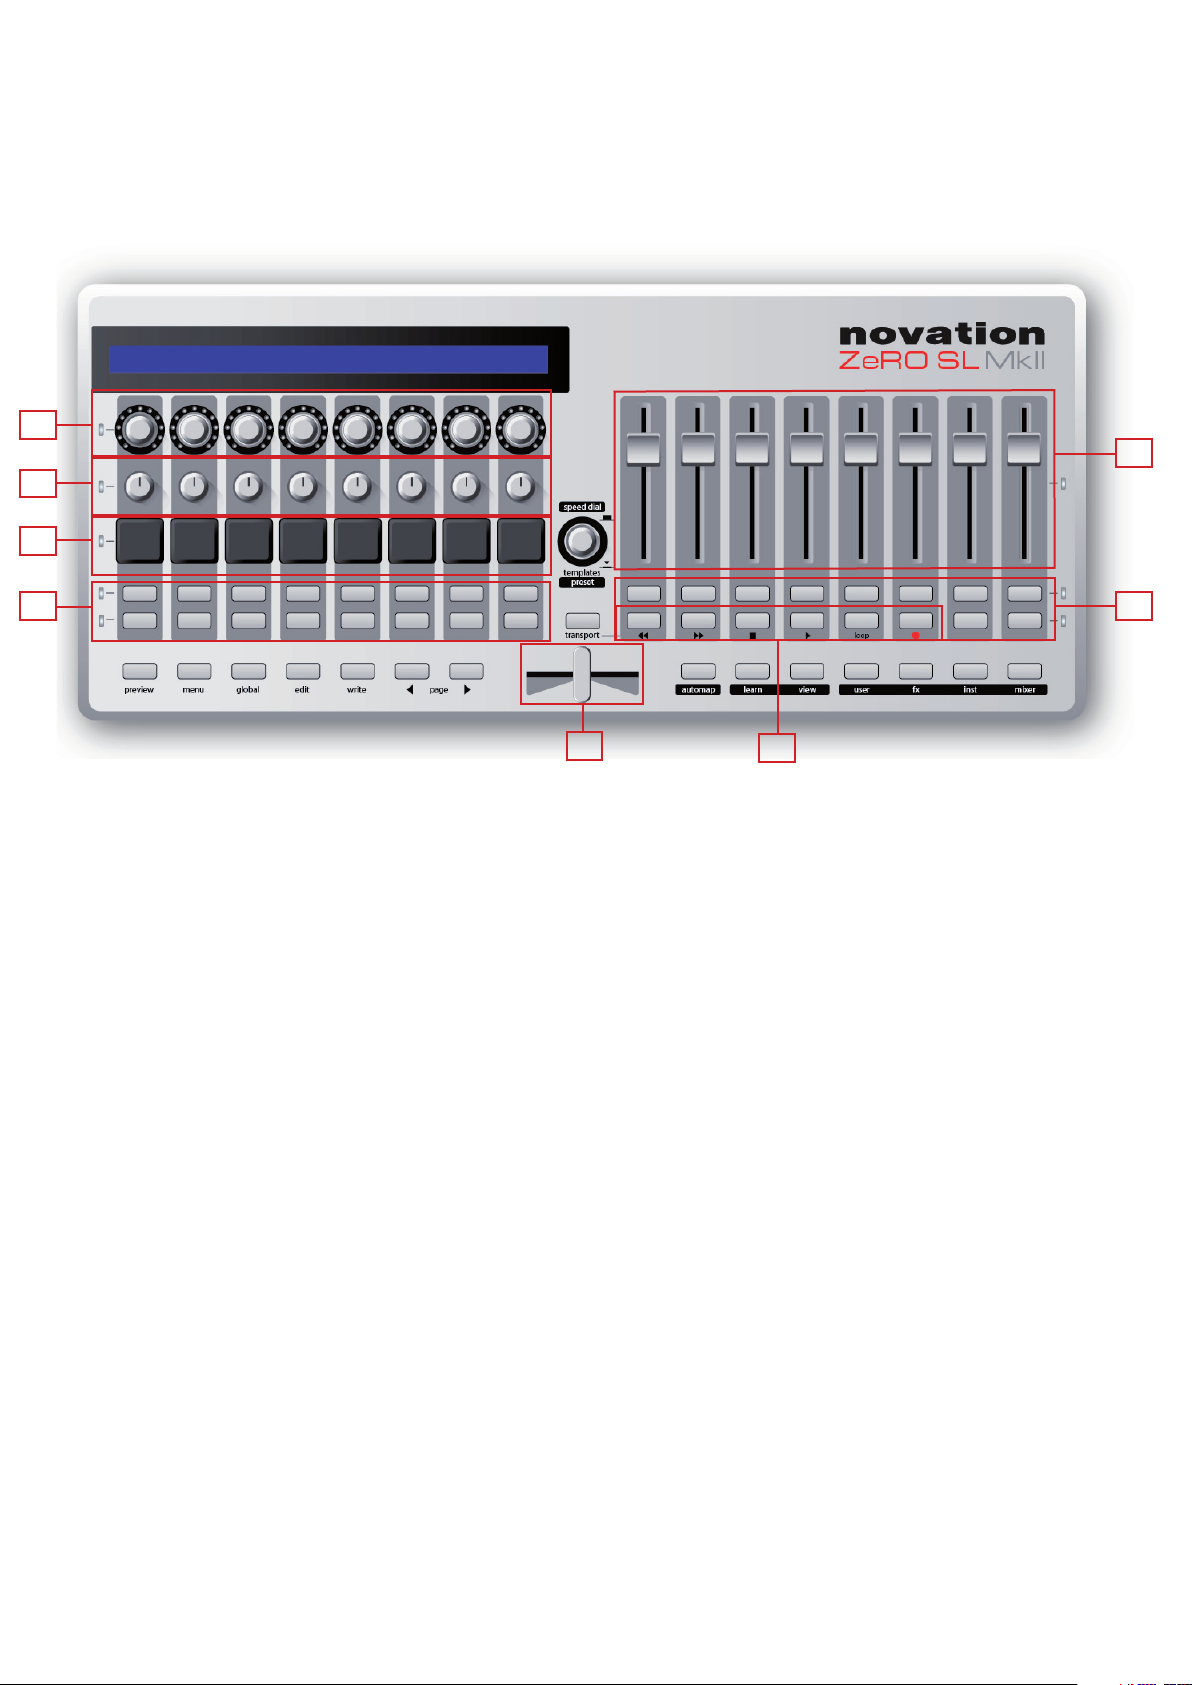
HARDWARE oVERVIEW
ASSIGnA BLE Con tRoLS
These are controls that can be assigned to parameters of the software or hardware you are controlling:
1
2
7
3
5
4
1) 8 touch sensitive endless rotary encoders with LED rings: These controls have no end points, so offer full 360˚
of movement. These controls offer speed dependent variable resolution, so moving the encoder slowly gives finer
resolution than moving the encoder quickly.
2) 8 touch sensitive pots: These controls have fixed end points and offer 300˚ of movement.
3) 8 touch sensitive 60mm sliders.
4) 1 touch sensitive 45mm Horizontal / Cross Fader
All touch sensitive controls are responsive to contact with skin, so simply touching any of the above controls will highlight
the parameter name and value on the LCD screen.
5) 32 buttons: All buttons are back-lit with LEDs.
6
5
6) 6 Transport buttons: 6 of the 32 assignable buttons can be switched to function as dedicated transport buttons.
7) 8 velocit y-sensitive drum trigger pads.
6
Page 7

non-ASSIGnABLE SyStEM ContRoLS
They have fixed functions, as follows:
9
1413
9) 144 character LCD display: Displays the names and values of each row of assignable controls from both the left
and right side of the ZeRO SL MkII
10) Automap Buttons: These 6 buttons are used for Automap Software navigation and control.
11) Preview Button: Press and hold this but ton and touch any control on the Zero SL MkII to preview the whole row’s
parameter information on the LCD.
12) Page Up / Down Buttons: Use these to scroll through pages of options when in a menu or through pages of additional
control information when in an Advanced template. These buttons have different specific functions when in certain
Advanced templates and when using Automap.
13) Mode and System Buttons (Automap, Quick, Edit, Global, Write, Transport): Use these to access the different modes
and menus of the ZeRO SL MkII.
14) Speed Dial /Template/Preset knob: The Speed Dial function acts as a way of controlling the computers mouse using
the ZeRO SL MkII hardware. When this button is pressed down it acts as a template selector (when in Advanced
mode) and as a preset selector (Automap mode).
1113121311
7
Page 8
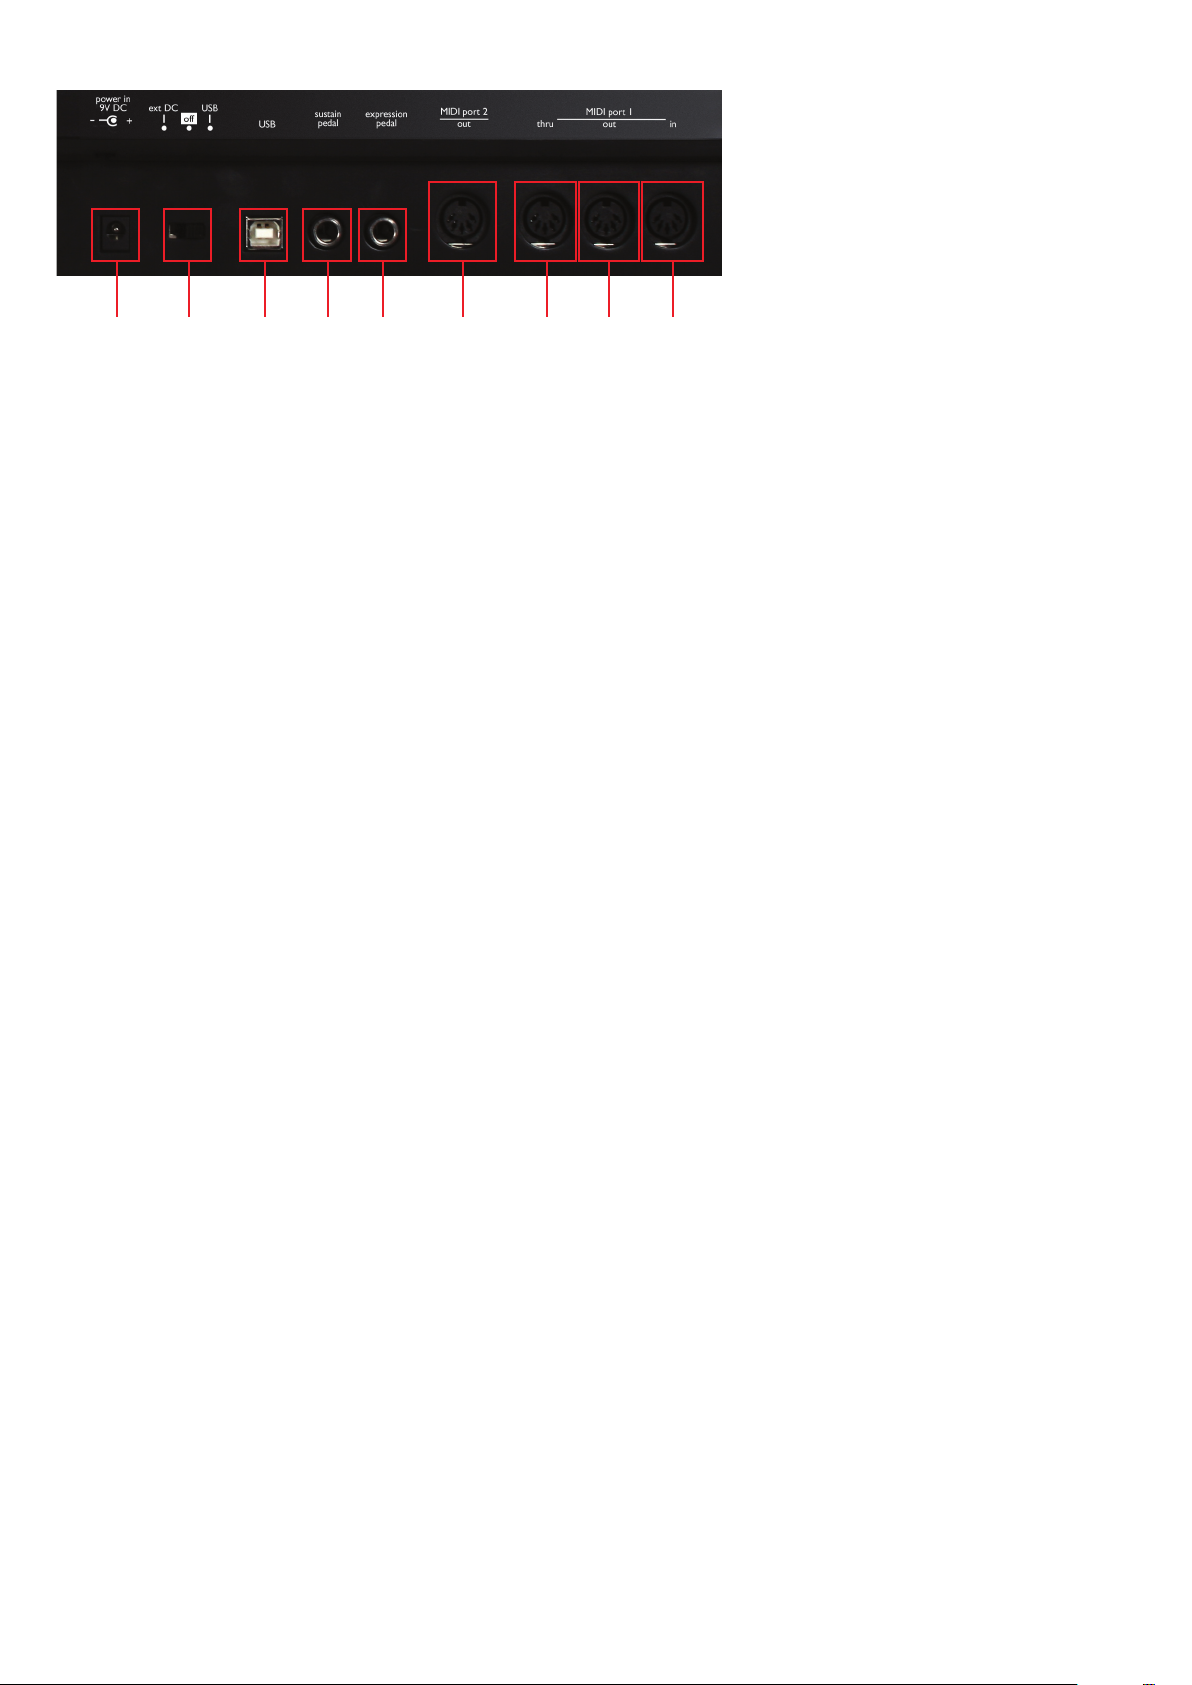
REAR PAnEL ConnECtIonS
1 2 3 4 5 6 7 8 9
1) Power in socket: Use to connect a 9volt DC 600-1000mAmp Centre Pin positive PSU. The power supply is available
from the online store: http://www.focusrite-estore.com/
2) Power switch: Use to switch the ZeRO SL MkII to external power, USB power, or off.
3) USB in socket: Use to connect the ZeRO SL MkII to your computer with the included USB cable.
4) Control pedal socket: Use to connect a control pedal. Any polarity pedal can be used.
5) Expression pedal Socket: Use to connect an expression pedal. Note that a 3 pin jack connector must be used.
6) MIDI port 2 out socket: Use to connect the ZeRO SL MkII to the MIDI input of an external device using a 5pin DIN MIDI
cable.
7) MIDI port 1 Through socket: Use to connect the ZeRO SL MkII to the MIDI input of an external device using a 5pin DIN
MIDI cable. MIDI Through is a copy of MIDI received from the MIDI In socket. Note: No MIDI from the ZeRO SL MkII or
computer can ever be sent to the MIDI Through socket. It is simply a way to forward MIDI from another device through the
ZeRO SL MkII to elsewhere.
8) MIDI port 1 Out socket: Use to connect the ZeRO SL MkII to the MIDI input of an external device using a 5pin DIN MIDI
cable.
9) MIDI port 1 In socket: Use to connect the ZeRO SL MkII to the MIDI output of an external device using a 5pin DIN MIDI
cable.
PoWER UP CALIBRAtIon
The ZeRO SL MkII self calibrates all touch sensitive controls when it powers up. Therefore you should not touch any control
during the boot up process.
8
Page 9
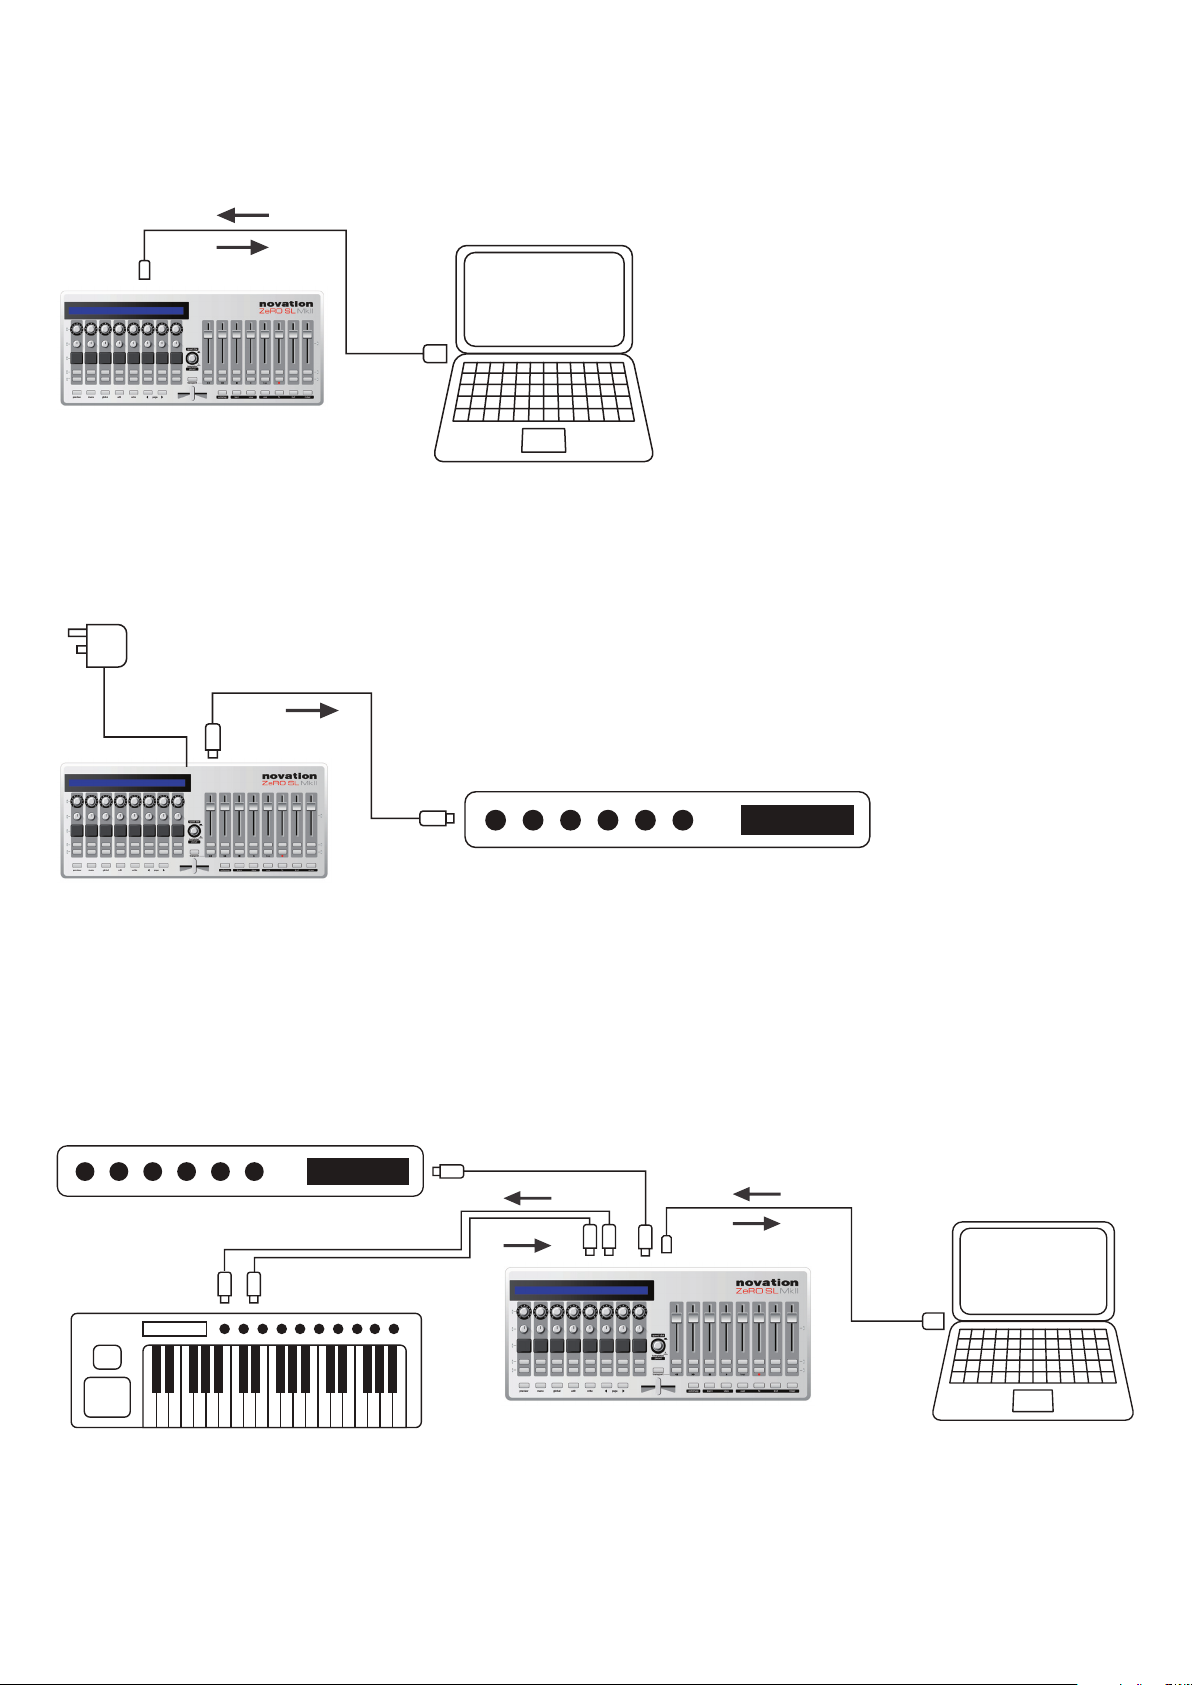
ZERo SL MkII SEtUP EXAMPLES
Control information
Power
Feedback - LCD Screen/LED Rings
USB
MIDI
PSU (optional)
Control information
USB
MIDI
Power
Feedback - LCD Screen/LED Rings
MIDI
The ZeRO SL MkII can be used for controlling both computer music sof tware and external hardware:
Soft WARE ContRoL
To use the ZeRO SL MkII to control your music sof tware, connect the ZeRO SL MkII to your computer with the supplied
USB cable.
HARDWARE ContRoL
To use the ZeRO SL MkII with your MIDI hardware, you will need to power the ZeRO SL MkII with a 9 volt 1000mAmp DC
PSU - center pin positive (not supplied).
Connect a MIDI Cable (5pin DIN) from the ZeRO SL MkII MIDI Out 1 port to the MIDI In port on your hardware.
ZERo SL MkII AS A MIDI In tERfACE WItH Soft WARE AnD HARDWARE ContRoL
Using the ZeRO SL MkII with Ex ternal Hardware AND a Host Computer
You can also combine the two above set-ups so that the ZeRO SL MkII is used as a sof tware controller and hardware
controller - transmitting MIDI data to and from computer and MIDI hardware. This will allow you to record MIDI data
to your software DAW or Sequencer, and the ZeRO SL MkII will then transmit this data to your hardware. For detailed
information on using the ZeRO SL MkII as a MIDI interface please see the routing section in the global menu.
9
Page 10
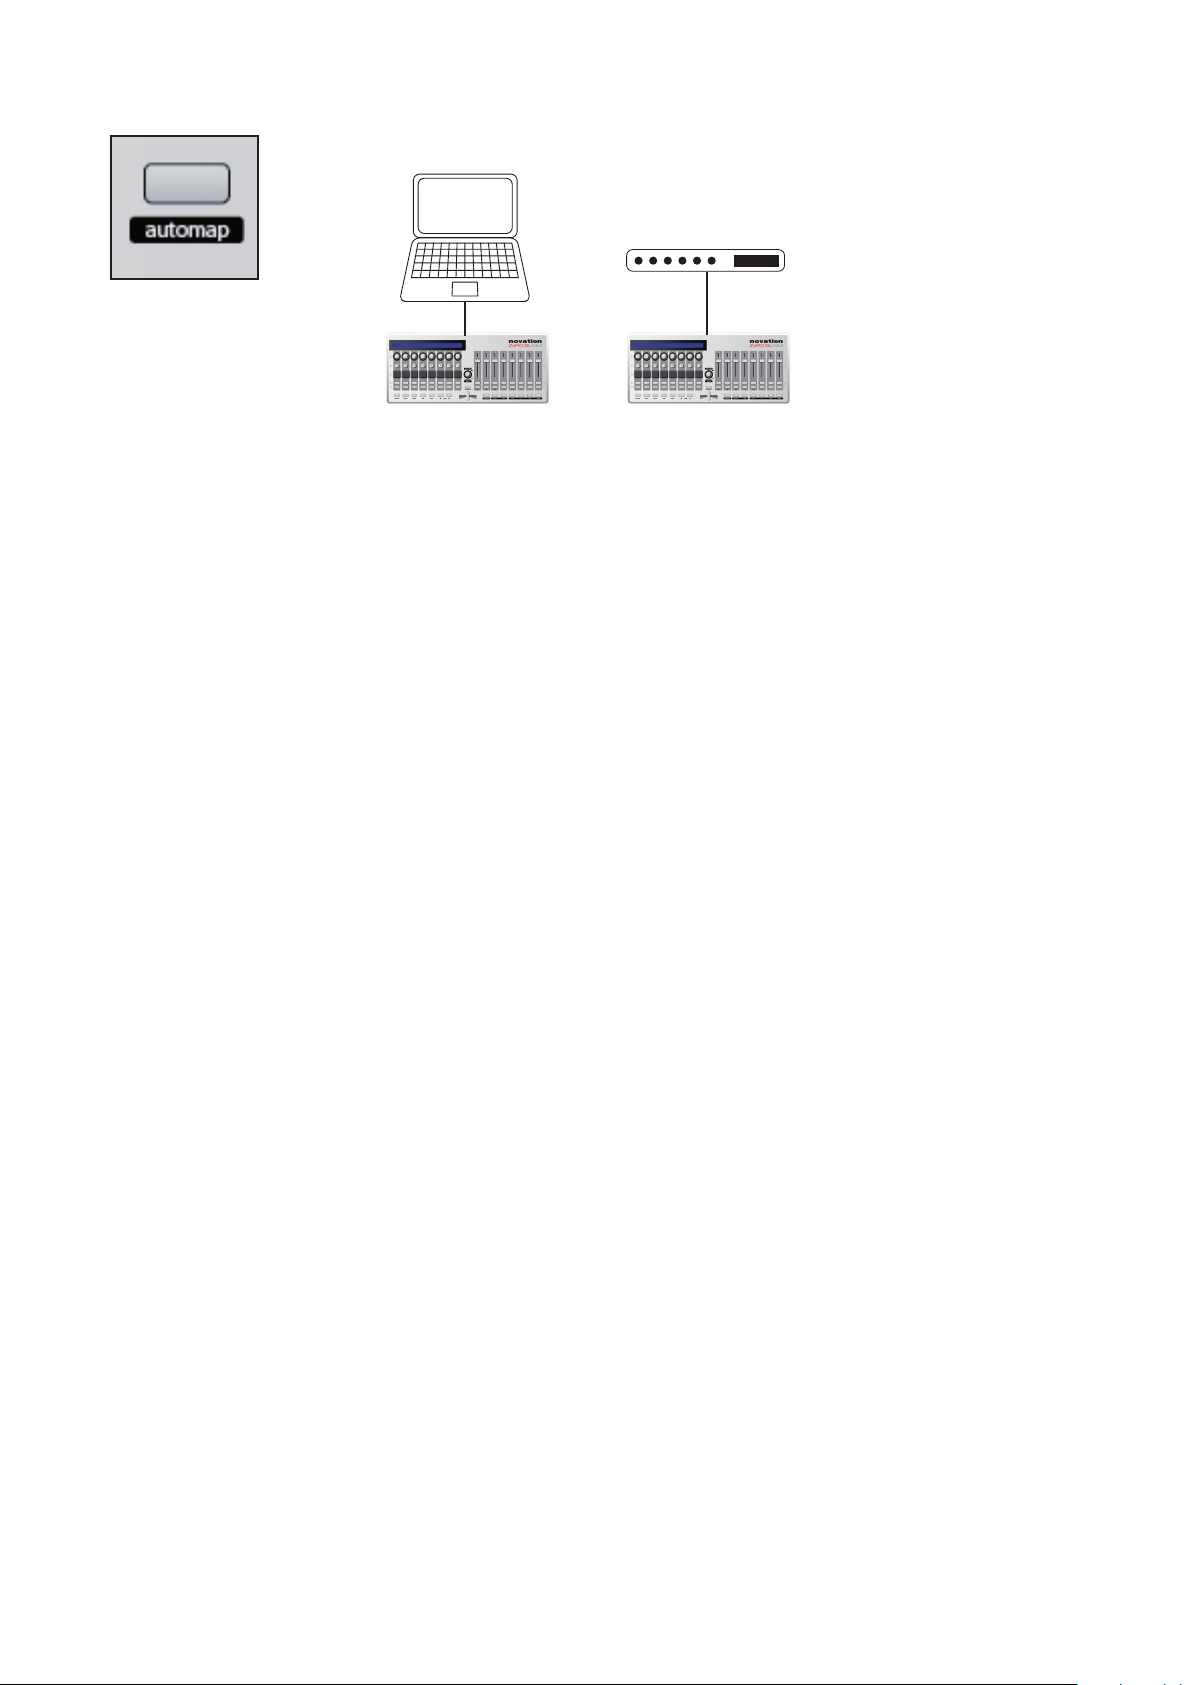
AUtoMAP MoDE VS ADVAnCED MoDE
Automap Mode Advanced Mode
The SLMkII has two main Modes of operation: ‘Automap Mode’ and ‘Advanced Mode’. These are both accessed via the main
‘Automap’ button.
Advanced Mode (Led off)
If you are going to use your ZeRO SL MkII without a computer then you must use ‘Advanced mode’. In fact, if you will only
ever use your ZeRO SL MkII in this way you can go straight to the Advanced Mode chapter of this user guide.
Automap Mode (Led On)
If you are going to use your ZeRO SL MkII with a computer, then you will most likely be using ‘Automap Mode’. To use
Automap mode you will need to connect the ZeRO SL MkII to a computer via USB and install Automap from the CD
contained within the product Box or by downloading the installer from the website. The Automap Server Application must
also be running for Automap to work.
The Automap Server is a unique software program written by Novation that allows dynamic communication between the
ZeRO SL MkII and any computer running music software and plug-ins (AU, VST, RTAS and TDM).
Easy Switching between the two modes
It is very quick and easy to switch between Advance mode and Automap Mode. This way, both modes can actually be used
at the same time once you become more familiar with the product.
Advantages and Disadvantages to both modes
Both Advanced Mode and Automap Mode can be used for controlling hardware and software via standard MIDI messages.
Automap MIDI:
MIDI message t ypes available are: MIDI CC, NOTE.
MIDI messages are limited to 1 MIDI channel per map.
MIDI message are limited to 1 port
Simpler Editing and assignment
Elegant Graphic display (HUD) and dynamic feedback
Advanced Mode:
MIDI message t ypes available are: CC, 14bit CC, SYSEX, RPN, NRPN, MMC NOTE.
MIDI messages can be output to different MIDI channels from the same template.
MIDI messages can be output to different ports from the same template.
Does not require Automap Server to be running.
Does not require and connection to computer.
Limited to the number of template slots on the ZeRO SL MkII.
Does not include any ‘Learn’ functionality.
More complex editing must be done using the ZeRO SL MkII hardware.
10
Page 11
AUtoMAP MoDE
Full instructions on how to use Automap Sof tware have been omitted from this user guide. The Automap software is
the same for all Automap Hardware, so please refer to the Automap User Guide, This guide can be found on this CD or
downloaded from the website.
Both the latest software and user guides can be downloaded at the following link: www.novationmusic.com/support
SELECtInG AUtoM AP MoDE
To use the SL Mk II in Automap Mode, press the automap button so that it is lit.
AUtoMAP MoDE - SySt EM BUt tonS
The Automap system buttons are important when in Automap mode and are used for navigation, assigning and browsing
the Automap HUD (heads up display)
view• – opens or hides the Automap HUD window
learn• - used for assigning and mapping parameters to ZeRO SL MkII controls.
Group buttons - • user, fx, inst and mixer allow the user to browse and load up the corresponding mappings.
11
Page 12

AUtoMAP tEMPLAtE oVERVIE W
Expression Control
When in Automap Mode (Led On), a unique template is used. This template is separate from the built in 32 templates
in advanced mode. All highlighted hardware controls displayed in the image below are available for controlling software
parameters via Automap.
The following controls can be assigned to either the Automap Port or to the Control port.
Control pedal•
Expression pedal •
Drum pads•
When switched out, they are routed to USB Port 1 and send standard MIDI messages. When switched in, they are
routed to the Automap client and therefore are not sending standard MIDI messages.
Page Up / Down buttons - scroll through pages of an Automap mapping.
Hold Preview button and press Page Up / Down buttons - scroll through presets of an Automap plug-in. Preset
navigation will only work where a plug-in uses the host preset navigation system, rather than it’s own built-in one.
Hold Preview and touch or press any assignable control to display that row’s controls on the ZeRO SL MkII’s LCD screen.
For example, by holding the Preview button and touching the third vertical fader, the parameter names and values
assigned to all eight faders are displayed on the LCD.
SPEED DIAL
The speed dial knob has 2 functions in Automap Mode.
Speed Dial mode: The speed dial can be used to control any on-screen parameter that can be altered using the mouse.
Simply move the mouse cursor over the parameter you want to change then rotate the knob to control it.
This process can be used for e.g. altering parameters on a soft-synth, controlling mixer parameters in your sequencer,
selecting an option from a drop-down menu or resizing a window. The Automap Server software must be running for
this function to work.
Preset mode: Press and rotate the knob whilst held down to select different plug-in presets. Preset navigation will only
work where a plug-in uses the host preset navigation system, rather than it’s own built-in one.
12
Page 13

PoRtS
Control information
U1 (Port 1)
U2 (Port 2)
Automap Port (Hidden)
SL MkII (Port 1)
SL MkII (Port 2)
Automap Port (Hidden)
Power
Feedback - LCD Screen/LED Rings
USB
What is a Port and how does it work?
The ZeRO SL MkII connects to the computer via a single USB cable, however this USB connection actually consists of 3
sub-connections called ‘ports’.
Port 1
This por t will be used when connecting external MIDI equipment to the ZeRO SL MkII MIDI inputs and for the ZeRO SL MkII
Control and Expression Pedals.
Port 2
Is generally reserved for special templates in advanced mode, but can be also used in more complex Advanced
mode set-ups.
Automap Port (Hidden)
This is a hidden port (i.e. your computer does not display this port anywhere) and is used for all Automap Server
messages. The Automap Server application then acts as a bridge between the ZeRO SL MkII Hardware and your DAW
software and plug-ins.
13
Page 14

Soft WARE SEt-UP EX AMPLES
Port 1 MIDI/Instrument Trac
k
DAW Mixer
Plug-in
Port 2
Automap Port
Port 1 MIDI/Instrument Trac
k
DAW Mixer
Plug-in
Port 2 Automap HUI
Automap Port
Port 1
Port 2 Automap MIDI
Automap Port Software that responds
to MIDI CC
MIDI/Instrument Track
Automap for Cubase, Nuendo, Sonar, Tracktion
MIDI notes are sent on Port 1 to a MIDI / Instrument track. Automap Server controls the DAW Mixer and hosted plug-ins
directly *Note other DAWs are being constantly added to this set-up configuration
Automap for Pro Tools, Digital Performer, Logic Pro, Reaper
MIDI notes are sent on Port 1 to a MIDI / Instrument track.
Automap Server controls the DAW Mixer using Automap HUI, and hosted plug-ins directly.
Automap for all other software
For software that responds to, or learns MIDI CC messages e.g. DJ software, stand-alone synthesiser software, certain
plug-ins (with no host automation parameters).
MIDI notes are sent on Port 1 to a MIDI / Instrument track (when applicable).
Automap Server sends MIDI CC data to software using Automap MIDI - a virtual MIDI port.
14
Page 15

AUtoMAP foR HARDWARE ContRoL
Automap MIDI
Automap Port
Before you move on to the Advanced Mode section of this guide, you should know that Automap MIDI can also be used to
hardware MIDI devices by routing MIDI CC data to the ZeRO SL MkII MIDI Ports (or any other MIDI interface connected to
your computer). Please refer to the Automap User guide for more info.
Ableton/Reason Special Templates
Please see advanced mode for more information on the Special Ableton/Reason templates.
15
Page 16

ADVAnCED MoDE
Advanced Mode is primarily used to control external MIDI hardware, however it can also be used to control software
when Automap is not supported or suitable for that sof tware.
To switch to Advanced mode, press the Automap button so the LED is off.
Advanced mode includes 32 pre-built templates for controlling both hardware units and some software. All templates
have been laid out intuitively with all controls labelled, but for full information on advanced mode templates, please check
the Novation Answerbase: www.novationmusic.com/answerbase
SELECtInG tEMPL AtES
To switch between the 32 Advanced mode templates, press the speed dial knob.
Once pressed, the first 16 of the 32 templates will be displayed on the LCD.
The flashing name on the LCD indicates the currently loaded template.
Press the button or knob on the top row to select the corresponding template from the top row on the LCD.
Press the button or knob on the bottom row to select the corresponding template from the bottom row on the LCD.
Press the Page Up / Down buttons to list the other 16 templates.
16
Page 17

ADVAnCED MoDE tEMPL AtE oVERVIEW
Expression Control
A ‘Template’ in the ZeRO SL MkII is a layout of controls stored inside of the ZeRO SL MkII memory. They are remembered
even when you turn the unit on and off. All of the hardware controls are used to send out MIDI data of some kind with the
exception
of the following:
Automap System Buttons – These are reserved for the Automap Template only so are unavailable for the Advanced
mode templates.
Hold Preview and touch or press any assignable control to display that row’s controls on the ZeRO SL MkII’s LCD screen.
For example, by holding the Preview button and touching the third vertical fader, the parameter names and values
assigned to all eight faders are displayed on the LCD.
Page Up / Down buttons – press up once to display the type of MIDI message e.g CC or Sysex. Press up again to display
the output port settings e.g. M1 (MIDI out 1) or U1 (USB port 1)
SPEED DIAL
The speed dial / template knob has two functions.
Speed Dial mode: The speed dial can be used to control any on-screen parameter that can be altered using the mouse.
Simply move the mouse cursor over the parameter you want to change then rotate the knob to control it.
Note: The Automap Server software must be running for this function to work.
Template mode: Press down on the knob to display the list of templates.
17
Page 18

M1
M2
Port 1 DAW/Sequencer
Any software tha
t
response to MIDI
Port 2
M1
M2
HARDWARE ContRoL
In Advanced mode, MIDI data can be sent to either one of the 2 MIDI output ports
You can set up the templates so that all controls in the template are sent to only one or both of the MIDI output ports.
Soft WARE AnD HARDWARE ContRoL
Advanced mode templates can be used in complex systems so that controls are sent to hardware via the MIDI ports
and to software via the USB ports 1 + 2. You can even set different controls from within the same template to be sent
to dif ferent output ports.
18
Page 19

SPECIAL tEMPL AtES foR ContRoLLInG ABLEton LIVE AnD REASon
Port 1 MIDI/Instrument Trac
k
DAW Mixer
Plug-in
Port 2
There are 2 special Advanced mode templates (templates 31 and 32).
These are templates for controlling DAW software that cannot be controlled using Automap, however the software
developers have worked with Novation to create a control experience that offers more than a standard template.
Whereas with most of the Advanced mode templates, are set up to just send out control information to control software
or hardware, these special templates include feedback, so if a parameter is changed from the software, then the ZeRO SL
MkII will update it’s LCDs and LED rings.
Additional level of control includes the Preview buttons and Page Up / Down buttons offering more functionality –
whereas these buttons have fixed functionality in all the other standard templates.
The 2 Special templates are for controlling Reason and Ableton.
Ableton Users Note: VST and AU plug-ins can be controlled using the Ableton template (as shown in the above diagram),
but can also be controlled using Automap. Press the Automap But ton on the ZeRO SL MkII to switch between the
Automap and Ableton (advanced) Template.
Reason Users Note: The only port that is used in the Reason template is Port 2 (i.e. both notes and controls are sent on
Port 2). The template offers control of Reason Mixer(s) and all Instruments and FX. Using Reason in Rewire mode with
another DAW requires additional port set-up. Please refer to the DAW set-up guide in the Automap Server.
For more information please refer to the DAW set-up guide which is accessible from the Automap HUD, or visit the
Novation Answerbase at: www.novationmusic.com/answerbase
19
Page 20

MEnU oVERVIEW
The ZeRO SL MkII system menus are accessed by pressing their corresponding button on the ZeRO SL MkII.
Once a menu is selected, all available options and sub-menus are displayed on the LCD screen.
The main Menus are: (quick) Menu, Global, Edit and Write
nAVIGAtInG MEnUS
Navigating menus and selecting menu items is done using a variety of controls on your ZeRO SL MkII. To enter a menu,
press the corresponding menu button. To exit a menu, press the same but ton again.
SAVInG/WRItInG SE ttInGS
To be able to save/write your settings, you need to ensure that Memory Protect is OFF. This option is available in the
Global > Options menu. If you have made changes to any of the Global menus options, press Write whilst in the Global
menu to save your changes.
If you have made edits to your current Template, press Write to save your changes to the ZeRO SL MkII memory.
SELECtInG
To select an option, simply touch or press a knob, encoder or button directly below the option’s position on the LCD.
If a button is lit, then this denotes that there are selectable parameters, if the button is not lit, then the option cannot
be changed.
To scroll through the options either rotate the encoder or the knob directly below the option. To step through the options
either hit the top row of buttons to step up, or the bottom row of buttons to step down.
Some of the menu options contain sub menus.
---> denotes enter sub menu.
<-- - denotes return to previous menu.
Some menu options contain multiple pages. If the Page Up / Down buttons are lit, then this denotes additional pages.
Press the lit button to navigate up/down through the pages.
HIERARCHy of SEt tInGS
There are three levels of settings that can be made on the ZeRO SL MkII.
Settings for individual controls within a template (Control • edit menu)
Settings for all controls within a single template (Template • edit menu / quick menu)
Settings for all controls within all templates (• Global menu)
20
Page 21

QUICk MEnU
The Quick menu contains mainly commonly used fucntions:
Press the quick menu button and the following options will be displayed on the ZeRO SL MkII LCD screen.
Bank
Use to output a bank change message from the template Program Port
Program
Use to output a program change message from the template Program Port
Program Channel - ProgChan
Adjusts the MIDI channel assigned to the Program Port.
Drum Pad Transpose - DrmTrans
Use to easily transpose the drum pads up and down (each step is 1 semitone).
Tempo BPM
Use to change the current Tempo. Entering the Tempo sub menu gives additional tempo options:
Tempo Submenu
Internal Tempo
Displays the tempo value as set in TempoBPM on previous page
Current Tempo
Displays the tempo as received from the computer (via USB) or an ex ternal MIDI device (via MIDI in). See MClk-In in
the Global > Routing menu for details on setting the input source for MIDI Clock. You can also use this to set the current
tempo.
Source
Displays the MIDI Clock In settings as specified in MClk-In
Status
Will either display:
RECEIVING – MIDI clock is being received
FLYWHEEL no external clock – no MIDI Clock is being received.
Tap Tempo
Tap the flashing button to set the tempo. You must tap 4 beats and the average tempo of the 4 beats is taken.
The button will flash in time with the tempo. Note that this will only work when the MIDI Clock settings: MClk-In is set
to Internal (for more info on MIDI clock settings, see the global > Routing menu).
21
Page 22

EDIt MEnU
The edit button allows access to two main functions, depending on how the button is pressed.
Template Edit Mode
Press and RELEASE the edit button to enter ‘Template Edit’ Mode. This mode allows you to edit settings that affect
the whole template (e.g. Velocity curves)
Control Edit Mode
Press and HOLD the edit button to enter ‘Control Edit’ Mode. This mode allows you to change the settings for each
individual control within the current template (e.g. CC messages)
tEMPLAtE EDIt MEnU
The following settings affect all the controls within the currently loaded template.
Note: All settings must be manually saved by pressing the write butt on.
Pot Pick-up - Pick-Up
This sets how the rotary pots and sliders behave when switching template and can be set to ON or OFF.
ON: After selecting a template, if the current position of a control does not match the value of the control stored with the
template, the control will not have any effect when operated until its position matches the value stored with the template.
OFF: After selecting a template, if the current position of a control does not match the value of the control stored
with the template, the control value will jump from the stored value to match the position of the control as soon as the
control is operated.
Note: Individual controls can have their own Pick-Up settings. The Template setting will be ignored unless the individual
control is set to TEMPLATE.
Template Routing Sub Menu
Although it is possible for the user to edit the Automap Template from the ZeRO SL MkII, editing the following settings for
the Automap Template should NOT be done.
Program Channel, Program Port - ProgChan, ProgPort
These settings define which MIDI Channel and Port the Drum Pads, Control and Expression pedals are sent to.
Common Channel, Common Port - ComnChan, ComnPort
These settings define which MIDI Channel and Port the all Pots, Encoder, Sliders, Buttons and XY pad are sent to.
Both Program and Common settings (above) provide a way of changing the routing of multiple controls from one knob.
For example, in control edit options (see final chapter) setting each individual control to Common Channel and Common
Port, rather than a specific Channel and Port, means that to change the Channel and Port of all controls is done via the
routing sub menu (above) rather than editing each individual controls routing.
22
Page 23

Template Grouping Sub Menu
Temp late
This displays the template that is currently being edited.
Position, Size
Multiple templates can be grouped together. The Position and Size values show how multiple templates are grouped.
These values can be changed (i.e. to group and un-group) templates.
Note:
Grouped templates must first be saved in adjacent positions.
Position and size values must be correct for changes to be saved.
E.g. for a group of 3 templates there must be 3 adjacent templates, each set to a size of 3, and with positions of
1, 2, 3 respectively.
Remember, for changes to be saved, the write button needs to be pressed for all templates in the group.
To step through templates within a group press any of the row select buttons multiple times.
Control Edit Overview
Creating and Editing Advanced Mode Templates from the ZeRO SL MkII.
Please note that we strongly advise you not to edit the Automap template.
To enter Control Edit Mode, Press and HOLD the edit button. Now touch or press any control on the SL. The name of the
control you have just touched will be displayed on-screen.
Note that Control Edit will also work for the last-moved control. i.e. move a control, then press and hold edit and you will
see that control on-screen.
When the edit button is released you will be able to set which MIDI messages are sent from each control, and how the
control behaves – for example setting a button to toggle between settings or to step through a range.
The control edit menu options are dependant on the type of control and the type of the MIDI message – for example,
options for buttons of fer different options than options for encoders.
Full details on how to edit a template on the ZeRO SL MkII are found in the final chapter of this user guide.
23
Page 24

GLoBAL MEnU BUtton
The Global Menu is a set of options that affect the operation of the whole unit.
Options Sub Menu
Memory Protect - MemProt
Ensure this is set to ‘OFF’ if you want to overwrite your Templates. To prevent accidental overwriting of templates,
set this to ON. Global settings can be saved regardless of whether this is set to ‘ON’ or ‘OFF’.
Pot Pick-Up - Pick-Up
This sets the pot and slider response for all controls in all templates: The settings are ON or OFF, they work in the same
way as described on page 22.
Note: Individual controls can have their own Pick-Up settings. The Global setting will be ignored unless the individual control
is set to GLOBAL.
Display Timeout - DispTime
This sets the length of time that temporarily displayed information remains on the ZeRO SL MkII displays. Set the value
between 0 and 1260ms, or to ‘PERM’ (permanent).
Keep Values - KeepVals
This applies to Advanced Mode (non-Automap) templates.
If this is set to ‘ON’ then the ZeRO SL MkII will automatically store the value of each control when you switch away from the
currently selected template and restore those values when you select that template again. If this is set to ‘OFF’ then the
ZeRO SL MkII will only store control values when you manually write the template.
Touch Select - Touch Sel
When set to on, the ZeRO SL MkII’s touch sensitivity is active for Automap and all Advanced Templates. Setting this to OFF
means that touching a control no longer displays that control’s row on the LCD screen.
Transport - Transprt
When the transport button is active, the transport buttons (re-wind, fast-forward, stop, play, loop, and record) can be set
to have independent settings for each template. For example, some MIDI hardware may respond to MMC (which is the
default for most Advanced Templates), but other hardware may respond to different MIDI messages for transport control.
When set to TEMPLATE, each template can have independent transport settings.
When set to GLOBAL, no matter what template you are using, the transport settings will be the same.
As default, the Global Transpor t settings are set to communicate with the Automap Server (which then sends Rewire
transport messages to software), however Global Transport settings can be edited. When this option is set to GLOBAL,
editing the transport control parameters from any template will affect the transport controls globally.
Control Pedal Polarity - CnPedal
The control pedal polarity can be changed here. The options are NormCLSD, NormOPN and Auto.If your control
pedal is behaving the wrong way (i.e. a press on the pedal results in ‘open’ rather than ‘closed’) then set the option to
NormCLSD. If your pedal works correctly then set the option to NormOPN. Setting the option to AUTO means that the SL
scans the control pedal port on boot up. It will presume that the pedal is in the Open position, and set the control pedal
polarity accordingly.
24
Page 25

Start-up Sub Menu
Start-up - Startup
Select whether the ZeRO SL MkII will boot up in Automap mode or in Advanced mode
Start Template - StartTmp
If Template is selected in the startup option, then select the template number that will load on bootup.
Automatic Demonstration - AutoDemo
When set to ON, the ZeRO SL MkII will run through a demo routine when booting up.
Set AutoDemo to OFF to disable this feature.
Routing Sub Menu
The following abbreviations are used in the Routing menu:
U1: USB Port 1
U2: USB Port 2
M1: MIDI OUT Port 1
M2: MIDI OUT Port 2
USB Port 1 To - USB1To
MIDI data sent from the computer on USB por t 1 can be routed to MIDI output port 1 and / or 2.
USB port1 will be displayed as ’SL Mk II (port1)’ when selecting the output port from your DAW software.
MIDI To - MIDITo
MIDI data received at the MIDI In port on the back of the ZeRO SL MkII can be routed to either USB por ts and / or either
MIDI Out ports.
MIDI Clock Output - MClck-Out
MIDI Clock output destination can be set to any, or a combination of the following:
M1, M2, U1, U2.
MIDI Clock Input - MClk-In
MIDI Clock input source can be set to any of the following:
AUTO – automatically selects the input port if there is MIDI Clock detected on that por t. If there is not external MIDI Clock
detected the SL will revert to the Internal Clock.
INTERNAL - the SL will use the Internal Clock
EXT-AUTO - automatically selects the input port if there is MIDI Clock detected on that port. If there is not ex ternal MIDI
Clock detected the SL will revert to it’s internal Clock.
Or any of the following options:
MIDI-IN
USB1
USB2
BPMPort
This sets whether or not ReWire BPM messages are sent to your computer when you use the TAP TEMPO button or
manually set the tempo from the Quick Menu.
These messages are used for tempo control over your sequencer from the ZeRO SL MkII but they will only have an effect
when the Automap server software is running. This should be set to ‘OFF’ if you do not want to control the tempo in your
sequencer from the ZeRO SL MkII using ReWire.
25
Page 26

Program Change Channel and Port Input - PRCGChan and PRCGPort
The SL can be set up so that Program change messages from an external device (or your computer) are used to change
the template on the SL. This can be useful in both Live and studio situations when switching between various set-ups.
The SL will respond to Program change messages 1-32 for Advanced Mode templates 1-32 and a Program change
message of 33 for Automap Mode.
PRCGChan and PRCGPort define which MIDI channel and input port are to be used to receive these program
change messages.
Send and Receive Sub Menu - SendRcv
Template, Dump
The first two options on this page allow you to dump templates in sysex format from the ZeRO SL MkII to your computer
or another MIDI device for backing up. The first option allows you to dump a single template. Rotate the encoder to select
which template you want to dump (range is Current, 1-33), then press the button above the encoder to send the template.
If you edit a template but do not save it, the edited version can be dumped by selecting ‘Current’ instead of the template
number. Selecting the template number will dump the version stored in the SL MkIIs flash memory (i.e. whether the
template has been saved or not). Press the button below ‘All’ to send all templates.
Send Globals
Press the button to dump the global settings in sysex format.
Ports
This option sets where template and global sysex dumps are sent to.
MIDI O/S Send, Receive
Press the buttons below ‘Send’ or ‘Receive’ on the left-hand display to transmit or listen for an operating system (OS)
dump on the MIDI IN and OUT connectors on the back of the ZeRO SL MkII. You will be asked to confirm that you want to
dump
or update the OS before it will transmit or accept an OS dump.
USB1 OS Receive
Press the button below ‘USB1 O/S Receive’ on the left-hand display to prepare the ZeRO SL MkII to receive an OS sysex
dump from a computer on USB port 1. You will be asked to confirm that you want to update the OS before it will accept an
OS dump.
Drum Pad Calibration Sub Menu - DrumPads
To begin the drum pad calibration press the Page Up button.
The eight values across the lef t-hand display correspond to drum pads 1-8. The pad hit velocity value is shown on the
top line (‘- --‘ if the pad has not yet been hit) and the calibration value is shown on the bottom line. This first page is for
full velocity (maximum strength hit) calibration:
Hit a pad at full strength to check the current calibration. If the hit velocity value above the pad goes to 127 too easily,
decrease the pad calibration value using the encoder or buttons underneath. This will reduce the sensitivit y of the pad,
meaning you need to hit it harder to reach maximum velocity.
26
Page 27

Once all 8 drum pads have been set for maximum velocity calibration, press the Page Up button again for soft hit
calibration:
Hit a pad softly and view the hit velocity value. If the value does not update when you hit the pad then the threshold is
too high. Use the encoders to adjust the threshold values. Lowering the threshold will increase the sensitivity of the pad
meaning that it will respond to a softer hit.
WRItInG GLoBAL SEttInGS
To save all global settings, press the WRITE but ton whilst in the Global menu. Remember that global settings can be saved
regardless of whether memory protect is set to ‘ON’ or ‘OFF’.
tRAnSPoRt
The second row of buttons below the sliders can either be used as transport control, or for use within the current
template (either as Automap or Advanced mode MIDI but tons).
When lit, the buttons will be available as transport controls. This will also be indicated in the Automap HUD when in
Automap Mode.
In Advanced Mode you can edit the MIDI message the Transport Buttons send in the same way as any other control.
27
Page 28

CREAtInG AnD EDItInG ADVAnCED MoDE
tEMPLAtES fRoM tHE SL: DEtAILED InfoRMAtIon
PLEASE REMEMBER THAT ALL TEMPLATE EDITING MUST BE SAVED BEFORE YOU CHANGE TEMPLATE OR
TURN OFF YOUR ZeRO SL MkII OTHERWISE ANY CHANGES MAYBE LOST.
When you have finished editing you should remember to press the write button. The LCD displays the option to rename
the template and choose the template position. Then press write again to finish saving.
MIDI message Assignment Table
The following table shows which MIDI messages can be assigned to the various physical controls on the SL.
Once you have chosen the type of MIDI message you want a control to send, you can adjust the rest of the settings
for that control. The available settings will depend on what Control is set to. The following is a guide to each of settings
available for the different Control options.
Follow through the section for Control Change (CC) first of all as these are the most commonly used MIDI messages
for parameter control and also many of the settings for ‘CC’ apply to the other Control options too:
ContRoL CHAnGE (CC )
DispType (Display Type): This setting allows you to select how the value for the control is displayed on the SL.
For encoders it can also be used to change the mode of operation. The options are:
0-127: Control value displayed with range 0 to 127. This is best suited to a parameter with a single direction increase/
decrease e.g. track volume.
-64/+63: Control value displayed with range -64 to +63. This is best suited to a parameter with a bi-directional increase/
decrease (zero position in the middle) e.g. track pan.
28
Page 29

ADDItIonAL oPtIonS foR EnCoDERS onLy
REL1 (Relative 1): A message with value 65 is sent out for every clockwise step (increment) and a message with value
63 is sent out for every anti-clockwise step (decrement). With this option the encoder functions as a true endless control
rather than emulates an analogue pot as with the 0-127 and -64/+63 settings.
REL2 (Relative 2): This is similar to the ‘REL1’ setting however it includes encoder acceleration. A message with value
64+n is sent out for every clockwise step (increment) and a message with value 64-n is sent out for every anti-clockwise
step (decrement). The value n depends on how fast you rotate the encoder. It will be 1 when you rotate it slowly and
get larger the faster you rotate it, meaning that you can scale the full range of a parameter with a small quick turn of
an encoder.
0-16K (14-bit mode): MIDI data values are transmitted as a 7-bit binary number, allowing a maximum value range of
0-127. The MIDI Specification allows for two MIDI control messages to be sent together where the data values form an
MSB (most significant byte) and LSB (least significant byte) pair, making a 14-bit binary number and allowing a maximum
value range of 0-16383. This is useful where fine control over a parameter is required, however the parameter you are
controlling must be able to receive 14-bit MIDI values. If you want to send 14-bit values for fine control over a parameter
then set DispType to ‘0-16K’. For CC controls, the MIDI Specification only allows for CC numbers 0 to 31 to be used in this
way. Two CC messages are sent when the value of a parameter is changed – the first with the MSB value and the second
with the LSB value. To enable the receiving device to distinguish between which CC message has the MSB value and which
has the LSB value, the LSB value message is sent using a different CC number, calculated by adding 32 to the original CC
number. Consequently CC numbers 32 to 63 are used for sending the LSB value in 0-16K (14-bit) mode. As an example, if
a CC encoder has DispType set to ‘0-16K’ and CC Num set to 0 then, for each encoder step, two messages will be sent –
a CC0 message with the MSB value and a CC32 message with the LSB value. The important point to note is that if
an encoder has Control set to ‘CC’ and DispType set to ‘0-16K’ then CC Num should only be set from 0 through 31
and not higher.
AP O T: This is a variation of ‘REL2’ and is the same system that is used by some other existing popular control surfaces.
A message with value 0+n is sent out for every clockwise step (increment) and a message with value 64+n is sent out for
every anti-clockwise step (decrement). The value n will equal 1 when you rotate the encoder slowly and increases as you
rotate the encoder faster.
Additional option for when Control is set to ‘NoContrl’:
LABEL: If a control is not assigned to send a MIDI message then there will be a blank space above it on the display.
You can however use that blank space to display up to 8 characters (on the top line of the display) by setting DispType
to ‘LABEL’. If this is set, the control name will be displayed, even though the control is not assigned to anything. You can
edit the control name by scrolling up to the second page of options in Edit mode (see below for further info on editing
control names).
Value Range: These options allow you to set the upper and lower limits of the control value. By default the Low Value will
be set to the lowest possible value and the High Value will be set to the highest possible value. In this case the control will
affect a parameter throughout its whole range. Adjust these settings if you want the control on the ZeRO SL MkII to affect
a parameter though only part of its range.
The range of values allowed for both of these settings will depend on the DispType setting as follows:
With an encoder or pot, the control value will scale from the Low Value to the High Value as you rotate it clockwise.
Consequently if you want the control value to increase as you rotate the encoder clockwise, make sure the High Value is
larger than the Low Value. If you want the control value to decrease as you rotate the encoder clockwise (inverted action),
make the Low Value larger than the High Value. It is possible to invert the action of the sliders, joystick, X-Y touchpad and
the expression pedal in this way.
29
Page 30

ADDItIonAL oPtIonS foR BUttonS onLy
DispType (Display Type): Control value displayed as either ON or OFF. The low value set ting determines the ON value and
the high value setting determines the OFF value. This is best suited to a bi-state parameter where you want to see whether
it is in an on or off state e.g. phase reverse on a mixer channel.
LED: This is like ON/OFF except that nothing is displayed when the control is in an OFF state.
ON/OFF & LED display t ypes should be used with control type Momentary or Toggle.
For buttons, drum pads and the control pedal, the Press Value and Release Value should be set in conjunction with the
BtnType (Button Type) setting (see below).
BtnType (Button Type): This setting is only available for buttons, drum pads and the control pedal. Where available, it can
be found on the second page of control settings so scroll up to access it.
It should be set in conjunction with the Press and Release values for the control to determine how the button works.
The options are as follows:
NORMAL: The Press Value is sent when the button is pressed, nothing is sent on release.
MOMENTRY: The Press Value is sent when the button is pressed and the Release Value is sent when the button
is released.
TOGGLE: The Press1 Value is sent when the but ton is first pressed, nothing is sent on release. The Press2 Value is sent
on the next button press, nothing is sent on release. The Low and High Values will be sent alternately on further button
presses. This setting is useful when you want to control a bi-state parameter such as Track Solo On/Off.
STEP: If this option is selected then an extra setting, StepVal (Step Value), will appear next to BtnType. With the ‘STEP’
option, the value sent each time the button is pressed will step from the From Value to the To Value in steps whose size
are determined by the StepVal setting. When the To Val is reached the nex t button press will cause the From Val to be
sent and the value will step up again on subsequent presses. Note that the To Value is always sent before returning to the
From Value, even if it takes a jump less than the step size to reach the To Value. For example if a button had the settings
From Value 0, To Value 16 and Step Value 5 then on alternate button presses the value sent would be 0, 5, 10, 15, 16, 0,
5…. If you want a button to step down instead of up then make the From Value larger than the To.
The ‘MOMENTRY’ option is not available for the drum pads because they only respond to a hit and do not have a
mechanism to detect when you release your finger from them. Instead of ‘MOMENTRY’ they have a special ‘VELOCITY’
option. When this is set, the value sent out when you hit the pad will depend on how hard you hit it. The control value is still
constrained within the Low Value and High Value settings. As an example if Low Value is 0 and High Value is 127 then a
soft hit will give a value near 0, a medium hit will give a value near 64 and a hard hit will give a value near 127. If Low Value
is 2 and High Value is 0 then a sof t hit will give value 2, a medium hit will give value 1 and a hard hit will give 0.
GEnERA L ContRoL EDIt SEt tInGS
Ports: This sets the port routing for the control i.e. where the MIDI messages generated by the control are routed to
when it is operated. The settings can be a combination of: M1, M2, U1, U2
or
ProgPORT: Sent to the Program Port – as set in the Template edit menu.
ComnPORT: Sent to the Common Port – as set in the Template edit menu.
‘ProgPORT’ and ‘ComnPORT’ are special options that allow the port routing for the control to follow one of two common
routing settings that can be accessed from the Template edit menu (Program Port and Common Port). The advantage
presented by these options is that if a number of controls are set to either ‘ProgPORT’ or ‘ComnPORT’ then you can
change the port routing for all of those controls by editing a single parameter, rather than editing the individual setting for
each control. More information on the Program Port and Common Port routing settings can be found in the page 24.
30
Page 31

MidiChan (MIDI Channel): This option sets the MIDI Channel on which the data will be transmitted. This can be set to
a value between 1 and 16, or to ‘ProgCHAN’ or ‘ComnCHAN’. Like the ‘ProgPORT’ and ‘ComnPORT’ options for the Ports
setting, ‘ProgCHAN’ and ‘ComnCHAN’ are special options which allow the MIDI Channel setting for the control to follow
one of two common MIDI Channel settings which can be accessed from the template edit menu (Program Channel and
Common Channel). More information on the Program Channel and Common Channel routing set tings can be found in page 24.
CC Num (Control Change Number): This allows you to set the Control Change (CC) number for the control to a value
from 0 through 127. You can toggle the display format of the CC Num setting between decimal and hexadecimal by
pressing the ROW-SELECT button for the upper lef t-hand row of buttons.
Pick-Up: This setting is only available for pots, sliders, the pitch/mod joystick and the expression pedal. Where available,
it can be found on the second page of control settings so scroll up to access it. It allows you to set the response of the
control to one of the following:
ON: After selecting a template, if the current position of a control does not match the value of the control stored with the
template, the control will not have any effect when operated until its position matches the value stored with the template.
OFF: After selecting a template, if the current position of a control does not match the value of the control stored with the
template, the control value will “jump” from the stored value to match the position of the control as soon as the control is
operated.
GLOBAL: The control will follow the Pick-Up setting in the Global menu, which can be set to ‘ON’ or ‘OFF’. The advantage
presented by this option is that the response of some or all controls in multiple templates can be changed by editing a
single parameter, rather than editing the individual set ting for each control.
TEMPLATE: The control will follow the Pick-Up set ting in the Template menu, which can be set to ‘ON’ or ‘OFF’. The
advantage presented by this option is that the response of some or all controls in a template can be changed by editing
a single parameter, rather than editing the individual set ting for each control.
non-REGIStERED PARAMEtER nUMBER (nRPn )
The DispType, LowVal, HighVal, Ports, MidiChan, Response, BtnType, TchMode and Name settings are the same as for
Control Change (CC) so see the previous section for information on these settings.
NRPN lsb (Non-Registered Parameter Number Least Significant Byte): This allows you to set the NRPN lsb value for
the control to a value from 0 through 127.
NRPN msb (Non-Registered Parameter Number Most Significant Byte): This allows you to set the NRPN msb value
for the control to a value from 0 through 127.
You can toggle the display format of the NRPN lsb and NRPN msb settings between decimal and hexadecimal by pressing
the row select button for the upper lef t-hand row of buttons.
REGIStERED PAR AMEtER nUMBER ( RPn)
The DispType, LowVal, HighVal, Ports, MidiChan, Response, BtnType, TchMode and Name settings are the same as for
Control Change (CC) so see that section for information on these settings.
RPN lsb (Registered Parameter Number Least Significant Byte): This allows you to set the RPN lsb value for the
control to a value from 0 through 127.
RPN msb (Registered Parameter Number Most Significant Byte): This allows you to set the RPN msb value for the
control to a value from 0 through 127.
You can toggle the display format of the RPN lsb and RPN msb settings between decimal and hexadecimal by pressing the
row select button for the upper left-hand row of buttons.
31
Page 32

SyStEM EXCLUSIVE ( SySEX )
The LowVal, HighVal, Ports, MidiChan, Response, BtnType, TchMode and Name settings are the same as for Control
Change (CC) so see that section for information on these settings.
DispType (DisplayType): The options for this setting are the same as for CC however the ‘REL1’, ‘REL2’ and ‘APOT’ display
types are not available for encoders.
Length: This determines the length of the sysex message sent when the control is operated. The value sets the number
of bytes and is variable bet ween 0 and 12, or 9 and 12 for ROLAND type sysex messages.
DataType: This allows you to set the format of the sysex message as follows:
NONE: Sysex message does not contain a variable byte and a fixed message is sent every time the control is operated.
SINGLE: Sysex message contains one variable by te. The value of this by te is determined by the current control value and
limited by the Low Value and High Value settings. The position of the variable byte in the sysex message can be edited.
ROLAND: Sysex message contains one variable by te and one checksum by te. The value of the variable by te is determined
by the current control value and limited by the Low Value and High Value set tings. The format of the sysex message is fixed
such that the second-to-last byte is always the variable byte and the last byte is always the checksum byte (excluding the
F7 byte).
If an encoder has DispType set to ‘0-16K’ then the options for DataType are as follows:
NONE: Sysex message does not contain a variable byte and a fixed message is sent every time the control is operated.
LSB-MSB: Sysex message contains two variable bytes which form an MSB and LSB pair, allowing a 14-bit value to be
transmitted. The LSB precedes the MSB in the sysex message. The two bytes cannot be separated by non-variable by tes
but the position of the pair of bytes in the message can be edited.
MSB-LSB: This is the same as LSB-MSB except the MSB precedes the LSB in the sysex string.
ROLAND: Sysex message contains two variable bytes and one checksum byte. The format of the message is fixed such
that the last three bytes of the string are always MSB, then LSB and then checksum (excluding the F7 by te).
DataPsn (Data Position): This allows you to set the position of the variable data byte(s) in the sysex message. This value
will automatically be constrained by the Length set ting. Note that if DataType is set to ROLAND then this value will be fixed,
as the format of ROLAND sysex messages cannot be edited.
To edit the value of each of the non-variable bytes in the sysex message scroll up to the sysex message page. All bytes
are displayed in hexadecimal format. By default the ZeRO SL MkII will place an F0h at the start and F7h at the end of the
message and set all other non-variable bytes to 00h. Variable bytes appear as ‘DV’ and a checksum byte will appear as ‘CS’
- these cannot be edited.
To edit a byte use the buttons or encoders in line with the ‘<<’ and ‘>>’ symbols to navigate the cursor to the desired byte
and then use the buttons, encoder or pot in line with ‘VALUE’ to set the value (range 00 to 7F). Scroll down after editing
the sysex message to return to the control settings.
MIDI MACHInE ContRoL ( MMC)
MMC messages are primarily used for transport control.
The Ports setting is the same as for Control Change (CC) so see that section for information on these settings.
Command: This sets the type of MMC command that the control will transmit from the following options: STOP, PLAY,
DEF PLAY (deferred play), FORWARD, REWIND, RECORD, REC EXIT (record exit), REC PSE (record pause), PAUSE, EJECT,
CHASE, ERRRESET (error reset), MMCRESET.
DeviceID: This sets the Device ID number transmitted in the MMC command message (range 0-127).
32
Page 33

notE on/off (notE)
The Ports, MidiChan, and Name settings are the same as for Control Change (CC) so see that section for information
on these settings.
Note: This sets the MIDI note value that the control will transmit (range C-2 to G8). The Note setting will be displayed as
a MIDI note value by default but you can toggle the display format between note value, decimal and hexadecimal by pressing
the ENCODER ROW-SELECT button. The note value can be set using the buttons, encoder and pot in line with the Note
setting.
Velocity: This sets the velocity value sent with the note on message (range 0-127).
BtnType (Button Type): This is exactly as described for Control Change (CC) however the ‘STEP’ option is not available.
If this is set to ‘MOMENTRY’ then the button will send a note on message when pressed and a note off message when
released. If this is set to ‘TOGGLE’ then alternate presses of the button will send note on and off messages.
BAnk CHAnGE ( BAnk CHG)
The Ports, MidiChan and Name settings are the same as for Control Change (CC) so see that section for information
on these settings.
BankMode: This determines the format of the bank change message that is sent. CC numbers 0 and 32 are reserved for
bank selection in the MIDI Specification. CC0 messages are used for coarse bank selection (Bank MSB) and CC32 for fine
bank selection (Bank LSB). As an example, a synth may accept CC0 messages to select different categories of sounds e.g.
keyboard instruments and then CC32 to select different sub-categories e.g. acoustic piano. Some synths however do not
respond to CC0 messages and some do not respond to CC32 messages. You should check the manual for the synth to
which you are sending the bank change message to find out what the required format for bank change messages is and
then set BankMode accordingly to one of the following options:
LSB: A single CC32 message is sent whose value is determined by the Banklsb setting (see below).
MSB: A single CC0 message is sent whose value is determined by the Bankmsb setting (see below).
MSB-LSB: A CC0 message followed by a CC32 message is sent. The values are determined by the Bankmsb and Banklsb
settings (see below).
Banklsb: This determines the bank least significant byte value i.e. the value of the CC32 message.
Bankmsb: This determines the bank most significant by te value i.e. the value of the CC0 message.
PRoGRAM CHAnGE (PRoG CHG)
The Ports, MidiChan, BtnType and Name settings are the same as for Control Change (CC) so see that section for
information on these settings. Also, Bank messages how now been included also (see above).
LowProg and HighProg: These are like the Low Value and High Value settings but instead they define the Low and High
Program Change number. They should be set in conjunction with the BtnType set ting as described in the Control Change
(CC) section. This way you can use a button to select a single program/patch, toggle between two different programs/
patches or step through a whole bank of programs/patches on repeated presses. Note that the ‘VELOCITY’ option for
drum pads is not available if Control is set to ‘PROG CHG’.
33
Page 34

DRUM PAD notE ( DRUMno tE)
This option only applies to the drum pads and allows you to set them up to send MIDI note data when hit. The velocity value
sent is always dependent on how hard you hit the drum pads and cannot be set to a fixed value. The Ports, MidiChan and
Name set tings are the same as for Control Change (CC) so see that section for information on these settings.
Note: This is the same as for ‘NOTE ON/OFF’ so see that section for information on this setting.
Auto-Off: This sets the amount of time (in milliseconds) that a note off message is sent after the drum pad has been hit.
It can be set to ‘NONE’, in which case a note off message is not sent at all, or from 10ms to 16383ms.
Off Sync: This sets the timing reference for the note off message that is sent after the drum pad has been hit. It can be
set to ‘TIMER’, in which case the note off message will be transmitted after the number of milliseconds Auto-Off is set to
(or if Auto-Off is set to ‘NONE’ no note off message will be sent at all). The other options allow you to set a note length, in
which case the ZeRO SL MkII will ignore the Auto-Off setting. Instead it uses MIDI clock as a timing reference and sends a
note off message after the selected note length has passed. If you are recording notes into a sequencer then you will need
to make sure that you are sending MIDI clock from the sequencer to the ZeRO SL MkII and that the ZeRO SL MkII is set to
sync to incoming MIDI clock. The range of the note length set ting ranges from 32nd triplet to 12 bars. When selecting a
note length, ‘T’ indicates a triplet note length and ‘D’ indicates a dotted note length.
SyStEM REAL tIME ( REALtIME)
The Ports and Name settings are the same as for Control Change (CC) so see that section for information on
these settings.
The available options for this setting are standard MIDI system real time messages: start (RT-Start), continue (RT-Contu),
stop (RT-Stop), active sensing (RT-Actvs) and system reset (RT-Reset).
tEMPLAtE
This option is different to the others describe above in that it is not a type of MIDI message. Instead this option allows
you to set any control button, drum pad or the control pedal to switch to another template on the ZeRO SL MkII. No MIDI
message is sent when you operate a Template control.
34
 Loading...