

Page 1
Page 2

English
Novation
A division of Focusrite Audio Engineering Ltd.
Windsor House,
Turnpike Road,
Cressex Business Park,
High Wycombe,
Bucks,
HP12 3FX.
United Kingdom
Tel: +44 1494 462246
Fax: +44 1494 459920
e-mail: sales@novationmusic.com
Web: http://www.novationmusic.com
Trademarks
The Novation trademark is owned by Focusrite Audio Engineering Ltd. All other brand, product
and company names and any other registered names or trade marks mentioned in this manual
belong to their respective owners.
Disclaimer
Novation has taken all possible steps to ensure that the information given here is both correct
and complete. In no event can Novation accept any liability or responsibility for any loss or
damage to the owner of the equipment, any third party, or any equipment which may result
from use of this manual or the equipment which it describes. The information provided in this
document may be modied at any time without prior warning. Specications and appearance
may differ from those listed and illustrated.
2
Page 3
English
IMPORTANT SAFETY INSTRUCTIONS
1. Read these instructions.
2. Keep these instructions.
3. Heed all warnings.
4. Follow all instructions.
5. Do not use this apparatus with water.
6. Clean only with dry cloth.
7. Do not install near any heat sources such as radiators, heat registers, stoves, or other
apparatus (including ampliers) that produce heat.
8. Protect the power cord from being walked on or pinched particularly at plugs, convenience
receptacles, and the point where they exit from the apparatus.
9. Only use attachments/accessories specied by the manufacturer.
10. Use only with the cart, stand, tripod, bracket, or table specied by the
manufacturer, or sold with the apparatus. When a cart is used, use caution
when moving the cart/apparatus combination to avoid injury from tip-over.
11. Unplug this apparatus during lightning storms or when unused for long periods of time.
12. Refer all servicing to qualied service personnel. Servicing is required when the
apparatus has been damaged in any way, such as power-supply cord or plug is damaged,
liquid has been spilled or objects have fallen into the apparatus, the apparatus has been
exposed to rain or moisture, does not operate normally, or has been dropped.
13. No naked ames, such as lighted candles, should be placed on the apparatus.
WARNING: This equipment must only be connected to USB 1.1 or 2.0 type ports.
CAUTION: TO REDUCE THE RISK OF ELECTRIC
SHOCK, DO NOT REMOVE COVER (OR BACK).
NO USER-SERVICEABLE PARTS INSIDE. REFER
SERVICING TO QUALIFIED SERVICE PERSONNEL.
The lightning ash with arrowhead symbol, within equilateral triangle,
is intended to alert the user to the presence of uninsulated “dangerous
voltage” within the product’s enclosure that may be of sufcient
magnitude to constitute a risk of electric shock to persons.
The exclamation point within an equilateral triangle is intended to alert
the user to the presence of important operating and maintenance
(servicing) instructions in the literature accompanying the appliance.
WARNING: TO REDUCE THE RISK OF FIRE OR ELECTRIC SHOCK, DO NOT EXPOSE THIS
APPARATUS TO RAIN OR MOISTURE.
3
Page 4

English
ENVIRONMENTAL DECLARATION
Compliance Information Statement: Declaration of Compliance procedure
Product Identication: Novation Launchkey Mini Keyboard
Responsible party: American Music and Sound
Address: 4325 Executive Drive
Suite 300
Southaven
MS 38672
Telephone: 800-431-2609
This device complies with part 15 of the FCC Rules. Operation is subject to the following two
conditions: (1) This device may not cause harmful interference, and (2) this device must accept
any interference received, including interference that may cause undesired operation.
For USA
To the User:
1. Do not modify this unit! This product, when installed as indicated in the instructions
contained in this manual, meets FCC requirements. Modications not expressly approved by
Focusrite may void your authority, granted by the FCC, to use this product.
2. Important: This product satises FCC regulations when high quality shielded cables are
used to connect with other equipment. Failure to use high quality shielded cables or to
follow the installation instructions within this manual may cause magnetic interference with
appliances such as radios and televisions and void your FCC authorization to use this
product in the USA.
3. Note: This equipment has been tested and found to comply with the limits for a Class B
digital device, pursuant to part 15 of the FCC Rules. These limits are designed to provide
reasonable protection against harmful interference in a residential installation. This
equipment generates, uses and can radiate radio frequency energy and, if not installed
and used in accordance with the instructions, may cause harmful interference to radio
communications. However, there is no guarantee that interference will not occur in a
particular installation. If this equipment does cause harmful interference to radio or television
reception, which can be determined by turning the equipment off and on, the user is
encouraged to try to correct the interference by one or more of the following measures:
• Reorient or relocate the receiving antenna.
• Increase the separation between the equipment and receiver.
• Connect the equipment into an outlet on a circuit different from that to which the receiver
is connected.
• Consult the dealer or an experienced radio/TV technician for help.
4
Page 5

English
For Canada
To the User:
This Class B digital apparatus complies with Canadian ICES-003.
Cet appareil numérique de la classe B est conforme à la norme NMB-003 du Canada.
RoHS Notice
Focusrite Audio Engineering Limited has conformed and this product conforms,
where applicable, to the European Union’s Directive 2002/95/EC on Restrictions of
Hazardous Substances (RoHS) as well as the following sections of California law
which refer to RoHS, namely sections 25214.10, 25214.10.2, and 58012, Health and
Safety Code; Section 42475.2, Public Resources Code.
CAUTION:
The normal operation of this product may be affected by a strong electrostatic
discharge (ESD). In the event of this happening, simply reset the unit by removing and
then replugging the USB cable. Normal operation should return.
COPYRIGHT AND LEGAL NOTICES
Novation, Launchkey Mini and InControl are registered trade marks of Focusrite Audio
Engineering Limited.
2013 © Focusrite Audio Engineering Limited. All rights reserved.
5
Page 6

English
CONTENTS
IMPORTANT SAFETY INSTRUCTIONS ........................................ 3
ENVIRONMENTAL DECLARATION............................................ 4
For USA............................................................... 4
For Canada ............................................................ 5
COPYRIGHT AND LEGAL NOTICES .......................................... 5
INTRODUCTION .......................................................... 7
Key Features ........................................................... 7
About This Manual ...................................................... 7
What’s In The Box ....................................................... 8
Registering Your Launchkey Mini ........................................... 9
Power Requirements ..................................................... 9
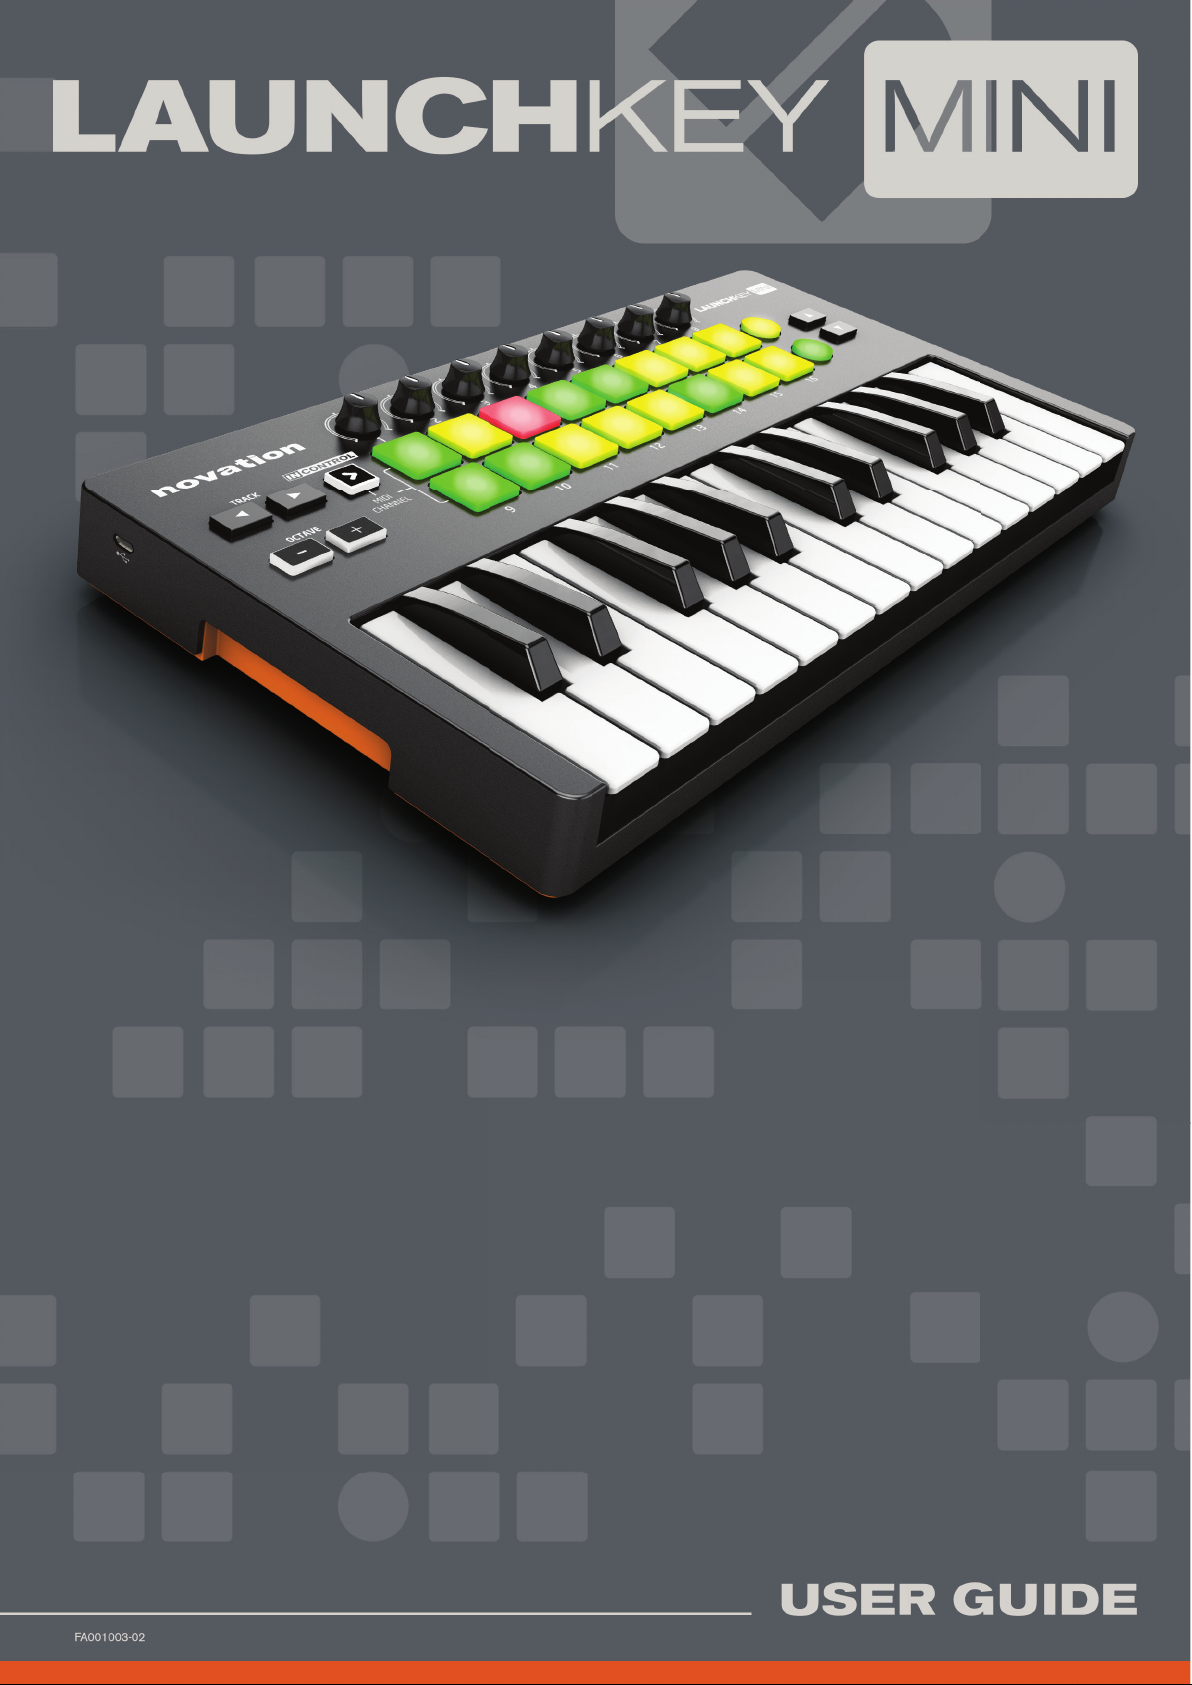
Hardware Overview......................................................10
Top and Side View – controls ..........................................10
LAUNCHKEY MINI SETUP EXAMPLES ........................................11
Interfacing Launchkey Mini to a computer ....................................11
InControl Mode .....................................................11
Basic Mapping Mode .................................................11
Interfacing Launchkey Mini to an iPad .......................................12
EXPLORING LAUNCHKEY MINI..............................................13
MIDI channel ...........................................................13
Octave up/down ........................................................13
Rotary controls .........................................................14
Launch Pads ...........................................................14
Round buttons..........................................................14
Track I / H..............................................................14
K and J buttons .......................................................14
Using Launchkey Mini with InControl ........................................15
IPAD GUIDE..............................................................16
Using Launchkey Mini with the Launchkey iPad app ............................16
Using Launchkey Mini with the Launchpad iPad app ............................17
Using Launchkey Mini with both Launchkey and Launchpad iPad apps .............17
TECHNICAL INFORMATION .................................................18
Basic Troubleshooting Examples ...........................................18
MIDI Messages Table ....................................................19
6
Page 7

English
INTRODUCTION
Thank you for purchasing this Novation Launchkey Mini MIDI controller keyboard. As well as
the music keyboard itself, Launchkey Mini is equipped with a range of controllers to allow the
modern musician to create great music in the studio, in live performance or on the move. The
keyboard allows you to control your existing Digital Audio Workstation (DAW) software, and also
the included V-Station and Bass Station software plug-ins, the Launchkey iPad synth app and
the Launchpad iPad loop-triggering app. Together, this unique software-hardware combination
allows instant, real-time tweaking of synth parameters, loops and audio effects.
This guide will introduce you to Launchkey Mini and explain the various ways you can use it
with your music software in your recording set-up.
Launchkey Mini includes Novation’s InControl mode, which gives you a simple yet powerful way
of controlling all your favourite music software applications.
With Launchkey Mini you have two ways of working:
• InControl – automatically maps Launchkey Mini’s rotary controls onto your essential DAW
parameters, such as channel faders or pan.
• Basic Mapping mode – use Launchkey Mini as a conventional MIDI controller, where
each control transmits a dedicated MIDI CC (Continuous Controller) message, while the
launch pads and keys transmit MIDI Note data.
For additional information, up to date support articles and a form to contact our Technical
Support Team please visit the Novation Answerbase at: www.novationmusic.com/answerbase
Key Features
• 25-note synth-action mini-key keyboard
• 8 rotary controls
• 16 performance launch pads with multi-colour backlighting
• 2 round multi-function buttons with multi-colour backlighting
• Octave buttons
• Track control buttons – change DAW tracks remotely
• Integrated with InControl for seamless control of your DAW
• Very simple installation procedure – class compliant, no driver required
About This Manual
We’ve tried to make this manual as helpful as possible for all types of user, both newcomers to
computer music and those more experienced, and this inevitably means some users will want
to skip over certain parts of it, while relative novices will want to avoid certain parts of it until
they’re condent they’ve mastered the basics.
However, there are a few general points that are useful to know about before you continue
reading this manual. We’ve adopted some graphical conventions within the text, which we hope
all types of user will nd helpful in navigating through the information to nd what they need to
know quickly:
7
Page 8

English
Abbreviations, conventions, etc.
Where top panel controls or side panel connectors are referred to, we’ve used a number thus:
[6] to cross-reference to the diagram. (See page 10.)
We’ve used CAPS to name physical things like top panel controls and side panel connectors,
and also on-screen buttons which you need to click, and bold Courier font to denote text
which you see on the computer screen.
Tips
These do what it says on the tin: we include bits of advice, relevant to the
topic being discussed that should simplify setting up Launchkey Mini to do
what you want. It’s not mandatory that you follow them, but generally they
should make life easier.
What’s In The Box
Launchkey Mini has been carefully packed in the factory and the packaging was designed
to withstand rough handling. Should the unit appear to have been damaged in transit, do not
discard any of the packing material and notify your music dealer.
Save all the packing materials for future use in case you ever need to ship the unit again.
Please check the list below against the contents of the packaging. If any items are missing or
damaged, contact the Novation dealer or distributor where you purchased the unit.
• Launchkey Mini MIDI controller keyboard
• Getting Started Guide
• Safety Instructions
• USB Type A to Micro-B cable (1 m)
• Product/software Registration Card, allowing download of:
• Full User Guide
• DAW Setup Guide
• Launchkey Software Installers
• Novation V-Station synth plug-in
• Novation Bass Station plug-in
• Loopmaster samples
• Novation Launchkey and Launchpad iPad apps
8
Page 9

English
Registering Your Launchkey Mini
It is important to register your Launchkey Mini on-line using the Product/software Registration
Card. Apart from validating your manufacturer’s warranty, you will also then be able to
download the additional software that you are entitled to as a Launchkey Mini purchaser. The
card also contains codes you will need to enter in the on-line forms on our website to download
the software, but before you attempt to do this, warranty registration is required.
Download your software
There is no software CD included with your product. Download the latest drivers
and software by registering your product at www.novationmusic.com/register
Go to
www.novationmusic
1 2 3
.com/register
Follow instructions Download
PLACE PRODUCT BUND LE CODE HERE
software & drivers
FA0754-01
Can’t get started?
If you have any trouble with this product
do not go back to the place of purchase.
Contact our support team on:
US:
1-855-24-FOCUS (1-855-243-6287)
Support available Monday - Friday 8am – 6pm (PST)
UK &
+44 1494 4 62246
International:
Support available Monday - Friday 9:30am – 6pm (GMT/BST)
Online:
www.novationmus ic.com/support
PLACE SERIAL NUMBER STICK ER HERE
Power Requirements
Launchkey Mini will normally be powered from your computer or iPad via its side panel USB
connector. DC power will be supplied by the computer through the standard USB cable. We
recommend that you connect Launchkey Mini directly to a computer’s native USB port, and not
via a USB hub.
A word about laptops:
When powering Launchkey Mini from a computer you should be aware that
although the USB specication agreed by the IT industry states that a USB port
should be able to supply 0.5 A at 5 V, some computers - particularly laptops – are unable
to supply this current. Unreliable operation may result in such a case. When powering
Launchkey Mini from a laptop’s USB port, it is recommended that the laptop is powered
from AC mains rather than its internal battery.
9
Page 10

English
Hardware Overview
Top and Side View – controls
5 8
2
9 10
7
6
1
Launchkey Mini’s controls are non-assignable. This makes Launchkey Mini very simple to congure
and use.
1
Keyboard – 25-note synth-action mini-key keyboard.
2
8 x rotary controls, providing DAW/MIDI control.
3 4
3
16 x velocity-sensitive launch pads. These can be used to trigger sounds (e.g., drums) in
your music software and provide other functions in some DAWs and the Novation iPad apps.
4
2 x round buttons. These can be used for custom functions in the apps, or in your DAW.
5
InControl button; this switches the operating mode of the rotary controls and launch pads
between InControl and Basic Mapping Mode. It can also be used to set Launchkey Mini’s
MIDI channel. See page 13.
6
Octave + / – buttons – shift the keyboard ‘up’ or ‘down’ in octave steps. Pressing the two
buttons together cancels the octave shift.
7
Track I / H buttons – use these to change tracks in your music software or to switch
between Novation iPad apps (I switches to the Launchkey app, H to the Launchpad app).
8
K and J buttons - use these to select different rows of pads in the Novation Launchpad
app. They also provide various control functions in some DAWs.
9
USB port – Micro-B USB connector compatible with USB 1.1, 2.0 or 3.0. Connect
Launchkey Mini to a USB port on your computer or iPad using the USB cable supplied.
10
Kensington security slot – secure your Launchkey Mini to a convenient structural point
if desired. Please see http://www.kensington.com/kensington/us/us/s/1704/kensington-
security-slot.aspx for further information on how to use this feature.
10
Page 11

English
LAUNCHKEY MINI SETUP EXAMPLES
Launchkey Mini is designed to integrate automatically and seamlessly with your computer
music software. Launchkey Mini can be used with either a computer/laptop, or with an iPad;
however the features and operational possibilities do differ with the two platforms, so they have
been covered separately in the User Guide sections that follow.
Interfacing Launchkey Mini to a computer
Connect Launchkey Mini to your computer using the supplied USB cable between Launchkey
Mini’s side panel USB socket and a USB port on the computer.
Power
Control information
USB
InControl Mode
InControl has been integrated into your Launchkey Mini to allow instant operability with certain
DAWs. Consult the DAW Setup Guide (downloadable from the Novation website) which includes
a list of currently supported DAWs. The DAW Setup Guide explains how the various controls on
Launchkey Mini map onto each DAW’s key functions.
If your favourite DAW is not in this list, you can still use Launchkey Mini with it effectively, but
you will need to use Basic Mapping Mode (see below).
Basic Mapping Mode
Launchkey Mini will act as a general-purpose MIDI controller for use with a wide range of
music software applications. In addition to the keyboard’s Note On/Note Off messages, each
of the various controls (e.g., rotary controls, pads) will always transmit their own unique MIDI
message, allowing you to congure your software to respond to the messages as you wish.
11
Page 12

English
Interfacing Launchkey Mini to an iPad
Power
Apple iPad Camera
Control information
If you have an iPad or iPad mini, you can run the free Novation Launchkey and Launchpad
iPad apps on it and use Launchkey Mini to control them*. You will need an Apple iPad Camera
Connection Kit to interface Launchkey Mini to an iPad/iPad mini, as shown above:
1. plug the USB cable (in the box) into the USB port on Launchkey Mini,
2. plug the other end of the USB cable into to the USB port on the Camera Connection Kit,
3. now connect the Camera Connection Kit to the iPad/iPad mini.
Connection Kit
USB
NOTE: Please note that an Apple iPad Camera Connection Kit is NOT included with Launchkey
Mini, and must be sourced separately.
* OS version-dependant
12
Page 13

English
EXPLORING LAUNCHKEY MINI
MIDI channel
MIDI data can be sent on any one of 16 channels. The default MIDI channel is 01.
In normal use with Launchkey/Launchpad apps and most DAWs it is not necessary to change
the MIDI channel. Under certain circumstances, e.g., when using multiple apps, you may wish
to change the MIDI channel.
To select a different MIDI channel:
• Press and hold the InControl button [5]. One of the
16 launch pads [3] will illuminate green, indicating the
current MIDI channel.
• While pressing the InControl button, select the desired
MIDI channel number by pressing its correspondingly
numbered pad. The pad will illuminate green,
conrming that the new MIDI channel has been
selected.
When powering-on, Launchkey Mini ALWAYS defaults to MIDI channel 01; if
you have re-powered since changing the MIDI channel number, you will
need to reset it.
In Basic mapping mode, the launch pads ALWAYS transmit on MIDI channel
10, as this is the standard GM MIDI channel for percussion instruments.
Octave up/down
The Octave + / Octave - buttons [6] shift the keyboard ‘up’ or ‘down’ in octave steps. The
range over which the keyboard can be shifted is -4 to +5 octaves. When a shift is applied,
the Octave + or Octave - button will illuminate. The intensity of illumination provides a rough
indication of the number of octaves shifted. (Note there are only three intensity levels.) Pressing
both buttons simultaneously will cancel any octave shift selected.
13
Page 14

English
Rotary controls
Launchkey Mini has eight rotary controls [2], which may be placed in InControl mode, or used
in Basic Mapping mode. In InControl mode they would typically act as level or pan controls for a
block of eight channels in the DAW’s mixer section. In Basic Mapping mode, each rotary control
transmits a xed MIDI CC message. See the MIDI tables on page 18.
Launch Pads
Launchkey Mini is equipped with a set of sixteen velocity-sensitive pads. Their primary purpose
is to trigger percussive sounds, and to do so, the pads need to be set to Basic Mapping mode.
In this case, all data is transmitted on MIDI Channel 10. In this mode, the pads illuminate red
when struck. If the pads are set to InControl mode, they can be used to trigger clips or loops
with certain software (Ableton Live, FL Studio and Reason), but have no function with nonclip-based applications such as Logic Pro or Cubase (hence cannot be switched into InControl
mo de).
However, the pads are used extensively with the Novation Launchkey and Launchpad iPad
apps; see page 16 for details.
Round buttons
The two large, round buttons [4] transmit xed MIDI CC messages (upper = 104, lower = 105)
when Launchkey Mini is in Basic Mapping mode. When InControl is active, or when Launchkey
Mini is connected to an iPad running one of the Novation apps, they have specic functions
within the software being used.
Track I / H
The two Track I / H buttons [7] are only operative in InControl mode. They allow you to ‘step’
the rotary controls between tracks or instruments in your DAW. With some DAWs, moving from,
e.g., track 8 to track 9, will automatically assign the rotary controls to the next bank of eight
tracks.
K and J buttons
Where supported by your DAW, the K and J buttons [8] step through the DAW tracks in banks
of eight, re-assigning the eight rotary controls to control the next set of tracks accordingly.
See DAW Setup Guide for further details regarding specic DAW control assignments.
14
Page 15

English
InControl Butto
Using Launchkey Mini with InControl
If you have one of the DAWs listed in the DAW Setup Guide, you will rst need to follow the
instructions on how to set it up to operate correctly with Launchkey Mini. Once this has been
done, InControl will automatically assign each hardware controller to a key DAW function in an
intelligent manner. You should be able to discover very easily how each controller is mapped
onto which DAW function by experimenting, but a full list of mappings is contained in the DAW
Setup Guide.
InControl assignments are xed and invisible to you, so its operation is seamless and
transparent.
InControl mode may be selected for the rotary controls, launch pads and round buttons
by pressing the InControl button [5]. When the mode is enabled, the InControl button is
illuminated.
n
Note that the launch pads have no InControl functionality with some DAWs – these will be
DAWs which are not clip-based, such as Logic Pro and Cubase. Under these conditions the
pads remain in Basic Mapping Mode. Ableton Live and FL Studio are clip-based, and you will
be able to trigger clips and loops directly with these DAWs, using the pads. When used with
Reason, the pads can be used for many other purposes, such as to select and edit drum loops
or modify sequencer steps.
15
Page 16

English
iPAD GUIDE
Novation has created two exciting iPad apps for use with your Launchkey Mini keyboard. These
can be downloaded from the Apple App Store in the usual way; check that your iPad version is
compatible. Each of the apps can be used on your iPad without connecting the Launchkey Mini;
they are largely self-explanatory, and a full description of their features is not within the scope of
this manual.
The following section of User Guide restricts itself to describing how you can use your
Launchkey Mini keyboard with these apps.
NOTE: It is recommended that you connect the Launchkey Mini to the iPad prior to launching
the Novation Launchkey and Novation Launchpad app.
Launchkey app
The Launchkey app is a software synthesiser. It includes 80 exciting synth sounds for
immediate use in your performances and productions. It uses a graphical interface to
manipulate the synth sounds, and gives you a fast and fun way to be creative. Connecting the
iPad to your Launchkey Mini gives greatly enhanced and more tactile control, and allows the
use of a physical keyboard.
Launchpad app
The Launchpad app is a software version of Novation’s successful LAUNCHPAD music
controller. The app offers an 8 x 6 matrix of multi-coloured pads, which can be used to make
and remix music from a library of samples and loops. Built-in time-stretching ensures that all
the loops and samples are synchronised and remain in tempo.
Using Launchkey Mini with the Launchkey iPad app
Connect your Launchkey Mini to your iPad via the Apple iPad Camera Connection Kit, following
the instructions on page 12.
When connected, Launchkey Mini’s hardware controllers are mapped directly “one-to-one” onto
the equivalent on-screen rotary controls; these are programmed to vary the most important
parameters of each synth patch. Note that the parameters controlled by both sets of controls
(hardware and software) will depend on the patch loaded.
The following list summarises the hardware assignments:
• The keys
• The Octave buttons
the Octave buttons on-screen, which only affect the virtual keyboard.
• The rotary controllers [2] are mapped directly to the eight rotary controls displayed onscreen for each patch.
• The K and J buttons [8] are used to select a patch.
[1]
operate in the normal manner, to play the loaded patch.
[6]
also operate normally, but note that these are independent of
16
Page 17

English
InControl Butto
Using Launchkey Mini with the Launchpad iPad app
Connect your Launchkey Mini to your iPad via the camera kit, following the instructions on
page 12.
Press the InControl button to enable the launch pads to interface with the app.
n
The hardware launch pads will illuminate, representing 16 of the 48 Launchpad app pads.
How they illuminate will depend on the current Launchpad app session. Note that when the
app is rst loaded, the hardware pads are mapped to the top two rows of the app, and this is
conrmed by the two “LEDs” at the left-hand end of the on-screen rows. Use the K and J
buttons [8] to select other pairs of rows; note that each press scrolls one row of app pads at a
time.
Using Launchkey Mini with both Launchkey and Launchpad iPad apps
It is possible to run the two apps simultaneously. For example, you can use the launch pads to
control the loops and samples that the Launchpad app generates, while playing the Launchkey
synth.
Although both apps run simultaneously, only one can appear on-screen at a time; Launchkey
Mini will always control the foreground app. You can remotely switch between apps using the
Track I and H buttons [7]. The I button selects the Launchkey app, while the H button selects the
Launchpad app.
17
Page 18

English
TECHNICAL INFORMATION
TROUBLESHOOTING
For the latest information and assistance with your Launchkey Mini please visit:
www.novationmusic.com/answerbase.
Basic Troubleshooting Examples
Q. Where can I nd my software?
A. The software for Launchkey Mini is available from our web site.
Go to http://www.novationmusic.com/register and follow the instructions.
Q. My iPad is saying that Launchkey Mini is drawing too much power.
A. Launchkey Mini is designed to be powered directly from the iPad, however the order of
connection is important. First plug the USB cable into Launchkey Mini, then the other end
into the Camera Connection Kit, and nally connect the CCK to the iPad.
Q. Do I need to install a USB driver when using Launchkey Mini with a Mac or PC?
A. No, Launchkey Mini is a class-compliant device. This means your computer will detect the
keyboard when you connect it and, if necessary, install the correct drivers automatically.
Q. Can I connect Launchkey Mini to both a computer and an iPad at the same time?
A. Launchkey Mini is designed to connect via USB, and thus can only connect to one device
at a time.
Q. How do I stop the Launchkey app playing?
A. Press the play button (triangular symbol) in the Launchkey app.
Q. What is InControl?
A. A unique Novation feature that provides control of all major music software straight
out of the box.
Q. What does the arrow button do?
A. This selects between InControl and Basic Mapping Modes for Launchkey Mini’s rotary
controls and pads. InControl mode is only available when Launchkey Mini is connected to
supported music software.
18
Page 19

English
MIDI Messages Table
Control Msg Type Msg No. Range
Knob 1 cc 21 0 - 127
Knob 2 cc 22 0 - 127
Knob 3 cc 23 0 - 127
Knob 4 cc 24 0 - 127
Knob 5 cc 25 0 - 127
Knob 6 cc 26 0 - 127
Knob 7 cc 27 0 - 127
Knob 8 cc 28 0 - 127
Pad 1 Note 40 E1
Pad 2 Note 41 F1
Pad 3 Note 42 F#1
Pad 4 Note 43 G1
Pad 5 Note 48 C2
Pad 6 Note 49 C#2
Pad 7 Note 50 D2
Pad 8 Note 51 Eb2
Pad 9 Note 36 C1
Pad 10 Note 37 C#1
Pad 11 Note 38 D1
Pad 12 Note 39 Eb1
Pad 13 Note 44 G#1
Pad 14 Note 45 A1
Pad 15 Note 46 Bb1
Pad 16 Note 47 B1
Round button top row cc 108 0 / 127
Round button bottom row cc 109 0 / 127
Arrow up button cc 104 0 / 127
Arrow down button cc 105 0 / 127
Track left (HUI track Down) cc 106 0 / 127
Track right (HUI Track Up) cc 107 0 / 127
Octave left (down) None
Octave right (up) None
InControl None
Keys Note
19
Page 20

English
20
 Loading...