

Page 1
Page 2

English
Novation
A division of Focusrite Audio Engineering Ltd.
Windsor House,
Turnpike Road,
Cressex Business Park,
High Wycombe,
Bucks,
HP12 3FX.
United Kingdom
Tel: +44 1494 462246
Fax: +44 1494 459920
e-mail: sales@novationmusic.com
Web: http://www.novationmusic.com
Disclaimer
Novation has taken all possible steps to ensure that the information given here is both correct and
complete. In no event can Novation accept any liability or responsibility for any loss or damage to
the owner of the equipment, any third party, or any equipment which may result from use of this
manual or the equipment which it describes. The information provided in this document may be
modied at any time without prior warning. Specications and appearance may differ from those
listed and illustrated.
2
Page 3

English
IMPORTANT SAFETY INSTRUCTIONS
1. Read these instructions.
2. Keep these instructions.
3. Heed all warnings.
4. Follow all instructions.
5. Clean only with dry cloth.
6. Do not install near any heat sources such as radiators, heat registers, stoves, or other
apparatus (including ampliers) that produce heat.
7. Protect the power cord from being walked on or pinched particularly at plugs, convenience
receptacles, and the point where they exit from the apparatus.
8. Only use attachments/accessories specied by the manufacturer.
9. Use only with the cart, stand, tripod, bracket, or table specied by the
manufacturer, or sold with the apparatus. When a cart is used, use caution
when moving the cart/apparatus combination to avoid injury from tip-over.
10. Unplug this apparatus during lightning storms or when unused for long periods of time.
11. Refer all servicing to qualied service personnel. Servicing is required when the
apparatus has been damaged in any way, such as power-supply cord or plug is damaged,
liquid has been spilled or objects have fallen into the apparatus, the apparatus has been
exposed to rain or moisture, does not operate normally, or has been dropped.
12. No naked ames, such as lighted candles, should be placed on the apparatus.
WARNING: Excessive sound pressure levels from earphones and headphones can cause
hearing loss.
WARNING: This equipment must only be connected to USB 1.1 or 2.0 ports.
3
Page 4

English
ENVIRONMENTAL DECLARATION
Compliance Information Statement: Declaration of Compliance procedure
Product Identication: Novation Impulse Keyboard
Responsible party: American Music and Sound
Address: 5304 Derry Avenue #C
Agoura Hills,
CA 91301
Telephone: 800-994-4984
This device complies with part 15 of the FCC Rules. Operation is subject to the following two
conditions: (1) This device may not cause harmful interference, and (2) this device must accept
any interference received, including interference that may cause undesired operation.
For USA
To the User:
1. Do not modify this unit! This product, when installed as indicated in the instructions
contained in this manual, meets FCC requirements. Modications not expressly approved by
Novation may void your authority, granted by the FCC, to use this product.
2. Important: This product satises FCC regulations when high quality shielded USB cables
with integral ferrite are used to connect with other equipment. Failure to use high quality
shielded USB cables with integral ferrite or to follow the installation instructions within this
manual may cause magnetic interference with appliances such as radios and televisions and
void your FCC authorization to use this product in the USA.
3. Note: This equipment has been tested and found to comply with the limits for a Class B
digital device, pursuant to part 15 of the FCC Rules. These limits are designed to provide
reasonable protection against harmful interference in a residential installation. This
equipment generates, uses and can radiate radio frequency energy and, if not installed
and used in accordance with the instructions, may cause harmful interference to radio
communications. However, there is no guarantee that interference will not occur in a
particular installation. If this equipment does cause harmful interference to radio or television
reception, which can be determined by turning the equipment off and on, the user is
encouraged to try to correct the interference by one or more of the following measures:
• Reorient or relocate the receiving antenna.
• Increase the separation between the equipment and receiver.
• Connect the equipment into an outlet on a circuit different from that to which the receiver
is connected.
• Consult the dealer or an experienced radio/TV technician for help.
4
Page 5

English
For Canada
To the User:
This Class B digital apparatus complies with Canadian ICES-003.
Cet appareil numérique de la classe B est conforme à la norme NMB-003 du Canada.
RoHS Notice
Novation has conformed and product conforms, where applicable, to the European
Union’s Directive 2002/95/EC on Restrictions of Hazardous Substances (RoHS) as
well as the following sections of California law which refer to RoHS, namely sections
25214.10, 25214.10.2, and 58012, Health and Safety Code; Section 42475.2, Public
Resources Code.
CAUTION:
The normal operation of this product may be affected by a strong electrostatic
discharge (ESD). In the event of this happening, simply reset the unit by removing and
then replugging the USB cable. Normal operation should return.
COPYRIGHT AND LEGAL NOTICES
Novation and Automap are registered trade marks of Focusrite Audio Engineering Limited.
Impulse is a trade mark of Focusrite Audio Engineering Limited.
VST is a trade mark of Steinberg Media Technologies GmbH.
Audio Units (AU) is a trade mark of Apple, Inc.
RTAS is a trade mark of Avid, Inc.
All other brand, product and company names and any other registered names or trade marks
mentioned in this manual belong to their respective owners.
2011 © Focusrite Audio Engineering Limited. All rights reserved.
5
Page 6

English
CONTENTS
IMPORTANT SAFETY INSTRUCTIONS . . . . . . . . . . . . . . . . . . . . . . . . . . . . . . . . . . . . . . . . 3
ENVIRONMENTAL DECLARATION. . . . . . . . . . . . . . . . . . . . . . . . . . . . . . . . . . . . . . . . . . . . 4
For USA. . . . . . . . . . . . . . . . . . . . . . . . . . . . . . . . . . . . . . . . . . . . . . . . . . . . . . . . . . . . . . . 4
For Canada . . . . . . . . . . . . . . . . . . . . . . . . . . . . . . . . . . . . . . . . . . . . . . . . . . . . . . . . . . . . 5
COPYRIGHT AND LEGAL NOTICES . . . . . . . . . . . . . . . . . . . . . . . . . . . . . . . . . . . . . . . . . . 5
INTRODUCTION . . . . . . . . . . . . . . . . . . . . . . . . . . . . . . . . . . . . . . . . . . . . . . . . . . . . . . . . . . 8
Key Features . . . . . . . . . . . . . . . . . . . . . . . . . . . . . . . . . . . . . . . . . . . . . . . . . . . . . . . . . . . 8
About This Manual . . . . . . . . . . . . . . . . . . . . . . . . . . . . . . . . . . . . . . . . . . . . . . . . . . . . . . 8
What’s In The Box . . . . . . . . . . . . . . . . . . . . . . . . . . . . . . . . . . . . . . . . . . . . . . . . . . . . . . . 9
Power Requirements. . . . . . . . . . . . . . . . . . . . . . . . . . . . . . . . . . . . . . . . . . . . . . . . . . . . .10
Glossary . . . . . . . . . . . . . . . . . . . . . . . . . . . . . . . . . . . . . . . . . . . . . . . . . . . . . . . . . . . . . .10
Hardware Overview. . . . . . . . . . . . . . . . . . . . . . . . . . . . . . . . . . . . . . . . . . . . . . . . . . . . . .12
Top View – assignable and non-assignable controls. . . . . . . . . . . . . . . . . . . . . . . . .12
Rear view – connections . . . . . . . . . . . . . . . . . . . . . . . . . . . . . . . . . . . . . . . . . . . . . .14
IMPULSE SETUP EXAMPLES . . . . . . . . . . . . . . . . . . . . . . . . . . . . . . . . . . . . . . . . . . . . . . .15
Interfacing to a computer . . . . . . . . . . . . . . . . . . . . . . . . . . . . . . . . . . . . . . . . . . . . . . . . .15
Automap mode. . . . . . . . . . . . . . . . . . . . . . . . . . . . . . . . . . . . . . . . . . . . . . . . . . . . . .15
Manual mapping mode . . . . . . . . . . . . . . . . . . . . . . . . . . . . . . . . . . . . . . . . . . . . . . .15
Interfacing to MIDI hardware . . . . . . . . . . . . . . . . . . . . . . . . . . . . . . . . . . . . . . . . . . . . . . .16
Using external hardware and a computer together. . . . . . . . . . . . . . . . . . . . . . . . . . . . . .16
MENU OVERVIEW. . . . . . . . . . . . . . . . . . . . . . . . . . . . . . . . . . . . . . . . . . . . . . . . . . . . . . . . .17
LCD features and Menu Navigation . . . . . . . . . . . . . . . . . . . . . . . . . . . . . . . . . . . . . . . . .17
EXPLORING IMPULSE . . . . . . . . . . . . . . . . . . . . . . . . . . . . . . . . . . . . . . . . . . . . . . . . . . . . .18
Loading and Saving a Template . . . . . . . . . . . . . . . . . . . . . . . . . . . . . . . . . . . . . . . . . . . .18
Help Mode . . . . . . . . . . . . . . . . . . . . . . . . . . . . . . . . . . . . . . . . . . . . . . . . . . . . . . . . . . . . .19
Conguring Impulse Controls . . . . . . . . . . . . . . . . . . . . . . . . . . . . . . . . . . . . . . . . . . . . . .19
Preview . . . . . . . . . . . . . . . . . . . . . . . . . . . . . . . . . . . . . . . . . . . . . . . . . . . . . . . . . . . . . . 20
Setup Mode . . . . . . . . . . . . . . . . . . . . . . . . . . . . . . . . . . . . . . . . . . . . . . . . . . . . . . . . . . . 20
Keyboard Settings . . . . . . . . . . . . . . . . . . . . . . . . . . . . . . . . . . . . . . . . . . . . . . . . . . . . . . 22
MIDI Channel . . . . . . . . . . . . . . . . . . . . . . . . . . . . . . . . . . . . . . . . . . . . . . . . . . . . . . . . . 23
Zones . . . . . . . . . . . . . . . . . . . . . . . . . . . . . . . . . . . . . . . . . . . . . . . . . . . . . . . . . . . . . . . 23
Program Change . . . . . . . . . . . . . . . . . . . . . . . . . . . . . . . . . . . . . . . . . . . . . . . . . . . . . . . .24
Transport Controls. . . . . . . . . . . . . . . . . . . . . . . . . . . . . . . . . . . . . . . . . . . . . . . . . . . . . . 25
Arpeggiator . . . . . . . . . . . . . . . . . . . . . . . . . . . . . . . . . . . . . . . . . . . . . . . . . . . . . . . . . . . 25
Arpeggiator Settings menu . . . . . . . . . . . . . . . . . . . . . . . . . . . . . . . . . . . . . . . . . . . 26
Setting the Arp/Roll Tempo . . . . . . . . . . . . . . . . . . . . . . . . . . . . . . . . . . . . . . . . . . . 27
Roll Mode . . . . . . . . . . . . . . . . . . . . . . . . . . . . . . . . . . . . . . . . . . . . . . . . . . . . . . . . . . . . 28
Boot Menu . . . . . . . . . . . . . . . . . . . . . . . . . . . . . . . . . . . . . . . . . . . . . . . . . . . . . . . . . . . . 28
6
Page 7

English
USING IMPULSE WITH AUTOMAP 4 . . . . . . . . . . . . . . . . . . . . . . . . . . . . . . . . . . . . . . . . . 29
Introduction . . . . . . . . . . . . . . . . . . . . . . . . . . . . . . . . . . . . . . . . . . . . . . . . . . . . . . . . . . . 29
Installing Automap 4 on your computer. . . . . . . . . . . . . . . . . . . . . . . . . . . . . . . . . . . . . . 29
Updating Impulse’s rmware . . . . . . . . . . . . . . . . . . . . . . . . . . . . . . . . . . . . . . . . . . 29
Conguring your DAW for Automap 4 control . . . . . . . . . . . . . . . . . . . . . . . . . . . . . . . . . 30
The Plugin, Mixer and MIDI buttons. . . . . . . . . . . . . . . . . . . . . . . . . . . . . . . . . . . . . .31
Automap Mode. . . . . . . . . . . . . . . . . . . . . . . . . . . . . . . . . . . . . . . . . . . . . . . . . . . . . 32
The Automap Mapping Editor . . . . . . . . . . . . . . . . . . . . . . . . . . . . . . . . . . . . . . . . . 32
Track Up/Down. . . . . . . . . . . . . . . . . . . . . . . . . . . . . . . . . . . . . . . . . . . . . . . . . . . . . 34
Bank Up/Down . . . . . . . . . . . . . . . . . . . . . . . . . . . . . . . . . . . . . . . . . . . . . . . . . . . . . 34
Learn Mode . . . . . . . . . . . . . . . . . . . . . . . . . . . . . . . . . . . . . . . . . . . . . . . . . . . . . . . 34
DAW GUIDE . . . . . . . . . . . . . . . . . . . . . . . . . . . . . . . . . . . . . . . . . . . . . . . . . . . . . . . . . . . . . 35
Ableton Live and Clip-launch mode (Mac or Windows) . . . . . . . . . . . . . . . . . . . . . . . . . 35
TROUBLESHOOTING . . . . . . . . . . . . . . . . . . . . . . . . . . . . . . . . . . . . . . . . . . . . . . . . . . . . . .37
Basic Troubleshooting Examples. . . . . . . . . . . . . . . . . . . . . . . . . . . . . . . . . . . . . . . .37
FACTORY TEMPLATES. . . . . . . . . . . . . . . . . . . . . . . . . . . . . . . . . . . . . . . . . . . . . . . . . . . . 38
ASSIGNABLE CONTROLS –
PARAMETERS AND RANGES . . . . . . . . . . . . . . . . . . . . . . . . . . . . . . . . . . . . . . . . . . . . . . 39
MIDI IMPLEMENTATION TABLE . . . . . . . . . . . . . . . . . . . . . . . . . . . . . . . . . . . . . . . . . . . . . 43
7
Page 8

English
INTRODUCTION
Thank you for purchasing the Novation Impulse MIDI controller keyboard. As well as the music
keyboard itself, Impulse is equipped with a range of controllers to allow the modern musician to
create great music in the studio, in live performance or on the move. Easy integration with your
music software has been a primary consideration of Impulse’s design team.
This guide will introduce you to Impulse and explain the various ways you can use Impulse with
your music software, either with or without other MIDI hardware, in your recording set-up.
Impulse is supplied with Novation Automap 4 software, giving you a powerful yet simple way
to control all your favourite music software applications. Automap 4 is compatible with other
Novation hardware so if you are already using Automap with existing Novation hardware
to control your software, you may only need to read the rst few chapters of this guide to
familiarise yourself with Impulse.
Full information about installing, setting up, and operating Automap 4 software can be found in
the separate Automap 4 User Guide. It can be downloaded from our website:
www.novationmusic.com/support
For additional information, up to date support articles and a form to contact our Technical
Support Team please visit the Novation Answerbase at: www.novationmusic.com/answerbase
Key Features
• Available with 25, 49 or 61-note semi-weighted piano-style keyboard
• 8 rotary encoders
• 9 faders (49/61 note versions)
• 8 drum pads with tri-colour backlighting and roll mode
• Large (75 x 32 mm) multifunction LCD displaying DAW data directly
• Standard transport control set
• Arpeggiator with pad-based rhythm editor
• Integrated with Automap 4 for seamless control of plug-ins and DAW mixers
• Buttons with QWERTY support via Automap (49/61 note versions)
• Very simple installation procedure
About This Manual
We don’t know whether you’ve got years of experience with using MIDI, or if this is your very
rst keyboard controller. In all probability, you’re somewhere between the two. So we’ve tried
to make this manual as helpful as possible for all types of user, and this inevitably means that
more experienced users will want to skip over certain parts of it, while relative novices will want
to avoid certain parts of it until they’re condent they’ve mastered the basics.
8
Page 9
English
However, there are a few general points that are useful to know about before you continue
reading this manual. We’ve adopted some graphical conventions within the text, which we hope
all types of user will nd helpful in navigating through the information to nd what they need to
know quickly:
Abbreviations, conventions, etc.
Where top panel controls or rear panel connectors are referred to, we’ve used a number thus:
6
to cross-reference to the top panel diagram, and thus: 1 to cross-reference to the rear
panel diagram. (See page 12 and page 14).
We’ve used BOLD to name physical things like top panel controls and rear panel connectors,
and also to name on-screen buttons which you need to click, and LCD dot-matrix text
to denote text which appears on the LCD.
Tips
These do what it says on the tin: we include bits of advice, relevant to the
topic being discussed that should simplify setting up Impulse to do what you
want. It’s not mandatory that you follow them, but generally they should make
life easier.
What’s In The Box
The Impulse has been carefully packed in the factory and the packaging was designed to
withstand rough handling. Should the unit appear to have been damaged in transit, do not
discard any of the packing material and notify your music dealer.
Save all the packing materials for future use if you ever need to ship the unit again.
Please check the list below against the contents of the packaging. If any items are missing or
damaged, contact the Novation dealer or distributor where you purchased the unit.
• Impulse MIDI controller keyboard
• Getting Started Guide
• Installation DVD, containing:
• Automap 4 software installer which includes drivers
• Impulse User Guide
• Xcite+ pack (Novation Bass Station soft synth, Mike the Drummer samples,
Loopmaster samples, Ableton Live Lite music software)
• USB Type A to Type B cable (2 m)
• Ableton Live Lite authorisation card
• Bass Station authorisation card
9
Page 10

English
Power Requirements
Impulse is powered via its rear panel USB connector. Normally, DC power will be supplied by
the computer to which Impulse is connected through a standard USB cable. We recommend
that you connect Impulse directly to a computer’s native USB port, and not via a USB hub.
Correct operation cannot be guaranteed if a hub is in use.
If you wish to use Impulse as a stand-alone MIDI controller for other hardware MIDI sound
sources (or other devices) without a computer – as you might in live performance, for example –
you should obtain an AC-to-DC USB mains adaptor, which you should plug in to Impulse’s USB
port in the same way as a standard USB cable. When using this method, please ensure that
your local AC supply is within the range of voltages required by the adaptor BEFORE you plug
it into the mains. Please contact your Novation dealer for advice on suitable mains adaptors if
you are in any doubt.
A word about laptops:
When powering Impulse from a computer, you should be aware that although
the USB specication agreed by the IT industry states that a USB port should
be able to supply 0.5 A at 5 V, some computers - particularly laptops – are
unable to supply this current. Unreliable operation may result in such a case.
When powering Impulse from a laptop’s USB port, it is recommended that the
laptop is powered from AC mains rather than its internal battery.
Glossary
Certain terms are used throughout this User Guide which may be new or unfamiliar to some
users. We have listed a few of them here to help you understand the Guide more easily.
Arp
Short for Arpeggiator, an Impulse feature. Arp mode lets you set up rhythmic patterns of notes
using the drum pads, and modify them in real time (great for live performance!), changing the
pattern length, the pattern itself and the way certain notes are accented.
Clip launch
This is a term specic to Ableton Live including the Lite version supplied with Impulse. Within
Ableton Live Lite, a Clip is essentially a sound le (of any duration) which can be assigned
to any DAW Track. Provision has been made for launching Clips directly from drum pads on
Impulse.
DAW
Digital Audio Workstation. An alternative term for your music creation/recording/editing
software.
10
Page 11

English
Map/Mapping
In Automap 4, mappings dene how the assignable controls on Impulse relate to the various
controls on the Thing you are controlling. Mappings will generally have multiple pages.
For example, with a software synth, the various pages of the map will dene which synth
parameters (of the oscillators, lters, envelopes, etc.) are controlled by which rotary encoder.
Automap 4 has a Mapping Editor window which lets you change the mapping assignments to
suit your particular requirements.
Plug-in
A Plug-in is a software add-on which gives a DAW additional functionality and is typically used
to either generate or process sounds. Many are emulations of hardware devices. A plug-in may
be ‘native’ – supplied as part of the DAW application, or ‘third-party’ – purchased by the user
separately to work within the DAW.
Roll
A variant of Arp mode, Roll is another mode suited for live performance, and lets you repeatedly
trigger specic sounds from the drum pads, with velocity sensitivity.
Template
A Template denes how your Impulse will operate. When you load a template, all Impulse’s
own settings and parameters will be set to whatever the template dictates. If you subsequently
change settings, you can resave the amended set of data to the template, and your
amendments will be restored next time you load the template. Impulse is supplied with 20
‘factory’ templates which congure it for use with particular DAWs and/or Things.
Thing
A Thing is anything that can be controlled by Impulse and/or Automap. A Thing may be
hardware or software. Examples of Things are the plug-ins you use in your DAW, your DAW’s
track mixer and external, MIDI-controllable synths or FX processors.
Zone
It is possible to split Impulse’s keyboard to create four keyboard ‘zones’. You have full control
over where the split points are. This is a useful feature in live performance, as it allows you to
use different parts of the keyboard to wwcontrol different instruments, or layer one sound on top
of another.
11
Page 12
English
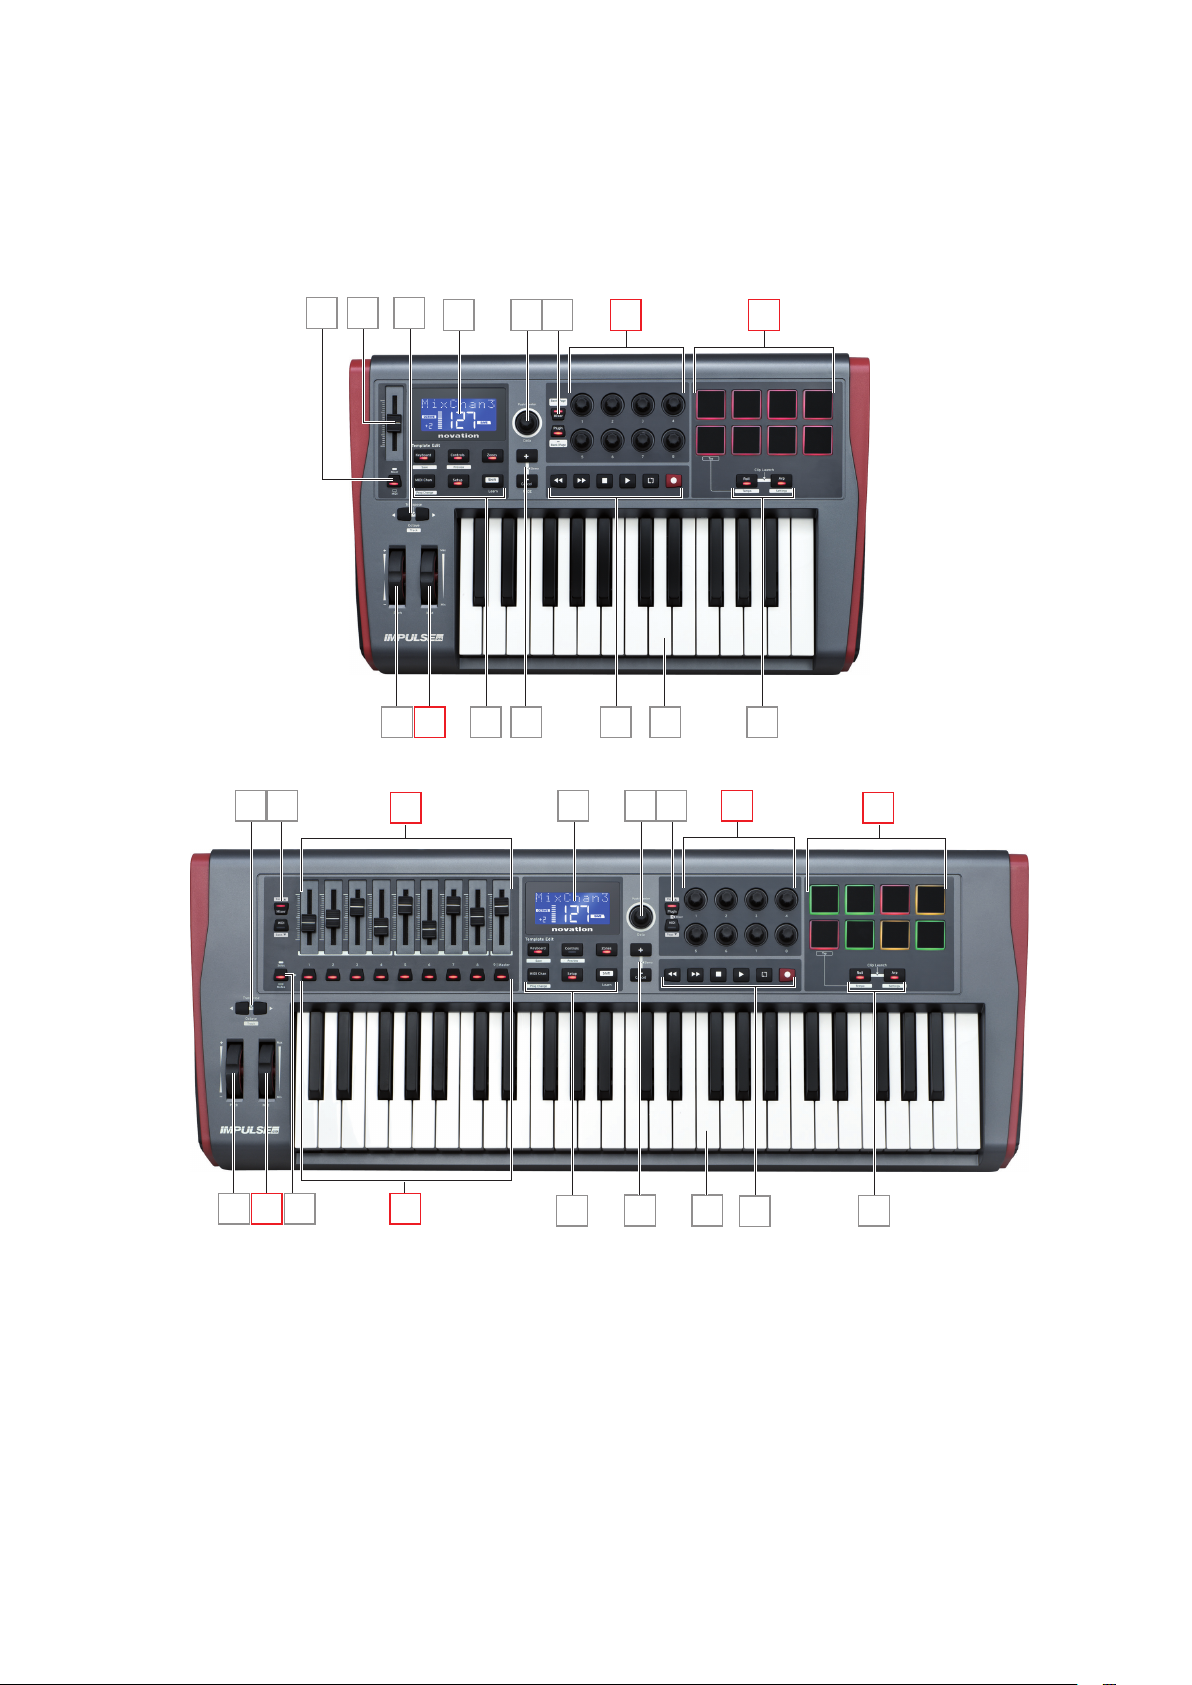
Hardware Overview
Top View – assignable and non-assignable controls
910 2
6 1114
516 17
9
2 4
78 18
1
4
15
6 111412
1
3516 13
Each of Impulse’s controls is either assignable or non-assignable. Assignable controls are
‘free’ – their function will vary according to which plug-in, DAW mixer or additional piece of MIDI
hardware is being controlled. Their assignment to a particular parameter of the Thing being
controlled will either be made automatically by Automap, or manually by you. Non-assignable
controls are ‘xed’ – their function will generally always be the same regardless of what sort of
setup you are using Impulse with.
8 15
7 17
18
12
Page 13

English
Assignable controls:
1
8 x rotary encoders. These are ‘360°’ controls with no end stops, and are used to control
plug-in parameters. These controls have speed-dependent resolution, so turning the encoder
slowly gives ner resolution than turning it quickly.
2
9 x 45 mm faders (slider controls), used to control volumes in your DAW mixer.
3
9 x press-buttons.
4
8 x pressure-sensitive drum pads. These can be used to trigger sounds (i.e., drums) in your
2
1
music software, and also to control Impulse’s “Arp”, “Roll” and “Clip Launch” functions
5
Mod (Modulation) wheel.
1
Impulse 49 and 61 only. Impulse 25 has one assignable fader.
2
Impulse 49 and 61 only. There are no assignable buttons on Impulse 25
Non-assignable controls:
6
Multifunction LCD display. Shows information contextually – i.e., will give you the most useful
data depending on which controls you’re currently using.
7
+ / – buttons. These are used in conjunction with the various menus, to scroll through
available options, etc. Precise function varies with menu. Pressing these buttons together
enables Help mode.
8
Template Edit buttons. A set of four buttons (Keyboard, Controls, Zones, and MIDI Chan),
which select the different menus used when modifying templates. A fth button, Setup, permits
global settings, and a sixth, Shift, enables secondary functions for some of the other buttons.
9
Octave > / Octave < buttons – shift the notes played from the keyboard ‘up’ or ‘down’ in
octave steps. Pressing the two buttons together lets you transpose the keyboard in semitone
increments. The number of octaves over which the keyboard can be shifted varies with Impulse
model; the smaller models have a greater shift range.
10
MIDI/Mixer button (Impulse 25 only) – sets Impulse 25’s single fader to be either a control
for a DAW mixer level, or an additional assignable MIDI control.
11
Plug-in/MIDI buttons – these determine whether the eight rotary encoders vary specic plug-in
parameters, mixer controls, or act as general purpose MIDI controllers. Pressing Plug-in or MIDI
while holding down Shift will step between pages in the Automap Mapping Edit window. Pressing
both simultaneously will map the encoders to the Automap mixer.
12
Mixer/MIDI buttons (Impulse 49 and 61 only) – these determine whether the nine faders
act as volume controls for individual tracks within a DAW mixer, or as general purpose MIDI
controllers. Pressing Mixer or MIDI while holding down Shift will scroll the set of DAW mixer
faders being controlled through eight channels at a time.
13
Page 14

English
13
Mute/Solo (Impulse 49 and 61 only) – this sets the nine per-fader buttons 3 to act as either
Mute or Solo buttons for their respective mixer channel when this section is used in mixer mode
only.
14
Data knob – this is a rotary encoder used for selecting options or altering values in the
Impulse’s menu system. The knob includes a ‘press’ action which performs an ‘Enter’ function
in the menus.
15
Roll and Arp buttons – these place Impulse’s drum pads into Roll and Arp modes
respectively. The buttons also have Shift functions, and pressing them together activates
Impulse’s Clip Launch function for Ableton Live.
16
Pitch wheel – standard pitchbend wheel, spring-loaded to return to centre detent position.
17
Keyboard – Impulse is available in 25-, 49- or 61-note versions. The keys are semi-weighted
and output channel aftertouch.
18
Transport controls - these provide remote control facilities for DAW transports.
Rear view – connections
1 2 3 4
1 USB port – USB Type B connector compatible with USB 1.1, 2.0 or 3.0. Connect the
Impulse to a USB port on your computer using the USB cable supplied. Alternatively you can
connect a USB AC-to-DC adaptor here if using Impulse away from a computer.
2 Sustain and Expression – two ¼” jack sockets for the connection of standard sustain and
expression pedals.
3 MIDI In and MIDI Out – standard 5-pin DIN sockets allowing you to connect to external
MIDI hardware such as additional sound modules.
4 Kensington security lock – secure your Impulse to a convenient structural point if desired.
14
Page 15

English
IMPULSE SETUP EXAMPLES
There are two basic ways of using Impulse: with or without connection to a computer.
Interfacing to a computer
If you are intending to use Impulse with your computer music software, the physical connection
is a simple USB cable between Impulse and a USB port on the computer.
Power
Feedback - LCD Screen and LEDs
Control information
USB
Automap mode
The simplest method of interfacing Impulse to your computer is to use the Novation Automap
software application supplied. Automap will automatically detect both your Impulse keyboard
and whichever DAW plug-in is currently active, and will congure Impulse’s assignable controls
to the various plug-in parameters in an intelligent manner. You have the option of editing these
assignments if you would prefer the control mapping to differ in some respects from the default.
As well as controlling parameters on your plug-ins, Impulse also provides you with a hardware
mixer control surface in the form of per-channel faders and mute or solo buttons (applicable to
Impulse 49 and 61 only). By default, Automap will assign the faders in channel order to the
per-track levels in the DAW’s mixer, but they can also be reassigned.
Manual mapping mode
This method of interfacing is recommended for advanced users only. Impulse is connected to
your computer in the same way, but is used as a general purpose MIDI controller for your
plug-ins, etc., by you making all the control assignments individually. Thus you can create
custom templates to suit your precise method of working.
15
Page 16

English
Interfacing to MIDI hardware
AC to USB power adapter
(not supplied)
MIDI Out
MIDI In
USB
You can also use Impulse to directly control other MIDI-compatible hardware, such as sound
modules, FX processors, and so on. To do so, use the standard MIDI ports on the Impulse rear
panel and standard 5-pin DIN MIDI cables. As there is no computer to supply Impulse with DC
power, you will need to use a separate AC-to-DC adapter designed for USB-powered devices.
This is the arrangement you might want to employ in live performance, for example, to avoid the
need for an on-stage computer.
Using external hardware and a computer together
MIDI
MIDI
Feedback - LCD Screen
Power
Control information
USB
You may wish to use your music software and one or more hardware devices, such as your
favourite sound modules, etc., as well as Impulse. In this situation, you can make use of both
the USB and DIN ports for MIDI data transfer. The USB port will connect to your computer in
the normal manner, while the DIN ports will connect to the external hardware. Impulse lets you
select whether the external devices are to be controlled by the computer, or from Impulse. See
“Midi Out Source” on page 21.
16
Page 17

English
MENU OVERVIEW
Most of the conguration and setting up of Impulse is carried out through the menu system and
the LCD screen. The menu system is also used to modify templates.
LCD features and Menu Navigation
Whilst the menus themselves vary with function, there are a number of basic principles which
always apply.
The upper 8-character row of the display shows the Impulse
parameter or setting being adjusted. The 3 large characters
in the lower row show the parameter value or setting itself.
In any of the menus, you can scroll through the available
pages with the + and – buttons.
The + and – symbols at the right hand side of the display tell
you if there are further pages, and in which direction.
On any menu page, the Data knob 14, is used to vary the parameter value or setting. Some
settings – e.g., Aftertouch in the Keyboard menu – have only two values – ‘On’ and ‘Off’.
Others have a full ‘analogue’ range of values, usually from 0 to 127. The effect of changing a
parameter is immediate and is remembered when you exit the page or menu.
Computer Connected icon
The Computer Connected icon conrms that Impulse is communicating correctly
with the computer, and a plug-in or DAW mixer is available. The icon will be off if you are using
Impulse without a computer, or when it’s connected to a computer, but no controllable DAW
mixer or plug-in is available.
Active Control
The Control icon illuminates when an assignable control (e.g., rotary encoder, fader,
button or pad) is moved. The 3-character display below the ag conrms the control you’re
touching; Fd = Fader, En = rotary encoder, dP = trigger (drum) pad, followed by the number of
the control (1 to 8). The adjacent vertical ‘bargraph’ display represents the control value.
17
Page 18

English
EXPLORING IMPULSE
Impulse is a fully assignable MIDI controller keyboard, whose operation revolves around the
concept of templates. A template (see Glossary) tells Impulse ‘what to do’ – it denes how
it is set up in terms of things like its MIDI parameters, keyboard zone limits, conguration of
controls, and so on. There are 20 default, pre-dened templates available*; some of these have
been created for use with specic software or hardware devices. However, any of these may be
modied for your own use if you wish. Note that in general, when using Impulse with Automap
software, these templates are not used. Impulse operates in a somewhat different manner
when used with Automap and this is described later in the manual.
*A table listing the default templates can be found in the Appendix section of this manual.
Getting Impulse to work the way you want it to ultimately comes down to editing these
templates. For example, you will probably want to use Impulse in quite a different way in your
studio for recording with your music software from how you use it in live performance. It is likely
that you would use different templates for these two ways of working.
Loading and Saving a Template
From the default screen (i.e., with no button LEDs lit in the
Template Edit section), rotate the Data knob 14 or press the
+ / - buttons 7 until the number of the required template is
displayed (1 to 20). The template is active as soon as its
number is displayed. Note: To select a template if MIDI
parameter values are currently displayed, use the + / -
buttons. Alternatively you can press any of the Keyboard,
Controls, Zones, MIDI Chan or Setup buttons twice to
access the template screen.
When you have modied MIDI parameters for any of the
controls, you must save your changes to the template
currently selected. (A SAVE element will light in the display
to prompt you to do so.) The Save function is invoked by
holding the Shift button down and pressing the Keyboard
button. This opens a conrmation screen containing the
Template Name, which you can edit one character at a time,
if you wish.
The character to be edited is the one with the ashing
cursor; use the Data knob 14 to alter the character, and the
+ / - buttons 7 to shift the character position. When you
have nished editing the name, press Enter, and a
SaveTpl? (Save Template?) conrmation screen appears.
If you are happy that you are saving the altered name to the
correct template, press Enter again. (Before pressing Enter,
you can use the Data knob to choose a different template to
which the new name will be applied, if you wish.)
18
Page 19

English
Note that if you make changes to a template but do not save those changes, when you try to
load a different template, Impulse will display a message: Discard? Use the Data knob to
select either No or Yes, and press Enter to conrm. If you select Yes, your changes will be lost
Help Mode
Pressing + and – buttons 7 together enables Help Mode. It is conrmed by hLP in the display.
In Help mode, pressing any control generates a scrolling text message in the display, reminding
you of what the control does and how to use it.
Conguring Impulse Controls
As each template can contain an entire set of conguration
settings, make sure you are in the correct template before
changing any MIDI parameters. Pressing the Controls
button 8 enters Control Edit mode, with the display as
shown, and the Controls button LED lit. Press Controls a
second time to exit the mode.
Operating any assignable control – e.g., faders 1-9*, buttons
1-9*, encoders 1-8 or the drum pads – makes the display
show parameter for that control. The selected control
number is displayed, for example Fd3 (Fader 3) or Bt5
(Button 5).
MIDI parameters can be selected by pressing the + and – buttons 7 with parameter values set
with the Data knob 14.
Note that the MIDI parameters available vary with control type: faders, rotary encoders, the
mod wheel, drum pads and buttons all have different menu pages. Most of the pages’ functions
will be self-evident, but a full list of all the available parameters for each control type, and
their ranges of operation can be found in the section ‘Assignable Controls – Parameters and
Ranges’ on page 39 of this user guide.
Note: do not forget to save your changes to the current template.
* Impulse 49 and 61 only.
19
Page 20

English
Preview
Preview mode is provided to conrm how a control is
currently congured without actually transmitting any MIDI
data to your computer or elsewhere. Enter Preview mode
by holding down Shift and pressing the Controls button.
The LED in the Controls button blinks to conrm the
mode. Pressing or moving any of the assignable controls
will display its MIDI message type. Pressing the Controls
button again will exit Preview mode.
Setup Mode
Setup mode lets you adjust certain global controller settings. In this context, ‘Global’ means
settings which apply to ALL templates. Setup mode is entered by pressing the Setup button; its
LED illuminates to conrm the mode. Setup pages can be selected by pressing the +/– buttons
7
with settings in each adjusted using the Data knob 14.
Page 1: Transport (Transprt)
If Automap is used, Automap will automatically take care
of the transport assignment for all the DAWs supported
and this setting will not be applicable. However if not using
Automap, this setting lets you select whether DAW transport
control commands will be transmitted as MIDI Machine
Control (MMC) data (MC), or as Continuous Controller data
(CC). When set to MMC, each transport button will send the
appropriate standard MIDI command. If your DAW responds
to MMC commands this is the best setting. If not, set this to
CC. The transport buttons will then need to be ‘learnt’ to the
corresponding DAW transport functions.
Page 2: Pad Curve (PadCurve)
This selects one of three velocity tables (1 to 3) which
change the velocity response of the pads to the initial force
applied to them as they are hit. Pad Curve 2 is the default,
and should be acceptable for most playing styles. Using the
same amount of force, setting PadCurve to 1 will output
lower note velocities and conversely a setting of 3 will result
in higher note velocities being transmitted. When set to Off,
the note velocities will always be xed at 127.
20
Page 21

English
Page 3: Tempo (Tempo)
This sets the tempo of Impulse’s internal MIDI clock, in
BPM. This can be useful in live performance for arpeggiator
and roll timings. The range is 40 to 240, with a default value
of 120 BPM.
Page 4: Clock source (ClockSrc)
This setting selects the source for Impulse’s clock
synchronisation, which is used for the Arpeggiator and Roll
functions. The options are: Internal (Int), USB (Usb), MIDI
(Mid) or Auto (Aut). In Auto setting, the setting reverts to
Internal when no USB sync source is present; note that Auto
mode ignores any clock signal that may be present at the
MIDI In DIN socket. Also, Auto mode will ensure that the
internal clock will continue to run at the ‘last-known’ external
clock rate should the external USB clock source fail.
Page 5: MIDI Out source (DIN From)
This setting determines whether an external device
connected to the DIN MIDI Out socket will receive its
MIDI commands locally from Impulse (Loc) or from your
computer (Usb). This is a useful feature when you are using
both music software and additional external devices such as
synths. The default setting is local (Loc).
Page 6: SysEx Data Dump (DumpSYX?)
With this option selected, pressing Enter 14 will let you
download all Impulse’s current internal settings for the
currently active template. This is a useful exercise for
backup security, or for transferring a template to another
Impulse.
Note – There is no need to enter any specic ‘mode’ to import SysEx data. Impulse is always
in ‘read’ mode; it is only necessary to transmit the SysEx data (either from another Impulse or
from a computer using a MIDI SysEx utility). The imported data is initially loaded into a RAM
buffer; when you are happy that the transfer is complete you can then overwrite (save) the
template data into the desired template location.
21
Page 22

English
Keyboard Settings
Primary keyboard parameters can be set in Keyboard mode, which is entered by pressing
the Keyboard button 8; the LED in the button conrms the mode. Keyboard settings are
per-template, so be sure you are working with the correct template before entering this mode.
Keyboard settings pages can be selected by pressing the +/– buttons 7 with the settings in
each adjusted with the Data knob 14.
Page 1: Midi Port (MIDIPort)
This lets you set the MIDI port to be used with the currently-
selected template. Options are: USB (Usb), MIDI (Mid) or
All (ALL). The default is All (i.e., both USB and the DIN MIDI
ports).
Page 2: Keyboard Velocity Curve (VelCurve)
This selects one of four velocity tables (1 to 4) Velocity
curve 2 is the default, and should be acceptable for most
playing styles. Using the same amount of force, setting
VelCurve to 1 will output lower note velocities when
compared to the higher settings of 3 or 4. When set to Off,
all notes played from the keyboard have a xed velocity of
127.
Page 3: Aftertouch (Aftertch)
Impulse’s keyboard is equipped with Channel Aftertouch,
which sends an additional set of MIDI data when further
pressure is applied to a key while it is being pressed. The
options are On or Off. The default setting is On as many
plug-ins use Aftertouch, but in some situations, you may
prefer to switch it off.
22
Page 23

English
MIDI Channel
MIDI data can be sent on any one of 16 channels, and will
only be received and interpreted correctly if the receiving
device is set to the same channel. Press the MIDI Chan
button to set the channel number.
Use the Data knob to change the MIDI channel number from
the default of 1. Note that MIDI channel numbers are part of
the template, and therefore any changes must be saved to
the template as described above (see “Loading and Saving
a Template” on page 18).
Zones
Normally Impulse’s keyboard uses the same MIDI channel for all its notes. Using Zones, it can
be split into 2, 3 or even 4 separate or overlapping regions. Each Zone can have its own MIDI
channel, port, and keyboard range. This feature can be of tremendous benet when playing
live.
Press the Zones button to enable and congure keyboard zones; the LED in the button lights to
conrm the mode.
Page 1: Zones Enable (KbdZones)
Use the data entry knob to select On or Off (default). When
Zones are set On, a ZONES ON element lights in the
display to remind you that Zones are enabled.
Page 2: Zone 1 Start (Z1 Start)
There are two methods of selecting the lowest note in the
Zone: i) press the note on the keyboard, and its note name
will be displayed; ii) use the data knob to scroll through the
list of available notes.
23
Page 24

English
Page 3: Zone 1 End (Z1 End)
You can set the upper note of the Zone in the same manner
as the lowest.
Page 4: Zone 1 Octave (Z1 Octav)
This enables you to change the octave that the keys in the
zone will play. A setting of 0 (the default) means that the
notes in the zone will play at their normal pitch. Note that
the range of octaves available varies between the three
Impulse models.
Page 5: Zone 1 MIDI Channel (Z1 Chan)
Each Zone can use a different MIDI channel, enabling you
to play different sound sources from different parts of the
keyboard. You can set the Zone to any of the 16 standard
MIDI channels, or select tPL, when the Zone’s MIDI
channel will follow that set in the current template.
Page 6: Zone 1 Ports (Z1 Ports)
As well as selecting a different MIDI channel for each
Zone, you can also set the MIDI Port each Zone uses. The
options are: Template (tPL) – the port will be that set in the
current template; USB (Usb) – the USB port will be used;
MIDI (Mid) – the DIN sockets will be used; All (ALL) – both
USB and DIN ports will be used; Off (Off) – the Zone is
disabled.
Pages 7 to 21: Zones 2 to 4
The remaining pages in the Zones menu repeat the settings available for Zone 1 in Pages 2 to 6.
Program Change
You can manually transmit a MIDI Program Change
message from Impulse. Press Shift + MIDI Chan to enable
Prog Change mode.
Select the Program Change number with the Data knob and
the MIDI data will be transmitted. Note: Program Change
MIDI values are automatically transmitted as the Data knob
is turned – i.e., this makes it possible to browse through
patches simply by turning the knob. Press Enter to exit this
mode and revert the screen to the normal display.
24
Page 25

English
Transport Controls
Impulse is provided with a standard set of six ‘transport’ controls 18, which can be used to
start, stop, relocate, etc., within your DAW’s timeline. They act as a convenient remote control
for the software and duplicate the on-screen buttons.
The transport buttons are always active, but your DAW will need to be set correctly to respond
to their commands. Also, you will need to ensure that they are set to send the correct type of
MIDI message – MIDI Machine Control or Continuous Controller – for the DAW. (See “Setup
Mode” on page 20)
Arpeggiator
Impulse has a powerful Arpeggiator feature which allows arpeggios of varying complexity and
rhythm to be played and manipulated in real-time. If a single key is pressed, the note will be
retriggered by the Arpeggiator. If you play a chord, the Arpeggiator identies its notes and plays
them individually in sequence (this is termed an arpeggio pattern or ‘arp sequence’); thus if you
play a C major triad, the selected notes will be C, E and G.
The Impulse Arpeggiator is enabled by pressing the Arp button 15; its LED will light to conrm
and the eight drum pads will turn green. Holding a note down will repeat the note in the
sequence, and you will see the pads’ illumination changing as the pattern progresses. Initially
all enabled beats in the sequence are sounded, but if you press a pad, the beat corresponding
to that pad’s position will now be omitted from the sequence, generating a rhythmic pattern.
The ‘deselected’ pads will show red instead of green. A ‘deselected’ pad may be re-enabled by
tapping it a second time. The pads are velocity-sensitive, and how hard the pads are hit, when
being enabled determines the velocity of the note in the sequence. The initial default state is for
all notes in the sequence to be at equal velocity.
25
Page 26

English
Arpeggiator Settings menu
Various parameters controlling the Arpeggiator’s operation can be set in the Arpeggiator
Settings menu, which is entered by holding down the Shift button and pressing Arp; the LED
in the Arp button ashes in this mode.
Page 1: Sync (Sync 1/x)
This parameter effectively determines the beat of the arp
sequence, based on the tempo rate (see “Tempo” on page
<?>). The sync rate is adjusted with the Data knob and can
have any of 12 values from 1 beat to 96, which correspond
to divisions of the tempo rate.
Page 2: Gate (Gate)
This parameter sets the basic duration of the notes played
by the Arpeggiator, though this may be further amended by
the Swing parameter (see below). The lower the parameter
value, the shorter the duration of the note played. At a
setting of 100, each note in the sequence is immediately
followed by the next without a gap. At the default value of
50, the note duration is exactly half the beat interval as
set by the tempo rate, and each note is followed by a rest
of equal length. Values over 100 will cause the notes to
‘overlap’.
Page 3: Swing (Swing)
If this parameter is set to something other than its default
value of 50, some further interesting rhythmic effects can
be obtained. Higher values of Swing lengthen the interval
between odd and even notes, while the even-to-odd
intervals are correspondingly shortened. Lower values
have the opposite effect. This is an effect which is easier to
experiment with than describe!
26
Page 27

English
Page 4: Arp Mode (Arp Mode)
The Arpeggiator will play all notes held down in a sequence
which is determined by the Arp Mode setting. The options are:
• Up(uP)-sequencebeginswiththelowestnoteplayed
• Down(dn)-sequencebeginswiththehighestnote
played
• Up/Down 2 (ud2) –sequencealternatesindirection
andrepeatsthehighestandlowestnotes
• Chord(crd)–allkeysheldareplayedsimultaneously
asachord
• Up/Down(uPd)–sequencealternatesindirection
• Random(rnd)–thekeysheldareplayedina
continuouslyvaryingrandomorder
• Key Order (PLY)–sequencecomprisesnotesinthe
orderinwhichtheyareplayed
Page 5: Arp Octave (Arp Octv)
This setting adds upper octaves to the arp sequence. If Arp
Octave is set to 2, the sequence is played as normal, then
immediately played again an octave higher. Higher values
of Arp Octave extend this process by adding additional
higher octaves. Arp Octave values greater than 1 have the
effect of doubling, tripling, etc., the length of the sequence.
The additional notes added duplicate the complete original
sequence, but octave-shifted. Thus a four-note sequence
played with Arp Octave set to 1, will consist of eight notes
when Arp Octave is set to 2. You can set Arp Octave to 1, 2,
3 or 4.
Page 6: Arp Length (ArpLngth)
This sets the length of the sequence, and has a default
value of 8. Reducing it to a lower value simply reduces the
number of notes in the sequence.
Setting the Arp/Roll Tempo
The tempo for Arp and Roll modes is set in the Tempo page of the Setup menu (see “Tempo”
on page 21). However, it may also be accessed directly by pressing Shift + Roll 8 + 15; the Roll
LED and drum pad 5 ash in this mode. Alternatively, you can set the tempo ‘manually’, by
tapping a steady beat on drum pad 5. Note that tapping out a tempo in this way is only possible
if Clock Source is set to Internal (see “ Clock Source” on page 21).
Note that by pressing +, you can also access the Clock Source settings menu page from here.
Press Roll again to cancel and return to default display.
27
Page 28

English
Roll Mode
Roll mode gives you a convenient method of repeatedly triggering a single note – typically a
percussive effect such as a drum sound. Enable Roll by pressing the Roll button 15. The Roll
button LED illuminates and the drum pads glow red. Pressing a drum pad will now trigger the
sound assigned to it for as long as the pad is pressed. The pads’ velocity-sensing is still active
– the volume will be proportional to the pressure applied to the pad. See also “Pad Curve” on
page 20.
Certain arp parameters (set in the Arpeggiator Settings menu – see page 26) have an effect on
the rhythmic pattern of the roll.
Boot Menu
The boot menu will not be required in normal operation, but is there to let you update Impulse’s
rmware, check rmware version numbers and also to reset all the settings to the original
factory values.
Boot menu is entered by holding down the +, - and Shift buttons simultaneously while applying
power – i.e., while plugging in the USB cable.
Page 1: Exit (Exit)
Press Enter to leave the boot menu.
Page 2: Setup (Setup)
This is related to the Impulse model and is for factory use
only. Do not alter this setting! A long press on the – button
(Cancel) will exit this level.
28
Page 29

English
Page 3: Version (Version)
Pressing Enter shows the rmware version of the Boot
Program; press the + button to see the version number of
the main rmware program. A long press on the – button
(Cancel) will exit this level.
Page 4: Restore Factory defaults (Fac Rst)
This will restore all Impulse’s internal settings to their
original factory values. Any changes you have made will
be lost. Pressing Enter will give you a conrmation screen
(Really?) to give you one more chance to change your
mind! Press Enter again to continue, or a long press on
the – button (Cancel) will exit this level.
USING IMPULSE WITH AUTOMAP 4
Introduction
Automap 4 is a software application designed to interface Impulse with your music software.
It greatly simplies the process of assigning Impulse’s controls to software plug-ins and/or
DAW mixer parameters, as it is virtually automatic in operation and runs transparently ‘in the
background’.
Full information about installing, setting up, and operating Automap software can be found in
the separate Automap User Guide. It can be downloaded from our website:
www.novationmusic.com/support. This contains much more detailed information about
Automap 4 than is possible to include in this User Guide. Please refer to it as necessary.
Note that Automap 4 is a generic product designed to interface with numerous other Novation
products as well as Impulse.
Installing Automap 4 on your computer
You will nd the Automap 4 installer on the DVD supplied with your Impulse, together with a
dedicated Automap 4 User Guide. First of all, please consult this to ensure that your computer
meets the minimum specications Automap 4 requires.
Refer to the Getting Started Guide supplied with Impulse; this provides full installation and
setup instructions. All necessary drivers are installed as part of this process automatically.
Installation is followed using an Installation Wizard. Follow all on-screen instructions; you may
also nd it helpful to refer to the Automap 4 User Guide.
Updating Impulse’s rmware
When installing Automap 4 for the rst time, or installing a subsequent update of Automap, the
Installation Wizard will check if the rmware in your connected Impulse is up to date. If not, the
Installation Wizard will guide you through the process of updating Impulse’s rmware.
Note: Updating rmware does not overwrite your templates.
29
Page 30

English
Conguring your DAW for Automap 4 control
Automap 4 has two separate tasks to perform in your DAW, and needs to be correctly
congured to enable full control by Impulse. Firstly, you need to enable your various
plug-ins for use with Automap 4. This will not affect their normal operation in any way, however,
once enabled, you will be able to alter their parameters from Impulse. Secondly, you need to
congure your DAW so that its audio mixer can be controlled by Impulse. Automap 4 includes a
simple setup procedure to allow you to do this.
DAW compatibility:
At the time of writing DAWs ofcially supported by Impulse and Automap 4 are:
Mac:
Live
Pro Tools
Cubase
Logic
Reason
Windows:
Live
Pro Tools
Cubase
Sonar
Reason
NOTE: Check the Novation website for up to date compatibility information.
www.novationmusic.com/support
If your DAW is not listed, but supports HUI, you can still use Automap 4 to control its mixer
functionality. See the Automap 4 User Guide for more details.
Enabling your plug-ins and conguring your DAW
This is a simple procedure; locate the Automap icon in the Menu bar (Mac) or System Tray
(Windows); click on it and select Software Setup…; this will open the Automap Software
Setup window. Select your hardware and DAW and then click the Setup… button. From this
point, please follow the on-screen instructions and the Automap 4 User Guide.
30
Page 31

English
The Plugin, Mixer and MIDI buttons
These buttons are central to the main mode of operation of Impulse. The buttons provided differ
on the Impulse 25.
Buttons adjacent to encoders Mixer and MIDI buttons
adjacent to faders
- Impulse 49 and 61
The encoder buttons
11
Mixer/MIDI button
- Impulse 25
The two buttons adjacent to the rotary encoders control their function:
• Plugin – this mode is used with Automap 4; the encoders become physical controls
for parameters of your plug-ins. The mapping of the encoders to the parameters is
determined by Automap 4.
• Mixer – press both Plugin and MIDI buttons together; both LEDs illuminate. In this mode,
the encoders control functions of the DAW’s mixer – e.g., Pan and Aux sends - as dened
by Automap 4.
• MIDI – when the MIDI LED is lit, the encoders will output normal MIDI data, as dened in
the current Impulse template. This is the mode you will use if you are not using Automap
4 (e.g., with no computer connected).
The fader button (Impulse 25 only)
10
This single button controls the action of Impulse 25’s single fader:
• Mixer – If the LED is lit, the fader is ready for use with Automap 4, and the fader will now
act as a level control for a track of the DAW mixer. Track assignment is performed onscreen (see the Automap User Guide); also Shift + Octave> or Shift + Octave< lets you
step between adjacent tracks.
• MIDI – in the alternative state (LED off), the fader is in MIDI mode, and can be used to
send MIDI data, as dened by the current template.
The fader buttons (Impulse 49 and 61)
12
The two buttons adjacent to the faders determine how they operate:
• Mixer – in this mode (Mixer LED lit), the faders are ready for use with Automap 4, and
the faders will act as level controls for the channels of the DAW mixer.
• MIDI – in MIDI mode, the faders can be used to send MIDI data, as dened by the current
template.
31
Page 32

English
Automap Mode
Normally, selection of Automap mode on Impulse will be completely automatic. When you rst
connect Impulse to your computer, before you launch your music software, you will see that the
LED in the MIDI button [11] is lit. This means that Impulse is in ‘manual’ mode, and ready for
use as a general-purpose MIDI controller. When you launch your music software, Automap 4
will also auto-launch, the MIDI LED will go out, and the Plugin and Mixer LEDs will illuminate.
Impulse is now ready for use with Automap 4.
The Automap Mapping Editor
1. Encoders
In your DAW, select the plug-in you want to control. Open the Automap Mapping Editor window
(single-click the Automap icon in the Menu Bar (Mac) or double-click System Tray (Windows)),
and make sure that the encoder section in the image of the Impulse has a red rectangle around
it. If not, click on the encoder area.
This will display the rst of several pages (number will vary with plug-in) graphically
representing the rotary encoders.
This window will tell you which parameter of the plug-in has been assigned to each encoder by
Automap 4, and its current value. Adjusting any encoder will change the value displayed in the
window, and you should also be able to see the equivalent control on the plug-in itself varying.
Most plug-ins have considerably more than 8 parameters, so additional pages are provided by
Automap 4, which can be accessed on two ways:
• From Impulse – press Shift + Plugin and Shift + MIDI (Page Up/Page Down) to scroll
through the available pages in either direction;
• From Automap – click the Page Up and Page Down icons in the Mapping Editor
window’s toolbar.
32
Page 33

English
2. Faders – Impulse 25 only
Clicking the fader area of the Impulse image in the Mapping Editor window will cause the
display to change to a set of nine faders (initially Tracks 1 – 8 plus the Master fader). As
Impulse 25 has just one physical fader, it will initially be assigned to Track 1.
Using Track Up/Down (these are shifted functions of the two Octave buttons 9) it is possible
to sequentially increment/decrement track assignment to the physical fader, thus allowing you
to build up your mix one channel at a time. See “Track Up/Down” on page 34.
As with the encoders, there are additional pages of the Mapping Editor window. These may be
accessed in the same way as described above.
3. Faders – Impulse 49 and 61
Clicking the fader area of the Impulse image in the Mapping Editor window will cause the
display to change to a set of nine faders. These represent the nine faders on Impulse.
33
Page 34

English
The faders will normally be assigned to Channels 1 to 8, plus Master, and this will be conrmed
by the labels below the faders. Higher-numbered channels and additional mixer features (such
as Send levels) can be found on additional pages. You can use the Bank buttons (Shift + MIDI,
Shift + Mixer by the faders) to scroll ‘sideways’ and select a further set of eight consecutive
channels.
Mute and Solo buttons
The Impulse 49 and 61 models are equipped with per-channel Mute/Solo buttons
3
below
each fader. These are also represented on-screen and reect the status of the physical buttons.
The Mute/Solo Select button 13 toggles the function of these buttons between Mute and Solo.
In Mute mode (LED off), the button will mute the mixer channel it is controlling; in Solo mode
(LED on), pressing the button will mute all mixer channels except that one.
Mute and Solo buttons – alternative assignments
As well as acting as either per-track Mutes or Solos, any of the eight buttons on Impulse 49
and 61 may be assignable to perform other functions (depending on your DAW). Click on a
button in the Mapping Editor window, and select an alternative function from the list in the Edit
Assignment pane. Note that the list includes both alternative fader functions and alternative
button functions.
Track Up/Down
Track Up/Down are shifted functions of the two Octave buttons 9. They allow you to ‘step’ the
fader(s) up or down one track or instrument within your DAW at a time. In the case of Impulse
49 and 61, the currently active DAW track will step one track in this manner while the eight
faders remain assigned to the current bank of eight (see Bank Up/Down below). In som DAWs,
selecting a new track in a different back of eight will cause the controls to switch automatically
to a new bank, although in other DAWs it will be necessary to bank manually using the Bank
Up / Down buttons (see below)
On Impulse 25, the single fader can be stepped through consecutive DAW channels in the
same manner by successive presses of Track +.
Bank Up/Down
This feature is only available on Impulse 49 and 61. Bank Up/Down are shifted functions of the
fader Mixer/MIDI buttons 12. Bank Up/Down perform the same function as Track Up/Down,
but act on eight faders/buttons at a time. For example, if you have Faders (and buttons) 1 to
8 assigned to DAW channels 1 to 8, and press Shift + Mixer (i.e., Bank Up), the faders and
buttons will now control channels 9 to 16.
34
Page 35

English
Learn Mode
Impulse has a Learn function which simplies the process of parameter assignment. Learn
Mode lets you map additional parameters to controls, or to overwrite existing parameters with
new ones. In Automap mode, Learn is activated with the Shift button 8 on its own.
1. On the plug-in itself, click on the control for the parameter you wish to assign, and alter its
value slightly. This is now the last used control.
2. On Impulse, press Learn, and move the Impulse control you wish to assign the parameter to.
3. The parameter’s name and value are now mapped to the control.
DAW GUIDE
We’re assuming that you are already quite familiar with the operation of your favourite DAW.
Because there are some differences in the way in which particular DAWs works with Impulse
(and/or Automap), you should look at the Support page of the Novation website
(www.novationmusic.com/support), where you’ll nd specic guidance on using Impulse with
each of the DAWs listed on page 30.
It is important when installing Automap 4, to follow the step-by-step instructions given in the
Automap 4 Setup Wizard carefully.
Ableton Live and Clip-launch mode (Mac or Windows)
Ableton Live Lite 8 is a music software package which you will nd bundled with Impulse
and Automap. You will also nd a full User Guide for Ableton Live on the DVD included with
Impulse. This contains instructions on how to install it on your computer; there is also some
additional information in the Impulse Getting Started Guide.
There are some general points to note regarding the operation of Ableton Live Lite when using
Impulse as a controller.
• Ableton Live Lite differs from the other compatible DAWs in that it does not require
Automap 4 to interface with Impulse. Nevertheless, we recommend that you still install
Automap 4 on your computer, and follow the on-screen Setup instructions as for the other
DAWs. (You will be prompted to close Automap on completion of Setup).
• When using Impulse 25 in Mixer mode, the rotary encoders will adjust the same
parameter on each track in a Bank of eight, the Bank depending on which Track is
currently selected in Ableton Live Lite. Thus, if Track 5 is selected, Tracks 1 to 8 will be
controllable; if Track 11 is selected, Tracks 9 to 16 will be controllable.
• Page+ and Page– let you scroll through the available mixer parameters: Pan, Sends A to
D, for the current set of eight Tracks. On Impulse 25 only, Track Volume is also available
as a controllable parameter.
• Ableton Live Lite’s mixer may be congured with any number of Return channels (A, B, C,
etc.), but Impulse only allows control of the rst four - Returns A to D.
• On Impulse 25, the single fader will control the volume of the currently selected Track in
Mixer mode.
• The Track+ and Track- buttons select the ‘active’ Track in Ableton Live.
• The functions of the Transport buttons vary between Ableton Live Lite’s Session View and
Arrangement View.
35
Page 36

English
Button Session View Arrangement View
Rwd Steps up one scene Rwd; Shift+Rwd = return to start
FFwd Steps down one scene FFwd; Shift+FFwd = go to end
Stop Stops Stop
Play Play Play
Loop Play Selected Scene Enables/disables Loop function
Rec Starts Arrangement Recording Records
• Impulse can be placed in Clip Launch mode by pressing Roll and Arp buttons
simultaneously. This redenes the function of the drum pads, which now trigger the Clips
in the currently selected Scene. The pads will illuminate according to the Clip status:
• Unlit – no Clip present
• Yellow – Clip available
• Green – Clip playing/ready to play
• Red – Clip recording/ready to record
Flashing colours indicate that Ableton Live Lite is awaiting the start of the next bar before
acting on the last command.
• Impulse is also compatible with Ableton’s Max for Live. All controllers (faders, buttons,
encoders, pads) will be fully supported as Max for Live controls, i.e., using the Live API.
Wheels, aftertouch and pedals however will not be supported, as they do not interact with
Live directly; they simply send MIDI messages.
• Preview mode is provided to conrm how an encoder is currently congured without
actually changing any Ableton Live parameters. Enter Preview mode by holding down
Shift and pressing the Controls button. The LED in the Controls button blinks to conrm
the mode. Moving any of the eight encoders will display its Ableton Live assignment.
Pressing the Controls button again will exit Preview mode.
36
Page 37

English
TROUBLESHOOTING
For the latest information and assistance with your Impulse please visit:
www.novationmusic.com/answerbase
Basic Troubleshooting Examples
• Impulse will not power up properly when connected to a laptop computer via USB.
When a USB connection is used to power the Impulse from a laptop computer the Impulse
may not power up successfully. This is due to the Impulse not being able to draw enough
power from the laptop computer. When powering Impulse from a laptop’s USB port, it is
recommended that the laptop is powered from AC mains rather than its internal battery.
See tip on page 10 for more information.
We also recommend that you connect Impulse directly to a computer’s native USB port,
and not via a USB hub. Correct operation cannot be guaranteed if a hub is in use.
Alternatively, for stand-alone use power the Impulse from a suitable AC:USB DC power
adaptor.
• Transmitting MIDI Program Change does not affect a connected MIDI device.
Some MIDI devices will not accept Program Change messages without receiving a Bank
Select message (CC32 and/or CC0).
• Impulse cannot be selected as a MIDI device from within an application.
When opening an application that uses the Impulse as its source of MIDI input and it is
found that the Impulse cannot be selected as the MIDI input - either the Impulse is greyed
out or it does not appear in a list of available MIDI devices - close the application, wait for
10 seconds, reopen the application and try again.
Under some circumstances it is possible for the Impulse driver to take a few seconds to
become active. If an application is started immediately after the Impulse is powered, without
a few seconds pause in between powering the Impulse and launching the application, the
Impulse driver may not always be available.
37
Page 38

English
FACTORY TEMPLATES
No. Template
Basic MIDI template for standard control and MIDI
1
learn. Avoids commonly used MIDI CCs
2 Controls send commonly used MIDI CCs UsefulCC
General MIDI Mixer Template. Faders send volume
3
and encoders send pans on different MIDI channels
4 Ableton Live and Live Lite Live
5 Propellerhead Reason Reason
6 Apple GarageBand GarageBd
7 Apple MainStage MainStge
Novation 'Stations' Template:
A-Station
K-Station
X-Station
V-Station
8
KS
Xio
Bass Station Keyboard
Bass Station Rack
Super Bass Station
Bass Station VST
Hardware name
(8 chars)
BascMIDI
GM Mixer
NovaStat
9 Novation Ultranova UltrNova
10 Novation Nova, Nova II, Supernova, Supernova II SupaNova
11 Native Instruments - Kontakt Kontakt
Native Instruments - FM 8
12
(requires mapping le on DVD)
13 Native Instruments - B4 Organ B4 Organ
Native Instruments - Massive
14
(requires mapping le on DVD)
15 Blank User Template Blank
16 Blank User Template Blank
17 Blank User Template Blank
18 Blank User Template Blank
19 Blank User Template Blank
20 Blank User Template Blank
FM 8
Massive
38
Page 39

English
ASSIGNABLE CONTROLS –
PARAMETERS AND RANGES
Faders, encoders and Mod Wheel:
Subsequent presses of the + button will offer the following parameter setting pages:
Type: CC (Continuous Controller)
CC#:(Controller number, 0 to 127)
Max: (Maximum parameter value, 0 to 127)
Min: (Minimum parameter value, 0 to 127)
Channel: MIDI Channel to be used (1 to 16, or tPL) ; tPL is as dened within the template
Ports: MIDI port to be used (tPL, USb, MId, ALL)
Type: rPn (Registered Parameter Number)
MSB: (Most Signicant Byte, 0 to 127)
Bank LSB: (Least Signicant Byte, 0 to 127)
Max: (Maximum parameter value, 0 to 127)
Min: (Minimum parameter value, 0 to 127)
Channel: MIDI Channel to be used (1 to 16, or tPL) ; tPL is as dened within the template
Ports: MIDI port to be used (tPL, USb, MId, ALL)
Type: nrP (Non-Registered Parameter Number)
MSB: (Most Signicant Byte, 0 to 127)
Bank LSB: (Least Signicant Byte, 0 to 127)
Max: (Maximum parameter value, 0 to 127)
Min: (Minimum parameter value, 0 to 127)
Channel: MIDI Channel to be used (1 to 16, or tPL) ; tPL is as dened within the template
Ports: MIDI port to be used (tPL, USb, MId, ALL)
Drum pads:
Type: not
Note: C-2 to G8
Max: (Maximum parameter value, 0 to 127)
Min: (Minimum parameter value, 0 to 127)
Channel: MIDI Channel to be used (1 to 16, or tPL) ; tPL is as dened within the template
Ports: MIDI port to be used (tPL, USb, MId, ALL)
Type: CC, rPn and nrP: as for encoders/faders
Buttons:
Type: CC
CC#:(Controller number, 0 to 127)
Btn.Type: sgl
Value: (0 to 127)
Channel: MIDI Channel to be used (1 to 16, or tPL) ; tPL is as dened
39
Page 40

English
within the template
Ports: MIDI port to be used (tPL, USb, MId, ALL)
Btn.Type: Mty
Press: (0 to 127)
Release: (0 to 127)
Channel: MIDI Channel to be used (1 to 16, or tPL) ; tPL is as dened
within the template
Ports: MIDI port to be used (tPL, USb, MId, ALL)
Btn.Type: Tgl
On: (0 to 127)
Off: (0 to 127)
Channel: MIDI Channel to be used (1 to 16, or tPL) ; tPL is as dened
within the template
Ports: MIDI port to be used (tPL, USb, MId, ALL)
Btn.Type: StP
To: (0 to 127)
From: (0 to 127)
StepSize: (1to 64)
Channel: MIDI Channel to be used (1 to 16, or tPL) ; tPL is as dened
within the template
Ports: MIDI port to be used (tPL, USb, MId, ALL)
Type: rPn (Registered Parameter Number)
MSB: (Most Signicant Byte, 0 to 127)
LSB: (Least Signicant Byte, 0 to 127)
Btn.Type: sgl
Value: (0 to 127)
Channel: MIDI Channel to be used (1 to 16, or tPL) ; tPL is as dened
within the template
Ports: MIDI port to be used (tPL, USb, MId, ALL)
Btn.Type: Mty
Press: (0 to 127)
Release: (0 to 127)
Channel: MIDI Channel to be used (1 to 16, or tPL) ; tPL is as dened
within the template
Ports: MIDI port to be used (tPL, USb, MId, ALL)
Btn.Type: Tgl
On: (0 to 127)
Off: (0 to 127)
Channel: MIDI Channel to be used (1 to 16, or tPL) ; tPL is as dened
within the template
Ports: MIDI port to be used (tPL, USb, MId, ALL)
Btn.Type: StP
To: (0 to 127)
From: (0 to 127)
StepSize: (1to 64)
40
Page 41

English
Channel: MIDI Channel to be used (1 to 16, or tPL) ; tPL is as dened
within the template
Ports: MIDI port to be used (tPL, USb, MId, ALL)
Type: nrP (Non-registered Parameter Number)
MSB: (Most Signicant Byte, 0 to 127)
LSB: (Least Signicant Byte, 0 to 127)
Btn.Type: sgl
Value: (0 to 127)
Channel: MIDI Channel to be used (1 to 16, or tPL) ; tPL is as dened
within the template
Ports: MIDI port to be used (tPL, USb, MId, ALL)
Btn.Type: Mty
Press: (0 to 127)
Release: (0 to 127)
Channel: MIDI Channel to be used (1 to 16, or tPL) ; tPL is as dened
within the template
Ports: MIDI port to be used (tPL, USb, MId, ALL)
Btn.Type: Tgl
On: (0 to 127)
Off: (0 to 127)
Channel: MIDI Channel to be used (1 to 16, or tPL) ; tPL is as dened
within the template
Ports: MIDI port to be used (tPL, USb, MId, ALL)
Btn.Type: StP
To: (0 to 127)
From: (0 to 127)
StepSize: (1to 64)
Channel: MIDI Channel to be used (1 to 16, or tPL) ; tPL is as dened
within the template
Ports: MIDI port to be used (tPL, USb, MId, ALL)
Type: Prg
Bank MSB: (Most Signicant Byte, 0 to 127)
Bank LSB: (Least Signicant Byte, 0 to 127)
Btn.Type: sgl
Value: (0 to 127)
Channel: MIDI Channel to be used (1 to 16, or tPL) ; tPL is as dened
within the template
Ports: MIDI port to be used (tPL, USb, MId, ALL)
Btn.Type: Mty
Press: (0 to 127)
Release: (0 to 127)
Channel: MIDI Channel to be used (1 to 16, or tPL) ; tPL is as dened
within the template
Ports: MIDI port to be used (tPL, USb, MId, ALL)
41
Page 42

English
Btn.Type: Tgl
On: (0 to 127)
Off: (0 to 127)
Channel: MIDI Channel to be used (1 to 16, or tPL) ; tPL is as dened
within the template
Ports: MIDI port to be used (tPL, USb, MId, ALL)
Btn.Type: StP
To: (0 to 127)
From: (0 to 127)
StepSize: (1to 64)
Channel: MIDI Channel to be used (1 to 16, or tPL) ; tPL is as dened
within the template
Ports: MIDI port to be used (tPL, USb, MId, ALL)
42
Page 43

English
MIDI IMPLEMENTATION TABLE
Function Transmitted Recognized Remarks
Basic Default
Channel Changed
Mode Default
Messages
Altered
Note
Number True Voice
Velocity Note ON
Note OFF
After Key’s
Touch Channel
Pitch Bend 0 X
Control
Change
Program
Change True #
1-16
1-16
Mode 3
0
*****
0-127
*****
0
X
X
0
0-127 X
0-127 X
X
X
X
X
X
X
X
X
System Exclusive 0* 0*
System Song Position
Pointer
Common Song Sel
Tune Request
System Clock
Real Time Commands
Aux Reset All Controllers
Messages Local ON/OFF
Active Sensing
System Reset
Notes
Mode 1: OMNI ON, POLY Mode 2: OMNI ON, MONO 0: Yes
Mode 3: OMNI OFF, POLY Mode 4: OMNI OFF, MONO X: No
X
X
X
0
0
0
X
X**
X
X
X
X
0
X
X
X
X**
X
*Send / recv rmware
update (Novation)
Send / recv template
data (Novation)
**Can be passed thru
via MIDI interface
43
 Loading...