

Page 1
English
User Guide
FLkey 37
Page 2

FLkey User Guide
Table of Contents
Introduction ........................................................................................................................... 4
Key Features ................................................................................................................. 5
Box Contents ................................................................................................................. 5
Troubleshooting ............................................................................................................. 5
Getting Started ...................................................................................................................... 6
Connecting FLkey with a Computer ................................................................................. 6
Easy Start ..................................................................................................................... 6
Updating your FLkey ...................................................................................................... 7
Hardware Overview ............................................................................................................... 8
Working with FL Studio ........................................................................................................ 11
Installation ................................................................................................................... 11
Manual Installation ............................................................................................... 11
Transport Controls ....................................................................................................... 12
Preset Navigation ........................................................................................................ 13
External Connections ................................................................................................... 14
Connecting FLkey MIDI Out with External MIDI Instruments ................................... 14
Sustain Input ....................................................................................................... 14
Pot Modes ................................................................................................................... 15
Pot Mode: Banking .............................................................................................. 15
Pot Mode: Plugin ................................................................................................. 16
Pot Mode: Mixer Volume ...................................................................................... 16
Pot Mode: Mixer Pan ........................................................................................... 16
Pot Mode: Channel Volume .................................................................................. 17
Pot Mode: Channel Pan ....................................................................................... 17
Pot Mode: Custom ............................................................................................... 17
Pad Modes .................................................................................................................. 19
Pad Mode: Channel Rack ..................................................................................... 19
Pad Mode: Instrument .......................................................................................... 21
Pad Mode: Sequencer ......................................................................................... 22
Scale Chord Mode ............................................................................................... 24
User Chord Mode ................................................................................................ 25
Custom Pad Mode ............................................................................................... 26
Quantise ..................................................................................................................... 27
Metronome .................................................................................................................. 27
Undo/Redo Functions .................................................................................................. 27
Score Log ................................................................................................................... 27
2
Page 3

FLkey User Guide
View Channel Rack Selections ..................................................................................... 28
Loop Record ............................................................................................................... 28
Focussing FL Studio's Windows ................................................................................... 29
Standalone Features ............................................................................................................ 30
Navigation Mode - ([…] Button) ..................................................................................... 30
Scale Mode ................................................................................................................. 31
Octave Buttons ............................................................................................................ 32
Fixed Chord ................................................................................................................ 32
Note Repeat ................................................................................................................ 33
To use Note Repeat ............................................................................................. 33
Change the Rate ................................................................................................. 33
Set the Tempo ..................................................................................................... 34
Change the note/drum hit velocity ......................................................................... 34
Pot Pickup ................................................................................................................... 34
Custom Modes and Components .......................................................................................... 35
Custom Modes ............................................................................................................ 35
Pot Custom Mode ........................................................................................................ 35
Pad Custom Mode ....................................................................................................... 35
FLkey Settings ..................................................................................................................... 36
LED Brightness ........................................................................................................... 36
Vegas Mode ................................................................................................................ 36
Easy Start ................................................................................................................... 37
Weight and Dimensions ....................................................................................................... 38
Novation Notices ................................................................................................................. 39
Troubleshooting ........................................................................................................... 39
Trade Marks ................................................................................................................ 39
Disclaimer ................................................................................................................... 39
Copyright and Legal Notices ......................................................................................... 39
3
Page 4

FLkey User Guide
Introduction
FLkey is Novation’s range of MIDI keyboards for making music in FL Studio. Combining hands-on
control of the most important FL Studio features with our best keys to date, FLkey puts production and
connection with your music in your control.
In this user guide, you’ll find all the information you need to get started with your new FLkey. We’ll
provide you with guides on how to set up your device with FL Studio, script features in FL Studio, and
how to make the most of FLkey’s standalone features. We’ll help you to get started with your FLkey
hardware and get making music as quickly and easily as possible.
Stay in the groove and keep focused on your music with unparalleled dedicated integration with FL
Studio. The full-size MIDI keyboard gives you complete hands-on control of your music production.
FLkey's pads map to FL Studio’s step sequencer and build beats fast, and four pad modes give your
rhythms a real human feel. Play straight into the Channel Rack or FPC and trigger slices in Slicex and
Fruity Slicer, or use Note Repeat to make perfect beats every single time.
FLkey also brings FL Studio’s Mixer and Channel Rack controls off the screen and into your hands.
Mix, create and automate with ease using the eight pots and essential transport buttons. Get access to
your Score Log and undo, redo, Quantise and trigger Metronome in an instant. Browse presets in your
Image-Line plugins to change up instruments and sounds fast, with no mouse needed.
Keep the creativity flowing with inspirational musical tools like Scale mode, so you always hit the right
note. Three Chord modes – Fixed, Scale, and User Chord mode – let you play a range of chords with
one finger, unlocking big harmonies and new sounds instantly.
FLkey MIDI keyboards also come with an extensive bundle of high-quality instruments and effects.
Throw all this content into your existing FL Studio projects and make music however you want,
wherever you want.
4
Page 5

FLkey User Guide
Key Features
• Dedicated Integration with FL Studio: Produce music easily with essential controls at your
fingertips
• Mixer, Channel Rack and Plugin control: Adjust volume and pan for the perfect mix, tweak
Image-Line plugins and record natural-sounding events with FLkey 37’s eight rotary knobs.
• Step sequencer: Take control of FL Studio’s step sequencer and programme drums easily.
• Channel Rack playability: Play directly into the Channel Rack from FLkey’s pads.
• Instrument control: Trigger FPC and Slicex with the pads for more expressive beats and
melodies.
• Never hit the wrong note with Scale Mode.
• Creativity with chord modes: Fixed Chord mode, User Chord Mode, and Scale Chord mode
allow you to assign custom chords, play chords from scales, and store chord progressions for
rapid song building and easy performance with just one finger.
• Velocity-sensitive keys and 16 velocity-sensitive RGB pads.
• Preset browsing: Find your favourite presets from Image-Line plugins directly from FLkey 37.
• Custom Modes: Assign custom controls on FLkey 37 to tailor your music production workflow.
Box Contents
• FLkey 37
• USB Type-A to B cable (1.5 metres)
• Safety Instructions
Troubleshooting
For help getting started with your FLkey, please visit:
novationmusic.com/get-started
If you have any questions or need any help at any time with your FLkey, please visit our Help Centre.
Here you can also contact our support team:
support.novationmusic.com
5
Page 6
FLkey User Guide
Getting Started
Connecting FLkey with a Computer
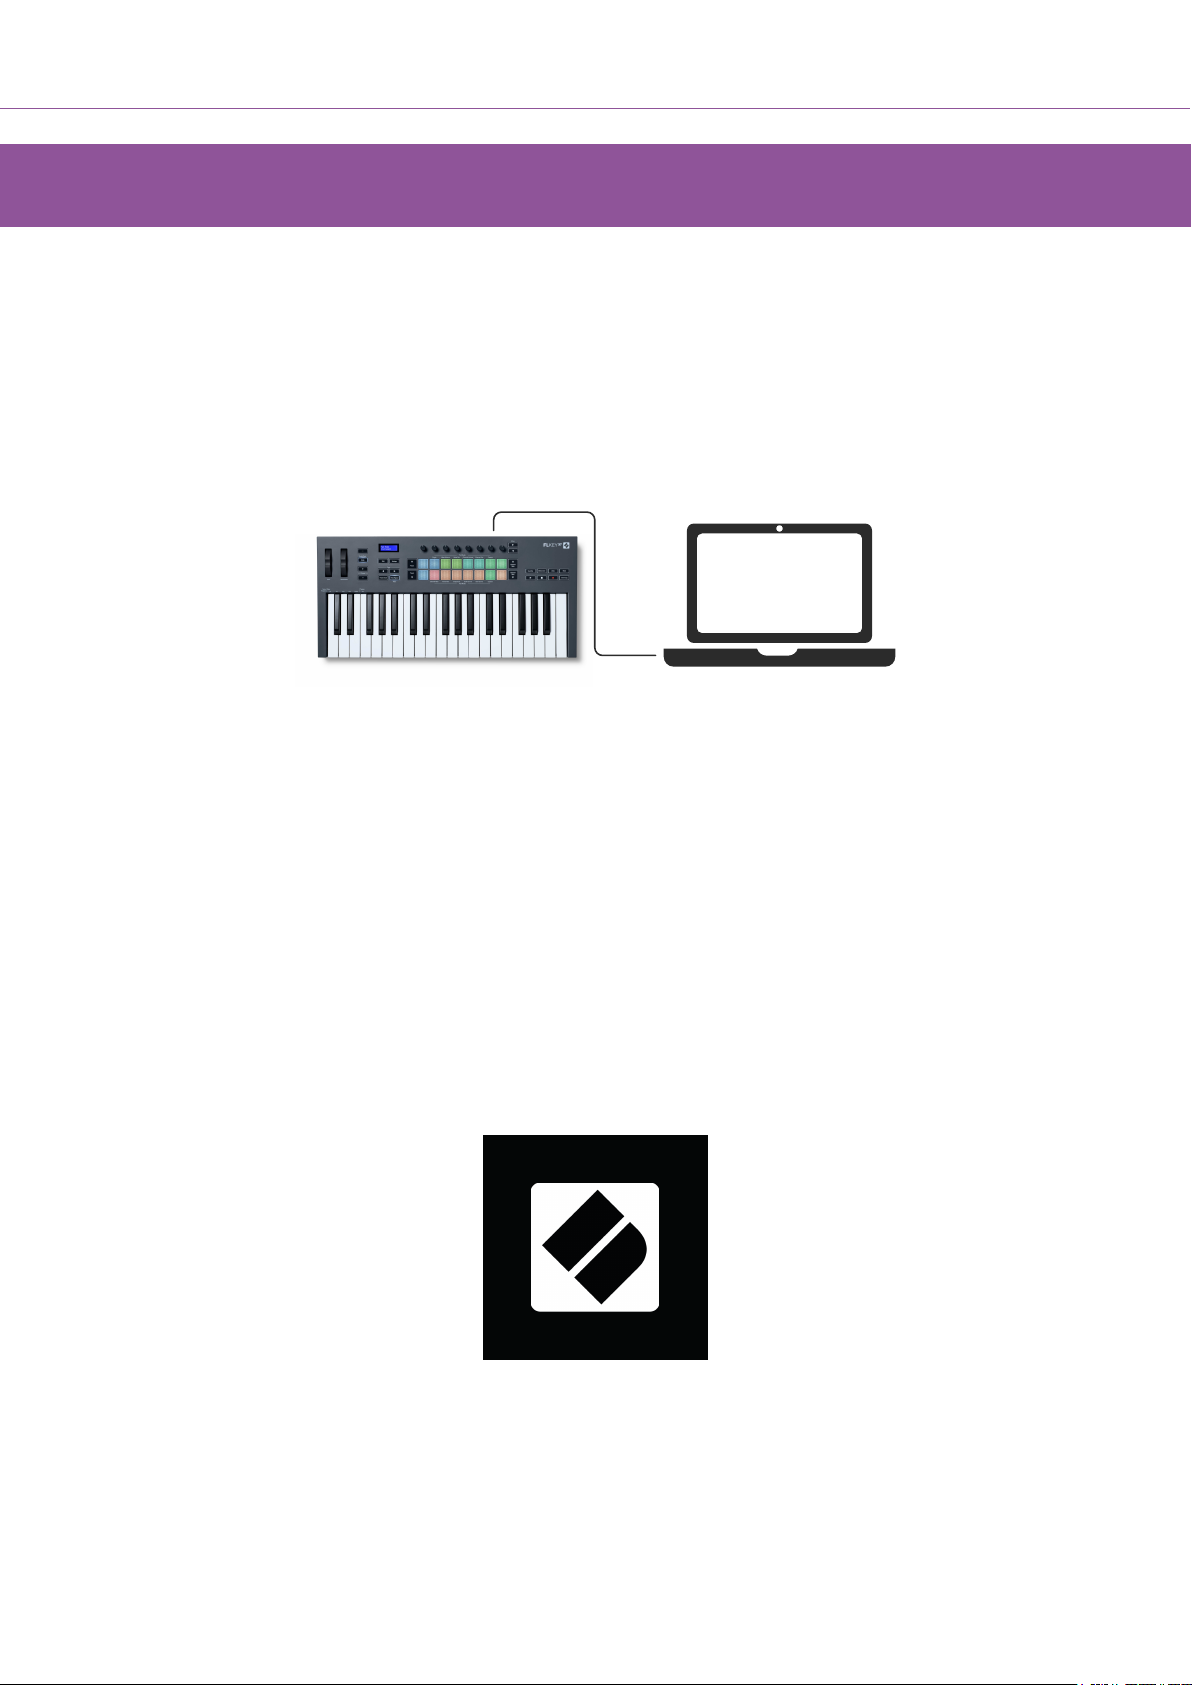
FLkey is USB bus-powered, it turns on when you connect it to your computer with a USB cable. When
you connect FLkey to a Mac, it may show the Keyboard Setup Assistant. This is because FLkey also
functions as a computer keyboard to enable the Navigate functionality. You can dismiss the Keyboard
Setup Assistant.
Easy Start
The ‘Easy Start’ give you a step-by-step guide to setting up your FLkey. This online tool guides you
through your FLkey’s registration process and accessing the software bundle.
On both Windows and Mac computers, when you connect your FLkey to your computer, it first appears
as a Mass Storage Device, like a USB drive. Open the drive and double click ‘Click Here To Get
Started.url’. Click ‘Get Started’ to open Easy Start in your web browser.
After you’ve opened the Easy Start tool, please follow the step-by-step guide, to install and use your
FLkey.
Alternatively, if you don’t want to use the Easy Start tool, please visit our website to register your FLkey
manually and access the software bundle.
customer.novationmusic.com/register
6
Page 7

FLkey User Guide
Updating your FLkey
Novation Components manages updates for your FLkey. To confirm you have the latest firmware and to
update your FLkey:
1. Go to components.novationmusic.com
2. Click on FLkey.
3. Click on the Updates tab at the top of the page.
4. Follow the instructions for your FLkey. If your FLkey needs to update Components will tell you
how to do this.
7
Page 8
Hardware Overview
1 2 3 4 5 6 7 8
9 10 11
12 13 14
FLkey User Guide
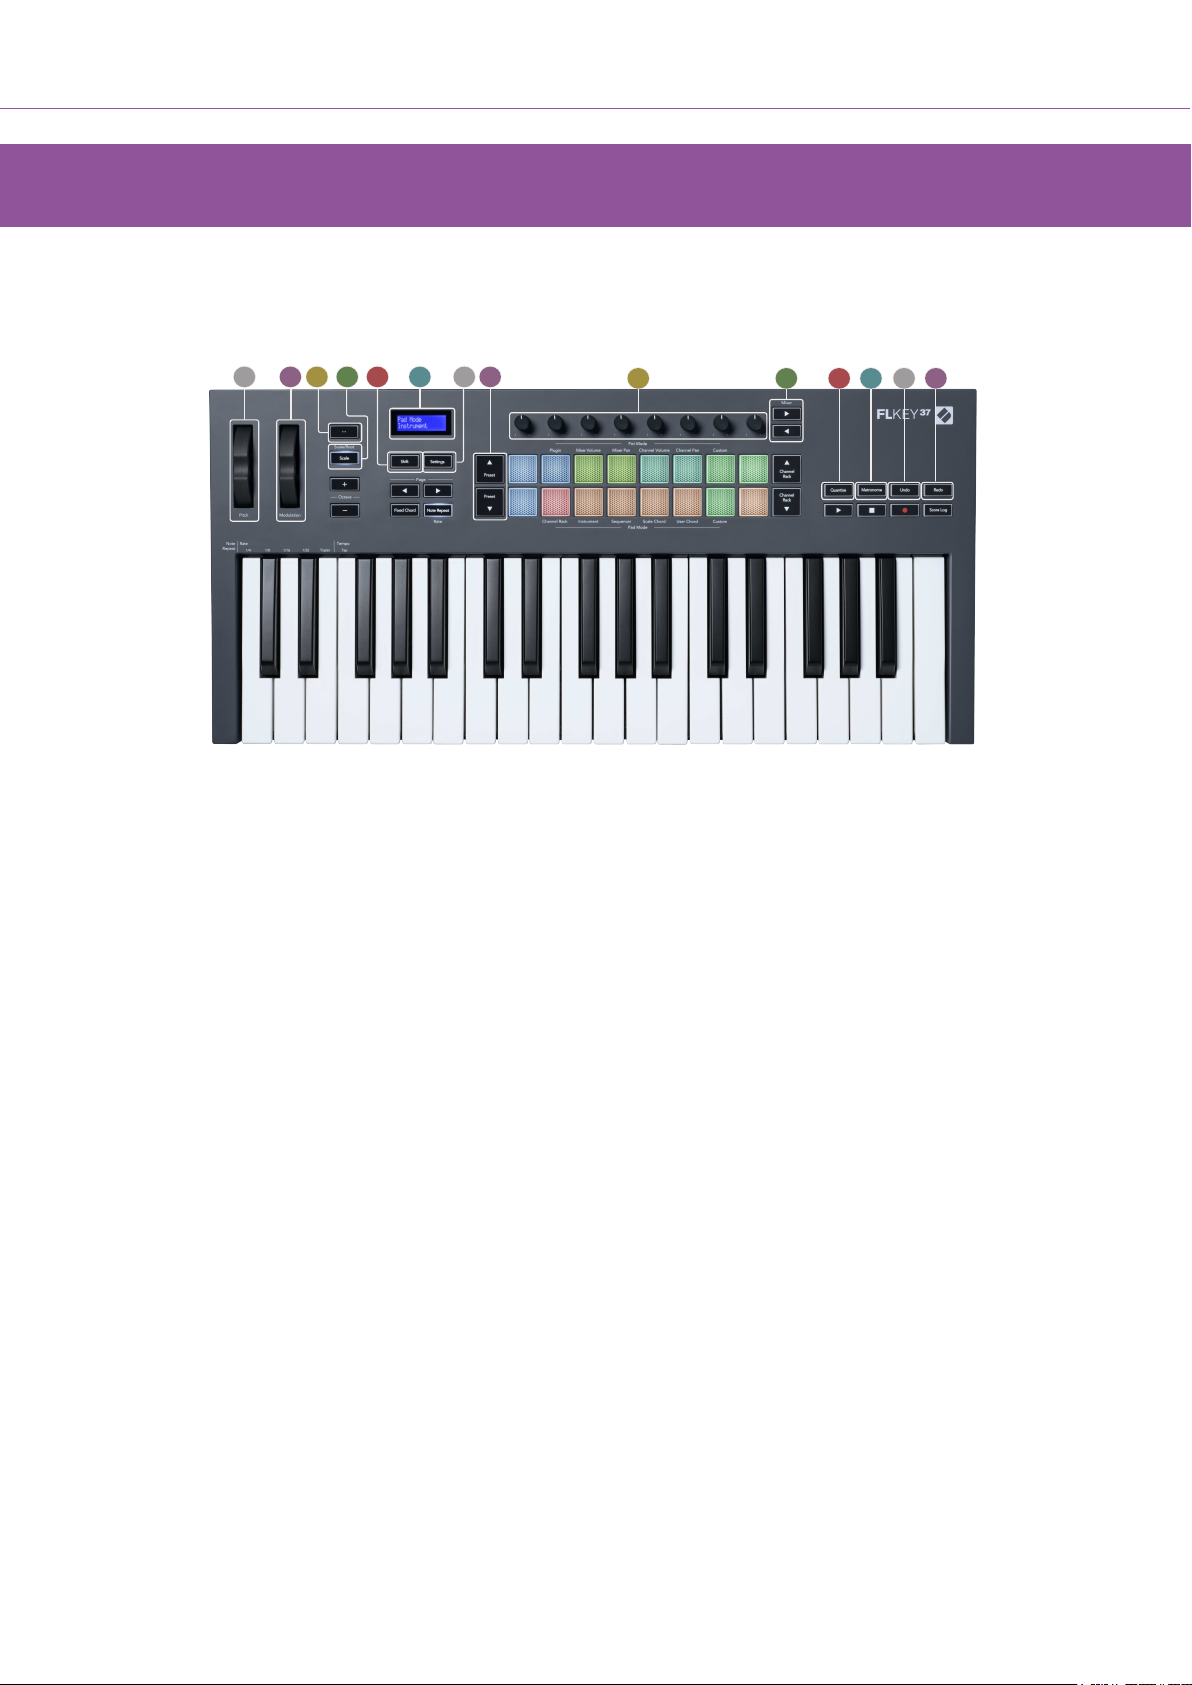
1. Pitch Wheel - Bends the pitch of the note being played.
2. Modulation Wheel - You can map this to modulate software/hardware parameters.
3. … Button (Navigation Mode) - Pressing the “...” button puts the FLkey into a navigation mode
for browsing samples and presets.
4. Scale Button - Turns on and off FLkey’s Scale Mode [31].
5. Shift Button - Enables access to secondary Shift functions. Shift functions are shown in text on
the front panel.
6. LCD Display - Shows the device status, and parameter values, and lets you navigate through
menus.
7. Settings Button - Opens the Settings [36] menu on the screen.
8. Preset ▲▼ Buttons - Navigates through FL Studio native plugin presets.
9. Pots - Control parameter preset mappings for FL Native generator plugins, control Mixer
Volume/pan, Channel Rack volume/pan, or assign your own parameters with custom modes.
10. Mixer ◄ ► Buttons – Move left and right in the FL Studio Mixer section.
11. Quantise - Triggers the Quantise [27] function in FL Studio, to snap notes to the grid.
12. Metronome – Toggles FL Studio’s Metronome, or click-track, on and off.
13. Undo - Triggers FL Studio’s Undo function.
8
Page 9
15 16 17 18
19 20 21
22
FLkey User Guide
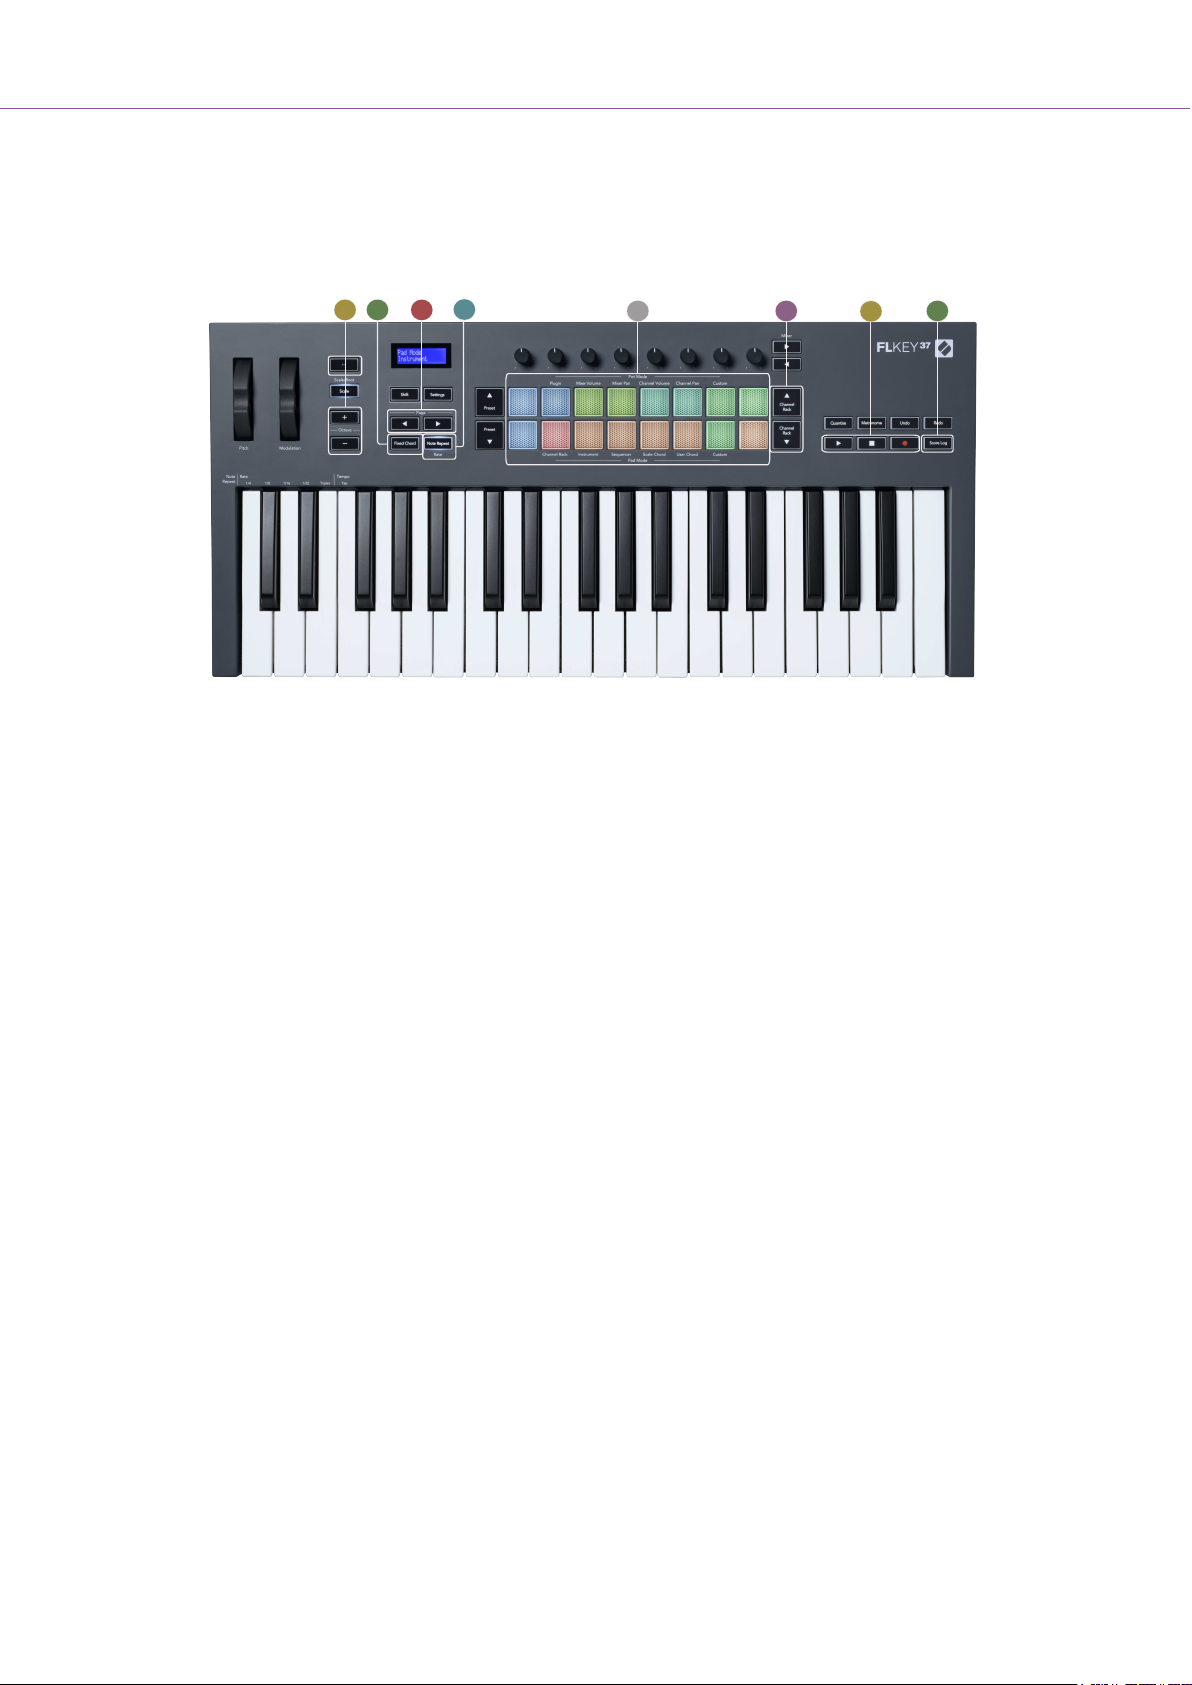
14. Redo - Triggers FL Studio’s Redo function.
15. Octave - + Buttons - Transposes the keyboard across ten octaves (C-2 to C6). Pressing both
buttons sets the transposition amount back to 0. See Octave Buttons [32].
16. Fixed Chord Button – Stores a chord for you to play anywhere on the keyboard. While holding
the Fixed Chord [32] button, press and release the keys you wish to be part of the ‘fixed’
chord.
17. Page ◄ ► Buttons – These navigate left and right in the Channel Rack to extend patterns
when sequencing, page between banks in FPC and bank between pages of Slicex/Fruity
Slicer. You can also change the voicing page in Scale Chord mode, Transpose in User Chord
or Custom mode and, adjust the pad octave in Instrument mode.
18. Note Repeat Button - Enables the pads to send repeated notes at various rates specified using
the Shift function on the keyboard. See Note Repeat [33].
19. Pads – Audition and select channels in Channel Rack mode. Use integrations with FPC, Slicex,
and Fruity Slicer in instrument mode. Sequence beats using Sequencer mode. Trigger chords
using the Scale and User Chord modes and Custom Modes.
20. Channel Rack ▲▼ Buttons - Move up and down FL Studio’s Channel Rack in all modes to
change the selected instrument (and the instrument played by FLkey).
21. Play, Stop, Record - Controls the playback in FL Studio.
22. Score Log - Capture the last five minutes of played MIDI notes in FL Studio
9
Page 10
23 24 25 26
FLkey User Guide
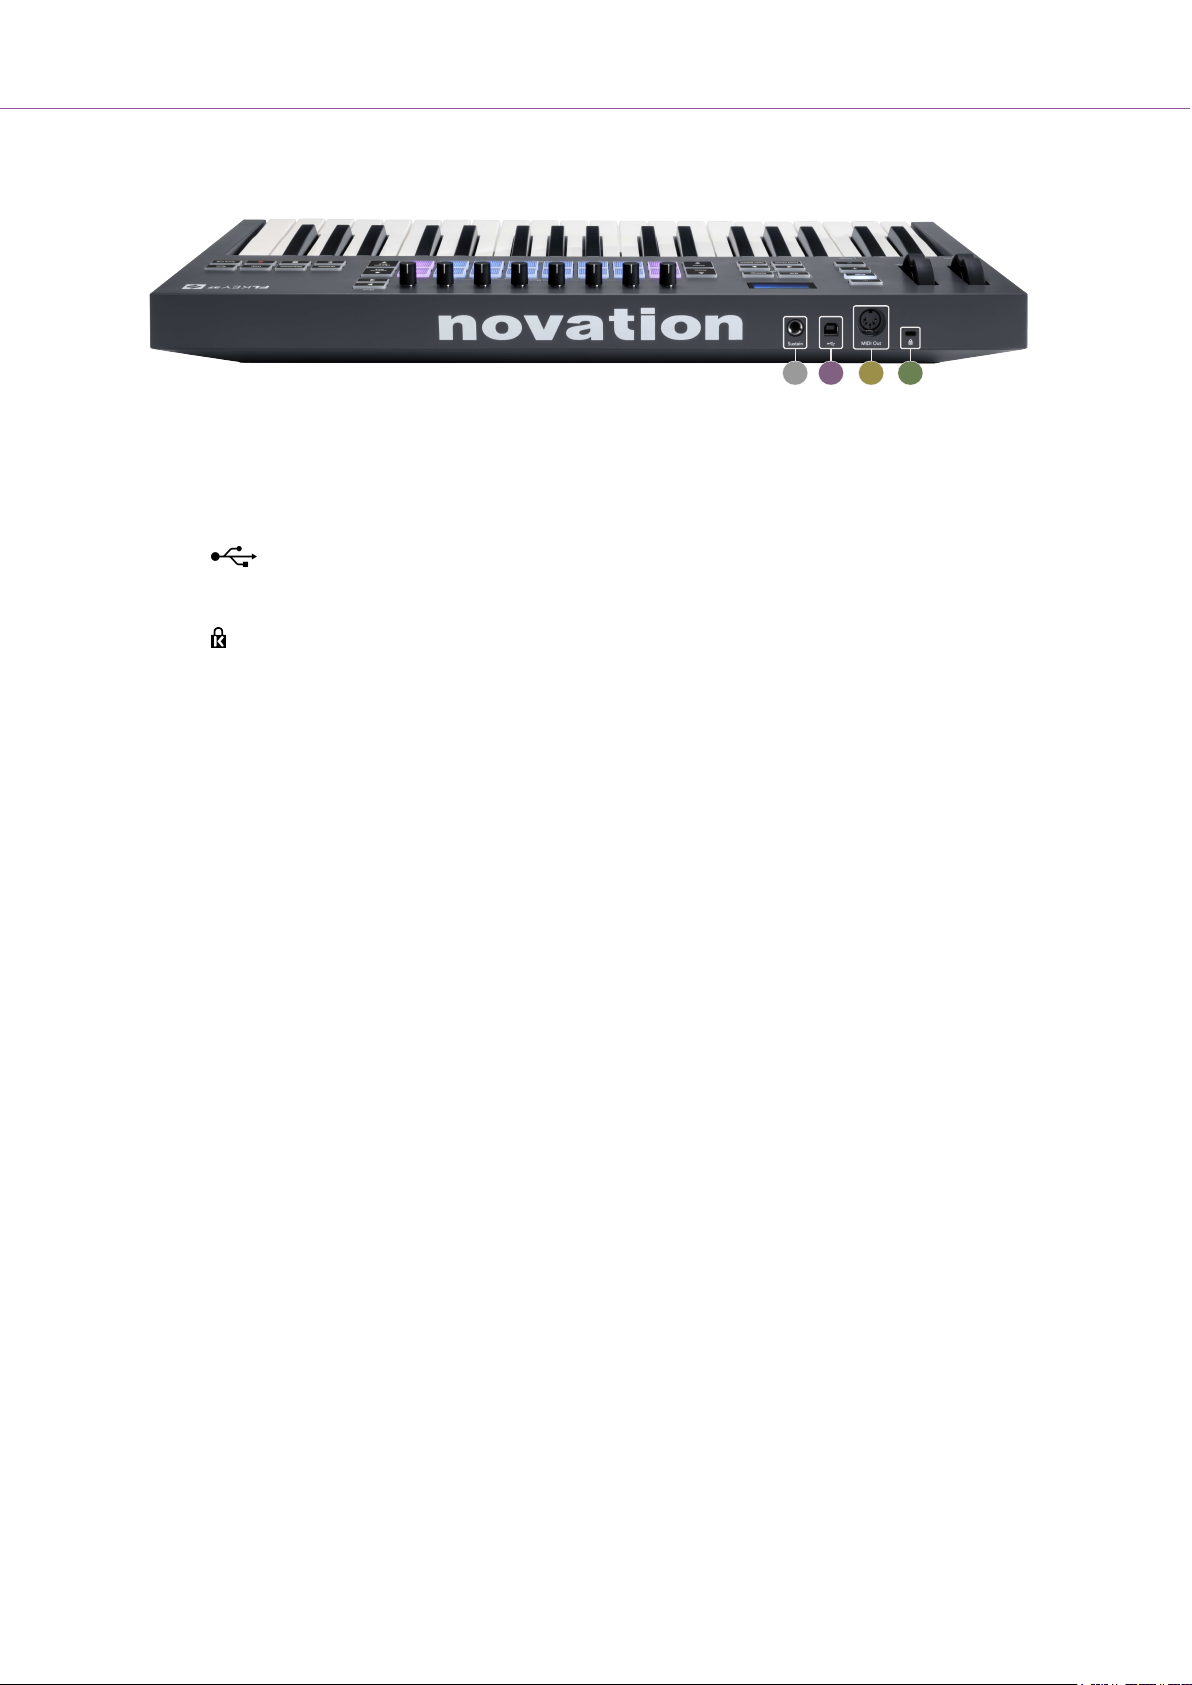
23. Sustain – 6.35mm jack input for sustain pedals.
24. - USB Type-B port.
25. MIDI Out – 5-Pin MIDI Din connector for connecting to external MIDI hardware [14].
26. - Kensington Lock Port, use a compatible Kensington lock to secure your FLkey to your
workstation.
10
Page 11
FLkey User Guide
Working with FL Studio
We’ve designed FLkey to work seamlessly with FL Studio, offering deep integration through powerful
production and performance controls. You can also change your FLkey to suit your needs with Custom
Modes [35].
Installation
Before using FLkey with FL Studio make sure your FLkey is up to date, for steps on how to do this
please see Updating your FLkey [7].
To use the FLkey you need to be running FL Studio version 20.9.2 or above. After you’ve connected
the FLkey to your computer open FL Studio and the FLkey is automatically detected and set up in FL
Studio’s MIDI settings.
Manual Installation
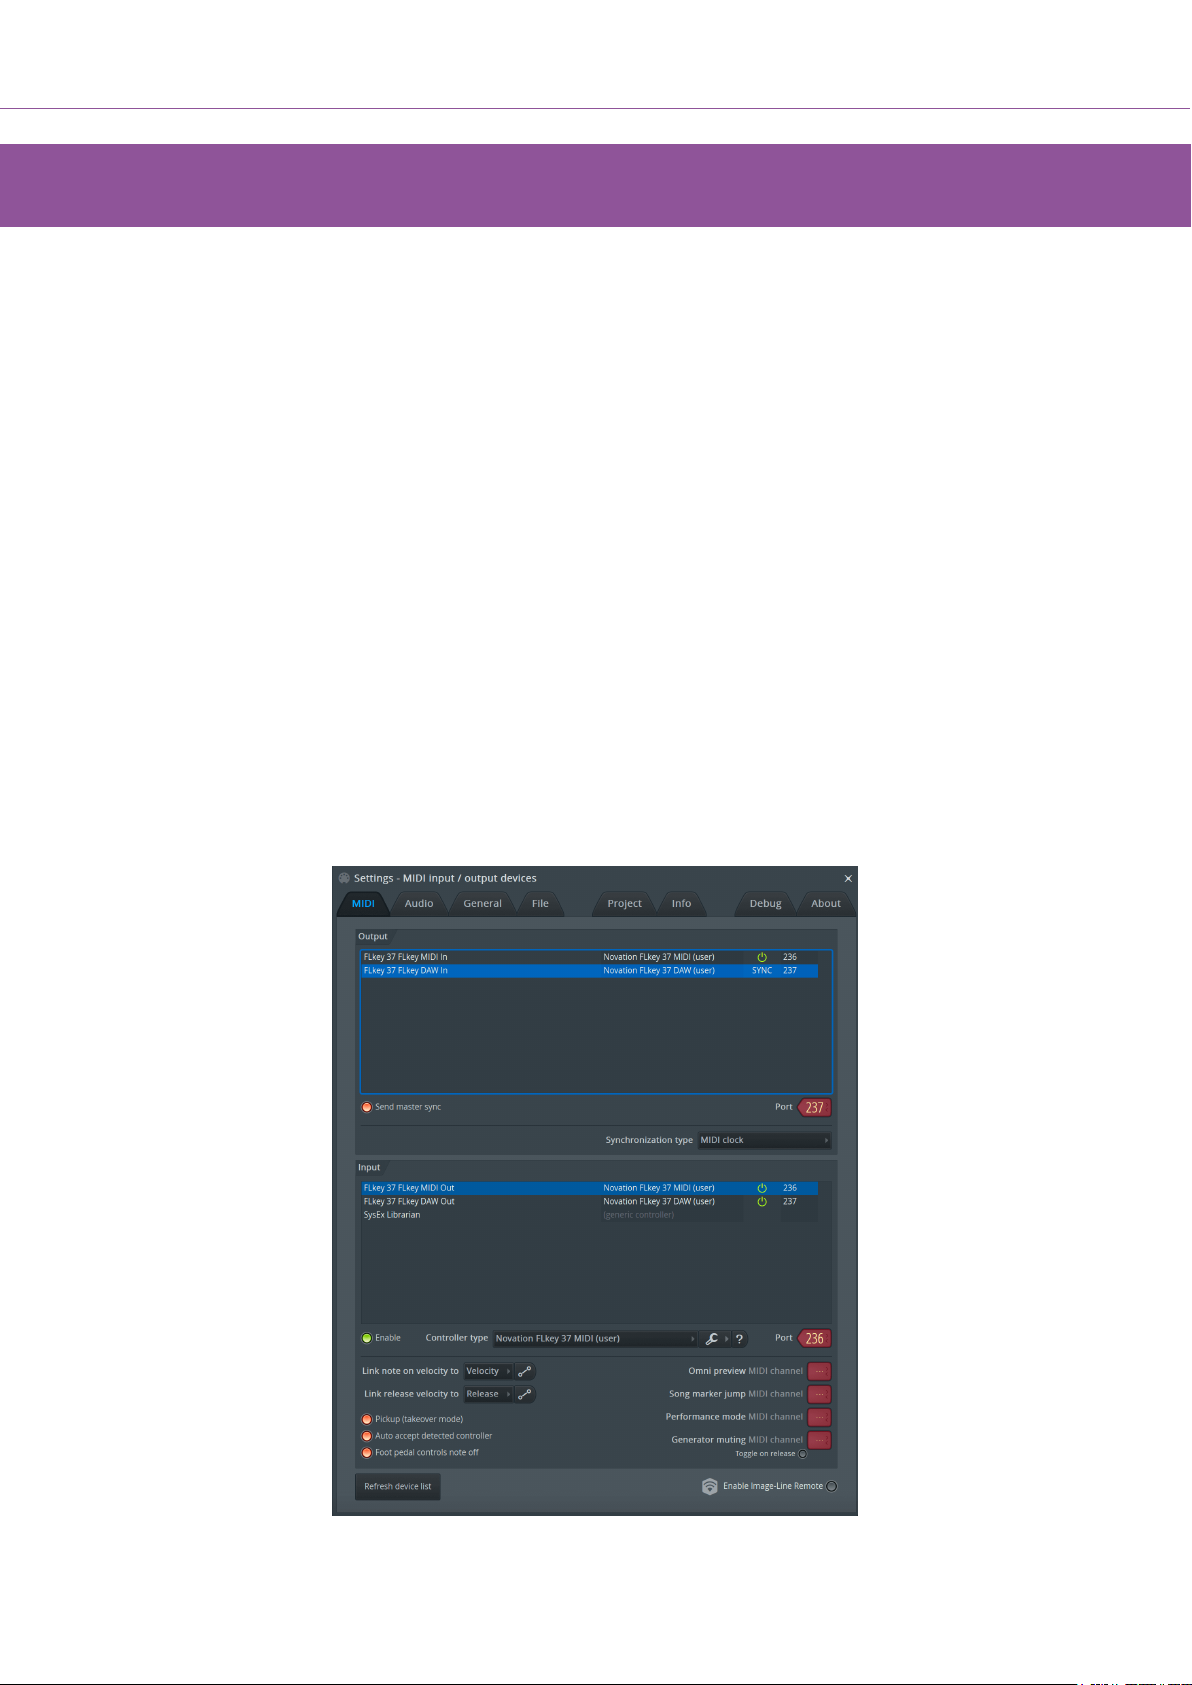
In the MIDI Settings window, (Options > Settings > MIDI) make sure it is set up like the following
screenshot. For a text guide on setting up your MIDI Settings, you can also use the steps after the
screenshot.
11
Page 12
FLkey User Guide
Manual Installation steps:
1. Select and enable the FLkey MIDI and DAW input ports in the lower ‘Input’ panel:
• FLkey MIDI Out
• FLkey DAW Out (named MIDIIN2 on Windows)
2. Click on each Input and, using the red ‘Port’ tab below, set different port numbers for both.
• Port numbers can be set to anything not already in use (except 0)
• Choose different port numbers for the MIDI and DAW ports
3. Select each input and assign the scripts:
• Click on the MIDI input, click the ‘Controller type’ drop down and choose: ‘Novation
FLkey MIDI’.
• Click on the DAW input, click the ‘Controller type’ drop down and choose: ‘Novation
FLkey DAW’.
4. Click the output ports in the upper ‘Output’ panel and set the ‘Port’ numbers to match the
inputs.
• FLkey MIDI In.
• FLkey DAW In (named MIDIOUT2 on Windows).
• The scripts you set in Step 3 automatically link.
5. Select the DAW output (upper panel) and enable ‘Send master sync’.
6. Near the bottom of the window, enable ‘Pickup (takeover mode)’.
7. Click ‘Refresh device list’ in the bottom left.
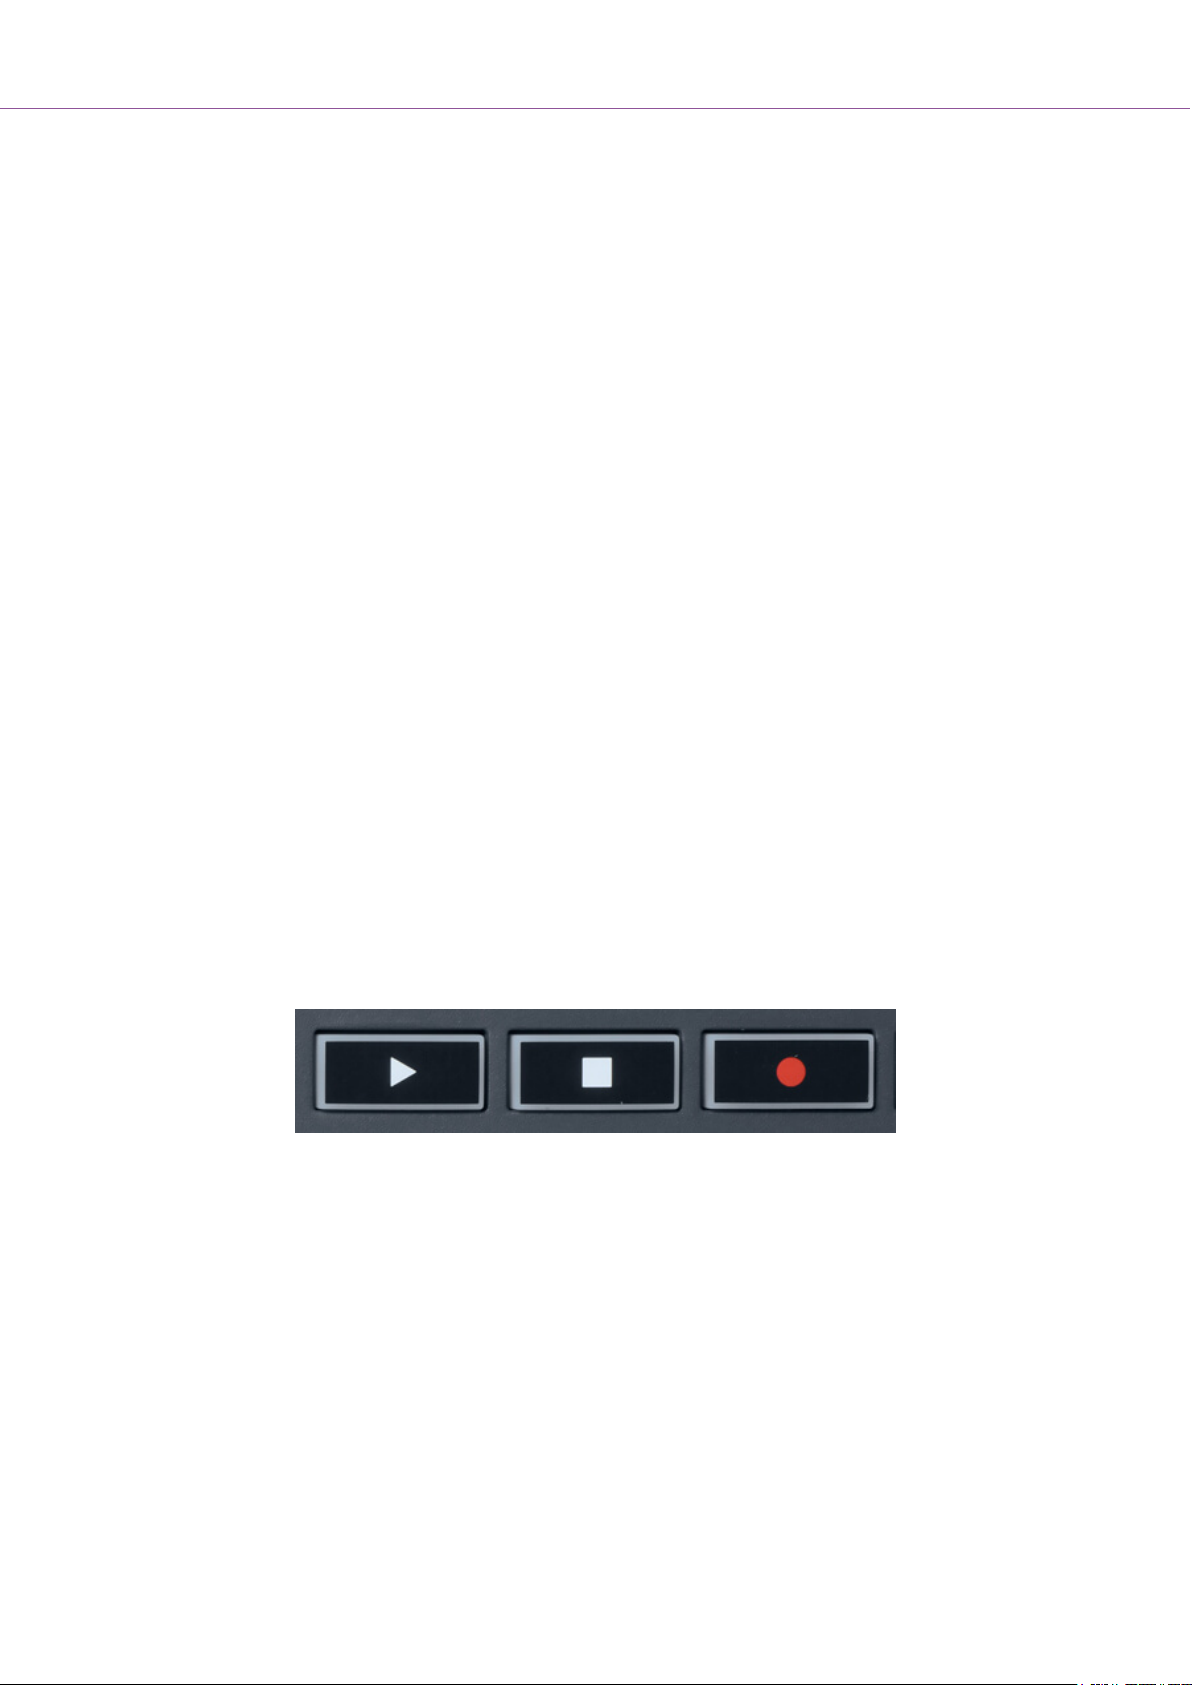
Transport Controls
• The Play ▶ button works in the same way as FL Studio’s Play button, it continues and pauses
playback.
• The Stop ■ button stops the playback and resets the play position.
• The Record ● button toggles FL Studio’s recording state.
12
Page 13
FLkey User Guide
Preset Navigation
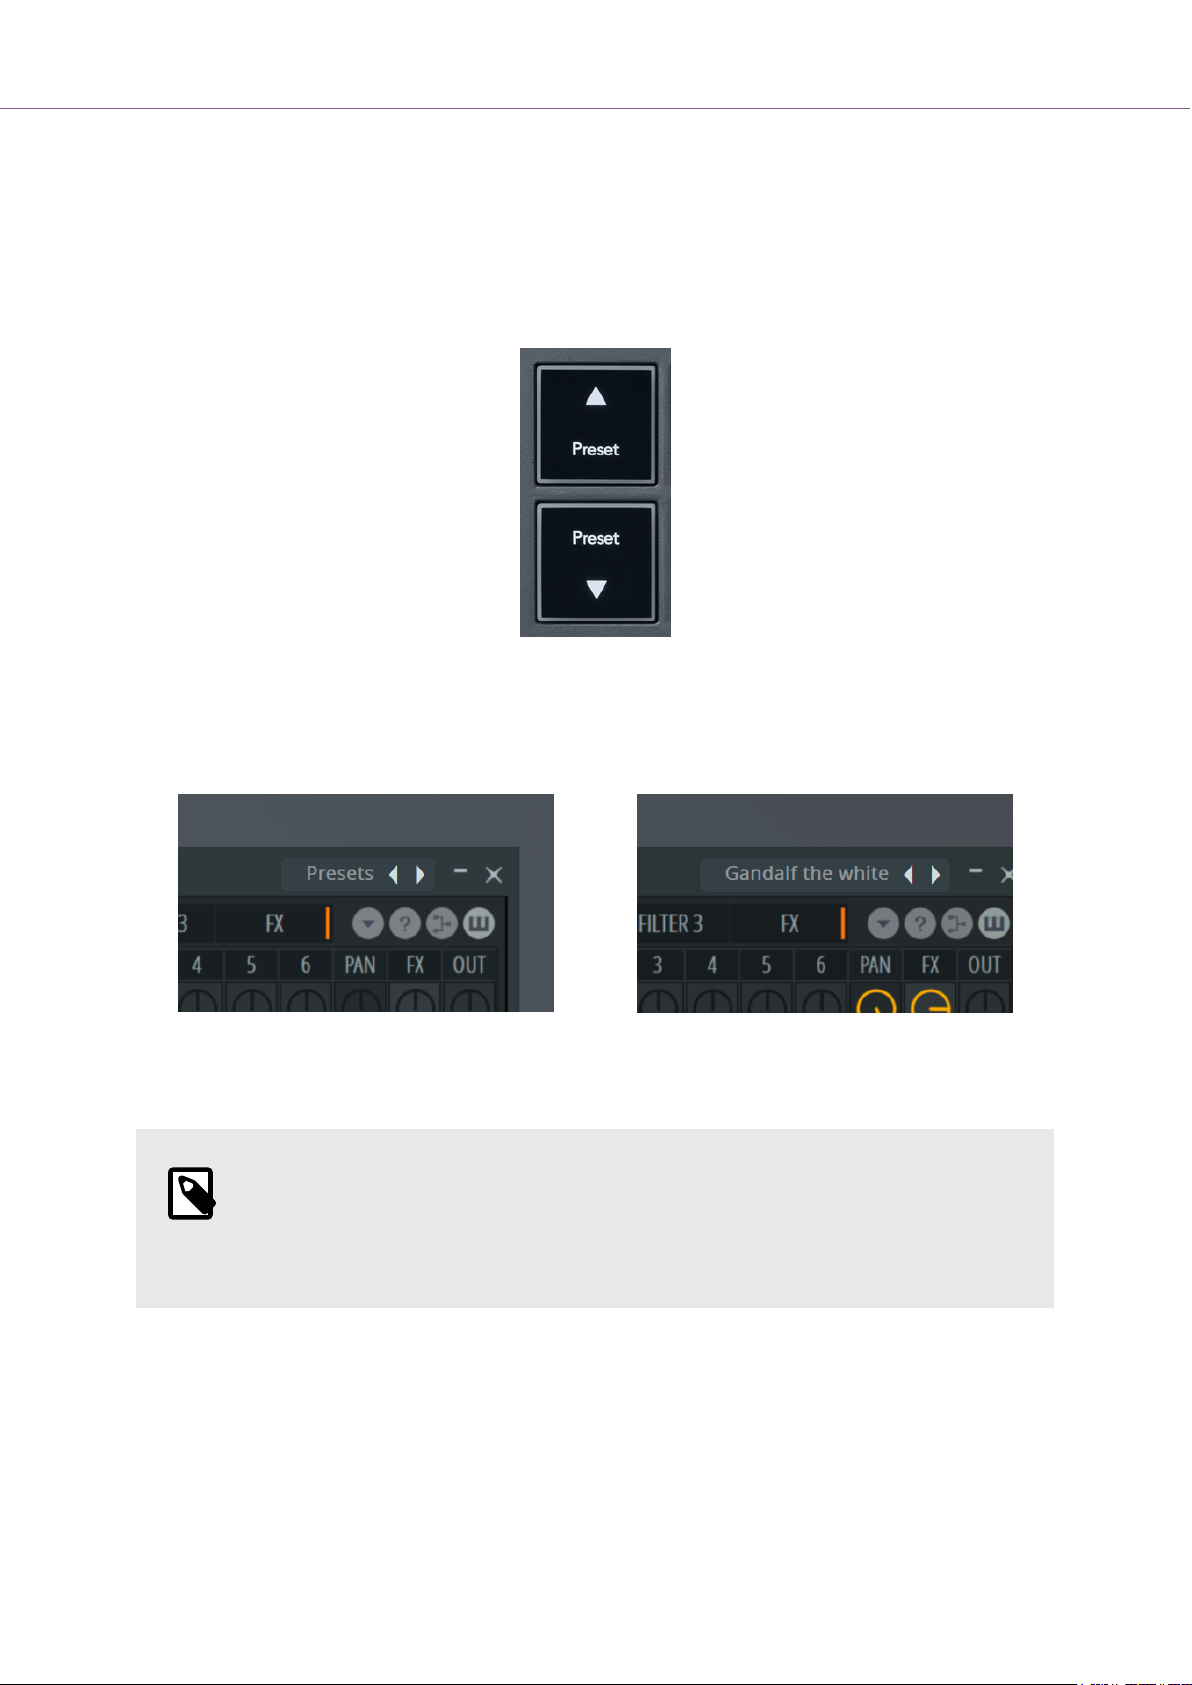
You can use the FLkey to scroll through presets. Select an instrument or plugin and press the Preset
▲ or Preset ▼ buttons to select the next/previous preset. You can use the keys/pads to audition the
preset.
The Preset ▲ and Preset ▼ buttons have the same interaction as clicking Presets ◄ ► in your FL
Studio plugin GUI:
Default Preset After clicking the Preset ►button
NOTE
If you're using third-party plugins you won't be able to browse their stock presets. You
can however browse presets you've saved in both FL Studio and thrid-party plugins.
13
Page 14
5-Pin MIDI DIN
USB
FLkey User Guide
External Connections
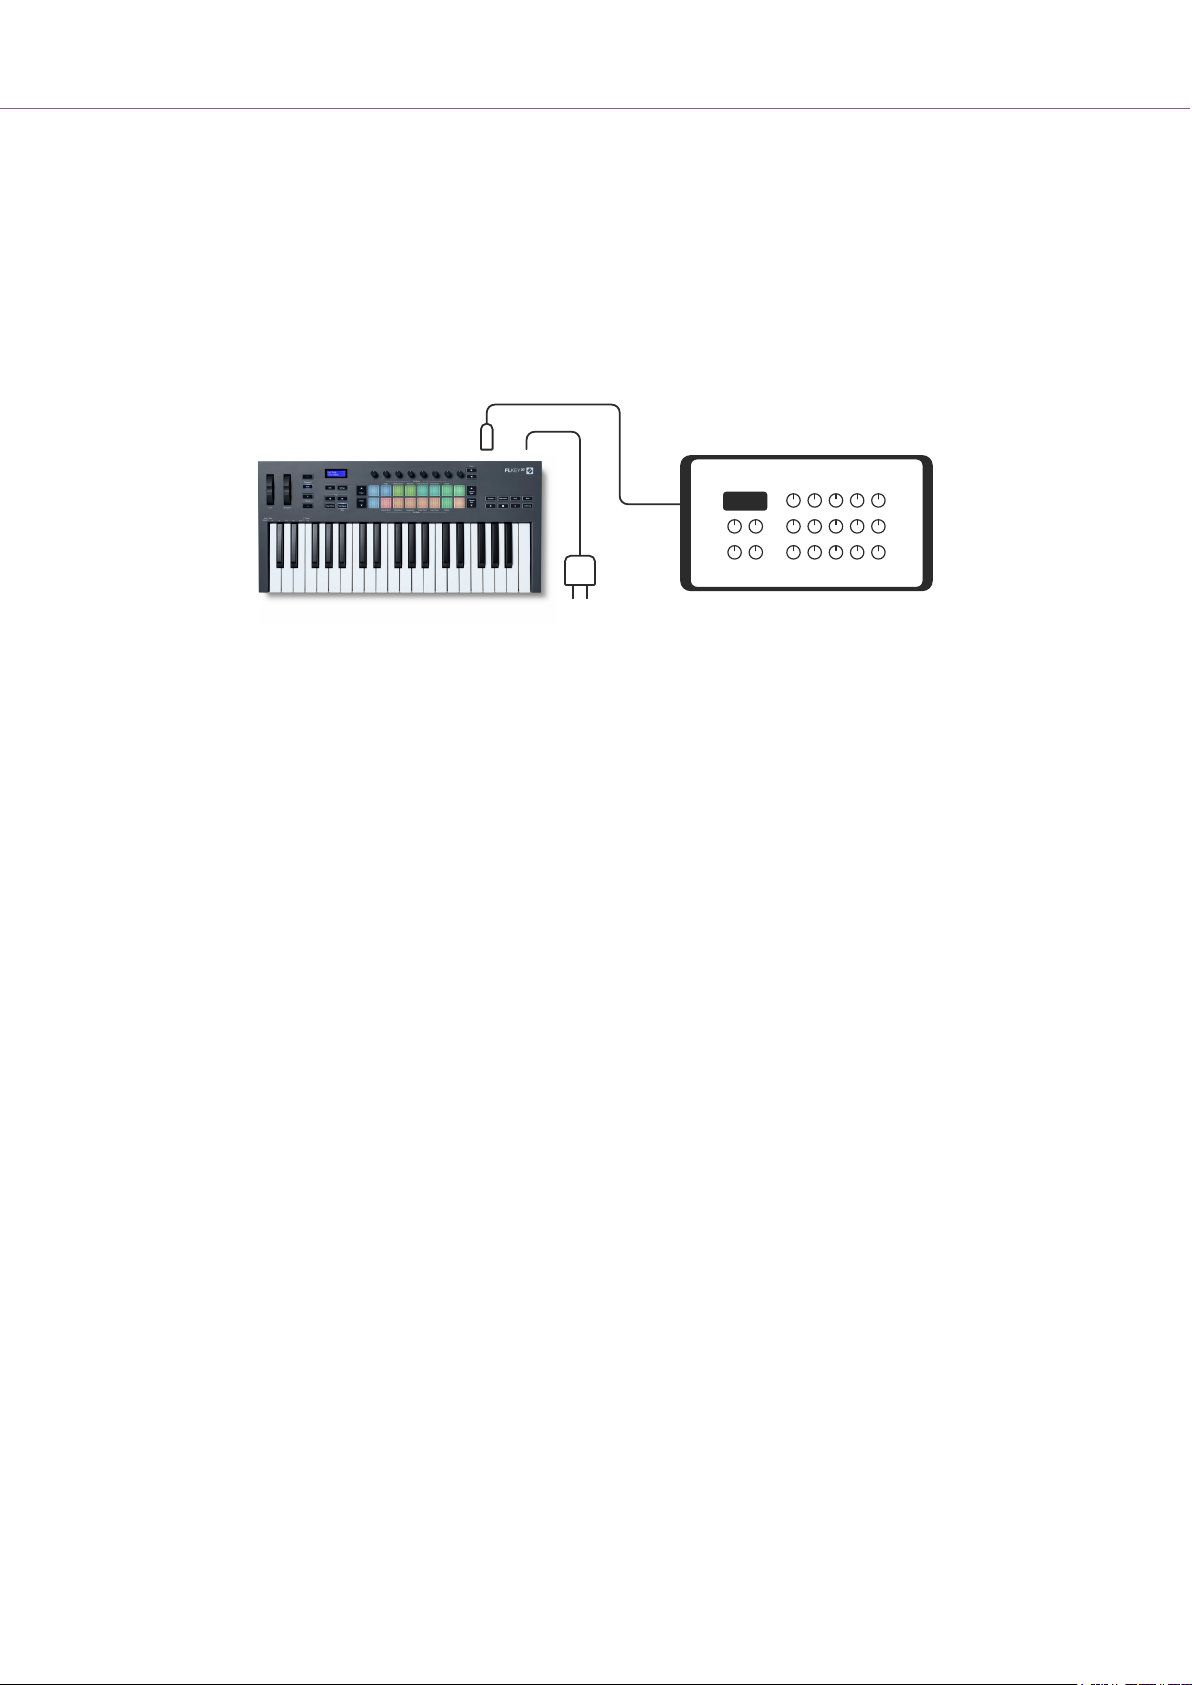
Connecting FLkey MIDI Out with External MIDI Instruments
To use the 5-pin DIN socket for MIDI output on your FLkey without a computer, you can power the unit
with a standard USB power supply (5V DC, minimum 500mA).
Sustain Input
You can connect any standard sustain pedal via the TS jack input. Not all plugins support sustain pedal
signals by default, so you might need to link it to the right parameter inside the plugin.
The FLkey’s sustain input automatically senses the pedal’s polarity. The Sustain input does not support
sostenuto, soft or volume pedals.
14
Page 15
FLkey User Guide
Pot Modes
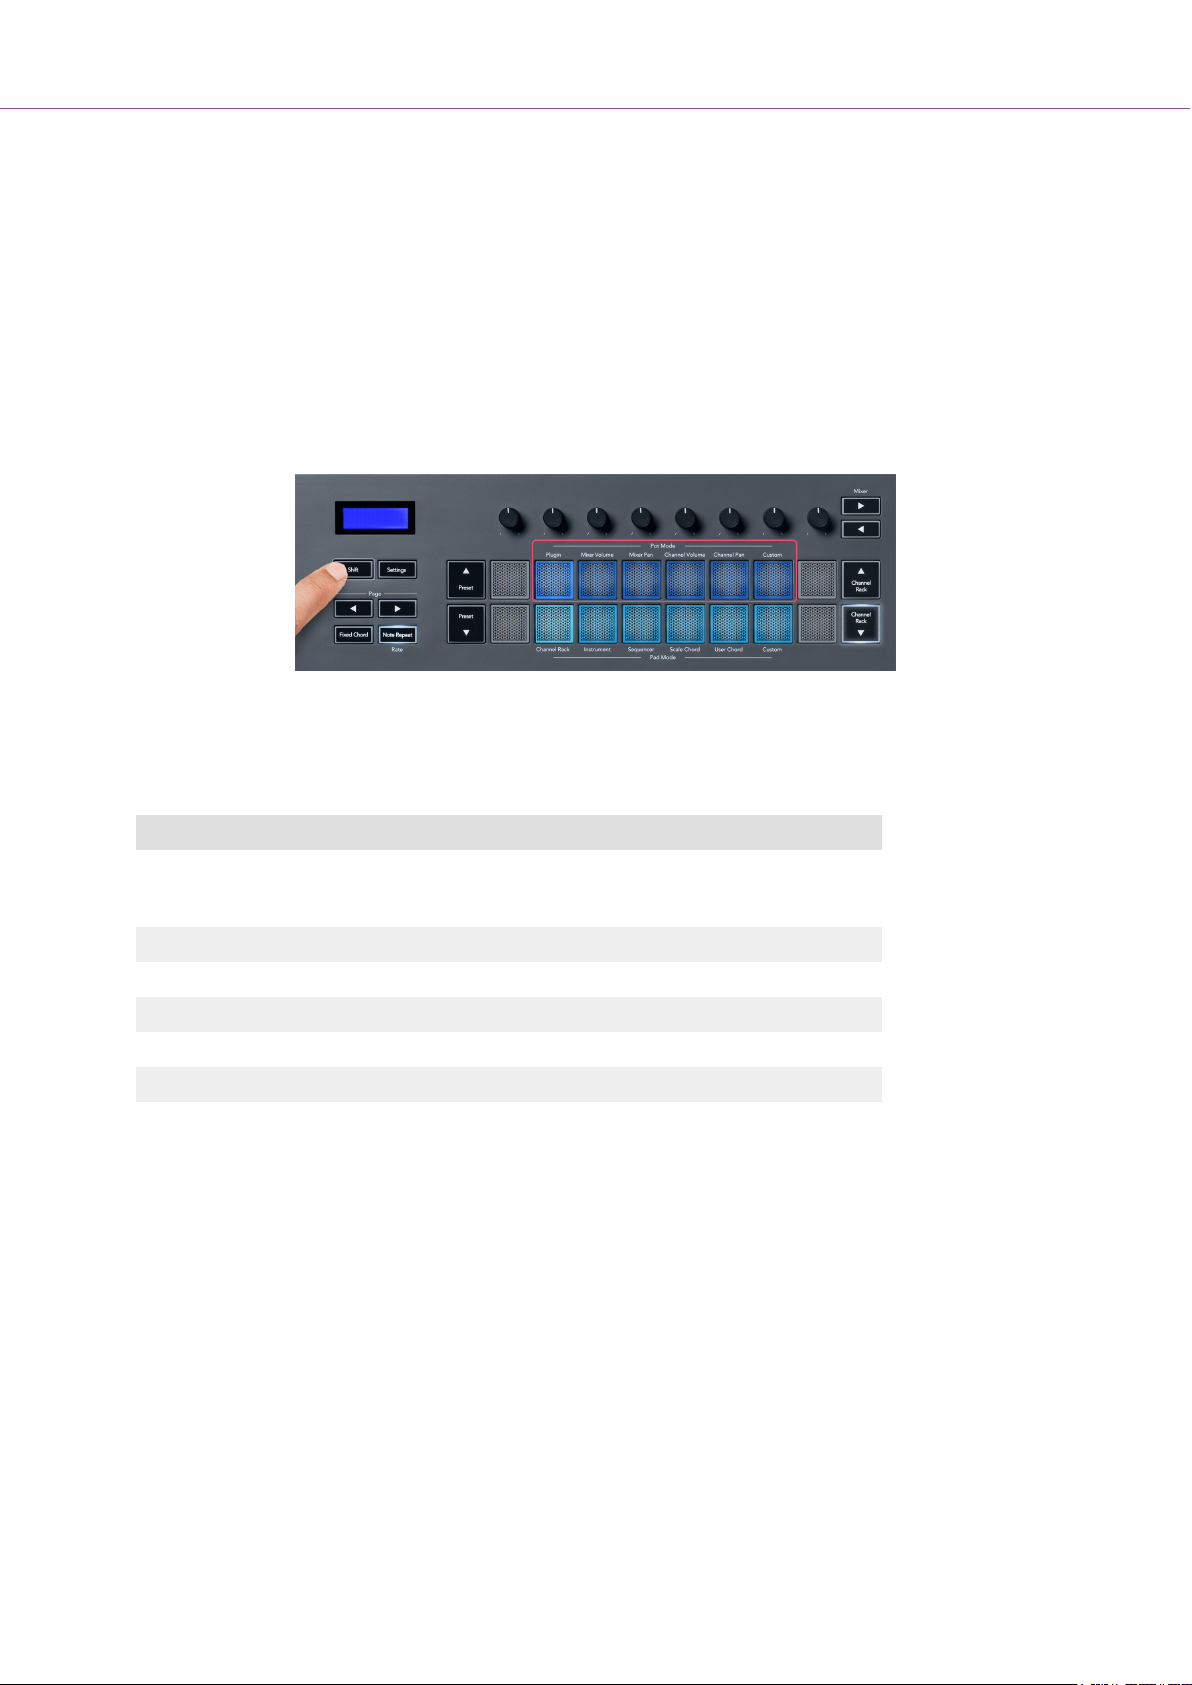
The FLkey has eight pots to control various parameters inside FL Studio depending on the pot mode.
To access pot modes:
1. Hold (or double press to latch) Shift to enter shift mode. The pads light up. The top row of pads
represents the pot modes. The text above each pad shows you the pad’s pot mode.
2. Press a pad to select the pot mode you want to use. The table below lists FLkey’s pot modes.
When you enable ‘Pickup (takeover mode)’ inside FL Studio’s MIDI settings, the pot needs to reach the
original value before the changes apply to the parameter connected to the current pot.
Pot Mode Use
Plugin Plugin mode controls eight parameters, dependent on the plugin in focus.
The screen shows the parameter name together with the new value temporarily.
Mixer Volume Mixer Volume mode maps the mixer faders in banks of eight to the pots.
Mixer Pan Mixer Pan mode maps the Mixer Pan pots, in banks of eight, to the pots.
Channel Volume Channel Volume mode maps the Channel Volume pots in banks of eight to the pots.
Channel Pan Channel Pan mode maps the Channel Panning pots in banks of eight to the pots.
Custom You can assign the eight pots to custom parameters
Pot Mode: Banking
When you’re in the pot modes for Mixer or Channel settings you can bank between mixer tracks or
channels. While using Channel Rack Pad mode navigation banks in groups of eight so the pots line up
with the bottom row of pads; in all other pad modes banking moves one Track or Channel at a time.
• In Mixer Volume and Mixer Pan pot modes press the ◀ or ▶ buttons under the ‘Mixer’ label to
move the selection to the previous/next track(s). The red selection in FL Studio shows which
bank the pots control.
• In Channel Volume or Channel Pan pot modes press the Channel Rack ▼ or Channel Rack ▲
to move the selection to the previous/next track(s). The red selection in FL Studio shows which
bank the pots control.
15
Page 16
FLkey User Guide
Pot Mode: Plugin
In Plugin mode, you can use the FLkey’s pots to control eight parameters in the plugin you have in
focus. Most native FL Studio plugins support FLkey’s pot mode.
NOTE
The parameters the FLkey maps to in FL Studio’s plugins are fixed preset mappings.
For third-party plugins, you can use the Custom pot mode to create your own
mappings.
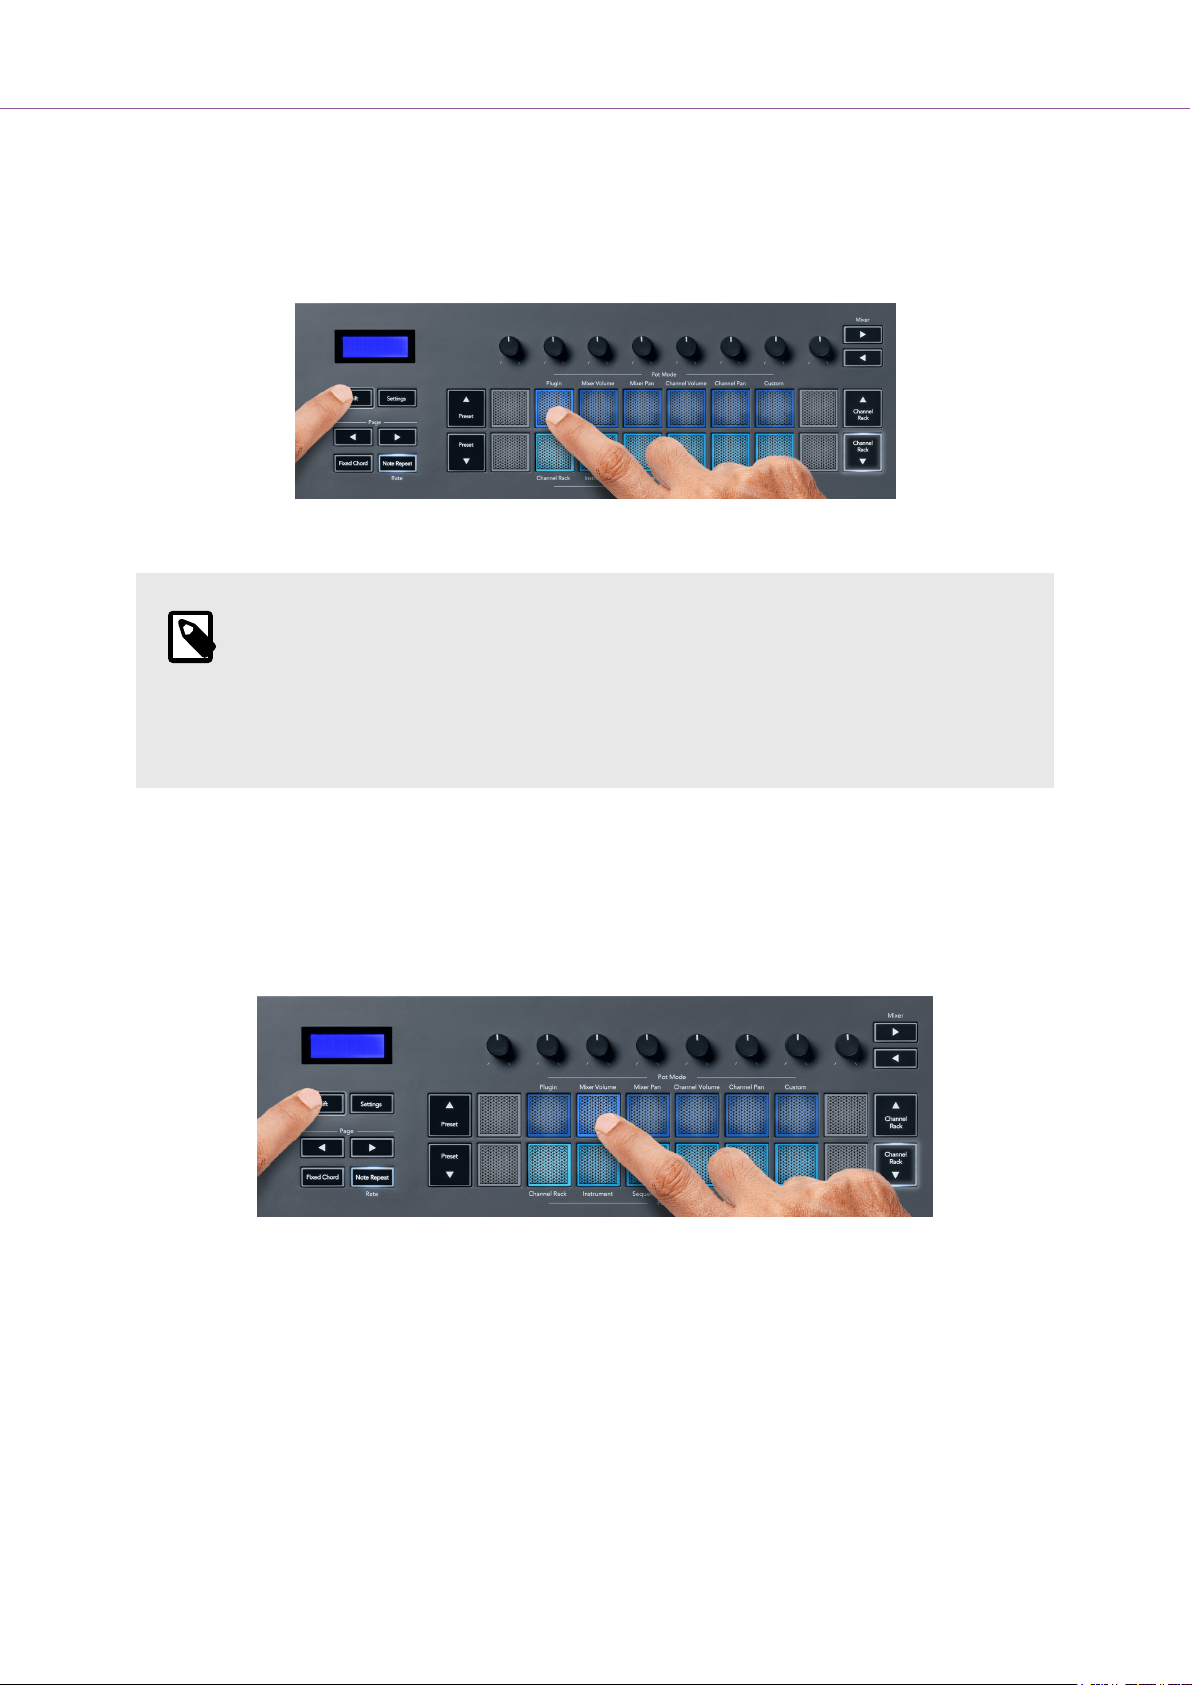
Pot Mode: Mixer Volume
In Mixer Volume mode, the FLkey’s eight pots map to the mixer faders in FL Studio. You can control
mixer track volumes in groups of eight.
Pot Mode: Mixer Pan
In Mixer Pan mode, the FLkey’s eight pots map to the pan controls in FL Studio’s mixer. You can control
the mixer track’s panning in groups of eight.
16
Page 17
FLkey User Guide
Pot Mode: Channel Volume
In Channel Volume mode, FLkey’s eight pots map to the Channel Volume control in groups of eight.
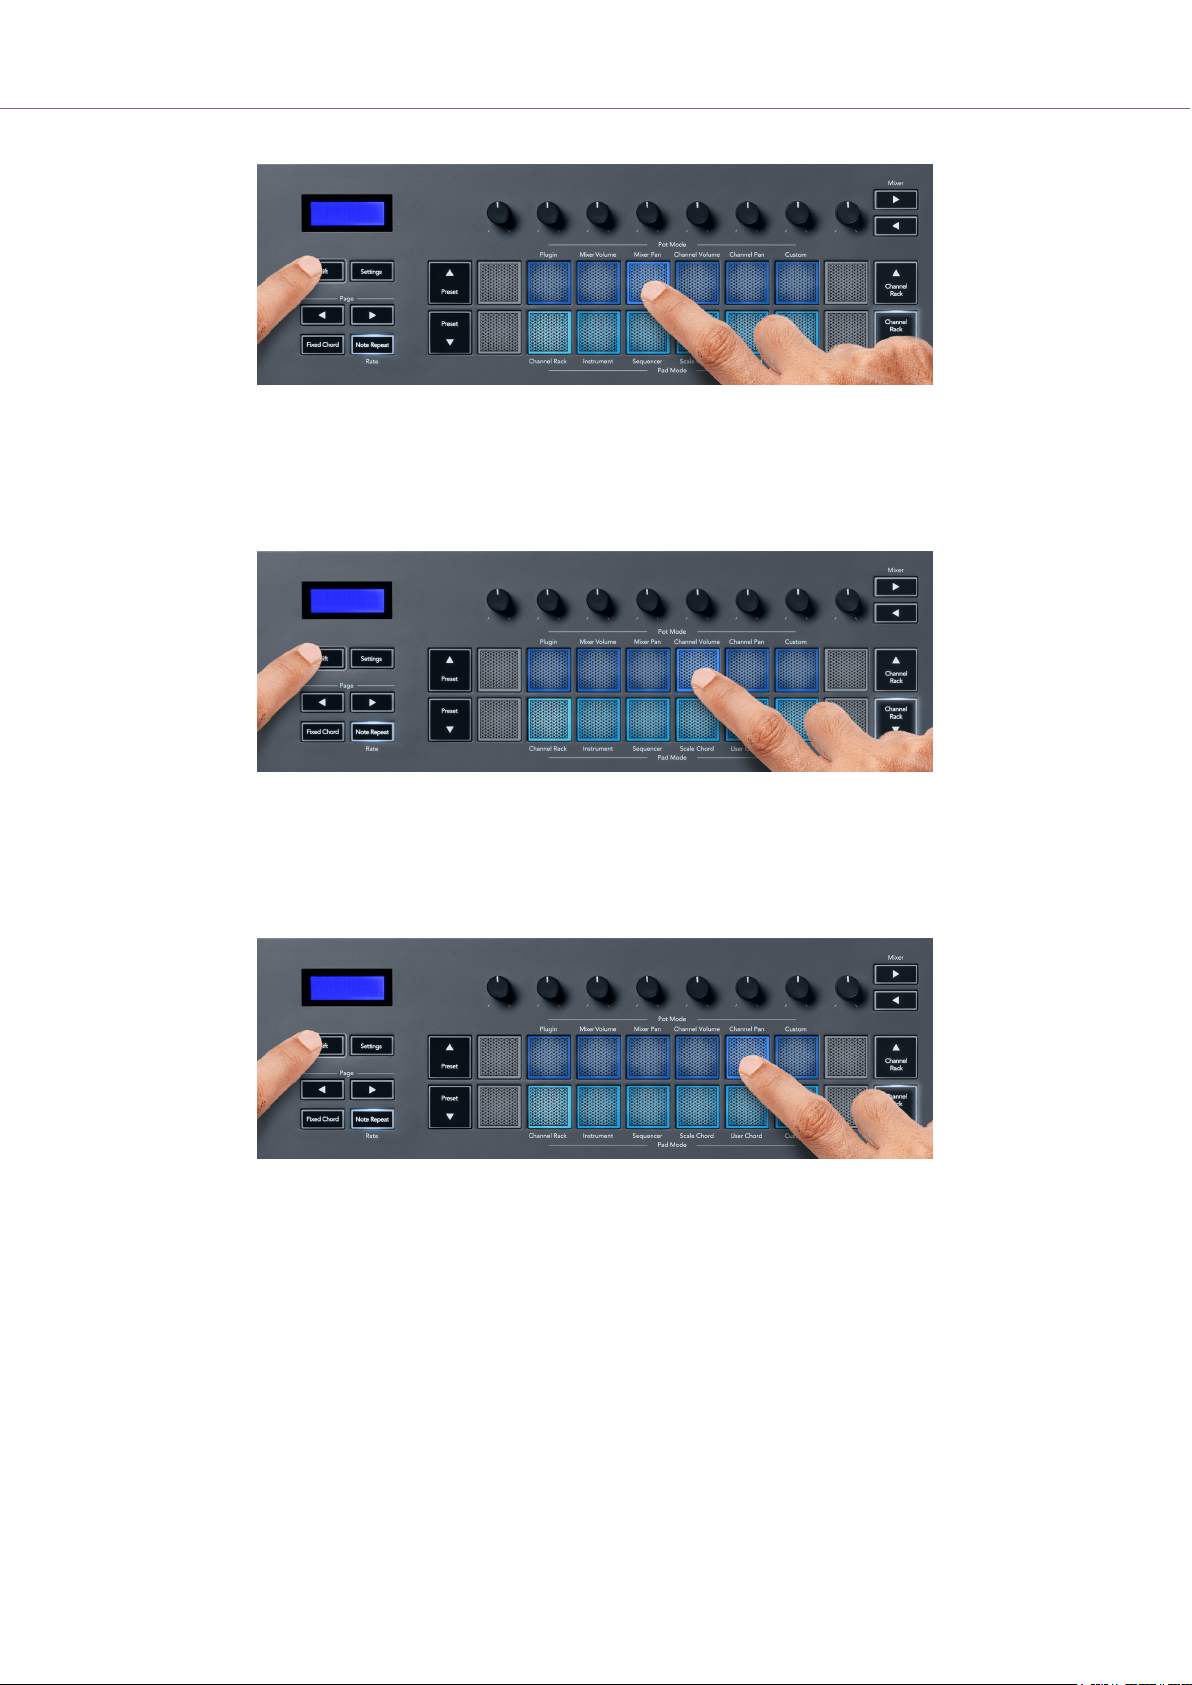
Pot Mode: Channel Pan
In Channel Pan mode, FLkey’s eight pots map to the Channel Pan control in groups of eight.
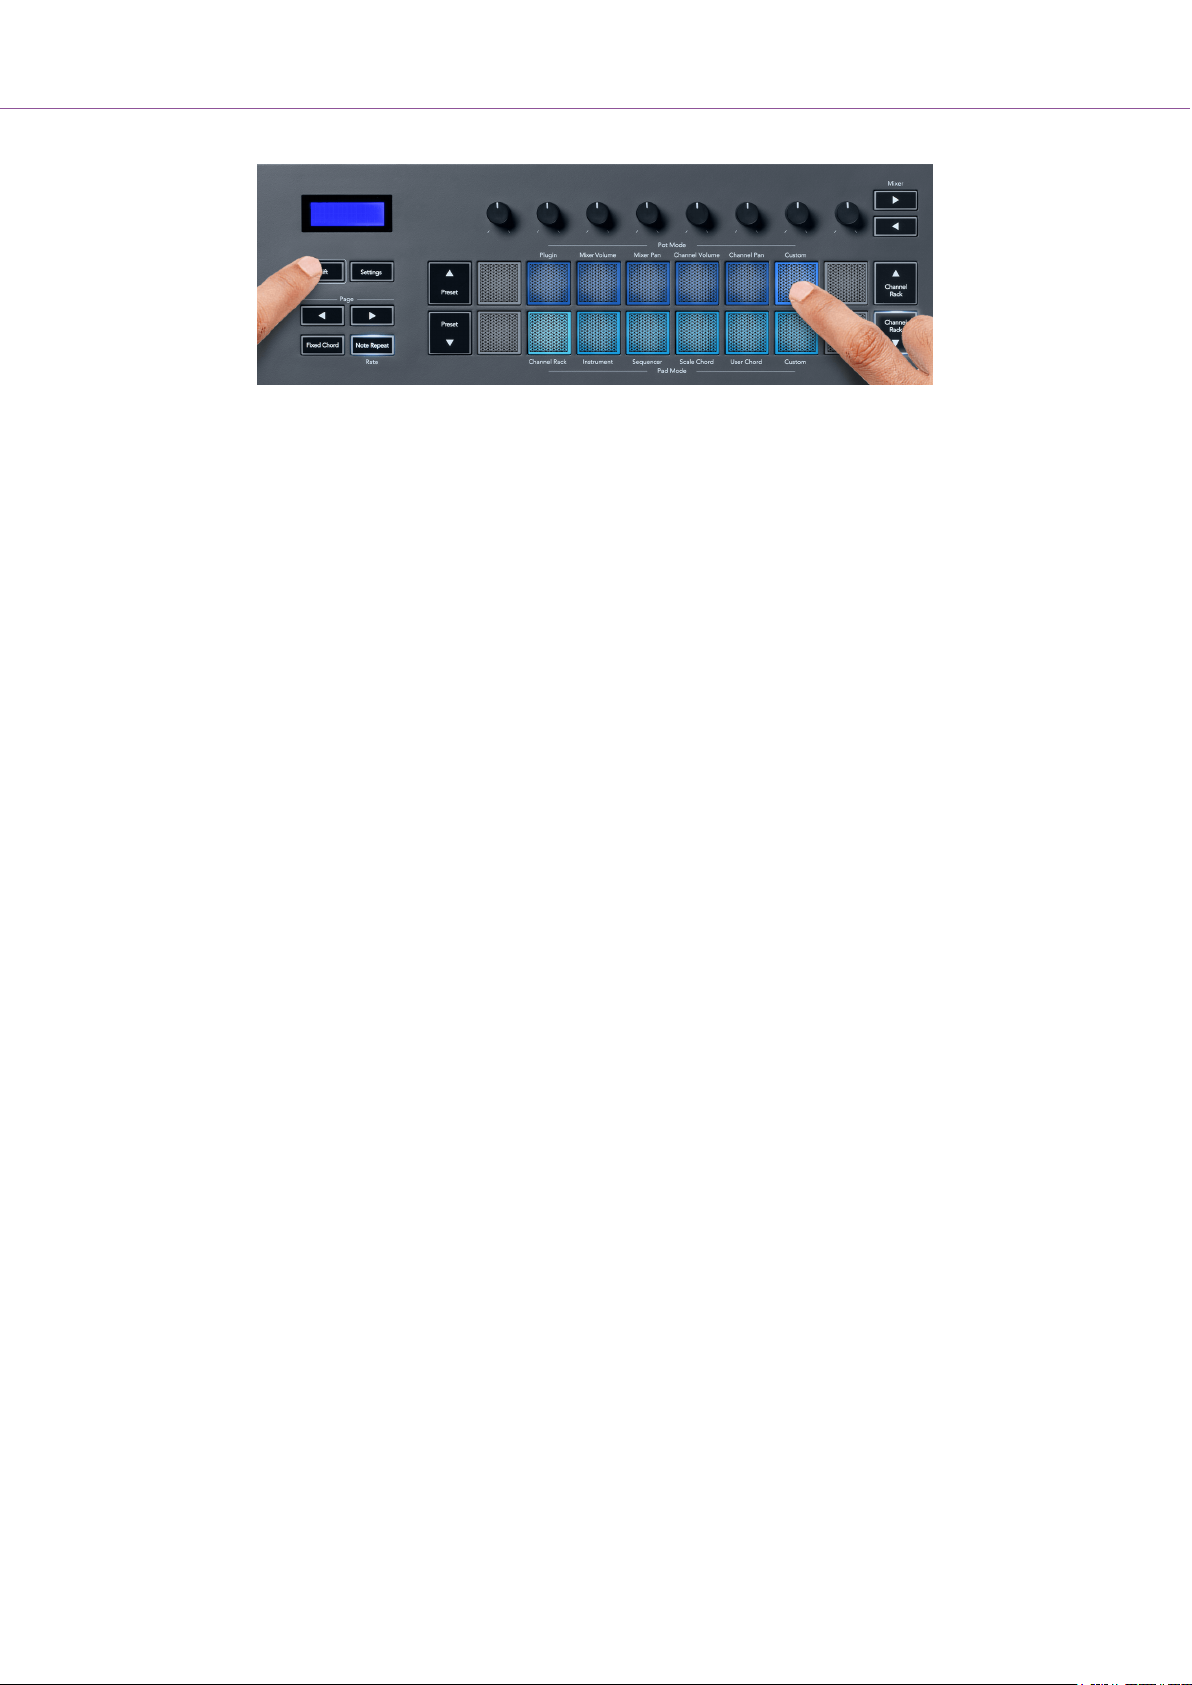
Pot Mode: Custom
This pot mode gives you freedom over whichever parameters you wish to control and up to eight
simultaneously. Using Novation Components, you can edit the messages the pots and fader buttons
send out in Custom Mode
components.novationmusic.com.
17
Page 18
FLkey User Guide
To map most parameters in FL Studio to the Pots on the FLkey:
1. Right-click a parameter in FL Studio.
2. Select one of two remote control modes (explained below).
3. Move a pot to map the parameter to the pot you moved.
Remote control modes:
• Link to controller - creates a link between one instance of the parameter and the pot, regardless
of focus. This link works project-wide.
• Override global link - creates a link across all projects, unless overwritten by a ‘per-project-link’.
As this depends on the focused instance, you can control many parameters with one pot.
18
Page 19
FLkey User Guide
Pad Modes
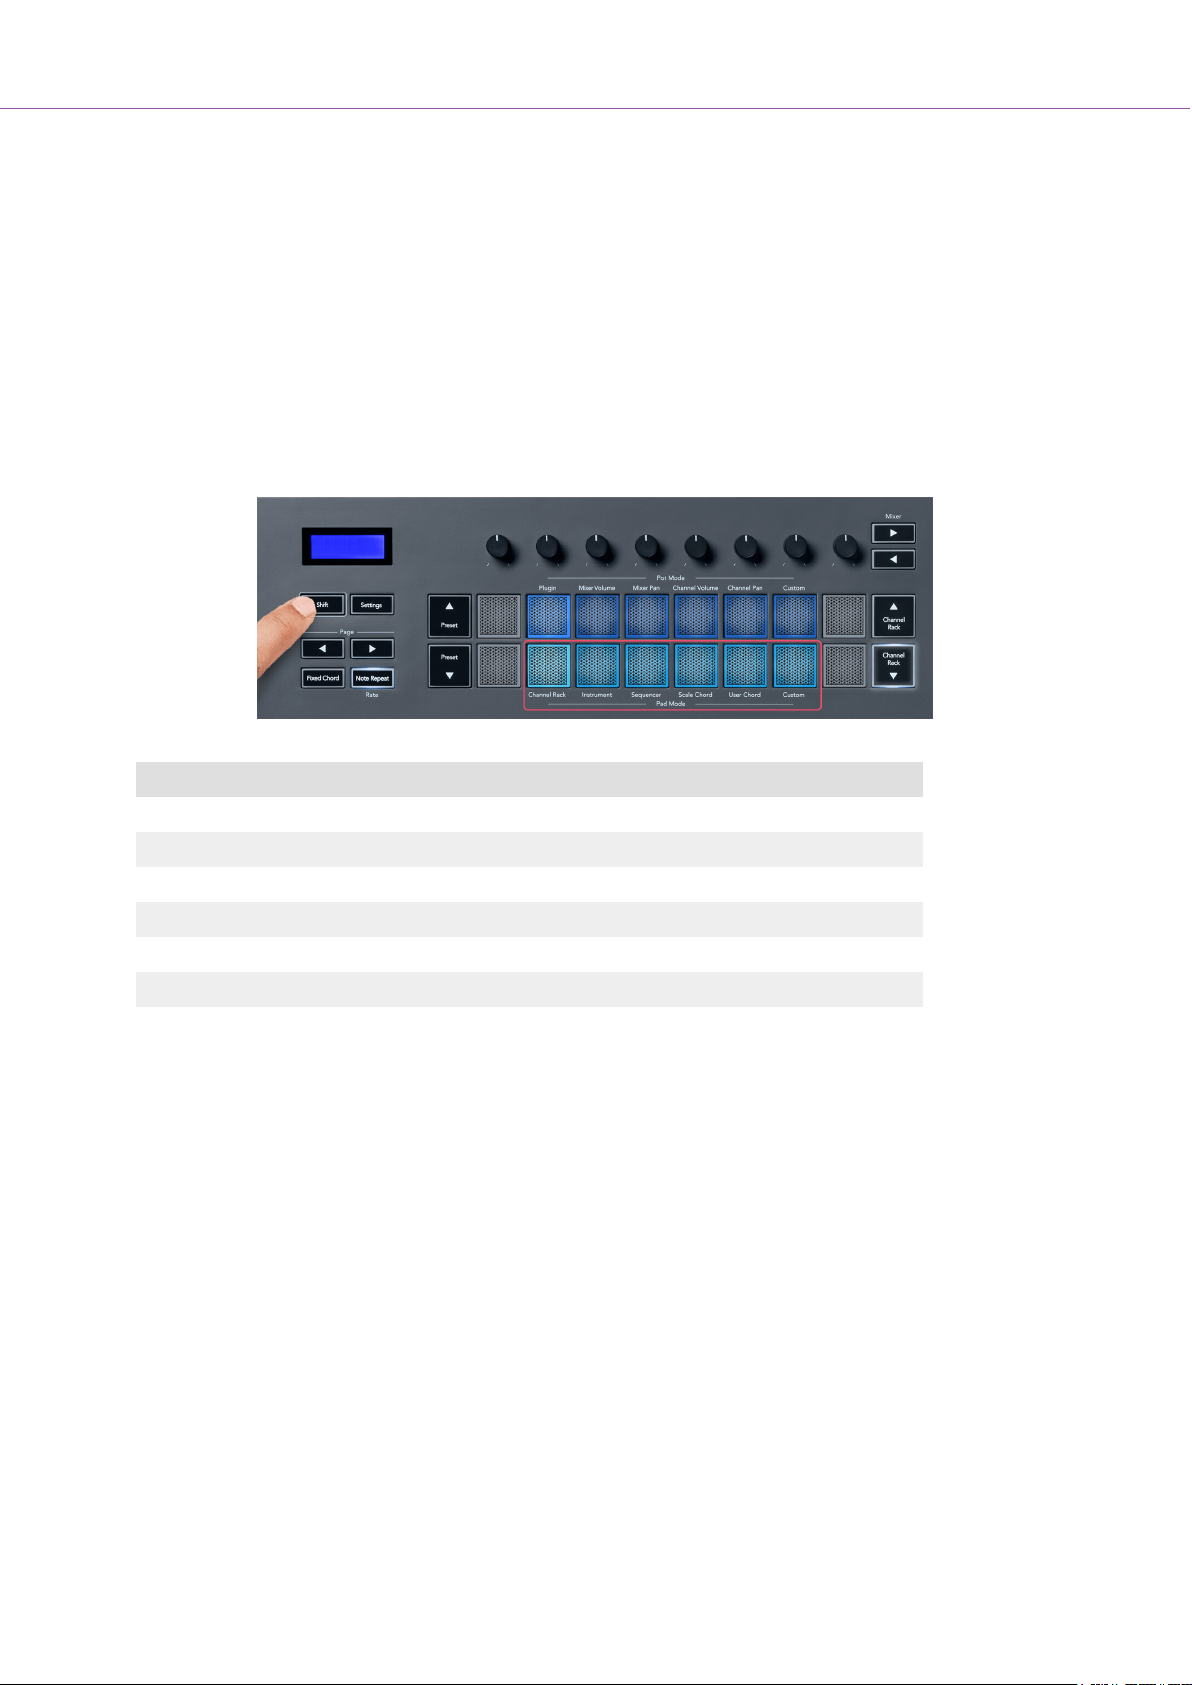
Depending on the pad mode, the FLkey has 16 pads to control various elements inside FL Studio.
To access pad modes:
1. Hold (or double press to latch) Shift to enter shift mode. The pads light up. The bottom row of
pads represents the pad modes. The text below each pad shows you the pad mode.
2. Press a pad to select the pad mode you want to use. The table below lists the FLkey’s pad
modes.
Mode Use
Pattern Add or select new patterns using FLkey's pads.
Channel Rack The Channel Rack mode lets you audition and select channels.
Instrument You can control the selected instrument; FPC, Slicex, and Fruity Slicer have special layouts.
Sequencer In Sequencer mode, you can create and edit steps. You can also edit the whole graph editor.
Scale Chord You can play predefined chords in your set root key and scale.
User Chord You can record and playback up to 16 chords.
Custom You can assign the sixteen pads to custom parameters.
Pad Mode: Channel Rack
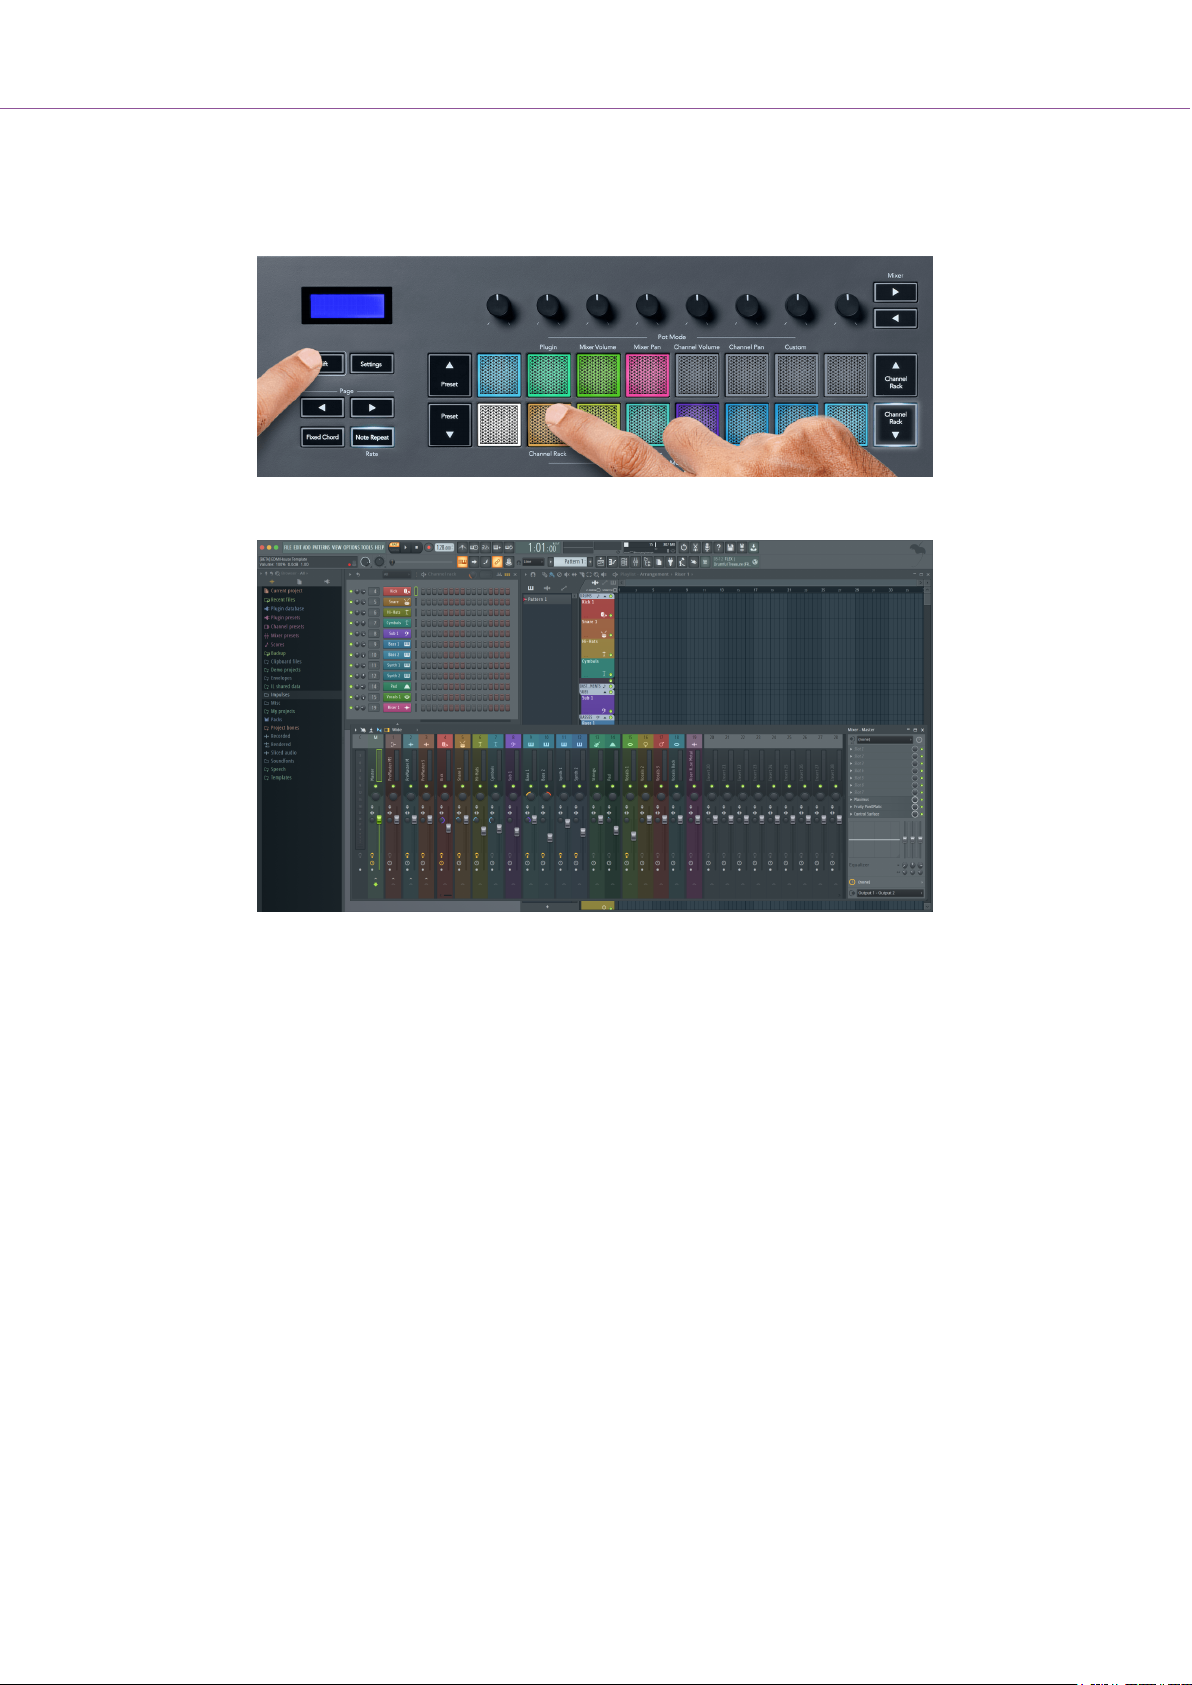
The Channel Rack pad mode lets you play up to 16 Channel Rack channels at once. Each pad
represents a single channel you can trigger using a C5 note. The pads light the channel colour for the
channel you assign the pad to.
When you press a pad, FL Studio selects the channel and triggers audio. The pad then lights white to
show the selected channel, and the channel’s name shows momentarily on the screen. You can select
one channel from the hardware at a time. The FLkey shows when you have no channel selected in FL
Studio.
19
Page 20
FLkey User Guide
The pad layout is left to right, bottom to top, in two rows of eight. The channels in the lower row align
with the Channel Rack Pan/Volume pot layout.
Pad Mode: Channel Rack Banking
You can use Channel Rack ▼ or Channel Rack ▲ to bank the selection to the previous/next group of
eight. The Channel Rack buttons light white when banking is available in that direction. Banking does
not affect the selected channel.
You can hold down the Channel Rack ▼ or Channel Rack ▲ buttons to auto-scroll through the Channel
Rack.
Pad Mode: Channel Rack Groups
The Channel Rack pad layout follows Channel Rack groups. When you switch Channel Rack groups in
FL Studio using the drop-down at the top of the Channel Rack window the pad grid refreshes to display
the new bank within the group you select selected.
20
Page 21
FLkey User Guide
Pad Mode: Instrument
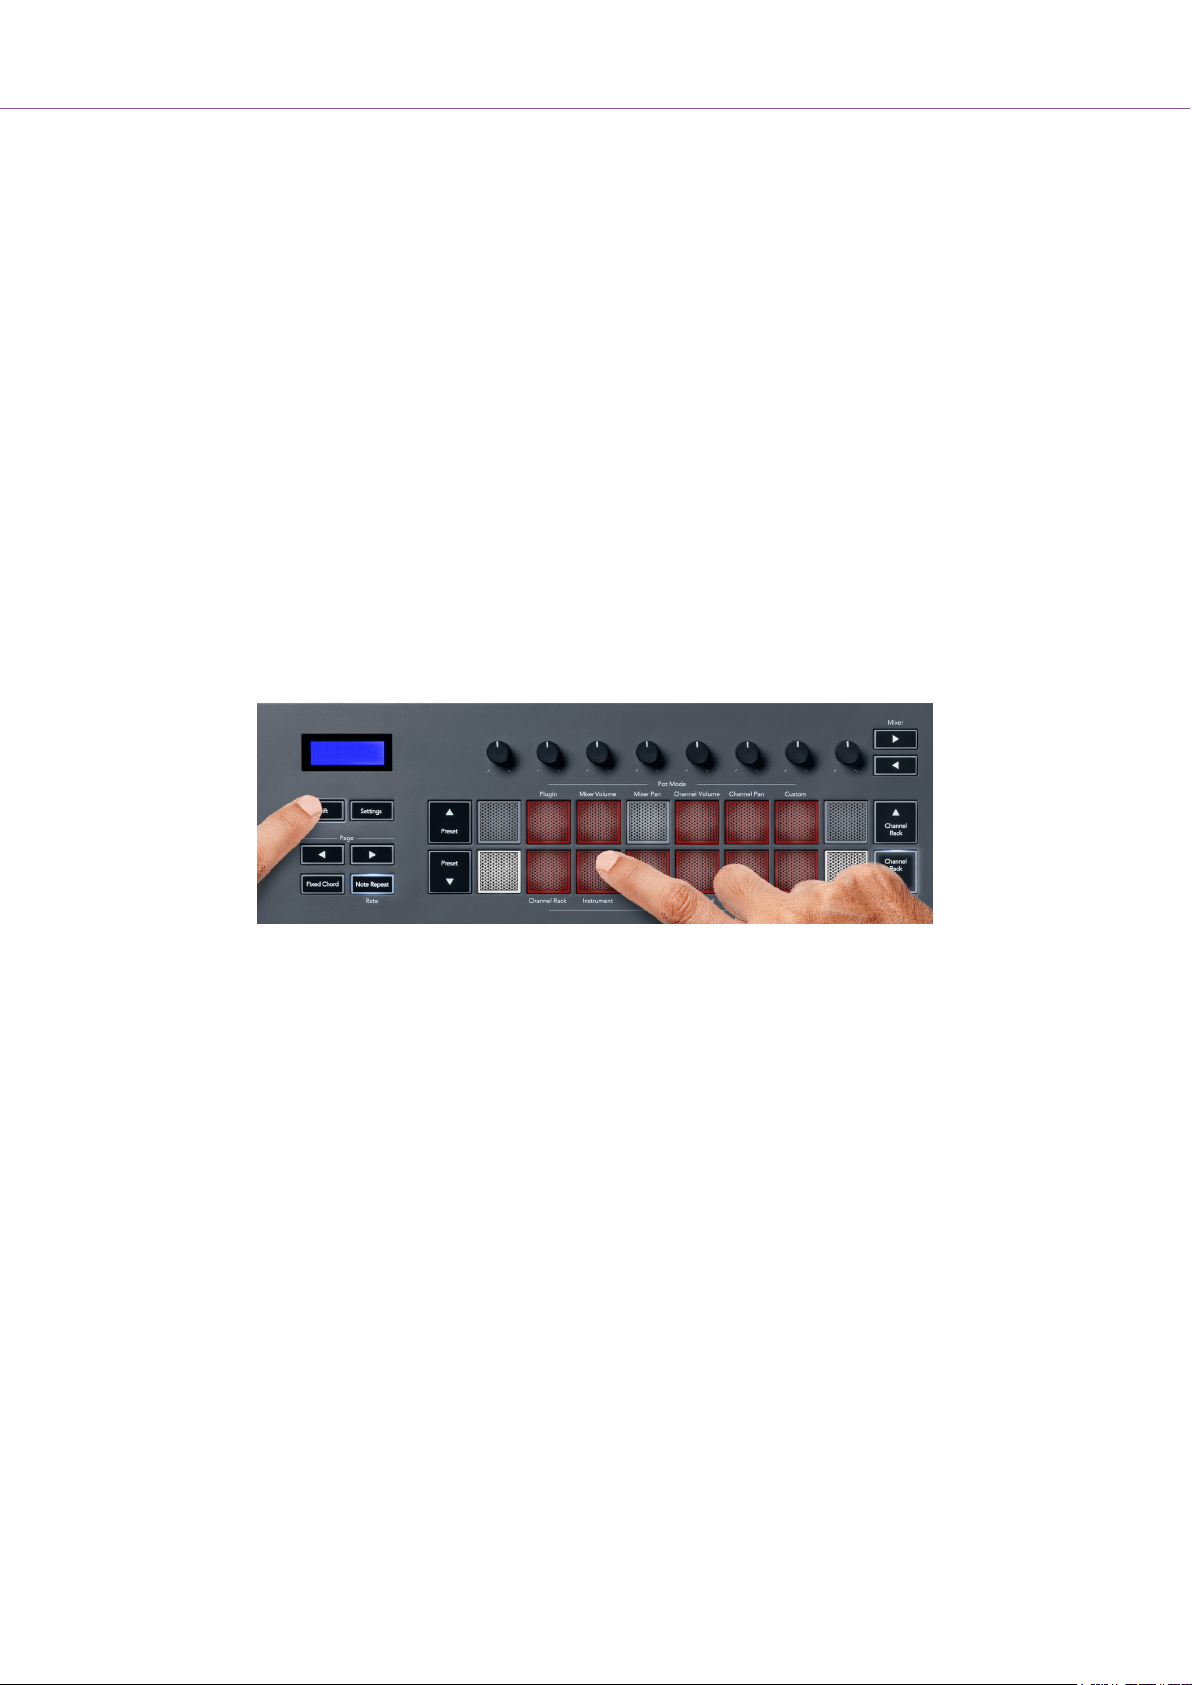
You can control Channel Rack plugins from your FLkey in instrument mode. To enter instrument mode,
hold shift and press the pad above ‘Instrument’ on the hardware. You can input MIDI note data via
pads, adapting special instrument layouts:
• FPC pads
• Slicex
• Fruity Slicer
• A Default Instrument layout
By default, Instrument Pad mode displays a chromatic keyboard across the pads (shown below). When
you have Scale mode enabled in Instrument mode, the MIDI data sent from the pads maps to the eight
notes in the scale you select, across two octaves.
The Preset ▲ or Preset ▼, buttons allow you to scroll through the instrument’s presets.
FPC
In Instrument mode, when you add the FPC plugin to a Channel Rack track, you can control the FPC
drum pads from FLkey. When you select a channel with the FPC plugin:
• The leftmost 4 × 2 pads control the bottom half of the FPC pads.
• The rightmost 4 × 2 pads control the top half of the FPC pads.
FPC is special in this: As its pads have distinct colours, the pads from the FLkey respect those colours
instead of the channel colour.
Slicex
In Instrument mode, when you add the Slicex plugin to the Channel Rack, you can play back slices
using the FLkey’s pads.
You can press the Page ◀ left or Page ▶ right to bank to the next 16 slices and trigger them with the
FLkey’s pads.
21
Page 22
FLkey User Guide
Fruity Slicer
You can play back slices using the FLkey pads while in instrument mode when you select a Channel
Rack channel with this plugin.
You can press the Page ◀ left or Page ▶ right page left or page right to get to the next 16 slices to be
able to trigger them with the FLkey pads.
Default Instrument
This layout is available for a Channel Rack track with any other plugin without custom support or no
plugin at all.
By default, the pads show a chromatic keyboard layout, with note C5 (MIDI note 84) on the bottom left
pad. You can change this using the FLkey’s Scale mode.
Pressing the Page ◀ left button decreases the octave, and the Page ▶ right button increases the
octave. The brighter bottom right/top left pad is always the root note (C by default). With Scale mode
enabled, the pad layout matches the scale you select, starting with the root note on the bottom left pad.
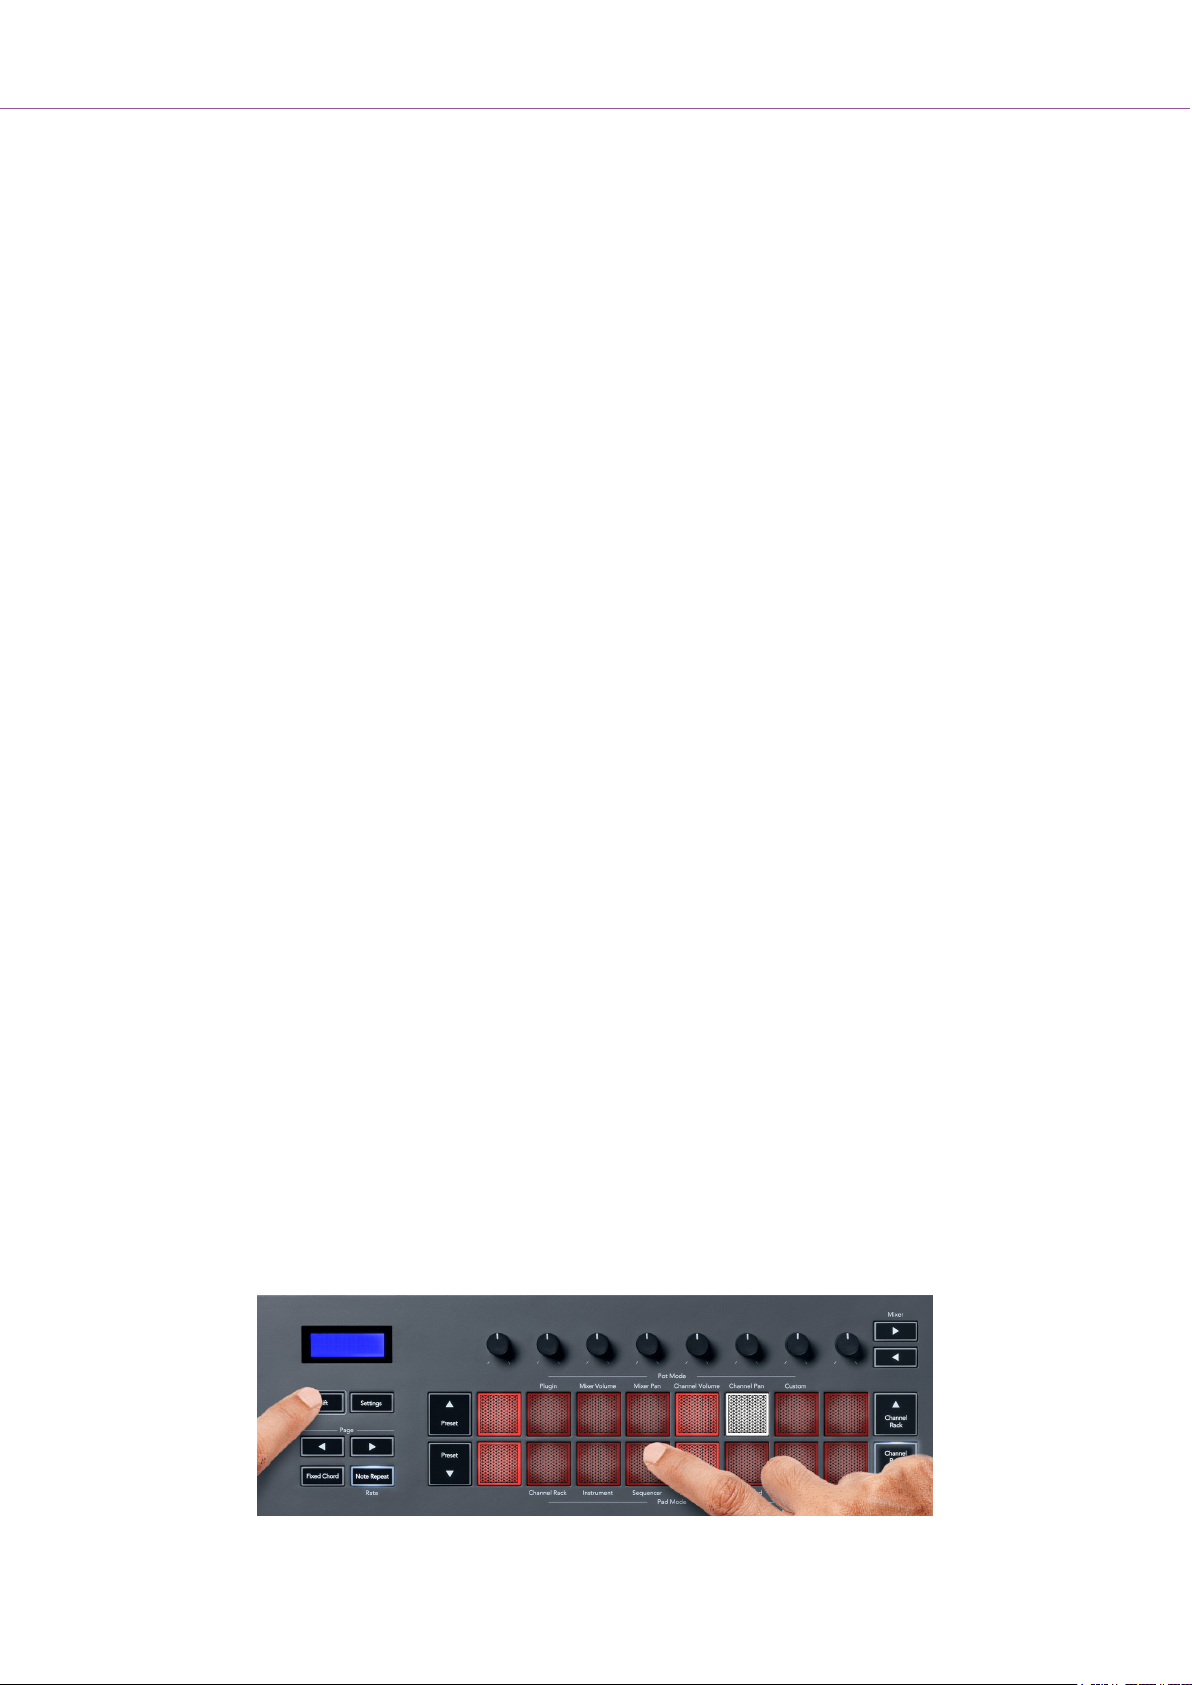
Pad Mode: Sequencer
In Sequencer mode, you control the sequencer grid in the FL Studio Channel Rack. You can place
and change steps inside the selected instrument and pattern. To use Sequencer mode, hold (or double
press to latch) Shift + Sequencer. The upper row of pads shows steps 1-8, and the lower row steps
9-16.
In Sequencer mode, the pads display the steps for the selected Channel Rack track, active steps
appear in bright track colour, and inactive steps in dim track colour. You can toggle the steps by
pressing the pads.
Press Channel Rack ▲ and Channel Rack ▼ to scroll through the instruments. The pads update to
match the colour of the Channel’s sequencer you’re controlling.
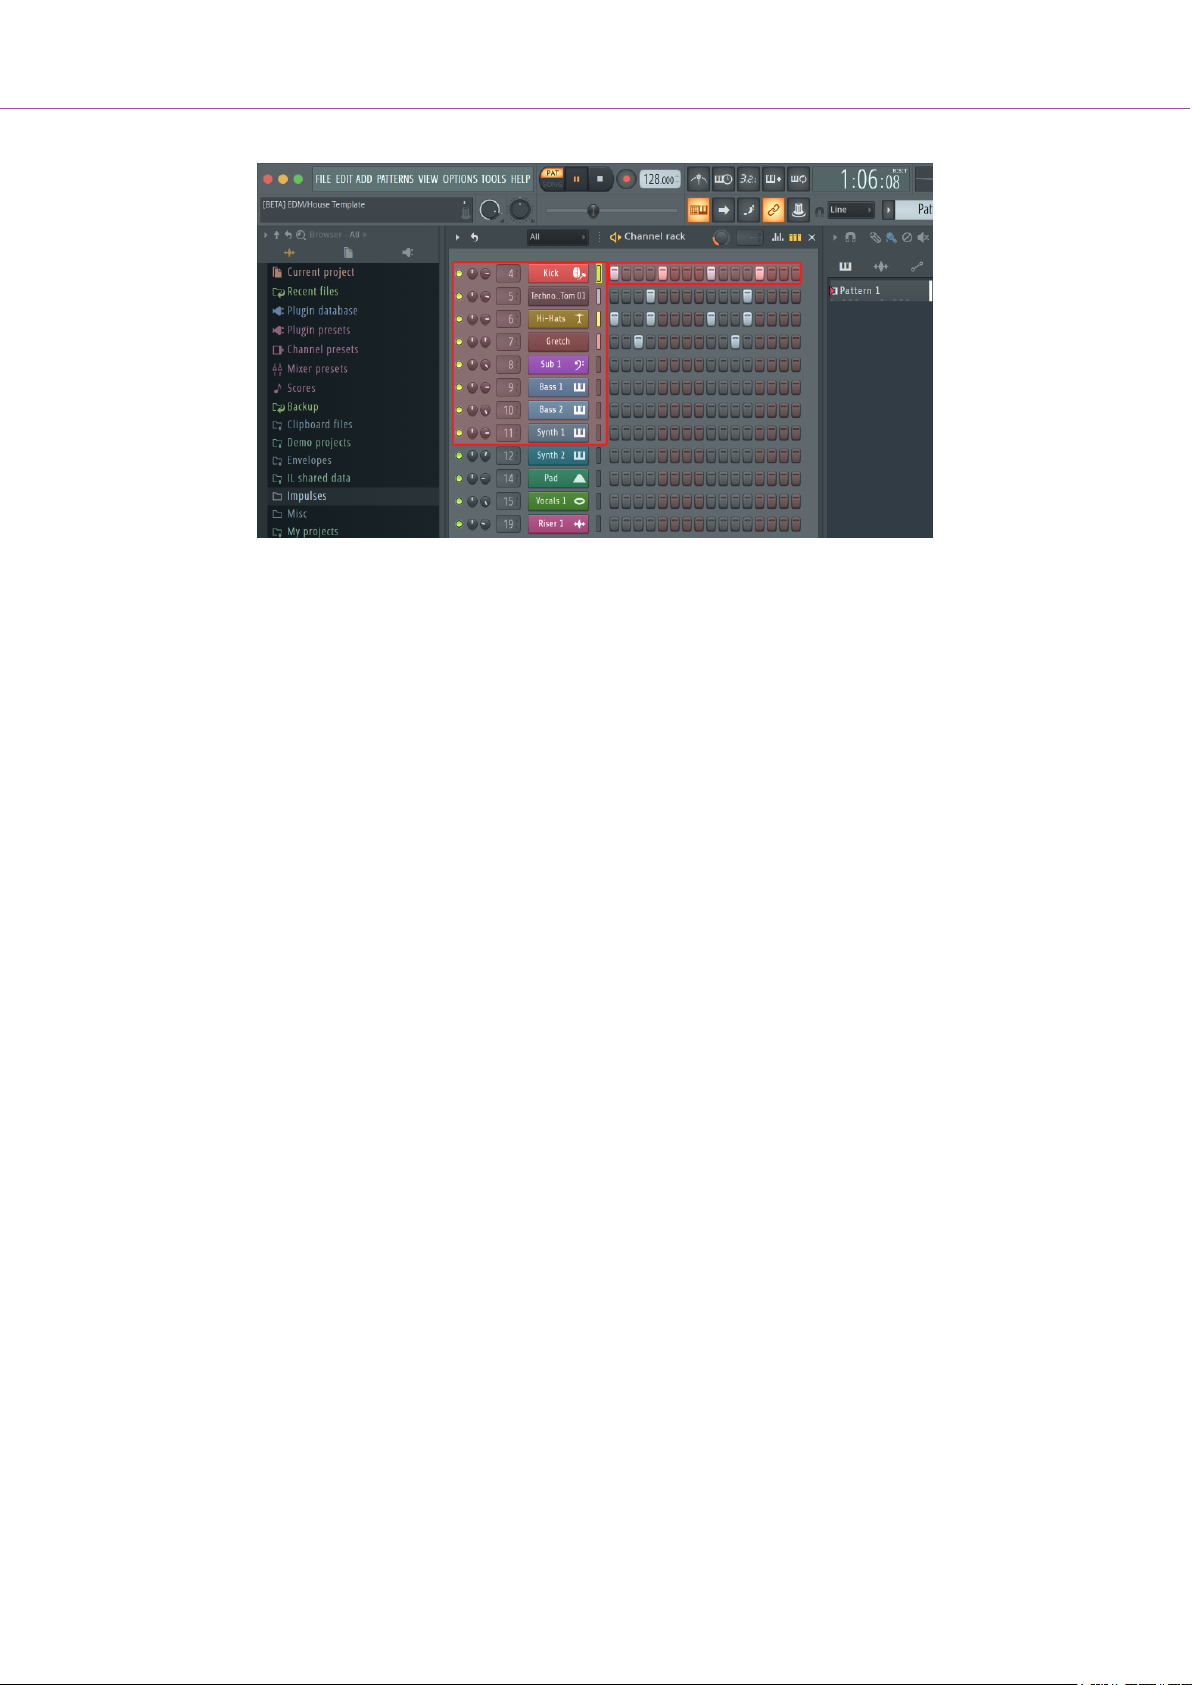
In the following graphic and screenshot of FL Studio– you can see the ‘Kick’ channel has four active
steps in the sequence and four lit pads on the FLkey’s pads.
22
Page 23
FLkey User Guide
While the transport is playing, the currently playing step (Step 6) is lit in bright white. When you pause
the sequencer, the playing step’s pad stays white, but it doesn’t show when you stop the transport.
Use the Page ◀ and ▶ buttons under the ‘Page’ label to shift the selection to the previous/next group of
16 steps. A red box briefly highlights which steps you’ve selected in FL Studio’s Channel Rack.
Channel Rack Graph Editor
You can use pots one to eight to edit step parameters in Sequencer mode. They map to the eight graph
editor parameters from left to right (see table below for more details). In Sequencer mode the pots
default to the last selected pot mode; to enable Graph Editor you need to hold the step(s) you want to
change. The Channel Rack Graph Editor modes are below.
When you edit parameters, the graph editor shows in FL Studio. When you change a step’s note value,
the graph editor window follows the note value you set.
Latch Edit
Latch edit allows you to edit one, or multiple steps' values. To enter Latch Edit mode, hold a step for
more than 1 second. The pads light in a graph editor parameter colour. This means you can release
steps before setting their parameters with a pot movement.
Press any step to add or remove it from the selection of latched steps. Any parameter change affects all
selected steps.
To exit latch edit mode, press the pulsing Channel Rack ▼ button.
Quick Edit
Hold a step and move a pot within a second to enter quick edit mode. Press and hold a step pad and
move one of the eight pots to control the parameters in the graph editor. Parameter changes affect any
step held in quick edit mode.
23
Page 24
FLkey User Guide
The moment you move a pot, the graph editor appears in FL Studio and disappears when you release
the step.
To exit quick edit mode release all held steps.
To edit steps with more parameters, hold the step on the pads and then turn the pot.
Pot/Knob Graph Function
Pot 1 Note Pitch
Pot 2 Velocity
Pot 3 Release Velocity
Pot 4 Fine Pitch
Pot 5 Panning
Pot 6 Mod X
Pot 7 Mod Y
Pot 8 Shift
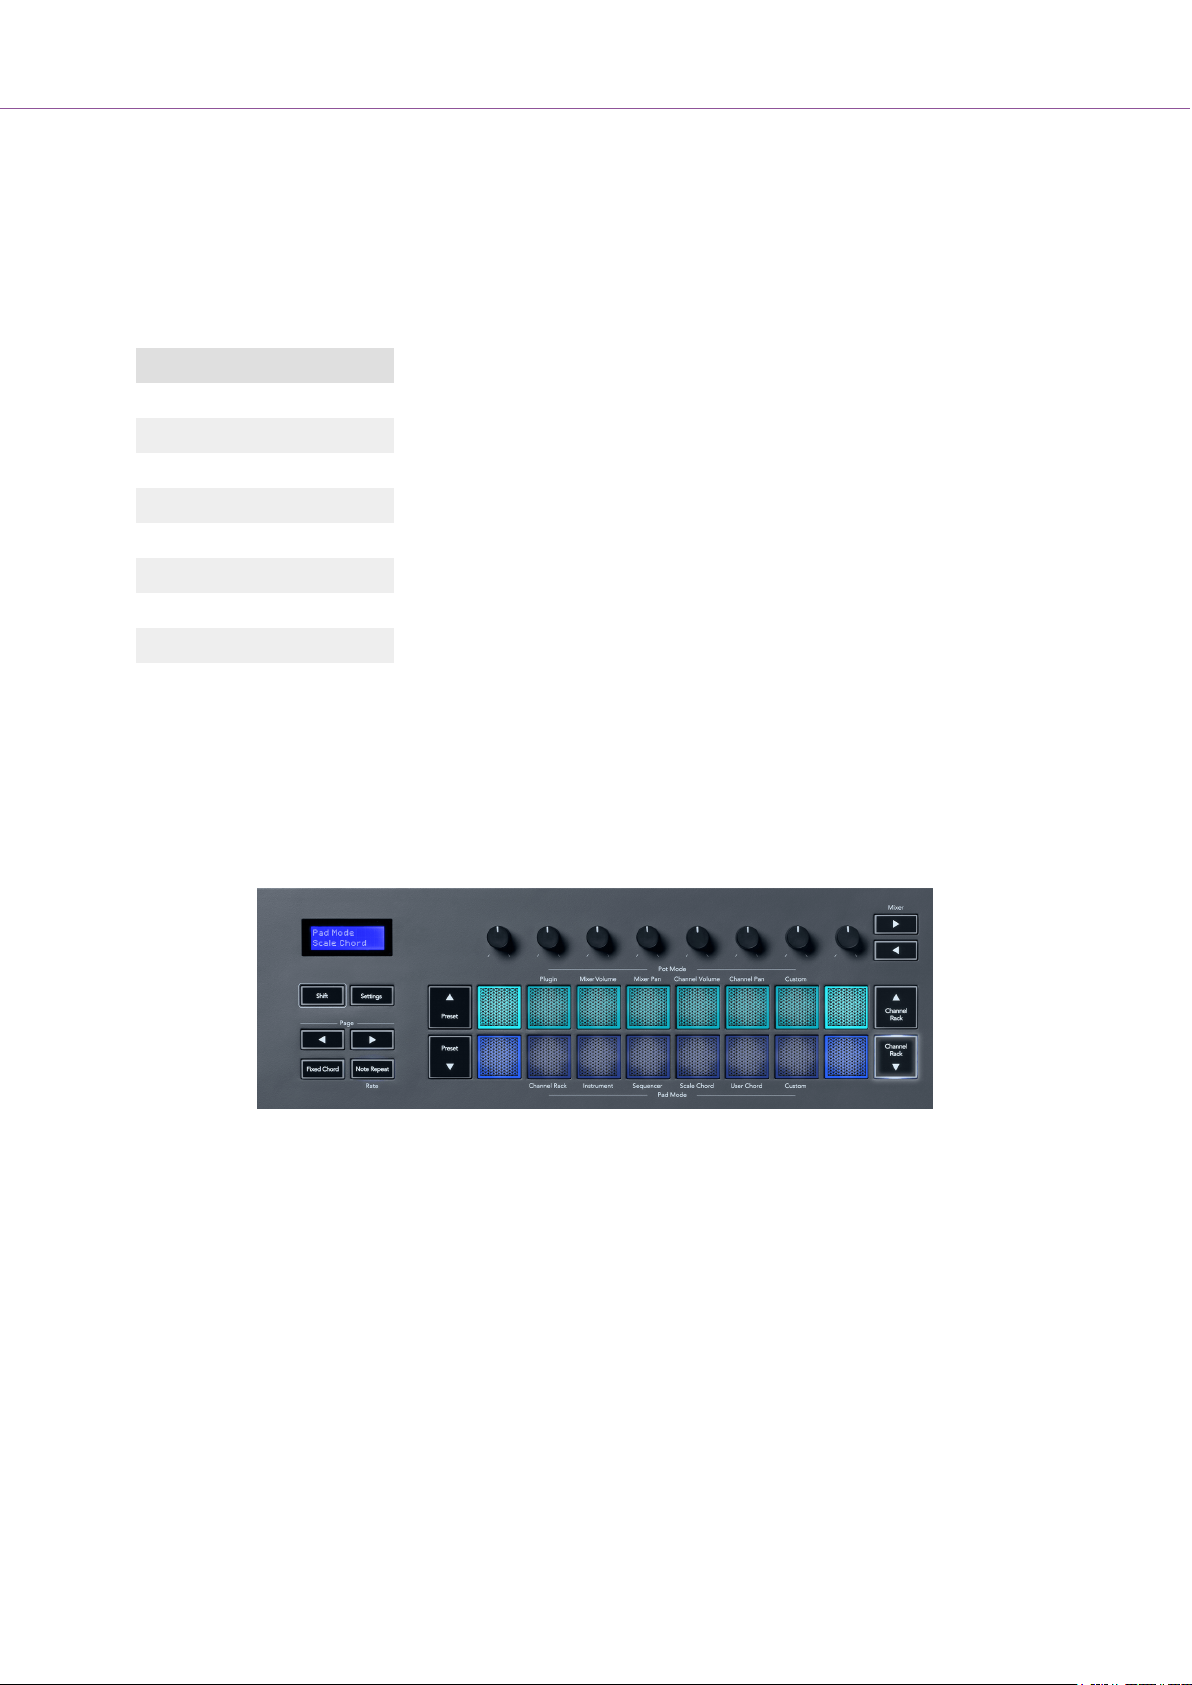
Scale Chord Mode
Scale Chord Mode provides you with banks of predefined chords. To access these banks, hold the shift
button and press the Scale Chord pad (5th pad). Each pad row contains a bank of chords. The root key
is C minor by default, to change this see Scale Mode [31].
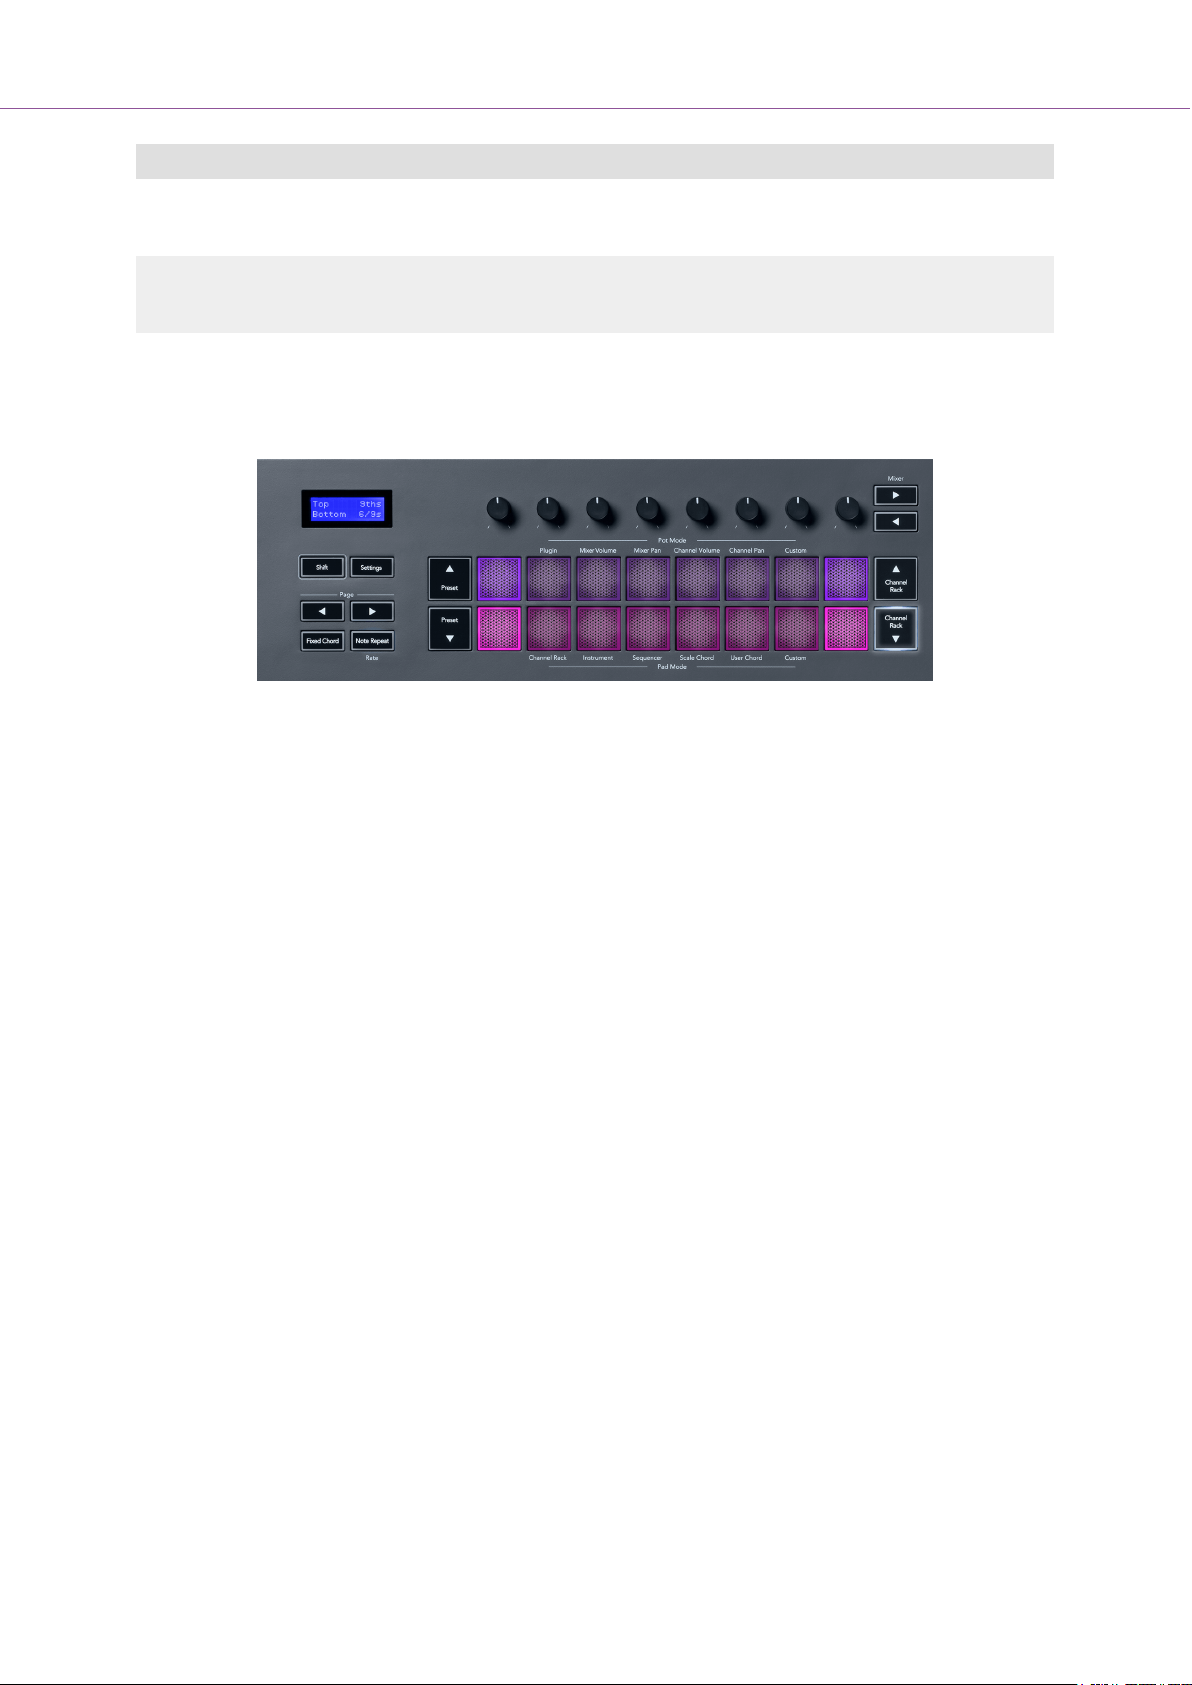
Each row's first and last pad lights up brighter than the middle pads to show the root chord position. To
navigate between pages of chords, use the Page ◄ ► navigation buttons. This mode has three pages
with predefined chords: Triads, 7ths, 9ths, and 6/9ths.
24
Page 25
FLkey User Guide
Visible on screen
Page 1
(Shown above)
Page 2 Top: 7ths (Dark Blue)
Page 3
(Shown below)
Top: Triads (Light blue)
Bottom: 7ths (Dark Blue)
Bottom: 9ths (Purple)
Top: 9ths (Purple)
Bottom: 6/9s (Pink)
When you press a pad, it lights green and returns to its original colour when released. To change the
chord’s octave, hold Shift and press the Page ◄ ► buttons, these provide access to a range of -3 to +3
octaves.
Press Shift + Scale to choose a scale with the pink lit pads and a root key with any note on the
keyboard that changes the predefined chord’s scale and root key.
User Chord Mode
In User Chord Mode, you can assign up to six note chords to each pad. The FLkey saves these
chords to its internal memory and is accessible between power cycles. Any assignments you make are
available after you turn your FLkey off and on again.
Hold the Shift button to enter User Chord Mode and press the User Chord pad (6th pad).
To assign a chord to a pad: press and hold a pad and press the notes you want to assign from the
keyboard. You can assign up to six notes to each pad using individual key pushes; you do not need to
hold all the notes at once if the pad is held.
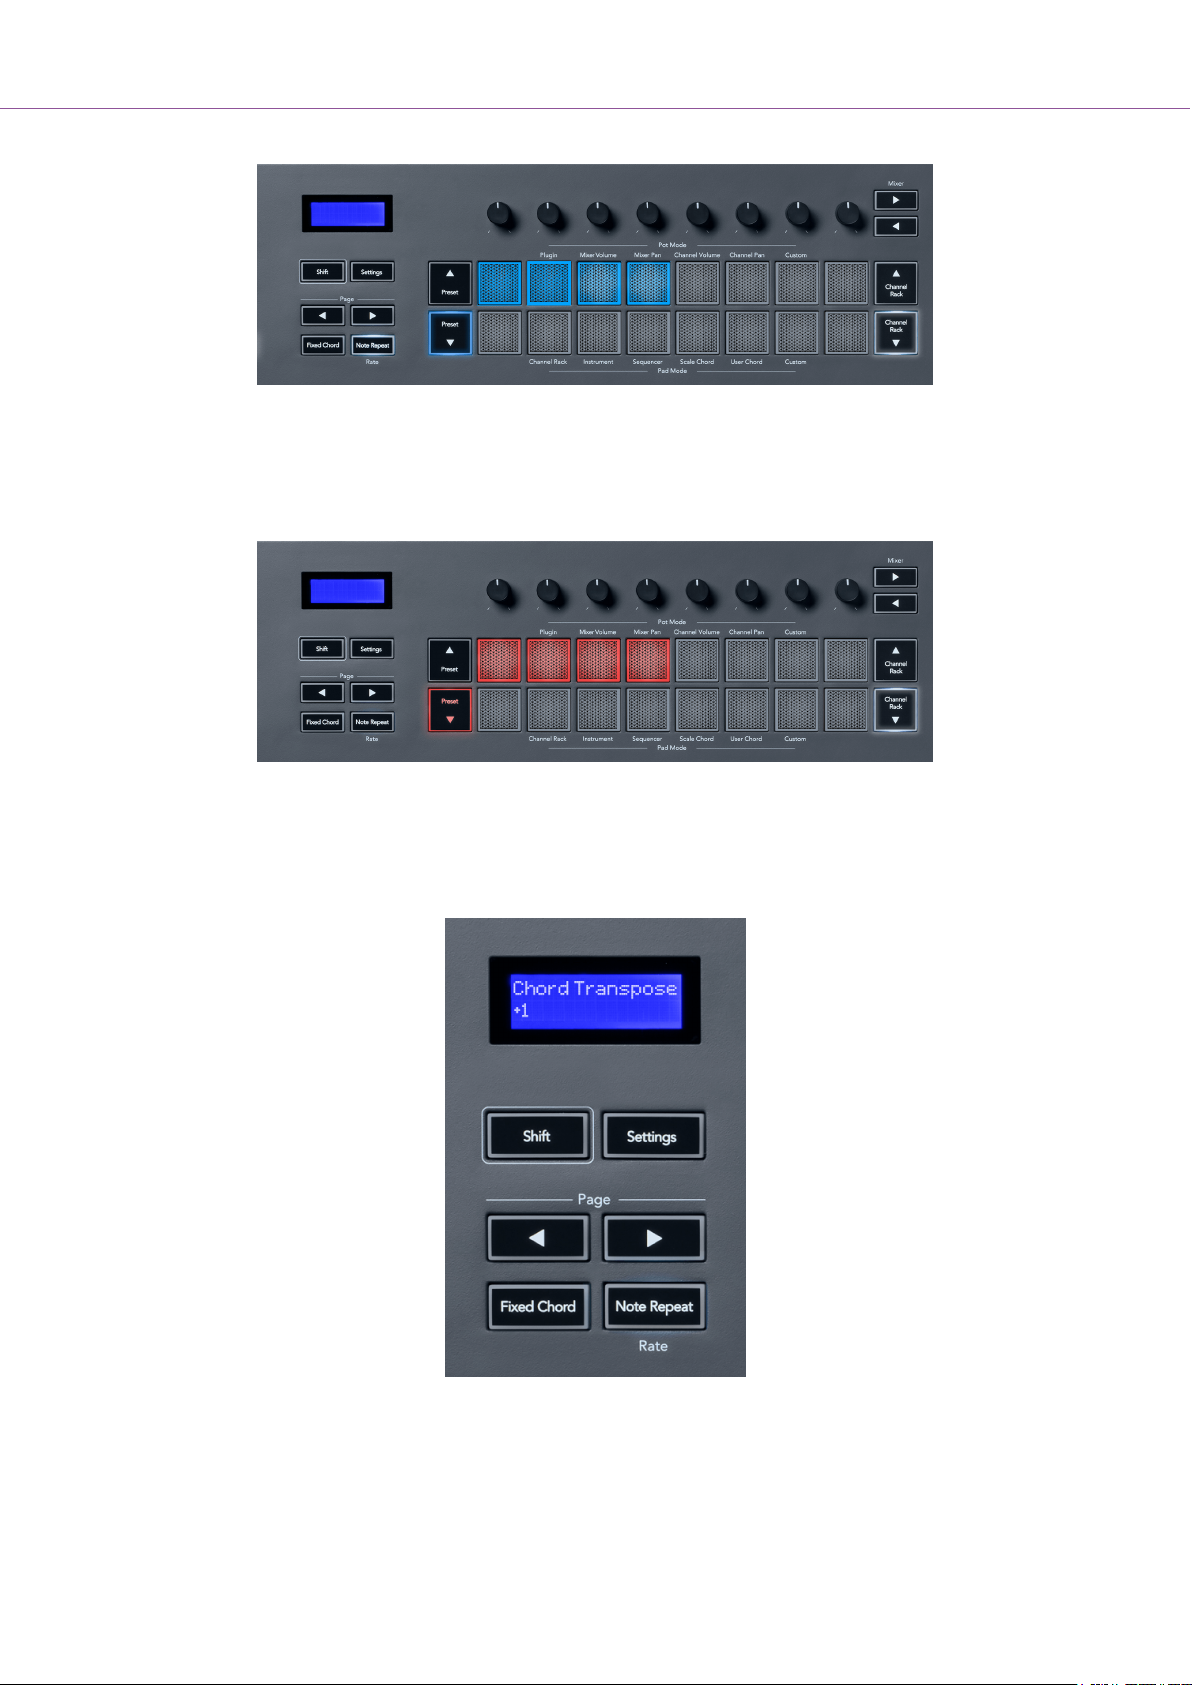
When you assign a chord, the pad lights up blue. When you press the pad, it plays the chord and lights
up green. If a pad has no chord assigned, the pad isn’t lit. The four blue pads below show pads with
assigned chords.
25
Page 26
FLkey User Guide
To delete a chord assignment from a pad, hold the Preset ▼ button, the pads with assigned chords turn
red. Press a red pad to delete the assigned chord, once deleted the pad is no longer lit.
The Page ◄ ► buttons transpose the chord bank in semitones between -12 and +12, the FLkey’s
screen displays any changes you make.
Custom Pad Mode
This pad mode gives you freedom over whichever parameters you wish to control. Using Novation
Components, you can edit the messages the pots send out in Custom Mode.
26
Page 27
FLkey User Guide
Quantise
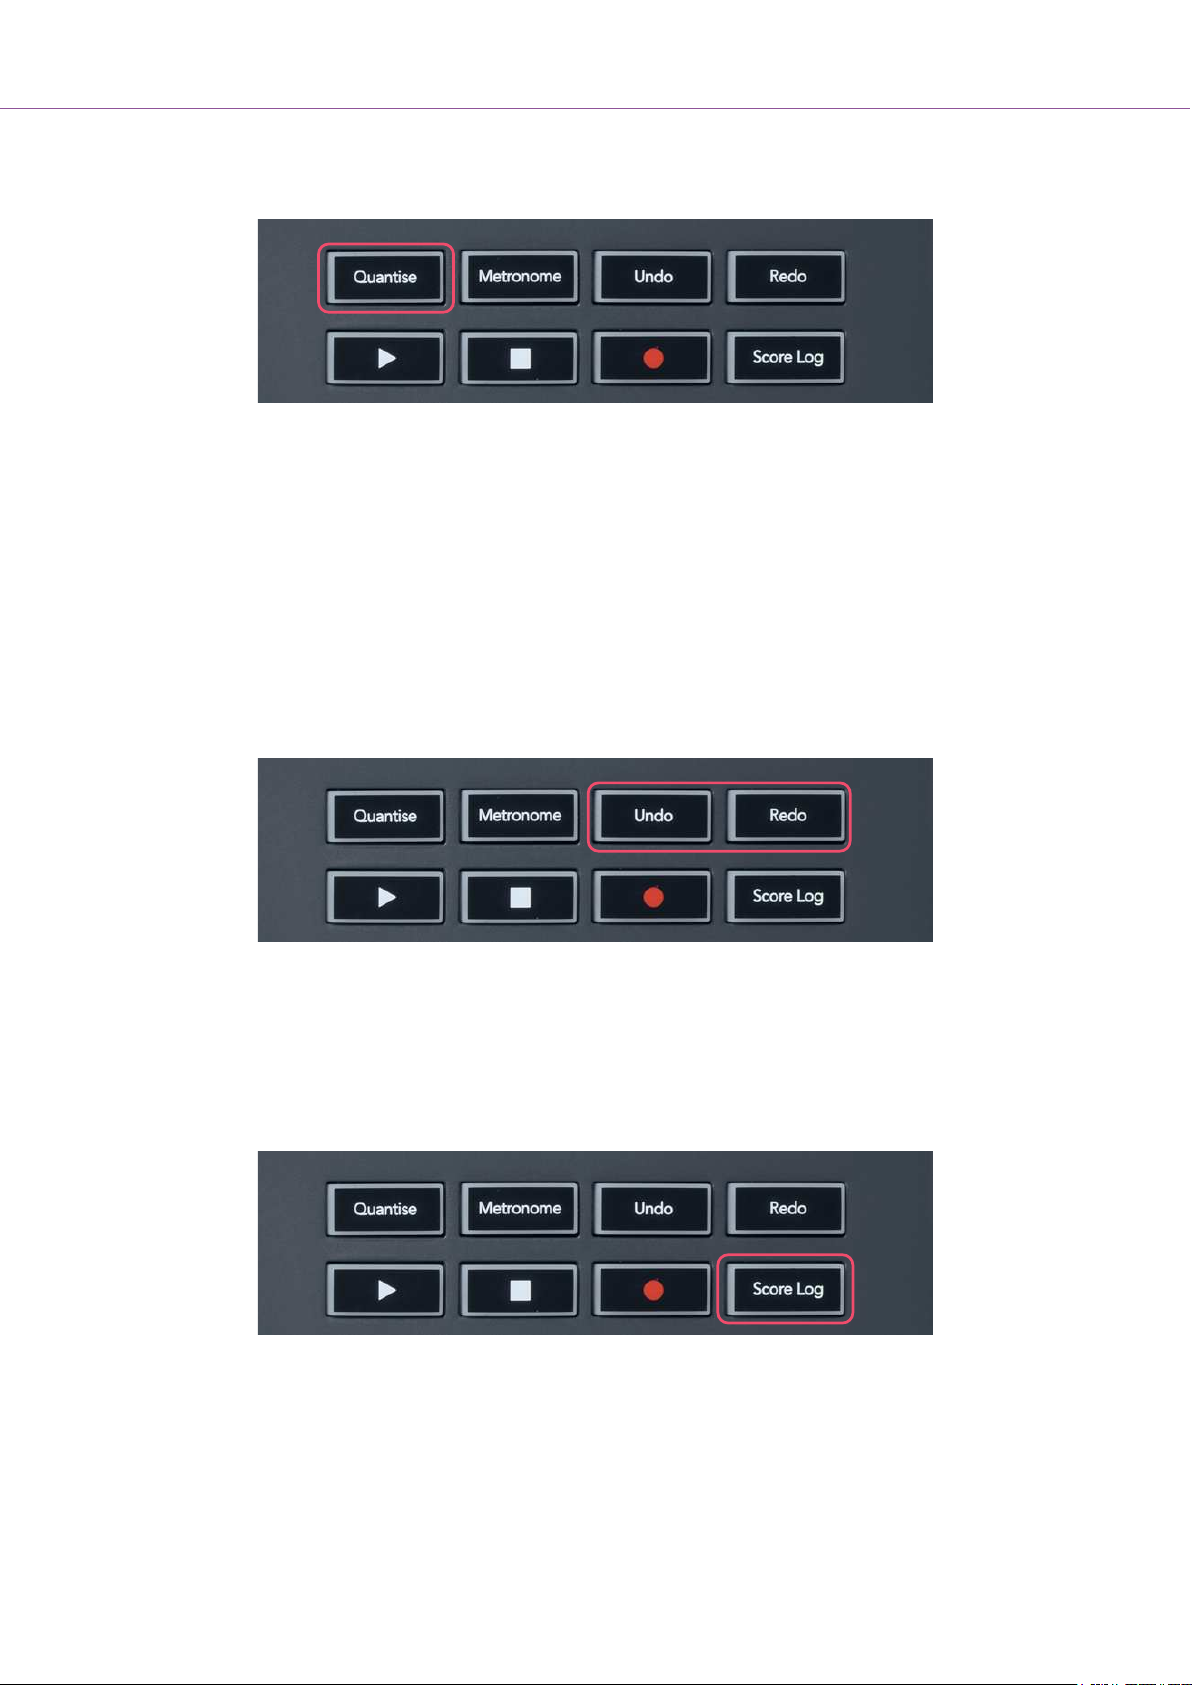
When you press the Quantise button on FLkey it performs the ‘quick Quantise start times’ function in FL
Studio. This quantises all note's start positions in the piano roll for the currently selected Channel Rack
channel to the current piano roll snap setting.
Metronome
The Metronome button toggles FL Studio’s metronome on/off.
Undo/Redo Functions
You can press the Undo and Redo buttons on FLkey to trigger FL Studio’s undo and redo functions.
The FL Studio setting “Alternate undo mode” doesn’t affect how these buttons work.
Score Log
The Score Log button allows you to insert all MIDI notes received by FL Studio in the last five minutes
into the selected pattern. If note data is already in the pattern, a popup asks you to confirm to overwrite
the notes.
This button is identical to using the Tools > Dump Score Log to Selected Pattern option in FL Studio.
27
Page 28
FLkey User Guide
View Channel Rack Selections
Hold Shift in any pad layout mod while the FL Studio Channel Rack is visible to see the current
selection. This applies to Channel Bank Selection, Channel Rack Pot Control and Channel Selection. If
you select a Mixer Pot Mode this displays the selected mixer bank.
Loop Record
(on first boot)
You can’t toggle Loop Record from FLkey, it’s set to ON the first time you connect the FLkey to FL
Studio. This ensures your current pattern loops when recording, and doesn’t extend infinitely.
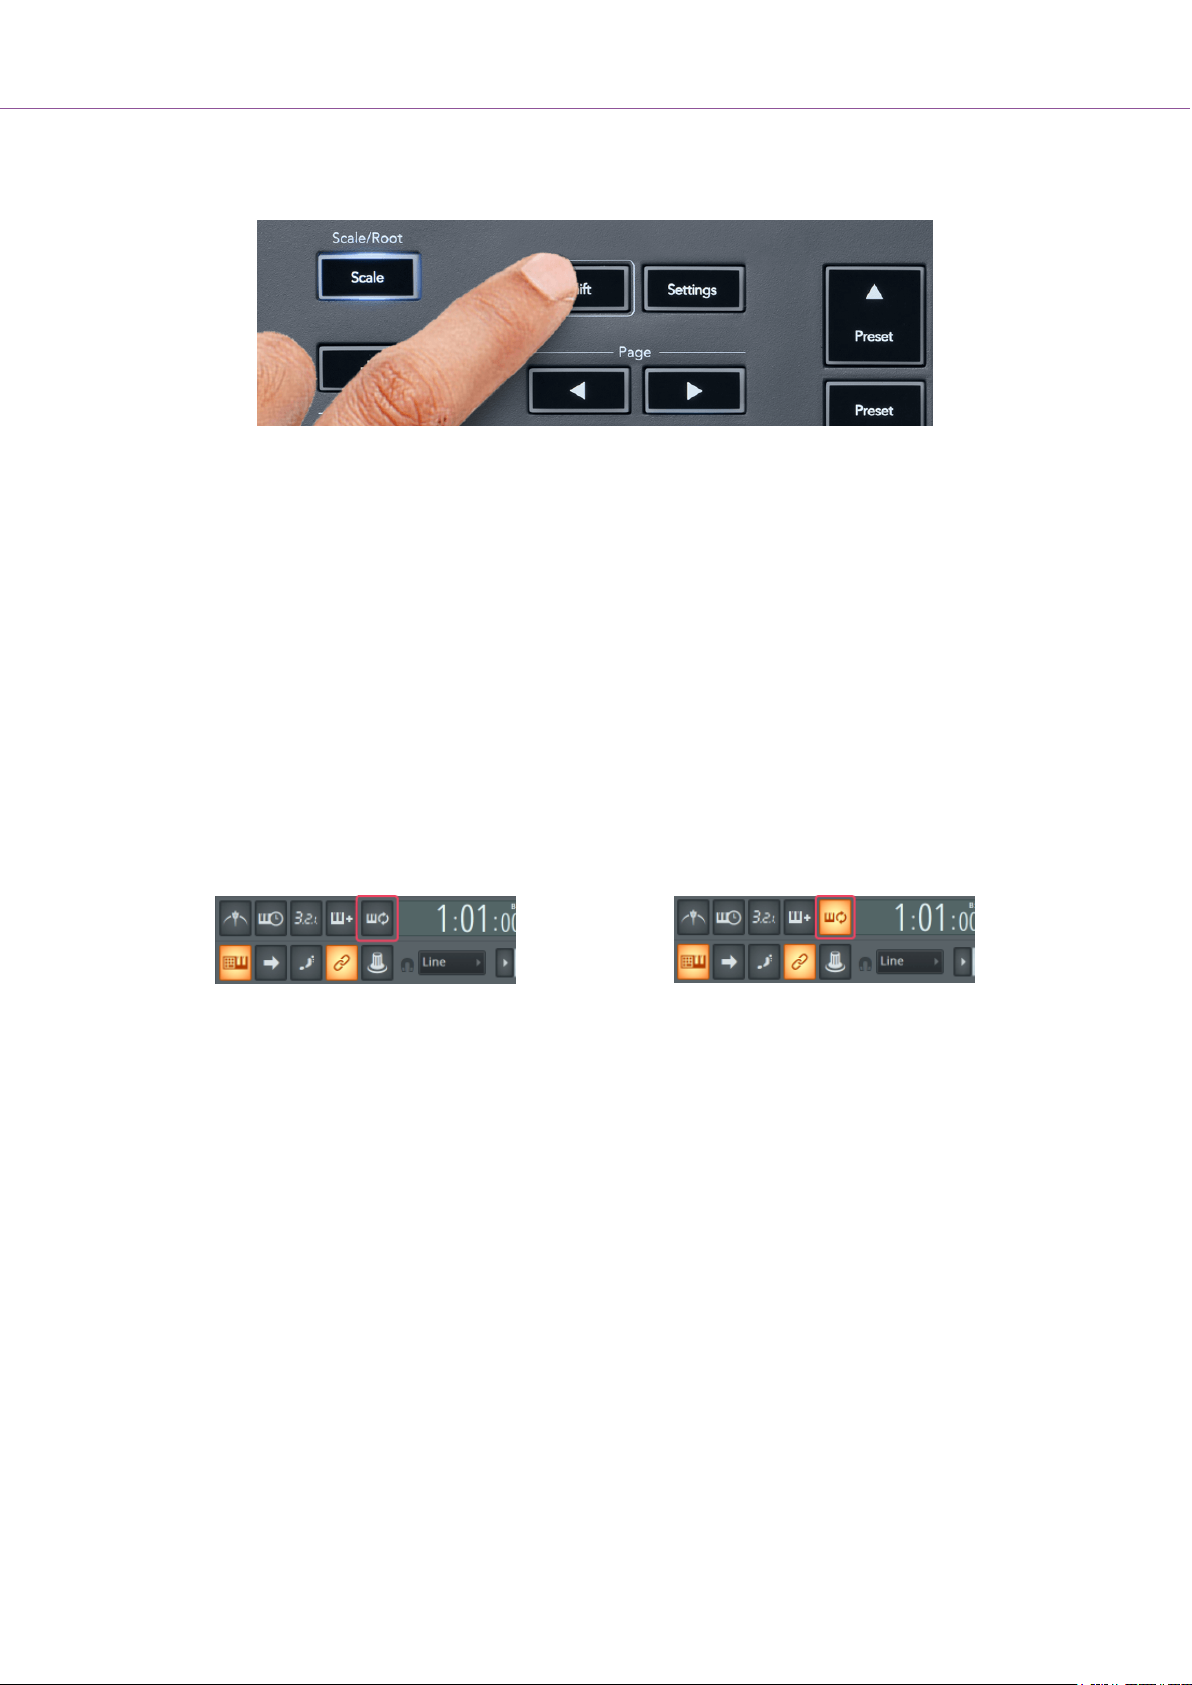
To disable Loop Record, to the left of FL Studio’s main clock is an icon with a keyboard and circular
arrows. If you disable Loop Record, it stays disabled– even if you disconnect and reconnect FLkey.
Loop Record Off
Loop Record On
28
Page 29

FLkey User Guide
Focussing FL Studio's Windows
Some interactions with FLkey affect the focussed window in FL Studio. The following actions focus the
Channel Rack:
FLkey 37FLkey 37
• Pad Modes
• Channel Rack
• Sequencer
• Pot Modes
• Channel Volume
• Channel Pan
• Paging left or right on the Sequencer
• Selecting a channel in the Channel Rack
The following actions focus the Mixer:
• Pot modes
• Mixer Volume
• Mixer Pan
• Moving a Mixer Volume or Pan pot
• Banking in the mixer
The following actions focus the plugin for the selected channel:
• Moving a Parameter in Plugin Pot mode
29
Page 30
FLkey User Guide
Standalone Features
Navigation Mode - ([…] Button)
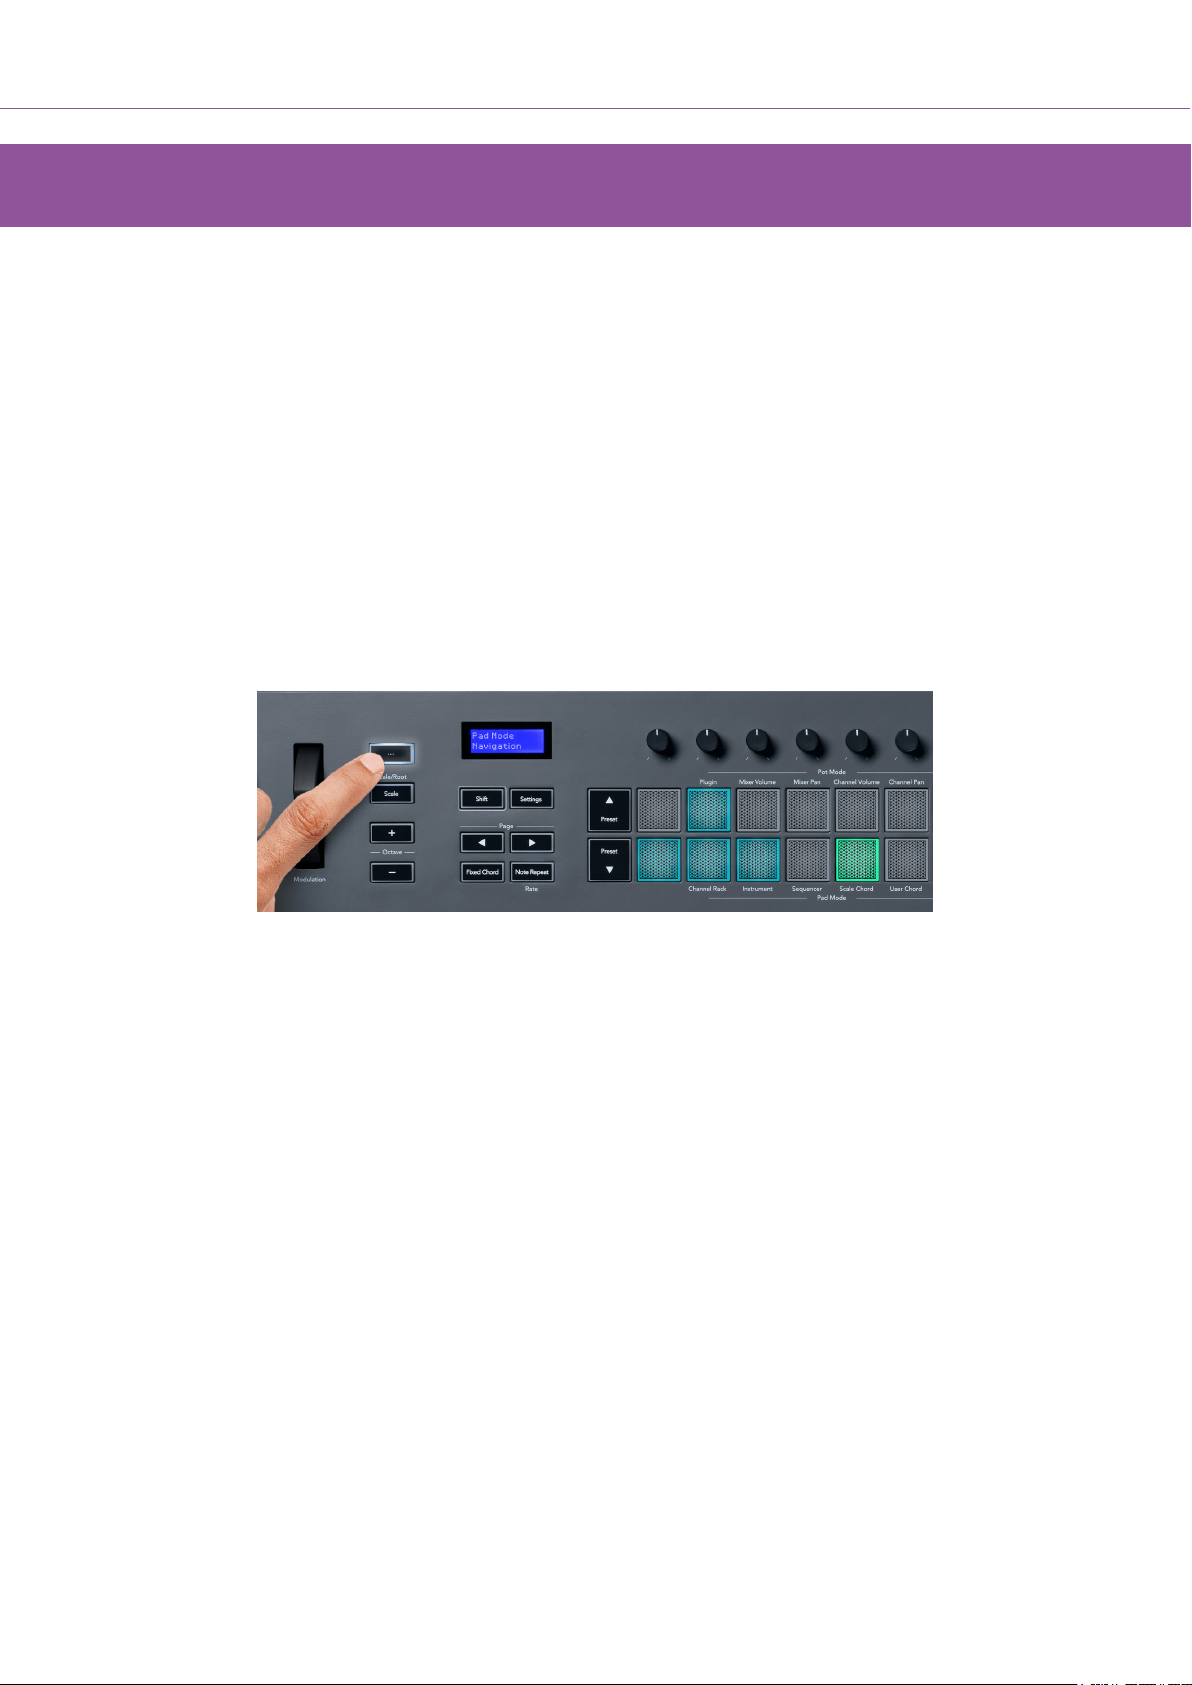
Pressing the “…” button enters FLkey into navigation mode for browsing samples and presets. The
pads light up as shown below. The four blue pads form a left, right, up, and down keypad which
replicates a computer keyboard’s cursor keys.
The green pad functions as the Enter ↵ key on your computer keyboard. The blue pads function as
keyboard cursor keys to browse presets and samples in FL Studio or a software plugin. They can also
perform any other function of a keyboard’s cursor keys and enter button.
The navigation keys are useful for stepping through samples in the Browser and pressing Enter (the
green pad) to load your sample to the Channel Rack.
30
Page 31
FLkey User Guide
Scale Mode
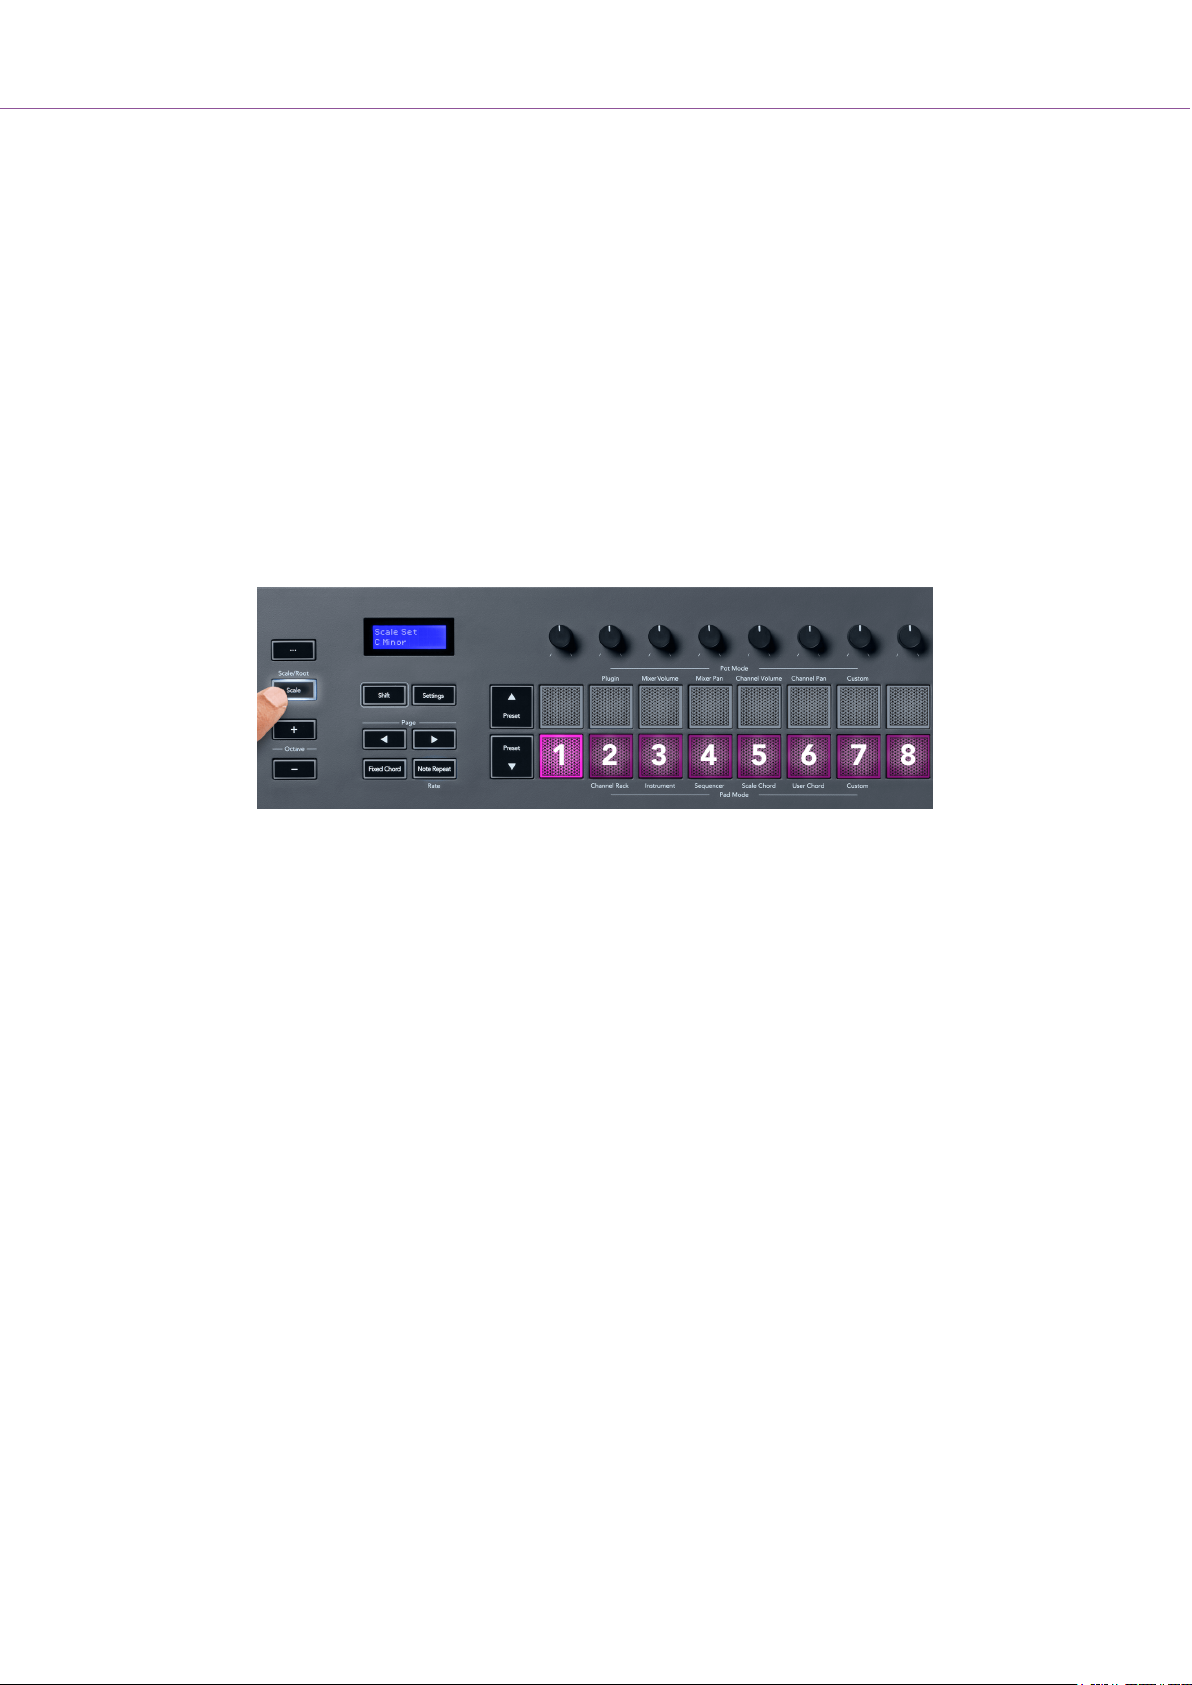
In Scale mode, you can set the entire keyboard, or the pads in instrument mode, to only play notes in a
scale you select. Press the “Scale” button to activate this mode, and the button lights to show the mode
is active.
The screen displays a message to show the active scale (C minor by default).
To change the scale, you need to access Scale Settings. Hold the Shift button and press the Scale
button. The Scale button flashes to show you are in scale settings.
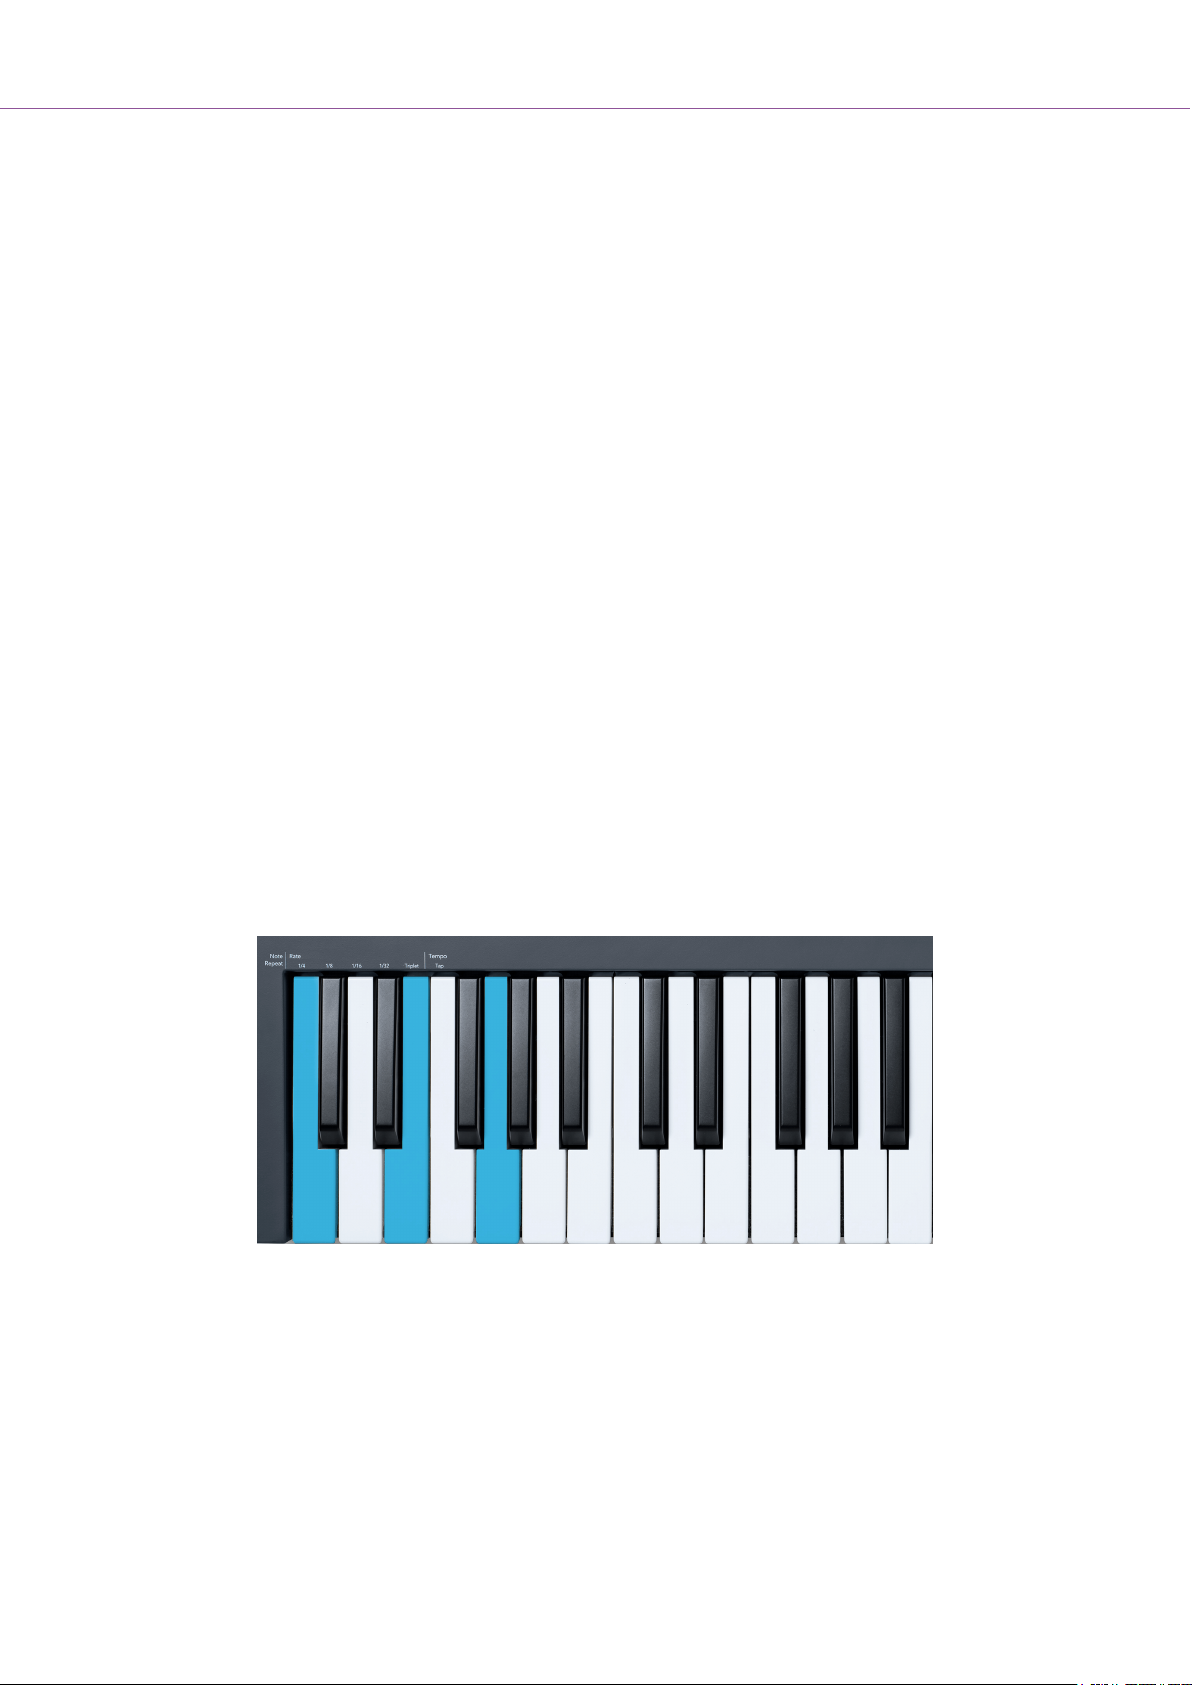
To change the root note, press the corresponding key (all the black keys represent sharps #). The pads
change the Scale type. In scale setting mode, they look like this:
The bottom row of the pads lights so you can select a scale, and the screen shows the selected scale.
From left to right, the pads select the following scales:
1. Minor
2. Major
3. Dorian
4. Mixolydian
5. Phrygian
6. Harmonic Minor
7. Minor Pentatonic
8. Major Pentatonic.
To exit the Scales setting mode, press the Scale button or any function button. The settings mode also
times out after ten seconds of inactivity, with the keyboard returning to its previous state.
31
Page 32
FLkey User Guide
Octave Buttons
Pressing the Octave buttons increments and decrements the keyboard octave by ±1. The available
octaves range from C0 to G10 in FL Studio (C-2 – G8 with other software). Shift-pressing the Octave
buttons transposes the keyboard up or down by one semitone.
After you change the octave, the screen displays the current Octave range for five seconds. You can
tell if your keyboard is in a different Octave as the Octave +/- button lights. The brighter the button, the
more octaves you have moved.
To reset the keyboard octave to 0, press the Octave +/- buttons simultaneously. To reset the keyboard
transposition to 0, hold shift and press the Octave +/- buttons simultaneously.
Hold Shift and press Octave +/- to transpose the keyboard up or down in semitones. The screen shows
the transposition amount.
Fixed Chord
Fixed Chord lets you play a chord shape and transpose it by pressing other keys. To set a chord, press
and hold the Fixed Chord button. While still holding the button, press and release the keys you wish to
be in your chord. The chord is now stored.
The FLkey sets the first note you input into the chord as the chord’s ‘root note’, even if you add notes
lower than the first note.
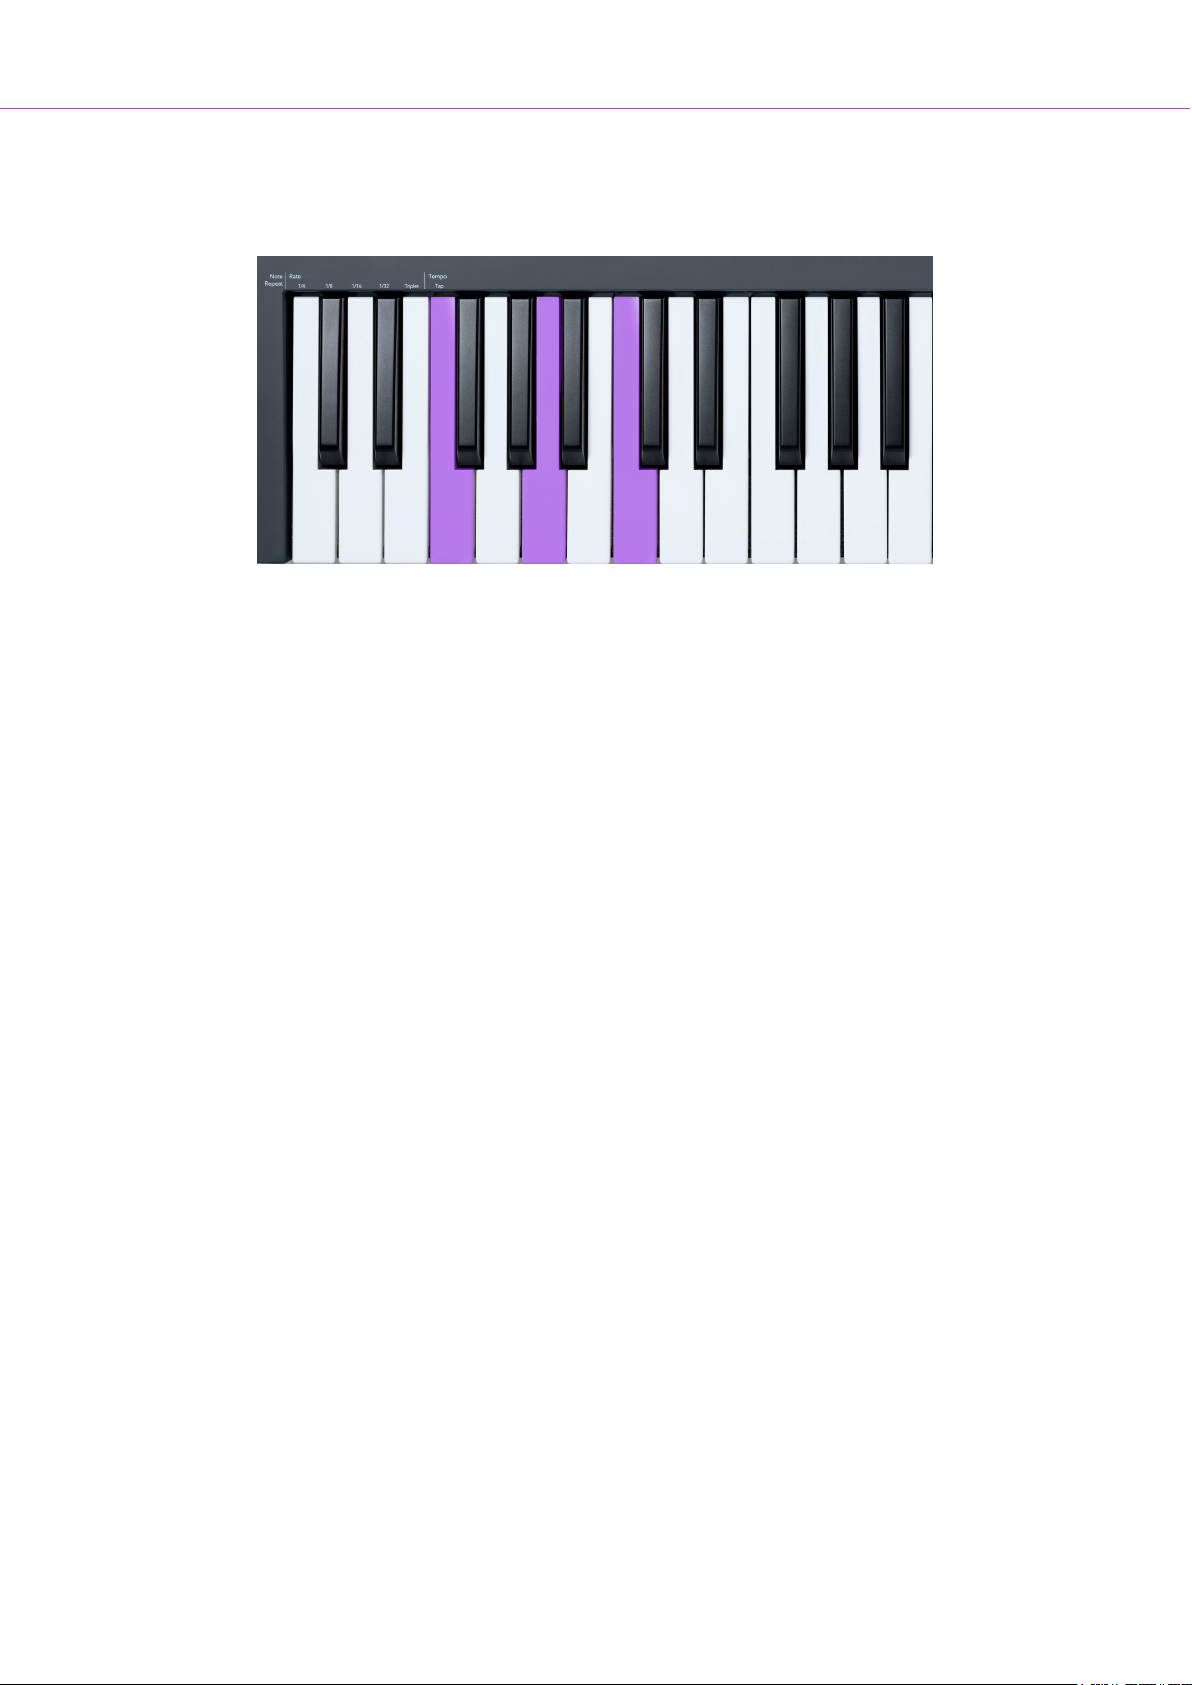
Press and hold the Fixed Chord button press and release C, E, and finally G (a C Major chord). The
FLkey stores this as the ‘Fixed Chord’. Release the Fixed Chord button.
32
Page 33
FLkey User Guide
Major chords now sound on whatever key you press. For example, you can now press F to hear an F
Major chord (shown below), or Ab to hear an Ab Major chord, etc.
Note Repeat
Note Repeat applies to the pads and allows you to play notes (especially drum hits) at various Rates,
locked to a set Tempo.
When connected to FL Studio, Note Repeat always follows the DAW tempo regardless of the playback
state. By default, master sync (in FL studio’s MIDI settings) is enabled, making Note Repeat trigger
tightly to the grid. If you disable master sync, Note Repeat begins when you press a pad.
To use Note Repeat
Press the Note Repeat button to enable Note Repeat on the pads. FL Studio sends MIDI clock to the
FLkey by default, so it synchronises to this tempo. Hold any pad, and they repeat at the set Rate and
Tempo.
In Sequencer mode, the Note Repeat function doesn’t affect the pads. In Sequencer mode, the pads
assign notes to the sequencer.
Change the Rate
To change the rate, hold the Shift button (or double-tap to latch) and press Note Repeat to enter Note
Repeat settings. Press a key labelled 1/4, 1/8, 1/16, 1/32, and Triplet. The Triplet option sets the Rate to
a Triplet feel for the currently selected rate, e.g. if the Rate was set to 1/8, enabling Triplet sets the rate
to 1/8t.
With Note Repeat held or latched, you can change the Rate as you play the pads, too. In Note Repeat
settings, the button pulses to show the keys are controlling the Rate and Tap Tempo.
33
Page 34

FLkey User Guide
Set the Tempo
In Note Repeat settings mode, repeatedly press the key labelled Tap Tempo until you’ve set the desired
tempo. With Master Sync enabled in FL Studio (this is by default), the screen reads ‘Tempo External’–
tap tempo is changing the DAW tempo. The Note Repeat button will flash at the tempo you set.
Change the note/drum hit velocity
You can use pad pressure to control the Note Repeat hit’s velocity. The initial velocity is set as you
press the pad. As you hold it, you can increase pressure to increase velocity, or reduce pressure to
reduce velocity, etc.
If you reduce pressure after the initial hit, the Note Repeat output keeps the initial velocity constant and
only change velocity if you increase the pressure above the initial velocity setting.
Pot Pickup
When you connect FLkey to FL Studio, it follows the Pickup (takeover mode) setting in FL Studio’s
Settings.
In standalone mode, you can turn on Pot Pickup from the settings menu. When Pot Pickup is on,
FLkey saves the various pages for the Pot’s states. The control only outputs MIDI when it moves to the
position of the saved state. This prevents sudden jumps in the control’s value.
When you move a pot, and it’s not yet picked up the value, the screen displays the saved value until
you’ve moved it to the pick-up point.
34
Page 35
FLkey User Guide
Custom Modes and Components
Custom modes allow you to create unique MIDI templates for each control area. You can create
templates and send them to the FLkey from Novation Components. To access Components, visit
components.novationmusic.com using a Web MIDI-enabled browser (we recommend Google Chrome,
Opera, or Firefox). Alternatively, download the Components standalone version from your Novation
Account page.
Custom Modes
You can configure the FLkey’s pots and pads to send custom messages using Novation Components.
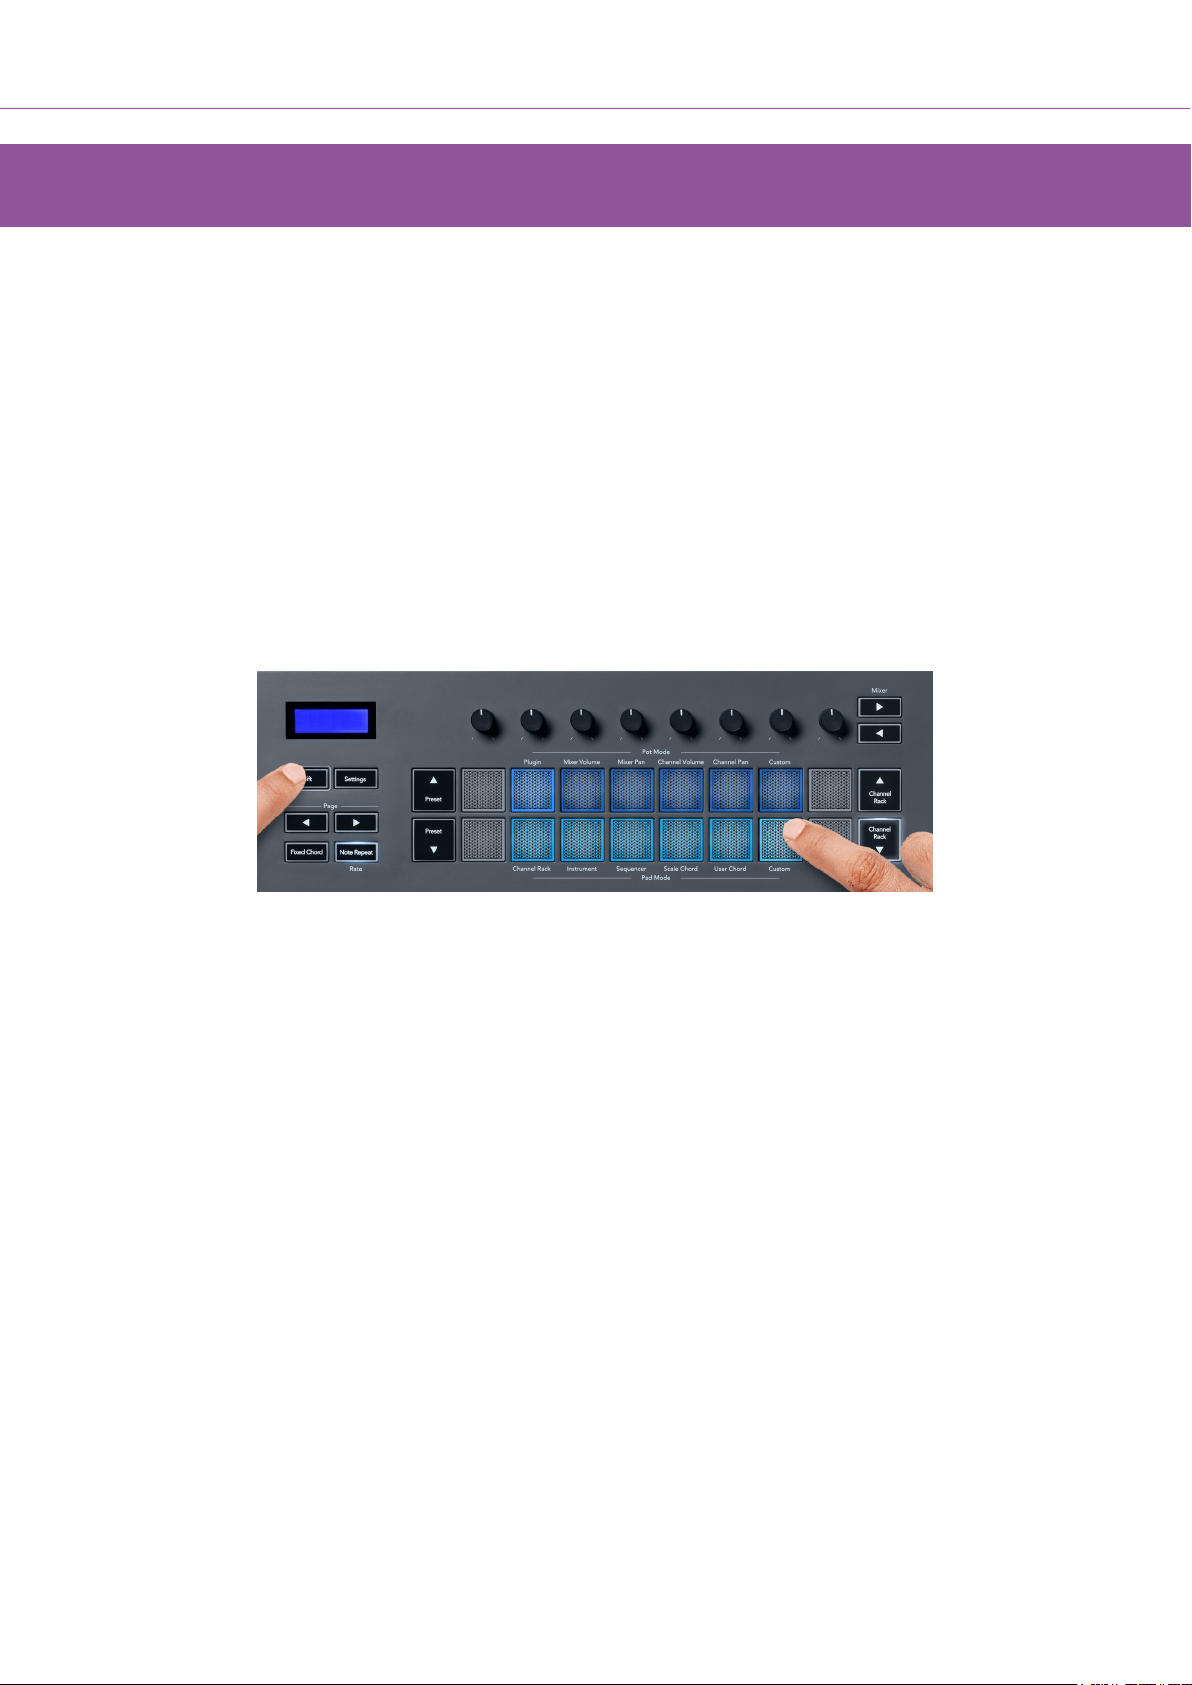
We refer to these custom message configurations as Custom Modes. To access the custom modes,
press Shift and the Custom Mode Pad buttons.
Pot Custom Mode
FLkey has one Pot Custom Mode. To access Custom Mode, hold Shift and press the Pot Mode Custom
button. You can set a pot's CC numbers using Components.
Without customising anything, the default custom pot mode already sends messages. You can use FL
Studio's Multilink to Controllers function to assign the pots to parameters in FL Studio.
Pad Custom Mode
FLkey has one pad Custom Mode. To access this Custom Mode, hold Shift and press the Custom
pad. You can set pads to send MIDI notes, Program Changes messages and CC (Control Change)
messages using Components.
35
Page 36
FLkey User Guide
FLkey Settings
Pressing the Settings button shows the settings menu on the screen. You can scroll through the
Settings list using the Preset ▲▼ buttons. To adjust the settings’ value, use the pads or the Page ◄ ►
buttons. The available settings are shown below.
Settings Description Value Range Default
Keys MIDI Channel Sets the MIDI channel for the keys 1-16 1
Chords MIDI Channel Sets the MIDI Channel for the Scale Chord and User
Chord
Drums MIDI Channel Sets the MIDI Channel for the Drum Mode 1-16 10
Velocity Curve (Keys) Select a velocity curve for the keys Soft/Normal/Hard/Off Normal
Velocity Curve (Pads) Select a velocity curve for the pads Soft/Normal/Hard/Off Normal
Pad Aftertouch Set the Aftertouch type Off/Channel/Polyphonic Polyphonic
Pad AT Threshold Set the threshold in which the aftertouch kicks in Low/Normal/High Normal
Pot Pick-Up Turn pot pick-up on/off for standalone mode. This does
not affect FL Studio.
MIDI Clock Out Turn MIDI Clock out on/off Off/On On
Brightness Adjust the pad and screen brightness. 1-16 9
Vegas Mode Turn off/on Vegas Mode Off/On Off
1-16 2
Off/On Off
LED Brightness
You can adjust all the FLkey’s LEDs to suit your environment, for example, you may want the LEDs
brighter in a light environment. To change the LED brightness:
1. Go to the Settings Page.
2. Use the Preset ▲▼ to go to Brightness.
3. Press the Page ◄ ► buttons or the Pads to change the brightness to a value from 1 to 16.
Vegas Mode
If the FLkey is idle for five minutes, it enters Vegas mode. In this mode, colours scroll across the pads
indefinitely until you press a pad, button, or key. To turn Vegas mode on and off:
1. Go to the Settings page.
2. Use the Preset ▲▼ to go to Vegas Mode.
3. Press the Page ◄ ► buttons or the first two Pads, the screen displays Vegas Mode: On/Off.
36
Page 37

FLkey User Guide
Easy Start
To remove the FLkey from Easy Start mode:
1. Hold the ‘Octave +’ and ‘Octave -’ buttons and connect the USB cable to put the FLkey in
Bootloader mode. The screen shows Easy Start: status.
2. Press the Note Repeat’ button to turn Easy Start Off.
3. Press the Mixer ◄ button to load the FLkey back into the main Firmware.
37
Page 38

FLkey User Guide
Weight and Dimensions
FLkey 37
Weight 2.18kg (4.81lbs)
Height 62mm (77mm/3.03” including knob caps)
Width 555mm (21.85”)
Depth 258mm (10.16”)
38
Page 39
FLkey User Guide
Novation Notices
Troubleshooting
For help getting started with your FLkey, please visit:
novationmusic.com/get-started
If you have any questions or need any help at any time with your FLkey, please visit our Help Centre.
Here you can also contact our support team:
support.novationmusic.com
Trade Marks
The Novation trademark is owned by Focusrite Audio Engineering Ltd. All other brands, products,
company names, and any other registered names or trade marks mentioned in this manual belong to
their respective owners.
Disclaimer
Novation has taken all steps to ensure the information given here is correct and complete. In no event
can Novation accept any liability or responsibility for any loss or damage to the owner of the equipment,
any third party, or any equipment which may result from this manual or the equipment it describes. The
information provided in this document may be changed at any time without warning. Specifications and
appearance may differ from those listed and illustrated.
Copyright and Legal Notices
Novation is a registered trade mark of Focusrite Audio Engineering Limited. FLkey is a trademark of
Focusrite Audio Engineering Plc. 2022 © Focusrite Audio Engineering Limited.
ELECTROSTATIC DISCHARGE (ESD)
A strong electrostatic discharge (ESD) may affect the normal operation of this product.
If this happens, reset the unit by removing and replugging the USB cable. Normal
operation should return.
39
 Loading...