

Page 1
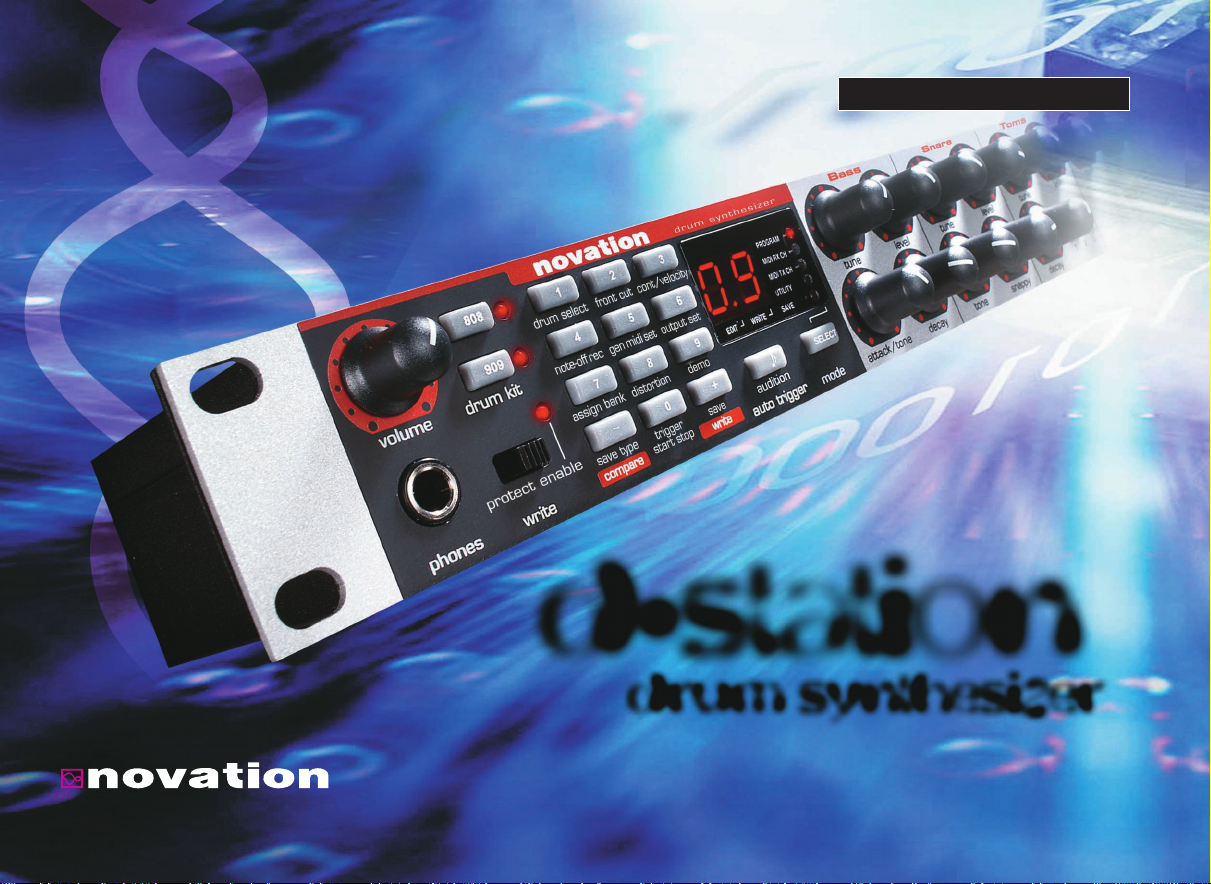
D-STATION
d-station
in music, anything is possible.
drum synthesizer
▲
User Manual
Page 2
Introduction Section 1
Front Panel Controls 2
Rear Panel Connections 3
Connections & Setting up 4
Applications - Basic 5
Applications - Advanced 6
Master Volume Section 7
Data Entry / Program Section 8
Keypad 8
Audition - Auto Trigger Button 9
Mode Button - Program Change 10
Midi TX & RX Channels 11
Selecting Utility Mode 11
Saving System Exclusive Data Dumps 11
Loading System Exclusive Data Dumps 12
Editing & Writing Programs 13
Compare Function 14
Voice Architecture / ASM 15
TR808 & TR909 Notes 16
Bass Drum Section 18
Snare Drum Section 20
Tom Toms Section 22
Rimshot / Handclap / Cowbell Section 24
Hi Hat Section 25
Cymbals Section 26
Congas / Maracas / Claves Section 28
Utility Mode 30
Operation 30
Drum Select 31
Front Cut 32
Controller / Velocity 33
Note Off Recognition 35
General MIDI Setup 36
Output Set 37
Assign Bank 39
Distortion 40
Factory Demo 40
Din Sync Output 41
Controller Map 42
Factory Program List 44
Factory Demo Guide 45
MIDI Implementation 46
MIDI Precussion Map 47
Troubleshooting Guide 48
Specification 49
Table of
Contents
* TR808 & TR909 are trademarks of Roland Corporation, Japan
Page 3
Thank you for buying the Novation D Station Rack drum synthesizer. The module you have
purchased is ideal for producing the kind of classic synthesized drum sounds which have
returned to popularity in recent years in various styles of dance music.
The two most popular drum machines which originally produced these sounds - Roland’s TR808 & TR909* - are no longer
manufactured and as a result, second-hand units are now changing hands for far more than their original selling prices (and
indeed the selling price of the D Station). The D Station will allow you to produce these sounds with stunning realism and
‘tweak’ their parameters using the original analogue synthesis techniques, unlike sampling or PCM playback which ‘freezes’
the sound and makes it extremely difficult to edit. Additionally the D Station is programmable so once you have adjusted
the sounds to your taste you can store them in complete ‘kits’. You have the recall of digital memories but with the life and
warmth that only original analogue sounds have. To get you started 25 Factory kits have been provided and there are 15
User Programs which you can use to store your own kits, once you become familiar with the editing parameters. The D
Station features stereo left/right and 6 individual assignable audio outputs so you can process your drum sounds individually through your mixer EQ and external effects.
The D Station is triggered via MIDI, allowing you to program your drums on your favourite MIDI sequencer (hardware or
software). The TR808 and TR909 kits can be accessed simultaneously allowing any combination of drum sounds to be
played as a ‘Kit’. MIDI Controllers are transmitted when any drumsound editing knob is adjusted in real-time and these too
can be recorded on a MIDI sequencer and reproduced from sequencer playback. For those who have vintage equipment
supporting Roland DIN Sync the D Station uses the incoming MIDI Clock to generate the original Roland DIN Sync 5v output trigger for external devices. Welcome to a percussive “Analogue for the 90s”.
* TR808 & TR909 are trademarks of Roland Corporation, Japan
Introduction
Section
1
Page 4
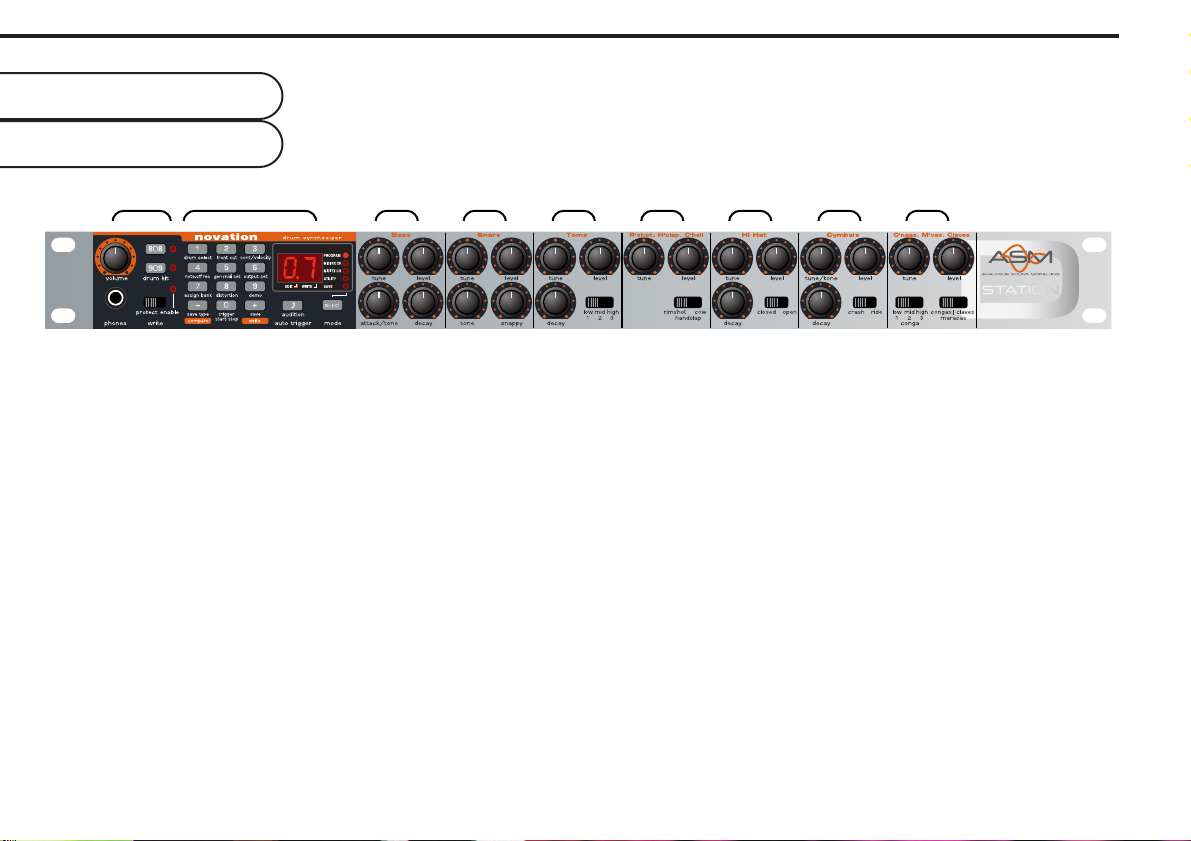
Front Panel
Controls
2
12 3456789
1 Master Volume Section
This section contains the Master Volume control, Drum Kit select buttons,
Headphone output socket and the Program write switch.
2 Data Entry/Program Section
This section contains the 12 Data Entry buttons, Display and Menu LED’s,
Audition/AutoTrigger and Mode select buttons.
3 Bass Drum Section
This section contains the Bass Drum Level, Tune, Attack/Tone, and Decay
controls.
4 Snare Drum Section
This section contains the Snare Drum Level, Tune, Tone, and Snappy controls.
5 Tom Toms Section
This section contains the Tom Toms Drum Level, Tune, Decay and Select
controls.
6 Rim Shot /HandClap Section
This section contains the Rim Shot and HandClap Level, Tune and Select
controls.
7 Hi Hat Section
This section contains the Hi Hat Level, Tune, Decay and Select controls.
8 Cymbals Section
This section contains the Cymbals Level, Tune/Tone, Decay and Select
controls.
9 Congas/Maracas/Claves Section
This section contains the TR808’s Congas/Maracas/Claves Level, Tune, Select
and Conga Select controls.
Page 5
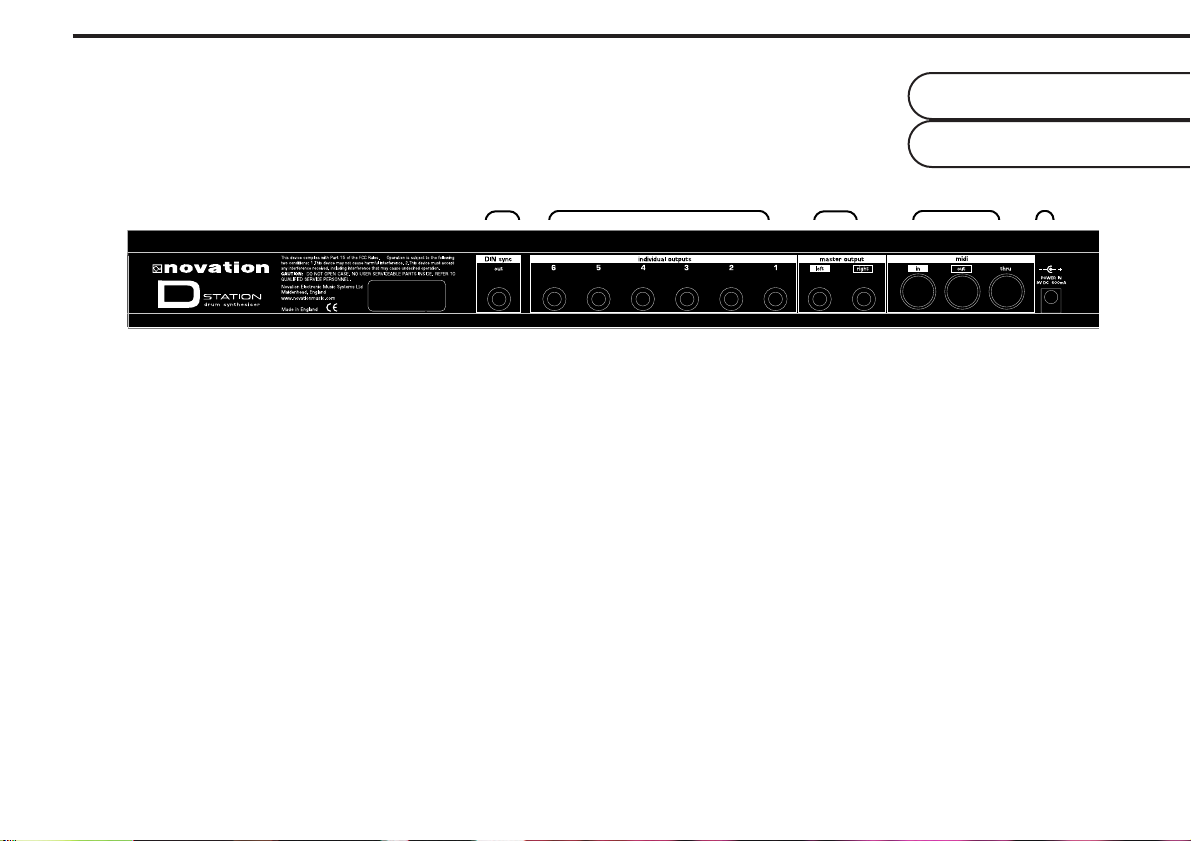
Rear Panel
Connections
3
1 DIN Sync. Out
This connector is used to control the Tempo/Start-Stop of classic analogue
drum machines or synthesisers from the MIDI Clock.
2 Individual Outputs
The six connectors in this section are used to separate a drum sound(s) from
the main stereo left/Right outputs. The sounds(s) can then be equalised or
processed individually.
3 Master Output
The two connectors deliver a stereo line level output signal for connection to a
mixing desk or amplifier.
4 MIDI
IN - This connector is used to receive MIDI Data from an external device.
OUT - This connector is used to Transmit MIDI Data to an external device.
THRU - This connector re-transmits MIDI Data received by the MIDI IN socket
to an external device.
5 9V DC INPUT
Connect the output plug of the AC Adapter supplied ( PSU-4 ) with the
DrumStation to this socket.
1 2 3 4 5
Page 6
Novation
PSU-6
Power Supply
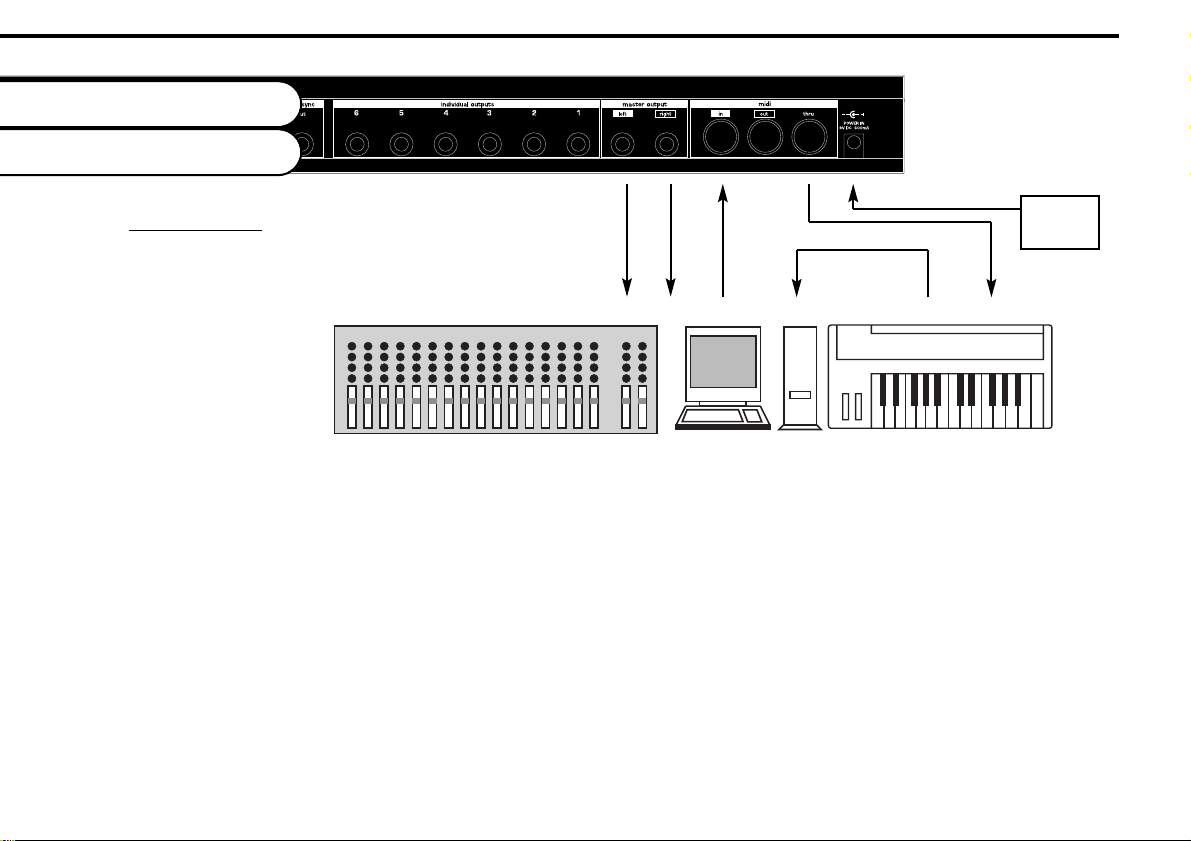
Connect the ‘Master output’ sockets of the D Station Rack to a suitable amplifier or mixing desk’s stereo inputs and set the
‘Volume’ control on the front panel to a reasonably high output level (9-10). This will maintain a good signal to noise ratio.
Make sure that the input volume setting on your amplifier or mixer is initially set to zero. Connect the MIDI Out from your
master keyboard or sequencer to the MIDI In on the D Station Rack and check that the ‘Write’ switch is in the ‘Protect’ position. Now, connect the power supply ( Novation PSU-4 ) to the socket marked ‘Power In 9VDC’ and plug into a suitable AC
power outlet. Switch on the power to the D Station and the display should now illuminate showing the last selected program
number. Now switch on your amplifier and adjust the volume accordingly. You can now use your master keyboard or
sequencer to play the drum sounds of the currently selected program ( the D Station Rack is initially set at the factory to
receive on MIDI channel 10). To listen to all 25 factory presets, first make sure the ‘Program’ LED is on ( if not, use the
‘Mode’ button to re-select ) and then use the ‘Data Entry’ keypad to call up sounds ‘00’ to ‘24’. See page 44 for factory program information. You can also use the ‘Audition’ button on the front panel to trigger the sounds.
Connections
& Setting up
4
Mixer/Amplifier Audio Inputs MIDI OUT MIDI IN MIDI OUT MIDI IN
BASIC SETUP
Mixer/Amplifier Computer/Sequencer Master Keyboard/Module
Page 7

On page 4 is a diagram of the basic way to set up the DrumStation Rack. Normally the
setup should be as follows: If the Master Keyboard is a “Workstation” i.e. it has a
Synthesiser built in, turn “Local Off” or the equivalent in its MIDI setup. ( Refer to the manufacturers Owners Manual for details on how to do this. ) Turn the Computer
Software/Sequencer’s “Soft Thru” (or sometimes called “Echo Back”) to the “ON” or “Enabled” position. Now when selecting
a “Track” in the Computer Software/Sequencer that is assigned to the MIDI RX channel of the Drumstation, (Refer: Page
11) playing the keyboard should play the Drumstation through the Headphones/Monitors. Similarly “Tracks” in the Computer
Software/Sequencer that are assigned to the MIDI channel(s) of the “Workstation” should make it produce sound. If not
please refer to the Keyboard & Computer Software/Sequencer manufacturers Owners Manuals for details on how to do
this.
Note:This setup does not allow the recording of knob movements on the Computer Software/Sequencer. This is because
the MIDI output of the DrumStation is not connected to the input of the Sequencer/Computer. To record Knob movements in
realtime refer Advanced Setup on page 6.
Note: If there are additional Keyboards/Modules connected via MIDI as shown, this diagram does not include audio for the
Keyboard/Module. The audio outputs of these devices must also be connected to the mixer.
5
Applications
Basic
Page 8

This is the advanced way to setup the DrumStation and utilises all of the rear panel features. This setup allows realtime
recording of knob movements onto the Computer Software/Sequencer as both the MIDI output of the keyboard and the
MIDI output of the DrumStation are merged with an external (not supplied) MIDI Merge box. If the Master Keyboard is a
“Workstation” i.e. it has a Synthesiser built in, turn “Local Off” or the equivalent in its MIDI setup. ( Refer to the manufacturers Owners Manual for details on how to do this. ) Turn the Computer Software/Sequencer’s “Soft Thru” (or sometimes
called “Echo Back”) to the “ON” or “Enabled” position. Now when selecting a “Track” in the Computer Software/Sequencer
that is assigned to the MIDI RX channel of the Drumstation, (Refer: Page 11) playing the keyboard should play the
Drumstation through the Headphones/Monitors. Similarly “Tracks” in the Computer Software/Sequencer that are assigned to
the MIDI channel(s) of the “Workstation” should make it produce sound. If not please refer to the Keyboard & Computer
Software/Sequencer manufacturers Owners Manuals for details on how to do this. When using the DIN Sync feature ensure
that your sequencer is transmitting MIDI Clock. If is is not this function will not work.
Applications
Advanced
6
Vintage Equipment DIN Sync Input Mixer/Amplifier Audio Inputs MIDI OUT MIDI IN MIDI OUT MIDI IN
MERGE
Novation
PSU-6
Power Supply
ADVANCED SETUP
Mixer/Amplifier Computer/Sequencer Master Keyboard/Module
Page 9
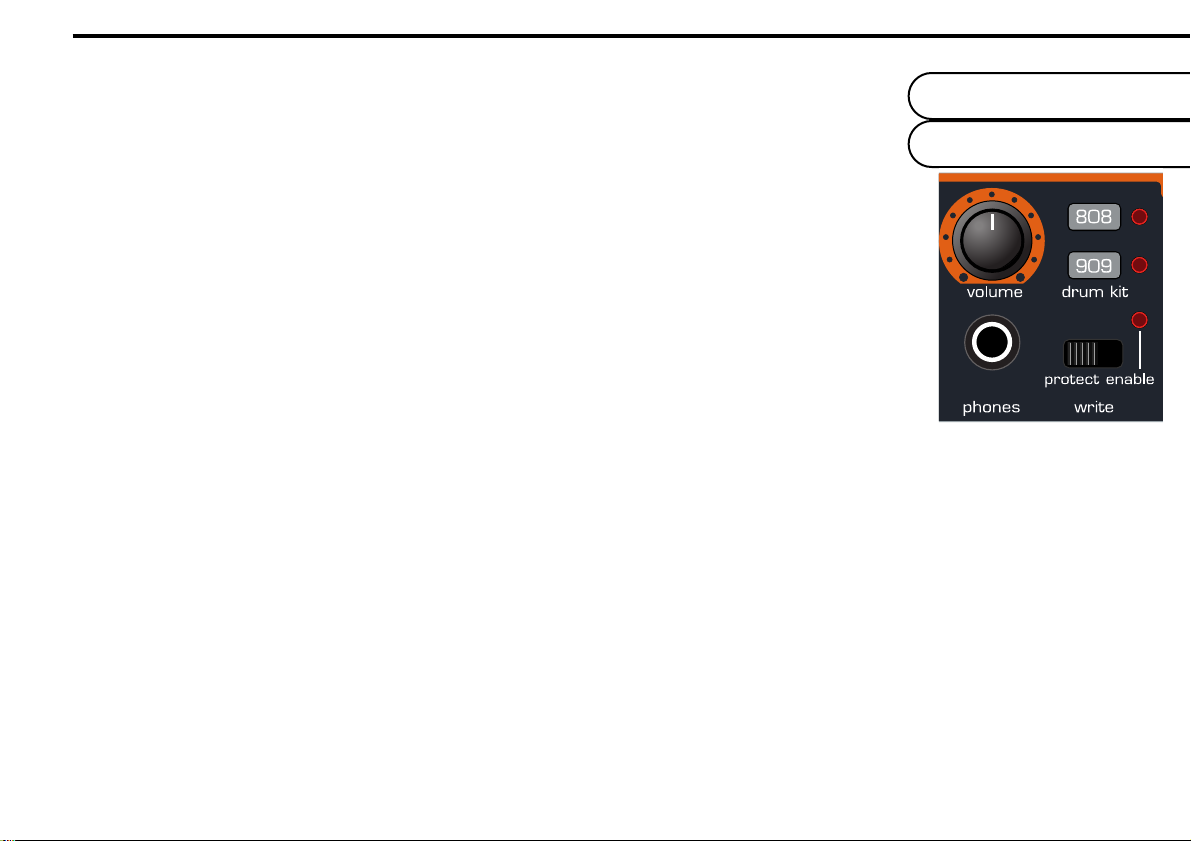
Volume - Rotary
This knob adjusts the overall output volume of the D Station on both the Main L/R and
Headphone outputs. The volume of a drum sound can be set individually using the ‘Level’
controls in each section.
NOTE: This control can be overidden by MIDI Volume data. If a MIDI Volume of ‘0’ has been
received by the D Station, no output will be heard regardless of the position of this knob. To
reset the volume either transmit the relevant MIDI Volume level or move the Volume knob this automatically overides the MIDI setting.
Drum Kit - Buttons
Here you select which drum kit (TR808 or TR909) will be edited when using the front panel
controls or any of the Utility functions. Each ‘Progam’ has TR808 & TR909 sounds - see
‘Function 5 - General MIDI Setup’ on page 36.
Write - Switch
This switch protects your programs from accidental erasure. During normal operation it should be left in it’s ‘Protect’ position
however, when you have edited or created a new program that you want to save, moving it to the ‘Enable’ position will
allow you to “write” over an existing program - see “Writing a Program Into Memory” on page 13.
Headphone - Socket
Use this 1/4 jack socket to monitor the output of your D Station Rack via headphones. This output will drive any type of
headphones.
Master Volume
Section
7
Page 10
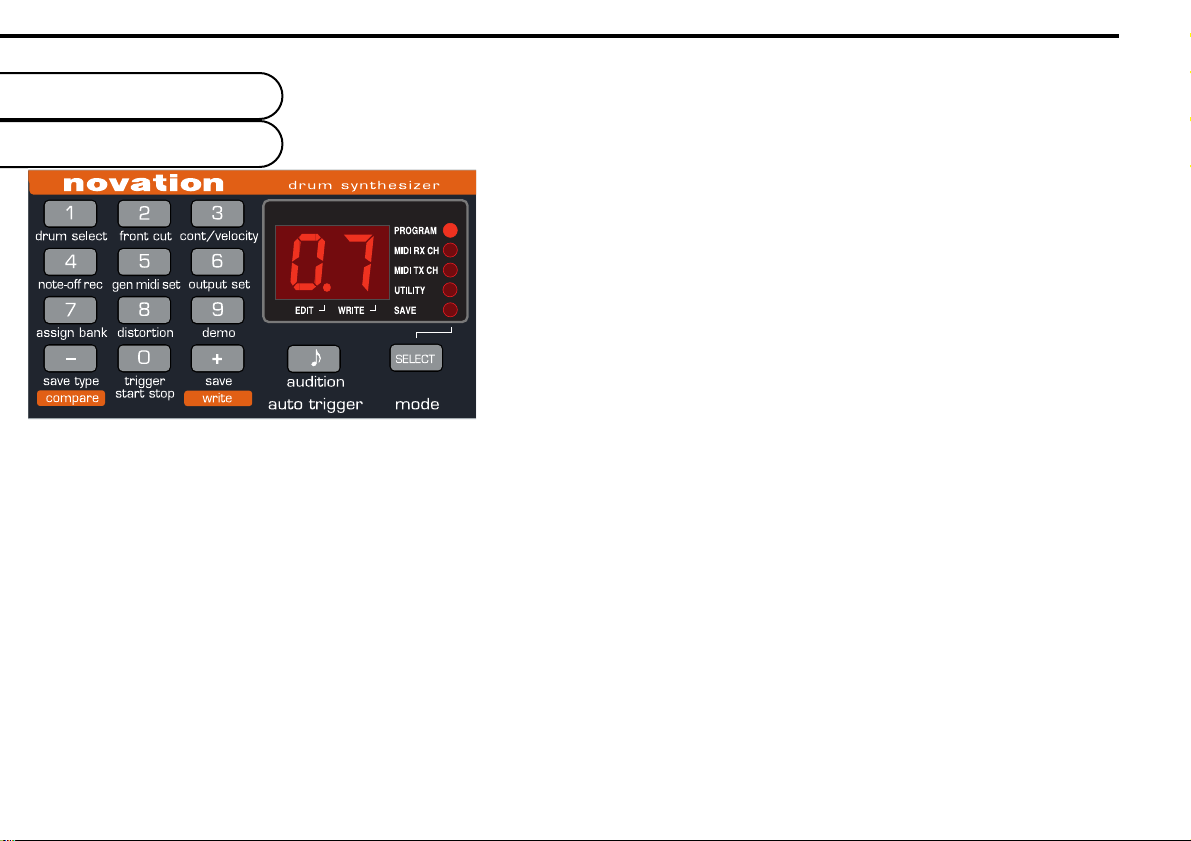
This is where you select the programs on the D Station Rack, set the MIDI transmit
and receive channels, set the various utility functions and store newly edited programs.
NOTE: When editing a program, the current position of a knob or
switch will probably be totally different to that of the program selected,
so when you turn a rotary control more than a few degrees or move a
switch expect the sound parameter to “jump” to the new value.
Data Entry Keypad - Buttons
The 12 buttons of the calculator style ‘Data Entry’ keypad are used to
call up and set the various operating parameters of each ‘Mode’. You
can use two methods to enter a number :
1. DIGIT INPUT - using the buttons 0 to 9.
NOTE: this must always be a two digit entry, for example :
Selecting program sound 8 —— press the ‘0’ and ‘8’ buttons - display reads ‘08’.
Selecting program sound 17 —- press the ‘1’ and ‘7’ buttons - display reads ‘17’.
2. INCREMENT/DECREMENT - using the ‘-’ and ‘+’ buttons.
Press the ‘+’ button to move up to the next program or value.
Press the ‘-’ button to move down to the next program or value.
These buttons can also be used to ‘scroll’ through values by pressing and holding down until the desired value is reached.
Data Entry/Program
Keypad
8
Page 11

Audition / Auto Trigger - Button
This button is used to trigger a drum sound from the currently selected program. It provides
a convenient way of monitoring a sound whilst working at the control panel. The AutoTrigger function will play the currently edited sound automatically at a pre-determined tempo.
Audition
Press the Audition button to trigger the currently edited drum sound. When a control or switch in another section is moved,
the Audition button will automatically change over to trigger that sound.
Example: Move any control in the ‘Hi-Hat’ section - Audition button triggers the Hi-Hat, then move any control in the ‘Snare
Drum’ section - Audition button triggers the Snare Drum etc.
NOTE: In the ‘Tom Toms’, ‘Rimshot/Handclap/Cowbell’, ‘Hi Hat’, ‘Cymbals’ and 'Conga/Maracas/Claves’ sections the physical position of the ‘Select’ switch always determines which drum sound is triggered.
Auto Trigger
The Auto-Trigger plays a basic 4 beats / bar sequence, accenting beat one.
To start the ‘Auto-Trigger’ running, press and hold the ‘Audition’ button and press the - ‘Trigger Start/Stop’ (‘0’) button on
the data entry keypad. The currently edited sound will auto-trigger at the set tempo. When the control of a different drum
sound is moved, the auto-trigger will ‘jump’ over to playing that sound.
Example: If the last control moved was in the Snare Drum section, the auto-trigger will play the Snare Drum sound. Move
any control in the Hi-Hat section - auto-trigger plays the Hi-Hat sound. Move any control in the Bass Drum section auto-trigger plays the Bass Drum etc.
To stop the Auto-Trigger , press and hold the ‘Audition’ button and press the ‘0’ - ‘Trigger Start/Stop’ button.
To adjust the tempo, start the autotrigger playing as above, press and hold the ‘Audition’ button and use the ‘+’ or ‘- ‘
Data Entry/Program
Audition/AutoTrig
9
Page 12
buttons on the data entry keypad to speed up or slow down the auto-trigger sequence. AutoTrigger tempo is a global setting and is not saved with each program.
The Audition and Auto-Trigger features can also be used when editing sounds in the various
Utility functions - see Utility Mode on page 30.
MODE - Button
This button is used to select which of the five main parameter ‘Modes’ are accessed by the ‘Data Entry’ keypad. The current mode is indicated by one of five LED’s on the right hand side of the display panel.
NOTE: When the D Station Rack is switched on, ‘Program’ mode is automatically selected. Each time the Mode button is
pressed the next ‘Mode’ in the menu will be selected i.e. MIDI RX Channel, MIDI TX Channel, Utility and Save. From
‘Save’, the next press will loop the menu back to the Program mode.
MODE 1 - Program Change.
This is where you select one of the D Station’s 40 programs. The program number displayed will be the one selected prior
to power being turned off. To select a different program, first check that the ‘Program’ LED is on. Using the ‘Data Entry’ keypad as described above, you can quickly call up any of the D Station’s 40 programs. The recognised numbers in this mode
are from ‘00’ to ‘39’. You can also use MIDI Program Change commands from a sequencer or other external MIDI device
to call up programs.
NOTE 1: Because the D Station Rack’s program numbers begin at ‘00’, the next higher number must always be used to call
up the correct sound. i.e. to select program 18, transmit a MIDI Program Change 19.
NOTE 2: The 25 factory sounds are stored in programs ‘00’ to ‘24’ whilst the 15 user locations from ‘25’ to ‘39’ are all initially set up with a basic drum kit - see page 44 for Factory Program listings.
Data Entry/Program
Program Change
10
Page 13
MODE 2 - MIDI Receive Channel
This is where you set the MIDI receive channel for the D Station Rack. Use the ‘Mode’ button to select the ‘MIDI RX Ch.’ mode - LED on, and then the ‘Data Entry’ keypad to enter
your selection. The recognised numbers in this mode are from ‘01’ to ‘16’.
NOTE: the ‘MIDI RX CH.’ LED will flash when MIDI data is received on this channel.
MODE 3 - MIDI T
ransmit Channel
This is where you set the MIDI transmit channel for the D Station Rack. Use the ‘Mode’ button to select the ‘MIDI TX Ch.’
mode - LED on, and then the ‘Data Entry’ keypad to enter your selection. The recognised numbers in this mode are from
‘01’ to ‘16’.
NOTE: The MIDI Tx and Rx channel settings are memorized when the power is turned off.
MODE 4 - Utility
This is where you access the various Utility functions of the D Station Rack. See page 30 for full details on the operation
and features of the Utility mode.
MODE 5 - Save System Exclusive Data Dumps
This is where you ‘Save’ the D Station Rack programs onto a computer or other data storage device using MIDI sysex
dumps. There are two types of ‘Save’ as follows:
Type Function Display Ident.
1 Save single program SS
2 Save all programs SA
Data Entry/Program
MIDI/Utilities/Save
11
Page 14
Ensure that your data storage device is ready to accept the data. Use the ‘Mode’ button to
select ‘SAVE’ mode - LED on, the display shows:
NOTE: The program ‘Saved’ will be the program currently selected in the ‘Program’ mode. If you were editing a program,
the modified version will be saved. Press the ‘SAVE’ ( ‘+’ ) button to transmit the single program.
To save all the programs in the D Station Rack press the ‘SAVE TYPE’ (‘-’) button once, the display changes to:
Ensure that your computer or data storage device is ready to accept the sysex bulk dump. Press the ‘SAVE’ ( ‘+’ ) button
to transmit the ‘All programs’ dump. The Global settings ( MIDI Tx and Rx channels ) will also be saved.
NOTE: The display will briefly go blank as the data is transmitted.
Loading System Exclusive Data Dumps
Single Programs
1 If you want to overwrite an existing program, select the ‘Program’ mode and call up the program number you want to use.
Now, move the ‘Write’ switch to the ‘Enable’ position and transmit the sysex dump from your computer. The ‘Write’ LED on
the display will flash to confirm reception. Return the ‘Write’ switch to the ‘Protect’ position.
NOTE: This operation will erase the existing program and replace it with the program from the computer.
Data Entry/Program
Loading Sysex
12
PROGRAM
MIDI RX CH
MIDI TX CH
UTILITY
EDIT WRITE
SAVE
PROGRAM
MIDI RX CH
MIDI TX CH
UTILITY
EDIT WRITE
SAVE
Page 15
2 If you want to listen to a program before committing it to memory, select the ‘Program’
mode ( don’t worry about which program number comes up ). Ensure that the ‘Write’ switch
is in the ‘Protect’ position and then transmit the sysex dump from your computer. The ‘Edit’
LED on the display will come on to show that the program available is different to the one
displayed i.e. an ‘edited’ program. Now you can use the ‘Compare’ procedure to select a suitable location to store the
imported program - see the ‘COMPARE’ section on page 14.
All Programs
If you want to overwrite all the existing programs, move the ‘Write’ switch to the ‘Enable’ position and transmit the sysex
dump from your computer. The ‘Write’ LED on the display will flash to confirm reception. Return the ‘Write’ switch to the
‘Protect’ position.
NOTE: if the ‘Write’ switch is in the ‘Protect’ position when the sysex dump is transmitted from your computer the display
will flash to indicate that the data cannot be loaded.
Editing a Program
To change or ‘Edit’ a program, simply adjust the parameters you wish to alter. The Edit LED on the display will flash to
show that you are no longer listening to the stored program. If you do not store this new edit before calling up another program it will be lost.
NOTE: Certain sounds are only available on each Kit.Example: The TR909 does not include a Cowbell (C’BLL )
If, whilst editing a Program, a sound is selected that does not appear on that particular kit, the D Station will automatically
switch over to the relevant kit. The selected kit is always indicated by the ‘Drum Kit’ LED’s in the Master Volume section.
W
riting a Program into memory
The program memory on the D Station Rack is divided up as below. If you edit a factory program, you can only save it in
one of the 15 user program locations - just think of the 25 factory programs as a ‘Reference Library’ to take drum kits from.
Data Entry/Program
Editing/Writing
13
Page 16
If you want to start creating a drum kit of your own from scratch, use one of the ‘Blank’ kits
initially stored in the user program locations.
To store a new or edited program, move the ‘Write’ switch to the ‘Enable’ position - LED
flashes. Now, using the ‘Data Entry’ buttons ( ‘0’ to ‘9’ only ) select the program number
where you want to store the program. To store the program in the same location ( 25 to 39 only ) simply press the ‘WRITE’
button. If you want to listen to a program before overwriting it use the Compare function as follows:
COMPARE: When you have edited a program, move the ‘Write’ switch to the ‘Enable’ position and the Enable LED flashes.
Press the ‘COMPARE’ button once and the ‘Edit’ LED will flash at a faster rate to indicate ‘Compare’ mode is active. You
can now listen to the original program before deciding whether you want to overwrite it or not. Check the program using an
external keyboard/computer or the ‘Audition’ button on the front panel. Pressing the ‘COMPARE’ button again will bring
back the edited program. If you do want to save the program in this location, press the ‘WRITE’ button and the ‘Write’ LED
on display panel flashes momentarily. If you don’t want to save the program in this location you can choose another by simply entering any program number from ‘25’ to ‘39’ using the ‘Data Entry’ keypad ( buttons ‘0’ to ‘9’ only / the ‘-’ and ‘+’ cannot be used ). Once again, you can check the programs using the ‘COMPARE’ feature and then, when you have found a
suitable location, press the ‘WRITE’ button. The program is now saved.
NOTE 1: Always return the ‘WRITE’ switch to the ‘Protect’ position after completing a save operation. This will avoid any
accidental erasure of programs. The ‘Write’ LED will flash to warn you of the ‘Enabled’ state.
NOTE 2: Programs can only be saved in the User locations (‘25’ to ‘39’). If you attempt to save a program into any of the
Factory locations ( ‘00’ to ‘24’ ) the display digits will flash rapidly to warn that this operation cannot be competed.
Data Entry/Program
Compare
14
Page 17

Voice Architecture
In the original TR808 and TR909 , many analogue circuits were used to produce the imitations of the various drum sounds. The essential sounds produced by skins (Bass Drum and
TomToms) rely mainly on a pitched element, those produced by struck metal (HiHat &
Cymbals) are based on multiple noise sources. Sounds like Snare and Rimshot use a combination of the two, one for the
skins and one for the snare chain. As a result, there are different parameters for each drum sound, enabling you to make
interesting variations within the sound category. Some parameters are only available on one or two sounds (eg. Attack on
the TR909 Bass Drum ) because those parameters are not so useful on the other sounds. Each of the parameters is covered in the appropriate section where you need to understand how it relates to that particular sound.
Other parameters feature on most or all sounds (eg. Decay, Tune & Level). Decay governs how quickly the sound dies
away, Tune the pitch of the sound and Level the maximum volume it is played in the respective mix.
Analogue Sound Modelling
The D Station faithfully re-creates the original analogue sounds of the TR808 & TR909 using a new digital system specially
developed by Novation - Analogue Sound Modelling (ASM).
A typical drum sound has a very complex structure made up of many simple waveforms all occuring at the same moment in
time. To re-model an original drum sound, first it must be broken down and analysed so as to identify the various simple
waveforms in it’s structure as these can be synthesised more easily. When all these waveforms are regenerated and
added back together the original sound is faithfully re-created in every detail and realtime ‘fluid’ changes to the character of
the drum sound can still be made using any of the front panel controls, just like the original TR808 and TR909.
Voice Architecture
ASM
15
Page 18

Drum Sounds
The TR808 and TR909’s range of drum sounds were not identical. For your reference, the
full set of sounds from the original units and the method used to re-create them in the D
Station are listed below.
Drum Sound ID TR808 TR909 ASM SAMPLE
Bass Drum BD ll4
Snare Drum SN ll4
Rim Shot RS ll 4
Handclap HC ll 4
Closed Hi Hat CH l ** l + 44
Open Hi Hat OH l ** l + 44
Ride Cymbal RC l4
Crash Cymbal CY l ** l + 44
Low Tom LT ll4
Mid Tom MT ll4
High Tom HT ll4
Cowbell CB l4
Low Conga LC l4
Mid Conga MC l4
Hi Conga HC l4
Maracas MA l4** Recreated using ASM on 808 only
Claves CL l4+Sample with ASM envelopes etc
TR808 / TR909
Notes
16
Page 19

Drum Sound Controls
The TR808 and TR909 also had differences in their sound editing controls. To give the D
Station enhanced sonic capabilities, the controls in each section will affect both drum kits.
For your reference, the controls of the original units and the D Station’s are as follows:
808 KIT l
D Station l + m
808 KIT BD SN RS HC CH OH CY LT MT HT CB LC MC HC MA CL
LEVEL llllllllllllllll
TUNE mmmmmm lllmlllmm
TONE ll l
ATTACK
DECAY l mllmmm
SNAPPY l
909 KIT l
D Station l + m
909 KIT BD SN RS HC CH OH CY LT MT HT RC
LEVEL lllllllllll
TUNE llmmmmlllll
TONE l
ATTACK l
DECAY l llmlllm
SNAPPY l
TR808 / TR909
Notes
17
Page 20

This section controls the timbre of the Bass (or kick) drum, the lowest pitched instrument in
both the conventional or electronic drum kit. This is one of the most crucial sounds for dance
and many other styles of music. The classic analogue Bass drum’s are the TR909 and
TR808 Bass drums. All the character of the original TR909 & TR808 Bass drums are faithfully reproduced using ASM Technology.
Level - Rotary
This knob controls the volume of the Bass drum on both the stereo and individual outputs.
When assigned to the stereo outputs this knob allows you to set the relative level of the bass
drum in the “mix”.
Tune - Rotary
This knob controls the pitch of the Bass drum. Turn anti-clockwise and the pitch will be lowered resulting in a ‘looser’
sound, clockwise and the pitch is raised, as if the skin on a real drum had been tightened.
NOTE: This control was not featured on the TR808. To re-produce the original pitch setting of the TR808 Bass drum always
set this knob to the 12 o’clock position.
Attack/Tone - Rotary
The TR909 and TR808 different controls for this sound so this knob has two functions depending on which ‘Drum Kit’ is currently selected.
Bass Drum
Section
18
808
909
Page 21

Attack - When the TR909 kit is selected this knob will affect the percussive character of the
Bass drum by changing the level of a shaped pulse or ‘thump’ at the beginning of the sound.
At ‘0’ it is completely removed. As the knob is moved in a clockwise direction the ‘thump’ element will become increasingly
louder.
Tone - When the TR808 kit is selected this knob will affect the tonal character of the Bass drum by changing the frequency
content of the sound. At ‘0’ all of the higher frequencies in the sound are removed making the sound more rounded and
‘plummy’. As the knob is moved in a clockwise direction the higher frequencies are introduced giving a brighter, cleaner
affect to the sound
Decay - Rotary
This knob controls the time it takes for the sound to die away once it has reached full volume. At ‘0’, the sound falls off
immediately producing a very ‘tight’ sound. As the knob is moved in a clockwise direction the longer it takes for the level to
drop to zero. A very long ring on the Bass drum is often used as a feature of dance grooves.
Bass Drum
Section
19
808
909
Page 22

The classic Analogue snare drums have to be the TR909 and TR808 snares. They are a
combination sound and comprise of two basic elements. Firstly there is the pitched element
which simulates the vibration of skins on a snare shell and a noise element simulates the
‘snare’ chains. Although not totally convincing as the ‘real’ thing, the original TR909 & TR808
snares have a unique sound and have become ‘The’ Dance and Soul music snares. All the
character of the original TR909 & TR808 snare drums are faithfully reproduced using ASM
Technology. Four parameters are provided for adjusting the timbre of the snare sound on
each drum kit.
Level - Rotary
This knob controls the volume of the Snare drum on both the stereo and individual outputs.
When assigned to the stereo outputs this knob allows you to set the relative level of the
Snare drum in the “mix”.
Tune - Rotary
This knob controls the pitch of the Snare drum. Turn anti-clockwise and the pitch will be lowered resulting in a ‘looser’
sound, clockwise and the pitch is raised, as if the skin on a real drum had been tightened.
NOTE: This control was not featured on the TR808. To re-produce the original pitch setting of the TR808 Snare drum
always set this knob to the 12 o’clock position.
Snappy - Rotary
This knob controls the amount of noise in the snare sound. The snare drum is unique in the fact that it is composed of two
parts, a pitched element from the skin and a noise element from the metal snare. This parameter decides the proportional
Snare Drum
Section
20
Page 23

level of that noise element. At ‘0’ it is completely removed. At ‘1’ the noise element is introduced and, as the knob is moved in a clockwise direction it will become increasingly louder
relative to the pitched element.
Tone - Rotary
This knob alters the ‘character’ of the TR808 and TR909 Snare drums in different ways.
TR808 - On this sound it changes the overall tone. At ‘0’, the sound is at it’s fullest. As the knob is moved in a clockwise
direction the pitched element loses it’s lower frequencies and, if an amount of ‘Snappy’ is applied to the sound the noise
element will become more ‘sharp’.
TR909 - On this sound it changes the duration of the noise element introduced by the ‘Snappy’ control. At ‘0’ the noise element is at it’s shortest, producing a ‘tight’ effect. As the knob is moved in a clockwise direction the duration increases giving
the Snare drum a broader, ‘looser’ sound.
Snare Drum
Section
21
Page 24

Both the TR909 & TR808 feature three Analogue Tom - Toms, Low Tom, Mid Tom & High
Tom. Using ASM the Drumstation recreates these sounds faithfully and adds more control.
A ‘Decay’ parameter not originally found on the TR808 is added giving you even more flexibility. Each of the Toms has three parameters to adjust its timbre.
Level - Rotary
This knob controls the volume of the Tom Toms on both the stereo and individual outputs.
When assigned to the stereo outputs this knob allows you to set the relative level of the Tom
Toms in the “mix”.
Tune - Rotary
This knob allows you to change the pitch of the Tom Toms. The pitching of toms is particularly important as they are often
use to create rising or falling patterns. Having selected the Tom-Tom whose pitch you wish to alter with the select switch,
turn anti-clockwise and the pitch will be lowered resulting in a ‘looser’ sound, clockwise and the pitch is raised, as if the skin
on a real drum had been tightened.
Decay - Rotary
This knob controls the time it takes for a tom sound to die away once it has reached full volume. At ‘0’, the sound falls off
immediately producing a very ‘tight’ sound. As the knob is moved in a clockwise direction the longer it takes for the level to
drop to zero. A long ring is often used for fills, whereas if a tom is used repeatedly in a pattern you may want to reduce its
decay time.
NOTE: This control was not featured on the TR808. To re-produce the original decay setting of the TR808 Tom Toms,
Tom Toms
Section
22
Page 25

always set this knob to the 12 o’clock position.
Select - Switch
This switch selects which of the three Tom Toms will be edited by the Level, Tune and
Decay knobs.
NOTE: Each Tom Tom sound has it’s own individual MIDI Controller information so when recording via MIDI always check
that this switch is pointing to the tom you want to change. When playing back via MIDI, the position of this switch is irrelevant. i.e. all controls for the 3 toms on each ‘Kit’ can be manipulated simultaneously via MIDI - see the ‘Controller Map’ section on page 42.
Tom Toms
Section
23
Page 26

The three specific percussion sounds in this section are easily recognisable from their
names. As the original TR808 and TR909 only had a Level control for these sounds no
dynamic sound changes could be made. As the DrumStation uses samples for these sounds
a Tune control has been added into this section to give the sounds greater dynamic scope.
Level - Rotary
This knob controls the volume of the Rim Shot, Handclap and Cowbell on both the stereo
and individual outputs. When assigned to the stereo outputs this knob allows you to set the
relative level of these sounds in the “mix”.
Tune - Rotary
This knob allows you to change the pitch of each of the sounds in this section. Turn anti-clockwise and the pitch will be lowered, clockwise and the pitch is raised.
NOTE: This control was not featured on the TR808/909. To re-produce the original pitch setting of the TR808/909 sounds,
always set this knob to the 12 o’clock position.
Select - Switch
This switch selects which of the three sounds will be edited by the Level and Tune knobs.
NOTE: Each of the three sounds has it’s own individual MIDI Controller information so when recording via MIDI always
check that this switch is pointing to the sound you want to change. When playing back via MIDI, the position of this switch
is irrelevant. i.e all the controls can be manipulated simultaneously via MIDI - see the ‘Controller Map’ section on page 42.
Rimshot/Handclap
Cowbell Section
24
Page 27

In the D station ASM is used to faithfully recreate the TR808’s Open and Closed High Hat
sounds and Samples are used to recreate the TR909’s Open and Closed High Hat sounds.
Level - Rotary
This knob controls the volume of the Hi-Hat on both the stereo and individual outputs.
When assigned to the stereo outputs this knob allows you to set the relative level of the HiHat in the “mix”.
Tune - Rotary
This knob controls the pitch of the Hi-Hat. Turn anti-clockwise and the pitch will be lowered
resulting in a ‘looser’ sound, clockwise and the pitch is raised, resulting in a ‘tighter’ sound.
NOTE: This control was not featured on the TR808/909. To re-produce the original pitch
setting of the TR808/909 sounds, always set this knob to the 12 o’clock position.
Decay - Rotary
This knob controls the time it takes for the Hi-Hat sound to die away. At ‘0’, the sound falls off immediately producing a very
‘tight’ sound. As the knob is moved in a clockwise direction the longer it takes for the level to drop to zero, producing a
longer ‘tail-off’ to the sound.
Select - Switch
This switch selects whether the Open or Closed Hi-Hat sound will be edited by the Level, Tune and Decay knobs.
NOTE: The Open and Closed Hi-Hats have their own individual MIDI Controller information so when recording via MIDI
always check that this switch is pointing to the sound you want to change. When playing back via MIDI the position of this
switch is irrelevant .i.e all the controls for these sounds can be manipulated simultaneously via MIDI - see the ‘Controller
Map’ section on page 42.
Hi Hat
Section
25
Page 28

In the D station ASM is used to faithfully recreate the TR808’s Crash Cymbal sound and a
Sample is used to recreate the TR909’s Crash and Ride Cymbal sounds. The TR909 has
Level and Tune parameters only. With the D station a ‘Decay’ parameter has been added to
the Crash and Ride Cymbals for even greater control.
Level - Rotary
This knob controls the volume of the Cymbals on both the stereo and individual outputs.
When assigned to the stereo outputs this knob allows you to set the relative level of the
Crash and Ride Cymbals in the “mix”.
Tune/Tone - Rotary
The TR909 and TR808 different controls for this sound so this knob has two functions
depending on which ‘Drum Kit’ is currently selected.
Tune - When the TR909 kit is selected this knob will change the pitch of the Crash and Ride cymbals. Turn anti-clockwise
and the pitch will be lowered resulting in a ‘larger’ cymbal, clockwise and the pitch is raised, as if a smaller cymbal has
been struck.
Tone - When the TR808 kit is selected this knob will affect the ‘character’ of the TR808 Crash cymbal by changing the fre-
Cymbals
Section
26
808
909
808
909
Page 29

quency content of the sound. Fully clockwise, all the frequencies in the sound are present,
giving you the brightest sound possible. The further anti-clockwise you move the knob, the
more high frequencies are removed, making the sound less harsh and intrusive.
Decay - Rotary
This knob controls the time it takes for the cymbal to die away. At ‘0’, the sounds falls off rapidly. As the knob is moved in a
clockwise direction the longer it takes for the level to drop to zero. The decay time of cymbals is quite critical especially if
they are triggered repeatedly in the bar. Only set the longest decay time if you are using the cymbals sparingly in your
songs.
NOTE: This control was not featured on the TR909. To re-produce the original decay setting of the TR909 Cymbals, always
set this knob to the fully clockwise position.
Select - Switch
This switch selects which TR909 Cymbal will be edited by the Level, Tune and Decay knobs.
NOTE: The TR808 has one Cymbal sound. This switch has no effect on the TR808 Cymbal. It is used to switch between
the two TR909 Cymbals.
NOTE: Each Cymbal sound has it’s own individual MIDI Controller information so when recording via MIDI always check
that this switch is pointing to the Cymbal you want to change. When playing back via MIDI the position of this switch is irrelevant.i.e all the controls for these sounds can be manipulated simultaneously via MIDI - see the ‘Controller Map’ section on
page 42.
Cymbals
Section
27
Page 30

The sounds in this section were only featured on the TR808. They are however the classic
selection for ballads and the like. The three Congas are recreated using ASM Technology
and the Maracas and Claves are samples. As the original TR808 only had a Level control
for the Maracas and Clave sounds no dynamic sound changes could be made. As the D
Station uses samples for these sounds a Tune control has been added to give the sounds
greater dynamic scope.
Level - Rotary
This knob controls the volume of each sound on both the stereo and individual outputs.
When assigned to the stereo outputs this knob allows you to set the relative level of the
Congas, Maracas and Claves in the “mix”.
Tune - Rotary
This knob allows you to change the pitch of each of the sounds in this section. Turn anti-clockwise and the pitch will be lowered, clockwise and the pitch is raised.
NOTE: This Tune control was not featured in the TR808’s Maracas and Claves sections. To re-produce the original pitch
setting of these sounds, always set this knob to the 12 o’clock position.
Conga Select - Switch
This switch selects which of the three Congas will be edited by the Level and Tune knobs when the ‘Select’ switch is set to
‘Congas’.
NOTE: Each Conga sound has it’s own individual MIDI Controller information so when recording via MIDI always check that
this switch is pointing to the Conga you want to change. When playing back via MIDI, the position of this switch is irrelevant. i.e. all controls for the 3 Congas can be manipulated simultaneously via MIDI - see the ‘Controller Map’ section on
page 42.
Congas/Maracas/
Claves Section
28
Page 31

Select - Switch
This switch selects which of the three sounds will be edited by the Level and Tune knobs.
NOTE: Each of the three sounds has it’s own individual MIDI Controller information so when
recording via MIDI always check that this switch is pointing to the sound you want to
change. When playing back via MIDI, the position of this switch is irrelevant. i.e all the controls for these sounds can be
manipulated simultaneously via MIDI - see the ‘Controller Map’ section on page 42.
Congas/Maracas/
Claves Section
29
Page 32

Operational Procedure
IMPORTANT NOTE: The operating system of the ‘Data Entry’ keypad is different in this
mode ( all of the functions in the Utility mode are visually indicated in small text under the
data entry buttons- see panel diagram on page 8 ). The ‘0’ to ‘9’ buttons are now used to call up ‘sub-directories’ of the
Utility mode and the ‘-’ and ‘+’ buttons used to change their values whilst the display may flash alternatately between a
value and a letter reference code. The nine sub-directories are as follows:
Button Function Display Ident.
1 Drum Select Selected Drum
2 Front Cut ‘FC’
3 Controller / Velocity ‘tu’-’to’-’At’-’dE’-’Sn’-’VL’
4 Note Off Recognition ‘nO’
5 General MIDI ‘Gn’
6 Output Set ‘01’ to ‘r4’
7 Assign Banks ‘AA’-’Ab’-’AC’-’Ad’
8 Distortion ‘dS’
9 Demo ‘dE’
Each drum has a display code which, in connection with the ‘Drum Kit’ select LED’s identifies which drum sound is currently selected or edited. The codes are as follows:
Utility Mode
Operation
30
Page 33

Utility Mode
Drum Select
31
TR808 Bass Drum bd TR808 Maracas Ar
TR808 Snare Drum Sd TR808 Claves CL
TR808 Low Tom t1
TR808 Mid Tom t2 TR909 Bass Drum bd
TR808 High Tom t3 TR909 Snare Drum Sd
TR808 Rim Shot rS TR909 Low Tom t1
TR808 Hand Clap CP TR909 Mid Tom t2
TR808 Cowbell Cb TR909 High Tom t3
TR808 Closed HiHat CH TR909 Rim Shot rS
TR808 Open HiHat OH TR909 Hand Clap CP
TR808 Crash Cymbal cC TR909 Closed HiHat CH
TR808 Low Conga C1 TR909 Open HiHat OH
TR808 Mid Conga C2 TR909 Crash Cymbal cC
TR808 High Conga C3 TR909 Ride Cymbal rC
Use the ‘Mode’ button to select the ‘UTILITY’ mode - LED on.
Function 1 - Drum Select
This is where you select the drum sound that will be edited. Each time you go into Utility mode, the selected drum sound
will automatically be the one last edited on the front panel. The range, in connection with the front panel 808 and 909 ‘Drum
Kit’ select LED’s is as follows:
TR808-bd-Sd-t1-t2-t3-rS-CP-Cb-CH-OH-cC-C1-C2-C3-Ar-CL-TR909-bd-Sd-t1-t2-t3-rS-CP-CH-OH-cC-rC
Page 34

Typical Display ident. ( TR808 Snare Drum )
Use the ‘+’ and ‘-’ buttons to “page” through the different drum sounds.
Function 2 - Front Cut
This function allows you to remove up to 99 milleseconds of the start or ‘front end’ of a drum sound to create a similar effect
to sample editing. To hear the effect this has on a drum sound, listen to the demo whilst making reference to the Factory
Demo Guide on page 45.
Range = ‘00’ ( off ) to ‘99’ ( max ) Each increment = 1mS
First, use the ‘Drum Select’ utility function to select the drum sound to be edited. Press the ‘FRONT CUT’ button once - the
display alternates between:
Display ident. Value
Utility Mode
Front Cut
32
808
909
MIDI RX CH
MIDI TX CH
PROGRAM
EDIT WRITE
UTILITY
SAVE
MIDI RX CH
MIDI TX CH
PROGRAM
EDIT WRITE
UTILITY
SAVE
MIDI RX CH
MIDI TX CH
PROGRAM
EDIT WRITE
UTILITY
SAVE
Page 35

Use the ‘-’ and ‘+’ buttons to change the value. Use the ‘Drum Select’ function again to
change these settings on another drum sound. This setting can be saved with the program.
See ‘Writing a program into memory, on page 13.
NOTE: The Front Cut setting can also be accessed via MIDI. This feature allows real-time, dynamic changes to be made
during a performance. See the ‘Controller Map’ section on page 42.
Function 3 - Controller / V
elocity
NOTE: All of the sound editing front panel rotary controls on the D Station can be set to transmit and receive MIDI data
allowing record and playback of any ‘live’ changes made during a performance. For more information see the ‘Controller
Map’ section on page 42.
This function allows you to choose whether a front panel control responds to MIDI Controller data or MIDI Velocity data.
This setting does not affect the transmitted data i.e. the front panel controls will always transmit MIDI Controller data.
Example 1: Snare Drum - If a control, say the snare drum’s ‘Snappy’ is set to receive MIDI Velocity, the harder a note is
played the more ‘snap’ will be applied. Any number of controls in a section can be set-up in this way. In this example the
‘Tune’, ‘Tone’ and ‘Snappy’ controls could all be set to respond to Velocity data giving a wide character change to the Snare
Drum between minimum and maximum velocities.
Example 2: Closed HiHat - With the HiHat’s ‘Decay’ control set to respond to Velocity data an extremely realistic ‘Accent’
can be created as the decay time increases with velocity, much like the real instrument.
The actual velocity (or volume) of the sound can be fixed at a predetermined level so that only the edit controls are affected
Utility Mode
Controller / Velo
33
Page 36

by the velocity data. To hear the effect this can have on a drum sound(s), listen to the demo
whilst making reference to page 45.
Control Display Ident.
Tune ‘tu’
Tone ‘to’
Attack ‘At’
Decay ‘dE’
Snappy ‘Sn’
Velocity ‘VL’
Only the controls relevant to a particular drum sound are available for selection with the exception of Velocity ‘VL’, which
can be applied to every drum. Here are some typical examples:
Drum Rotary Controls Display Idents.
TR808 Bass Drum Tune - Tone - Decay tu - to - dE - VL
TR909 Bass Drum Tune - Attack - Decay tu - At - dE - VL
TR808 Tom 2 Mid Tune - Decay tu -dE - VL
TR909 Crash Cymbal Tune - Tone tu - to - VL
TR808 Crash Cymbal Decay - Tone dE - to - VL
TR909 Snare Drum Tune - Tone - Snappy tu - to - Sn - VL
First, use the ‘Drum Select’ utility function to select the drum sound to be edited. Range = ‘OF’ & ‘On’
Utility Mode
Controller / Velo
34
Page 37

Response for tu - to - At - dE - Sn parameters:
‘OF’ - will respond to MIDI Controller data
‘On’ - will respond to MIDI Velocity data
Response for VL parameter:
‘OF’ - has a fixed MIDI Velocity level ( 100 )
‘On’ - will respond to MIDI Velocity data
Press the ‘CONT./VELOCITY’ button once and the display alternates between:
Typical Display Ident. Value
Use the ‘-’ and ‘+’ buttons to change the value. Press the ‘CONT./VELOCITY’ button again to select ‘to’ ( Tone ) ‘At’
( Attack ) etc. The display will loop back to ‘Tu’ ( tune ) after ‘VL’ ( Velocity ). Use the ‘Drum Select’ function again to change
these settings on another drum sound. This setting can be saved with the program.
NOTE: the ‘VL’ display ident. appears as a ‘UL’ on screen due to limitations of the 7 segment display.
Function 4 - Note-Off Recognition
This function is used to setup a drum sounds response to MIDI Note-Off messages. Normally, when a MIDI Note-On message is received a drum sound will play in full ( long decay on a bass drum, cymbal etc.) thus ignoring any Note-Off message. When set to recognised ( ‘rE’ ), the duration of the drum sound will be determined by the length of time a note is held
Utility Mode
Note Off Recogn’t’n
35
MIDI RX CH
MIDI TX CH
PROGRAM
EDIT WRITE
UTILITY
SAVE
MIDI RX CH
MIDI TX CH
PROGRAM
EDIT WRITE
UTILITY
SAVE
Page 38

down. When set to ignored (‘IG’) the drum sound will play in full regardless of the note dura-
tion.
First, use the ‘Drum Select’ utility function to select the drum sound to be edited.
Range = ‘rE’ ( recognised ) & ‘IG’ ( ignored ).Press the ‘NOTE-OFF REC.’ button once - the display alternates between:
Display Ident. Value
Use the ‘-’ and ‘+’ buttons to change the value. Use the ‘Drum Select’ function again to change settings on another drum
sound. This setting can be saved with the program.
Function 5 - General MIDI Setup
This function is used to select which drum kit ( TR808 or TR909 ) is placed in the General MIDI drum map area.
Range = ‘80’ ( TR808 ) & ‘90’ ( TR909 ). Press the ‘GEN.MIDI SET’ button once - the display alternates between:
Display Ident. Value
Utility Mode
GM MIDI Setup
36
MIDI RX CH
MIDI TX CH
PROGRAM
EDIT WRITE
UTILITY
SAVE
MIDI RX CH
MIDI TX CH
PROGRAM
EDIT WRITE
UTILITY
SAVE
MIDI RX CH
MIDI TX CH
PROGRAM
EDIT WRITE
UTILITY
SAVE
MIDI RX CH
MIDI TX CH
PROGRAM
EDIT WRITE
UTILITY
SAVE
Page 39

Use the ‘-’ and ‘+’ buttons to change the value. As a secondary visual indication, the relevant ‘Drum Kit’ LED will flash. This setting can be saved with the program. See ‘Writing a
program into memory, on page 13.
NOTE: Because the TR909 has fewer drum sounds than the TR808 ( Conga’s - Maracas - Cowbell etc.) only the drum
sounds common to both units will be moved in this operation. - see the ‘MIDI Percussion Maps’ on page 47.
Function 6 - Output Set
The D Station’s output section consists of a Stereo left/right pair and six Individual outputs which enable a drum sound(s) to
be processed separately.
This function is used to select either a drum sound’s position in the ‘stereo field’ or one of the six individual mono outputs.
OUTPUT DISPLAY IDENT OUTPUT DISPLAY IDENT
Individual O/P 1 01 Stereo O/P Left 3 L3
Individual O/P 2 02 Stereo O/P Left 2 L2
Individual O/P 3 03 Stereo O/P Left 1 L1
Individual O/P 4 04 Stereo O/P Centre Ct
Individual O/P 5 05 Stereo O/P Right 1 R1
Individual O/P 6 06 Stereo O/P Right 2 R2
Individual O/P 4 04 Stereo O/P Right 3 R3
Stereo O/P Left 4 L4 Stereo O/P Right 4 R4
Utility Mode
Output Set
37
Page 40

First, use the ‘Drum Select’ function to select the drum sound to be edited. Press the ‘OUT-
PUT SET’ button once - the display alternates between:
Display Ident.( Selected drum ) Value ( Individual output 1 )
Use the ‘-’ and ‘+’ buttons to change the value. Use the ‘Drum Select’ function again to change settings on another drum
sound. This setting can be saved with the program. See ‘Writing a program into memory, on page 13.
Any number of drum sounds can be routed to an Individual output enabling a ‘stack’ of sounds to be processed in a similar
manner.
Example: TR808 Snare - TR909 Snare - TR909 Handclap all routed to output 1 - all treated with the same effect i.e.
Reverb/Compression/Eq etc.
NOTE 1: When a drum sound is routed to an Individual output it will be removed from the Stereo left/right mix and
Headphone outputs.
NOTE 2: The stereo output ‘Pan’ setting can also be accessed via MIDI. This feature allows real-time, dynamic changes to
be made during a performance. See the ‘Controller Map’ section on page 42.
Utility Mode
Output Set
38
MIDI RX CH
MIDI TX CH
PROGRAM
EDIT WRITE
UTILITY
SAVE
MIDI RX CH
MIDI TX CH
PROGRAM
EDIT WRITE
UTILITY
SAVE
Page 41

Function 7 - Assign Bank
This function is used to setup the Pitch Play Assign Banks. There are four Assign banks, A,
B, C, & D. Range = ‘AA’ to ‘Ad’. This feature places a drum sound in the centre of a one
octave range of undefined MIDI note numbers allowing the drums pitch to follow a musical
scale.
Assign Bank Display Ident. MIDI Note Range
Bank A ‘AA’ 12 ( C-1 ) - 23 ( B-1 )
Bank B ‘Ab’ 84 ( C5 ) - 95 ( B5 )
Bank C ‘AC’ 96 ( C6 ) - 107 ( B6 )
Bank D ‘Ad’ 108 ( C7 ) - 120 ( C8 )
Press the ‘ASSIGN BANK’ and the display alternates between:
Display Ident. Value ( Bass Drum )
Use the ‘-’ and ‘+’ buttons to change the value ( drum code ). This setting can be saved with a program. See ‘Writing a program into memory’ on page 13. Press the ‘ASSIGN BANK’ button again to select banks B, C and D. The display will loop
back to ‘AA’ after ‘Ad ‘
Utility Mode
Assign Bank
39
MIDI RX CH
MIDI TX CH
PROGRAM
EDIT WRITE
UTILITY
SAVE
MIDI RX CH
MIDI TX CH
PROGRAM
EDIT WRITE
UTILITY
SAVE
Page 42

Function 8 - Distortion
This function is used to add ‘Soft-knee’ distortion in varying amounts to a drum sound.
To hear the effect this has on a drum sound listen to the demo whilst making reference to Page 45. Range = 0F ( Off ) to 15
( Maximum ). First, use the ‘Drum Select’ utility to select the drum sound. Press the ‘DISTORTION’ button once and the display will alternate between:
Display Ident Value ( level 3 )
Use the ‘-’ and ‘+’ buttons to change the value. This setting can be saved with a program. See ‘Writing a program into
memory’ on page 13.
NOTE: The Distortion setting can also be accessed via MIDI. This feature allows real-time, dynamic changes to be made
during a performance. See the ‘Controller Map’ section on page 42.
Function 9 - Demo
This function demonstrates the full potential of the D Station Rack. If a Novation BassStation is connected to the MIDI Out
socket and set to receive on MIDI channel 1 an accompaniment to the rhythm track can be heard.
Utility Mode
Distortion / Demo
40
MIDI RX CH
MIDI TX CH
PROGRAM
EDIT WRITE
UTILITY
SAVE
MIDI RX CH
MIDI TX CH
PROGRAM
EDIT WRITE
UTILITY
SAVE
Page 43

To start the demo running, press the ‘DEMO’ button once - the display alternates between:
Display Ident Value ( Program Number )
As the demo plays, the value changes to show the currently used program. The demo will ‘loop’ continuously with a few
seconds break between the end and beginning. To stop the demonstration at any time simply press the ‘DEMO’ button
again.
NOTE 1: The demo function does NOT operate if the ‘Autotrigger’ is running.
NOTE 2: The changing program numbers can be used to ‘track’ the demo as it plays through which will help identify the
various functions and effects detailed previously in this chapter and as summarised in the ‘Factory Demo Guide’ on page
45.
DIN Sync.
DIN Sync. was a standard developed by Roland for synchronising drum machines and basslines before the advent of
MIDI. This feature on the D Station converts the incoming MIDI clock from your sequencer or sync box into the DIN Sync.
format allowing you to control the tempo of a unit like the original TB303 etc. with your MIDI equipment. It sends a 5v pulse
at a rate of 24ppqn (pulses per quarter note) to keep a slaved machine at the same tempo as your master clock.
To use this feature, simply connect a suitable lead between the D Station’s output and the slave units DIN Sync input.
When the MIDI clock is running the slave unit will play it’s current pattern or song at the same tempo.
Utility Mode
Din Sync
41
MIDI RX CH
MIDI TX CH
PROGRAM
EDIT WRITE
UTILITY
SAVE
MIDI RX CH
MIDI TX CH
PROGRAM
EDIT WRITE
UTILITY
SAVE
Page 44

TR808 Kit
Bass Drum Front cut 20
Pan 21
Distortion 22
Tune 23
Tone 24
Decay 25
Snare Drum Front cut 26
Pan 27
Distortion 28
Tune 29
Tone 30
Snappy 31
Low Tom (1) Front cut 32
Pan 33
Distortion 34
Tune 35
Decay 36
Mid Tom (2) Front cut 37
Pan 38
Distortion 39
Tune 40
Decay 41
High Tom (3) Front cut 42
Pan 43
Distortion 44
Tune 45
Decay 46
Rim Shot Pan 47
Tune 48
Hand Clap Pan 49
Tune 50
Cowbell Pan 51
Distortion 52
Tune 53
Closed HiHat Pan 54
Tune 55
Decay 56
Open HiHat Pan 57
Tune 58
Decay 59
Crash Cymbal Pan 60
Tone 61
Decay 62
Low Conga (1) Pan 63
Distortion 64
Tune 65
Mid Conga (2) Pan 66
Distortion 67
Tune 68
High Conga (3) Pan 69
Distortion 70
Tune 71
Maracas Pan 72
Tune 73
Claves Pan 74
Tune 75
TR909 Kit
Bass Drum Front cut 105
Pan 106
Distortion 107
Tune 76
Attack 77
Decay 78
Controller
Map
42
Page 45

Controller
Map
43
Snare Drum Front cut 108
Pan 109
Distortion 110
Tune 79
Tone 80
Snappy 81
Low Tom (1) Front cut 82
Pan 83
Distortion 84
Tune 85
Decay 86
Mid Tom (2) Front cut 87
Pan 88
Distortion 89
Tune 90
Decay 91
High Tom (3) Front cut 92
Pan 93
Distortion 94
Tune 95
Decay 96
Rim Shot Pan 97
Tune 98
Hand Clap Pan 99
Tune 100
Closed HiHat Pan 111
Distortion 101
Tune 102
Decay 103
Open HiHat Pan 112
Tune 104
Decay 113
Crash Cymbal Pan 114
Tune 115
Decay 116
Ride Cymbal Pan 117
Tune 118
Decay 119
Equivalent Controllers found on the BassStation Keyboard & BassStation Rack Module.
Note: Controllers marked with * are only available on the BassStation Rack Module.
BassStation Controller DrumStation
Filter Frequency 105 TR909 Bass drum - Front Cut
Filter Resonance 106 TR909 Bass drum - Pan
Filter Mod Depth 107 TR909 Bass drum - Distortion
Env 1 Attack 108 TR909 Snare drum - Front Cut
Env 1 Decay 109 TR909 Snare drum - Pan
Env 1 Sustain* 110 TR909 Snare drum - Distortion
Env 1 Release* 111 TR909 Closed HiHat - Pan
Env 1 Velocity* 112 TR909 Open HiHat - Pan
Page 46

NOTE : Factory programs 00 to 22 have their outputs set to the Left/Right Main Stereo Output.
Programs 23 and 24 are setup to demonstrate the Individual Outputs.
Prog No Kit Name Description
1 Classic TR909 V1 A typical setup of this instantly recognisable classic.
2 ‘FX’ TR909/TR808 Key velocity Mod - 909 Snare. Note off recognised - 808 Bass/909 Crash
3 ‘Garage’ 909/808 808/909 kits setup in the ‘Garage’ style.
4 Classic TR909 V2 Another setup of this timeless classic.
5 ‘Hardcore’ TR909 Distortion effect on 808/909 Bass drums.
6 ‘Rave/Jungle’ TR808 808 kit setup in the real ‘Rave/Jungle’ style.
7 Classic TR808 V1 Familiar setup of the classic TR808. Ballad City.
8 ‘Tune Me Up’ Key velocity Mod - Tuning on all 808/909 drums.
9 ‘Cut’ TR909 Front Cut effect - Bass/Snare drums.
10 ‘Dynamic’ TR909 Key velocity Mod - Decay, Attack etc. Bass, Snare, Toms, Hats & Cymbals.
11 ‘Cut’ TR808 Front Cut effect - Bass/Snare drums.
12 ‘Grunge’ TR909 Distortion - Bass, Snare & Toms.
13 ‘Dynamic’ TR808 Key velocity Mod - Decay, Attack etc. Bass, Snare, Toms, Hats & Cymbals.
14 ‘Grunge’ TR808 Distortion - Bass, Snare & Toms.
15 Classic TR909 V3 Another setup of this timeless classic.
16 ‘Power’ TR909 Distortion - Bass, Snare & HiHats.
17 ‘Power’ TR808 Distortion - Bass, Snare & HiHats.
18 ‘A Bit Off’ TR909 Note off recognised - TR909 kit.
19 ‘A Bit Off’ TR808 Note off recognised - TR909 kit.
20 ‘Velo’ TR909 Key velocity Mod - Tuning HiHats & Cymbals.
21 ‘VeloDis’ TR909 Key velocity Mod - Tuning on Bass drum with distortion.
22 ‘VeloTom’ TR909 Key velocity Mod - Tuning on Tom Toms.
23 ‘VeloTom’ TR808 Key velocity Mod - Tuning on Tom Toms.
24 Classic TR909 Ind. Individual Outputs - 1= Bass 2= Snare 3= HiHats. Other sounds on Stereo
25 Classic TR808 Ind. Individual Outputs - 1= Bass 2= Snare 3= HiHats. Other sounds on Stereo.
Factory Program
List
44
Page 47

Part No Prog Bars Features
1 01 1 to 4 Velocity Mod of TR909 Snare - Tuning and Snappy controls.
Note-off recognised on TR808 Bass drum/ TR909 Crash Cymbal.
2 02 4 to 12 ‘Garage’ style demo of the classic TR808 & TR909 sounds.
3 03 12 to 18 Classic TR909 kit demo with dynamic tuning of Ride Cymbal and dynamic
mod on Bass drum Front Cut/Tuning. TR808 Snare Panning.
4 04 18 to 26 ‘Hardcore’ style demo with dynamic mod of Crash Cymbal Tune/Pan, Bass
Distortion/Pan, Open HiHat Tuning/Pan opposite channels & Handclap Pan.
5 05 26 to 31 ‘Rave/Jungle’ style demo using the classic TR808.
6 06 31 to Out Classic Ballad style demo using the classic TR808.
Factory Demo
Guide
45
Page 48

Function Transmitted Recognised Remarks
Basic Default 1 - 16 1 - 16 Memorised
Channel Changed
Mode Default 4
Messages x x
Altered ************
Note True ************ 12 - 120
Number Voice ************ 12 - 120
Velocity Note ON x o v=1-127
Note OFF x o
After Keys x x
Touch Ch’s x x
Pitch Bender x x
Control 1 x x Modulation Wheel
Change
7ooVolume
20 to 119 o o Parameter Control
inclusive
Program change o 0 - 39 o 0 - 39
True * ***********
System exclusive o o Voice parameters
System :Clock x o Start,Stop,
Real Time Continue
Aux messages
:Local ON/OFF x x
:All Notes OFF x x
:Active Sense x x
:Reset x x
Mode 1 : OMNI ON,POLY Mode 3 : OMNI ON,MONO
Mode 2 : OMNI OFF, POLY Mode 4 : OMNI OFF,MONO
Version : 1.0 Date : 10th - May - 1996 o = Yes x = No
MIDI
Implementation
46
Page 49

MIDI Key Number MIDI Note ( Normal ) Gn = 808 Drum Sound Gn = 909 Drum Sound
24 C0 TR909 Bass Drum TR808 Bass Drum
25 C#0 TR909 Rim Shot TR808 Rim Shot
26 D0 TR909 Snare Drum TR808 Snare Drum
27 D#0 TR909 Hand Clap TR808 Hand Clap
28 E0 TR909 Low Tom TR808 Low Tom Note: When using a KORG or Yamaha
29 F0 TR909 Mid Tom TR808 Mid Tom instrument the note values differ by
30 F#0 TR909 Closed HiHat TR808 Closed HiHat one octave from those in this table.
31 G0 TR909 High Tom TR808 High Tom i.e. C3 on a Korg / Yamaha equals
32 G#0 TR909 Crash Cymbal TR808 Crash Cymbal C2 on everything else.
33 A0 TR909 Ride Cymbal TR909 Ride Cymbal Note: There is no TR808 Ride Cymbal
34 A#0 TR909 Open HiHat TR909 Open HiHat
36 C1 TR808 Bass Drum TR909 Bass Drum
37 C#1 TR808 Rim Shot TR909 Rim Shot
38 D1 TR808 Snare Drum TR909 Snare Drum
39 D#1 TR808 Hand Clap TR909 Hand Clap
40 E1 TR808 Snare Drum TR909 Snare Drum
41 F1 TR808 Low Tom TR909 Low Tom
42 F#1 TR808 Closed HiHat TR909 Closed HiHat
43 G1 TR808 Low Tom TR909 Low Tom
44 G#1 TR808 Closed HiHat TR909 Closed HiHat
45 A1 TR808 Mid Tom TR909 Mid Tom
46 A#1 TR808 Open HiHat TR909 Open HiHat
47 B1 TR808 Mid Tom TR909 Mid Tom
48 C2 TR808 High Tom TR909 High Tom
49 C#2 TR808 Crash Cymbal TR909 Crash Cymbal
50 D2 TR808 High Tom TR909 High Tom
51 D#2 TR909 Ride Cymbal TR909 Ride Cymbal Note: There is no TR808 Ride Cymbal
56 G#2 TR808 Cowbell TR808 Cowbell
62 D3 TR808 High Conga TR808 High Conga
63 D#3 TR808 Mid Conga TR808 Mid Conga
64 E3 TR808 Low Conga TR808 Low Conga
70 A#3 TR808 Maracas TR808 Maracas
75 D#4 TR808 Claves TR808 Claves
MIDI
Percussion Maps
47
Page 50

If the D Station Rack does not operate as expected, make reference to the troubleshooting
guide below. Remember in most cases, problems that appear to be caused by equipment
malfunction can often be traced to human error.
No power
Check that the Power supply not connected correctly or you are using an A/C adaptor of the incorrect polarity. Check
polarity of 9v DC output plug (center pin +.)
No sound
Check that the Volume’ knob is not set at ‘0’
Check that the current Program is not saved with ‘Level’ knob(s) set to ‘0’ Check you are not sending a MIDI volume
message ( Controller 7 ) set to zero - this will also affect the headphone output
No Individual Output
Check that the sound is not assigned to different output check settings on all outputs
Check that the drum sound level knob is not set (or saved) in the ‘0’ position
Knob movements cannot be recorded on my sequencer
Some sequencers feature the ability to ‘Remap’ the MIDI Channel. .Check that the playback channel of the track on your
sequencer corresponds to the RX channel of the D station. Some sequencers feature the ability to ‘Filter’ out Controller
data. Check this feature is not active on your sequencer. Some sequencers feature the ability to ‘Remap’ Controllers.Check
this feature is not active on your sequencer. Refer to your sequencer’s owners manual for details.
Changes to the Level knobs are not recorded on my sequencer
This is because no controller is generated by the D Station’s individual Level knob’s for this purpose. The D Station will
respond to Controller 7 (Volume) but this will alter the total level of all drumsounds simultaneously. The way to do it is to
adjust the velocities of the individual notes themselves in your sequencer. For this reason it is popular to have one drumsound per track on the sequencer as it make velocity adjustments easy.
Troubleshooting
Guide
48
Page 51

Assigning kits/individual drums to individual outputs
Please refer to pages 37 and 38 for information on how to do this.
Simultaneous playing of both 808 and 909 Drum kits
When triggered from MIDI both 808 and 909 sounds may be played simultaneously. The front panel buttons only select
which type of sounds - 808 or 909 are live for front panel editing.
Operating System Firmware
The latest version of the Operating system may be displayed by holding down the AUDITION BUTTON while applying
power to D- Station. The final production version of the operating system firmware is 1.3. and the display should show this.
Please note this system in NOT flash memory upgradeable. If a previous version is displayed and it is desired to perform
an upgrade, please contact the dealer who supplied the unit.
49
Troubleshooting
Guide
Page 52

Sounds
Featured Sounds : TR808, TR909
Modelled : Bass, Snare, Tom Toms, Hi Hat, Cymbals (TR808), Congas
Samples : Rimshot, HandClap, Cowbell, Cymbals (TR909), Maracas, Claves
Polyphony : 8 note
MIDI
Programs : 40 Total - 25 Factory/15 User
Controllers : All front panel rotary controls except Individual drum “Level” rotary controls.
Via MIDI - Front Cut, Pan and Distortion on most sounds. Refer Controller Map on page 42.
Note-Off Recognition : Selective Note-Off recognition for each drum sound.
General MIDI : Selective Drum Kit (TR808/TR909) for placement within the GM map.
Connections
MIDI : IN/OUT/THRU
Outputs : Stereo Left/Right + 6 Individual Outputs & Headphone
DIN Sync : Output - 24 ppqn
Power : 9VDC 500mA input. Use Novation PSU-4
Dimensions / Weight
Case Style : 1U 19” Rackmount
Width : 483mm
Depth : 110mm
Height : 44mm
Weight : 1.9kg
NOTE: Specification and design subject to change without prior notice, due to improvements.
50
Specifications
Page 53

FCC Information ( U.S.A.)
1. IMPORTANT NOTICE: DO NOT MODIFY THIS UNIT! This product, when installed as indicated in the instructions contained in this Manual, meets FCC requirements. Modifications not expressly approved by Novation may void
your authority, granted by the FCC, to use the product.
2. IMPORTANT: When connecting this product to accessories and/or another product use only high quality shielded cables. Cable/s supplied with this product MUST be used. Follow all installation instructions. Failure to follow instructions could void your FCC authorisation to use this product in the USA.
3 NOTE: This product has been tested and found to comply with the requirements listed in FCC Regulations, Part 15 for Class “B” digital devices. Compliance with these requirements provides a reasonable level of assurance that
your use of this product in residential environment will not result in harmful interference with other electronic devices. This equipment generates/uses radio frequencies and, if not installed and used according to the instructions found in
the users manual, may cause interference harmful to the operation of other electronic devices. Compliance with FCC regulations does not guarantee that interference will not occur in all installations. If this product is found to be the
source of interference, which can be determined by turning the unit “OFF” and “ON”, please try to eliminate the problem by using one of the following measures:
Relocate either this product or the device that is being affected by the interference.
Utilise power outlets that are on different branch (Circuit breaker or fuse) circuits or install AC line filter/s.
In the case of radio or TV interference, relocate/re orient the antenna. If the antenna lead-in is 300 ohm ribbon lead, change the lead-in to co-axial type cable.
If these corrective measures do not produce satisfactory results, please contact the local retailer authorised
to distribute this type of product.
The statements above apply ONLY to products distributed in the USA.
CANADA
The digital section of this apparatus does not exceed the “Class B” limits for radio noise emissions from digital apparatus set out in the radio interference regulation of the Canadian Department of Communications.
Le present appareil numerique n’emet pas de bruits radioelectriques depassant les limites applicables aux appareils numeriques de la “Classe B” prescrites dans le reglement sur le brouillage radioelectrique edicte par le Ministere Des
Communications du Canada.
This only applies to products distributed in Canada.
Ceci ne s’applique qu’aux produits distribues dans Canada.
Other Standards ( Rest of World )
This product complies with the radio frequency interference requirements of the Council Directive 89/336/EC.
Dette apparat overholder det gaeldenda EF-direktiv vedr¯rendareadiost¯j.
Cet appareil est conforme aux prescriptions de la directivecommunautaire 89/336/EC
Diese Ger‰te entsprechen der EG-Richtlinie 89/336/EC.
Specifications subject to change:
The information contained in this manual is believed to be correct at the time of going to press. However, Novation reserves the right to change or modify the specification without notice or obligation to update existing units.
Copyright 2002
Novation Electronic Music Systems Ltd.
Printed in England
Page 54

Part No: MAN-DST-UK
Vers. 1.1
O
n
in music, anything is possible.
Novation EMS Limited
Platinum House 32 Clivemont Road Maidenhead Berkshire England SL6 7BZ
Phone +44 1 628 678520 Fax +44 1 628 671122 E-mail sales@novationmusic.com
Novation USA Limited
Int. Toll-free Tel: 011 - 800 - NOVATION (6682-8466) E-mail salesusa@novationmusic.com
Specification subject to change without prior notice.
www.novationmusic.com
 Loading...