

Page 1
English
Page 2

English
English
Novation
A division of Focusrite Audio Engineering Ltd.
Windsor House,
Turnpike Road,
Cressex Business Park,
High Wycombe,
Bucks,
HP12 3FX.
United Kingdom
Tel: +44 1494 462246
Fax: +44 1494 459920
e-mail: sales@novationmusic.com
Web: www.novationmusic.com
Trademarks
The Novation trademark is owned by Focusrite Audio Engineering Ltd. All other brand, product
and company names and any other registered names or trade marks mentioned in this manual
belong to their respective owners.
Disclaimer
Novation has taken all possible steps to ensure that the information given here is both correct and
complete. In no event can Novation accept any liability or responsibility for any loss or damage to
the owner of the equipment, any third party, or any equipment which may result from use of this
manual or the equipment which it describes. The information provided in this document may be
modifed at any time without prior warning. Specifcations and appearance may differ from those
listed and illustrated.
COPYRIGHT AND LEGAL NOTICES
Novation and Circuit are trade marks of Focusrite Audio Engineering Limited.
2016 © Focusrite Audio Engineering Limited. All rights reserved.
Page 3

English
OVERVIEW
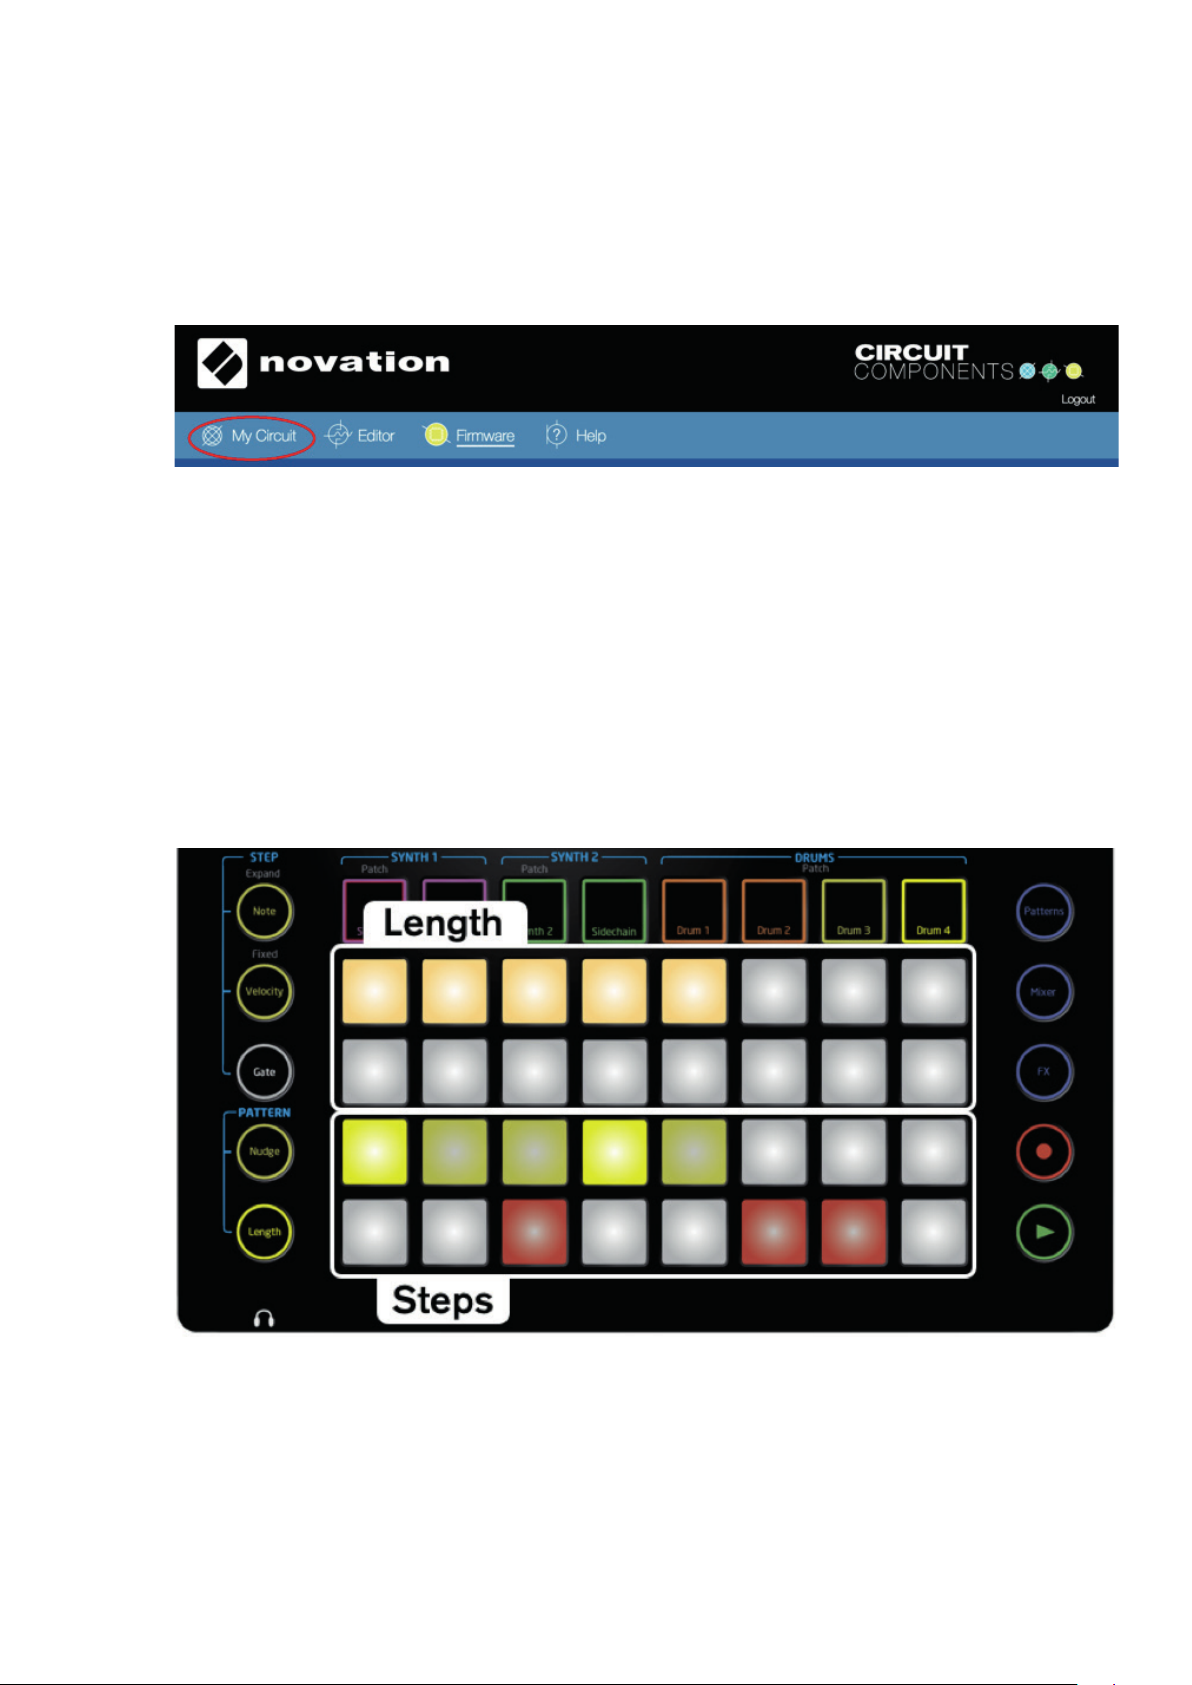
This update adds new functionality to Circuit. To use it please go to components.novationmusic.com and click
the ‘Firmware’ tab (1).
Connect your Circuit and switch on. The Components web site will show your Circuit version and if your
Circuit needs to be updated. Click the ‘Reboot to Bootloader’ button (2) and your Circuit will restart ready
to be updated.
Next click the ‘Update my Circuit Firmware’ (3) button to begin the update.
Circuit will show a red and green animation while it is updating. This make take a little time to start. After the
process has completed Circuit will reboot and will be ready to use.
Page 4
English
Circuit v1.4 – New Features
Circuit Packs
The all-new Circuit Packs format combines a complete library of Sessions, Samples and Patches in a single fi le,
for easy archiving and sharing. A full Circuit Pack is included with v1.4 which can be loaded via the free Circuit
Components Software.
4
For more information on this please go to components.novationmusic.com and click the ‘My Circuit’ tab (4) and
you will see all your Circuit Packs listed on the left hand side.
If it is the fi rst time you’ve visited the site then a Tutorial will appear to guide you through working with Circuit
Packs.
Drum Pattern Length
You can now customise your drum pattern lengths from 1-16. This opens up new possibilities in time signatures and evolving rhythms. Drum parts 1&2 and 3&4 share the common pattern length respectively letting you
apply two time signatures. These run entirely independently of your synth pattern lengths.
Press Length to enter the Length Edit view.
If you pressed Drum 1 or Drum 3 then the drum steps are shown on the top two rows of pads and the pattern
length is shown on the bottom two rows. If you pressed Drum 2 or Drum 4 then the drum steps and pattern
length are the other way round. Look for the sandy coloured pads. Press one of these pads to set the length
of the pattern between 1 and 16 steps.
Page 5

English
Instant Pattern Switch
Previously, Patterns could be cued up to play after the current Pattern fi nishes. Now they can also be switched
instantly to generate glitchy drum fi lls and beat repeats.
Press the Patterns button to enter Pattern View. Start Circuit by pressing play. Press and hold Shift and press
pads to instantly switch the currently playing pattern or patterns. You can press groups of pads to switch
instantly to a new Pattern Chain.
Page 6

English
Session Colour Select
Session colours can be changed directly from the Circuit hardware when saving. To use this feature you must
fi rst press the Sessions button to enter Session View.
Next press the Save button. The Save button and the selected Session pad will fl ash white. In addition, the
LED under Macro Knob 1 will light with the currently selected Session colour. You can now turn this knob to
select a colour for your Session. Finally press the currently fl ashing pad or the Save button again to confi rm the
save, or press a different pad to save to a different Session location.
Starting Points
The new pack contains 15 ‘Starting Points’ Sessions. We’ve pre-selected combinations of the new patches
and samples on the Synth and Drum parts, and saved them in these blue User Sessions to get you started
making new tunes even quicker.
Page 7

English
Clock Settings
Making MIDI control more versatile, the Settings page offers separate transmit and receive settings for MIDI
clock.
To see the Settings page hold Shift while turning Circuit on. Circuit will show two green pads and two blue
pads on the bottom row as follows:
Circuit is able to send and receive MIDI data both via the USB port and the dedicated MIDI IN and MIDI OUT
sockets. When it is shipped from the factory, both MIDI Rx and MIDI Tx are ON.
The fi rst two pads in the bottom row control MIDI Rx (left) and MIDI Tx (right). A dimly lit green means that Tx
or Rx are OFF; a brightly lit green means that Tx or Rx is ON. Note that the MIDI Tx/Rx settings have no effect
on how Circuit uses MIDI clock.
The second 2 pads control Rx and Tx of synchronisation MIDI messages. These are: Start, Stop, Continue,
Clock, Song Position Pointer and Song Select.
The left blue pad toggles Clock Receive on/off. When brightly lit, Automatic Clock is selected, allowing
synchronization to external equipment. When dimly lit, the Internal Clock is used and incoming synchronisation
messages are ignored.
The right blue pad toggles Clock Transmit on/off. When brightly lit, Circuit will transmit synchronisation
messages. When dimly lit, Circuit will never create or forward synchronisation messages.
Page 8

English
Circuit v1.3 – New Features
CIRCUIT FIRMWARE - SAMPLE FLIP
Sample Audition
In fi rmware v1.3 it is now possible to audition Drum Samples from the Drum Patch View. Press Shift + Drum 1
(or any of the Drum Part buttons) to select Drum Patch View.
Now, when you tap a pad on the grid Circuit will play the Drum sample, so you can hear what each sounds like.
This is different to how Circuit used to work but if you prefer to be able to change samples without hearing
them just hold down the Shift button while pressing a pad.
Tip: Remember that there are 2 pages of drum samples which can be accessed using the
Oct /Oct buttons.
Sample Flip
Recording Drum Notes and Sample Flips
Go to Drum Patch View (Shift + Drum 1) and make sure that the Circuit is playing and recording (Record
button lit bright red).
You can use the grid to record notes and samples in real time. As you record in Sample fl ips, you will see the
selected sample lit in Red.
Page 9

English
The notes and the sample choice will be stored to steps in the selected drum pattern including drum velocity
(how hard you hit the pads).
Tip: Press Shift + Velocity if you want to record with a fi xed velocity
Recording just Sample Flip
You may have already recorded some notes into your sequencer and want to record just the sample fl ip
without adding any more notes to the sequence. Or you want to record some sample fl ips and then add some
notes later.
Again, go to Drum Patch View (Shift + Drum 1) and make sure that the Circuit is playing and the Record
button is on.
Now with Shift held down, press the drum pads and only the sample selections will be recorded to steps
in the pattern.
Note: Sample fl ip automation is on an independent automaton ‘lane’, so if a note is removed for a step, the
sample change will still be active on that step.
Tip: You can record sample fl ips with no notes playing, then when you play in expanded note mode for drums
the sample fl ip automation is still active
Editing Sample Flip / Step Edit Mode
If you want to manually edit the sample assigned to a step you must do this when Circuit is not playing (this
applies to all step automation).
So with the transport stopped, press Drum 1 or any drum track that you want.
Then press Velocity to go to velocity view.
Press the Record button.
Press the step you want to edit.
Then go to Drum Patch View (Shift + Drum 1) and press the pad you want. You can audition the patches,
and the last selected patch will be the one that is saved to that step.
Page 10

English
Clearing Sample Flip
To clear sample changes, go to Drum Patch View and hold Clear then press any pad. This will delete the
sample change automation for the selected drum across the whole pattern but leave all notes intact.
Circuit Firmware - Drum Macros
It used to be the case that when you select a different patch on a Synth part or sample on a Drum part this
would reset the macros. As you can change Drum samples a lot within a pattern we have updated the way
Circuit works so that it doesn’t reset the macros anymore. This allows you to record free macro automation
throughout a pattern while changing samples.
Drum Macro Reset
To reset macros on a Drum part, hold down Clear and turn any of the macro knobs clockwise. The LED
underneath the knob will turn blue and macro automation will be reset.
Clear still works the same way as it did before if you turn it anti-clockwise. The LED will turn red and all
automation for the current part will be deleted for the selected macro.
Macro reset doesn’t actually clear automation so you can use it to part way through a pattern to reset macros
on a particular step. If you did want to clear and then reset, simply turn the knob anti-clockwise followed
by clockwise.
Tip: If you are in Step Edit mode (see above section) resetting a macro will record the reset value to that step.
Playing in Velocity View
You can now play drum steps in Velocity View even when a drum track is muted.
Press either Drum 1, or any other drum part, then press Velocity.
When you press any of the steps in Velocity view, you’ll trigger the drum sounds, this means you can hear
the notes, and any automation and sample changes that are assigned to the step as you perform the steps
in real time.
Page 11

English
Sample Length
You can adjust the envelope setting for Samples using macros 3 and 4.
In fi rmware v1.3 we’ve changed this function so that if you turn the macro to maximum the envelope decay
will be cancelled and the sample will play to its full length. This is particularly useful when working with loops.
If you do want a sample to decay then turn the knob anti-clockwise by a fraction to achieve the longest
decay setting.
Tip: With Decay set to full, the sample will play out in its entirety, even if the sequencer has stopped. To bring
the sample to an end turn the decay down”
Session Colour
You can now colour your Sessions using the Components software to group Sessions together and to easily
identify what you have saved where.
In the ‘Librarian’ tab of Components simply click on a Session in the grid and click on a colour from the palette
at the bottom.
If you want to colour Sessions that are on your Circuit then take care to fi rst click ‘Get from Circuit’. This will
upload your Sessions from Circuit to the Components software. Next colour your Sessions as you choose.
And fi nally click ‘Send to Circuit’.
 Loading...