

Novation Bass Station User Manual

BassStation
ANALOGUE BASS SYNTH
OWNER'S MANUALOWNER'S MANUAL

Contents & Introduction Contents & Introduction
Contents
Introduction
Front Panel Controls & Features
Rear Panel Connections & Features
Preparation & Connections
Preparation ........................................................................................................... page 3
Connections .......................................................................................................... page 4
Quick Guide .......................................................................................................... page 4
How The Controls Work
Control Section ...................................................................................................... page 5
Memory Section .................................................................................................... page 7
Analogue Voice Architecture ................................................................................. page 7
LFO Section .......................................................................................................... page 8
Oscillators 1&2 Section ......................................................................................... page 9
Oscillators 1&2 Modulation Section .................................................................... page 10
Filter Section ........................................................................................................ page 11
Envelopes 1&2 Section ....................................................................................... page 12
MIDI Control ........................................................................................................ page 14
Appendix
Specification ........................................................................................................ page 15
Introduction
Thank you for buying the Novation BassStation Analogue Bass Synthesiser. The keyboard
you have purchased is ideal for producing the kind of bass sounds which have returned
to popularity in recent years, but it is capable of far more than just that. Analogue
synthesis is also suitable for melody lines and lead solos as well as sound effects.
Coming from the Novation stable, it is also obvious that the BassStation makes an ideal
performance keyboard for stage use, not just for lines played using it's bass and lead
sounds, but also for polyphonic control of MIDI sound modules with velocity, pitch bend,
modulation and after touch control.
The MIDI on the BassStation allows for real-time transmission and reception of controller
information. This means that the live 'tweaking' of controls during a performance which is
particularly appropriate for analogue sounds can be recorded into a sequencer along
with the notes played and the entire performance recreated on playback. Bulk Dumps of
the 7 Memory locations can also be sent and received, allowing you to build a large
library of analogue sounds for different applications.

Front Panel Controls & FeaturesFront Panel Controls & Features
0 10
FILTER OFF PITCH
MOD WHEEL DEPTH
OCTAVE SELECT
_
/ Down
Compare
PITCH CONTROLLER
3
4
0 10 0 10 0 10 0 10 0 10 0 10 0 10
PORTAMENTOVOLUME
OFFKEY'B TUNING
UTIL. MODE
+/ Up
Write
2
3
2
1
MEMORY
5
4
PROTECTEDIT/ WRITE
1 2
5
WRITE
1
6
7
MANUAL
ENABLE TRISPEED
6
SPEED
LFO FILTER ENVELOPEOSC 1 OSC 2
R'DOM SAW
3
7 8 9 10 11
OSC1 OSC2
SHAPE
WAVEFORM
4 5
_
16' 8' 2'4'
RANGE
_
5
12
0
+
+
ENVELOPE
MIDI CHANNEL SELECT
8
9
_
_
5
5
5
+
OSC 1-2 MODULATION
1 2
OSCILLATOR
11 12 13 14 15 16 RXTX
1076
5
5
+
+
PULSE WIDTH MIX SEMI-TONEDETUNE LFO
MAN LFOENV 2
12dB 24dB
PWM SOURCEWAVEFORM
CUT- OFF
_
5
5
MOD DEPTH
ENV 2LFO
MOD SOURCE
+
ATTACK DECAYDELAY
1
ENVELOPE
CONTROLLER ASSIGN
A.TOUCH
RESONANCEFREQUENCY
0 10 0 10
0 10
SUSTAIN RELEASE VELOCITY
2
MOD
BassStation
MULTIAUTOGLIDESIN GLE
ANALOGUE BASS SYNTH
TRIGGERING
LOAD
VOL
SINGLE ALL
ALL
SINGLE
SAVEMEMORY
1
Keyboard
6
LFO Section
Full size key, 25 note velocity sensitive keyboard. This section contains the LFO Speed, Depth and Waveform Shape
2
Performance Wheels
Pitch bend wheel / Controller wheel - assignable to Modulation,
After Touch or Volume.
3
Octave Select / Up & Down Buttons etc.
These buttons control 3 functions depending on the selected
operating mode.
Normal Mode Memory Mode Tuning Mode -
4
Control Section
This section contains the Master Volume, Portamento, Mod Wheel
Depth and Utility Mode controls.
5
Memory Section
This section contains the 8 way Memory selector, edit/write Led and
program "write" switch.
See page 4
See page 5
See page 3
controls.
7
Oscillator 1 Section
This section contains the Oscillator 1 Waveform and Oscillator 1 / 2 Mix
controls.
8
Oscillator 2 Section
This section contains the Oscillator 2 Waveform, Range, Detune and
Semi-Tone transposition controls.
9
Oscillator 1 & 2 Modulation Section
This section contains the Oscillator select, PWM Source, Envelope
Modulation, LFO Modulation and Pulse Width Depth controls.
10
Filter Section
This section contains the Modulation Source, Frequency, Resonance
Cut-off slope and Modulation Depth controls.
11
Envelope Section
This section contains the Envelope select, Triggering, Attack, Decay,
Sustain, Release and Velocity controls.
Rear Panel Connections & FeaturesRear Panel Connections & Features
7
6
5
MIDI OutLine Out
BassStation
1
On/Off9vDCExt.Cont.MIDI In
1 5
Power On/Off Switch MIDI In Connector
Slide to the "On" position to turn the BassStation on, and to the "Off"
position to turn it off.
2
External 9vDC Input
Use this jack to power the BassStation from an optional DC adapter.
3
Battery Compartment
The BassStation uses six AA size ( SUM - 3 or R6P ) batteries.
4
External Pitch Bend / Controller Wheel Grip Connector
This connector is used to receive MIDI data from an external device..
6
MIDI Out Connector
This connector is used to transmit MIDI data to an external device.
7
Line Out Connector
This 1/4 jack delivers a line-level output signal for connection to a
mixing desk or amplifier input.
Use this connector when using the optional Controller Grip ( ECG-1 ).
3
4
2
Preparation
Power Supply
The BassStation will operate either from batteries or an optional DC adapter.
Using Batteries
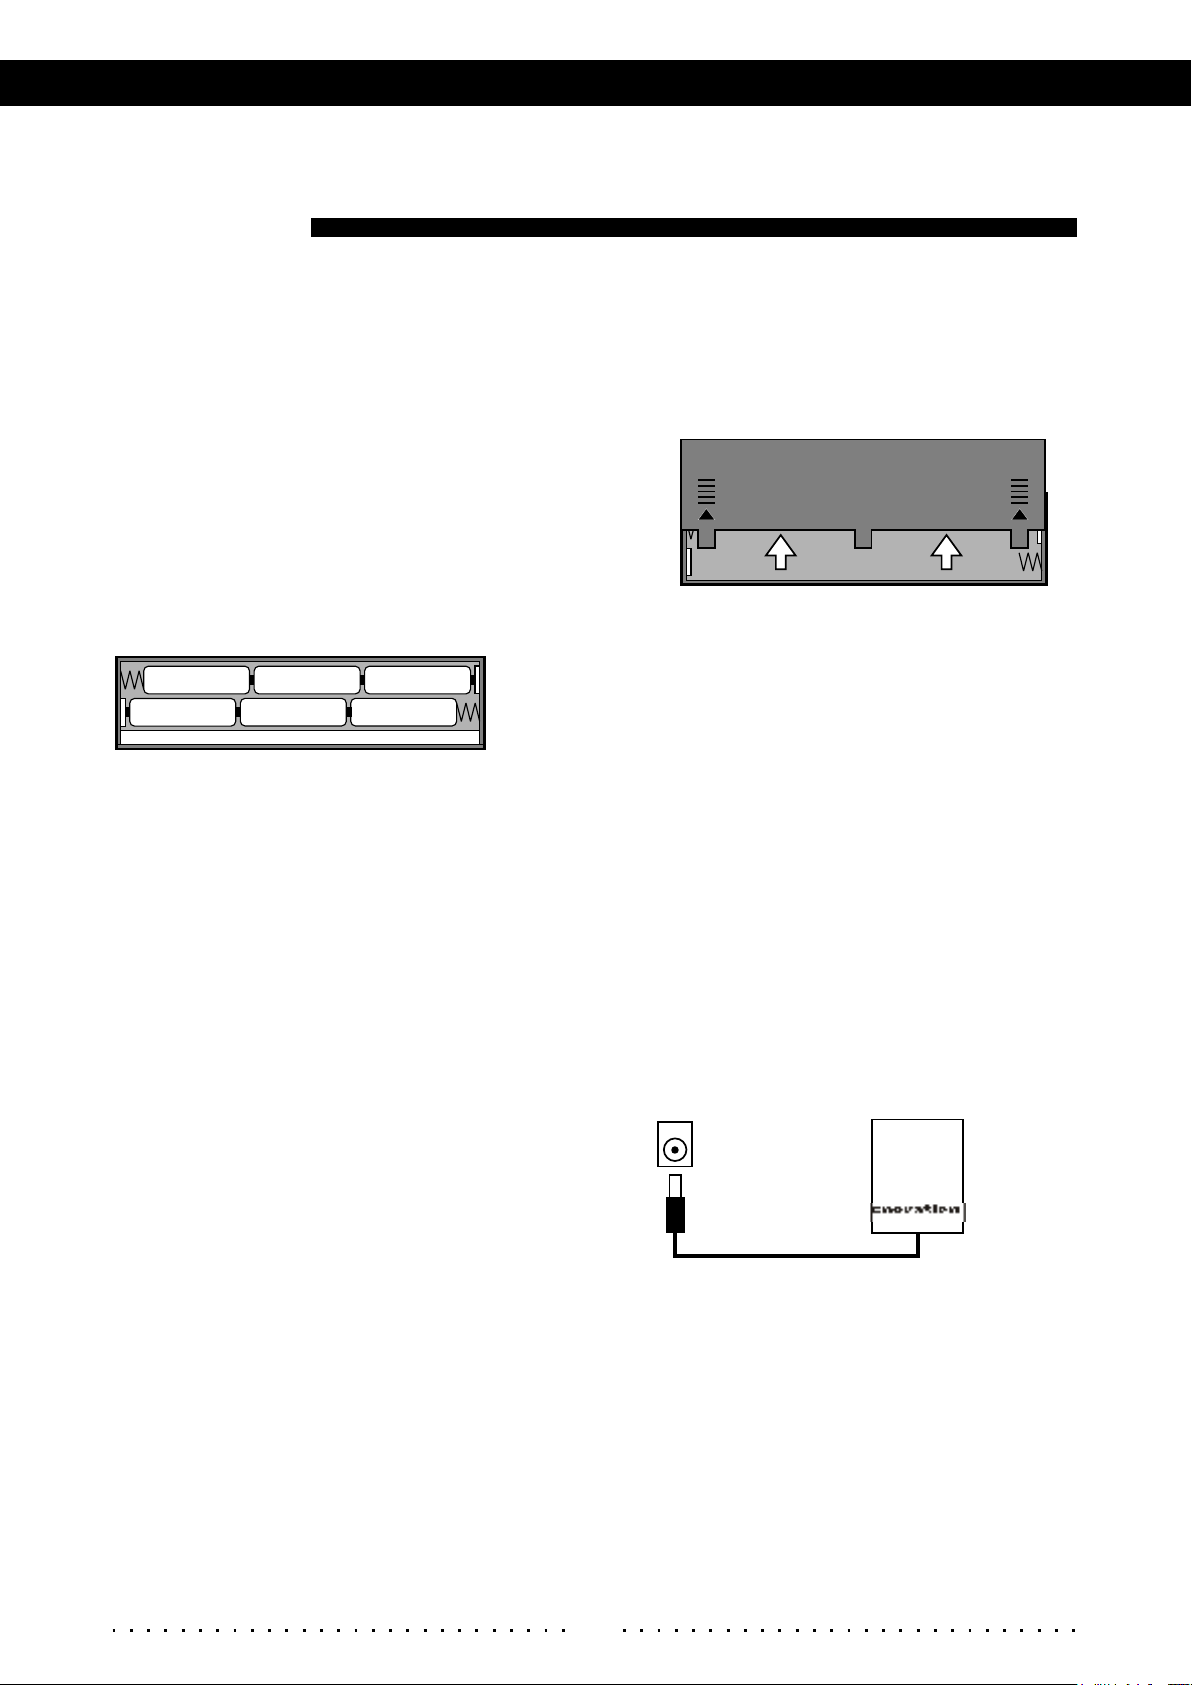
Six AA size batteries must first be installed in the battery compartment.
Removing The Battery Cover
Remove the battery cover - located on the
bottom panel - by pressing down on the textured
pads and sliding in the direction of the arrows,
as shown in the illustration.
Battery Insertion
PreparationPreparation
AA 1.5V
AA 1.5V AA 1.5V AA 1.5V
Correct battery insertion
AA 1.5VAA 1.5V
Insert the six batteries as shown in the diagram.
Note that three batteries fit in one direction and
three in the other as shown by the polarity
indications inside the compartment.
always fits against the negative end of the battery.
The spring
Replace Cover
Replace the battery compartment cover, making sure that it locks firmly in place.
When to Replace the Batteries
Your BassStation will run for approximately 40 hours on alkaline batteries. When the batteries
run down the BassStation's output will become distorted. When this happens,
batteries with a complete set of six new batteries.
replace the
Caution
To prevent any possible damage due to battery leakage, remove the batteries from the BassStation if it is not to be used
for an extended period of time.
Using a Power Adapter
If you wish to use the optional DC Power
Adapter ( PSU - 2 ), plug the connector into
the 9vDC jack on the rear panel, then plug
the adapter into a convenient wall AC
power socket.
9vDC
PSU - 2
Power Switch
Move this switch to the "On" position to turn the BassStation on, and to the "Off" position to
turn the power off.
3

Connections & Quick GuideConnections & Quick Guide
Connections
9vDC In Jack
This jack is used to power the BassStation from an optional external DC adapter instead of
batteries. The plug of a Novation PSU-2 should be plugged into this jack. The batteries are
automatically disconnected when the plug is inserted.
MIDI In Connector
Use this connector when you wish to play the BassStation's sounds from an external MIDI
device i.e. a sequencer or keyboard.
MIDI Out Connector
Use this connector to play external MIDI devices using the BassStation's 2 octave, polyphonic
keyboard or to store sounds on a MIDI data recorder.
Line Out Connector
This 1/4" jack delivers a line-level audio output signal from the BassStation for connection to
an amplifier or mixing desk input. The output level is adjusted using the "Volume" knob on
the front panel.
Fitting the Strap Buttons
The BassStation comes with 2 strap buttons which, when fitted, allow you to attach a guitar strap
for use on stage or when in a mobile situation. Use the 2 screws provided to secure the plastic
buttons to the threaded brass inserts at each end of the case.
Quick Guide
Powering up for the first time
When you have connected the power supply or inserted a set of batteries and connected the
'Line Out' socket to a suitable amplifier or mixing desk, you can listen to the 7 factory sounds
programmed into the BassStation's memory.
First, set the 'Volume' control to a reasonably high output level (8-9). This will maintain a good
signal to noise ratio on the line level output from the BassStation, but be sure that the input volume
setting on your amplifier or mixer is initially set at a low level to ensure a comfortable listening
volume when the first notes are played. Move the rotary 'Memory' selector to position '1'. Ensure
that the 'Mod Wheel Depth' and 'Util.Mode' switches in the Control Section are at their central 'off'
positions and that the 'Write' switch in the Memory Section is in the 'Protect' position.
Now, move the 'Power On/Off' switch located on the rear panel to the 'On' position. The LFO speed
LED should be flashing at a constant rate. If this does not happen, check that the batteries are
new and correctly fitted or that the power supply is of the specified type. Play the keyboard and
you will hear the sound that is stored in memory location number 1. Use the 'Memory' knob to
select all 7 of the factory demonstration sounds.
Reading the following chapter "How the controls work" in detail, will help you to understand how
these sounds were set up and allow you to explore the extensive sonic capabilities of the
BassStation so you can easily create your own, individual sounds.
4
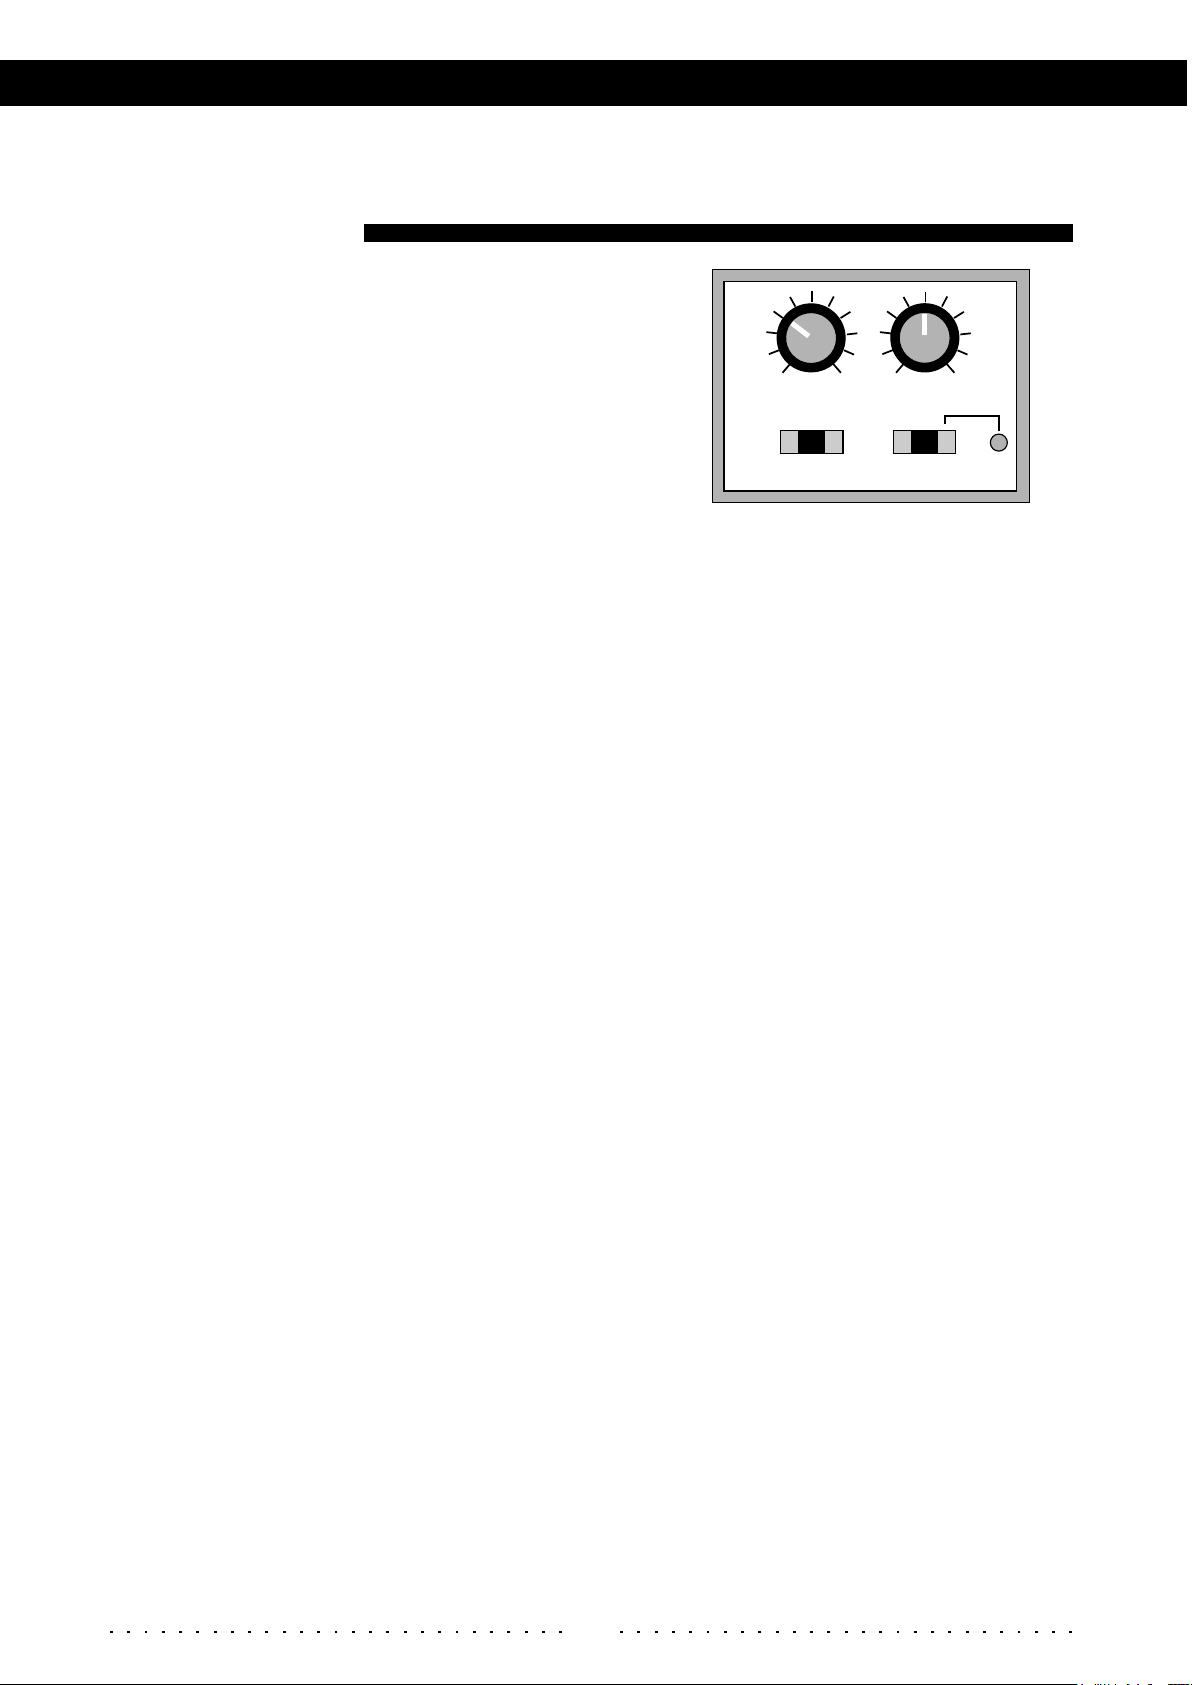
Control Section
This section allows you to set up the main control
parameters of the BassStation. These parameters
need to be accessed less often than other controls
along the front panel and so they are grouped
together into this area.
How The Controls WorkHow The Controls Work
0 10 0 10
PORTAMENTOVOLUME
FILTER OFF PITCH
MOD WHEEL DEPTH
Volume
This knob allows you to adjust the volume output of the BassStation. Turn to the left to reduce the
volume and to the right to increase the volume. Because the BassStation also acts as a
polyphonic MIDI keyboard controller, you may also want to use this knob to silence the sound of
the BassStation whilst playing external sounds on the same MIDI channel.
Mod Wheel Depth
This switch allows you to alter the amount of Pitch or Filter modulation depth available on the
controller wheel. These settings can be stored with each Memory for custom setups. When set to
either the Pitch or Filter position, the Controller Wheel is used to set the maximum depth of
modulation from the wheel at it's 'full on' position. Whilst playing a note(s) on the keyboard, adjust
the Controller Wheel to set the required depth of either the Filter or Pitch. i.e. the amount of depth
set during this procedure will have effect at the full "end stop" position of the Controller Wheel.
N.B. Ensure this switch is in the " Off " position during normal use.
Util. Mode
The "Utility Mode" switch allows you to access the keyboard functions or adjust the tuning. N.B.
When playing the BassStation normally you should keep this switch in the central 'off' position.
- Rotary
- Switch
- Switch
OFFKEY'B TUNING
UTIL. MODE
Tuning the BassStation
When the above switch is in the Tuning position, you can use the "Octave Select" buttons to adjust
the tuning of the oscillators. When you switch it on, the BassStation automatically tunes itself to
concert pitch (A-440Hz), so you will not normally need to adjust the tuning. However, if you need
to adjust the tuning to play with musicians who are not tuned to concert pitch, press the -/Down
button to lower the tuning (flat) or the +/Up button to raise it (sharp). The LED next to the tuning
position of the switch will flash whenever the tuning is not set to 440Hz. This means that if you need
to readjust the tuning back to 440Hz, you simply adjust the pitch until the LED stops flashing.
Accessing The Keyboard Parameters
When this switch is set to the Key'b position, the BassStation's keyboard changes function. It is no
longer used to make the instrument sound but to set the following parameters:
Pitch Bend Wheel Range
Use the keys numbered 1 to 12 to set the amount of pitch bend in semi-tones. i.e. if, for instance
you want to bend a note up or down 5 semi-tones, press the key number 5.
MIDI Channel
Keys 1-18 govern the MIDI channels on which the BassStation transmits (TX) and receives (RX). To
set the transmit channel, first press the key labelled "TX" followed by the key corresponding to the
MIDI channel on which you want the BassStation to transmit. Similarly, to set the receive channel,
press the key labelled "RX" followed by the key corresponding to the MIDI channel on which you
want the BassStation to receive. N.B. Remember to press the "TX" or "RX" key first, otherwise you will
change the pitch bend setting if a key numbered 1 to 12 is pressed.
Important note: When playing the BassStation from it's own keyboard you must always set the
transmit and receive channels to the same number. If no sound appears and the volume is
turned up, check that the TX and RX channels are set to the same value.
5
 Loading...