

Page 1

❚❙❏MPI✄ IPIGM❙❘
✄&✄
◗M✷✒✄❋❊❖I✄ ✪✭✳✾✼✽
ATTENTION: After STEP 6
(end of Basic Set-Up Guide)
Your GTX is now set-up just like our top factory drivers currently use it!
• The settings on this page are optional--No further adjustments are required •
adjust minimum/drag brake
The GTX lets you select between 2 different styles of braking--the
Standard Constant Force brakes or Drag Braking. Either style you
choose, you also get to select from 7 different levels of initial braking
In addition to this, the GTX stores a separate Minimum or Drag
Brake setting for each of the 7 Throttle Profiles.
Minimum/Drag Brake value = percentage of full-brakes (transmitter @ full-brake pos.)
The braking then ranges from selected value up to 100% braking force.
Min/Drag Brake Setting#:
Minimum Brake (%):
The default Min.Brake setting for all 7 Profiles is #2 (20% Minimum Brake).
select minimum brakeselect minimum brake %%
With GTX connected to a charged battery (transmitter ON or OFF):
1. IF TRANSMITTER IS OFF, DISCONNECT GTX FROM RECEIVER
Without a transmitter signal present there is a risk of possible radio
interference from other transmitters, so it is advised to remove the
GTX’s input signal harness from the receiver.
2. TURN ON THE SPEED CONTROL’S POWER
3. PRESS & HOLD THE GTX’S ONE-TOUCH SET BUTTON
Press and hold SET button on GTX until the blue LED turns on.
4. RELEASE SET BUTTON AS SOON AS BLUE LED COMES ON
Once released, the blue status LED will flash to indicate what
Minimum Brake value is currently selected. The number of times
the LED flashes indicates the Minimum Brake selection (1 of 7).
5. QUICK PRESS
Each press will change to the next consecutive Minimum Brake
value.
(After value #7, the sequence begins again at value #1)
Note: there is no time constraint during this selection process--if button
is not pressed, software rolls over & LED flashes current selection again.
6.
PRESS & HOLD THE GTX’S SET BUTTON TO ENTER SELECTION
When SET button is pressed & held for about 1 second, the selected
Minimum Brake value is stored in the GTX’s memory for the active
Profile--The 4 different color status LEDs will then scroll back & forth to
indicate that you are exiting the Minimum Brake selection part of the GTX’s
software. The red status LED will then turn on solid
signal present)
(& release)
, indicating that the GTX is at neutral & ready to go.
SET BUTTON TO CHANGE SELECTION
switch to drag brakinswitch to drag brakingg
Every bit as easy as it was to select the Minimum Brake value above,
it’s that easy to switch over to Drag Braking and select its value.
With GTX connected to a charged battery & GTX powered ON:
1. PRESS & HOLD THE GTX’S ONE-TOUCH SET BUTTON
Press and hold SET button on GTX until the blue LED turns on.
2. CONTINUE HOLDING SET BUTTON PAST THE BLUE LED
3.
RELEASE SET BUTTON WHEN BLUE & AMBER LEDs COMES ON
Once released, the blue & amber status LEDs will flash to indicate
that Drag Braking is now active and which Drag Brake value is
currently selected.
4. QUICK PRESS
Each press will change to the next consecutive Drag Brake value.
5.
PRESS & HOLD THE GTX’S SET BUTTON TO ENTER SELECTION
When pressed & held for about 1 second, selected Drag Brake value
is loaded into GTX’s memory for active Profile. The 4 status
scroll back & forth and GTX exits to the red status LED of neutral.
(# of flashes = Drag Brake selection--1 of 7)
(& release)
SET BUTTON TO CHANGE SELECTION
1 234567
0 203035404550
::
(red & green if no transmitter
::
blue
blue & amber
to switch back to std. brakinto switch back to std. brakingg
Just repeat steps in ‘SELECT MINIMUM BRAKE %’ above, and you’re
automatically switched back to Standard Constant Force brakes.
.
LEDs
::
, your GTX is fully programmed & Ready-to-Run
9-2004#IM-1780P-2
throttle profile selection
The GTX is equipped with 7 user-selectable Throttle Profiles
from. The chart below shows how the different Throttle Profiles
change the feel of the throttle response.
FEEL: AGGRESSIVE SMOOTH
PROFILE#:
The ‘Factory-Installed Profiles’ chart below shows the Drive Frequency,
Minimum Drive, Brake Frequency, Minimum Brake, and Deadband values
that are the factory defaults for Throttle Profiles 1-7.
1234567
FACTORY-INSTALLED PROFILES 1-7
Throttle Profile #: 1 2 34567
Drive Frequency (kHz): 1.5 2.5 3.5 4.5 5.5 7.5 11.0
Minimum Drive (%): 3335556
Brake Frequency (kHz): 3.5 3.5 3.5 3.5 3.5 3.5 3.5
Minimum Brake (%): 20 20 20 20 20 20 20
Standard Brakes are active: √√√√√√√
NOTE: GTX is factory set to Profile #3--This is the
choice of our top drivers for stock & modified.
•Use higher Profile numbers for tracks with less grip•
•Use lower Profiles for higher grip tracks or stock
selecting throttle profilselecting throttle profilee
With GTX connected to a charged battery (transmitter ON or OFF):
1. IF TRANSMITTER IS OFF, DISCONNECT GTX FROM RECEIVER
To avoid possible radio interference from other transmitters, remove
the GTX’s input signal harness from the receiver.
2. TURN ON THE SPEED CONTROL’S POWER
3. PRESS & HOLD THE GTX’S ONE-TOUCH SET BUTTON
Continue to hold SET button on GTX until all 4 LEDs turns on.
Note: you will continue holding past the blue and then blue & amber.
4. RELEASE SET BUTTON AS SOON AS ALL 4 LEDs COMES ON
Once released, the 4 status LEDs will flash to indicate what Throttle
Profile is currently selected. The number of times the LEDs flash
indicates the Throttle Profile selection (1 of 7).
5. QUICK PRESS
Each press will change to the next consecutive Throttle Profile. (After
Profile 7, the sequence begins again at Profile 1)
6.
GTX STORES SELECTION & BEGINS TO EXIT PROGRAMMING
When SET button is not pressed for about 3 seconds, the selected
Profile is stored into memory & all 4 LEDs will come on solid. Then:
If a Profile other than 7 is selected: status LEDs will then turn off in a
rolling motion from right to left, until just the red LED is on solid
(red & green if no transmitter signal present)
If Profile 7 is selected: the 4 status LEDs will stay on solid for a few
seconds
Mode)
will then turn off in a rolling motion from right to left
until just the red LED is on solid
present)
REMEMBER: Whenever the One-Touch set-up is performed, the GTX will automatically
revert to the factory default settings & the Throttle Profile will revert to #3.
www.teamnovak.com
P5
Deadband (%): 4444444
(this gives you smoother throttle response)
(this gives you a more aggressive response)
::
(& release)
Note: there is a time constraint during this selection process.
(to give you a chance to enter into the 7th Profile Customization
--if SET button is not pressed while they are all on solid, they
. The GTX is at neutral & ready to go.
SET BUTTON TO CHANGE SELECTION
.
GTX is at neutral & ready to go.
(red & green if no transmitter signal
to choose
current
motors•
all LEDs
(as above)
,
Page 2
❊❍❊❘GI❍
✄
✑✑
✄
7
L
✄ ❚❙❏MPI✄ ✬✾✼✽✸✶MM✷✰
PLEASE NOTE: This page contains Advanced Programming items only!
Because of the GTX’s high degree of adjustability, the items on this page give you access to a very powerful tool.
This level of tuning also means you have the ability to thoroughly mess-up the GTX’s performance.
• These programming items are STRICTLY ADVANCED--No further adjustments are required •
(but don’t worry, you can always reset factory defaults by performing the One-Touch programming again, so go ahead & experiment--that’s why you bought it , right?)
The GTX’S 7th Throttle Profile can be customized
the speed control to feel just the way you like it with any motor.
The GTX lets you tune the following items in 7th Throttle Profile:
•Drive Frequency--1 of 7 frequencies from 1.5 to 11kHz
•Minimum Drive Percentage--1 of 5 settings from 2 to 12%
•Brake Frequency--1 of 5 frequencies from 1.5 to 6.5kHz
•Minimum Brake Percentage--1 of 7 settings from 0 to 50%.
•Braking Type--1 of 2 types of braking styles (standard Constant Force
braking or DRAG BRAKING).
•Dead Band--1 of 5 Dead Band settings from 2 to 6%
for fine tuning
.
.
.
.
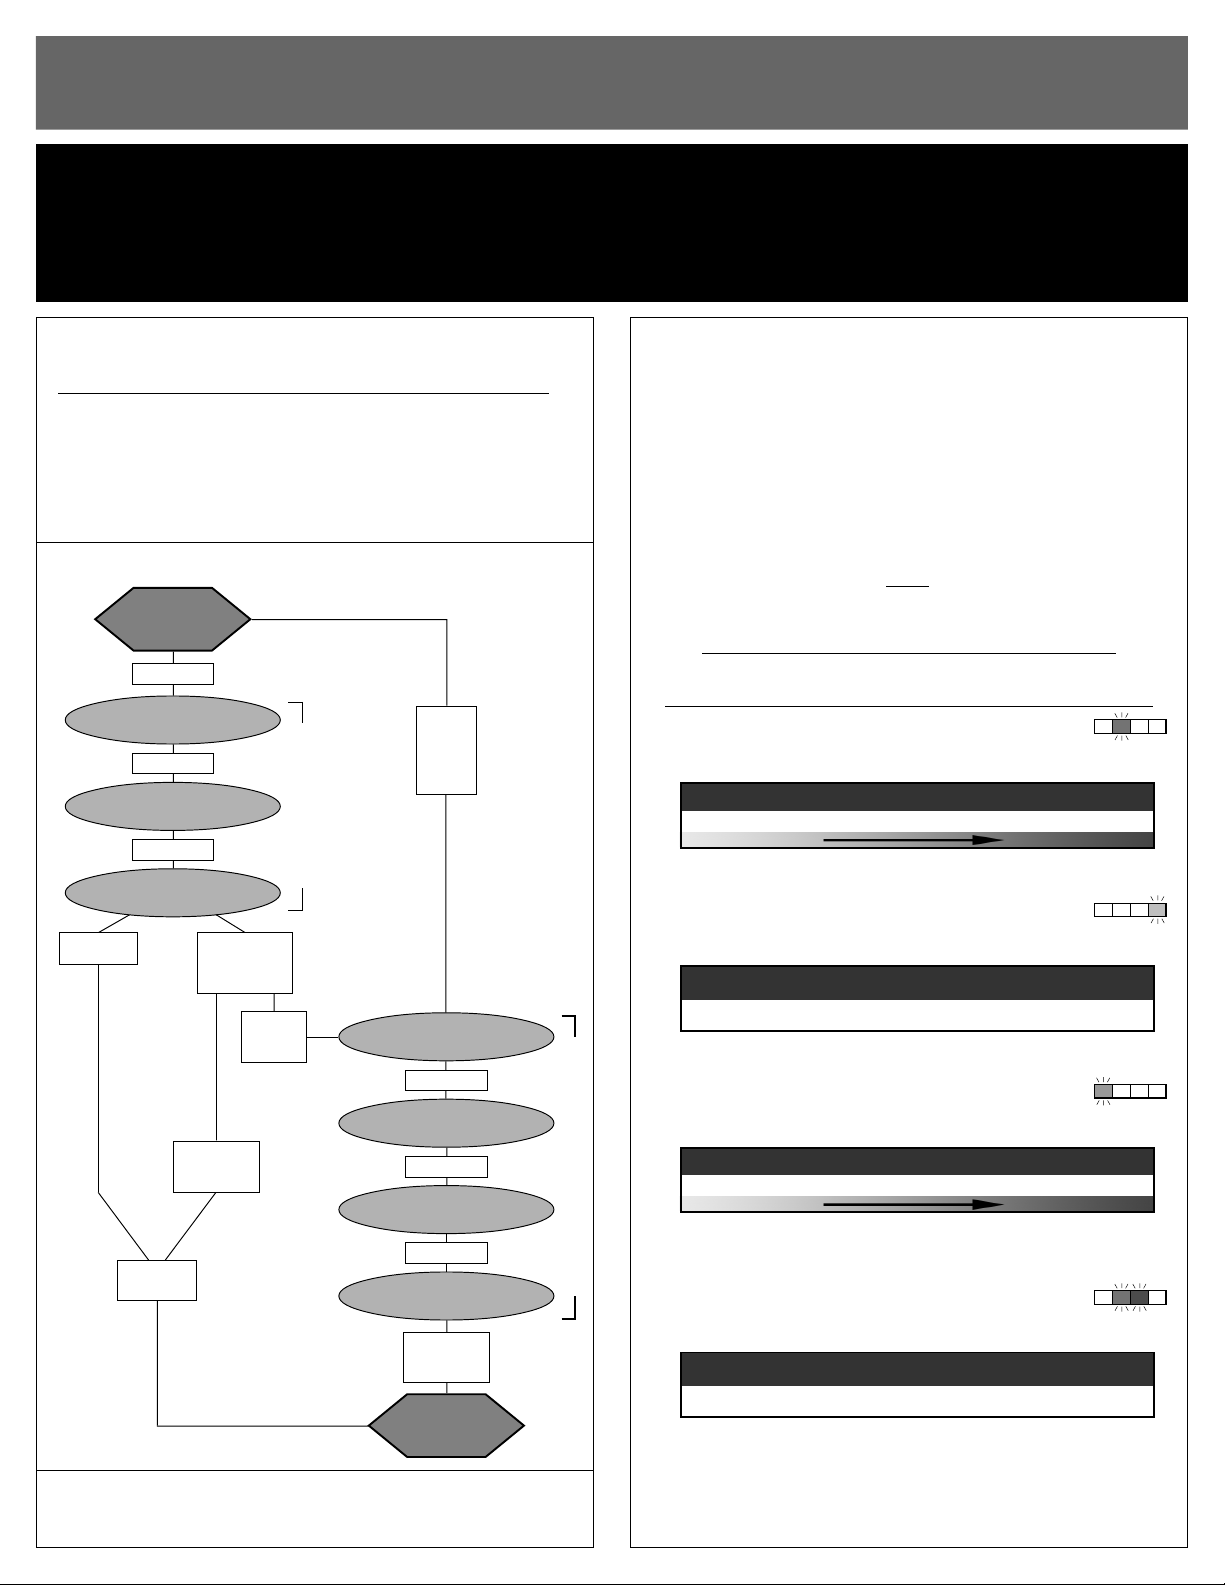
gtx software flow chartgtx software flow chart::
@NEUTRAL
RED or RED & GREEN
press & hold
MIN. BRAKE
BLUE
press & hold
DRAG BRAKE
BLUE & AMBER
press & hold
ACTIVE PROFILE
all LEDs (flashing)
if Profile 1-6
selected
LEDs roll off
––––
save & exit
if Profile 7
selected
––––––
wait & all LEDs
come on solid
if not pressed
––––––
while all
LEDs on
continue holding GTX’s SET
button to skip steps here
if pressed
––––––
while all
LEDs on
two
quick
presses
if
profile 7
active
DRIVE FREQ.
GREEN
press & hold
MIN. DRIVE
AMBER
press & hold
BRAKE FREQ.
RED
press & hold
DEAD BAND
GREEN & BLUE
press & hold
––––
LEDs scroll
––––
save & exit
@NEUTRAL
RED or RED & GREEN
restoring gtx factory defaultrestoring gtx factory defaultss ::
Every time you perform the One-Touch Set-Up, the GTX’s factory default
settings are restored--as shown in ‘Factory-Installed Profile 1-7’ chart.
profile
to enter profilto enter profilee
With GTX connected to a charged battery (transmitter ON or OFF):
1. IF TRANSMITTER IS OFF, DISCONNECT GTX FROM RECEIVER
To avoid possible radio interference from other transmitters, remove
the GTX’s input signal harness from the receiver.
2. TURN ON THE SPEED CONTROL’S POWER
3. MAKE THROTTLE PROFILE 7 ACTIVE
If you are not sure that Profile 7 is selected, follow the procedures
in ‘Throttle Profile Selection’ to check or select Profile 7.
4. DOUBLE-CLICK SPEED CONTROL’S SET BUTTON
With Profile 7 active & speed control in neutral, quickly press &
release GTX’s SET button
mode. All 4 LEDs will turn on solid for about 1 second, then turn
off. The green status LED
the active Drive Frequency (& that you’re in the customizing mode).
to adjust profilto adjust profilee
Note: there is no time constraint during the Profile 7 customizing process.
5. SELECT DRIVE FREQUENCY
Green status LED (2nd from left) flashes to indicate active Drive
Frequency setting. Quick press & release to select desired setting.
Setting
Drive PWM Frequency
6. PRESS & HOLD SET BUTTON TO MOVE ON
When
amber status LED (4th from left) comes on
7. SELECT MINIMUM DRIVE PERCENTAGE
Amber status LED flashes to indicate active Minimum Drive setting.
Quick press & release to select desired setting.
Setting
PROFILE 7 CUSTOMIZING MODE
8. PRESS & HOLD SET BUTTON TO MOVE ON
When
red status LED (1st from left) comes on
9. SELECT BRAKE FREQUENCY
Red status LED flashes to indicate active Brake Frequency setting.
Quick press & release to select desired setting.
Setting
Drive PWM Frequency
Note: Same as Drag Brake frequency if Drag Brakes are active.
10.
PRESS & HOLD SET BUTTON TO MOVE ON
When green & blue status LEDs
11.
SELECT DEAD BAND PERCENTAGE
Green & blue status LEDs flash to indicate active Dead Band setting.
Quick press & release to select desired setting.
Setting
12.
PRESS & HOLD SET BUTTON TO COMPLETE CUSTOMIZING
When SET button is pressed & held for about 1 second, the new
Profile 7 selections are stored in GTX’s memory--The 4 status LEDs
will then scroll back & forth to indicate you are exiting the Profile 7
Customization part of GTX’s software. The red LED will turn on solid
(red & green if no transmitter signal present)
P6
(# of flashes)
(# of flashes)
Minimum Drive
(# of flashes)
(# of flashes)
Dead Band
77
customizing mod customizing modee ::
twice to enter Profile 7 customizing
(2nd LED from left) will then flash to indicate
77
parameter parameterss::
green
:
1234567
(kHz)
: 1.5 2.5 3.5 4.5 6.5 8.5 11.0
:
12345
(%)
: 235812
:
12345
(kHz)
: 1.5 2.5 3.5 4.5 6.5
(2nd & 3rd)
:
12345
(%)
: 23456
--GTX is at neutral & ready to go.
LESS AGGRESSIVE
, release SET button.
amber
, release SET button.
red
LESS AGGRESSIVE
come on, release SET button.
green & blue
 Loading...