

Page 1

Title page
Nortel Networks Communication Server 1000
Nortel Networks Integrated Conference
Bridge
User Guide
Page 2

Page 3

Revision history
July 2004
Standard 1.00. This document is issued to support Nortel
Networks Integrated Conference Bridge Release 4.0.
Revision history
3
Page 4

Revision history
4
Page 5

Contents
Introduction . . . . . . . . . . . . . . . . . . . . . . . . . . . . . . . . . . . . . . . 9
User levels . . . . . . . . . . . . . . . . . . . . . . . . . . . . . . . . . . . . . . . . 9
Integrated Conference Bridge interfaces . . . . . . . . . . . . . . . . . 9
Browser User Interface . . . . . . . . . . . . . . . . . . . . . . . . . . . . 11
Accessing the BUI . . . . . . . . . . . . . . . . . . . . . . . . . . . . . . . . . 11
General information . . . . . . . . . . . . . . . . . . . . . . . . . . . . . 11
Preparing to use the BUI . . . . . . . . . . . . . . . . . . . . . . . . . 11
Logging in to the BUI . . . . . . . . . . . . . . . . . . . . . . . . . . . . 11
Changing the user password . . . . . . . . . . . . . . . . . . . . . . 13
Conference List window . . . . . . . . . . . . . . . . . . . . . . . . . . . . . 14
Title frame . . . . . . . . . . . . . . . . . . . . . . . . . . . . . . . . . . . . 17
Scheduling a one-time conference . . . . . . . . . . . . . . . . . . . . . 17
Scheduling a new one-time conference . . . . . . . . . . . . . . 17
Scheduling a one-time conference by copying and
reconfiguring a conference . . . . . . . . . . . . . . . . . . . . . . . . 26
Contents
Scheduling a recurrent conference . . . . . . . . . . . . . . . . . . . . . 27
Scheduling a new recurring conference . . . . . . . . . . . . . . 28
Scheduling a recurring conference by copying and
reconfiguring a conference . . . . . . . . . . . . . . . . . . . . . . . . 30
Editing a conference (one-time or recurring) . . . . . . . . . . . . . 31
Deleting a conference . . . . . . . . . . . . . . . . . . . . . . . . . . . . . . . 33
Managing a conference in progress . . . . . . . . . . . . . . . . . . . . 34
Tasks for managing a conference . . . . . . . . . . . . . . . . . . 34
Dual-card meeting . . . . . . . . . . . . . . . . . . . . . . . . . . . . . . 36
Conference Call Manager window . . . . . . . . . . . . . . . . . . 36
Managing the conference . . . . . . . . . . . . . . . . . . . . . . . . . 39
Changing the status of the chairperson . . . . . . . . . . . . . . 42
Managing the status of all participants . . . . . . . . . . . . . . . 44
Managing the status of individual participants . . . . . . . . . 45
5
Page 6

Contents
Microsoft Outlook User Interface . . . . . . . . . . . . . . . . . . . . 48
Overview . . . . . . . . . . . . . . . . . . . . . . . . . . . . . . . . . . . . . . . . . 48
System requirements . . . . . . . . . . . . . . . . . . . . . . . . . . . . 48
Microsoft Outlook settings . . . . . . . . . . . . . . . . . . . . . . . . 48
ICB form . . . . . . . . . . . . . . . . . . . . . . . . . . . . . . . . . . . . . . . . . 49
ICB files . . . . . . . . . . . . . . . . . . . . . . . . . . . . . . . . . . . . . . 49
Getting started . . . . . . . . . . . . . . . . . . . . . . . . . . . . . . . . . 50
Publishing the ICB files . . . . . . . . . . . . . . . . . . . . . . . . . . 50
Adding the ICB form as the default Calendar form . . . . . 52
Removing ICB files from the Personal Forms Library . . . 53
Resetting the default Calendar form for Microsoft Outlook 54
Upgrading the ICB form . . . . . . . . . . . . . . . . . . . . . . . . . . 55
Clearing the Microsoft Outlook forms cache . . . . . . . . . . 55
ICB form errors . . . . . . . . . . . . . . . . . . . . . . . . . . . . . . . . . 56
Logging in to ICB . . . . . . . . . . . . . . . . . . . . . . . . . . . . . . . . . . 57
Changing the ICB password . . . . . . . . . . . . . . . . . . . . . . 58
Adding access to a different ICB card . . . . . . . . . . . . . . . 59
Renaming an ICB card . . . . . . . . . . . . . . . . . . . . . . . . . . . 59
Scheduling a conference . . . . . . . . . . . . . . . . . . . . . . . . . . . . 60
Scheduling a new conference . . . . . . . . . . . . . . . . . . . . . 61
Modifying a past conference to start in the future . . . . . . 66
Editing a conference . . . . . . . . . . . . . . . . . . . . . . . . . . . . . . . . 67
Editing a conference before it begins . . . . . . . . . . . . . . . . 67
Editing a conference while it is in progress . . . . . . . . . . . 69
Deleting a conference . . . . . . . . . . . . . . . . . . . . . . . . . . . . . . . 70
Telephone User Interface . . . . . . . . . . . . . . . . . . . . . . . . . . . 71
Overview . . . . . . . . . . . . . . . . . . . . . . . . . . . . . . . . . . . . . . . . . 71
Scheduling a conference . . . . . . . . . . . . . . . . . . . . . . . . . . . . 71
Acquiring and releasing chairperson control . . . . . . . . . . . . . 74
Using the TUI commands . . . . . . . . . . . . . . . . . . . . . . . . . . . . 75
Using the chairperson TUI commands . . . . . . . . . . . . . . . 75
6
Page 7

Contents
Using the participant TUI commands . . . . . . . . . . . . . . . . 75
Adjusting audio volume . . . . . . . . . . . . . . . . . . . . . . . . . . . . . 76
Recording a conference-specific greeting . . . . . . . . . . . . . . . 77
Creating an “ad hoc” conference . . . . . . . . . . . . . . . . . . . . . . 77
TUI command summary . . . . . . . . . . . . . . . . . . . . . . . . . . . . . 78
Chairperson commands . . . . . . . . . . . . . . . . . . . . . . . . . . 78
Participant commands . . . . . . . . . . . . . . . . . . . . . . . . . . . 81
7
Page 8

Contents
8
Page 9

Introduction
Introduction
Nortel Networks Integrated Conference Bridge allows users to schedule
and administer multiple, simultaneous conferences using a web,
telephone, or Microsoft® Outlook® user interface.
User levels
Nortel Networks Integrated Conference Bridge (ICB) supports the
following four user levels:
• Administrator — An administrator can set up the ICB card, add one
or more users (including super users), and delete one or more users.
• Super user — A super user can view and change any conference
scheduled on the ICB.
• Executive user — An executive user can create and modify their
own conferences. An executive user can also view any conference
scheduled on the ICB.
• Regular user — A regular user can create and modify their own
conferences. A regular user cannot view or change the conferences
of others.
This document describes ICB operations for the super user, executive
user, and regular user levels. Administrator operations are described in
Nortel Networks Integrated Conference Bridge Administrator Guide.
Integrated Conference Bridge interfaces
A conference can be configured on the Nortel Networks Integrated
Conference Bridge (ICB) system in the following ways:
• Use the Browser User Interface.
• Use the Microsoft Outlook User Interface.
• Use the Telephone User Interface.
9
Page 10

Introduction
Browser User Interface
The ICB Browser User Interface (BUI) offers one set of configuration
options for administrators and a second set for other users.
• For information about BUI options for administrators, refer to Nortel
Networks Integrated Conference Bridge Administrator Guide.
• For information about BUI options for non-administrators, see
“Browser User Interface” on page 11.
Microsoft Outlook User Interface
The Microsoft Outlook User Interface enables users to schedule and
manage ICB conferences. The interface includes a subset of the options
available in the BUI.
• For information about Microsoft Outlook User Interface options for
administrators, refer to Nortel Networks Integrated Conference Bridge
Administrator Guide.
• For information about Microsoft Outlook User Interface options for
non-administrators, see “Microsoft Outlook User Interface” on
page 48.
Telephone User Interface
The ICB Telephone User Interface (TUI) lets administrators and other
users enter commands on a telephone keypad to configure conferences.
• For information about TUI options for administrators, refer to Nortel
Networks Integrated Conference Bridge Administrator Guide.
• For information about TUI options for non-administrators, see
“Telephone User Interface” on page 71.
10
Page 11

Browser User Interface
Browser User Interface
Accessing the BUI
This section contains instructions on accessing the BUI and changing the
user password.
General information
The ICB BUI supports open access from anywhere on the Internet,
including gateways and firewalls. The ICB web server is accessed over
an Ethernet connection. The system does not support browsers running
on MacIntosh computers. When using the BUI, do not disable the cookies
function in the browsers.
Preparing to use the BUI
1. Check the web browser version.
a. Netscape Communicator® users must run version 4.5 or later. To
check the version, choose Help > About Netscape.
b. Microsoft Internet Explorer® users must run version 4.01 or later
with Service Pack 1. To check the version, choose Help > About
Internet Explorer.
To upgrade the web browser, ask your system administrator about
the upgrade procedure.
2. Obtain the following information from the ICB administrator:
a. your ICB UserID name
b. your ICB login password
c. the ICB IP address (URL or DNS Name)
Logging in to the BUI
1. Enter the ICB IP address in the browser’s Location or Address field,
and press Enter or Return.
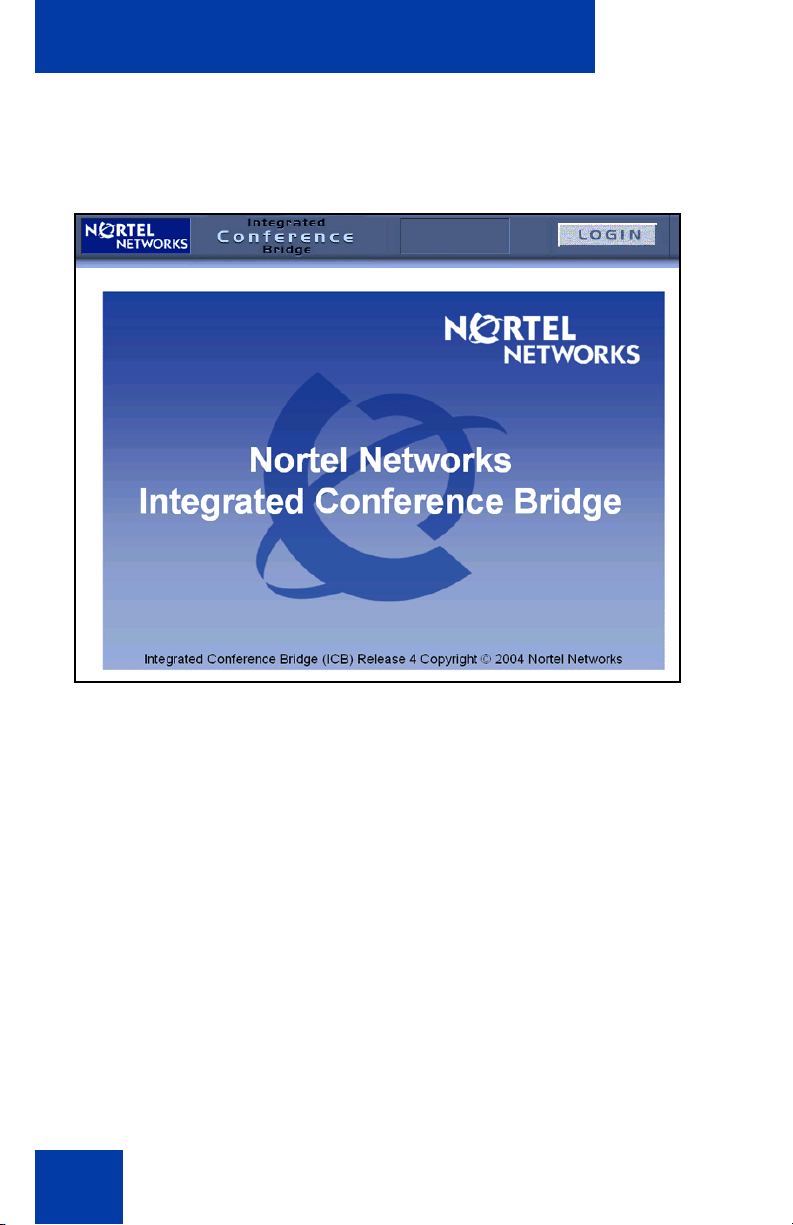
The ICB Login window opens. See Figure 1 on page 12.
11
Page 12
Browser User Interface
Note: By default, the ICB Login window has a generic image.
Administrators can remove or replace this image.
Figure 1: ICB Login window
553-AAA1292
2. Bookmark this URL for future use.
3. Click LOGIN
.
The Network Password window opens. See Figure 2 on page 13.
12
Page 13
Browser User Interface
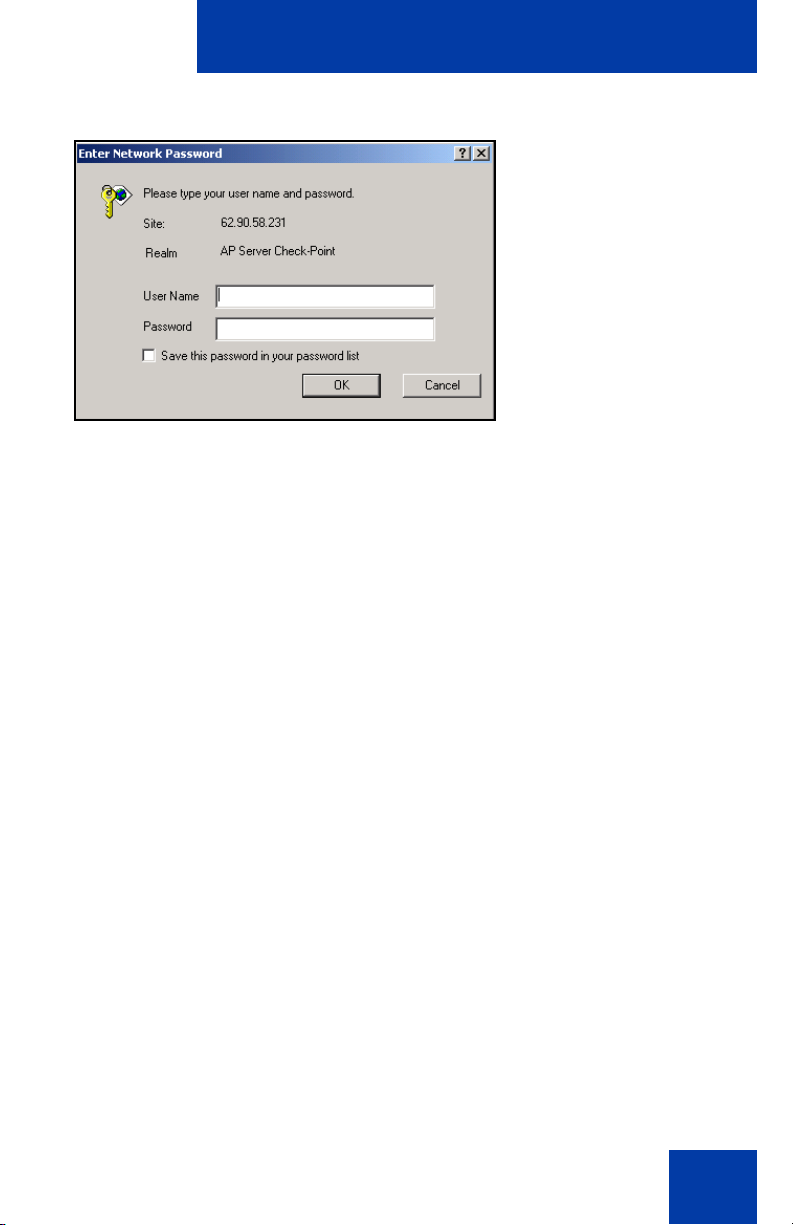
Figure 2: Network Password window
553-AAA1293
4. Enter your user name in the User Name field.
• To log in as chairperson, enter the chairperson access number
(this is the same number the chairperson dials when joining the
conference from a telephone).
• To log in for any other reason (such as to schedule a
conference), enter your ICB User Name.
5. Enter your password in the Password field.
• To log in as chairperson, enter the chairperson conference
password (this is the same number the chairperson dials when
joining the conference from a telephone).
• To log in for any other reason (such as to schedule a
conference), enter your ICB password. To log in the first time,
use the default password assigned by your Administrator.
6. Select Save this password in your password list (optional).
7. Click OK.
Changing the user password
1. Log in to the BUI. See “Accessing the BUI” on page 11.
2. Click Change Password.
The Change Password window opens. See Figure 3 on page 14.
13
Page 14

Browser User Interface
Figure 3: Change Password window
553-AAA1294
3. Enter the current password in the Enter current password field.
4. Enter the new password in the New password field.
5. Reenter the new password in the Confirm new password field.
6. Click Submit.
Conference List window
The home window for the ICB BUI is the Conference List window (see
Figure 4 on page 15). Use this window to view scheduled conferences,
create a new conference, change passwords, and more.
14
Page 15
Browser User Interface
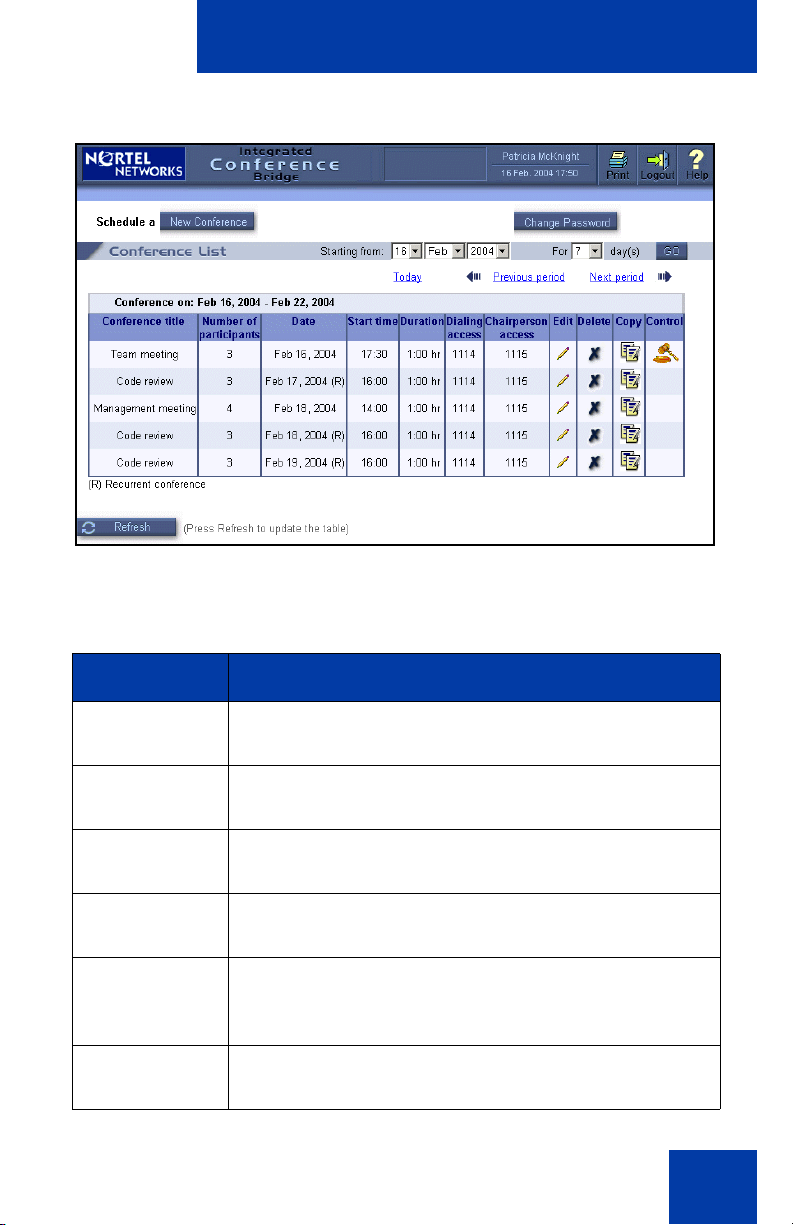
Figure 4: Conference List window
The controls and fields in this window are described in Table 1.
Table 1: Components of Conference List window (Part 1 of 2)
Component Description
New
Click to set up a new ICB conference.
Conference
Change
Click to change a password.
password
Conference
title
Number of
Subject text of the conference. This field can be
empty.
Number of ports reserved for this conference.
participants
Date Conference date. For permanent conferences, the
date shows Permanent. For recurrent conferences,
(R) follows the date.
Start time Conference start time. This field is empty for
permanent conferences.
15
Page 16

Browser User Interface
Table 1: Components of Conference List window (Part 2 of 2)
Component Description
Duration Conference duration. This field is empty for
permanent conferences.
Dialing access Conference access number (DN).
Chairperson
Chairperson access number (DN).
access
Owner Name of the person who owns the conference. This
column appears only for super users, as they can
view all conferences. When a super user schedules
a conference and enters another user in the Owner
field, that user becomes conference owner and that
user’s name appears here.
Edit Click the Edit icon (a pencil) to open a window for
editing the conference. The window opens with the
selected item’s parameters. Super users cannot edit;
they can only view or control a permanent
conference.
Delete Click the Delete icon (an X) to delete the conference.
When clicked, a confirmation dialog box opens. If the
conference is active, the following additional line
appears before the confirm delete statement:
“Warning! This conference is active.” Super users
cannot edit a permanent conference; they can only
view or control a permanent conference.
Copy Click the Copy icon (pages) to schedule a new
conference by copying an existing conference
without having to reenter all the detailed information.
A window opens with the selected item’s parameters.
Permanent conferences and “ad hoc” conferences
cannot be copied.
Control Click the Control icon (a gavel) to open the
Conference Call Manager window. This icon
appears only for conferences currently in progress.
16
Page 17
Browser User Interface
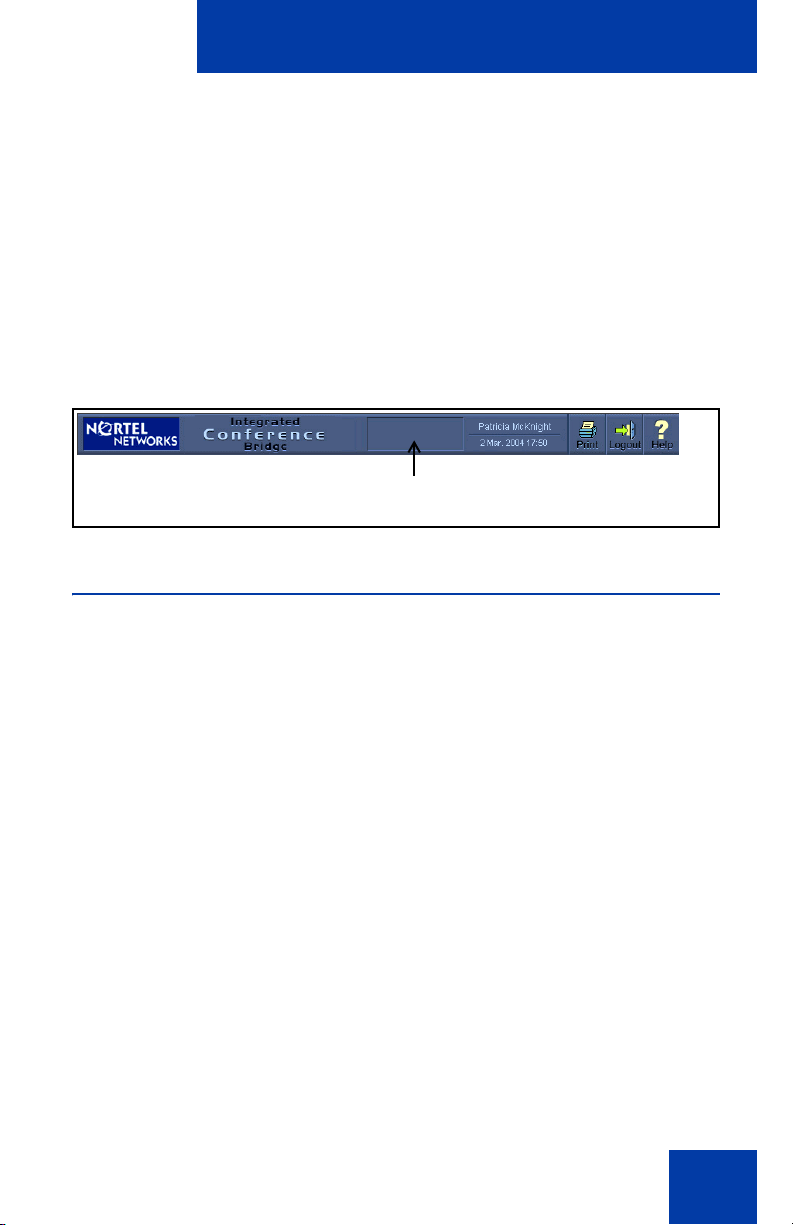
Title frame
The title frame sits at the top of the Conference List window and all ICB
windows (see Figure 5). It contains the following buttons:
• Print — Sends the current window to the printer.
• Logout — Terminates the session and returns the user to the ICB
Login window (see Figure 1 on page 12).
• Help — Displays help information relevant to the current window. The
information is displayed in a separate window.
Figure 5: ICB title frame
553-AAA1395
Optional Customer Logo
Scheduling a one-time conference
You can schedule a one-time conference by:
• scheduling a new conference (see “Scheduling a new one-time
conference” below), or
• copying an existing conference and changing the parameters as
appropriate for the new conference (see “Scheduling a one-time
conference by copying and reconfiguring a conference” on page 26).
Scheduling a new one-time conference
1. Log in to the BUI. See “Accessing the BUI” on page 11.
2. Click New Conference in the Conference List window (see Figure 4
on page 15).
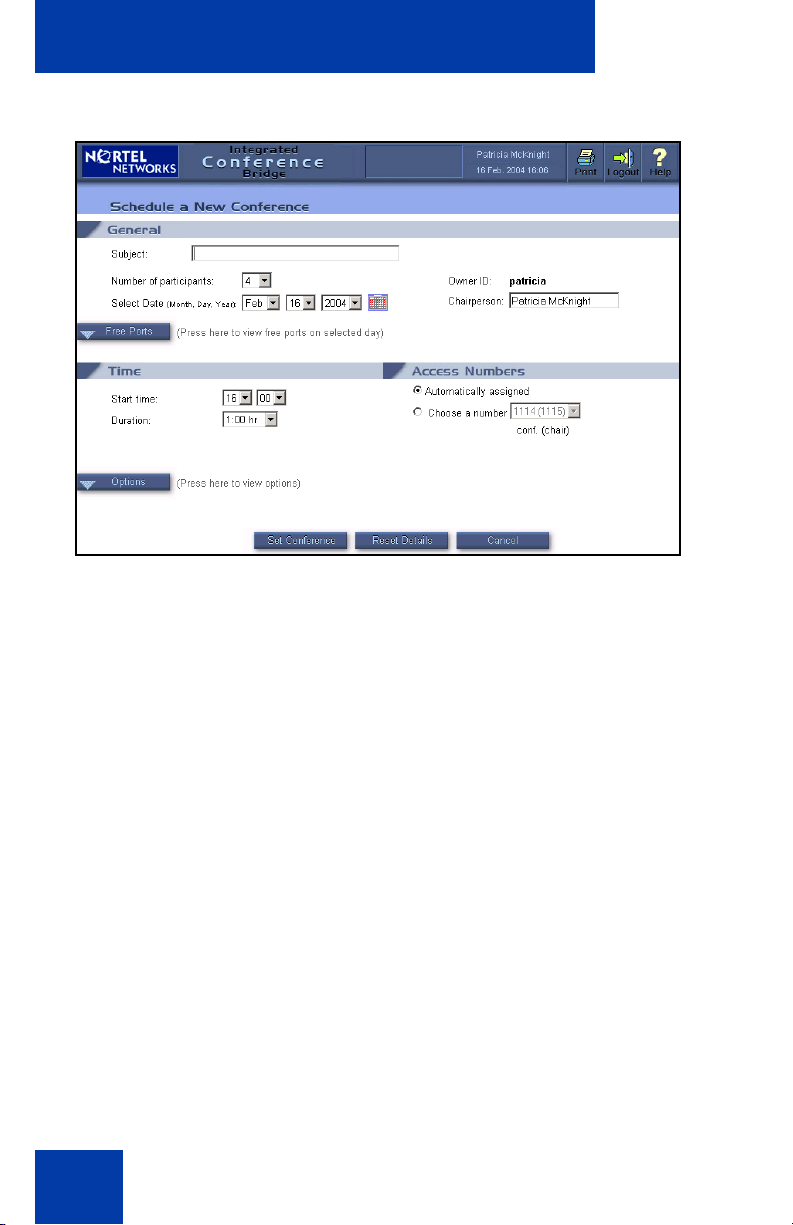
The Schedule a New Conference window opens. See Figure 6 on
page 18.
17
Page 18
Browser User Interface
Figure 6: Schedule a New Conference window
3. Configure the parameters in the General section:
a. In the Subject field, enter up to 20 characters of text that
describes the purpose of the conference (optional). By default,
this field is empty.
553-AAA1295
b. In the Number of participants field, enter the number of ports
reserved for the conference, including chairperson ports. The
application ensures that the total number of reserved ports for the
time period does not exceed system capacity. The system
performs validation after submission. Acceptable values are 3 to
32; the default is 4.
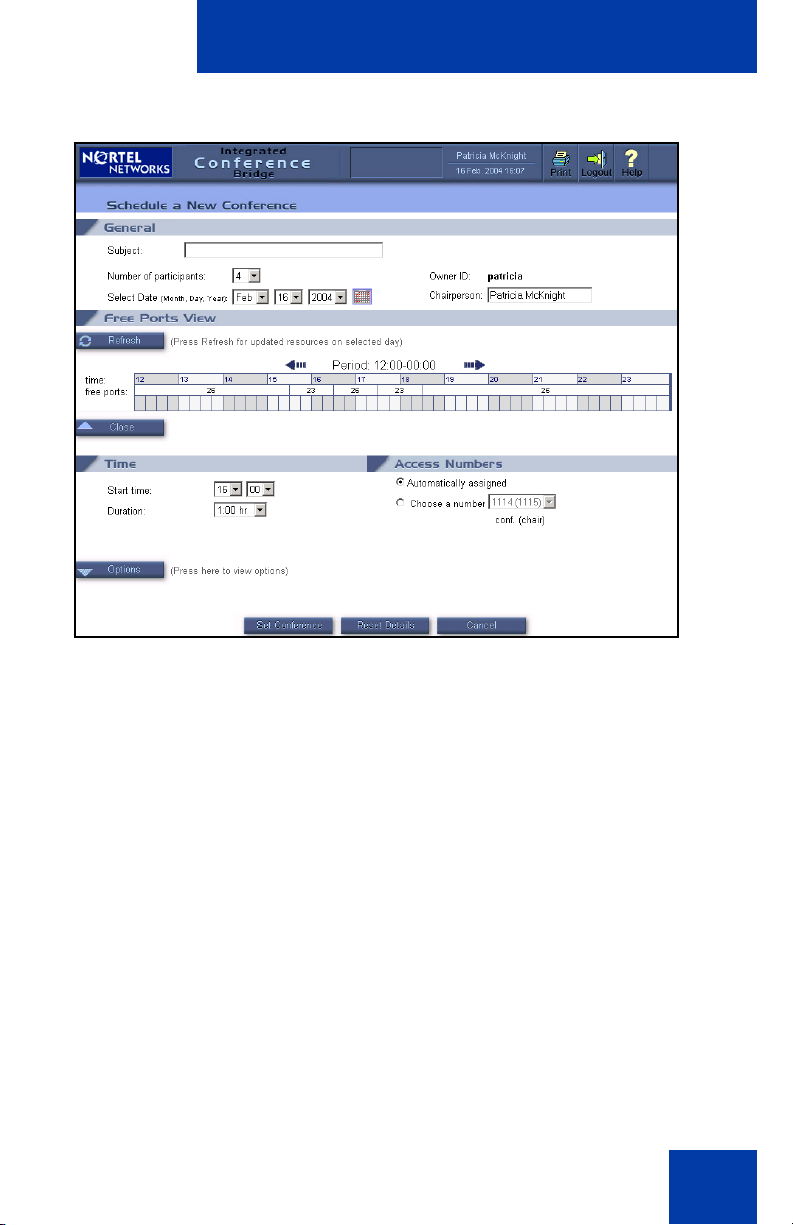
c. To determine port availability, click Free Ports (optional).
The window expands to show the Free Ports View section (see
Figure 7 on page 19). This section shows the ports available for
the date selected in the Select date field.
18
Page 19
Browser User Interface
Figure 7: Schedule a New Conference — Free Ports View
553-AAA1296
d. Select Dual meeting. This link appears only on the primary ICB
card in a dual-card set. It is not shown in Figure 6 on page 18. If
selected, a Dual Meeting window opens. Users can select up to
60 or 62 ports, depending on the value of the full chairperson
control parameter. The Access Numbers section displays a
fixed dual-card meeting DN that cannot be changed.
e. In the Select date field, enter the start date for the conference.
Valid entries are the current day up to one year ahead of the
current day. The default is the current day.
If the BUI application is operating on a Microsoft Windows®
operating system, you can alternatively click the Calendar icon to
open the Select Date window (see Figure 8 on page 20) and
select the start date from the calendar.
19
Page 20

Browser User Interface
Figure 8: Select Date window
553-AAA1297
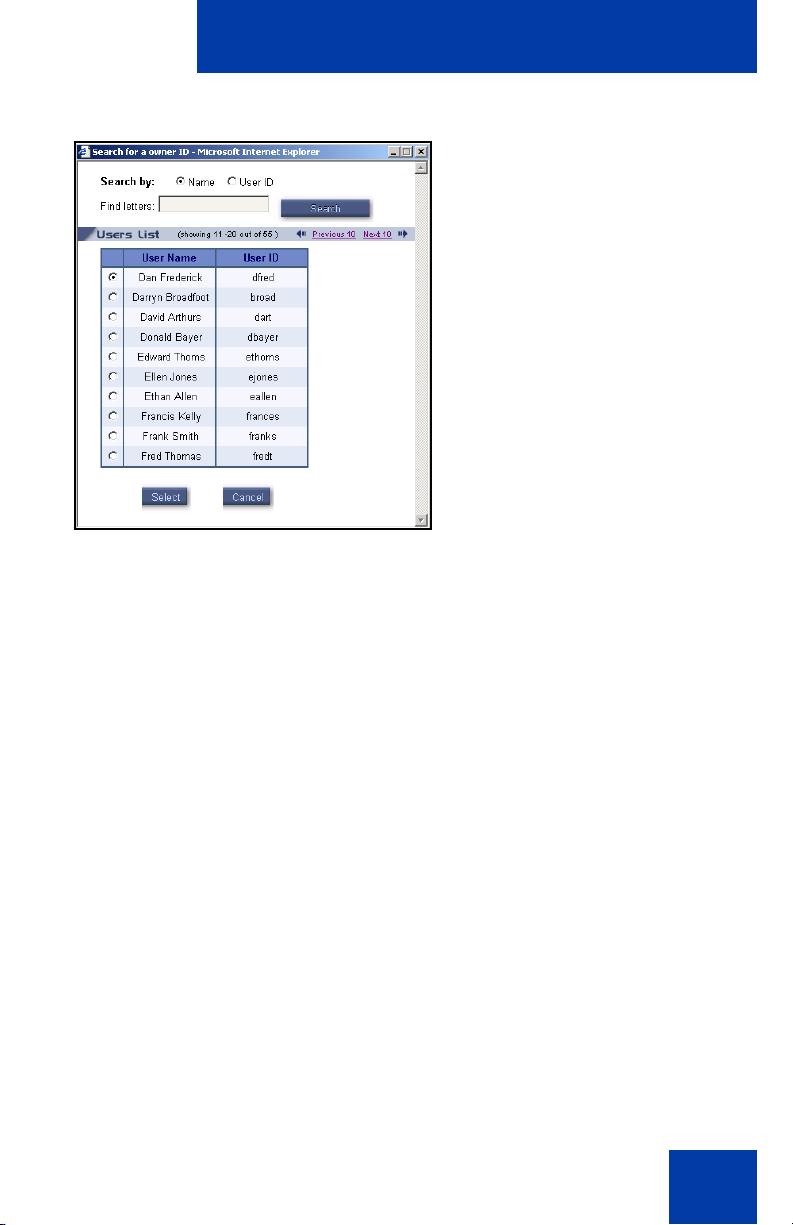
f. In the Owner ID field, enter the User ID of the person scheduling
the conference and who has permission to edit or delete the
conference. The field defaults to the User ID of the user logged in
to the BUI. When the BUI displays the User Name field to a
regular user, it cannot be edited. When the BUI displays this field
to a super user, the super user can edit it by:
20
• typing a User ID in the field, or
• clicking Search, which opens the Search for a owner ID
window (see Figure 9 on page 21).
Page 21
Browser User Interface
Figure 9: Search for a owner ID window
553-AAA1298
g. In the Chairperson field, enter the name of the chairperson for
the user’s reference. The default value is the User Name
corresponding to the User ID in the Owner ID field, but you can
edit it as required. You can enter up to 20 characters.
4. Configure the parameters in the Time section:
a. In the Start Time field, enter the start time for the conference.
The minutes box shows 15-minute increments (that is, 0, 15, 30,
and 45). The default is the current time and is rounded to the
nearest 15 minutes, as follows:
• In the first 10 minutes of the interval, the system rounds the
time to the last 15-minute value. For example, if the time is
8:23, the box shows the time as 8:15.
• In the last 5 minutes of the interval, the system rounds the
time to the future 15-minute value. For example, 8:26
appears as 8:30.
b. In the Duration field, enter the conference duration. Enter up to
12 hours in 15-minute increments. The selection box shows all
possible values. The default is 1 hour.
21
Page 22

Browser User Interface
5. Configure the access numbers in the Access Numbers section.
Select one of the following options:
a. Select Automatically assigned. The system automatically
selects the DN pair. This is the default option.
b. Select Choose a number, and select a number pair from the
drop-down list. The list contains number pairs in the format:
[conference (chairperson)]. The system checks the availability
of the number when a form is submitted. If the numbers are not
available, the scheduling fails.
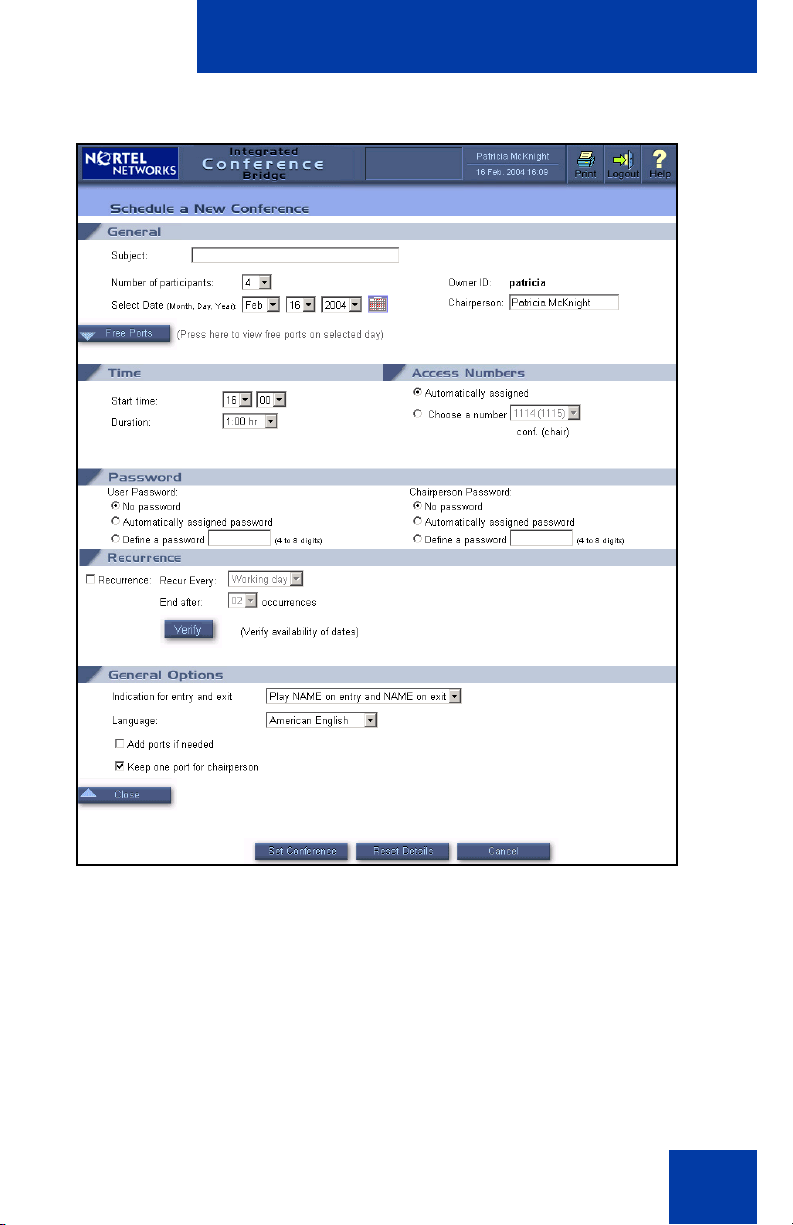
6. Select Options to configure a conference password, a recurring
conference, or other general conference options (optional).
The window expands to include three new sections. See Figure 10 on
page 23.
22
Page 23
Browser User Interface
Figure 10: Schedule a New Conference — Options
553-AAA1299
a. In the Password section, create a password for conference
participants and the chairperson (optional).
i. To create a password that participants use to join the
conference, select one of the following options from the User
Password field:
• No password
23
Page 24

Browser User Interface
• Automatically assigned password — The system
automatically generates the password. The length of the
password is configured by the administrator and can be
from 4 to 8 digits.
• Choose a password — Enter a 4- to 8-digit password in
this field. The password is displayed in the window as it is
entered. The system does not check the password for
uniqueness. Different conferences can use the same
password.
ii. To create a password to authenticate the chairperson, select
one of the following options from the Chairperson Password
field:
• No password
• Automatically assigned password — The system
automatically generates the password. The length of the
password is configured by the administrator and can be
from 4 to 8 digits.
• Choose a password — Enter a 4- to 8-digit password in
this field. The password is displayed in the window as it is
entered. The system does not check the password for
uniqueness. Different conferences can use the same
password.
b. Configure General Options in the General Options section
(optional).
i. In the Indication for entry and exit field, define how the
system indicates the entry or exit of a participant. Select one
of the following options from the drop-down list:
• Play name on entry and name on exit
• Play name on entry and tone on exit
• Play tone on entry and tone on exit
• Silence (no indication for entry or exit
ii. In the Language field, select the language the system uses
for voice prompts. The drop-down list offers the languages
available in the system. When using single-number access,
the selected language takes effect after the caller enters the
24
Page 25

Browser User Interface
conference ID and password. Otherwise, the system uses the
default language.
iii. Select Add ports if needed to have the system reserve
additional ports to accommodate unanticipated participants.
The system adds ports only if available (that is, if they are not
reserved for another conference).
iv. Select Keep one port for the chairperson to reserve a port
for the chairperson. If this option is not selected, the system
makes ports available on a first-come, first-serve basis. In
this case, if all the ports are in use when the chairperson tries
to join the conference, the system does not allow the
chairperson to enter the conference.
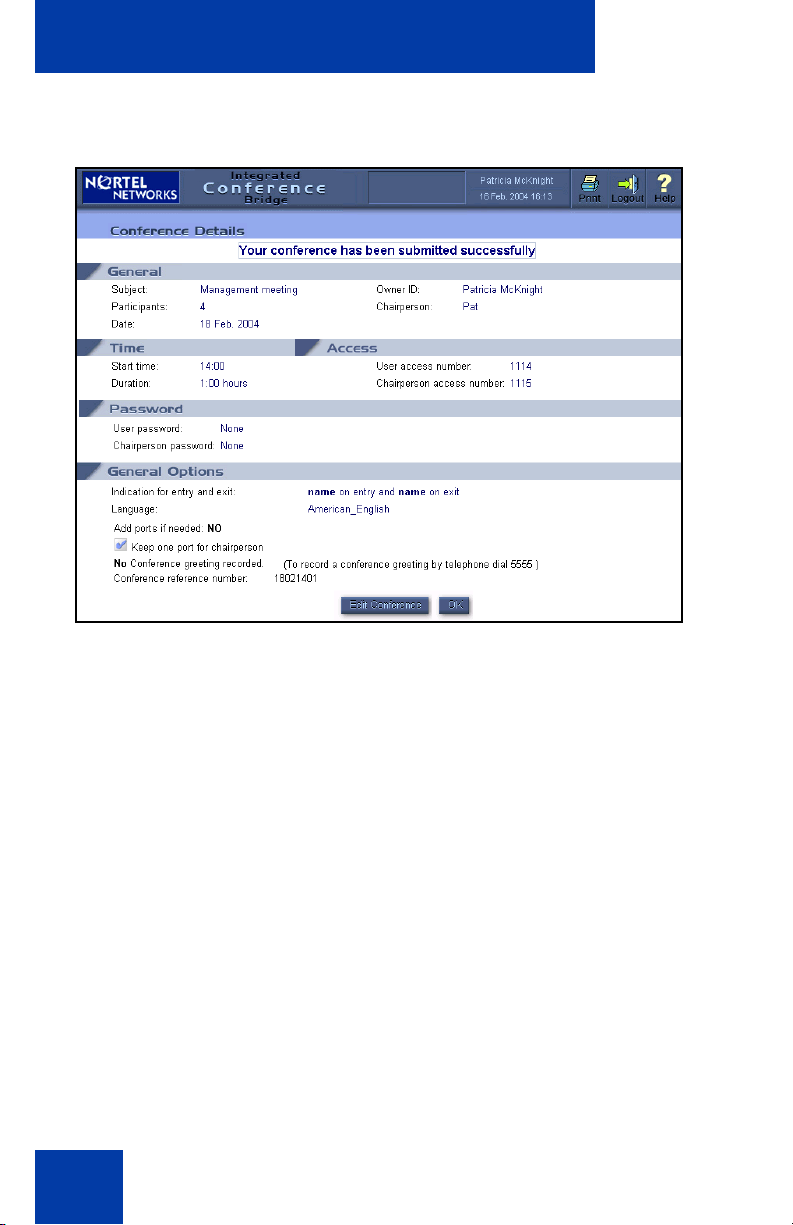
7. Click Set Conference to save the conference.
After the conference details are saved, the Conference Details
window opens (see Figure 11 on page 26). This window displays
conference details and options in the same layout as the Schedule a
New Conference window.
Use the Conference reference number, shown in the General
Options section, when recording a conference-specific greeting. See
“Recording a conference-specific greeting” on page 77.
25
Page 26
Browser User Interface
Figure 11: Conference Details window for a one-time
conference
553-AAA1300
8. Do one of the following:
• Click OK to return to the Conference List window.
• Click Edit Conference to make any changes to the conference
(see “Editing a conference (one-time or recurring)” on page 31).
Scheduling a one-time conference by copying and reconfiguring a conference
The reconfiguring of an existing conference to create a new conference is
not the same as editing an existing conference. When reconfiguring a
copied conference to create a new conference, all parameters can be
changed as necessary. When editing an existing conference, only some
parameters can be changed.
Steps
1. Log in to the BUI. See “Accessing the BUI” on page 11.
26
Page 27

Browser User Interface
2. Click the Copy icon (pages) for the conference you are copying in the
Conference List window (see Figure 4 on page 15). The Schedule a
New Conference window opens (see Figure 6 on page 18), with all
the parameters of the selected conference.
3. Configure the parameters as appropriate for the new conference.
Refer to steps 3 to 6 in “Scheduling a new one-time conference” on
page 17 for instructions on configuring and reviewing the parameters.
4. Click Set Conference to save the new conference.
After the conference is saved, the Conference Details window opens
(see Figure 11 on page 26). The window displays conference details
and options in the same layout as the Schedule a New Conference
window.
Use the Conference reference number, shown in the General
Options section, when recording a conference-specific greeting. See
“Recording a conference-specific greeting” on page 77.
5. Do one of the following:
• Click OK to return to the Conference List window.
• Click Edit Conference to make any changes to the conference
(see “Editing a conference (one-time or recurring)” on page 31).
Scheduling a recurrent conference
The Recurrence section does not appear for dual-card meetings
because they do not support the recurrence option.
The recurrence option is available only when a user selects a specific DN
pair in the Access Numbers section of the Schedule a New Conference
window (see Figure 6 on page 18. If a DN pair is not selected, a dialog
box opens saying the DN pair must be selected first.
You can schedule a recurrent conference by:
• scheduling a new conference (see “Scheduling a new recurring
conference” on page 28), or
• copying an existing conference and reconfiguring the parameters as
appropriate for the new conference (see “Scheduling a recurring
conference by copying and reconfiguring a conference” on page 30).
27
Page 28

Browser User Interface
Scheduling a new recurring conference
1. Log in to the BUI. See “Accessing the BUI” on page 11.
2. Select New Conference in the Conference List window (See
Figure 4 on page 15).
The Schedule a New Conference window opens. See Figure 6 on
page 18.
3. Enter standard conference details as outlined in “Scheduling a new
one-time conference” on page 17.
Note: In the Access Numbers section, select Choose a
Number and select a DN pair.
4. Configure recurrence parameters.
a. Select Options in the New Conference window.
The Options panel opens. See Figure 6 on page 18).
b. Select Recurrence in the Recurrence section. This enables the
recurrent parameters.
c. In the Recur Every field, select the recurrence interval from the
drop-down list. Available values are:
• working day
•day
•week
•two weeks
•month
Note: If the first conference is not a working day, the working day
option is not available.
d. In the End After field, define the number of conference
occurrences. Up to 52 occurrences can be defined, but they
cannot be more than a year in advance.
e. Click Verify to verify port availability without actually setting up
the conferences.
The Conference Dates window opens, which indicates if each
recurrence is available or not. See Figure 12 on page 29.
28
Page 29

Browser User Interface
Figure 12: Conference Dates window
553-AAA1301
5. Click Return to return to the Schedule a New Conference window,
and adjust the recurrence parameters if necessary.
6. Click Set Conference.
After the conference details are saved, the Conference Details
window opens (see Figure 13 on page 30). This window displays
conference details and options in the same layout as the Schedule a
New Conference window. Use the Conference reference number,
shown in the General Options section, when recording a
conference-specific greeting. See “Recording a conference-specific
greeting” on page 77.
The Conference Dates section lists the scheduled dates for the
conference, including the first date specified in conference details.
The window also displays the success result for each date specified
in the recurrence criteria. Successful occurrences are booked. In the
case of a failure, the occurrence is not booked and the reason for the
failure given. For example, the DN may be in use or the number of
available ports may be insufficient.
29
Page 30

Browser User Interface
Figure 13: Conference Details window for a recurring
conference
553-AAA1302
7. Click OK.
Scheduling a recurring conference by copying and reconfiguring a conference
Follow the steps below to schedule a new recurring conference by
copying an existing conference and reconfiguring its parameters as
appropriate.
1. Log in to the BUI. “Accessing the BUI” on page 11.
2. Click the Copy icon (pages) for the conference you are copying in the
Conference List window (see Figure 4 on page 15). The Schedule a
New Conference window opens (see Figure 6 on page 18), with all
the parameters of the selected conference.
30
Page 31

Browser User Interface
3. Configure the standard conference parameters as appropriate for the
new conference. See steps 3 to 6 of “Scheduling a new one-time
conference” on page 17 for instructions on configuring the
parameters.
Note: In the Access Numbers section, select Choose a
Number and select a DN pair, if not already selected
4. Configure the recurrence parameters as appropriate for the new
conference. Refer to step 4 in “Scheduling a new recurring
conference” on page 28.
5. Click Set Conference.
After the conference details are saved, the Conference Details
window opens (see Figure 13 on page 30). This window displays
conference details and options in the same layout as the Schedule a
New Conference window. Use the Conference reference number,
shown in the General Options section, when recording a
conference-specific greeting. See “Recording a conference-specific
greeting” on page 77.
The Conference Dates section lists the scheduled dates for the
conference, including the first date specified in conference details.
The window also displays the success result for each date specified
in the recurrence criteria. In the case of a failure, the system indicates
the reason. For example, a failure can result because the DN is in use
or the number of available ports may be insufficient.
6. Click OK.
Editing a conference (one-time or recurring)
The following fields cannot be modified when editing a conference:
•date
• dual-card meeting option (a single-card conference cannot be made
dual)
• recurrent option
31
Page 32

Browser User Interface
An active conference can be edited, but only the following fields can be
changed:
• number of participants
• duration
• addition of ports as needed (under the Options section)
Steps
1. Log in to the BUI. See “Accessing the BUI” on page 11.
2. Click the Edit icon (a pencil) for a scheduled conference in the
Conference List window (See Figure 4 on page 15).
The Edit Conference window opens (see Figure 14). It is similar to
the Schedule New Conference window, except certain fields, such as
date, cannot be edited.
Figure 14: Edit Conference window
553-AAA1303
3. Edit conference details as outlined in “Scheduling a new one-time
conference” on page 17 (and “Scheduling a new recurring
conference” on page 28 if applicable).
4. Click Set Conference to save the changes.
32
Page 33

Browser User Interface
After the conference details are saved, the Conference Details
window opens (see Figure 11 on page 26). This window displays
conference details and options in the same layout as the Schedule a
New Conference window.
5. Click OK.
Deleting a conference
You can delete any conference that you have scheduled, even if it is in
progress. Recurring conferences can be completely (all current and future
occurrences) or partially (individual occurrences) deleted.
Super users can delete any one-time and recurring conference,
regardless of who scheduled the conference.
Administrators can delete any conference, including permanent
conferences.
Steps
1. Log in to the BUI. See “Accessing the BUI” on page 11.
The Conference List window opens. See Figure 4 on page 15.
2. Click the Delete icon (X) for the conference to be deleted.
This opens a confirmation dialog box (see Figure 15 and Figures 16
and 17 on page 34.
3. Do one of the following:
• If the conference is a one-time conference and has not started,
click OK in the confirmation dialog (see Figure 15).
Figure 15: Delete confirmation — one-time inactive conference
553-AAA1309
• If the conference is a one-time conference and has started, click
OK in the confirmation dialog (see Figure 16 on page 34).
33
Page 34

Browser User Interface
Figure 16: Delete confirmation — one-time active conference
553-AAA1310
• If the conference is a recurring conference, respond to the
confirmation dialog (see Figure 17) as follows:
— Click Selected Instance Only to delete only this occurrence
of the recurring conference.
— Click Include Following to delete only this and future
occurrences of the recurring conference.
Figure 17: Delete confirmation — recurring conference
553-AAA1311
Managing a conference in progress
Tasks for managing a conference
Table 2 on page 35 lists the various tasks used to manage the
conference and indicates if a chairperson must be present. This section
describes each task.
34
Page 35

Browser User Interface
Table 2: Managing a conference — tasks (Part 1 of 2)
Tasks
Managing the conference:
• Lengthening the conference
• Locking or unlocking the conference
• Session management — holding a
voting session
• Session management — holding a
question-and-answer session
Changing the status of the
chairperson:
• Muting or unmuting the chairperson
• Stopping or resuming music
• Adjusting the volume of the chairperson
• Releasing chairperson control
Managing the status of all participants:
• Counting and announcing all
participants
Chairperson
present
✓
✓
✓
✓
✓
✓
✓
✓
Chairperson
not present
✓
✓
✓
• Muting all participants
• Disconnecting all ports
• Examining port status
• Dialing out and returning with or without
the called party
✓
✓
✓
✓
✓
✓
✓
35
Page 36

Browser User Interface
Table 2: Managing a conference — tasks (Part 2 of 2)
Tasks
Chairperson
present
Chairperson
not present
Managing the status of individual
participants:
• Adding details for an individual
participant
• Consulting between chairperson and
participant
• Muting or unmuting individual
participant(s)
• Playing the name of individual
participants
• Disconnecting an individual participant
• Adjusting the volume of an individual
participant
✓
✓
✓
✓
✓
✓
✓
✓
✓
✓
✓
Dual-card meeting
In a dual-card meeting, the commands that a chairperson implements
from the BUI apply to participants in both cards. The following features
are available in a dual-card conference:
• Dial-out to a specified number — dial-out uses a port on the
secondary card, if no port is available on the primary card.
• Consult with participant — the chairperson can consult with
participants on the secondary card.
• Play name — this feature works with participants on both cards. The
system plays the name on the chairperson’s desktop, not on the
telephone.
Conference Call Manager window
All of tasks listed in Table 2 on page 35 are performed from the
Conference Call Manager window. Figure 18 on page 37 shows the
window when a chairperson is present. Figure 19 on page 38 shows the
window when a chairperson is not present.
36
Page 37

Browser User Interface
Figure 18: Conference Call Manager — Chairperson present
Note: When the Conference Call Manager is accessed from
Microsoft Outlook (see “Editing a conference” on page 67), the BUI
title frame does not appear.
37
Page 38

Browser User Interface
Figure 19: Conference Call Manager — Chairperson not
present
The BUI permits only one active Conference Call Manager window per
conference. The chairperson’s access number identifies the associated
voice port.
The time remaining in the conference is displayed in the Time left field in
the upper right-hand corner of the Conference Call Manager window.
If the chairperson is present, the Active Chairperson field in the
Chairperson section shows:
• the CLID of the conference, if the CLID is available and the
chairperson dials in to join the conference. If the CLID is not
available, the window displays Active chairperson: the number not
available.
• the called number, if the chairperson dials out to join the conference.
This is part of the Acquire Chairperson Control feature.
38
Page 39

Browser User Interface
If a chairperson is not present, the Chairperson section displays
Chairperson not present.
The Participant List section contains several information fields. The
Phone number field shows the CLID or called number. The Call Type
field shows regular, dial-out, or expand. The current speaker is shown by
a highlight in the Details field.
The Conference Call Manager window is updated automatically every
two minutes and can be refreshed manually by clicking Refresh.
The Conference Call Manager window can be accessed in one of three
ways:
• In the Login window (Figure 1 on page 12), enter the conference
access number and chairperson password for the active conference.
• In the Conference List window (Figure 4 on page 15), click the
Control icon (a gavel) for an active conference. (The icon appears
only while the conference is active.)
• In the Microsoft Outlook User Interface window, select the Control
button in the ICB form while the conference is active. Refer to
“Microsoft Outlook User Interface” on page 48 for information about
the Microsoft Outlook interface.
Managing the conference
This section describes how to perform tasks from the Conference section
of the Conference Call Manager window (see Figure 18 on page 37).
Note: If a chairperson is not present on the conference, the session
management activities (voting session and question-and-answer
session) are not available (Figure 19 on page 38).
Lengthening the conference
To lengthen the conference by 15 minutes, click Add 15 minutes at any
time during the conference. If successful, the system updates the “Time
Left” indication.
Locking or unlocking the conference
Click Lock at any time during the conference to prevent any more
participants from joining. To unlock the conference, click Unlock. The
39
Page 40

Browser User Interface
button text toggles between Lock and Unlock, depending on the state of
the conference.
Session management — holding a voting session
Only the conference chairperson can run a voting session.
1. Click Session Management.
The window expands to show a Session Management panel. See
Figure 20.
Figure 20: Conference Call Manager — Session Management
panel
40
553-AAA1306
Page 41

Browser User Interface
2. Click Start Voting.
The button text changes to End Voting.
3. Enter the subject of the vote in the voting subject field.
4. Ask the participants to vote.
The participants use their telephone keypads to register their votes:
*81 for Yes, *82 for No, or *83 for Abstain. The results are displayed
in the Voting panel.
5. Click End Voting.
The final results are displayed in the Voting panel, and also e-mailed
to the chairperson. The button text changes back to Start Voting.
Note 1: If the participant leaves the conference during the voting
session, the participant’s vote is cancelled and not counted.
Note 2: If a participant votes more than once, only the participant’s
last vote is counted.
Session management — holding a question-and-answer session
A question-and-answer session can be used in a lecture-type conference,
where participants may want to address questions to the chairperson.
Only the conference chairperson can run a question-and-answer session.
1. Click Mute All.
2. Click Session Management.
The window expands to show a Session Management panel. See
Figure 20 on page 40.
3. Click Start Questions.
The button text changes to End Questions.
4. Ask the participants for questions.
Participants who have questions press *85 on their telephone
keypads. Question requests are shown in the Participant list as
follows:
• blinking ‘?’ icon — question request not answered
• steady ‘?’ icon — question request answered
41
Page 42

Browser User Interface
•no ‘?’ icon — no question request
To cancel the question request, the participant presses *86.
5. Click the ? icon in the header row of the Participant list to sort the list
so that those participants who are asking questions appear first in the
list (optional).
6. Click Unmute in the Participant List or click the blinking ‘?’ icon.
The participant asks his or her question.
7. Click End Questions to end the session when all questions have
been answered, or when the allotted time is over.
The button text changes to Start Questions.
Changing the status of the chairperson
This section describes how to perform tasks from the Chairperson
section of the Conference Call Manager window (see Figure 18 on
page 37).
Note: If a chairperson is not present on the call, none of these
activities is available (see Figure 19 on page 38).
Muting or unmuting the chairperson
Click Mute to deactivate the chairperson’s voice port. Click Unmute to
activate it. The button text toggles between Mute and Unmute,
depending on the state of the voice port.
Stopping or resuming music
Click Stop Music to stop music playing when only one person is present
in the conference. Click Resume Music to resume the music. The button
text toggles between Stop Music and Resume Music.
Adjusting the volume of the chairperson
Only the chairperson can adjust the chairperson’s volume. Follow the
steps below to adjust the incoming (hearing) and/or outgoing (speaking)
volume for the chairperson.
42
Page 43

Browser User Interface
1. Click Volume Control.
The Volume Control panel opens (see Figure 21 on page 43). The
two scales in the middle of the Volume Control panel show the
increase/decrease level for hear and talk directions. The middle of the
scale is zero, which indicates no volume change.
Figure 21: Conference Call Manager — Chairperson Volume
Control
553-AAA1307
2. Click an arrow to increase or decrease volume. The colored rectangle
in the scale advances one step for each arrow click.
3. Click Reset Volume of all participants to restore the volume level
for all participants (optional).
Releasing chairperson control
Click Release to release chairperson control. This button releases both
BUI and TUI control. The Conference Call Manager window closes.
43
Page 44

Browser User Interface
Managing the status of all participants
This section describes how to perform tasks from the Participants
section of the Conference Call Manager window (see Figure 18 on
page 37).
Note: If a chairperson is not present on the conference, the Dial-out
activity is not available (see Figure 19 on page 38).
Counting and announcing all participants
Click Count and announce to announce the total number of participants,
followed by the participants’ names as recorded in the name entry.
Muting all participants
Click Mute all to silence all participants except the chairperson. To
unmute all participants, click Unmute All. The button text toggles
between Mute all and Unmute All.
Individual participants can still be unmuted or muted (see “Muting or
unmuting individual participant(s)” on page 46) while the conference is in
Mute all state. Mute all takes precedence, but Unmute all restores all
participants to their individual states - muted or unmuted.
Disconnecting all ports
Click Disconnect all to disconnect all participants except the
chairperson.
Examining port status
The first line in the Participants section shows the number of participants
attending (ports in use) and the number of participants invited (number of
ports reserved).
Dialing out and returning with or without the called party
Follow the steps below to make a private call outside of the conference.
Only the chairperson can initiate the call.
1. Select the type of call, as follows:
•Select Add a Participant to make a call to an individual.
44
Page 45

Browser User Interface
•Select Add a Group to make a call to a group. Call-out groups
are configured by the administrator.
•Select Call Assistant to use a Call Assistant to make the call.
The number of the Call Assistant is configured by the
administrator.
2. Enter the call parameter, as follows:
• If Add a Participant was selected in step 1, type the number to
be dialed in the text box. The number may contain digits,
asterisks (*), and number sign (#). If required, enter a pause
anywhere by entering ‘p’ for a 100 ms pause or ‘P’ for a 500 ms
pause.
• If Add a Group was selected in step 1, select a group from the
list.
3. Click Dial.
After call origination, the chairperson is engaged in a private call. All
buttons in the Chairperson section are disabled, as are Count &
Announce and Mute All in the Participants section.
4. Return to the conference as follows:
• Click Return with called party to end the private call and return
to the conference with the called party. The new participants join
the conference and are added to the Participant List. A dialog
box opens if no ports are available for dial-out, in the case of a
single or group call, and the participants are not added to the call.
If some, but not all, of the required ports are available for a group
call, no dialog box opens.
• Click Return without called party to end the private call and
return to the conference. The called party is not added to the
conference.
Managing the status of individual participants
This section describes how to perform tasks from the Participant’s List
section of the Conference Call Manager window (see Figure 18 on
page 37).
Note: If a chairperson is not present on the conference, the Consult
activity is not available (see Figure 19 on page 38).
45
Page 46

Browser User Interface
Adding details for an individual participant
Type any text in the Details field for a participant. For example, the text
can be a name to uniquely identify the participant.
Consulting between chairperson and participant
Click Consult to hold a private call with an individual participant. Only the
chairperson can initiate the call. Click End consultation to end the
private call and return both parties to the conference. The button text
toggles between Consult and End consultation.
Muting or unmuting individual participant(s)
Click Mute to mute an individual participant. Click Unmute to unmute the
individual. The button text toggles between Mute and Unmute.
Playing the name of individual participants
Click the Play name icon (a speaker) to play the participant’s name as
recorded by the name entry feature. The name plays on the chairperson’s
desktop, not on the telephone.
Disconnecting an individual participant
Click the Disconnect icon (an X) to disconnect a participant.
Adjusting the volume of an individual participant
Follow the steps below to adjust the outgoing (speaking) and/or incoming
(hearing) volume for an individual participant.
1. Click Volume for the individual participant.
The Volume Control panel opens (see Figure 22 on page 47). The
two scales in the middle of the Volume Control panel show the
increase/decrease level for hear and talk directions. The middle of the
scale is zero, which indicates no volume change.
46
Page 47

Browser User Interface
Figure 22: Conference Call Manager — Participant Volume
Control
553-AAA1308
2. Click an arrow to increase or decrease volume. The colored rectangle
in the scale advances one step for each arrow click.
3. Click Reset Volume to restore the original volume level for the
participant (optional).
4. Click Apply to all to set the volume level of all participants to these
settings (optional).
47
Page 48

Microsoft Outlook User Interface
Microsoft Outlook User Interface
Overview
Nortel Networks Integrated Conference Bridge (ICB) integrates Microsoft
Outlook Calendar’s Appointment and Meeting functionality to enable
users to schedule ICB conferences with Microsoft Outlook.
Note: The Microsoft Outlook Calendar shows only conferences
scheduled and modified in the Microsoft Outlook ICB scheduling
interface. It does not show new conferences scheduled or modified
directly in the Browser User Interface (BUI) or Telephone User
Interface (TUI).
System requirements
The Microsoft Outlook User Interface requires the following versions of
Microsoft Outlook and Microsoft Exchange:
• Microsoft Outlook version 2000 or later
• Microsoft Exchange version 5.5 or later
Contact your system administrator for instructions on upgrading your
system.
Microsoft Outlook settings
ICB conferences are configurable in 15-minute increments, and start and
end on the quarter-hours (:00, :15, :30, and :45). To take full advantage of
these capabilities, Nortel Networks recommends that you configure your
Microsoft Outlook Calendar with 15-minute increments, following the
steps below.
Steps
1. Open Microsoft Outlook.
2. Click Calendar in the Folder List.
3. If your Calendar view is set to Week or Month, click Day in the Tool
bar to display the time scale on the left of the Calendar.
48
Page 49

Microsoft Outlook User Interface
4. Right-click in the time scale on the left of the Calendar.
5. Choose 15 Minutes.
The time scale now displays in 15-minute increments.
ICB form
Audio-conference details are added to a Microsoft Outlook meeting or
appointment using the ICB form. This form is the ICB tab in the
Appointment or Meeting window in Microsoft Outlook (see Figure 23 on
page 49).
Figure 23: ICB form
ICB files
The ICB form is based on the following ICB files:
• form file required for all ICB applications — icbf.oft
553-AAA1312
49
Page 50

Microsoft Outlook User Interface
• language files, one or more required for each ICB application:
— icbsjc.oft — for the Japanese and Chinese languages
— icbsk.oft — for the Korean language
— icbs.oft — for all other languages
Getting started
To use the ICB form for the first time, go to “Publishing the ICB files”
below.
To upgrade the ICB form, go to “Upgrading the ICB form” on page 55.
Publishing the ICB files
ICB files must be published in Microsoft Outlook before the user can
configure the ICB form as the default Calendar form in Microsoft Outlook.
Nortel Networks recommends that the Microsoft Outlook administrator
publish the ICB files in the Organizational Forms folder (refer to Nortel
Networks Integrated Conference Bridge Administrator Guide). However, if
the ICB files are not published by the Microsoft Outlook administrator,
each user wishing to use the form must publish the ICB files in the
Personal Forms Library by following the steps below.
Steps
Note 1: Do not perform this procedure if the ICB files have already
been published by the Microsoft Outlook administrator.
Note 2: These instructions are specific to Microsoft Exchange 5.5.
For other systems, contact your Microsoft Outlook administrator for
specific instructions on publishing a form.
1. Obtain the ICB files (form file icbf.oft and one or more language files
icbs.oft, icbsjc.oft, and icbsk.oft) from the ICB Administrator.
2. Save the files in an accessible location.
3. For each language file (icbs.oft, icbsjc.oft, and icbsk.oft) you are
publishing:
a. Double-click the name of the file, for example icbs.oft.
50
Page 51

Microsoft Outlook User Interface
Note: Click No if asked to Enable macros.
b. Click OK in the Select Folder window.
Note: Do not select a folder from the folder list in the Select
Folder window.
The Calendar window opens.
c. Choose Tools > Forms > Publish Form As.
The Publish Form As window opens. See Figure 24.
Figure 24: Publish Form As window
553-AAA1314
d. Select Personal Forms Library in the Look In field.
e. Enter a Display name and Form name as follows:
• If you are publishing icbs.oft, enter icbs.
• If you are publishing icbsjc.oft, enter icbsjc.
• If you are publishing icbsk.oft, enter icbsk.
f. Click Publish.
Note: Click Yes if asked to replace an existing form.
51
Page 52

Microsoft Outlook User Interface
g. Close the Calendar window. Do not save the appointment.
4. Publish the ICB form file icbf.oft.
a. Go to the folder where the ICB files are located.
b. Double-click icbf.oft.
Note: Click No if asked to Enable macros.
The Calendar window opens.
c. Choose Tools > Forms > Publish Form As.
The Publish Form As window opens. See Figure 24 on
page 51.
d. Select Personal Forms Library in the Look In field.
e. Enter a Display name and Form name, such as icbf.
f. Click Publish.
Note: Click Yes if asked to replace an existing form.
g. Close the Calendar window. Do not save the appointment.
Adding the ICB form as the default Calendar form
The ICB files must be published in Microsoft Outlook before the user can
configure the ICB form as the default Calendar form in Microsoft Outlook.
Follow the steps below to configure the ICB form as the default Calendar
form in Microsoft Outlook.
Steps
Note: Before beginning this procedure, obtain the name of the
published ICB form file icbf.oft.
1. Open Microsoft Outlook.
2. Right-click Calendar in the Folder List.
3. Choose Properties.
The Calendar Properties window opens.
4. Select the General tab.
5. Select Forms in When posting to this folder, use.
52
Page 53

Microsoft Outlook User Interface
The Choose Form window opens.
6. Select the library in which the files were published:
• If you published the forms yourself, select Personal Forms
Library in the Look In field.
• If the ICB administrator published the files, select Organizational
Forms Library in the Look In field.
7. Select the form name and click Open.
8. Click OK.
9. Verify that you are using the correct version of the ICB form.
a. Double-click a timeslot in the Calendar.
b. Choose Help > About this Form from the toolbar.
The form version is displayed.
You are now ready to schedule ICB conferences in Microsoft Outlook.
Removing ICB files from the Personal Forms Library
When searching for published ICB files, Microsoft Outlook searches first
in the Personal Forms Library, then in the Organizational Forms Library. If
upgraded ICB files exist in the Organizational Forms Library, and older
versions in the Personal Forms Library, the new upgraded ICB files will
never be used.
If necessary, ask the ICB administrator to remove any ICB files from the
Organizational Forms Library. Follow the steps below to remove
previously published ICB files from the Personal Forms Library.
Steps
1. Open Microsoft Outlook.
2. Right-click Calendar in the Folder List.
3. Choose Properties.
The Calendar Properties window opens.
4. Select the Forms tab.
53
Page 54

Microsoft Outlook User Interface
5. Click Manage.
The Forms Manager window opens.
6. Click Set in the left half of the window.
The Forms Manager window has two Set buttons. The one on the
right is inactive.
7. Select Personal Forms in the Forms Library.
8. Click OK.
9. Select the ICB form(s) to be deleted from the list in the panel on the
left side of the window.
10. Click Delete.
11. Click Yes in the confirmation dialog box.
12. Click Close to close the Forms Manager window.
13. Click OK to close the Calendar Properties window.
After you remove an ICB form, the Microsoft Outlook Appointment form
becomes the default Calendar form. See “Adding the ICB form as the
default Calendar form” on page 52 to set another ICB form as the default
Calendar form.
Resetting the default Calendar form for Microsoft Outlook
Follow the steps below to change the default Calendar form back to the
Microsoft Outlook Appointment form.
Steps
1. Open Microsoft Outlook.
2. Right-click Calendar in the Folder List.
3. Choose Properties.
The Calendar Properties window opens.
4. Select the General tab.
5. Select Appointment in When posting to this folder, use.
6. Click OK.
54
Page 55

Microsoft Outlook User Interface
Upgrading the ICB form
The ICB administrator will notify you if the ICB form has been upgraded
and published.
Follow the steps below to obtain, publish, and install the upgraded ICB
form as the default Calendar form.
Steps
1. Remove the current default form. Follow the steps in “Removing ICB
files from the Personal Forms Library” on page 53.
2. If the ICB administrator has not published the form, follow the steps in
“Publishing the ICB files” on page 50 to publish the form in the
Personal Forms Library.
3. Set the new upgraded form as the default Calendar form. Follow the
steps in “Adding the ICB form as the default Calendar form” on
page 52.
4. Clear the Microsoft Outlook forms cache, following the steps in
“Clearing the Microsoft Outlook forms cache”.
5. Schedule a test meeting to ensure the upgrade was successful.
Follow the steps in “Scheduling a new conference” on page 61.
Clearing the Microsoft Outlook forms cache
1. Open Microsoft Outlook.
2. Choose Tools > Options.
The Options window opens.
3. Select the Other tab.
4. Click Advanced Options.
The Advanced Options window opens.
5. Click Custom Forms.
The Options window opens.
6. Click Manage Forms.
The Forms Manager window opens.
7. Click Clear Cache.
55
Page 56

Microsoft Outlook User Interface
If no Clear Cache button is available, you must delete the forms
cache file manually, following the steps in “Deleting the forms cache
file manually” on page 56.
8. Click Close to close the Forms Manager window.
9. Click OK to close the Options window.
10. Click OK to close the Advanced Options window.
11. Click OK to close the Options window.
Deleting the forms cache file manually
Some versions of Microsoft Outlook 2000 may not have a Clear Cache
button. In this case, you must delete the forms cache file manually,
following the steps below.
1. Close Microsoft Outlook.
2. Go to the folder where the forms cache file is located.
• If you are using User Profiles, go to
C:\Windows\Profiles\<username>\Local Settings\
Application Data\Microsoft\Forms
• If you are not using User Profiles, go to
C:\Windows\Local Settings\Application Data\Microsoft\Forms
3. Delete the file Frmcache.dat.
ICB form errors
When scheduling a new conference, you may receive one of the following
error messages:
• ICB Outlook form not found
• ICB Outlook forms versions mismatch
To fix the problem:
• Clear the Microsoft Outlook forms cache by following the steps in
“Clearing the Microsoft Outlook forms cache” on page 55.
56
Page 57

Microsoft Outlook User Interface
• Check that the files were published correctly and publish the forms
again, if necessary.
— If you published the forms yourself, refer to “Publishing the ICB
files” on page 50.
— If the Microsoft Administrator published the forms, consult him or
her.
Logging in to ICB
You only have to log in to ICB when you are setting up or editing the ICB
parameters of a conference. Use the same ICB User ID and password for
the ICB form in Microsoft Outlook that you use for the BUI. If you have
access to more than one ICB card, you must have a User ID defined for
each card.
Steps
1. If you are not already at the ICB tab, go to the ICB tab as follows:
a. Select Calendar from the Folder List in Microsoft Outlook.
b. Click New.
c. Select the ICB tab.
d. Select the ICB card from the ICB Address drop-down list.
e. Select ICB Conference.
2. Enter your user name and password in the Enter Network
Password window (see Figure 25 on page 58).
a. Enter your User ID in the User Name field.
b. Enter your password in the Password field.
c. Select Save this password in your password list (optional).
d. Click OK.
57
Page 58

Microsoft Outlook User Interface
Figure 25: Enter Network Password window
553-AAA1313
Changing the ICB password
1. Log in to the ICB form. See “Logging in to ICB” on page 57.
2. Click Change Password.
The window expands to include a Change Password section. See
Figure 26.
Figure 26: ICB form — Change password
553-AAA1315
3. In the Change Password section:
a. Enter your current password in the Enter current password:
field.
b. Enter your new password in the New password: field.
58
Page 59

Microsoft Outlook User Interface
c. Confirm your new password in the Confirm new password:
field.
4. Click Submit.
Adding access to a different ICB card
1. Open Microsoft Outlook.
2. Select Calendar from the Folder List.
3. Click New.
4. Select the ICB tab.
5. Enter the URL or DNS Name of the new card in the ICB Address
field.
6. Select ICB Conference.
7. Log in to the new ICB card. See “Logging in to ICB” on page 57.
8. Click Save and Close.
The next time you open the ICB form, this card will appear in the ICB
Address drop-down list.
Renaming an ICB card
To make it easier to identify ICB cards in the ICB Address drop-down list
in the ICB form, you can give each card a more meaningful name. For
example, you can call the ICB card located at your head office “Head
Office”.
Steps
1. Open Microsoft Outlook.
2. Expand the Calendar folder in the Folder List.
The ICB Cards sub-folder appears in the Folder List.
3. Select the ICB Cards sub-folder.
4. Double-click the ICB card to be renamed.
The Contact window for that ICB card opens. See Figure 27.
59
Page 60

Microsoft Outlook User Interface
You can also use this step to verify which card you are renaming, by
checking the URL given in the Web page address field in this
window.
Figure 27: Contact window — ICB card
553-AAA1396
5. Enter the new name for the card in the Full Name field.
6. Click Save and Close.
Scheduling a conference
An ICB conference is set up in Microsoft Outlook similar to a non-ICB
conference. The conference date, time, and subject is defined in the
normal Microsoft Outlook GUI, and then the ICB resources are added to
it.
You set up a conference by:
• scheduling a new one (see “Scheduling a new conference” on
page 61), or
• modifying a past conference to start at a future time and changing its
parameters appropriately (see “Modifying a past conference to start in
the future” on page 66).
60
Page 61

Microsoft Outlook User Interface
Scheduling a new conference
1. Select Calendar in the Folder List in Microsoft Outlook.
2. Click and drag in the Calendar to select a timeslot for the conference
(optional).
3. Create a new conference by doing one of the following:
• Double-click in the Calendar. This does not preserve any timeslot
set in step 2.
• Click New.
Note: Click Yes if asked to Enable macros.
• Right-click the Calendar and choose New Appointment or New
Meeting Request from the menu.
• Choose File > New > New Appointment or New Meeting
Request.
The Appointment or Meeting window opens.
4. In the Appointment tab:
a. Enter the subject of the conference in the Subject field.
b. Enter the start and end time of the conference in the Start time
and End time fields, if not already entered in step 2.
Conferences can start or end only on quarter-hours (that is 0, 15,
30, 45). ICB does not support any other time increments.
If you double-clicked in the Calendar to open this window (in
step 3), the timeslot may not have been preserved. Reenter the
time if necessary.
c. Identify the conference participants, as follows:
• If New Appointment was selected in step 3, click Invite
Attendees, and select them from your address book.
• If New Meeting Request was selected in step 3, enter the
participants’ names, either by listing them in the To: field
(separated by semicolons), or by clicking To: and selecting
them from your address book.
5. In the ICB tab:
a. Select an ICB card from the ICB Address drop-down list.
61
Page 62

Microsoft Outlook User Interface
If no ICB card is listed in the ICB Address list, type the IP
address or DNS Name of an ICB card (as provided by the ICB
administrator) in the ICB Address field.
b. Select ICB Conference.
c. Log in to ICB. See “Logging in to ICB” on page 57.
d. Edit the name in the Chairperson field (optional).
e. Enter the number of participants. The default is 4.
f. Click Free Ports (optional).
The window expands to show the availability of free ports (see
Figure 28).
Figure 28: ICB form — Free ports
553-AAA1316
g. Configure the access numbers in the Access Numbers section
(optional for one-time conferences.) Select one of the following
options:
•Select Automatically assigned. The system automatically
selects the DN pair.
•Select Choose a Number, and select a number pair from the
drop-down list. The list contains number pairs in the format:
[conference (chairperson)]. The system checks the
62
Page 63

Microsoft Outlook User Interface
availability of the number when a form is submitted. If the
numbers are not available, the scheduling fails.
If you are scheduling a recurring conference, you must select
Choose a Number.
h. Select Options to configure a password for the conference
chairperson and other participants and for other general
conference options (optional).
The window expands to include three new sections. See
Figure 29 on page 63.
Figure 29: ICB form — Options
553-AAA1317
63
Page 64

Microsoft Outlook User Interface
i. To create a password for participants to use to join the
conference (optional), select one of the following options from
the User Password section:
• No password
• Automatically assigned password — The system
automatically generates the password. The length of the
password is configured by the administrator and can be
from 4 to 8 digits.
• Define a password — Enter a 4- to 8-digit password in
this field. The password is displayed in the window as it is
entered. The system does not check the password for
uniqueness. Different conferences can use the same
password.
ii. To create a password to authenticate the chairperson
(optional), select one of the following options from the
Chairperson Password section:
• No password
• Automatically assigned password — The system
automatically generates the password. The length of the
password is configured by the administrator and can be
from 4 to 8 digits.
64
• Choose a password — Enter a 4- to 8-digit password in
this field. The password is displayed in the window as it is
entered. The system does not check the password for
uniqueness. Different conferences can use the same
password.
iii. Configure General Options (optional).
• In the Indication for entry and exit field of the General
Options section, define how the system announces the
entry or exit of a participant. Select one of the following
options from the drop-down list:
— Play name on entry and name on exit
— Play name on entry and tone on exit
— Play tone on entry and tone on exit
— Silence (no indication for entry or exit)
Page 65

Microsoft Outlook User Interface
• In the Language field, select the language the system
uses for voice prompts. The drop-down list offers the
languages available in the system. The default is the ICB
card’s default language. When using single-number
access, the selected language takes effect after the
caller enters the conference ID and password. Before
that, the system uses the default language.
•Select Add port if required to have the system reserve
additional ports to accommodate unanticipated
participants. The system adds ports only if available (that
is, if they are not reserved for another conference).
•Select Keep one port for the chairperson to reserve a
port for the chairperson. If this box is not selected, the
system makes ports available on a first-come, first-serve
basis. In this case, if all the ports are in use when the
chairperson tries to join the conference, the system does
not allow the chairperson to enter the conference. By
default, this option is enabled.
6. To set up a recurring conference, select Recurrence and set up the
recurrence parameters using the recurrence functionality in Microsoft
Outlook.
Do not schedule more than 52 occurrences of a recurring conference.
If you need to schedule more than 52 occurrences, schedule a
separate recurring conference with the additional occurrences.
Do not schedule any occurrence of a recurring conference more than
one year in advance. All occurrences of a recurring conference with
one or more occurrences scheduled more than one year in advance
will not be saved.
7. Select Save and Close for an appointment, or select Send for a
meeting.
If the scheduling is successful (that is, all resources are available),
ICB scheduling is updated automatically. A window opens showing
the conference parameters, including access numbers and
passwords (see Figure 30 on page 66). Conference and access
information is e-mailed to the invited parties and added to their
Microsoft Outlook calendars.
65
Page 66

Microsoft Outlook User Interface
Figure 30: Scheduling success message and conference
information
553-AAA1318
If all resources are not available for a one-time conference, a dialog
box opens and the conference is not saved. You must re-create the
conference with different parameters, such as a different ICB card (if
more than one is equipped), fewer ICB ports, or a different time and/
or date.
All occurrences of a recurring conference are booked in Microsoft
Outlook whether the resources are available or not. However, only
those occurrences that are successful (that is, all resources are
available) are booked in ICB.
All occurrences of a recurring conference will not be saved in ICB and
Microsoft Outlook if either of the following conditions is true:
• the conference has more than 52 occurrences, or
• the conference has one or more occurrences scheduled more
than a year in advance.
8. Click OK.
Modifying a past conference to start in the future
The start time and date of a past conference with ICB resources can be
modified to start in the future. ICB allocates resources as if a new
conference is scheduled.
66
Page 67

Microsoft Outlook User Interface
Follow the steps in “Editing a conference before it begins” on page 67 to
change the start date and time of a past conference, then edit the other
parameters to set up the “new” conference.
Editing a conference
An ICB conference can be edited before it begins or while it is in progress.
Editing a conference before it begins
When a conference is edited before it begins, all the conference
parameters except the ICB card and Owner ID can be changed.
Steps
1. Open Microsoft Outlook to the Calendar view.
You can change the conference date, start time, duration, and/or
subject in this view, as follows:
• Select a conference, and drag it to a new date or time.
• Click and move the top or bottom edge to change the duration.
• Click the subject and overwrite it.
These items can also be changed in the Appointment tab, as
described in step 3 on page 68.
2. Open the conference by doing one of the following:
• Double-click the conference.
• Right-click the conference and select Open from the menu.
• Select the conference, and select File > Open > Selected Items
from the Microsoft Outlook tool bar.
A window opens showing the details of the conference (see Figure 31
on page 68). A conference that was created as an ICB conference
opens automatically with the ICB form. A regular Microsoft Outlook
meeting opens with the standard Microsoft Outlook meeting form.
You cannot convert a regular Microsoft Outlook meeting to an ICB
conference.
67
Page 68

Microsoft Outlook User Interface
Figure 31: ICB form — Edit conference
553-AAA1319
3. Edit the parameters as required (see “Scheduling a new conference”
on page 61):
• Edit ICB parameters in the ICB tab.
The ICB Address and Owner ID fields cannot be edited.
• Edit the normal Microsoft Outlook conference parameters, such
as Start: and Duration, in the Appointment tab. These
parameters can also be changed directly in the Calendar view.
• Add or remove participants, if required. Any changes may cause
additional invitations to be e-mailed.
• Edit the recurrence parameters, if required, by clicking
Recurrence.
4. In the ICB tab. do any of the following:
• Click Change Password to change the password (optional). See
“Changing the ICB password” on page 58.
• Click Control to open the BUI Conference Call Manager
window (optional). See “Conference Call Manager window” on
page 36 for details on this window.
68
Page 69

Microsoft Outlook User Interface
• Click Display to view the audio conference access information
(optional). See Figure 32.
If prompted to log in to ICB, follow the steps in “Logging in to ICB”
on page 57.
Figure 32: Audio Conference Access Information
553-AAA1320
5. Click Save and Close to submit the changes.
If the modifications are successful, that is, if all resources are
available, ICB scheduling is updated automatically. A window, similar
to Figure 30 on page 66, displays conference information.
If all resources are not available, the changes to a one-time
conference are not saved. Changes to a recurring conference are
saved in Microsoft Outlook, but only successful changes (that is,
when resources are available for a given occurrence) are saved in
ICB.
6. Click Send Updates to update the Calendars of invited parties
(optional).
7. Click OK.
Editing a conference while it is in progress
When a conference is edited while it is in progress, only the conference
duration, number of ports, and the “Additional port if needed” option can
be edited.
69
Page 70

Microsoft Outlook User Interface
Follow the steps in “Editing a conference before it begins” on page 67 to
edit a conference while it is in progress.
Deleting a conference
1. Open Microsoft Outlook to the Calendar view.
2. Select the conference to be deleted.
3. If you are using Microsoft Office 2000 and the conference has no
attendees, do the following:
a. Clear the ICB Conference check box in the ICB form.
b. Click Save and Close.
This deletes the conference from ICB in this particular case.
4. Delete the conference by doing one of the following:
• Press Control-D on the keyboard.
• Click the Delete icon (an X).
• Right-click the conference and choose Delete from the menu.
• Choose Edit > Delete.
If the conference has no attendees, this deletes the conference.
5. If the conference has attendees:
a. Select one of the following:
• Send cancellation and delete meeting — Deletes the
conference from ICB and Microsoft Outlook for all
participants.
• Delete without sending a cancellation — Deletes the
conference from your Microsoft Outlook Calendar only. The
conference remains in the other participants’ Calendars and
in ICB.
This option allows users to schedule conferences for other
people without including themselves. To do so, a user can
schedule a conference for someone else, then remove
himself or herself as a participant.
b. Click OK.
70
Page 71

Telephone User Interface
Telephone User Interface
Overview
The Nortel Networks Integrated Conference Bridge provides a Dual Tone
Multi-Frequency (DTMF), menu-driven Telephone User Interface (TUI).
The TUI enables the chairperson and conferees to initiate commands
during an active conference (for example, to mute a caller).
A separate service enables booking a conference by using the
telephone’s keypad. Also, a conference owner can record a conferencespecific greeting, or an administrator can record a system greeting. Dial a
unique DN to access the TUI service, then schedule a conference or
record a greeting by following the voice menu’s instructions.
To use the TUI scheduler, enter a TUI user name and password.
Scheduling a conference
When a port is reserved for the TUI, x-1 ports are available for the
conference, where x is the total number of ports in the card. After a
conference is scheduled using the TUI, the conference can be viewed,
modified, or deleted using the Browser User Interface (BUI).
The conference defined from the TUI has default attributes. When
prompted by a voice menu, insert the conference parameters through the
telephone keypad. The ICB plays messages when an error is made.
Note: You have up to seven minutes to schedule a conference with
the TUI. After seven minutes, the ICB plays a voice message
indicating that the allocated time is over. The ICB then disconnects
the call.
The ICB sets up the following default attributes:
• entry and exit by name
• no custom greeting
• no conference expansion
71
Page 72

Telephone User Interface
• no name for the name of the conference
• no name for the name of the chairperson
If a second user dials the TUI DN when the TUI is in use, the ICB plays a
voice message announcing that the port is in use.
Steps
1. Dial the TUI DN.
2. Log in to TUI:
a. Enter your TUI user name followed by *.
b. Enter your TUI password followed by *.
3. Set the date of the conference.
• To schedule a conference for today, press 1.
• To schedule a conference for a specific day:
i. Press 2.
ii. Enter the date. Enter two digits for the day, two digits for the
month, and four digits for the year, followed by *. For
example, enter 11032004* for a conference on
March 11, 2004.
4. Set up the conference.
a. Enter the start time of the conference, in 24-hour format with
15-minute intervals. Enter two digits for the hour (00 to 23) and
two digits for the minutes (00, 15, 30, or 45), followed by *. For
example, enter 0945* for a conference starting at 9:45 in the
morning.
b. Enter the duration of the conference.The conference can be up to
12 hours in duration, measured in 15-minute intervals. Enter two
digits for hours (00 to 12) and two digits for minutes (00, 15, 30,
or 45), followed by *. For example, enter 0215* for a conference
lasting two hours and 15 minutes.
The system states the number of available ports.
c. Enter the number of ports that are needed for the conference,
followed by *. For example, enter 5* to reserve five ports.
72
Page 73

Telephone User Interface
5. Do one of the following:
• Press 1 to continue entering definitions (DNs, password lengths,
and language) for the conference.
• If you are finished defining the conference:
i. Press 2.
The system plays a list of the conference definitions.
ii. Go to step 9.
6. Define the Conferee DN.
• To select a DN:
i. Press 1.
The system plays a list of numbers and corresponding DNs.
ii. Enter the number corresponding to the DN you select.
• To have the system select the DN automatically, press 2.
The ICB card determines the chairperson DN automatically.
7. Disable passwords or define password lengths.
a. For the participant password, do one of the following:
• Press 0* for no password.
• Enter the password length (4 to 8 digits), followed by *.
b. For the chairperson password, do one of the following:
• Press 0* for no password.
• Enter the password length (4 to 8 digits), followed by *.
8. Select the language for the conference.
• To select a language other than the default language:
i. Press 1.
The system plays a list of numbers and corresponding
languages.
ii. Enter the number corresponding to the language you select.
• To select the default language, press 2.
The system plays a list of the conference definitions.
73
Page 74

Telephone User Interface
9. Do one of the following:
• To confirm the reservation, press 1.
The ICB sends a confirmation e-mail to you.
• To change any of the conference definitions:
i. Press 2.
The system plays a list of numbers and corresponding
definitions.
ii. Enter the number corresponding to the definition you want to
change.
• To repeat the conference definitions, press 3.
The system plays a list of the conference definitions.
• To input all the conference definitions again, without saving the
current definitions, press 4.
The system restarts the scheduling process, starting with step 3
on page 72.
Acquiring and releasing chairperson control
1. Dial in to the conference as a regular participant.
2. Enter the conference ID.
3. Enter the conference password if configured.
4. To acquire chairperson control, enter *51.
• If another chairperson is present at the conference, the command
fails. The system notifies the user and returns them to the
conference.
• If an active chairperson is not present, the system prompts the
user to enter the chairperson password for the conference. If the
password is correct, the user becomes the chairperson. If the
password is incorrect, the system prompts the user to retry two
more times. If the password is still incorrect, the command fails
and the system returns the user to the conference.
74
Page 75

Telephone User Interface
5. To release chairperson control, enter *52. Only the chairperson uses
this command.
When activated, the person releasing chairperson control becomes a
regular conference participant, allowing someone else to acquire
chairperson control.
Using the TUI commands
All commands in the TUI are entered using the telephone keypad. They
are listed in “TUI command summary” on page 78.
Using the chairperson TUI commands
The chairperson can use the commands in “Chairperson commands” on
page 78 to manage a conference. The chairperson can use the
commands for all participants on either card if the ICB is dual-card.
Steps
1. Dial in to the conference as chairperson.
2. At the prompt, enter the conference ID.
3. At the prompt, enter the conference password, if configured.
4. Enter the TUI commands listed in Tables 3 to 5 on pages78to 80 as
required.
Using the participant TUI commands
Participants can use only those commands listed in Table 6 on page 81
while a call is in progress.
Steps
1. Dial in to the conference as a regular participant.
2. At the prompt, enter the conference ID.
3. At the prompt, enter the conference password, if configured.
4. Enter the TUI commands listed in Table 6 on page 81, as required.
75
Page 76

Telephone User Interface
Adjusting audio volume
1. Dial in to the conference as chairperson or as a regular participant.
2. Enter the conference ID.
3. Enter the conference password (if configured).
4. Enter *7.
The command *7 accesses the volume control feature. Figure 33
shows how to operate this feature.
Figure 33: Volume control feature operation
553-AAA1321
When a selection is made, the system applies the command, plays a
confirmation tone, and returns the user to the conference.
Each selection of the command advances one step in the required
direction. To advance more than one step, the entire sequence must
be repeated. For example, to reach the maximum volume in the listen
direction, dial: *76 *76 *76.
You can interrupt the menu. That is, the two-digit sequence can be
entered without waiting for the menu.
76
Page 77

Telephone User Interface
Recording a conference-specific greeting
The maximum length of a conference-specific greeting is ten seconds.
The system deletes the voice file at the end of the conference, and it
cannot be used for other conferences.
Steps
1. Dial the TUI Services DN and log in.
2. Select “Record customer greeting” from the voice menu.
3. At the prompt, enter the reference number of the conference.
When a conference is scheduled using TUI or BUI, the system
generates a reference number that uniquely identifies the conference.
The system displays this reference number in the BUI (see Figure 11
on page 26 or Figure 13 on page 30) and in the confirmation e-mail.
The system repeats the number and prompts the user to confirm it or
reenter it.
4. Confirm or reenter the number.
The system presents a menu for recording the greeting, similar to that
used for the brandline greeting.
After recording the greeting, it can be verified, re-recorded, or deleted
at a later time. Conference details displayed in the BUI indicate
whether or not a greeting exists.
A greeting recorded for a conference that is part of a recurrent chain
applies to all occurrences of the chain.
Creating an “ad hoc” conference
An “ad hoc” conference is a conference that is not scheduled in advance.
It uses only card resources (ports and DNs) that are available at that time.
You can create an “ad hoc” conference only with the TUI.
An “ad hoc” conference is initially 30 minutes in duration, with three ports
for participants. You can extend the duration in 15-minute increments by
pressing *98. The maximum number of participants is eight, but you can
change this limit using the BUI (see “Editing a conference (one-time or
recurring)” on page 31).
77
Page 78

Telephone User Interface
Use the steps below to create an “ad hoc” conference. Only the
chairperson can create the conference.
Steps
1. Set up the conference. The chairperson must:
a. Dial the single access number.
b. Enter his or her TUI login as the conference ID.
c. Enter his or her TUI login password as the conference password.
The TUI login password is the same as the BUI login password.
2. To join the conference, each participant must:
a. Dial the single access number.
b. Enter his or her TUI login as conference ID. No password is
required.
TUI command summary
Chairperson commands
Table 3 lists conference commands that the chairperson can use to
control a conference while it is in progress.
Table 3: Chairperson commands (Part 1 of 3)
Command Description
*0<DN>#
*0#
*#
*2<GN>#
78
Dial out to a DN, where DN is the called party’s directory
number. The called party must not be a conference
participant.
To return to the conference, see Table 4 on page 80.
Dial out to the Call Assistant.
Redial the last dialed DN.
Dial out to a Call-Out Group, where GN is the group
number to call.
Page 79

Telephone User Interface
Table 3: Chairperson commands (Part 2 of 3)
Command Description
*4
*10
*19
*52
*60
*69
*71
*72
*73
*74
*76
*78
*81
Lock or unlock the conference.
Mute/unmute all ports (toggle).
Mute/unmute self (toggle).
Release chairperson control.
Count conferees and announce names to all
participants.
Plays a scrolling list of participants for the chairperson.
The chairperson can use this command to access an
individual participant. See Table 5 on page 80.
Decrease volume on speak direction.
Restore initial volume level.
Increase volume on speak direction.
Decrease volume on listen direction.
Increase volume on listen direction.
Restore initial volume level of all participants.
Vote: “Yes, I agree”.
*82
*83
*90
*91
*92
*98
Vote: “No, I don’t agree”.
Vote: “I abstain”.
Drop all ports except the chairperson’s port.
Drop the last dialed-out port.
Drop the last dialed-in port.
Extend the conference duration by 15-minute
increments (up to a maximum of 12 hours).
Note: This command is not active for a permanent
conference.
79
Page 80

Telephone User Interface
Table 3: Chairperson commands (Part 3 of 3)
Command Description
*99
Stop or start the initial conference music, which is
possible only when the chairperson is the first person
joining the conference. The first entry stops the music,
and the second entry starts the music.
*
**
Cancel current command.
Start or stop the Help menu.
Table 4 lists commands available to end a dial-out call (see the command
*0<DN># in Table 3 on page 78).
Table 4: Commands to end a dial-out call
Command Description
*2
Return to the conference with dialed party during dial
out.
*3
Return to the conference without dialed party during dial
out.
While the system announces the list of conference participants (the
command *69 in Table 3 on page 78), the chairperson can use the
commands listed in Table 5 to access an individual participant.
Table 5: Chairperson commands — while participant list plays
(Part 1 of 2)
Command Description
#
0
1
2
4
80
Stop and start the playlist.
Consult privately with the conferee.
Mute/unmute the conferee.
Play the current conferee name greeting.
Select the previous conferee.
Page 81

Telephone User Interface
Table 5: Chairperson commands — while participant list plays
(Part 2 of 2)
Command Description
6
9
*3
Select the next conferee.
Disconnect the current conferee.
Return to the conference.
Participant commands
Table 6 lists conference commands that a participant can execute on the
telephone while the conference is in progress.
Table 6: Participant commands for a conference in progress
(Part 1 of 2)
Command Description
*19
*51
*71
*72
*73
*74
Mute/unmute self (toggle).
Acquire chairperson control.
Decrease volume on speak direction.
Restore initial volume level.
Increase volume on speak direction.
Decrease volume on listen direction.
*76
*81
*82
*83
*85
*86
Increase volume on listen direction.
Vote: “Yes, I agree”.
Vote: “No, I don’t agree”.
Vote: “I abstain”.
Ask a question.
Cancel a question.
81
Page 82

Telephone User Interface
Table 6: Participant commands for a conference in progress
(Part 2 of 2)
Command Description
*99
*
**
Stop or start the initial conference music, which is
possible only when the conferee is the first person
joining the conference. The first entry stops the music,
and the second entry starts it.
Cancel current command.
Start or stop the Help menu.
82
Page 83

Page 84

Nortel Networks Communication Server 1000
Nortel Networks Integrated Conference
Bridge
User Guide
Copyright © 2004 Nortel Networks
All Rights Reserved
Information is subject to change without notice. Nortel Networks reserves
the right to make changes in design or components as progress in
engineering and manufacturing warrant. This equipment has been tested
and found to comply with the limits for a Class A digital device pursuant
to Part 15 of the FCC rules, and the radio interference regulations of
Industry Canada. These limits are designed to provide reasonable
protection against harmful interference when the equipment is operated
in a commercial environment. This equipment generates, uses, and can
radiate radio frequency energy, and if not installed and used in
accordance with the instruction manual, may cause harmful interference
to radio communications.
Operation of this equipment in a residential area is likely to cause
harmful interference in which case the user will be required to correct the
interference at their own expense.
SL-1, Meridian 1, and Succession are trademarks of Nortel Networks.
Microsoft, Outlook, Internet Explorer, Windows, and Exchange are
registered trademarks of Microsoft Corporation. Netscape
Communicator is a registered trademark of Netscape Communications
Corporation.
Document Release: Standard 1.00
Date: July 2004
Produced in Canada
Internet address
http://www.nortelnetworks.com
 Loading...