

Page 1

Title page
Expansion Module for IP Phone 1100
Series
User Guide
Page 2

Page 3

Revision history
Revision history
May 2007
Standard 01.03. This document is up-issued to support Nortel
Communication Server 1000 Release 5.0 software.
December 2006
Standard 01.02. This document is up-issued to include updates based on
feedback. Expansion Module for the IP Phone 1100 series terminology
has been updated.
December 2006
Standard 01.01. This document is up-issued to include updates based on
feedback. Regulatory and safety information chapter was updated after a
review. This is a new user guide for the Expansion Module for the IP
Phone 1100 series.
3
Page 4

Revision history
4
Page 5

Contents
About the Expansion Module for IP Phone 1100 Series . . . 7
Description . . . . . . . . . . . . . . . . . . . . . . . . . . . . . . . . . . . . . . . . 7
Features . . . . . . . . . . . . . . . . . . . . . . . . . . . . . . . . . . . . . . . . . . 8
Adjusting the display . . . . . . . . . . . . . . . . . . . . . . . . . . . . . . . . . 9
Expansion Module for IP Phone 1100 Series font support . . . . 9
Setup and assembly . . . . . . . . . . . . . . . . . . . . . . . . . . . . . . . 10
Installing the Expansion Module . . . . . . . . . . . . . . . . . . . . . . . 11
Expansion Module startup initialization . . . . . . . . . . . . . . . . . 14
Using the wall-mount option . . . . . . . . . . . . . . . . . . . . . . . . . . 14
Adjusting the tilt base . . . . . . . . . . . . . . . . . . . . . . . . . . . . . . . 15
Controls and settings . . . . . . . . . . . . . . . . . . . . . . . . . . . . . . 16
Shift key functionality . . . . . . . . . . . . . . . . . . . . . . . . . . . . . . . 16
Contents
Services key operation . . . . . . . . . . . . . . . . . . . . . . . . . . . . . . 16
Display diagnostics . . . . . . . . . . . . . . . . . . . . . . . . . . . . . 17
Regulatory and safety information . . . . . . . . . . . . . . . . . . . 19
Other . . . . . . . . . . . . . . . . . . . . . . . . . . . . . . . . . . . . . . . . . . . . 20
DenAn regulatory notice for Japan . . . . . . . . . . . . . . . . . . . . . 21
Terms you should know . . . . . . . . . . . . . . . . . . . . . . . . . . . 23
Index . . . . . . . . . . . . . . . . . . . . . . . . . . . . . . . . . . . . . . . . . . . 25
5
Page 6

Contents
6
Page 7

About the Expansion Module for IP Phone 1100 Series
About the Expansion Module for
IP Phone 1100 Series
This document describes the Expansion Module for IP Phone 1100
Series (Expansion Module) and how to use it with the IP Phone.
Description
The Expansion Module is supported on the following IP Phones:
• IP Phone 1120E
• IP Phone 1140E
• IP Phone 1150E
The Expansion Module is a hardware accessory that connects to the
IP Phone and provides additional line appearances and feature keys.
Up to three modules are supported. The IP Phone 1120E, IP Phone
1140E, and IP Phone 1150E can have up to 54 additional line/feature
keys with three Expansion Modules.
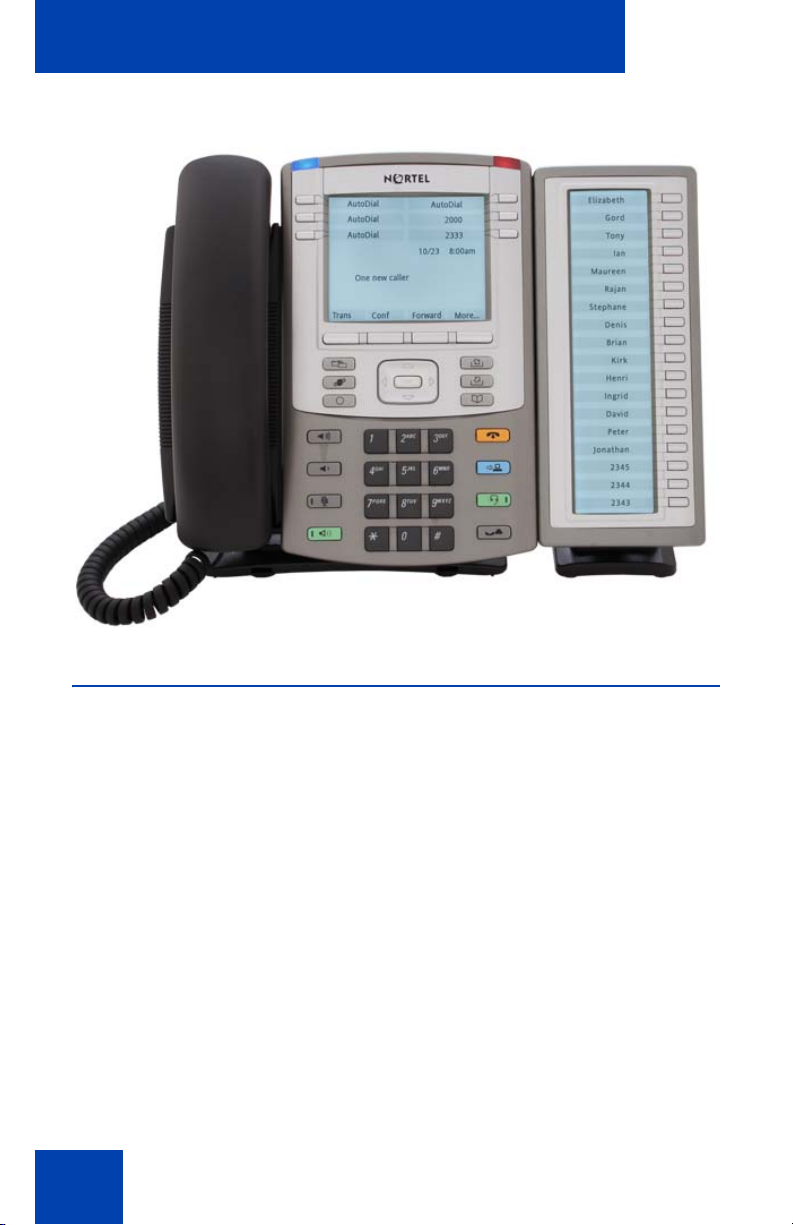
Figure 1 on page 8 shows the IP Phone 1140E with an Expansion Module
attached.
7
Page 8
About the Expansion Module for IP Phone 1100 Series
Figure 1: IP Phone 1140E with Expansion Module
Features
The Expansion Module has the following features:
• 18 keys provide up to 36 additional self-labeled line/programmable
feature keys when using the Shift feature. Using the Shift key
functionality, an IP Phone 1140E, for example, can have up to 66
additional logical line/feature keys.
• Upgradeable firmware using a TFTP or a UFTP Server.
• A desk-mount bracket and structural baseplate support the
connection of an Expansion Module for IP Phone 1100 Series to an
IP Phone, or to another Expansion Module.
• IP Phone and Expansion Module combination can be wall-mounted
using the wall mount template provided.
8
Page 9

About the Expansion Module for IP Phone 1100 Series
Adjusting the display
The Expansion Module is equipped with a graphical, pixel-based,
grayscale LCD display area beside the 18 line/feature keys (see Figure 1
on page 8). Each of the 18 physical keys on the Expansion Module has a
10-character display label. This label is set automatically, however, the
user can edit the label using the controls on the IP Phone.
To adjust the display and contrast on the Expansion Module, use the
Contrast Adjustment option in the Telephone Options menu on the
IP Phone. Any contrast changes you make on the IP Phone affect the
Expansion Module. The Expansion Module and IP Phone do not have
separate contrast adjustments.
The type of power supply to the phone controls what is functional on the
Expansion Module for IP Phone 1100 Series. The Expansion Module’s
backlight can only light when the local 48V power supply is present. On
the other hand, either local 48V power supply or Power over Ethernet
(PoE) to the phone will power all of the Expansion Module’s other
functionality.
For more information, see the section “Adjusting the screen display
contrast” in your IP Phone User Guide.
Expansion Module for IP Phone 1100 Series font support
The Expansion Module for IP Phone 1100 Series (Expansion Module)
text is rendered by the IP Phone; therefore, the selected language and
font mappings on the Expansion Module mirror the selected language
and font mappings on the IP Phone. For further information, see IP
Phones Fundamentals (NN43001-368).
9
Page 10

Setup and assembly
Setup and assembly
The Expansion Module mounts on the right side of the IP Phone. The
Expansion Module snaps into the Accessory Expansion Module (AEM) on
the back of the IP Phone using the desk-mount bracket and structural
baseplate supplied with the Expansion Module.
10
Page 11

Setup and assembly
Installing the Expansion Module
Use the following instructions to install the Expansion Module.
CAUTION
Damage to Equipment
To avoid damaging the equipment, remove the
power (PoE cable, or local power) from the IP
Phone before connecting the Expansion
Module.
CAUTION
Damage to Equipment
The Expansion Module is shipped with the
base locked in position. To avoid damaging the
Expansion Module, press the tilt lever, located
on the base at the front of the
Module.
Expansion
Wall Mount Lever
1. Press the tilt lever to adjust the stand angle on the IP Phone. You can adjust
the stand angle to maximum, instead of removing the stand. See Figure 2.
11
Page 12

Setup and assembly
Figure 2: Adjusting the stand angle on the IP Phone
2. At the back of the IP Phone, remove the rubber plug from the AEM
port. Place the connecting arm of the Expansion Module behind the
IP Phone and align the Expansion Module connection plug to the
AEM port on the back of the IP Phone.
3. Insert the screws in to the top and bottom holes of the connecting arm of the
Expansion Module and tighten until snug. See Figure 3.
12
Page 13

Setup and assembly
Figure 3: Connecting the Expansion Module
4. If connecting a second, or a third Expansion Module, repeat steps 2
to 4.
Note: The second Expansion Module is attached to the right side of
the first Expansion Module. The third Expansion Module is attached
to the right side of the second Expansion Module.
5. Adjust the height of the IP Phone tilt adjustment to a comfortable
viewing angle. Then adjust each of the Expansion Module foot stands
so they are flush to the desk surface. Turn the wheel on the back right
side of the Expansion Module to the right (if viewed from the front) to
tighten the Expansion Module.
WAR NING
Do not over tighten the wheel on the Expansion Module.
6. Connect power to the IP Phone. The Expansion Module powers up.
Note: The Expansion Module uses the electrical connection of the
IP Phone for power. It does not have its own power source.
13
Page 14

Setup and assembly
Expansion Module startup initialization
Once the Expansion Module has been installed and powered up on the
IP Phone, the Expansion Module initializes.
Table 1 lists the initialization process for the Expansion Module.
Table 1: Initializing Expansion Module
Phase Description
Expansion
Module performs
self-test
Expansion
Module
establishes
communication
with the
IP Phone
Expansion
Module
downloads key
maps
The self-test confirms the operation of the
Expansion Module local memory, CPU, and other
circuitry. While undergoing this self-test, the
Expansion Module display lights up.
Note: If the Expansion Module display does not
light up, or lights up and then goes blank, or fails to
begin flashing, check that the Expansion Module is
correctly installed and configured.
The Expansion Module display flashes until it
establishes communication with the IP Phone.
If the Expansion Module display does not stop
flashing, communication has not been established
with the IP Phone. Check that the Expansion
Module is correctly installed and configured.
The key labels download to the Expansion Module.
During the download, the display is blank.
Using the wall-mount option
IP Phone and Expansion Module combination can be wall-mounted using
the wall mount template provided.
14
Page 15

Setup and assembly
Adjusting the tilt base
The Expansion Module stand provides a continuous tilt adjustment so the
tilt angle matches the IP Phone stand angle while accommodating
variations in the desk surface. A clamp mechanism is used to unlock and
lock the foot stand angle.
CAUTION
Do not over tighten the wheel on the Expansion Module.
The Expansion Module is tightened by spinning the wheel clockwise and loosened
by spinning the wheel counter-clockwise.
Turn the wheel on the back right side (if viewed from the front) of the
Expansion Module to loosen the stand hinge. Adjust the angle of the IP
Phone using the tilt lever. When the IP Phone is set to a preferred angle,
turn the wheel on the back of the Expansion Module to tighten the stand
hinge and lock the stand at the same angle as the attached IP Phone.
15
Page 16

Controls and settings
Controls and settings
When an Expansion Module is installed on an IP Phone, the controls and
settings of the IP Phone control both the IP Phone and the Expansion
Module. Use the Telephone Options menu on the attached IP Phone to
set the contrast and feature key labels of the Expansion Module.
For more information about controls and settings (including the
Telephone Options menu) for your IP Phone, see the IP Phone user
guide.
Shift key functionality
The IP Phone 1140E and IP Phone 1150E can also have up to 36
additional line/feature keys using the Shift key functionality with one
Expansion Module (if the Communication Server supports the Shift
feature).
If more than one Expansion Module connected, the Shift key functionality
does not affect the Expansion Module since the maximum number of line/
feature keys is already available.
The Shift/Outbox key on the IP Phone 1120E is a fixed key that is
reserved for future feature development.
Services key operation
The Services key is used to access user settings and certain features on
the IP Phone. When one or more Expansion Module are attached to the
IP Phone, the actions of the display diagnostics for the IP Phones DN/
feature key display area are duplicated for the Expansion Module.
If an incoming call occurs when in the diagnostic mode, the call is
answered by pressing the DN/feature key, handsfree, or headset key, or
by picking up the handset. The display area remains in diagnostic mode
until either the user exits the diagnostic more, or the idle timeout clears
the mode. Once cleared, the normal display for the current state of the
IP Phone is displayed.
16
Page 17

Controls and settings
Press the Services key to access the following menu items:
• Display diagnostics
• Set Info
Display diagnostics
Use the Up/Down navigation keys to scroll the Display diagnostics menu
to access the following screens/diagnostic operations:
• initial screen
• Full Contrast
•LED Test
• Character Test
Initial screen
Instructions are displayed on the display area of the IP Phone and the
Expansion Module. The DN/feature key display areas is blank.
Full Contrast
The IP Phone and the Expansion Module display areas are set to
maximum (dark) contrast, including the DN/feature key areas. All LEDs
are off.
LED Test
The IP Phone and the Expansion Module LEDs are set to on. The display
area is cleared including the DN/feature key display areas.
Character Test
The IP Phone and the Expansion Module LEDs are set to off. The
available character set is displayed across all writable areas of the
display, including the DN/feature key display areas. The telephone onhook icon is displayed for all DN/feature keys.
17
Page 18

Controls and settings
Table 2 shows the display diagnostic operation on the IP Phones and the
Expansion Module.
Table 2: Display diagnostic operation on the IP Phone and the
Expansion Module
Expansion Module for
IP Phone 1100 Series
area display
Diagnostic step
IP Phone DN/feature
key display area
initial screen blank blank
Full Contrast set to highest contrast set to highest contrast
LED Test blank blank
Character Test Characters display
across the display
areas, the telephone
on-hook icon is
Characters display
across the display areas,
the telephone on-hook
icon is displayed.
displayed.
18
Page 19

Regulatory and safety information
Regulatory and safety
information
This equipment has been tested and found to comply with the limits for a
Class B digital device, pursuant to part 15 of the FCC Rules. These limits
are designed to provide reasonable protection against harmful
interference in a residential installation. This equipment generates, uses
and can radiate radio frequency energy and, if not installed and used in
accordance with the instructions, may cause harmful interference to radio
communications. However, there is no guarantee that interference will not
occur in a particular installation. If this equipment does cause harmful
interference to radio or television reception, which can be determined by
turning the equipment off and on, the user is encouraged to try to correct
the interference by one or more of the following measures:
• Reorient or relocate the receiving antenna.
• Increase the separation between the equipment and receiver.
• Connect the equipment into an outlet on a circuit different from that to which
the receiver is connected.
• Consult the dealer or an experienced radio/ TV technician for help.
Note: The user should not make changes or modifications not expressly
approved by Nortel Networks. Any such changes could void the user’s
authority to operate the equipment.
This Class B digital apparatus complies with Canadian ICES-003. Cet appareil
numérique de la classe B est conforme à la norme NMB-003 du Canada.
Warnings:
• This is a Class B product. In a domestic environment this product can cause
radio interference in which case the user must take adequate measures.
• Operation is subject to the following two conditions: (1) this device may not
cause interference, and (2) this device must accept any interference,
including interference that may cause undesired operation of the device.
• Privacy of communications may not be ensured when using this telephone.
To prevent radio interference to the licensed service, this device must be operated
indoors only and should be kept away from windows to provide maximum
shielding
.
19
Page 20

Regulatory and safety information
この装置は、情報処理装置等電波障害自主規制協議会(VCCI)の基準に基づくクラス
B 情報技術装置です。この装置は、家庭環境で使用することを目的としていますが、この
装置がラジオやテレビジョン受信機に近接して使用されると、受信障害を引き起こすこと
があります。
取扱説明書に従って正しい取り扱いをして下さい。
Table 3 lists EMC compliance for various jurisdictions.
Table 3: EMC compliance
Jurisdiction Standard Description
United States FCC CFR 47
Part 15
Canada ICES-003 Class B Emissions: Interference-Causing
Australia/New
Zealand
European
Community
Japan
AS/NZS 3548
CISPR 22
EN 55022 Class B Emissions: Information technology
EN 55024 Information technology equipment - Immunity
EN 61000-3-2 Limits for harmonic current emissions
EN 61000-3-3 Limitation of voltage fluctuations and flicker in
VCCI Regulations for voluntary control measures.
Class B Emissions: FCC Rules for Radio
Frequency Devices
Equipment Standard: Digital Apparatus
Class B Emissions: Information technology
equipment - Radio disturbance
equipment - Radio disturbance
characteristics
Limits and methods of measurement
(equipment input current <= 16 A per phase)
low-voltage supply systems for equipment with
rated current <= 16 A
Other
This equipment complies with the CE Marking requirements.
EU Countries: This device complies with the essential requirements and other
relevant provisions of EMC and LVD directives. A copy of the Declaration may be
obtained from http://www.nortel.com/products/announcements/eumrdc/index.html
or Nortel Networks GmbH address: Ingolstaedter Strasse 14-18, 80807 Munich
Germany.
20
Page 21

Regulatory and safety information
DenAn regulatory notice for Japan
21
Page 22

Regulatory and safety information
22
Page 23

Terms you should know
Terms you should know
Accessory Expansion Module
A built-in port on an Nortel IP Phone that enables accessory
components (such as a Expansion Module for IP Phones 1100
Series) to connect and communicate with the IP Phone.
Directory Number (DN)
A one- to seven-digit number assigned to a system telephone.
Expansion Module for the IP Phone 1100 Series
An accessory for IP Phone 1120E, 1140E and 1150E, which has
18 physical keys for additional line/programmable feature keys
(36 where deployed on Nortel Communication Servers
supporting the shift function).
Feature display
An area that shows status information about the feature in use. It
also displays the name and status of the active session.
Soft keys (self-labeled)
A set of keys programmed by your system administrator. The four
keys located directly below the display area have four
programmable layers. Access the layers through the More... key.
The soft keys are also used to configure parameters in the
Telephone Options menu.
23
Page 24

Terms you should know
24
Page 25

Index
Index
A
Accessory Expansion Module
(AEM) 23
Auto Dial 23
D
Directory Number (DN) 23
Display 9
Display label 9
DN 23
F
Feature display 23
Features 8
I
Initialize the IP Phone KEM 16
Install the IP Phone KEM 10
IP Phone 2002 7
IP Phone 2004 7
IP Phone KEM 7, 23
IP Phone KEM controls and settings 16
IP Phone KEM description 7
IP Phone KEM display 9
IP Phone KEM features 8
R
Regulatory and safety information
19
S
Shift key 16
Soft keys 23
T
Tilt base 15
W
Wall-mount option 14
L
LCD 9
Liquid Crystal Display (LCD) 9
25
Page 26

Index
26
Page 27

Page 28

Nortel Communication Server 1000
Expansion Module for IP Phone 1100
Series
User Guide
Copyright © 2006 Nortel Networks. All Rights Reserved.
The information in this document is subject to change without notice. The
statements, configurations, technical data, and recommendations in this
document are believed to be accurate and reliable, but are presented
without express or implied warranty. Users must take full responsibility for
their applications of any products specified in this document. The
information in this document is proprietary to Nortel Networks.
Nortel, Nortel (Logo), the Globemark, SL-1, Meridian 1, and Succession
are trademarks of Nortel Networks.
The Bluetooth word mark and logos are owned by the Bluetooth SIG, Inc.
and any use of such marks by Nortel Networks is under license. Other
trademarks and trade names are those of their respective owners.
Publication Number: NN43130-101
Document Release: Standard 01.02
Date: May 2007
Produced in Canada
To provide feedback or report a problem in this document,
go to www.nortel.com/documentfeedback
 Loading...