

Page 1
NH
TM
Series
Outdoor
ELECTRODE
STEAM HUMIDIFIER
Out door Model
Inst allation Manual
2531550-B
Page 2
PROPRIETARY NOTICE
This document and the information disclosed herein are proprietary data of W alter Meier. Neither this
document nor the information contained herein shall be reproduced used, or disclosed to others
without the written authorization of Walter Meier, except to the extent required for installation or
maintenance of recipient’s equipment. All references to the NORTEC name should be taken as
referring to Walter Meier (Climate USA) Inc. and Walter Meier (Climate Canada) Ltd.
LIABILITY NOTICE
Walter Meier does not accept any liability for installations of humidity equipment installed by
unqualified personnel or the use of parts/component s/equipment that are not authorized or approved
by Walter Meier.
COPYRIGHT NOTICE
Copyright 2008, Walter Meier (Climate USA) Inc. and Walter Meier (Climate Canada) Ltd. All rights
reserved.
RECORD OF REVISIONS
For each revision, put the revised pages in your manual and disca rd the superseded pages. W rite the
revision number and revision date, date put in manual, and the incorporator’s initials in the applicable
columns on the Record of Revisions.
Revision
Number
Page Number Date Put
In Manual By
Revision
Number
Revision
Date
Date Put
In Manual By
2008-10-01
Page 3

TABLE OF CONTENTS
Subject Page
10-00 INTRODUCTION
1. PREINSTALLATION . . . . . . . . . . . . . . . . . . . . . . . . . . . . . . . . . . . . . . . . . . . . . . . . . . . . . . . . . . . . . . . . . . . .2
A. ABOUT THIS GUIDE . . . . . . . . . . . . . . . . . . . . . . . . . . . . . . . . . . . . . . . . . . . . . . . . . . . . . . . . . . . . . . . .2
B. RECEIVING AND UNPACKING EQUIPMENT. . . . . . . . . . . . . . . . . . . . . . . . . . . . . . . . . . . . . . . . . . . . .2
2. PACKAGING . . . . . . . . . . . . . . . . . . . . . . . . . . . . . . . . . . . . . . . . . . . . . . . . . . . . . . . . . . . . . . . . . . . . . . . . . .2
A. GENERAL . . . . . . . . . . . . . . . . . . . . . . . . . . . . . . . . . . . . . . . . . . . . . . . . . . . . . . . . . . . . . . . . . . . . . . . .2
B. HUMIDIFIER SKID . . . . . . . . . . . . . . . . . . . . . . . . . . . . . . . . . . . . . . . . . . . . . . . . . . . . . . . . . . . . . . . . . .2
C. DISTRIBUTOR BOX . . . . . . . . . . . . . . . . . . . . . . . . . . . . . . . . . . . . . . . . . . . . . . . . . . . . . . . . . . . . . . . .2
D. ACCESSORIES BOX . . . . . . . . . . . . . . . . . . . . . . . . . . . . . . . . . . . . . . . . . . . . . . . . . . . . . . . . . . . . . . . .3
3. PREINSTALLATION EQUIPMENT VERIFICATION . . . . . . . . . . . . . . . . . . . . . . . . . . . . . . . . . . . . . . . . . . . .5
A. EQUIPMENT VERIFICATION. . . . . . . . . . . . . . . . . . . . . . . . . . . . . . . . . . . . . . . . . . . . . . . . . . . . . . . . . .5
B. MOVING AND HANDLING THE HUMIDIFIER . . . . . . . . . . . . . . . . . . . . . . . . . . . . . . . . . . . . . . . . . . . . .5
10-10 INSTALLATION PROCEDURES
1. HUMIDIFIER INSTALLATION . . . . . . . . . . . . . . . . . . . . . . . . . . . . . . . . . . . . . . . . . . . . . . . . . . . . . . . . . . . . .8
A. LOCATION & MOUNTING . . . . . . . . . . . . . . . . . . . . . . . . . . . . . . . . . . . . . . . . . . . . . . . . . . . . . . . . . . . .8
B. AIR HANDLING MOUNTING . . . . . . . . . . . . . . . . . . . . . . . . . . . . . . . . . . . . . . . . . . . . . . . . . . . . . . . . . .8
C. CURB MOUNTING . . . . . . . . . . . . . . . . . . . . . . . . . . . . . . . . . . . . . . . . . . . . . . . . . . . . . . . . . . . . . . . . . .9
D. WALL MOUNTING . . . . . . . . . . . . . . . . . . . . . . . . . . . . . . . . . . . . . . . . . . . . . . . . . . . . . . . . . . . . . . . . . .9
E. ELECTRICAL INSTALLATION . . . . . . . . . . . . . . . . . . . . . . . . . . . . . . . . . . . . . . . . . . . . . . . . . . . . . . . .14
F. WATER SUPPLY LINE . . . . . . . . . . . . . . . . . . . . . . . . . . . . . . . . . . . . . . . . . . . . . . . . . . . . . . . . . . . . . .14
G. DRAINL LINE . . . . . . . . . . . . . . . . . . . . . . . . . . . . . . . . . . . . . . . . . . . . . . . . . . . . . . . . . . . . . . . . . . . . .18
H. AUXILIARY DRAINS. . . . . . . . . . . . . . . . . . . . . . . . . . . . . . . . . . . . . . . . . . . . . . . . . . . . . . . . . . . . . . . .18
I. STEAM LINES. . . . . . . . . . . . . . . . . . . . . . . . . . . . . . . . . . . . . . . . . . . . . . . . . . . . . . . . . . . . . . . . . . . . .18
2. IMPORTANT INFORMATION . . . . . . . . . . . . . . . . . . . . . . . . . . . . . . . . . . . . . . . . . . . . . . . . . . . . . . . . . . . .19
A. GENERAL . . . . . . . . . . . . . . . . . . . . . . . . . . . . . . . . . . . . . . . . . . . . . . . . . . . . . . . . . . . . . . . . . . . . . . .19
B. HEATER AND FAN SYSTEM . . . . . . . . . . . . . . . . . . . . . . . . . . . . . . . . . . . . . . . . . . . . . . . . . . . . . . . . .19
C. FREEZE PROTECTION SYSTEM (OPTIONAL) . . . . . . . . . . . . . . . . . . . . . . . . . . . . . . . . . . . . . . . . . .20
D. SERVICING ELECTRODE STEAM CYCLINDER. . . . . . . . . . . . . . . . . . . . . . . . . . . . . . . . . . . . . . . . . .20
E. SERVICING NHRS WITH SCALE MANAGEMENT SYSTEM . . . . . . . . . . . . . . . . . . . . . . . . . . . . . . . .21
F. CLEANING DUST AND POLLEN DEPOSITS . . . . . . . . . . . . . . . . . . . . . . . . . . . . . . . . . . . . . . . . . . . .21
G. RESTARTING AFTER FREEZING. . . . . . . . . . . . . . . . . . . . . . . . . . . . . . . . . . . . . . . . . . . . . . . . . . . . .21
3. OPERATION AND ADDITIONAL MAINTENANCE . . . . . . . . . . . . . . . . . . . . . . . . . . . . . . . . . . . . . . . . . . . .22
A. OPERATION. . . . . . . . . . . . . . . . . . . . . . . . . . . . . . . . . . . . . . . . . . . . . . . . . . . . . . . . . . . . . . . . . . . . . .22
B. ADDITIONAL MAINTENANCE . . . . . . . . . . . . . . . . . . . . . . . . . . . . . . . . . . . . . . . . . . . . . . . . . . . . . . . .22
4. WEATHER DESIGN DATA . . . . . . . . . . . . . . . . . . . . . . . . . . . . . . . . . . . . . . . . . . . . . . . . . . . . . . . . . . . . . .22
A. WEATHER DATA . . . . . . . . . . . . . . . . . . . . . . . . . . . . . . . . . . . . . . . . . . . . . . . . . . . . . . . . . . . . . . . . . .22
10-20 TECHNICAL
1. SPARE PARTS . . . . . . . . . . . . . . . . . . . . . . . . . . . . . . . . . . . . . . . . . . . . . . . . . . . . . . . . . . . . . . . . . . . . . . .28
10-30 WIRING DIAGRAMS
1. . . . . . . . . . . . . . . . . . . . . . . . . . . . . . . . . . . . . . . . . . . . . . . . . . . . . . . . . . . . . . . . . . . . . . . . . . . . . . . . . . . . .31
WARRANTY
2008-10-01
Page 4

LIST OF FIGURES
Figure Page
10-00 INTRODUCTION
Figure 1. Humidifier . . . . . . . . . . . . . . . . . . . . . . . . . . . . . . . . . . . . . . . . . . . . . . . . . . . . . . . . . . . . . . . . . . . . .4
Figure 2. Distributor Box Contents. . . . . . . . . . . . . . . . . . . . . . . . . . . . . . . . . . . . . . . . . . . . . . . . . . . . . . . . . . .4
Figure 3. SAM-e Distributor Box . . . . . . . . . . . . . . . . . . . . . . . . . . . . . . . . . . . . . . . . . . . . . . . . . . . . . . . . . . . . 4
Figure 4. Remote Mounted Blower Pack Box . . . . . . . . . . . . . . . . . . . . . . . . . . . . . . . . . . . . . . . . . . . . . . . . . .4
10-10 INSTALLATION PROCEDURES
Figure 1. Recommended Clearances and Curb Dimensions. . . . . . . . . . . . . . . . . . . . . . . . . . . . . . . . . . . . . .11
Figure 2. Typical Air Handling Unit Installation . . . . . . . . . . . . . . . . . . . . . . . . . . . . . . . . . . . . . . . . . . . . . . . .12
Figure 3. Typical Rooftop Curb Installation . . . . . . . . . . . . . . . . . . . . . . . . . . . . . . . . . . . . . . . . . . . . . . . . . . .12
Figure 4. Typical Wall Mount Installation. . . . . . . . . . . . . . . . . . . . . . . . . . . . . . . . . . . . . . . . . . . . . . . . . . . . .13
Figure 5. Normally Open / Normally Closed Valve Arrangement. . . . . . . . . . . . . . . . . . . . . . . . . . . . . . . . . . .16
Figure 6. 3-Way Valve Arrangement . . . . . . . . . . . . . . . . . . . . . . . . . . . . . . . . . . . . . . . . . . . . . . . . . . . . . . . .17
10-20 TECHNICAL
Figure 1. NHRS Outdoor Exploded View. . . . . . . . . . . . . . . . . . . . . . . . . . . . . . . . . . . . . . . . . . . . . . . . . . . . .28
Figure 2. NHTC Oudoor Exploded View . . . . . . . . . . . . . . . . . . . . . . . . . . . . . . . . . . . . . . . . . . . . . . . . . . . . .29
LIST OF TABLES
Table Page
10-10 INSTALLATION PROCEDURES
Table 1. Weather Design Data. . . . . . . . . . . . . . . . . . . . . . . . . . . . . . . . . . . . . . . . . . . . . . . . . . . . . . . . . . . .23
2008-10-01
Page 5

THIS PAGE INTENTIONALLY LEFT BLANK
2008-10-01
Page 6

10-00
INTRODUCTION
10-00
Page 1
2008-10-01
Page 7

1. PRE-INSTALLATION
A.
ABOUT THIS GUIDE
(1) This guide is intended as a supplement for the NH Series Installation Guide.
The NH Series Installation guide is included with all NH Series humidifiers and
contains information on installation, operation, and maintenance that applies to
both indoor and outdoor models. This guide contains supplementary information
that pertains specifically to the NH Series Outdoor humidifiers.
(2) For information on the installation of controls, interior piping, interior wiring,
distribution systems please refer to the NH Series Installation Guide.
(3)
The operation and control of the NH Outdoor Series is identical to the indoor
series. Please refer to the NH Series Installation guide for information on operating
your humidifier.
(4)
The maintenance items described in this guide are specific to the outdoor model
and must be performed IN ADDITION to the regular maintenance that an indoor
model would require. Please refer to the NH Series Installation guide for other
regular maintenance items.
B. RECEIVING & UNPACKING EQUIPMENT
(1) Check packing slip to ensure ALL material has been delivered.
(2) All material shortages are to be reported to NORTEC within 48 hours from receipt
of goods. NORTEC assumes no responsibility for any material shortages beyond
this period.
(3) Inspect shipping boxes for damage and note damages on shipping waybill
accordingly.
(4) After unpacking, inspect equipment for damage and if damage is found, notify the
shipper promptly.
(5)
All NORTEC products are shipped on an FOB factory basis. Any and all damage,
breakage or loss claims are to be made directly to the shipping company.
2. PACKAGING
A.
GENERAL
(1) The equipment packaging is standardized in that each box in the shipment will
always have the same contents. The following paragraphs identify the contents
of each box.
B.
HUMIDIFIER SKID
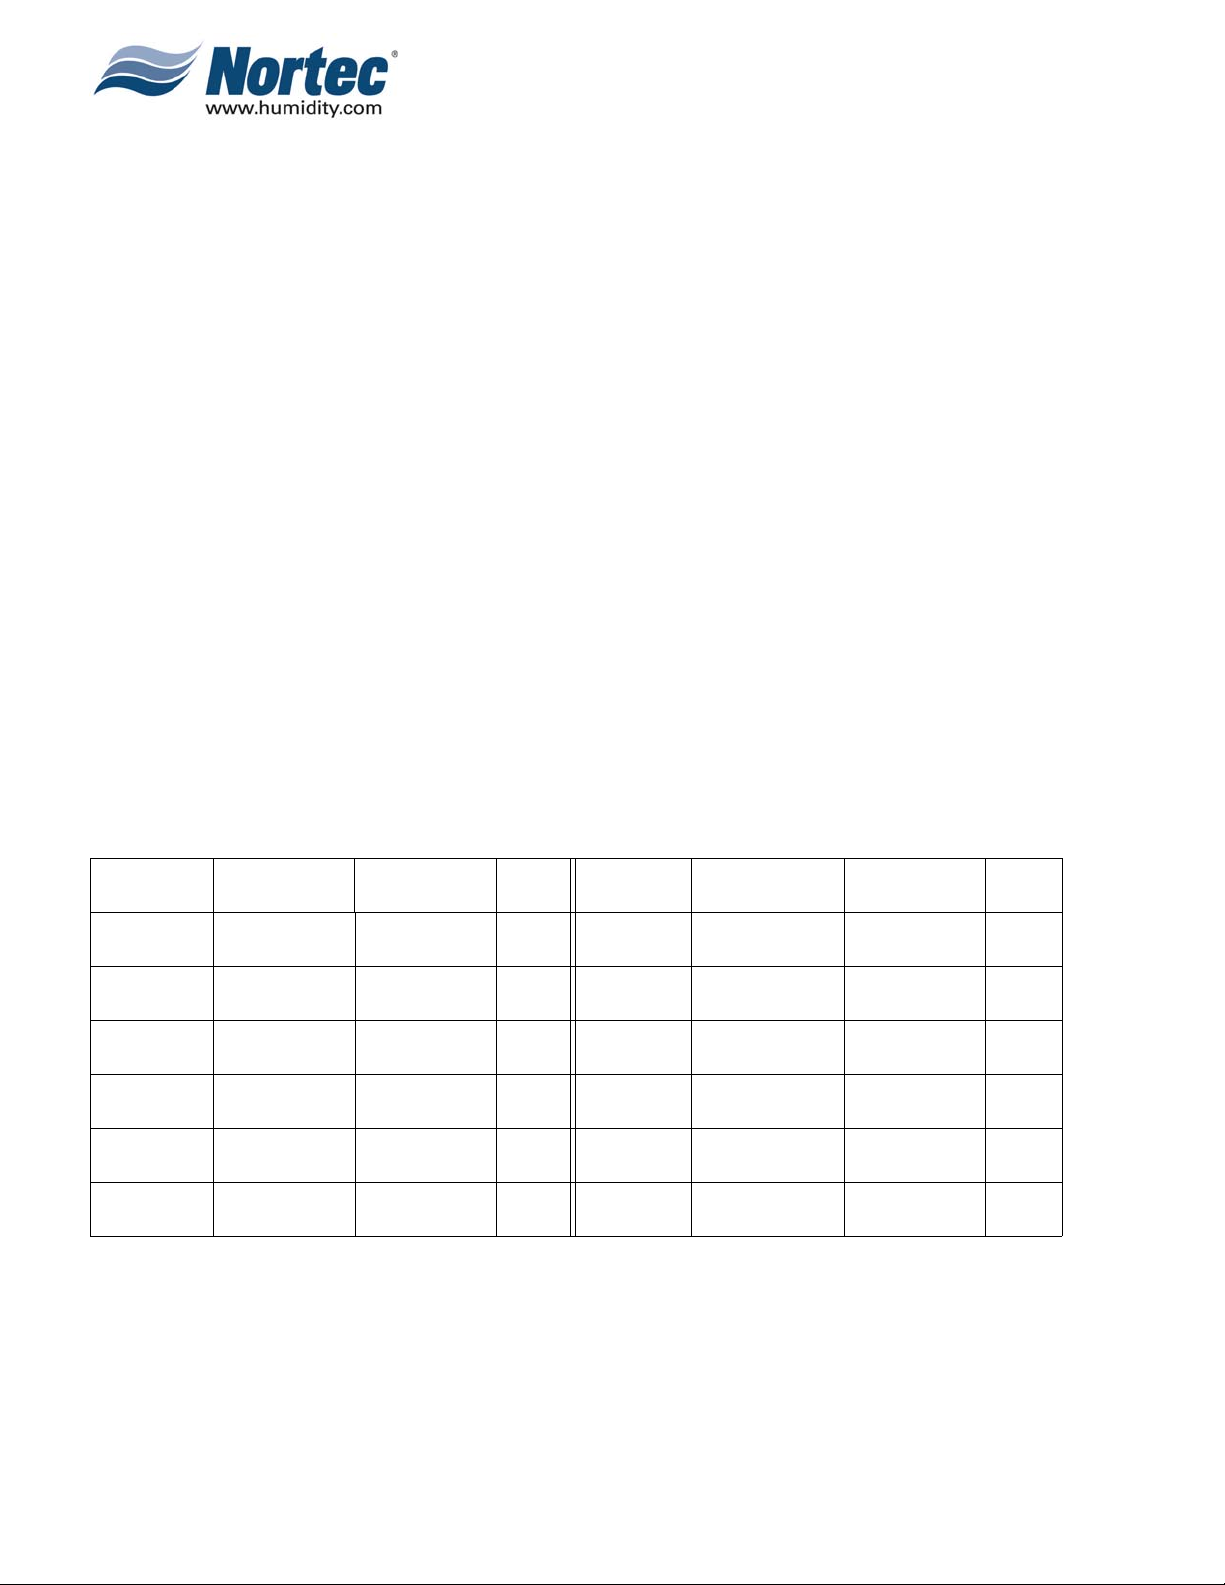
(1) Typically the NH Series Outdoor Humidifier ships on a skid (shown in Figure 1).
Controls and accessories are shipped separately in a box. The contents of the box
will be listed on the outside of the box.
C.
DISTRIBUTOR BOX
(1) Depending on the equipment ordered any of the following distributor box
configurations may be received:
2008-10-01
10-00
Page 2
Page 8

(a) For equipment received if an ASD, BSD, CSD distributor(s) is ordered refer to
Figure 2.
(b) For equipment received if a SAM-e distributor is ordered refer to Figure 3.
(c)
For equipment received if a RMBP is ordered refer to Figure 4.
D.
ACCESSORIES BOX
(1) Additional accessories such as drain water coolers and filters are shipped in a
separate box. Smaller accessories that would fit in the humidifier box are put in the
humidifier box and the box is identified as containing such.
10-00
Page 3
2008-10-01
Page 9
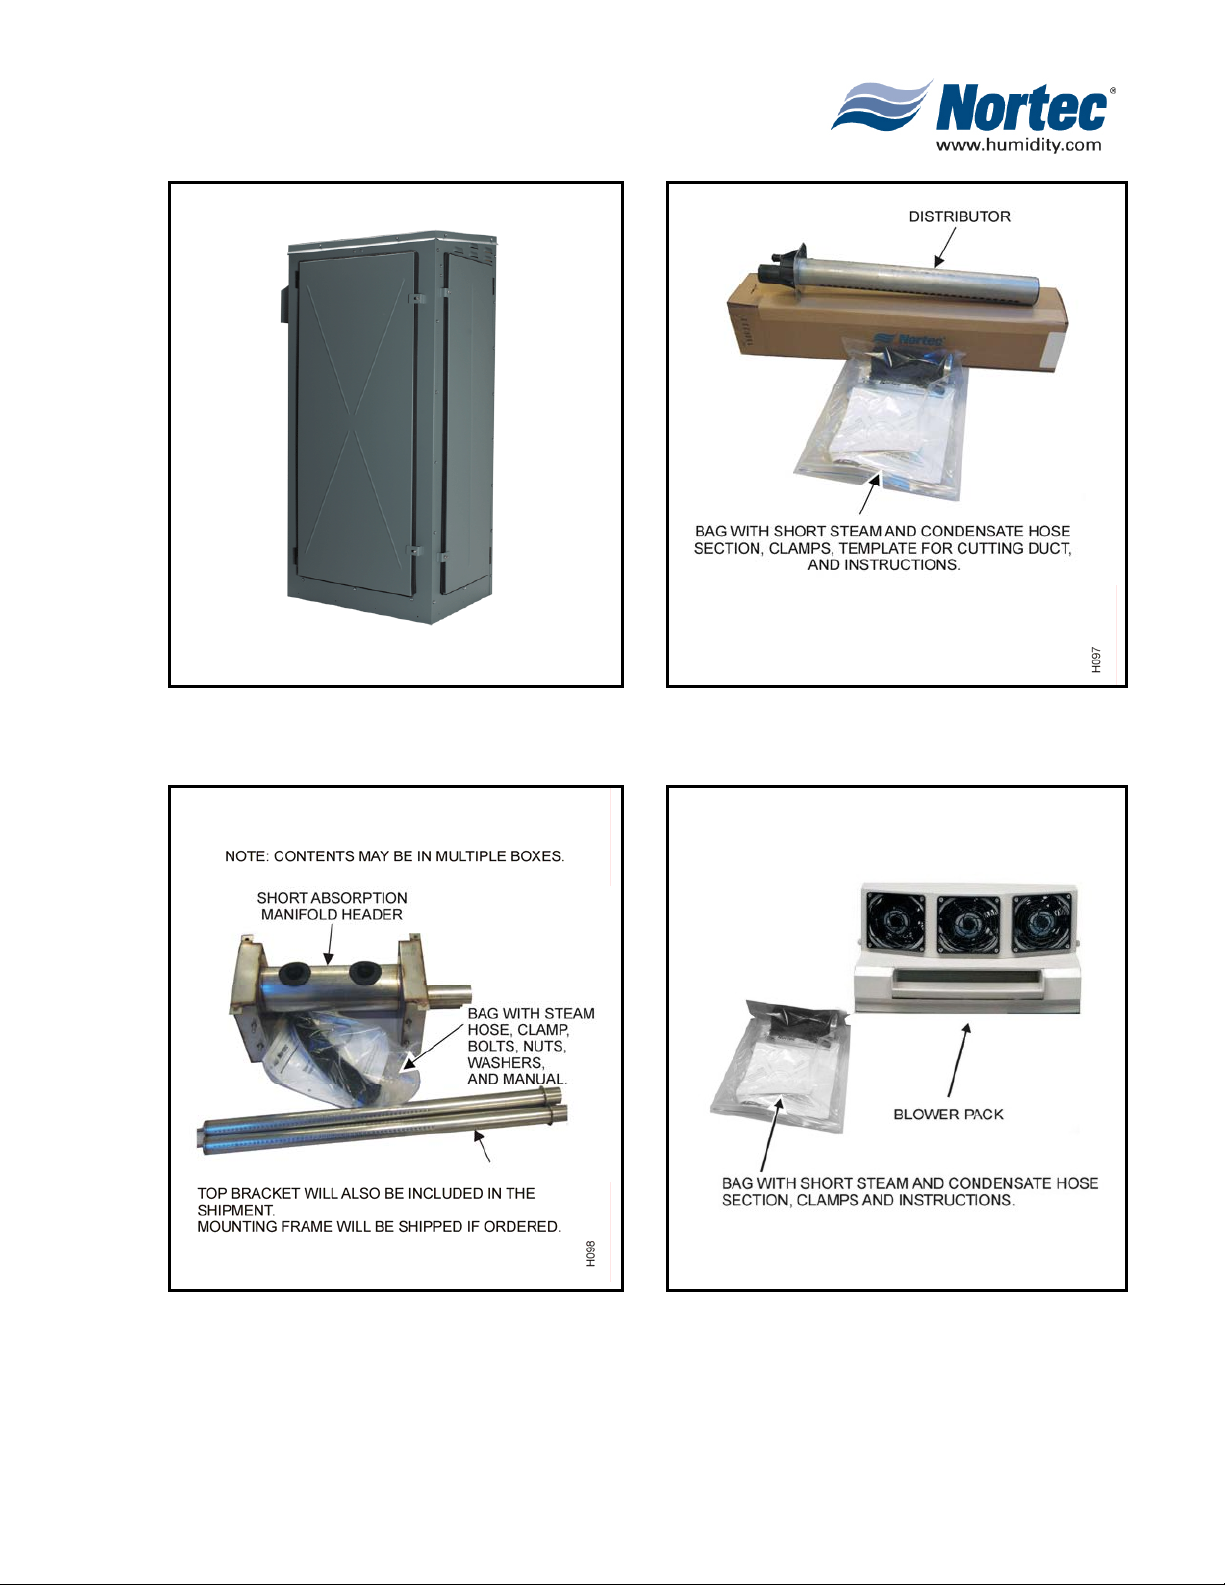
Figure 1. Humidifier
Figure 2. Distributor Box Contents
Figure 3. SAM-e Distributor Box
Figure 4. Blower Pack Box Contents
10-00
Page 4
2008-10-01
Page 10

3. PRE-INSTALLATION
A. EQUIPMENT VERIFICATION
(1) Ensure that available voltage and phase corresponds with humidifier voltage and
phase as indicated on humidifier’s specification label.
(2) Ensure that the dedicated external fuse disconnect is of sufficient size to handle
the rated amps as indicated on the specification label. Refer to local codes.
(3) Report any discrepancy immediately to the site engineer.
(4) Location and mounting is described in Chapter 10-10.
(5) Typical installation is described in Chapter 10-10.
B. MOVING AND HANDLING THE HUMIDIFIER
(1) The NH Outdoor Series humidifier is bolted to a shipping skid for easy
transportation. While still attached the skid, the humidifier can be lifted to a rooftop
or other location using a forklift or crane. The unit can also be positioned for wall
mounting using a forklift as long as the skid is attached, although it may be easier
to manually lift the unit onto its wall brackets. Installation on a curb requires guide
lifting of the unit. Observe the following precautions when moving and positioning
the humidifier:
(a) When lifting by crane, ensure that the unit is protected from physical damage
by the tethers and lifting equipment.
(b) When lifting by forklift, ensure that unit is properly balanced and secured to
prevent tipping.
(c) Use proper lifting techniques when manually lifting. Often several people will
be required to lift the unit.
(d) Remove the cabinet doors before manually lifting the unit.
(e) Ensure that the humidifier is the proper model, capacity, and voltage for the
specific location.
10-00
Page 5
2008-10-01
Page 11

THIS PAGE ITENTIONALLY LEFT BLANK
10-00
Page 6
2008-10-01
Page 12

10-10
INSTALLATION
PROCEDURES
10-10
Page 7
2008-10-01
Page 13

1.
HUMIDIFIER INSTALLATION
A.
LOCATION AND MOUNTING
(1) NH Outdoor Series humidifiers are UL listed for outdoor installation and come
complete with internal cooling for the electronics. An internal heater is standard
and ensures the enclosure remains at proper operating temperatures.
Additionally, a freeze protection system is available for use in cold climates.
(2) The NH Outdoor Series humidifiers can be mounted on an air handler, on an
appropriately sized curb, or on a wall or vertical surface. The clearance
dimensions shown in this guide are for reference only and are the minimum
required for maintenance of the humidifier. Local and National Codes should be
consulted prior to final location and installation of the humidifier. NORTEC cannot
accept responsibility for installation code violations. The minimum required
maintenance clearances are shown in Figure 1.
(3) Humidifiers typically operate in the cold winter months. As a result they should be
located where it is safe and convenient for maintenance personnel to service the
unit. This is essential as it may be less desirable to service the unit during
inclement weather. The warranty does NOT cover damage resulting to humidifier
as a result of neglect or freezing. NH Outdoor series should NOT be installed on a
rooftop in severe climates or where temperatures reach below 14°F (-10°C).
Please refer to Table 1: Weather Design Data in this document.
(4)
It is also important to consider the length and location of the humidifier steam line
that will result from the installation. Consult section 10-10 in the NH Series Indoor
Installation guide for further information on steam lines.
B. AIR HANDLER MOUNTING
(1) The NH outdoor series features provisions for hanging on brackets (supplied).
This allows the unit to be mounted directly to a vertical wall on an air handler unit.
This installation is advantageous since the steam piping is shorter, and hence the
condensate losses and backpressure are minimized. Typical air handler
installations are shown in Figure 2. Additionally, observe the following precautions
when installing the humidifier:
(a) Ensure that the surface selected to mount the humidifier is structurally sound
and capable of supporting the entire weight of the humidifier when in
operation.
(b) For minimum required maintenance clearances see Figure 1.
(c) Wall mounting bracket provided should be securely attached horizontally with
open edge upwards, using field-supplied fasteners.
(d) Using proper lifting techniques, lift the humidifier onto the brackets to mount
it. Several people may be required to lift the unit.
(e) Ensure that both the bracket and humidifier are mounted level.
(f) Do not store or use gasoline or other flammable vapors and liquids in the
vicinity of the humidifier.
10-10
Page 8
2008-10-01
Page 14

C. CURB MOUNTING
(1) The integral base of the NH Outdoor models is designed to mount on a curb. The
curb must be built to structurally support the entire weight of the humidifier when in
operation. Required curb dimensions are given in Figure 1. Typical curb mounting
installations are shown in Figure 3. Additionally, observe the following precautions
when installing the humidifier:
(a) The NH Outdoor unit is shipped on a skid to allow for lifting by a forklift.
When lifting by this method, ensure that the forks extend across the entire
skid to prevent tipping or damage to the unit.
(b) Ensure that the humidifier is mounted level.
(c) The pan in the bottom of all outdoor models has a pipe chase for routing of
services into the humidifier from below.
(d) If the humidifier will be roof mounted, it is not necessary to make the hole in
the roof the same size as the curb, the curb drawing shows the size and
location of the pipe chase required. The pipe chase should be sealed when
installation is complete to ensure positive or negative pressure from the
building.
(e) When mounting the unit in cold climates, ensure the lowest point of the air
louvers is 12” above any surface when snow or ice could accumulate.
Remove excessive ice and snow as necessary.
(f) Final installation of the humidifier is accomplished by manually lifting the unit
into position on the curb. Ensure that proper lifting techniques are used.
Several people may be required to lift the unit.
(g) The base of the humidifier is predrilled to allow the unit to the screwed to a
curb. Ensure that the unit is securely fastened to the curb in this manner.
(h) Do not store or use gasoline or other flammable vapors and liquids in the
vicinity of the humidifier.
(i) If possible, DO NOT locate humidifier any further than absolutely necessary
from steam distributor location as net output will be reduced as a result of
heat loss through steam line.
D. WALL MOUNTING
(1) A third option for installation involves mounting the humidifier on an exterior wall or
other vertical surface. This method requires holes to be drilled into the wall to
accommodate the steam lines, which exit from the rear of the humidifier. Typical
wall mounting installations are shown in Figure 4. If this method is selected, utilize
the provided brackets in a similar manner as if the installation was on an air
handler. Additionally, observe the following precautions:
(a) Ensure that the surface selected to mount the humidifier is structurally sound
and capable of supporting the entire weight of the humidifier when in
operation.
10-10
Page 9
2008-10-01
(b) For minimum required maintenance clearances see Figure 4.
Page 15

(c) Wall mounting bracket provided should be securely attached horizontally with
open edge upwards, using 5/16” x 3” (minimum) flat head screws. (See
Figure 4).
(d) Using proper lifting techniques, lift the humidifier onto the brackets to mount
it. Several people may be required to lift the unit.
(e) Ensure that both the bracket and humidifier are mounted level.
(f) Do not store or use gasoline or other flammable vapors and liquids in the
vicinity of the humidifier.
10-10
Page 10
2008-10-01
Page 16

FRONT VIEW
B
BACK VIEW
D
E
STEAM LINE
CONNECTION
1.750inch OD
FILL WATER LINE,
SINGLE OR DOUBLE,
1/2" NPT B Y OTHE RS
A
EXPLODED VIEW
TOP
BOTTOM VIE W
SECONDARY FILL LINE
ONLY FOR NHRS.
1/2" NPT BY OTHERS
LEFT
RIGHT
C
KNOCKOUT FOR
OPTIONAL
WATER INLET
5"
(12.7cm)
G
F
ROOF PIPE
CHASES
FRONT
Model Dim. A Dim. B Dim. C Dim. D Dim. E
** 0-50lbs 34.7" (88.1cm) 25.0" (63.5cm) 15.5" (39.4cm) 3.4" (8.6cm) 7.9" (20.1cm)
50-100lbs 55.1" (140.0cm) 30.0" (76.2cm) 20.4" (51.8cm) 3.1" (7.8cm) 12.75" (32.4cm)
100-200lbs 55.1" (140.0cm) 46.0" (116.8cm) 20.4" (51.8cm) 3.1" (7.8cm) 12.75"/28.75" (32.4cm/73.1cm)
NHRS humidifiers under 50lbs/hour requ ire a medium Outdoor Enclosure
KNOCKOUT FOR
POWER LINE AND
HOLES F OR CONTROL
WIRING
ROOF CURB
BY OTHERS
5"
(12.7cm)
4"
(10.16cm)
3 3/4" MAX
(9.5cm)
** 0-50lbs 20.1" (51.1cm) 13.3" (33.8cm) 15"(38.1cm) Min.
50-100lbs 25.1" (63.8cm) 18.1"(46.0cm) 15"(38.1cm) Min.
100-200lbs 41.1" (104.4cm) 18.1" (46.0cm) 15"(38.1cm) Min.
Model Front Left Right Back(Curb Mount)
** 0-50lbs 24" (60.96cm) 0 20" (50.80cm) 6" (15.25cm)
50-100lbs 24" (60.96cm) 0 20" (50.80cm) 6" (15.25cm)
100-200lbs 38" (96.52cm) 0 20" (50.80cm) 6" (15.25cm)
POWER KNOCKOUTS
TO AND FROM
BRE A KER
Model Weight (lbs)
0-50 lbs
50-100lbs
100-200lbs
Model Dimension F Dimension G Curb Height
Minimum Required Clearance
Major Dimensions
137 lbs (62 kg)
206 lbs (93 kg)
Roof Curb Height
FRONT
99 lbs (45 kg)
10-10
Page 11
2008-10-01
NH Outdoor Enclosure Physical Data Sheet
Small/Medium/Large models
May 21 2008
Figure 1. Recommended Clearances and Curb Dimensions
Page 17

NH OUTDOOR TYPICAL AIR HANDLING UNIT INSTALLATION
STEAM LINE TO DISTRIB UTOR
AIR HANDLING
UNIT
INSULATED AND HEAT-TRACED
WATER SUPPLY (BY OTHERS)
CAN ALSO BE ROUTED THROUGH
PIPE-CHASE AND PROVIDED
PUNCHOUTS
3-WAY VALVE OR
NO-NC VALVE
ARRANGEMENT
(BY OTHERS)
MANUAL SHUT-OFF
FUNNEL WITH
AIR GAP
Figure 2. Typical Air Handling Unit Installation
DRAIN LINES
SEE FIGURE 8 FOR
MOUNTING DETAIL
PUNCHOUTS PROVIDED
FOR POWER WIRING
TO AND FROM BREAKER
NH OUTDOOR TYPICAL ROOFTOP CURB INSTALLATION
INSULATED STEAM LINE
(BY OTHERS)
PUNCHOUTS PROVIDED
FOR POWER WIRING
INSULATED AND HEAT-TRACED
WATER SUPPLY (BY OTHERS)
CAN ALSO BE ROUTED THROUGH
PIPE-CHASE AND PROVIDED
PUNCHOUTS
3-WAY VALVE OR
NO-NC VALVE
ARRANGEMENT
(BY OTHERS)
MANUAL SHUT-OFF
DRAIN LINES
FUNNEL WITH
AIR GAP
TO AND FROM BREAKER
Figure 3. Typical Rooftop Curb Installation
10-10
Page 12
2008-10-01
Page 18

10-10
Page 13
2008-10-01
Figure 4. Typical Wall Mount Installation
Page 19

E. ELECTRICAL INSTALLATION
(1) Only qualified personnel should install electrical wiring. All wiring must be in
accordance with national and local codes.
(2) Power and control wiring is to be routed into the humidifier through the pipe chase
in the base of the unit.
(3) A field supplied NEMA rated weatherproof disconnect switch must be mounted
external to the NH Outdoor unit to allow for power interruption during servicing
and/or maintenance. A mounting plate, located on the side of each outdoor model,
is available for mounting of the disconnect switch. Two electrical cutouts are
provided for routing the primary wiring from the disconnect switch to the main
power terminal strip inside the unit.
(4) Installation details for primary and low voltage control wiring are the same as for
indoor units.
F. WATER SUPPLY LINE
(1) The water supply line is critical to the proper operation of the humidifier.
Humidifiers primarily operate in the cold winter months when freezing is a serious
issue. To prevent freezing of the humidifier, a water supply line freeze protection
system should be ordered and used in conjunction with a normally open / normally
closed valve arrangement described below. NORTEC’s limited warranty does
NOT cover damage resulting from freezing.
(2) There are two alternative configurations for the supply line plumbing. The first
method involves using a normally open / normally close valve arrangement (see
Figure 5). The valves should be installed inside of the building to prevent freezing.
The water should flow from the supply through a normally closed valve. This valve
should always be closed unless energized by the humidifier. This prevents water
from flowing to the humidifier when there is no demand, or in the event of a power
failure. After the first valve the water should flow to a tee. The central branch of
the tee is to be plumbed to the humidifier. The remaining branch of the tee should
is to be connected to a normally open valve. This valve remains open to allow
water to drain back from the outdoor lines when there is no demand from the
humidifier or in the event of a power failure. When energized by the humidifier, this
valve will close and allow water to flow to the humidifier. With this configuration the
outdoor line will be empty unless the humidifier requests water. This effectively
eliminates the chance of water freezing in the outdoor portion of the line.
(3) The second method operates on the same principle as the first, however it
replaces the two-valve configuration with a single safety three-way water valve.
This valve is to be installed inside of the building. When the humidifier begins to
operate, it will energize this valve and send water to the humidifier. When the
humidifier is not in use, the valve will close the supply, and allow water in the
outdoor lines to flow to drain. See Figure 6 for details.
(4) The valves described above should operate on either a 24V or 110V signal and
should be wired to the appropriate terminals inside of the humidifier.
10-10
Page 14
2008-10-01
Page 20

(5) Additionally the following points should be considered:
(a) Each unit is supplied with a ½” NPT male connection to the fill valve. Refer to
the NH series indoor installation guide for allowable pressures and fill rates.
(b) ALL OUTDOOR LINES MUST BE PROPERLY HEAT TRACED AND
INSULATED TO PREVENT FREEZING
(c) It is recommended to install and additional guide shut off valve within the
building to allow isolation of the water to the unit for easy servicing. The
guide shut off valve must be accessible to service personnel.
10-10
Page 15
2008-10-01
Page 21

Figure 5. Normally Open / Normally Closed Valve Arrangement
10-10
Page 16
2008-10-01
Page 22

10-10
Page 17
2008-10-01
Figure 6. 3-Way Valve Arrangement
Page 23

G. DRAIN LINE
(1) NH Series Outdoor units require and external drain line to provide for draining from
the unit.
(2) ALL OUTDOOR PIPING SHOULD BE PROPERLY INSULATED AND HEAT
TRACED TO PREVENT FREEZING.
(3) Route the drain hose to a drain funnel inside the building to provide an air gap
before entering the main building drain/sewage system.
(4) Some units have a drain pump. Refer to the NH Indoor Installation Guide for flow
rates and pressures.
(5) Drain line should be capable of withstanding 200°F (93°C) temperatures.
(6) Internal drain water tempering will ensure a maximum of 140°F (60°C) during
normal operation.
(7) Optional low temperature drain water cooler is available to cool drain water to
120°F (49°C).
H. AUXILIARY DRAINS
(1) Auxiliary draining is part of the freeze protection system that is discussed in section
2C of this chapter.
(2) A second hose, 5/8” in diameter, extends from the bottom of the unit. This is the
auxiliary drain hose.
(3) This hose must be drained into an open funnel. It can share a funnel with the
primary drain line if necessary.
(4) ENSURE ALL AUXILIARY DRAIN HOSE IS PROPERLY HEAT TRACED A ND
INSULATED TO PROTECT FROM FREEZING.
(5) Auxiliary drain water temperature will be 50°F (10°C)
(6)
Additionally, the NHSC has an additional port to allow for guide draining of the
scale tank. It is recommended that this drain port be plumbed to a funnel in the
same manner as the other drains. This drain can share a funnel with the other
primary and auxiliary drains if desired.
I. STEAM LINES
(1) The steam outlet connection is located at the back of the NH Outdoor unit. Steam
hose(s) and clamps are supplied with the unit and are intended to provide a flexible
coupling outside of the unit to the building steam lines.
(2) NH Outdoor models can develop steam pressures up to 12” w.c. to overcome duct
and steam line pressures. Duct and line pressures about 12” w.c. will cause steam
to exit through the drain line.
(3) Steam lines can be routed to an air handler on a roof or pipe chased (external to
the unit) through an exterior wall or roof to enter the building.
(4) All steam lines must be insulated to reduce losses.
(5)
For steam line installation guidelines, consult the distribution system installation
10-10
Page 18
2008-10-01
Page 24

Y
W
T
T
guide (Steam Distributor Installation Guide Form #XX-231 and SAM-e Short
Absorption Manifold Form #XX-249).
2.
IMPORTANT INFORMATION
A.
GENERAL
OUR HUMIDIFIER OPERATES ON HIGH VOLTAGE AND CURRENTS,
HICH CAN CAUSE SERIOUS INJURY OR DEATH. ENSURE THAT
HE POWER TO THE UNIT IS OFF BEFORE PERFORMING ANY
SERVICE WORK ON THE HUMIDIFIER. ONLY QUALIFIED
PERSONNEL SHOULD PERFORM MAINTENANCE OR REPAIRS ON
HE HUMIDIFIER. DO NOT SERVICE THE HUMIDIFIER WHILE
STANDING ON WET OR ICY SURFACES, OR IN WET WEATHER.
IF THE HUMIDIFIER HAS BEEN IN OPERATION, INTERNAL
COMPONENTS CAN BE HOT ENOUGH TO CAUSE SERIOUS INJURY.
FULLY DRAIN THE UNIT AND ALLOW SUFFICIENT TIME FOR THE
UNIT TO COOL BEFORE PERFORMING ANY SERVICE WORK.
CAUTION
CAUTION
B.
HEATER AND FAN SYSTEM
(1) The NH Outdoor humidifiers feature an internal heating and cooling system to
maintain appropriate operating temperatures and protect the electronics during
adverse conditions.
(2) During the winter months when the temperatures are cooler, a 200 W heater and
fan system will automatically activate to keep the internals of the case at an
appropriate operating temperature. This heater is automatically controlled by an
internal thermostat, and cannot be manually activated.
(3) During the warm summer months, a weather shielded case fan will circulate air
throughout the case, cooling the electronics and maintaining operating
temperatures. This fan is automatically controlled by a thermostat, and cannot be
manually activated.
10-10
Page 19
2008-10-01
Page 25

A
A
WARNING
IT IS ESSENTIAL THAT THE FANS AND HEATERS BE INSPECTED
PERIODICALLY TO ENSURE THAT THEY CAN SPIN FREELY AND
HAVE NOT BECOME CLOGGED WITH DIRT, POLLEN, OR BY
NIMALS. THIS IS ESPECIALLY TRUE OF THE EXTERNAL CASE FAN
ND FAN SHROUD.
WARNING
IN COLD CLIMATES THE FREEZE PROTECTION SYSTEMS MUST BE
CORRECTLY INSTALLED AND FULLY FUNCTIONAL AT ALL TIMES.
HUMIDIFIER WARRANTY DOES NOT COVER DAMAGE RESULTING
FROM FREEZING OF THE HUMIDIFIER, SUPPLY LINES, DRAIN LINES,
OR STEAM DISTRIBUTION SYSTEM.
FREEZE PROTECTION SYSTEM (STANDARD)
C.
(1) Freeze protection is Standard for NH Outdoor units. This system prevents internal
water freeze-up, which may damage the humidifier.
(2) The system consists of an additional normally closed mechanical drain valve. This
valve is activated by a bi-metallic strip thermostat, which allows for it to operate in
the event of a power failure. When the thermostat detects that the water inside the
humidifier has cooled to 43°F (6°C), the valve opens allowing water to drain. The
freeze protection system drains water from steam cylinders, reservoirs, hoses, and
internal lines. Emptying the humidifier protects the hoses, fittings, valves,
cylinders, and fill cups from ice damage and prevents unit freeze up.
WARNING
ENSURE THAT THE FREEZE PROTECTION SYSTEM DRAIN HOSE IS
FREE OF KINKS OR BLOCKAGES THAT MAY PREVENT IT FROM
OPERATING.
WARNING
IN COLD CLIMATES THE FREEZE PROTECTION SYSTEMS MUST BE
CORRECTLY INSTALLED AND FULLY FUNCTIONAL AT ALL TIMES.
HUMIDIFIER WARRANTY DOES NOT COVER DAMAGE RESULTING
FROM FREEZING OF THE HUMIDIFIER.
D. SERVICING ELECTRODE STEAM CYLINDER
(1) The cylinders inside of the NH electrode stream models have a finite life and must
be replaced periodically. The life span of the cylinder varies based on incoming
water conditions. The unit will indicate that it is time to change the cylinder by way
of a message displayed on the screen. The humidifier should be frequently
monitored ensure that the cylinder is changed when required to eliminate
downtime. An optional Remote Fault Indication Package (P/N: 2522170) is
10-10
Page 20
2008-10-01
Page 26

available to signal remotely that he humidifier requires service. If the NORTEC
OnLine option was ordered, cylinder change notices will be delivered via email.
(2)
Please refer to the NH Series Indoor Installation guide for further details on
replacing cylinders.
E. SERVICING NHRS WITH SCALE MANAGEMENT SYSTEM
(1) As with the indoor units, the scale collector tanks on the NHRS must be emptied
periodically based on supply water conditions. At a minimum NORTEC
recommends the tanks be emptied twice every year/season. Also, every third time
the tanks are cleaned, the cylinder and heating elements should be disassembled
and cleaned as well. This will ensure long and reliable operation of your NORTEC
humidifier.
(2) The procedure for changing the cylinder is similar to that of the indoor units with
two minor differences:
(a) The guide drain control is located on the back of the scale collector tank as
opposed to the side.
(b) When the tank has finished draining the hose clamps that secure the freeze
protection/ drain hoses to the tank need to be loosened and the hoses
removed. With the hoses disconnected the scale collector tank can be
removed and emptied. Ensure that the hoses are reconnected and secure
before restarting the humidifier.
(c) For further details please refer to the NHSC Installation Guide.
F. CLEANING DUST AND POLLEN DEPOSITS
(1) Dust, pollen, and animal nests must be periodically removed from the humidifier.
This is best accomplished with a vacuum or with compressed air. When cleaning
the humidifier focus on the following areas:
(a) Exhaust and heater fans
(b) Heater coil
(c) Case louvers
(d) Heat sinks (if applicable)
(e) Electronics
(f) Case floor
G. RESTARTING AFTER FREEZING
(1) In the unlikely event that the humidifier must be restarted after freezing, the
following procedure should be followed:
(a) Inspect all hoses, fittings, valves, and seals for cracking or damage. Since
water expands when it freezes, connections may have come loose, or fittings
may have cracked. If any parts are damaged contact your NORTEC
representative for replacement parts.
10-10
Page 21
2008-10-01
(b) Power the humidifier on. The heater and fan circuit will automatically power
on and begin to warm the case.
Page 27

(c) Once the unit has reached an appropriate temperature it will resume normal
operation.
3. OPERATION AND ADDITIONAL MAINTENANCE
A. OPERATION
(1) NH Outdoor series humidifiers are operated in the same manner as their indoor
counterparts. Please refer to the NH Series Installation guide for more details.
B. ADDITIONAL MAINTENANCE
(1) In addition to the maintenance items listed in this guide, the NH Series Installation
Guide lists other maintenance items that apply the entire NH Series (indoor and
outdoor). Refer to the NH Series Installation Guide for further details and
procedures.
4. WEATHER DESIGN DATA
A. WEATHER DATA
(1) The following weather design data is provided to assist in determining suitable
locations for rooftop mounting of the NH Series Outdoor models. Climates that see
very cold winter conditions are not good candidates for rooftop NH units. It is NOT
recommended to install the humidifier in areas that reach below 14°F (-10°C)
during January, or above 122°F (50°C) during July (see table below). These
harsh climates can cause required maintenance to be difficult to perform and
increase the risk of the humidifier freezing or overheating.
10-10
Page 22
2008-10-01
Page 28

A
A
A
Table 1. Weather Design Data
State/Province City
labama Birmingham 10 -12 81 61 66 95 35 84 56 68
Mobile 10 -12 -- -- -- 95 35 90 64 78
rizona Flagstaff -10 -23 83 58 -- 90 32 77 36 - Phoenix 25 -4 75 47 39 105 41 53 31 23
Yuma 30 -1 56 37 27 110 44 51 31 23
rkansas Little Rock 5 -15 80 67 68 95 35 85 55 59
California Eureka 30 -1 87 -- 77 90 32 92 -- 80
Fresno 25 -4 93 80 66 105 41 61 36 20
Los Angeles 35 2 63 46 51 90 32 85 50 54
Sacramento 30 -1 90 82 70 100 38 76 46 28
San Diego 35 2 76 58 60 85 29 86 68 65
San Francisco 35 2 84 68 70 85 29 92 75 78
Colorado Denver -10 -23 54 37 41 95 35 55 27 30
Grand Junction -15 -26 77 64 64 95 35 48 27 22
Pueblo -20 -29 67 44 48 95 35 73 34 35
Connecticut New Haven 0 -18 75 65 69 95 35 77 64 74
Delaware Wilmington 0 -18 77 62 70 95 35 80 52 69
District of Columbia Washington 0 -18 73 56 64 95 35 78 52 64
Florida Jacksonville 25 -4 89 56 75 95 35 85 57 76
Miami 35 2 87 59 75 91 33 83 64 76
Georgia Atlanta 10 -12 80 64 69 95 35 83 57 68
Augusta 10 -12 84 59 69 98 37 83 55 69
Savannah 20 -7 83 58 72 95 35 85 61 80
Idaho Boise -10 -23 82 75 74 95 35 54 34 23
Lewiston -5 -20 79 73 71 95 35 64 37 25
Illinois Cairo 0 -18 81 69 -- 98 37 83 57 - Chicago -10 -23 81 70 75 95 35 78 51 55
Peoria -10 -23 83 72 77 96 35 81 53 58
Indiana Fort Wayne -10 -23 84 75 81 95 35 84 53 58
Indianapolis -10 -23 83 72 78 95 35 84 54 60
Terre Haute 0 -18 82 70 76 95 35 77 50 56
Iowa Davenport -15 -26 -- -- -- 95 35 -- -- - Sioux City -20 -29 78 67 72 95 35 86 55 54
Kansas Dodge City -10 -23 78 57 61 95 35 77 45 52
Topeka -10 -23 78 64 67 100 38 85 54 54
Kentucky Louisville 0 -18 78 68 69 95 35 77 52 57
Louisiana New Orleans 20 -7 85 67 73 95 35 84 64 72
Shreveport 20 -7 83 67 66 100 38 86 56 62
Maine Portland -5 -21 81 65 74 90 32 78 58 76
Maryland Baltimore 0 -18 72 68 56 95 35 71 52 65
Massachusetts Boston 0 -18 72 59 67 92 33 72 55 70
Michigan Detroit -10 -23 82 71 77 95 35 74 50 56
Grande Rapids -10 -23 85 78 80 95 35 76 51 54
Minnesota Duluth -25 -32 78 74 74 93 33 87 61 66
Minneapolis -20 -29 82 72 75 95 35 82 54 54
Mississippi Vicksburg 10 -12 82 65 67 95 35 87 61 70
JANUARY
Temperature
Dry
Bulb
°F
Dry
Bulb
°C
JANUARY
Relative Humidity (% RH)
7:30
A.M.
1:30
P.M.
7:30
P.M.
JULY
Temperature
Dry
Bulb
°F
Dry
Bulb
°C
Relative Humidity (% RH)
7:30
A.M.
JULY
1:30
P.M.
7:30
P.M.
10-10
Page 23
2008-10-01
Page 29

Missouri Kansas City -10 -23 78 64 66 100 38 76 48 47
St. Louis 0 -10 77 65 68 95 35 73 50 55
Montana Billings -25 -32 67 73 60 90 32 65 40 33
Butte -20 -29 76 70 71 95 35 82 36 33
Nebraska North Platte -20 -29 80 62 66 85 29 84 50 46
Omaha -10 -23 82 68 73 95 35 80 51 51
Nevada Reno -5 -21 82 67 54 95 35 72 25 20
New Hampshire Concord -15 -26 78 60 69 90 32 80 49 69
New Jersey Atlantic City 5 -15 79 68 74 95 35 81 72 82
Newark 0 -18 72 79 65 95 35 75 51 65
Trenton 0 -18 73 62 68 95 35 77 55 68
New Mexico Albuquerque 0 -18 68 51 46 95 35 59 33 28
New York Albany -10 -23 75 63 71 93 34 79 52 64
Buffalo -5 -21 79 72 78 93 34 78 53 63
New York 0 -18 72 61 66 95 35 75 58 68
Rochester -5 -21 81 73 79 95 35 80 50 60
North Carolina Asheville 0 -18 82 59 69 93 34 88 56 73
Raleigh 10 -12 82 57 69 95 35 86 55 72
North Dakota Bismarck -30 -34 77 71 75 95 35 85 52 49
Ohio Cincinnati 0 -18 82 70 74 95 35 84 52 60
Cleveland 0 -18 81 72 79 95 35 79 52 58
Columbus -10 -23 83 71 76 95 35 78 52 60
Toledo -10 -23 79 72 75 95 35 76 52 59
Oklahoma Oklahoma City 0 -18 79 62 65 101 38 80 49 51
Oregon Baker -5 -21 83 81 78 90 32 69 68 36
Portland 10 12 87 82 78 90 32 86 63 48
Pennsylvania Harrisburg 0 -18 72 49 65 95 35 78 51 62
Philadelphia 0 -18 74 65 68 95 35 78 52 64
Pittsburg 0 -18 77 67 63 95 35 80 52 63
Scranton -5 -21 80 67 -- 95 35 77 50 -Rhode Island Providence 0 -18 73 60 67 93 34 79 57 73
South Carolina Charleston 15 -9 87 55 76 95 35 88 64 82
Columbia 10 -12 81 57 65 95 35 83 56 68
South Dakota Huron -20 -29 79 72 76 95 35 86 52 49
Rapid City -20 -29 71 69 67 95 35 71 42 40
Tennessee Knoxville 0 -18 83 65 69 95 35 83 55 66
Memphis 0 -18 82 67 73 95 35 85 55 59
Texas Amarillo -10 -23 71 51 52 100 38 77 43 42
Corpus Christi 20 -7 88 66 75 95 35 93 58 68
Dallas 10 -12 81 62 62 100 38 79 50 47
El Paso 10 -12 63 45 39 100 38 60 37 30
Houston 20 -7 85 66 73 95 35 90 58 66
San Antonio 20 -7 82 60 59 100 38 88 49 45
Utah Salt Lake City -10 -23 80 71 72 95 35 56 27 23
Vermont Burlington -10 -23 81 69 78 90 32 76 54 67
Virginia Richmond 15 -9 84 60 68 95 35 81 57 72
Washington Seattle 15 -9 86 80 74 85 29 86 63 47
Walla Walla -5 -21 80 74 78 95 35 50 33 22
West Virginia Charleston 0 -18 79 64 70 95 35 88 53 67
Parkersburg -10 -23 82 66 74 95 35 80 52 65
Wisconsin Green Bay -15 -26 75 68 73 95 35 85 58 64
Milwaukee -15 -26 76 70 73 95 35 81 58 64
10-10
Page 24
2008-10-01
Page 30

A
Wyoming Cheyenne -15 -26 59 48 55 95 35 73 36 40
lberta Calgary -29 -34 71 87 31 34
Edmonton -29 -34 75 86 30 42
Grande Prairie -43 -42 80 84 29 38
Lethbridge -32 -36 66 91 33 30
Medicine Hat -30 -34 73 96 36 31
British Columbia Estevan Point 17 -8 84 87 31 32
Fort Nelson -40 -40 79 94 34 32
Penticton 0 -18 81 85 29 44
Prince George -37 -38 82 73 23 53
Prince Rupert 11 -12 87 80 27 54
Vancouver 15 -9 87 80 27 41
Manitoba Brandon -29 -34 73 90 32 50
Churchill -40 -40 76 79 26 57
The Pas -35 -37 77 85 29 54
Winnipeg -29 -34 78 90 32 50
New Brunswick Campbellton -18 -28 77 87 31 54
Fredericton -16 -27 72 89 32 47
Moncton -12 -24 82 88 31 52
Saint John's -12 -24 82 81 27 62
Newfoundland Corner Brook -10 -23 84 84 29 47
Gander -5 -21 76 85 29 45
Goose Bay -26 -32 85 86 30 42
St. John's 1 -17 79 26 60
N.W.T. Frobisher -45 -43 77 63 17 67
Resolute -49 -45 71 54 12 81
Yellowknife -49 -45 82 78 26 50
Nova Scotia Halifax 0 -18 83 83 28 50
Sydney 1 -17 84 84 29 56
Yarmouth 5 -15 83 76 24 70
Ontario Thunder Bay -27 -33 80 86 30 52
Hamilton 0 -18 75 91 33 52
Kaspuskasing -30 -34 79 87 31 52
Kingston -11 -24 85 29 69
Kitchener -3 -19 84 88 31 58
London 0 -18 80 90 32 53
North Bay -20 -29 77 87 31 46
Ottawa -17 -27 90 32 50
Peterborough -13 -25 77 90 32 53
Sioux Lookout -33 -36 78 65 18 69
Sudbury -20 -29 81 89 32 44
Timmins -33 -36 79 90 32 45
Toronto -3 -19 82 90 32 56
Windsor -3 -16 92 31 51
Sault Ste. Marie -20 -29 88 29 48
P.E.I. Charlottetown -6 -21 86 84 29 57
Quebec Knob Lake -40 -40 79 55 13 70
Mont Joli -11 -24 75 62 17 71
Montreal -16 -27 88 31 58
Port Harrison -39 -39 76
Quebec City -19 -28 81 86 30 60
Sept-Iles -27 -33 80 27 47
10-10
Page 25
2008-10-01
Page 31

Sherbrooke -18 -28 87 31 58
Trois Rivieres -18 -28 88 31 58
Saskatchewan Prince Albert -41 -41 77 88 31
Regina -34 -37 81 92 33
Saskatoon -34 -37 76 90 32
Swift Current -29 -34 79 93 34
Yukon Territory Dawson -56 -49 76 57 14 60
Whitehorse -45 -43 82 78 26 40
Table Source: ASHRAE
10-10
Page 26
2008-10-01
Page 32

10-20
TECHNICAL
10-20
Page 27
2008-10-01
Page 33

Figure 1. NHRS Outdoor Exploded View
10-20
Page 28
2008-10-01
Page 34

10-20
Page 29
2008-10-01
Figure 2. NHTC Outdoor Exploded View
Page 35

THIS PAGE INTENTIONALLY LEFT BLANK
10-20
Page 30
2008-10-01
Page 36

10-30
WIRING DIAGRAMS
10-30
Page 31
2008-10-01
Page 37

Figure 1. Wiring Diagram NHTC Outdoor
10-30
Page 32
2008-10-01
Page 38

10-30
Page 33
2008-10-01
Figure 2. Wiring Diagram NHRS Outdoor (Single)
Page 39

Figure 3. Wiring diagram NHRS Outdoor (Double)
10-30
Page 34
2008-10-01
Page 40

THIS PAGE INTENTIONALLY LEFT BLANK
Page 41

WARRANTY
(1) Walter Meier Inc. and/or Walter Meier Ltd. (hereinafter collectively referred to as THE
COMPANY), warrant for a period of two years after installation or 30 months from
manufacturer’s ship date, whichever date is earlier, that THE COMPANY’s
manufactured and assembled products, not otherwise expressly warranted (with the
exception of the cylinder), are free from defects in material and workmanship. No
warranty is made against corrosion, deterioration, or suitability of substituted materials
used as a result of compliance with government regulations.
(2) THE COMPANY’s obligations and liabilities under this warranty are limited to furnishing
replacement parts to the customer, F.O.B. THE COMPANY’s factory, providing the
defective part(s) is returned freight prepaid by the customer. Parts used for repairs are
warranted for the balance of the term of the warranty on the original humidifier or
90 days, whichever is longer.
(3) The warranties set forth herein are in lieu of all other warranties expressed or implied
by law. No liability whatsoever shall be attached to THE COMPANY until said produ cts
have been paid for in full and then said liability shall be limited to the original purchase
price for the product. Any further warranty must be in writing, signed by an officer of
THE COMPANY.
(4) THE COMPANY’s limited warranty on accessories, not of the companies manufacture,
such as controls, humidistats, pumps, etc. is limited to the warranty of the original
equipment manufacturer from date of original shipment of humidifier.
(5) THE COMPANY makes no warranty and assumes no liability unless the equipment is
installed in strict accordance with a copy of the catalog and installation manual in effect
at the date of purchase and by a contractor approved by THE COMPANY to install
such equipment.
(6) THE COMPANY makes no warranty and assumes no liability whatsoever for
consequential damage or damage resulting directly from misapplication, incorrect
sizing or lack of proper maintenance of the equipment.
(7) THE COMPANY makes no warranty and assumes no liability whatsoever for damage
resulting from freezing of the humidifier, supply lines, drain lines, or steam distribution
systems.
(8) THE COMPANY makes no warranty and assumes no liability whatsoever for
equipment that has failed due to ambient conditions when installed in locations having
climates below 14°F (-10°C) during January or above 104°F (40°C) during July. (See
Table 1: Weather Design Data above).
(9) THE COMPANY retains the right to change the design, specification and performance
criteria of its products without notice or obligation.
Page 42

INSTALLATION DATE (MM/DD/YYYY)
MODEL #
SERIAL #
CYLINDER #
Cylinder Replacement Date (MM/DD/YYYY)
U.S.A.
Walter Meier (Climate USA) Inc.
826 Proctor Avenue
Ogdensburg, NY 13669
TEL: 1-866-NORTEC-1
EMAIL: northamerica.climate@waltermeier.com
WEBSITE: www.humidity.com
CANADA
Walter Meier (Climate Canada) Ltd.
2740 Fenton Road
Ottawa, ON K1T 3T7
TEL: 1-866-NORTEC-1
FAX: (613) 822-7964
Authorized Agent:
 Loading...