


CAUTION
Read all precautions and instructions in this manual before using
this equipment. Keep this manual
for future reference.
Model No. NTMC29930
Serial No.
Serial Number
Decal (on frame)
QUESTIONS?
As a manufacturer, we are committed to providing complete
customer satisfaction. If you
have questions, or if there are
missing parts, we will guarantee
complete satisfaction through
direct assistance from our factory.
TO AVOID DELAYS, PLEASE
CALL DIRECT TO OUR TOLLFREE CUSTOMER HOT LINE. The
trained technicians on our customer hot line will provide immediate assistance, free of charge to
you.
CUSTOMER HOT LINE:
1-888-825-2588
Mon.–Fri., 6 a.m.–6 p.m. MST
USER’S MANUAL
Visit our website at
www.nordictrack.com
new products, prizes,
fitness tips, and much more!

TABLE OF CONTENTS
IMPORTANT PRECAUTIONS . . . . . . . . . . . . . . . . . . . . . . . . . . . . . . . . . . . . . . . . . . . . . . . . . . . . . . . . . . . . .2
BEFORE YOU BEGIN . . . . . . . . . . . . . . . . . . . . . . . . . . . . . . . . . . . . . . . . . . . . . . . . . . . . . . . . . . . . . . . . . . .3
ASSEMBLY . . . . . . . . . . . . . . . . . . . . . . . . . . . . . . . . . . . . . . . . . . . . . . . . . . . . . . . . . . . . . . . . . . . . . . . . . . .4
USING THE INTERACTIVE STAND . . . . . . . . . . . . . . . . . . . . . . . . . . . . . . . . . . . . . . . . . . . . . . . . . . . . . . . . .6
MAINTENANCE AND TROUBLESHOOTING . . . . . . . . . . . . . . . . . . . . . . . . . . . . . . . . . . . . . . . . . . . . . . . . . .8
PART LIST . . . . . . . . . . . . . . . . . . . . . . . . . . . . . . . . . . . . . . . . . . . . . . . . . . . . . . . . . . . . . . . . . . . . . . . . . . .10
HOW TO ORDER REPLACEMENT PARTS . . . . . . . . . . . . . . . . . . . . . . . . . . . . . . . . . . . . . . . . . . . . . . . . . .10
EXPLODED DRAWING . . . . . . . . . . . . . . . . . . . . . . . . . . . . . . . . . . . . . . . . . . . . . . . . . . . . . . . . . . . . . . . . .11
LIMITED WARRANTY . . . . . . . . . . . . . . . . . . . . . . . . . . . . . . . . . . . . . . . . . . . . . . . . . . . . . . . . . . .Back Cover
2
NordicTrack is a registered trademark of ICON Health & Fitness, Inc.
IMPORTANT PRECAUTIONS
WARNING:To reduce the risk of serious injury, read the following important precau-
tions before using the interactive stand.
1. Read all instructions in this manual before
using the interactive stand.
2. It is the responsibility of the owner to ensure
that all users of the interactive stand are
adequately informed of all precautions.
3. Place the interactive stand on a level surface. Keep the interactive stand indoors,
away from moisture.
4. The interactive stand is not designed to support objects. Do not lean against or sit on
the interactive stand.
5. Keep children under the age of 12 and pets
away from the interactive stand at all times.
6. To reduce the possibility of electric shock, keep
the interactive stand dry. Avoid spilling
liquids on the interactive stand.
7. When NordicTrack Wireless Workout CDs
are used, an electronic “chirping” sound will
alert you when the settings of your exercise
equipment are about to change. Always listen for the “chirp” and be prepared for the
settings to change. In some instances, the
settings may change before the personal
trainer describes the changes.
8. When using NordicTrack Wireless Workout
CDs, you can manually override the settings
by pressing the buttons on the console of
your exercise equipment. However, when the
next “chirp” is heard, the settings will change
to the next settings of the CD program.
9. The interactive stand with NordicTrack
Wireless workout CDs will control your exercise equipment. Always remove NordicTrack
Wireless Workout CDs from the interactive
stand when you are not using them.
3
BEFORE YOU BEGIN
Thank you for selecting the new NordicTrack®Wireless
Workout with CleanAireTMionizer interactive stand. The
interactive stand blends advanced engineering with
innovative styling to let you enjoy exercising in the
convenience of your home while the CleanAire
TM
ioniz-
er helps keep airborne contaminants to a minimum.
For your benefit, read this manual carefully before
you use the interactive stand. If you have questions
after reading this manual, please call our Customer
Service Department toll-free at 1-888-825-2588,
Monday through Friday, 6 a.m. until 6 p.m. Mountain
Time (excluding holidays). To help us assist you,
please note the product model number and serial
number before calling. The model number is
NTMC29930. The serial number can be found on a
decal attached to the interactive stand (see the front
cover of this manual for the location of the decal).
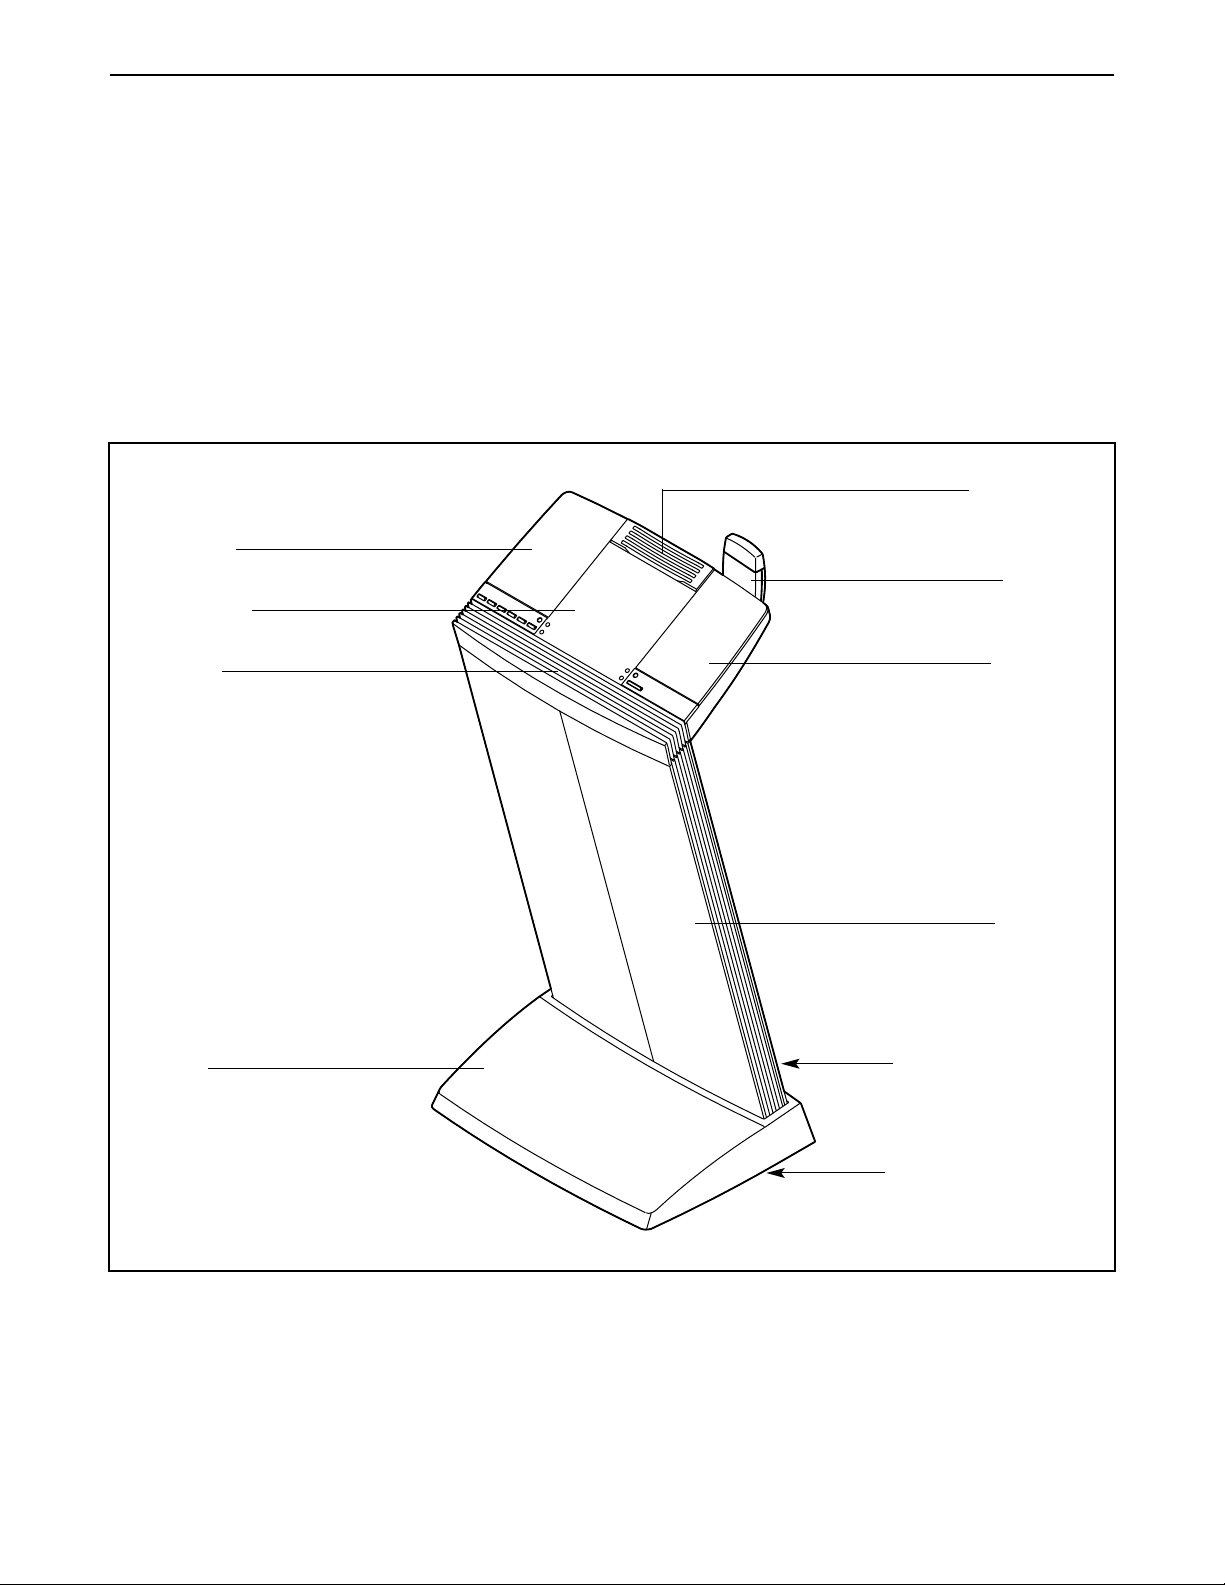
Before reading further, please familiarize yourself with
the parts that are labeled in the drawing below.
Ionizer
Speaker
Base
Upright
CD Holder
Speaker
IR Pod
CD Player
Battery Receptacles
Power Supply Jack

4
ASSEMBLY
Place all parts of the interactive stand in a cleared area and remove the packing materials. Do not dispose of the
packing materials until assembly is completed. Assembly requires a Phillips screwdriver .
1. Have another person hold the Upright (2) near the
Base (1). Make sure the Upright is turned as shown on
page 3.
Connect one end of the Wire Harness (7) to the wire
harness on the Base (1). Attach the Upright (2) to the
Base with eight #10 x 1” Screws (9). Make sure the
wire harnesses are not pinched between the
Upright and the Base.
1
2
1
2. Remove the Ionizer (3) from the Console (4).
Connect the Wire Harness (7) to the wire harness on
the Console (4). Attach the Console to the Upright (2)
with eight #10 x 1 1/4” Screws (8). Make sure the
wire harnesses are not pinched between the
Console and the Upright.
Press the Ionizer (3) back onto the Console (4). Make
sure the Ionizer is fully seated.
3. Plug one end of the Power Supply (A) into the indicated
jack on the Base (1). Plug the other end of the Power
Supply into an appropriate outlet that is properly
installed in accordance with all local codes and ordinances.
Note: The Console (not shown) can be operated with
batteries (not included) instead of the Power Supply
(A) if desired. To install batteries, first tip the Base (1)
onto its side and remove the battery cover. Insert
eight D-cell batteries (not included) into the battery
receptacles. Make sure the batteries are oriented
as shown by the diagram inside the battery receptacles. Reattach the battery cover.
3
8
8
7
8
8
2
A
1
Jack
4
2
3
7
Wire
Harness
Wire
Harness
9
9
9
1
Batteries
Battery
Cover