

Page 1

Nokia N97 User Guide
9221217
Issue 2.0
Page 2
© 2010 Nokia. All rights reserved.
DECLARATION OF CONFORMITY
Hereby, NOKIA CORPORATION declares that this RM-505 product is in compliance with the essential requirements and other
relevant provisions of Directive 1999/5/EC. A copy of the Declaration of Conformity can be found at http://www.nokia.com/
phones/declaration_of_conformity/.
Nokia, Nokia Connecting People, Nseries, N97, Nokia Original Accessories logo, and Ovi are trademarks or registered trademarks of Nokia Corporation. Nokia
tune is a sound mark of Nokia Corporation. Other product and company names mentioned herein may be trademarks or tradenames of their respective owners.
Reproduction, transfer, distribution, or storage of part or all of the contents in this document in any form without the prior written permission of Nokia is
prohibited. Nokia operates a policy of continuous development. Nokia reserves the right to make changes and improvements to any of the products described
in this document without prior notice.
Java and all Java-based marks are trademarks or registered trademarks of Sun Microsystems, Inc.
Portions of the Nokia Maps software are ©1996-2010 The FreeType Project. All rights reserved.
This product is licensed under the MPEG-4 Visual Patent Portfolio License (i) for personal and noncommercial use in connection with information which has
been encoded in compliance with the MPEG-4 Visual Standard by a consumer engaged in a personal and noncommercial activity and (ii) for use in connection
with MPEG-4 video provided by a licensed video provider. No license is granted or shall be implied for any other use. Additional information, including that
related to promotional, internal, and commercial uses, may be obtained from MPEG LA, LLC. See http://www.mpegla.com.
TO THE MAXIMUM EXTENT PERMITTED BY APPLICABLE LAW, UNDER NO CIRCUMSTANCES SHALL NOKIA OR ANY OF ITS LICENSORS BE RESPONSIBLE FOR ANY LOSS OF
DATA OR INCOME OR ANY SPECIAL, INCIDENTAL, CONSEQUENTIAL OR INDIRECT DAMAGES HOWSOEVER CAUSED.
The third-party applications provided with your device may have been created and may be owned by persons or entities not affiliated with or related to Nokia.
Nokia does not own the copyrights or intellectual property rights to the third-party applications. As such, Nokia does not take any responsibility for end-user
support, functionality of the applications, or the information in the applications or these materials. Nokia does not provide any warranty for the third-party
applications.
BY USING THE APPLICATIONS YOU ACKNOWLEDGE THAT THE APPLICATIONS ARE PROVIDED AS IS WITHOUT WARRANTY OF ANY KIND, EXPRESS OR IMPLIED, TO THE
MAXIMUM EXTENT PERMITTED BY APPLICABLE LAW. YOU FURTHER ACKNOWLEDGE THAT NEITHER NOKIA NOR ITS AFFILIATES MAKE ANY REPRESENTATIONS OR
WARRANTIES, EXPRESS OR IMPLIED, INCLUDING BUT NOT LIMITED TO WARRANTIES OF TITLE, MERCHANTABILITY OR FITNESS FOR A PARTICULAR PURPOSE, OR THAT
THE APPLICATIONS WILL NOT INFRINGE ANY THIRD-PARTY PATENTS, COPYRIGHTS, TRADEMARKS, OR OTHER RIGHTS.
THE CONTENTS OF THIS DOCUMENT ARE PROVIDED "AS IS". EXCEPT AS REQUIRED BY APPLICABLE LAW, NO WARRANTIES OF ANY KIND, EITHER EXPRESS OR IMPLIED,
INCLUDING, BUT NOT LIMITED T O, THE IMPLIED WARRANTIES OF MERCHANTABILITY AND FITNESS FOR A PARTICULAR PURPOSE, ARE MADE IN RELATION TO THE ACCURACY,
RELIABILITY OR CONTENTS OF THIS DOCUMENT. NOKIA RESERVES THE RIGHT TO REVISE THIS DOCUMENT OR WITHDRAW IT AT ANY TIME WITHOUT PRIOR NOTICE.
For the most current product information, please refer to www.nokia.com.hk.
Page 3

Reverse engineering of software in the d
evice is prohibited to the extent permitted by
applicable law. Insofar as this user gui
de contains any limitations on
Nokia's representations, warranties, d
amages and liabilities, such limitations shall l
ikewise limit any representations, warran
ties, damages and liabilities of
Nokia's licensors.
The availability of particular products an
d applications and services for these produc
ts may vary by region. Please check with
your Nokia dealer for details and
availability of language options. This
device may contain commodities, technology
or software subject to export laws and regu
lations from the US and other
countries. Diversion contrary to law is proh
ibited.
FCC/INDUSTRY CANADA NOTICE
Your device may cause TV or radio interference (for
example, wh
en using a telephone in close proximity
to receiving equipment).
The FCC or Industry Canada
can require you to stop using your te
lephone if such interferen
ce cannot be eliminated. If you require ass
istance, contact your
local service facility. This device
complies with part 15 of the FCC rules. Opera
tion is subject to the following two conditio
ns: (1) This device may not cause har
mful interference, and (2) this
device must accept any interference received
, including interfer
ence that may cause undesired operation
. Any changes or modific
ations not expressly approved
by Nokia could void the user's au
thority to operate this equipment.
9221217
Issue 2.0
Page 4

Contents
Safety................................................................6
About your device.................................................................6
Network services...................................................................7
Shared memory.....................................................................7
Mail for Exchange..................................................................8
Find help...........................................................9
Support..................................................................................9
In-device help........................................................................9
Extended user guide.............................................................9
Do more with your device.................................................10
Update device software.....................................................10
Settings................................................................................11
Access codes........................................................................11
Remote lock.........................................................................12
Prolong battery life............................................................12
Free memory.......................................................................13
Get started......................................................14
Keys and parts (top)...........................................................14
Keys and parts (front).........................................................14
Keys and parts (back).........................................................15
Keys and parts (sides)........................................................15
Insert the SIM card and battery.........................................16
Memory card........................................................................17
Antenna locations...............................................................18
Switch the device on and off.............................................18
Charge the battery..............................................................19
Headset................................................................................19
Touch screen actions..........................................................20
Write text.............................................................................21
Lock the keys and touch screen........................................23
Transfer content.................................................................24
Profiles.................................................................................24
Your device.....................................................25
Home screen........................................................................25
Display indicators...............................................................26
Offline profile......................................................................28
Make calls.......................................................28
Touch screen during calls..................................................28
Make a voice call ................................................................29
Internet calls.......................................................................29
Contacts (phonebook)....................................30
Save and edit names and numbers..................................30
Contact cards.......................................................................31
Messaging.......................................................31
Write and send messages..................................................31
Connectivity....................................................32
Wireless LAN .......................................................................33
Access points.......................................................................34
Bluetooth connectivity.......................................................35
Internet..........................................................37
Browse the web..................................................................37
Browser toolbar..................................................................38
Contents
Page 5

End the connection.............................................................39
Ovi Maps.........................................................39
Maps overview....................................................................39
About positioning methods...............................................40
Use the compass.................................................................40
View your location and the map.......................................41
Plan a route.........................................................................41
Get voice guidance.............................................................42
Drive to your destination...................................................43
Camera............................................................43
Activate the camera............................................................43
Image capture.....................................................................43
Video recording..................................................................45
Photos............................................................45
About Photos.......................................................................45
View images and videos....................................................45
Photos toolbar....................................................................46
TV-out mode........................................................................46
Image print.........................................................................47
Music...............................................................48
Play a song or a podcast....................................................48
Ovi Music..............................................................................49
FM radio...............................................................................49
Videos.............................................................50
Download and view video clips........................................50
Green tips.......................................................51
Save energy.........................................................................51
Recycle.................................................................................52
Product and safety information.....................52
Index..............................................................75
Contents
Page 6
Safety
Read these simple guidelines. Not following them may
be dangerous or illegal. Read the complete user guide
for further information.
SWITCH ON SAFELY
Do not switch the device on when wireless
phone use is prohibited or when it may cause
interference or danger.
INTERFERENCE
All wireless devices may be susceptible to
interference, which could affect performance.
SWITCH OFF IN RESTRICTED AREAS
Follow any restrictions. Switch the device off in
aircraft, near medical equipment, fuel,
chemicals, or blasting areas.
ROAD SAFETY COMES FIRST
Obey all local laws. Always keep your hands free
to operate the vehicle while driving. Your first
consideration while driving should be road
safety.
QUALIFIED SERVICE
Only qualified personnel may install or repair
this product.
ACCESSORIES AND BATTERIES
Use only approved accessories and batteries. Do
not connect incompatible products.
WATER-RESISTANCE
Your device is not water-resistant. Keep it dry.
About your device
The wireless device described in this guide is approved for
use on the (E)GSM 850, 900, 1800, 1900, and UMTS 900,
1900, 2100 MHz networks. Contact your service provider
for more information about networks.
When using the features in this device, obey all laws and
respect local customs, privacy and legitimate rights of
others, including copyrights.
Copyright protection may prevent some images, music,
and other content from being copied, modified, or
transferred.
Your device supports several methods of connectivity. Like
computers, your device may be exposed to viruses and
other harmful content. Exercise caution with messages,
connectivity requests, browsing, and downloads. Only
install and use services and other software from
trustworthy sources that offer adequate security and
6
Safety
Page 7
protection against harmful software, such as applications
that are Symbian Signed or have passed the Java Verified™
testing. Consider installing antivirus and other security
software on your device and any connected computer.
Important: Your device can only support one
antivirus application. Having more than one application
with antivirus functionality could affect performance and
operation or cause the device to stop functioning.
Your device may have preinstalled bookmarks and links for
third-party internet sites. You may also access other thirdparty sites through your device. Third-party sites are not
affiliated with Nokia, and Nokia does not endorse or
assume liability for them. If you choose to access such
sites, you should take precautions for security or content.
Warning: To use any features in this device, other
than the alarm clock, the device must be switched on. Do
not switch the device on when wireless device use may
cause interference or danger.
Remember to make back-up copies or keep a written
record of all important information stored in your device.
When connecting to any other device, read its user guide
for detailed safety instructions. Do not connect
incompatible products.
The images in this guide may differ from your device
display.
Network services
To use the device you must have service from a wireless
service provider. Some features are not available on all
networks; other features may require that you make
specific arrangements with your service provider to use
them. Network services involve transmission of data.
Check with your service provider for details about fees in
your home network and when roaming on other
networks. Your service provider can explain what charges
will apply. Some networks may have limitations that affect
how you can use some features of this device requiring
network support such as support for specific technologies
like WAP 2.0 protocols (HTTP and SSL) that run on TCP/IP
protocols and language-dependent characters.
Your service provider may have requested that certain
features be disabled or not activated in your device. If so,
these features will not appear on your device menu. Your
device may also have customized items such as menu
names, menu order, and icons.
Shared memory
The following features in this device may share memory:
multimedia messaging (MMS), e-mail application, instant
messaging. Use of one or more of these features may
reduce the memory available for the remaining features
sharing memory. Your device may display a message that
the memory is full when you try to use a shared memory
7
Safety
Page 8

feature. In this case, delete some of the information or
entries stored in the shared memory features before
continuing.
During extended operation such as an active video call and
high speed data connection, the device may feel warm. In
most cases, this condition is normal. If you suspect the
device is not working properly, take it to the nearest
authorised service facility.
Digital rights management
Content owners may use different types of digital rights
management (DRM) technologies to protect their
intellectual property, including copyrights. This device
uses various types of DRM software to access DRMprotected content. With this device you can access content
protected with WMDRM 10 and OMA DRM 2.0. If certain DRM
software fails to protect the content, content owners may
ask that such DRM software's ability to access new DRMprotected content be revoked. Revocation may also
prevent renewal of such DRM-protected content already in
your device. Revocation of such DRM software does not
affect the use of content protected with other types of DRM
or the use of non-DRM-protected content.
Mail for Exchange
Use of the Mail for Exchange is limited to over-the-air
synchronisation of PIM information between the Nokia
device and the authorised Microsoft Exchange server.
8
Safety
Page 9
Find help
Support
When you want to learn more about how to use your
product or you are unsure how your device should
function, go to www.nokia.com/support, or using a
mobile device, nokia.mobi/support. You can also select
Menu > Applications > Help in your device.
If this does not resolve your issue, do one of the
following:
● Reboot your device. Switch off the device, and
remove the battery. After about a minute, replace
the battery, and switch on the device.
● Restore the original factory settings.
● Update your device software.
If your issue remains unsolved, contact Nokia for repair
options. Go to www.nokia.com.hk/repair. Before
sending your device for repair, always back up the data
in your device.
In-device help
Your device contains instructions to help to use the
applications in your device.
To open help texts from the main menu, select Menu >
Applications > Help and the application for which
you want to read instructions.
When an application is open, to access the help text for
the current view, select Options > Help.
When you are reading the instructions, to change the
size of the help text, select Options > Decrease font
size or Increase font size.
You may find links to related topics at the end of the
help text. If you select an underlined word, a short
explanation is displayed. Help texts use the following
indicators:
Link to a related help topic. Link to
the application being discussed.
When you are reading the instructions, to switch
between help texts and the application that is open in
the background, select Options > Show open apps.
and the desired application.
Extended user guide
An extended version of this user guide is available on
the product support pages of the Nokia website. Some
applications or functions are explained only in the
extended user guide. This is explained in the relevant
9
Find help
Page 10
sections. The extended user guide also contains a
troubleshooting section.
Do more with your device
There are various applications provided by Nokia and
third party software developers, that help you do more
with your device. To find and download applications,
visit the Ovi Store at store.ovi.com. These applications
are explained in the guides that are available on the
product support pages at www.nokia.com/support or
your local Nokia website.
Update device software
About device software and
application updates
W it h de vi ce so ft wa re up da tes and application updates,
you can get new features and enhanced functions for
your device. Updating the software may also improve
your device performance.
It is recommended that
you back up your
personal data before
updating your device
software.
Warning: If you
install a software
update, you cannot use
the device, even to make
emergency calls, until
the installation is
completed and the
device is restarted. Be
sure to back up data
before accepting installation of an update.
Downloading software updates may involve the
transmission of large amounts of data (network
service).
Make sure that the device battery has enough power,
or connect the charger before starting the update.
After you update your device software or applications,
the instructions in the user guide may no longer be up
to date.
10
Find help
Page 11

Update software using your device
You can check if there are updates available for your
device, and download them to your device (network
service).
Select Menu > Settings > Phone > Phone
mgmt. > Device updates and Options > Check for
updates.
Update device software using your
PC
You can use the Nokia Software Updater PC application
to update your device software. To update your device
software, you need a compatible PC, a high-speed
internet connection, and a compatible USB data cable
to connect your device to the PC.
To get more information and to download the Nokia
Software Updater application, go to
www.nokia.com.hk/softwareupdate.
Settings
Your device normally has MMS, GPRS, streaming, and
mobile internet settings automatically configured,
based on your network service provider information.
You may have settings from your service providers
already installed in your device, or you may receive or
request the settings from the network service
providers as a special message.
You can change the general settings in your device,
such as language, standby mode, display, and keypad
lock settings.
Access codes
If you forget any of the access codes, contact your
service provider.
● Personal identification number (PIN) code — This
code protects your SIM card against unauthorised
use. The PIN code (4 - 8 digits) is usually supplied
with the SIM card. After three consecutive incorrect
PIN code entries, the code is blocked, and you need
the PUK code to unblock it.
● UPIN code — This code may be supplied with the
USIM card. The USIM card is an enhanced version of
the SIM card and is supported by 3G mobile phones.
● PIN2 code — This code (4 - 8 digits) is supplied with
some SIM cards, and is required to access some
functions in your device.
● Lock code (also known as security code) — The lock
code helps you to protect your device against
unauthorised use. The preset code is 12345. You can
create and change the code, and set the device to
request the code. Keep the new code secret and in
a safe place separate from your device. If you forget
the code and your device is locked, your device will
11
Find help
Page 12

require service. Additional charges may apply, and
all the personal data in your device may be deleted.
For more information, contact a Nokia Care Centre
or your device dealer.
● Personal Unblocking Key (PUK) code and PUK2
code — These codes (8 digits) are required to
change a blocked PIN code or PIN2 code,
respectively. If the codes are not supplied with the
SIM card, contact the network service provider
whose SIM card is in your device.
● UPUK code — This code (8 digits) is required to
change a blocked UPIN code. If the code is not
supplied with the USIM card, contact the network
service provider whose USIM card is in your device.
● International Mobile Equipment Identity (IMEI)
number — This number (15 or 17 digits) is used to
identify valid devices on the GSM network. Devices
that are, for example, stolen, can be blocked from
accessing the network. The IMEI number for your
device can be found under the battery.
Remote lock
To prevent unauthorised use of your device, you can
lock your device and memory card remotely using a
text message. You must define the text message, and
to lock your device, send the text message to your
device. To unlock your device, you need the lock code.
To enable remote locking, and to define the text
message, select Menu > Settings and Phone >
Phone mgmt. > Security settings > Phone and
SIM card > Remote phone locking > Enabled. Tap
the text input field to enter the text message content
(5-20 characters), select
, and verify the message.
Enter the lock code.
Prolong battery life
Many features in your device increase the demand on
battery power and reduce the battery lifetime. To save
battery power, note the following:
● Features that use Bluetooth technology, or allowing
such features to run in the background while using
other features, increase the demand on battery
power. Deactivate Bluetooth technology when you
do not need it.
● Features that use wireless LAN (WLAN), or allowing
such features to run in the background while using
other features, increase the demand on battery
power. WLAN on your Nokia device deactivates
when you are not trying to connect, not connected
to an access point, or not scanning for available
networks. To further reduce battery consumption,
you can specify that your device does not scan, or
scans less often, for available networks in the
background.
12
Find help
Page 13

● If you have set Packet data connection to When
available in connection settings, and there is no
packet data coverage (GPRS), the device periodically
tries to establish a packet data connection. To
prolong the operating time of your device, select
Packet data connection > When needed.
● The Maps application downloads new map
information when you scroll to new areas on the
map, which increases the demand on battery power.
You can prevent the automatic download of new
maps.
● If the signal strength of the cellular network varies
much in your area, your device must scan for the
available network repeatedly. This increases the
demand on battery power.
If the network mode is set to dual mode in the
network settings, the device searches for the 3G
network. You can set the device to use only the GSM
network. To use only the GSM network, select
Menu > Settings and Connectivity > Network >
Network mode > GSM.
● The backlight of the display increases the demand
on battery power. In the display settings, you can
change the length of the time-out period after
which the backlight is switched off. Select Menu >
Settings and Phone > Display > Light timeout. To adjust the light sensor that observes lighting
conditions and adjusts the display brightness, in the
display settings, select Light sensor.
● Leaving applications running in the background
increases the demand on battery power. To close
the applications you are not using, if they are not
responding, select Options > Show open apps.,
and go to the application using the menu key. Press
and hold the menu key to open the application, and
select Options > Exit.
Free memory
To view how much space is available for different data
types, select Menu > Applications > Office > File
mgr..
Many features of the device use memory to store data.
The device notifies you if the memory in different
memory locations is low.
To free memory, transfer data to a compatible memory
card (if available) or to a compatible computer.
To remove data you no longer need, use File manager
or open the respective application. You can remove the
following:
● Messages in the folders in Messaging and retrieved
e-mail messages in the mailbox
● Saved web pages
● Contact information
● Calendar notes
13
Find help
Page 14
● Applications shown in Application manager that you
do not need
● Installation files (.sis or .sisx) of applications you
have installed. Transfer the installation files to a
compatible computer.
● Images and video clips in Photos. Back up the files
to a compatible computer.
Get started
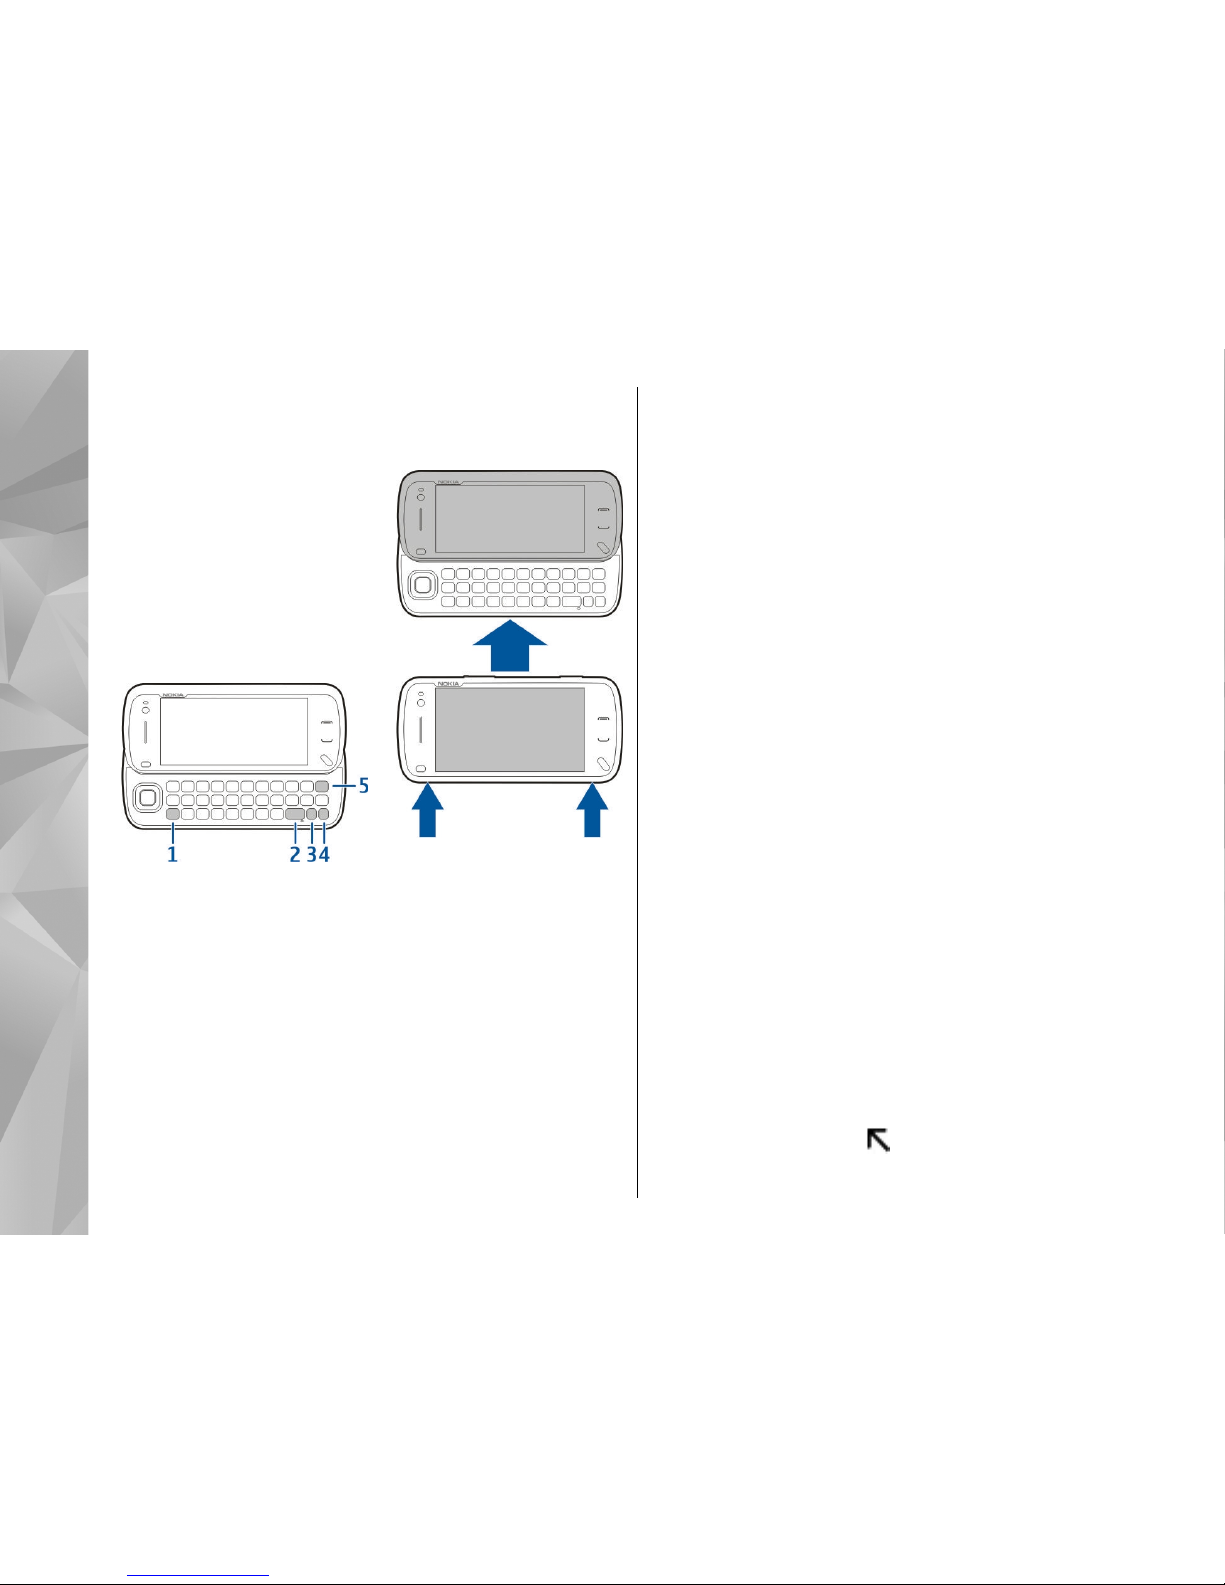
Keys and parts (top)
1 — Power key
2 — Nokia AV connector (3.5 mm) for compatible
headsets, headphones, and TV-out connectors
Keys and parts (front)
1 — Proximity sensor
2 — Earpiece
3 — Touch screen
4 — Menu key
5 — Call key
14
Get started
Page 15
6 — Secondary camera lens
7 — Light sensor
8 — End key
Do not cover the area above the
touch screen, for example, with
protective film or tape.
Keys and parts (back)
1 — Camera flash
2 — Camera lens
3 — Lens cover
Keys and parts (sides)
1 — Stereo speaker
2 — Micro USB connector
3 — Charging indicator light
4 — Lock switch
5 — Volume up/Zoom in key
6 — Volume down/Zoom out key
7 — Capture key
Note: The surface of this device does not
contain nickel in the platings. The surface of this device
contains stainless steel.
15
Get started
Page 16
Insert the SIM card and battery
Follow the instructions carefully, to avoid damaging
the back cover.
Always switch the device off and disconnect the
charger before removing the battery.
1. Remove the back cover by lifting it from the bottom
end of the device.
2. If the battery is inserted, lift the battery in the
direction of the arrow to remove it.
3. Pull out the SIM card holder, and insert the SIM card.
Ensure that the gold-coloured contact area on the
card is facing down and that the bevelled corner on
the card is facing the bevelled corner on the holder.
Push the SIM card holder back in.
4. Align the contacts of the battery with the
corresponding connectors on the battery
compartment, and insert the battery in the
direction of the arrow.
5. To replace the back cover, direct the top locking
catches toward their slots, and press down until the
cover locks into place.
16
Get started
Page 17

Memory card
Use only compatible microSD cards
approved by Nokia for use with this device.
Nokia uses approved industry standards for
memory cards, but some brands may not be fully
compatible with this device. Incompatible cards may
damage the card and the device and corrupt data
stored on the card.
Insert the memory card
A memory card may be already inserted in the device.
If not, do the following:
1. Remove the back cover of the device.
2. Insert a compatible
memory card in the slot.
Ensure that the contact
area on the card is facing
down and towards the
slot.
3. Push the card in. You can
hear a click when the card
locks into place.
4. Replace the back cover. Keep
the device facing down when
replacing the cover. Ensure
that the cover is properly
closed.
Remove the memory card
Important: Do not remove the memory card
during an operation when the card is being accessed.
Doing so may damage the memory card and the device,
and corrupt data stored on the card.
1. Before you remove the card, press the power key,
and select Remove memory card. All applications
are closed.
2. When Removing memory card will close all open
applications. Remove anyway? is displayed,
select Yes.
17
Get started
Page 18
3. When
Remove memory card and press 'OK'
is
displayed, remove the back cover of the device.
4. Press the memory card to release it from the slot.
5. Pull out the memory card. If the device is switched
on, select
OK.
6. Replace the back cover. Ensure that the cover is
properly closed.
Antenna locations
Your device may have internal and external antennas.
Avoid touching the antenna area unnecessarily while
the antenna is transmitting or receiving. Contact with
antennas affects the communication quality and may
cause a higher power level during operation and may
reduce the battery life.
Switch the device on and off
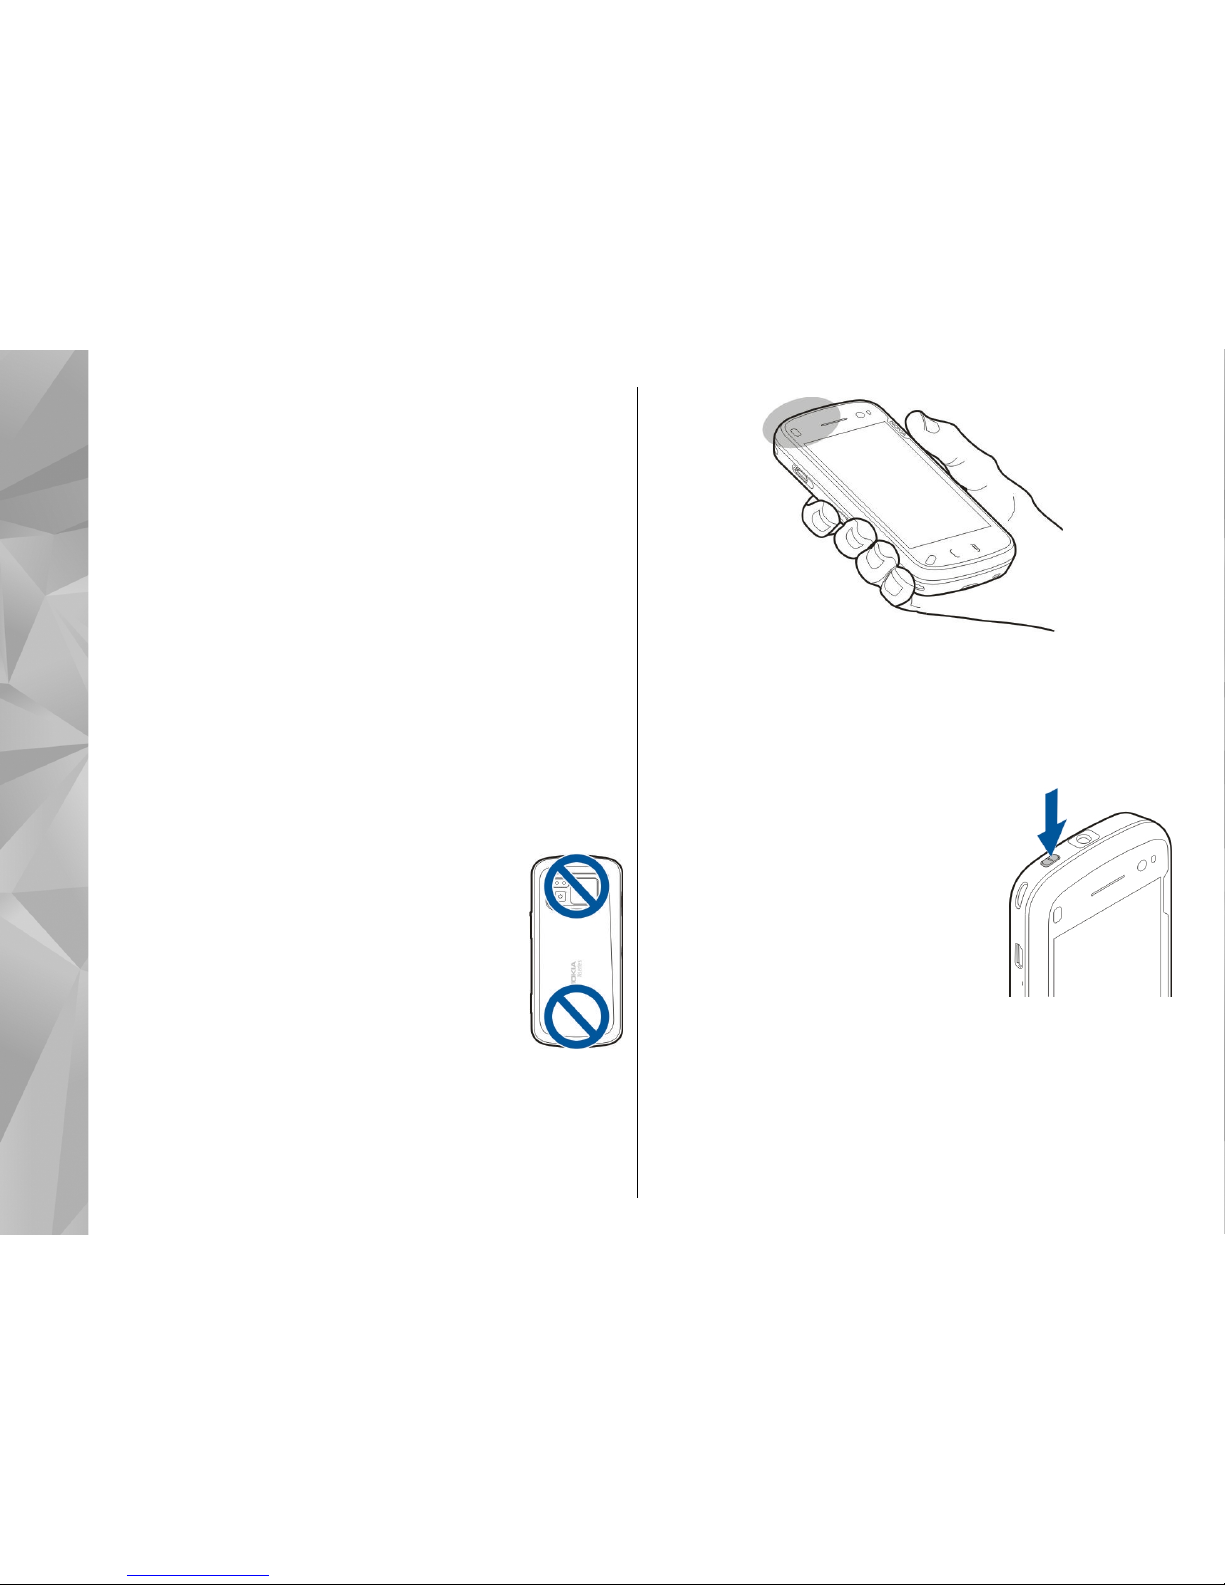
To switch on the device:
1. Press and hold the power key.
2. If the device asks for a PIN code
or lock code, enter it, and select
OK. The preset lock code is
12345. If you forget the code and
your device is locked, your device
will require service and
additional charges may apply.
For more information, contact a
dealer.
To switch off the device,
press the power key briefly,
and select
Switch off!.
18
Get started
Nok
ia Care Center or your device
Page 19
Charge the battery
Your battery has been partially charged at the factory.
There is no need to charge the device in adva nce. If the
device indicates a low charge, do the following:
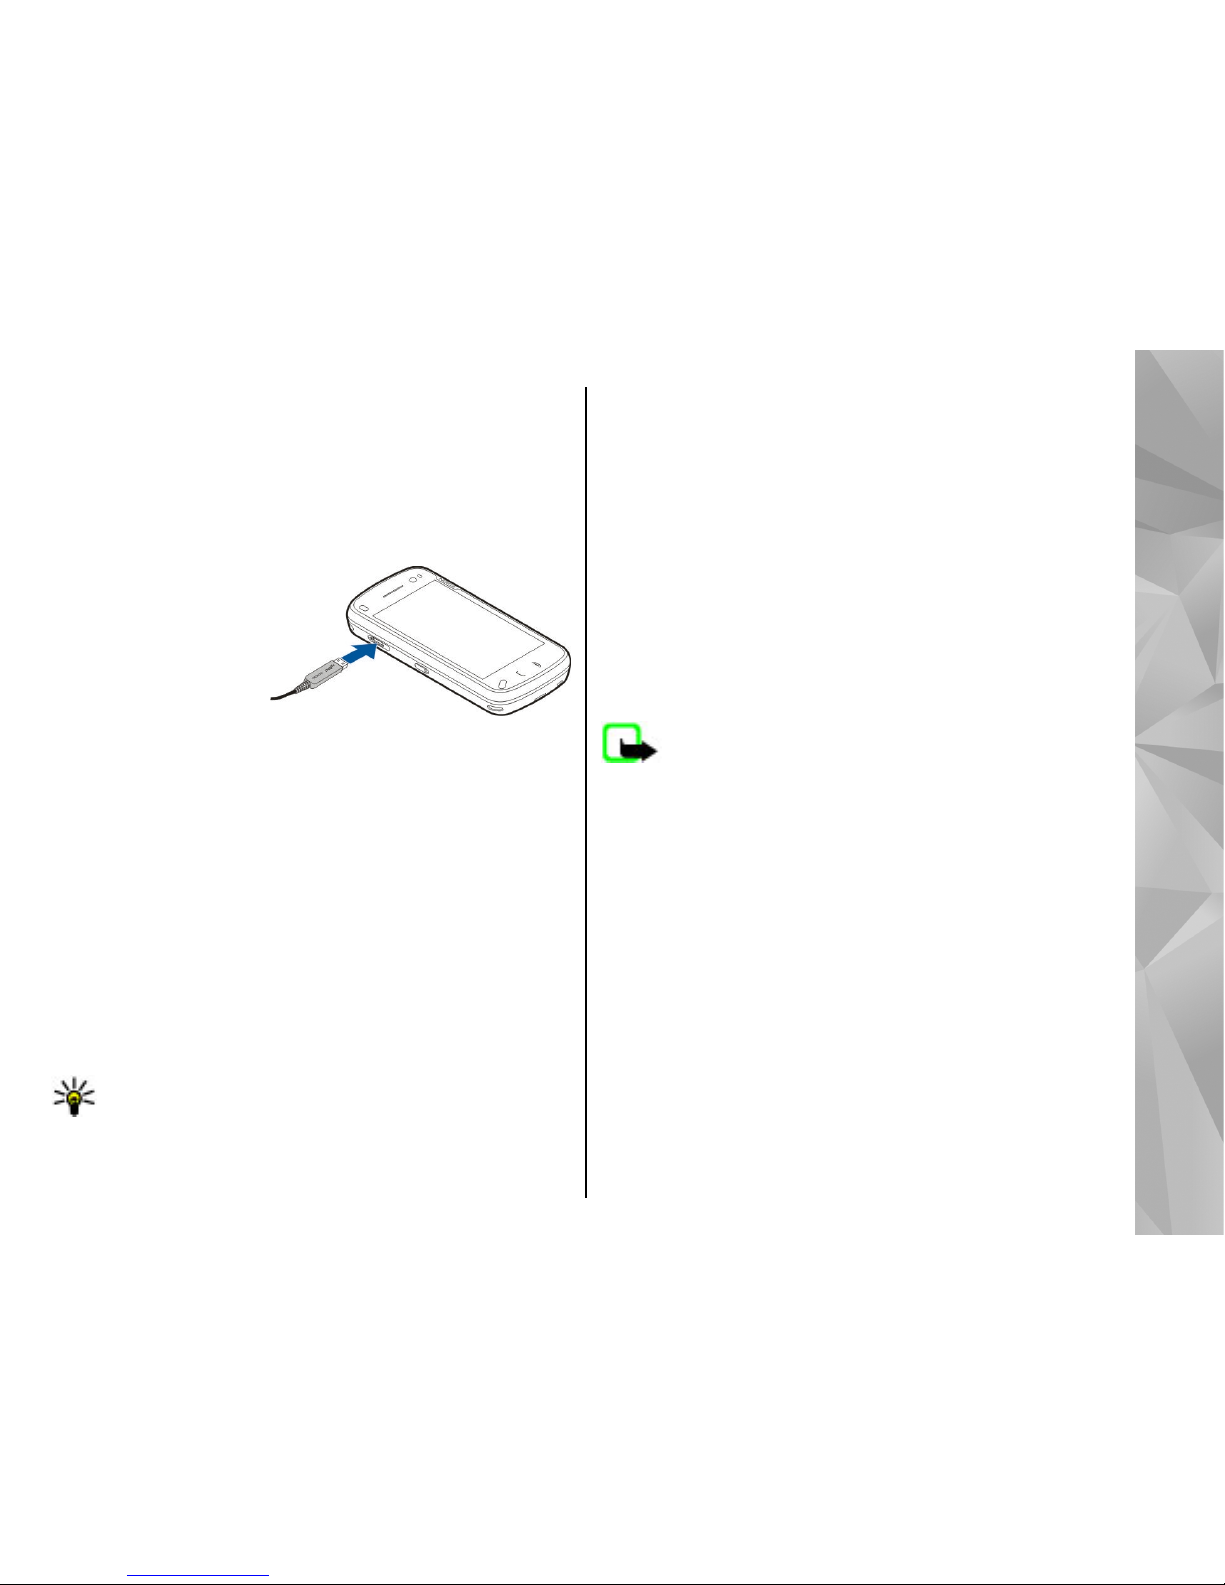
Regular charging
1. Connect the
charger to a wall
outlet.
2. Connect the
charger to the
device. The
charging indicator
light next to the USB connector is lit when the
battery is being charged.
3. When the device indicates a full charge, disconnect
the charger from the device, then from the wall
outlet.
You do not need to charge the battery for a specific
length of time, and you can use the device while it is
charging. If the battery is completely discharged, it
may take several minutes before the charging
indicator appears on the display or before any calls can
be made.
Tip: Disconnect the charger from the wall outlet
when the charger is not in use. A charger that is
connected to the outlet consumes power even
when it is not connected to the device.
USB charging
You can use USB charging when a wall outlet is not
available. With USB charging, you can also transfer data
while charging the device.
1. Connect a compatible USB device to your device
using a compatible USB cable.
Depending on the type of device that is used for
charging, it may take a while for charging to start.
2. If your device is switched on, you can select from
the available USB mode options on the display of
the device.
Note: During extended operation or charging,
the device or the charger may feel warm. In most cases,
this condition is normal. If you suspect that the device
or the charger are not working properly, take them to
the nearest authorised service facility.
Headset
You can connect a compatible headset or compatible
headphones to your device. You may need to select the
cable mode.
19
Get started
Page 20
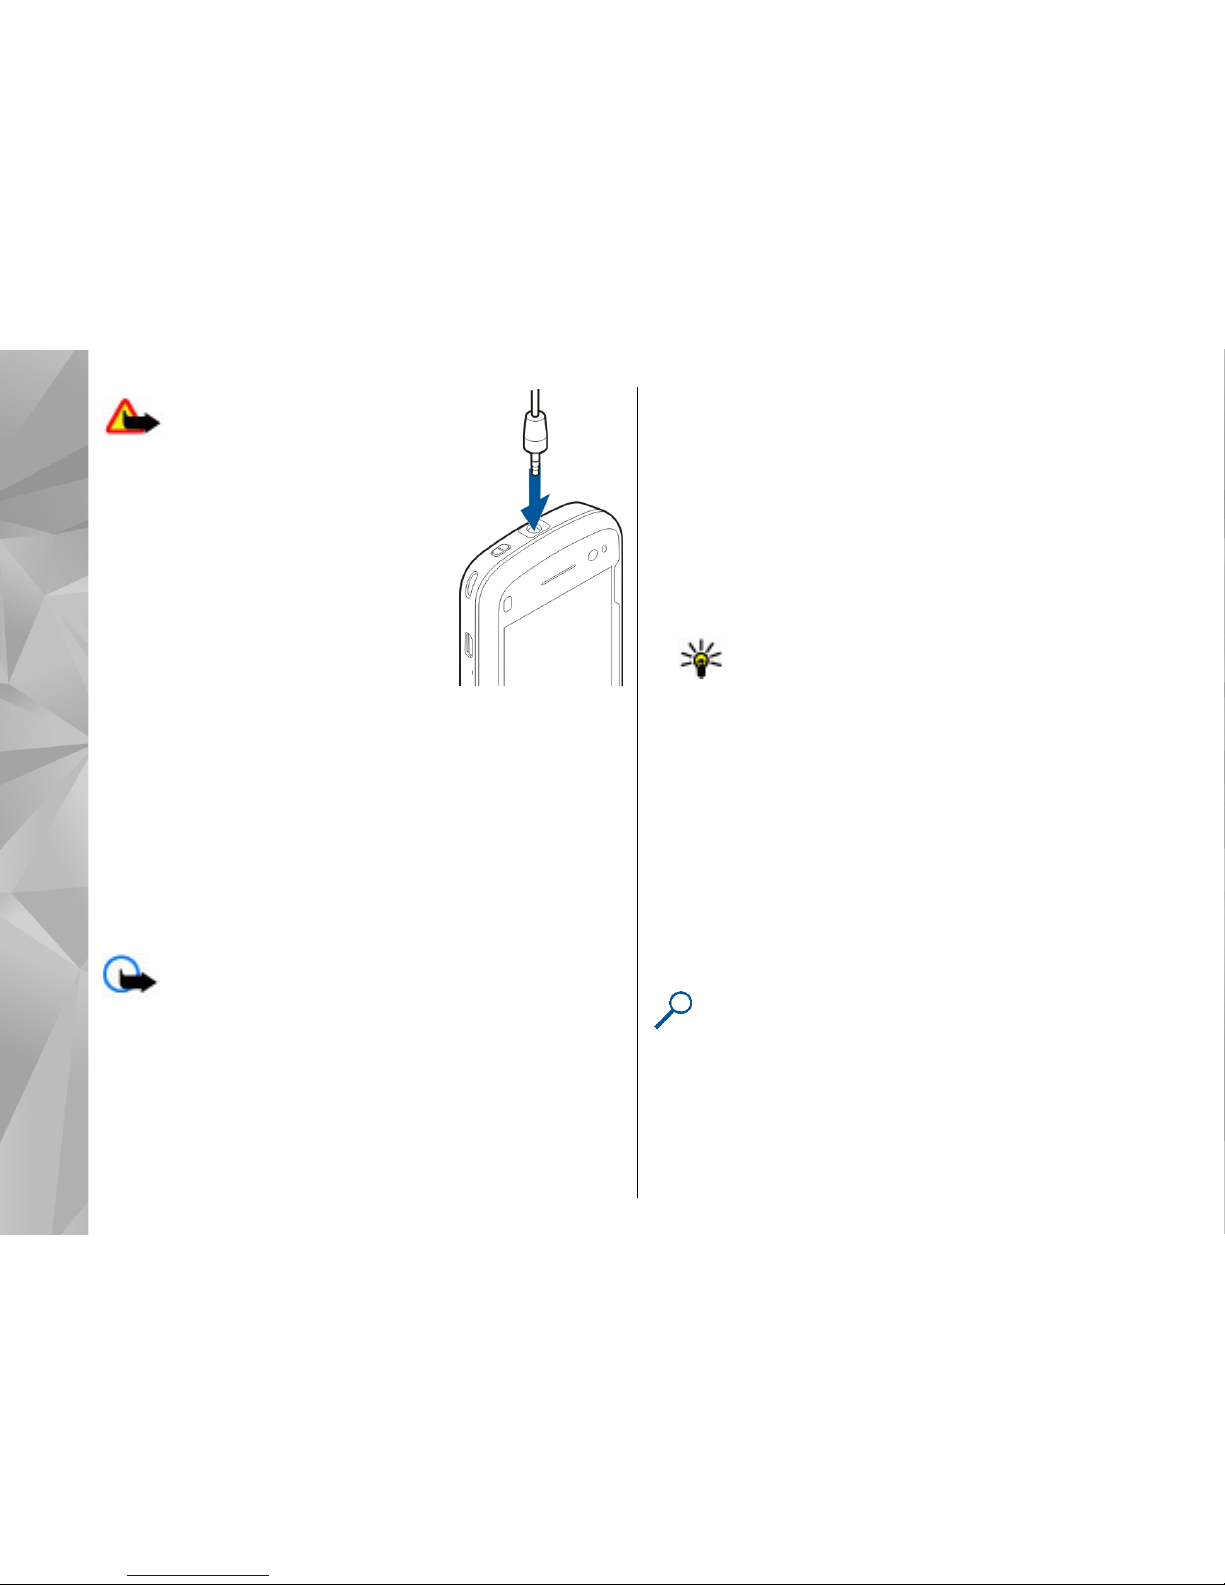
Warning: When you use the
headset, your ability to hear outside
sounds may be affected. Do not use
the headset where it can endanger
your safety.
Do not connect products that create
an output signal as this may cause
damage to the device. Do not
connect any voltage source to the
Nokia AV Connector.
When connecting any external
device or any headset, other than those approved by
Nokia for use with this device, to the Nokia AV
Connector, pay special attention to volume levels.
Touch screen actions
Use the touch screen with your finger or with a stylus
(if available).
Important: Use only a stylus approved by Nokia
for use with this device. Using any other stylus may
invalidate any warranty applying to the device and
may damage the touch screen. Avoid scratching the
touch screen. Never use an actual pen or pencil or other
sharp objects to write on the touch screen.
Tap and double-tap
To open an application or other element on the touch
screen, you normally tap it with your finger. However,
to open the following items, you must tap them twice.
● List items in an application, such as the Drafts folder
in the Messaging application.
● Files in a file list, for example, an image in the
Captured folder in the Photos application.
Tip: When you open a list view, the first item
is already highlighted. To open the
highlighted item, tap it once.
If you tap a file or similar item once, it is not opened,
it becomes highlighted. To see the options available
for the item, select Options or, if available, select an
icon from a toolbar.
Select
In this user documentation, to open applications or
items by tapping them once or twice, you "select"
them. If you need to select several items in a sequence,
the display texts to select are separated by arrows.
Example: To select Options > Help, tap
Options, and then tap Help.
Drag
To drag, place your finger on the screen, and slide it
across the screen.
20
Get started
Page 21
Example: To scroll up or down on a web page,
drag the page with your finger.
Swipe
To swipe, slide your finger quickly left or right on the
screen.
Example: When viewing an image, to view the
next or previous image, swipe left or right,
respectively.
Flick
To flick, place your finger on the screen, slide it quickly
across the screen, then quickly lift your finger. The
content of the screen will continue scrolling with the
speed and direction it had at the moment of release.
To select an item from a scrolling list and to stop the
movement, tap the item. In your device, flicking is
available in Music player.
Scroll
To scroll up or down in lists that have a scroll bar, drag
the slider of the scroll bar.
In some list views, you can place your finger on a list
item and drag up or down.
Example: To scroll through contacts, place your
finger on a contact, and drag up or down.
Tip: To view a brief description of an icon, place
your finger on the icon. Descriptions are not
available for all icons.
Touch screen backlight
The touch screen backlight is turned off after a period
of inactivity. To turn the screen backlight on, unlock the
screen and keys, if necessary, and press the menu key.
Write text
You can enter text in different modes. The full keyboard
works as a traditional keyboard, and the on-screen
alphanumeric keypad mode allow you to tap
characters. The handwriting recognition modes allow
you to write characters directly on the screen.
To activate text input mode, tap any text input field.
In the text input view, to switch between the available
text input modes, tap
, and select the desired input
mode.
The input methods and languages supported by the
handwriting recognition vary by region.
For information on the different touch input methods,
see the extended user guide on the product support
pages of the Nokia website.
21
Get started
Page 22
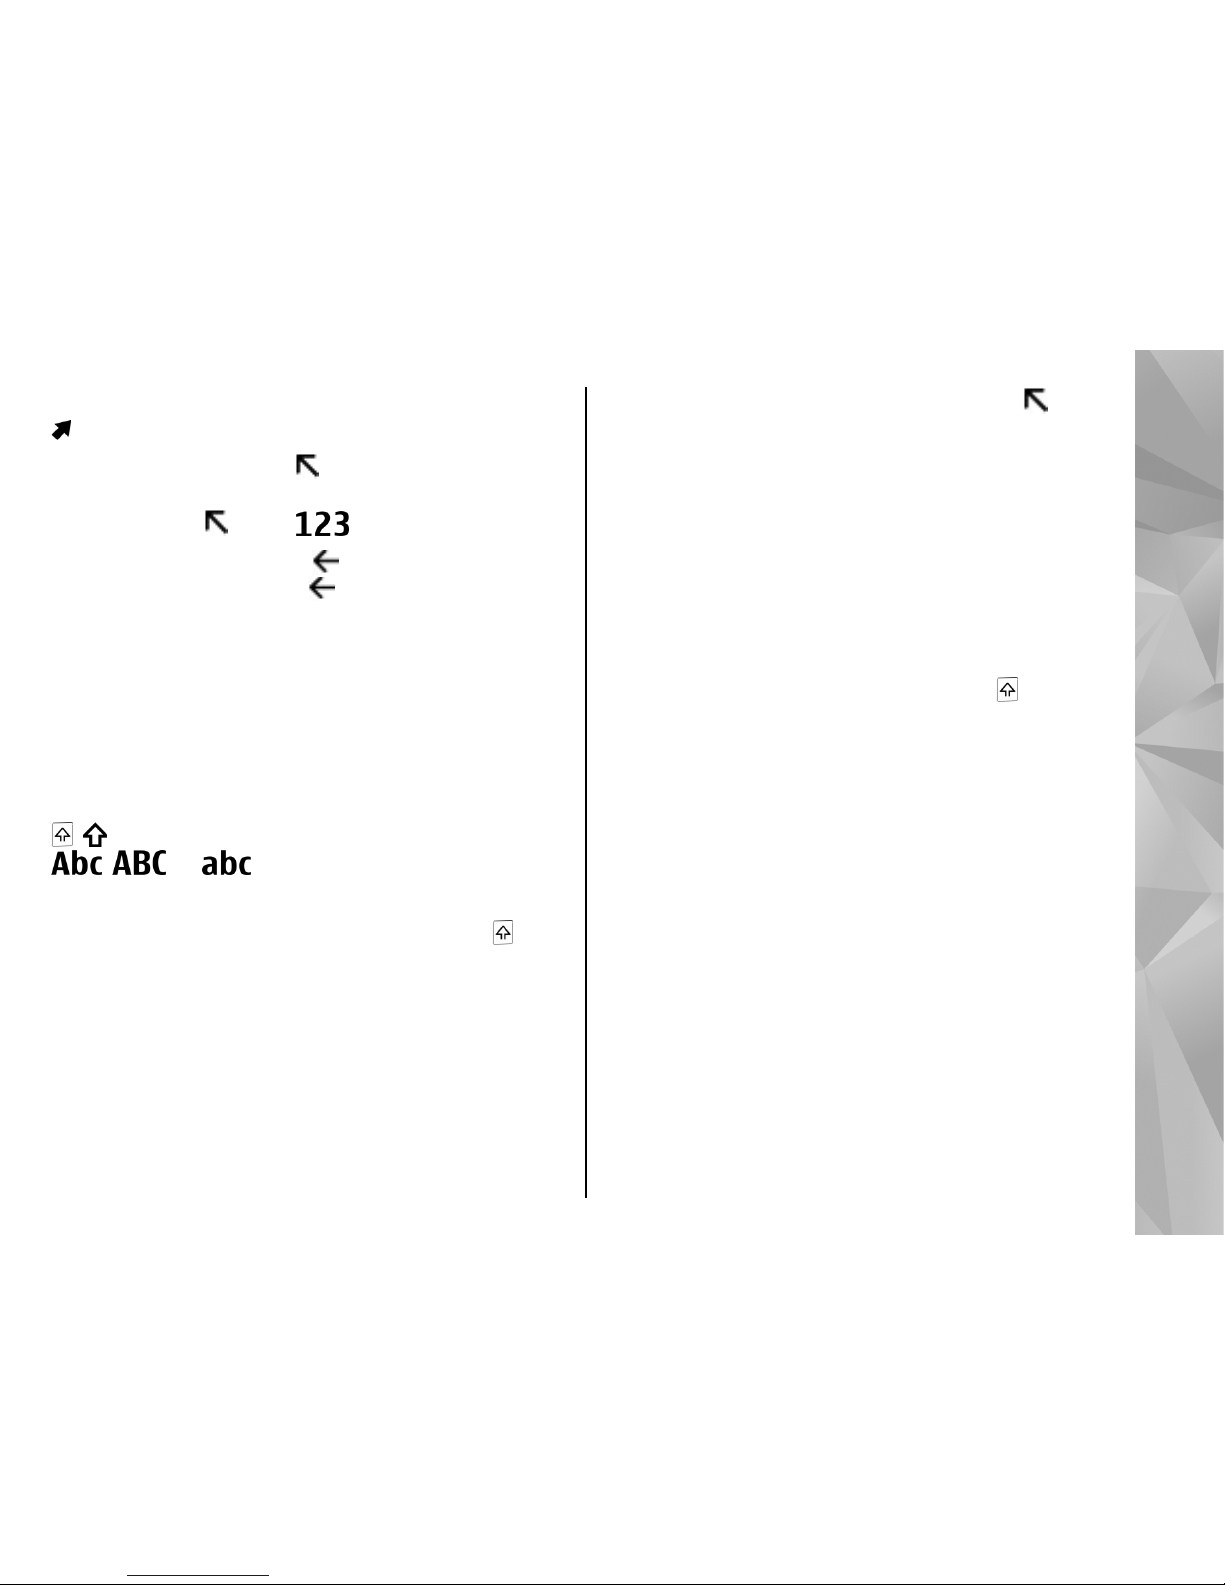
Keyboard input
Keyboard
Your device has a full
keyboard. To open the
keyboard, push the touch
screen up. In all applications,
the screen rotates
automatically from portrait to
landscape when you open the
keyboard.
1 — Shift key. To change between uppercase and
lowercase modes, press the shift key twice. To enter a
single uppercase letter in lowercase mode, or a single
lowercase letter in uppercase mode, press the shift key
once, and then the desired alphabet key.
2 — Space key
3 — Sym key. To insert special characters not shown
on the keyboard, press the sym key once, and select the
desired character from the table.
4 — Function key. To insert special characters printed
at the top of keys, press the function key once, and then
press the desired key. To enter several special
characters in a row, press the function key twice
quickly. To return to normal mode, press the function
key once.
5 — Backspace key. To erase a character, press the
backspace key. To erase several characters, press and
hold the backspace key.
Insert letters not shown on the keyboard
It is possible to insert variations of letters, for example,
letters with accents. To insert á, press and hold the sym
key, and simultaneously press the A key repeatedly,
until the desired character is displayed. The order and
availability of letters depends on the selected writing
language.
Write text
The input methods provided in the device may vary
according to different sales markets.
Keyboard
Your device has a full keyboard. The most common
punctuation marks can be found from the keypad. To
enter the most common punctuation marks, use the
keyboard, or press the sym key.
Some characters (for example, some punctuation
marks and other symbols) are printed at the top of
keys. To insert a character printed at the top of a key,
press the function key
and then the key that has the
22
Get started
Page 23
desired character. When you press the function key,
is displayed.
To insert a number, press
, and then the key with the
number. To lock the function key and insert only
numbers, press
twice. is displayed.
To erase a character, press
. To erase several
characters, press and hold
.
To insert characters and symbols that are not shown
on the keyboard, press the sym key.
To use other keys (for example, "A" or "O") to insert a
character, press and hold the sym key, then press the
other key repeatedly, until the desired character is
displayed.
To switch between the different character cases, press
. is displayed. The selected case is indicated by
, , or .
Copy and paste text
1. To select letters and words, press and hold
while
scrolling.
2. To copy, cut, and paste the text, select Options >
Editing options and the desired option.
Change the writing language
When writing text, you can change the writing
language. Select Options > Input options >
Writing language and the desired writing language.
To enter a special character, press and hold , and
then press another key repeatedly until the desired
character is displayed.
Changing the writing language allows you to access
different characters. For example, if you are writing
text in Chinese and want to use Latin characters to add
a name, select Options > Input options > Writing
language and the writing language that allows you to
use Latin characters.
Switch input methods
To switch input methods, press and hold
, and press
the space key repeatedly until the symbol for the
desired input method is displayed.
Lock the keys and touch screen
To lock or unlock the touch screen and the keys, slide
the lock switch on the side of the device.
When the touch screen and keys are locked, the touch
screen is switched off and the keys are inactive.
The screen and keys may be locked automatically after
a period of inactivity. To change settings for automatic
screen and key locking, select Menu > Settings and
Phone > Phone mgmt. > Auto. keyguard.
23
Get started
Page 24

Transfer content
You can use the Switch application to copy content
such as phone numbers, addresses, calendar items,
and images from your previous Nokia device to your
device.
The type of content that can be transferred depends on
the model of the device from which you want to
transfer content. If that device supports
synchronisation, you can also synchronise data
between the devices. Your device notifies you if the
other device is not compatible.
If the other device cannot be switched on without a
SIM card, you can insert your SIM card in it. When your
device is switched on without a SIM card, the Offline
profile is automatically activated, and transfer can be
done.
Transfer content for the first time
1. To retrieve data from the other device for the first
time, on your device, select Menu > Settings >
Connectivity > Data transfer > Phone switch.
2. Select the connection type you want to use to
transfer the data. Both devices must support the
selected connection type.
3. If you select Bluetooth connectivity as the
connection type, connect the two devices. To have
your device search for devices with Bluetooth
connectivity, select Continue. Select the device
from which you want to transfer content. You are
asked to enter a code on your device. Enter a code
(1-16 digits), and select OK. Enter the same code on
the other device, and select OK. The devices are now
paired.
Some earlier Nokia devices may not have the Switch
application. In this case, the Switch application is
sent to the other device as a message. To install the
Switch application on the other device, open the
message, and follow the instructions on the display.
4. On your device, select the content you want to
transfer from the other device.
When the transfer has started, you can cancel it and
continue later.
Content is transferred from the memory of the other
device to the corresponding location in your device.
The transfer time depends on the amount of data to be
transferred.
Profiles
Select Menu > Settings and Profiles.
You can use profiles to set and customise the ringing
tones, message alert tones, and other tones for
different events, environments, or caller groups. The
name of the selected profile is displayed at the top of
the home screen.
24
Get started
Page 25

To change a profile, scroll to the profile, and select
Options > Activate.
To personalise a profile, scroll to the profile, and select
Options > Personalise. Select the setting you want
to change.
To set the profile to be active until a certain time within
the next 24 hours, scroll to the profile, select Options >
Timed, and set the time. When the time expires, the
profile changes back to the previously active nontimed profile. When the profile is timed,
is displayed
in the home screen. The Offline profile cannot be timed.
To create a new profile, select Options > Create
new.
Your device
For more information on your device, such as
shortcuts, see the extended user guide on the product
support pages of the Nokia website.
Home screen
About the home screen
In the home screen, you can quickly access your most
frequently used applications, control applications,
such as the music player, view your favourite contacts,
and view at a glance if you have missed calls or new
messages.
Interactive home screen elements
To open the clock application, tap the clock (1).
To open calendar or change profiles in the home
screen, tap the date or the profile name (2).
To view or change connectivity settings (
), to see
the available wireless LANs if WLAN scanning is
enabled, or to view the missed events, tap the top right
corner (3).
25
Your device
Page 26

To make a phone call, select
(4).
To open the main menu, press the menu key (5).
To hide and show content, swipe the home screen with
your finger.
Add items to the home screen
To add an item to the home screen, select
Options
>
Edit content
> Options
> Add content
, and select
the item from the list. Using widgets may involve the
transmission of large amounts of data (network
service).
To move an item, select
Options >
Edit content
,
select the desired item, and
drag and drop it to a new
location.
Remove an item from the home screen
1. Select
Options >
Edit content
and the item to be
removed.
2. Select
Options >
Remove >
Done.
Music player in
the home screen
You can use the music player from the home screen. To
activate the music player controls, select
Options
>
Edit content
> Options
> Add content
>
Music
player.
Go to Music
appears in the home screen.
To open the music player, tap
Go to Music
, and select
the items you want to listen to.
The music player control keys,
and, if available, the title
of the song, artist, and al
bum art are displayed when
a song is played.
Favourite contacts in the home
screen
You can add several contacts directly to the home
screen, and quickly make call
s or send messages to the
contacts, view the contacts' web feeds, or access the
contact information and settings.
1.
To add your favourite contacts to the home screen,
select Options
> Edit content
> Options
> Add
content
> Favourite contacts
.
A row of
icons is displayed
in the home screen.
2. Select any of the icons (
) and a contact from
Contacts.
Display indicators
General indicators
The touch screen and keys are locked.
The device alerts silent
ly for incoming calls.
You have set a clock alarm.
You are using a timed profile.
26
Your device
Page 27

Call indicators
Someone has tried to call you.
You have set your device to divert incoming
calls to another number (network service).
Your device is ready for an internet call.
You have an ongoin
g data call (network
service).
Messaging indicators
You have unread messages. If the indicator is
blinking, the SIM card memory for messages
may be full.
You have received new mail.
You have messages waiting to be sent in the
Outbox folder.
Network indicators
Your device is connected to a GSM network
(network service).
Your device is connected to a 3G network
(network service).
You have a GPRS packet data connection
(network service).
indicates that the
connection is on hold and
that a connection
is being established.
You have an EGPRS packet data connection
(network service).
indicates that the
connection is on hold and
that a connection
is being established.
You have a 3G packet data connection
(network service).
indicates that the
connection is suspended and
that a
connection is being established.
You have a high-speed downlink packet
access (HSDPA) connection
(network service).
indicates that the co
nnection is suspended
and
that a connection is being established.
A WLAN connection is available (network
service).
indicates that the connection is
encrypted and
that the connection is not
encrypted.
Connectivity indicators
Bluetooth is active.
indicates that your
device is sending data. If the indicator is
blinking, your device is trying to connect to
another device.
You have connected a USB cable to your
device.
27
Your device
Page 28

GPS is active.
The device is synchronising.
You have connected a compatible headset to
the device.
You have connected a compatible TV-out
cable to the device.
Offline profile
The offline profile lets you use the device without
connecting to the wireless cellular network. When the
offline profile is active, you
can use your device without
a SIM card.
Activate the offline profile
— Press the power key
briefly, and select
Offline.
When you activate the offline profile, the connection
to the cellular network is closed. All radio frequency
signals to and from the device to the cellular network
are prevented. If you try
to send messages using the
cellular network, they are placed in the Outbox folder
to be sent later.
Important:
In the Offline profile you cannot
make or receive any calls, or use other features that
require cellular network coverage. Calls may still be
possible to the official emergency number
programmed into your device
. To make calls, you must
first activate the phone function by changing profiles.
If the device has been locked, enter the lock code.
When you have activated the offline profile, you can
still use a wireless LAN, for example, to read your e-mail
or browse on the internet.
You can also use Bluetooth
connectivity while in the o
ffline profile. Remember to
comply with any applicable
safety requirements when
establishing and using wireless LAN or Bluetooth
connections.
Make calls
Touch screen during calls
Your device has a proximity sensor. To extend battery
life and prevent accidental selections, the touch screen
is disabled automatically during calls, when you place
the device next to your ear.
28
Make calls
Page 29

Do not cover the proximity sensor,
for example, with protective film
or tape.
Make a voice call
1. In the home screen, select to open the dialler,
and enter the phone number, including the area
code. To remove a number, select C.
For international calls, select * twice for the +
character (which replaces the international access
code), and enter the country code, area code (omit
the leading zero if necessary), and phone number.
2. To make the call, press the call key.
3. To end the call (or to cancel the call attempt), press
the end key.
Pressing the end key always ends a call, even if
another application is active.
Call a contact
1. Select Menu > Contacts.
2. Go to the desired name. Or, enter the first letters or
characters of the name in the search field, and go
to the name.
3. To call the contact, press the call key. If you have
saved several numbers for a contact, select the
desired number from the list, and press the call key.
End a call — Press the end key.
Internet calls
About internet calls
With the internet call network service, you can make
and receive calls over the internet. Internet call services
may support calls between computers, between
mobile phones, and between a VoIP device and a
traditional telephone. For availability and costs,
contact your internet call service provider.
To make or receive an internet call, you must be in the
service area of a wireless LAN (WLAN) or have a packet
data (GPRS) connection in a UMTS network, and be
connected to an internet call service.
Your device may offer you an installation widget, to
install internet call services.
Log into an internet call service
When an internet call service has been installed, a tab
for the service is displayed in the contacts list.
To log into a service, select Menu > Contacts, the
service, and Options > Log in.
To add contacts as service contacts to the friends list
manually or from the contacts list, select Options >
New contact.
29
Make calls
Page 30

Make internet calls
To call a contact when you are logged into a service,
tap the contact in the friends list, and select
.
To make an internet call in the home screen, select
, enter the number, and select Options > Call >
Internet call.
To make an internet call to an internet call address, in
the home screen, select
and Options > Open
keyboard. Enter the address, and select
.
Internet communication settings
Select Menu > Settings and Connectivity > Admin.
settings > Net settings.
To view and edit the settings for a service, select the
service name.
To remove a service from your service list, select
Options > Delete service.
Internet call service settings
Select Menu > Contacts, open a service tab, and select
Options > Settings.
To set an internet call service as the default service,
select Default service. When you press the call key to
call a number, your device makes an internet call using
the default service if the service is connected. You can
set only one service at a time as the default service.
To edit the service destination, select Service
connectivity.
Contacts (phonebook)
To open Contacts, select Menu > Contacts.
You can save and update contact information, such as
phone numbers, home addresses, or e-mail addresses
of your contacts. You can add a personal ringing tone
or a thumbnail image to a contact. You can also create
contact groups, which allow you to send text messages
or e-mail to many recipients at the same time.
Save and edit names and
numbers
1. To add a new contact to the contacts list, select .
2. Tap a field to enter the information in the field. To
close the text input, select
. Fill in the fields that
you want, and select Done.
30
Contacts (phonebook)
Page 31

To edit contacts, select a contact and Options >
Edit.
Contact cards
Select Menu > Contacts and a contact. All available
communication methods for the selected contact are
displayed in the contact cards view.
Select a contact from the list, the desired
communication method, Options, and from the
following:
● Edit — Edit, add, or delete the contact card fields.
● Defaults — Define the numbers and addresses to
use by default when you communicate with the
contact, if a contact has more than one number or
address defined.
● Voice tag details — View the voice tag details, or
listen to the voice tag for the contact.
The available options and communication methods
may vary.
Messaging
Write and send messages
Select Menu > Messaging.
Important: Exercise caution when opening
messages. Messages may contain malicious software
or otherwise be harmful to your device or PC.
Before you can create a multimedia message or write
a mail, you must have the correct connection settings
defined.
The wireless network may limit the size of MMS
messages. If the inserted picture exceeds this limit, the
device may make it smaller so that it can be sent by
MMS.
Only devices that have compatible features can receive
and display multimedia messages. The appearance of
a message may vary depending on the receiving
device.
Check the size limit of mail messages with your service
provider. If you attempt to send a mail message that
exceeds the size limit of the mail server, the message
is left in the Outbox folder, and the device attempts to
resend it periodically. Sending a mail requires a data
connection, and continuous attempts to resend the
mail may incur charges from your service provider. In
31
Messaging
Page 32

the Outbox folder, you can delete such a message or
move it to the Drafts folder.
Messaging requires network services.
Send a text or multimedia message — Select New
message.
Send an audio or mail message — Select Options >
Create message, and the relevant option.
Select recipients or groups from the contacts
list — Select
from the toolbar.
Enter the number or mail address manually — Tap
the To field.
Enter the subject of the mail or multimedia
message — Enter it in the Subject field, . If the Subject
field is not visible, select Options > Message header
fields to change the fields that are visible.
Write the message — Tap the message field.
Add an object to a message or mail — Select
and
the relevant type of content. The message type may
change to multimedia message based on the inserted
content.
Send the message or mail — Select
, or press the
call key.
Your device supports text messages beyond the limit
for a single message. Longer messages are sent as two
or more messages. Your service provider may charge
accordingly. Characters with accents, other marks, or
some language options take more space, and limit the
number of characters that can be sent in a single
message.
Connectivity
Nokia understands how important it is that your
mobile phone or device operates reliably and that your
personal content is saved safely.
Any information from an unknown or unreliable
source, for example, via Bluetooth connectivity,
multimedia message, or cable, may harm your PC,
mobile phone, or device. You may protect your mobile
phone or device from damage and keep it secured by
following simple measures:
● Always keep Bluetooth connectivity closed unless
you want your phone or device to be visible to
others, when your phone or device supports
Bluetooth.
32
Connectivity
Page 33

● Always be alert when receiving information, like
Bluetooth file or multimedia message, from an
unknown or untrustworthy source.
● Do not download or install any applications that
may include software harmful to your phone or
device.
● Always download and install applications or
content, like ringing tone or game, from trusted or
well-known sources, such as Nokia Software Market,
where good protection is provided against viruses
and other harmful software.
This is a friendly reminder, the mentioned function
may vary from different device model.
Your device offers several options to connect to the
internet or to another compatible device or PC. For
more information on other connectivity methods, see
the extended user guide on the product support pages
of the Nokia website.
Wireless LAN
Your device can detect and connect to wireless local
area networks (WLAN). Using a WLAN, you can connect
your device to the internet and compatible devices that
have WLAN support.
About WLAN
To use a wireless local area network (WLAN)
connection, it must be available in the location, and
your device must be connected to the WLAN. Some
WLANs are protected, and you need an access key from
the service provider to connect to them.
Using WLAN may be restricted in some countries. For
example, in France, you are only allowed to use WLAN
indoors. For more information, contact your local
authorities.
Features that use WLAN, or that are allowed to run in
the background while using other features, increase
the demand on battery power and reduce the battery
life.
Important: Always enable one of the available
encryption methods to increase the security of your
wireless LAN connection. Using encryption reduces the
risk of unauthorised access to your data.
WLAN wizard
Select Menu > Settings and Connectivity > WLAN.
The WLAN wizard helps you to connect to a wireless
LAN (WLAN) and manage your WLAN connections.
If the search finds WLANs, to create an internet access
point (IAP) for a connection and start the web browser
33
Connectivity
Page 34

using this IAP, select the connection and Start web
browsing.
If you select a secured WLAN, you are asked to enter
the relevant password. To connect to a hidden
network, you must enter the correct network name
(service set identifier, SSID).
If you already have the web browser running using the
currently active WLAN connection, to return to the web
browser, select Continue web browsing. To end the
active connection, select the connection and
Disconnect WLAN.
Access points
Create a new access point
Select Menu > Settings and Connectivity >
Destinations.
You may receive access point settings in a message
from a service provider. Some or all access points may
be preset for your device by your service provider, and
you may not be able to change, create, edit, or remove
them.
When you open one of the access point groups (
,
, ), you can see the access point types:
indicates a protected access point
indicates a packet data access point
indicates a wireless LAN (WLAN) access point
Tip: You can create internet access points in a
WLAN with the WLAN wizard.
To create a new access point, select
Access point.
The device asks to check for available connections.
After the search, connections that are already available
are shown and can be shared by a new access point. If
you skip this step, you are asked to select a connection
method and to define the settings needed.
To edit the settings of an access point, open one of the
access point groups, and select an access point. Follow
the instructions from your service provider.
● Connection name — Enter a name for the
connection.
● Data bearer — Select the data connection type.
Depending on the data connection you select, only
certain setting fields are available. Fill in all fields
marked with Must be defined or with a red *. Other
fields can be left empty, unless your service provider
has instructed otherwise.
To use a data connection, your service provider must
support this feature, and if necessary, activate it for
your SIM card.
34
Connectivity
Page 35

Bluetooth connectivity
About Bluetooth connectivity
With Bluetooth connectivity, you can make a wireless
connection to other compatible devices, such as
mobile phones, computers, headsets, and car kits.
You can use the connection to send images, video clips,
music and sound clips, and notes, transfer files from
your compatible PC, and print images with a
compatible printer.
Since devices with Bluetooth wireless technology
communicate using radio waves, they do not need to
be in direct line-of-sight. Ho we ve r, th ey mu st be wi th in
10 metres (33 feet) of each other, although the
connection may be subject to interference from
obstructions such as walls or from other electronic
devices.
This device is compliant with Bluetooth Specification
2.0 + EDR supporting the following profiles: Dial-Up
Networking (DUN), Object Push Profile (OPP), File
Transfer Profile (FTP), Hands Free Profile (HFP), Headset
Profile (HSP), Basic Imaging Profile (BIP), Remote SIM
Access Profile (SimAP), Device Identification Profile
(DI), Phonebook Access Profile (PBAP), Generic Audio/
Video Distribution Profile (GAVDP), Audio/Video
Remote Control Profile (AVRCP), Advanced Audio
Distribution Profile (A2DP). To ensure interoperability
between other devices supporting Bluetooth
technology, use Nokia approved accessories for this
model. Check with the manufacturers of other devices
to determine their compatibility with this device.
Features using Bluetooth technology increase the
demand on battery power and reduce the battery life.
When the device is locked, only connections to
authorised devices are possible.
Settings
Select Menu > Settings and Connectivity >
Bluetooth.
When you open the application for the first time, you
are asked to define a name for your device. You can
change the name later.
Select from the following:
● Bluetooth — Turn Bluetooth connectivity on or off.
● My phone's visibility — To allow your device to be
found by other devices with Bluetooth wireless
technology, select Shown to all. To set a time
period after which the visibility is set from shown to
hidden, select Set visibility period. To hide your
device from other devices, select Hidden.
● My phone's name — Edi t the n ame sh own to other
devices with Bluetooth wireless technology.
● Remote SIM mode — Enable or disable another
device, such as a compatible car kit accessory, to use
35
Connectivity
Page 36

the SIM card in your device to connect to the
network.
Send data using Bluetooth
connectivity
You can have several Bluetooth connections active at a
time. For example, if you are connected to a compatible
headset, you can also transfer files to another
compatible device.
1. Open the application where the item you want to
send is stored.
2. Go to an item, and select Options > Send > Via
Bluetooth.
Devices with Bluetooth wireless technology that
are within range are displayed. Device icons are as
follows:
computer
phone
audio or video device
other device
To interrupt the search, select Cancel.
3. Select the device with which you want to connect.
4. If the other device requires pairing before data can
be transmitted, a tone sounds, and you are asked
to enter a passcode. The same passcode must be
entered in both devices.
When the connection is established, Sending
data is displayed.
Tip: When searching for devices, some devices
may show only the unique address (device
address). To find the unique address of your
device, in the dialler, enter *#2820#.
Pair devices
Select Menu > Settings and Connectivity >
Bluetooth.
To pair with compatible devices and view your paired
devices, open the Paired devices tab.
Before pairing, create your own passcode (1 to 16
digits), and agree with the owner of the other device
to use the same code. Devices that do not have a user
interface have a factory-set passcode. The passcode is
used only once.
1. To pair with a device, select Options > New
paired device. Devices that are within range are
displayed.
2. Select the device, and enter the passcode. The same
passcode must be entered on the other device, as
well.
3. Some audio accessories connect automatically to
your device after pairing. Otherwise, to connect to
an accessory, select Options > Connect to audio
device.
36
Connectivity
Page 37

Paired devices are indicated by in the device search.
To set a device as authorised or unauthorised, select
from the following:
● Set as authorised — Connections between your
device and the authorised device can be made
without your knowledge. You will not be asked for
authorisation or acceptance separately. Use this
status only for your own devices, such as your
compatible headset or PC, or devices that belong to
someone you trust. indicates authorised devices
in the paired devices view.
● Set as unauthorised — Connection requests from
this device must be accepted separately every time.
To cancel a pairing with a device, select Options >
Delete.
To cancel all pairings, select Options > Delete all.
Internet
The XHTML browser in this device supports the Unicode
encoding format.
If the web page is unreadable or not supported and
garbage code is found while browsing, you can try to
select Menu > Web and Options > Settings >
Page > Default encoding, and select a
corresponding encoding.
To browse the web, you need to have an internet
access point configured in your device. Using the web
browser requires network support or WLAN available.
For more information on the web browser, see the
extended user guide on the product support pages of
the Nokia website.
Browse the web
Select Menu > Web.
To browse the web, select
Go to web address from
the toolbar, and enter a web address.
By default, the browser is in full screen mode. To exit
full screen mode, select the arrow icon in the bottom
right corner.
Some web pages may contain material, such as
graphics or video clips, that requires a large amount of
memory to view. If your device runs out of memory
while loading such a web page, insert a memory card.
Otherwise, the video clips are not displayed.
To browse web pages with graphics disabled, to save
memory and increase the page loading speed, select
37
Internet
Page 38

Options > Settings > Page > Load content >
Text only.
To refresh the content of the web page, select
Options > Web page options > Reload.
To save the current web page as a bookmark, select
Options > Web page options > Save as
bookmark.
To view snapshots of the web pages you have visited
during the current browsing session, select Back
(available if History list is activated in the browser
settings and the current web page is not the first web
page you visit).
To prevent or allow the automatic opening of multiple
windows, select Options > Web page options >
Block pop-ups or Allow pop-ups.
To zoom in on a web page, double-tap the display.
Tip: To send the browser to the background
without exiting the application or connection,
press the end key once.
Browser toolbar
The browser toolbar helps you select frequently used
functions of the browser.
To open the toolbar when browsing, select the arrow
in the bottom right corner.
From the toolbar, select from the following:
● Expand toolbar — Expand the toolbar to access
more toolbar functions.
●
Go to web address — Enter a web address.
●
Show zoom — Zoom in or out on the web page.
To use the expanded toolbar, select
Expand
toolbar and from the following:
●
Go to feeds — View your current feed
subscriptions.
●
Send URL — Send the web address of the current
page to another device.
●
Switch win. — Switch between open browser
windows.
●
Subsc. feeds — View a list of available web feeds
on the current web page, and subscribe to a web
feed.
●
Settings — Edit the settings.
●
Save bkmrk. — Save the current web page as a
bookmark.
●
Reload — Refresh the web page.
●
Overview — View an overview of the current
web page.
●
Homepage — Go to the homepage (if defined
in settings).
●
Bookmarks — Open the bookmarks view.
●
Find keywd. — Se arch on the current web pa ge .
38
Internet
Page 39

End the connection
To end the connection and close the browser, select
Options > Exit.
To delete the information the network server collects
about your visits to various web pages, select
Options > Clear privacy data > Cookies.
Ovi Maps
For more information on Maps, see the extended user
guide on the product support pages of the Nokia
website.
Maps overview
Select Menu > Maps.
Welcome to Maps.
Maps shows you what is nearby, helps you plan your
route, and guides you where you want to go.
● Find cities, streets, and services.
● Find your way with turn-by-turn directions.
● Synchronise your favourite locations and routes
between your mobile device and the Ovi Maps
internet service.
● Check weather forecasts and other local
information, if available.
Maps availability depends on the laws of each country/
region (e.g. maps may not be available due to legal
restrictions of countries/regions). Nokia disclaims any
and all warranty with respect to the availability of
maps, including its accuracy, correctness and update.
Note: Downloading content such as maps,
satellite images, voice files, guides or traffic
information may involve transmission of large
amounts of data (network service).
Some services may not be available in all countries, and
may be provided only in selected languages. The
services may be network dependent. For more
information, contact your network service provider.
Almost all digital cartography is inaccurate and
incomplete to some extent. Never rely solely on the
cartography that you download for use in this device.
Content such as satellite images, guides, weather and
traffic information and related services are generated
by third parties independent of Nokia. The content may
be inaccurate and incomplete to some extent and is
subject to availability. Never rely solely on the
aforementioned content and related services.
39
Ovi Maps
Page 40

About positioning methods
Maps displays your location on the map using GPS, AGPS, or cell ID based positioning.
The Global Positioning System (GPS) is a satellite-based
navigation system used for calculating your location.
Assisted GPS (A-GPS) is a network service that sends you
GPS data, improving the speed and accuracy of the
positioning.
When you use Maps for the first time, you are prompted
to define an internet access point to download map
information or use A-GPS.
indicates the availability of the satellite
signals. One bar is one satellite. When the device is
searching for satellite signals, the bar is yellow. When
there is enough data available to calculate your
location, the bar turns green. The more green bars, the
more reliable the location calculation.
The Global Positioning System (GPS) is operated by the
government of the United States, which is solely
responsible for its accuracy and maintenance. The
accuracy of location data can be affected by
adjustments to GPS satellites made by the United
States government and is subject to change with the
United States Department of Defense civil GPS policy
and the Federal Radionavigation Plan. Accuracy can
also be affected by poor satellite geometry. Availability
and quality of GPS signals may be affected by your
location, buildings, natural obstacles, and weather
conditions. GPS signals may not be available inside
buildings or underground and may be impaired by
materials such as concrete and metal.
GPS should not be used for precise location
measurement, and you should never rely solely on
location data from the GPS receiver and cellular radio
networks for positioning or navigation.
The trip meter has limited accuracy, and rounding
errors may occur. Accuracy can also be affected by
availability and quality of GPS signals.
With cell ID based positioning, the position is
determined through the antenna tower your mobile
device is currently connected to.
Depending on the available positioning method, the
accuracy of positioning may vary from a few metres to
several kilometres.
Use the compass
If your device has a compass, when activated, both the
arrow of the compass and the map rotate
automatically in the direction to which the top of your
device is pointing.
Select Menu > Maps and My position.
Activate the compass — Select
.
Deactivate the compass — Select
again. The map
is oriented north.
40
Ovi Maps
Page 41

The compass is active when there is a green outline. If
the compass needs calibration, the outline of the
compass is red or yellow. To calibrate the compass,
rotate the device around all axes in a continuous
movement.
The compass has limited accuracy. Electromagnetic
fields, metal objects, or other external circumstances
may also affect the accuracy of the compass. The
compass should always be properly calibrated.
View your location and the
map
See your current location on the map, and browse
maps of different cities and countries.
Select Menu > Maps and My position.
When the GPS connection is active,
marks your
current or last known location on the map. If the icon's
colours are faint, no GPS signal is available.
If only cell ID based positioning is available, a red halo
around the positioning icon indicates the general area
you might be in. The accuracy of the estimate increases
in densely populated areas.
Move on the map — Drag the map with your finger.
By default, the map is oriented north.
View your current or last known location — Select
.
Zoom in or out — Select + or -.
If you browse to an area not covered by maps that are
stored on your device and you have an active data
connection, new maps are automatically downloaded.
Map coverage varies by country and region.
Plan a route
Plan your journey, and create your route and view it on
the map before setting off.
Select Menu > Maps and My position.
Create a route
1. Tap the location of your starting point. To search for
an address or place, select Search.
2. Tap the location's information area (
).
3. Select Add to route.
4. To add another route point, select Add new route
point and the appropriate option.
Change the order of the route points
1. Select a route point.
2. Select Move.
3. Tap the place where you want to move the route
point to.
Edit the location of a route point — Tap the route
point, and select Edit and the appropriate option.
41
Ovi Maps
Page 42

View the route on the map — Select Show route.
Navigate to the destination — Select Show
route > Options > Start driving or Start walking.
Change the settings for a route
The route settings affect the navigation guidance and
the way the route is displayed on the map.
1. In the route planner view, open the Settings tab. To
get to the route planner view from the navigation
view, select Options > Route points or Route
point list.
2. Set the transportation mode to Drive or Walk. If
you select Walk, one-way streets are regarded as
normal streets, and walkways and routes through,
for example, parks and shopping centres, can be
used.
3. Select the desired option.
Select the walking mode — Open the Settings tab,
and select Walk > Preferred route > Streets or
Straight line. Straight line is useful on off-road
terrain as it indicates the walking direction.
Use the faster or shorter driving route — Open the
Settings tab, and select Drive > Route selection >
Faster route or Shorter route.
Use the optimised driving route — Open the
Settings tab, and select Drive > Route selection >
Optimised. The optimised driving route combines the
advantages of both the shorter and the faster routes.
You can also choose to allow or avoid using, for
example, motorways, toll roads, or ferries.
Get voice guidance
Voice guidance, if available for your language, helps
you find your way to a destination, leaving you free to
enjoy the journey.
Select Menu > Maps and Drive or Walk.
When you use drive or walk navigation for the first
time, you are asked to select the language of the voice
guidance, and download the appropriate files.
If you select a language that includes street names,
also the street names are said aloud. Voice guidance
may not be available for your language.
Change the voice guidance language — In t he mai n
view, select
> Navigation > Drive guidance or
Walk guidance and the appropriate option.
Repeat the voice guidance for car navigation — In
the navigation view, select Options > Repeat.
Adjust the volume of the voice guidance for car
navigation — In the navigation view, select
Options > Volume.
42
Ovi Maps
Page 43

Drive to your destination
When you need turn-by-turn directions while driving,
Maps helps you get to your destination.
Select Menu > Maps and Drive.
Drive to a destination — Select Set destination and
the appropriate option.
Drive to your home — Select Drive home.
When you select Drive home or Walk home for the
first time, you are prompted to define your home
location. To later change the home location, do the
following:
1. In the main view, select
.
2. Select Navigation > Home Location >
Redefine.
3. Select the appropriate option.
Tip: To drive without a set destination, select
Map. Your location is displayed on the centre of
the map as you move.
Change views during navigation — Swipe the
screen to select 2D view, 3D view, Arrow view, or
Route overview.
Obey all local laws. Always keep your hands free to
operate the vehicle while driving. Your first
consideration while driving should be road safety.
Camera
Your device supports an image capture resolution of
2592x1944 pixels (5 megapixels). The image
resolution in this guide may appear different.
To ensure good quality photos, wipe the camera lens
carefully with a cleaning cloth.
Activate the camera
To activate the camera, open the lens cover. If the
camera is active in the background, and the lens cover
is open, press the capture key to activate the camera.
Image capture
Capture images
When capturing an image, note the following:
43
Camera
Page 44

● Use both hands to keep the camera still.
● The quality of a digitally zoomed image is lower
than that of a non-zoomed image.
● The camera goes into battery saving mode if there
are no actions for about a minute. To continue
capturing images, select Continue.
● Keep a safe distance when using the flash. Do not
use the flash on people or animals at close range. Do
not cover the flash while taking a picture.
To capture an image with the main camera, do the
following:
1. To switch from video mode to image mode, if
necessary, select
> .
2. To capture an image, press the capture key. Do not
move the device before the image is saved and the
final image displayed.
Capture images with secondary camera — To
capture an image, select
. Do not move the device
before the image is saved and the final image
displayed.
To zoom in or out when capturing an image, use the
zoom slider.
To leave the camera open in the background and use
other applications, press the menu key. To return to
the camera, press and hold the capture key.
Location information
You can automatically add capture location
information to the file details of the captured material.
For example, in the Photos application, you can then
view the location where an image was captured.
Select Menu > Applications > Camera.
Add location information to all captured
material — Select Options > Settings > Show GPS
info > On. The location information is available only
for images captured with the main camera.
It may take several minutes to obtain the coordinates
of your location. The availability and quality of GPS
signals may be affected by your location, buildings,
natural obstacles, and weather conditions. If you share
a file that includes location information, also the
location information is shared, and your location may
be visible to third parties viewing the file. The device
requires network services to acquire location
information.
Location information indicators:
●
— Location information unavailable. GPS stays
active in the background for several minutes. If a
satellite connection is made and the indicator
changes to
within that time, all the images
captured and video clips recorded during that time
are tagged based on the received GPS positioning
information.
44
Camera
Page 45

● — Location information is available. Location
information is added to the file details.
Files with location information are indicated with
in
the Photos application.
Video recording
Record a video clip
1. To switch from image mode to video mode, if
necessary, select
> .
2. To start recording, press the capture key, or select
. A red record icon is displayed.
3. To pause recording, select Pause. To resume, select
Continue. If you pause recording and do not press
any key within one minute, the recording stops.
To zoom in or out, use the zoom keys.
4. To stop recording, press the capture key. The video
clip is automatically saved in Photos.
Photos
About Photos
With Photos, you can view images and video clips you
have captured and recorded, downloaded from the
web, received in a multimedia or e-mail message,
saved on a memory card, or copied to your device
memory from a memory card or other sources.
Select Menu > Photos and from the following:
● Captured — View all the images and video clips you
have captured and recorded.
● Months — View images and video clips categorised
by the month they were captured or recorded.
Applicable only for content captured or recorded
with your device.
● Albums — View the default albums and the ones
you have created.
● Tags — View the tags you have created for each
item.
● Share online — Post your images or video clips to
the web.
View images and videos
Select Menu > Photos.
45
Photos
Page 46

Images and video clips
can also be sent to you
from a compatible
device. To be able to
view a received image or
video clip in Photos, you
must first save it.
The images and video
clip files are ordered by
date and time. The
number of files is
displayed. To browse
the files, swipe up or
down.
To open a file, select the
file. To view the toolbar,
tap the image. To zoom in the image, use the zoom
slider. The zooming ratio is not stored permanently.
To edit an image or a video clip, select the file and
Options > Edit.
To view the details of an image, select Options >
Details.
To print your images on a compatible printer, select
Options > Print.
Photos toolbar
From the active toolbar, select the desired option. The
available options vary depending on the view you are
in and whether you have selected an image or a video
clip.
When viewing an image or a video clip in full screen
mode, tap the item to show the toolbar and the zoom
slider.
Select an image or a video clip and from the following:
Send the image or video clip.
Mark the image or video clip.
Upload the image or video clip to a compatible
online album (only available if you have set up an
account for a compatible online album).
Delete the image or video clip.
Rename the image or video clip.
View images as a slideshow.
Create a new album.
TV-out mode
To view the captured images and recorded video clips
on a compatible TV, use a Nokia Video Connectivity
Cable.
46
Photos
Page 47

Before viewing the images and video clips on a TV, you
may need to configure the TV-out settings and aspect
ratio.
To view images and video clips on a TV, do the
following:
1. Connect a Nokia Video Connectivity Cable to the
video input of a compatible TV.
2. Connect the other end of the Nokia Video
Connectivity Cable to the Nokia AV Connector of your
device.
3. You may need to select the cable mode.
4. Select Menu > Photos, and browse for the file you
want to view.
All audio, including
active calls, stereo
video clip audio,
keypad tones, and
ringing tone is
routed to the TV
when the Nokia
Video Connectivity
Cable is connected to the device. You can use the device
microphone normally.
For content other than video clips, the TV screen
displays what is displayed on the screen of your device.
Video clips are only displayed on the TV screen, not on
the device screen.
You can view images as a slide show on the TV. All items
in an album or marked images are displayed on the TV
in full screen mode while the selected music plays.
The quality of the TV image may vary due to differing
screen resolutions.
You cannot use the TV as the camera viewfinder in TVout mode.
Wireless radio signals, such as incoming calls, may
cause interference in the TV image.
Image print
You can print images from your device using a printer
compatible with PictBridge. You can only print images
that are in the JPEG file format.
To print images in Photos, camera, or image viewer,
mark the images, and select Options > Print.
Connect to printer
In the Print submenu, select whether you want to print
the image using Bluetooth connectivity or using a
compatible USB data cable.
If you want to print using a USB data cable, first connect
your device to a compatible printer using the USB data
cable, and select Image transfer as the USB
connection mode.
47
Photos
Page 48

Print preview
After you select the printer, the selected images are
displayed using predefined layouts.
To change the layout, scroll left or right to browse
through the available layouts for the selected printer.
If the images do not fit on a single page, scroll up or
down to display the additional pages.
To set the printer settings, select Options > Print
settings and from the following: To select the paper
size, select Paper size.
To select the print quality, select Print quality.
Music
Warning: Continuous exposure to high volume
may damage your hearing. Listen to music at a
moderate level, and do not hold the device near your
ear when the loudspeaker is in use.
For more information on the music player, radio and
podcasting, see the extended user guide on the
product support pages of the Nokia website.
Play a song or a podcast
Select Menu > Music > Music library.
To play a song or a podcast:
1. Select categories to navigate to the song or
podcasts you want to hear.
2. To play an item, select the item from the list.
To pause playback, tap ; to resume, tap .
To fast-forward or rewind, tap and hold
or .
To go to the next item, tap
. To return to the
beginning of the item, tap
. To skip to the previous
item, tap
again within 2
seconds after a song or
podcast has started.
To turn random play (
) on
or off, select Options >
Shuffle play.
To repeat the current item
(
), all items ( ), or to turn
48
Music
Page 49

repeat off, select Options > Repeat.
If you play podcasts, shuffle and repeat are
automatically turned off.
To modify the tone of the music playback, select
Options > Equaliser.
To modify the balance and stereo image or to enhance
the bass, select Options > Settings.
To return to the home screen and leave the player
playing in the background, press the end key.
To close the player, select Options > Exit.
Ovi Music
With Ovi Music (network service), you can search,
browse, purchase, and download music to your device.
The Ovi Music service will eventually replace the Music
store.
Select Menu > Music > Music store.
To download music, you first need to register for the
service.
Downloading music may involve additional costs and
the transmission of large amounts of data (network
service). For information about data transmission
charges, contact your network service provider.
To access Ovi Music, you must have a valid internet
access point in the device. You may be asked to select
the access point to use when connecting to Ovi Music.
Select the access point — Select Default access
point.
The availability and appearance of Ovi Music settings
may vary. The settings may also be predefined and you
may not be able to modify them. When browsing Ovi
Music, you may be able to modify the settings.
Modify Ovi Music settings — Select Options >
Settings.
Ovi Music is not available for all countries or regions.
FM radio
Listen to the radio
Select Menu > Music > Radio.
The FM radio depends on an antenna other than the
wireless device antenna. A compatible headset or
accessory needs to be attached to the device for the FM
radio to function properly.
When you open the application for the first time, you
can choose to have the local stations tuned
automatically.
To listen to the next or the previous station, select
or .
49
Music
Page 50

To mute the radio, select .
Select Options and from the following:
● Stations — View saved radio stations.
● Tune stations — Search for radio stations.
● Save — Save the radio station.
● Activate loudspeaker or Deactivate
loudspeaker — Turn the loudspeaker on or off.
● Alternative frequencies — Select whether you
want the radio to automatically search for a better
RDS frequency for the station if the frequency level
becomes low.
● Play in background — Return to the home screen
with the radio playing in the background.
Manage radio stations
Select Menu > Music > Radio.
To listen to saved stations, select Options >
Stations, and select a station from the list.
To remove or rename a station, select Options >
Stations > Options > Delete or Rename.
To set the desired frequency manually, select
Options > Tune stations > Options > Manual
tuning.
Videos
You can download and stream video clips over the air
from compatible internet video services (network
service) using a packet data or WLAN connection. You
can also transfer video clips from a compatible PC to
your device to view them.
Downloading videos may involve the transmission of
large amounts of data through your service provider's
network. Contact your service provider for information
about data transmission charges.
Your device may have predefined services.
Service providers may provide free content or charge a
fee. Check the pricing in the service or from the service
provider.
Download and view video
clips
Select Menu > Videos & TV.
50
Videos
Page 51

Connect to video services
To connect to a service to install video services, select
Video feeds > Video directory and the desired video
service.
To add a video feed manually, in the Video feeds view,
select Options > Add feed > Add manually.
View a video clip
To browse the content of installed video services,
select Video feeds.
The content of some video services is divided into
categories. To browse video clips, select a category.
To search for a video clip in the service, select Video
search. Search may not be available in all services.
Some video clips can be streamed over the air, but
others must be first downloaded to your device. To
download a video clip, select the Download icon.
Downloads continue in the background if you exit the
application. The downloaded video clips are saved in
My videos.
To stream a video clip or view a downloaded one, select
the Play icon. To view the control keys during playback,
tap the screen. To adjust the volume, use the volume
key.
Schedule downloads
Setting the application to download video clips
automatically may involve the transmission of large
amounts of data through your service provider's
network. For information about data transmission
charges, contact your service provider. To schedule an
automatic download for video clips in a service, select
Options > Schedule downloads. New video clips are
automatically downloaded daily at the time you
define.
To cancel scheduled downloads, select Manual
download as the download method.
Green tips
Save energy
You do not need to charge your battery so often if you
do the following (if available for your device):
51
Green tips
Page 52

● Close applications and data connections, for
example, your Bluetooth connection, when not in
use.
● Decrease the brightness of the screen.
● Set your device to enter power saver mode after the
minimum period of inactivity, if available in your
device.
● Deactivate unnecessary sounds, such as key tones.
Recycle
All materials of this device can be recovered as
materials and energy. For information on how to
recycle your old Nokia products, go to
www.nokia.com/werecycle, or using a mobile device,
nokia.mobi/werecycle.
Recycle packaging and user guides at your local
recycling scheme.
For more information on the environmental attributes
of your device, go to www.nokia.com/ecodeclaration.
Product and safety information
Accessories
Nokia original accessories
Warning: Use only batteries, chargers, and
accessories approved by Nokia for use with this
particular model. The use of any other types may
invalidate any approval or warranty, and may be
dangerous. In particular, use of unapproved chargers
or batteries may present a risk of fire, explosion,
leakage, or other hazard.
For availability of approved accessories, check with
your dealer.
An extensive range of accessories
is available for your device. For
more details, see
www.nokia.com.hk.
Practical rules about accessories
● Keep all accessories out of the reach of small
children.
52
Product and safety information
Page 53

● When you disconnect the power cord of any
accessory, grasp and pull the plug, not the cord.
● Check regularly that accessories installed in a vehicle
are mounted and are operating properly.
● Installation of any complex car accessories must be
made by qualified personnel only.
Battery
Type: BP-4L
Talk time:
Up to 360 minutes (WCDMA)
Standby:
Up to 385 hours (WCDMA)
Important: Battery talk and stand-by times are
estimates and only possible under optimal network
conditions. Actual battery talk and standby times
depend on SIM cards, features used, battery age and
condition, temperatures to which battery is exposed,
network conditions, and many other factors, and may
be significantly shorter than those specified above.
Ringing tones, hands free call handling, use in digital
mode, and other features will also consume the
battery, and the amount of time a device is used for
calls will affect its stand-by time. Likewise, the amount
of time that the device is turned on and in the standby
mode will affect its talk time.
Battery and charger
information
Battery and charger information
Your device is powered by a rechargeable battery. The
battery intended for use with this device is BP-4L.
Nokia may make additional battery models available
for this device. This device is intended for use when
supplied with power from the following chargers:
AC-10. The exact charger model number may vary
depending on the type of plug. The plug variant is
identified by one of the following: E, EB, X, AR, U, A, C,
K, or UB. For example, the model numbers for the
charger can be, among others, AC-10 etc.
The battery can be charged and discharged hundreds
of times, but it will eventually wear out. When the talk
and standby times are noticeably shorter than normal,
replace the battery. Use only Nokia approved batteries,
and recharge your battery only with Nokia approved
chargers designated for this device.
If a battery is being used for the first time or if the
battery has not been used for a prolonged period, it
may be necessary to connect the charger, then
disconnect and reconnect it to begin charging the
battery. If the battery is completely discharged, it may
take several minutes before the charging indicator
appears on the display or before any calls can be made.
53
Product and safety information
Page 54

Safe removal. Always switch the device off and
disconnect the charger before removing the battery.
Proper charging. Unplug the charger from the electrical
plug and the device when not in use. Do not leave a
fully charged battery connected to a charger, since
overcharging may shorten its lifetime. If left unused, a
fully charged battery will lose its charge over time.
Avoid extreme temperatures. Always try to keep the
battery between 15°C and 25°C (59°F and 77°F).
Extreme temperatures reduce the capacity and lifetime
of the battery. A device with a hot or cold battery may
not work temporarily. Battery performance is
particularly limited in temperatures well below
freezing.
Do not short-circuit. Accidental short-circuiting can
occur when a metallic object such as a coin, clip, or pen
causes direct connection of the positive (+) and
negative (-) terminals of the battery. (These look like
metal strips on the battery.) This might happen, for
example, when you carry a spare battery in your pocket
or purse. Short-circuiting the terminals may damage
the battery or the connecting object.
Disposal. Do not dispose of batteries in a fire as they
may explode. Dispose of batteries according to local
regulations. Please recycle when possible. Do not
dispose as household waste.
Leak. Do not dismantle, cut, open, crush, bend,
puncture, or shred cells or batteries. In the event of a
battery leak, prevent battery liquid contact with the
skin or eyes. If this happens, flush the affected areas
immediately with water, or seek medical help.
Damage. Do not modify, remanufacture, attempt to
insert foreign objects into the battery, or immerse or
expose it to water or other liquids. Batteries may
explode if damaged.
Correct use. Use the battery only for its intended
purpose. Improper battery use may result in a fire,
explosion, or other hazard. If the device or battery is
dropped, especially on a hard surface, and you believe
the battery has been damaged, take it to a service
centre for inspection before continuing to use it. Never
use any charger or battery that is damaged. Keep your
battery out of the reach of small children.
Important: Talk and standby times are
estimates only. Actual performance depends on many
factors such as network conditions, device settings
selected, device features being used (or running in the
background), battery condition and ambient
temperature. Making calls with the device affects the
standby time and the amount of time in standby mode
affects the talk time.
Nokia battery authentication
guidelines
Always use original Nokia batteries for your safety. To
check that you are getting an original Nokia battery,
54
Product and safety information
Page 55

purchase it from a Nokia authorised service centre or
dealer, and inspect the hologram label using the
following steps:
Authenticate hologram
1. When you look at the hologram
on the label, you should see the
Nokia connecting hands symbol
from one angle and the Nokia
Original Enhancements logo
when looking from another
angle.
2. When you angle the hologram
left, right, down and up, you
should see 1, 2, 3 and 4 dots on
each side respectively.
Successful completion of the steps
is not a total assurance of the
authenticity of the battery. If you
cannot confirm authenticity or if
you have any reason to believe that your Nokia battery
with the hologram on the label is not an authentic
Nokia battery, you should refrain from using it, and
take it to the nearest Nokia authorised service centre
or dealer for assistance.
To find out more about original Nokia batteries, see
www.nokia.com/batterycheck
Taking care of your device
Your device is a product of superior design and
craftsmanship and should be treated with care. The
following suggestions will help you protect your
warranty coverage.
● Keep the device dry. Precipitation, humidity, and all
types of liquids or moisture can contain minerals
that will corrode electronic circuits. If your device
does get wet, remove the battery, and allow the
device to dry completely before replacing it.
● Do not use or store the device in dusty, dirty areas.
Its moving parts and electronic components can be
damaged.
● Do not store the device in high or cold temperature.
High temperatures can shorten the life of electronic
devices, damage batteries, and warp or melt certain
plastics. When the device warms to its normal
temperature from a cold temperature, moisture can
form inside the device and damage electronic circuit
boards.
● Do not attempt to open the device other than as
instructed in this guide.
● Do not drop, knock, or shake the device. Rough
handling can break internal circuit boards and fine
mechanics.
● Do not use harsh chemicals, cleaning solvents, or
strong detergents to clean the device. Only use a
55
Product and safety information
Page 56

soft, clean, dry cloth to clean the surface of the
device.
● Do not paint the device. Paint can clog the moving
parts and prevent proper operation.
● Use only the supplied or an approved replacement
antenna. Unauthorised antennas, modifications, or
attachments could damage the device and may
violate regulations governing radio devices.
● Use chargers indoors.
● Backup all data you want to keep, such as contacts
and calendar notes.
● To reset the device from time to time for optimum
performance, power off the device and remove the
battery.
These suggestions apply equally to your device,
battery, charger, or any accessory.
Recycle
Always return your used electronic products, batteries,
and packaging materials to dedicated collection
points. This way you help prevent uncontrolled waste
disposal and promote the recycling of materials. Check
product environmental information and how to recycle
your Nokia products at www.nokia.com/werecycle, or
nokia.mobi/werecycle.
Additional safety information
Small children
Your device and its accessories are not toys. They may
contain small parts. Keep them out of the reach of small
children.
Operating environment
This device meets RF exposure guidelines in the normal
use position at the ear or at least 1.5 centimetres (5/8
inch) away from the body. Any carry case, belt clip, or
holder for body-worn operation should not contain
metal and should position the device the above-stated
distance from your body.
To send data files or messages requires a quality
connection to the network. Data files or messages may
be delayed until such a connection is available. Follow
the separation distance instructions until the
transmission is completed.
Parts of the device are magnetic. Metallic materials
may be attracted to the device. Do not place credit
cards or other magnetic storage media near the device,
because information stored on them may be erased.
Medical devices
Operation of radio transmitting equipment, including
wireless phones, may interfere with the function of
inadequately protected medical devices. Consult a
56
Product and safety information
Page 57

physician or the manufacturer of the medical device to
determine whether they are adequately shielded from
external RF energy. Switch off your device when
regulations posted instruct you to do so. Hospitals or
health care facilities may use equipment sensitive to
external RF energy.
Implanted medical devices
Manufacturers of medical devices recommend a
minimum separation of 15.3 centimetres (6 inches)
between a wireless device and an implanted medical
device, such as a pacemaker or implanted cardioverter
defibrillator, to avoid potential interference with the
medical device. Persons who have such devices should:
● Always keep the wireless device more than 15.3
centimetres (6 inches) from the medical device.
● Not carry the wireless device in a breast pocket.
● Hold the wireless device to the ear opposite the
medical device.
● Turn the wireless device off if there is any reason to
suspect that interference is taking place.
● Follow the manufacturer directions for the
implanted medical device.
If you have any questions about using your wireless
device with an implanted medical device, consult your
health care provider.
Hearing aids
Some digital wireless devices may interfere with some
hearing aids.
Vehicles
RF signals may affect improperly installed or
inadequately shielded electronic systems in motor
vehicles such as electronic fuel injection, electronic
antilock braking, electronic speed control, and air bag
systems. For more information, check with the
manufacturer of your vehicle or its equipment.
Only qualified personnel should service the device or
install the device in a vehicle. Faulty installation or
service may be dangerous and may invalidate your
warranty. Check regularly that all wireless device
equipment in your vehicle is mounted and operating
properly. Do not store or carry flammable liquids,
gases, or explosive materials in the same compartment
as the device, its parts, or accessories. Remember that
air bags inflate with great force. Do not place your
device or accessories in the air bag deployment area.
Switch off your device before boarding an aircraft. The
use of wireless teledevices in an aircraft may be
dangerous to the operation of the aircraft and may be
illegal.
57
Product and safety information
Page 58

Potentially explosive environments
Switch off your device in any area with a potentially
explosive atmosphere. Obey all posted instructions.
Sparks in such areas could cause an explosion or fire
resulting in bodily injury or death. Switch off the device
at refuelling points such as near gas pumps at service
stations. Observe restrictions in fuel depots, storage,
and distribution areas; chemical plants; or where
blasting operations are in progress. Areas with a
potentially explosive atmosphere are often, but not
always, clearly marked. They include areas where you
would be advised to turn off your vehicle engine, below
deck on boats, chemical transfer or storage facilities
and where the air contains chemicals or particles such
as grain, dust, or metal powders. You should check with
the manufacturers of vehicles using liquefied
petroleum gas (such as propane or butane) to
determine if this device can be safely used in their
vicinity.
Emergency calls
Important: This device operates using radio
signals, wireless networks, landline networks, and
user-programmed functions. If your device supports
voice calls over the internet (internet calls), activate
both the internet calls and the cellular phone. The
device will attempt to make emergency calls over both
the cellular networks and through your internet call
provider if both are activated. Connections in all
conditions cannot be guaranteed. You should never
rely solely on any wireless device for essential
communications like medical emergencies.
To make an emergency call:
1. If the device is not on, switch it on. Check for
adequate signal strength. Depending on your
device, you may also need to complete the
following:
● Insert a SIM card if your device uses one.
● Remove certain call restrictions you have
activated in your device.
● Change your profile from offline profile mode to
an active profile.
● If the screen and keys are locked, slide the lock
switch on the side of the device to unlock them.
2. Press the end key as many times as needed to clear
the display and ready the device for calls.
3. Open the dialler by selecting the dialler icon (
).
4. Enter the official emergency number for your
present location. Emergency numbers vary by
location.
5. Press the call key.
When making an emergency call, give all the necessary
information as accurately as possible. Your wireless
device may be the only means of communication at the
58
Product and safety information
Page 59

scene of an accident. Do not end the call until given
permission to do so.
Certification information (SAR)
This mobile device meets guidelines for exposure
to radio waves.
Your mobile device is a radio transmitter and receiver.
It is designed not to exceed the limits for exposure to
radio waves recommended by international
guidelines. These guidelines were developed by the
independent scientific organisation ICNIRP and include
safety margins designed to assure the protection of all
persons, regardless of age and health.
The exposure guidelines for mobile devices employ a
unit of measurement known as the Specific Absorption
Rate or SAR. The SAR limit stated in the ICNIRP
guidelines is 2.0 watts/kilogram (W/kg) averaged over
10 grams of tissue. Tests for SAR are conducted using
standard operating positions with the device
transmitting at its highest certified power level in all
tested frequency bands. The actual SAR level of an
operating device can be below the maximum value
because the device is designed to use only the power
required to reach the network. That amount changes
depending on a number of factors such as how close
you are to a network base station.
The highest SAR value under the ICNIRP guidelines for
use of the device at the ear is 0.66 W/kg.
Use of device accessories may result in different SAR
values. SAR values may vary depending on national
reporting and testing requirements and the network
band. Additional SAR information may be provided
under product information at www.nokia.com.
Limited Warranty
Nokia Corporation, represented by its Mobile Phones
Division ("Nokia") warrants that this Nokia cellular
product and/or genuine Nokia accessory ("Product") is
free from defects in material and workmanship,
according to the following terms and conditions:
1. The limited warranty for the cellular phone, data
product and all genuine Nokia accessories (except
battery packs) extends for the first twelve (12)
months beginning on the date of purchase of the
Product.
2. The limited warranty for genuine Nokia battery
packs extends for the first six (6) months beginning
on the date of purchase of the Product.
3. The limited warranty extends only to the original
consumer purchaser ("Consumer") of the Product
and is not assignable or transferable to any
subsequent purchaser/end user.
4. The limited warranty extends only to Consumers
who purchase the Product in one of the countries
(or areas) set forth at the end of this document. The
59
Product and safety information
Page 60

limited warranty is only valid in Nokia’s intended
country (or area) of sale of the Product.
5. During the limited warranty period, Nokia or its
authorised service network will repair or replace,
at Nokia’s option, any defective Product or parts
thereof with new or factory rebuilt replacement
items, and return the Product to the Consumer in
working condition. No charge will be made to the
Consumer for either parts or labor in repairing or
replacing the Product. All replaced parts, boards or
equipment shall become property of Nokia. The
external housing and cosmetic parts shall be free
of defects at the time of shipment and, therefore,
shall not be covered under these limited warranty
terms.
6. Repaired Product will be warranted for the balance
of the original warranty period or for ninety (90)
days from the date of repair, whichever is longer.
7. Upon request from Nokia or its authorised service
centre, the Consumer must provide purchase
receipt or other information to prove the date and
place of purchase.
8. Transportation, delivery and handling charges
incurred in the transport of the Product to and from
Nokia or its authorised service centre will be borne
by the Consumer.
9. The Consumer shall have no coverage or benefits
under this limited warranty if any of the following
conditions are applicable:
a) The Product has been subject to: abnormal use,
abnormal condition, improper storage,
exposure to moisture or dampness, exposure
to excessive temperature or other such
environmental conditions, unauthorised
modifications, unauthorised connections,
unauthorised repair including but not limited
to use of unauthorised spare parts in repairs,
misuse, neglect, abuse, accident, alteration,
improper installation, Acts of God, spill of foods
or liquids, maladjustment of customer controls
or other acts which are beyond of reasonable
control of Nokia, including deficiencies in
consumable parts such as fuses and breakage
or damage to antennas, unless caused directly
by defects in materials or workmanship, and
normal wear and tear of the Product.
b) Nokia was not notified by Consumer of the
alleged defect or malfunction of the Product
during the applicable limited warranty period.
c) The Product serial number or the accessory
date code has been removed, defaced or
altered.
d) The defect or damage was caused by defective
function of the cellular system or by inadequate
signal reception by the external antenna.
e) The Product was used with or connected to
accessory not supplied by Nokia, not fit for use
60
Product and safety information
Page 61

with Nokia cellular phones or used in other
than its intended use.
f) The battery was short circuited or seals of the
battery enclosure or cells are broken or show
evidence of tampering or the battery was used
in equipment other that for which is has been
specified.
10. If a problem develops during the limited warranty
period, the Consumer should take the following
step-by-step procedure:
a) The Consumer shall return the Product to the
place of purchase for repair or replacement
processing.
b) If "a" is not convenient, the Consumer may
contact the local Nokia office for the location of
the nearest authorised service centre.
c) The Consumer shall arrange for the Product to
be delivered to the authorised service centre.
Expenses related to removing the Product from
an installation are not covered under this
limited warranty.
d) The Consumer will be billed for any parts or
labor charges not covered by this limited
warranty. The Consumer shall be responsible
for expenses related to reinstallation of the
Product.
e) In case of certain operator specific features in
the Product such as SIM-lock, Nokia reserves
the right to refer the Consumer to the relevant
cellular operator before service will be
provided.
f) If the Product is returned to Nokia after the
expiration of the warranty period, Nokia’s
normal service policies shall apply and the
Consumer will be charged accordingly.
11. ANY IMPLIED WARRANTY OF MERCHANTABILITY, OR
FITNESS FOR A PARTICULAR PURPOSE OR USE, SHALL
BE LIMITED TO THE DURATION OF THE FOREGOING
WRITTEN WARRANTY. OTHERWISE, THE FOREGOING
WARRANTY IS THE PURCHASER’S SOLE AND EXCLUSIVE
REMEDY AND IS IN LIEU OF ALL OTHER WARRANTIES,
EXPRESS OR IMPLIED. NOKIA SHALL NOT BE LIABLE
FOR INCIDENTAL OR CONSEQUENTIAL DAMAGES OR A
LOSS OF ANTICIPATED BENEFITS OR PROFITS, LOSS OR
IMPAIRMENT OF PRIVACY OF CONVERSATIONS, WORK
STOPPAGE OR LOSS OR IMPAIRMENT OF DATA ARISING
OUT OF THE USE OR INABILITY TO USE THE PRODUCT.
12. The benefits conferred by this limited warranty are
in addition to all other rights and remedies under
any applicable mandatory legislation as may be in
force from country (area) to country (area).
13. Nokia neither assumes nor authorises any
authorised service centre or any person or entity to
assume for it any other obligation or liability
beyond that which is expressly provided for in this
limited warranty.
61
Product and safety information
Page 62

14. All warranty information, product features and
specifications are subject to change without
notice.
15. The countries (or areas) in which this limited
warranty is in force, subject to clause 4 above, are
Hong Kong SAR and Macau SAR.
Terms of use, OVI SERVICE
TERMS and privacy policy
Terms of Use
Thank you for choosing Nokia. By starting to use your
device you begin your exciting journey with us.
First use of your device
To access the wide range of Nokia’s Ovi services a Nokia
Account will be automatically created for you when you
first use your device. You then only need to add
personal user information when accessing the services
for the first time, after which you can manage your
Nokia Account online.
To help you to get the most out of your device and
services, you will start receiving free personalized text
messages from My Nokia with tips, tricks and support.
You may unsubscribe from these My Nokia messages
at any time by following the information on the
welcome message you receive shortly after activating
your device, or by clicking the My Nokia icon in your
device and selecting Unsubscribe.
Upon first use of your device and after you have
updated the Nokia device software an activation text
message will be sent to Nokia.
Software updates
If you update your Nokia device software the
information described above in this notice still applies.
To ensure you have the latest Nokia device software
and applications, your device checks the availability of
software updates from Nokia. If any are available you
will be prompted to approve their installation. You may
disable automatic checking for updates through
settings in your device. You may also install software
through available software update channels.
Other important information
By starting to use the device or when you update the
Nokia device software you accept the Ovi Service Terms
and Privacy Policy ("Terms") included in the sales box
or as otherwise made available to you.
To provide you with the services described above your
mobile number, device serial number and mobile
subscription identifiers will be sent to Nokia upon first
use of the device. Some or all of the above information
may also be sent to Nokia in connection with software
62
Product and safety information
Page 63

updates. This information may be used as further
specified in the Privacy Policy.
This notice is not applicable and the welcome screen
will not appear at first device use, if the service is not
available in your country, software version or selected
device language.
Normal charges for text messages and transmission of
data will apply.
OVI SERVICE TERMS
1. Acceptance
These Ovi Service Terms together with the Privacy
Policy (collectively “Terms”) govern your use of the
application or website where you accessed these Ovi
Service Terms and use of the related services
(collectively “Service”) and the Terms constitute an
agreement between you and Nokia Corporation
defining the rights and responsibilities of you and
Nokia Corporation including its affiliates and suppliers
(collectively “Nokia”) with respect to the Service. There
may be additional conditions applicable to certain
parts of the Service. You are not allowed to use the
Service if you do not agree to the Terms.
2. Eligibility
To use the Service, you must be at least thirteen (13)
years of age. If you are at least thirteen (13) years of
age but a minor where you live, you must review the
Terms and have your parent or legal guardian
complete the registration on your behalf for you to use
the Service. The person completing the registration
must be legally competent.
3. Registration and Termination
You agree to provide truthful and complete
information when registering for the Service and to
keep that information updated. Providing misleading
information about your identity is forbidden.
When you register, you will create a username and a
password. You (and your parent or legal guardian, if
you are a minor) are personally responsible for any use
of the Service with your username and password. You
agree to take due care in protecting your username
and password against misuse by others and promptly
notify Nokia about any misuse.
You may terminate your registration if you no longer
wish to use the Service. After termination, you will no
longer have access to the Service. Nokia may terminate
your registration or restrict your access to certain parts
of the Service if there is an indication that you have
breached the Terms or with a prior notice if you have
not signed into the Service with your username in the
past six (6) months. Except as set forth in Privacy Policy,
Nokia shall not be responsible for any removal of the
information or content you have submitted
(“Material”) from the Service when your registration is
terminated.
63
Product and safety information
Page 64

After the Material is removed from the Service by either
you or Nokia, some traces of the Material may remain
and copies of the Material may still reside within the
Service.
4. Using the Service
You agree to:
● Use the Service only for your private, non-
commercial purposes;
● Comply with applicable laws, the Terms and good
manners;
● Not submit unlawful, offensive, abusive,
pornographic, harassing, libelous or other
inappropriate Material;
● Respect the privacy of others;
● Obtain any consents, permission or licenses that
may be required for you to have the legal right to
submit any Material; and
● Not distribute or post spam, unreasonably large
files, chain letters, pyramid schemes, viruses or any
other technologies that may harm the Service, or the
interest or property of the Service users.
Nokia may but has no obligation to:
● Monitor or moderate any of the Material; and
● Remove any Material from the Service and restrict
access to any part of the Service at any time in its
sole discretion.
5. Allegations of Copyright Infringement
You may notify Nokia of copyright infringement on the
Service by providing notice (a) by email with
“Copyright Notification” in the subject line to
copyright. notices@nokia.com, (b) by a document
titled “Copyright Notification” mailed to Nokia, Attn:
Copyright Agent, 102 Corporate Park Drive, White
Plains, NY 10604, or (c) via the online form, if available.
Your notice must:
(1) Identify the original copyrighted work you claim is
infringed;
(2) Identify the content on the Service that you claim
is infringing the copyrighted work. Please provide
enough detail for Nokia to locate the allegedly
infringing content on the Service;
(3) Provide your contact information, including your
full name, mailing address, telephone number, and
email address, if available;
(4) Provide a statement that you have a good faith
belief that the use of the content in the manner
complained of is not authorized by the copyright
owner, its agent, or the law;
(5) Provide this statement: “I swear, under penalty of
perjury, that the information in this notification and
complaint is accurate and that I am the copyright
owner, or am authorized to act on behalf of the
copyright owner of an exclusive right that is
infringed.”; and
64
Product and safety information
Page 65

(6) Provide your signature.
6. Licenses
Nokia does not claim ownership in your Material. Your
submission of Material to the Service does not transfer
ownership rights in the Material to Nokia. However, by
submitting Material to the Service you grant Nokia a
worldwide nonexclusive, assignable, fully paid,
royalty-free, perpetual and irrevocable license to use,
copy, publicly perform, display, distribute and modify
the Material, and to prepare derivative works thereof,
or incorporate the Material into other works as well as
sublicense the same.
Users of the Service are granted a non-exclusive, nontransferable, revocable license (revocable at the sole
discretion of Nokia at any time) to access and use the
Service strictly in accordance with the Terms. Any
further intellectual property rights in any information
or content in the Service are not granted.
7. Fees
Your use of the Service may be or may become subject
to charges. Any fees charged by Nokia will be
announced separately in connection with the Service.
Use of the Service may involve transmission of data
through your service provider’s network. Your network
service provider may charge for such data
transmission.
Nokia assumes no responsibility for the payment of any
charges.
8. Availability
The Service may not be available in some countries and
may be provided only in selected languages. The
Service may be network dependent, contact your
network service provider for more information.
Nokia reserves the right, in its sole discretion, to
change, improve and correct the Service. The Service
may not be available during maintenance breaks and
other times.
Nokia may also decide to discontinue the Service or any
part thereof in its sole discretion. In such case you will
be provided a prior notification.
9. Dealings with Others
You may interact with other users on or through the
Service. You agree that any such interactions do not
involve Nokia and are solely between you and the other
user(s).
10. Personal Data
The Privacy Policy and additional provisions in these
Ovi Service Terms govern use of your personal data.
11. Limitation of Liability
65
Product and safety information
Page 66

The Service is provided on “AS IS” and “AS AVAILABLE”
basis. Nokia does not warrant that the Service will be
uninterrupted or error or virus-free. No warranty of any
kind, either express or implied, including but not
limited to warranties of title or non-infringement or
implied warranties of merchantability or fitness for a
particular purpose, is made in relation to the
availability, accuracy, reliability, information or
content of the Service. You expressly agree and
acknowledge that the use of the Service is at your sole
risk and that you may be exposed to content from
various sources.
Except for liability for death or personal injury caused
by gross negligence or intentional misconduct, Nokia
shall not be liable for any direct, indirect, incidental,
punitive or consequential damages caused by the use
or inability to use the Service.
12. Indemnification
You agree to defend, indemnify and hold harmless
Nokia from and against any and all third party claims
and all liabilities, assessments, losses, costs or
damages resulting from or arising out of i) your breach
of the Terms, ii) your infringement or violation of any
intellectual property, other rights or privacy of a third
party, iii) misuse of the Service by a third party where
such misuse was made available by your failure to take
reasonable measures to protect your username and
password against misuse.
13. Miscellaneous
13.1 Choice of Law and Arbitration
Except where prohibited by applicable law or provided
otherwise herein, the Terms shall be governed by the
laws of Finland without regard to its conflict of law
provisions.
If you are a US resident the following paragraph shall
apply: The Terms shall be governed by the laws of New
York without regard to its conflicts of law provisions.
Any dispute relating to these Terms or the Service shall
be submitted to binding arbitration in Westchester
County, New York within eighteen (18) months of the
date the facts giving rise to the suit were known, or
should have been known, by the complainant, except
that Nokia may seek injunctive or other relief if you
have violated or threatened to violate any intellectual
property rights. All matters relating to arbitration shall
be governed by the Federal Arbitration Act (9 U.S.C. §1
et. seq.). Arbitration shall be conducted by a single
arbitrator under the then prevailing Wireless
Arbitration Rules of the American Arbitration
Association (“AAA”), Each party must submit any claim
which would constitute a compulsory counterclaim in
litigation or such claim shall be barred. No award of
exemplary, special, consequential or punitive damages
shall be permitted. The losing party, as determined by
the arbitrator, shall pay the arbitration fees. The
arbitrator’s award shall be binding and may be entered
as a judgment and enforceable in any court of
66
Product and safety information
Page 67

competent jurisdiction. Arbitration shall be conducted
on an individual, not class-wide basis, and no
arbitration shall be joined with an arbitration
involving any other person or entity.
13.2 Validity
The Terms shall neither exclude nor limit any of your
mandatory rights in your country of residence. If a
provision of the Terms is found to be invalid, the
validity of the remaining provisions shall not be
affected and the invalid provision shall be replaced
with a valid provision that comes closest to the result
and purpose of the Terms. If there is any conflict
between these Ovi Service Terms and the Privacy
Policy, the provisions of these Ovi Service Terms shall
prevail. The provisions of the Terms that are intended
to survive termination shall remain valid after any
termination.
13.3 Changes in Terms
Nokia reserves the right to modify the Terms at any
time without prior notice. If the Terms are changed in
a material, adverse way, Nokia will provide a separate
prior notice advising of such change.
You are responsible for regularly reviewing the Terms.
Your continued use of the Service shall constitute your
consent to any changes and modifications.
13.4 Links to Third Party Sites and Content
For your easy accessibility Nokia may include links to
sites on the Internet that are owned or operated by
third parties and that are not part of the Service. Upon
following a link to such a third-party site, you shall
review and agree to that site’s rules of use before using
such site.
You agree that Nokia has no control over the content
of third-party sites and cannot assume any
responsibility for services provided or material created
or published by such sites. A link to a third-party site
does not imply that Nokia endorses the site or the
products or services referenced in the site.
In addition, users may create links within the Service
to content that has not otherwise been submitted to
the Service. You agree that Nokia is neither responsible
for nor liable for any such links.
14. Intellectual Property
The Service and related software are protected under
international copyright laws and you are hereby
notified that copyrights are claimed by Nokia. Subject
to the Terms, Nokia retains all right, title and interest
in the Service and in all Nokia’s products, software and
other properties provided to you or used by you
through the Service.
WE CARE ABOUT YOUR PRIVACY
Nokia is committed to protecting your privacy and to
comply with applicable data protection and privacy
laws. We hope that this Privacy Policy (“Policy”) helps
you understand what kind of information we collect in
67
Product and safety information
Page 68

connection with our products and services and how we
process such information. Throughout this Policy the
term “personal data” means information relating to an
identified or identifiable individual (i.e. a natural
person). “Nokia” refers to Nokia Corporation, including
its affiliates (also referred to as “we”, “us”, or “our”).
This Policy applies to personal data collected in
connection with products and services offered by
Nokia or from other interactions with us where a link
or other reference of incorporation to this Policy is
made, for example, in connection with our devices and
accessories, websites (also including mobile websites),
games, music and other types of services offered by
Nokia typically in electronic form, as well as other
services such as customer care and warranty services
or promotions and campaigns.
We may provide additional or amending privacy
information in connection with a particular Nokia
product or service. Such information prevails over this
Policy to the extent of any conflict. Our products or
services may contain links to other companies’
websites and other third party services that have
privacy policies of their own. We recommend that you
read the privacy policies of such services. Nokia is not
responsible for the privacy practices or contents of any
such services.
By using this website and/or by submitting
personal data to Nokia, you express your
agreement to the processing of your personal data
in the manner provided in this Policy. If you do not
agree with this Policy, please do not use this
website or provide Nokia with your personal data.
The Data We Collect
We collect your personal data typically when you make
a purchase, use or register into our services, enter into
a sales promotion or a campaign or otherwise interact
with us. We endeavour to collect personal data only
with your knowledge or consent. Below are examples
of the categories of data collected.
● Technical Information For the most part, you may
visit our websites or use our products or services
without having to tell us who you are. However,
certain technical information is normally collected
as a standard part of your use of our services. Such
information includes, for example, your IP-address,
access times, the website you linked from, pages
you visit, the links you use, the adbanners and other
content you viewed, information about your devices
and other such technical information your browser
provides us with or as may be otherwise collected
in connection with certain products and services.
When you use our services or otherwise interact
with us over telecommunications networks, certain
additional information, such as your mobile
telephone number, may be transmitted to us by the
telecommunications operator as a standard part of
that communication. Please also see the section
“Use of Cookies and Web Beacons” below.
68
Product and safety information
Page 69

● Information you provide us with When you
register for our services, make a purchase, enter a
sales promotion or otherwise interact with us, we
may ask you to provide us with information such as
your name, email address, street address, as well as
user names, passwords and other such credentials
that are used to authenticate users and to validate
their actions or that may be needed to provide you
with the products and services you have requested
or to communicate with you.
We may collect demographic information, for
example, your age, gender, postal code and
language preferences. We may also collect other
information you provide, such as your consents,
preferences and feedback, information relating to
your devices and other such information you
provide us with. Please note that certain nonidentifiable information collected from you may
become personally identifiable when you provide us
with your personal data. We may also obtain, in
accordance with applicable la w, so me p er so na l da ta
from list-rental companies and other such publicly
available sources. Some of our services may allow
you to submit information about other people, for
example, if you make an order for a product that you
wish us to send directly to another recipient.
● Your transactions with us We collect or ask for
information relating to your purchase and/or use of
our products and/or services and your other
interactions with us. Such information may include,
for example, details of the queries or requests you
have made, the products and services provided
(including delivery details), financial details
(including payments made, credit card details,
billing address, credit checks and other such
financial information), details of agreements
between you and Nokia, records of contacts and
communications, information and details relating
to the content you have provided us with and other
such transactional information. We may, in
accordance with applicable law, record your
communication with our customer care or with
other such contact points. Certain services may
involve the use of your location data. However, use
of your location data for such services is subject to
your consent.
The Purposes for which We Process Your Personal
Data
Nokia processes your personal data for the purposes
described in this Policy and/ or any additional service
specific privacy information. Please note that one or
more purposes may apply simultaneously.
● Provision of products and services We may use
your personal data to fulfill your requests, process
your order or as otherwise may be necessary to
perform or enforce the contract between you and
Nokia, to ensure the functionality and security of our
69
Product and safety information
Page 70

products and services, to identify you and to prevent
and investigate fraud and other misuses.
● Development of products and services We may
use your personal data to develop our products and/
or services. However, for the most part we only use
aggregate and statistical information in the
development of our products and services. We may
also use your personal data to personalize our
offering and to provide you with service more
relevant to you, for example, to make
recommendations and to display customized
content and advertising in our websites. We may
combine personal data collected in connection with
your use of a particular Nokia product and/or service
with other personal data we may hold about you,
except where such personal data was collected for
a different purpose. We may create aggregate and
statistical information based on your personal data.
● Communicating with you and marketing We
may use your personal data to communicate with
you, for example, to provide information relating to
our products and/or services you are using or to
contact you for customer satisfaction queries. We
may use your personal data for marketing or
research purposes, for example, to conduct market
research and we may, in accordance with applicable
law, contact you to inform you of new products,
services or promotions we may offer. Also, some of
our products and services may be used to promote
produc ts and servic es of other companies. However,
Nokia does not disclose your personal data to such
companies or any other company for marketing
purposes without your prior consent.
Sharing Your Personal Data
Generally, we do not sell, lease, rent or otherwise
disclose your personal data to third parties unless
otherwise stated below.
● Consent We may share your personal data if we
have your consent to do so. Some services may
include sharing your personal data with other users
of the service, for example services where users
publish their own content or Nokia user
communities.
● Nokia companies and authorized third
partiesWe may share your personal data with other
Nokia companies or authorized third parties who
process personal data for Nokia for the purposes
described in this Policy. Such parties are not
permitted to use your personal data for other
purposes, and we require them to act consistently
with this Policy and to use appropriate security
measures to protect your personal data.
● International transfers Our products and services
may be provided using resources and servers
located in various countries around the world.
Therefore your personal data may be transferred
across international borders outside the country
where you use our services, including to countries
70
Product and safety information
Page 71

outside the European Economic Area (EEA) that do
not have laws providing specific protection for
personal data or that have different legal rules on
data protection, for example, the United States of
America. In such cases we take steps to ensure that
there is a legal basis for such a transfer and that
adequate protection for your personal data is
pr ov id ed as r eq ui re d b y ap pl ic ab le law , f or exa mp le ,
by using standard agreements approved by relevant
authorities (where necessary) and by requiring the
use of other appropriate technical and
organizational information security measures.
● Mandatory disclosures We may be obligated by
mandatory law to disclose your personal data to
certain authorities or other third parties, for
example, to law enforcement agencies in the
countries where we or third parties acting on our
behalf operate. We may also disclose and otherwise
process your personal data in accordance with
applicable law to defend Nokia’s legitimate
interests, for example, in civil or criminal legal
proceedings.
● Mergers and Acquisitions If we decide to sell, buy,
merge or otherwise reorganise our businesses in
certain countries, this may involve us disclosing
personal data to prospective or actual purchasers
and their advisers, or receiving personal data from
sellers and their advisers.
Collecting the Data of Minors
Nokia does not seek to collect any information from or
engage in any transactions with persons under the age
of 13. Our databases may nevertheless contain
personal data of children under 13 due to the fact that
it is not always possible to determine precisely the age
of the user. Insofar as we ask you to provide your age,
we block the service from any person who is under 13
years of age. We will also make reasonable efforts to
clear our databases of personal data relating to under
age users.
Nokia’s policy is to request that minors (the legal age
of majority and therefore the age of minors is
determined by local law where you reside) do not make
purchases or engage in other legal acts on our products
and services without the consent of a parent or legal
guardian, unless otherwise permitted by applicable
law.
Data Quality
We take reasonable steps to keep the personal data we
possess accurate and upto- date and to delete out of
date or otherwise incorrect or unnecessary personal
data.
As certain Nokia products and services may allow you
to manage your profile, we encourage you to access
your personal data from time to time to ensure that it
is correct and up-to-date. Please remember that it is
your responsibility to provide us with correct details as
well as to update the personal data you have provided
us with in case of any changes.
71
Product and safety information
Page 72

Security
While there are always risks associated with providing
personal data, whether in person, by phone, via the
internet or otherwise, and no technology is completely
safe or “tamper” or ”hacker” proof, Nokia takes
appropriate technical and organizational information
security measures to prevent and minimize such risks.
Such measures include, where appropriate, the use of
firewalls, secure server facilities, encryption,
implementing proper access rights management
systems and processes, careful selection of processors
and other technically and commercially reasonable
measures to provide appropriate protection for your
personal data against unauthorized use or disclosure.
Where appropriate, we may also take back-up copies
and use other such means to prevent accidential
damage or destruction to your personal data. If a
particular part of a Nokia website supports on-line
transactions, we will use an industry standard security
measure, such as the one available through “Secure
Sockets Layer” (“SSL”), to protect the confidentiality
and security of online transactions.
Use of Cookies and Web Beacons
From time to time when you visit a Nokia website,
information may be placed on your computer to allow
us to recognize your computer. This information is
commonly in the form of a textfile known as a “cookie”.
Cookies are small pieces of data stored on your
computer’s hard drive, rather than on the website.
Typically, they enable collection of certain information
about your computer, including your internet protocol
(IP) address, your computer’s operating system, your
browser type and the address of any referring sites. Our
use of cookies is intended to provide benefits to you,
such as eliminating the need for you to enter your
password frequently during a session or the need to
re-enter items you place in a shopping cart if you do
not finish a transaction in a single visit. Cookies are also
used for website traffic analysis and anonymous
demographic profiling so that we may improve our
services.
Nokia may use so called web beacons (or “pixel tags”)
i n c on ne ct io n w it h s om e w eb si te s. Ho we ve r, we do no t
use them to identify individual users personally. Web
beacons are typically graphic images that are placed
on a website and they are used to count visitors to a
website and/or to access certain cookies. This
information is used to improve our services. Web
beacons do not typically collect any other information
than what your browser provides us with as a standard
part of any internet communication. If you turn off
cookies, the web beacon will no lo ng er be able to track
your specific activity. The web beacon may, however,
continue to collect information of visits from your IPaddress, but such information will no longer be unique.
If you do not wish to receive cookies, or want to be
notified before they are placed, you may set your web
browser to do so, if your browser so permits. Please
72
Product and safety information
Page 73

understand that if cookies are turned off, you may not
be able to view certain parts of this site that may
enhance your visit. Some of our business partners
whose content is linked to or from this site may also
use cookies or web beacons. However, we have no
access to or control over these cookies.
Your Rights
In case you wish to know what personal data we hold
about you or you wish to replenish, rectify, anonymize
or delete any incomplete, incorrect or outdated
personal data, or you wish us to cease processing your
personal data for the purpose of sending promotional
materials or direct marketing or for the performance
of market research or on other compelling legal
grounds, you may, as appropriate and in accordance
with applicable law, exercise such rights by contacting
us through the contact points referred to below. In
some cases, especially if you wish us to delete or cease
the processing of your personal data, this may also
mean that we may not be able to continue to provide
the services to you. We encourage you to use available
profile management tools for the above purposes as
such tools often provide you with direct access to your
personal data and allow you to effectively manage it.
Please note that Nokia may need to identify you and to
ask for additional information in order to be able to
fulfill your above request. Please also note that
applicable law may contain restrictions and other
provisions that relate to your above rights.
The Controller of Your Personal Data and Contact
Details
Nokia Corporation of Keilalahdentie 4, 02150 Espoo,
Finland shall be the controller of your personal data.
In addition, the Nokia affiliate providing the product
or service may be a controller of your personal data.
You may find the identity of the controller and its
contact details by reviewing the terms and conditions
of such a product or service or by using contact
information provided in the applicable Nokia websites.
In matters pertaining to Nokia’s privacy practices you
may also contact us at:
Nokia Corporation
c/o Privacy
Keilalahdentie 4
02150 Espoo
Finland
Changes to This Privacy Policy
Nokia may from time to time change this Privacy Policy
or change, modify or withdraw access to this site at any
time with or without notice. However, if this Privacy
Policy is changed in a material, adverse way, Nokia will
post a notice advising of such change at the beginning
of this Policy and on this site’s home page for 30 days.
We will assume you have accepted any such change
after the expiry of this 30 day period or if you continue
to use this site after such changes have been posted
73
Product and safety information
Page 74

and before such period has expired. If you do not
accept any such changes, please contact us by using the
contact details above and ask us to stop using your
personal data. We recommend that you re-visit this
Privacy Policy from time to time to learn of any such
changes to this Privacy Policy.
74
Product and safety information
Page 75

Index
A
access codes 11
access points 34
antennas 18
audio messages 31
B
battery
charging 19
inserting 16
saving power 12
Bluetooth 36
Bluetooth connectivity
device visibility 35
pairing devices 36
settings 35
turning on/off 35
browser
browsing pages 37
toolbar 38
C
calls 29
internet calls 30
camera
image mode 43
location information 44
video mode 45
charging the battery 19
connectors 14
contacts
editing 30
favourites 26
images in 30
saving 30
F
FM radio 49
G
general information 9
H
headset 19
help application 9
home screen 25, 26
contacts 26
music player 26
I
icons 26
indicators 26
internet browser 37
internet calls 29
log in 29
making 30
settings 30
internet connection 37
See also
browser
K
keyboard 22
keypad lock 23
keys 14, 15
L
lock code 11, 18
lock switch 23
locking
remotely 12
M
Maps 39
browsing 41
compass 40
driving routes 43
navigating 43
planning routes 41
positioning 40
voice guidance 42
75
Index
Page 76

memory
clearing 13
MMS (multimedia message
service) 31
multimedia messages 31
music player 26, 48
my music 48
N
Nokia original accessories 52
Nokia support information 9
O
offline profile 28
Ovi Music 49
P
photographs
See
camera
Photos 45
photos
toolbar 46
viewing 45
PIN code 11
pin code 18
PIN2 code 11
profiles 24
offline restrictions 28
personalisation 24
proximity sensor 28
PUK codes 11
R
radio 49
listening 49
stations 50
recording
video clips 45
remote locking 12
ringing tones 24
S
security code 11
settings
access points 34
Bluetooth connectivity 35
internet calls 30
side keys 15
SIM card
inserting 16
SMS (short message
service) 31
software updates 10, 11
songs 48
support 9
T
text input 22
text messages
sending 31
tones 24
top keys 14
touch screen 20, 28
transferring content 24
TV-out mode 46
U
updates 11
applications 10
device software 10, 11
UPIN code 11
UPUK code 11
USB charging 19
useful information 9
V
video
downloading 50
viewing 50
voice calls
See
calls
W
web browser 37
web connection 37
wireless LAN (WLAN) 33
WLAN (wireless local area
network) 33
76
Index
 Loading...