


© 2008 Nokia. All rights reserved.
Nokia, Nokia Connecting People, Nseries, N78, Navi, and Nokia Care are trademarks or registered trademarks of Nokia Corporation. Other product and
company names mentioned herein may be trademarks or tradenames of their respective owners.
Reproduction, transfer, distribution, or storage of part or all of the contents in this document in any form without the prior written permission of Nokia
is prohibited.
9205913/Issue 3

Keys and parts (front)
1 — Power key
2 — Nokia AV Connector (3.5 mm) for compatible
headsets, and headphones
3 — Earpiece
4 — Selection keys
5 — Call key
6 — Menu key
7 — Numeric keypad
8 — Microphone
9 — Navi™ wheel. Hereinafter referred to as the
scroll key.
10 — Clear key C
11 — Multimedia key
12 — End key
13 — Light sensor
14 — Secondary camera
3

Keys and parts (back)
1 and 9 — Stereo speakers with 3-D sound effect
2 — Zoom/Volume key
3 — 2-stage capture key for auto-focus, still image
capture, and video recording
4 — LED flash
4
5 — Main camera for high resolution (up to 3.2
megapixels) image capture and video recording
6 — Micro USB connector to connect to a compatible
computer
7 — Memory card slot for a compatible microSD card
8 — Charger connector
10 — Hole for a wrist strap

Insert (U)SIM card and battery
A USIM card is an enhanced version of the SIM card
and is supported by UMTS mobile phones.
Always switch the device off and disconnect the
charger before removing the battery.
1. With the back of the
device facing you,
press and hold the
release button and
lift up the cover.
2. Insert the SIM card
into the card holder.
Ensure that the
bevelled corner on the
card is facing toward
the slot, and that the
contact area on the
card is facing down.
3. Insert the battery.
4. To replace the cover,
direct the top locking
catch toward its slot
first and then press
down until the cover
locks into place.
5

Switch the device on
1. Press and hold the power key.
2. If the device asks for a PIN code
or lock code, enter it, and press
the left selection key. The
factory setting for the lock
code is 12345.
Your device has internal
antennas.
Note: Your device may
have internal and external antennas. As with any
radio transmitting device, avoid touching the
antenna unnecessarily when the antenna is in use.
Contact with such an antenna affects the
communication quality, may cause the device to
operate at a higher power level than otherwise
needed and may reduce the battery life.
1 — Bluetooth and wireless LAN antenna, and GPS
6
receiver
2 — FM transmitter antenna
3 — Cellular antenna
Note: The Bluetooth, WLAN, GPS, and FM transmitter
an tenna s are in the ba ck cove r of yo ur devi ce. If you
change the back cover, verify that you have a
genuine Nokia part intended for use with this
device, or these connections may stop working.

Memory card
Use only compatible microSD cards
approved by Nokia for use with this
device. Nokia uses approved industry
standards for memory cards, but some brands may
not be fully compatible with this device.
Incompatible cards may damage the card and the
device and corrupt data stored on the card.
Insert the memory card
Keep all memory cards out of the reach of small
children.
A memory card may be already inserted in the
device. If not, do the following:
1. Place your finger in the recess beside the door of
the memory card slot, and lift the door. Pull the
door to the left to reveal the hinge, and swing
the door to the side.
2. Insert a
compatible
memory card in
the slot. Make
sure that the
contact area on
the card is
facing down and
towards the
slot.
3. Push the card in.
You can hear a click
when the card
locks into place.
4. Push the hinge
back in, and close
the door. Ensure that the door is properly closed.
Eject the memory card
Important: Do not remove the memory card
in the middle of an operation when the card is being
accessed. Removing the card in the middle of an
operation may damage the memory card as well as
the device, and data stored on the card may be
corrupted.
1. Before you eject the card, press the power key,
and select Remove memory card. All
applications are closed.
7

2. When Removing memory card will close all
open applications. Remove anyway? is
displayed, select Yes.
3. When Remove memory
card and press 'OK' is
displayed, open the door of
the memory card slot.
4. Press the memory card to
release it from the slot.
5. Pull out the memory card. If
the device is switched on, select OK.
8

Charge the battery
1. Connect a compatible
charger to a wall
outlet.
2. Connect the power
cord to the device. If
the battery is
completely
discharged, it may
take a while before the charging indicator starts
scrolling.
3. When the battery is fully charged, the charging
indicator stops scrolling. Disconnect the charger
from the device, then from the wall outlet.
Tip: Disconnect the charger from the wall
outlet when the charger is not in use. A
charger that is connected to the outlet
consumes power even when it is not
connected to the device.
9
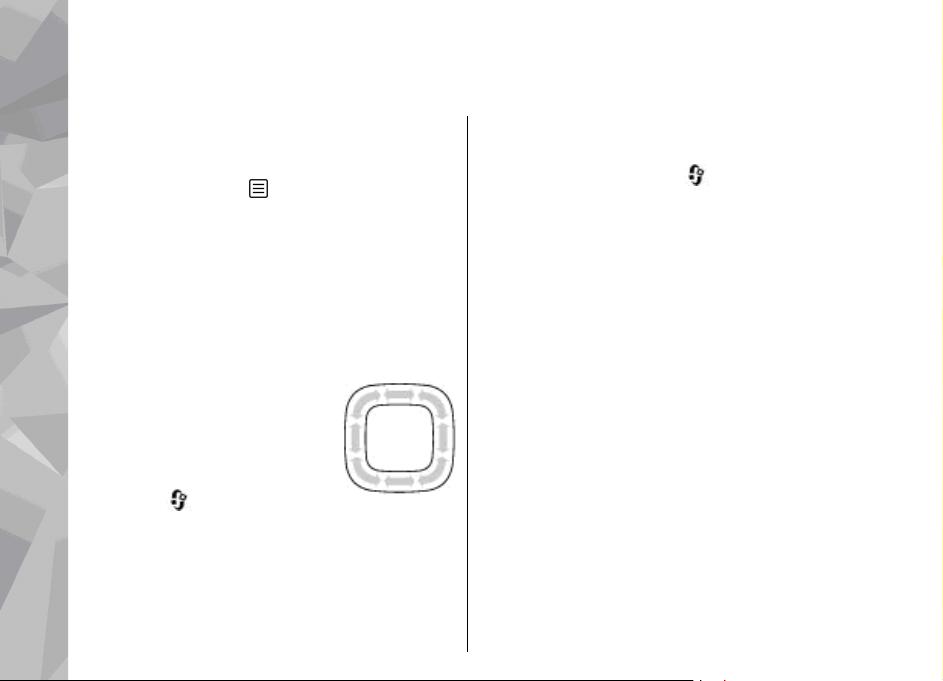
Navi™ wheel
Use the scroll key to move around the menus and
lists (up, down, left, or right). Press the scroll key to
select the action shown on top of the key or to show
the most used options
When the Navi™ wheel setting is switched on in the
settings, you can scroll quickly through Photos,
Music Player, Nokia Video Centre, Contacts, and
Messaging lists, or the multimedia menu.
1. Move the tip of your finger gently around the rim
of the scroll key clockwise or counterclockwise.
Keep moving your finger until scrolling starts on
the display.
2. To continue scrolling, slide your
finger around the rim of the
scroll key clockwise or
counterclockwise.
To turn the Navi wheel setting on
or off, press
Settings > General > Navi wheel > Navi wheel.
, and select Tools >
.
Sleep mode indicator
When the device is on standby, the rim inside the
Navi wheel lights up slowly. The light varies
10
periodically as if the device was breathing. The
breathing is quicker if there are missed calls or
received messages.
To turn off breathing, press
Settings > General > Navi wheel >
Breathing.
, and select Tools >

Shortcuts
To switch between open applications, press and
hold
background increases the demand on battery
power and reduces the battery life.
To open the multimedia menu to view your
multimedia content, press the multimedia key.
To start a web connection (network service), in the
standby mode, press and hold 0.
In many applications, to view the most common
option items (
To change the profile, press the power key, and
select a profile.
To switch between the General and Silent profiles,
in the standby mode, press and hold #. If you have
two phone lines (network service), this action
switches between the two lines.
To call your voice mailbox (network service), in the
standby mode, press and hold 1.
To open the last dialled numbers list, in the standby
mode, press the call key.
To use voice commands, in the standby mode, press
and hold the right selection key.
. Leaving applications running in the
), press the scroll key.
11

Lock the keypad
When the device or keypad is locked, calls may be
possible to the official emergency number
programmed into your device.
To lock the keys, press the left selection key, then
*.
To unlock the keys, press the left selection key, then
*.
You can set the keypad to lock automatically after a
time-out.
To illuminate the keypad in low light conditions,
briefly press the power key.
12

Wrist strap
1. Remove the back cover.
2. Thread a strap as shown and
tighten it.
3. Replace the cover.
13

Display indicators
The device is being used in a GSM network
(network service).
The device is being used in a UMTS network
(network service).
You have one or more unread messages in the
Inbox folder in Messaging.
You have received new e-mail in the remote
mailbox.
There are messages waiting to be sent in the
Outbox folder.
You have missed calls.
The ringing type is set to silent, and the message
alert tone and e-mail alert tone are set to off.
A timed profile is active.
The device keypad is locked.
A clock alarm is active.
The second phone line is being used (network
service).
All calls to the device are diverted to another
number (network service). If you have two phone
lines, a number indicates the active line.
14
A compatible microSD card is in the device.
A c om pa ti bl e heads et is co nn ected to th e d ev ic e.
A compatible text phone is connected to the
device.
A G PRS pa cket da ta conn ectio n is act ive (n etwork
service).
that a connection is available.
A packet data connection is active in a part of the
network that supports EGPRS (network service).
indicates the connection is on hold and that a
connection is available. The icons indicate that
EGPRS is available in the network, but your device is
not necessarily using EGPRS in the data transfer.
A UMTS packet data connection is active (network
service).
that a connection is available.
High-speed downlink packet access (HSDPA) is
supported and active (network service).
the connection is on hold and
is available.
and a wireless LAN is available (network service).
indicates the connection is on hold and
indicates the connection is on hold and
indicates
that a connection
You have set the device to scan for wireless LANs,

A wireless LAN connection is active in a
network that has encryption.
A wireless LAN connection is active in a network
that does not have encryption.
Bluetooth connectivity is on.
Data is being transmitted using Bluetooth
connectivity. When the indicator is blinking, your
device is trying to connect with another device.
A USB connection is active.
Synchronisation is in progress.
15

Positioning
The Global Positioning System (GPS) is a worldwide
radio navigation system that includes 24 satellites
and their ground stations that monitor the
operation of the satellites. Your device has an
internal GPS receiver.
A GPS terminal receives low-power radio signals
from the satellites and measures the travel time of
the signals. From the travel time, the GPS receiver
can calculate its location to the accuracy of metres.
The Global Positioning System (GPS) is operated by
the government of the United States, which is solely
responsible for its accuracy and maintenance. The
accuracy of location data can be affected by
adjustments to GPS satellites made by the United
States government and is subject to change with
the United States Department of Defense civil GPS
policy and the Federal Radionavigation Plan.
Accuracy can also be affected by poor satellite
geometry. Availability and quality of GPS signals
may be affected by your location, buildings, natural
obstacles, and weather conditions. The GPS receiver
should only be used outdoors to allow reception of
GPS signals.
Any GPS should not be used for precise location
16
measurement, and you should never rely solely on
location data from the GPS receiver and cellular
radio networks for positioning or navigation.
The GPS receiver is located in the top of the device.
Wh en usi ng t he rec eiver, make su re tha t yo u do no t
cover the antenna with your hand.
Establishing a GPS
connection may
take from a couple
of seconds to
several minutes.
Establishing a GPS
connection in a
vehicle may take
longer.
The GPS receiver
draws its power from the device battery. Using the
GPS receiver may drain the battery faster.
Your device also supports Assisted GPS (A-GPS)
(network service).
A-GPS is used to retrieve assistance data over a
packet data connection, which assists in calculating
the coordinates of your current location when your
device is receiving signals from satellites.

When you activate A-GPS, your device receives
useful satellite information from an assistance data
server over the cellular network. With the help of
assisted data, your device can detect satellites that
are closer to your device, which speeds up the
location calculation.
Your device is preconfigured to use the Nokia A-GPS
service, if no service provider-specific A-GPS settings
are available. The assistance data is retrieved from
the Nokia A-GPS service server only when needed.
Nokia Maps
With Maps, you can see your current location on the
map, browse maps for different cities and countries,
search for addresses and different points of interest,
plan routes from one location to another, and save
locations as landmarks and send them to
compatible devices. You can also purchase extra
services, such as guides and a turn-by-turn
navigation service with voice guidance.
Tip: Location information is automatically
added to the file details of an image if Record
location is set on in the camera settings. If
you want to see where the image was
captured on a map, open Photos.
Press
the first time, you may need to define an internet
access point for downloading map information for
your current location. To change the default access
, and select Maps. When you use Maps for
point later, select Options > Settings >
Network > Default access point.
Almost all digital cartography is inaccurate and
incomplete to some extent. Never rely solely on the
cartography that you download for use in this
device.
When you browse the map on the display, a new
map is automatically downloaded if you scroll to an
area which is not covered by maps already
downloaded. These maps are free of charge, but
downloading may involve the transmission of large
amounts of data through your service provider's
network. For more information on data
transmission charges, contact your service
provider.
To prevent the device from automatically
downloading maps through the internet, for
example, when you are outside your home cellular
network, select Options > Settings > Network >
Use network > Never.
Download maps
Nokia Map Loader is PC software that you can use to
download and install maps for different countries
from the internet to your device or a compatible
memory card (if inserted). You can also use it to
download voice files for turn-by-turn navigation. To
use Nokia Map Loader, you must first install it to a
compatible PC. You can download the PC software
17

at www.nokia.com/maps. Follow the instructions
on the screen.
18

Nokia Video Centre
With Nokia Video Centre (network service), you can
download and stream video clips over the air from
compatible internet video services using packet
data or WLAN. You can also transfer video clips from
a compatible computer to your device and view
them in Video centre.
Your device may have predefined services. Service
providers may provide free content or charge a fee.
Check the pricing in the service or from the service
provider.
1. To view video clips, press
centre.
2. To connect to a service, select Video directory
and the desired video service.
Select Video feeds. The device updates and
displays the content available in the service.
3. To view videos by categories (if available), scroll
down.
4. To view information about a video, select
Options > Video details.
5. Some video clips can be streamed over the air,
but others must be first downloaded to your
, and select Video
device. To download a video clip, select
Options > Download.
To stream a video clip or to view a downloaded
clip, select Options > Play.
Downloads continue in the background if you
exit the application. The downloaded videos are
saved in the My videos folder in Video centre.
19

Play music
To play a song:
1. Press
2. Select a song or a playlist.
3. To play the selected
files, press the scroll
key.
music at a moderate level.
Continuous exposure to
high volume may damage
your hearing.
To close the player, select
Options > Exit.
20
, and select Music > Music player.
Warning: Listen to

About the FM transmitter
The availability of this feature may vary by country.
At the time of printing, the FM transmitter part of
this equipment is intended to be used in the
following countries: Austria, Belgium, Bulgaria,
Czech Republic, Denmark, Estonia, Finland,
Germany, Iceland, Ireland, Lithuania, Liechtenstein,
Luxembourg, Malta, Netherlands, Norway, Portugal,
Spain, Switzerland, Sweden, Turkey and the United
Kingdom. For the latest information and the list of
non-European countries where the FM transmitter
can be used, see www.nseries.com/fmtransmitter.
Before using the feature in a foreign country, see
www.nseries.com/fmtransmitter to check if use is
permitted.
With the FM transmitter, you can play songs in your
device through any compatible FM receiver, such as
a car radio or a home stereo system.
The operating distance of the FM transmitter is up
to a maximum of 3 metres (10 feet). The
transmission may be subject to interference due to
obstructions, such as walls, other electronic devices,
or from public radio stations. The FM transmitter
may cause interference to nearby FM receivers
operating on the same frequency. To avoid
interference, always search for a free FM frequency
on the receiver before using the FM transmitter.
The FM transmitter cannot be used at the same time
as the FM radio of your device.
The operating frequency range of the transmitter is
from 88.1 to 107.9 MHz.
When the transmitter is on and transmitting sound,
is displayed in the standby mode. If the
transmitter is on, but not transmitting anything,
is displayed and a periodic tone sounds. If the
transmitter is not transmitting anything for several
minutes, it switches off automatically.
21

Play a song using FM transmitter
To play a song stored in your device through a
compatible FM receiver, do the following:
1. Press
2. Select a song or a playlist to be played.
3. In the Now playing view, select Options > FM
transmitter.
4. To activate the FM transmitter, set FM
transmitter to On, and enter a frequency that is
free from other transmissions. For example, if
the frequency 107.8 MHz is free in your area and
you tune your FM receiver to it, you must also
tune the FM transmitter to 107.8 MHz.
5. Tune the receiving device to the same frequency,
and select Options > Exit.
To adjust the volume, use the volume function in
the receiving device. Listen to music at a moderate
level. Continuous exposure to high volume may
damage your hearing.
To deactivate the FM transmitter, select Options >
FM transmitter, and set FM transmitter to Off.
If music is not played for several minutes, the
transmitter switches off automatically.
22
, and select Music > Music player.

Support
Issues with your device?
If you have issues with your device or you are unsure
how your device should function, see the online
support at www.nseries.com/support or your local
Nokia website at www.nokia.com, the Help
application in the device, or the user guide. If this
does not resolve your issue, try the following:
● Reset the device: switch off the device and
remove the battery. After a few seconds, replace
the battery, and switch on the device.
● Update your device software with Nokia
Software Updater. See www.nokia.com/
softwareupdate or your local Nokia website.
● Restore the original factory settings as explained
in the user guide. Your documents and files are
not deleted in the reset.
If the issue remains unresolved, contact Nokia for
repair options. See www.nokia.com/repair. Before
sending your device for repair, always back up or
make a record of data in your device.
Online
See www.nseries.com/support or your local Nokia
website for the latest guides, additional
information, downloads, and services related to
your Nokia product.
Tip: You can also access the support pages
from the web browser in your device.
Help
The help function provides instructions when using
the device. To access it from an application, select
Options > Help.
User guide
See the user guide for other important information
about your device.
23
 Loading...