

Nokia HS-13W User Manual

User Guide for Nokia Wireless Image Headset HS-13W
0903388
Issue 1
1

DECLARATION OF CONFORMITY
We, NOKIA CORPORATION declare under our sole responsibility that the product HS-13W is in
conformity with the provisions of the following Council Directive: 1999/5/EC.
A copy of the Declaration of Conformity can be found from http://www.nokia.com/phones/
declaration_of_conformity/.
Part No. 0903388, Issue No. 1
Copyright © 2005 Nokia. All rights reserved.
Reproduction, transfer, distribution or storage of part or all of the contents in this document in
any form without the prior written permission of Nokia is prohibited.
Nokia, Nokia Connecting People, Nokia HS-13W, and the Nokia Original Enhancements logos
are trademarks or registered trademarks of Nokia Corporation. Other company and product
names mentioned herein may be trademarks or trade names of their respective owners.
Bluetooth is a registered trademark of Bluetooth SIG, Inc.
The information contained in this user guide was written for the Nokia HS-13W product. Nokia
operates a policy of ongoing development. Nokia reserves the right to make changes to any of
the products described in this document without prior notice.
UNDER NO CIRCUMSTANCES SHALL NOKIA BE RESPONSIBLE FOR ANY LOSS OF DATA OR
INCOME OR ANY SPECIAL, INCIDENTAL, AND CONSEQUENTIAL OR INDIRECT DAMAGES
HOWSOEVER CAUSED. THE CONTENTS OF THIS DOCUMENT ARE PROVIDED "AS IS." EXCEPT AS
REQUIRED BY APPLICABLE LAW, NO WARRANTIES OF ANY KIND, EITHER EXPRESS OR IMPLIED,
INCLUDING, BUT NOT LIMITED TO, THE IMPLIED WARRANTIES OF MERCHANTABILITY AND
FITNESS FOR A PARTICULAR PURPOSE, ARE MADE IN RELATION TO THE ACCURACY AND
RELIABILITY OR CONTENTS OF THIS DOCUMENT. NOKIA RESERVES THE RIGHT TO REVISE THIS
DOCU MENT OR WI THDR AW IT AT AN Y TIM E WITHO UT PRIOR NOT ICE.
2

EXPORT CONTROLS
This device may contain commodities, technology, or software subject to export laws and
regulations from the U.S. and other countries. Diversion contrary to law is prohibited.
FCC/INDUSTRY CANADA NOTICE
Your device may cause TV or radio interference (for example, when using a telephone in close
proximity to receiving equipment). The FCC or Industry Canada can require you to stop using
your telephone if such interference cannot be eliminated. If you require assistance, contact
your local service facility. This device complies with part 15 of the FCC rules. Operation is
subject to the condition that this device does not cause harmful interference.
3

Contents
Contents
For your safety......................... 5
Introduction ............................. 7
Bluetooth wireless technology........... 7
Bluetooth passcode............................... 8
1. Overview............................... 9
Headset parts .......................................... 9
Standby and image modes............... 10
2. Get started ......................... 12
Charge the battery ............................. 12
Switch the headset on and off ....... 13
Pair the headset with your phone....13
3. Call functions..................... 14
Make a call ........................................... 14
Answer or reject a call....................... 16
Call waiting (network service) ........ 17
4
4. Menu usage........................ 18
Move in the menu............................... 18
Write with the text editor ................ 18
Enter the time, date, and passcode..20
5. Menu functions.................. 21
Call log (network service) ................. 21
Phone book ........................................... 22
Gallery .................................................... 28
Settings.................................................. 32
Keyguard................................................ 40
Battery information............... 41
Charging and Discharging ................ 41
Care and maintenance........... 42
FCC notice .............................. 43
Limited warranty.................... 44
For your safety
For your safety
Warning: This headset may affect your ability to hear sounds around you. Do
not use this headset in situations that may endanger your safety. To use any
features in this device, the device must be switched on. Do not switch the
device on when wireless device use may cause interference or danger.
Read these simple guidelines. Not following them may be dangerous or illegal.
Read the complete user guide for further information.
SWITCH ON SAFELY
Do not switch the device on when wireless phone use is prohibited or
when it may cause interference or danger.
INTERFERENCE
All wireless devices may be susceptible to interference, which could
affect performance.
SWITCH OFF IN HOSPITALS
Follow any restrictions. Switch the device off near medical equipment.
SWITCH OFF IN AIRCRAFT
Follow any restrictions. Wireless devices can cause interference in
aircraft.
SWITCH OFF WHEN REFUELING
Don't use the device at a refueling point. Don't use near fuel or
chemicals.
5
For your safety
SWITCH OFF NEAR BLASTING
Follow any restrictions. Don't use the device where blasting is in
progress.
QUALIFIED SERVICE
Only qualified personnel may repair this product.
CONNECTING TO OTHER DEVICES
When connecting to any other device, read its user guide for detailed
safety instructions. Do not connect incompatible products.
6

Introduction
Introduction
The Nokia Wireless Image Headset (HS-13W) uses Bluetooth wireless
technology to provide an easy way to manage calls and display your
favorite images.
The headset has its own memory for storing phone numbers and data.
Remember to make back-up copies or keep a written record of all
important information. Information stored on the headset is not stored on
your mobile phone.
You can carry your headset around your neck using the provided neck
strap, or attach it to your clothing with the clip on the back of the device.
Read this user guide carefully before using the headset. More detailed
information about general usage is given in the user guide of your mobile
phone. Do not use this user guide in place of the user guide of your phone,
since it provides important safety and maintenance information.
Note: There may be restrictions on using Bluetooth devices in some
locations. Check with your local authorities or service provider.
■ Bluetooth wireless technology
The Nokia HS-13W headset supports Bluetooth wireless technology,
which allows you to connect the headset to a compatible device within 10
meters (32 ft). The connection can be subject to interference from
obstructions such as walls or other electronic devices.
7

Introduction
This device is compliant with Bluetooth Specification 1.1 supporting the
following profiles: Generic Access Profile, Hands-Free Profile. Generic
Object Exchange Profile, Object Push Profile and File Transfer Profile. Profile
means a set of Bluetooth wireless technology commands that your phone
uses for controlling the headset. Check with the manufacturers of other
devices to determine their compatibility with this device.
■ Bluetooth passcode
You need a Bluetooth passcode to pair the HS-13W headset with
compatible devices. The passcode is 0000, and you cannot change it.
In addition, use the passcode to restrict the use of headset. For information on
entering the passcode, see "Enter the time, date, and passcode," page 20
8
Overview
1. Overview
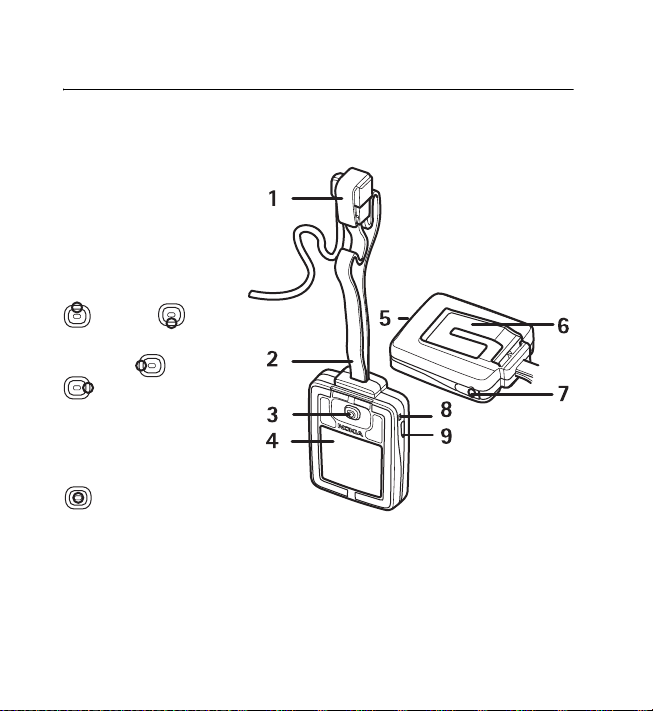
■ Headset parts
The headset has the
following parts and keys:
Earpiece clip (1)
Strap (2)
Joystick (3)—in the
standby mode, scroll up
or down to
access the phone book.
Scroll left or right
depending on the
guiding text (for
example, Menu and
Voice dial in the
standby mode). Press
to select.
Display (4), Buzzer (5),
Clip (6), Charger cover (7), and Microphone (8)
Power key (9)—a short press of the power key turns the display lights on
and allows you to turn the audio tones on or off.
9
Overview
■ Standby and image modes
The headset is in the standby mode when it is ready for use and you have
not opened the menu.
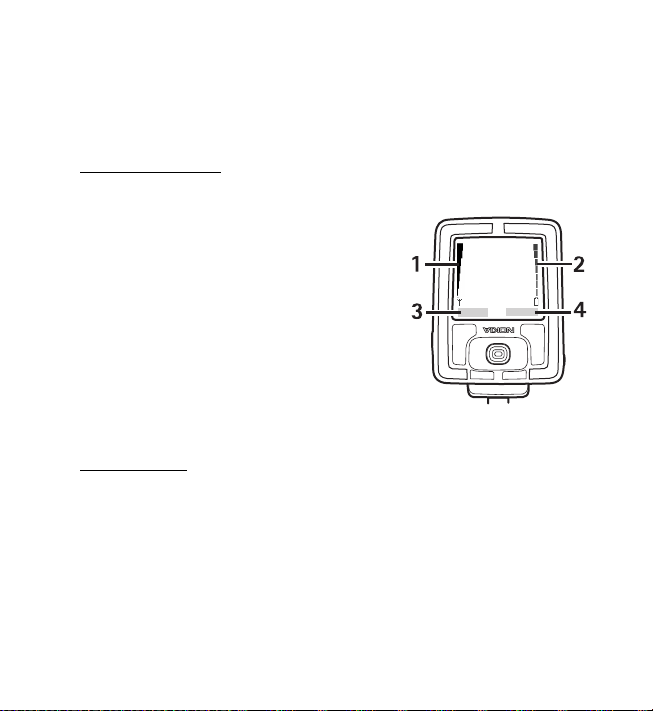
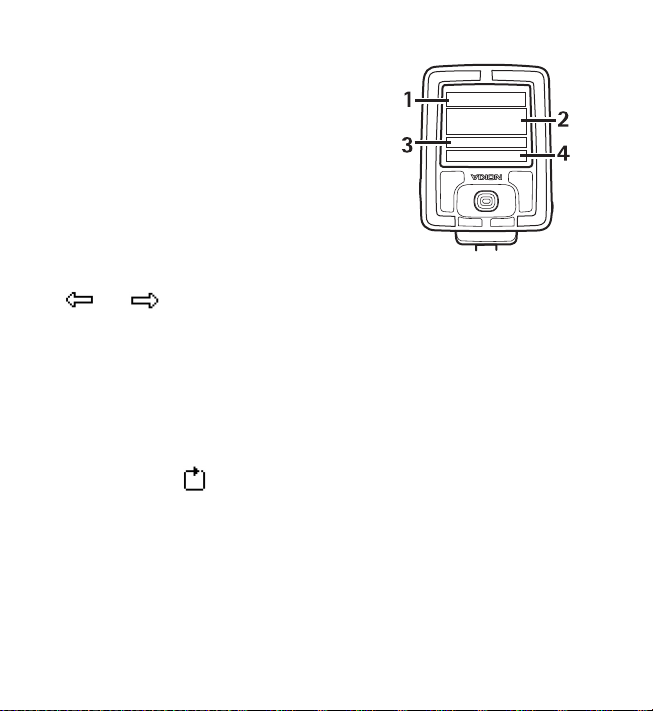
Display features
The display has the following features:
Signal indicator (1)—the higher the bar,
the greater the signal strength at your
current location.
Battery charge indicator (2)—the higher
the bar, the more power in the battery.
Left selection key (3)—in the standby mode
is Menu.
Right selection key (4)—in the standby
mode is Voice dial.
Image mode
The headset automatically activates the image mode when it has been in
the standby mode for 30 seconds, or when the keyguard is activated. See
"Keyguard," page 40.
The image mode is activated only if the Image mode is enabled. In the
image mode, the headset displays a single image, text, or a show stored in
the headset. To activate image mode and define the images displayed, see
"Image mode," page 36.
10
Overview
To exit the image mode, press the joystick.
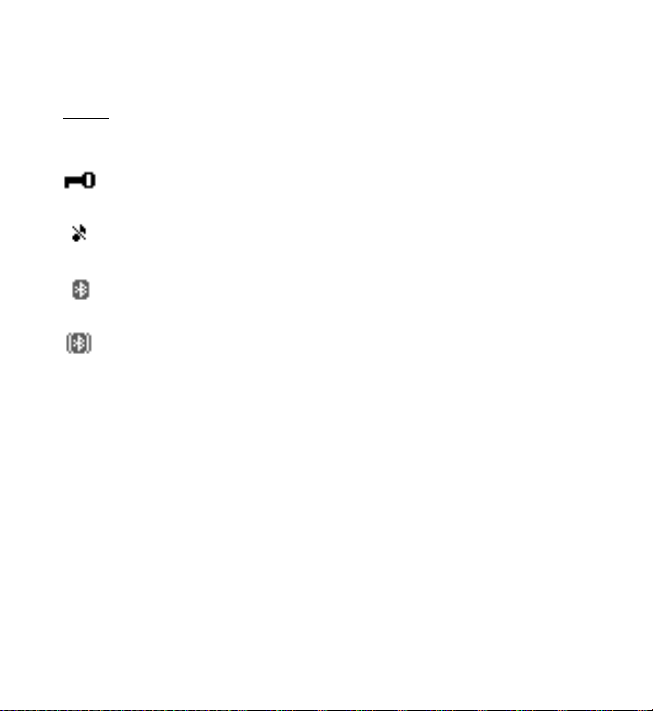
Icons
Icons indicate which features are active.
The keypad is locked. See "Keyguard," page 40.
The audio sounds of the headset are turned off. See "Tone
settings," page 37.
Bluetooth is on. See "Bluetooth connections," page 32.
The headset is connected to a device.
11
Get started
2. Get started
■ Charge the battery
The headset has an internal, nonremovable, rechargeable battery. Do not
attempt to remove the battery from the phone, as you may damage the
device. If the battery needs replacing, take it to your nearest authorized
service facility.
Check the model number of any charger before using with this device.
This device is intended for use when supplied with power from the Nokia
ACP-12, ACP-8, and LCH-12 chargers.
Warning: Use only batteries, chargers, and enhancements
approved by Nokia for use with this particular model. The use of
any other types may invalidate any approval or warranty, and may
be dangerous.
When you disconnect the power cord of any accessory, grasp and pull the
plug, not the cord.
Your device and its enhancements may contain small parts. Keep them
out of reach of small children.
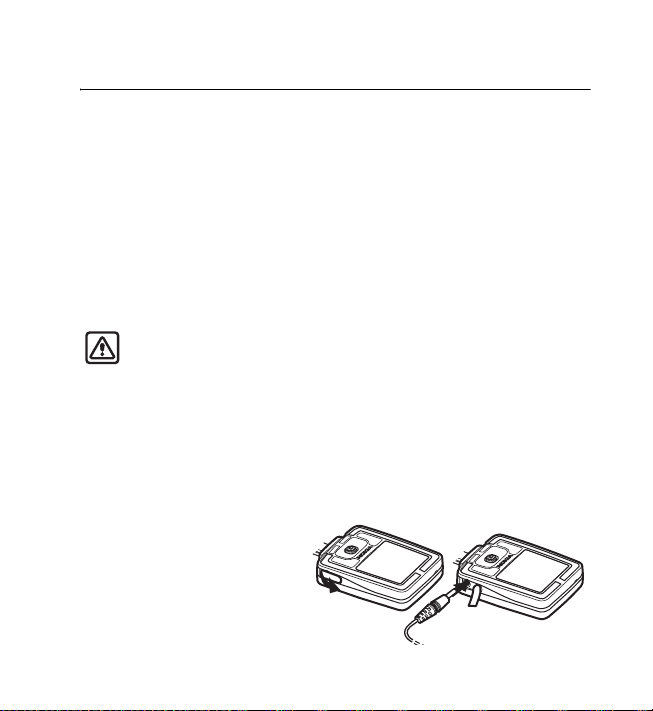
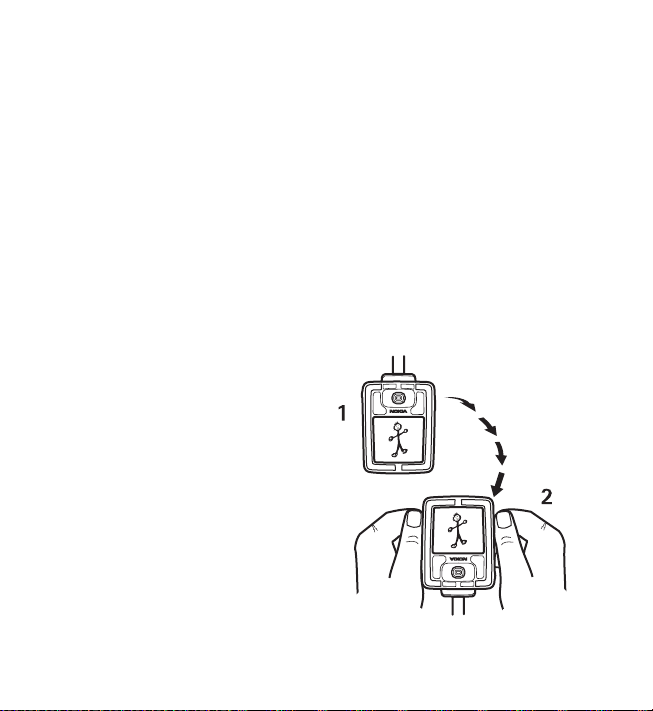
1. Connect the charger to a
wall socket.
12

Get started
2. Open the charger cover, and connect the lead from the charger to the
charger connector.
Charging is displayed briefly if the headset is switched on. The battery
charge indicator scrolls on the display until the battery is full. If the
battery is completely discharged, it may take a few minutes before the
indicator appears on the display.
You can use the headset while the charger is connected.
■ Switch the headset on and off
Press and hold the power key.
Bluetooth wireless technology is activated by default when the headset is
switched on for the first time.
Warning: Do not switch the device on when wireless use is
prohibited or when it may cause interference or danger.
■ Pair the headset with your phone
When you switch the headset on for the first time, you must pair it with
your mobile phone. Pairing is important, because each time you switch on
the headset, it automatically attempts to connect to the first device with
which you have paired.
Create a connection from your mobile phone to the headset using
Bluetooth wireless technology. Follow the instructions in the user guide
of your phone. The passcode of your headset is 0000.
13

Call functions
Copy the phonebook to the headset
If the mobile phone does not have the application needed to copy the
phone book to the headset, the headset automatically attempts to send it
to the phone the first time you connect the phone to the headset.
Approximately 30 seconds after the first Bluetooth wireless technology
connection is established, the headset displays Send contacts download
application to phone?, if the headset is in the standby mode. Press Yes.
If you want to send the application to the phone later, press No. See
"Download application," page 39.
After the application is successfully downloaded to the phone, you receive
a notification in the phone inbox. Install the application as instructed in
the notification. For more information on copying, see "Copy the phone
book to the headset," page 25.
3. Call functions
■ Make a call
You can make a call by voice dialing or by using the numbers stored in the
phone book or call log.
During a call, scroll up to increase or down to decrease the volume.
Use the phone book
1. Select Menu > Contacts > Names (or scroll down in the standby mode).
14

Call functions
2. Select the name or number you want, and Options > Call.
Use the call log
1. Select Menu > Call register > Dialled numbers, Missed calls, or
Received calls.
2. Select the name or number you want, and Options > Call.
Note: If you use the call log to make an international call, make
sure that the number has the correct international prefix and
country code.
Use voice dialing
The call log contains the last 10 missed, the last 10 received, and the last
20 numbers you called. See "Call log (network service)," page 21.
Before you use voice dialing, change the voice dialing language to the
language you speak. See "Voice dial settings," page 38.
1. Select Voice dial.
2. When the headset displays Speak now and sounds a tone, say the
name of the person you want to call.
The headset plays the voice tag of the name, displays the name and the
default number, and automatically makes the call after a short delay.
During the delay, press Quit to cancel the call, or to change the
number or person you are calling. If the displayed name is correct, but
you want to call a different number (for example, the home number
instead of the mobile phone number), scroll up or down to select the
15

Call functions
correct number. If the displayed name is wrong, press Change, and
select the correct name from a list of similar names.
Since the headset automatically generates a voice tag each time a name is
stored in the phone book, you do not need to separately record the voice tags.
Note: Using voice tags may be difficult in a noisy environment or
during an emergency, so you should not rely solely upon voice
dialing in all circumstances.
You can use voice dialing only if the name of the person you want to call
is in the phone book of the headset. The headset plays the voice tag only if
the voice tag playback is on. See "Voice dial settings," page 38.
End a call
1. To end the call or to cancel the call attempt, press End call.
2. If End call is not available when the call is muted, select Options >
End call.
■ Answer or reject a call
1. To answer or reject an incoming call, press Answer or Reject.
2. If the Answer and Reject options are not available, select Options >
Answer or Reject.
When somebody is calling you, the headset shows the caller’s name and
number, if known, or the text Call. If more than one name is found in the
headset phone book with the same phone number, only the phone number
is displayed.
16

Call functions
■ Call waiting (network service)
1. During a call, to answer a waiting call, select Answer or Options > Answer.
The first call is put on hold.
2. To end the active call, select Options > End call.
The call waiting function must be activated before you can use it. You can
activate the function from the paired mobile phone. See the user guide of
your mobile phone for more information, and to determine if your phone
is compatible.
17

Menu usage
4. Menu usage
The HS-13W headset offers an extensive range of functions, which are
grouped in menus. Most of the menu functions are provided with a brief
help text. To view the help text, scroll to the menu function you want, and
wait for 14 seconds. To exit the help text, press Exit. See "Help text
activation," page 35.
■ Move in the menu
1. Press Menu.
2. Scroll to select the function you want, and press Select.
3. If the menu contains submenus, select the submenu you want, and
press Select.
4. Press Back or Exit to return to the previous menu level and exit
the menu.
Press and hold Back to exit the menu regardless of your present
menu location.
■ Write with the text editor
When you need to insert data to the headset, a text editor is displayed.
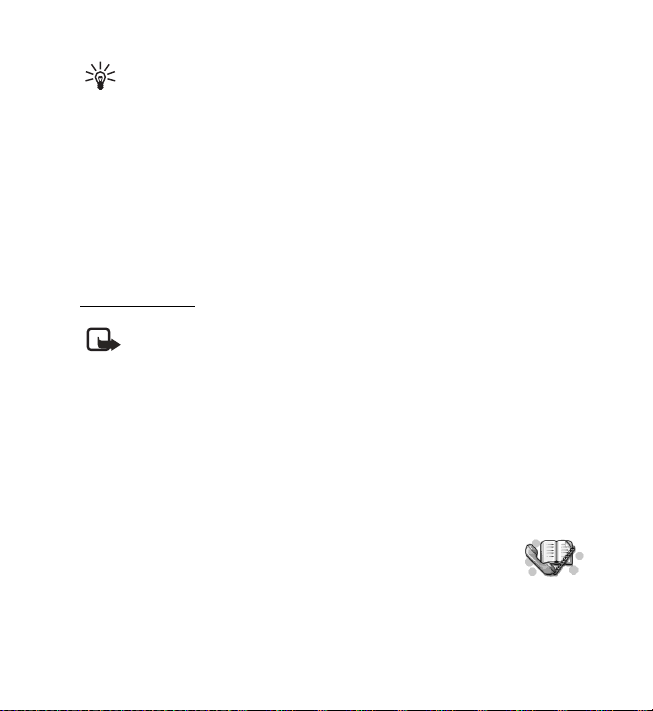
The main areas of the text editor screen are:
18
Menu usage
Prompt area (1) displays the objective
of the screen.
Editor area (2) displays the text you
have entered.
Character area (3) displays all the
characters you can select from. The content
of the list varies. If you are inserting a phone
number, only characters allowed in a phone
number are available.
Command area (4) displays all the available actions you can take. The
and icons allow you to move the cursor in the editor area.
Scroll up or down to move between the areas. Scroll left or right to move
within one area.
To insert data, do the following:
1. Select the editing mode (such as lowercase letters, uppercase letters,
and numbers):
• Scroll up or down to move to the command area, and scroll left or
right until is highlighted.
• Press the joystick repeatedly until the mode you want is shown at
the top of the screen.
2. Insert the first character:
Scroll up to move to the character area, and scroll left or right until the
correct character is highlighted. Press the joystick to select it.
The selected character is added to the editor area.
19

Menu usage
3. Repeat step 2 until you have inserted all the text you want.
4. To save the data, select Options in the command area, press the
joystick, and select Save.
To exit the editor without saving, select Options in the command area,
press the joystick, and select Exit editor.
■ Enter the time, date, and passcode
When you need to insert the time, date, or a passcode, a special editor
appears.
To enter the date, time, or a password, do the following:
1. Scroll up or scroll down until the desired number appears in the area
highlighted by the cursor.
2. Select Next to move to the next number, and repeat step 1.
3. Repeat step 2 until you have entered all the requested information.
4. Select OK to approve your entry, or Back to return to the menu
without saving your entry.
20

Menu functions
5. Menu functions
■ Call log (network service)
The headset logs the phone numbers and the approximate
length of the calls that have been missed, received, or dialed using the
headset. In addition, the call log contains the calls that have been missed
or received using the connected phone.
The headset logs missed and received calls only if the network supports
these functions, the headset and phone are switched on and within the
network service area, and the Bluetooth connection between the phone
and the headset is active.
When you press Options in the Missed calls, Received calls and Dialed
numbers menu, you can view the date and the time of the call.
Note: If you use the call log to make an international call, make
sure that the number has the correct international prefix and
country code.
Recent calls lists
Select Menu > Call register and one of the following:
Dialed numbers—to view the list of the last 20 phone numbers that you
have called or attempted to call.
Missed calls—to view the list of the last 10 phone numbers from which
somebody has tried to call you (network service).
21
Menu functions
Tip: When a note about missed calls is displayed, press List to
access the list of phone numbers. Scroll to the number you would
like to call back, and select Options > Call.
Received calls—to view the list of the last 10 phone numbers from which
you have accepted or rejected calls (network service).
Delete recent call lists—to delete the recent calls lists. Select whether
you want to delete all the phone numbers in the recent call lists, or only
those numbers in the missed calls, received calls, or dialed numbers lists.
You cannot undo the operation.
Call duration
Note: The actual invoice for calls and services from your service
provider may vary, depending upon network features, roundingoff for billing, taxes, etc.
Select Menu > Call register > Call duration.
Scroll to view the approximate duration of your incoming and outgoing
calls in hours, minutes, and seconds.
To clear the timers, you need the Bluetooth passcode. See "Bluetooth
passcode," page 8.
■ Phone book
You can save names and phone numbers in the phone book in
the headset memory.
You can save a maximum of 250 names, with 2 numbers for each name.
22

Menu functions
To access the phone book, select Menu > Contacts, or scroll up or down in
the standby mode.
Select the phone book view
To select how names and numbers are displayed, select Menu >
Contacts > Contacts view.
Save names and phone numbers
1. Select Menu > Contacts > Add new contact.
2. Enter the name, and save it.
See "Write with the text editor," page 18.
3. Enter the phone number, and save it.
4. Press Done.
The headset automatically creates a voice tag for the new name.
Save multiple numbers
You can save two types of phone numbers for each name in the phone book.
1. Select Menu > Contacts > Add number.
2. Select the name to which you want to add a new number, and Add.
3. Select number type: General, Mobile, Home, or Office.
4. Enter the phone number, and save it.
5. To return to the menu, press Back.
23

Menu functions
The first number saved is automatically set as the default number. When
you select a name from the phone book to call, the default number is used
unless you select another number. The default number is always at the top
of the list.
Change the default number
1. Select Menu > Contacts > Names.
2. Select the name you want, and Options > View details.
3. Select the number you want to set as the default number, and
Options > Set as default.
Edit a name
1. Select Menu > Contacts > Edit name.
2. Select the phone book entry you want to edit, and Edit.
To enter letters or numbers, see "Write with the text editor," page 18.
To play the voice tag to hear how the system pronounces the name of a
contact, select Options > Play voicetag.
Edit a number
1. Select Menu > Contacts > Names.
2. Select the name you want, and Options > View details.
3. Select the number you want to edit, and Options > Edit number.
24

Menu functions
Delete names and numbers
Select Menu > Contacts > Delete.
• To delete names and numbers one by one, select One by one, and scroll to
the name and number you want to delete. Select Delete > Yes to confirm.
• To delete names and numbers in the phone book all at once, select
Delete all. Confirm the deletion, and enter the Bluetooth passcode.
See "Bluetooth passcode," page 8.
Copy the phone book to the headset
You can copy names and phone numbers to the headset from the mobile
phone to which it is connected. You can copy either the whole phone book
or only selected names and numbers.
Only the name and the first two phone numbers are copied to the headset
phone book. All text items and additional phone numbers are ignored.
If your phone does not support file transfer profile (FTP) or have the phone
book download application, the headset must send the download
application to the phone to enable copying. If you did not send the
download application to the phone when you first connected the headset,
see "Download application," page 39.
The phonebook download application must be running when you copy
phone book entries from the mobile phone to the headset.
25

Menu functions
Note: If the same name is in the headset and the source memory,
and its name or number has changed in the source memory, then
the entry in the headset is deleted and replaced during the
copying process.
1. Select Menu > Contacts > Copy from phone.
If the headset is not connected to a phone or the phone does not
support this function, the Copy from phone menu is unavailable.
2. Select the source memory from which you want to copy: the internal
memory of the phone (Phone) or the SIM card memory (SIM card).
If your SIM card memory is not available, SIM card is unavailable.
3. Select All entries or Selected entries.
If the phone does not support the Selected entries function, the menu
item is unavailable.
If you select Selected entries, the headset displays the list of all names
in the source memory. Scroll through the list; to mark all the entries
you want to copy, press Mark. To delete a selection, press Unmark.
When finished, press Done.
4. To start copying, press OK. To stop the copying process, press Quit.
When the copying is finished, the headset display shows how many entries
were copied and how many were not. To exit the screen, press Back. The
headset automatically creates voice tags for all the copied names.
26

Menu functions
Send and receive a business card
You can send and receive a person’s contact information (business card)
using Bluetooth wireless technology.
Receive a business card
1. When you receive a business card to the headset, a notification
is displayed.
2. To view the business card, press Show.
To discard the business card, select Exit > OK.
3. To save the business card to the phone book of the headset, select
Options > Save.
Note: If you attempt to send a business card from a mobile phone
that is currently connected to your headset, and the phone does
not support multiple simultaneous Bluetooth connections, you
must disconnect from the phone, send the business card, and
then activate the connection again.
27
Menu functions
Send a business card
1. Search for the name and phone number you want to send from the
phone book, and select Options > Send bus. card.
2. The headset searches for compatible devices and displays them as a
list. Select the device to which you want to send the business card.
Note: If you attempt to send a business card to a mobile phone
that is currently connected to your headset and cannot see the
phone in the displayed list, you must disconnect from the phone,
send the business card, and then activate the connection again.
■ Gallery
You can save images, shows, and text items in the folders of
the Gallery.
Images and text files
To see the list of image or text files, select Menu > Gallery > Graphics or
Texts, the desired file, and Options.
Some of the following options are available:
Add (visible only in the Texts folder)—to create a new text file.
Edit (visible only in the Texts folder)—to edit an existing text file.
Open—to open the selected file.
Delete—to delete the selected file.
28
Menu functions
Send or Send images (visible only in the Graphics folder)—to send one or
several images files to a compatible device using Bluetooth wireless
technology. The headset searches for compatible devices, and displays
them as a list. Select the device to which you want to send the files.
If you select Send images, you must select the images to send. Scroll
through the list; mark all the images you want to send, and press Mark. To
delete a selection, press Unmark. When finished, press Save, and confirm
the selection.
Rename (visible only in the Graphics folder)—to give a new name to the file.
Set as wallpaper (visible only in the Graphics folder)—to have the
selected file displayed as wallpaper in the standby mode.
Set image mode—to have the selected file displayed in the image mode.
Image orientation—to set whether
the show is shown to other people
(1) or to you (2).
Font size (visible only in the Texts
folder)—to change the font size in
the text files.
Details (visible only in the Graphics
folder)—to see the details of the file
(for example, the name of the file).
Sort (visible only in the Graphics
folder)—to sort the files and folders
by name, date, or size.
29

Menu functions
Shows
The headset contains the following four preset shows and two shows you
can modify:
All images—shows all the images stored in the Graphics folder.
All texts—shows all the text files stored in the Texts folder.
My show1 and My show2— shows whose contents you can modify
(user-definable).
Digital clock—shows a digital clock with the current time.
Analog clock—shows an analog clock with the current time.
View and manage shows
1. Select Menu > Gallery > Shows.
2. Select the desired show, and select from the following options:
Open—to open a list of show files.
Select images—to add new images to a user-definable show. Scroll
through the list; mark all the images you want to add, press Mark. To
delete a selection, press Unmark. When finished, press Done, and save
the changes.
Select texts—to add new text files to a user-definable show. Scroll
through the list; mark all the text files you want to add, press Mark. To
delete a selection, press Unmark. When finished, press Done, and save
the changes.
Open in sequence—to view the show.
Clear—to delete all the images in a user-definable show.
30
 Loading...