

Page 1

Good Mobile
™
Messaging
Wireless Enterprise Messaging System
User’s Guide
Version 4.9 Beta
Page 2

User’s Guide (Last revised: 04/12/06)
Documentation complies with client software beta version 4.9
Copyright, trademark and patent information.
©Good Technology, Inc. 2001-2006. All rights reserved. All use subject to license terms
posted at www.good.com/legaldocs. Good, Good Technology, the Good logo, GoodInfo,
GoodAccess, GoodControl, Good Messaging Forms, Good Messaging and powered by
Good are trademarks of Good Technology, Inc. VeriSign(R) is a registered trademark of
VeriSign, Inc. All other trademarks and service marks contained herein are the property of
their respective owners. For example, Microsoft, Windows, Windows NT, Exchange and
Outlook are trademarks of Microsoft Corporation. RIM, Research in Motion, RIM 950, RIM
957, and BlackBerry are registered trademarks or trademarks of Research in Motion Limited.
Mobitex is a trademark of the Swedish Telecommunications Administration that may be
registered in some jurisdictions. Datalight is a registered trademark of Datalight, Inc.
FlashFX(tm) is a trademark of Datalight, Inc. Cingular, Cingular Wireless, the Cingular Icon,
Xpress Mail, and Xpress Mail with Good Messaging are trademarks of Cingular Wireless,
LLC. All rights reserved.
Some or all of the following notices may apply to portions of the software or documentation
provided by Good Technology, Inc.: Outside In®Wireless Export © 2001 Stellent Chicago,
Inc. All rights reserved. Copyright 1993-2001 Datalight, Inc., All Rights Reserved. U.S.
Patent Office 5,860,082. Code written by John Halleck is used with his permission. This distribution contains executables of the Netscape ® Security Service (NSS) and Netscape Portable Runtime (NSPR). You may obtain the source code for these files from www.mozilla.org,
which source files are subject to the Mozilla Public License 1.1. Part of the software embedded in this product is eCos - Embedded Configurable Operating System, a trademark of Red
Hat. Portions created by Red Hat are Copyright (C) 1998, 1999, 2000 Red Hat, Inc. (http://
www.redhat.com/). All Rights Reserved. THE SOFTWARE IN THIS PRODUCT WAS IN
PART PROVIDED BY RED HAT AND ANY EXPRESS OR IMPLIED WARRANTIES,
INCLUDING, BUT NOT LIMITED TO, THE IMPLIED WARRANTIES OF MERCHANTABILITY AND FITNESS FOR A PARTICULAR PURPOSE ARE DISCLAIMED BY RED
HAT. IN NO EVENT SHALL RED HAT BE LIABLE FOR ANY DIRECT, INDIRECT, INCIDENTAL, SPECIAL, EXEMPLARY, OR CONSEQUENTIAL DAMAGES (INCLUDING,
BUT NOT LIMITED TO, PROCUREMENT OF SUBSTITUTE GOODS OR SERVICES; LOSS
OF USE, DATA, OR PROFITS; OR BUSINESS INTERRUPTION) HOWEVER CAUSED
AND ON ANY THEORY OF LIABILITY, WHETHER IN CONTRACT, STRICT LIABILITY,
OR TORT (INCLUDING NEGLIGENCE OR OTHERWISE) ARISING IN ANY WAY OUT
OF THE USE OF THIS SOFTWARE, EVEN IF ADVISED OF THE POSSIBILITY OF SUCH
DAMAGE. You may obtain a copy of the source code of the eCos Original Code from http:/
/ www.redhat.com. You may obtain a copy of source code of Good Technology, Inc.'s Modifications that have been publicly released in Executable form by sending an email to support@good.com. The source code of the eCos Original Code and Good Technology, Inc.'s
Modifications are subject to the Red Hat eCos Public License Version 1.1 (copy available at
http://www.redhat.com/.)
Some or all of the following notices may also apply to portions of the software or documentation provided by Good Technology, Inc.: ScriptEase(tm) Javascript/ECMAScript interpreter developed by Nombas, Inc. All Rights Reserved. This product includes software
developed by the Apache Software Foundation (http://www.apache.org). Copyright (c)
2000-2003, The Apache Software Foundation and/or Yves Piguet. All rights reserved. Neither the name of Yves Piguet nor the names of its contributors may be used to endorse or
promote products derived from this software without specific prior written permission.
Licensed under the Apache License, Version 2.0 (the “License”); you may not use this file
except in compliance with the License. You may obtain a copy of the License at http://
www.apache.org/licenses/LICENSE-2.0 Unless required by applicable law or agreed to in
writing, software distributed under the License is distributed on an “AS IS” BASIS, WITHOUT WARRANTIES OR CONDITIONS OF ANY KIND, either express or implied. See the
License for the specific language governing permissions and limitations under the License.
Copyright (c)1999-2001 Dan Adler, 315 E72 St. NY, NY, 10021 USA. mailto: dana-
dler@rcn.com All rights reserved. The Jetty Package is Copyright Mort Bay Consulting Pty.
Ltd. (Australia) and others. Individual files in this package may contain additional copyright notices. The javax.servlet packages are copyright Sun Microsystems Inc. Copyright (c)
1990-2003 Sleepycat Software. All rights reserved. You may obtain a copy of the source code
for the DB software from http://www.sleepycat.com
of Good Technology, Inc.’s Modifications that have been publicly released in Executable
. You may obtain a copy of source code
ii User’s Guide
Use and Disclosure Governed by Good Technology, Inc. NDA
Proprietary and Confidential – Beta
Page 3

form by sending an email to support@good.com. Copyright ©1996-1999 Corporation
for National Research Initiatives; All Rights Reserved. Copyright (c) 1995-2000 by the
Hypersonic SQL Group. All rights reserved. Copyright (c) 2001-2002, The HSQL
Development Group. All rights reserved. Copyright 2002 (C) Nathaniel G. Auvil. All
Rights Reserved. Copyright (c) 1998-2000 World Wide Web Consortium (Massachusetts Institute of Technology, Institut National de Recherche en Informatique et en
Automatique, Keio University). All Rights Reserved. Copyright (c) 2001 MX4J. All
rights reserved. Copyright 1994-2005 Sun Microsystems, Inc. All Rights Reserved.
Copyright 1999,2000 Boris Fomitchev Copyright 1994 Hewlett-Packard Company
Copyright 1996, 97 Silicon Graphics Computer Systems, Inc. Copyright 1997 Moscow
Center for SPARC Technology. THIS SOFTWARE IS PROVIDED BY THE COPYRIGHT
HOLDERS AND CONTRIBUTORS “AS IS” AND ANY EXPRESS OR IMPLIED WARRANTIES, INCLUDING, BUT NOT LIMITED TO, THE IMPLIED WARRANTIES OF
MERCHANTABILITY AND FITNESS FOR A PARTICULAR PURPOSE ARE DISCLAIMED. IN NO EVENT SHALL THE COPYRIGHT OWNER OR CONTRIBUTORS
BE LIABLE FOR ANY DIRECT, INDIRECT, INCIDENTAL, SPECIAL, EXEMPLARY,
OR CONSEQUENTIAL DAMAGES (INCLUDING, BUT NOT LIMITED TO, PROCUREMENT OF SUBSTITUTE GOODS OR SERVICES; LOSS OF USE, DATA, OR
PROFITS; OR BUSINESS INTERRUPTION) HOWEVER CAUSED AND ON ANY
THEORY OF LIABILITY, WHETHER IN CONTRACT, STRICT LIABILITY, OR TORT
(INCLUDING NEGLIGENCE OR OTHERWISE) ARISING IN ANY WAY OUT OF
THE USE OF THIS SOFTWARE, EVEN IF ADVISED OF THE POSSIBILITY OF SUCH
DAMAGE.
Good Technology, Inc. may have patents or pending patent applications, trademarks,
copyrights or other intellectual property rights covering this subject matter. The
software and documentation do not give you any license to these patents, trademarks,
copyrights, or other intellectual property rights except as expressly provided in any
written license agreement from Good Technology, Inc. The software and
documentation may be covered by one or more patents as set forth at http://
www.rim.net/patents which have been licensed by Research in Motion, Ltd. (“RIM”)
to Good. RIM is not affiliated with, nor does RIM endorse the operability of, the
products or services described herein. Such patent license should not be construed as
exhausting RIM's rights to royalties or damages or other compensation or relief or the
grant of any express or implied license: (a) in relation to customer's use of third party
products (except to the extent that use of third party email applications arises as a
direct result of the customer using Good's products or services or the customer uses a
third party wireless personal digital assistant or network carrier services in
conjunction with Good's products or services); or (b) where customer or the supplier of
the wireless personal digital assistant or wireless network services asserts any
intellectual property rights against RIM notwithstanding the terms of clause (a) above,
and RIM has exercised its right to suspend all or a portion of the licenses granted to
Good.
Disclaimer
No part of this document may be reproduced or transmitted in any form or by any
means, electronic or mechanical, for any purpose, without the express written
permission of Good Technology, Inc. Information in this document is subject to
change without notice. This publication could include technical inaccuracies or
typographical errors. Good Technology may make improvements or changes in the
products or the programs described in this publication at any time.
User’s Guide iii
Proprietary and Confidential – Beta
Use and Disclosure Governed by Good Technology, Inc. NDA
Page 4

Good Technology, Inc.
4250 Burton Drive
Santa Clara, CA, 95054
Tel. (408) 327-6000 Fax (408) 327-6001
www.good.com
Be Good. Be Safe.
Please do not use while driving or engaged in any other activity that
requires your full attention.
iv User’s Guide
Use and Disclosure Governed by Good Technology, Inc. NDA
Proprietary and Confidential – Beta
Page 5

Contents
1Overview11
About Good Messaging 12
Features and Benefits 12
System Overview 14
How Good Messaging Changes Your Handheld 15
About Good Messaging Applications 17
For More Information 18
2 Getting Started 19
Using Good Messaging 19
Palm OS Handhelds 19
Windows Mobile Pocket PC Handhelds 22
Windows Mobile Smartphones 23
Symbian OS, Nokia Series 60 Handhelds 26
Turning the Handheld On and Off 28
The Handheld Battery 29
Extending Battery Life 29
Good Messaging and the Handheld Radio 30
Good Messaging and Your Phone 33
Making a Call 33
Dialing by Name 34
Using Speed Dial 34
User’s Guide v
Proprietary and Confidential – Beta
Use and Disclosure Governed by Good Technology, Inc. NDA
Page 6

Working Offline 35
Activating Data Transmission 35
Interaction with Wi-Fi 35
Resetting Your Handheld 36
Restoring the Good Messaging Applications 36
Entering Text 37
Entering Text on a Windows Mobile Smartphone 37
Cutting, Copying, and Pasting Text 39
Changing Dates and Times 39
Getting Help 40
3 Using Good Messaging Email 41
Creating Email Messages 41
Searching the Global Address List 43
Viewing Email Messages 45
Viewing Email Attachments 47
Viewing Digitally-Signed or Encrypted Messages 49
Replying to Email Messages 49
Responding to a Meeting Request 50
Viewing a Sender’s Email Address and Adding It to Your
Contacts 51
Finding Messages 52
Sorting Messages 52
Using Email Folders 53
Viewing Email Folders 54
Filing Email Messages in Folders 55
Deleting Email Messages 55
Setting Email and Display Options 56
Blocking Messages from a Sender 57
Synchronizing Messages Filtered to Other Folders 58
Notes on Synchronization 59
vi User’s Guide
Proprietary and Confidential – Beta
Use and Disclosure Governed by Good Technology, Inc. NDA
Page 7

4 Additional Applications 61
Contacts 62
Understanding the Company History Folder 63
Viewing Contacts 64
Finding Contacts 64
Editing Contacts 65
Deleting Contacts 65
Adding Contacts 66
Adding and Deleting Shared Folders 67
Setting Contact Options 68
Using Contacts with Other Applications 69
Calendar 70
Viewing Appointments 71
Adding New Appointments or Meetings 71
Changing Appointments 73
Setting Calendar Options 73
Notes/Personal Journal 74
Viewing and Editing Notes 74
Adding Notes/Journal Entries 74
Deleting Notes/Journal Entries 75
Tasks/To Do Lists 75
Viewing Tasks/To Do Lists 76
Adding New Tasks/To Do List 77
Editing Tasks/To Do Lists 78
Deleting Tasks/To Do Lists 78
Setting Task/Do List Options 78
GoodLink Forms Applications 79
Installing GoodLink Forms Applications 79
Using GoodLink Forms Applications 81
Deleting GoodLink Forms Applications 84
5 Preferences and Maintenance 85
Setting Good Messaging Preferences 86
User’s Guide vii
Proprietary and Confidential – Beta
Use and Disclosure Governed by Good Technology, Inc. NDA
Page 8

Backing Up Good Messaging 88
Using Notifications 89
Using Autotext 91
Data Storage and Aging 92
Software Updates and Policy Changes 94
Installing Additional Software 94
Updating Good Messaging and Other Applications 95
6 Keyboard Command Reference 99
Shortcuts for Palm OS Handhelds 99
Shortcuts for Windows Mobile Pocket PC Handhelds 100
Shortcuts on Windows Mobile Smartphones 101
Shortcuts on Symbian OS, Nokia
Series 60 Handhelds 102
A Wireless Setup 103
Memory Requirements 104
Procedure Overview 106
Installing Good Messaging for the First Time 106
Index 111
viii User’s Guide
Proprietary and Confidential – Beta
Use and Disclosure Governed by Good Technology, Inc. NDA
Page 9
1 Overview
Welcome to Good Mobile Messaging, the behind-the-firewall,
wireless corporate email and data access system from Good
Technology. Good Messaging enables mobile professionals to access
their corporate email, PIM (Personal Information Management), and
enterprise data wirelessly while away from the office.
Good Messaging on Windows
Mobile, PPC
Good Messaging on
Windows Mobile,
Smartphone
Good Messaging on
Symbian OS, Nokia
Series 60
Good Messaging on
Palm OS
User’s Guide 11
Proprietary and Confidential – Beta
Use and Disclosure Governed by Good Technology, Inc. NDA
Page 10

Overview
About Good Messaging
Good Messaging provides mobile users with a wirelessly
synchronized connection to their company servers, so they can
instantly access up-to-date corporate email, attachments, contacts,
calendar, notes, tasks, public folders, and critical enterprise data
when away from their desks.
Good Messaging‘s enterprise-class solutions are available on a variety of
handhelds. Good Messaging is a complete encrypted wireless system for
accessing corporate messaging and data from behind the firewall on the
mobile handheld.
The complete Good Messaging system includes:
• The Good Messaging Client, supporting a broad number of
handhelds
• The Good Messaging Server, an easy-to-install enterprise class
application allowing for elegant fleet management/global policy
control and remote security enforcement of wireless
synchronization
Features and Benefits
The Good Messaging application software runs on the following
handheld types:
• Palm OS Treo 600 and 650 handhelds
• Windows Mobile 2003 and 5.0 Pocket PC and Smartphone
handhelds (including Treo 700w)
• Symbian OS Nokia Series 60 handhelds.
Good Messaging is fully compatible with the Microsoft® Outlook®
and Lotus® Notes® environment.
12 Overview
Proprietary and Confidential – Beta
Use and Disclosure Governed by Good Technology, Inc. NDA
Page 11

Features and Benefits
The following are some of the key features and benefits of Good
Messaging:
• Wireless corporate email and data—Extends all the capabilities of
Microsoft Outlook or Lotus Notes and data access to a wireless
handheld, including email, attachments, calendar, contacts, public
folders, notes, journal, to do items, and tasks.
• Up-to-date — Two-way wireless synchronization between the
handheld and Microsoft Exchange Server® or Lotus Domino
Server based data to ensure that mobile users are up-to-date - no
cradle required.
• Thin-client access to corporate data—Optional Good Messaging
Forms™ wireless information system leverages existing Webenabled applications and is optimized for wireless. This feature is
only available on supported Palm handhelds.
• One-touch simplicity —Ensures that actions taken by the user,
whether on the handheld or on the desktop, are mirrored. Delete a
message and it is deleted everywhere.
• Integrated attachment viewing and forwarding —Microsoft
Office® (*.doc, *.ppt, *.xls), Adobe Acrobat® (*.pdf), Word
Perfect® (*.wpd), HTML (*.htm and .html), Rich Text (*.rtf),
message (*.msg), sound (.wav, .mp3, etc.), image (.bmp, .png, etc.),
and plain text (*.txt). Displays attachments with original
formatting, or with plain text formatting when no capable viewer
is installed. If no viewer is installed, a download option is
available to save the file. This feature is not available on all
handhelds.
• Enterprise-class, end-to-end system—Encrypted and reliable
wireless access to corporate email and data from behind the
firewall to the handheld.
• Reliable message delivery—Uses Positive Acknowledgement
Architecture to confirm message delivery every time.
User’s Guide 13
Proprietary and Confidential – Beta
Use and Disclosure Governed by Good Technology, Inc. NDA
Page 12

Overview
• Zero desktop install option—Eliminates the need for desktop
deployment, dramatically lowering the cost and time required to
deploy and maintain a fleet of users. No cradle-based or cablebased synchronization is required.
• Multi-handheld and multi-network—Enables handheld and
network choices for the future.
• Multi-purpose—Converges phone and data service capabilities in
standard operating-system environments that support your other
required handheld applications.
System Overview
Your handheld works in conjunction with your email server and
Good Messaging Server software on your corporate network.
After being set up for use, your handheld, when turned on, connects
wirelessly with your corporate network using high-speed wireless
network service supported by your handheld. Good Messaging
works with many domestic and international wireless carriers.
Good Messaging Service synchronizes your handheld with your
email, calendar, contacts, notes, journal, tasks, to do items, and
folders stored on your corporate email server, just as the Outlook or
Lotus Notes application synchronizes your desktop computer with
your email server. In this way, your Outlook or Lotus Notes and
handheld folders present the same information. (Personal folders
stored on your PC hard disk are not synchronized.)
Handheld setup instructions in this guide assume your IT
administrator has set up your handheld for use, installed Good
Messaging Server software on your network, and added your
handheld to Good Messaging Server. Refer to Figure A, “Wireless
Setup,” on page 103 for more information.
14 Overview
Proprietary and Confidential – Beta
Use and Disclosure Governed by Good Technology, Inc. NDA
Page 13

How Good Messaging Changes Your Handheld
How Good Messaging Changes Your
Handheld
Your handheld guide describes your handheld before it has been set
up for use with Good Messaging software. In most cases, the guide
remains accurate after the handheld has been set up. The following
sections describe how Good Messaging may change your handheld’s
behavior.
Palm OS Handhelds
• If your Palm OS guide describes Email, Calendar, Contact, and
Task applications, use this guide instead.
• In Treo 600 Preferences, the Sun key (also called Power button)
on the front panel is now set to display the Good Messaging
Today screen.
• In Treo 650 and 700w Preferences, the Side key on the left side of
the handheld is now set to display the Good Messaging Today
screen.
• The handheld radio is used for Good Messaging applications, as
well as for the phone and Internet. When a Good Messaging data
connection is established via the radio, the word “Data” is added
to the radio-strength indicator on-screen.
• When the Caller ID and Speed Dial features link to your contacts,
the Good Messaging Contacts application is used.
Windows Mobile 2003 Handhelds
• Access to the Good Messaging applications is added to the Today
screen.
• Hardware buttons, if any, that connect to calendar, contacts, and
email, will now connect to the Good Messaging versions of these
applications.
• Email status and upcoming appointments are added to the Today
window.
User’s Guide 15
Proprietary and Confidential – Beta
Use and Disclosure Governed by Good Technology, Inc. NDA
Page 14

Overview
• If your handheld guide describes email, calendar, contact, and
task applications, the applications are still available, but you’ll use
this guide instead for the Good Messaging versions of these
applications.
• When the Caller ID and Speed Dial features link to your contacts,
the Good Messaging Contacts application is used.
Windows Mobile 5.0 Handhelds
• Access to the Good Messaging applications is added to the Home
screen.
• Hardware buttons that connect to Calendar, Contacts, and Email,
will now connect to the Good Messaging versions of these
applications.
• Email status, text messages, and upcoming Calendar
appointments are added to the Home screen.
• SMS (text) messages can be accessed through the Messaging menu
and you can send an SMS message from within Good Messaging
Contacts.
• If your handheld guide describes email, calendar, contact, and
task applications, these applications are still available, but you’ll
use this guide instead for the Good Messaging versions.
• When the Caller ID and Speed Dial features link to your contacts,
the Good Messaging Contacts application is used.
Symbian OS, Nokia Series 60 Handhelds
• Access to the Good Messaging applications is added to the Active
Standby screen.
• The email hardware button will now connect to the Good
Messaging inbox. A long press of the email hardware button will
open an email compose window inside GoodLink.
16 Overview
Proprietary and Confidential – Beta
Use and Disclosure Governed by Good Technology, Inc. NDA
Page 15

About Good Messaging Applications
• SMS (text) or MMS (multimedia) messages can be accessed
through the Messaging menu and you can send an SMS message
from within Good Messaging Contacts.
• If your handheld guide describes email, calendar, contact, and
task applications, these applications are still available, but you’ll
use this guide instead for the Good Messaging versions.
• When the Caller ID and Speed Dial features link to your contacts,
the Good Messaging Contacts application is used.
• Depending on the E series handheld you have, Good Messaging
Contacts may not be integrated with the phone. Therefore, SMS,
spped dial, and caller ID do not query the Good Messaging
Contacts database.
About Good Messaging Applications
Good Messaging applications are wirelessly synchronized with your
email server account. Synchronization includes:
• Email messages and folders
Both message status and folder contents are synchronized. For
example:
- Messages marked read on your handheld are marked read on
the email server and in your Inbox.
- New messages sent to your email server Inbox are
automatically sent to your handheld.
- Messages you delete from the Inbox on your handheld are also
deleted from the Inbox.
- Email folders you add, delete, or rearrange also appear on your
handheld.
For more information on email synchronization, see “Using Email
Folders” on page 53.
• Contacts
User’s Guide 17
Proprietary and Confidential – Beta
Use and Disclosure Governed by Good Technology, Inc. NDA
Page 16

Overview
All personal contacts are synchronized. Personal contacts are
those stored in the Contacts folder or Address Book in your
account (the ones that you see when you click the Contacts folder
in Outlook or Lotus Notes). Your IT administrator determines
which public contacts are available to you. Public contacts are
those stored in public folders in Outlook or Lotus Notes.
• Calendar
Both calendar appointments and meeting requests are
synchronized. You can create, change, and delete meetings, and
accept, tentatively accept, or decline meeting requests from your
handheld.
• Notes/Personal Journal
Notes or Personal Journal are synchronized. Up to 4K of text per
note is included.
• Tasks /To Do Lists
Tasks or To Do lists are synchronized. Recurring tasks in appear as
individual tasks on the handheld.
You do not need a cable, cradle, or the desktop software installed on
your computer to synchronize. Synchronization happens whenever
the handheld radio is on and you are in coverage, as shown by the
signal-strength indicator for data service on your handheld. You can
choose to work offline; however, you can continue to read and
compose messages while offline. An active GPRS subscription, or
access to a WiFi network (if it is supported by your handheld), is
required for synchronization to work.
For More Information
For more information about Good Messaging and other applications
within the Good System product suite, visit www.good.com.
18 Overview
Proprietary and Confidential – Beta
Use and Disclosure Governed by Good Technology, Inc. NDA
Page 17

2 Getting Started
This chapter gives a basic introduction to using your handheld with
Good Messaging.
For information about installing Good Messaging, refer to “Wireless
Setup” on page 103 or to the Good Messaging Easy Setup Card.
Using Good Messaging
In general, Good Messaging works the same on all handhelds.
Depending on the handheld itself, key functions and menus may
vary. Refer to the handheld maker’s user guide for information on
basic operation and care of the handheld.
Palm OS Handhelds
You can use the touch screen or the five-way navigation pad to move
around the screen. Select the Good icon from the Programs screen to
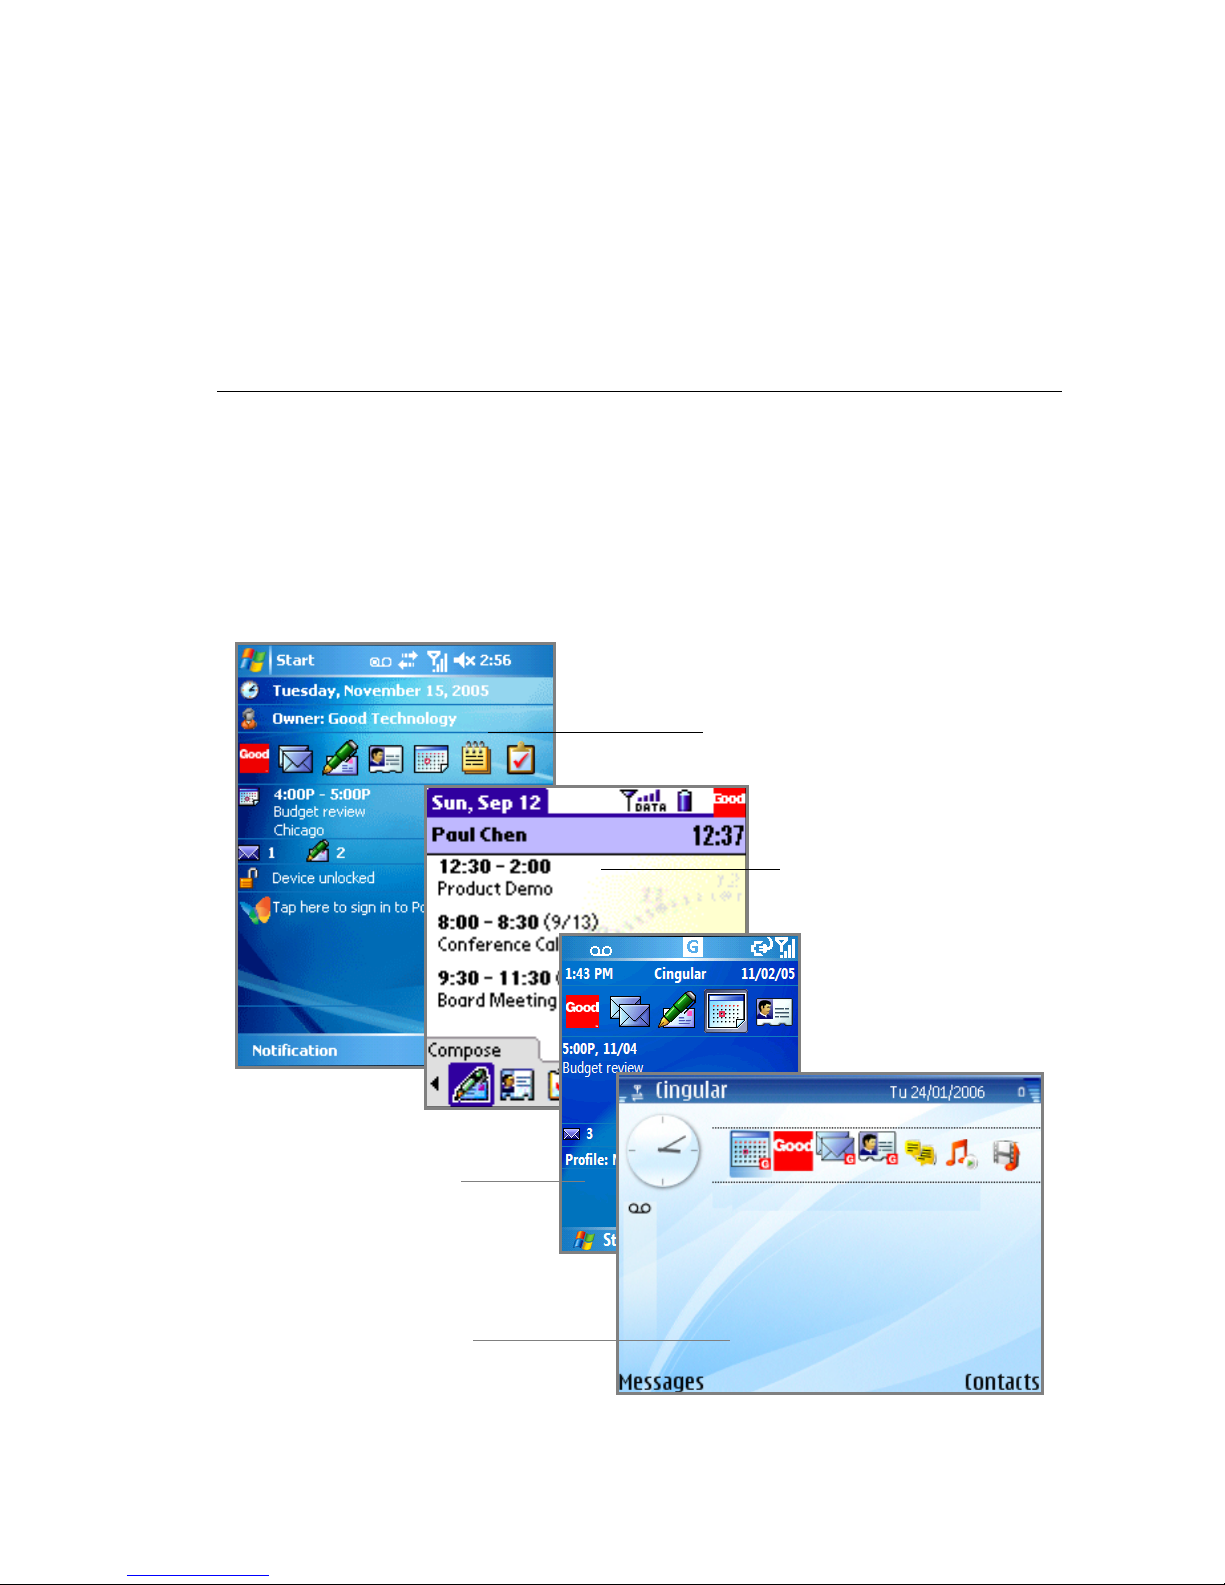
get to the main Good Messaging screen. This screen includes an icon
bar you can use to open Good Messaging applications.
User’s Guide 19
Proprietary and Confidential – Beta
Use and Disclosure Governed by Good Technology, Inc. NDA
Page 18
Getting Started
The Home screen includes an icon bar you can use to open Good
Messaging applications.
To open the Good Today
screen, press the Home key
or select the Good icon on
the Palm home screen.
Select an icon on the icon bar to
open Good Messaging
applications.
Select the scroll arrow to
view more icons.
20 Getting Started
Proprietary and Confidential – Beta
Use and Disclosure Governed by Good Technology, Inc. NDA
Page 19
Using Good Messaging
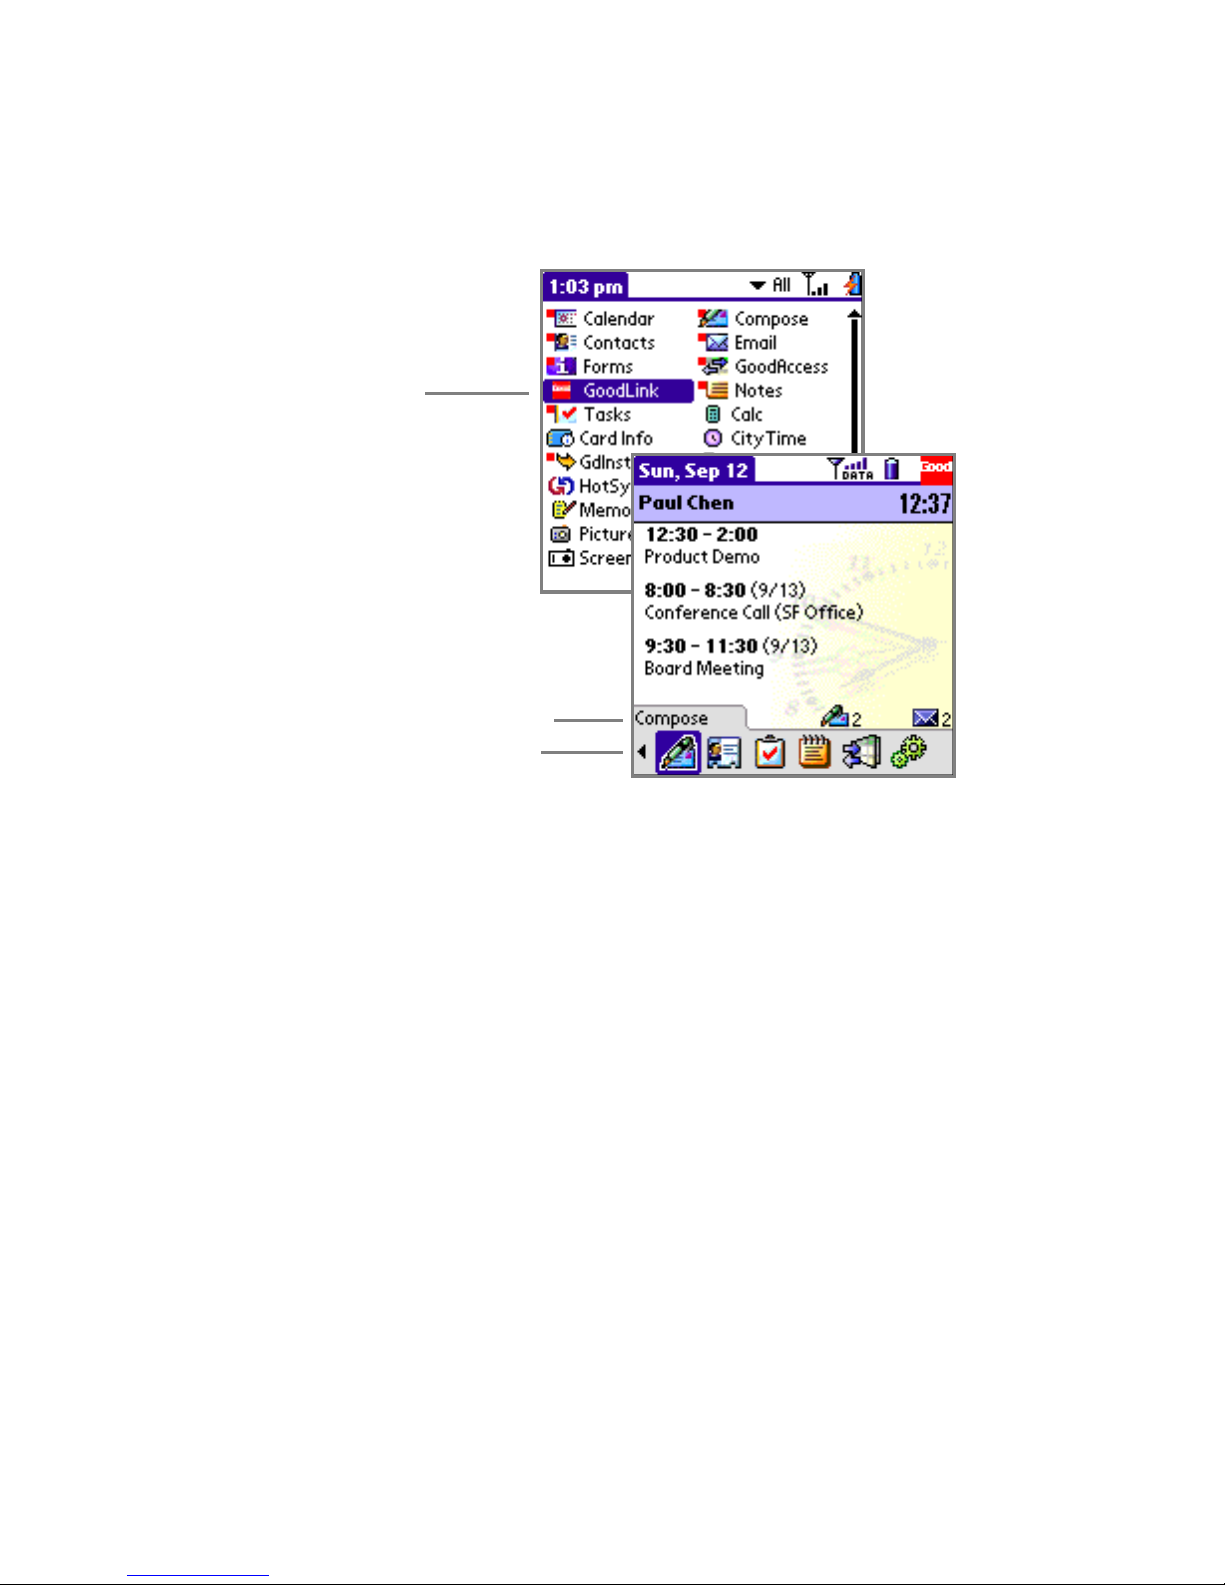
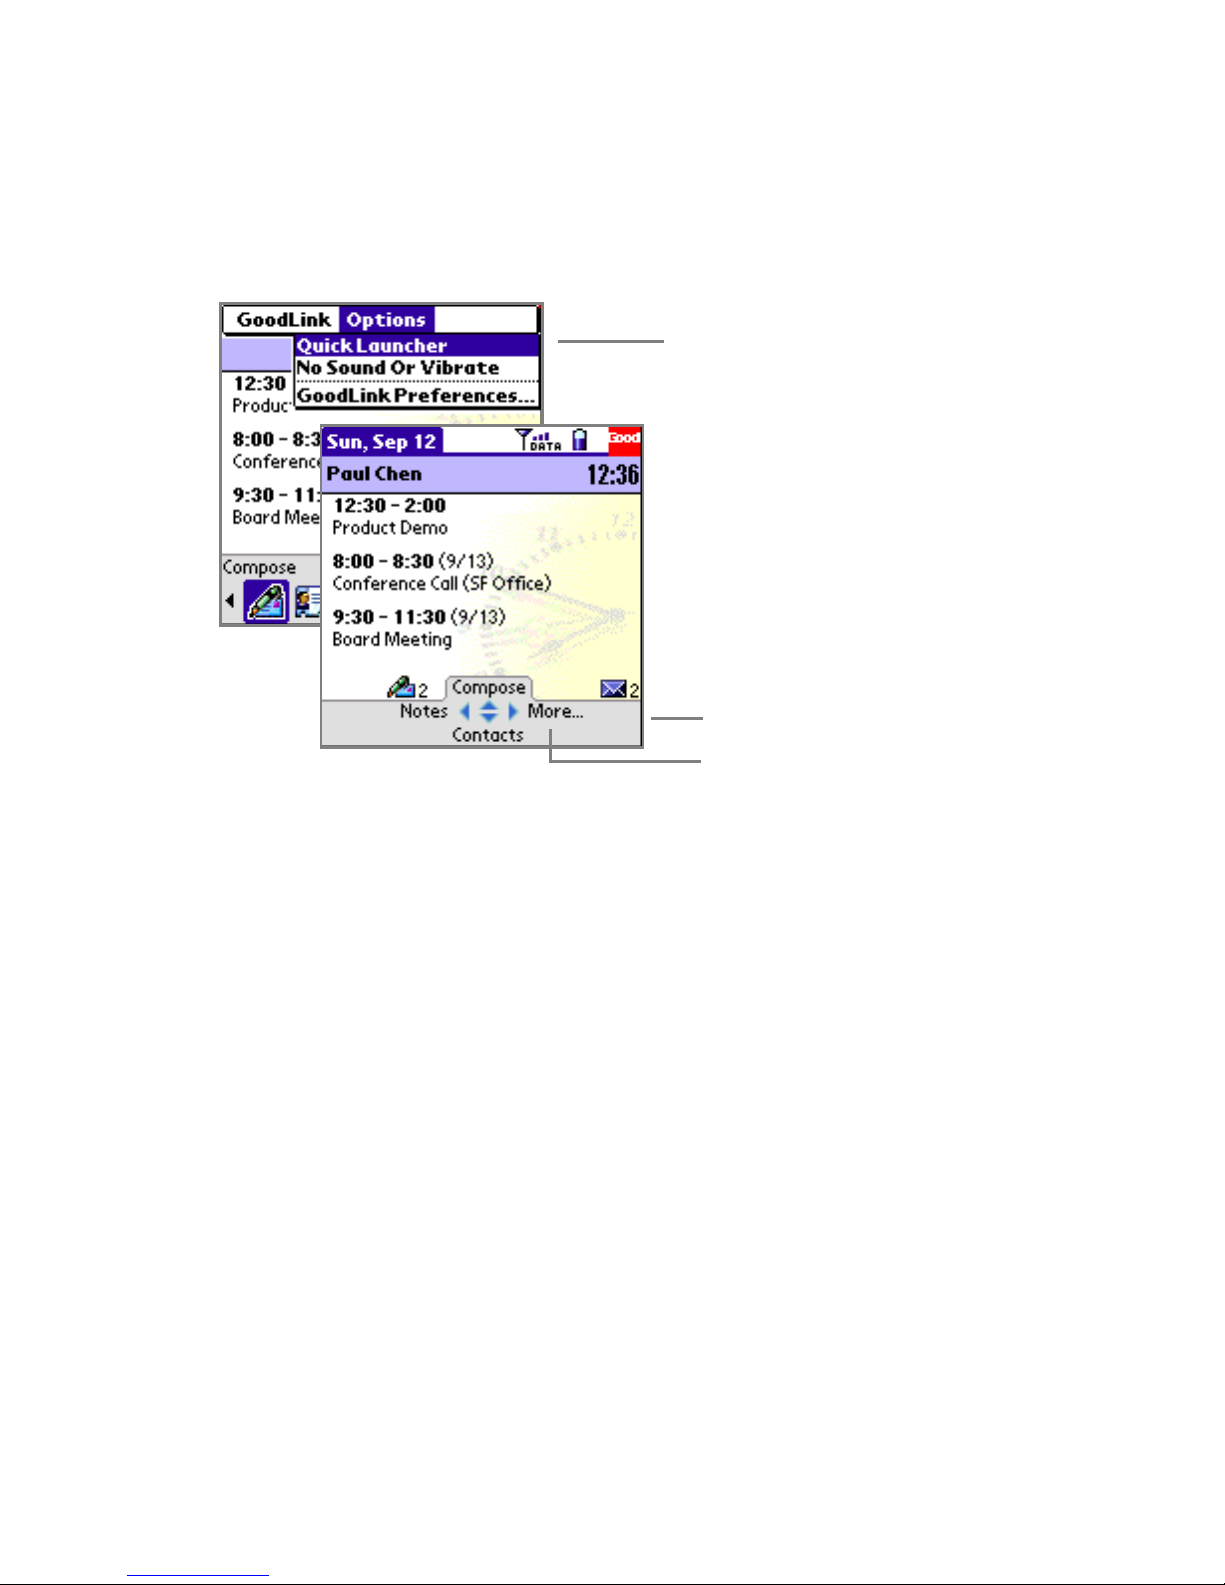
If you prefer, you can change the Today screen to show a quick
launcher instead of the icon bar. To hide (or show) the quick launcher,
press Menu and choose Quick Launcher from the Options menu.
Select this command to show or
hide the Good quick launcher.
Select an application name
on the quick launcher to
open a Good Messaging
application.
Select More... to view a list of
additional Good Messaging
applications.
To open a Good Messaging application, select an application icon on
the Today screen. You can also use the five-way navigation pad on
your handheld to scroll and open applications from the icon bar or
quick launcher.
To return to the Home screen, press the Home button.
• You can configure the Sun key, the Side Key, or the Home key on
your handheld to automatically open the Good Today screen. For
more information, see “Setting Good Messaging Preferences” on
page 86. Choices are:
Treo 600: The Sun (Power) key or the Home key.
Treo 650: The Side key or the Home key
If you select the Sun key:
• Pressing the Sun key opens the Good Today screen.
User’s Guide 21
Proprietary and Confidential – Beta
Use and Disclosure Governed by Good Technology, Inc. NDA
Page 20

Getting Started
• Holding down the Sun key for a few seconds will activate the
keyboard lock.
• Press the Home key to use Palm applications (return to Palm
home).
If you select the Side key:
• Holding down the Side key for a few seconds will open the
Good Today screen.
• Press the Home key to use Palm applications (return to Palm
home).
If you select the Home key:
• Pressing the Home key from any GoodLink application will
open the Good Today screen.
• On the Good Today screen, pressing the Home key returns you
to Palm home. You can also choose Go to Palm Applications
from the GoodLink menu.
• Sun key (Treo 600) and Side key (Treo 650 and 700p) functions
are unchanged.
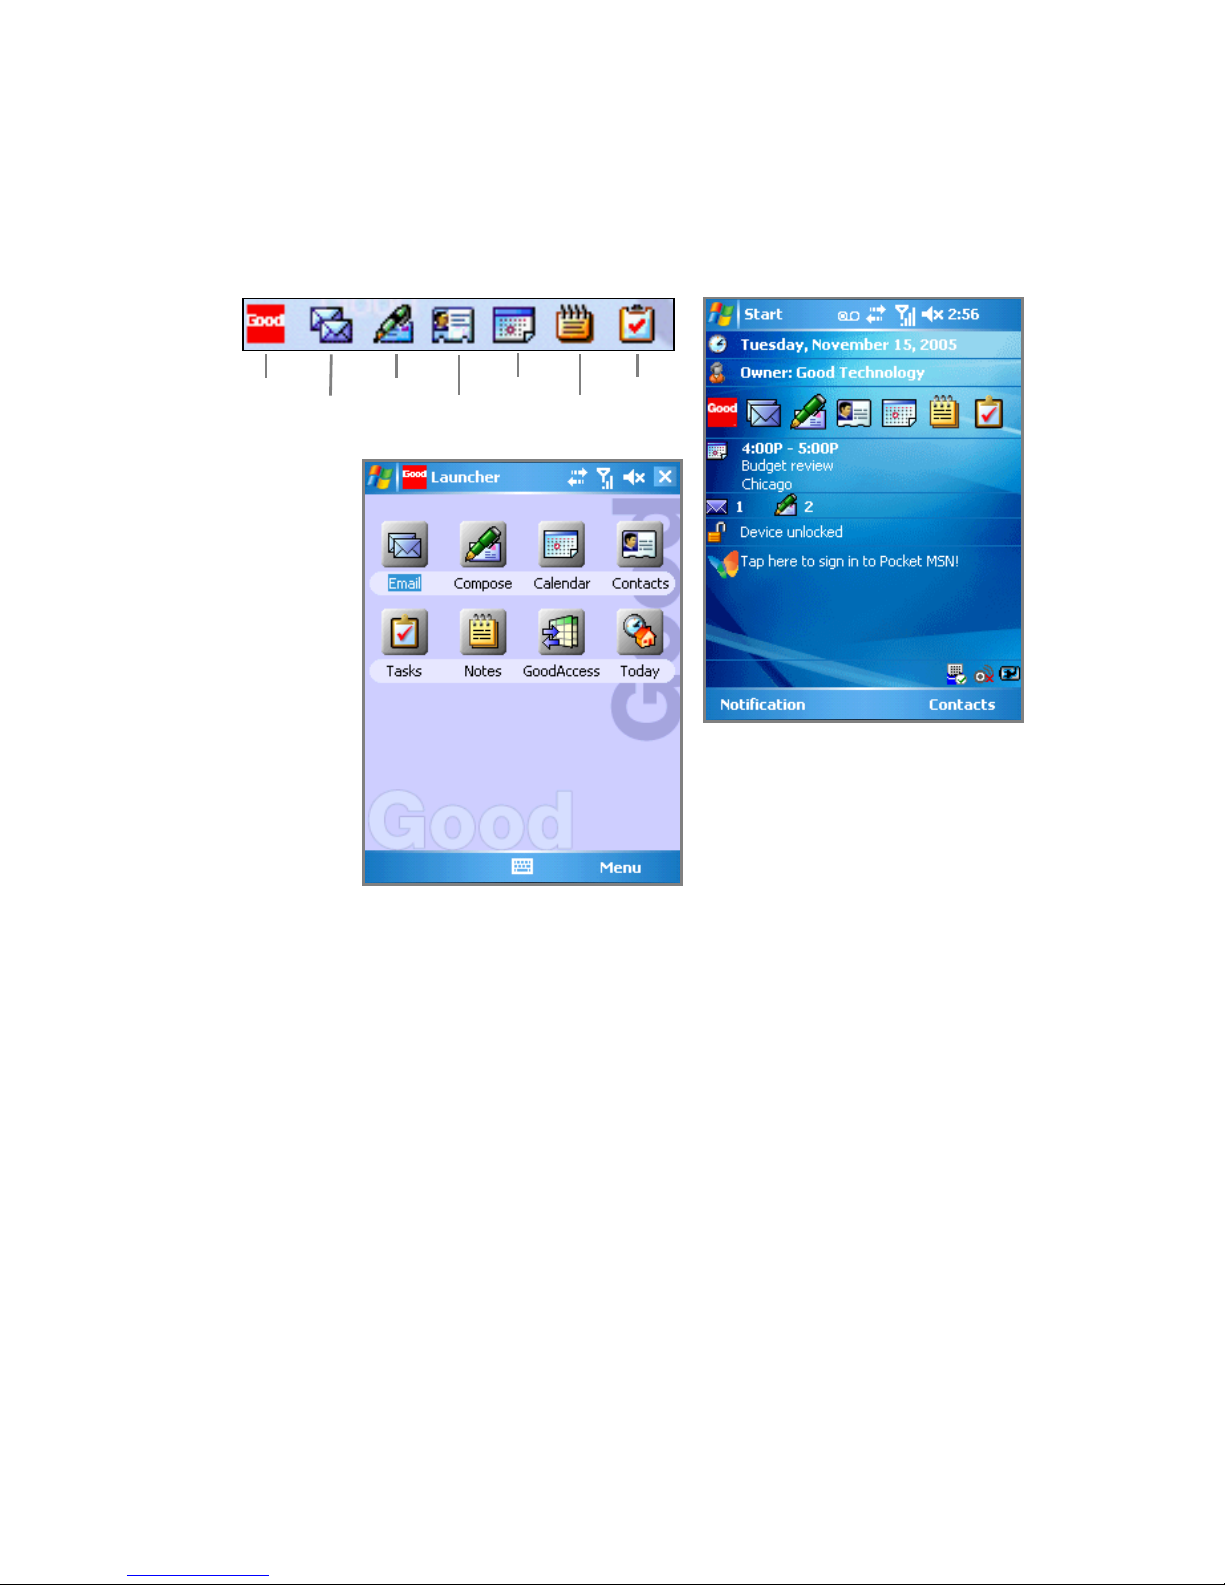
Windows Mobile Pocket PC Handhelds
You can use the touch screen or the five-way navigation pad to move
around the screen. You can use the Good Launcher to move between
the Good Messaging applications. The Good Launcher includes a
menu of all of the Good Messaging applications and preferences.
From the Today screen, select the Good logo to open the Good
Launcher. From the Good Launcher, you can start any of the Good
Messaging applications. You can return to the Good Launcher at any
time by selecting Menu, and then Good Launcher while using a Good
Messaging application.
Press the back arrow key to return to the previous screen. If you are in
a text entry field, pressing the back arrow key deletes the characters
to the left of the cursor.
22 Getting Started
Proprietary and Confidential – Beta
Use and Disclosure Governed by Good Technology, Inc. NDA
Page 21
Using Good Messaging
To use other applications (non-Good) on your handheld, use the Start
menu from the Home screen.
Launcher Compose Calendar Tasks
Email Contacts Notes
Select
GoodLink
from the
Start menu,
or select the
Good icon on
the Home
screen.
Windows Mobile Smartphones
You use the five-way navigation pad on your phone to move around
the screen. You can move left, right, up, or down. Press the Action
key (center of the five-way navigation pad) to select a highlighted
item.
User’s Guide 23
Proprietary and Confidential – Beta
Use and Disclosure Governed by Good Technology, Inc. NDA
Page 22
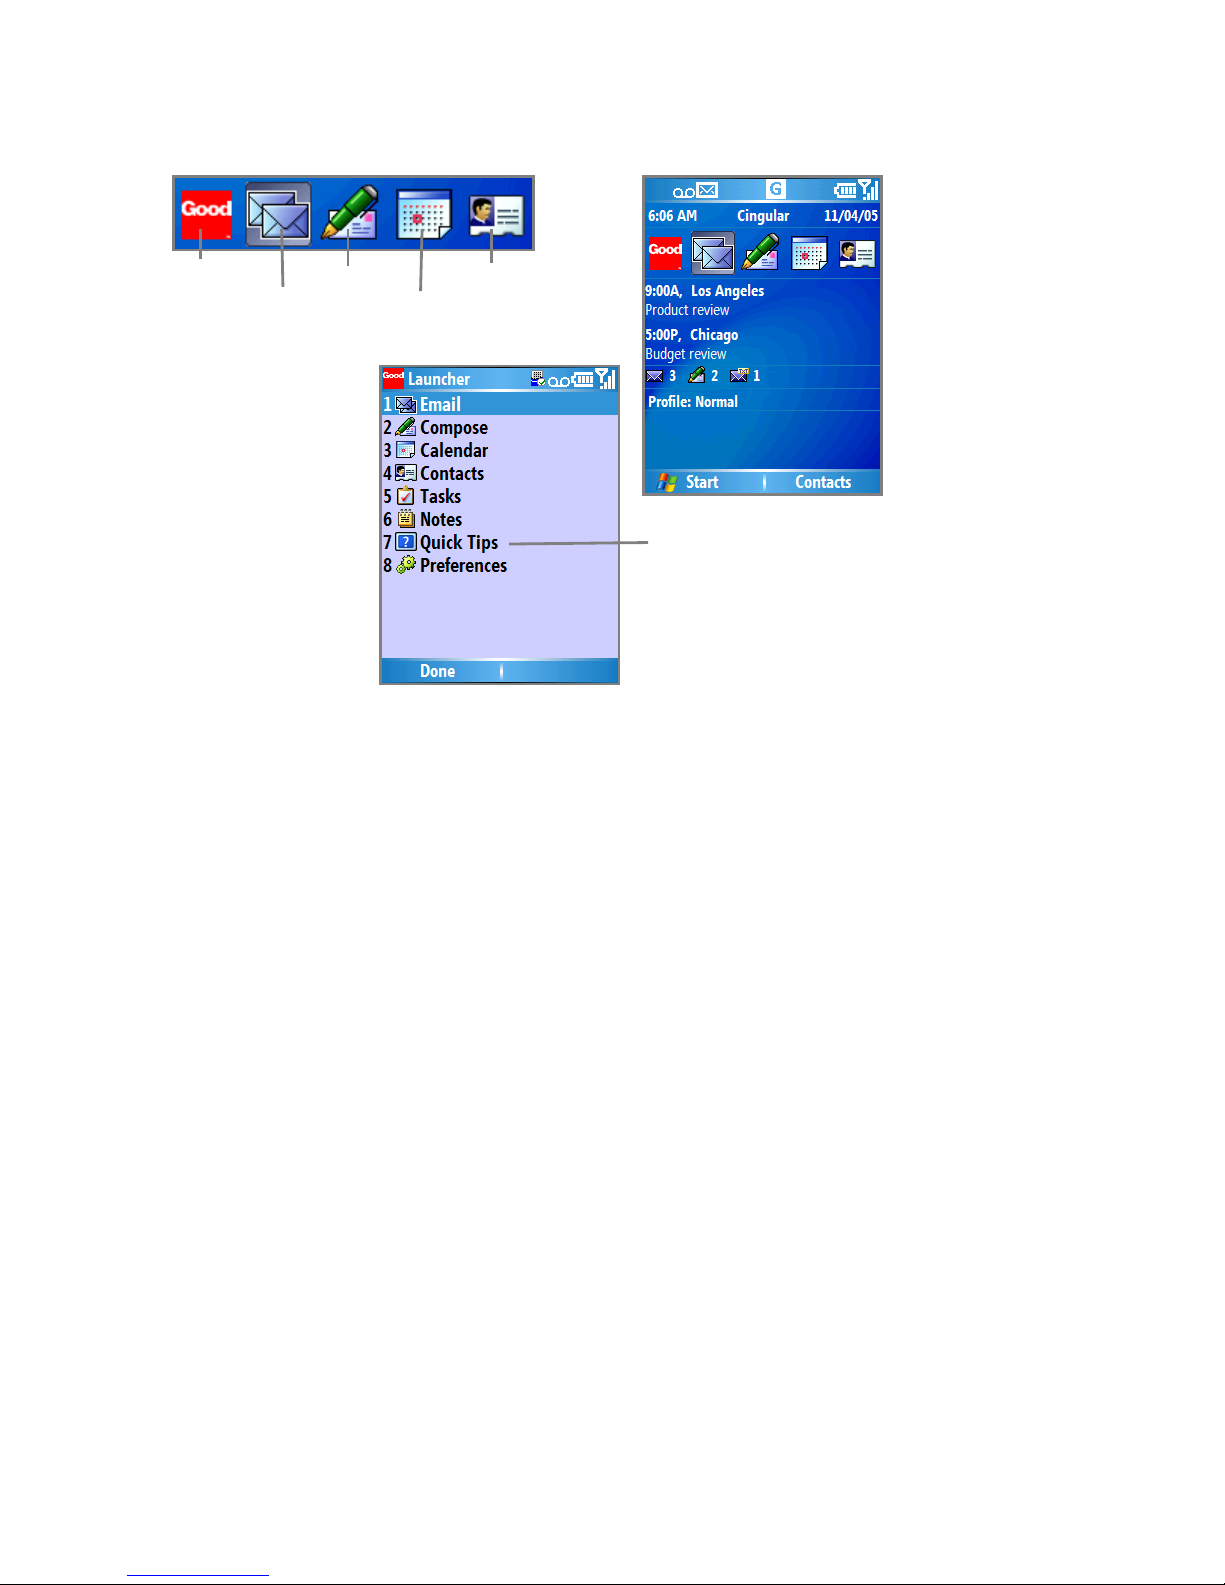
Getting Started
Launcher Compose Contacts
Email Calendar
Select
GoodLink from
the Start menu,
or select the
Good icon on
the Home
screen.
For help with GoodLink,
select Quick Tips.
You use the two soft keys located directly below the screen to select a
menu. The menus change depending upon the application. On many
screens, the right soft key is Menu. Press Menu to display options or
to perform a command within an application.
To choose an item on a menu, you can use the five-way navigation
pad or you can also enter the number that corresponds to the menu
24 Getting Started
Proprietary and Confidential – Beta
Use and Disclosure Governed by Good Technology, Inc. NDA
Page 23

Using Good Messaging
item. The following table describes the main ways to navigate using
your Smartphone.
Item Description
Five-way
Navigation pad
Action (center)
Key
Soft Keys Use the two soft keys located directly below the screen
Menu Key Press Menu to display options or to perform a
Back Arrow Key Press the back arrow key to return to the previous
Left Key Press the left key to return to a field at the top of the
Home Press the Home key to return to the Home Screen. The
Good Launcher The Good Launcher includes a menu of all of the
Use the five-way navigation pad on your phone to
move around the screen. You can move up, down, left,
or right.
Use to select a highlighted item. Press the center of the
five-way navigation to select items.
to select a menu. The menus change depending upon
the application. On many screens, the right soft key is
Menu.
command within an application.
screen. If you are in a text entry field or compose area of
an email, pressing the back arrow key deletes the
characters to the left of the cursor.
screen. For example, if you are scrolling through a long
list of contacts and want to return to the Find field,
press the left arrow key.
Home screen also includes icons, (such as the Email,
Compose, Calendar and Contacts), you can select to
start the application. It does not include an icon for
Notes or Tasks, which can be accessed through the
Good Launcher. Press the Home key twice to return to
the Good Launcher from within any GoodLink
application.
GoodLink applications and preferences. From the
Home screen, select the Good logo to open the Good
Launcher. You can return to the Good Launcher at any
time by selecting Menu, and then Good Launcher while
using a GoodLink application.
User’s Guide 25
Proprietary and Confidential – Beta
Use and Disclosure Governed by Good Technology, Inc. NDA
Page 24

Getting Started
Item Description
Start Menu From the Home screen, use the Start menu to access all
other (non-GoodLink) applications.
Notifications You receive an on-screen alert to notify you when a
particular event occurs. For example, if a new email
arrives or an appointment is coming up, a yellow alert
appears on the bottom of the screen. Press * to view the
notification or # to dismiss it.
Symbian OS, Nokia Series 60 Handhelds
You can use the Good Launcher to move between the Good
Messaging applications. The Good Launcher includes a menu of all
of the Good Messaging applications and preferences. From the Active
Standby screen, select the Good logo to open the Good Launcher.
From the Good Launcher, you can start any of the Good Messaging
applications. You can return to the Good Launcher at any time by
selecting Menu, and then Good Launcher while using a Good
application.
Press the right softkey (Back) to return to the previous screen. If you
are in a text entry field, pressing the back arrow key deletes the
characters to the left of the cursor.
To use other applications (non-Good) on your handheld, use the
Applications screen.
Active Standby and Standby Modes
Nokia Series 60 handhelds have two types of standby modes: Active
Standy and Standby. If you turn on the handheld and see a bar of
icons, like in the screen below, the handheld is in Active Standby
mode. If you do not see any application icons besides the clock, you
are in Idle mode.
You can choose the applications available while in Active Standby
mode by selecting Menu > Tools > Settings > Phone > Standby Mode.
The behavior of some keys changes depending on the standby mode
of the handheld.
26 Getting Started
Proprietary and Confidential – Beta
Use and Disclosure Governed by Good Technology, Inc. NDA
Page 25
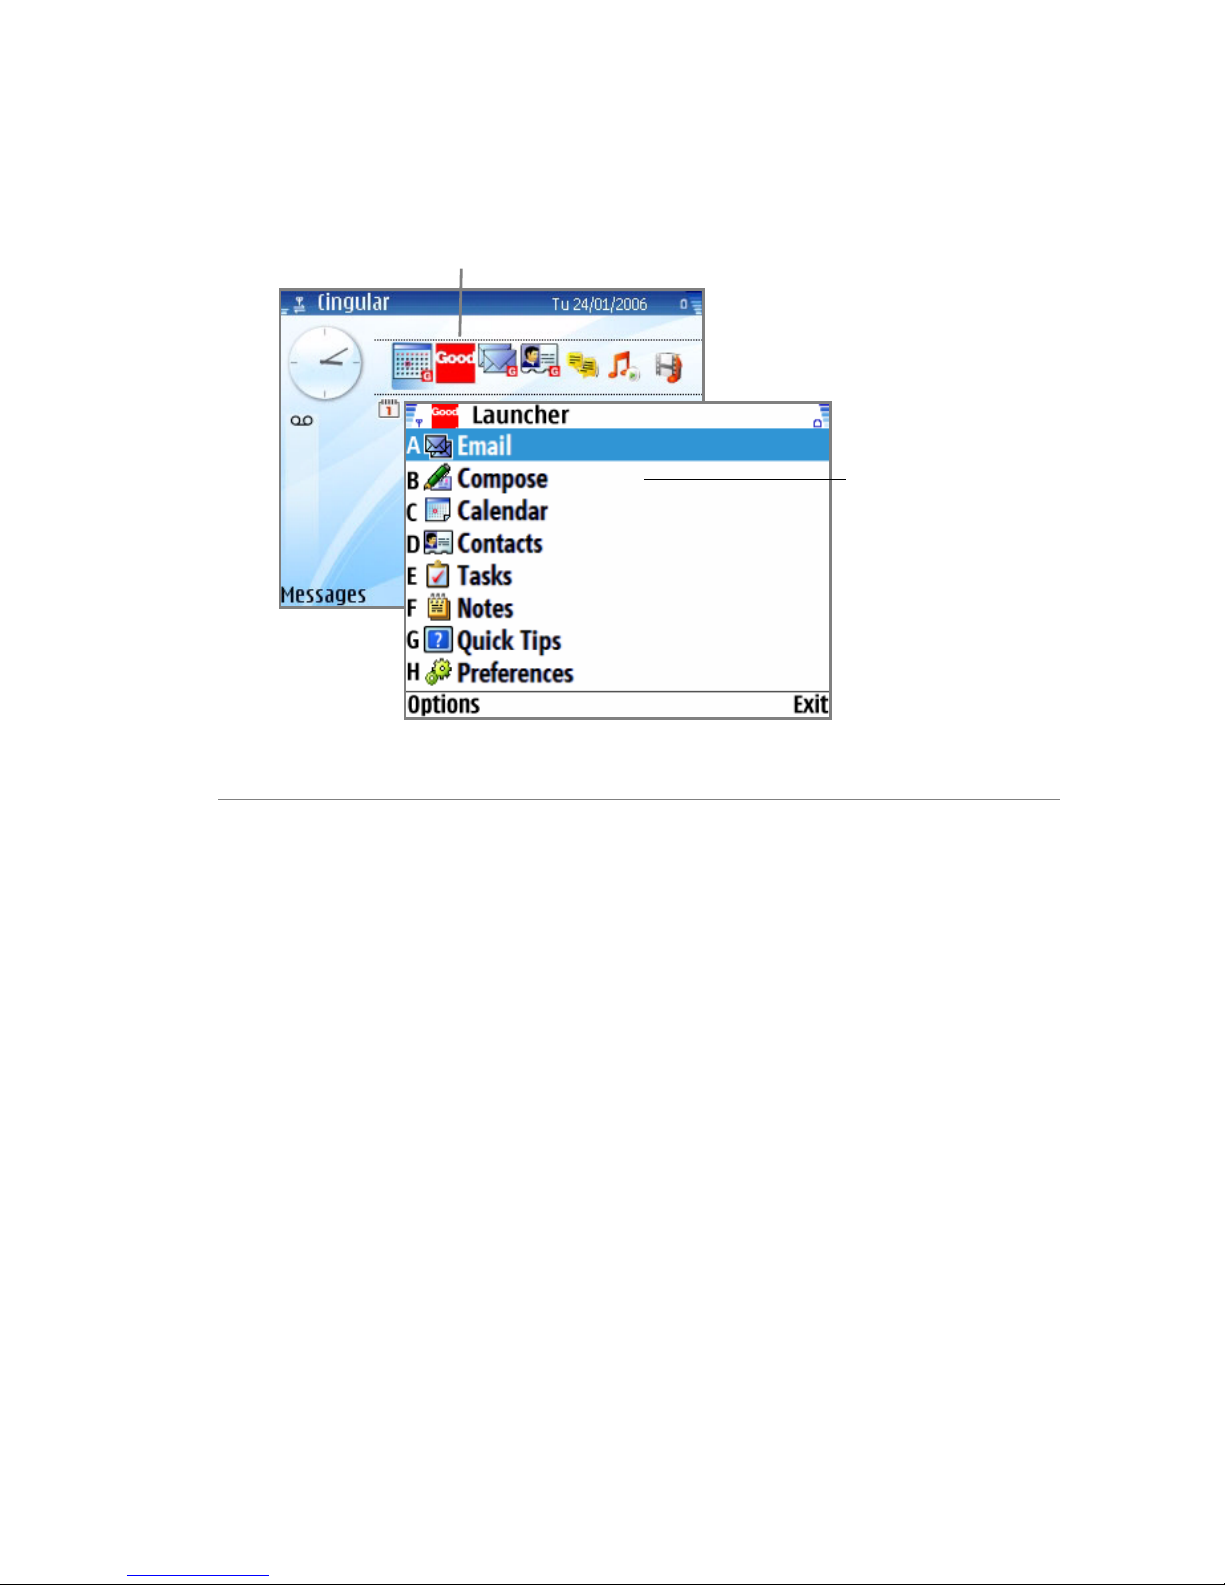
While in Active Standby
mode, select the Good
logo to access the Good
Launcher
Using Good Messaging
Select an
application to open
it or enter the letter
that corresponds to
it.
The following table describes the key navigation methods:
Item Description
Five-way Navigation
Joystick
Selection (center of fiveway navigation joystick)
Key
Right Soft Key Use to close current screen or return to the
Left Soft Key Use to select a menu. On many screens, the left
Use to move around the screen. You can move
up, down, left, or right.
Use to select a highlighted item. Press the center
of the five-way navigation joystick to select
items. From Active Standby screens, goes to
Good Launcher.
previous screen.
soft key is Options. The menu changes
depending upon the screen.
User’s Guide 27
Proprietary and Confidential – Beta
Use and Disclosure Governed by Good Technology, Inc. NDA
Page 26

Getting Started
Item Description
Options Menu Press to display options or to perform a
command within an application.
Applications Press to go to the Applications folder. From the
Applications folder, you can navigate to other
installed applications. Pressing and holding this
button takes you to the application switcher
which is a fast way to move between
applications that are currently open.
Email Press to go to the Good Messaging Inbox.
Pressing and holding this button goes to the
Compose screen.
End (red) Goes to Active Standby or Standby screen.
Call (green) Used to make phone call after the phone
number is entered or goes to Call logs on Active
Standby only.
Up arrow (from Idle
screen)
Down arrow (from Idle
screen)
Right arrow (from Idle
screen)
Left Arrow (from Idle
screen)
Getting Help Select Quick Tips from the Good Launcher to
Goes to Compose screen.
Goes to Contacts.
Goes to Calendar.
Goes to Tasks.
get information about using Good Messaging.
Turning the Handheld On and Off
To turn your handheld on or off, press and hold the Power key.
Holding down the key turns off the radio only on Windows Mobile
and Palm OS handhelds. On some handhelds, you can press the
28 Getting Started
Proprietary and Confidential – Beta
Use and Disclosure Governed by Good Technology, Inc. NDA
Page 27

The Handheld Battery
Power key quickly to display a list of options to turn off your phone,
set the key or device lock, set the profile type, and set other options.
The Handheld Battery
Keep your handheld’s battery charged. Refer to your handheld user’s
guide for detailed information on battery maintenance and
performance (for example, to find how much battery charge is
necessary for the radio to remain operational). When the battery
charge is too low for the radio to function, Good Messaging will not
synchronize.
Extending Battery Life
To extend battery life:
• Set the Auto-off and backlight settings to the minimum.
• Recharge the handheld’s battery at night or whenever you aren’t
using the handheld.
• Use the Block Sender feature to block messages from non-critical
senders. (See “Blocking Messages from a Sender” on page 57.)
• Turn off the handheld radio when traveling on airplanes or other
out-of-range situations.
• Where possible, use multiple recipients for email messages rather
then sending the message more than once.
• When possible, work offline. While working offline, you can
continue to read and compose messages, browse the Internet, and
make and receive calls.
User’s Guide 29
Proprietary and Confidential – Beta
Use and Disclosure Governed by Good Technology, Inc. NDA
Page 28
Getting Started
Good Messaging and the Handheld
Radio
The handheld’s radio connects your handheld to the wireless
network, enables you to send and receive email, and synchronizes
your applications. You can use your handheld without the radio (for
example, when you’re on an airplane), but the radio must be turned
on to synchronize.
Radio indicators that appear on screen apply to Good Messaging as
they do to the handheld. The service must be present for active Good
Messaging synchronization. If you are working offline, you can select
Send/Receive Now to synchronize on demand, and you can also
continue to make calls and browse the Internet.
Radio indicators vary depending on the type of handheld you are
using. (See the documentation that came with your handheld for
details.)
The following are some of the common indicators that appear on
your handheld.
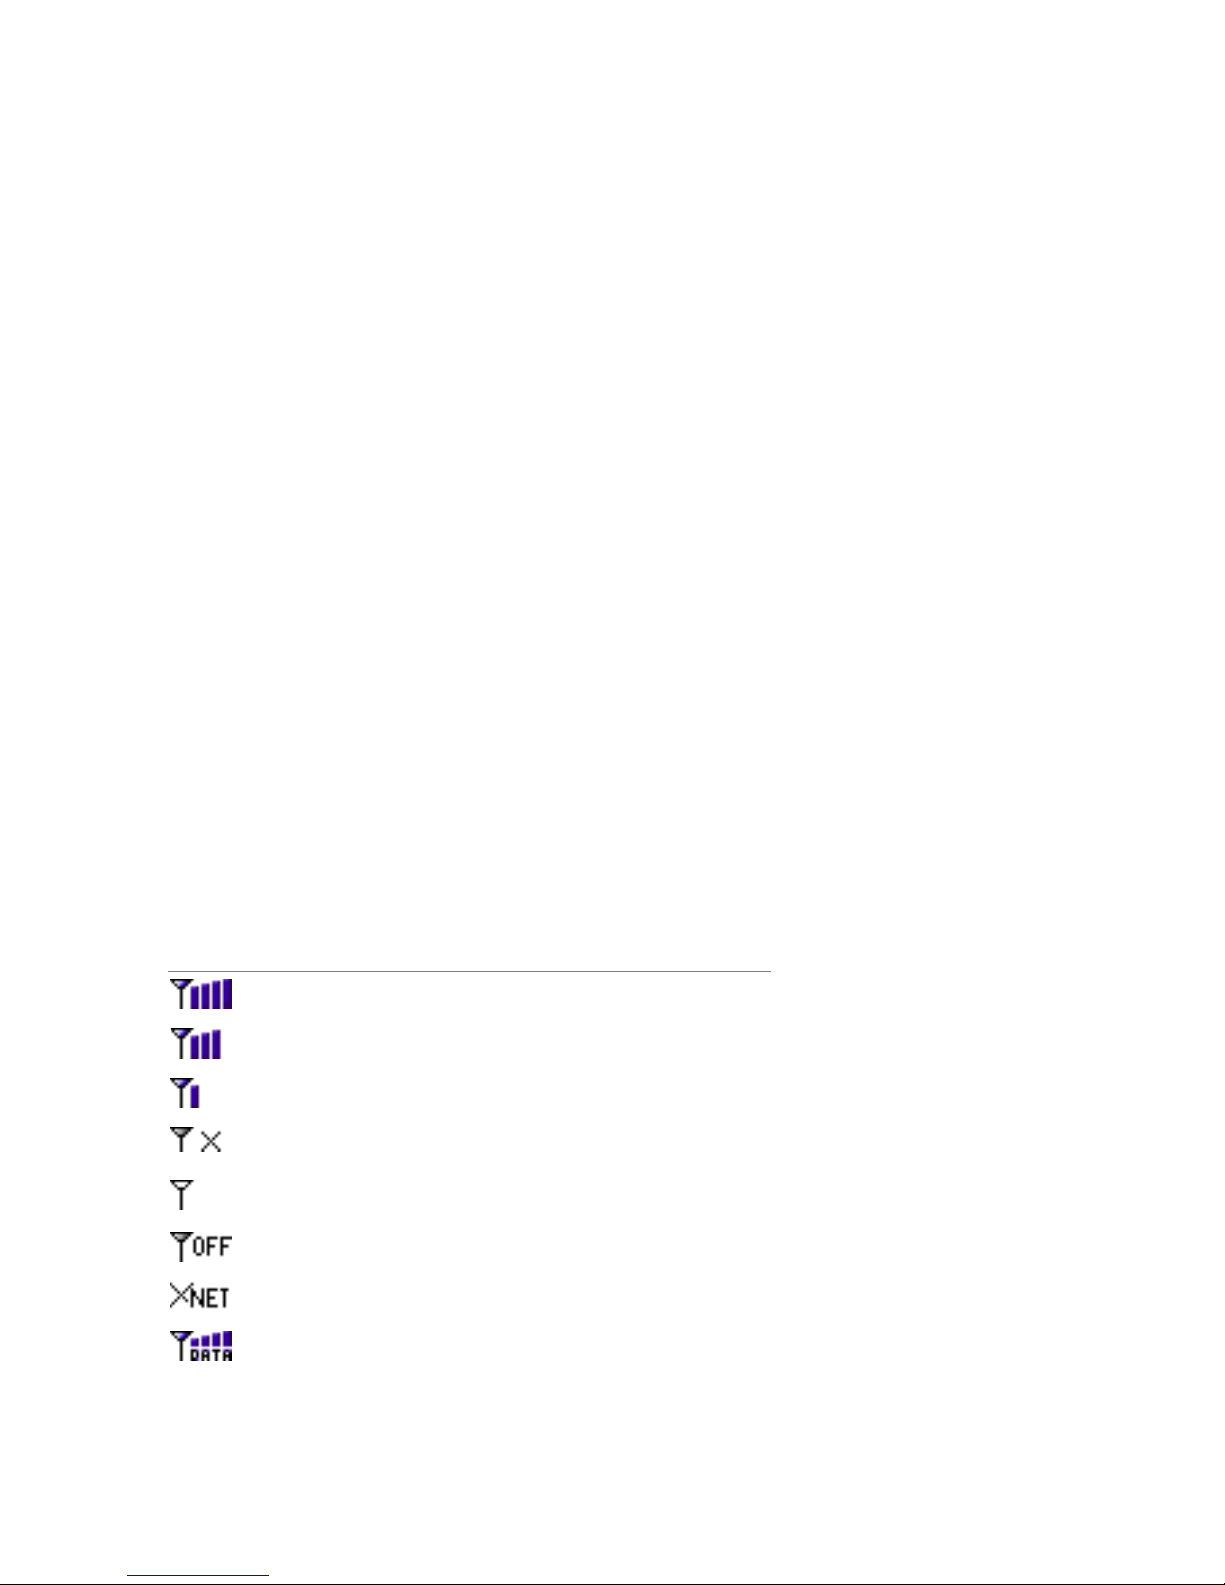
Palm OS Indicators
The following indicators appear on Palm OS handhelds:
Radio signal strength is high.
Radio signal strength is medium.
Radio signal strength is low.
Radio coverage is currently unavailable.
Radio signal strength is insufficient to transmit
messages.
Radio is turned off.
Network problems are preventing communication.
Radio is transmitting data, such as Good
Messaging data and GPRS is activated.
30 Getting Started
Proprietary and Confidential – Beta
Use and Disclosure Governed by Good Technology, Inc. NDA
Page 29
Good Messaging and the Handheld Radio
Data transmission off. Use Send/Receive now to
activate.
Battery too weak for radio use.
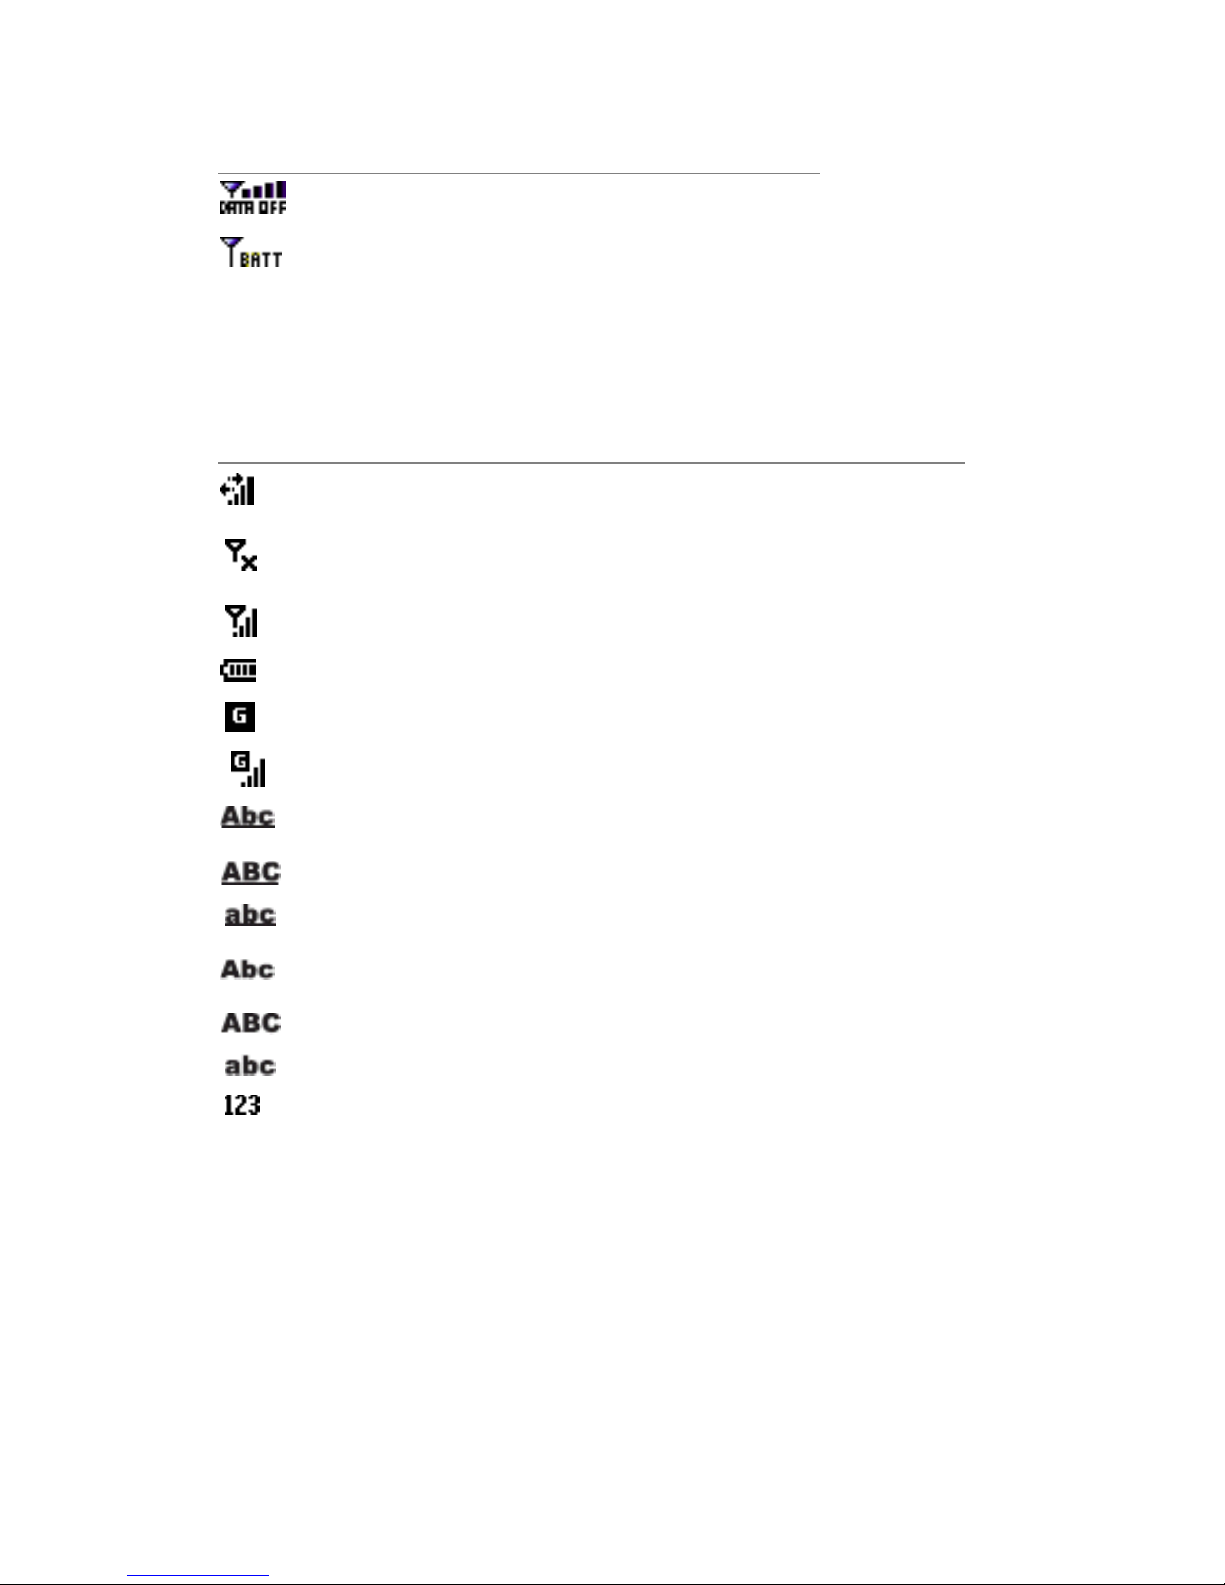
Windows Mobile Smartphone Indicators
The following indicators appear on Windows Mobile Smartphone
handhelds:.
Data call active. Connection arrows. Indicates the handheld is
connected to the network.
Connection problems/radio off. Symbols such as !, X, and OFF are
often used to indicate the radio is off or connection problems have
occurred.
Signal bars. Indicates signal strength. The more bars that appear,
the stronger the signal.
t9
T9
T9
Battery level.
GPRS available.
GPRS in use.
Predictive text (also known as T9 or iTap) input mode, uppercase.
Predictive text (also known as T9 or iTap) input mode, caps lock.
Predictive text (also known as T9 or iTap) input mode, lowercase.
Multi-tap text input mode, uppercase.
Multi-tap text input mode, caps lock.
Multi-tap text input mode, lowercase.
Numeric input mode
Predictive text input mode, lowercase
Predictive text input mode, caps lock
Predictive text input mode, uppercase
User’s Guide 31
Proprietary and Confidential – Beta
Use and Disclosure Governed by Good Technology, Inc. NDA
Page 30
Getting Started
Windows Mobile Pocket PC Indicators
The following indicators appear on Windows Mobile Pocket PC
handhelds:
Signal bars. Indicates signal strength. The more bars that appear,
the stronger the signal.
Connection arrows. Indicates the handheld is connected to the
network.
In addition to connection arrows, some handhelds may show
symbols or words (such as DATA) when data is transferred over
the connection.
Connection problems/radio off. Symbols such as !, X, and OFF are
often used to indicate the radio is off or connection problems have
occurred.
Symbian OS, Nokia Series 60 Indicators
The following indicators appear on Symbian OS, Nokia Series 60
handhelds:
Signal bars. Indicates signal strength. The more bars that appear,
the stronger the signal.
In addition to connection arrows, some handhelds may show D
symbols when data is transferred over the connection.
GPRS connection available.
GPRS connection problem. Indicates the handheld is not
connected.
GPRS connection active. Indicates the handheld is connected to
the network.
Bluetooth connection active
Infrared connect active.
32 Getting Started
Proprietary and Confidential – Beta
Use and Disclosure Governed by Good Technology, Inc. NDA
Page 31

Good Messaging and Your Phone
Good Messaging and Your Phone
Good Messaging applications enhance your phone applications in
the following ways:
• You can initiate phone calls directly from the Contacts application,
simply by displaying a contact and selecting Dial Contact from the
menu of options. You can call home, work, pager, and mobile
numbers. You can set options to prompt you for confirmation
before a selected contact or email number is dialed.
• Caller ID displays the Contact name associated with an incoming
call, as well as the phone number and whether it is a home, work,
or mobile number.
• When creating new Speed-dial favorites, you can add your Good
Messaging Contacts.
• On some supported Windows Mobile handhelds, the Save to
Contacts option in Call History saves the number to Pocket
Outlook.
• Domestic roaming for Good Messaging is available when your
carrier supports data roaming.
• Good Messaging applications are available through international
roaming when your handheld is configured for international
phone roaming.
• You can use Good Messaging applications during a phone call.
Good Messaging continues to process data that it has received
prior to the call; however, no data is sent or received while the call
is in progress.
Making a Call
Windows Mobile and Palm OS Handhelds
Press the green phone key from within a Good Messaging
application. Enter the phone number you wish to call. You can also
User’s Guide 33
Proprietary and Confidential – Beta
Use and Disclosure Governed by Good Technology, Inc. NDA
Page 32

Getting Started
enter a number from the Home screen. The call history is listed below
the number entry field. It lists incoming and outgoing calls. You can
select a number from the call history list and then press the green
phone key to dial the number.
Symbian OS, Nokia Series 60 Handhelds
From within Good Messaging, press the red phone key to return to
the Active Standby or Standby screen. Enter the phone number you
wish to call. Press the Call (green) key to make the call. From within
Contacts, select the phone number for the person you wish to call.
Dialing by Name
On Windows Mobile handhelds, Ppress the green phone key or from
the Home screen, use the keypad to enter the name of the person you
want to call. For example, if you want to call Joe, press 5-6-3. As you
enter characters, the names are matched against those stored in your
contacts. Select the contact, use the right key to cycle through
available phone numbers, and then press the green phone key to
make the call. You can also open Contacts and select the contact you
wish to call.
Using Speed Dial
To add a number to speed dial, select a phone number from Contacts
or Call History, press Menu, and then Add to Speed Dial. Assign a
speed dial number. Your handheld type determines the number of
entries you can add. To dial a number, press and hold the speed dial
number.
On Nokia Series 60 handhelds, you can add Good Messaging Speed
dial entires from within Good Messaging but not from the Call
History.
34 Getting Started
Proprietary and Confidential – Beta
Use and Disclosure Governed by Good Technology, Inc. NDA
Page 33

Working Offline
Working Offline
You can choose to work offline. When you work offline, you can read
and compose responses to messages, just as you would if you were
connected. When you reconnect to the server, Good Messaging
synchronizes your mail folder and sends any messages that you
composed while offline. After synchronizing, your handheld returns
to the work offline state. This features is convenient when you are
travelling, especially by air.
Activating Data Transmission
If the radio icon indicates that the data service is off or if you are
working offline, the Good Messaging screen indicates “Data Off,”
you can turn data transmission on, activating synchronization
between handheld and your Outlook or Lotus Notes account. Select
Send/Receive Now from the menu. After synchronizing, your
handheld returns to the work offline state.
Interaction with Wi-Fi
Depending on the type of networking supported by your handheld,
Good Messaging can use either a standard mobile phone network
(such as GPRS or CDMA) or Wi-Fi to access your corporate network,
synchronize mail, and more.
For handhelds that support both standard and Wi-Fi connections:
• Good Messaging stays connected when you move from a
standard connection to a Wi-Fi connection.
• Some handhelds automatically switch between Wi-Fi and
standard connections which can impact connection speed and
battery life.
User’s Guide 35
Proprietary and Confidential – Beta
Use and Disclosure Governed by Good Technology, Inc. NDA
Page 34

Getting Started
You may not be able to connect using Wi-Fi if:
• Your corporate network doesn’t allow users to connect to the
Internet via Wi-Fi.
• Your corporate network does not allow UDP connections to the
Internet.
• The access point to your corporate network requires a VPN or
other types of filtering.
If your Wi-Fi connection cannot be activated, you may need to turn
off the Wi-Fi radio on your handheld and reconnect using a standard
mobile network.
For more information, review the Wi-Fi documentation included
with your handheld.
Resetting Your Handheld
Resetting your handheld is similar to restarting your PC.
Occasionally a procedure requires that you reset the handheld.
Refer to your handheld’s user guide for information about how to
reset your handheld.
Restoring the Good Messaging
Applications
If your Good Messaging applications are lost or corrupted (by
deleting them accidentally, for example), you can restore the
applications from the location where they were originally backed up
(refer to “Backing Up Good Messaging” on page 88):
Note: Nokia Series 60 handhelds do not support backup and
restore.
36 Getting Started
Proprietary and Confidential – Beta
Use and Disclosure Governed by Good Technology, Inc. NDA
Page 35

Entering Text
You can back up your Good Messaging applications to a memory
card, persistent flash memory or other locations supported by your
handheld.
To restore a backup:
1. Start the restoration utility included with your handheld.
If you used a memory card to back up your applications, make
sure the card is inserted in your handheld.
2. Specify the location you used for backup.
3. When prompted, enter your passcode. You’ll only be prompted if
the Good Messaging applications are missing from the handheld
or are present but are a different version from those in the backup.
4. When prompted, select the option to restore the Good Messaging
applications.
Note: Emails, contacts, and so forth, are not backed up, but they are
resynchronized with information in your Outlook or Lotus
Notes account once your network connection is restored.
Entering Text
If your handheld includes a fully-functional QWERTY keyboard, you
use the keyboard to compose text for email messages or notes. If your
handheld does not include a QWERTY keyboard, you use the
numbers on your phone's keypad to enter text.
Entering Text on a Windows Mobile Smartphone
You use the numbers on your phone’s keypad to enter text.
You can use multi-tap, predictive text (sometimes called iTap or T9),
or numeric mode to enter characters in your Smartphone.
To enter a new line, press the Action key (center of the five-way
navigation pad).
User’s Guide 37
Proprietary and Confidential – Beta
Use and Disclosure Governed by Good Technology, Inc. NDA
Page 36

Getting Started
Multi-Tap Mode
In multi-tap mode, press the number assigned to a letter one or more
times until the letter you want appears. For example, to enter the
letters A, B, or C you use the number 2 key. You would press once for
A, twice for B, and three times for C. To lock in the letter, pause for a
moment or press the right navigation key, and then you can enter the
next letter.
Predictive Text Mode
Predictive text input mode tries to determine the word you are trying
to enter. You press the number key assigned to each letter. For
example, if you want to enter the word Good, you press the 4 6 6 3.
The system tries to determine the word you are entering. Use the up
and down navigational keys to select from the list of choices that are
presented.
Determining the Text Entry Mode
To determine the text entry mode you are using, select Menu and
then Text Entry. A check appears next to the current text entry mode.
The input mode is also displayed in the top right corner of your
phone's screen. Underlined letters or T9 indicate that you are in
predictive text mode. If they are not underlined, you are in multi-tap
mode. If numbers are displayed, you are in numeric input mode. You
can choose Predictive as your default.
Switching Text Entry Modes
To switch input modes, select Menu, Text Entry, and then select an
entry mode. You can also use the * key. You may have to press and
hold the key to get to the mode you want. The display in the top right
corner changes as you change modes.
Entering Special Characters
To enter special characters, press and hold the # key to display a list
of symbols. Press and hold a number key to enter a number.
38 Getting Started
Proprietary and Confidential – Beta
Use and Disclosure Governed by Good Technology, Inc. NDA
Page 37

Entering Text
Deleting Text
Press the back arrow key to delete text that is left of the cursor. This is
true if you are in a field that can be edited.
Cutting, Copying, and Pasting Text
You can cut or copy text within an application to the handheld
clipboard. You can then paste the text to another location within the
same application (for example, from one email message to another)
or between applications (for example, from a task to a message).
To cut or copy text to the clipboard:
1. Open an application and select the text you want to cut or copy. To
select text, drag the stylus to select text or on Smartphones, use the
2 (select up), 4 (select left), 6 (select right), or 8 (select down) keys.
2. Open the menu at the selected text and then choose Cut or Copy
(available in Edit mode). On Smartphones, you can also press 5 to
copy the text.
The text is copied to the clipboard, and deleted from the
application if you choose Cut.
To paste text from the clipboard:
1. Navigate to a new location within the application or open a new
application.
2. Set the insertion point. Select Edit, and then Paste from the menu.
The text is pasted in the new location.
Changing Dates and Times
Dates, times, and other settings (such as notification numbers) appear
as fields you can edit.
To change a date or time:
User’s Guide 39
Proprietary and Confidential – Beta
Use and Disclosure Governed by Good Technology, Inc. NDA
Page 38

Getting Started
1.
Select the field you want to change. A Choose Date or Choose
Time window is displayed. You can also enter a time by entering
numbers in the fields.
Getting Help
Some applications on your handheld include context-sensitive Help
that you can use to learn about the applications. If you need help
using Good Messaging applications:
• On Palm OS, choose Help from the application menu
• On Windows Mobile PPC handhelds, choose Help from the Start
menu.
• On Windows Mobile Smartphones and Nokia Series 60
handhelds, choose Quick Tips from the Good Launcher.
40 Getting Started
Proprietary and Confidential – Beta
Use and Disclosure Governed by Good Technology, Inc. NDA
Page 39

3 Using Good Messaging
Email
This chapter introduces you to the Good Messaging Email
application included on your handheld.
After your handheld is set up, email messages sent to Outlook or
Lotus Notes also appear in your handheld’s Good Messaging Inbox.
You can use your handheld to manage your email the same way you
would in Outlook or Lotus Notes.
Creating Email Messages
To create an email message:
1. Use one of the following options to compose a message:
• Select Compose from either the Today, Home screen, or the
Good Launcher.
• Select Compose in the Email application.
A blank (or draft) message appears.
By default, email headings include To:, CC:, and Subject: fields.
As you enter characters in these fields, a list of your contacts
appears that match the letters you have entered. You can enter an
email address directly, or select a contact from the list. The To:
field is limited to 32 recipients.
User’s Guide 41
Proprietary and Confidential – Beta
Use and Disclosure Governed by Good Technology, Inc. NDA
Page 40

Using Good Messaging Email
When you select an item in the list, the corresponding address is
displayed in the address field.
To display matching contacts and a list of all matching addresses
in Outlook or Lotus Notes, refer to the following section
“Searching the Global Address List” on page 43.
Contacts can be any of the following:
• Personal contacts, including distribution lists.
• Shared company contacts, including distribution lists, (if use of
shared contacts folders has been enabled by your IT
administrator and by you).
• Recently used email addresses from Company History.
2. To change the importance tag or request a delivery or read receipt,
bring up the Options menu.
Change the Importance tag for the message from Normal to High
or Low. You can also request a Delivery Receipt or Request Read
Receipt.
3. Enter a message.
When writing a long message, it’s a good idea to save your work
occasionally. See the next instructions about saving email drafts.
4. When you have finished composing the email message, select
Send.
To save an email message as a draft:
1. Select Save or Save As Draft from the menu.
The message is saved in the Drafts folder on the handheld.
2. Select the message in your Drafts folder and select to open it and
continue writing it.
If you are composing an email and open another application, the
email you are composing is automatically saved as a draft. You
can get back to the message you are composing by selecting the
Compose icon.
42 Using Good Messaging Email
Use and Disclosure Governed by Good Technology, Inc. NDA
Proprietary and Confidential – Beta
Page 41

Creating Email Messages
If desired, you can compose more than one message at a time:
1. To start another message, select Compose or Compose New from
the menu.
You do not have to save the current message to start composing a
new one.
2. Use the Compose drop-down menu to switch between messages
you are composing. Messages are listed by subject.
Searching the Global Address List
If you don’t know the email address of an individual or distribution
list in your organization, and you don’t have it in your Contacts,
Company History, or Shared Contacts folders, you can look it up
wirelessly in your company’s Global Address List (GAL).
To look up an address or distribution list in your organization’s
address book, for use in the To:, CC:, or BCC: fields of an email
message that you are composing, do the following:
1. Prepare to compose an email.
2. In the To: field, begin entering an email address, first name, or last
name.
As you enter characters, a list of contacts appears that match the
text you have entered (first name, last name, or initials separated
by a space). Contacts in your Personal Contacts, Company
History, Shared Contacts folders and GAL are displayed. (See
“Contacts” on page 62 for more about Contacts.)
On some Windows Mobile Smartphones, if you have the Fast
Addressing option turned on, Good Messaging presents you with
a list of email addresses that match the text you are entering in the
To or CC field. If you want to lookup an email address in the GAL,
select Lookup.
User’s Guide 43
Proprietary and Confidential – Beta
Use and Disclosure Governed by Good Technology, Inc. NDA
Page 42

Using Good Messaging Email
To turn Fast Addressing on or off, select Menu and then Fast
Addressing. A check appears if it is turned on. If you don’t see the
name you want in the list, you can expand the list to include all
matches in your organization’s Global Address List.
To expand the list, select Lookup... from the bottom of the
displayed list.
The To: field will change to To: partial_address [Looking...], where
partial_address is the partial address you’ve entered.
The lookup occurs on your Exchange or Lotus Domino server, so
your handheld radio needs to be on and in coverage for the
lookup to succeed. If you are not in radio coverage, you’ll be
informed and given the choice of canceling the lookup or trying
again later.
3. While the lookup is in progress, you can continue adding To:, CC:,
and BCC: names or addresses, and begin composing your
message. You can save a draft of the message you are composing
or simply leave it and use other applications. The ongoing Lookup
is indicated in the message list in the Drafts folder.
4. If you have saved a draft of the message or simply left the
composition window open and moved to another application, and
you have notification turned on for “Address Lookup Received or
Complete” in preferences, you’ll be notified when the lookup is
complete. If you have On-screen Alerts turned on, the alert will be
accompanied by the lookup symbol.
Note: New GAL entries may not be immediately available.
5. To cancel the lookup, add other recipients, save, or send the
message before the lookup is complete, open the message draft or
return to the composition window. Select Save or Send, or select
the Lookup field, and bring up the context menu, which will
contain the options to add recipients or cancel the lookup.
6. When the lookup is complete, the To: field will change to To:
partial_address [nn found], where nn is the number of matching
addresses found.
44 Using Good Messaging Email
Use and Disclosure Governed by Good Technology, Inc. NDA
Proprietary and Confidential – Beta
Page 43

Viewing Email Messages
Select Lookup Results to display a list of addresses that match the
7.
partial address you’ve entered.
If no matches are found, you’ll be informed. If more than 25
matches are found, a partial list is displayed. Be more specific to
narrow the search and reduce the number of matches found.
8. To use one of the displayed addresses in the To: field, use the
context menu and choose Select.
To add an address to the Company History folder in Contacts,
select the address and from the context menu choose Add to
Company History. If you send the message using this address, it
will be added to Company History automatically. You can all use
the Save to Contacts menu option to add a contact to your
Personal Contacts.
To view the full address entry, from the context menu choose
View.
Viewing Email Messages
All email messages on your handheld, except those in the Drafts and
Sent Items folders, are synchronized with email messages in Outlook
or Lotus Notes. Your IT administrator can also enable Sent Items
synchronization for your handheld.
When you receive a new message, the New Email icon appears next
to the message in the Email list. If you have on-screen alerts activated
an alert bar also appears.
To view email messages in your Inbox:
1. Start the Email application.
User’s Guide 45
Proprietary and Confidential – Beta
Use and Disclosure Governed by Good Technology, Inc. NDA
Page 44

Using Good Messaging Email
Your Inbox appears with a list of messages. A preview of any
selected message may also be displayed at the bottom of the
screen.
The icon next to each message indicates its status.
New, unread message Opened message
New, unread message
Opened message with attachment
with attachment
Meeting request
Important message
Replied to message Forwarded message
Message is flagged as
Message is flagged for follow up
complete
Email icons that appear on the Today or Home screen include:
Composing message
New mail Working offline
Data being sent or received SMS or text message
Outgoing message
To display the first few lines of the message at the bottom of the
email list, toggle on Preview Pane from the View menu. (Click the
menu bar and then click View.) To change the message display
options, choose Display Options from the Options menu.
2. Use the menu for the selected message to mark it read/unread,
flag it for follow up, flag it complete, or to clear a flag. Exchange
flag types, colors, and due dates are not supported.
3. Select the message you want to open. The message is displayed.
To display all of the message’s header information, move the
cursor to the top of the screen using the navigation keys.
46 Using Good Messaging Email
Use and Disclosure Governed by Good Technology, Inc. NDA
Proprietary and Confidential – Beta
Page 45

Viewing Email Messages
After reviewing the message, you can close it and return to the
4.
Inbox by selecting OK, Done, or the back arrow key.
To save delivery time and extend battery life, email messages are
delivered in sections. For long messages, you may see a [More]
indicator at the bottom of the screen. To view the next section of
the message, select [More]. You can then either wait for the
additional data to download, or have the data load while you are
doing other tasks. After the additional data has been delivered,
the icon appears next to the opened message. You can also set
notifications to alert you when the delivery arrives. The amount of
additional data loaded is set by your IT administrator.
Viewing Email Attachments
You can view the following types of email attachments on your
handheld: Microsoft Office® (*.doc, *.ppt, *.xls), Adobe Acrobat®
(*.pdf), Word Perfect® (*.wpd), HTML (*.htm and .html), Rich Text
(*.rtf), message (*.msg), sound (.wav, .mp3, etc.), image (.bmp, .png,
etc.), and plain text (*.txt). Original formatting is displayed for some
attachment types when a capable third-party text viewer is present
on the handheld and your IT administrator has enabled such viewing
on your handheld.
Images within attachments (such as an image in an Acrobat or Word
file) can’t be displayed on your handheld unless a capable viewer is
present. Any attachments that are password-protected can’t be
displayed on your handheld. These attachments will appear empty if
you try to open them.
User’s Guide 47
Proprietary and Confidential – Beta
Use and Disclosure Governed by Good Technology, Inc. NDA
Page 46

Using Good Messaging Email
To view an attachment:
1. Open the message containing the attachment you want to view.
Email attachments are listed at the top of the message. If there are
more than 16 attachments, only the first 16 are listed. Select an
attachment and open the drop-down Email menu.
2. Select the attachment in text format. If your IT administrator has
enabled your handheld for high-quality attachments and you
have a capable viewer installed, you can select View High Quality
to display the attachment with it’s original formatting.
The Download item saves the attachment. A Save As screen is
displayed. Designate the name, folder, type, and location of the
file to contain the attachment contents, and select OK.
The Download To Card item saves the attachment to the
handheld’s memory card (confirm in advance that the card has
enough available free space).
On Windows Mobile Pocket PC handhelds, the Download item
saves the attachment to \Storage\My Documents\Good
Messaging\Attachments directory on the handheld. A yellow
status bar shows you when the file has been downloaded
completely.
After a few moments, the attachment appears.
You can have up to 4 attachments downloading at once. You can
be notified when a download is complete, as with the More...
operation.
To save delivery time, attachments are transferred to your
handheld in separate sections. You can do other work on your
handheld while the attachment is being delivered.
3. If necessary, select More to download more of the attachment.
If you forward a message with an attachment, the attachment is
included.
48 Using Good Messaging Email
Use and Disclosure Governed by Good Technology, Inc. NDA
Proprietary and Confidential – Beta
Page 47

Replying to Email Messages
Viewing Digitally-Signed or Encrypted Messages
The body of an email message that is encrypted (with a personal
certificate) is not sent to your handheld. The other parts of the
message (date, subject, sender) do appear on your handheld, along
with a sentence in the message body which states that you have
received this type of message. Use Outlook or Lotus Notes on your
computer to view the encrypted portion of the message.
Email messages that are digitally signed but not encrypted can be
viewed on your handheld. Make sure the sender selects the following
message options and security properties in Outlook or Lotus Notes:
• Add digital signature to this message
• Send this message as clear text signed
Make sure that the sender does not select the “Encrypt message
contents and attachments” option if you want the message to be
readable on your handheld. Likewise, don’t select this option if you
want the recipient of your message to be able to read the message on
his or her handheld.
Replying to Email Messages
To reply to an email message:
1. With the message open, Reply, Reply All, Forward, or Call Sender
from the Respond menu.
2. Enter your response.
User’s Guide 49
Proprietary and Confidential – Beta
Use and Disclosure Governed by Good Technology, Inc. NDA
Page 48

Using Good Messaging Email
The original email text is automatically included at the bottom of
the response. When you reply to a message, you cannot delete or
edit the original email text. However, you can copy the text to a
new message, then edit it.
3. When you have finished your response, select Send.
Messages you send are temporarily stored in the Outbox folder on
your handheld until an acknowledgement is received. You cannot
cancel a message while it is stored in your Outbox. After a
message is sent, a copy is stored in the Sent Items folder on your
handheld and in Outlook or Lotus Notes.
If you want to call the person who sent you email, select the email
address and then Call Sender. If the person’s phone number is in
your Contacts, the number is dialed automatically. If you have
more than one number for this contact, you may be presented
with a choice of numbers to dial.
Responding to a Meeting Request
Meeting requests sent from other users appear in your inbox with
this icon . You can use your handheld to respond to meeting
requests.
To respond to a meeting request:
1. From your Inbox, select the message to open the meeting request.
A description of the meeting appears.
If a meeting request conflicts with another item on your schedule,
a message appears in the meeting request to notify you of the
conflict. To display the schedule conflict(s), select Show.
When there are conflicts with recurring meetings, a message
notifies you of the conflicts, but you cannot see details of the
conflicting meetings.
50 Using Good Messaging Email
Use and Disclosure Governed by Good Technology, Inc. NDA
Proprietary and Confidential – Beta
Page 49

Viewing a Sender’s Email Address and Adding It to Your Contacts
Accept, decline, or tentatively accept the request using the
2.
Respond menu or on-screen buttons. After you choose a response,
a comments screen appears.
3. Add comments if desired. Then select Send to send your response.
After you send your response, the meeting request is
automatically deleted from your Inbox and moved to the Deleted
Items folder. Meeting requests that you accept are automatically
added to your calendar. (See also “Adding New Appointments or
Meetings” on page 71.)
Viewing a Sender’s Email Address and
Adding It to Your Contacts
To view a sender’s email address and add it to your contacts:
1. Open the sender’s message from your Inbox.
2. Select the sender’s name in the From field at the top of the
message. The sender’s email address is displayed.
3. To add the sender’s email address to your address book as a
contact, select Add to Contacts.
To add more information about the sender, such as company
name and telephone numbers, edit the contact. (See “Editing
Contacts” on page 65.)
User’s Guide 51
Proprietary and Confidential – Beta
Use and Disclosure Governed by Good Technology, Inc. NDA
Page 50

Using Good Messaging Email
Finding Messages
You can search for email messages based on Address, Sender, Subject,
or Body text.
To find messages:
1. Open your Inbox.
2. Select Find Messages from the menu. The Find screen appears.
3. Enter the text you want to find. Then select which parts of the
message you want to search.
You can search for text in the Address, Sender, Subject, and/or
Body of messages. All email folders on your handheld are
searched.
Searching for text in the body of a message takes a little longer
than an Address or Subject search.
4. Select Find.
A list of email messages appears that matches the search criteria
you specified.
5. Select a message and bring up the context menu so you can read,
delete, or otherwise handle it.
6. Select OK to return to the complete, unfiltered list of messages.
Sorting Messages
You can sort the list of email messages based on when the messages
are received, the sender, the subject, or by flag. By default, messages
are sorted by when they are received, and the most recent message is
placed at the top of the list.
To sort messages:
1. Open your Inbox.
2. Choose one of the following from the drop-down menu near the
upper-right corner of the email list:
52 Using Good Messaging Email
Use and Disclosure Governed by Good Technology, Inc. NDA
Proprietary and Confidential – Beta
Page 51

Using Email Folders
• By Sender
• By Subject (When you sort messages by subject, prefixes such
as “RE:,” “FW:,” and “UPDATED,” and the trailing colons are
ignored.)
• By Date
• By Flag. When you sort messages by flag, Flag for Follow Up
messages are listed first, followed by Flag Complete messages.
Using Email Folders
Your handheld comes with a set of folders you can use for managing
email messages. Folders include:
Good Messaging Email Folders
Inbox
Outbox
Sent Items
Drafts
Deleted Items
Contains new messages
Contains messages to be sent from the handheld. Does
not contain messages to be sent from Outlook.
However, your Outbox in Outlook or Lotus Notes will
contain messages to be sent from Outlook or Lotus
Notes and messages to be sent from your handheld.
Contains a copy of messages sent from the handheld.
Does not contain messages sent from Outlook or Lotus
Notes unless your IT administrator configures your
account to do so. Only headers are synchronized. You
can receive the body of the message using More.
Contains unfinished messages you have saved on the
handheld. Does not contain drafts saved from Outlook
or Lotus Notes.
Contains messages you have deleted from the handheld
and from Outlook or Lotus Notes.
In addition to the folders listed above, your handheld contains email
folders you have added to your email server account. (You can create
and rearrange folders using Outlook or Lotus Notes but not your
handheld.)
Some things to remember about email folders:
User’s Guide 53
Proprietary and Confidential – Beta
Use and Disclosure Governed by Good Technology, Inc. NDA
Page 52

Using Good Messaging Email
• Only email folders that are stored on the Exchange or Domino
email server are included on your handheld. Personal email
folders (*.pst) stored on your computer’s hard disk are not
included. (You can access both types of folders with Outlook or
Lotus Notes.)
• If you create sub-folders under Drafts, Contacts, Calendars, or
Outbox in Outlook or Lotus Notes, these folders will not appear
on your handheld. Other folders and subfolders do appear on
your handheld.
Viewing Email Folders
To view email folders:
1. Open the Email application.
The Inbox appears.
2. Select the Inbox drop-down at the top of the screen to display a list
of folders.
A plus (+) symbol on a folder indicates the folder contains subfolders. Select to expand the folder hierarchy.
3. Select the folder you want to view. The contents of the folder
appear.
Only messages sent or received after you set up your handheld
appear in the folders. Only messages sent to your Inbox or other
folders that you’ve designated for synchronization using Good
Messaging Preferences appears on the handheld. For more
information, refer to “Synchronizing Messages Filtered to Other
Folders” on page 58.
54 Using Good Messaging Email
Use and Disclosure Governed by Good Technology, Inc. NDA
Proprietary and Confidential – Beta
Page 53

Deleting Email Messages
Filing Email Messages in Folders
To file a message:
1. Select the message you want to file.
To move more than one message, hold down the Shift key and
scroll with the direction buttons or drag with the stylus to select
multiple messages. On Smartphones, to move more than one
message, press the 2 key to select messages above or the 8 key to
select messages below.
Choose Move or Move Selected To from the menu. A list of folders
appears.
2. Select the folder where you want to move the message. You can
enter a letter (such as S) on the keyboard to scroll to a folder that
has a name that starts with that letter (such as Status).
3. Select the folder. The message moves to the folder you selected.
Deleting Email Messages
To delete an email message:
1. Select the message you want to delete.
2. Choose Delete from the menu.
The email message moves to the Deleted Items folder. You can
retrieve messages by opening the Deleted Items folder and
moving messages back to the Inbox or other folders. Messages in
the Deleted Items folder can be permanently deleted using the
menu.
Notes:
• You can also delete a message when it is open by pressing the
Backspace key, or by bringing up the Email menu and choosing
Delete.
• To delete more than one message, use the 2 (select above) or 8
(select below) keys to select multiple messages, or drag the stylus
User’s Guide 55
Proprietary and Confidential – Beta
Use and Disclosure Governed by Good Technology, Inc. NDA
Page 54

Using Good Messaging Email
or hold down the Shift key and scroll to select multiple messages.
Choose Delete Selected from the menu.
• To make room on your handheld, older email messages might be
removed from the handheld automatically. Don’t worry—they’re
still on the Exchange or Domino email server and shown by
Outlook or Lotus Notes. For more information, see “Data Storage
and Aging” on page 92.
Setting Email and Display Options
You can set email and display options for your Good Messaging
Email. To set display options:
1. Open your Inbox.
2. Choose Display Options from the Options menu.
The following set of display options appears.
Display 1 or 2 lines per Email. Select 1 to display one line of text
for each message or 2 to display two lines of text in the Inbox for
each message.
Display Time (online). Select this option to display the time a
message is received in email lists.
Display Name (online). Select this option to include the sender’s
name in email lists.
Display Status Bar. Select this option to view the status bar at the
bottom of the screen.
Display Preview Pane. Select this option to view a preview of
your messages.
To set email options:
1. Open your Inbox.
2. Choose Email Options from the Options menu.
The following set of email options appears.
56 Using Good Messaging Email
Use and Disclosure Governed by Good Technology, Inc. NDA
Proprietary and Confidential – Beta
Page 55

Setting Email and Display Options
Confirm Delete. Select this option to protect your email messages
from accidental deletion. When this option is enabled, a
confirmation message appears when you press the Delete key to
delete messages.
Return Read Receipts. Select this option if you want to be notified
when email you have sent has been received and read. The
recipient’s email system must support read receipts and the
recipient must allow the receipt to be sent.
Append Signature. Select this option to automatically append
signature text to new email messages, forwarded messages, or
replies to messages that you send from the handheld. (The
signature does not affect messages you send from your PC.) This
option is turned on by default, with a message that the email has
been seen from your Good Messaging handheld.
After selecting the Append Signature option, enter your signature
in the Signature field.
If you want to distinguish between email messages sent from your
handheld and email messages sent from Outlook or Lotus Notes,
you can include additional information as part of your signature.
For example:
Mark J. Gee
Manager, Technical Operations
Data Systems, Inc.
(510) 555-1212 x56
Secure, wireless message sent via Good Messaging.
I am currently In the Office/I am currently Out of the Office.
Choose from the drop-down to automatically notify senders when
you are out of the office.
AutoReply Text. When you set the Out of the Office notification,
you can specify text to include in the AutoReply message.
Blocking Messages from a Sender
You can block delivery of messages to the handheld from a particular
sender.
User’s Guide 57
Proprietary and Confidential – Beta
Use and Disclosure Governed by Good Technology, Inc. NDA
Page 56

Using Good Messaging Email
To block delivery to the handheld from a sender:
1. Open a message from the sender you want to block.
2. Select the sender in the From field.
3. Select Block Sender from the menu.
Email messages from that sender are no longer sent to your
handheld. However, they will appear in Outlook or Lotus Notes.
To display a list of senders that are blocked, open the Inbox, bring
up the Options menu, and then choose Blocked Senders. To
unblock a sender, select the sender and then choose Remove Block
from the menu. Answer Yes when prompted.
Synchronizing Messages Filtered to Other Folders
By default, all new email messages delivered to the Inbox in Outlook
or Lotus Notes will appear on your handheld. However, if Outlook or
Lotus Notes is set up to filter incoming messages to a folder other
than the Inbox, you must set that up on your handheld as well.
Otherwise, new email messages sent to that folder will not appear on
the handheld—even if you manually move them to another folder.
To synchronize messages filtered to other folders:
1. Select Good Messaging Preferences from the menu in the Email
window. A list of preferences appears.
2. Select Email Delivery. A list of folders appears.
3. To add a folder to the list, choose Add Folder from the menu. A
list of your email folders appears.
4. Navigate to and select the folder you want to add.
You can’t add the Sent Items, Deleted Items, Outbox, or Drafts
folders to the list. These folders have pre-defined synchronization
behavior. For more information, see “Using Email Folders” on
page 53.
58 Using Good Messaging Email
Use and Disclosure Governed by Good Technology, Inc. NDA
Proprietary and Confidential – Beta
Page 57

Notes on Synchronization
Incoming messages filtered to this folder will now appear on your
handheld. (The messages filtered to the folder only display the
email header information at first. To see the message body, select
More.)
Notes on Synchronization
The following are exceptions to synchronization between Outlook
and Lotus Notes and the handheld:
• Items removed from the handheld via aging to free up space
(See “Data Storage and Aging” on page 92) are not deleted from
Outlook or Lotus Notes.
• Items in the Outlook or Louts Notes and handheld Sent Items
folders are not synchronized unless your IT administrator has
explicitly enabled this synchronization.
• New mail received on the handheld in folders other than Inbox
(you set this up in Good Messaging Preferences) will include only
the header or the header and body of the message, depending
upon which of these two options your IT administrator has
enabled for your handheld. If only the header is delivered, you
display the body of the message by using More...
• Items sent to the Drafts folder are not sent from Outlook or Lotus
Notes to handheld and vice versa.
• Items originally filtered into an unsynchronized Exchange or
Domino server folder are synchronized if moved or copied to a
synchronized folder, subject to the rules in the following item.
• For email messages older than three days that have accumulated
while your handheld was turned off (when you were on vacation
and out of coverage, for example), only headers are sent to the
handheld (unless your IT administrator enables delivery of the
complete message). Select “More” to synchronize and display the
complete message. Email messages older than a month are not
synchronized; neither message nor header is sent.
User’s Guide 59
Proprietary and Confidential – Beta
Use and Disclosure Governed by Good Technology, Inc. NDA
Page 58

Using Good Messaging Email
• Email recipients in the To: field are limited to 32.
• If you exceed your Exchange mailbox storage limit, your
handheld will display the following message: “You are over your
host email storage quota. The handheld cannot send or receive
email until you free up mail storage from your desktop
computer.”
The handheld will pause for 15 minutes before trying again to
synchronize with your Outlook or Lotus Notes accounts. Clear
some mail from your mailbox using Outlook or Lotus Notes or
request a higher quota from your IT administrator. Good
Messaging will retry every 15 minutes until you are no longer
over quota.
• Good Messaging will not synchronize Outlook or Lotus Notes
with a Pocket PC that is cradled, when the cradle is connected to a
PC currently running ActiveSync.
60 Using Good Messaging Email
Use and Disclosure Governed by Good Technology, Inc. NDA
Proprietary and Confidential – Beta
Page 59

4 Additional Applications
This chapter describes how to use the following Good Messaging
applications:
• Contacts
• Calendar
• Notes/Personal Journal
• Tasks/To Do Items
• GoodLink Forms
User’s Guide 61
Proprietary and Confidential – Beta
Use and Disclosure Governed by Good Technology, Inc. NDA
Page 60

Additional Applications
Contacts
Your handheld includes a Good Messaging address book you can use
to manage contacts. Contacts in your address book are automatically
synchronized with your address book in Outlook or Lotus Notes,
providing you with the latest, most accurate contact information. For
example, if you change a contact address in Outlook or Lotus Notes,
your handheld contact is updated too. The same is true if you add or
delete a contact.
Note: Your Pocket Outlook Contacts are not used with Good
Messaging but they remain on your handheld.
On most handhelds, phone features such as Speed Dial use Good
Messaging contacts.
Note: This phone-specific information in this section does not
apply if you are using a WiFi-only handheld.
The address book contains the following types of folders containing
contacts:
• All - Lists all contacts, personal and shared.
• Personal Contacts - Lists all personal contacts, including
distribution lists, synchronized with your Outlook or Lotus
Notes account.
• Company History - Lists all recent recipients of email from you
and all those who have recently sent you email, if they are
listed in your organization’s Global Address List (GAL). (Not
synchronized with your Outlook account.)
• Shared Contacts - Includes all public, shared Contacts folders
for your organization, synchronized with your Outlook or
Lotus Notes account. Shared contacts are an optional feature
that your IT administrator may have enabled for your
handheld. If shared contacts are available, use Good
62 Additional Applications
Proprietary and Confidential – Beta
Use and Disclosure Governed by Good Technology, Inc. NDA
Page 61

Contacts
Messaging Preference to determine and revise which shared
folders you have synchronized to the handheld.
Contacts can also be used to make phone calls with your phone and
send email and SMS messages. Good Messaging must be running for
Contacts to be available to other applications.
Understanding the Company History Folder
The Contacts application organizes your contacts into the following
types of folders: your personal contacts, your company’s shared
folders, a Company History folder, and a folder that lists all the
contacts contained in these folders.
The Company History folder provides you with a list of all those
people in your organization that you have communicated with
through email. The list includes the email addresses of those you
have sent mail to and received mail from. In addition, you can add
contacts to the Company History folder from the list of matches
found by a Lookup operation. Lookup addresses that you actually
use in a message are added to Company History automatically.
To display the Company History, select the folder name at the top of
the Contacts screen. From the drop-down list, select Company
History. To display a quick summary of information for a contact in
the list, select the contact to open it.
To display additional information about the contact, select More. All
information about the contact gathered from the GAL is displayed.
The GAL does not contain some contact information, such as home
address and notes data; you can add this information to the contact
manually using the Edit menu.
To send email to the contact, select it, bring up the Contacts menu,
and choose the desired action.
User’s Guide 63
Proprietary and Confidential – Beta
Use and Disclosure Governed by Good Technology, Inc. NDA
Page 62

Additional Applications
Viewing Contacts
To v iew con tacts :
1. Start the Contacts application.
A list of all of your contacts appears.
2. All contacts are displayed by default. To display the contents of a
different contacts folder, select the folder name at the top of the
screen.
3. Select a folder to view it.
4. Select a contact to view detailed information about it.
5. To edit or delete the contact (see following sections), send email to
or phone the contact, or close the view, select the action from the
menu.
For a contact in the Company History folder, the menu displays
options to get the body of the contact when only the header is
displayed (Get More), delete the contact, send email to the contact,
and an option to add the contact to the Personal Contacts list.
Finding Contacts
You can find contacts based on the first few characters of a first name
or last name. This feature is useful for working with long lists of
contacts. You can search your personal contacts or the GAL.
To find a contact:
1. Start the Contacts application.
2. Enter the contact name in the Find field.
The contacts that match the characters you enter appear in the list.
For example, if you enter al in the Find field, only contacts whose
first or last names start with al appear.
3. Continue to enter characters until you find the appropriate
contact. If you leave the Find Contact screen and return to it later,
the text previously entered remains and is selected by default.
64 Additional Applications
Proprietary and Confidential – Beta
Use and Disclosure Governed by Good Technology, Inc. NDA
Page 63

Contacts
If the characters you enter do not match any contacts, a [No
Matching Contacts] message appears. To redisplay contacts,
backspace to remove characters from the Find field.
4. Select the Lookup icon or Search Global Address List link.
Note: You cannot search the GAL while working offline.
Editing Contacts
To e dit a co n tact:
1. Start the Contacts application.
A list of contacts appears.
2. Select or display the contact you want to edit and bring up the
menu. Select the contact you want to edit.
3. Choose Edit from the menu.
A list of fields appears. Enter or change information in the fields
as desired.
4. When you have finished making changes, choose Save from the
menu. You’ll be prompted to save or discard your changes if you
attempt to close the window without saving.
Deleting Contacts
To delete a contact:
1. Start the Contacts application.
2. In the list of contacts, select the contact you want to delete.
3. Select Delete from the menu.
To delete more than one contact, drag or hold down the Shift key
and scroll to select multiple contacts. Select Delete Selected from
the menu.
User’s Guide 65
Proprietary and Confidential – Beta
Use and Disclosure Governed by Good Technology, Inc. NDA
Page 64

Additional Applications
To remove a shared contact from the handheld, first remove the
shared folder using Preferences > Public Folders - Shared Public
Folders - Contacts in the Preferences window.
Adding Contacts
To add a new contact to the address book using the New Contact
menu item, use the following procedure. You can move contacts from
the Company History folder to the Contacts folder using the Add to
Contact menu item.
1. Start the Contacts application.
2. Select a folder to display its contents.
3. Select New Contact from the menu.
A blank form appears.
4. Enter the contact information.
At a minimum, you must enter any one of the following items for
a contact: first name, middle name, last name, company, or email
address. The remaining fields are optional. You can enter up to
three email addresses for a contact. You can also include a
contact’s title, company address, home address, and notes about
the contact.
The handheld will accept contact phone numbers for the
following categories: Work, Mobile, Home, Pager, and Fax. The
other Outlook or Lotus Notes categories are not synchronized
with the handheld.
To set a special notification tune for the contact, choose one in the
Notification list.
66 Additional Applications
Proprietary and Confidential – Beta
Use and Disclosure Governed by Good Technology, Inc. NDA
Page 65

Contacts
Tip: If you include the country code and/or area code as part of a
contact’s phone number, Good Messaging will automatically
include this code (as required) when you dial the contact. For
more information on dialing contacts, see “Using Contacts
with Other Applications” on page 69.
5. When you have finished entering contact information, bring up
choose Save from the menu.
The new contact you added appears in the list of contacts and will
be synchronized with contacts in Outlook or Lotus Notes.
Adding and Deleting Shared Folders
In addition to synchronizing the personal contacts in your Outlook
Contacts folder with those on your handheld, Good Messaging can
also keep your handheld up-to-date with all the shared company
contacts available to your Outlook or Lotus Notes account (look in
Public Folders and All Public Folders in Outlook for a list of your
organization’s shared contact folders). Your IT administrator can
enable shared folders when setting up your handheld.
To look up information such as phone numbers for contacts in the
shared folders, use the procedure described in “Viewing Contacts”
on page 64.
Your organization may share more folders than you want to display
in your handheld’s Contacts applications. Or, your organization may
add additional shared folders that you do want to display. To add or
remove shared folders from Contacts, do the following:
1. Select Good Messaging Preferences from the menu.
A list of preferences appears.
2. Select Public Folders - Contacts.
A list of folders appears.
User’s Guide 67
Proprietary and Confidential – Beta
Use and Disclosure Governed by Good Technology, Inc. NDA
Page 66

Additional Applications
The contacts in these shared folders are the ones that your
handheld is set up to display. Initially the list may be empty. This
does not imply that your organization has no shared folders. You
can check shared folders in Outlook by expanding Public Folders
and then All Public Folders.
3. To add a folder to the list:
• Select Menu and then Add Folder. Select or click the screen to
add a folder. Choose Add Folder from the menu. A list of
available shared folders appears.
• Navigate to the folder you want to add and select the folder.
Note: You can’t add non-contact shared folders to the list.
Contacts added to this folder will now appear on your handheld.
The contacts moved to the folder only display the contact header
information at first. To see the contact body, select More.
4. To delete a folder, select it in the list, select Delete from the menu.
5. When you have finished adding or deleting folders, select Done or
Close.
Setting Contact Options
You can use contact options to change how contacts are sorted and
whether to display the contact’s phone number or company name in
the list of contacts.
To set contact options:
1. Start the Contacts application.
A list of contacts appears.
2. Select Contacts Options from the menu.
A screen of options appears.
68 Additional Applications
Proprietary and Confidential – Beta
Use and Disclosure Governed by Good Technology, Inc. NDA
Page 67

Contacts
Select the options you want to set. You can choose to sort contacts
3.
by first name, last name or company and display contacts by
phone number, company name or name only (none). You can also
set whether or not to display a confirmation message when
deleting contacts.
Note: The Sort By option does not impact the Find feature, both
first and last name are searched for matches.
Using Contacts with Other Applications
You can send email and SMS messages and make phone calls directly
from the Contacts application.
To send email or SMS from the Contacts application:
1. Start the Contacts application.
2. Select the contact to whom you want to send a message. Then
choose Compose Email or Compose SMS from the menu.
The Compose Email or Compose SMS option is only available if
the contact has a valid email or SMS address.
For a new email, a new message appears with the name of the
contact filled in.
For a new SMS message, the SMS composition screen appears
with the mobile phone number filled in. The SMS option appears
for contacts with a mobile address rather than an email address.
To make a phone call from the Contacts application:
1. Start the Contacts application.
2. Select and open the contact you want to call.
3. Select the phone number in the contact that you want to dial. It’s a
hotlink to the phone application.
User’s Guide 69
Proprietary and Confidential – Beta
Use and Disclosure Governed by Good Technology, Inc. NDA
Page 68

Additional Applications
The phone number for the selected contact will be dialed
automatically. For numbers that include country codes or area
codes or country codes, Good Messaging automatically prepends
the country/area code as necessary based on your location.
Characters to indicate a pause in dialing (such as commas) are not
recognized.
Alternatively, you can select a contact in the Contacts list and choose
Dial Contact from the menu.
Calendar
Your handheld includes a Calendar application you can use to
manage your appointments and meetings. With this application you
can:
• View existing appointments
• Add new appointments or edit existing appointments
• View appointments by day, week, month, or agenda
• Invite attendees to a meeting
• Set appointment reminders
• Create and respond to meeting requests
• Set calendar options
Meeting requests and your responses to meeting requests (for
example, acceptances) are stored in the Sent Items folder of Outlook
or Lotus Notes but not in the Sent Items folder on the handheld
unless your IT administrator has enabled this feature on your
handheld.
When your handheld is set up, all of your calendar appointments
from the past week and all future appointments are added to it.
70 Additional Applications
Proprietary and Confidential – Beta
Use and Disclosure Governed by Good Technology, Inc. NDA
Page 69

Calendar
Viewing Appointments
To view your appointments:
1. Start the Calendar application.
The calendar appears with the Day view showing and the current
day selected.
A list of appointments for the day appears. A preview of any
selected appointment is shown at the bottom of the Day and Week
screens.
To hide (or show) the preview pane, select View and then Preview
Pane from the Day or Week menu.
2. Select an appointment to view details about it.
• Although you must use your desktop computer to add or edit
recurring appointments, you can select and view recurring
appointments on your handheld.
• You can view calendar appointments by Day, Week, Month, or
Agenda. Select Day, Week, Month, or Agenda from the menu
to change views.You can also use the d, w, m, and a keys to
change views.
• A “Free” setting for an appointment is indicated by (free)
following the appointment listing in the Home screen, or (f) in
the Day and Agenda screens. A “Tentative” setting is indicated
by (tent.) following the appointment listing in the Home
screen, or (t) in the Agenda screens.
Adding New Appointments or Meetings
To add a new appointment or meeting:
1. Start the Calendar application.
2. Choose New Appointment from the menu.
A new appointment screen appears. The keyboard is displayed for
your convenience.
User’s Guide 71
Proprietary and Confidential – Beta
Use and Disclosure Governed by Good Technology, Inc. NDA
Page 70

Additional Applications
Shortcut: Select an empty time slot in the Day, Week, or Month
view to open the new appointment screen with the time of the slot
filled in.
3. Enter appointment information:
• Type in a name or subject and location for the meeting.
• Select the checkbox for an all-day event.
• To enter a date, select a date field. In the window that opens,
select year, month, and then select the starting or ending day to
close the window. Or select Today to make the appointment
for the current day.
• To enter a time, select a time field. Set the time by entering the
hour and minutes into the appropriate fields in the window
that opens, or select hour and minutes by selecting the arrows
to increment or decrement them. Then select AM or PM, and
OK. (Not necessary for all-day events.)
• Use the drop-downs to specify start and end dates and times
for the appointment. Enter the time by using the numbers on
the handheld.
4. To invite attendees, select the Invite field and start entering
characters.
As you enter characters, a list of contacts appears that match the
letters you have entered.
5. Select a contact from the list.
You can also enter an email address of an attendee who is not in
your contacts list.
6. To invite additional people, select the Invite field. Then, choose
Add Invite from the menu. (When you first edit an existing
appointment, an additional, empty Invite: field is provided.)
An additional Invite field appears. Good Messaging automatically
sends meeting requests to all attendees on the list.
To remove a name from the invitation list, select the name, bring
up the menu, and then choose Remove Invite or Clear.
72 Additional Applications
Proprietary and Confidential – Beta
Use and Disclosure Governed by Good Technology, Inc. NDA
Page 71

Calendar
When you have finished entering your appointment, select Save.
7.
The appointment is added to your calendar and invitations are
sent.
Changing Appointments
To change an appointment:
1. Start the Calendar application.
2. Select the appointment you want to change. Then bring up the
menu and do either of the following:
• To edit an appointment, choose Edit.
• To delete an appointment or cancel a meeting, choose Delete.
You can edit only appointments that you created. For recurring
appointments you created in Outlook or Lotus Notes, you can edit
a specific occurrence or the subject, location, notes, or attendees
for the series of meetings. You cannot use the handheld to change
the dates, times, or other rules for a series.
3. When you have finished changing the appointment, choose Save
from the menu.
The changes are sent to any attendees you invited. Attendees
deleted from a meeting are not notified.
Setting Calendar Options
To set calendar options:
1. Start the Calendar application.
2. Choose Calendar Options from the Options menu.
To turn meeting reminders on/off, select Good Messaging
Preferences, Notification, and then Reminders.
3. When you have finished setting calendar options, select Done or
OK to return to the calendar.
User’s Guide 73
Proprietary and Confidential – Beta
Use and Disclosure Governed by Good Technology, Inc. NDA
Page 72

Additional Applications
Notes/Personal Journal
Your handheld includes a Notes or Personal Journal application that
you can use to jot down questions, ideas, directions, checklists, or any
other bits of information you want to store on your handheld. Notes
on your handheld are automatically synchronized with Notes in
Outlook. Personal Journal items on your handheld are automatically
synchronized with Personal Journal items in Lotus Notes.
The Notes/Personal Journal application enables you to:
• View or edit existing notes or journal entries
• Create new notes or journal entries
• Copy note or journal text to other applications
Viewing and Editing Notes
To v iew not es:
1. Start the Notes/Journal application.
A list of notes or journal entries appears.
If you don’t have any notes defined, a [No Notes] or [No Journal
Entries] message appears.
2. Select the note or entry you want to view.
The text of the note or entry appears. If necessary, you can scroll or
press the spacebar to page down.
3. To edit the note or entry, select Edit from the menu.
4. When you have finished making changes, select Save from the
menu.
Adding Notes/Journal Entries
To create a new note:
1. Start the Notes/Journal application.
2. Select New.
74 Additional Applications
Proprietary and Confidential – Beta
Use and Disclosure Governed by Good Technology, Inc. NDA
Page 73

Tasks/To Do Lists
A new, blank note appears with an insertion point at the
beginning of the note.
3. Enter text in the note or journal entry. Just as in Outlook or Lotus
Notes, the first line is used as the title of the note.
4. When you have finished entering characters, select Save.
The list of notes reappears.
Deleting Notes/Journal Entries
To delete a note or journal entry:
1. In the list of notes or journal entries, select the item you want to
delete.
2. Select Delete from the menu.
To delete more than one note, drag or hold down the Shift key and
scroll or use the #2 or 8 keys to select multiple notes. Then, select
Delete from the menu.
Tasks/To Do Lists
A task or to do list is a personal or work-related activity you want to
track through completion. The Task or To Do List application enables
you to:
• View or edit existing tasks or to do lists
• Create new tasks or to do lists
• Specify task or to do list priority
• Set task or to do list reminders
Tasks created on your handheld are automatically synchronized with
tasks in Outlook. To Do lists created on your handheld are
User’s Guide 75
Proprietary and Confidential – Beta
Use and Disclosure Governed by Good Technology, Inc. NDA
Page 74

Additional Applications
automatically synchronized with to do lists in Lotus Notes. For
example:
• If you add (or delete) a task or to do item in Outlook or Lotus
Notes, the task is automatically added (or deleted) on your
handheld and vice versa.
• Marking a task or to do list complete on your handheld
automatically marks the task complete in Outlook or Lotus Notes
and vice versa.
When your handheld first synchronizes tasks or to do lists with
Outlook or Lotus Notes, only yet-to-be-completed tasks and to do
lists are loaded on the handheld.
Viewing Tasks/To Do Lists
To view existing tasks:
1. Start the Tasks/To Do List application.
A list of tasks appears. (If you don’t have any tasks defined, a
[No Tasks] message appears.)
Tasks in the task list are sorted in the following way:
• Primary sort is Uncompleted/Completed, with Uncompleted
at the top of the list.
• Secondary sort is your selection: Due Date or Priority.
If Due Date is selected, the tasks or to do lists with no dates are
placed at the top of the list. The rest of the tasks or to do lists
are ordered from later date to earlier date.
If Priority is selected, High Priority tasks are placed on top,
then Normal, then Low.
• Tertiary sort is alphabetically by Subject.
Configure secondary sorts using Task or To Do Options in the
menu.
2. Select a task or to do list.
A detailed description of the task or to do list appears.
76 Additional Applications
Proprietary and Confidential – Beta
Use and Disclosure Governed by Good Technology, Inc. NDA
Page 75

Tasks/To Do Lists
When you have finished reviewing the description, select OK or
3.
Done.
Adding New Tasks/To Do List
To add a ne w Task o r To Do L ist:
1. Start the Tasks/To Do List application.
A list of tasks or to do lists appears.
2. Select New.
A form appears.
3. Enter a task Subject.
Subject is a short name or description of the task. This description
appears in the task list.
4. Choose a task or to do list priority and status.
Tasks or to do lists can have a High, Normal, or Low priority.
Task or to do list status can be Not Started, In Progress,
Completed, Waiting, or Deferred.
5. If desired, set a due date and/or reminder.
• To set a due date, select the Date field and then select. Then
enter a due date for the task. To do so, move the cursor to
month, day, or year, click, and then enter the desired setting
using the directional keys.
• To set a reminder, select the Reminder field and then select.
Then enter a reminder date and time.
When you set a task or to do list reminder, a notification appears
at the time you specify.
6. When you have finished defining the task, bring up the menu and
select Save.
The new task you created is included in the Task or To Do list.
User’s Guide 77
Proprietary and Confidential – Beta
Use and Disclosure Governed by Good Technology, Inc. NDA
Page 76

Additional Applications
Editing Tasks/To Do Lists
To edit a task or to do list:
1. In the task or to do list, select the item you want to edit. Choose
Edit from the menu.
A description appears.
2. Change the information.
3. When you have finished making changes, select Save from the
menu.
Deleting Tasks/To Do Lists
To delete a task or to do list:
1. Select the item you want to delete and select Delete from the
menu.
To delete more than one task, drag or hold down the Shift key and
scroll or on Smartphones, use the #2 or #8 keys to select multiple
tasks. Then choose Delete from the menu.
Setting Task/Do List Options
You can use the Task or To Do options to sort items by due date or
priority.
To s et Task or To D o opti o ns:
1. Start the Task or To Do List application.
2. Select Task or To Do options from the menu.
A list of options appears.
3. Select the options you want to set. When you have finished setting
options, select OK or Done.
78 Additional Applications
Proprietary and Confidential – Beta
Use and Disclosure Governed by Good Technology, Inc. NDA
Page 77

GoodLink Forms Applications
GoodLink Forms Applications
Note: This section only applies to Palm OS handhelds.
If your company purchased the GoodLink Forms™ wireless
information system, your handheld can include the GoodLink Forms
icon for using GoodLink Forms applications. GoodLink Forms
applications let you use your handheld to access information stored
behind your company’s firewall or on public Internet sites. For
example, you can use a GoodLink Forms application to query
information and submit data to applications such as a corporate
directory, sales order tracking, customer profile database, or airline
flight schedules.
Important: GoodLink Forms may not be supported on some
handhelds. Check with your Good Technology sales
representative for details.
A GoodLink Forms application allows you to enter data or select
options on the handheld and then submit the information. The
application automatically sends your request to the appropriate
server or automated program. If you are outside wireless network
coverage when you submit the request, the GoodLink Forms
application automatically sends your request when network
coverage is available. The requested information is returned to you in
an email message, which you can receive while working on other
tasks.
Note: GoodLink Forms has also been distributed as GoodInfo.
Some aspects of the user interface and this documentation may
reflect this fact.
Installing GoodLink Forms Applications
A GoodLink Forms application is sent to you as an attachment to an
email message. After you install the application on your handheld,
you can use the application.
User’s Guide 79
Proprietary and Confidential – Beta
Use and Disclosure Governed by Good Technology, Inc. NDA
Page 78

Additional Applications
To install a GoodLink Forms application:
1. Open the Inbox and select the message that contains the
GoodLink Forms application.
2. Do either of the following:
• Select to open and view the message.
• Bring up the menu and then choose Open.
The message opens.
3. Select the Install Application button.
The application downloads and installs on your handheld. While
you’re waiting, you can switch to another application screen if
you want to do other work.
If there is a problem that prevents downloading or installation, an
error message appears. Inform your IT administrator of the
message’s content. (See “Installation Error Messages” on page 80.)
After the application installs successfully, you receive a
confirmation message.
4. Select OK.
If you install an application that is an update to a previously
installed application, the newer application automatically replaces
the previously installed one.
Note: After a successful installation, the message that contained the
application is automatically deleted from your Inbox and
moved to the Deleted Items folder.
Installation Error Messages
Contact your IT administrator if any of the following errors occur
during downloading or installation:
Application is too large. The application is larger than the maximum
size of 50 KB. This error occurs before download and prevents the
application from being installed.
80 Additional Applications
Proprietary and Confidential – Beta
Use and Disclosure Governed by Good Technology, Inc. NDA
Page 79
GoodLink Forms Applications
The sender of this GoodLink Forms application is not from a
permitted email domain. The sender of the application is not in the
same top-level domain as you, which is not permitted. This error
occurs before download and prevents the application from being
installed.
Syntax error in form. The application’s code contains a syntax error
and is unusable. This error occurs after download and prevents the
application from being installed.
Using GoodLink Forms Applications
After you install the first GoodLink Forms application, GoodLink
Forms is added automatically to the navigation pane.
To use a GoodLink Forms application:
1. Select GoodLink Forms on the Today screen.
A list of installed GoodLink Forms applications appears.
List of installed GoodLink
Forms applications
User’s Guide 81
Proprietary and Confidential – Beta
Use and Disclosure Governed by Good Technology, Inc. NDA
Page 80

Additional Applications
2.
Select the application you want to use.
The application’s form opens. For example, this is a Directory
Lookup application.
3. In this application, you only need to click a button to obtain a list
from the target web site. In other applications, you may need to
fill in a form by entering text, choosing options from menus, and
selecting check boxes as necessary. Scroll to make sure you see the
entire form.
4. Do any of the following:
• If you want to clear a form, bring up the menu and choose
Reset Form. To cancel a request, choose Cancel.
• When you’re ready to submit data, bring up the menu and
choose Submit Query. Alternatively, you can select the button
on the bottom of the form.
5. To save the settings on a form, choose Set Defaults. The next time
you use the same application, the text you entered previously is
entered automatically in each field.
• To save a draft of a form, bring up the menu and choose Save
As Draft. The next time you use the same application, the text
you entered previously is automatically entered in each field.
You can then use the same text or enter new text. The form is
saved with a DRAFT suffix.
82 Additional Applications
Proprietary and Confidential – Beta
Use and Disclosure Governed by Good Technology, Inc. NDA
Page 81

GoodLink Forms Applications
A message appears confirming that the data has been submitted.
The application sends the data in an email message to the server
or automated program.
6. After a few minutes, check your Inbox (or the appropriate folder if
you’re using mail filters) for a message from the server or
program that contains the information you requested. Open the
message to display the information. For example:
Notes:
• Some applications require you to enter a user name and password
to access a server. Each GoodLink Forms application remembers
the user name and password after you enter them once so that you
don't have to enter them every time you use the same application.
However, your password will time-out according to the Timeout
setting specified in your Lock preferences, or after one hour if you
have not specified a Timeout setting.
• If you use multiple applications that access different servers and
require different user names and passwords, you must enter the
appropriate user name and password whenever you use each
application.
• If you want to display a report that includes formatting, select
Monospace Font from the Email menu. The report is displayed
with the correct formatting and will include such styles as left or
right justification.
User’s Guide 83
Proprietary and Confidential – Beta
Use and Disclosure Governed by Good Technology, Inc. NDA
Page 82

Additional Applications
Deleting GoodLink Forms Applications
You can delete applications you never want to use again.
To delete a GoodLink Forms application:
1. In the list of GoodLink Forms applications, select the application
you want to delete.
2. Bring up the menu and choose Delete.
To delete more than one application, hold down the Shift key and
scroll (if necessary) to select multiple applications. Then bring up
the menu and choose Delete Selected.
84 Additional Applications
Proprietary and Confidential – Beta
Use and Disclosure Governed by Good Technology, Inc. NDA
Page 83

5 Preferences and
Maintenance
This chapter describes how to maintain your handheld. Topics
described in this chapter include:
• Setting Good Messaging preferences
• Using Autotext
• Using passwords
• Understanding data storage and aging
User’s Guide 85
Proprietary and Confidential – Beta
Use and Disclosure Governed by Good Technology, Inc. NDA
Page 84

Preferences and Maintenance
Setting Good Messaging Preferences
Your handheld includes a set of Good Messaging preferences you
can customize for your individual use. To view or change
preferences, select Preferences from the Options menu of any Good
Messaging application or from the Good Launcher screen. A list of
preferences appears. You can set some of the preferences. Others are
informational or may not be supported on your handheld.
Option Description
About
Good Messaging
Applications Lists Good applications and application status on
Autotext Changes Autotext settings. Autotext includes
Backup Backs up Good applications. Email, contacts, etc., are
Email Delivery Specifies which email messages sent to folders in
Good Intranet Activates Good Intranet (if available) on your
Help Contains Help information for preferences.
Lock Enables, disables (if allowed), and changes the
Contains the Good Messaging version, copyright and
trademark information.
your handheld. For more information, see “Software
Updates and Policy Changes” on page 94.
shortcuts you can use for entering text.
not backed up.
And/or changes the passcode necessary to access the
backup location.
Outlook or Lotus Notes will be synchronized with
your handheld.
handheld. See your IT
handheld password. Sets the time interval for an
automatic password lock. Also enables or disables
the automatic Keyguard lock when no password is
set for the handheld.
administrator for details.
86 Preferences and Maintenance
Proprietary and Confidential – Beta
Use and Disclosure Governed by Good Technology, Inc. NDA
Page 85

Setting Good Messaging Preferences
Option Description
Notification Sets the sound and vibrate on/off, sound volume (if
applicable) and the tune for email notification. You
can enable on-screen alerts (a dialog window with
details) for email, completed More requests, and
completed lookups for saved drafts.
Allows you to specify if you want to be notified for
all incoming email messages (Normal) or those
marked High Importance, for the Inbox folder and
for other folders that synchronize with your Outlook
account.
Allows you to specify if you want to be notified
when a Lookup or More operation completes, or for
Calendar or Task reminders.
Allows you to enable the On-screen Alerts
preference. Use On-screen Alerts when you want a
notification dialog to appear on-screen with
information about new messages arriving, and when
a lookup or More operation completes.
If more than one notification in a category (Email,
Lookup) arrives while others remain in the
notification dialog, the notifications are listed in
order of arrival. Notifications are removed when you
address them (i.e., read new email, open email after a
More completes, or check Lookup results).
Phone Sets the dialer to the handheld’s native phone dialer.
By default, the Good Messaging dialer is used. If
enabled, confirms the phone number before dialing.
Public folders Contacts
If enabled by your
can use the contacts listed in public shared folders.
IT administrator, your handheld
This feature is explained in “Adding and Deleting
Shared Folders” on page 67.
Screen Sets the font size for on-screen text.
Status A detailed description of handheld status, such as
Time Zone Set the time zone for the handheld.
User’s Guide 87
Proprietary and Confidential – Beta
Use and Disclosure Governed by Good Technology, Inc. NDA
Free Memory and handheld serial number.
Page 86

Preferences and Maintenance
Option Description
Tod ay S creen
This option
applies to Palm
handhelds only.
Sets the display text that appears on the Good Today
screen.
For Palm OS handhelds, this option also sets the
button on your handheld that opens the Today
screen. Choices are:
Treo 600: The Sun (Power) key or the Home key.
Treo 650: The Side key or the Home key
If you choose the Side key, pressing this key from any
GoodLink application returns you to the Good Today
screen. Pressing the Home key returns you to Palm
home.
If you choose the Side key, pressing and holding this
key from any Good application returns you to the
Good Today screen. Pressing the Home key returns
you to Palm home.
If you choose the Home key, pressing this key form
any Good application returns you to the Good Today
screen. To launch Palm applications, return to the
Good Today screen, then press the Home key or
choose Go to Palm Applications from the Good
Messaging menu.
Web Links Specifies whether to use Good Intranet or the
You can set additional preferences for your handheld by using
handheld preferences.
Backing Up Good Messaging
On some handhelds, you can back up your Good Messaging
applications to a memory card, persistent flash memory, or other
locations supported by your handheld. Then, if they are lost or
corrupted (by deleting them accidentally, for example), you can
restore them from the backup location.
To back up Good Messaging:
88 Preferences and Maintenance
Proprietary and Confidential – Beta
Use and Disclosure Governed by Good Technology, Inc. NDA
handheld browser to access links.
Page 87

Backing Up Good Messaging
If backing up to a card, insert it.
1.
2. From preferences, choose Backup.
3. Select a backup location from the drop-down menu. Depending
on your handheld, choices may include SD Card or other options.
4. Enter a new passcode. Enter it again to confirm.
5. Select Backup.
GoodLink is backed up to the location you specified.
Important: Email messages, contacts, and so on, are not backed up
but they are resynchronized with your Outlook account.
Using Notifications
The Notification option in Preferences specifies which handheld
events trigger a notification to you and the format of that notification.
Events that can trigger a notification (your choice of any or all):
• Email in Inbox, Normal priority
• Email in Inbox, High priority
• Email in other folders that synchronize with your handheld,
Normal priority
• Email in other folders that synchronize with your handheld, High
priority
• “More” operation completed
• Address lookup completed
• Reminders
Types of notification that can be set (more than one are allowed for
an event):
• Sound
• Vibrate
User’s Guide 89
Proprietary and Confidential – Beta
Use and Disclosure Governed by Good Technology, Inc. NDA
Page 88

Preferences and Maintenance
• On-screen alert
To set sound and vibration notifications:
1. In the Preferences Notification window, from the drop-down
menu, select the event that triggers the tone and/or vibration.
2. Select the boxes to enable on-screen alerts, sound and vibration
notification, and use the drop-down menu to choose the
notification sound. You can also set notification volume.
On-screen alerts: If more than one notification in a category
(Email, Lookup) arrives while others remain in the notification
dialog, the notifications are listed in order of arrival. Notifications
are removed when you address them (for example, read new
email, and so on.).
For on-screen alerts, if you choose Snooze instead of Go To, a
reminder (blinking asterisk (*) symbol) appears in the upper left
corner of your screen. This symbol remains until you view the
alert.
90 Preferences and Maintenance
Proprietary and Confidential – Beta
Use and Disclosure Governed by Good Technology, Inc. NDA
Page 89

Backing Up Good Messaging
Using Autotext
Your Good Messaging handheld includes an Autotext feature to help
you compose messages. For example, as you enter characters,
Autotext automatically enters capital letters at the beginning of
sentences and translates abbreviations into complete words.
Autotext Features
Item Description
Capitalization
and punctuation
Spelling Commonly misspelled words are corrected. For
Abbreviations Abbreviations and acronyms are replaced with complete
Variables Enter the letters ct (for current time) to automatically
Special
Symbols
Numbers In fields where numbers are expected, you can type
When entering text in a message body, note, or task, you
can press Space twice at the end of a word or sentence to
insert a period (.) and a space automatically, as well as
capitalizing the next word.
example, the misspelled word thier is replaced with their.
words. For example, mo is replaced by month.
insert the time. Enter td (for today’s date) to
automatically insert the current date.
In email address fields, press Space twice to
automatically insert an @ symbol. Press Space again to
enter a dot (.) symbol. Press Space again to automatically
enter a com suffix. Continue to press Space to cycle
between .com, .net, .gov, .org, .mil, and .edu suffixes.
numbers without using the Alt key (for example, when
you enter a Contact’s phone number or use the
Calculator). This feature applies to Nokia Series 60 and
Palm OS handhelds only.
To view Autotext settings:
1. Select Preferences from the Options menu.
2. Select Autotext.
A list of Autotext settings appears. These settings show the
substitutions Autotext makes as you enter characters.
User’s Guide 91
Proprietary and Confidential – Beta
Use and Disclosure Governed by Good Technology, Inc. NDA
Page 90

Preferences and Maintenance
To change an Autotext setting:
1. Scroll to the setting you want to change using the five-way
navigation arrows and select. Alternatively, you can scroll to a
setting using the arrow keys, select it, open the Preferences menu
and choose Edit.
2. An edit screen appears. Enter new replacement text.
3. When you have finished making the change, choose Save. Or,
click Done and you’ll be prompted to save your changes.
The Autotext settings are updated to show your changes.
To add a new Autotext setting:
1. In the Autotext screen, select New from the menu. An edit screen
appears.
2. Define a new setting. Be sure to include both the original and
replacement text.
3. Select Save from the menu. The Autotext screen reappears with
the new setting you added.
Data Storage and Aging
Personal information and email on your handheld is stored
indefinitely, with the following exceptions:
• Each Good Messaging application is guaranteed a certain amount
of memory for data storage. The remainder of memory is available
for extra data storage by any of the applications.
• If storage space is needed, calendar appointments and meetings
older than two months are removed from the handheld, but are
not deleted from the user’s Outlook or Lotus Notes account. If
more space is required, calendar data older than three days is
removed.
92 Preferences and Maintenance
Proprietary and Confidential – Beta
Use and Disclosure Governed by Good Technology, Inc. NDA
Page 91

Data Storage and Aging
• The Email application stores at least 250 messages (the
approximate number of messages that can fit in the Email
guaranteed space). Maximum number of stored email messages is
determined by available memory on the handheld. This
maximum number starts at 5,000 messages for a handheld with
the minimum allowed total memory.
• When email must be removed, messages older than two weeks in
the Deleted Items folder are removed first, followed by older
messages in the Sent folder. If more space is required, the oldest
messages in any folder are removed, folder by folder, day by day,
until enough space is obtained. These messages are not removed
in Outlook.
• You can mark critical email messages so that they are not removed
by opening the message, selecting Mark As and then Mark
Permanent from the menu.
• The Company History folder ages out items on a least-recently-
used basis, maintaining a minimum of 250 items in the folder.
• If space is needed, completed tasks older than one week are
deleted.
• If there is insufficient space, incoming data for the application
stops downloading. If you delete data on the handheld to free up
space, the data downloading resumes. No new incoming data is
lost. It is held by Good Messaging Server and then sent when
space becomes available.
If your handheld runs out of space for new contacts, notes, or tasks,
and data aging cannot solve the problem, you must delete existing
contacts, notes, or tasks to make room for the new ones. Do this from
the handheld, not from Outlook. To preserve contacts, notes, or tasks
before deleting them from the handheld, use the Outlook Export
feature on your PC. Note that you export the data from Outlook and
your PC and then delete it from the handheld.
User’s Guide 93
Proprietary and Confidential – Beta
Use and Disclosure Governed by Good Technology, Inc. NDA
Page 92

Preferences and Maintenance
Software Updates and Policy Changes
If enabled by your IT administrator, you can use Good Messaging’s
OTA Setup capabilities to install or update software on your
handheld. You can also respond wirelessly to policy changes (such as
password updates) activated by your IT administrator.
Installing Additional Software
With wireless setup, your IT administrator can notify you when
additional applications are available for you to install. Or, if an
application download is mandatory, it will occur in the background
on your handheld.
1. When a new application is available, a notification appears on
your handheld in a yellow alert bar on the bottom of your screen.
2. To install the application:
a. When the notification appears, choose Yes to download the
software.
b. After the download notification appears on your handheld,
choose Yes to start the installation.
3. To install the application at a later date:
a. When the notification appears, choose No.
b. To install the application later, select Good Messaging Prefer-
ences and then Applications. Then, select the application you
want to download and install.
Applications listed in Good Messaging Preferences can have the
following states:
State Description
Download Enabled by the IT administrator. Click to download
and install the application on your handheld.
Installed Already downloaded and installed. Click to reinstall
the application.
Downloading Application is currently downloading.
94 Preferences and Maintenance
Proprietary and Confidential – Beta
Use and Disclosure Governed by Good Technology, Inc. NDA
Page 93

Software Updates and Policy Changes
Install Downloaded but not installed. Click to install the
application.
Scheduled Application is scheduled for downloading.
Pending Application is pending installation.
Verifying Application is downloaded to handheld and is being
verified.
Install Alert A problem exists with the application’s certificate.
Click Install to continue with the installation. Contact
your IT administrator for more information.
Updating Good Messaging and Other Applications
With wireless setup, your IT administrator can notify you when
software updates for Good Messaging (or other applications) are
enabled on your handheld. Follow the on-screen instructions to
perform the update. Notifications are displayed when you change
applications within Good Messaging.
Mandatory Updates
Occasionally, your IT administrator may designate an application
download and installation as mandatory. In this case, the software is
downloaded wirelessly in the handheld background during offhours without prior notification. You can override the download
schedule using Good Messaging Preferences and Applications.
Once the mandatory application is downloaded, you’re prompted to
install it. If you decline, you’re reminded later. If you continue to
decline, the software is finally installed automatically. The number of
reminders is determined by your IT administrator.
Policy Changes
With wireless setup, your IT administrator can notify you about
policy changes (for example, password security) for your handheld.
When policies changes occur, a notification appears.
1. Select OK to confirm the notification.
User’s Guide 95
Proprietary and Confidential – Beta
Use and Disclosure Governed by Good Technology, Inc. NDA
Page 94

Preferences and Maintenance
2. In some cases, a policy change may require you to enter or change
information on your handheld (for example, resetting your
password). Follow the on-screen instructions as directed.
A few examples of policy changes are listed below. Additional policy
changes may occur.
Handheld Policy Changes
Change Description/Action Required
Password
Required
Password
Policy Change
A password is now required for your handheld. Follow
the on-screen instructions to create a new password.
Enter your password to make sure it meets new policy
requirements. Policy requirements set by the IT
administrator may include:
– Setting a minimum password length
– Requiring or disallowing certain characters (upper/
lower case, alphanumeric combinations, and so on)
– Restricting password reuse (password history)
-–Adding password expiration
– Limiting repeated characters in passwords
– Restricting personal information (such as a user’s
initials) in passwords
IT Administrators can also set policies for:
– Setting a maximum number of attempts a user has to
successfully enter a password
– Erasing handheld information after a number of failed
password attempts
Global Address
List Lookup
Handheld
Timeout
Global Address List Lookup has been enabled or disabled.
No action required.
Timeout values have been added or changed on your
handheld. No action required. You cannot lengthen or
disable timeout values set by your
Public Folders
for Contacts
96 Preferences and Maintenance
Proprietary and Confidential – Beta
Use and Disclosure Governed by Good Technology, Inc. NDA
Public folders for contacts have been enabled or disabled.
No action required.
IT administrator.
Page 95

Software Updates and Policy Changes
Handheld Policy Changes
Change Description/Action Required
Rich
Attachments
Attachment
Size
Rich attachments in email messages have been enabled or
disabled. No action required.
IT administrator has set a maximum size for email
You r
attachments. No action required. Attachments that exceed
the maximum size cannot be viewed on your handheld.
User’s Guide 97
Proprietary and Confidential – Beta
Use and Disclosure Governed by Good Technology, Inc. NDA
Page 96

Preferences and Maintenance
98 Preferences and Maintenance
Proprietary and Confidential – Beta
Use and Disclosure Governed by Good Technology, Inc. NDA
Page 97

6 Keyboard Command
Reference
The following tables include keyboard shortcuts that you can use
with Good Messaging applications.
Note: Good Messaging applications run on handhelds that may
include on-screen keyboards, integrated keyboards, or
attached keyboards. Shortcuts that require special keys such
as Ctrl, Page up/down, or arrow keys only work on
handhelds that include those keys.
Shortcuts for Palm OS Handhelds
Location Key Description
General t, b Moves to top/bottom of a screen. Doesn’t apply to
edit screens.
l Locks handheld when password is set.
n Moves to next item in application
p Moves to previous item in application
g Goes to Good Launcher
Spacebar Pages down in Email, Tasks, Notes, and Help
GoodLink
Tod ay
screen
(Quick
Launcher
off)
Email list n Moves to the next day’s messages (down the list)
c, t, n, p, f, a Opens Contacts, Tasks, Notes, Preferences,
GoodLink Forms (if present), Good Intranet (if
present), respectively
s Initiates Send/Receive Now command
p Moves to the previous day’s messages (up the list)
d, backspace Deletes the selected message
Enter Opens the selected message
m Moves selected message to a folder
User’s Guide 99
Proprietary and Confidential – Beta
Use and Disclosure Governed by Good Technology, Inc. NDA
Page 98

Keyboard Command Reference
Location Key Description
Reading a
message
r Reply to sender
a Reply to all
fForward message
m Moves message to a folder
n, p Opens the next or previous message respectively
Note: No shortcuts are available while in the Email Edit, Reply, or Forward screens.
Additional shortcuts are available by pressing the menu button and then the letter
indicated in the dropdown menu.
Shortcuts for Windows Mobile Pocket
PC Handhelds
Location Key Description
General t Moves to top of a screen. Doesn’t apply to edit or
help screens.
b Moves to bottom of a screen. Doesn’t apply to edit
or help screens.
g Returns to the Good Launcher.
n Moves to next item in application
p Moves to previous item in application
Spacebar Pages down in Email, Tasks, Notes, and Help
Tab Moves cursor to next field
From attached keyboard:
Ctrl-g Displays Good Launcher
Ctrl-m Opens context menu
Ctrl-w Closes window
Fn-up/
down
arrows
Alerts o View alert
x Dismiss alert
tap alert Closes top on-screen alert and opens respective
Email list n Moves to the next day’s messages (down the list)
p Moves to the previous day’s messages (up the list)
d,
backspace
Enter Opens the selected message
Page up/down
email.
Deletes the selected message
100 Keyboard Command Reference
Use and Disclosure Governed by Good Technology, Inc. NDA
Proprietary and Confidential – Beta
Page 99

Shortcuts for Windows Mobile Pocket PC Handhelds
Location Key Description
m Moves selected message to a folder
Ctrl-n Opens a window to compose a new message
(attached keyboard)
Reading a
message
Note: No shortcuts are available while in the Email Reply, Reply All, or Forward screens.
Additional shortcuts are available by pressing the menu button and then the letter indicated in the
drop-down menu.
r Reply to sender
a Reply to all
fForward message
m Moves message to a folder
n, p Opens the next or previous message respectively
Ctrl-n Opens a window to compose a new message (attached
keyboard)
Ctrl-h Shows/hides message header (attached keyboard)
Shortcuts on Windows Mobile Smartphones
The number keys on your phone also act as navigational shortcuts
when you are using a Good Messaging application.
Key Shortcut
1Top
2Select up
3Page up
4Select left
5Copy
6Select right
7 Bottom
8Select down
9Page down
0 Good Launcher
* View alert
# Dismiss alert
User’s Guide 101
Proprietary and Confidential – Beta
Use and Disclosure Governed by Good Technology, Inc. NDA
Page 100

Keyboard Command Reference
Shortcuts on Symbian OS, Nokia
Series 60 Handhelds
Location Key Description
General t, b Moves to top/bottom of a screen. Doesn’t apply to
edit screens.
n Moves to next item in application
p Moves to previous item in application
g Goes to Good Launcher
o Opens alert
x Closes alert
Spacebar Pages down in Email, Tasks, Notes, and Help
Good
Launcher
Email List s Initiates Send/Receive Now command
Reading a
message
Note: No shortcuts are available while in an editable field.
c, t, n, p Opens Contacts, Tasks, Notes, Preferences,
respectively
n Moves to the next day’s messages (down the list)
p Moves to the previous day’s messages (up the list)
d, backspace Deletes the selected message
Enter Opens the selected message
m Moves selected message to a folder
u Marks as Unread
v Shows/Hides preview pane
r Replies to sender
a Replies to all
f Forwards message
m Moves message to a folder
n, p Opens the next or previous message respectively
l Flags message
102 Keyboard Command Reference
Use and Disclosure Governed by Good Technology, Inc. NDA
Proprietary and Confidential – Beta
 Loading...