

Page 1

Nokia G100
Ghid de utilizare
Ediția 2022-06-12 ro-RO
Page 2

Nokia G100 Ghid de utilizare
Cuprins
1 Despre acest ghid de utilizare 5
2 Pregătire pentru utilizare 6
Actualizarea telefonului . . . . . . . . . . . . . . . . . . . . . . . . . . . . . . . . . . . . . 6
Keys and parts . . . . . . . . . . . . . . . . . . . . . . . . . . . . . . . . . . . . . . . . . . 6
Insert the SIM and memory cards . . . . . . . . . . . . . . . . . . . . . . . . . . . . . . . 7
Încărcarea telefonului . . . . . . . . . . . . . . . . . . . . . . . . . . . . . . . . . . . . . . 8
Switch on and set up your phone . . . . . . . . . . . . . . . . . . . . . . . . . . . . . . . . 8
Use the touch screen . . . . . . . . . . . . . . . . . . . . . . . . . . . . . . . . . . . . . . 9
3 Protejarea telefonului 13
Blocarea și deblocarea telefonului . . . . . . . . . . . . . . . . . . . . . . . . . . . . . . . 13
Protejarea telefonului prin blocarea ecranului . . . . . . . . . . . . . . . . . . . . . . . . 13
Protejarea telefonului prin amprentă . . . . . . . . . . . . . . . . . . . . . . . . . . . . . 13
Protejarea telefonului cu ajutorul feței . . . . . . . . . . . . . . . . . . . . . . . . . . . . 14
Find your lost phone . . . . . . . . . . . . . . . . . . . . . . . . . . . . . . . . . . . . . . . 15
4 Introducere 16
Personalize your phone . . . . . . . . . . . . . . . . . . . . . . . . . . . . . . . . . . . . . 16
Notifications . . . . . . . . . . . . . . . . . . . . . . . . . . . . . . . . . . . . . . . . . . . 16
Control volume . . . . . . . . . . . . . . . . . . . . . . . . . . . . . . . . . . . . . . . . . . 17
Automatic text correction . . . . . . . . . . . . . . . . . . . . . . . . . . . . . . . . . . . . 18
Battery life . . . . . . . . . . . . . . . . . . . . . . . . . . . . . . . . . . . . . . . . . . . . 18
Accessibility . . . . . . . . . . . . . . . . . . . . . . . . . . . . . . . . . . . . . . . . . . . 19
5 Conectarea cu prietenii și familia 20
Calls . . . . . . . . . . . . . . . . . . . . . . . . . . . . . . . . . . . . . . . . . . . . . . . . 20
Contacts . . . . . . . . . . . . . . . . . . . . . . . . . . . . . . . . . . . . . . . . . . . . . 20
Trimiterea de mesaje . . . . . . . . . . . . . . . . . . . . . . . . . . . . . . . . . . . . . . 20
Corespondență . . . . . . . . . . . . . . . . . . . . . . . . . . . . . . . . . . . . . . . . . . 21
© 2022 HMD Global Oy. Toate drepturile rezervate. 2
Page 3

Nokia G100 Ghid de utilizare
6 Cameră 22
Camera basics . . . . . . . . . . . . . . . . . . . . . . . . . . . . . . . . . . . . . . . . . . 22
Your photos and videos . . . . . . . . . . . . . . . . . . . . . . . . . . . . . . . . . . . . . 22
7 Internet și conexiuni 23
Activate Wi-Fi . . . . . . . . . . . . . . . . . . . . . . . . . . . . . . . . . . . . . . . . . . . 23
Browse the web . . . . . . . . . . . . . . . . . . . . . . . . . . . . . . . . . . . . . . . . . 23
Bluetooth® . . . . . . . . . . . . . . . . . . . . . . . . . . . . . . . . . . . . . . . . . . . . 24
VPN . . . . . . . . . . . . . . . . . . . . . . . . . . . . . . . . . . . . . . . . . . . . . . . . 25
8 Agendă 26
Date and time . . . . . . . . . . . . . . . . . . . . . . . . . . . . . . . . . . . . . . . . . . 26
Ceas cu alarmă . . . . . . . . . . . . . . . . . . . . . . . . . . . . . . . . . . . . . . . . . . 26
Calendar . . . . . . . . . . . . . . . . . . . . . . . . . . . . . . . . . . . . . . . . . . . . . 27
9 Hărți 28
Găsirea de locuri și obținerea de indicații . . . . . . . . . . . . . . . . . . . . . . . . . . . 28
10 Aplicații, actualizări și copii de rezervă 29
Get apps from Google Play . . . . . . . . . . . . . . . . . . . . . . . . . . . . . . . . . . . 29
Update your phone software . . . . . . . . . . . . . . . . . . . . . . . . . . . . . . . . . . 29
Efectuarea de copii de rezervă ale datelor . . . . . . . . . . . . . . . . . . . . . . . . . . 29
Restore original settings and remove private content from your phone . . . . . . . . . . 30
11 Informații privind siguranța și produsul 31
Pentru siguranța dvs. . . . . . . . . . . . . . . . . . . . . . . . . . . . . . . . . . . . . . . 31
Servicii de rețea și costuri . . . . . . . . . . . . . . . . . . . . . . . . . . . . . . . . . . . . 34
Emergency calls . . . . . . . . . . . . . . . . . . . . . . . . . . . . . . . . . . . . . . . . . 34
Întreținerea dispozitivului . . . . . . . . . . . . . . . . . . . . . . . . . . . . . . . . . . . . 35
Reciclare . . . . . . . . . . . . . . . . . . . . . . . . . . . . . . . . . . . . . . . . . . . . . 36
Simbolul coș de gunoi barat . . . . . . . . . . . . . . . . . . . . . . . . . . . . . . . . . . 36
Informații despre baterie și încărcător . . . . . . . . . . . . . . . . . . . . . . . . . . . . 36
© 2022 HMD Global Oy. Toate drepturile rezervate. 3
Page 4

Nokia G100 Ghid de utilizare
Copii mici . . . . . . . . . . . . . . . . . . . . . . . . . . . . . . . . . . . . . . . . . . . . . 38
Dispozitive medicale . . . . . . . . . . . . . . . . . . . . . . . . . . . . . . . . . . . . . . . 38
Dispozitive medicale implantate . . . . . . . . . . . . . . . . . . . . . . . . . . . . . . . . 38
Auzul . . . . . . . . . . . . . . . . . . . . . . . . . . . . . . . . . . . . . . . . . . . . . . . 39
Protejați-vă dispozitivul împotriva conținutului dăunător . . . . . . . . . . . . . . . . . . 39
Vehicule . . . . . . . . . . . . . . . . . . . . . . . . . . . . . . . . . . . . . . . . . . . . . . 39
Medii cu pericol de explozie . . . . . . . . . . . . . . . . . . . . . . . . . . . . . . . . . . . 39
Informații privind certificarea (SAR) . . . . . . . . . . . . . . . . . . . . . . . . . . . . . . 40
Despre gestionarea drepturilor digitale (Digital Rights Management) . . . . . . . . . . . 41
Copyrights and other notices . . . . . . . . . . . . . . . . . . . . . . . . . . . . . . . . . . 41
© 2022 HMD Global Oy. Toate drepturile rezervate. 4
Page 5
Nokia G100 Ghid de utilizare
1 Despre acest ghid de utilizare
Important: Pentru informații importante despre utilizarea în siguranță a dispozitivului și a
bateriei, citiți secțiunea „Pentru siguranța dvs.” din ghidul de utilizare imprimat sau la adresa
www.nokia.com/support înainte de utilizarea dispozitivului. Pentru a afla cum să începeți
utilizarea noului dvs. dispozitiv, citiți ghidul de utilizare imprimat.
© 2022 HMD Global Oy. Toate drepturile rezervate. 5
Page 6
Nokia G100 Ghid de utilizare
2 Pregătire pentru utilizare
ACTUALIZAREA TELEFONULUI
Software-ul telefonului
Mențineți-vă telefonul actualizat și acceptați actualizările de software disponibile pentru
a beneficia de caracteristici noi și îmbunătățite pentru telefon. De asemenea, actualizarea
software-ului poate îmbunătăți performanța telefonului.
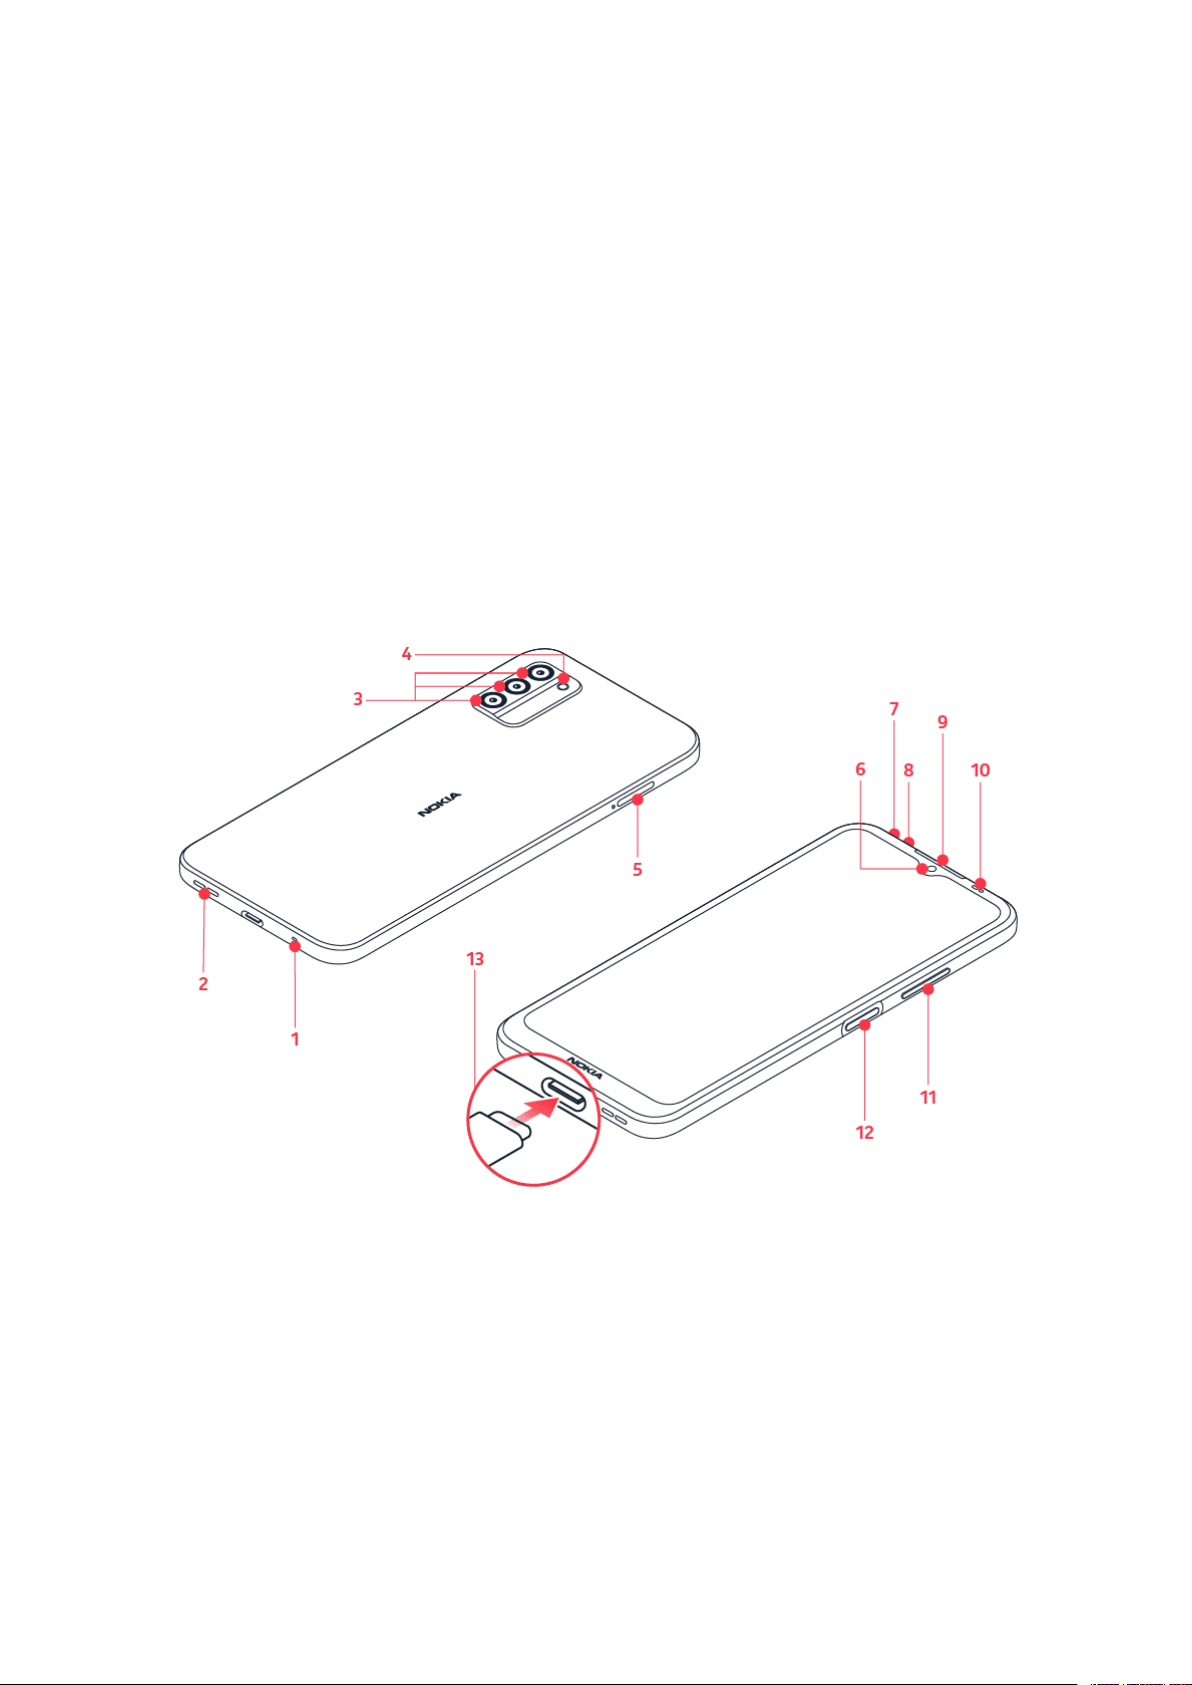
KEYS AND PARTS
Your phone
This user guide applies to the following models: TA-1430, N150DL.
1. Microphone
2. Loudspeaker
3. Camera
4. Flash
5. SIM and memory card slot
© 2022 HMD Global Oy. Toate drepturile rezervate. 6
6. Front camera
7. Microphone
8. Headset connector
9. Earpiece
10. Proximity sensor
Page 7
Nokia G100 Ghid de utilizare
11. Volume keys
12. Power/Lock key, Fingerprint sensor
Some of the accessories mentioned in this user guide, such as charger, headset, or data cable,
may be sold separately.
Piese și conectori, magnetism
Nu vă conectați la aparate care emit semnale de ieșire, deoarece dispozitivul se poate
deteriora. Nu conectați nicio sursă de curent la conectorul audio. Când conectați la conectorul
audio orice dispozitiv sau set de căști cu microfon extern, altele decât cele aprobate spre a fi
utilizate cu acest dispozitiv, aveți o grijă deosebită la nivelul de volum.
Unele componente ale dispozitivului sunt magnetice. Materialele metalice pot fi atrase de
dispozitiv. Nu așezați carduri de credit sau alte carduri cu bandă magnetică în apropierea
dispozitivului, pentru perioade lungi de timp, deoarece cardurile pot fi deteriorate.
13. USB connector
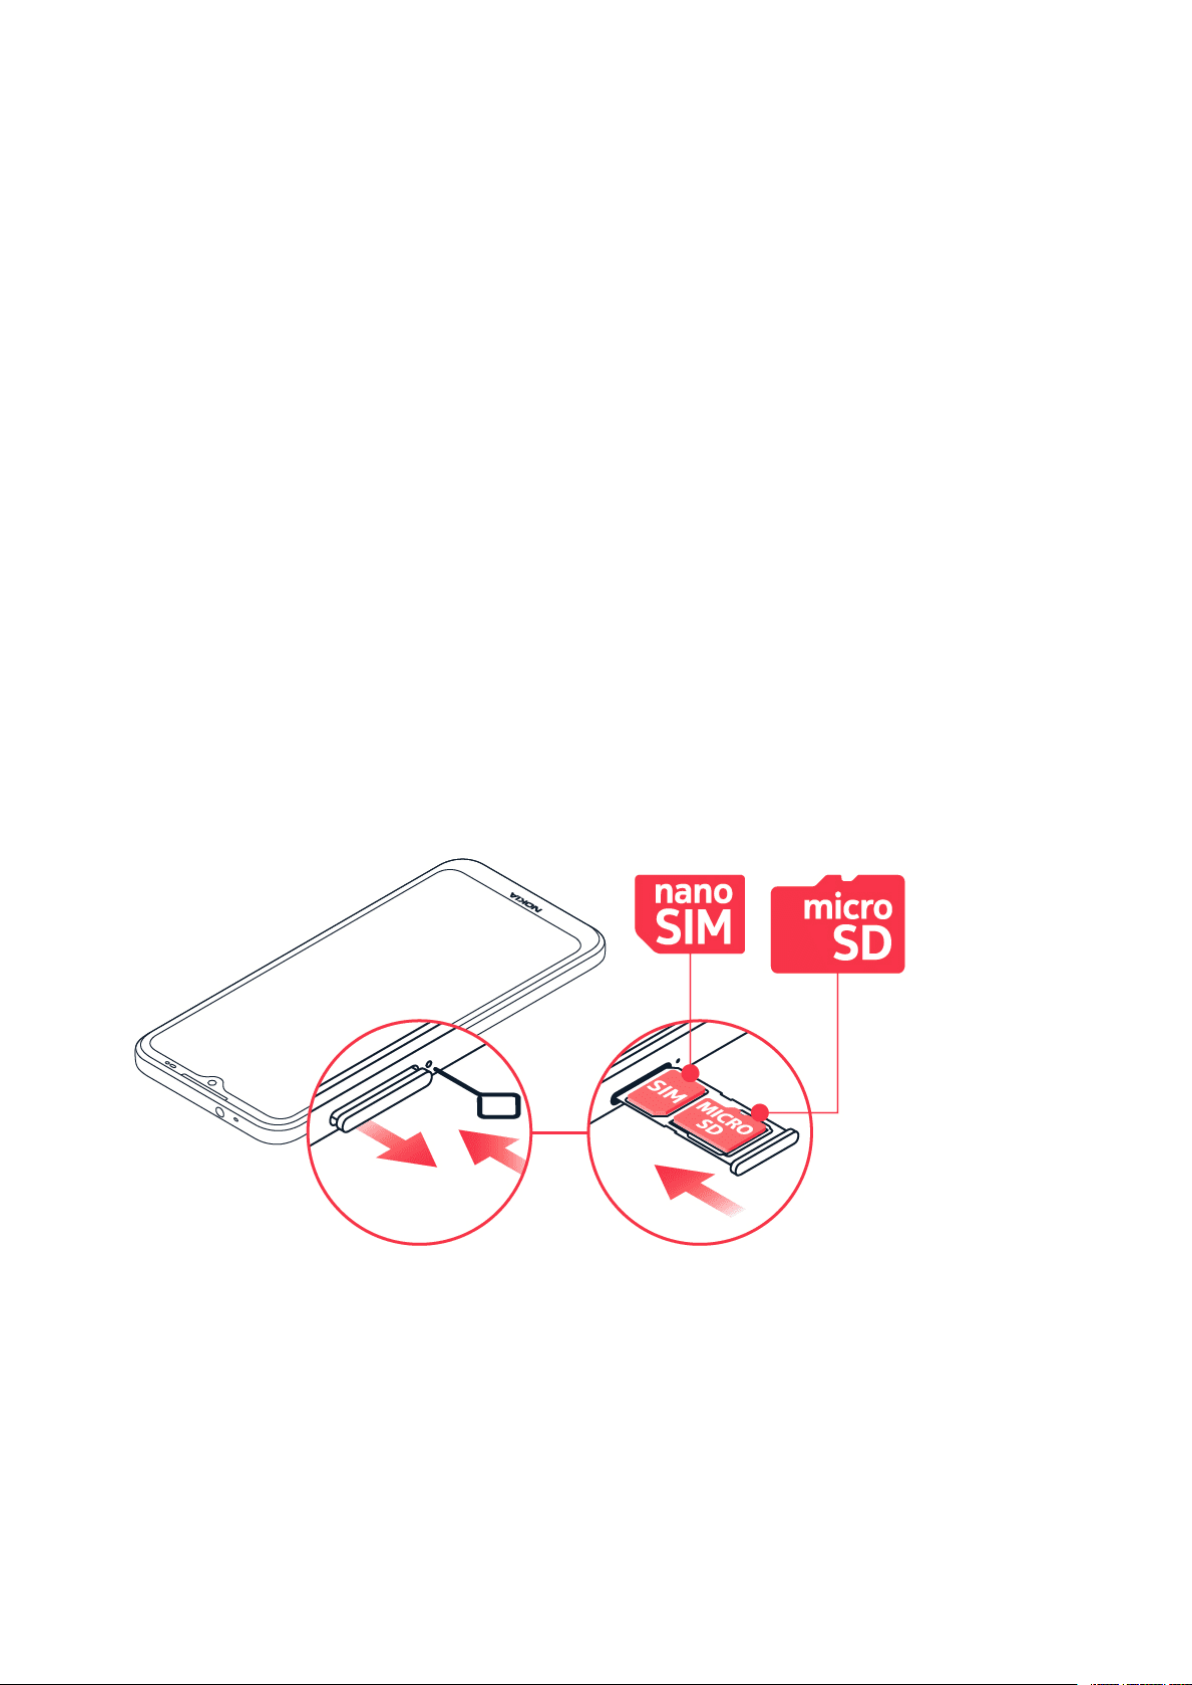
INSERT THE SIM AND MEMORY CARDS
Insert the cards
1. Open the SIM card tray: push the tray opener pin in the tray hole and slide the tray out.
2. Put the nano-SIM in the SIM card slot on the tray with the contact area face down.
3. If you have a memory card, put it in the memory card slot.
4. Slide the tray back in.
© 2022 HMD Global Oy. Toate drepturile rezervate. 7
Page 8
Nokia G100 Ghid de utilizare
Important: Nu scoateți cartela de memorie atunci când este utilizată de o aplicație. Astfel se
pot provoca defecțiuni ale cartelei de memorie și ale dispozitivului, afectând și datele stocate
pe cartelă.
Sfat: Utilizați un card de memorie microSD rapid, de până la 512 GB, fabricat de un
producător cu reputație.
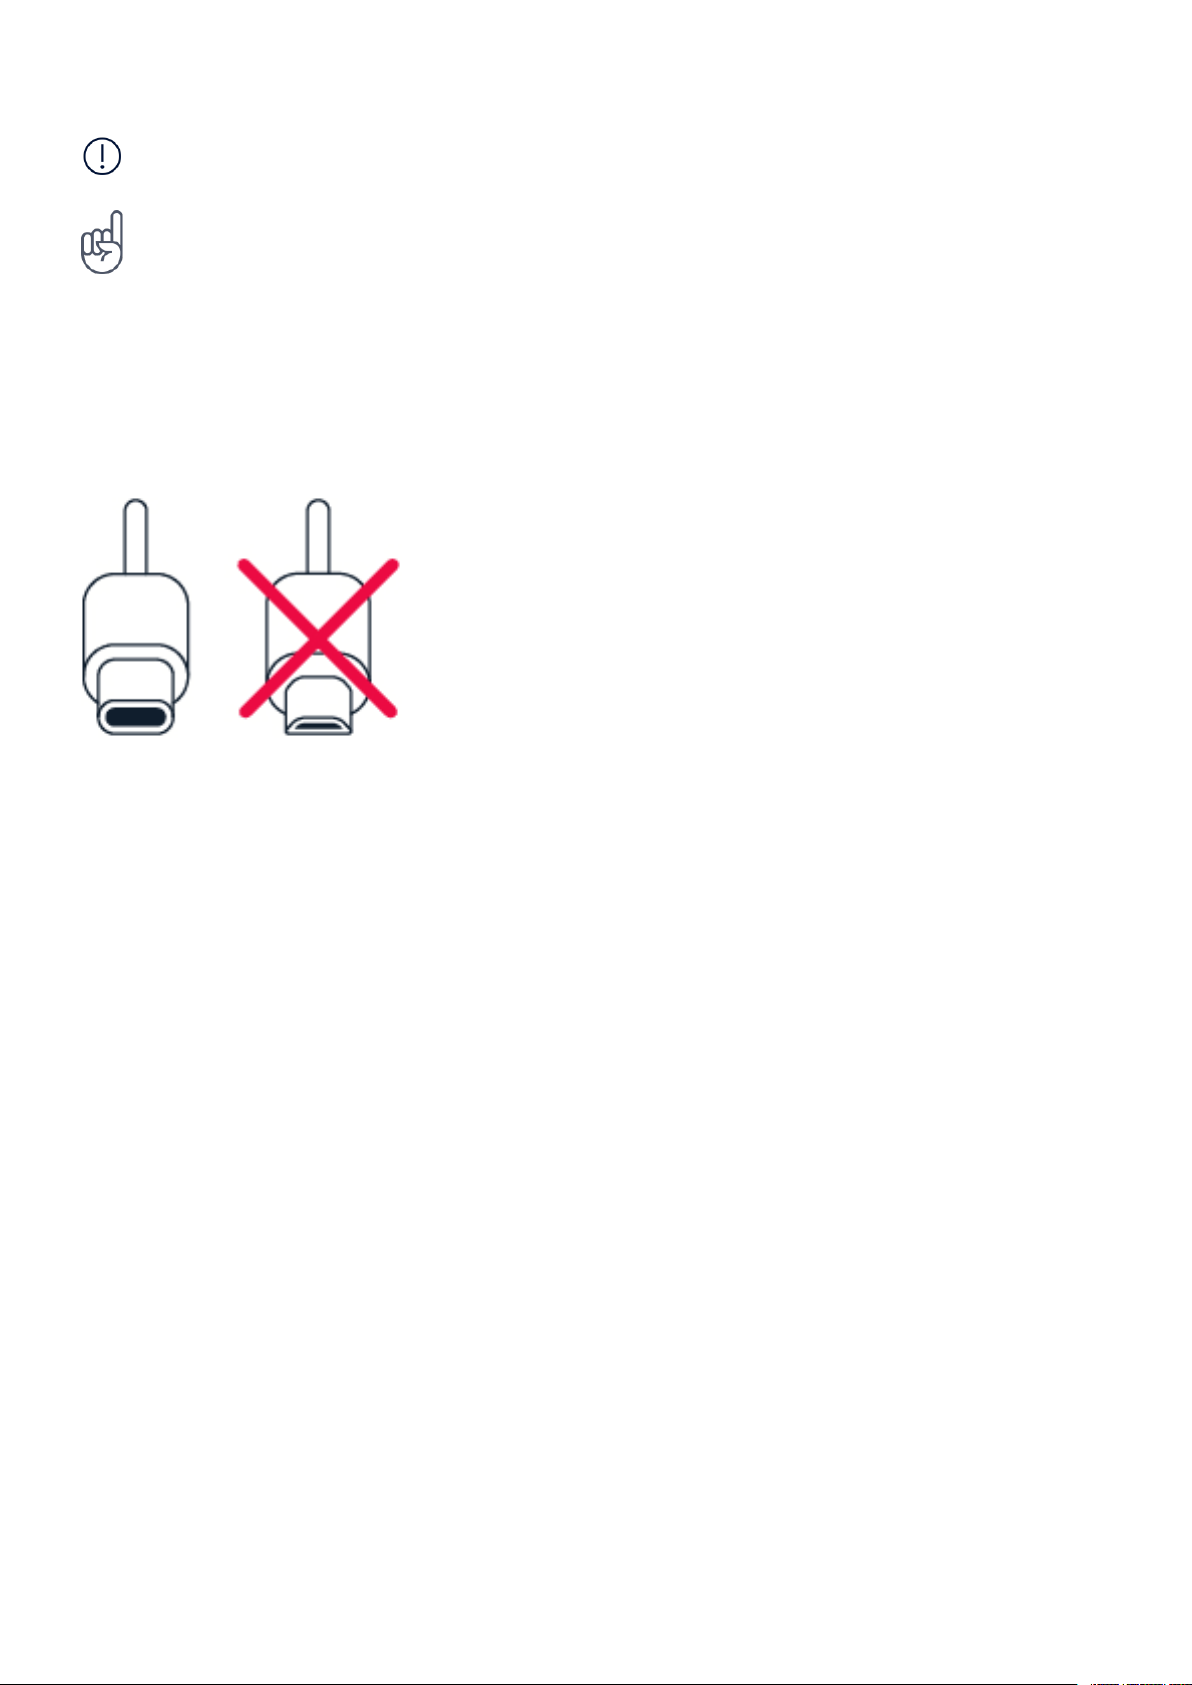
ÎNCĂRCAREA TELEFONULUI
Încărcarea bateriei
1. Conectați un încărcător compatibil la o priză de perete.
2. Conectați cablul la telefon.
Telefonul acceptă cablurile USB-C. De asemenea, puteți încărca telefonul de la un computer cu
un cablu USB, dar poate dura mai mult timp.
Dacă acumulatorul este complet descărcat, s-ar putea să fie necesare mai multe minute până
când se afișează indicatorul de încărcare.
SWITCH ON AND SET UP YOUR PHONE
Switch on your phone
When you switch your phone on for the first time, your phone guides you to set up your
network connections and phone settings.
1. Press and hold the power key.
2. Choose your language and region.
3. Follow the instructions shown on your phone.
© 2022 HMD Global Oy. Toate drepturile rezervate. 8
Page 9

Nokia G100 Ghid de utilizare
Transferul datelor de pe telefonul anterior
Puteți transfera datele de pe vechiul telefon pe noul dvs. telefon utilizând contul dvs. Google.
Pentru a efectua copia de rezervă a datelor de pe telefonul vechi în contul dvs. Google,
consultați ghidul de utilizare a vechiului telefon.
Restore app settings from your previous Android™ phone
If your previous phone was an Android, and you had set it to back up data to your Google
account, you can restore your app settings and passwords.
1. Tap Settings > Passwords & accounts > Add account > Google .
2. Select which data you want to restore on your new phone. The sync starts automatically
once your phone is connected to the internet.
Switch off your phone
To switch off your phone, press the power key and the volume up key at the same time.
Tip: If you want to switch off your phone by pressing and holding the power key, tap Settings
> System > Gestures > Press and hold power button and switch off Hold for Assistant .
USE THE TOUCH SCREEN
Important: Avoid scratching the touch screen. Never use an actual pen, pencil, or other sharp
object on the touch screen.
© 2022 HMD Global Oy. Toate drepturile rezervate. 9
Page 10
Nokia G100 Ghid de utilizare
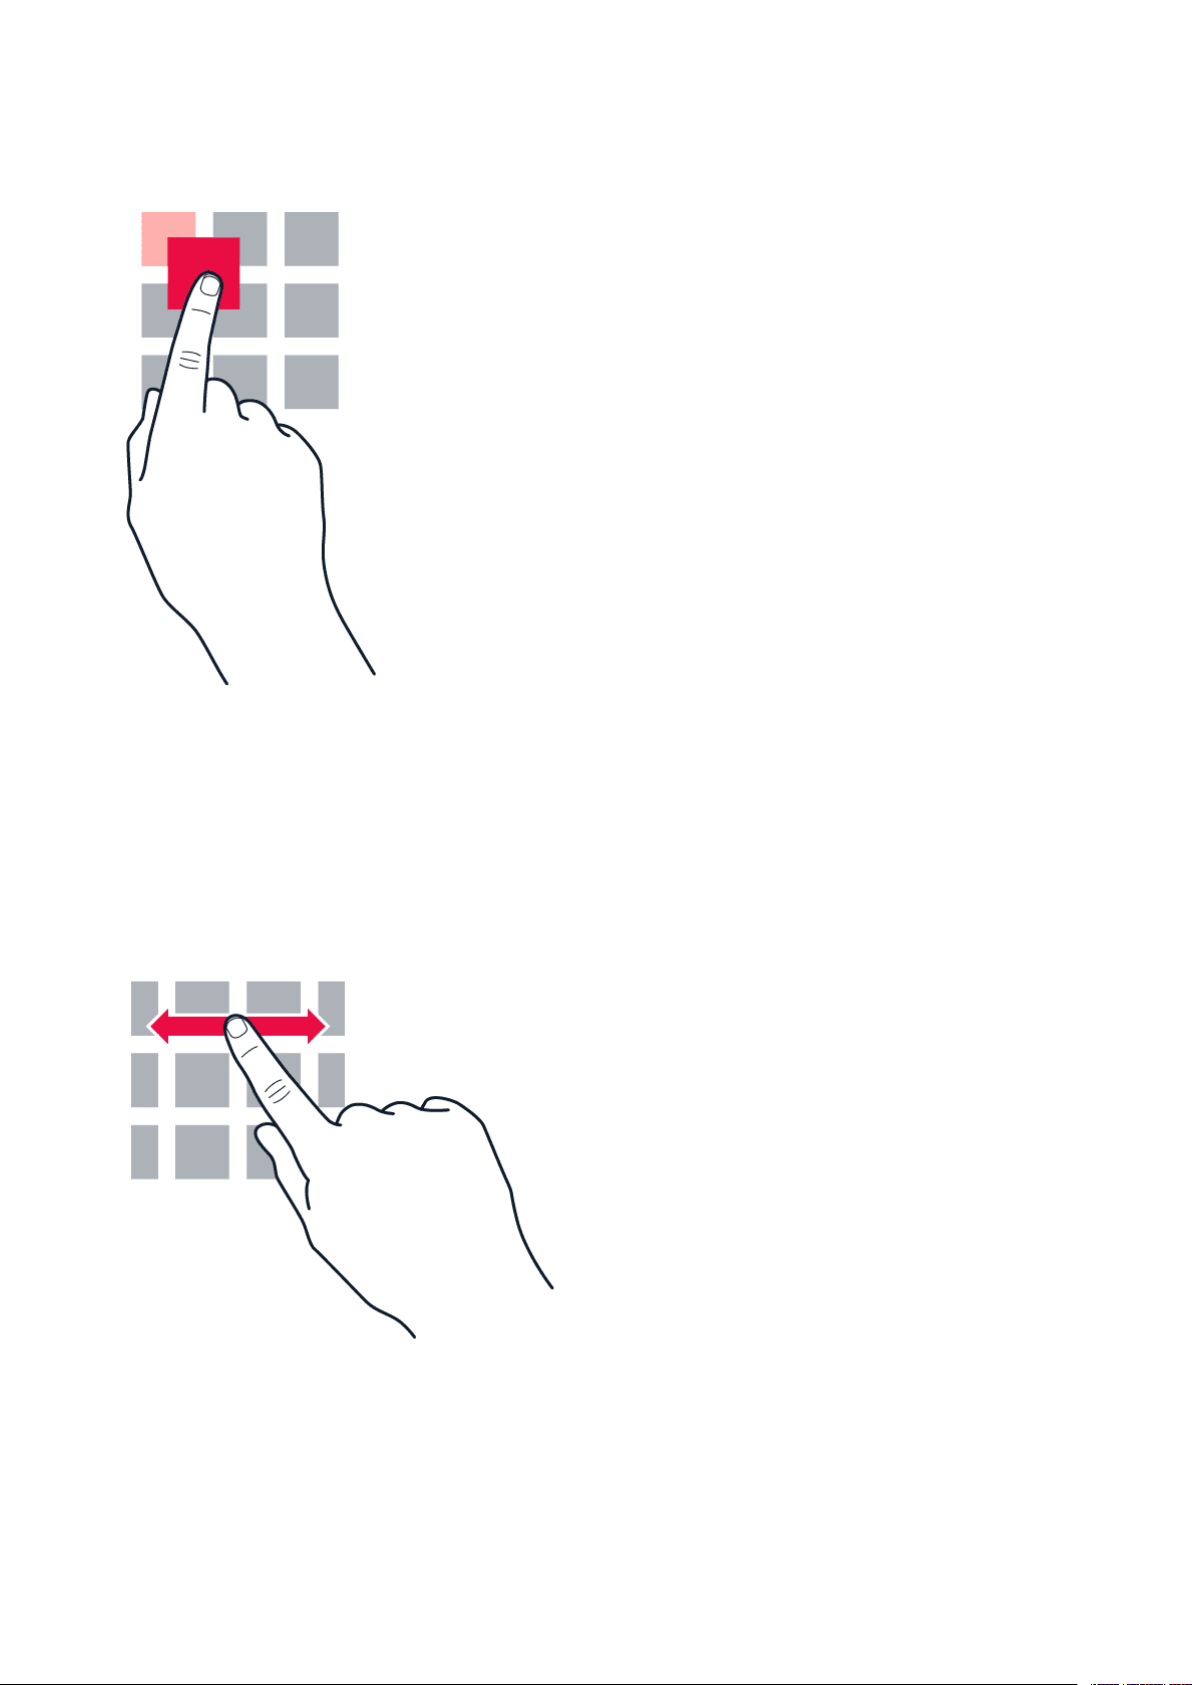
Atingerea continuă a unui element pentru tragerea acestuia
Așezați degetul pe un element timp de câteva secunde, apoi glisați degetul pe ecran.
Glisarea
Puneți degetul pe ecran, apoi glisați-l în direcția dorită.
© 2022 HMD Global Oy. Toate drepturile rezervate. 10
Page 11
Nokia G100 Ghid de utilizare
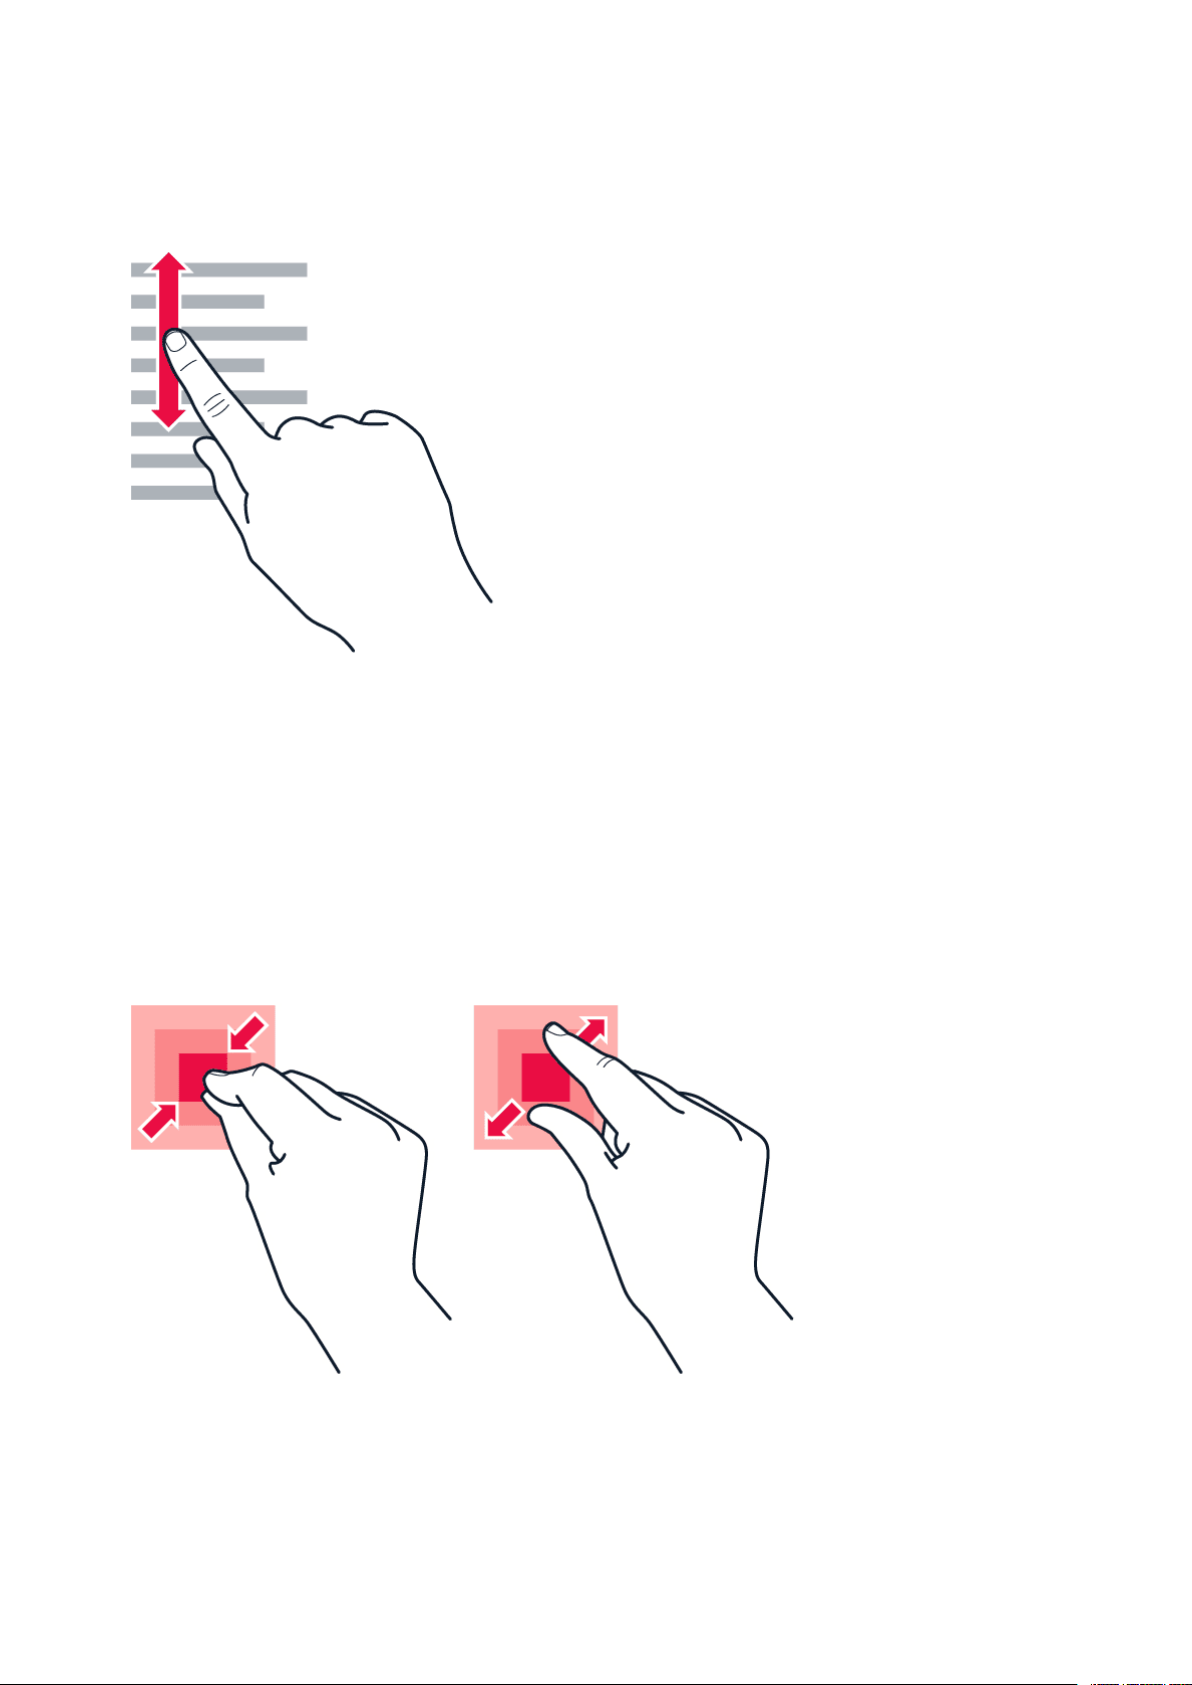
Defilarea printr-o listă sau meniu lung
Glisați degetul rapid în sus sau în jos pe ecran, apoi ridicați degetul. Pentru a opri defilarea,
atingeți ecranul.
Mărirea sau micșorarea
Așezați 2 degete pe un element, cum ar fi o hartă, o fotografie sau o pagină web, apoi
îndepărtați sau apropiați degetele.
© 2022 HMD Global Oy. Toate drepturile rezervate. 11
Page 12

Nokia G100 Ghid de utilizare
Lock the screen orientation
The screen rotates automatically when you turn the phone 90 degrees.
To lock the screen in portrait mode, swipe down from the top of the screen, and tap
Auto-rotate > Off .
Navigate with gestures
To switch on using gesture navigation, tap Settings > System > Gestures >
System navigation > Gesture navigation .
• To see all your apps, on the home screen, swipe up on the screen.
• To go to the home screen, swipe up from the bottom of the screen. The app you were in
stays open in the background.
• To see which apps you have open, swipe up from the bottom of the screen without releasing
your finger until you see the apps, and then release your finger. To switch to another
open app, tap the app. To close all the open apps, swipe right through all the apps and tap
CLEAR ALL .
• To go back to the previous screen you were in, swipe from the right or left edge of the
screen. Your phone remembers all the apps and websites you’ve visited since the last time
your screen was locked.
Navigate with keys
To switch on the navigation keys, tap Settings > System > Gestures > System navigation >
3-button navigation .
• To see all your apps, on the home screen, swipe up from the bottom of the screen.
• To go to the home screen, tap . The app you were in stays open in the background.
• To see which apps you have open, tap . To switch to another open app, swipe right and
tap the app. To close all the open apps, swipe right through all the apps and tap CLEAR ALL .
• To go back to the previous screen you were in, tap . Your phone remembers all the apps
and websites you’ve visited since the last time your screen was locked.
© 2022 HMD Global Oy. Toate drepturile rezervate. 12
Page 13

Nokia G100 Ghid de utilizare
3 Protejarea telefonului
BLOCAREA ȘI DEBLOCAREA TELEFONULUI
Blocarea telefonului
Dacă doriți să evitați efectuarea accidentală a unui apel atunci când telefonul este în buzunar
sau în geantă, puteți să blocați tastele și ecranul.
Pentru a bloca tastele și ecranul, apăsați tasta de pornire.
Deblocarea tastelor și a ecranului
Apăsați tasta de pornire și glisați ecranul în sus. Dacă se solicită, introduceți informațiile
suplimentare.
PROTEJAREA TELEFONULUI PRIN BLOCAREA ECRANULUI
Puteți să setați telefonul să solicite o parolă pentru deblocarea ecranului.
Setarea ecranului de blocare
1. Atingeți Setări > Securitate > Blocați ecranul .
2. Alegeți tipul de blocare și urmați instrucțiunile de pe telefon.
PROTEJAREA TELEFONULUI PRIN AMPRENTĂ
Adăugați o amprentă
1. Atingeți Setări > Securitate > Amprentă .
2. Selectați metoda de deblocare de rezervă pe care doriți să o utilizați pentru ecranul de
blocare și urmați instrucțiunile de pe telefon.
Deblocarea telefonului cu amprenta
Poziționați amprenta înregistrată pe tasta de pornire.
Dacă se afișează o eroare privind senzorul de amprentă și nu puteți utiliza o metodă de
conectare alternativă pentru a recupera sau reseta telefonul în orice mod, este necesar ca
telefonul dvs. să fie remediat de către personal autorizat. Se pot percepe tarife suplimentare și
este posibil să fie șterse toate datele personale de pe telefon. Pentru informații suplimentare,
contactați cel mai apropiat punct de asistență pentru telefonul dvs. sau contactați
distribuitorul telefonului.
© 2022 HMD Global Oy. Toate drepturile rezervate. 13
Page 14

Nokia G100 Ghid de utilizare
PROTEJAREA TELEFONULUI CU AJUTORUL FEȚEI
Configurarea autentificării faciale
1. Atingeți Setări > Securitate > Deblocare facială .
2. Selectați metoda de deblocare de rezervă pe care doriți să o utilizați pentru ecranul de
blocare și urmați instrucțiunile de pe telefon.
Țineți ochii deschiși și asigurați-vă că fața dvs. este complet vizibilă, neacoperită de obiecte,
precum o pălărie sau ochelari de soare.
Notă: Folosirea feței pentru deblocarea telefonului este mai puțin sigură decât utilizarea
amprentei, modelului sau parolei. Telefonul dvs. ar putea fi deblocat de cineva sau ceva cu
aspect similar. Este posibil ca Deblocarea facială să nu funcționeze corespunzător în medii cu
lumină de fundal, prea întunecate sau prea luminoase.
Deblocarea telefonului cu ajutorul feței
Pentru a debloca telefonul, porniți ecranul și priviți la cameră.
Dacă se afișează o eroare privind recunoașterea facială și nu puteți utiliza o metodă de
conectare alternativă pentru a recupera sau reseta telefonul în orice mod, telefonul dvs. va
necesita service. Se pot percepe tarife suplimentare și este posibil să fie șterse toate datele
personale de pe telefon. Pentru informații suplimentare, contactați cea mai apropiată unitate
de service autorizată pentru telefonul dvs. sau contactați distribuitorul telefonului.
© 2022 HMD Global Oy. Toate drepturile rezervate. 14
Page 15

Nokia G100 Ghid de utilizare
FIND YOUR LOST PHONE
Localizarea sau blocarea telefonului
Dacă vă pierdeți telefonul, puteți să îl găsiți, să îl blocați sau să îl ștergeți de la distanță, în cazul
în care v-ați conectat la un cont Google. Caracteristica Găsește-mi dispozitivul este activată
implicit pe telefoanele asociate cu un cont Google.
Pentru a utiliza caracteristica Găsește-mi dispozitivul, telefonul trebuie să fie:
• Pornit
• Conectat la un cont Google
• Conectat la date mobile sau la Wi-Fi
Atunci când caracteristica Găsește-mi dispozitivul se conectează la telefon, veți vedea locația
acestuia și telefonul va primi o notificare.
1. Accesați android.com/find pe un computer, o tabletă sau un telefon conectat la internet și
conectați-vă la contul Google.
2. Dacă aveți mai multe telefoane, dați clic pe telefonul pierdut din partea de sus a ecranului.
3. Pe hartă, vedeți locația aproximativă a telefonului. Locația este aproximativă și este posibil
să nu fie precisă.
Dacă dispozitivul nu poate fi găsit, caracteristica Găsește-mi dispozitivul va afișa ultima locație
cunoscută a acestuia, dacă este disponibilă. Pentru a bloca sau a șterge telefonul, urmați
instrucțiunile de pe site-ul web.
• Vizibil în Google Play
• Locația să fie activată
• Găsește-mi dispozitivul să fie activată
© 2022 HMD Global Oy. Toate drepturile rezervate. 15
Page 16

Nokia G100 Ghid de utilizare
4 Introducere
PERSONALIZE YOUR PHONE
Change your wallpaper
Tap Settings > Wallpaper .
Change your phone ringtone
Tap Settings > Sound > Phone ringtone , and select the tone.
Change your message notification sound
Tap Settings > Sound > Default notification sound .
NOTIFICATIONS
Use the notification panel
When you receive new notifications, such as messages or missed calls, icons appear at the top
of the screen.
To see more information about the notifications, swipe down from the top of the screen. To
close the view, swipe up on the screen.
To change the notification settings of an app, tap Settings > Notifications > App settings >
Most recent > All apps , and switch the app’s notifications on or off.
© 2022 HMD Global Oy. Toate drepturile rezervate. 16
Page 17

Nokia G100 Ghid de utilizare
Use the quick access items
To activate features, tap the corresponding quick access item on the notification panel. To see
more items, drag the menu down. To rearrange or add new items, tap , tap and hold an item,
and then drag it to another location.
CONTROL VOLUME
Modificarea volumului
Dacă nu puteți auzi când sună telefonul în medii zgomotoase sau dacă sonorul apelurilor este
prea puternic, puteți modifica volumul așa cum doriți cu ajutorul tastelor pentru volum de pe
partea laterală a telefonului.
Nu vă conectați la aparate care emit semnale de ieșire, deoarece dispozitivul se poate
deteriora. Nu conectați nicio sursă de curent la conectorul audio. Când conectați la conectorul
audio orice dispozitiv sau set de căști cu microfon extern, altele decât cele aprobate spre a fi
utilizate cu acest dispozitiv, aveți o grijă deosebită la nivelul de volum.
Change the volume for media and apps
1. Press a volume key to see the volume level bar.
2. Tap .
3. Drag the slider on the volume level bars left or right.
4. Tap DONE .
© 2022 HMD Global Oy. Toate drepturile rezervate. 17
Page 18

Nokia G100 Ghid de utilizare
Set the phone to silent
1. Press a volume key.
2. Tap .
3. Tap to set your phone to vibrate only, or tap to set it to silent.
AUTOMATIC TEXT CORRECTION
Utilizarea cuvintelor sugerate de tastatură
Telefonul sugerează cuvinte pe măsură ce tastați, pentru a vă ajuta să scrieți mai rapid și mai
corect. Sugestiile de cuvinte pot să nu fie disponibile în toate limbile.
Când începeți să scrieți un cuvânt, telefonul vă sugerează cuvinte posibile. Când cuvântul pe
care doriți să îl folosiți este afișat în bara de sugestii, selectați-l. Pentru a vedea mai multe
sugestii, atingeți lung sugestia.
Sfat: În cazul în care cuvântul sugerat este îngroșat, telefonul îl folosește automat pentru a
înlocui cuvântul pe care l-ați scris. În cazul în care cuvântul este greșit, atingeți-l lung pentru a
vedea și alte câteva sugestii.
Dacă nu doriți ca tastatura să vă sugereze cuvinte în timp ce tastați, dezactivați corectările de
text. Atingeți Setări > Sistem > Limbi și introducere text > Tastatură pe ecran . Selectați
tastatura pe care o utilizați în mod normal. Atingeți Corectare text și dezactivați metodele de
corectare a textului pe care nu doriți să le utilizați.
Corectarea unui cuvânt
În cazul în care observați că ați scris greșit un cuvânt, atingeți-l pentru a vedea sugestii de
corectare a cuvântului.
Switch spell checker off
Tap Settings > System > Languages & input > Spell checker , and switch Use spell checker
off.
BATTERY LIFE
Extend battery life
To save power:
© 2022 HMD Global Oy. Toate drepturile rezervate. 18
Page 19
Nokia G100 Ghid de utilizare
1. Always charge the battery fully.
2. Mute unnecessary sounds, such as touch
sounds. Tap Settings > Sound , and
select which sounds to keep.
3. Use wired headphones, rather than the
loudspeaker.
4. Set the phone screen to switch off after
a short time. Tap Settings > Display >
Screen timeout and select the time.
5. Tap Settings > Display >
Brightness level . To adjust the
brightness, drag the brightness
level slider. Make sure that
Adaptive brightness is switched off.
6. Stop apps from running in the background.
7. Use location services selectively: switch
location services off when you don’t need
them. Tap Settings > Location , and
switch off Use location .
8. Use network connections selectively:
Switch Bluetooth on only when needed.
Use a Wi-Fi connection to connect to
the internet, rather than a mobile data
connection. Stop your phone scanning for
available wireless networks. Tap Settings
> Network & internet , and switch off
Wi-Fi . If you’re listening to music or
otherwise using your phone, but don’t
want to make or receive calls, switch
the airplane mode on. Tap Settings
> Network & internet , and switch on
Airplane mode . Airplane mode closes
connections to the mobile network and
switches your device’s wireless features
off.
ACCESSIBILITY
Make the text on the screen larger
1. Tap Settings > Accessibility > Text and display .
2. Tap Font size , and tap the the font size slider until the text size is to your liking.
Make the items on the screen larger
1. Tap Settings > Accessibility > Text and display .
2. Tap Display size , and tap the display size slider until the size is to your liking.
© 2022 HMD Global Oy. Toate drepturile rezervate. 19
Page 20

Nokia G100 Ghid de utilizare
5 Conectarea cu prietenii și familia
CALLS
Make a call
1. Tap .
2. Tap and type in a number, or tap and select a contact you want to call.
3. Tap .
Preluarea unui apel
Dacă telefonul sună atunci când ecranul este deblocat, atingeți RĂSPUNS . Dacă telefonul sună
atunci când ecranul este blocat, glisați în sus pentru a răspunde.
Respingerea unui apel
Dacă telefonul sună atunci când ecranul este deblocat, atingeți RESPINGERE . Dacă telefonul
sună atunci când ecranul este blocat, glisați în jos pentru a respinge apelul.
CONTACTS
Adăugarea unui contact
1. Atingeți Contacte > + .
2. Completați informațiile.
3. Atingeți Salvare .
Salvarea unui contact din istoricul de apeluri
1. Atingeți > pentru a vedea istoricul apelurilor.
2. Atingeți numărul pe care doriți să îl salvați.
3. Atingeți Adăugare contact . Dacă este vorba de un contact nou, tastați informațiile de
contact și atingeți Salvare . Dacă acest contact este deja în lista dvs. de contacte, atingeți
Adăugare la existente , selectați contactul și atingeți Salvare .
TRIMITEREA DE MESAJE
Trimiterea unui mesaj
© 2022 HMD Global Oy. Toate drepturile rezervate. 20
Page 21

Nokia G100 Ghid de utilizare
1. Atingeți Mesaje .
2. Atingeți Începeți conversație .
3. Pentru a adăuga un destinatar, atingeți
, tastați numărul acestuia și atingeți .
Pentru a adăuga un destinatar din lista dvs.
de contacte, începeți să îi tastați numele și
apoi atingeți contactul.
4. Pentru a adăuga mai mulți destinatari,
atingeți . După ce ați selectat toți
destinatarii, atingeți Înainte .
5. Scrieți mesajul în caseta de text.
6. Atingeți .
CORESPONDENȚĂ
Puteți trimite e-mailuri cu ajutorul telefonului atunci când sunteți în mișcare.
Adăugarea unui cont de e-mail
Când folosiți aplicația Gmail pentru prima dată, va trebui să configurați contul de e-mail.
1. Atingeți Gmail .
2. Puteți selecta adresa asociată cu contul dvs. Google sau puteți atinge
Adăugare adresă de e-mail .
3. După ce ați adăugat toate conturile, atingeți DU-MĂ LA GMAIL .
Trimiterea unui e-mail
1. Atingeți Gmail .
2. Atingeți .
3. În caseta Către , tastați o adresă sau
atingeți > Adăugare din Contacte .
4. Tastați subiectul mesajului și adresa de
e-mail.
5. Atingeți .
© 2022 HMD Global Oy. Toate drepturile rezervate. 21
Page 22

Nokia G100 Ghid de utilizare
6 Cameră
CAMERA BASICS
Efectuarea unei fotografii
Realizați fotografii clare și vibrante - captați cele mai bune momente într-un album de
fotografii.
1. Atingeți Cameră .
2. Țintiți și focalizați.
3. Atingeți .
Take a selfie
1. Tap Camera > to switch to the front camera.
2. Tap .
Înregistrați un videoclip
1. Atingeți Cameră .
2. Pentru a comuta la modul de înregistrare
videoclip, atingeți Video .
3. Atingeți pentru a începe să înregistrați.
4. Pentru a opri înregistrarea, atingeți .
5. Pentru a reveni la modul cameră foto,
atingeți Foto .
YOUR PHOTOS AND VIDEOS
Vizualizarea fotografiilor și a înregistrărilor video pe telefon
Atingeți Fotografii .
Partajarea fotografiilor și a videoclipurilor
1. Atingeți Fotografii , atingeți fotografia pe care doriți să o partajați și atingeți .
2. Selectați modul în care doriți să partajați fotografiile sau videoclipurile.
Copy your photos and videos to your computer
Connect your phone to your computer with a compatible USB cable. Use your computer’s file
manager to copy or move your photos and videos to the computer.
© 2022 HMD Global Oy. Toate drepturile rezervate. 22
Page 23
Nokia G100 Ghid de utilizare
7 Internet și conexiuni
ACTIVATE WI-FI
Switch on Wi-Fi
1. Tap Settings > Network & internet .
2. Switch Wi-Fi on.
3. Select the network you want to use.
Your Wi-Fi connection is active when is shown at the top of the screen. If both Wi-Fi and
mobile data connections are available, your phone uses the Wi-Fi connection.
Important: Use encryption to increase the security of your Wi-Fi connection. Using encryption
reduces the risk of others accessing your data.
BROWSE THE WEB
Căutarea pe web
1. Atingeți Chrome .
2. Tastați un cuvânt de căutat sau o adresă web în câmpul de căutare.
3. Atingeți sau selectați dintre rezultatele propuse.
Sfat: Dacă furnizorul de servicii de rețea nu vă taxează un tarif fix pentru transferul de date,
pentru a economisi costurile de date, utilizați o rețea Wi-Fi pentru a vă conecta la Internet.
Use your phone to connect your computer to the web
Use your mobile data connection to access the internet with your laptop or other device.
1. Tap Settings > Network & Internet > Hotspot & tethering .
2. Switch on Wi-Fi hotspot to share your mobile data connection over Wi-Fi, USB tethering to
use a USB connection, Bluetooth tethering to use Bluetooth, or Ethernet tethering to use
a USB Ethernet cable connection.
The other device uses data from your data plan, which may result in data traffic costs. For info
on availability and costs, contact your network service provider.
© 2022 HMD Global Oy. Toate drepturile rezervate. 23
Page 24

Nokia G100 Ghid de utilizare
BLUETOOTH®
Connect to a Bluetooth device
1. Tap Settings > Connected devices >
Connection preferences > Bluetooth .
2. Switch Use Bluetooth on.
3. Make sure the other device is switched on.
You may need to start the pairing process
from the other device. For details, see the
user guide for the other device.
Since devices with Bluetooth wireless technology communicate using radio waves, they do not
need to be in direct line-of-sight. Bluetooth devices must, however, be within 10 meters (33
feet) of each other, although the connection may be subject to interference from obstructions
such as walls or from other electronic devices.
Paired devices can connect to your phone when Bluetooth is switched on. Other devices can
detect your phone only if the Bluetooth settings view is open.
Do not pair with or accept connection requests from an unknown device. This helps to protect
your phone from harmful content.
4. Tap Pair new device and tap the device
you want to pair with from the list of
discovered Bluetooth devices.
5. You may need to type in a passcode. For
details, see the user guide for the other
device.
Partajarea conținutului prin Bluetooth
Dacă doriți să partajați fotografii sau alt conținut cu un prieten, trimiteți aceste elemente către
telefonul prietenului dvs. prin Bluetooth.
Puteți utiliza mai multe conexiuni Bluetooth odată. De exemplu, puteți trimite elemente către
alt telefon chiar și în timpul utilizării unor căști cu microfon Bluetooth.
1. Atingeți Setări > Dispozitive conectate >
Preferințe conexiune > Bluetooth .
2. Asigurați-vă că funcția Bluetooth este
activată pe ambele telefoane și că
telefoane sunt vizibile unul pentru celălalt.
3. Accesați conținutul pe care doriți să îl
trimiteți și atingeți > Bluetooth .
Parola este utilizată numai când vă conectați pentru prima dată la un dispozitiv.
4. În lista de dispozitive Bluetooth
descoperite, atingeți telefonul prietenului
dvs.
5. Dacă pentru celălalt telefon este nevoie de
o parolă, introduceți sau acceptați parola
și atingeți Împerechere .
Remove a pairing
If you no longer have the device with which you paired your phone, you can remove the pairing.
© 2022 HMD Global Oy. Toate drepturile rezervate. 24
Page 25

Nokia G100 Ghid de utilizare
1. Tap Settings > Connected devices > Previously connected devices .
2. Tap next to a device name.
3. Tap FORGET .
VPN
You may need a virtual private network (VPN) connection to access your company resources,
such as intranet or corporate mail, or you may use a VPN service for personal purposes.
Contact your company IT administrator for details of your VPN configuration, or check your
VPN service’s website for additional info.
Use a secure VPN connection
1. Tap Settings > Network & internet > VPN .
2. To add a VPN profile, tap .
3. Type in the profile info as instructed by your company IT administrator or VPN service.
Editarea unui profil VPN
1. Atingeți de lângă numele profilului.
2. Modificați informațiile după caz.
Ștergerea unui profil VPN
1. Atingeți de lângă numele profilului.
2. Atingeți UITAȚI .
© 2022 HMD Global Oy. Toate drepturile rezervate. 25
Page 26

Nokia G100 Ghid de utilizare
8 Agendă
DATE AND TIME
Setarea datei și a orei
Atingeți Setări > Sistem > Dată și oră .
Update the time and date automatically
You can set your phone to update the time, date, and time zone automatically. Automatic
update is a network service and may not be available depending on your region or network
service provider.
1. Tap Settings > System > Date & time .
2. Switch on Set time automatically .
3. Switch on Set time zone automatically .
Schimbarea ceasului pe formatul cu 24 de ore
Atingeți Setări > Sistem > Dată și oră și activați Utilizați formatul de 24 de ore .
CEAS CU ALARMĂ
Setați o alarmă
1. Atingeți Ceas > Alarmă .
2. Pentru a adăuga o alarmă, atingeți .
3. Selectați ora și minutele și atingeți OK .
4. Pentru a seta alarma să se repete în anumite zile, atingeți zilele lucrătoare respective.
Dezactivarea alarmei
Când sună alarma, glisați alarma la dreapta.
© 2022 HMD Global Oy. Toate drepturile rezervate. 26
Page 27

Nokia G100 Ghid de utilizare
CALENDAR
Select the calendar type
Tap Calendar > , and select what type of calendar you want to see.
If you have signed into an account, such as your Google account, your calendar is shown on the
phone.
Add an event
1. Tap Calendar > .
2. Add the needed details.
3. To make the event repeat on certain days,
tap Does not repeat , and select how
Sfat: Pentru a edita un eveniment, atingeți evenimentul și , apoi editați detaliile.
Ștergeți o programare
1. Atingeți evenimentul.
2. Atingeți > Ștergeți .
often the event should repeat.
4. To set a reminder, tap Add notification
and set the time.
5. Tap Save .
© 2022 HMD Global Oy. Toate drepturile rezervate. 27
Page 28

Nokia G100 Ghid de utilizare
9 Hărți
GĂSIREA DE LOCURI ȘI OBȚINEREA DE INDICAȚII
Găsirea unui loc
Google Maps vă ajută să găsiți anumite locații și companii.
1. Atingeți Hărți .
2. Scrieți cuvintele căutate, cum ar fi numele străzii sau al locului, în bara de căutare.
3. Selectați un element din lista de rezultate propuse pe măsură ce scrieți sau atingeți
pentru căutare.
Locația este indicată pe hartă. În cazul în care căutarea nu se soldează cu niciun rezultat,
verificați dacă ați scris corect cuvintele căutate.
Vizualizarea locației curente
Atingeți Hărți > .
Obținerea indicațiilor către un loc
1. Atingeți Hărți și introduceți destinația în bara de căutare.
2. Atingeți Indicații . Pictograma evidențiată afișează modul de transport, de exemplu .
Pentru a schimba modul, selectați noul mod din bara de căutare.
3. Dacă nu doriți ca punctul de pornire să fie locația dvs. curentă, atingeți Locația dvs. și
căutați un punct de pornire nou.
4. Atingeți Începere pentru a porni navigarea.
Traseul este afișat pe hartă împreună cu timpului estimat pentru a ajunge la destinație. Pentru
a vedea indicații detaliate, atingeți Pași .
© 2022 HMD Global Oy. Toate drepturile rezervate. 28
Page 29

Nokia G100 Ghid de utilizare
10 Aplicații, actualizări și copii de rezervă
GET APPS FROM GOOGLE PLAY
Add a payment method
To use Google Play services, you need to have a Google account added to your phone. Charges
may apply to some of the content available in Google Play. To add a payment method, tap
Play Store , tap your Google logo in the search field, and then tap Payments & subscriptions .
Always be sure to have a permission from the payment method owner when buying content
from Google Play.
Descărcarea aplicațiilor
1. Atingeți Play Store .
2. Atingeți bara de căutare pentru a căuta aplicații sau pentru a selecta aplicațiile
recomandate.
3. În descrierea aplicației, atingeți Instalați pentru a descărca și a instala aplicația.
Pentru a vedea aplicațiile dvs., accesați ecranul de pornire și glisați de jos în sus pe ecran.
UPDATE YOUR PHONE SOFTWARE
Install available updates
Tap Settings > System > System update > Check for update to check if updates are
available.
When your phone notifies you that an update is available, just follow the instructions shown
on your phone. If your phone is low on memory, you may need to move your photos and other
stuff to the memory card.
Before starting the update, connect a charger or make sure the device battery has enough
power, and connect to Wi-Fi, as the update packages may use up a lot of mobile data.
EFECTUAREA DE COPII DE REZERVĂ ALE DATELOR
Pentru a vă asigura că datele sunt sigure, folosiți funcția de efectuare de copii de rezervă de
pe telefon. Copiile de rezervă ale datelor de pe dispozitivul dvs. (cum ar fi parolele Wi-Fi și
istoricul de apeluri) și ale datelor aplicațiilor (cum ar fi setările și fișierele stocate de aplicații)
vor fi efectuate la distanță.
© 2022 HMD Global Oy. Toate drepturile rezervate. 29
Page 30

Nokia G100 Ghid de utilizare
Activarea copiilor de rezervă automate
Atingeți Setări > Sistem > Backup și activați backupul.
RESTORE ORIGINAL SETTINGS AND REMOVE PRIVATE CONTENT FROM YOUR PHONE
Reset your phone
1. Tap Settings > System > Reset options > Erase all data (factory reset) .
2. Follow the instructions shown on your phone.
© 2022 HMD Global Oy. Toate drepturile rezervate. 30
Page 31

Nokia G100 Ghid de utilizare
11 Informații privind siguranța și produsul
PENTRU SIGURANȚA DVS.
Citiți aceste instrucțiuni simple. Nerespectarea acestor instrucțiuni poate fi periculoasă
sau poate încălca legislația și reglementările locale. Pentru informații suplimentare, citiți în
întregime ghidul de utilizare.
OPRIȚI ÎN ZONE CU RESTRICȚII
Opriți dispozitivul dacă folosirea telefoanelor mobile este interzisă sau dacă aceasta poate
provoca interferențe sau pericole, de exemplu, în avioane, în spitale sau în apropierea
dispozitivelor medicale sau în apropierea zonelor cu carburanți, substanțe chimice sau cu
pericol de explozie. Respectați toate instrucțiunile din zonele cu restricție.
SIGURANȚA CIRCULAȚIEI – ÎNAINTE DE TOATE
Respectați toate legile locale. Păstrați-vă întotdeauna mâinile libere în timp ce conduceți un
autovehicul. Prima grijă a dvs. în timp ce conduceți un autovehicul trebuie să fie siguranța
circulației.
© 2022 HMD Global Oy. Toate drepturile rezervate. 31
Page 32

Nokia G100 Ghid de utilizare
INTERFERENȚE
Toate dispozitivele wireless pot intra în interferență, ceea ce le-ar putea afecta performanțele.
SERVICE AUTORIZAT
Instalarea sau repararea acestui produs este permisă numai personalului autorizat.
BATERII, ÎNCĂRCĂTOARE ȘI ALTE ACCESORII
Folosiți numai acumulatoare, încărcătoare și alte accesorii omologate de HMD Global Oy pentru
a fi utilizate cu acest model. Nu conectați între ele produse incompatibile.
PĂSTRAȚI DISPOZITIVUL ÎN STARE USCATĂ
© 2022 HMD Global Oy. Toate drepturile rezervate. 32
Page 33

Nokia G100 Ghid de utilizare
Dacă dispozitivul dvs. este rezistent la apă, vă rugăm să consultați clasificarea IP, pentru
îndrumări mai detaliate.
COMPONENTE DIN STICLĂ
Dispozitivul și/sau ecranul acestuia sunt realizate din sticlă. Aceasta se poate sparge dacă
dispozitivul este scăpat pe o suprafață dură sau intră într-un impact puternic. În cazul în
care sticla se sparge, nu atingeți componentele din sticlă ale dispozitivului și nu încercați să
îndepărtați fragmentele de pe dispozitiv. Nu utilizați dispozitivul până când sticla nu este
înlocuită de către personalul autorizat.
PROTEJAȚI-VĂ AUZUL
Pentru a împiedica apariția problemelor de auz, evitați audițiile îndelungate la volume mari. Fiți
precaut când țineți dispozitivul la ureche atunci când utilizați difuzorul.
SAR
© 2022 HMD Global Oy. Toate drepturile rezervate. 33
Page 34

Nokia G100 Ghid de utilizare
Acest dispozitiv corespunde recomandărilor de expunere la radiofrecvență atunci când este
folosit în poziție normală de utilizare, la ureche, sau când este amplasat la o distanță de cel
puțin 1,5 centimetri față de corp. Valorile maxime SAR respective pot fi găsite în secțiunea
Informații de specificare (SAR) din ghidul utilizatorului. Pentru informații suplimentare,
consultați secțiunea Informații despre certificare (SAR) din acest ghid de utilizare sau accesați
www.sar-tick.com.
SERVICII DE REȚEA ȘI COSTURI
Utilizarea anumitor funcții și servicii sau descărcarea de conținut, inclusiv articole gratuite,
necesită conexiune la rețea. Acest lucru poate implica transferul unor volume mari de date,
ceea ce poate duce la apariția unor costuri legate de trafic. De asemenea, poate fi necesar să
vă abonați la anumite funcții.
Important: Este posibil ca 4G/LTE să nu fie acceptat de furnizorul dvs. de servicii de rețea sau
de furnizorul de servicii utilizat când călătoriți. În acest caz, este posibil să nu puteți efectua
sau primi apeluri, expedia sau primi mesaje sau utiliza conexiunile de date mobile. Pentru
a vă asigura că dispozitivul funcționează perfect atunci când nu este disponibil serviciul
4G/LTE complet, se recomandă să schimbați cea mai mare viteză de conexiune de la 4G la 3G.
Pentru aceasta, în ecranul de pornire, atingeți Setări > Rețea și internet > Rețea mobilă și
comutați Tip de rețea preferată la 3G .
Notă: Este posibil ca utilizarea rețelelor Wi-Fi să fie restricționată în unele țări. De exemplu,
în UE folosirea rețelei Wi-Fi de 5150-5350 MHz este permisă numai în interior, iar în S.U.A.
și Canada, folosirea rețelei Wi-Fi de 5,15-5,25 GHz este permisă numai în interior. Pentru
informații suplimentare, contactați autoritățile locale.
Pentru informații suplimentare, contactați furnizorul de servicii de rețea.
EMERGENCY CALLS
Important: Conexiunile nu pot fi garantate în toate condițiile. Nu vă bazați niciodată exclusiv
pe un telefon mobil pentru efectuarea unor comunicări esențiale, cum ar fi urgențele de
natură medicală.
Before making the call:
• Switch the phone on.
• If the phone screen and keys are locked, unlock them.
• Move to a place with adequate signal strength.
On the home screen, tap .
1. Type in the official emergency number for your present location. Emergency call numbers
vary by location.
2. Tap .
© 2022 HMD Global Oy. Toate drepturile rezervate. 34
Page 35

Nokia G100 Ghid de utilizare
3. Give the necessary info as accurately as possible. Do not end the call until given permission
to do so.
You may also need to do the following:
• Put a SIM card in the phone. If you don’t have a SIM card, on the lock screen, tap
Emergency call .
• If your phone asks for a PIN code, tap Emergency call .
• Switch the call restrictions off in your phone, such as call barring, fixed dialling, or closed
user group.
• If the mobile network is not available, you may also try making an internet call, if you can
access the internet.
ÎNTREȚINEREA DISPOZITIVULUI
Manevrați cu grijă aparatul, acumulatorul, încărcătorul și accesoriile. Următoarele sugestii vă
pot ajuta să mențineți aparatul în funcțiune.
• Păstrați aparatul în stare uscată.
Precipitațiile, umiditatea și alte tipuri
de lichide sau impurități pot conține
substanțe care corodează circuitele
electronice.
• Nu folosiți și nu depozitați dispozitivul în
zone cu mult praf sau murdărie.
• Nu păstrați dispozitivul la temperaturi
ridicate. Este posibil ca temperaturile
ridicate să deterioreze aparatul sau
acumulatorul.
• Nu păstrați dispozitivul la temperaturi
scăzute. Când aparatul revine la
temperatură normală, umezeala poate
forma condens în interiorul acestuia și îl
poate deteriora.
• Nu deschideți dispozitivul în alt mod decât
cel descris în ghidul utilizatorului.
• Modificările neautorizate pot duce la
defectarea dispozitivului și pot reprezenta
o încălcare a reglementărilor privind
dispozitivele de comunicații prin unde
radio.
• Nu scăpați, nu loviți și nu scuturați
dispozitivul sau bateria. Manipularea dură
poate distruge aparatul.
• Utilizați o lavetă moale, curată și uscată
pentru a curăța suprafața dispozitivului.
• Nu vopsiți dispozitivul. Vopseaua poate
împiedica funcționarea corectă.
• Feriți aparatul de magneți sau de
câmpurile magnetice.
• Pentru ca informațiile importante să fie
în siguranță, stocați-le în cel puțin două
locuri separate (cum ar fi dispozitivul,
cardul de memorie sau calculatorul) sau
scrieți-le pe hârtie.
Dispozitivul se poate încălzi în urma utilizării prelungite. În majoritatea cazurilor, acesta este
un lucru normal. Pentru a evita supraîncălzirea, funcționarea aparatului poate încetini automat,
luminozitatea ecranului se poate estompa în timpul unui apel video, aplicațiile se pot închide,
încărcarea se poate dezactiva și, dacă este necesar, aparatul se poate opri. Dacă dispozitivul nu
funcționează corespunzător, duceți-l la cel mai apropiat atelier de service autorizat.
© 2022 HMD Global Oy. Toate drepturile rezervate. 35
Page 36

Nokia G100 Ghid de utilizare
RECICLARE
Duceți întotdeauna produsele electronice, bateriile și acumulatorii, precum și ambalajele
folosite la centrele de colectare specializate. Astfel ajutați la prevenirea eliminării necontrolate
a deșeurilor și promovați reciclarea materialelor. Produsele electrice și electronice conțin
numeroase materiale valoroase, inclusiv metale (cum ar fi cupru, aluminiu, oțel și magneziu)
și metale prețioase (cum ar fi aur, argint și paladiu). Toate materialele din dispozitiv pot fi
recuperate ca materiale și energie.
SIMBOLUL COȘ DE GUNOI BARAT
Simbolul coș de gunoi barat
Simbolul coș de gunoi barat plasat pe un produs, pe baterii, pe documentație sau pe ambalaj,
indică faptul că toate produsele electrice și electronice, precum și bateriile se vor colecta
separat la sfârșitul ciclului de viață. Nu aruncați aceste produse la gunoiul municipal nesortat:
reciclați-le. Pentru informații despre cel mai apropiat punct de reciclare, luați legătura cu
autoritățile locale de salubritate.
INFORMAȚII DESPRE BATERIE ȘI ÎNCĂRCĂTOR
Informații despre baterie și încărcător
Pentru a verifica dacă telefonul are o baterie amovibilă sau una nedetașabilă, consultați ghidul
Introducere.
Dispozitive cu baterie amovibilă Folosiți dispozitivul doar cu o baterie reîncărcabilă originală.
Bateria poate fi încărcată și descărcată de sute de ori, dar în cele din urmă se va uza. Atunci
© 2022 HMD Global Oy. Toate drepturile rezervate. 36
Page 37

Nokia G100 Ghid de utilizare
când duratele de convorbire și de așteptare sunt considerabil mai reduse decât ar fi normal,
înlocuiți bateria.
Dispozitive cu baterie nedetașabilă Nu încercați să scoateți bateria, deoarece puteți deteriora
telefonul. Bateria poate fi încărcată și descărcată de sute de ori, dar în cele din urmă se va
uza. Atunci când duratele de convorbire și de așteptare sunt considerabil mai reduse decât ar
fi normal, duceți telefonul la cea mai apropiată unitate de service autorizată pentru a înlocui
bateria.
Încărcați dispozitivul cu un încărcător compatibil. Tipul mufei de încărcător poate varia. Timpul
de încărcare poate varia în funcție de capacitatea telefonului.
Informații despre siguranța bateriei și a încărcătorului
După ce se încheie încărcarea dispozitivului, deconectați încărcătorul de la dispozitiv și de la
priza electrică. Rețineți faptul că încărcarea continuă nu trebuie să depășească 12 ore. Dacă nu
este utilizată, o baterie complet încărcată se va descărca în timp.
Temperaturile extreme reduc capacitatea și durata de viață a bateriei. Pentru performanță
optimă, păstrați întotdeauna bateria la temperaturi cuprinse între 15 °C și 25 °C (59 °F și
77 °F). Este posibil ca un dispozitiv a cărui baterie este fierbinte sau rece să nu funcționeze
temporar. Rețineți faptul că bateria se poate descărca rapid la temperaturi scăzute și poate
pierde suficientă energie astfel încât telefonul să se oprească în câteva minute. Când vă aflați
în aer liber la temperaturi scăzute, mențineți telefonul cald.
Respectați reglementările locale. Reciclați bateria ori de câte ori acest lucru este posibil. Nu
aruncați la deșeuri menajere.
Nu expuneți bateria la presiuni ale aerului extrem de scăzute și nici la temperaturi extrem de
ridicate, cum ar fi cele obținute prin eliminare în foc, întrucât aceasta poate provoca explozia
bateriei sau scurgerea de lichid ori gaz inflamabil.
Nu demontați, nu tăiați, nu striviți, nu îndoiți, nu înțepați și nu deteriorați în alt mod bateria.
În cazul apariției unei scurgeri de lichid din baterie, evitați contactul lichidului cu pielea sau
cu ochii. Dacă, totuși, acest lucru se întâmplă, spălați imediat cu apă din abundență zonele
afectate sau apelați la un medic. Nu modificați bateria, nu încercați să introduceți corpuri
străine în aceasta, nu o scufundați și feriți-o de apă sau alte lichide. Bateriile pot exploda dacă
sunt deteriorate.
Folosiți bateria și încărcătorul numai conform destinației. Utilizarea incorectă sau utilizarea
unor baterii sau a unor încărcătoare incompatibile poate implica riscuri de incendii, explozii
sau alte pericole. De asemenea, poate duce la anularea aprobărilor sau a garanțiilor acordate
dispozitivului. În cazul în care considerați că bateria sau încărcătorul sunt deteriorate, duceți-le
la un centru de service sau la distribuitorul telefonului înainte de a continua să le utilizați. Nu
folosiți niciodată un încărcător sau un acumulator deteriorat. Utilizați încărcătoarele numai
în interior. Nu încărcați dispozitivul în timpul unei furtuni. Când încărcătorul nu este inclus
în pachetul de vânzare, încărcați dispozitivul utilizând cablul de date (inclus) și un adaptor de
alimentare USB (poate fi vândut separat). Puteți încărca dispozitivul prin intermediul cablurilor
și adaptoarelor de alimentare terțe care sunt conforme cu USB 2.0 sau o versiune ulterioară și
cu reglementările naționale aplicabile și standardele de siguranță internaționale și regionale.
© 2022 HMD Global Oy. Toate drepturile rezervate. 37
Page 38

Nokia G100 Ghid de utilizare
Este posibil ca alte adaptoare să nu îndeplinească standardele de siguranță aplicabile, iar
încărcarea cu astfel de adaptoare poate reprezenta un risc de pierdere a bunurilor sau de
vătămare corporală.
Pentru a scoate din priză cablul de alimentare al încărcătorului sau al unui accesoriu, prindeți
ștecherul și trageți de acesta, nu de cablu.
În plus, dacă dispozitivul are baterie amovibilă, se aplică următoarele condiții: – Înainte
de a scoate bateria, opriți întotdeauna dispozitivul și deconectați-l de la încărcător. –
Scurtcircuitarea accidentală se poate produce atunci când un obiect metalic atinge contactele
metalice ale bateriei. Este posibil ca acesta să deterioreze bateria sau alt obiect.
COPII MICI
Dispozitivul dvs. și accesoriile acestuia nu sunt jucării. Acestea ar putea conține piese de mici
dimensiuni. Nu le lăsați la îndemâna copiilor mici.
DISPOZITIVE MEDICALE
Folosirea echipamentelor de transmisie radio, inclusiv a telefoanelor mobile, poate interfera cu
funcționarea unor dispozitive medicale neprotejate corespunzător. Adresați-vă unui medic sau
producătorului echipamentului medical pentru a afla dacă acesta este protejat corespunzător
față energia radio externă.
DISPOZITIVE MEDICALE IMPLANTATE
Pentru a evita eventualele interferențe, producătorii de dispozitive medicale implantate
(precum stimulatoare cardiace, pompe de insulină și neurostimulatoare) recomandă păstrarea
unei distanțe minime de 15,3 centimetri între un dispozitiv wireless și unul medical. Persoanele
care au astfel de dispozitive trebuie să respecte următoarele reguli:
‑ Să țină întotdeauna dispozitivul mobil la o distanță mai mare de 15,3 centimetri (6 inci) de
dispozitivul medical.
• Să nu poarte dispozitivul mobil în buzunarul de la piept.
• Să țină dispozitivul mobil la urechea opusă poziției dispozitivului medical.
• Să oprească dispozitivul mobil dacă există un motiv de a bănui prezența unei interferențe.
• Să respecte instrucțiunile producătorului dispozitivului medical implantat.
Dacă aveți întrebări privind utilizarea dispozitivului dvs. mobil în apropierea unui dispozitiv
medical implantat, consultați medicul.
© 2022 HMD Global Oy. Toate drepturile rezervate. 38
Page 39

Nokia G100 Ghid de utilizare
AUZUL
Avertisment: Când utilizați setul cu cască, abilitatea dvs. de a auzi sunetele din exterior poate
fi redusă. Nu utilizați setul cu cască dacă acest lucru vă poate periclita siguranța.
Unele dispozitive mobile pot interfera cu unele proteze auditive.
PROTEJAȚI-VĂ DISPOZITIVUL ÎMPOTRIVA CONȚINUTULUI DĂUNĂTOR
Dispozitivul poate fi expus la viruși și la alte tipuri de conținut dăunător. Luați următoarele
măsuri de prevedere:
• Procedați cu precauție când deschideți
mesaje. Acestea pot conține programe de
virusare sau pot fi dăunătoare în alt mod
dispozitivului sau computerului.
• Aveți grijă la acceptarea solicitărilor de
conectare, la navigarea pe internet sau
la preluarea de conținut. Nu acceptați
conexiuni Bluetooth de la surse în care nu
aveți încredere.
• Instalați și utilizați numai servicii și
alte programe provenite din surse de
încredere, care oferă siguranță și protecție
adecvate.
• Instalați aplicații antivirus și alte programe
de siguranță pe aparat și pe calculatoarele
conectate. Nu utilizați mai multe aplicații
antivirus în același timp. Acest lucru poate
afecta performanțele și funcționarea
aparatului și/sau ale calculatorului.
• Dacă accesați marcaje și linkuri
preinstalate către site-uri de internet ale
unor terțe părți, luați măsuri de precauție
corespunzătoare. HMD Global nu sprijină
și nu își asumă răspunderea pentru
asemenea site-uri.
VEHICULE
Este posibil ca semnalele radio să afecteze sistemele electronice instalate sau ecranate
necorespunzător în automobile. Pentru informații suplimentare, interesați-vă la producătorul
autovehiculului sau al echipamentelor din dotarea acestuia. Doar personalul autorizat poate
instala dispozitivul într-un vehicul. Instalarea neadecvată poate fi periculoasă și poate anula
garanția dispozitivului. Verificați regulat ca toate echipamentele wireless din vehiculul dvs. să
fie montate și să funcționeze în mod adecvat. Nu depozitați și nu transportați materiale sau
explozive în același compartiment cu dispozitivul, cu componentele sau cu accesoriile acestuia.
Nu amplasați dispozitivul sau accesoriile acestuia în zona de declanșare a air-bagului.
MEDII CU PERICOL DE EXPLOZIE
Închideți dispozitivul în mediile cu pericol de explozie, cum ar fi pompele de combustibil.
Scânteile pot provoca explozii sau incendii care pot duce la vătămări corporale sau deces.
Conformați-vă restricțiilor din depozitele de carburanți, din incinta combinatelor chimice sau
din locurile unde se efectuează lucrări cu explozibili. Este posibil ca zonele cu medii cu pericol
© 2022 HMD Global Oy. Toate drepturile rezervate. 39
Page 40

Nokia G100 Ghid de utilizare
de explozie să nu fie marcate vizibil. Acestea includ, de obicei, zone unde se recomandă oprirea
motorului, cala vapoarelor, unități de transfer și stocare a substanțelor chimice și zone în care
aerul conține substanțe chimice sau particule. Consultați producătorii vehiculelor alimentate
cu gaze lichefiate (cum ar fi propanul sau butanul) pentru a stabili dacă acest dispozitiv poate fi
utilizat în siguranță în apropierea acestora.
INFORMAȚII PRIVIND CERTIFICAREA (SAR)
Acest dispozitiv mobil îndeplinește recomandările cu privire la expunerea la unde radio.
Dispozitivul mobil este un emițător și un receptor radio. Este conceput pentru a nu depăși
limitele de expunere la unde radio (radiofrecvență, câmpuri electromagnetice) prevăzute
în recomandările internaționale ale organizației științifice independente ICNIRP. Aceste
recomandări includ marje de siguranță substanțiale, menite să asigure protecția tuturor
persoanelor, indiferent de vârstă și de starea de sănătate. Recomandările privind expunerile
se bazează pe Specific Absorption Rate (SAR), care este expresia cantității de radiofrecvență
(RF) din cap sau din corp atunci când dispozitivul este în faza de transmitere. Limita SAR ICNIRP
pentru dispozitive mobile este de 2,0 W/kg, calculată ca valoare medie pe 10 grame de țesut.
Testele SAR sunt desfășurate cu dispozitivul în pozițiile de funcționare standard, transmițând la
cel mai înalt nivel de putere certificat, pe toate benzile de frecvență.
Pentru valoarea maximă SAR a acestui dispozitiv consultați
[www.nokia.com/phones/sar](https://www.nokia.com/phones/sar
”www.nokia.com/phones/sar”.
Acest dispozitiv corespunde recomandărilor de expunere la radiofrecvență atunci când este
lipit de cap sau când este amplasat la o distanță de cel puțin 5/8 inchi (1,5 cm) față de corp.
Dacă telefonul este purtat pe corp, într-un toc de purtare, într-o agățătoare la centură sau în
alt suport pentru dispozitiv, aceste suporturi nu trebuie să conțină metale și trebuie să asigure
plasarea telefonului cel puțin la distanța față de corp specificată mai sus.
Pentru transmiterea de date sau de mesaje este necesară o conexiune bună cu rețeaua.
Expedierea poate fi întârziată până când o astfel de conexiune este disponibilă. Urmați
instrucțiunile referitoare la distanțele de separație menționate mai sus până la terminarea
expedierii.
În timpul utilizării generale, valorile SAR sunt în mod normal mai mici decât valorile menționate
mai sus. Acest lucru se datorează faptului că, pentru a asigura eficiența sistemului și pentru a
minimiza interferența cu rețeaua, puterea de funcționare a dispozitivului mobil este automat
diminuată atunci când nu este necesară pentru efectuarea apelurilor. Cu cât puterea este mai
mică, cu atât este mai mică valoarea SAR.
Modelele de dispozitiv pot avea diferite versiuni și mai multe valori. De-a lungul timpului pot
apărea modificări ale componentelor și ale designului și unele dintre acestea pot afecta valorile
SAR.
Pentru informații suplimentare, accesați www.sar-tick.com. Rețineți: dispozitivele mobile pot
transmite chiar și atunci când nu efectuați apeluri vocale.
© 2022 HMD Global Oy. Toate drepturile rezervate. 40
Page 41

Nokia G100 Ghid de utilizare
Organizația Mondială a Sănătății (OMS) a specificat că informațiile științifice disponibile curent
nu indică necesitatea niciunei măsuri de precauție speciale în timpul utilizării dispozitivelor
mobile. Dacă doriți să reduceți gradul de expunere, se recomandă limitarea utilizării sau
utilizarea unui kit fără comenzi manuale pentru a ține dispozitivul la distanță de cap și de corp.
Pentru informații, explicații și discuții suplimentare despre expunerea la RF, accesați site-ul web
al OMS la adresa www.who.int/peh-emf/en.
DESPRE GESTIONAREA DREPTURILOR DIGITALE (DIGITAL RIGHTS MANAGEMENT)
Atunci când utilizați acest dispozitiv, respectați toate legile și obiceiurile locale,
confidențialitatea și drepturile legitime ale altor persoane, inclusiv drepturile de autor.
Protecția drepturilor de autor vă poate împiedica să copiați, să modificați sau să transferați
fotografii, muzică și alte tipuri de conținut.
COPYRIGHTS AND OTHER NOTICES
Copyrights and other notices
The availability of some products, features, applications and services described in this guide
may vary by region and require activation, sign up, network and/or internet connectivity and
an appropriate service plan. For more info, contact your dealer or your service provider.
This device may contain commodities, technology or software subject to export laws and
regulations from the US and other countries. Diversion contrary to law is prohibited.
The contents of this document are provided ”as is”. Except as required by applicable law, no
warranties of any kind, either express or implied, including, but not limited to, the implied
warranties of merchantability and fitness for a particular purpose, are made in relation to the
accuracy, reliability or contents of this document. HMD Global reserves the right to revise this
document or withdraw it at any time without prior notice.
To the maximum extent permitted by applicable law, under no circumstances shall HMD Global
or any of its licensors be responsible for any loss of data or income or any special, incidental,
consequential or indirect damages howsoever caused.
Reproduction, transfer or distribution of part or all of the contents in this document in any
form without the prior written permission of HMD Global is prohibited. HMD Global operates
a policy of continuous development. HMD Global reserves the right to make changes and
improvements to any of the products described in this document without prior notice.
HMD Global does not make any representations, provide a warranty, or take any responsibility
for the functionality, content, or end-user support of third-party apps provided with your
device. By using an app, you acknowledge that the app is provided as is.
Downloading of maps, games, music and videos and uploading of images and videos may
involve transferring large amounts of data. Your service provider may charge for the data
© 2022 HMD Global Oy. Toate drepturile rezervate. 41
Page 42

Nokia G100 Ghid de utilizare
transmission. The availability of particular products, services and features may vary by region.
Please check with your local dealer for further details and availability of language options.
Certain features, functionality and product specifications may be network dependent and
subject to additional terms, conditions, and charges.
All specifications, features and other product information provided are subject to change
without notice.
HMD Global Privacy Policy, available at http://www.nokia.com/phones/privacy, applies to your
use of the device.
HMD Global Oy is the exclusive licensee of the Nokia brand for phones & tablets. Nokia is a
registered trademark of Nokia Corporation.
Android, Google and other related marks and logos are trademarks of Google LLC.
Snapdragon is a product of Qualcomm Technologies, Inc. and/or its subsidiaries. Snapdragon
is a trademark or registered trademark of Qualcomm Incorporated. aptX is a trademark
of Qualcomm Technologies International, Ltd., registered in the United States and other
countries, used with permission.
The Bluetooth word mark and logos are owned by the Bluetooth SIG, Inc. and any use of such
marks by HMD Global is under license.
OZO
OZO este marcă înregistrată a Nokia Technologies Oy.
HAC notice
Your phone is compliant with the FCC Hearing Aid Compatibility requirements. The FCC has
adopted HAC rules for digital wireless phones. These rules require certain phone to be tested
and rated under the American National Standard Institute (ANSI) C63.19-2011 hearing aid
compatibility standards. The ANSI standard for hearing aid compatibility contains two types
of ratings: M-Ratings: Rating for less radio frequency interference to enable acoustic coupling
with hearing aids. T-Ratings: Rating for inductive coupling with hearing aids in telecoil mode.
Not all phones have been rated, a phone is considered hearing aid compatible under FCC
rules if it is rated M3 or M4 for acoustic coupling and T3 or T4 for inductive coupling. These
ratings are given on a scale from one to four, where four is the most compatible. Your phone
meets the M4/T3 level rating. However, hearing aid compatibility ratings don’t guarantee
that interference to your hearing aids won’t happen. Results will vary, depending on the
© 2022 HMD Global Oy. Toate drepturile rezervate. 42
Page 43

Nokia G100 Ghid de utilizare
level of immunity of your hearing device and the degree of your hearing loss. If your hearing
device happens to be vulnerable to interference, you may not be able to use a rated phone
successfully. Trying out the phone with your hearing device is the best way to evaluate it
for your personal needs. This phone has been tested and rated for use with hearing aids
for some of the wireless technologies that it uses. However, there may be some newer
wireless technologies used in this phone that have not been tested yet for use with hearing
aids. It is important to try the different features of this phone thoroughly and in different
locations, using your hearing aid or cochlear implant, to determine if you hear any interfering
noise. Consult your service provider or the manufacturer of this phone for information on
hearing aid compatibility. If you have questions about return or exchange policies, consult
your service provider or phone retailer. Hearing devices may also be rated. Your hearing
device manufacturer or hearing health professional may help you find this rating. For more
information about FCC Hearing Aid Compatibility, please go to http://www.fcc.gov/cgb/dro.
© 2022 HMD Global Oy. Toate drepturile rezervate. 43
 Loading...