

Page 1
Nokia Holder Easy Mount HH-20
and CR-118
1
D
B
C
A
9220097/2
E
Page 2

2
D
A
C
F
E
G
B
3
5
6
7
8
4
Page 3
9
12
11
10
Page 4

© 2009-2010 Nokia. All rights reserved.
Nokia, Nokia Connecting People and the
Nokia Original Accessories logo are
trademarks or registered trademarks of
Nokia Corporation.
Introduction
The Nokia Holder Easy Mount HH-20
is a mounting device that allows you
to attach your compatible mobile
holder to the windscreen or, using the
optional adhesive pad, to the
dashboard of your vehicle.
Read this guide carefully before
installing and using the product.
This product may contain small parts.
Keep them out of the reach of small
children.
General safety instructions
Obey all local laws. Always keep your
hands free to operate the vehicle
while driving. Your first consideration
while driving should be road safety.
Only operate the mounting device or
mobile holder if it is safe to do so
under all driving conditions.
When you install the mounting device
or mobile holder, ensure that they do
not interfere with or hinder the
steering or braking systems or other
systems used in the operation of the
vehicle (for example, airbags) or
disturb your field of vision while
driving.
Check that the deployment of the
airbag is not blocked or impaired in
any way.
ENGLISH
Page 5

Ensure that the mounting device or
mobile holder is not installed where
you might come in contact with it in
the event of an accident or collision.
Periodically check that the suction cup
at the bottom of the mounting device
is firmly attached to the windscreen or
dashboard, especially if the ambient
temperature changes a lot.
Never leave the mounting device
inside the vehicle in direct sunlight or
Attach to a windscreen
ENGLISH
in excessive heat. The mounting
device and suction cup may be
damaged and adhesion may be
impaired if the inside temperature
exceeds +70°C (160°F).
When attaching a mobile holder,
ensure that the display of the mobile
device is clearly visible for the user.
For your safety, install the holder in
the upright position.
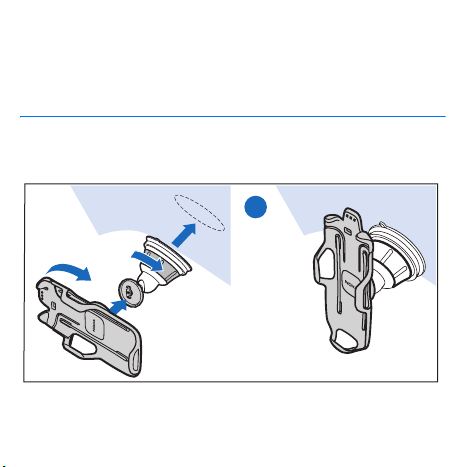
Attach the holder to the mounting device
To attach the mobile holder to the
mounting device, insert the catch on
the mounting device into the slot at
the back of the holder (see step 1A at
the start of this guide). Rotate the
holder clockwise about 90 degrees
until it locks into place (1B).
To detach the holder from the
mounting device, rotate it
anticlockwise.
Attach the mounting device to the windscreen
Before you attach the mounting
device to the windscreen, loca te a safe
mounting surface on the windscreen,
Page 6

and clean the surface thoroughly with
a glass cleaner and a clean towel.
If the ambient temperature is below
+15°C (60°F), carefully warm the
surface and the suction cup with
a hair dryer to ensure a firm grip on
the windscreen. Ensure that you do
not heat the windscreen excessively
to avoid damage to it.
Press the suction cup of the mounting
device against the windscreen (1C),
and rotate the ring on the mounting
Attach to a dashboard
ENGLISH
device clockwise (1D) to create
a vacuum between the suction cup
and the windscreen. Ensure that
the mounting device is firmly
attached (1E).
To detach the suction cup from the
windscreen, rotate the ring on the
mounting device anticlockwise (10),
pull the strap located on the edge of
the suction cup (11), and pull the
holder with the mounting device from
the windscreen (12).
Attach the mounting device to the dashboard
If the product was supplied with an
adhesive pad, you can attach the
mounting device to the dashboard.
Ensure that the surface where you
attach the adhesive pad on the
dashboard is flat, dry, and free from
dirt and dust.
Peel off the protective sheet from the
adhesive side of the pad (see step 2A),
and press the pad against the
dashboard so that it stays firmly in
place. When you peel off the
Page 7

protective sheet from the pad, do not
touch the adhesive side.
Press the suction cup of the mounting
device against the pad (2B).
Turn the catch on the mounting device
to the desired position (2C). Rotate
the ring on the mounting device
clockwise (2D) to create a vacuum
between the suction cup and the pad.
To detach the suction cup from the
pad, proceed in the same way as when
you detach the cup from a windscreen
(10, 11, and 12).
Attach the holder to the mounting device
To attach the mobile holder to the
mounting device, insert the catch on
the mounting device into the slot at
the back of the holder (2E). Rotate the
holder clockwise about 90 degrees
until it locks into place (2F). Ensure
that the mounting device is firmly
attached (2G).
To detach the holder from the
mounting device, rotate it
anticlockwise.
Place or remove the mobile device
Do not place or remove a mobile
device while driving.
To place your device into the holder,
slide the device into the holder from
the top while you push the latch
(see step 3), and press it against the
bottom of the holder (4). Ensure that
the device is firmly in place (5).
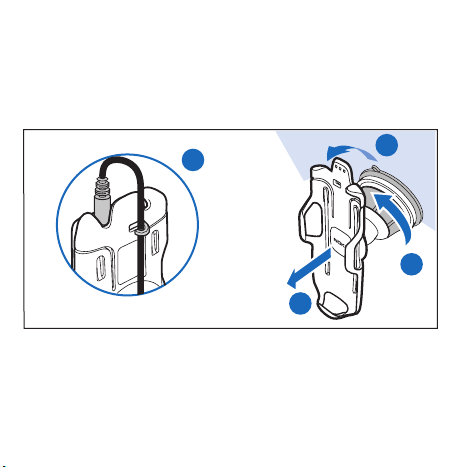
To charge the battery of your device,
use a compatible charger. To attach
the charger cable to the back of the
holder, insert the cable into the
cable support (9), and connect the
ENGLISH
Page 8

charger plug to the charger connector
on your device.
Taking care of your device
Your device is a product of superior
design and craftsmanship and should be
treated with care. The following
suggestions will help you protect your
warranty coverage.
• Do not use or store the device in
dusty, dirty areas. Its moving parts
can be damaged.
• Do not drop, knock, or shake the
device. Rough handling can break
fine mechanics.
• Do not use harsh chemicals, cleaning
solvents, or strong detergents to
clean the device. Only use a soft,
clean, dry cloth to clean the surface
of the device.
ENGLISH
To remove the device, push the latch
(6), hold the sides of the device (7),
and pull the device out from the
holder (8).
• Do not paint the device. Paint can
clog the moving parts and prevent
proper operation.
 Loading...