


Owner’s Manual
Part 2
Operating System
TM
DIGITAL MULTIMEDIA TERMINAL
MANUFACTURED BY NOKIA
1

Important Information
Please be aware that ASTRO will update your Digital Multimedia Terminal (DMT) with new software from time to time. This can change the functionality of the DMT. Therefore, it is important that your DMT be put in Stand-By mode whenever it is not in use, as this is the mode in which it will receive this new software. It is important that you leave your ASTRO Smart Card 1 inserted at all times in order to receive this new software, and to ensure that your DMT functions correctly, as described in this manual.
ASTRO operates a policy of continuous development. Therefore we reserve the right to make changes and improvements to any of the products described in this manual without prior notice.
In the event of significant changes being made to the Operating System of your DMT, ASTRO will endeavour to amend, update or reissue this manual.
ASTRO is a trademark of MEASAT Broadcast Network Systems
Sdn. Bhd. (240064-A)
Copyright © 1999. MEASAT Broadcast Network Systems Sdn.
Bhd. (240064-A). All rights reserved.
2

CONTENTS
CHAPTER 1 : Basic Operations |
4 |
CHAPTER 2 : Changing Channels |
4 |
Using Numeric Keypad (0..9) |
4 |
Using the Programme Buttons P+ or P- |
4 |
Using the Channel List |
5 |
CHAPTER 3 : Using the Channel Guide |
6 |
CHAPTER 4 : Using the Channel Pilot |
7 |
Programme Information of Current Channel |
7 |
Programme Information of Other Channels |
7 |
CHAPTER 5 : Using the Parental Lock |
8 |
Preset Channels to be Locked |
8 |
Watching Locked Channels |
9 |
Restore Parental Lock |
9 |
CHAPTER 6 : Using the Personalized Scheduler |
10 |
Select Programmes for Recording |
10 |
Setting the Video Recorder |
10 |
Inspect Tagged Programmes |
10 |
CHAPTER 7 : Using the Favourite Channel List |
11 |
Compile your Favourite List |
11 |
View the Favourite List |
11 |
CHAPTER 8 : Using the Message Function |
12 |
To Read your Messages |
12 |
CHAPTER 9 : Update List of Services |
13 |
CHAPTER 10 : Update New DMT Software |
14 |
Through the Main Menu |
14 |
Switching the Mains AC Power |
14 |
Set the DMT to Stand-By Mode |
14 |
CHAPTER 11 : Viewing Options |
15 |
CHAPTER 12 : Check your Satellite Signal |
18 |
CHAPTER 13 : Installation Setup and Setting |
19 |
Auto Configuration |
19 |
Manual Configuration |
20 |
Technical Parameters |
22 |
CHAPTER 14 : ASTRO Customer Service |
22 |
3
CHAPTER 1 : Basic Operations
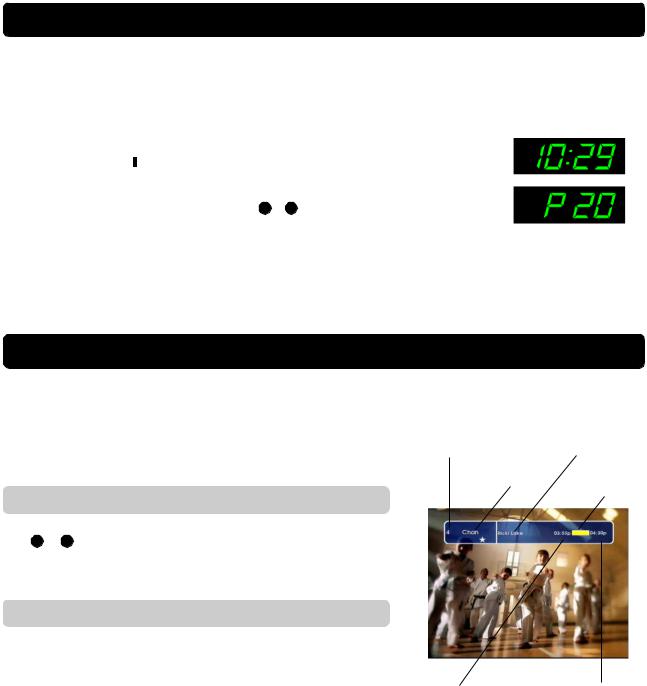
When you switch ON the mains AC power switch on the wall socket, your DMT will be put into Stand-By mode. In Stand-By mode, you will notice that the front panel display will show the current time. While in Stand-By mode, you will need to switch ON the DMT in order to view ASTRO programmes. To switch ON your DMT perform any one of the following:
•Press the Stand-By Button on either the DMT front panel or remote control.
•Press any of the Numeric Keypad Buttons ( 0 … 9 ) on your remote control.
•Press either the P+ or P- button on your remote control.
CHAPTER 2 : Changing Channels
There are 3 basic ways to surf through the list of available channels broadcast by ASTRO. In all cases, a channel banner will appear on the top of your TV screen displaying basic information related to the channel selected. ASTRO channels can be selected using the following methods:
Using the Numeric Keypad (0…9)
Your DMT remote control contains a set of numerical buttons labeled from 0 to 9 . If you know the ASTRO channel which you want to watch, simply key in the channel number on the numeric keypad by pressing the numeric keys in quick succession.
Using the Programme Buttons P+ or P-
Pressing P+ or P- selects the next higher or lower channel number to the one currently selected.
Stand-By
Mode
ON
Mode
Channel |
Current |
Number |
Programme |
Short Channel |
Elapsed |
Name |
Time |
Start Time |
Stop Time |
4
Using the Channel List
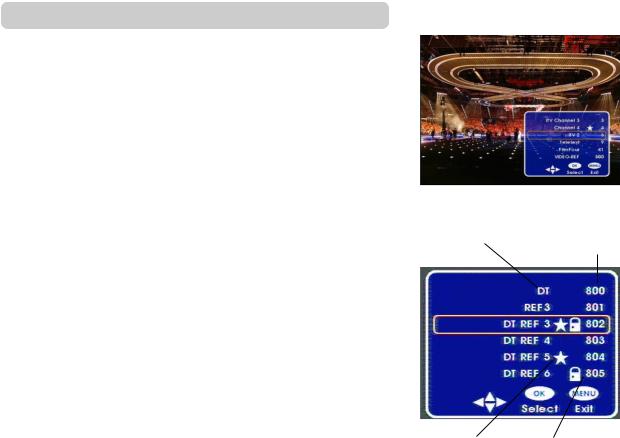
The channel list is an alternative way of viewing the channels that are available on ASTRO. The list will display details of all available channels superimposed over the programme you are currently watching, and will also indicate which channels have been selected as your favourites, or channels that have been locked.
•Press OK to display the channel list whilst viewing any channel.
•The display will show a total of 6 channels at a time, along with symbols that identify the status of a particular channel, such as favourite and locked channels. The channel you are currently viewing will be highlighted on this list.
•Press  or
or  to move through the channel list. When you have reached the bottom of the list, continue to press
  to scroll to the next
screen. Alternatively, pressing  or
or  will scroll a full page at a time.
•Press OK to view the channel you want to watch or press MENU to remove the channel list from your screen without changing channels.
Channel |
Channel |
Name |
Number |
Favourite |
Locked |
Channel |
Channel |
Icon |
Icon |
5
CHAPTER 3 : Using the Channel guide
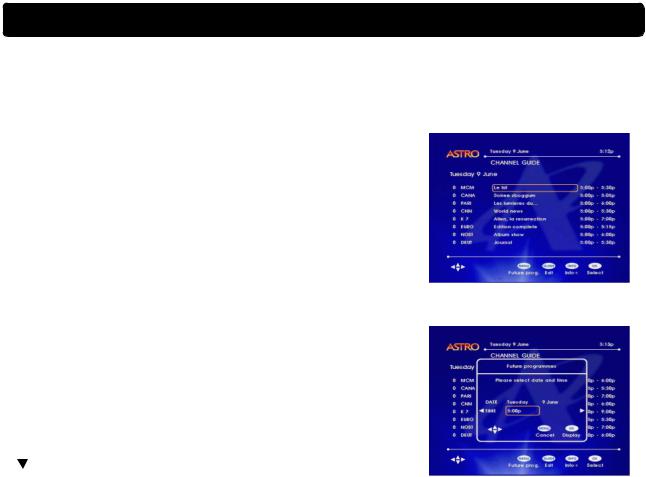
When you are watching ASTRO programmes, you can display the current and future programme information using the Channel Guide. The Channel Guide contains programme information for all available channels up to 7 consecutive days ahead.
•While watching ASTRO programmes, press the GUIDE button on your remote control or DMT front panel.
•The list of available channels and their current programmes will be shown.
•Pressing the INFO button will display additional information (synopsis) pertaining to the programme currently being shown on the selected channel.
•When you have read the additional information, press INFO again to return to the Channel Guide.
•While in the Channel Guide, you can also view additional information for programmes to be shown in the near future (up to 7 days ahead).
•Press MENU to display the “Future Programme” dialog box.
•Using  ,
, ,
, , or
, or buttons, you can now view future programmes by specifying your date and time of interest.
•Once the preferred date and time has been specified, press OK to display the list of future programmes, or alternatively, you can press MENU to return to the Channel Guide without any changes.
•You can now select your channel or programme of interest using the or
or
 buttons. When you have reached the bottom of the list, continue to press to scroll to the next page.
•If you would like to view the channel highlighted in the Channel Guide, press OK. Otherwise, press GUIDE to return to normal TV viewing without changing the viewed channel.
6
CHAPTER 4 : Using the Channel Pilot
Channel Pilot displays the same information as the Channel Guide but in a different form. The main purpose of the Channel Pilot is to be able to acquire programme information on the current and next programmes on every channel very quickly, while being able to watch the selected programme at the same time. The Channel Pilot can also be very useful when you want to know about additional information on the current or upcoming programmes immediately.
Programme Information of Current Channel
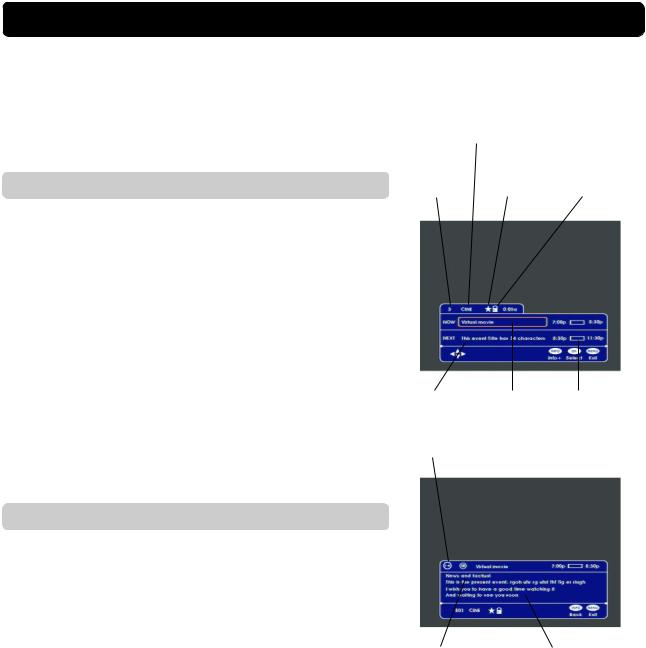
•While watching ASTRO programmes, press INFO to activate the Channel Pilot.
•The Channel Pilot will appear on the bottom part of the screen, along with pictures of the currently viewed programme in the background.
•The Channel Pilot contains both the current and next programme names and their respective duration. It also tells you whether the selected channel is one of your favourites and if it is a parental locked channel.
•Using and
and you can highlight the current or next programme on the same channel.
•To view additional information on the highlighted programme, press INFO (Info+).
•This screen contains additional information (Synopsis) on the highlighted programme.
•To return to the Channel Pilot, press INFO again.
•Press MENU to return to normal TV viewing.
Programme Information Other Channels
•While watching ASTRO programmes, press INFO.
•Use the  and
and  buttons to scroll through the available channels. Note that if the Favourite channel function is active, you will be scrolling through your favourite list.
•Or alternatively, use the numeric keypad to select your channel of interest.
•Note that although the channel on your Channel Pilot banner has changed, the actual channel being viewed remains the same.
•Now you can use the  and
and  buttons to highlight the current or next programme. To view additional information on the highlighted programme, press INFO.
•This screen contains additional information (Synopsis) on the highlighted programme.
•To return to the Channel Pilot banner, press INFO again.
•If you would like to view the channel indicated in the Channel Pilot, press OK to select. Otherwise, press MENU to return to normal TV viewing without changing the viewed channel.
Short
Channel
Name
|
Favourite |
Locked |
Channel |
Channel |
Channel |
Number |
Icon |
Icon |
Next |
Current |
Duration |
Programme |
Programme |
(Time Bar) |
Dual Language Icon
Maturity |
Synopsis |
Rating |
|
7

CHAPTER 5 : Using the Parental Control Feature
Parental Lock is a parental control feature which enables you to block access to any particular channel. When a locked channel is selected for viewing, your PIN code will be prompted. Only those who know your PIN code will be able to unlock the channel for viewing. Below are 3 basic means of using the parental lock feature.
Preset Channels to be Locked
First you must preset the channels which you want to lock when the parental lock feature is active.
•While watching ASTRO programmes, press MENU. The main menu screen will appear.
• Select the “List of Services” option by pressing 3 on the numeric keypad.
•Press  or
or  to highlight the channel you want to lock.
•Press OK to lock
•Enter your PIN code. Note that an asterisk V will be displayed in the 4-digit field as you enter each digit.
•If necessary, press  to move back and make amendments if you have entered a wrong code.
•Press OK to confirm the code.
•A  symbol will appear along-side the selected channel to confirm your choice.
•Press  or
or to highlight other channels to be locked and press OK to confirm.
•Repeat this step until you have identified all the channels you want to lock.
•If you have mistakenly locked a channel, you can unlock it by pressing OK so that the 
 symbol beside it disappears.
•Once you have completed selecting the channels you want to lock, press MENU twice to return to normal TV viewing.
Note : Remember to put your DMT in Stand-By mode after locking channels and before leaving the unit unattended to ensure that the locked channels are stored in the memory.
8
 Loading...