

Page 1

Nokia C110/C111 Wireless LAN Card
User’s guide
Page 2
For your safety
Read these simple guidelines. Breaking the rules may be dangerous or illegal. Further
detailed information is given in this user’s guide.
Road safety comes first
Do not use the wireless LAN card while driving; park the vehicle first.
Interference
All wireless LAN cards may receive interference, which could affect performance.
Hospitals and aircraft
Wireless LAN cards can cause interference. Observe restrictions for use in these areas.
Switch off when refueling
Do not use the wireless LAN card at a refueling point. Do not use near fuel or
chemicals.
Switch off near blasting
Do not use the wireless LAN card where blasting is in progress. Observe
restrictions, and follow any regulations or rules.
Use sensibly
Use only in the normal operating position.
Use qualified service
Only qualified service personnel must repair equipment.
Accessories
Use approved accessories only. Do not connect incompatible products.
Water resistance
Your wireless LAN card is NOT water-resistant. The wireless LAN card is not
covered under warranty for damage by any liquid substance.
Make backup copies
Remember to make backup copies of all important data.
Connecting to other devices
When connecting to any other device, read its user's guide for detailed safety
instructions. Do not connect incompatible products.
Page 3

DECLARATION OF CONFORMITY
We, Nokia Mobile Phones Ltd declare under our sole responsibility that the products DTN-10 and DTN-11 are in
conformity with the provisions of the following Council Directive: 1999/5/EC.
Copyright © Nokia Mobile Phones 2000-2001. All rights reserved.
Reproduction, transfer, distribution or storage of part or all of the contents in this document in any form without
the prior written permission of Nokia is prohibited.
Nokia and Nokia Connecting People are registered trademarks of Nokia Corporation. Other product and
company names mentioned herein may be trademarks or tradenames of their respective owners.
Includes MD5 algorithm software from RSA Security.
Nokia operates a policy of continuous development. Nokia reserves the right to make changes and improvements
to any of the products described in this document without prior notice.
Under no circumstances shall Nokia be responsible for any loss of data or income or any special, incidental,
consequential or indirect damages howsoever caused.
The contents of this document are provided “as is”. Except as required by applicable law, no warranties of any
kind, either express or implied, including, but not limited to, the implied warranties of merchantability and fitness
for a particular purpose, are made in relation to the accuracy, reliability or contents of this document. Nokia
reserves the right to revise this document or withdraw it at any time without prior notice.
The availability of particular products may vary by region. Please check with the Nokia dealer nearest to you.
Page 4

Table of contents
Introduction 6
Wireless LAN . . . . . . . . . . . . . . . . . . . . . . . . . . . . . . . . . . . . . . . 6
Security . . . . . . . . . . . . . . . . . . . . . . . . . . . . . . . . . . . . . . . . . . . . 8
Antennas . . . . . . . . . . . . . . . . . . . . . . . . . . . . . . . . . . . . . . . . . . . 9
Getting started 11
Installation . . . . . . . . . . . . . . . . . . . . . . . . . . . . . . . . . . . . . . . . 11
Basic settings . . . . . . . . . . . . . . . . . . . . . . . . . . . . . . . . . . . . . . 12
Connecting to a network . . . . . . . . . . . . . . . . . . . . . . . . . . . . . 14
Removing the card . . . . . . . . . . . . . . . . . . . . . . . . . . . . . . . . . . 17
Uninstalling the Nokia C110/C111 . . . . . . . . . . . . . . . . . . . . . 17
Nokia C110/C111 features 19
Monitor window . . . . . . . . . . . . . . . . . . . . . . . . . . . . . . . . . . . . 19
Manager window . . . . . . . . . . . . . . . . . . . . . . . . . . . . . . . . . . . 20
Profiles. . . . . . . . . . . . . . . . . . . . . . . . . . . . . . . . . . . . . . . . . . . . 21
Status . . . . . . . . . . . . . . . . . . . . . . . . . . . . . . . . . . . . . . . . . . . . 26
General settings . . . . . . . . . . . . . . . . . . . . . . . . . . . . . . . . . . . . 29
Diagnostics . . . . . . . . . . . . . . . . . . . . . . . . . . . . . . . . . . . . . . . . 33
Update. . . . . . . . . . . . . . . . . . . . . . . . . . . . . . . . . . . . . . . . . . . . 33
Administrator . . . . . . . . . . . . . . . . . . . . . . . . . . . . . . . . . . . . . . 34
SIM services . . . . . . . . . . . . . . . . . . . . . . . . . . . . . . . . . . . . . . . 36
Security options 40
WEP security. . . . . . . . . . . . . . . . . . . . . . . . . . . . . . . . . . . . . . . 40
Smart cards. . . . . . . . . . . . . . . . . . . . . . . . . . . . . . . . . . . . . . . . 43
Troubleshooting 46
Installation . . . . . . . . . . . . . . . . . . . . . . . . . . . . . . . . . . . . . . . . 46
Network. . . . . . . . . . . . . . . . . . . . . . . . . . . . . . . . . . . . . . . . . . . 48
Wireless LAN. . . . . . . . . . . . . . . . . . . . . . . . . . . . . . . . . . . . . . . 50
Resources . . . . . . . . . . . . . . . . . . . . . . . . . . . . . . . . . . . . . . . . . 52
Hardware. . . . . . . . . . . . . . . . . . . . . . . . . . . . . . . . . . . . . . . . . . 52
Smart card. . . . . . . . . . . . . . . . . . . . . . . . . . . . . . . . . . . . . . . . . 53
Card specifications 54
Physical specifications . . . . . . . . . . . . . . . . . . . . . . . . . . . . . . . 54
Radio specifications . . . . . . . . . . . . . . . . . . . . . . . . . . . . . . . . . 54
Page 5

Important safety information 55
Important information . . . . . . . . . . . . . . . . . . . . . . . . . . . . . . . 55
FCC Declaration of Conformity Statement. . . . . . . . . . . . . . . 58
Care and maintenance 59
Glossary 60
Page 6

Introduction
The Nokia C110 Wireless LAN Card and the Nokia C111 Wireless LAN Card are
extended type II PC cards, offering a data transmission rate of up to 11 Mbit/s in a
wireless local area network (LAN) environment. The Nokia C110 features two
internal antennas for compact size. The Nokia C111 is equipped with internal
antennas and two external antenna connectors.
The Nokia C110/C111 Wireless LAN Card:
• Complies with the IEEE 802.11b standard.
• Supports data rates of 1, 2, 5.5, and 11 Mbit/s.
• Operates at a frequency of 2.4 GHz using direct sequence spread spectrum
(DSSS) radio technology.
• Supports the Windows® 95, Windows® 98, Windows® Me, Windows® 2000,
and Windows NT® 4.0 operating systems. For other supported operating
systems, please check the Nokia Web site at www.forum.nokia.com.
Nokia’s wireless LAN cards enable you to wirelessly connect compatible laptop
computers, hand-held devices, desktop PCs, and other devices with a type II or III
PC card slot to a wired local area network through an access point. Instead of
cables, radio waves are used to transmit and receive data over the air. With the
Nokia C110/C111 you can:
• set up an infrastructure network where wireless stations communicate with wired
and wireless stations through an access point. You can wirelessly access your
company database, e-mail, the Internet, and other network resources, for example.
• set up an ad hoc network where wireless stations send and receive data directly
with each other. No access point is needed, and as long as the stations are within
range, you can, for example, share and exchange files.
The Nokia C110/C111 comes with an integrated smart card reader. Vital
information, such as security keys and personal network profiles that make
moving between networks easy, can be stored on a smart card.
Wireless LAN
The wireless LAN cards described in this document are approved for use in a
wireless local area network.
The wireless LAN card employs the data transmission capabilities of a wireless
LAN in order to send and receive data, to browse the Internet, and to establish
connections with other computers, for example.
6
Page 7

Data connections can be made from most locations where your wireless LAN card
operates. However, it is recommended that you move the wireless LAN card to a
location where the strongest possible network signal can be obtained. When the
signal is strong, data transmission is efficient.
The following factors may impair wireless connections:
Noise
Electronic appliances and equipment can cause radio interference. Also in areas
where wireless LAN cards are prevalent, other wireless LAN cards can impair the
wireless connection.
Roaming
As the wireless LAN card user moves from one access point coverage area to
another, the signal strength of the channel drops. As a consequence, the network
may hand the user over to a coverage area and frequency where the signal is
stronger. Due to varying network traffic loads, roaming may also occur when the
user is stationary.
Electrostatic discharge
A discharge of static electricity from a finger or a conductor may cause erroneous
functions in electrical devices. The discharge may result in unstable software
operation. Network connections may become unreliable, data may be corrupted,
and the transmission halted. In this case, end the existing connection (if any), stop
the wireless LAN card, and remove it from the PC card slot. Then re-insert the
wireless LAN card into the PC card slot and try connecting again.
Dead spots and dropouts
Dead spots are areas where radio signals cannot be received. Dropouts occur when
the wireless LAN card user passes through an area where the radio signal is
blocked or reduced by geographical or structural obstructions, such as concrete
walls.
Signal impairment
Distance and obstacles can cause out-of-phase reflected signals that result in a loss
of signal strength.
Low signal strength
Due to either distance or obstacles, the radio signal strength from an access point
may not be strong or stable enough to provide a reliable wireless connection for
communication. Therefore, to ensure the best possible communication,
remember to consider the following points:
• Data connection works best when the wireless LAN card is in a stationary
position.
• Do not place the wireless LAN card on a metal surface.
7
Page 8
Important!
Warning: Do not use the wireless LAN card when the use of a wireless device
is prohibited or when it may cause interference or danger. Note that the
wireless LAN card may cause similar interference as a cellular device and
must not be used in areas where the use of a cellular device is prohibited.
Warning: Be careful when moving your computer so that you do not cause
damage to the protruding end of the inserted wireless LAN card.
Warning: In Europe, this equipment is intended to be used in the following EU
Member States: Austria, Belgium, Denmark, Finland, France, Germany,
Greece, Ireland, Italy, Luxembourg, Netherlands, Portugal, Spain, Sweden,
and United Kingdom. This equipment can also be used in Norway and
Switzerland.
Warning: Use the wireless LAN card in the specified countries only. Using the
wireless LAN card in any other country or with an incorrect country setting
may be illegal.
Warning: This equipment operates at 2.4 - 2.4835 GHz. Note that in France
the use of this equipment is only allowed at the frequency band of 2.445 -
2.4835 GHz (channels 10, 11, 12, and 13).
Note: Transmitted data is not encrypted by the wireless LAN card by default.
For more information about security in data transmission, please visit
www.forum.nokia.com.
Security
Security issues should always be carefully considered to ensure the secure
transmission of data in both wired and wireless LANs. In current wireless systems,
for example, access points need to authenticate wireless stations to prevent
unauthorized access to the network. Authentication is a service that confirms the
identity of an entity, such as a user or a computer, or confirms the origin of a
transmitted message.
The Nokia C110/C111 supports the wired equivalent privacy (WEP) protocol to
provide security equivalent to that of a wired local area network. The WEP
protocol utilizes the RC4 algorithm with an up to 128-bit secret key, which
encrypts data before it is transmitted over the radio waves. This provides
protection against intruders and unauthorized access to the data. When the
wireless stations in a wireless LAN wish to communicate using WEP, they must
have possession of the same secret key.
The Nokia C110/C111 is equipped with an integrated smart card reader. Smart
cards and smart card readers provide a tool for managing secure user
8
Page 9
authentication in a wireless LAN. Smart cards also provide an easy way for users
to carry an authentication device with them. On a smart card users can store
important information, such as security keys and network profiles. The smart
card reader reads the data stored on the computer chip and sends it to the network
for processing. The smart card is protected by a PIN code; to access the contents of
the smart card, you need to enter the correct PIN code.
Warning: Keep all miniature smart cards out of small children’s reach.
Antennas
The Nokia C110/C111 Wireless LAN Card is equipped with two internal antennas
placed inside an extension box providing improved signal quality and coverage
area. As with any other radio transmitting device, do not touch the antenna
unnecessarily when the wireless LAN card is in use. Contact with the antenna
affects the quality of the transmission and may cause the wireless LAN card to
operate at a higher power level than otherwise needed.
Note: Make sure that the antenna is pointing towards the access point and
placed in an open area. Do not cover the antenna.
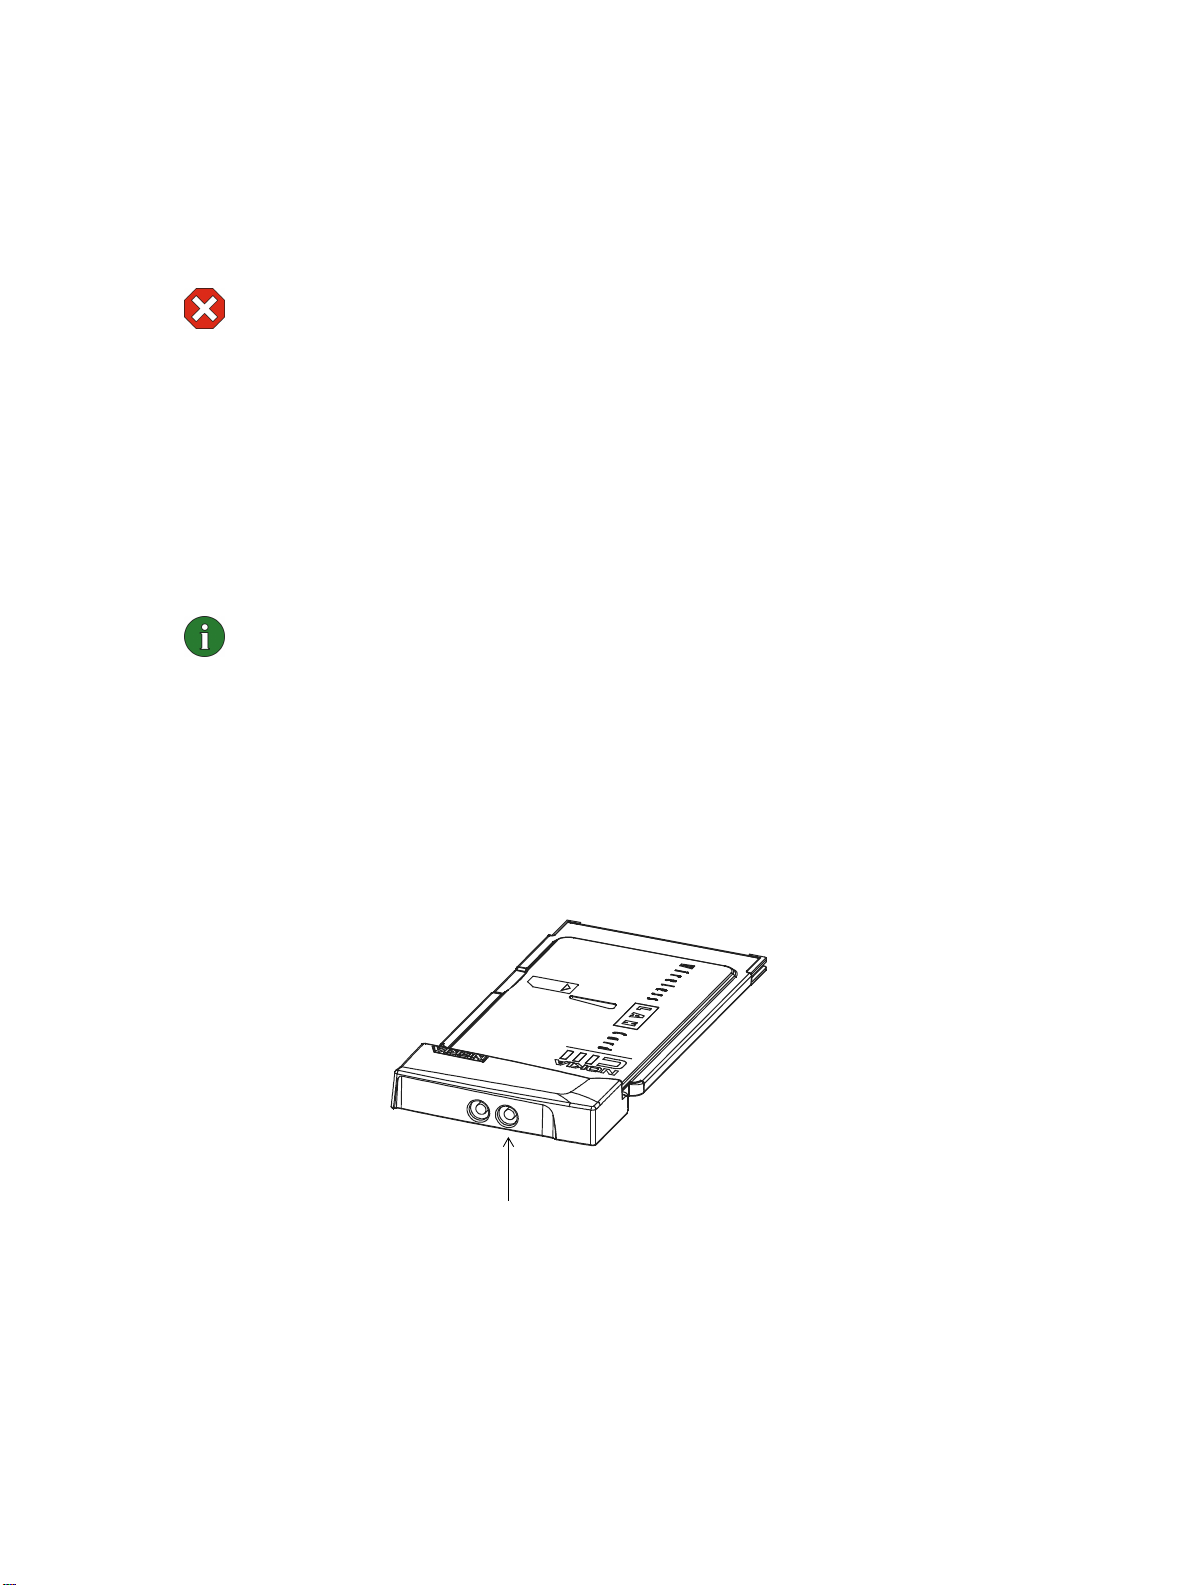
The Nokia C111 has two antenna connectors for attaching external antennas for
coverage area extension. The Nokia C111 can be used with up to two external
antennas at the same time. Use only the supplied antennas or an approved external
antenna. Unauthorized antennas, modifications, or attachments could damage
the wireless LAN card and may violate regulations governing radio devices.
If only one external antenna is used, best performance is obtained by connecting
the external antenna to the right antenna connector of the wireless LAN card.
Right antenna connector
Figure 1 - Nokia C111
9
Page 10

Warning:
Use only accessories approved by the wireless LAN card
manufacturer for use with this particular wireless LAN card. The use of any
other type of accessories will invalidate any approval or warranty applying
to the wireless LAN card, and may be dangerous.
Caution: When you disconnect the cable of any external antenna, grasp and
pull the plug, not the cable.
Note: For availability of approved accessories, please check with your dealer.
Caution: In order to comply with FCC RF exposure
requirements for a mobile transmitter, a minimum separation
distance of 20 cm must be maintained between the antenna
and all persons during transmission.
10
Page 11

Getting started
To access and to operate in a wireless LAN with the Nokia C110/C111 Wireless
LAN Card, you need to specify a number of network settings. If wireless stations
are to communicate with each other in the wireless LAN, the stations must share
certain settings. You can leave most settings at their default value, or use the
automatic option when applicable, unless, for example, the system administrator
advises you to the contrary.
Note: When you have changed certain settings, the system may prompt you
to restart it. Restart your computer to enable the new settings.
Different wireless LANs require different settings. All necessary settings are
configured when you create a network profile. A profile is a collection of settings
needed for connecting to a wireless LAN. With the Nokia C110/C111 you do not
need to remember these settings by heart or configure them every time you use
your wireless LAN card. You can easily switch between networks, for example,
from headquarters to field office, simply by selecting the appropriate profile. Any
of the settings can be changed by editing the existing profiles. See “Profiles” on
page 21 for more information.
Three profiles with pre-defined settings are automatically created during software
installation. The Quick Infrastructure and Quick Ad Hoc profiles enable quick
and easy access to a wireless LAN: you need not configure any network settings.
The Quick Infrastructure profile is used for accessing public access zones or your
corporate network. The Quick Ad Hoc profile is used for setting up a network
where wireless stations communicate directly with each other without access
points. When you activate either of these profiles, a list of available networks
appears where you can select the network which offers the best signal strength and
data rate for communication. The third pre-defined profile, Wired LAN, contains
the original network settings needed for accessing the wired local area network.
See “Using default profiles” on page 16 for more information.
Installation
For instructions on installing the Nokia C110/C111, please see the separate
Installation guide on the CD-ROM.
11
Page 12
Basic settings
The minimum set of parameters to be configured are listed below.
Note: All wireless stations within a wireless LAN must share the basic
settings if the stations are to communicate with each other.
Country
You must always configure the country setting according to the country where
you are currently using your wireless LAN card. Using the Nokia C110/C111
Wireless LAN Card in any other country not specified, or with an incorrect
country setting may be illegal.
The country setting can be configured on the General settings page.
Operating mode
The Nokia C110/C111 enables different types of communication in a wireless
LAN. There are two operating modes to choose from: infrastructure and ad hoc.
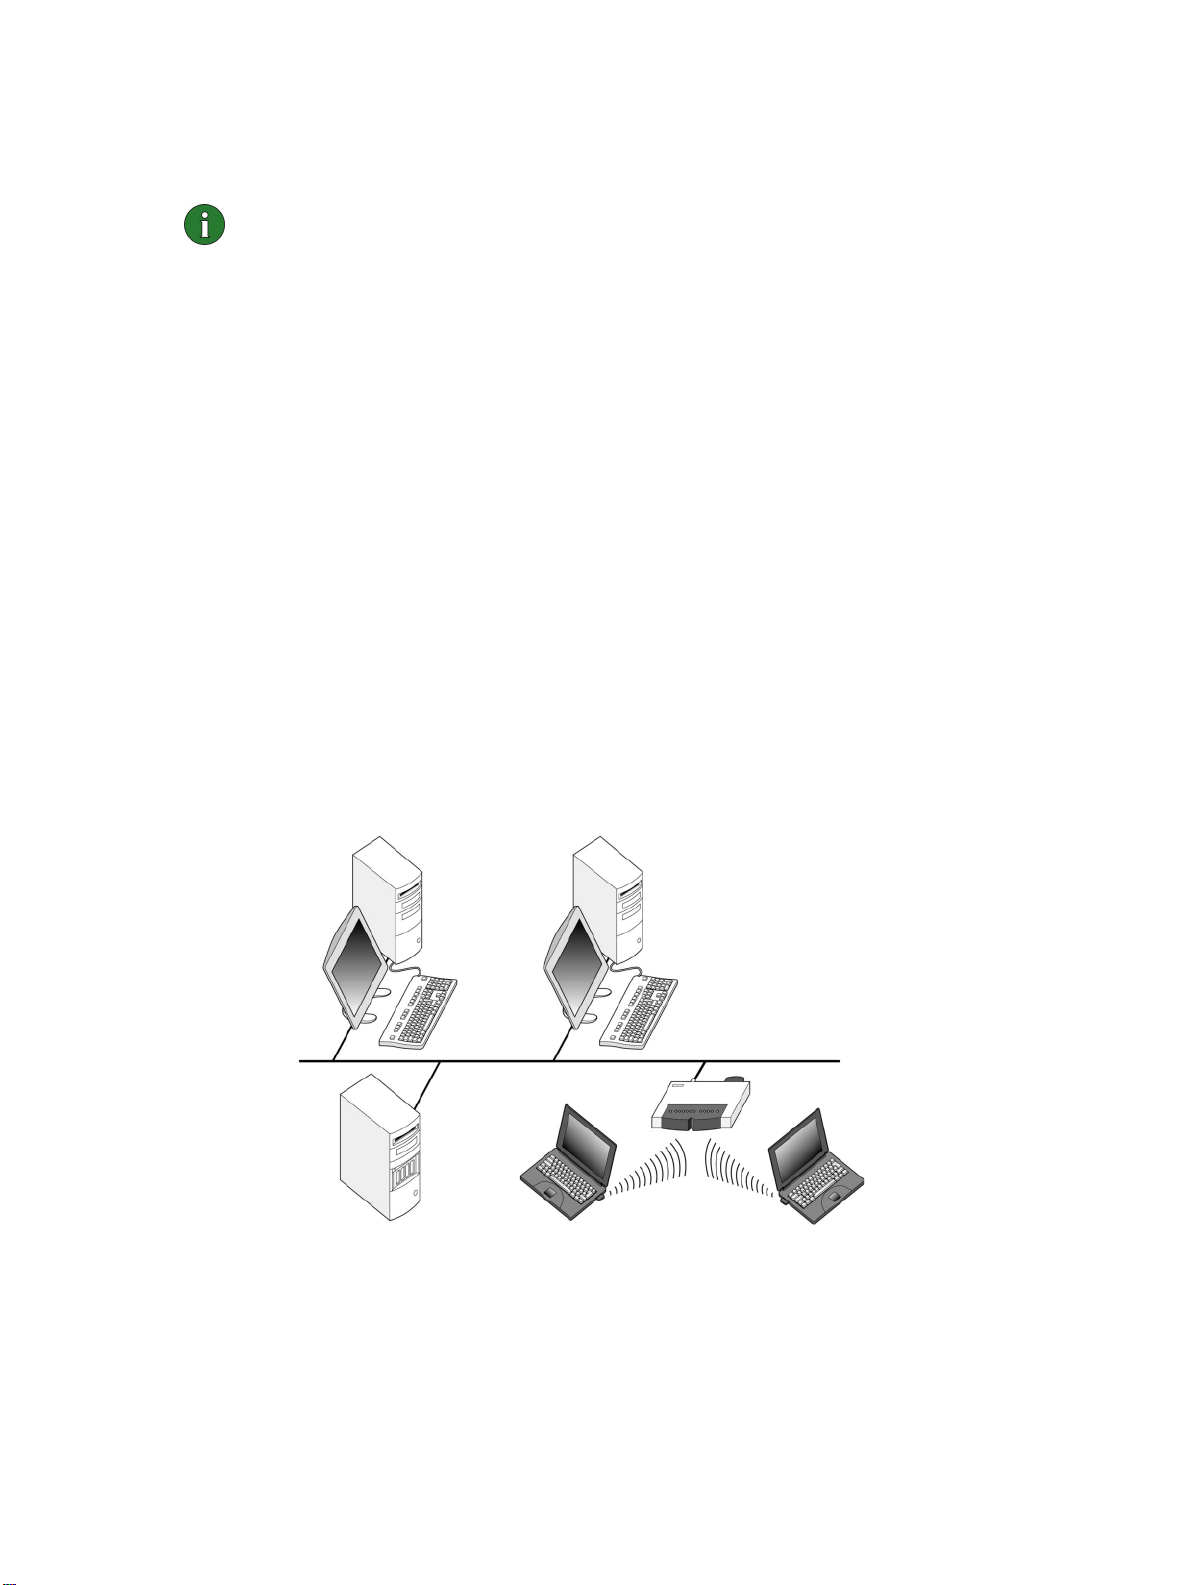
Infrastructure
The infrastructure operating mode allows two kinds of communication:
• Wireless stations communicate with each other through an access point.
• Wireless stations communicate with a wired LAN station through an access
point.
Figure 2 - Infrastructure networking
12
Page 13
The advantage of the infrastructure operating mode is that you can have more
control over network connections because they pass through an access point.
A wireless station can access the services that are available for a regular wired
LAN by using an access point.
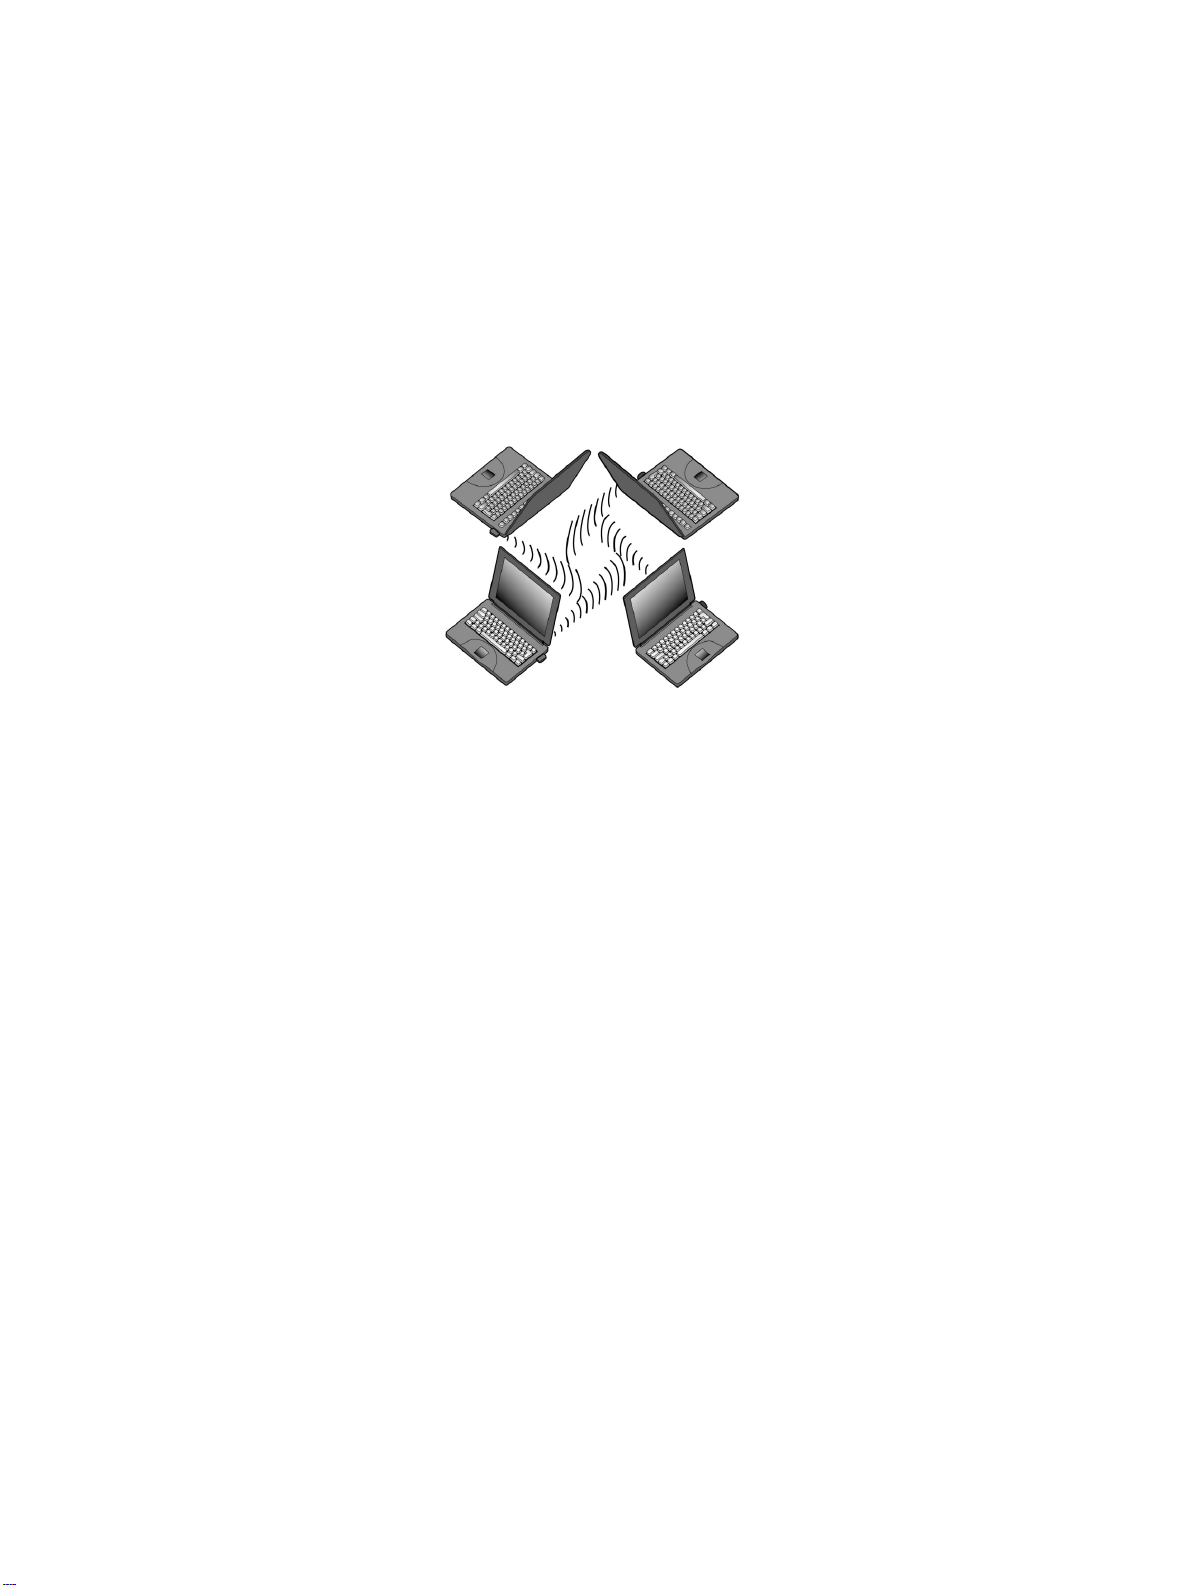
Ad hoc
In the ad hoc operating mode, wireless stations communicate directly with each
other; no access point is required. Simply insert the wireless LAN cards into the
stations, make the necessary configurations, and start communicating. Ad hoc
networking is easy to set up, but communication is limited to stations that are
within range.
Figure 3 - Ad hoc networking
Select the desired operating mode when you are creating a new profile with the
Profile Wizard. If you want to change the operating mode later, go to the Profiles
page and click Edit.
Network name
The network name is the name of the wireless LAN to which the card can connect.
It is usually programmed into an access point by a system administrator. You
should ask the system administrator for the network name.
You can save more than one network name for each profile. If you enter more than
one network name, the names must be separated from each other by a semicolon,
for example: Headquarters;Office4.
Within a network, there may be subnetworks that all have different names, for
example: Office_wlan1, Office_wlan2, Office_wlan3, etc. One profile can be used
to connect the wireless LAN card to all the subnetworks. The network name may
include a special character, a wildcard *, which can be used as a place holder for
one or more letters or numbers. By using the wildcard, you can specify
Office_wlan* as the network name, and the wireless LAN card can be connected
to any of the networks whose name starts with Office_wlan.
13
Page 14

In the ad hoc operating mode, the users themselves give a name to the network.
Note: The network name can consist of up to 32 alphanumeric characters.
By default, the network name is case-sensitive. To change this property, go
to the General settings page and select the Advanced tab. There you can clear
the Case-sensitive network names check box.
If you want to change the network name later, go to the Profiles page and click
Edit.
Channel
The Nokia C110/C111 operates in the 2.4 GHz frequency band. You need to
specify a radio frequency channel on which the wireless LAN card is used. The
selection of available channels may vary from country to country, as certain
countries have a limited number of channels that can be used.
You can select the Automatic channel selection option when you are creating a
new profile with the Profile Wizard: you are automatically allocated an available
channel without needing to specify one. You can, however, also select the correct
channel yourself. In that case, make sure that the wireless LAN card and the access
point are using the same channel.
If you want to change the channel setting, go to the Profiles page and click Edit.
Connecting to a network
The Nokia C110/C111 Wireless LAN Card connects your computer automatically
to the access point and network that offer the best quality for communications. If
you move the computer to another location within the network and out of range of
the access point, the roaming functionality will automatically connect your
computer to another access point that belongs to the same network. As long as you
remain within range of access points that belong to the same network, your
computer will stay connected to the network.
Once you have installed the software for the Nokia C110/C111, you can connect to
a wireless LAN. For instructions on installing the Nokia C110/C111, please see the
Installation guide on the CD-ROM.
14
Page 15
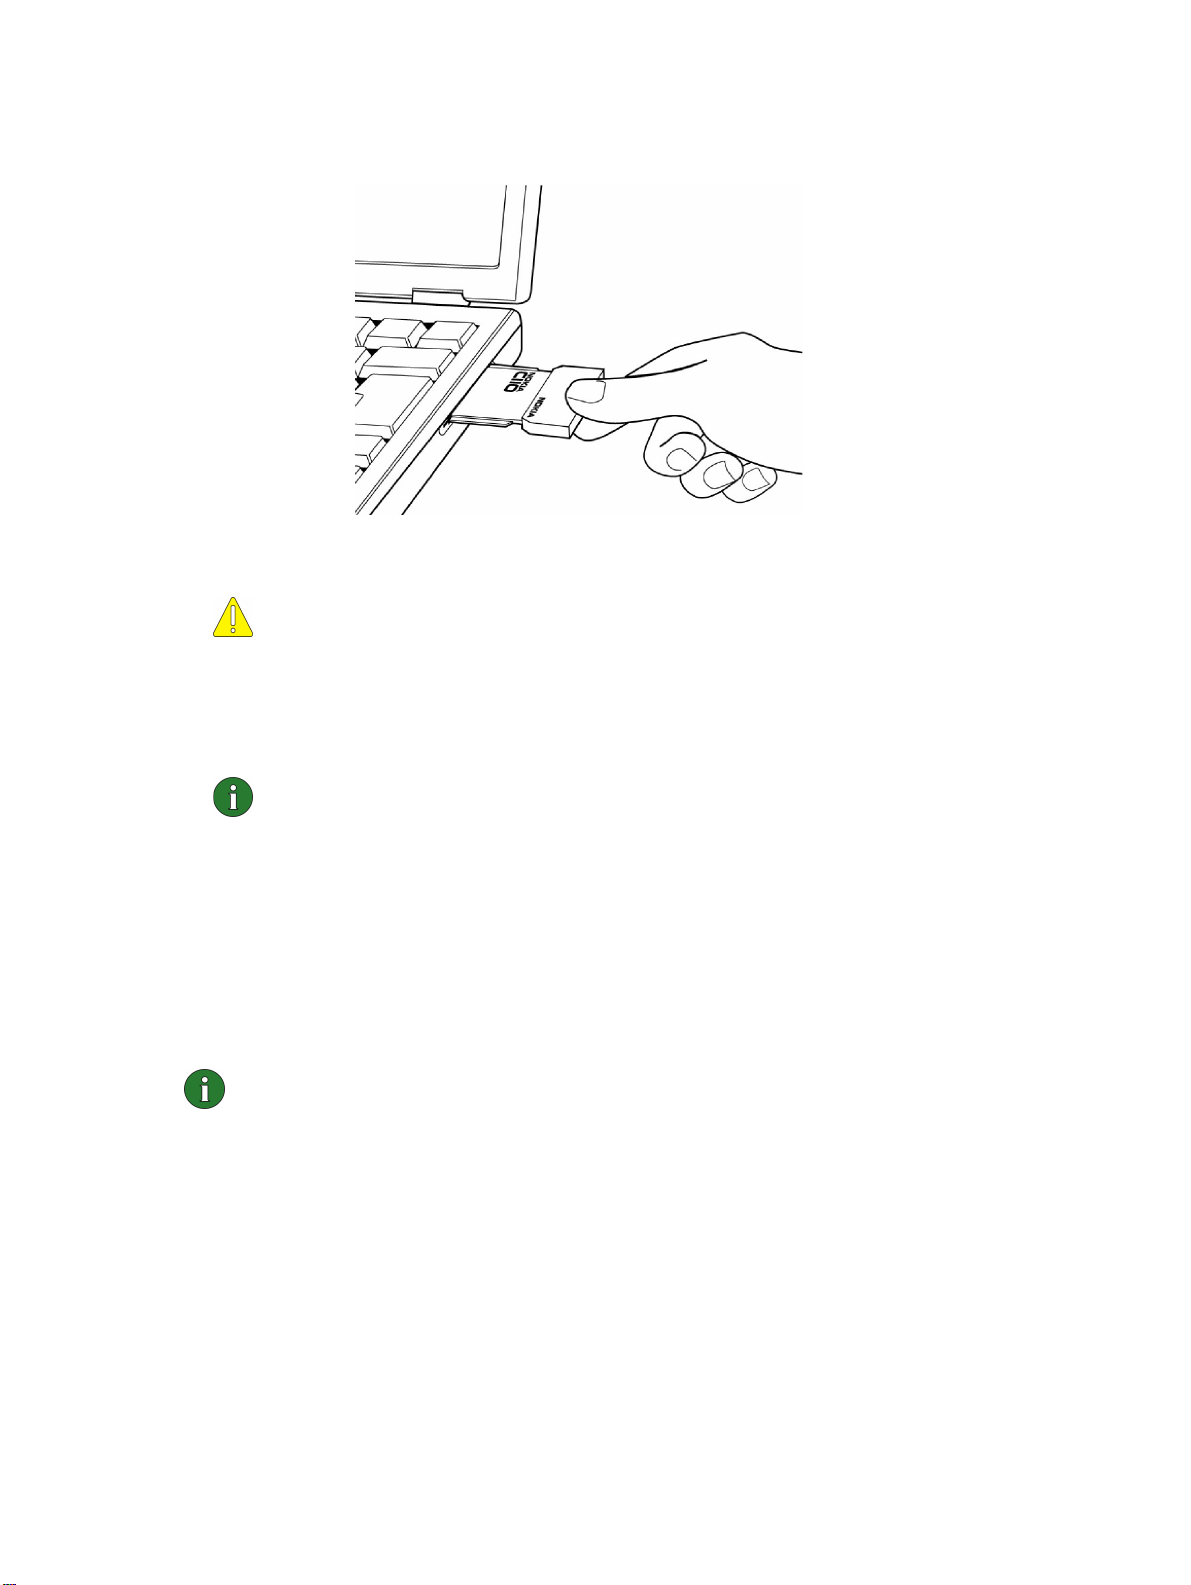
1
Insert the wireless LAN card firmly into the PC card slot of the computer.
See Figure 4.
Figure 4 - Inserting the card
Caution: Note that the wireless LAN card is not inserted all the way into the
PC card slot and there is a gap between the protruding extension box and
the computer. Do not use excess force when inserting the card.
2 Switch on your computer.
3 If you are using a smart card, enter the PIN code and click OK.
Note: If the dialog box asking for your PIN code appears before the
network logon dialog box, type the PIN code first.
4 Open the program by right-clicking the Nokia C110/C111 icon on the taskbar.
A shortcut menu opens. Click Manager window or Profiles.
5 The Profiles page opens. Under Profile selection, select the profile you want to
use with the wireless LAN in question. Click Apply. You may need to restart
your computer. If you are about to connect to a new network and therefore need
to create a new profile, or if you need to modify an existing profile, see “Creating
new profiles” on page 22, or “Editing profiles” on page 23.
Note: In Windows 2000 and Windows NT 4.0, if you want to connect to a
wireless LAN when logging onto a domain, insert the wireless LAN card into
your computer and switch on the computer, then wait until the small Nokia
C110/C111 icon appears in the bottom right corner of the screen. After that
you can type your user name and password.
Setting up and joining an ad hoc network
Ad hoc networks allow wireless stations to communicate directly with each other
without any access points. The stations can, for instance, share folders. One user
creates the ad hoc network and other users then join the network.
15
Page 16
You can choose to use a password to protect the network from unauthorized
users. Only those stations that have the correct password can join the network.
To start an ad hoc network:
1 On the Profiles page, select the Quick Ad Hoc profile and click Apply.
2 Give the ad hoc network a name. You can also define a password for the
network. Click Start.
3 Select an appropriate data rate: 2 or 11 Mbit/s. Note that all stations on an ad
hoc network must be using the same data rate. Click OK.
To join an ad hoc network:
1 On the Profiles page, select the Quick Ad Hoc profile and click Apply.
2 Select the network you want to join and click Join. If a password is used in the
network, type the password and click OK.
3 Select an appropriate data rate: 2 or 11 Mbit/s. Note that all stations on an ad
hoc network must be using the same data rate. Click OK.
Note: When you select a profile for ad hoc networking, the system asks you to
restart your computer if your network settings need to be changed. Restart
your computer and then either start a network or select the network you want
to join.
Tip: Create your own profile for ad hoc networking with the Profile Wizard if
you use the ad hoc operating mode frequently. This saves you from having to
start a network each time and allows quicker access. See “Creating new
profiles” on page 22 for more information.
Using default profiles
Three default profiles are created during the installation: Quick Infrastructure,
Quick Ad Hoc, and Wired LAN. With these profiles you can easily and quickly
establish a network connection: you get a list of available networks and can join
one without having to change the network settings manually. The Wired LAN
profile contains the original network settings needed for accessing the wired local
area network. Note that these profiles cannot be edited, deleted, or exported. The
Wired LAN profile, however, can be updated to comply with the current wired
LAN settings.
1 On the Profiles page, select the appropriate default profile and click Apply. If
your network settings need to be changed, the system asks you to restart your
computer. In that case, restart the computer.
2 A dialog box with a list of available networks opens. Select a desired network
and click OK. The wireless LAN card joins the network.
16
Page 17
Removing the card
You should always stop the wireless LAN card before removing it from the PC
card slot of your computer.
Caution: In Windows NT 4.0, by default, you should not remove the wireless
LAN card without switching off the computer first.
To stop the card:
1 Click Start. Select Settings and Control Panel. Double-click the PC Card icon to
open the PC Card Properties dialog box.
2 Select Nokia C110/C111 Wireless LAN Card from the list and click Stop.
3 When the operating system prompts you, remove the wireless LAN card.
4 Click OK to exit the PC Card Properties dialog box.
Tip: A quicker way to stop the wireless LAN card is to click the PC Card icon
on the taskbar and to select the option Stop Nokia C110/C111 Wireless
LAN Card. Again, wait until the operating system prompts you to remove
the card.
Caution: Closing the Monitor or the Manager window does not quit the
program. To quit the program, you must stop the wireless LAN card.
Caution: The Windows 98 operating system stops all PC cards when a new PC
card is inserted into the computer. If you insert another PC card into your
computer, make sure that you first stop the Nokia C110/C111 and remove it
from the PC card slot.
Uninstalling the Nokia C110/C111
Caution: Before you start uninstalling the Nokia C110/C111, you must first
stop the wireless LAN card and then remove it from the PC card slot of the
computer. See “Removing the card” for more information.
Note: Network profiles will remain unchanged even if you uninstall the
Nokia C110/C111 software and then reinstall it.
Windows 95, 98, Me, 2000
1 Click Start, select Programs and Nokia C110. Click Uninstall Nokia C110.
2 A dialog box asks you to confirm whether you want to remove the program.
Click OK.
3 The uninstallation starts. A dialog box informs you when the uninstallation is
completed. Click Finish.
17
Page 18

Windows NT 4.0
1 Click Start, select Programs and Nokia C110. Click Uninstall Nokia C110.
2 A dialog box asks if you are sure you want to uninstall the program. Click OK.
3 In the Network dialog box, select Nokia C110/C111 Wireless LAN Card and
click Remove.
4 Click Close to close the Network dialog box.
5 You are asked if you want to restart your computer. Click No.
6 In the Network Driver Uninstall dialog box, click OK and the program starts
uninstalling the files.
7 A dialog box informs you when the uninstallation is completed. Click Finish.
18
Page 19

Nokia C110/C111 features
Monitor window
The user interface of the Nokia C110/C111 consists of two types of windows: the
Monitor window and the Manager window.
The Monitor window is a small window displaying information on the status of
the network connection. When you are using the Nokia C110/C111, you can
quickly check the Monitor window to see that you are still within the coverage
area, for example, or that the wireless LAN card is connected to the network.
Browse button
Figure 5 - Monitor window
When you insert the Nokia C110/C111 Wireless LAN Card into your computer,
the Nokia C110/C111 icon appears on the taskbar. Double-click the icon to open
the Monitor window.
The Monitor window displays the name of the profile which is currently used and
information on the network connection. The following messages are displayed in
the Monitor window according to the status of the connection:
CONNECTED The wireless LAN card is connected to the network.
NOT
CONNECTED
The connection could not be established. Make sure
that you are within the coverage area, and all the
settings are correct.
CONNECTION
WEAK
A network connection has been established, but the
connection is weak. Something may be either
obstructing the connection (a concrete wall, for
example) or the wireless station has moved too far
away from the access point, or, in the ad hoc
operating mode, moved too far away from the other
stations.
19
Page 20
CONNECTED
WITH SECURITY
NO CARD Either the wireless LAN card is not inserted or is not
WEP keys are used for securing data transmission.
inserted properly.
CONNECTED TO
SIM SERVICES
You are connected to subscribed services provided
by your network operator or service provider.
The Nokia C110/C111 icon on the taskbar changes in a similar manner and
displays the current status of the connection.
The Monitor window also has a signal strength indicator and a data flow indicator.
The signal strength indicator shows the strength and quality of the radio signal
between a wireless LAN card and an access point in the current location.
Remember that the strength of the radio signal is affected by distance and obstacles,
and that the computer needs to be within an access point coverage area, or, in the ad
hoc operating mode, within range of other stations (see “Wireless LAN” on page 6).
The data flow indicator shows the relative speed at which data is transferred.
The browse button (see Figure 5 on page 19) opens the Manager window and the
page last visited.
Manager window
Figure 6 - Manager window
20
Page 21

In the Manager window, you can configure various settings for your wireless LAN
card and get more detailed information on the status of the connection. You can
access it either by clicking the browse button in the Monitor window (see Figure 5
on page 19), or by right-clicking the Nokia C110/C111 icon on the task bar and by
selecting Manager window from the shortcut menu.
The Manager window can consist of the following pages: Profiles, Status, General
settings, Diagnostics, Update, Administrator and SIM Services. The
Administrator page is used by system administrators. The number of pages may
vary depending on which pages were selected during installation. You can view
the different pages by clicking the icons on the left icon bar.
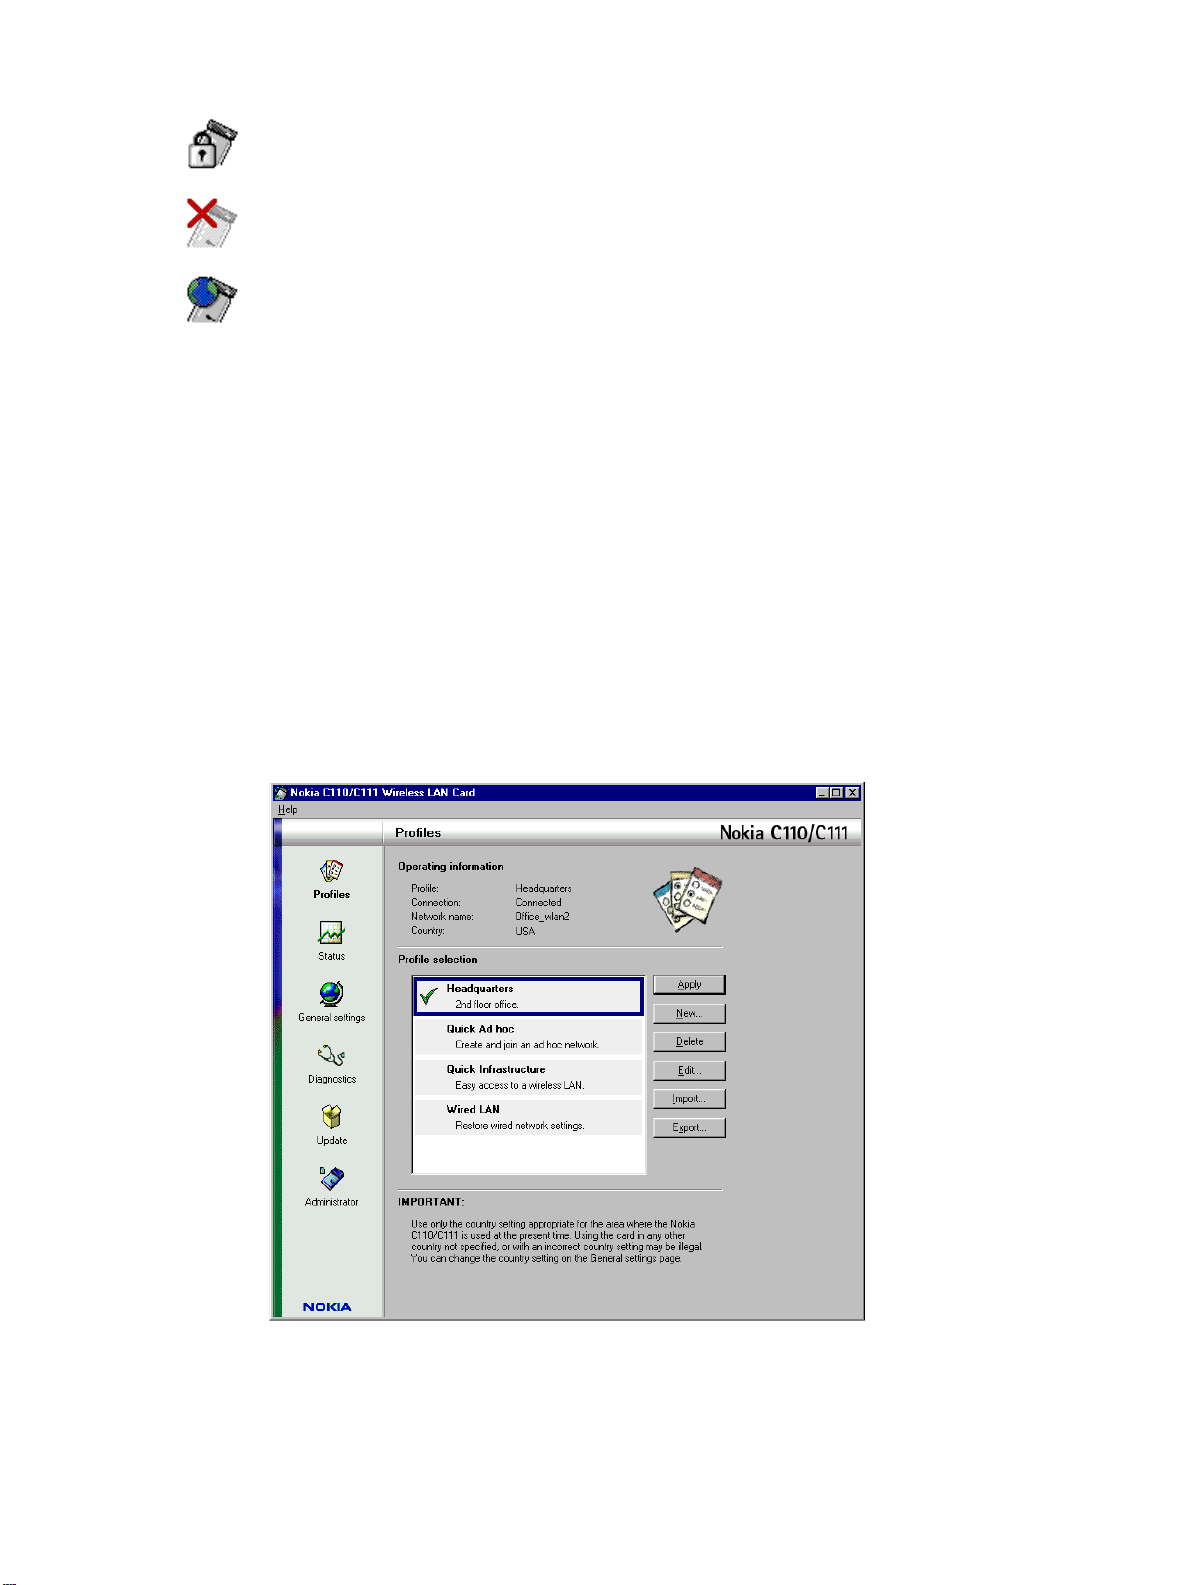
Profiles
For the Nokia C110/C111 to operate in wireless local area networks, you need to
configure certain settings for each network. For example, when you use the card in
your office LAN, you need different settings from those of the LAN at an airport
you are visiting. On the Profiles page you can configure the necessary settings and
create network profiles for specific wireless LAN environments.
A profile is a group of wireless LAN specific and Windows networking settings
that you need for accessing wireless LANs. Profiles enable easy transfer from one
network to another without having to remember all the different settings. On the
Profiles page you can also modify existing profiles and create new profiles. Profiles
are stored to a hard disk or a smart card.
Selecting profiles
You need to select a network profile suitable for the wireless LAN in which you
want your wireless LAN card to operate.When you insert the wireless LAN card
into your computer, the card selects the profile last used as a default profile. If,
however, you want to use another profile, you can either select it from the list of
existing profiles or create a new one.
In the Profile selection area, there is a list of profiles from which you can select a
profile with all necessary settings for a particular wireless LAN. If you have
connected to a network previously, you can simply select the profile for that
network and then click the Apply button. The profile that is currently active is
indicated with a green check mark, while a profile that has been selected but is not
yet activated has a frame around it. A profile which is stored on a smart card is
indicated with a small smart card symbol. The name of the active profile is
displayed in the Operating information area. See Figure 6 on page 20.
Note: When you select a different profile, you may be prompted to restart
your computer.
21
Page 22

Note:
You may need to change the proxy settings when you change profiles.
Creating new profiles
By creating different profiles for different wireless LANs, you can easily switch
from one wireless LAN to another without having to memorize the network
settings.
1 To create a new profile, click New. The Profile Wizard opens. This wizard will
guide you through creating a new profile. To continue, click Next.
Note: Most settings can be left at their default values, as in most cases these
settings are sufficient to provide good quality communications. However,
there are situations when you may need to change the default settings.
2 Type a name for the new profile. You can select a name yourself that consists of
up to 30 alphanumeric characters. In the text box you can enter information to
help you identify different profiles. This information can contain up to 108
characters. Click Next.
Tip: When you create new profiles, make the name of the new profile as
descriptive as possible. This enables quick selection among different
profiles. You can also add in the text box further details about the profile,
for example the name or address of the place where the wireless LAN is
located.
3 Select one of the two available operating modes. In the infrastructure mode,
computers can communicate with each other and with wired LAN stations
through an access point. In the ad hoc mode, computers can send and receive
data directly with each other. No access point is needed. See “Operating mode”
on page 12 for more information. Click Next.
4 Type the network name as defined by the system administrator, or select one
from the list box. In the ad hoc operating mode, the users themselves name the
wireless LAN. The network name can consist of up to 32 alphanumeric
characters. By default, the network name is case-sensitive. To change this
property, go to the General settings page and select the Advanced tab. There
you can clear the Case-sensitive network names check box.
Select a channel for wireless communications. If you select the Automatic
channel selection option, you are automatically allocated an available channel
without needing to specify one. You can, however, also select the correct
channel yourself. In that case, make sure that the wireless LAN card and the
access point are using the same channel. Click Next.
5 Select the Obtain an IP address from a DHCP server box if you want the DHCP
server to assign an IP address for the wireless LAN card automatically. Make
sure the network has a DHCP server. Alternatively, the IP address, subnet mask,
22
Page 23

default gateway, and the advanced TCP/IP settings can also be specified and
configured manually. Ask your system administrator for the correct values.
Note: Make sure that the Manage TCP/IP properties together with
profiles check box is selected on the General settings page/Advanced tab.
If this check box is not selected, the TCP/IP settings are managed by
network settings which can be configured in the Control Panel.
If you want your computer to log on to a specific domain, select the Log on to
domain check box. You must have a user name and password for the domain.
Note: Make sure that the Manage domain settings together with profiles
check box is selected (General settings page, Advanced tab). If this check
box is not selected, the logon settings are managed by network settings
which can be configured in the Control Panel.
In the Workgroup text box you can type a name of a workgroup if you want
your computer to join one. Click Next.
Note: In Windows 95/98/Me, you must always specify a workgroup name.
6 The Profile creation complete window informs you when the creation of a new
profile is completed. Click Finish.
Note: When you have created a new profile and want to use it for the first
time, you may be prompted to restart your computer.
Removing profiles
You can remove a profile from the list of profiles. Select a profile from the list and
click Remove.
The default profiles that were created automatically during installation (Quick
Infrastructure, Quick Ad Hoc, and Wired LAN) cannot be deleted.
Profiles that are stored on a smart card can only be removed on the Administrator
page by the system administrator.
Editing profiles
You may want to edit an existing profile or create a new profile with similar
settings to an old one.
1 On the Profiles page, select the profile from the list of profiles and click Edit.
2 Make the necessary changes and click OK. If you want to create an entirely new
profile, click Save As and give the modified profile a new name.
23
Page 24

Note:
The Edit Profile dialog box consists of several tabs (General, Logon,
Security, TCP/IP, Advanced), and from some of the tabs you can open
additional dialog boxes. On each tab you can change the existing settings,
but the changes will take effect only when you click the OK or Save As button
in the main Edit Profile dialog box.
The following types of profiles cannot be edited:
• Quick Infrastructure and Quick Ad Hoc profiles. The Wired LAN profile can
only be updated to comply with the current wired LAN settings.
• Profiles that are stored on a smart card.
• Profiles that are write-protected. See “Write-protect profile” on page 26.
You can leave most settings at their default values, as in most cases these settings
are sufficient to provide good quality communications. However, there are
situations when you may need to change the default settings. On the General tab
you can edit the following properties:
DESCRIPTION You can enter detailed information on the profile,
such as the name or address of the place where the
wireless LAN is located. This free text field is for
information that helps you identify different
profiles.
OPERATING MODE There are two available operating modes to choose
from: In the infrastructure mode, computers can
communicate with each other and with wired LAN
stations through an access point. In the ad hoc
mode, computers can send and receive data directly
with each other. No access point is needed. See
“Operating mode” on page 12 for more
information.
NETWORK NAME The name of the wireless LAN as defined by the
system administrator. In the ad hoc operating mode,
the users themselves name the wireless LAN. The
network name can contain up to 32 characters.
CHANNEL The radio frequency channel used for wireless
communication. You can choose the Automatic
channel selection option, or you can set the channel
manually.
24
Page 25

On the Logon tab, you can edit the following properties:
LOG ON TO DOMAIN If you select this option, your wireless LAN card
automatically logs on to a specified domain. You
must have a user name and password for the domain.
Note: Make sure that the Manage domain
settings together with profiles check box is
selected on the General settings page/
Advanced tab. If this check box is not selected,
the logon settings are managed by network
settings which can be configured in the
Control Panel.
WORKGROUP The name of the workgroup if you want your
computer to join one.
Note: In Windows 95/98/Me, you must always
specify a workgroup name.
On the Security tab, you can manage your shared WEP keys which are used for
ensuring secure radio communication. For a more detailed description of WEP
and how to create and manage different WEP keys, see “WEP security” on page 40.
USE WEP SECURITY WEP uses keys to protect the information
transmitted in a wireless LAN. If this check box is
not selected, communication is not protected
against unauthorized persons.
USE A PERSONAL
WEP KEY
Personal WEP keys are used for authenticating users
in a wireless LAN. To create a personal WEP key, go
to the General settings page and select the Personal
Keys tab. See “Creating and editing personal keys”
on page 42 for more information.
Various network and radio settings can be edited on the TCP/IP and Advanced tabs:
OBTAIN AN IP
ADDRESS FROM A
DHCP SERVER
An IP address for the wireless LAN card can be
obtained automatically from a DHCP server. Make
sure the network has a DHCP server. If needed, the
IP address, subnet mask, default gateway, and the
advanced TCP/IP settings can also be specified and
configured manually.
Note: Make sure that the Manage TCP/IP
properties together with profiles check box is
selected on the General settings page/
Advanced tab. If this check box is not selected,
25
Page 26

the TCP/IP settings are managed by network
settings which can be configured in the Control
Panel.
AUTOMATIC
CONFIGURATION
There are a number of advanced radio settings
(DTIM period, fragmentation threshold, listen
interval, RTS threshold, etc.) which are configured
automatically. Alternatively, you can specify a new
value manually, if necessary.
Caution: Do not change the settings manually
unless you are sure how each setting affects
system performance. System performance may
drop dramatically if automatic settings are not
used.
WRITE-PROTECT
PROFILE
You can write-protect a profile so that it cannot be
edited. The profile can still be imported, exported
and deleted, but it cannot be changed any more.
Note: You may need to restart your computer to enable the new settings.
Importing and exporting profiles
On the Profiles page, click Import and select the source from which you want to
import the profile. You can import a profile from a folder. The system
administrator can import profiles from a smart card.
Similarly, you can export a profile to a folder. Click Export, and select the folder
where you want to save the profile.
The default profiles that were automatically created during installation (Quick
Infrastructure, Quick Ad Hoc, and Wired LAN) cannot be exported.
Status
On the Status page, you can find general information on the current operation of
the Nokia C110/C111 Wireless LAN Card and the network you are using.
General tab
The following properties are displayed on the General tab in the Operating
information area:
PROFILE Name of the profile currently in use.
26
Page 27

CONNECTION Displays the current status of the wireless LAN
connection.
Connected indicates that the card is connected to
the network.
Not connected indicates that the card is not
connected to the network.
Connected with security indicates that the system
is using WEP keys.
No card indicates that no wireless LAN card has
been inserted into the PC card slot of the
computer.
Connection weak indicates that something is
either obstructing the connection (a concrete
wall, for example) or the computer has moved too
far away from the access point, or, in the ad hoc
operating mode, moved too far away from the
other stations.
Authorization failed indicates that you have
possibly used a wrong WEP key, or that you have
no access rights for the network.
OPERATING MODE Type of network communication in use.
In the infrastructure mode, computers can
communicate with each other and with wired
LAN stations through an access point. In the ad
hoc mode, computers can send and receive data
directly with each other. No access point is
needed.
NETWORK NAME Name of the network to which the wireless LAN
card is currently connected.
ACCESS POINT Name of the access point to which the wireless
LAN card is currently connected.
You have a browse button visible in the user
interface if you have the Administrator page
installed or if your system administrator has
chosen to install the button. Click it and you can
configure the Nokia A032 Wireless LAN Access
Point using a standard browser interface. For
details on how to configure the Nokia A032,
please refer to the Nokia A032 Wireless LAN
Access Point Advanced User Guide.
27
Page 28

CHANNEL Radio frequency channel on which the wireless
LAN card operates.
DATA RATE Speed at which data is transferred. Possible rates
are 1, 2, 5.5, and 11 Mbit/s
MAC ADDRESS Unique hardware address of the wireless LAN
card.
The Statistics area shows the status of the current connection in graphics.
SIGNAL STRENGTH Indicates the quality of the radio connection
between the computer and the access point, or, in
the ad hoc mode, between two computers.
DATA FLOW Indicates the relative speed of data transfer in the
network.
Smart Card tab
The Smart card information area shows information on the smart card which is
being used by the wireless LAN card: the name and status of the smart card, when
data was last stored and by whom, and an optional description of the smart card.
If you temporarily want to lock the smart card in order to deny access to it, click
Lock Smart Card. Those profiles that are used from the smart card will not be
shown in the list of available profiles on the Profiles page. To access the smart card
again, click Unlock Smart Card, type your PIN code, and click OK.
If you set the PIN code request on, you are asked for the PIN code every time the
wireless LAN card is inserted with the smart card. To activate this setting, click
Enable PIN Code Request. Alternatively, you can turn off the PIN code request.
Note: Some smart cards do not allow turning off the PIN code request.
Your smart card has the default PIN code, for example 0000. For security reasons
it is important that you change the PIN code. To change the PIN code, click
Change PIN Code and type a new value for the PIN code. The PIN code can be 4 to
8 digits long. Retype the code and click OK. Keep the new code secret and in a safe
place.
If you enter an incorrect PIN code three times in a row, the smart card is blocked
and cannot be used. To change a disabled PIN code, you need a PUK (PIN
Unblocking Key) code. The PUK code is unique for each smart card and it cannot
be changed. You can find the PUK code for the Nokia Smart Card in the sales
package of the smart card.
28
Page 29

Access Points/Stations tab
In the infrastructure operating mode, the Access points in range area shows which
access points are currently in range and available. As the wireless LAN card user
moves from one access point coverage area to another, the signal strength of the
channel drops. Therefore the network may hand the user over to a coverage area
and frequency where the signal is stronger.
In the ad hoc operating mode, the names of the other computers connected to the
ad hoc network are displayed under the Wireless stations in the ad hoc network
area. Note that only the names of those computers which are using the Nokia
C110/C111 Wireless LAN Card are shown. By double-clicking the entries, you can
access those folders that are shared.
History tab
Here you can monitor the status of the network connection. The following events
can be reported:
Card has been reset - Due to a temporary hardware or software failure, the card
may have lost the network connection for a while, but the card has reset itself.
Card found - The system has found the card.
Card not found - The system could not find the card.
Started network - An ad hoc network has been successfully established.
Failed to start network - An ad hoc network could not be established.
Joined network - The wireless LAN card has successfully joined the network and
can start using its resources. The network can be either ad hoc or infrastructure.
Failed to join network - The issued command to join a network was unsuccessful.
Left network - The wireless LAN card has left the network which was previously used.
General settings
On the General settings page, you can set properties which are common for all
profiles. These settings will remain unchanged even when you switch to using
another profile.
General tab
Country selection
You must always configure the country setting according to the country where
you are currently using your wireless LAN card. Select the correct country from
the list of countries and click Apply.
29
Page 30

Warning:
Use only the country setting appropriate for the area where the
wireless LAN card is used at the present time. Using the wireless LAN card in
any other country not specified, or with an incorrect country setting may be
illegal.
The Nokia C110/C111 operates in the license-free frequency band of
2.4 - 2.4835 GHz, but local regulations may limit the use of radio equipment.
Therefore, the selection of available channels varies according to the country
where the wireless LAN card is used.
Power saving
Since a wireless LAN card has no direct wire connection of its own, it uses power
from the host computer. The Nokia C110/C111 is equipped with a power saving
option which allows you to control the power consumption of your computer: you
can prolong the life of the battery when needed.
If you select the Enable power saving check box, the wireless LAN card is fully
powered up only when sending or receiving data. The card wakes up from the
power saving mode at regular intervals to check if there is any data for it at an
access point, and wakes up immediately when there is any outgoing data.
Note: The speed of communication decreases when the power saving option
is used.
Note: The power saving option may not be compatible with access points
that are not Wi-Fi
™ (Wireless Fidelity) approved. Do not use power saving
with such access points.
Monitor window
By default, the Monitor window opens in the middle of the display area of your
computer. If you move the Monitor window to a different place on the screen and
want it to be displayed in that position the next time you open it, select the
Remember Monitor window position check box. The next time you open the
Monitor window, it will be in the same place where you had moved it.
Select Always show Monitor window on top if you want the Monitor window to
remain visible even when you have other applications open.
When you insert the Nokia C110/C111 Wireless LAN Card into your computer,
a small icon appears on the taskbar. By right-clicking this icon a shortcut menu
opens, and you can access either the Monitor window or the Manager window.
If, however, you want the Monitor window to open automatically each time the
card is inserted, you can select the Open Monitor window automatically option.
If you select Always show icon on taskbar, the small Nokia C110/C111 icon on the
taskbar will be displayed even when the card has not been inserted.
30
Page 31

For the changes to take effect, click the Apply button. If you have made changes to
the settings but wish to restore the previous settings, click Restore.
Personal Keys tab
Personal WEP keys are used for authenticating the user in a network. Personal
keys are usually created by the system administrator, who can store them on smart
cards and then distribute them to the users. Personal keys can also be saved in a
file. Because personal keys are not network specific, they cannot be saved together
with profiles. They can, however, be saved independently from profiles.
Personal keys can be used only with the infrastructure operating mode. Ad hoc
networks use shared keys only. See “WEP security” on page 40 for more
information.
There are two types of personal keys, and the difference between the keys is the
type of information which is used for identifying the user:
USER-SPECIFIC Uses an identifier which the users can create
themselves.
STATION-SPECIFIC Uses the MAC address of the wireless LAN card to
identify the user.
To create a new personal key:
1 Click New. Give the personal key a name. You can also add in the text box a
further description of the key, such as the name of the network where the key is
used.
2 Select the type of key you want to create: user-specific or station-specific. If you
choose a station-specific key, the MAC address of the wireless LAN card is used
as an identifier. If you choose a user-specific key, you can choose the identifier
yourself. However, make sure that the same personal key is configured to the
access point; if the access point and wireless LAN card are using incompatible
keys, they cannot communicate.
3 Select the appropriate key length. Supported key lengths are 40, 56, 64, 104, and
128 bits. Remember that the more bits there are in the key, the higher the level of
security. Click Generate. The system generates your personal key.
4 Click OK to save the WEP key and to close the dialog box.
Similarly, you can edit existing keys. You can also remove keys you do not need
any more. Instead of creating a personal key yourself, you can import from a folder
a key created by a system administrator. You can export and save personal keys in
folders. The system administrator can also store personal keys on smart cards.
31
Page 32

Tip:
You can enter and edit the personal WEP key in text format, too. Click
As Text, and type in the text. Click OK and the system converts the text into
hexadecimal format. You can copy and paste the text by using the CTRL+ C
and CTRL+V key combinations respectively.
Note that on the Personal Key tab you cannot select a personal WEP key to be
used. To select a personal key to be used with a certain profile:
1 Go to the Profiles page, select the profile you want to modify, click Edit, and
select the Security tab.
2 Select Use WEP security, then select Use a personal WEP key. Click Select.
3 A list of personal WEP keys is displayed. Select a personal key from the list and
click OK.
4 Click OK to close the Edit Profile dialog box.
Advanced tab
When you create profiles, you are asked to specify whether you want the DHCP
server to allocate an IP address for the wireless LAN card, and whether you want
your computer to log on to a domain. By default, these settings are managed
automatically as defined in each profile.
When the Manage TCP/IP properties together with profiles check box is cleared,
profiles will be activated without TCP/IP settings. You can change the settings
manually in the Control Panel.
Profiles will be activated without domain settings if the Manage domain settings
together with profiles check box is cleared. You can change the settings manually
in the Control Panel.
Note: Both of these check boxes must be selected if you want the profiles to be
able to log you on to a domain or allocate IP addresses.
By default, the network name is case-sensitive. To change this property, clear the
Case-sensitive network names check box.
If you want the system to allocate you IP addresses automatically, select the Renew
DHCP automatically when needed check box. You can also renew your IP address
whenever you want by clicking the Renew DHCP Now button.
For the changes to take effect, click the Apply button. If you have made changes to
the settings but wish to restore the previous settings, click Restore.
32
Page 33

Diagnostics
On the Diagnostics page, you can run a series of fault diagnosis tests to ensure that
the Nokia C110/C111 Wireless LAN Card and the software are operating
correctly. If you encounter problems in accessing the wireless LAN, for example,
the tests can help to identify the source of the problem.
The tests check that the software files have not been modified, the settings
configured both on the Profiles and General settings pages are valid and do not
conflict, and the wireless LAN drivers have been installed correctly. If the card
does not pass a test, you are given advice on how to proceed.
To start the fault diagnosis test, click Start. You can stop the test at any time by
clicking Stop. The test results are displayed in the Advice area.
• The Repair button is activated if the software finds a fault which can be corrected
automatically by the software.
• The Help button opens the troubleshooting section of the online help, where you
can find information on how to solve possible problems.
• The Support button opens the online help where you get information on how to
contact Nokia’s technical support.
You are advised to run the diagnosis tests when, for example, the Monitor
window reports a failure with the network connection, or when you have
problems in accessing a network. A number of possible problem situations are
covered in this guide under “Troubleshooting” on page 43.
Update
You can download the latest software version of the Nokia C110/C111 Wireless
LAN Card from Nokia’s customer support Web site. In order to be able to update
your software, you first have to register to Nokia’s customer database.
Registering in the customer database
You can register in Nokia’s customer database electronically by clicking the
Register button. Your Web browser opens and you are taken to the Nokia Web
site. There you find a link for the Web page where you get further information on
registration and where you find the registration form. You are asked to select a
user name and a password. You need them when logging into the Web site where
the updated software can be downloaded. Note that you will not be able to
download the software updates immediately after registering, as it takes a while
for your user name and password to become valid.
33
Page 34

Tip:
Because it takes a while for your user account information to become
valid, it is recommended that you register at your earliest convenience. This
way you can get the software update as soon as you actually need it.
Note: When registering, you are asked for the serial number of your wireless
LAN card. You can find the number both on the card and the outside of the
sales package.
Updating software
Once you have registered in Nokia’s customer database and your user name and
password are valid, you are entitled to download the latest software version of the
Nokia C110/C111 from Nokia’s Web site.
Note: Before installing the updated software, you must uninstall the older
version of the Nokia C110/C111. See “Uninstalling the Nokia C110/C111”
on page 17 for details.
Click the Update button. Your Web browser opens and you are taken to Nokia’s
Web site. There you find a link for the Web page where you get the latest software.
Install the updated software version for your wireless LAN card. The installation
is carried out in the same manner as the original installation from the CD-ROM.
Note: All the existing settings which you have configured on the Profiles and
General settings pages - including your personal profiles - will remain
unchanged even when the software has been updated.
Note: Make sure that your computer has enough battery power before you
start to download the updated software.
Administrator
The Administrator page is meant for system administrators and is not installed as
part of the typical installation procedure. On the Administrator page, the system
administrator can save important data on a smart card and can create installation
disks, which can then be distributed to end users within a corporation, for
example, offering quick access to networked resources.
Note: When you have installed the Administrator page, you can configure the
Nokia A032 Wireless LAN Access Point using a standard browser interface.
Go to the Status page of the Manager window and click the browse button
there. Your Web browser opens. For details on how to configure the Nokia
A032, please refer to the Nokia A032 Wireless LAN Access Point Advanced
User Guide.
34
Page 35

Creating smart cards
The system administrator can store important information such as personal WEP
keys and network profiles on a smart card. The administrator can then give users
smart cards which contain the necessary network settings and encryption keys for
quick network access. The user inserts the smart card into the Nokia C110/C111,
inserts the wireless LAN card into a compatible computer, and is then ready to
access the wireless LAN.
To store data on a smart card:
1 Slide the smart card into the smart card slot of the Nokia C110/C111. Make sure
that the metal contacts of the smart card are facing down and that the beveled
corner is on the right. See Figure 7 on page 44.
2 Insert the wireless LAN card in your computer and start the Nokia C110/C111
program. Go to the Administrator page. In the Smart card area
click Add/Remove.
3 The Smart Card dialog box opens. Select the items on the left to be copied to the
smart card. Click the arrow button pointing to the right. If you want to remove
items from the smart card, select the desired items on the right and click the
arrow button pointing to the left.
4 You can type additional information about the smart card in the Smart card
description text box.
5 Click OK to save the selected items on the smart card.
Note: Profiles are copied to a smart card when the Keep data after storing
on smart card check box is selected. If this check box is cleared, the
selected profiles will be removed - instead of being copied - from the
system to a smart card.
If you want to empty the contents of a smart card, click Erase All. Note that all
items on a smart card will be removed, including the smart card description. If you
want the program to re-read the contents of a smart card, click Reload.
Creating installation disks
The system administrator can create installation disks which contain all the
necessary settings needed for accessing a wireless LAN. The custom installation
package can also be saved on a hard disk.
The installation disk can be used for distributing profiles. All the desired settings
and profiles can be copied to the installation disk, which then offers an end user
quick access to a wireless LAN. The end user does not have to configure settings in
order to be able to connect to a network.
To generate an installation disk:
35
Page 36

1
On the Administrator page, in the Installation disk area, click Create.
2 The Installation Disk dialog box opens. The Profiles available list contains the
names of all the profiles found in the system registry. Select a profile you want to
save on the installation disk and click the arrow button pointing to the right.
Note: General settings are automatically copied to a disk, and do not have
to be selected separately like profiles.
The name of the selected profile is added to the list on the right. If you want to
remove a profile from the list, select it and click the arrow button pointing to the
left. Also select the pages you want to include on the disk. If you select the Access
point configuration button check box, the browse button on the Status page will
be visible and you will be able to configure access point settings in your Web
browser. To start creating an installation disk with the selected profiles, click
OK.
3 Insert a disk into the floppy disk drive of your computer and click OK.
The selected files are copied to the disk.
4 Click OK to finish the creation of an installation disk.
The installation disk can now be used: the user inserts the installation disk into the
disk drive of a computer and selects setup.exe. The installation starts and when
prompted by the system, the user inserts the Nokia C110/C111 Wireless LAN
Card into a compatible computer. The installation is carried out without the user
having to configure settings. When the installation is completed, the user is ready
to access a wireless LAN.
SIM services
On the SIM services page, you can connect to services provided by the network
operator or service provider you have subscribed to. Your service provider may,
for example, offer you the possibility to check data from your company intranet,
send and receive e-mail, and save documents.
Note: Before you can take advantage of the SIM services, you must subscribe
to these services from your service provider or network operator and obtain
instructions for use.
An access controller acts as a gateway between the Internet and wireless stations
that are attached to a wireless LAN. An access controller handles user
authentication and controls the data sent to and from the Internet. A SIM card is
used as a means for user identification: the data stored on the SIM card is read and
if valid, the access controller allows you to connect to the Internet and intranets.
The access controller also monitors usage in real time and gathers accounting
information, such as used access time and/or transferred data. This accounting
36
Page 37

data is then passed on to the service provider for billing purposes. Accounting
begins when the wireless station is authenticated and ends when the wireless
station logs off.
Note: The actual invoice for services from your service provider may vary,
depending upon network features, rounding-off for billing, taxes and so
forth.
The SIM services page is not installed as a part of the typical installation
procedure.
Connecting to SIM services
Note: Before connecting to SIM services, make sure you are within the
coverage area of an access point and connected to a wireless LAN. The
Connect button is activated only when the wireless device has detected a
service in the network, otherwise the button remains inactive.
1 On the SIM services page, Click Connect.
2 If a dialog box appears asking for the PIN code, enter the PIN code for your SIM
card and click OK.
3 Connection to your service provider’s network and SIM services is now
established. To disconnect from SIM services, click Disconnect.
The connection to the SIM services is valid only for a certain length of time. This
ensures that you are not accidentally connected to the service for a long period of
time. The length of time varies depending on the network. When the set time limit
is about to end, you are asked if you want to continue or disconnect. If you do not
want to continue, the connection to SIM services is ended when the specified time
expires.
Settings tab
Note: You cannot configure these settings when you are connected to SIM
services. You must end the connection first.
For the changes to take effect, click the Apply button. If you have made changes to
the settings but have not clicked Apply, and now wish to restore the previous
settings, click Restore.
Service provider domain
Type the domain name provided by your service provider or network operator, as
in company.com. You cannot connect to SIM services without specifying the
domain name.
Automatic connectio n
You can get automatically connected to SIM services when such a service is
detected and available. If you select the Prompt when a service is detected check
37
Page 38

box, every time a service is detected you are asked whether you want to get
connected. Once you have confirmed that you want to get connected, the access
controller authenticates you to the service without your having to click the
Connect button.
Advanced connection cont rolling
Your wireless device sends keep-alive signals on a periodic basis to the access
controller in order to check the validity of the connection. If the wireless device
receives no response, the connection is ended automatically.
If you select the Enable advanced connection controlling check box, your wireless
device and the access controller can exchange additional signals, which enables a
quicker detection of lost connection.
Settings on SIM card
Your service provider’s domain name and Web address can be stored on a SIM
card in SMS (Short Message Service) form. Your service provider may store these
settings on the SIM card before issuing you the card, or the service provider may
send a text message to your cellular phone when the SIM card is inserted in it.
If you have the Read settings from SIM card check box selected and new settings
are found on the SIM card, you are asked to confirm whether you want to apply
them. To accept the settings from the SIM card, click Yes.
History tab
Here you can monitor the status of the connection. The following events can be
reported:
Service detected - The wireless device has detected in the network an access
controller which authenticates you to the provided services.
Connection opened - Connection to the SIM services has been successfully
established.
Connection failed - Connection to the SIM services could not be established.
Connection closed - The connection to the SIM services has ended.
The list of events in the History area is erased when you shut down your computer.
If you want to keep track of the events occurred and be able to view them
afterwards, you should create a connection log in text file format.
To create the text file, select the Create connection log check box. To save the file
in a different folder, click Browse and select a folder. All events that occur from
now on will be listed in a text file. To view this file, click View Log.
38
Page 39

Tip:
The text file contains only the events that have occurred after selecting
the Create connection log check box. Therefore, if you want to be able to
view all the events from the very beginning of establishing the connection,
you should select the check box before connecting to SIM services.
Update tab
You may need to update the network profile that is used for accessing SIM
services. Your service provider can, for example, put the new profile on their Web
page where you can download it.
To get an updated network profile from your service provider’s Web site, click the
Update button and type the correct Web address in the text box. Click OK and
your Web browser opens.
Tip: When you type your service provider’s Web address, click the Set As
Default button. The Web address is stored to the system registry and is
displayed in the text box every time you click the Update button.
39
Page 40

Security options
WEP security
To provide secure communication over the wireless LAN, the Nokia C110/C111
offers the Wired Equivalent Privacy (WEP) security feature. WEP uses the RC4
algorithm with an up to 128-bit key. The algorithm provides for security via two
methods: authentication and encryption. Authentication is the means by which
one wireless station is verified to have authorization to communicate with a
second station in a given coverage area.
In the infrastructure mode, authentication is established between an access point
and each wireless station. If a wireless station receives a packet that has not been
scrambled with a correct key, the packet is discarded. Encrypted messages can be
opened by other wireless LAN cards only if they all use the same encryption key.
In the ad hoc mode, authentication is established between each wireless station.
The WEP feature offers a security level comparable to that of wired networks. The
level of security is dependent on the length of the key: the more bits there are in the
key, the longer it takes to decrypt the information sent and the higher the level of
security.
WEP keys consist of a secret key and a 24-bit Initialization Vector. For example,
the 104-bit WEP key has a 104-bit secret key which the user can set, and a 24-bit
Initialization Vector that cannot be controlled by the user. Some manufacturers
refer to the 104-bit key as a 104-bit key, whereas others refer to it as a 128-bit key
(104+24). Both keys offer the same level of encryption and are therefore
interoperable.
Tip: Other manufacturer’s 128-bit keys may not be compatible with the 128-
bit key (128+24) used with the Nokia C110/C111. Instead, with the Nokia
C110/C111 you may need to use the 104-bit key (104+24) to ensure
compatibility with other manufacturer’s 128-bit keys.
There are two types of WEP keys: shared keys and personal keys.
Shared keys
Shared WEP keys are shared by all wireless stations using the network or
subnetwork; only stations that have the correct key can receive and decrypt data.
The same key is loaded into the access point. Shared keys are usually created by
system administrators, who distribute them to users. In the ad hoc operating
mode, the person who is creating the ad hoc network decides on a password and
then distributes it to others. The system uses this password to create a shared
WEP key.
40
Page 41

Shared keys are network-specific, and each network can have up to 4 different
shared keys. The name of a shared key is the same as the name of the network.
An access point only transmits data using the active key, but can receive data from
wireless stations using any of the four shared WEP keys.
Because the shared WEP keys are network-specific and user-independent, they can
be saved in a file together with profiles. Users can import profiles from a file or a
smart card that include shared keys and that have been created by their system
administrator.
Shared keys can be used as the only form of WEP security or used together with a
personal key.
If a wireless LAN includes a Nokia A032 Wireless LAN Access Point that is
configured to use open authentication, you can still use shared WEP keys.
Personal keys
Each wireless station can have an individual, personal WEP key. Personal keys are
used for providing additional security for wireless connections. They are usually
created by system administrators, who distribute them to users. An access point
uses a different key for each wireless station.
There are two types of personal keys, and the difference between the keys is the
type of information that is used for identifying the user:
USER-SPECIFIC Uses an identifier that the users can create
themselves.
STATION-SPECIFIC Uses the MAC address of the wireless LAN card to
identify the user.
Unlike shared keys, personal keys are not network specific, and therefore cannot
be saved together with profiles. They can, however, be separately saved in a file.
Note: Personal keys can be used only with the infrastructure operating mode.
Ad hoc networks use shared keys only.
Creating and editing shared keys
Shared keys are usually created by a system administrator. In the ad hoc operating
mode, the person who is creating the ad hoc network decides on a password and
then distributes it to others. The system uses this password to create a shared
WEP key.
Note: In the infrastructure operating mode, the same key value must be
entered both at the access point side of the network and on the wireless
station.
1 On the Profiles page, select the profile you want to modify and click Edit.
41
Page 42

2
Select the Security tab, then select Use WEP security. If you do not select this
check box, WEP encrypted communication will be ignored. Click Add if you
want to generate a new shared key or Edit if you want to edit an existing one.
3 The Edit Shared WEP Key dialog box opens. Select the name of the network
from the list. The name of a shared key must be the same as the name of the
network.
For each wireless LAN network, you may specify four shared keys. In the Use as
list, select a slot for the key.
Select the appropriate key length. Supported key lengths are 40, 56, 64, 104, and
128 bits. The more bits there are in the key, the higher the level of security. Click
Generate. The system generates your shared key.
Tip: You can enter and edit the personal WEP key in text format, too. Click
As Text, and type in the text. Click OK and the system converts the text
into hexadecimal format. You can copy and paste the text by using the
CTRL+ C and CTRL+V key combinations respectively.
4 Click OK to save the WEP key and to close the dialog box.
Importing and exporting shared keys
You can import and export shared WEP keys from and to a file. The system
administrator can save shared WEP keys on a smart card together with profiles.
1 On the Profiles page, select the profile you want to modify, click Edit, and select
the Security tab.
2 Select Use WEP security, and click Import or Export.
3 Select the source from which you want to import or the destination in which
you want to save the shared key.
Creating and editing personal keys
Personal keys can be used only with the infrastructure operating mode.
Note: You must also configure the personal key to the access point in order to
be able to communicate with it.
1 On the General settings page, select the Personal Keys tab. Click New if you
want to generate a new personal key or Edit if you want to edit an existing one.
2 Give the personal key a name. You can also add in the text box a description of
the key, such as the name of the network where the key is used.
3 Select the type of key you want to create: station-specific or user-specific. If you
choose a station-specific key, the MAC address of the wireless LAN card is used
as an identifier. If you select a user-specific key, you need to type in an identifier
yourself.
42
Page 43

4
Select the appropriate key length. Supported key lengths are 40, 56, 64, 104, and
128 bits. Remember that the more bits there are in the key, the higher the level of
security. Click Generate. The system generates your personal key.
Tip: You can enter and edit the personal WEP key in text format, too. Click
As Text, and type in the text. Click OK and the system converts the text
into hexadecimal format. You can copy and paste the text by using the
CTRL+ C and CTRL+V key combinations respectively.
5 Click OK to save the WEP key and to close the dialog box.
Importing and exporting personal keys
You can import personal WEP keys from a file and save them to a file. The system
administrator can import personal WEP keys from a smart card and export them
to a smart card.
1 On the General settings page, select the Personal Keys tab. Select the key you
want to import or export and click Import or Export accordingly.
2 If you are importing a key, select the source from which you want to import and
click Open. If you are exporting a personal key, select the destination to which
you want to save the key, and click Save.
Selecting a personal key
1 On the Profiles page, select the profile you want to modify, click Edit, and select
the Security tab.
2 Select Use WEP security, then select Use a personal WEP key. Click Select.
3 A list of personal WEP keys is displayed. Select a personal key from the list and
click OK.
4 Click OK to close the Edit Profile dialog box.
Smart cards
A smart card is a miniature SIM-card sized plastic card with an embedded
computer chip. Smart cards provide a means of storing vital information such as
security keys or network profiles. Smart cards also provide an easy way for users to
carry data with them. The Nokia C110/C111 is equipped with an integrated smart
card reader that reads the electronic data from a smart card.
The smart card is protected by a PIN code, which provides an additional tool for
managing secure user authentication in a wireless LAN. Only a person who knows
the PIN code can access the information stored on the smart card. The Nokia
Smart Card has the default PIN code 0000. For security reasons, it is important
that you change the PIN code. Keep the new code secret and in a safe place.
43
Page 44
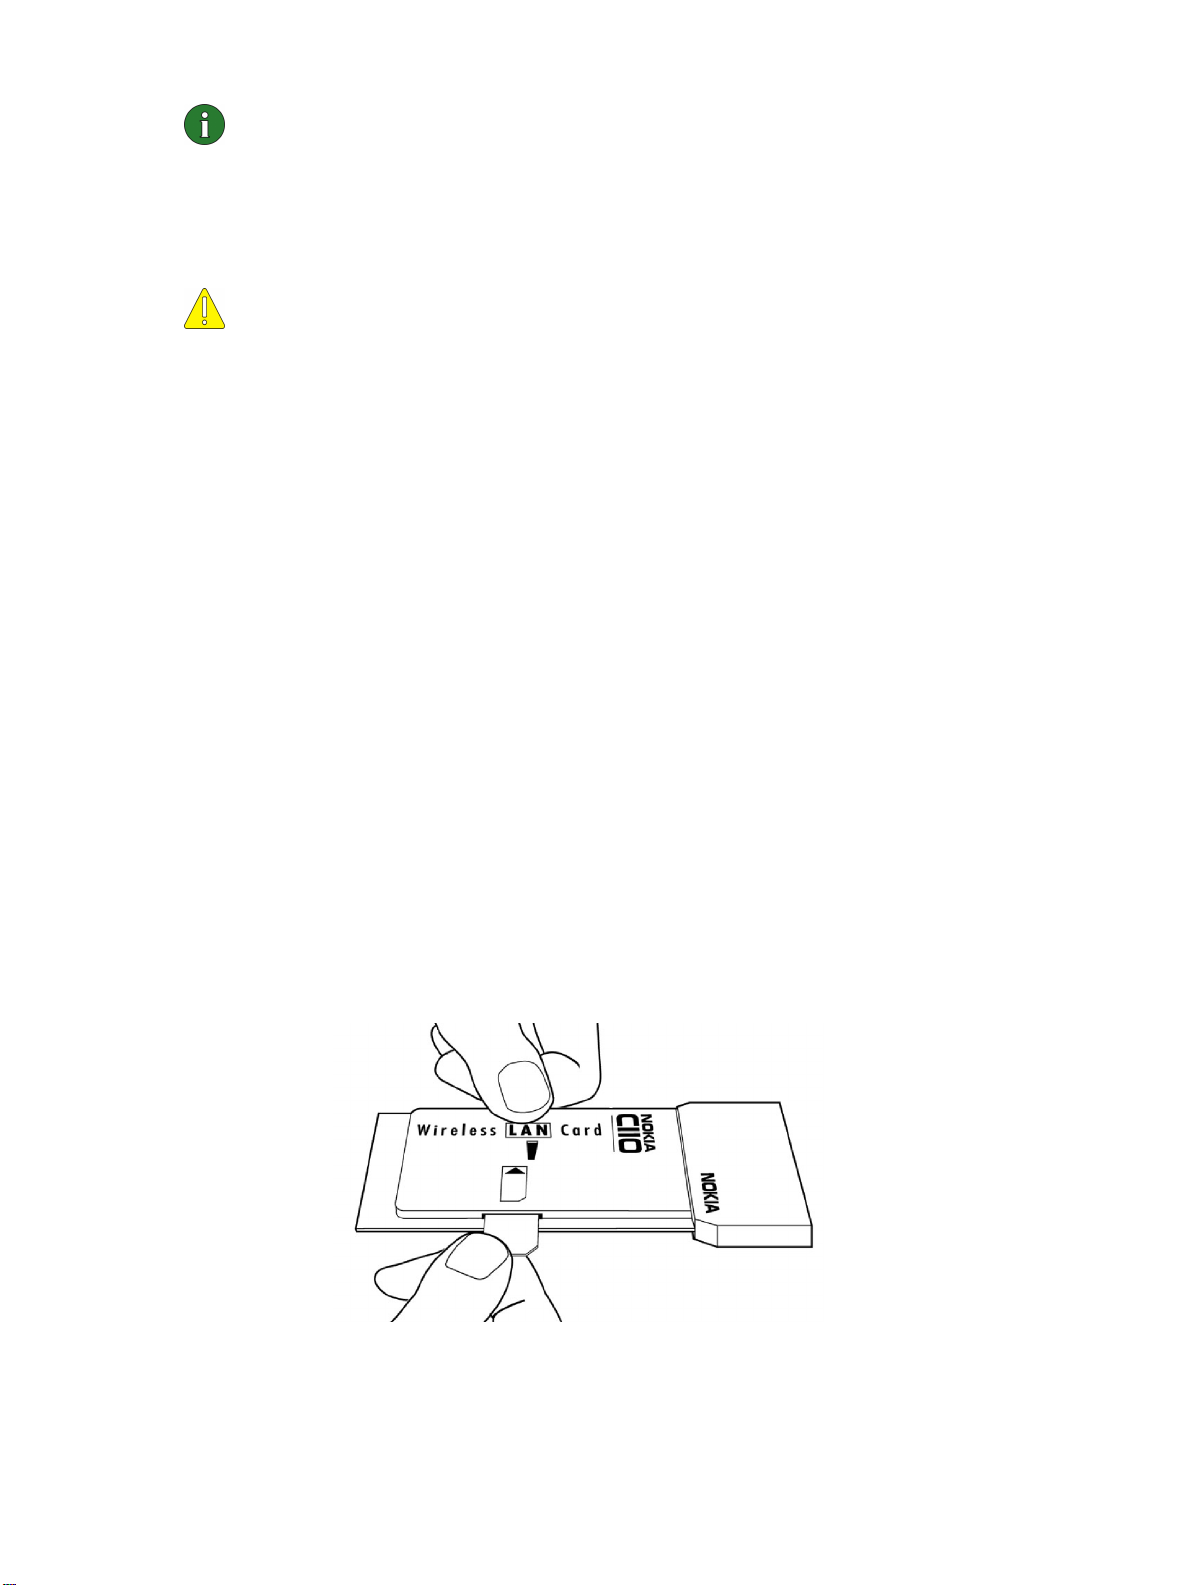
Note:
The PIN code can be 4 to 8 characters long.
If you enter an incorrect PIN code three times in a row, the smart card is blocked
and cannot be used. To change a disabled PIN code, you need a PUK (PIN
Unblocking Key) code. The PUK code is unique for each smart card and cannot be
changed. You can find the PUK code in the sales package of the Nokia Smart Card.
Caution: The smart card and its contacts can be damaged by scratches or
bending, so be careful when you handle, insert, or remove the card.
The system administrator may provide users with smart cards that contain
predefined network profiles. Profiles enable quick access to the wireless LAN
without having to configure any settings. The smart card may also contain WEP
keys, which are used for authentication and encryption.
The integrated smart card reader can only be used with the Nokia C110/C111.
If you want other applications to be able to use the smart card reader of the Nokia
C110/C111, you need to install separately a PC/SC (Personal Computer Smart
Card) compliant smart card driver on your computer. Please consider the
following points:
• Install the PC/SC compliant smart card driver only if you want to use other smart
card applications with the smart card reader of the Nokia C110/C111.
• You can have only one smart card driver installed on your computer at one time.
If you already have a smart card driver installed on your computer and you want
to use the smart card driver provided by Nokia, you first have to uninstall the
existing driver.
For further information and installation instructions, please see the readme.txt file
in the SCard folder of the CD-ROM.
Inserting a smart card
1 Slide the smart card into the smart card slot of the wireless LAN card. Make sure
that the metal contacts of the smart card are facing down and that the beveled
corner is on the right. See Figure 7.
Figure 7 - Inserting the smart card
44
Page 45

2
Insert the wireless LAN card in your computer.
3 Enter the PIN code of your smart card and click OK. You can now start the
Nokia C110/C111 program and access the network.
Warning: Keep all miniature smart cards out of small children’s reach.
Changing a PIN code
1 On the Status page, select the Smart Card tab.
2 In the Smart card locking area, click Change PIN Code.
3 Type the old PIN code, then type the new PIN code and confirm it. Click OK.
Unblocking a PIN code
If entering the PIN code fails three times successively, the code is blocked. You can
unblock it by entering your PUK (PIN Unblocking Key) code.
1 A message box informs you when the PIN code is blocked. Click OK.
2 The Unblock PIN Code dialog box opens. Type the PUK code, then type a new
PIN code and confirm it. Click OK.
Setting PIN code request
If you set the PIN code request on, you are asked for the PIN code every time the
wireless LAN card is inserted with the smart card.
1 On the Status page, select the Smart Card tab.
2 In the Smart card locking area, click Enable PIN Code Request.
You can turn off the PIN code request by clicking Disable PIN Code Request.
Note: Some smart cards do not allow turning off the PIN code request.
Locking and unlocking a smart card
You may want to lock the smart card in order to temporarily deny access to it.
1 On the Status page, select the Smart Card tab.
2 In the Smart card locking area, click Lock Smart Card. The smart card is now
locked and cannot be opened without the correct PIN code.
3 To access the smart card again, click Unlock Smart Card, type your PIN code,
and click OK.
45
Page 46

Troubleshooting
If you encounter problems when installing and/or using the Nokia C110/C111
Wireless LAN Card, this chapter will provide assistance. The chapter is organized
according to the type of problem.
Tip: When troubleshooting the wireless LAN card, a good starting point is to
go through the following questions:
1 Was the installation successful?
2 Is the wireless LAN card connected to an access point? You can check the status
of the network connection in the Monitor window.
3 Are the network settings, such as TCP/IP properties, correct? Check with your
system administrator if necessary.
4 Are the wireless LAN settings (network name, operating mode, etc.) correct?
5 Are there any IRQ or other resource conflicts?
Installation
The installation program is interrupted.
Make sure you have enough power on your computer.
Make sure you have enough free disk space on your computer.
Check that you have closed all Windows programs before starting the installation,
and that you have not inserted the wireless LAN card into your computer until
prompted to do so in the installation program.
The CD-ROM drive cannot be opened during the installation.
Some CD-ROM drives cannot be opened when installing software from them. If
you think that you might need the operating system files during the installation, it
is advisable that you first copy the Nokia C110/C111 installation files to the hard
drive and install the program from there.
The wireless LAN card cannot be inserted into the PC card slot.
Check that the wireless LAN card is turned the right side up.
Check the PC card slot for any problems.
46
Page 47

After inserting the wireless LAN card, it takes a while before the computer responds.
It is true that there might be a pause while the driver initializes the wireless LAN
card. This is normal. Please wait until the next message box appears and tells you
what to do. This should not take more than a few minutes.
Installation to a network drive fails.
You cannot install the Nokia C110/C111 Wireless LAN Card software onto a
network drive. The software must always be installed on a local hard drive.
After inserting the wireless LAN card, Windows 95 starts installing a network client on
my computer.
If there is no network client installed on your computer, Windows automatically
starts installing it when you insert the wireless LAN card. When the network client
installation is finished, Windows asks you to restart the computer (YES/NO). You
must select NO and continue with the wireless LAN card installation. Restart the
computer after the card installation is complete.
Windows NT 4.0 starts installing NT Networking on my computer.
You must have NT Networking installed on your computer. If you do not have
NT Networking installed, a dialog box opens asking if you want to install it now.
Click Yes and follow the instructions given in the wizard. Note that you need the
Windows NT installation files during this procedure. The order in which the
various installation files are used is: first the Nokia C110/C111 installation files,
then the Windows NT installation files, and finally the Nokia C110/C111 files
again.
The computer was shut down or it stopped responding during installation, and the
software cannot be installed or uninstalled.
Go to Start, click Run, and type regedit. Click OK. The following registry entries
should be deleted in the Registry Editor window:
• HKEY_LOCAL_MACHINE\Software\Microsoft\Windows\CurrentVersion\Un
install\{BFA1B53A-C809-11D3-AABD-0008C79B73DF}
• HKEY_LOCAL_MACHINE\Software\Nokia\C11x WLAN Card\Installation
After deleting these, install the software again. It is recommended that you let your
system administrator remove the registry entries.
When installing or uninstalling the software, an error message appears: “Error
installing:ikernel.exe.”
You must have local administrator rights when installing or uninstalling in
Windows NT 4.0 or Windows 2000.
47
Page 48

In Windows 2000, I get a message saying that this is not a Microsoft digitally signed
software.
The Windows 2000 driver for the Nokia C110/C111 Wireless LAN Card does not
have a WHQL certification (Windows Hardware Quality Labs). You can,
however, continue with the installation.
The installation directory remains in the system after uninstallation.
When upgrading to a newer version of software, profiles are not deleted. You do
not have to configure them again because the installation directory remains in the
system. All other settings are restored with their default values.
I do not have a CD-ROM drive on my computer.
Using another computer, copy the installation program on floppy disks. On the
CD-ROM there are three folders (Disk1, Disk2, and Disk3) at
Setup\Language\Disks. Copy the contents of these folders on floppy disks. It is
recommended that you then copy the contents of the disks to the hard drive before
installing. If installed directly from the floppy disks, the system will ask you to
change the disk several times.
Network
The wireless LAN card seems to be working, but the network connection does not work.
Run the fault diagnosis tests on the Diagnosis page. If all tests are passed
successfully, make sure that the network settings are correct. Ask your system
administrator for advice.
If you have defined different profiles for different networks, you should also check
that you have chosen the correct profile.
You can use winipcfg in Windows 95/98/Me and ipconfig in Windows NT 4.0 to
check that you have a correct IP address.
Network Neighborhood does not show any computers except the host itself.
Check that you have version 2.0 of Microsoft Winsock. If not, download it from
the Microsoft Web site and run the installation program. In Windows NT 4.0 it
can take up to a couple of minutes for the computer to detect the rest of the
network.
48
Page 49

In Windows 95/98/Me, Network Neighborhood does not show my computer name at all.
Other computers cannot see my computer name in Network Neighborhood either.
Open the Network dialog box (click Start, Settings, Control Panel, Network) and
click the File and Print Sharing button. Make sure that the I want to be able to give
others access to my files check box is selected. Other users should now be able to
see your computer in Network Neighborhood. If you share folders on your
computer, other users can see them too.
In Windows 95/NT 4.0, I cannot browse Network Neighborhood in the ad hoc operating
mode.
Open the Network dialog box (click Start, Settings, Control Panel, Network) and
double-click File and printer sharing for Microsoft Networks in the list of network
components. Check that the Browse Master has value Enabled or Automatic, not
Disabled. Updating Network Neighborhood may take a while.
In Windows NT 4.0, I cannot join the domain.
If you allow the domain settings to be managed by the Nokia C110/C111, you
might lose your domain settings if you use a profile without a domain. To avoid
being mistakenly locked out, go to the General settings page, select the Advanced
tab and clear the Manage domain settings together with profiles check box.
I cannot access the Internet.
Check that you use a routing protocol such as TCP/IP.
Make sure that the proxy settings in the Web browser are correct.
Also make sure that there is a connection from your network to the Internet.
In Windows 95, when roaming between networks, the system crashes and the computer
displays a blue screen.
You should update Microsoft Winsock 2.0. Download it from the Microsoft Web
site at www.microsoft.com, and run the installation program. Note that you
should always re-install the Winsock 2.0 update after adding or removing new
protocols.
Changes made to general settings do not become effective immediately.
General settings are enabled only after the network connection is ended. A
changed country setting, however, becomes effective immediately after clicking
the Apply button on the General settings page.
49
Page 50

Wireless LAN
The wireless LAN car d is dete cte d b y the PC card con tr ol le r, but the user interfa ce is n ot
displayed and there is no network connection.
Check that the Nokia C110/C111 Wireless LAN Card software is properly
installed by running the fault diagnosis tests. If necessary, uninstall the software
and then reinstall it.
The wireless LAN card cannot connect to an access point or the connection is very poor.
Check that the computer is within the coverage area of the access point. It must not
be too far away or too close to the access point.
Make sure that the access point is powered on and connected to the wireless LAN.
Ensure that you have entered the correct network name. The access point and the
wireless LAN card must have the same network name. Note that when selecting a
network name for an infrastructure network, names of ad hoc networks are also
shown in the list of networks.
Check that you have access rights to the access point, and that the access point is
connected to a network to which you have access rights.
Check that the external antenna is properly connected and that no part of the cable
is broken.
If you have selected the power saving option on the General settings page, there
may be interoperability problems with some access points that are not Wi-Fi
(Wireless Fidelity) compatible.
The wireless LAN card is connected to a Nokia A020/A021 Wireless LAN Access Point
but there is no data flow.
The Nokia A020/A021 Wireless LAN Access Point does not support the power
saving mode of the Nokia C110/C111. Power saving should be disabled on the
General settings page of the Manager window.
The ad hoc operating mode does not work.
Make sure that all computers are on the same channel and have the same network
name.
Make sure that all computers are using the same data rate, either 2 Mbit/s or 11
Mbit/s.
Make sure that all computers use the same network protocol, such as TCP/IP.
™
Make sure that you have given the correct password if you are using WEP keys.
50
Page 51

When you are asked to log on to the network, click OK.
If two wireless stations cannot see each other in the Wireless stations in the ad hoc
network list on the Status page, one of the stations should rejoin the ad hoc
network by selecting the profile again and clicking Apply.
In Windows 95 (OSR2 = 4.00.950B), 11 Mbit/s ad hoc networks may be unstable if
you are using battery power on your laptop computer.
The wireless LAN card is working but the capacity is decreasing.
There might be interference from an outside source. Typical sources of
electromagnetic interference at this frequency level are, for example, microwave
ovens, access control systems, and cordless telephone systems.
The Quick Ad Hoc profile does not work with the peer-to-peer mode of the
Nokia C020/C021.
Quick Ad Hoc is not compatible with peer-to-peer networking. Wireless stations
can communicate, but TCP/IP addresses cannot be set automatically.
Create a new ad hoc network profile with the Profile Wizard and set the TCP/IP
address manually.
No wireless stations with the Nokia C020/C021 Wireless LAN Card are shown on the list
of ad hoc network stations in the Manager window.
Only wireless stations using the Nokia C110/C111 Wireless LAN Card can be
shown on the list of stations. If stations with the Nokia C110/C111 Wireless LAN
Card are not shown on the list, join the ad hoc network again.
Roaming from one access point to another is slow.
If you want roaming to be faster and to tolerate faster moving of the wireless
station, you should change the Hidden scan period value to a smaller value. To
change the value:
1 Go to Profiles page and click Edit.
2 Select the Advanced tab and clear the Automatic configuration check box.
3 Click Advanced Properties and select Hidden scan period from the list.
4 Clear the Automatic check box and give the hidden scan period a new value.
Click OK.
No access point management page opens with Internet Explorer.
When you click the browse button on the Status page, a Web page showing the
access point management window should open. Some versions of Internet Explorer,
however, may not show the page. Try opening the Web page with another browser.
51
Page 52

Resources
The wireless LAN card does not work and this is probably caused by another installed
device.
Check that the wireless LAN card is not trying to use an I/O, IRQ, or memory
address used by another device in your computer.
To check the status of resources:
Windows 95/98/
Me
Windows NT 4.0
In Windows 2000, when inserting the wireless LAN card, I get a warning saying that
there are not enough free resources.
Restart the computer. Windows 2000 allocates resources dynamically and, if
possible, rearranges devices to free an IRQ.
Click Start - Settings - Control Panel - System - Device
Manager - Network Adapters. If there is a conflict, a
yellow symbol is shown in front of the name of the
device.
Click Start - Programs - Administrative tools (Common)
- Windows NT Diagnostics - Resources.
Hardware
I am not sure if the wireless LAN card is working.
Check in the Monitor window that the wireless LAN card is working. You can
also check the Status page for the status of the connection.
There are no resource conflicts, but the wireless LAN card still does not work.
Check that the operating environment does not cause damage or interference to
the wireless LAN card. Detailed information on the operating environment can be
found in the chapter “Important safety information” on page 52.
Check that the wireless LAN card is properly inserted.
Run fault diagnosis tests on the Diagnostics page.
You can try to determine whether the problem lies with the computer or the
wireless LAN card by using the card in another available PC card slot, by installing
the card in another computer, or by using another wireless LAN card in the first
computer.
52
Page 53

The wireless LAN card does not work in another PC card slot, but works in another
computer.
Try to insert another PC card in the slot to determine if there is a compatibility
problem between the Nokia C110/C111 Wireless LAN Card and the PC card slot,
or if there is a general fault with the slot.
Smart card
I cannot install the smart card components.
Smart card installation files should not be copied to a directory with a long file
name; preferably, they should be installed from the CD-ROM.
The smart card is not detected by the wireless LAN card.
Make sure you are using a correct type of smart card.
Make sure that the smart card is inserted correctly: the connectors on the smart
card and the wireless LAN card must meet.
A dialog box asking for smart card’s PIN code appears before the log on dialog box.
You can enter the PIN code before logging on to a network.
I cannot open the Monitor window or enter the PIN code for the smart card when using
a smart card in Windows 2000/NT 4.0.
Press CTRL+ALT+DELETE to enter the PIN code.
In Windows 2000, disable the Administrator Autologon: click Start, Settings,
Control Panel, Users and Passwords. Select the Users must enter a user name and
password to use this computer check box.
Note: You can find the latest troubleshooting information in the readme.txt
file on the product CD-ROM. You can also find further information at
www.forum.nokia.com.
53
Page 54

Card specifications
Physical specifications
TYPE PC card (extended type II)
DIMENSIONS 116 mm x 54 mm x 5/10 mm
WEIGHT 43 g/45 g
STANDARDS IEEE 802.11b
ANTENNAS Integrated antennas (The Nokia C111 also has
external antenna connectors.)
SECURITY Wired equivalent privacy (WEP) with up to 128-bit
secret key. For other security solutions, check the
product CD-ROM and Nokia’s Web site at
www.forum.nokia.com.
SMART CARD
SUPPORT
PC/SC compliant integrated smart card reader for
security key (WEP) storage, profile storage, and
other applications.
POWER
CONSUMPTION
(3.3 V/5 V)
Sleep: 10 mA/10 mA
Receive: 240 mA/180 mA
Transmit: 360 mA/310 mA
OPERATING
TEMPERATURE
-5°C...+55°C
Radio specifications
CHANNELS 13 channels (depending on local regulations)
DATA RATE Up to 11 Mbit/s
MODULATION
TECHNIQUE
OUTPUT POWER 35 mW (with the internal antennas)
RECEIVER
SENSITIVITY
Direct sequence spread spectrum
Min. -84 dBm
COVERAGE AREA Outdoor: Max. 400 m radius
Office environment: 20 m-100 m radius (depending
on the building)
54
Page 55

Important safety information
Important information
Traffic safety
Do not use the wireless LAN card while driving a vehicle. If using the wireless LAN
card, park the vehicle first. Do not place the wireless LAN card on the passenger
seat or where it can break loose in a collision or sudden stop.
Remember: road safety always comes first!
Operating environment
Remember to follow any special regulations in force in any area and always power
off your wireless LAN card whenever it is forbidden to use it, or when it may cause
interference or danger. Note that the wireless LAN card may cause similar
interference as a cellular terminal and must not be used in areas where the use of a
cellular terminal is prohibited.
When connecting the wireless LAN card or any accessory to another device, read
its user’s guide for detailed safety instructions. Do not connect incompatible
products.
As with other mobile radio transmitting equipment, users are advised that for the
satisfactory operation of the equipment and for the safety of personnel, it is
recommended that the wireless LAN card should only be used in the normal
operating position.
Electronic devices
Most modern electronic equipment is shielded from radio frequency (RF) signals.
However, certain electronic equipment may not be shielded against the RF signals
from your wireless LAN card.
Pacemakers
Pacemaker manufacturers recommend that a minimum separation of 20 cm
(6 inches) be maintained between a wireless LAN card and a pacemaker to avoid
potential interference with the pacemaker. These recommendations are consistent
with the independent research by and recommendations of Wireless Technology
Research. Persons with pacemakers should always keep the wireless LAN card
more than 20 cm (6 inches) from their pacemaker when the wireless LAN card is
powered on. If you have any reason to suspect that interference is taking place,
power off your wireless LAN card immediately.
55
Page 56

Hearing aids
Some digital wireless devices may interfere with some hearing aids. In the event of
such interference, you may want to consult your service provider.
Other medical devices
Operation of any radio transmitting equipment, including wireless LAN cards,
can cause interference. Observe restrictions for use. Power off your wireless LAN
card in health care facilities when any regulations posted in these areas instruct
you to do so.
Vehicles
RF signals may affect improperly installed or inadequately shielded electronic
systems in motor vehicles (e.g. electronic fuel injection systems, electronic antiskid (anti-lock) braking systems, electronic speed control systems, air bag
systems). Check with the manufacturer or its representative regarding your
vehicle. You should also consult the manufacturer of any equipment that has been
added to your vehicle.
Do not store or carry flammable liquids, gases, or explosive materials in the same
compartment as the wireless LAN card, its parts, or accessories.
For vehicles equipped with an air bag, remember that an air bag inflates with great
force. Do not place objects in the area over the air bag or in the air bag deployment
area. If the in-vehicle wireless LAN card is improperly placed and the air bag
inflates, serious injury could result.
Remove your wireless LAN card from the PC card slot before boarding an aircraft.
The use of wireless LAN cards in an aircraft may be dangerous to the operation of
the aircraft and may be illegal.
Failure to observe these instructions may be illegal and lead to legal action.
Posted facilities
Power off your wireless LAN card in any facility where posted notices so require.
Potentially explosive atmospheres
Power off your wireless LAN card when located in any area with a potentially
explosive atmosphere and obey all signs and instructions. Sparks in such areas
could cause an explosion or fire resulting in bodily injury or even death.
Users are advised to power off the wireless LAN card when at a refueling point
(service station). Users are reminded of the need to observe restrictions on the use
of radio equipment in fuel depots (fuel storage and distribution areas), chemical
plants, or where blasting operations are in progress.
56
Page 57

Areas with a potentially explosive atmosphere are often but not always clearly
marked. These include the area below deck on boats; chemical transfer or storage
facilities; vehicles using liquefied petroleum gas (such as propane or butane); areas
where the air contains chemicals or particles, such as grain, dust, or metal
powders; and any other area where you would normally be advised to turn off
your vehicle engine.
57
Page 58
FCC Declaration of Conformity Statement
Name: Nokia C110 Wireless LAN Card and Nokia C111 Wireless LAN Card
Responsible party:Nokia Mobile Phones Ltd.
P.O. Box 100
FIN-00045 Nokia Group
Finland
This device complies with part 15 of the FCC Rules. Operation is subject to the
following two conditions: (1) This device may not cause harmful interference, and (2)
this device must accept any interference received, including interference that may cause
undesired operation.
Note: This equipment has been tested and found to comply with the limits for a Class B
digital device, pursuant to part 15 of the FCC Rules. These limits are designed to provide
reasonable protection against harmful interference in a residential installation. This
equipment generates, uses and can radiate radio frequency energy and, if not installed
and used in accordance with the instructions, may cause harmful interference to radio
communications. However, there is no guarantee that interference will not occur in a
particular installation. If this equipment does cause harmful interference to radio or
television reception, which can be determined by turning the equipment off and on, the
user is encouraged to try to correct the interference by one or more of the following
measures:
• Reorient or relocate the receiving antenna.
• Increase the separation between the equipment and receiver.
• Connect the equipment into an outlet on a circuit different from that to which the
receiver is connected.
• Consult the dealer or an experienced radio/TV technician for help.
Caution: Any changes or modifications not expressly approved by Nokia Mobile
Phones Ltd. could void the user's authority to operate this device.
58
Page 59

Care and maintenance
Your wireless LAN card is a product of superior design and craftsmanship and
should be treated with care. The suggestions below will help you to fulfill any
warranty obligations and to enjoy this product for many years. When using your
wireless LAN card or any accessory:
• Keep it and all its parts and accessories out of small children's reach.
• Keep it dry. Precipitation, humidity, and liquids contain minerals that will
corrode electronic circuits.
• Do not use or store it in dusty, dirty areas.
• Do not store it in hot areas. High temperatures can shorten the life of electronic
devices, damage batteries, and warp or melt certain plastics.
• Do not store it in cold areas. When the wireless LAN card warms up (to its
normal temperature), moisture can form inside the wireless LAN card, which
may damage electronic circuit boards.
• Do not attempt to open it. Non-expert handling of the wireless LAN card may
damage it.
• Do not drop, knock, or shake it. Rough handling can break internal circuit
boards.
• Do not use harsh chemicals, cleaning solvents, or strong detergents to clean it.
Wipe it with a soft, dry cloth.
• Do not paint it. Paint can prevent proper operation.
• Use only the supplied or an approved external antenna. Unauthorized antennas,
modifications, or attachments could damage the wireless LAN card and may
violate regulations governing radio frequency devices.
If the wireless LAN card or any accessory is not working properly, contact your
dealer.
59
Page 60

Glossary
Access controller
Device that manages permission and restrictions for logging onto a computer or
network.
Access point
Physical device that connects wired and wireless networks together.
Access zone
Office, campus, hotel, airport, etc. where wireless LAN connections are provided
to employees, students, or visitors. Often specified as public access zones and
corporate or enterprise access zones.
Ad hoc
One of the two operating modes that can be selected when using the
Nokia C110/C111. With this configuration option, users can set up a wireless
network where wireless stations can send and receive data directly with each other
without access points. This type of network is sometimes called
a peer-to-peer network.
Bandwidth
Size (in Hertz) of the operating or transmission channel of a system that a signal
transmission occupies.
Channel
A specified frequency band for the transmission and reception of signals.
Coverage area
Geographical area within which service from a radio communications facility can
be received.
DHCP
Dynamic Host Configuration Protocol. A protocol which automatically issues IP
addresses to devices on the network. The system administrator assigns a range of
IP addresses to DHCP, and each client computer on the LAN has its own TCP/IP
software configured to request an IP address from the DHCP server.
60
Page 61

Direct sequence spread spectrum (DSSS)
Radio transmission technology that spreads the signal over a wide frequency
band.
Domain name
Name of a group of computers connected to the Internet. For example, in
www.nokia.com, nokia.com is the domain name.
DTIM period
(1-1024, default 50). The Delivery Traffic Indication Message period indicates the
number of beacon intervals between successive DTIMs. If all traffic indication
messages are DTIMs, the period has the value 1.
Fragmentation threshold
This parameter defines a threshold above which the Radio Frequency packet will
be split up, or fragmented.
IP address
Internet Protocol address. A 32-bit number in dotted-decimal notation. Identifies
the sender or the receiver of information sent in packets across the Internet.
Infrastructure
One of the two operating modes that can be selected when using the
Nokia C110/C111. With this configuration option users can set up a network
where wireless stations communicate with wired and wireless stations through an
access point. Sometimes called StructureNet.
IRQ
Interrupt request. One of a set of possible hardware interrupts, identified by a
number. The number determines which interrupt handler will be used.
Listen interval
(0-1024, default 20). The listen interval indicates to the access point how often a
wireless station wakes to listen to beacon management frames.
Local area network (LAN)
Group of interconnected devices that share common processing and file
management resources usually within a specific physical area, such as a building,
floor, or office.
61
Page 62

Wired LAN
A local area network in which cables are used to connect devices.
Wireless LAN
A local area network in which radio, microwave, or infrared links are used to
connect devices instead of physical cables.
MAC
Media Access Control. A protocol that governs access to a shared transmission
medium, such as a wireless LAN. In a local area network, MAC address is the
computer’s unique hardware address.
Memory address
Each memory location on a computer has its own memory address. All the
information on a computer’s memory can be accessed based on its memory
address.
Network name
String of up to 32 alphanumeric characters comprising the name of the logical
group to which the wireless station belongs.
Operating mode
Type of communication that must be selected when using a wireless LAN card.
The two operating modes available for the Nokia C110/C111 are ad hoc and
infrastructure.
PIN code
Personal Identity Number code. PIN code (4 to 8 digits) is an access code for
protecting a smart card against unauthorized use.
Profile
Feature unique to the Nokia C110/C111. A profile is a collection of settings needed
for connecting to a wireless LAN. You can easily switch between networks by
selecting an appropriate profile.
PUK code
PIN Unblocking Key code. PUK is an eight-digit code supplied with the smart
card. The code is needed when you want to change a blocked PIN code.
62
Page 63

Range
The distance that a radio signal travels from a radio transmitter before becoming
too weak for a radio receiver to identify it.
Roaming
Moving from one access point to another without having to re-establish the
connection.
RTS threshold
Request To Send threshold parameter, which controls for what size data packet
the low level RF protocol issues an RTS packet.
Service provider
Company that offers its users telecommunication services. A service provider may
be a network operator or possibly a separate body.
SIM card
Subscriber Identity Module card. A small plastic card with an embedded
integrated circuit. The SIM card is inserted into a wireless LAN card for subscriber
identification and other security related information.
Smart card
Small plastic card with an embedded integrated circuit. Provides a secure medium
for storing and transporting information.
TCP/IP
Transmission Control Protocol/Internet Protocol. A protocol for interconnecting
disparate networks to get data from one network device to another.
WEP
Wired Equivalent Privacy. A security feature using the RC4 algorithm that
performs wireless data encryption. The WEP algorithm uses a 40-bit
or 128-bit key.
Wireless LAN card
PC card conforming to the PC card type II specification. The card provides the
functions necessary for sending and receiving data across the air.
63
Page 64

Wireless station
Any device with a PC card slot, into which the wireless LAN card can be inserted
in order to send and receive data.
64
Page 65

Index
A
access controller 36
access points 29
configuring Nokia A032 34
accessing smart card 45
ad hoc networks
creating 16
joining 16
ad hoc operating mode 13
administrator 34
advanced settings 26
antennas 9
B
basic settings 12
C
card
removing 17
stopping 17
care and maintenance 59
changing PIN code 45
channel 14
connecting
to network 14
to SIM services 37
connection status 19, 29
country setting 12, 29
creating
ad hoc networks 16
connection log for SIM services
38
installation disks 35
personal WEP keys 31, 42
profiles 22
shared WEP keys 41
smart cards 35
customer database 33
D
data flow indicator 20
data rates 6
dead spots 7
default profiles 11
using 16
deleting profiles 23
diagnostics 33
dropouts 7
E
editing
personal WEP keys 42
shared WEP keys 41
editing profiles 23
electronic devices 55
hearing aids 56
other medical devices 56
pacemakers 55
electrostatic discharge 7
explosive atmospheres 56
exporting
personal WEP keys 31, 43
profiles 26
shared WEP keys 42
F
faults
diagnosing 33
G
general settings
advanced settings 32
country setting 29
network name 32
personal WEP keys 31
power saving 30
glossary 60
H
hardware
troubleshooting 52
hearing aids 56
history 29, 38
I
importing
personal WEP keys 31, 43
profiles 26
shared WEP keys 42
infrastructure operating mode 12
65
Page 66

initialization vector 40
inserting
smart card 44
wireless LAN card 15
installation
troubleshooting 46
installation disks
creating 35
J
joining ad hoc network 16
L
locking smart card 28
M
Manager window 20
Monitor window 19, 30
data flow indicator 20
settings 30
signal strength indicator 20
N
network
troubleshooting 48
network connection 19
establishing 14
monitoring 29
network name 13
O
operating environment 55
operating mode
ad hoc 13
infrastructure 12
importing 31, 43
selecting 32, 43
PIN code 43
changing 28, 45
unblocking 45
PIN code request 28, 45
power saving 30
profiles 11, 21
copying to smart card 35
creating 22
default profiles 11, 16
editing 23
exporting 26
importing 26
Quick Ad Hoc 11
Quick Infrastructure 11
removing 23
selecting 21
Wired LAN 11
write-protecting 26
PUK code 44
Q
Quick Ad Hoc profile 16
Quick Infrastructure profile 16
R
registering in customer database 33
removing
profiles 23
wireless LAN card 17
resources
troubleshooting 52
roaming 7
P
pacemakers 55
pages 21
administrator 34
diagnostics 33
general settings 29
profiles 21
SIM services 36
status 26
update 33
personal WEP keys 31, 41
creating 31, 42
editing 31, 42
exporting 31, 43
S
safety 2
security 8
PIN code 43
PUK code 44
smart cards 43
wired equivalent privacy (WEP)
40
settings
advanced 32
basic settings 12
channel 14
country 12, 29
general settings 29
66
Page 67

Monitor window 30
network name 13
operating mode 12
power saving 30
SIM services 37
TCP/IP 23
shared WEP keys 40
creating 41
editing 41
exporting 42
importing 42
sharing folders 29
signal strength 7
signal strength indicator 20
SIM services 36
creating a connection log 38
getting connected 37
settings 37
smart card
troubleshooting 53
smart cards 28, 43
accessing 45
changing PIN code 45
creating 35
emptying contents 35
inserting 35, 44
locking 28, 45
PIN code 43
PIN code request 28
PUK code 44
saving information 35
unlocking 28, 45
software
testing 33
updating 34
stations 29
status 26
stopping wireless LAN card 17
T
terminology 60
testing software 33
traffic safety 55
troubleshooting 46
general 46
hardware 52
installation 46
network 48
resources 52
smart card 53
wireless LAN 50
U
unblocking PIN code 45
uninstalling 17
unlocking smart card 45
updating software 34
W
WEP 8, 40
WEP keys
initialization vector 40
personal 31, 41
shared 40
windows
Manager window 20
Monitor window 19
wired equivalent privacy (WEP) 8, 40
Wired LAN profile 16
wireless LAN 6
terminology 60
troubleshooting 50
wireless LAN card
inserting 15
removing 17
stopping 17
uninstalling 17
write-protecting profiles 26
67
 Loading...