

Page 1

vSIM INSTALLATION AND SETUP GUIDE RELEASE 20.10.R1
VIRTUALIZED 7750 SR AND 7950 XRS
SIMULATOR (vSIM)
vSIM INSTALLATION AND SETUP GUIDE
RELEASE 20.10.R1
3HE 15836 AAAD TQZZA 01
Issue: 01
October 2020
Nokia — Proprietary and confidential.
Use pursuant to applicable agreements.
Page 2

vSIM INSTALLATION AND SETUP GUIDE
RELEASE 20.10.R1
Nokia is committed to diversity and inclusion. We are continuously reviewing our
customer documentation and consulting with standards bodies to ensure that
terminology is inclusive and aligned with the industry. Our future customer
documentation will be updated accordingly.
Nokia is a registered trademark of Nokia Corporation. Other products and company
names mentioned herein may be trademarks or tradenames of their respective
owners.
The information presented is subject to change without notice. No responsibility is
assumed for inaccuracies contained herein.
© 2020 Nokia.
Contains proprietary/trade secret information which is the property of Nokia and must
not be made available to, or copied or used by anyone outside Nokia without its
written authorization. Not to be used or disclosed except in accordance with
applicable agreements.
2 3HE 15836 AAAD TQZZA 01 Issue: 01
Page 3

vSIM INSTALLATION AND SETUP GUIDE
RELEASE 20.10.R1
Table of Contents
1 Getting Started................................................................................5
1.1 About This Guide.........................................................................................5
1.1.1 Audience......................................................................................................5
1.1.2 List of Technical Publications ......................................................................6
1.2 vSIM Installation and Setup Process...........................................................6
2 vSIM Overview ................................................................................9
2.1 vSIM Overview ............................................................................................9
2.1.1 vSIM Concept ...........................................................................................10
2.2 vSIM Deployment Models..........................................................................11
2.2.1 Integrated Model........................................................................................11
2.2.2 Distributed Model ......................................................................................11
2.3 Supported vSIM Configurations.................................................................12
2.4 vSIM Networking .......................................................................................14
2.5 vSIM Software Packaging ........................................................................15
3 Host Machine Requirements .......................................................17
3.1 Overview....................................................................................................17
3.2 Host Machine Hardware Requirements.....................................................17
3.2.1 vCPU Requirements..................................................................................17
3.2.2 CPU and DRAM Memory ..........................................................................17
3.2.3 Storage ......................................................................................................18
3.2.4 NICs...........................................................................................................18
3.3 Host Machine Software Requirements ......................................................19
3.3.1 Host OS and Hypervisor............................................................................19
3.3.1.1 Linux KVM Hypervisor ...............................................................................19
3.3.1.2 VMware Hypervisor ...................................................................................20
3.3.2 Virtual Switch.............................................................................................20
3.3.2.1 Linux Bridge...............................................................................................21
4 vSIM Software Licensing .............................................................23
4.1 vSIM Licensing Overview ..........................................................................23
4.2 vSIM License Keys ....................................................................................23
4.3 Checking the License Status .....................................................................24
5 Creating and Starting a vSIM VM on a Linux KVM Host ...........25
5.1 Introduction ...............................................................................................25
5.2 VM Configuration Process Overview.........................................................25
5.3 Libvirt Domain XML Structure....................................................................27
5.3.1 Domain Name and UUID...........................................................................27
5.3.2 Memory......................................................................................................28
5.3.3 vCPU .........................................................................................................28
5.3.4 CPU ...........................................................................................................29
5.3.5 Sysinfo.......................................................................................................30
Issue: 01 3HE 15836 AAAD TQZZA 01 3
Page 4

vSIM INSTALLATION AND SETUP GUIDE
RELEASE 20.10.R1
5.3.6 OS .............................................................................................................34
5.3.7 Clock..........................................................................................................35
5.3.8 Devices......................................................................................................36
5.3.8.1 Disk Devices..............................................................................................36
5.3.8.2 Network Interfaces.....................................................................................38
5.3.8.3 Guest vNIC Mapping in vSIM VMs ............................................................40
5.3.8.4 Console and Serial Ports...........................................................................42
5.3.9 Seclabel.....................................................................................................43
5.4 Example Libvirt Domain XML ....................................................................43
6 Creating and Starting a vSIM VM on a VMware ESXi
Host................................................................................................45
6.1 Creating and Starting an Integrated Model vSIM VM on a VMware
Host ...........................................................................................................45
7 Verifying the vSIM Installation.....................................................57
7.1 Overview....................................................................................................57
7.2 Verifying Host Details ................................................................................57
7.2.1 General System Information......................................................................57
7.2.2 Linux Distribution Type ..............................................................................57
7.2.3 PCI Devices...............................................................................................58
7.2.4 CPU Processor Information.......................................................................58
7.2.5 Host Memory .............................................................................................59
7.2.6 Host Capability ..........................................................................................60
7.2.7 QEMU and libvirt Information ....................................................................60
7.2.8 Loaded Modules ........................................................................................60
7.2.9 Host Virtualization Setup ...........................................................................61
7.3 Verifying the Creation of VMs....................................................................61
7.4 Verifying Host Networking .........................................................................63
7.5 Verifying vSIM Software ............................................................................64
7.5.1 Check the Status of the System BOF........................................................64
7.5.2 Check the Chassis Type ...........................................................................65
7.5.3 Check the Card Types Equipped in the System........................................65
7.5.4 Check the vSIM System Licenses ............................................................. 66
Appendices .............................................................................................. 69
Appendix A: vSIM Supported Hardware ............................................................71
7250 IXR ...................................................................................................................71
7750 SR ...................................................................................................................73
7950 XRS ...................................................................................................................92
Appendix B: Known Limitations .........................................................................95
Appendix C: vSIM Glossary of Key Terms ........................................................97
4 3HE 15836 AAAD TQZZA 01 Issue: 01
Page 5

vSIM INSTALLATION AND SETUP GUIDE
RELEASE 20.10.R1
1 Getting Started
1.1 About This Guide
This guide describes how to install and set up the Virtualized 7750 SR and 7950 XRS
Simulator (vSIM).
This guide is organized into functional chapters and includes:
• a functional overview of the vSIM
• a description of the vSIM system architecture
• requirements for the NFV infrastructure (NFVI) supporting the vSIM system
• initial commissioning procedures to bring up a vSIM for first-time use
Command outputs shown in this guide are examples only; actual outputs may differ
depending on supported functionality and user configuration.
Getting Started
Note: This guide generically covers Release 20.x.Rx. content and may contain some
content that will be released in later maintenance loads. Refer to the SR OS 20.x.Rx.
Software Release Notes, part number 3HE 16194 000x TQZZA, for information on features
supported in each load of the Release 20.x.Rx. software.
1.1.1 Audience
This guide is intended for anyone who is creating vSIMs in a qualified lab
environment. It is assumed that the reader has an understanding of the following:
• x86 hardware architecture
• Linux system installation, configuration, and administration methods
• basic XML syntax
• 7750 SR and 7950 XRS chassis components
•SR OS CLI
• networking principles and configurations, including virtualized I/O techniques
Issue: 01 3HE 15836 AAAD TQZZA 01 5
Page 6

Getting Started
vSIM INSTALLATION AND SETUP GUIDE
RELEASE 20.10.R1
1.1.2 List of Technical Publications
After the installation process of the vSIM is completed, refer to the SR OS
documents, as listed in the 7450 ESS, 7750 SR, and 7950 XRS Documentation Suite
Overview, part number 3HE 15080 AAAB TQZZA. These documents contain
information about the software configuration and the command line interface (CLI)
that is used to configure network parameters and services.
1.2 vSIM Installation and Setup Process
This guide is presented in an overall logical configuration flow. Each section
describes the tasks for a functional area.
Table 1 lists the general tasks and procedures necessary to install and setup a vSIM,
in the recommended order of execution.
Table 1 vSIM Installation and Configuration Workflow
Task Description See
Installing the host
machine
Installing the virtualization
packages
Configuring host
networking
Downloading the software
image
Obtaining the license keys Obtain the software license keys from Nokia. vSIM Software Licensing
VM resource
requirements
Creating configuration
files
Set up and install the host machine,
including the host operating system.
Install the necessary virtualization packages
on the host machine.
Configure host networking (NICs, network
interfaces, vSwitch).
Download the SR OS software image. vSIM Software Packaging
Determine resource requirements for the
virtual machine (VM).
If required, create configuration files for the
VM. The exact format of the configuration
files depends on the method of installation.
Host OS and Hypervisor
Linux KVM Hypervisor
Virtual Switch
vSIM Networking
Virtual Switch
Network Interfaces
Guest vNIC Mapping in vSIM VMs
Memory
vCPU
Creating and Starting a vSIM VM on
a Linux KVM Host
Creating and Starting a vSIM VM on
a VMware ESXi Host
6
3HE 15836 AAAD TQZZA 01 Issue: 01
Page 7
vSIM INSTALLATION AND SETUP GUIDE
RELEASE 20.10.R1
Getting Started
Table 1 vSIM Installation and Configuration Workflow (Continued)
Task Description See
Launching the VM Launch the vSIM VM. Creating and Starting a vSIM VM on
a Linux KVM Host
Creating and Starting a vSIM VM on
a VMware ESXi Host
Verifying the installation Verify the vSIM VM installation. Verifying the vSIM Installation
Issue: 01 3HE 15836 AAAD TQZZA 01 7
Page 8

Getting Started
vSIM INSTALLATION AND SETUP GUIDE
RELEASE 20.10.R1
8
3HE 15836 AAAD TQZZA 01 Issue: 01
Page 9

vSIM INSTALLATION AND SETUP GUIDE
RELEASE 20.10.R1
2 vSIM Overview
2.1 vSIM Overview
The Nokia Virtualized 7750 SR and 7950 XRS Simulator (vSIM) is a Virtualized
Network Function (VNF) that simulates the control, management, and forwarding
functions of a 7750 SR or 7950 XRS router.
The vSIM runs the same Service Router Operating System (SR OS) as 7750 SR and
7950 XRS hardware-based routers and, therefore, has the same feature set and
operational behavior as those platforms. Configuration of interfaces, network
protocols, and services on the vSIM are performed the same way as they are on
physical 7750 SR and 7950 XRS systems. vSIM software is designed to run on x86
virtual machines (VMs) deployed on industry-standard Intel servers. In this
document, vSIM refers to the guest software running on a VM and to the set of those
VMs that comprise a network element.
vSIM Overview
The vSIM is suitable for labs, training and education, network simulation, or to
emulate a device under test (DUT) in preparation for deployment into a production
network. It is not intended for deployment in an actual production network.
NFV enables network functions that previously depended on custom hardware to be
deployed on commodity hardware using standard IT virtualization technologies. For
network operators, the benefits of NFV include:
• reduced CAPEX by using industry-standard hardware that is potentially easier
to upgrade
• reduced OPEX (space, power, cooling) by consolidation of multiple functions on
fewer physical platforms
• faster and simpler testing and rollout of new services
• more flexibility to scale capacity up or down, as needed
• ability to move or add network functions to a location without necessarily
needing new equipment
Issue: 01 3HE 15836 AAAD TQZZA 01 9
Page 10
vSIM Overview
vSIM INSTALLATION AND SETUP GUIDE
RELEASE 20.10.R1
2.1.1 vSIM Concept
The vSIM software is designed for a standard virtualization environment in which the
hypervisor software running on a host machine creates and manages one or more
VMs that consume a subset of the host machine resources. Each VM is an
abstraction of a physical machine with its own CPU, memory, storage, and
interconnect devices. Each vSIM can be viewed as a Virtual Network Function (VNF)
made up of one or more VNF components (VNF-C) spanning one or more compute
servers. For a vSIM, each VNF-C is a VM that emulates one card slot of a physical
router, or a complete physical router in the case of one integrated model.
The SR OS is the guest operating system of each VNF-C VM. vSIM VMs can be
deployed in combination with other VMs on the same server, including VMs that run
guest operating systems other than the SR OS.
Note: Care must be taken not to over-subscribe host resources; vSIM VMs must have
dedicated CPU cores and dedicated vRAM memory to ensure stability. In addition,
combining vSIM VMs with other VMs that have intensive memory access requirements on
the same CPU socket should be generally avoided for stability reasons. See Creating and
Starting a vSIM VM on a Linux KVM Host for more information about this topic.
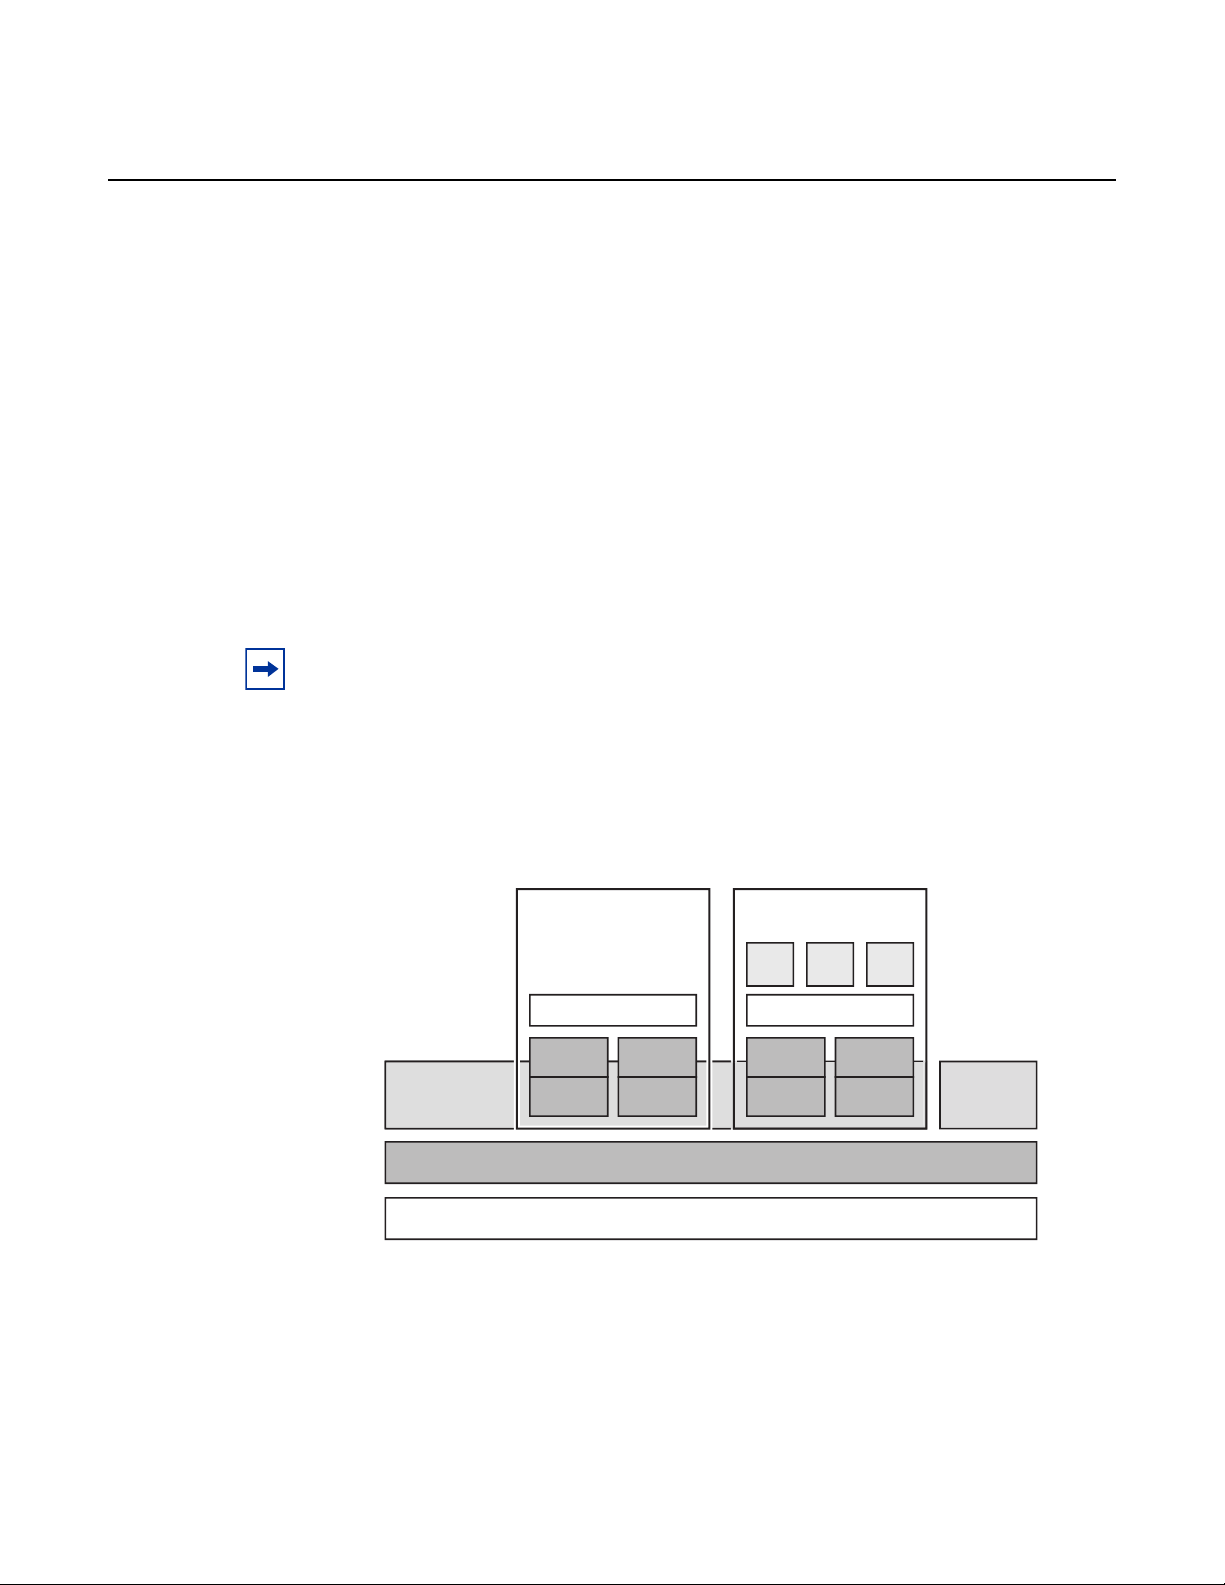
Figure 1 shows the general concept of a vSIM.
Figure 1 vSIM Concept
Other VM
HYPERVISOR
vSIM VNF-C
VIRTUAL
CPU
VIRTUAL
DISK
SR OS
VIRTUAL
MEMORY
VIRTUAL
NIC
HOST OS
HOST MACHINE
APP1 APP3APP2
GUEST O/S
VIRTUAL
CPU
VIRTUAL
DISK
VIRTUAL
MEMORY
VIRTUAL
NIC
HOST APP
sw0240
The host machine supporting a vSIM VM must be a qualified x86 machine that may
range from a laptop to a dedicated server.
10
3HE 15836 AAAD TQZZA 01 Issue: 01
Page 11

vSIM INSTALLATION AND SETUP GUIDE
RELEASE 20.10.R1
The host machine must run a hypervisor that is compatible with the vSIM software.
QEMU-KVM and VMware are the only supported hypervisors.
See Host Machine Requirements for detailed information about the minimum
requirements of the host server and the supported hypervisors for the vSIM.
2.2 vSIM Deployment Models
The vSIM can be deployed as one of two models: integrated or distributed. The
deployment model depends entirely on the configured chassis type of the vSIM
system.
2.2.1 Integrated Model
vSIM Overview
The integrated vSIM model uses a single VM to emulate the physical router. All
functions and processing tasks of the emulated router, including control,
management and data plane, are performed by the resources of the single VM.
An integrated vSIM is created when the configured chassis type is SR-1, SR-1s, or
IXR-R6. All other chassis types require a “distributed” model of deployment.
While SR-1 and SR-1s chassis types are single VM combined systems without
redundancy support, the IXR-R6 chassis type can have two combined VMs to allow
for redundancy. The IXR-R6 otherwise behaves as an integrated model, as both VMs
have combined CPM/IOM components.
2.2.2 Distributed Model
The distributed vSIM model uses two or more VMs (VNFCs) connected to a common
internal network to emulate a single physical router (VNF).
In a distributed system (vSIM), each VM is specialized, supporting either control
plane processing (CPM) or datapath functions (IOM or XCM).
A distributed vSIM supports one CPM or two hot-redundant CPMs in the same
active-standby model as the emulated physical router so that if the active CPM fails,
the standby can take over immediately, with minimal or no impact to packet
forwarding, services, or control plane sessions. These can be placed on different
hosts to provide hardware and software resiliency.
Issue: 01 3HE 15836 AAAD TQZZA 01 11
Page 12

vSIM Overview
vSIM INSTALLATION AND SETUP GUIDE
RELEASE 20.10.R1
A distributed vSIM is created when the configured chassis type is anything other than
“SR-1”, “SR-1s”, or “IXR-R6”.
The VMs of a distributed vSIM must be able to communicate privately over an
internal network dedicated to the router being emulated. The internal network
behaves similar to the switch fabric of a physical router.
Each CPM and IOM/XCM of a specific vSIM instance must be connected to the fabric
network of that instance. The fabric network is a Layer 2 broadcast domain over
which the VMs of the vSIM send messages to each other for purposes of discovery,
inter-card communication and synchronization, inter-IOM data traffic, and so on. The
MTU of network interfaces associated with vSIM internal fabric interfaces must be set
to 9000 bytes. Packets sent over the fabric by each IOM/XCM or CPM are Ethernet
encapsulated (without 802.1Q VLAN tags) and frames with a multicast/broadcast
destination MAC address must be delivered to all the VMs of the vSIM instance.
2.3 Supported vSIM Configurations
For a vSIM to properly simulate a particular 7750 SR or 7950 XRS router
configuration, the SR OS software running on each of its component VMs must read
the SMBIOS information (see Sysinfo for information about SMBIOS parameters)
which must have the following configured:
• the chassis type of the emulated router
The chassis type must be set identically for all VMs that make up one chassis or
system.
• the slot number corresponding to each VM
• the card type represented by each VM
• the equipped MDAs/XMAs in each VM emulating an IOM or XCM card
• the SFM (switch fabric module) that virtually connects the slot to the rest of the
system
The SFM must be set identically for all VMs that make up one chassis or system.
• the chassis-topology of the system
When this value is set to XRS-40, the slot is part of an extended 7950 XRS
chassis. This must be set identically for all VMs that make up one 7950 XRS-40
system.
12
3HE 15836 AAAD TQZZA 01 Issue: 01
Page 13

vSIM INSTALLATION AND SETUP GUIDE
RELEASE 20.10.R1
Note: Prior to Release 16.0, the chassis-topology attribute was not supported and VMs
emulating a 7950 XRS-20 or 7950 XRS-20e card would automatically boot as being part of
an extended 7950 XRS-40 system. With Release 16.0 and later software, a VM emulating
a 7950 XRS-20 or7950 XRS-20e card automatically boots as being part of a standalone
XRS-20 system.
vSIM software can only simulate valid 7750 SR and 7950 XRS router configurations.
For example, with real physical hardware, you cannot install a 7950 XRS CPM-X20
in an SR-12 chassis or pass data traffic through a 7950 XRS chassis with only one
CPM-X20 and no XCMs installed. The same rules apply to vSIMs.
vSIM configuration should always start with a decision about the chassis type to be
emulated. vSIM supports the following chassis types:
7750 SR
•7750SR-7
•7750SR-12
• 7750 SR-12e
vSIM Overview
• 7750 SR-a4
• 7750 SR-a8
• 7750 SR-1e
• 7750 SR-2e
• 7750 SR-3e
• 7750 SR-1
• 7750 SR-1s
• 7750 SR-2s
• 7750 SR-7s
• 7750 SR-14s
7950 XRS
• 7950 XRS-16
• 7950 XRS-20
• 7950 XRS-20e
7250 IXR
•7250IXR-6
•7250IXR-10
•7250IXR-R4
•7250IXR-R6
Issue: 01 3HE 15836 AAAD TQZZA 01 13
Page 14

vSIM Overview
vSIM INSTALLATION AND SETUP GUIDE
RELEASE 20.10.R1
•7250IXR-s
•7250IXR-e
•7250IXR-X
The chassis, sfm, and chassis-topology SMBIOS parameters determine the total
number of card slots available, the eligible card types in each slot position and the
minimum configuration of cards to create a functional system.
If a VM of a vSIM emulates a physical card with I/O ports (for example, an IOM or
XCM) then certain MDAs compatible with that card can be virtually equipped. I/O
ports on these MDAs map to VM vNIC interfaces as explained later in this document.
The MDA types that are compatible with a card adhere to physical hardware rules.
Appendix A: vSIM Supported Hardware summarizes all currently supported valid
combinations of chassis type, SFM type, card type, XIOM type and MDA type that
may be represented by one single vSIM VM.
2.4 vSIM Networking
A vSIM VM can have one or more virtual NIC ports. Depending on the hypervisor,
each vNIC port presented to a vSIM VM can be one of the following types:
• VirtIO (KVM)
• E1000 (KVM and VMware)
For each of the above options, the virtual NIC port that is presented to the guest is
internally connected to a logical interface within the host. The logical host interface
may map directly to a physical NIC port/VLAN or it may connect to a vSwitch within
the host. If a vNIC port is connected to a vSwitch, a physical NIC port/VLAN must be
added as a bridge port of the vSwitch to enable traffic to reach other external hosts.
Note: SR-IOV and PCI pass-through are not supported technologies for vSIM VMs.
Each vSIM VM supports up to eight virtual NIC ports. Depending on the card-type
emulated by the VM, this may be more or less than the actual number of I/O ports
supported by the card-type. Additional ports may be configured on the vSIM, but they
will have no external connectivity and will remain in the down state.
14
3HE 15836 AAAD TQZZA 01 Issue: 01
Page 15

vSIM INSTALLATION AND SETUP GUIDE
RELEASE 20.10.R1
Note: Throughput on vSIM ports is limited to no more than 250 pps.
2.5 vSIM Software Packaging
vSIM software is part of the VSR software package that is available for download
from OLCS
images are stored in virtual disk images inside the ZIP file.
The sros-vm.ova file inside the ZIP archive is used to deploy a vSIM in a VMware
data center.
Note: Do not use the sros-vsr.ova file to on-board a vSIM; this OVA archive file is intended
for use only with VSR virtual machines.
as a ZIP file with a name such as Nokia-VSR-VM-20.2.zip. The software
vSIM Overview
The QCOW2 disk image inside the ZIP archive is used to deploy a vSIM on a Linux
KVM hypervisor (either using libvirt tools or OpenStack).
Issue: 01 3HE 15836 AAAD TQZZA 01 15
Page 16

vSIM Overview
vSIM INSTALLATION AND SETUP GUIDE
RELEASE 20.10.R1
16
3HE 15836 AAAD TQZZA 01 Issue: 01
Page 17

vSIM INSTALLATION AND SETUP GUIDE
RELEASE 20.10.R1
3 Host Machine Requirements
3.1 Overview
This section describes the requirements that must be fulfilled by a host machine in
order to support vSIM virtual machines (VMs).
The host machine for vSIM VMs is usually a dedicated server or PC in a lab
environment. vSIM VMs may also be deployed in a fully orchestrated data center, but
this topic is out of scope of this guide.
3.2 Host Machine Hardware Requirements
Host Machine Requirements
This section describes the host machine hardware requirements.
3.2.1 vCPU Requirements
The minimum number of vCPUs that you can allocate to a vSIM VM is two. See
vCPU for more information.
The 7250 IXR family has the following minimum requirements:
• 1) four vCPUs for cpiom-ixr-r6
• 2) a minimum of four vCPUs for imm36-100g-qsfp28; however, eight vCPUs are
recommended
3.2.2 CPU and DRAM Memory
vSIM VMs can be deployed on any PC or server with an Intel CPU that is Sandy
Bridge or later in terms of micro-architecture.
The PC or server should be equipped with sufficient DRAM memory to meet the
memory requirement of the host, and have adequate resources to back the memory
of each vSIM VM without oversubscription.
Issue: 01 3HE 15836 AAAD TQZZA 01 17
Page 18

Host Machine Requirements
The minimum amount of memory for each vSIM VM depends on emulated card type,
as listed in Table 2.
Table 2 VM Memory Requirements by Card Type
Emulated card type Minimum required memory (GB)
cpiom-ixr-r6 6
imm36-100g-qsfp28 6
xcm-14s 8
xcm-1s 6
xcm-2s 6
xcm2-x20 6
xcm-7s 6
all other card types 4
vSIM INSTALLATION AND SETUP GUIDE
RELEASE 20.10.R1
Note: vSIM deployment is not supported on PCs or servers powered by AMD or ARM
CPUs.
3.2.3 Storage
Each vSIM VM needs only a moderate amount of persistent storage space; 5 to 10
Gbytes is sufficient in most cases.
The currently supported method for attaching a storage device to a vSIM VM is to
attach a disk image that appears as an IDE hard drive to the guest. The vSIM VM
disk images can either be stored on the host server hard drive, or stored remotely.
3.2.4 NICs
vSIM VMs are supported with any type of NIC, as long as it is supported by the
hypervisor.
18
3HE 15836 AAAD TQZZA 01 Issue: 01
Page 19

vSIM INSTALLATION AND SETUP GUIDE
RELEASE 20.10.R1
3.3 Host Machine Software Requirements
This section describes the requirements for host OS and virtualization software
requirements for vSIM VMs.
3.3.1 Host OS and Hypervisor
The supported host OS depends on the hypervisor selected to run the vSIM VMs.
Integrated model vSIM VMs (SR-1, SR-1s, IXR-R6) are supported with the following
hypervisors:
• Linux KVM, as provided by one of the host OSs listed below
• VMware ESXi 6.0, 6.5, or 6.7
Distributed model vSIM VMs are only supported with the Linux KVM hypervisor,
using one of the following host OSs:
Host Machine Requirements
• CentOS 7.0-1406 with 3.10.0-123 kernel
• CentOS 7.2-1511 with 3.10.0-327 kernel
• CentOS 7.4-1708 with 3.10.0-693 kernel
• Centos 7.5-1804 with 3.10.0-862 kernel
• Red Hat Enterprise Linux 7.1 with 3.10.0-229 kernel
• Red Hat Enterprise Linux 7.2 with 3.10.0-327 kernel
• Red Hat Enterprise Linux 7.4 with 3.10.0-693 kernel
• Red Hat Enterprise Linux 7.5 with 3.10.0-862 kernel
• Ubuntu 14.04 LTS with 3.13 kernel
• Ubuntu 16.04 LTS with 4.4
3.3.1.1 Linux KVM Hypervisor
vSIM VMs can be created and managed using the open-source Kernel-based VM
(KVM) hypervisor.
Nokia recommends the use of the Libvirt software package to manage the
deployment of VMs in a Linux KVM environment. Libvirt is open source software that
provides a set of APIs for creating and managing VMs on a host machine,
independent of the hypervisor. Libvirt uses XML files to define the properties of VMs
and virtual networks. It also provides a convenient virsh command line tool.
Issue: 01 3HE 15836 AAAD TQZZA 01 19
Page 20

Host Machine Requirements
The vSIM VM examples shown in this guide assume that VM parameters in a domain
XML file are read and acted upon by the virsh program.
3.3.1.2 VMware Hypervisor
You can install integrated model vSIM (SR-1, SR-1s, IXR-R6) VMs on hosts running
the VMware ESXi hypervisor. Only ESXi versions 6.0, 6.5, and 6.7 are supported
with the vSIM.
Note: Distributed model vSIMs are not supported on VMware managed hosts.
Nokia recommends deployment of the vSphere vCenter server and use of the
vSphere Web Client GUI for managing the virtual machines in a VMware
environment.
vSIM INSTALLATION AND SETUP GUIDE
RELEASE 20.10.R1
The following VMware features are supported with vSIM VMs:
• e1000 vNIC interfaces
• vNIC association with a vSphere standard switch
• vNIC association with a vSphere distributed switch
•vMotion
• High Availability
Non-supported features include VMXNET3 device adapter support, SR-IOV, PCI
pass-through, DRS, fault tolerance, and Storage vMotion.
3.3.2 Virtual Switch
A virtual switch (vSwitch) is a software implementation of a Layer 2 bridge or Layer
2-3 switch in the host OS software stack. When the host has one or more VMs, the
vNIC interfaces (or some subset) can be logically connected to a vSwitch to enable
the following:
• vNIC-to-vNIC communication within the same host without relying on the NIC or
other switching equipment
• multiple vNICs to share the same physical NIC port
20
The Linux Bridge vSwitch implementation option is available on Linux hosts.
3HE 15836 AAAD TQZZA 01 Issue: 01
Page 21

vSIM INSTALLATION AND SETUP GUIDE
RELEASE 20.10.R1
The standard switch and distributed switch vSwitch implementation options are
available on VMware ESXi hosts.
3.3.2.1 Linux Bridge
The Linux bridge is a software implementation of an IEEE 802.1D bridge that
forwards Ethernet frames based on learned MACs. It is part of the bridge-utils
package. The Linux bridge datapath is implemented in the kernel (specifically, the
bridge kernel module), and it is controlled by the brctl userspace program.
On Centos and RHEL hosts, a Linux bridge can be created by adding the ifcfg-brN
(where N is a number) file in the /etc/sysconfig/network-scripts/ directory. The
contents of this file contain the following directives:
• DEVICE=brN (with N correctly substituted)
• TYPE=Bridge (Bridge is case-sensitive)
Host Machine Requirements
The following shows an example ifcfg file:
TYPE=Bridge
DEVICE=br0
IPADDR=192.0.2.1
PREFIX=24
GATEWAY=192.0.2.254
DNS1=8.8.8.8
BOOTPROTO=static
ONBOOT=yes
NM_CONTROLLED=no
DELAY=0
To add another interface as a bridge port of brN, add the BRIDGE=brN directive to
the ifcfg network-script file for that other interface.
On Ubuntu hosts, a Linux bridge is created by adding an auto brN stanza followed
by an iface brN stanza to the /etc/network/interfaces file. The iface brN stanza can
include several attributes, including the bridge_ports attribute, which lists the other
interfaces that are ports of the Linux bridge.
The following example shows an /etc/network/interfaces file that creates a bridge
br0 with eth0 as a bridge port:
auto lo
iface lo inet loopback
auto br0
iface br0 inet dhcp
bridge_ports eth0
bridge_stp off
bridge_fd 0
Issue: 01 3HE 15836 AAAD TQZZA 01 21
Page 22

Host Machine Requirements
By default, the Linux bridge is VLAN unaware and it does not look at VLAN tags, nor
does it modify them when forwarding the frames.
If the bridge is configured to have VLAN sub-interfaces, frames without a matching
VID are dropped or filtered.
If a VLAN sub-interface of a port is added as a bridge port, then frames with the
matching VID are presented to the bridge with the VLAN tag stripped. When the
bridge forwards an untagged frame to this bridge port, a VLAN tag with a matching
VID is automatically added.
vSIM INSTALLATION AND SETUP GUIDE
RELEASE 20.10.R1
bridge_maxwait 0
22
3HE 15836 AAAD TQZZA 01 Issue: 01
Page 23

vSIM INSTALLATION AND SETUP GUIDE
RELEASE 20.10.R1
4 vSIM Software Licensing
4.1 vSIM Licensing Overview
This section describes how software licensing applies to vSIMs. For a vSIM to be
fully functional, the system must load a valid license file at bootup. The license file
encodes the allowed capabilities and features of the vSIM system. Contact your
Nokia account representative to obtain license files associated with a purchase order
or trial request.
4.2 vSIM License Keys
vSIM Software Licensing
When you purchase software licenses for one or more vSIMs, your Nokia account
representative will provide you with corresponding vSIM license key files, which
could be one license file for all the vSIMs or a separate license file for each one.
Each vSIM requires its own license tied to the specific UUID of the individual vSIM
VM, but more than one license may be included in a license file. The virtual machines
acting as the CPMs of each vSIM must have their UUID identifiers manually set to
the specified values. See Domain Name and UUID for more information UUID
identifiers.
The license-file boot-option parameter of each vSIM indicates the location of the
license file, which can be a local disk location or an FTP server location. The license-
file parameter can be specified by editing the BOF file (before or after bootup), or by
including it in the SMBIOS information provided to each CPM virtual machine of the
vSIM. See Sysinfo for more information about the SMBIOS parameters.
Note: Both CPMs in a redundant vSIM system should have the same BOF setting for the
license-file parameter. Also, if the license-file is stored on the local disk (CF3) of the active
CPM, it should also be stored on the local disk (CF3) of the standby CPM. You can use the
admin redundancy synchronize boot-env co mmand to synchro ni ze the BO F s ettings an d
copy the license-file to the standby CPM if it is stored locally.
When the vSIM software starts booting and determines that it should serve the
function of a CPM in a vSIM system, it attempts to read and parse the referenced
license file.
Issue: 01 3HE 15836 AAAD TQZZA 01 23
Page 24

vSIM Software Licensing
If the CPM cannot find a valid license key and it is the only CPM of the vSIM, the
system is allowed to complete its bootup procedures but only a limited number of
non-configuration-related commands are available in this state, and the system is
forced to reboot after 60 minutes.
If the CPM cannot find a valid license key (with matching UUID, major software
version, and valid date range), and the vSIM has another CPM with a valid license
key, only the CPM without a license will be rebooted after 60 minutes. In the
meantime the system is fully functional. However, if either CPM of a vSIM system has
a corrupt license file or a license file for the wrong type of product, the entire chassis
will be forced to reboot after 60 minutes.
Note: The IOMs of a vSIM system do not need their own license keys; they inherit the
license state of the system, as determined by the CPMs. The IOMs reboot immediately if no
CPM has a valid license.
vSIM INSTALLATION AND SETUP GUIDE
RELEASE 20.10.R1
4.3 Checking the License Status
After the vSIM is operational, you can check the license status of the system. At the
prompt, type the following:
show system license ↵
The following is sample output for a vSIM emulating a 7750 SR-7 chass is with a valid
license:
A:Dut-A# show system license
===============================================================================
System License
===============================================================================
License status : monitoring, valid license record
Time remaining : 99 days 4 hours
------------------------------------------------------------------------------License name : name@organization.com
License uuid : 00000000-0000-0000-0000-000000000000
Machine uuid : a8812f3e-a90d-4de3-8a5e-6e44001e35f6
License desc : 7xxx vm-training-sim
License prod : Virtual-SIM
License sros : TiMOS-[BC]-16.0.*
Current date : WED OCT 24 20:52:37 UTC 2018
Issue date : THU AUG 02 17:40:35 UTC 2018
Start date : WED AUG 01 00:00:00 UTC 2018
End date : FRI FEB 01 00:00:00 UTC 2019
===============================================================================
A:Dut-A#
24
3HE 15836 AAAD TQZZA 01 Issue: 01
Page 25

vSIM INSTALLATION AND SETUP GUIDE
RELEASE 20.10.R1
5 Creating and Starting a vSIM VM on a
Linux KVM Host
5.1 Introduction
This section describes how to create and start up vSIM virtual machines (VMs) on
host machines using the Linux KVM hypervisor.
Several methods are available for creating a Linux KVM VM based on a specific set
of parameters or constraints. These methods include:
• specifying the VM parameters in a domain XML file read by virsh, the libvirt
command shell
• using the virt-manager GUI application available as part of the libvirt package
• using the qemu-kvm (RedHat/Centos) or qemu-system-x86_64 (Ubuntu)
commands
Creating and Starting a vSIM VM on a Linux KVM
Host
The Linux libvirt package provides the Virtual Shell (virsh) command-line
application to facilitate the administration of VMs. The virsh application provides
commands to create and start a VM using the information contained in a domain XML
file. It also provides commands to shut down a VM, list all the VMs running on a host,
and output specific information about the host or a VM.
This section describes how to define and manage your vSIM VM using the virsh tool.
5.2 VM Configuration Process Overview
The libvirt domain XML file for a vSIM VM defines the important properties of the
VM. You can use any text editor to create the domain XML file; pass the filename as
a parameter of the virsh create command to start up the vSIM VM. For example,
virsh create domain1.xml.
You can run virsh commands to display information about the VM or change specific
properties. Table 3 lists the basic virsh commands, where VM_name is the value that
you configured for the name element in the XML configuration file. Refer to http://
libvirt.org/virshcmdref.html for more information.
Issue: 01 3HE 15836 AAAD TQZZA 01 25
Page 26

Creating and Starting a vSIM VM on a Linux KVM
Host
Table 3 Basic virsh Commands
Command Example Result
vSIM INSTALLATION AND SETUP GUIDE
RELEASE 20.10.R1
capabilities |
grep cpu
console virsh console VM_name ↵ Connects the serial console of the VM if using the serial
define virsh define VM_name.xml ↵ Reads the XML configuration file and creates a domain.
destroy virsh destroy VM_name ↵ Stop and power down a VM (domain). The terminated VM
dumpxml virsh dumpxml VM_name ↵ Displays the XML configuration information for the
list virsh list [ --all | --inactive] ↵ The “--all” argument displays all active and inactive VMs
nodeinfo virsh nodeinfo ↵ Displays the memory and CPU information, including the
start virsh start VM_name ↵ Starts the VM domain
virsh capabilities | grep cpu ↵ Displays the number of cores on the physical machine,
the vendor, and the model
PTY port
This is useful to provide persistence of the domain across
reboots
is still available on the host and can be started again. The
system status is “shut off”
specified VM, including properties added automatically by
libvirt
that have been configured and their state
The “--inactive” argument displays all VMs that are
defined but inactive
number of CPU cores on the physical machine
undefine virsh undefine VM_name ↵ Deletes a specified VM from the system
vcpuinfo virsh vcpuinfo VM_name ↵ Displays information about each vCPU of the VM
Note: The virsh shutdown and virsh reboot commands do not affect vSIM VMs because
the vSIM software does not respond to ACPI signals.
Some VM property changes made from the virsh command line do not take
immediate effect because the vSIM does not recognize and apply these changes
until the VM is destroyed and restarted. Examples of these changes include:
• modifying the vCPU allocation with the virsh setvcpus command
• modifying the vRAM allocation with the virsh setmem command
• adding or removing a disk with the virsh attach-disk, virsh attach-device,
virsh detach-disk, or virsh detach-device commands
26
3HE 15836 AAAD TQZZA 01 Issue: 01
Page 27

vSIM INSTALLATION AND SETUP GUIDE
RELEASE 20.10.R1
• adding or removing a vNIC with the virsh attach-interface, virsh attach-
device, virsh detach-interface, or virsh detach-device commands
5.3 Libvirt Domain XML Structure
The libvirt domain XML file describes the configuration of a vSIM VM. The file begins
with a <domain type=‘kvm’> line and ends with a </domain> line. In XML syntax,
domain is an element and type=‘kvm’ is an attribute of the domain element. vSIM
VMs must have the type='kvm' attribute because KVM acceleration is mandatory.
Other domain types, including type='qemu', are not valid.
The libvirt domain XML file structure can conceptually be interpreted as a tree,
where the domain element is the root element and contains all the sub-elements
(child elements) in the file. All sub-elements can contain their own child elements,
and so on. The following domain child elements should be configured to for vSIM
VMs:
Creating and Starting a vSIM VM on a Linux KVM
Host
• name, see Domain Name and UUID
• uuid, see Domain Name and UUID
• memory, see Memory
• vcpu, see vCPU
• cpu, see CPU
• sysinfo, see Sysinfo
• os, see OS
• clock, see Clock
• devices, see Devices
• seclabel, see Seclabel
5.3.1 Domain Name and UUID
Use the <name> element to assign each VM a meaningful name. The name should
be composed of alphanumeric characters (spaces should be avoided) and must be
unique within the scope of the host machine. Use the virsh list command to display
the VM name. The following is an example of a <name> element:
<name>v-sim-01-control</name>
Issue: 01 3HE 15836 AAAD TQZZA 01 27
Page 28

Creating and Starting a vSIM VM on a Linux KVM
Host
Each VM has a globally unique UUID identifier. The UUID format is described in RFC
4122. If you do not include a <uuid> element in the domain XML file, libvirt auto
generates a value that you can display (after the VM is created) using the virsh
dumpxml command. Setting the UUID value explicitly ensures that it matches the
UUID specified in the software license. See vSIM Software Licensing for information
about vSIM software licenses. The following is an example of a <uuid> element,
using the correct RFC 4122 syntax:
<uuid>ab9711d2-f725-4e27-8a52-ffe1873c102f</uuid>
5.3.2 Memory
The maximum memory (vRAM) allocated to a VM at boot time is defined in the
<memory> element. The 'unit' attribute is used to specify the unit to count the vRAM
size.
vSIM INSTALLATION AND SETUP GUIDE
RELEASE 20.10.R1
Note: The unit value is specified in kibibytes (2^10 bytes) by default. However, all memory
recommendations in this document are expressed in units of gigabytes (2^30 bytes), unless
otherwise stated.
To express a memory requirement in gigabytes, include a unit=‘G’ (or unit=‘GiB’)
attribute, as shown in the following example:
<memory unit='G'>6</memory>
The amount of vRAM needed for a vSIM VM depends on the vSIM system type, vSIM
card type, and the MDAs installed in the system or card. See CPU and DRAM
Memory for more information.
5.3.3 vCPU
The <vcpu> element defines the number of vCPU cores allocated to a VM. The
minimum number of vCPUs that you can allocate to a vSIM VM is two.
The <vcpu> element contains the following attributes:
• cpuset
28
3HE 15836 AAAD TQZZA 01 Issue: 01
Page 29

vSIM INSTALLATION AND SETUP GUIDE
RELEASE 20.10.R1
The cpuset attribute provides a comma-separated list of physical CPU numbers
or ranges, where “^” indicates exclusion. Any vCPU or vhost-net thread
associated with the VM that is not explicitly assigned by the <cputune>
configuration is assigned to one of the physical CPUs allowed by the cpuset
attribute.
• current
The current attribute allows fewer than the maximum vCPUs to be allocated to
the VM at boot up. This attribute is not required for vSIM VMs because in-service
changes to the vCPU allocation are not allowed.
• placement
The placement attribute accepts a value of either 'static' or 'auto'. You should
use 'static' when specifying a cpuset. When 'auto' is used, libvirt ignores the
cpuset attribute and maps vCPUs to physical CPUs in a NUMA-optimized
manner based on input from the numad process. The placement attribute
defaults to the placement mode of <numatune>, or to static if a cpuset is
specified.
The following example <vcpu> configuration for a vSIM VM allocates four vCPUs.
Creating and Starting a vSIM VM on a Linux KVM
Host
<vcpu>4</vcpu>
5.3.4 CPU
The <cpu> element specifies CPU capabilities and topology presented to the guest,
and applies to the model of the CPU. The mode attribute of <cpu> supports the
following values:
• custom
In the custom mode, you must specify all the capabilities of the CPU that will be
presented to the guest.
• host-model
In the host-model mode, the model and features of the host CPU are read by
libvirt just before the VM is started and the guest is presented with almost
identical CPU and features.
If the exact host model cannot be supported by the hypervisor, libvirt falls back
to the next closest supported model that has the same CPU features. This
fallback is permitted by the <model fallback=‘allow’/> element.)
• host-passthrough
In the host-passthrough mode, the guest CPU is represented as exactly the
same as the host CPU, even for features that libvirt does not understand.
Issue: 01 3HE 15836 AAAD TQZZA 01 29
Page 30

Creating and Starting a vSIM VM on a Linux KVM
Host
The <topology> child element specifies three values for the guest CPU topology: the
number of CPU sockets, the number of CPU cores per socket, and the number of
threads per CPU core.
The <numa> child element in the <cpu> element creates specific guest NUMA
topology. However, this is not applicable to the vSIM because the vSIM software is
not NUMA-aware.
The following is the recommended configuration of the <cpu> element for vSIM VMs:
<cpu mode="custom" match="minimum">
<model>SandyBridge</model>
<vendor>Intel</vendor>
</cpu>
5.3.5 Sysinfo
The <sysinfo> element presents SMBIOS information to the guest. SMBIOS is
divided into three blocks of information (blocks 0 to 2); each block consists of multiple
entries. SMBIOS system block 1 is most important for the vSIM. The SMBIOS
system block contains entries for the manufacturer, product, version, serial number,
UUID, SKU number, and family.
vSIM INSTALLATION AND SETUP GUIDE
RELEASE 20.10.R1
SMBIOS provides a necessary way to pass vSIM-specific configuration information
from the host to the guest so that it is available to vSIM software when it boots. When
a vSIM VM is started, the vSIM software reads the product entry of the SMBIOS
system block. If the product entry begins with 'TIMOS:' (without the quotes and case
insensitive), the software recognizes the string that follows as containing important
initialization information. The string following the 'TIMOS:' characters contains one
or more attribute-value pairs formatted as follows:
attribute1=value1 attribute2=value2 attribute3=value3
This pattern continues until all attributes have been specified.
The supported attribute-value pairs and their uses are summarized in Table 4.
30
3HE 15836 AAAD TQZZA 01 Issue: 01
Page 31

vSIM INSTALLATION AND SETUP GUIDE
RELEASE 20.10.R1
Creating and Starting a vSIM VM on a Linux KVM
Table 4 vSIM Boot Parameters in SMBIOS Product Entry
Attribute Name Valid Values Description
Host
address For a vSIM VM acting as CPM:
<ip-prefix>/<ip-prefix-length>@active
<ip-prefix>/<ip-prefix-length>@standby
For a vSIM VM acting as IOM:
n/a
Where:
<ip-prefix>: an IPv4 or IPv6 prefix
<ip-prefix-length>: 1-128
static-route For a vSIM VM acting as CPM:
<ip-prefix>/<ip-prefix-length>@<next-hop-ip>
For a vSIM VM acting as IOM:
n/a
Where:
<ip-prefix>: an IPv4 or IPv6 prefix
<next-hop-ip>: an IPv4 or IPv6 address
Sets a management IP
address.
In a vSIM with two CPMs,
the SMBIOS product entry
for each CPM should
include two address
attributes: one for the active
CPM (ending with @active)
and one for the standby
CPM (ending with
@standby).
The active and standby
management IP addresses
must be different
addresses in the same IP
subnet.
Adds a static route for
management connectivity.
Static default routes (0/0)
are not supported.
license-file For a vSIM VM acting as CPM:
<file-url>
For a vSIM VM acting as IOM:
n/a
Where:
<file-url>: <cflash-id/><file-path>
or
ftp://<login>:<password>@<remote-host/><file-path>
or
tftp://<login>:<password>@<remote-host/><file-path>
<cflash-id>: cf1: | cf1-A: | cf1-B: | cf2: | cf2-A: | cf2-B: | cf3: |
cf3-A: | cf3-B:
Issue: 01 3HE 15836 AAAD TQZZA 01 31
Specifies the local disk or
remote FTP/TFTP location
of the license file.
Page 32

Creating and Starting a vSIM VM on a Linux KVM
Host
vSIM INSTALLATION AND SETUP GUIDE
Table 4 vSIM Boot Parameters in SMBIOS Product Entry (Continued)
Attribute Name Valid Values Description
RELEASE 20.10.R1
primary-config For a vSIM VM acting as CPM: <file-url>
For a vSIM VM acting as IOM: n/a
Where:
<file-url>: <cflash-id/><file-path>
or
ftp://<login>:<password>@<remote-host/><file-path>
or
tftp://<login>:<password>@<remote-host/><file-path>
<cflash-id>: cf1: | cf1-A: | cf1-B: | cf2: | cf2-A: | cf2-B: | cf3: |
cf3-A: | cf3-B:
chassis One of the chassis names listed in Appendix A: vSIM
Supported Hardware. This parameter must be set to the
same value for all CPM and IOM VMs that make up one
system.
chassis-topology For 7950 XRS-20/XRS-20e CPM and IOM VMs: XRS-40
This parameter must be set to the same value for all CPM
and IOM VMs that make up one system.
Specifies the local disk or
remote FTP/TFTP location
of the primary configuration
file.
Specifies the emulated
chassis type.
Specifies that the 7950
XRS-20 or 7950 XRS-20e
CPM or IOM VM should
boot up as belonging to an
extended 7950 XRS-40
system.
sfm One of the SFM names from Appendix A.
The SFM type must be valid for the chassis type and must
be set to the same value for all CPM and IOM VMs that
make up one system.
slot For a vSIM VM acting as CPM: A,B,C,D
For a vSIM VM acting as IOM: 1 to 20 (chassis dependent)
card One of the card names from Appendix A: vSIM Supported
Hardware. The card type must be valid for the chassis type,
SFM type, and the slot number.
xiom/m
m=x1, x2
32
One of the XIOM names from Appendix A: vSIM Supported
Hardware. The XIOM type must be valid for the card type.
3HE 15836 AAAD TQZZA 01 Issue: 01
Specifies the switch fabric
module to be emulated.
Specifies the slot number in
the emulated chassis.
Specifies the emulated
card type.
Specifies the emulated
XIOM types that are
logically equipped in the
indicated card.
Page 33

vSIM INSTALLATION AND SETUP GUIDE
Creating and Starting a vSIM VM on a Linux KVM
RELEASE 20.10.R1
Table 4 vSIM Boot Parameters in SMBIOS Product Entry (Continued)
Attribute Name Valid Values Description
Host
mda/n
n=1, 2, 3, 4, 5, 6
One of the MDA names from Appendix A: vSIM Supported
Hardware. The MDA type must be valid for the card type and
XIOM type (if applicable).
mda/m/n
m=x1, x2 and
n=1, 2
system-base-mac For a vSIM VM acting as CPM:
hh:hh:hh:hh:hh:hh
For a vSIM VM acting as IOM:
n/a
The following <sysinfo> example personalizes a vSIM VM to emulate an iom3-xp-b
card installed in slot 1 of an SR-12 chassis equipped with an m-sfm5-12 switch fabric
module The card is virtually equipped with one m12-1gb-xp-sfp MDA and one isatunnel MDA. Replace the attribute values in the SMBIOS product entry string with
values appropriate for your deployment.
Specifies the emulated
MDA types that are logically
equipped in the indicated
card.
The mda/m/n only applies
to XIOM MDAs.
Specifies the first MAC
address in a range of 1024
contiguous values to use as
chassis MACs.
The default is the same for
all vSIMs and should be
changed so that each vSIM
has a unique, nonoverlapping range.
The two CPMs of a vSIM
node must specify the
same system-base-mac
value.
<sysinfo mode=smbios’>
<system>
<entry name='product'>TIMOS:slot=1 chassis=SR-12 sfm=m-sfm5-12 card=iom3-xp-
b mda/1=m12-1gb-xp-sfp mda/2=isa-tunnel</entry>
</system>
</sysinfo>
The following <sysinfo> example personalizes a vSIM VM to emulate a xcm-14s
card installed in slot 1 of an SR-14s chassis. This chassis has the sfm-s switch fabric
module. The following example simulates 2 XIOMs where the first one h as two M DAs
and the second one has one MDA. Replace the attribute values in the SMBIOS
product entry string with values appropriate for your deployment.
<sysinfo mode=smbios'>
<system>
<entry name='product'>TIMOS:slot=1 chassis=SR-14s sfm=sfm-s card=xcm-14s xiom/
x1=iom-s-3.0t mda/x1/1=ms18-100gb-qsfp28 mda/x1/2=ms4-400g-qsfpdd+4-100gqsfp28 xiom/x2=iom-s-3.0t mda/x2/1=ms6-200gb-cfp2-dco</entry>
Issue: 01 3HE 15836 AAAD TQZZA 01 33
Page 34

Creating and Starting a vSIM VM on a Linux KVM
Host
</system>
</sysinfo>
The following <sysinfo> example personalizes a vSIM VM to emulate a cpm5 card
installed in slot A of an SR-12 chassis. This chassis has the m-sfm5-12 switch fabric
module. Replace the attribute values in the SMBIOS product entry string with values
appropriate for your deployment.
<sysinfo mode=smbios'>
<system>
<entry name='product'>TIMOS:slot=A chassis=SR-12 sfm=m-sfm5-12 card=cpm5 \
system-base-mac=de:ad:be:ef:00:01 \
address=192.0.2.124@active address=192.0.2.2/24@standby \
primary-config=ftp://user01:pass@10.0.0.1/home/user01/SR-12/config.cfg \
license-file=ftp://user01:pass@10.0.0.1/home/user01/license.txt</
entry>
</system>
</sysinfo>
5.3.6 OS
vSIM INSTALLATION AND SETUP GUIDE
RELEASE 20.10.R1
The <os> element provides information about the guest OS to the hypervisor. It
contains a <type> element that specifies the guest operating system type. For vSIM
VMs, the <type> element must specify hvm, which means that the guest OS is
designed to run on bare metal and requires full virtualization.
The arch attribute of the <type> element specifies the CPU architecture that is
presented to the guest. For vSIM VMs, you must specify arch=x86_64 to allow the
vSIM software to take advantage of 64-bit instructions and addressing.
The machine attribute of the <type> element specifies how QEMU should model the
motherboard chipset in the guest system. For vSIM VMs, you should specify
machine='pc', which is an alias for the latest I440FX/PIIX4 architecture supported
by the hypervisor when the VM is created. The I440FX is a (1996 era) motherboard
chipset that combines both Northbridge (memory controller) and Southbridge (IO
devices) functionality.
QEMU-KVM can also emulate a Q35 chipset, if you specify machine='q35'. Q35 is
a relatively modern (2009 era) chipset design; it separates the Northbridge controller
(MCH) from the Southbridge controller (ICH9) and provides the guest with advanced
capabilities such as IOMMU and PCI-E.
Although the I440FX emulation is the older machine type, it is the more mature and
hardened option and is recommended by Nokia.
34
3HE 15836 AAAD TQZZA 01 Issue: 01
Page 35

vSIM INSTALLATION AND SETUP GUIDE
RELEASE 20.10.R1
The <os> element also contains the <smbios> child element that you must include
in the configuration of vSIM VMs. Set the mode attribute to “sysinfo”, which allows
you to pass the information specified in the <sysinfo> element (including the
product entry) to the vSIM guest.
The <os> element can also include one or more <boot> child elements. The dev
attribute of each <boot> element specifies a device such as 'hd' (hard drive), 'fd'
(floppy disk), 'cdrom', or 'network', which indicates that the guest should load its OS
from this device. The order of multiple <boot> elements determines the boot order.
For vSIM VMs, you should always boot from the 'hd' device that vSIM translates to
its CF3 disk.
The following <os> example shows element configuration suitable for vSIM VMs of
all types.
<os>
<type arch='x86_64' machine='pc'>hvm</type>
<boot dev='hd'/>
<smbios mode='sysinfo'/>
</os>
Creating and Starting a vSIM VM on a Linux KVM
Host
5.3.7 Clock
The <clock> element controls specific aspects of timekeeping within the guest. Each
guest must initialize its clock to the correct time-of-day when booting and update its
clock accurately as time passes.
The offset attribute of <clock> controls how the of the time-of-day clock of the guest
is initialized at bootup. For vSIM VMs, the offset attribute value should be set to utc,
which enable the host and guest to belong to different timezones, if required.
The vSIM and other guests update the time-of-day clock by counting ticks of virtual
timer devices. The hypervisor injects ticks to the guest in a manner that emulates
traditional hardware devices, for example, the Programmable Interrupt Timer (PIT),
CMOS Real Time Clock (RTC), or High Precision Event Timer (HPET). Each virtual
timer presented to the guest is defined by a <timer> sub-element of <clock>. The
name attribute of <timer> specifies the device name (for example, 'pit', 'rtc' or 'hpet'),
the present attribute indicates whether the particular timer should be made available
to the guest, and the tickpolicy attribute controls the action taken when the
hypervisor (QEMU) discovers that it has missed a deadline for injecting a tick to the
guest. A tickpolicy value set to 'delay' means the hypervisor should continue to
delay ticks at the normal rate, with a resulting slip in guest time relative to host time.
A tickpolicy value set to 'catchup' means the hypervisor should deliver ticks at a
higher rate to compensate for the missed tick.
Issue: 01 3HE 15836 AAAD TQZZA 01 35
Page 36

Creating and Starting a vSIM VM on a Linux KVM
Host
The following <clock> example shows element configuration suitable for vSIM VMs.
<clock offset='utc'>
<timer name='pit' tickpolicy='delay'/>
<timer name='rtc' tickpolicy='catchup'/>
<time name='hpet' present='no'/>
</clock>
5.3.8 Devices
Use the <devices> element to add various devices to the VM, including hard drives,
network interfaces, and serial console ports.
The <devices> element requires that the file path of the program used to emulate
the devices must be specified in the <emulator> child element. On Centos and Red
Hat hosts the emulator is a binary called qemu-kvm; on Ubuntu hosts, the emulator
is called qemu-system-x86_64.
vSIM INSTALLATION AND SETUP GUIDE
RELEASE 20.10.R1
Device types are:
• Disk Devices
• Network Interfaces
• Console and Serial Ports
5.3.8.1 Disk Devices
The <disk> child element of the <devices> element allows you to add up to three
disks to a vSIM VM.
The type attribute of the <disk> element specifies the underlying source for each
disk. The only supported value for vSIM VMs is type='file', which indicates that the
disk is a file residing on the host machine.
The device attribute of the <disk> element configures the representation of the disk
to the guest OS. The supported value for vSIM VMs is device='disk'. When
device='disk' is specified, QEMU-KVM attaches a hard drive to the guest VM and
vSIM interprets this as a Compact Flash (CF) storage device.
The optional <driver> child element of the <disk> element provides additional
details about the back-end driver. For vSIM VMs, set the name attribute to 'qemu'
and the type attribute to 'qcow2'. These two attributes specify that the disk image
has the QCOW2 format.
36
3HE 15836 AAAD TQZZA 01 Issue: 01
Page 37

vSIM INSTALLATION AND SETUP GUIDE
RELEASE 20.10.R1
When you download the vSIM software, the zip file contains a QCOW2 disk image,
which is a file that represents the vSIM software on a hard disk; you can boot any
vSIM VM from this disk image. QCOW2 is a disk image format for QEMU-KVM VMs
that uses thin provisioning (that is, the file size starts small and increases in size only
as more data is written to disk). It supports snapshots, compression, encryption, and
other features.
The optional cache attribute of the <driver> element controls the caching
mechanism of the hypervisor. A value set to 'writeback' offers high performance but
risks data loss (for example, if the host crashes but the guest believes the data was
written). For vSIM VMs, it is recommended to set cache='none' (no caching) or
cache='writethrough' (writing to cache and to the permanent storage at the same
time).
The mandatory <source> child element of the <disk> element indicates the path (for
disks where type='file') to the QCOW2 file used to represent the disk.
Note: The recommended storage location for QCOW2 disk image files is the /var/lib/
libvirt/images directory; storing disk images in other locations may cause permission
issues.
Creating and Starting a vSIM VM on a Linux KVM
Host
The mandatory <target> child element of the <disk> element controls how the disk
appears to the guest in terms of bus and device. The dev attribute should be set to
a value of 'hda', 'hdb' or 'hdc'. A value of 'hda' is the first IDE hard drive; it maps to
CF3 on vSIM VMs. A value of 'hdb' is the second IDE hard drive; it maps to CF1 on
vSI M VMs actin g as CP Ms. A value of 'hdc' is the third IDE hard drive; it maps to CF2
on vSIM VMs acting as CPMs. The bus attribute of the <target> element should be
set to 'virtio' for vSIM virtual disks.
Each vSIM VM, including the ones acting as IOMs, must be provided with a “hda”
hard disk that contains the vSIM software images. You cannot write to the “hda” disk
associated with an IOM or browse its file system using SR OS file commands. Each
virtual disk of each vSIM VM should have be provided with its own, independent
QCOW2 file.
The following <disk> element configuration example provides a vSIM CPM with a
CF3 device.
<disk type='file' device='disk'>
<driver name='qemu' type='qcow2' cache='none'/>
<source file='/var/lib/libvirt/images/SR-12-cpm.qcow2'/>
<target dev='hda' bus='virtio'/>
</disk>
Issue: 01 3HE 15836 AAAD TQZZA 01 37
Page 38

Creating and Starting a vSIM VM on a Linux KVM
Host
5.3.8.2 Network Interfaces
The <interface> sub-element of the <devices> element allows you to add up to
eight virtual NIC ports to a vSIM VM. The type attribute of <interface> supports one
of two values:
• type=‘direct’
• type=‘bridge’
The following child elements of <interface> are common to most interface types:
•<mac>: Contains an address attribute that indicates the MAC address of the
guest vNIC port.
•<model>: Contains a type attribute that indicates the NIC model presented to
the guest.
The default value for type is 'virtio', which indicates that the guest should use
its VirtIO driver for the network interface.
vSIM INSTALLATION AND SETUP GUIDE
RELEASE 20.10.R1
•<driver>: Contains several attributes corresponding to tunable driver settings.
The queues attribute, when used in conjunction with the <model type='virtio'/
> element, enables multi-queue VirtIO in the guest.
Note: The vSIM does not support multi-queue VirtIO.
•<address>: Specifies the guest PCI address of the vNIC interface when the
type='pci' attribute is included.
The other attributes required to specify a PCI address are: domain (0x0000),
bus (0x00-0xff), slot (0x00-0x1f), and function (0x0-0x7).
If the <address> element is not included, the hypervisor assigns an address
automatically as follows: the first interface defined in the libvirt domain XML has
the lowest PCI address, the next one has the next-lowest PCI address, and so
on.
The vSIM maps vNIC interfaces to its own set of interfaces based on the order
of the vNIC interfaces, from lowest to highest PCI address; this should be
considered when you change the PCI address of a vNIC interface. See Guest
vNIC Mapping in vSIM VMs for information about how the vSIM maps vNIC
interfaces.
•<target>: Specifies the name of the target device representing the vNIC
interface in the host.
Note: You do not need to configure this element with vSIM VMs.
38
3HE 15836 AAAD TQZZA 01 Issue: 01
Page 39

vSIM INSTALLATION AND SETUP GUIDE
RELEASE 20.10.R1
5.3.8.2.1 type=‘direct’
The <interface> element with type='direct' allows you to create a direct connection
between the guest vNIC port and a host physical NIC port. The interconnection uses
a MACVTAP driver in the Linux host.
To connect a guest vNIC port to a physical NIC port using the MACVTAP driver,
include a <source> sub-element with the dev attribute that indicates the interface
name of the host interface and mode='passthrough'. The following example shows
a configuration where 'enp133s0' is the host interface name.
Note: type=direct should not be confused with PCI pass-through, which is not supported for
vSIM VMs.
<interface type='direct'>
<source dev='enp133s0' mode='passthrough'/>
<model type='virtio'>
</interface>
Creating and Starting a vSIM VM on a Linux KVM
Host
5.3.8.2.2 type=‘bridge’
The <interface> element with type='bridge' specifies that the guest vNIC port
should be connected to a vSwitch or Linux bridge in the host. The interconnection
uses the Vhost-Net back end driver when the <model type='virtio'/> element is
included.
To use a Linux bridge named brX, include a <source> sub-element with a
bridge='brX' attribute, as shown in the following configuration example.
<interface type='bridge'>
<source bridge='br0'/>
</interface>
To use an OpenvSwitch bridge named brX, include a <source> sub-element with a
bridge='brX' attribute. In addition, include a <virtualport type='openvswitch'/>
element, as shown in the following configuration example.
<interface type='bridge'>
</interface>
<model type='virtio'>
<source bridge='br1'/>
<virtualport type='openvswitch'/>
<model type='virtio'>
Issue: 01 3HE 15836 AAAD TQZZA 01 39
Page 40

Creating and Starting a vSIM VM on a Linux KVM
Host
5.3.8.3 Guest vNIC Mapping in vSIM VMs
This section describes the relationship between a network interface defined in the
libvirt XML for a vSIM VM and its use by the vSIM software.
In the current release, each vSIM VM supports a maximum of eight vNIC interfaces.
The vSIM software puts the defined interfaces in ascending order of (guest) PCI
address.
The order of the defined interfaces and the vSIM VM type determines the use of each
interface by the vSIM software. The vSIM interface mapping information is
summarized in the following tables:
• Table 5, 7750 SR-1, 7750 SR-1s, 7250 IXR-R6 vSIM Interface Mapping
• Table 6, vSIM CPM Interface Mapping
• Table 7, vSIM IOM Interface Mapping
Table 5 7750 SR-1, 7750 SR-1s, 7250 IXR-R6 vSIM Interface Mapping
vSIM INSTALLATION AND SETUP GUIDE
RELEASE 20.10.R1
Order (By Guest
PCI Address)
First Management port (A/1) type='direct' with <model
Second
Third MDA port (1/1/1) See Network Interfaces for
Fourth MDA port (1/1/2) See Network Interfaces for
vSIM Software Use Supported Interface Types
type='virtio'/>
type='bridge' with <model
type='virtio'/>
Fabric port
1
type='direct' with <model
type='virtio'/>
type='bridge' with < model
type='virtio'/>
more information about the
following interface types:
type='direct' with <model
type='virtio'/>
type='bridge' with < model
type='virtio'/>
more information about the
following interface types:
type='direct' with <model
type='virtio'/>
type='bridge' with <model
type='virtio'/>
40
3HE 15836 AAAD TQZZA 01 Issue: 01
Page 41

vSIM INSTALLATION AND SETUP GUIDE
RELEASE 20.10.R1
Table 5 7750 SR-1, 7750 SR-1s, 7250 IXR-R6 vSIM Interface Mapping
Creating and Starting a vSIM VM on a Linux KVM
Host
Order (By Guest
PCI Address)
... - -
Eighth MDA port (1/1/6) See Network Interfaces for
Note:
1. For 7750 SR-1 and 7750 SR-1s, the fabric port is not defined and the second vNIC interface (by
PCI device order) is the first MDA port.
vSIM Software Use Supported Interface Types
more information about the
following interface types:
type='direct' with <model
type='virtio'/>
type='bridge' with < model
type='virtio'/>
Table 6 vSIM CPM Interface Mapping
Order
(By Guest PCI
Address)
First Management port (A/1) type='direct' with <model
vSIM Software Use Supported Interface Types
type='virtio'/>
type='bridge' with <model
type='virtio'/>
Second Fabric port type='direct' with <model
type='virtio'/>
type='bridge' with <model
type='virtio'/>
Table 7 vSIM IOM Interface Mapping
Order
(By Guest PCI
Address)
First Management port (not used) type='direct' with <model
Issue: 01 3HE 15836 AAAD TQZZA 01 41
vSIM Software Use Supported Interface Types
type='virtio'/>
type='bridge' with <model
type='virtio'/>
Page 42

Creating and Starting a vSIM VM on a Linux KVM
Host
Table 7 vSIM IOM Interface Mapping (Continued)
vSIM INSTALLATION AND SETUP GUIDE
RELEASE 20.10.R1
Order
(By Guest PCI
Address)
Second Fabric port type='direct' with <model
Third MDA port (1/1/1) See Network Interfaces for
... — —
Eighth MDA port (1/1/6) See Network Interfaces for
vSIM Software Use Supported Interface Types
type='virtio'/>
type='bridge' with <model
type='virtio'/>
more information about the
following interface types:
type='direct' with <model
type='virtio'/>
type='bridge' with <model
type='virtio'/>
more information about the
following interface types:
type='direct' with <model
type='virtio'/>
type='bridge' with <model
type='virtio'/>
42
If a vSIM is emulating an MDA with connectors (which is only supported by specific
chassis), then only the first breakout port of each connector can be associated with
a VM vNIC interface and pass traffic. For example, if an MDA has connectors 1/1/c1,
1/1/c2, 1/1/c3, and so on, then only ports 1/1/c1/1, 1/1/c2/1, 1/1/c3/1, and so on can
become operationally up.
5.3.8.4 Console and Serial Ports
The <console> sub-element in the <devices> element allows you to add a console
port to a vSIM VM. As it does on physical routers, the console port on a vSIM VM
provides interactive access to CLI.
There are several methods for creating and accessing a vSIM console port. The first
method is to bind the console port to a TCP socket opened by the host. To access
the console, you must establish a Telnet session with the host, using the port number
of the TCP socket. The following example shows a configuration for this method:
3HE 15836 AAAD TQZZA 01 Issue: 01
Page 43

vSIM INSTALLATION AND SETUP GUIDE
RELEASE 20.10.R1
<console type='tcp'>
<source mode='bind' host='0.0.0.0' service='4000'/>
<protocol type='telnet'/>
<target type='virtio' port='0'/>
</console>
The second method is to bind the console port to an emulated serial port. In this case,
the virsh console <domain-name> command is used to access the console. The
following example shows a configuration for this method:
<serial type='pty'>
<source path='/dev/pts/1'/>
<target port='0'/>
<alias name='serial0'/>
</serial>
<console type='pty' tty='/dev/pts/1'>
<source path='/dev/pts/1'/>
<target type='serial' port='0'/>
<alias name='serial0'/>
</console>
Creating and Starting a vSIM VM on a Linux KVM
Host
5.3.9 Seclabel
The <seclabel> element controls the generation of security labels required by
security drivers such as SELinux or AppArmor. These are not supported with vSIM
VMs and therefore you must specify <seclabel type='none'> in the domain XML.
5.4 Example Libvirt Domain XML
The following example shows a Libvirt domain XML configuration for a vSIM VM
emulating one CPM of a 7750 SR-12. You should substitute the correct values for
your configuration.
<domain type="kvm">
<name>CPM.A</name>
<uuid>cb0ba837-07db-4ebb-88ea-694271754675</uuid>
<description>SR-12 CPMA VM</description>
<memory>4194304</memory>
<currentMemory>4194304</currentMemory>
<cpu mode="custom" match="minimum">
<model>SandyBridge</model>
<vendor>Intel</vendor>
</cpu>
<vcpu current="2">2</vcpu>
<sysinfo type="smbios">
<system>
<entry name="product">
Issue: 01 3HE 15836 AAAD TQZZA 01 43
Page 44

Creating and Starting a vSIM VM on a Linux KVM
Host
TiMOS: slot=A chassis=SR-12 sfm=m-sfm5-12 card=cpm5 \
primary-config=ftp://user:pass@[135.121.120.218]/./dut-a.cfg \
license-file=ftp://user:pass@[135.121.120.218]/./license.txt \
address=135.121.123.4/21@active \
address=135.121.123.8/21@standby \
address=3000::135.121.123.4/117@active \
address=3000::135.121.123.8/117@standby \
static-route=128.251.10.0/24@135.121.120.1 \
static-route=135.0.0.0/8@135.121.120.1 \
static-route=138.0.0.0/8@135.121.120.1 \
static-route=172.20.0.0/14@135.121.120.1 \
static-route=172.31.0.0/16@135.121.120.1 \
static-route=192.168.120.218/32@135.121.120.218 \
system-base-mac=fa:ac:ff:ff:10:00 \
</entry>
</system>
</sysinfo>
<os>
<type arch="x86_64" machine="pc">hvm</type>
<smbios mode="sysinfo"/>
</os>
<clock offset="utc">
<timer name="pit" tickpolicy="delay"/>
<timer name="rtc" tickpolicy="delay"/>
</clock>
<devices>
<emulator>/usr/libexec/qemu-kvm</emulator>
<disk type="file" device="disk">
<driver name="qemu" type="qcow2" cache="none"/>
<source file="/var/lib/libvirt/images/cf3.qcow2"/>
<target dev="hda" bus="virtio"/>
</disk>
<disk type="file" device="disk">
<driver name="qemu" type="qcow2" cache="none"/>
<source file="/var/lib/libvirt/images/cf1.qcow2"/>
<target dev="hdb" bus="virtio"/>
</disk>
<interface type="bridge">
<mac address="FA:AC:C0:04:06:00"/>
<source bridge="breth0"/>
<model type="virtio"/>
</interface>
<interface type="bridge">
<mac address="FA:AC:C0:04:06:01"/>
<source bridge="breth1"/>
<model type="virtio"/>
</interface>
<console type="tcp">
<source mode="bind" host="0.0.0.0" service="2500"/>
<protocol type="telnet"/>
<target type="virtio" port="0"/>
</console>
</devices>
<seclabel type="none"/>
</domain>
vSIM INSTALLATION AND SETUP GUIDE
RELEASE 20.10.R1
44
3HE 15836 AAAD TQZZA 01 Issue: 01
Page 45

vSIM INSTALLATION AND SETUP GUIDE
RELEASE 20.10.R1
6 Creating and Starting a vSIM VM on a
VMware ESXi Host
6.1 Creating and Starting an Integrated Model vSIM VM on a VMware Host
This chapter provides instructions on deploying integrated model vSIM VMs on
VMware ESXi hosts using the vSphere Web Client only. Techniques for deploying
VMs on ESXi hosts using other options (for example, vSphere Windows client, direct
ESXi shell access) are beyond the scope of this guide.
Note: This procedure assumes that you have already installed the vCenter Server and
added the ESXi host to the data center group.
Creating and Starting a vSIM VM on a VMware ESXi
Host
Note: Distributed model vSIM VMs are not supported on VMware hosts.
Step 1. Connect to the vCenter Server over HTTP and log in from the VMware
vCenter Single Sign-On window, as shown in Figure 2.
i. Enter the username.
ii. Enter the password you set during installation.
Figure 2 VMware vCenter Single Sign-On
Step 2. Click Login. The vSphere Web Client dashboard is displayed, as shown in
Figure 3.
Issue: 01 3HE 15836 AAAD TQZZA 01 45
Page 46
Creating and Starting a vSIM VM on a VMware ESXi
Host
Figure 3 vSphere Web Client Dashboard
vSIM INSTALLATION AND SETUP GUIDE
RELEASE 20.10.R1
46
Step 3. From the Navigator panel, choose Home→Hosts and Clusters, as shown
in Figure 4.
3HE 15836 AAAD TQZZA 01 Issue: 01
Page 47
vSIM INSTALLATION AND SETUP GUIDE
RELEASE 20.10.R1
Figure 4 Home Menu
Creating and Starting a vSIM VM on a VMware ESXi
Host
Step 4. Select and deploy your OVF template as follows:
i. Browse to the source location of your data center.
ii. Right-click the ESXi host on which to deploy the vSIM VM.
The Actions menu is displayed, as shown in Figure 5.
iii. Select the Deploy OVF Template option.
Issue: 01 3HE 15836 AAAD TQZZA 01 47
Page 48
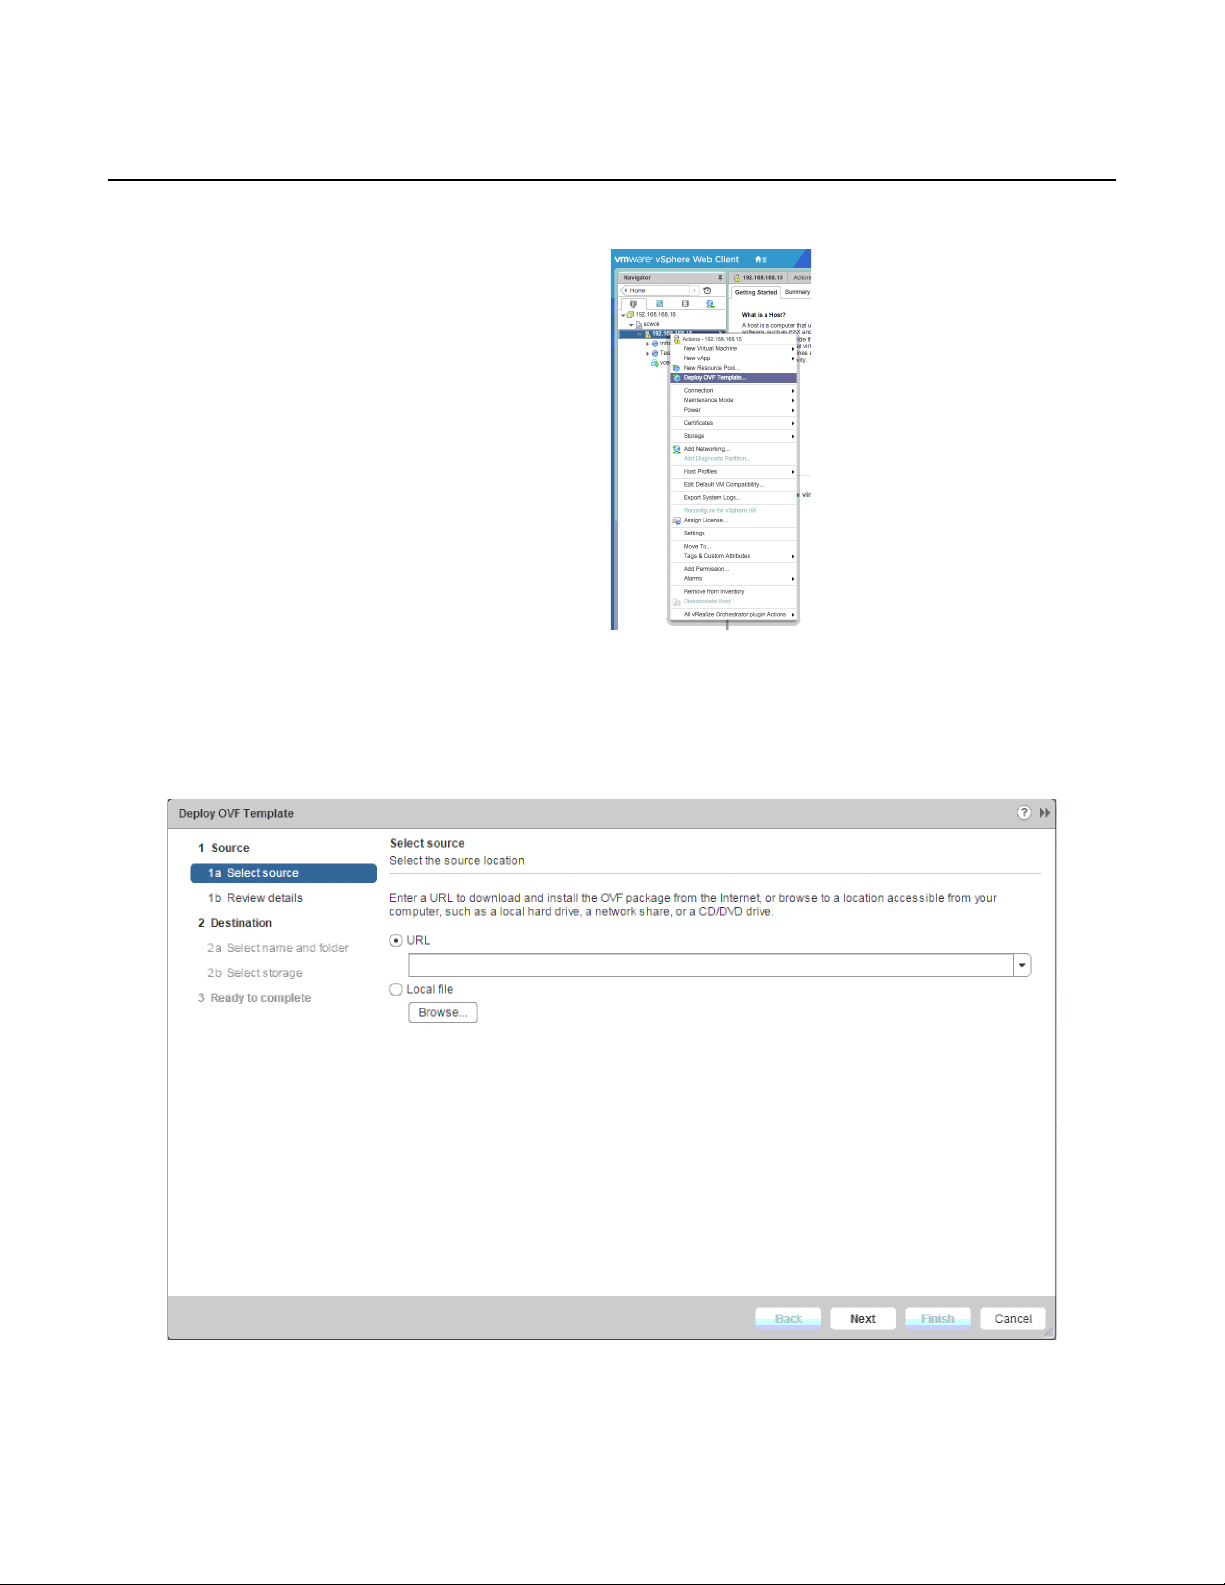
Creating and Starting a vSIM VM on a VMware ESXi
Host
Figure 5 Actions Menu
vSIM INSTALLATION AND SETUP GUIDE
RELEASE 20.10.R1
Step 5. The Deploy OVF Template window is displayed with the Select source
option selected, as shown in Figure 6.
Figure 6 Deploy OVF Template
48
Step 6. Specify the location of the vSIM OVA archive file (sros-vm.ova).
3HE 15836 AAAD TQZZA 01 Issue: 01
Page 49
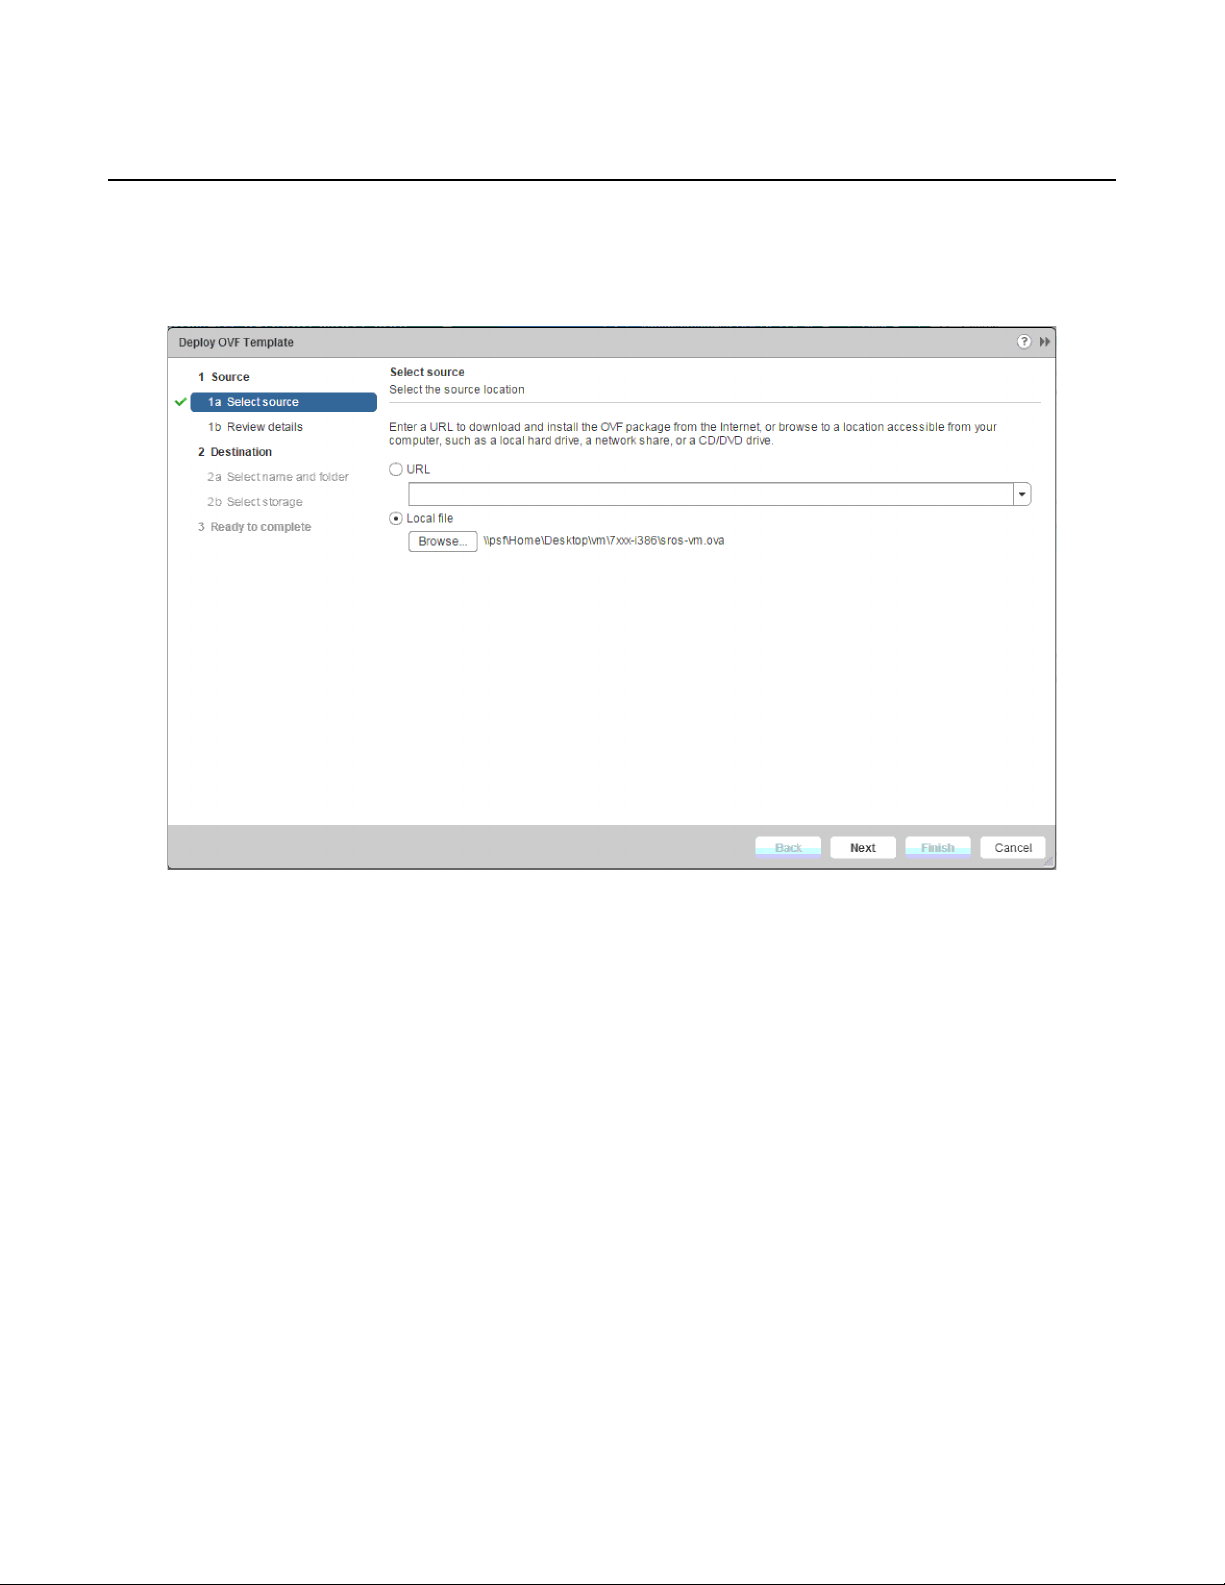
vSIM INSTALLATION AND SETUP GUIDE
RELEASE 20.10.R1
i. Select the Local file radio button to browse for and retrieve a local file;
Figure 7 shows an example selection using the Local file radio button.
Figure 7 Select the Local File
Creating and Starting a vSIM VM on a VMware ESXi
Host
ii. Click Next to advance to the Review details panel.
Step 7. From the Review details panel, select the Accept extra configuration
options check box, as shown in Figure 8.
This selection allows you to accept the additional configuration options in
the vSIM OVA archive file that are not available in the standard VMware
OVA templates.
Issue: 01 3HE 15836 AAAD TQZZA 01 49
Page 50

Creating and Starting a vSIM VM on a VMware ESXi
Host
Figure 8 Review Details
vSIM INSTALLATION AND SETUP GUIDE
RELEASE 20.10.R1
Click Next to advance to the Select name and folder option.
Step 8. Specify a name and location for the deployed OVF template.
i. Name the deployed OVF template as the vSIM VM.
The name can be up to 80 characters and must be unique within the
vCenter Server VM folder.
ii. Select the data center where the vSIM VM will be deployed.
iii. Click Next to advance to the Select storage option.
Step 9. Select the storage location for the deployed template, as shown in
Figure 9.
i. Select a virtual disk format.
ii. Select a VM storage policy.
iii. Click Next to advance to the Setup networks option.
For more information about the virtual disk format for your configuration, go
to www.vmware.com
.
50
3HE 15836 AAAD TQZZA 01 Issue: 01
Page 51
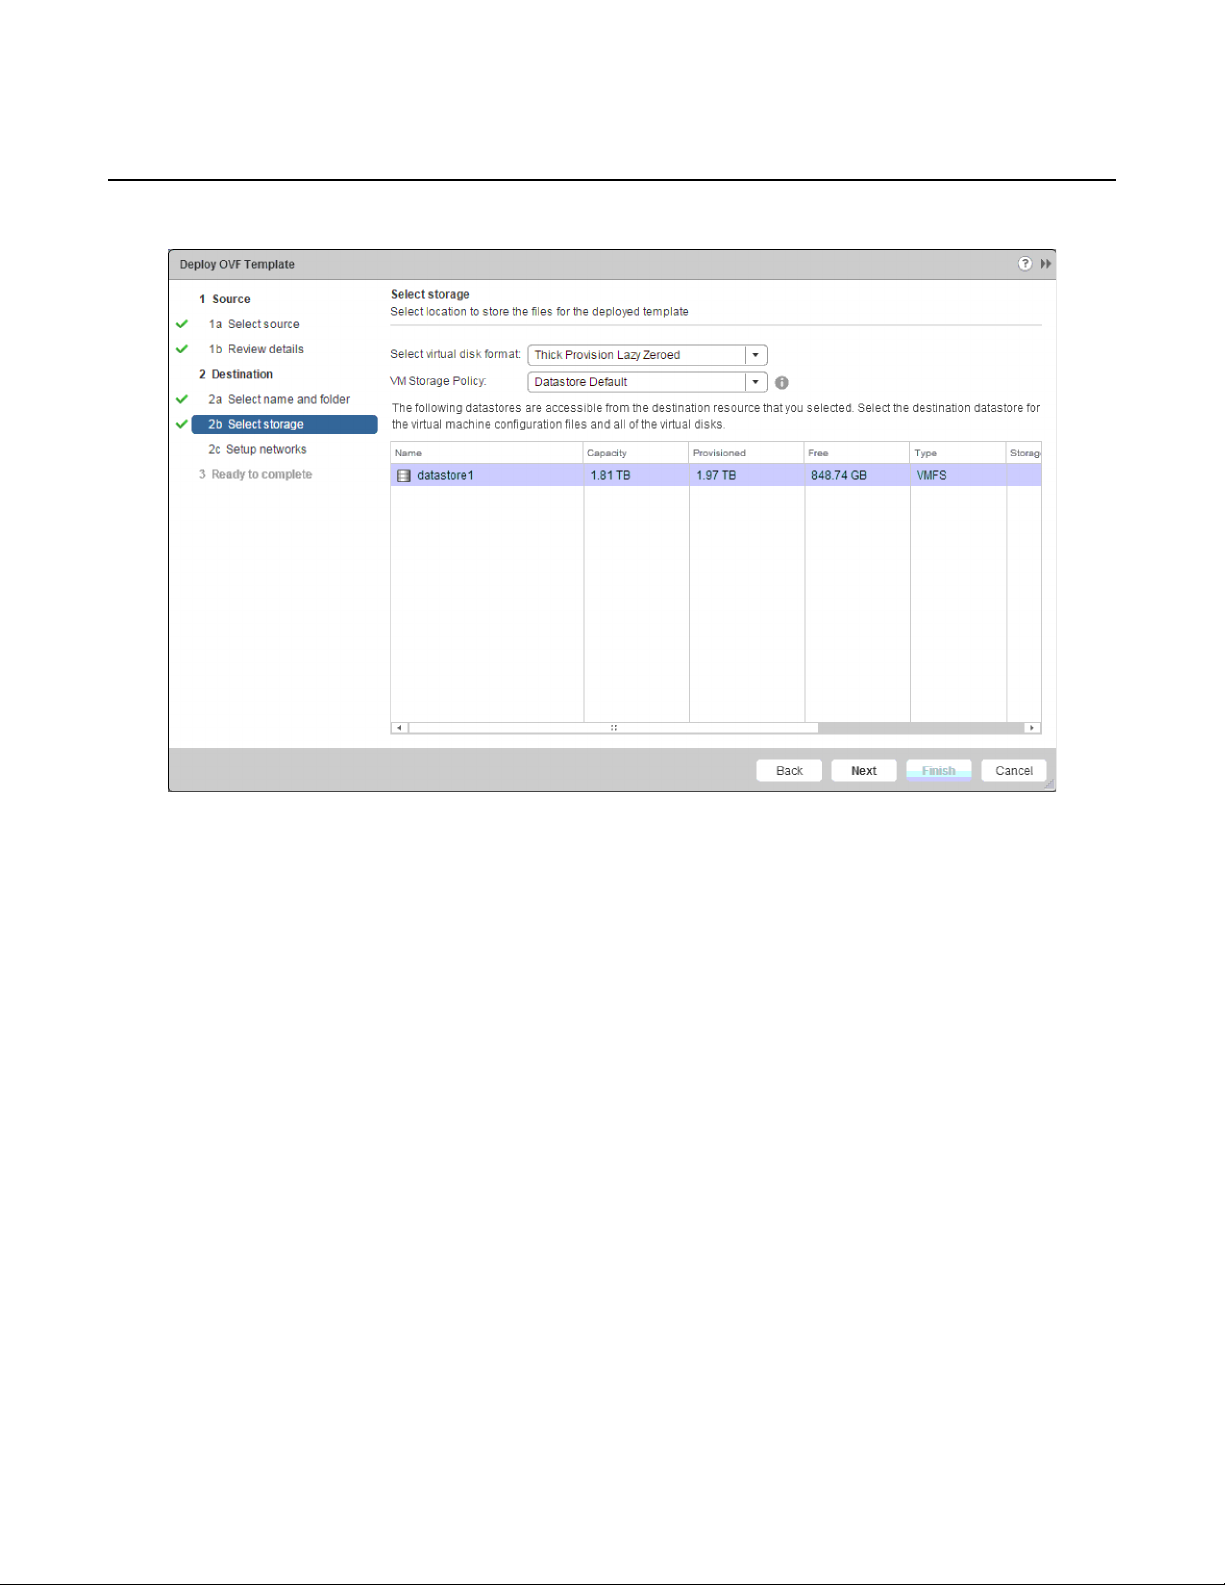
vSIM INSTALLATION AND SETUP GUIDE
RELEASE 20.10.R1
Figure 9 Select the Storage Location
Creating and Starting a vSIM VM on a VMware ESXi
Host
Step 10. Configure the network interfaces for the vSIM VM, as shown in the example
in Figure 10.
By default, the vSIM created from the supplied OVF template is deployed
with four network interfaces: breth0, breth1, breth2, and breth3. For
example, breth0 is the first guest interface and maps to the A/1
management port of CPM A, and so on. See Table 5 and Guest vNIC
Mapping in vSIM VMs for the mapping of the vNIC interfaces to SR OS
interfaces, which is performed independently of the hypervisor.
Click Next to advance to the Ready to complete option.
Issue: 01 3HE 15836 AAAD TQZZA 01 51
Page 52

Creating and Starting a vSIM VM on a VMware ESXi
Host
Figure 10 Configure the Network Interfaces
vSIM INSTALLATION AND SETUP GUIDE
RELEASE 20.10.R1
Step 11. Review the vSIM VM settings.
Note: Ensure that the ‘Power on after deployment’ check box is not selected.
Step 12. Click Finish to deploy the vSIM VM.
The Recent Tasks panel on the dashboard displays the status of the vSIM
deployment, as shown in Figure 11.
Figure 11 vSIM VM Deployment Status
Step 13. Configure the memory and resource allocation for the vSIM VM:
52
3HE 15836 AAAD TQZZA 01 Issue: 01
Page 53
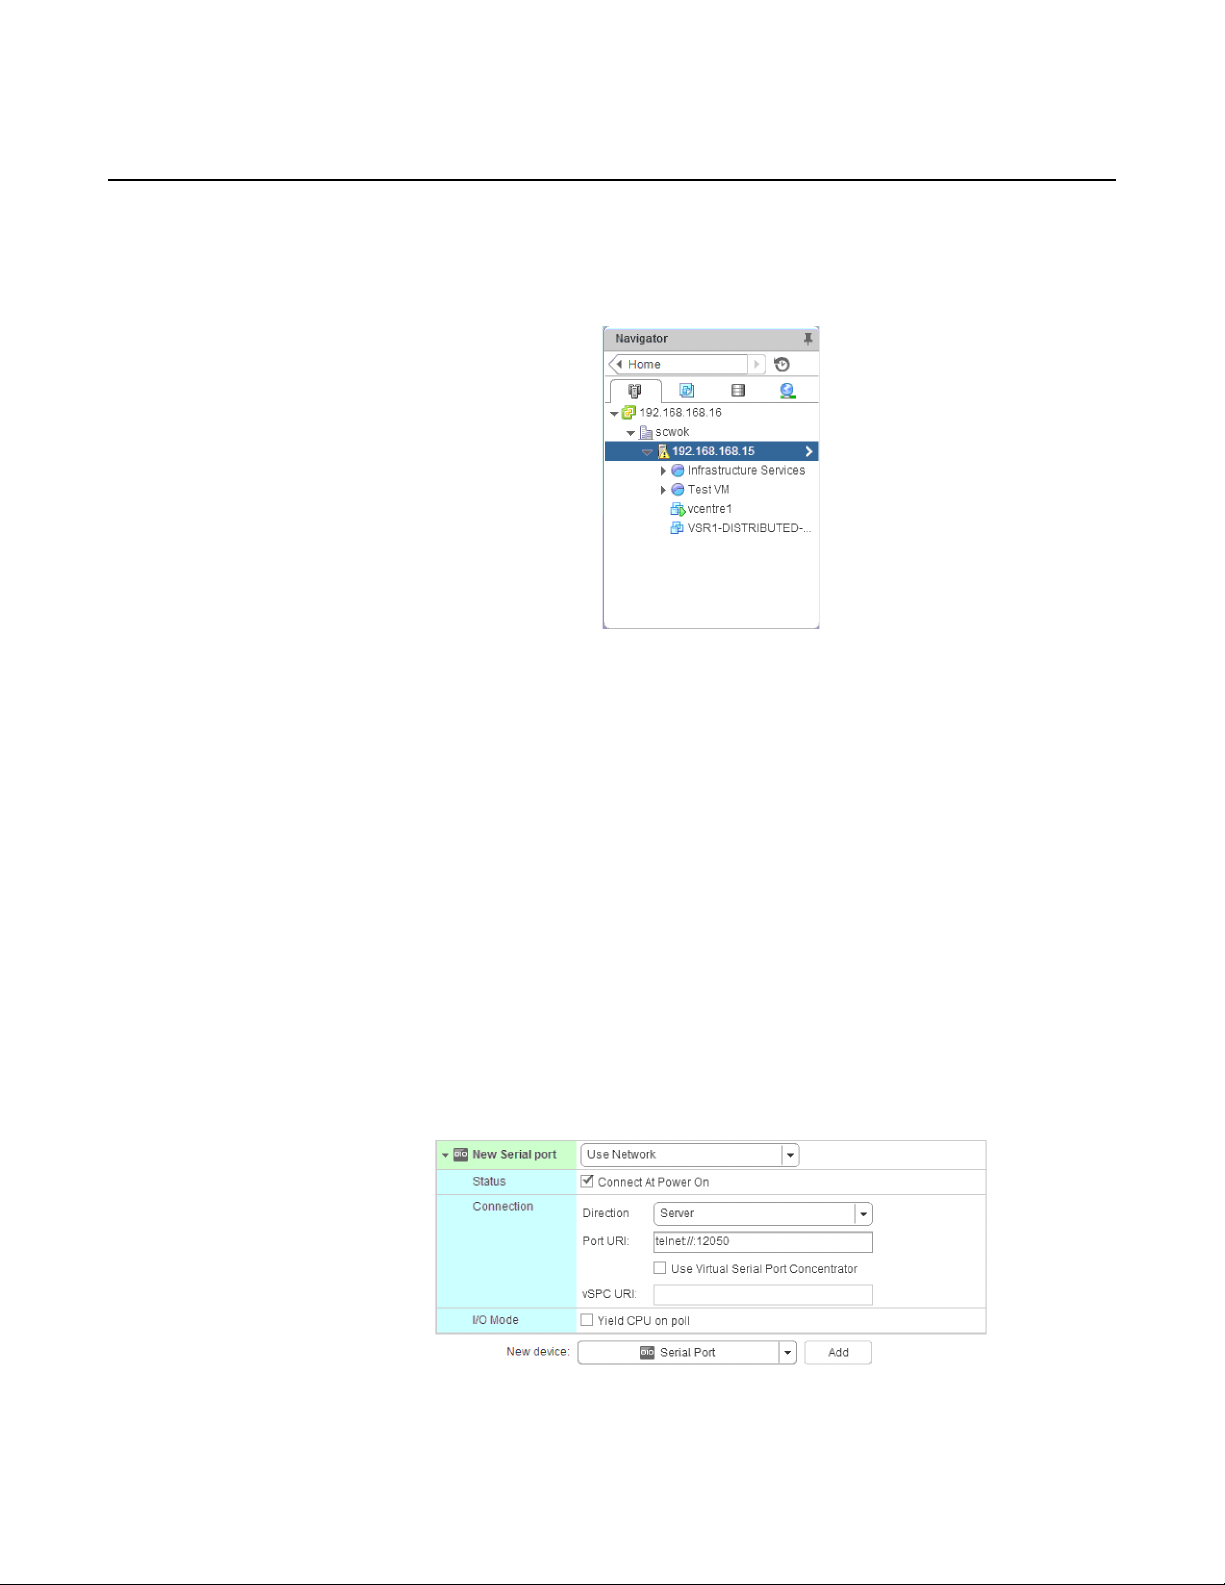
vSIM INSTALLATION AND SETUP GUIDE
RELEASE 20.10.R1
i. In the Navigator panel, locate the newly deployed vSIM, as shown in
Figure 12.
Figure 12 Navigator
Creating and Starting a vSIM VM on a VMware ESXi
Host
ii. Right-click the vSIM name and select Edit settings.
Step 14. The Edit Settings window is displayed with the Virtual Hardware tab
selected.
Select the number of vCPU and vMemory to allocate to the vSIM VM.
Step 15. Configure a serial port to obtain console connectivity to the vSIM:
i. Click the New Device drop-down menu located toward the bottom of
the Edit Settings window.
ii. Select a Serial Port from the drop-down menu.
iii. Configure the serial port, as required.
The sample configuration shown in Figure 13 enables console access
to the vSIM via telnet by routing TCP port 12050 on the ESXi host to the
serial port on the vSIM. Other methods are available but are not
documented here.
Figure 13 Serial Port Configuration
Issue: 01 3HE 15836 AAAD TQZZA 01 53
Page 54
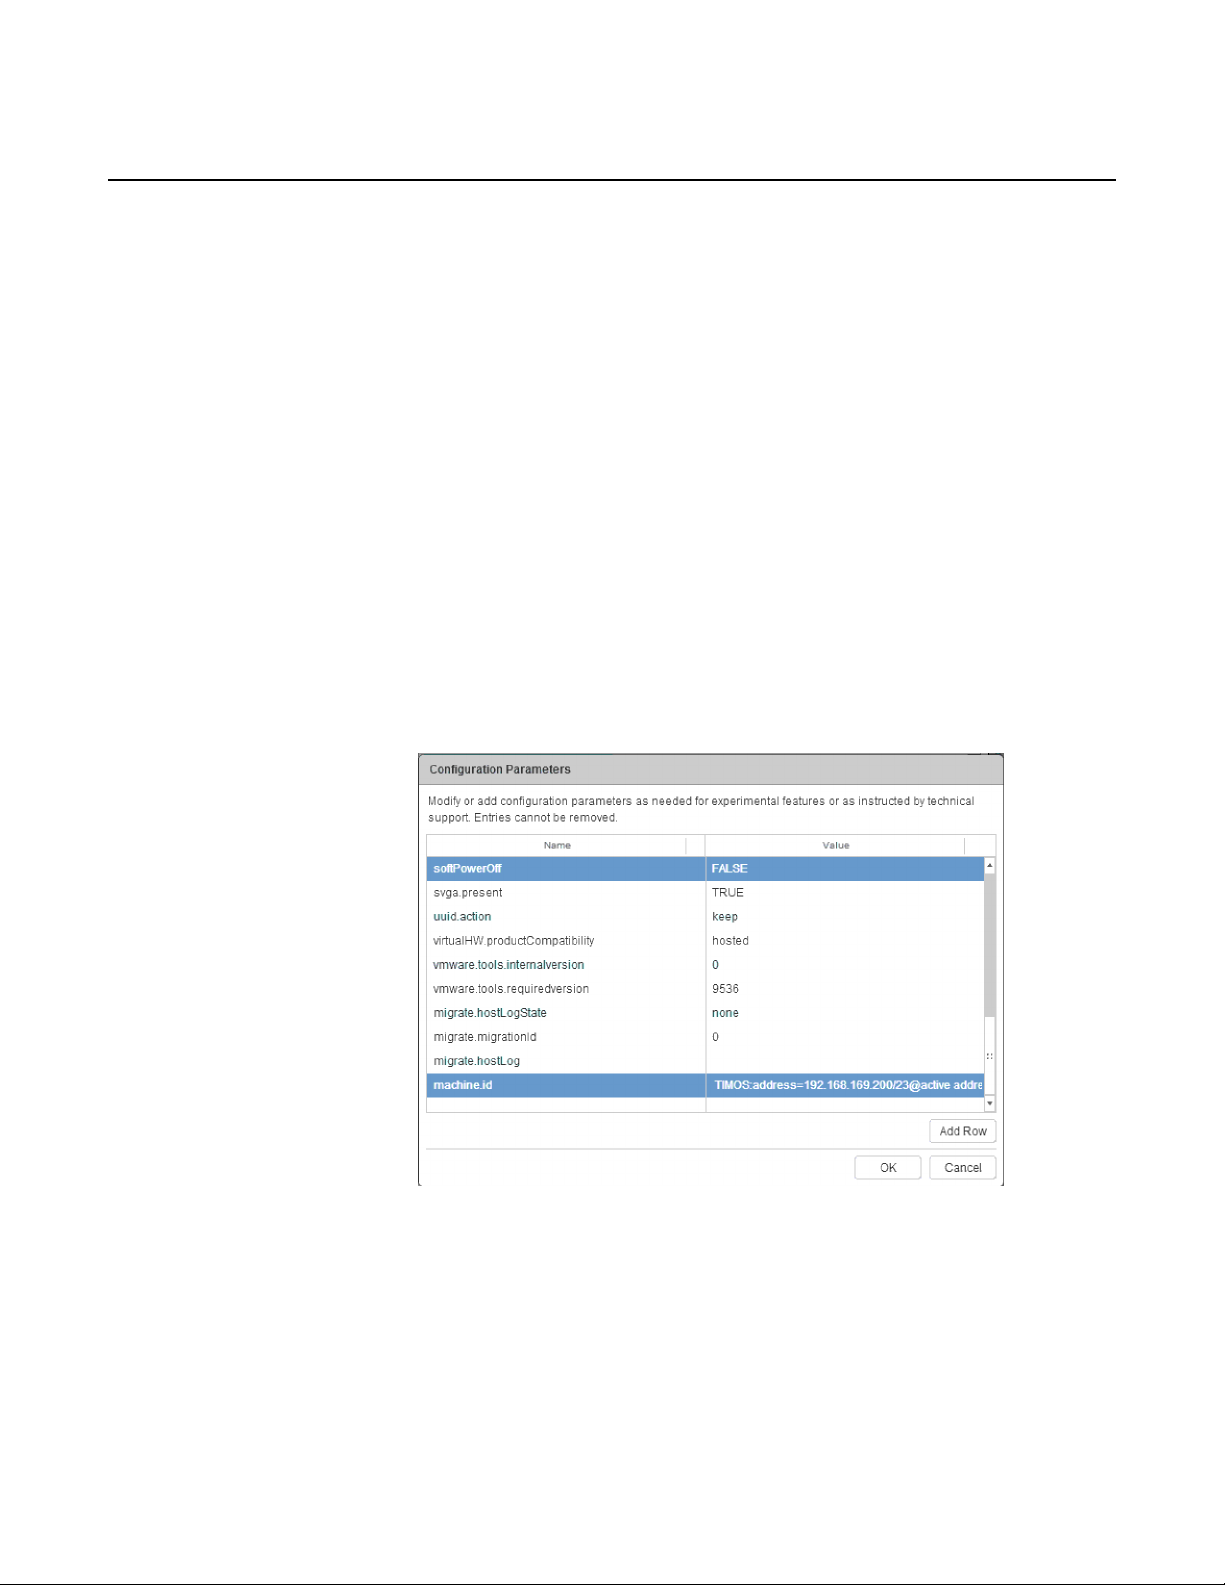
Creating and Starting a vSIM VM on a VMware ESXi
Host
iv. Click Add to implement the new serial port configuration.
Step 16. Add and modify the vSIM configuration parameters:
i. From the Edit Settings window, select the VM Options tab.
ii. Click the arrow to expand the Advanced Settings option.
iii. Click the Edit Configuration button to display the Configuration
Parameters.
iv. Click the Add Row button to add a machine.id setting.
Add a machine.id setting and set its value to the SMBIOS text string
appropriate for the VM. See Sysinfo for more information.
Figure 14 shows an example vSIM in an integrated model deployment
emulating a 7750 SR-1s chassis. The example machine.id setting is as
follows:
TIMOS:address=192.168.169.200/23@active
address=192.168.169.201@standby license-file=ftp://
user:password@192.168.169.110/license.txt slot=A
chassis=SR-1s card=xcm-1s mda/1=s36-100gb-qsfp28
vSIM INSTALLATION AND SETUP GUIDE
RELEASE 20.10.R1
Figure 14 Example machine.id Setting
v. Click OK to return to the Edit Settings window.
Step 17. From the Edit Settings window, click OK to finish the vSIM VM
configuration.
Step 18. From the Recent Tasks panel, check the status of the vSIM VM
reconfiguration.
54
3HE 15836 AAAD TQZZA 01 Issue: 01
Page 55

vSIM INSTALLATION AND SETUP GUIDE
RELEASE 20.10.R1
Step 19. Start the vSIM:
i. Locate the vSIM in the Navigator panel and right-click it.
The Actions menu is displayed.
ii. Select the Actions→Power→Power On action. The vSIM starts the boot
process.
Step 20. You can connect to the console by using telnet to connect to the ESXi host
(in this example, 192.168.168.15) on the TCP port number you defined
earlier (in this example, 12050).
Step 21. The TIMOS login screen is displayed when the vSIM is up and running
successfully.
Step 22. Log in using the following credentials:
login: admin
password: admin
SR OS commands can now be issued as normal.
Creating and Starting a vSIM VM on a VMware ESXi
Host
Issue: 01 3HE 15836 AAAD TQZZA 01 55
Page 56

Creating and Starting a vSIM VM on a VMware ESXi
Host
vSIM INSTALLATION AND SETUP GUIDE
RELEASE 20.10.R1
56
3HE 15836 AAAD TQZZA 01 Issue: 01
Page 57

vSIM INSTALLATION AND SETUP GUIDE
RELEASE 20.10.R1
7 Verifying the vSIM Installation
7.1 Overview
This section describes the basic procedures for verifying your vSIM virtual machine
(VM) installation. Common problems that you may encounter are highlighted and
possible solutions to resolve these issues are provided.
Note: This section provides instructions on verifying and troubleshooting VMs deployed on
Linux hosts using the QEMU-KVM hypervisor. Similar techniques can also be applied to
VMs deployed in a VMware environment.
Verifying the vSIM Installation
7.2 Verifying Host Details
Successful installation of a vSIM VM requires the host machine to be set up properly.
Use the commands described in this section to display host information for Linux
systems (running Centos, Red Hat).
7.2.1 General System Information
To display the Linux kernel version, enter the following:
uname -a ↵
To verify that your Linux kernel is 64-bit, enter the following:
uname -m ↵
The command output should be x86_64.
7.2.2 Linux Distribution Type
To display the type of Linux distribution and version, enter the following:
lsb_release -a ↵
Issue: 01 3HE 15836 AAAD TQZZA 01 57
Page 58

Verifying the vSIM Installation
Note: Depending on your Linux distribution, you may have to install a package such as
redhat-lsb-core to run this command.
7.2.3 PCI Devices
To view all PCI devices, enter the following:
lspci ↵
A partial sample output of the command is as follows:
[user@host ~]# lspci
04:00.0 Ethernet controller: Intel Corporation 82574L Gigabit Network Connection
05:00.0 Ethernet controller: Intel Corporation 82574L Gigabit Network Connection
06:00.0 Ethernet controller: Intel Corporation 82574L Gigabit Network Connection
07:00.0 Ethernet controller: Intel Corporation 82574L Gigabit Network Connection
vSIM INSTALLATION AND SETUP GUIDE
RELEASE 20.10.R1
The first entry indicates that there is a PCI device attached to bus 04, with device ID
00 and function 0 (04:00.0) and that it is an 82574L Gigabit Ethernet controller made
by Intel Corporation.
To view PCI device details, including capabilities such as the maximum bus speed
and the number of lanes (for example x4), enter the following:
lspci -vvv ↵
7.2.4 CPU Processor Information
To view details about all the CPU processors available to the host, enter the
following:
cat /proc/cpuinfo ↵
When hyper-threading is enabled on Intel CPUs, every hyper-thread appears as a
separate processor, as shown in the following partial sample output:
[user@host ~]# cat /proc/cpuinfo
processor : 0
vendor_id : GenuineIntel
cpu family : 6
model : 62
model name : Intel(R) Xeon(R) CPU E5-2630 v2 @ 2.60GHz
stepping : 4
58
3HE 15836 AAAD TQZZA 01 Issue: 01
Page 59

vSIM INSTALLATION AND SETUP GUIDE
RELEASE 20.10.R1
cpu MHz : 2593.614
cache size : 15360 KB
physical id : 0
siblings : 12
core id : 0
cpu cores : 6
apicid : 0
initial apicid : 0
fpu : yes
fpu_exception : yes
cpuid level : 13
wp : yes
flags : fpu vme de pse tsc msr pae mce cx8 apic mtrr pge mca cmov pat pse3
6 clflush dts acpi mmx fxsr sse sse2 ss ht tm pbe syscall nx pdpe1gb rdtscp lm const
ant_tsc arch_perfmon pebs bts rep_good xtopology nonstop_tsc aperfmperf pni pclmulqd
q dtes64 monitor ds_cpl vmx smx est tm2 ssse3 cx16 xtpr pdcm dca sse4_1 sse4_2 x2api
c popcnt aes xsave avx f16c rdrand lahf_lm ida arat epb xsaveopt pln pts dts tpr_sha
dow vnmi flexpriority ept vpid fsgsbase smep erms
bogomips : 5187.22
clflush size : 64
cache_alignment : 64
address sizes : 46 bits physical, 48 bits virtual
power management:
Verifying the vSIM Installation
To run vSIM VMs, the cpu family value must be 6 (Intel) and the model should be
greater than or equal to 42 (in most cases). In addition, several CPU flags are critical
for the vSIM and must be passed through to the guest. These include:
• x2apic—support for an advanced interrupt controller introduced with Intel
Nehalem processors
Support for the x2apic is mandatory; the flag must not be emulated
• lm—long mode, indicating a 64-bit CPU, which is necessary to support 64-bit
guests
• vmx—support for Intel virtualization technologies such as VT-d/VT-x
7.2.5 Host Memory
To view details about the host memory, enter the following:
cat /proc/meminfo ↵
The following is a partial sample output of this command:
[user@host ~]# cat /proc/meminfo
MemTotal: 16406144 kB
MemFree: 9442676 kB
MemAvailable: 11272708 kB
Buffers: 648220 kB
Cached: 1352744 kB
SwapCached: 0 kB
Issue: 01 3HE 15836 AAAD TQZZA 01 59
Page 60

Verifying the vSIM Installation
Active: 4898888 kB
Inactive: 1723664 kB
The MemFree value must be at least 4194304 kB if you want to create another vSIM
VM on this host.
7.2.6 Host Capability
To show summary information about the host and its virtualization capabilities, enter
the following:
virsh capabilities ↵
Note: The libvirt package must be installed to run this command on the host.
vSIM INSTALLATION AND SETUP GUIDE
RELEASE 20.10.R1
The command output must confirm that the system is capable of supporting guests
with the x86_64 architecture (64-bit guests).
7.2.7 QEMU and libvirt Information
To show libvirt and QEMU version information, enter the following:
virsh version ↵
Note: The libvirt package must be installed to run this command on the host.
7.2.8 Loaded Modules
To list all the kernel modules installed on the host, enter the following:
lsmod ↵
60
Some key modules are: bridge, kvm, kvm_intel, vhost_net, tun, macvtap and
openvswitch.
3HE 15836 AAAD TQZZA 01 Issue: 01
Page 61

vSIM INSTALLATION AND SETUP GUIDE
RELEASE 20.10.R1
7.2.9 Host Virtualization Setup
To check that dependencies for virtualization are installed correctly on the host, enter
the following:
virt-host-validate ↵
The following is a sample output of the command:
[user@host ~]# virt-host-validate
QEMU: Checking for hardware virtualization : PASS
QEMU: Checking for device /dev/kvm : PASS
QEMU: Checking for device /dev/vhost-net : PASS
QEMU: Checking for device /dev/net/tun : PASS
LXC: Checking for Linux >= 2.6.26 : PASS
[user@host ~]#
7.3 Verifying the Creation of VMs
Verifying the vSIM Installation
Before attempting to log in to a vSIM and to check for successful boot of its VMs,
ensure that the VMs have been created as expected on all the host machines.
If you are using libvirt, you can view the list of VMs on a specific host by entering the
following command:
virsh list ↵
The following is a sample output of this command:
[user@host ~]# virsh list --all
Id Name State
---------------------------------------------------1 CPMA running
2 CPMB running
3 IOM1 running
Because each QEMU-KVM VM is a process with two or more threads, you can also
use a sequence of commands, such as the following, to get more details about a
running VM:
[user@host ~]# ps -ef | grep CPMA
qemu 6304 1 5 Sep10 ? 05:03:50 /usr/libexec/qemu-kvm.real
name CPMA -S -machine rhel6.0.0, accel=kvm, usb=off
cpu SandyBridge, +erms, +smep, +fsgsbase, +rdrand, +f16c, +osxsave, +pcid, +pdcm, +
tpr, +tm2, +est, +smx, +vmx, +ds_cpl, +monitor, +dtes64, +pbe, +tm, +ht, +ss, + acp
, + ds, +vme -m 6144 -realtime mlock=off -smp 2, sockets=2, cores=1, threads=1
uuid nnnnnnnn-nnnn-nnnn-nnnn-nnnnnnnnnnnn -nographic -no-user-config -nodefaults
chardev socket, id=charmonitor, path=/var/lib/libvirt/qemu
Issue: 01 3HE 15836 AAAD TQZZA 01 61
Page 62

Verifying the vSIM Installation
CPMA.monitor, server, nowait -mon chardev=charmonitor, id=monitor, mode=control
rtc base=utc -no-kvm-pit-reinjection -no-shutdown -no-acpi -boot strict=on
device piix3-usb-uhci, id=usb, bus=pci.0, addr=0x1.0x2 -device virtio-serial
pci, id=virtio-serial0, bus=pci.0, addr=0x7 -drive file=/path
disk1.qcow2, if=none, id=drive-virtio-disk0, format=qcow2, cache=none
device virtio-blk-pci, scsi=off, bus=pci.0, addr=0x8, drive=drive-virtio
disk0, id=virtio-disk0 -netdev tap, fd=23, id=hostnet0, vhost=on, vhostfd=24
device virtio-net
pci, netdev=hostnet0, id=net0, mac=nn:nn:nn:nn:nn:nn, bus=pci.0, addr=0x3, bootinde
=1 -netdev tap, fd=25, id=hostnet1, vhost=on, vhostfd=26 -device virtio-net
pci, netdev=hostnet1, id=net1, mac=nn:nn:nn:nn:nn:nn, bus=pci.0, addr=0x4
chardev socket, id=charconsole0, host=0.0.0.0, port=2500, telnet, server, nowait
device virtconsole, chardev=charconsole0, id=console0 -device virtio-balloon
pci, id=balloon0, bus=pci.0, addr=0x6
[user@host ~]# ps -T 6304
root@bksim4204 6304]# ps -T 6304
PID SPID TTY STAT TIME COMMAND
6304 6304 ? Sl 0:19 /usr/libexec/qemu-kvm.real -name CPMA -S -
machine rhel6.0.0,accel=k
6304 6310 ? Sl 169:47 /usr/libexec/qemu-kvm.real -name CPMA -S -
machine rhel6.0.0,accel=k
6304 6311 ? Sl 134:52 /usr/libexec/qemu-kvm.real -name CPMA -S -
machine rhel6.0.0,accel=k
vSIM INSTALLATION AND SETUP GUIDE
RELEASE 20.10.R1
These sample command outputs indicate that the VM called CPMA is running as
process ID 6304 in the host machine. There are three threads associated with this
process.
You can obtain a real-time view of the host system impact of all running VMs by
entering the following commands:
top ↵
htop ↵
The following is a sample output of the command:
[root@bksim4204 bin]# top
top - 14:00:10 up 5 days, 4:44, 2 users, load average: 4.09, 4.08, 4.09
Tasks: 184 total, 2 running, 182 sleeping, 0 stopped, 0 zombie
%Cpu(s): 51.2 us, 0.1 sy, 0.0 ni, 48.7 id, 0.0 wa, 0.0 hi, 0.0 si, 0.0 st
KiB Mem: 16406144 total, 6970448 used, 9435696 free, 649488 buffers
KiB Swap: 0 total, 0 used, 0 free. 1328612 cached Mem
PID USER PR NI VIRT RES SHR S %CPU %MEM TIME+ COMMAND
6349 qemu 20 0 4860828 2.445g 5912 S 402.1 15.6 24522:22 qemu-
kvm.real
6304 qemu 20 0 6736452 0.981g 5916 S 4.7 6.3 305:44.16 qemu-
kvm.real
6321 qemu 20 0 6736424 0.980g 5916 S 4.3 6.3 280:32.31 qemu-
kvm.real
6308 root 20 0 0 0 0 S 0.3 0.0 4:45.88 vhost-
6304
62
3HE 15836 AAAD TQZZA 01 Issue: 01
Page 63

vSIM INSTALLATION AND SETUP GUIDE
RELEASE 20.10.R1
6324 root 20 0 0 0 0 S 0.3 0.0 1:23.12 vhost-6321
7.4 Verifying Host Networking
You can use different methods to provide network connectivity between the vSIM
VMs and external destinations.
Table 8 lists some useful commands that can help you troubleshoot networking at
the host level.
Table 8 Host Network Troubleshooting
Command Syntax Description
ip -d link show Shows details of all host network interfaces, including
Verifying the vSIM Installation
physical NIC ports and logical interfaces, such as vNIC
interface constructs on the host
ip link set dev <interfacename> mtu <value>
ip addr show Displays the IP addresses associated with host network
ip route show Displays the IP routing table of the host
tcpdump -i <interface name> Captures packets on the selected interface and outputs
brctl show Displays all the Linux bridges
ovs-vsctl show Displays all the Open vSwitch bridges
ethtool -S <interface name> Displays statistics collected by the physical NIC for a
Explicitly sets the MTU (Maximum Transmit Unit) of a host
interface
You are required to set the MTU of network interfaces
associated with vSIM internal fabric interfaces to 9000
bytes
interfaces
Note: In a virtualization environment, many interfaces will
not have any IP addresses assigned to them
them for analysis
selected interface
Issue: 01 3HE 15836 AAAD TQZZA 01 63
Page 64

Verifying the vSIM Installation
7.5 Verifying vSIM Software
After you have verified that the vSIM VMs have been created successfully on the
respective hosts, check the SR OS operating system to verify that it has booted up
properly on each VM and that the vSIM is functional. You will typically need console
access to the vSIM to perform these checks. This is the main reason for adding a
serial console port to vSIM VMs. With console access, you can log in to each vSIM
and perform the checks that are described in this section.
7.5.1 Check the Status of the System BOF
The output of this check depends on the SMBIOS text string you used for the VM and
the saved BOF configuration. At the prompt, type the following:
A:vSIM# show bof ↵
vSIM INSTALLATION AND SETUP GUIDE
RELEASE 20.10.R1
The following is a sample output of this command:
===============================================================================
BOF (Memory)
===============================================================================
primary-image cf3:\timos\
primary-config ftp://*:*@[135.121.120.218]/./dut-a.cfg
license-file ftp://*:*@[135.121.120.218]/./license.txt
address 135.121.123.4/21 active
address 135.121.123.8/21 standby
address 3000::8779:7b04/117 active
address 3000::8779:7b08/117 standby
static-route 128.251.10.0/24 next-hop 135.121.120.1
static-route 135.0.0.0/8 next-hop 135.121.120.1
static-route 138.0.0.0/8 next-hop 135.121.120.1
static-route 172.20.0.0/14 next-hop 135.121.120.1
static-route 172.31.0.0/16 next-hop 135.121.120.1
static-route 192.168.120.218/32 next-hop 135.121.120.218
autonegotiate
duplex full
speed 100
wait 3
persist off
no li-local-save
no li-separate
no fips-140-2
console-speed 115200
system-base-mac fa:ac:ff:ff:10:00
===============================================================================
64
3HE 15836 AAAD TQZZA 01 Issue: 01
Page 65

vSIM INSTALLATION AND SETUP GUIDE
RELEASE 20.10.R1
7.5.2 Check the Chassis Type
You should verify that the vSIM VM chassis type is set correctly.
If the chassis type does not match the one encoded in the SMBIOS text string, you
should assume there is an error in the SMBIOS text string. To view the chassis
information, type the following at the prompt:
A:vSIM# show chassis ↵
The following is a sample output of this command:
*A:sim-01# show chassis
===============================================================================
System Information
===============================================================================
Name : sim-01
Type : 7750 SR-12
Chassis Topology : Standalone
Location : (Not Specified)
Coordinates : (Not Specified)
CLLI code :
Number of slots : 12
Oper number of slots : 12
Number of ports : 483
Critical LED state : Off
Major LED state : Off
Minor LED state : Off
Over Temperature state : OK
Base MAC address : fa:ac:ff:ff:10:00
Admin chassis mode : d
Oper chassis mode : d
===============================================================================
Chassis Summary
===============================================================================
Chassis Role Status
------------------------------------------------------------------------------1 Standalone up
===============================================================================
Verifying the vSIM Installation
7.5.3 Check the Card Types Equipped in the System
You should verify that correct (virtualized) card types are equipped in the system.
If a card type does not match the one encoded in the SMBIOS text string of the
corresponding VM, you should assume there is an error in that SMBIOS text string.
To view the card information, type the following at the prompt:
A:vSIM# show card state ↵
Issue: 01 3HE 15836 AAAD TQZZA 01 65
Page 66

Verifying the vSIM Installation
The following is a sample output of this command:
===============================================================================
Card Summary
===============================================================================
Slot Provisioned Type Admin Operational Comments
------------------------------------------------------------------------------1 imm48-1gb-sfp-c up up
2 iom4-e up up
3 imm-2pac-fp3 up up
4 iom3-xp-c up up
5 imm-1pac-fp3 up up
6 imm12-10gb-sf+ up up
7 iom3-xp-b up up
8 imm5-10gb-xfp up up
9 iom3-xp up up
10 iom3-xp up up
A cpm5 up up/active
B cpm5 up up/standby
===============================================================================
vSIM INSTALLATION AND SETUP GUIDE
RELEASE 20.10.R1
Equipped Type (if different) State State
7.5.4 Check the vSIM System Licenses
You should verify that the vSIM has valid licenses. To view the system license
information, type the following at the prompt:
A:vSIM# show system license ↵
The following is a sample of the command output:
===============================================================================
System License
===============================================================================
License status : monitoring, valid license record
Time remaining : 141 days 10 hours
===============================================================================
===============================================================================
Active License [CPM A]
===============================================================================
License status : monitoring, valid license record
Time remaining : 141 days 10 hours
------------------------------------------------------------------------------License name : name@organization.com
License uuid : cb0ba837-07db-4ebb-88ea-694271754675
Machine uuid : cb0ba837-07db-4ebb-88ea-694271754675
License desc : vSIM license1a
License prod : Virtual-SIM
License sros : TiMOS-[BC]-15.0.*
Current date : WED JUL 12 14:21:52 UTC 2017
Issue date : THU JUN 01 22:57:48 UTC 2017
Start date : THU JUN 01 00:00:00 UTC 2017
End date : FRI DEC 01 00:00:00 UTC 2017
66
3HE 15836 AAAD TQZZA 01 Issue: 01
Page 67

vSIM INSTALLATION AND SETUP GUIDE
RELEASE 20.10.R1
===============================================================================
===============================================================================
Standby License [CPM B]
===============================================================================
License status : monitoring, valid license record
Time remaining : 141 days 10 hours
------------------------------------------------------------------------------License name : name@organization.com
License uuid : 60ca42cf-d45a-4124-afd0-81057f167bf4
Machine uuid : 60ca42cf-d45a-4124-afd0-81057f167bf4
License desc : vSIM license1b
License prod : Virtual-SIM
License sros : TiMOS-[BC]-15.0.*
Current date : WED JUL 12 14:21:52 UTC 2017
Issue date : THU JUN 01 22:57:48 UTC 2017
Start date : THU JUN 01 00:00:00 UTC 2017
End date : FRI DEC 01 00:00:00 UTC 2017
===============================================================================
Verifying the vSIM Installation
Issue: 01 3HE 15836 AAAD TQZZA 01 67
Page 68

Verifying the vSIM Installation
vSIM INSTALLATION AND SETUP GUIDE
RELEASE 20.10.R1
68
3HE 15836 AAAD TQZZA 01 Issue: 01
Page 69

vSIM INSTALLATION AND SETUP GUIDE
RELEASE 20.10.R1
Appendices
• Appendix A: vSIM Supported Hardware
• Appendix B: Known Limitations
• Appendix C: vSIM Glossary of Key Terms
Appendices
Issue: 01 3HE 15836 AAAD TQZZA 01 69
Page 70

Appendices
vSIM INSTALLATION AND SETUP GUIDE
RELEASE 20.10.R1
70
3HE 15836 AAAD TQZZA 01 Issue: 01
Page 71
vSIM INSTALLATION AND SETUP GUIDE
RELEASE 20.10.R1
Appendix A: vSIM Supported Hardware
This appendix provides tables that list supported hardware for the following chassis
types:
• 7250 IXR
• 7750 SR
• 7950 XRS
7250 IXR
The following tables list the supported hardware for the 7250 IXR chassis type.
Table 9 7250 IXR-6 Supported Hardware
Appendix A: vSIM Supported Hardware
7250 IXR-6
SFM Card MDA
sfm-ixr-6 cpm-ixr —
imm36-100g-qsfp28 m36-100g-qsfp28
imm48-sfp+2-qsfp28 m48-sfp+2-qsfp28
Table 10 7250 IXR-10 Supported Hardware
7250 IXR-10
SFM Card MDA
sfm-ixr-10 cpm-ixr —
imm36-100g-qsfp28 m36-100g-qsfp28
imm48-sfp+2-qsfp28 m48-sfp+2-qsfp28
Table 11 7250 IXR-e Supported Hardware
7250 IXR-e
Card MDA
cpm-ixr-e —
Issue: 01 3HE 15836 AAAD TQZZA 01 71
Page 72

Appendix A: vSIM Supported Hardware
vSIM INSTALLATION AND SETUP GUIDE
Table 11 7250 IXR-e Supported Hardware (Continued)
7250 IXR-e
Card MDA
cpm-ixr-e-gnss —
imm24-sfp++8-sfp28+2-qsfp28 m24-sfp++8-sfp28+2-qsfp28
Table 12 7250 IXR-R4 Supported Hardware
7250 IXR-R4
Card MDA
cpm-ixr-r4 —
iom-ixr-r4 m6-10g-sfp++1-100g-qsfp28
RELEASE 20.10.R1
m20-1g-csfp
m10-10g-sfp+
m4-10g-sfp++1-100g-cfp2
m6-10g-sfp++4-25g-sfp28
m10-1g-sfp+2-10g-sfp+
Notes:
1. This MDA must use slots 1, 2, or 3.
2. The integrated MDA must be specified as mda/5.
Table 13 7250 IXR-R6 Supported Hardware
7250 IXR-R6
Card MDA
cpiom-ixr-r6 —
1
2
72
3HE 15836 AAAD TQZZA 01 Issue: 01
Page 73

vSIM INSTALLATION AND SETUP GUIDE
RELEASE 20.10.R1
Table 13 7250 IXR-R6 Supported Hardware (Continued)
7250 IXR-R6
Card MDA
Appendix A: vSIM Supported Hardware
iom-ixr-r6
a32-chds1v2
m4-10g-sfp++1-100g-cfp2
m6-10g-sfp++1-100g-qsfp28
m6-10g-sfp++4-25g-sfp28
m10-10g-sfp+
m20-1g-csfp
Notes:
1. This MDA has slot restrictions for slot 5 or 6.
2. This MDA must use either slot 3 or 4.
1
2
Table 14 7250 IXR-s Supported Hardware
7250 IXR-s
Card MDA
cpm-ixr-s —
imm48-sfp++6-qsfp28 m48-sfp++6-qsfp28
Table 15 7250 IXR-X Supported Hardware
7250 IXR-X
Card MDA
cpm-ixr-x —
imm6-qsfpdd+48-sfp56 m6-qsfpdd+48-sfp56
7750 SR
The following tables list the supported hardware for the 7750 SR chassis type.
Issue: 01 3HE 15836 AAAD TQZZA 01 73
Page 74

Appendix A: vSIM Supported Hardware
vSIM INSTALLATION AND SETUP GUIDE
Table 16 7750 SR-12/7 Supported Hardware
7750 SR-12 7750 SR-7
SFM Card MDA SFM Card MDA
m-sfm5-12 cpm5 — m-sfm5-7 cpm5 —
RELEASE 20.10.R1
m-sfm5-12
m-sfm5-12
m-sfm5-12
m-sfm5-12
m-sfm5-12
m-sfm5-12
m-sfm5-12
m-sfm5-12
m-sfm5-12
1
imm1-100gb-
imm1-100gb-xp-cfp
cfp
1
imm12-10gb-
imm12-10gb-xp-sf+
sf+
1
imm3-40gb-
imm3-40gb-xp-qsfp
qsfp
1
imm4-10gb-
imm2-10gb-xp-xfp
xfp
1
imm48-1gb-
imm24-1gb-xp-sfp
sfp
1
imm48-1gb-
imm24-1gb-xp-sfp
sfp-b
1
imm48-1gb-tximm24-1gb-xp-tx
1
imm5-10gb-
imm5-10gb-xp-xfp
xfp
1
imm8-10gb-
imm4-10gb-xp-xfp
xfp
m-sfm5-7
m-sfm5-7
m-sfm5-7
m-sfm5-7
m-sfm5-7
m-sfm5-7
m-sfm5-7
m-sfm5-7
m-sfm5-7
1
imm1-100gb-
imm1-100gb-xp-cfp
cfp
1
imm12-10gb-
imm12-10gb-xp-sf+
sf+
1
imm3-40gb-
imm3-40gb-xp-qsfp
qsfp
1
imm4-10gb-
imm2-10gb-xp-xfp
xfp
1
imm48-1gb-
imm24-1gb-xp-sfp
sfp
1
imm48-1gb-
imm24-1gb-xp-sfp
sfp-b
1
imm48-1gb-tximm24-1gb-xp-tx
1
imm5-10gb-
imm5-10gb-xp-xfp
xfp
1
imm8-10gb-
imm4-10gb-xp-xfp
xfp
74
3HE 15836 AAAD TQZZA 01 Issue: 01
Page 75

vSIM INSTALLATION AND SETUP GUIDE
Appendix A: vSIM Supported Hardware
RELEASE 20.10.R1
Table 16 7750 SR-12/7 Supported Hardware (Continued)
7750 SR-12 7750 SR-7
SFM Card MDA SFM Card MDA
m-sfm5-12
1
iom3-xp isa-aa
1
m-sfm5-7
iom3-xp isa-aa
isa-bb isa-bb
isa-tunnel isa-tunnel
m10-1gb+1-10gb m10-1gb+1-10gb
m10-1gb-hs-sfp-b m10-1gb-hs-sfp-b
m10-1gb-xp-sfp m10-1gb-xp-sfp
m1-10gb-hs-xfp-b m1-10gb-hs-xfp-b
m1-10gb-xp-xfp m1-10gb-xp-xfp
m12-1gb+2-10gb-xp m12-1gb+2-10gb-xp
m12-1gb-xp-sfp m12-1gb-xp-sfp
m12-chds3-as m12-chds3-as
m16-oc12/3-sfp-b m16-oc12/3-sfp-b
m1-choc12-as-sfp m1-choc12-as-sfp
m1-choc12-ces-sfp m1-choc12-ces-sfp
m1-choc3-ces-sfp m1-choc3-ces-sfp
m20-1gb-xp-sfp m20-1gb-xp-sfp
m20-1gb-xp-tx m20-1gb-xp-tx
m2-10gb-xp-xfp m2-10gb-xp-xfp
m2-oc192-xp-xfp m2-oc192-xp-xfp
m4-10gb-xp-xfp m4-10gb-xp-xfp
m48-1gb-xp-tx m48-1gb-xp-tx
m4-chds3-as m4-chds3-as
m4-choc3-as-sfp m4-choc3-as-sfp
m4-choc3-ces-sfp m4-choc3-ces-sfp
m4-oc48-sfp-b m4-oc48-sfp-b
Issue: 01 3HE 15836 AAAD TQZZA 01 75
Page 76

Appendix A: vSIM Supported Hardware
vSIM INSTALLATION AND SETUP GUIDE
Table 16 7750 SR-12/7 Supported Hardware (Continued)
7750 SR-12 7750 SR-7
SFM Card MDA SFM Card MDA
RELEASE 20.10.R1
m-sfm5-12
1
iom3-xp-b isa-aa
1
m-sfm5-7
iom3-xp-b isa-aa
isa-bb isa-bb
isa-tunnel isa-tunnel
m10-1gb+1-10gb m10-1gb+1-10gb
m10-1gb-hs-sfp-b m10-1gb-hs-sfp-b
m10-1gb-xp-sfp m10-1gb-xp-sfp
m1-10gb-hs-xfp-b m1-10gb-hs-xfp-b
m1-10gb-xp-xfp m1-10gb-xp-xfp
m12-1gb+2-10gb-xp m12-1gb+2-10gb-xp
m12-1gb-xp-sfp m12-1gb-xp-sfp
m12-chds3-as m12-chds3-as
m16-oc12/3-sfp-b m16-oc12/3-sfp-b
m1-choc12-as-sfp m1-choc12-as-sfp
m1-choc12-ces-sfp m1-choc12-ces-sfp
m1-choc3-ces-sfp m1-choc3-ces-sfp
76
m20-1gb-xp-sfp m20-1gb-xp-sfp
m20-1gb-xp-tx m20-1gb-xp-tx
m2-10gb-xp-xfp m2-10gb-xp-xfp
m2-oc192-xp-xfp m2-oc192-xp-xfp
m4-10gb-xp-xfp m4-10gb-xp-xfp
m48-1gb-xp-tx m48-1gb-xp-tx
m4-chds3-as m4-chds3-as
m4-choc3-as-sfp m4-choc3-as-sfp
m4-choc3-ces-sfp m4-choc3-ces-sfp
m4-oc48-sfp-b m4-oc48-sfp-b
3HE 15836 AAAD TQZZA 01 Issue: 01
Page 77

vSIM INSTALLATION AND SETUP GUIDE
Appendix A: vSIM Supported Hardware
RELEASE 20.10.R1
Table 16 7750 SR-12/7 Supported Hardware (Continued)
7750 SR-12 7750 SR-7
SFM Card MDA SFM Card MDA
m-sfm5-12 or
m-sfm6-7/12
1
m-sfm5-12 or
m-sfm6-7/12
1
m-sfm5-12 or
m-sfm6-7/12
1
imm-1pacfp3
imm-2pacfp3
imm48-1gbsfp-c
p160-1gb-csfp m-sfm5-7 or
m-sfm6-7/12
1
isa2-aa m-sfm5-7 or
m-sfm6-7/12
isa2-bb isa2-bb
1
imm-1pacfp3
imm-2pacfp3
p160-1gb-csfp
isa2-aa
isa2-tunnel isa2-tunnel
p10-10g-sfp p10-10g-sfp
p1-100g-cfp p1-100g-cfp
p20-1gb-sfp p20-1gb-sfp
p3-40g-qsfp p3-40g-qsfp
p6-10g-sfp p6-10g-sfp
imm24-1gb-xp-sfp m-sfm5-7 or
m-sfm6-7/12
1
imm48-1gbsfp-c
imm24-1gb-xp-sfp
Issue: 01 3HE 15836 AAAD TQZZA 01 77
Page 78

Appendix A: vSIM Supported Hardware
vSIM INSTALLATION AND SETUP GUIDE
Table 16 7750 SR-12/7 Supported Hardware (Continued)
7750 SR-12 7750 SR-7
SFM Card MDA SFM Card MDA
RELEASE 20.10.R1
m-sfm5-12 or
m-sfm6-7/12
1
iom3-xp-c isa-aa m-sfm5-7 or
isa-bb isa-bb
m-sfm6-7/12
1
isa-tunnel isa-tunnel
m10-1gb+1-10gb m10-1gb+1-10gb
m10-1gb-hs-sfp-b m10-1gb-hs-sfp-b
m10-1gb-xp-sfp m10-1gb-xp-sfp
m1-10gb-hs-xfp-b m1-10gb-hs-xfp-b
m1-10gb-xp-xfp m1-10gb-xp-xfp
m12-1gb+2-10gb-xp m12-1gb+2-10gb-xp
m12-1gb-xp-sfp m12-1gb-xp-sfp
m12-chds3-as m12-chds3-as
m16-oc12/3-sfp-b m16-oc12/3-sfp-b
m1-choc12-as-sfp m1-choc12-as-sfp
m1-choc12-ces-sfp m1-choc12-ces-sfp
m1-choc3-ces-sfp m1-choc3-ces-sfp
iom3-xp-c isa-aa
78
m20-1gb-xp-sfp m20-1gb-xp-sfp
m20-1gb-xp-tx m20-1gb-xp-tx
m2-10gb-xp-xfp m2-10gb-xp-xfp
m2-oc192-xp-xfp m2-oc192-xp-xfp
m4-10gb-xp-xfp m4-10gb-xp-xfp
m48-1gb-xp-tx m48-1gb-xp-tx
m4-chds3-as m4-chds3-as
m4-choc3-as-sfp m4-choc3-as-sfp
m4-choc3-ces-sfp m4-choc3-ces-sfp
m4-oc48-sfp-b m4-oc48-sfp-b
3HE 15836 AAAD TQZZA 01 Issue: 01
Page 79

vSIM INSTALLATION AND SETUP GUIDE
Appendix A: vSIM Supported Hardware
RELEASE 20.10.R1
Table 16 7750 SR-12/7 Supported Hardware (Continued)
7750 SR-12 7750 SR-7
SFM Card MDA SFM Card MDA
m-sfm5-12 or
m-sfm6-7/12
1
m-sfm5-12 or
m-sfm6-7/12
1
iom4-e isa2-aa m-sfm5-7 or
isa2-bb isa2-bb
m-sfm6-7/12
1
isa2-tunnel isa2-tunnel
me10-10gb-sfp+ me10-10gb-sfp+
me1-100gb-cfp2 me1-100gb-cfp2
me12-10/1gb-sfp+ me12-10/1gb-sfp+
me2-100gb-cfp4 me2-100gb-cfp4
me2-100gb-msqsfp28
me2-100gb-qsfp28 me2-100gb-qsfp28
me40-1gb-csfp me40-1gb-csfp
me6-10gb-sfp+ me6-10gb-sfp+
me8-10/25gb-sfp28 me8-10/25gb-sfp28
iom4-e-b isa2-aa m-sfm5-7 or
isa2-bb isa2-bb
m-sfm6-7/12
1
iom4-e isa2-aa
me2-100gb-msqsfp28
iom4-e-b isa2-aa
isa2-tunnel isa2-tunnel
me10-10gb-sfp+ me10-10gb-sfp+
me1-100gb-cfp2 me1-100gb-cfp2
me12-10/1gb-sfp+ me12-10/1gb-sfp+
me2-100gb-cfp4 me2-100gb-cfp4
me2-100gb-msqsfp28
me2-100gb-msqsfp28
me2-100gb-qsfp28 me2-100gb-qsfp28
me40-1gb-csfp me40-1gb-csfp
me6-10gb-sfp+ me6-10gb-sfp+
me8-10/25gb-sfp28 me8-10/25gb-sfp28
Issue: 01 3HE 15836 AAAD TQZZA 01 79
Page 80
Appendix A: vSIM Supported Hardware
vSIM INSTALLATION AND SETUP GUIDE
Table 16 7750 SR-12/7 Supported Hardware (Continued)
7750 SR-12 7750 SR-7
SFM Card MDA SFM Card MDA
RELEASE 20.10.R1
m-sfm5-12 or
m-sfm6-7/12
1
iom4-e-hs me10-10gb-sfp+ m-sfm5-12 or
me1-100gb-cfp2 me1-100gb-cfp2
m-sfm6-7/12
1
iom4-e-hs me10-10gb-sfp+
me12-10/1gb-sfp+ me12-10/1gb-sfp+
me2-100gb-cfp4 me2-100gb-cfp4
me2-100gb-msqsfp28
me2-100gb-msqsfp28
me2-100gb-qsfp28 me2-100gb-qsfp28
me40-1gb-csfp me40-1gb-csfp
me6-10gb-sfp+ me6-10gb-sfp+
me8-10/25gb-sfp28 me8-10/25gb-sfp28
m-sfm6-7/12 iom5-e me3-200gb-cfp2-dco m-sfm6-7/12 iom5-e me3-200gb-cfp2-dco
me6-100gb-qsfp28 me6-100gb-qsfp28
me16-25gb-sfp28+2100gb-qsfp28
me16-25gb-sfp28+2100gb-qsfp28
me3-400gb-qsfpdd me3-400gb-qsfpdd
Note:
1. This SFM type is only valid if the chassis has a cpm5.
Table 17 7750 SR-12e Supported Hardware
7750 SR-12e
SFM Card MDA
m-sfm5-12e or m-sfm6-12e cpm5 —
m-sfm5-12e or m-sfm6-12e
80
1
3HE 15836 AAAD TQZZA 01 Issue: 01
imm-1pac-fp3 p160-1gb-csfp
Page 81

vSIM INSTALLATION AND SETUP GUIDE
Appendix A: vSIM Supported Hardware
RELEASE 20.10.R1
Table 17 7750 SR-12e Supported Hardware (Continued)
7750 SR-12e
SFM Card MDA
m-sfm5-12e or m-sfm6-12e
m-sfm5-12e or m-sfm6-12e
m-sfm5-12e or m-sfm6-12e
m-sfm5-12e or m-sfm6-12e
m-sfm5-12e or m-sfm6-12e
m-sfm5-12e or m-sfm6-12e
m-sfm5-12e or m-sfm6-12e
1
imm-2pac-fp3 isa2-aa
isa2-bb
isa2-tunnel
p10-10g-sfp
p1-100g-cfp
p20-1gb-sfp
p3-40g-qsfp
p6-10g-sfp
1
1
1
1
1
1
imm40-10gb-sfp m40-10g-sfp
imm4-100gb-cfp4 m4-100g-cfp4
imm4-100gb-cxp m4-100g-cxp
imm48-1gb-sfp imm24-1gb-xp-sfp
imm48-1gb-sfp-b imm24-1gb-xp-sfp
imm48-1gb-sfp-c imm24-1gb-xp-sfp
m-sfm5-12e or m-sfm6-12e
m-sfm5-12e or m-sfm6-12e
1
1
imm48-1gb-tx imm24-1gb-xp-tx
imm5-10gb-xfp imm5-10gb-xp-xfp
Issue: 01 3HE 15836 AAAD TQZZA 01 81
Page 82

Appendix A: vSIM Supported Hardware
vSIM INSTALLATION AND SETUP GUIDE
Table 17 7750 SR-12e Supported Hardware (Continued)
7750 SR-12e
SFM Card MDA
RELEASE 20.10.R1
m-sfm5-12e or m-sfm6-12e
1
iom3-xp isa-aa
isa-bb
isa-tunnel
m10-1gb+1-10gb
m10-1gb-hs-sfp-b
m10-1gb-xp-sfp
m1-10gb-hs-xfp-b
m1-10gb-xp-xfp
m12-1gb+2-10gb-xp
m12-1gb-xp-sfp
m12-chds3-as
m16-oc12/3-sfp-b
m1-choc12-as-sfp
m1-choc12-ces-sfp
m1-choc3-ces-sfp
82
m20-1gb-xp-sfp
m20-1gb-xp-tx
m2-10gb-xp-xfp
m2-oc192-xp-xfp
m4-10gb-xp-xfp
m48-1gb-xp-tx
m4-chds3-as
m4-choc3-as-sfp
m4-choc3-ces-sfp
m4-oc48-sfp-b
3HE 15836 AAAD TQZZA 01 Issue: 01
Page 83

vSIM INSTALLATION AND SETUP GUIDE
RELEASE 20.10.R1
Appendix A: vSIM Supported Hardware
Table 17 7750 SR-12e Supported Hardware (Continued)
7750 SR-12e
SFM Card MDA
m-sfm5-12e or m-sfm6-12e
1
iom3-xp-b isa-aa
isa-bb
isa-tunnel
m10-1gb+1-10gb
m10-1gb-hs-sfp-b
m10-1gb-xp-sfp
m1-10gb-hs-xfp-b
m1-10gb-xp-xfp
m12-1gb+2-10gb-xp
m12-1gb-xp-sfp
m12-chds3-as
m16-oc12/3-sfp-b
m1-choc12-as-sfp
m1-choc12-ces-sfp
m1-choc3-ces-sfp
m20-1gb-xp-sfp
m20-1gb-xp-tx
m2-10gb-xp-xfp
m2-oc192-xp-xfp
m4-10gb-xp-xfp
m48-1gb-xp-tx
m4-chds3-as
m4-choc3-as-sfp
m4-choc3-ces-sfp
m4-oc48-sfp-b
Issue: 01 3HE 15836 AAAD TQZZA 01 83
Page 84

Appendix A: vSIM Supported Hardware
vSIM INSTALLATION AND SETUP GUIDE
Table 17 7750 SR-12e Supported Hardware (Continued)
7750 SR-12e
SFM Card MDA
RELEASE 20.10.R1
m-sfm5-12e or m-sfm6-12e
1
iom3-xp-c isa-aa
isa-bb
isa-tunnel
m10-1gb+1-10gb
m10-1gb-hs-sfp-b
m10-1gb-xp-sfp
m1-10gb-hs-xfp-b
m1-10gb-xp-xfp
m12-1gb+2-10gb-xp
m12-1gb-xp-sfp
m12-chds3-as
m16-oc12/3-sfp-b
m1-choc12-as-sfp
m1-choc12-ces-sfp
m1-choc3-ces-sfp
84
m20-1gb-xp-sfp
m20-1gb-xp-tx
m2-10gb-xp-xfp
m2-oc192-xp-xfp
m4-10gb-xp-xfp
m48-1gb-xp-tx
m4-chds3-as
m4-choc3-as-sfp
m4-choc3-ces-sfp
m4-oc48-sfp-b
3HE 15836 AAAD TQZZA 01 Issue: 01
Page 85
vSIM INSTALLATION AND SETUP GUIDE
Appendix A: vSIM Supported Hardware
RELEASE 20.10.R1
Table 17 7750 SR-12e Supported Hardware (Continued)
7750 SR-12e
SFM Card MDA
m-sfm5-12e or m-sfm6-12e
m-sfm5-12e or m-sfm6-12e
1
iom4-e isa2-aa
isa2-bb
isa2-tunnel
me10-10gb-sfp+
me1-100gb-cfp2
me12-10/1gb-sfp+
me2-100gb-cfp4
me2-100gb-ms-qsfp28
me2-100gb-qsfp28
me40-1gb-csfp
me6-10gb-sfp+
me8-10/25gb-sfp28
1
iom4-e-b isa2-aa
isa2-bb
isa2-tunnel
me10-10gb-sfp+
me1-100gb-cfp2
me12-10/1gb-sfp+
me2-100gb-cfp4
me2-100gb-ms-qsfp28
me2-100gb-qsfp28
me40-1gb-csfp
me6-10gb-sfp+
me8-10/25gb-sfp28
Issue: 01 3HE 15836 AAAD TQZZA 01 85
Page 86

Appendix A: vSIM Supported Hardware
vSIM INSTALLATION AND SETUP GUIDE
Table 17 7750 SR-12e Supported Hardware (Continued)
7750 SR-12e
SFM Card MDA
RELEASE 20.10.R1
m-sfm5-12e or m-sfm6-12e
m-sfm6-12e iom5-e me12-100gb-qsfp28
1
iom4-e-hs me10-10gb-sfp+
me1-100gb-cfp2
me12-10/1gb-sfp+
me2-100gb-cfp4
me2-100gb-ms-qsfp28
me2-100gb-qsfp28
me40-1gb-csfp
me6-10gb-sfp+
me8-10/25gb-sfp28
me3-200gb-cfp2-dco
me6-100gb-qsfp28
me6-400gb-qsfpdd
me16-25gb-sfp28+2-100gb-qsfp28
me3-400gb-qsfpdd
Note:
1. This SFM type is only valid if the chassis has a cpm5.
Table 18 7750 SR-a4/a8 Supported Hardware
7750 SR-a4/a8
Card MDA
cpm-a —
86
3HE 15836 AAAD TQZZA 01 Issue: 01
Page 87
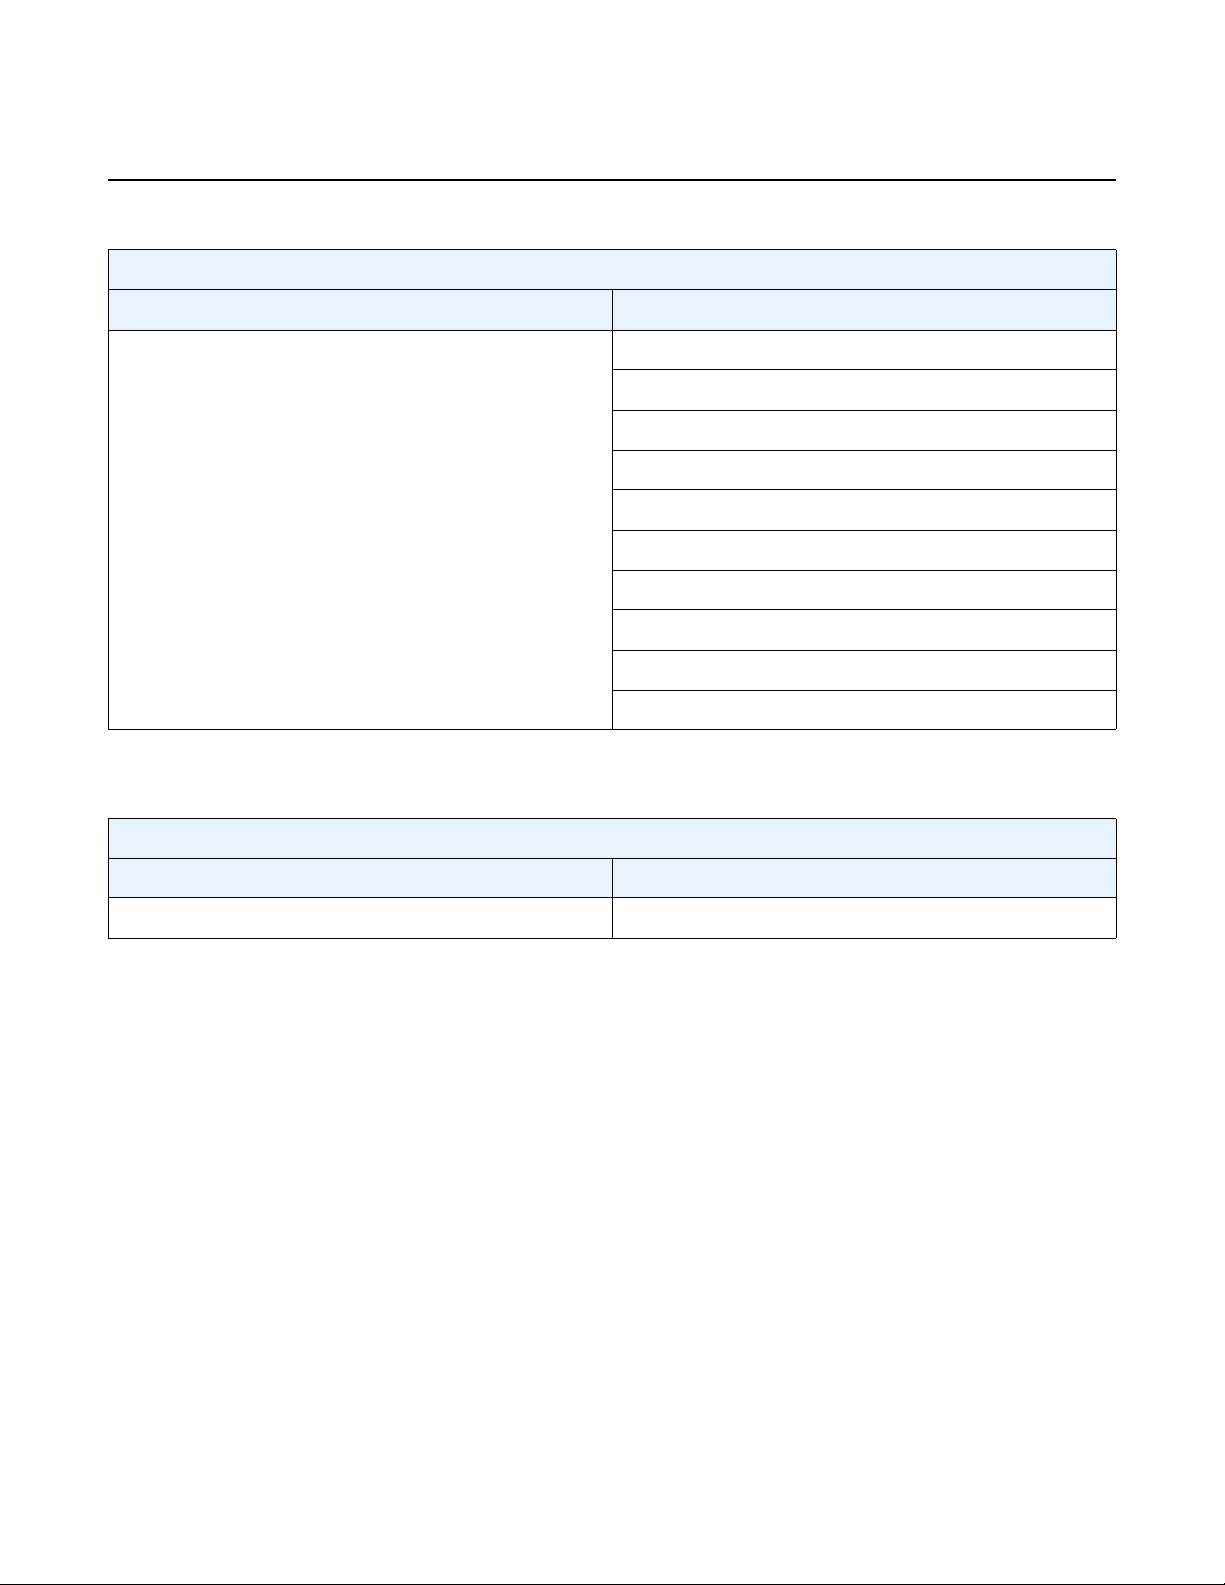
vSIM INSTALLATION AND SETUP GUIDE
RELEASE 20.10.R1
Table 18 7750 SR-a4/a8 Supported Hardware (Continued)
7750 SR-a4/a8
Card MDA
iom-a ma20-1gb-tx
ma2-10gb-sfp+12-1gb-sfp
ma4-10gb-sfp+
ma44-1gb-csfp
maxp10-10/1gb-msec-sfp+
maxp10-10gb-sfp+
maxp1-100gb-cfp
maxp1-100gb-cfp2
maxp1-100gb-cfp4
Appendix A: vSIM Supported Hardware
maxp6-10gb-sfp+1-40gb-qsfp+
Table 19 7750 SR-1e/2e/3e Supported Hardware
7750 SR-1e/2e/3e
Card MDA
cpm-e —
Issue: 01 3HE 15836 AAAD TQZZA 01 87
Page 88
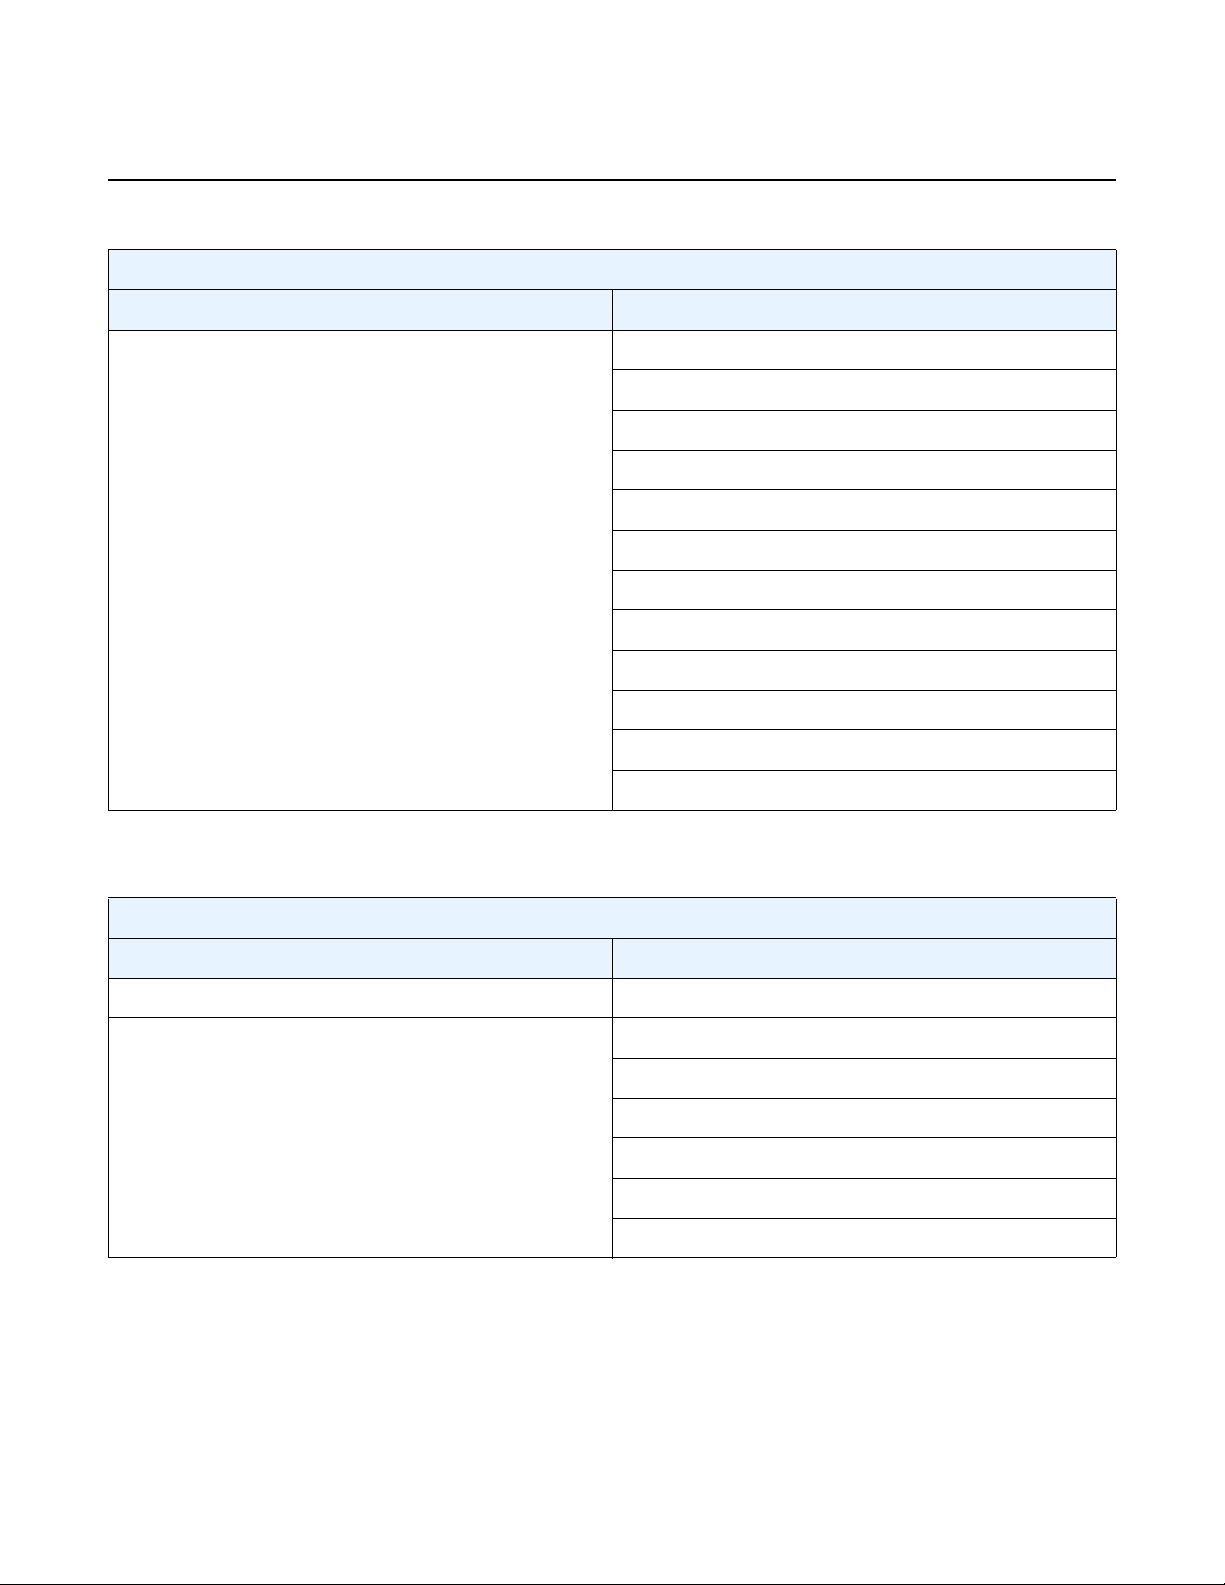
Appendix A: vSIM Supported Hardware
vSIM INSTALLATION AND SETUP GUIDE
Table 19 7750 SR-1e/2e/3e Supported Hardware (Continued)
7750 SR-1e/2e/3e
Card MDA
iom-e isa2-aa
isa2-bb
isa2-tunnel
me10-10gb-sfp+
me1-100gb-cfp2
me12-10/1gb-sfp+
me2-100gb-cfp4
me2-100gb-ms-qsfp28
me2-100gb-qsfp28
RELEASE 20.10.R1
me40-1gb-csfp
me6-10gb-sfp+
me8-10/25gb-sfp28
Table 20 7750 SR-1 Supported Hardware
7750 SR-1
Card MDA
cpm-1 —
iom-1 me12-100gb-qsfp28
me3-200gb-cfp2-dco
me6-100gb-qsfp28
me6-400gb-qsfpdd
me16-25gb-sfp28+2-100gb-qsfp28
me3-400gb-qsfpdd
88
3HE 15836 AAAD TQZZA 01 Issue: 01
Page 89

vSIM INSTALLATION AND SETUP GUIDE
RELEASE 20.10.R1
Appendix A: vSIM Supported Hardware
Table 21 7750 SR-1s Supported Hardware
7750 SR-1s
Card XIOM MDA
cpm-1s — —
xcm-1s — s18-100gb-qsfp28
s36-100gb-qsfp28
s36-400gb-qsfpdd
s36-100gb-qsfp28-3.6t
iom-s-1.5t
iom-s-3.0t
ms2-400gb-qsfpdd+2-100gb-qsfp28
ms3-200gb-cfp2-dco
ms4-400g-qsfpdd+4-100g-qsfp28
ms6-300gb-cfp2-dco
ms8-100gb-sfpdd+2-100gb-qsfp28
ms18-100gb-qsfp28
ms16-100gb-sfpdd+4-100gb-qsfp28
ms24-10/100gb-sfpdd
Issue: 01 3HE 15836 AAAD TQZZA 01 89
Page 90

Appendix A: vSIM Supported Hardware
vSIM INSTALLATION AND SETUP GUIDE
Table 22 7750 SR-2s Supported Hardware
7750 SR-2s
SFM Card XIOM MDA
sfm-2s cpm-2s — —
xcm-2s — s18-100gb-qsfp28
s36-100gb-qsfp28
s36-400gb-qsfpdd
s36-100gb-qsfp28-3.6t
RELEASE 20.10.R1
iom-s-1.5t
iom-s-3.0t
ms2-400gb-qsfpdd+2-100gb-qsfp28
ms3-200gb-cfp2-dco
ms4-400g-qsfpdd+4-100g-qsfp28
ms6-300gb-cfp2-dco
ms8-100gb-sfpdd+2-100gb-qsfp28
ms16-100gb-sfpdd+4-100gb-qsfp28
ms18-100gb-qsfp28
ms24-10/100gb-sfpdd
90
3HE 15836 AAAD TQZZA 01 Issue: 01
Page 91

vSIM INSTALLATION AND SETUP GUIDE
RELEASE 20.10.R1
Appendix A: vSIM Supported Hardware
Table 23 7750 SR-7s Supported Hardware
7750 SR-7s
SFM Card XIOM MDA
sfm-s cpm-s
cpm-2s
xcm-7s — s18-100gb-qsfp28
——
s36-100gb-qsfp28
s36-400gb-qsfpdd
s36-100gb-qsfp28-3.6t
iom-s-1.5t
iom-s-3.0t
ms2-400gb-qsfpdd+2-100gb-qsfp28
ms3-200gb-cfp2-dco
ms4-400g-qsfpdd+4-100g-qsfp28
ms6-300gb-cfp2-dco
ms8-100gb-sfpdd+2-100gb-qsfp28
ms16-100gb-sfpdd+4-100gb-qsfp28
ms18-100gb-qsfp28
ms24-10/100gb-sfpdd
Issue: 01 3HE 15836 AAAD TQZZA 01 91
Page 92
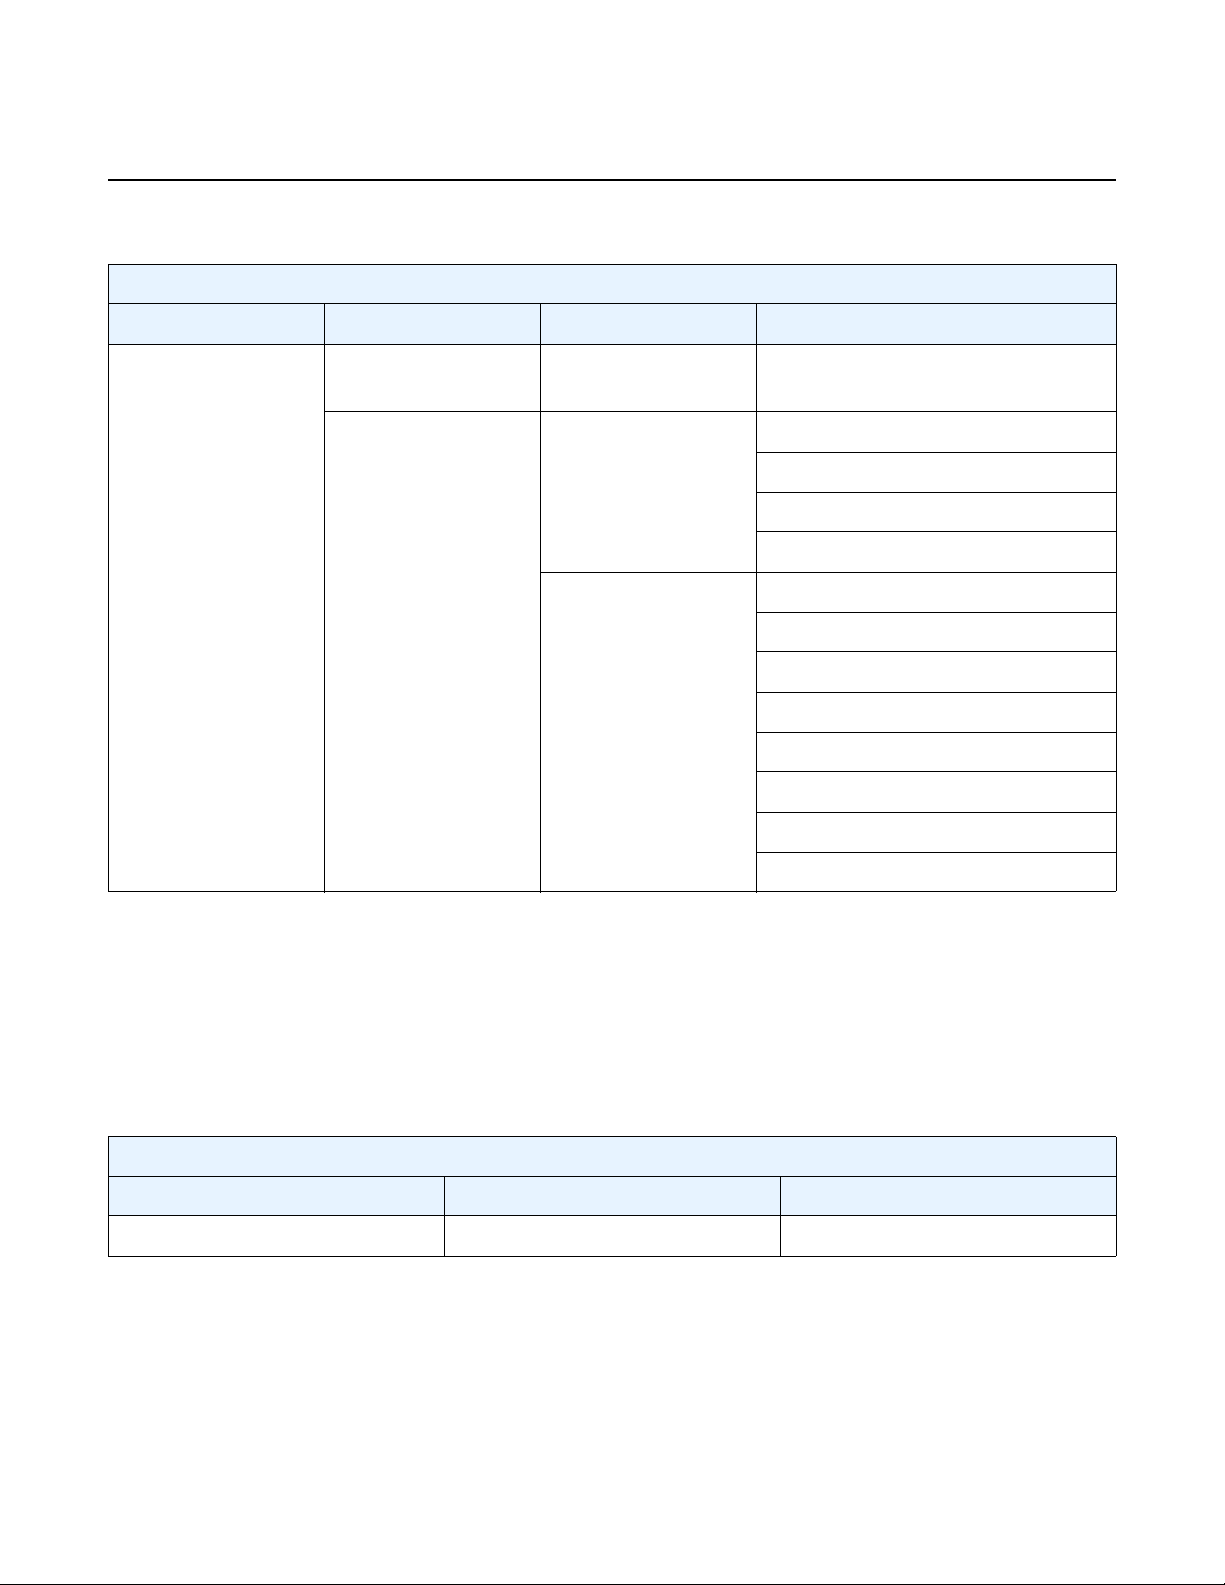
Appendix A: vSIM Supported Hardware
vSIM INSTALLATION AND SETUP GUIDE
Table 24 7750 SR-14s Supported Hardware
7750 SR-14s
SFM Card XIOM MDA
RELEASE 20.10.R1
sfm-s cpm-s
cpm-2s
xcm-14s — s18-100gb-qsfp28
——
s36-100gb-qsfp28
s36-400gb-qsfpdd
s36-100gb-qsfp28-3.6t
iom-s-1.5t
iom-s-3.0t
ms2-400gb-qsfpdd+2-100gb-qsfp28
ms3-200gb-cfp2-dco
ms4-400g-qsfpdd+4-100g-qsfp28
ms6-300gb-cfp2-dco
ms8-100gb-sfpdd+2-100gb-qsfp28
ms16-100gb-sfpdd+4-100gb-qsfp28
ms18-100gb-qsfp28
ms24-10/100gb-sfpdd
7950 XRS
The following tables list the supported hardware for the 7950 XRS chassis type.
Table 25 7950 XRS-16 Supported Hardware
7950 XRS-16
SFM Card MDA
sfm-x16-b cpm-x16 —
92
3HE 15836 AAAD TQZZA 01 Issue: 01
Page 93
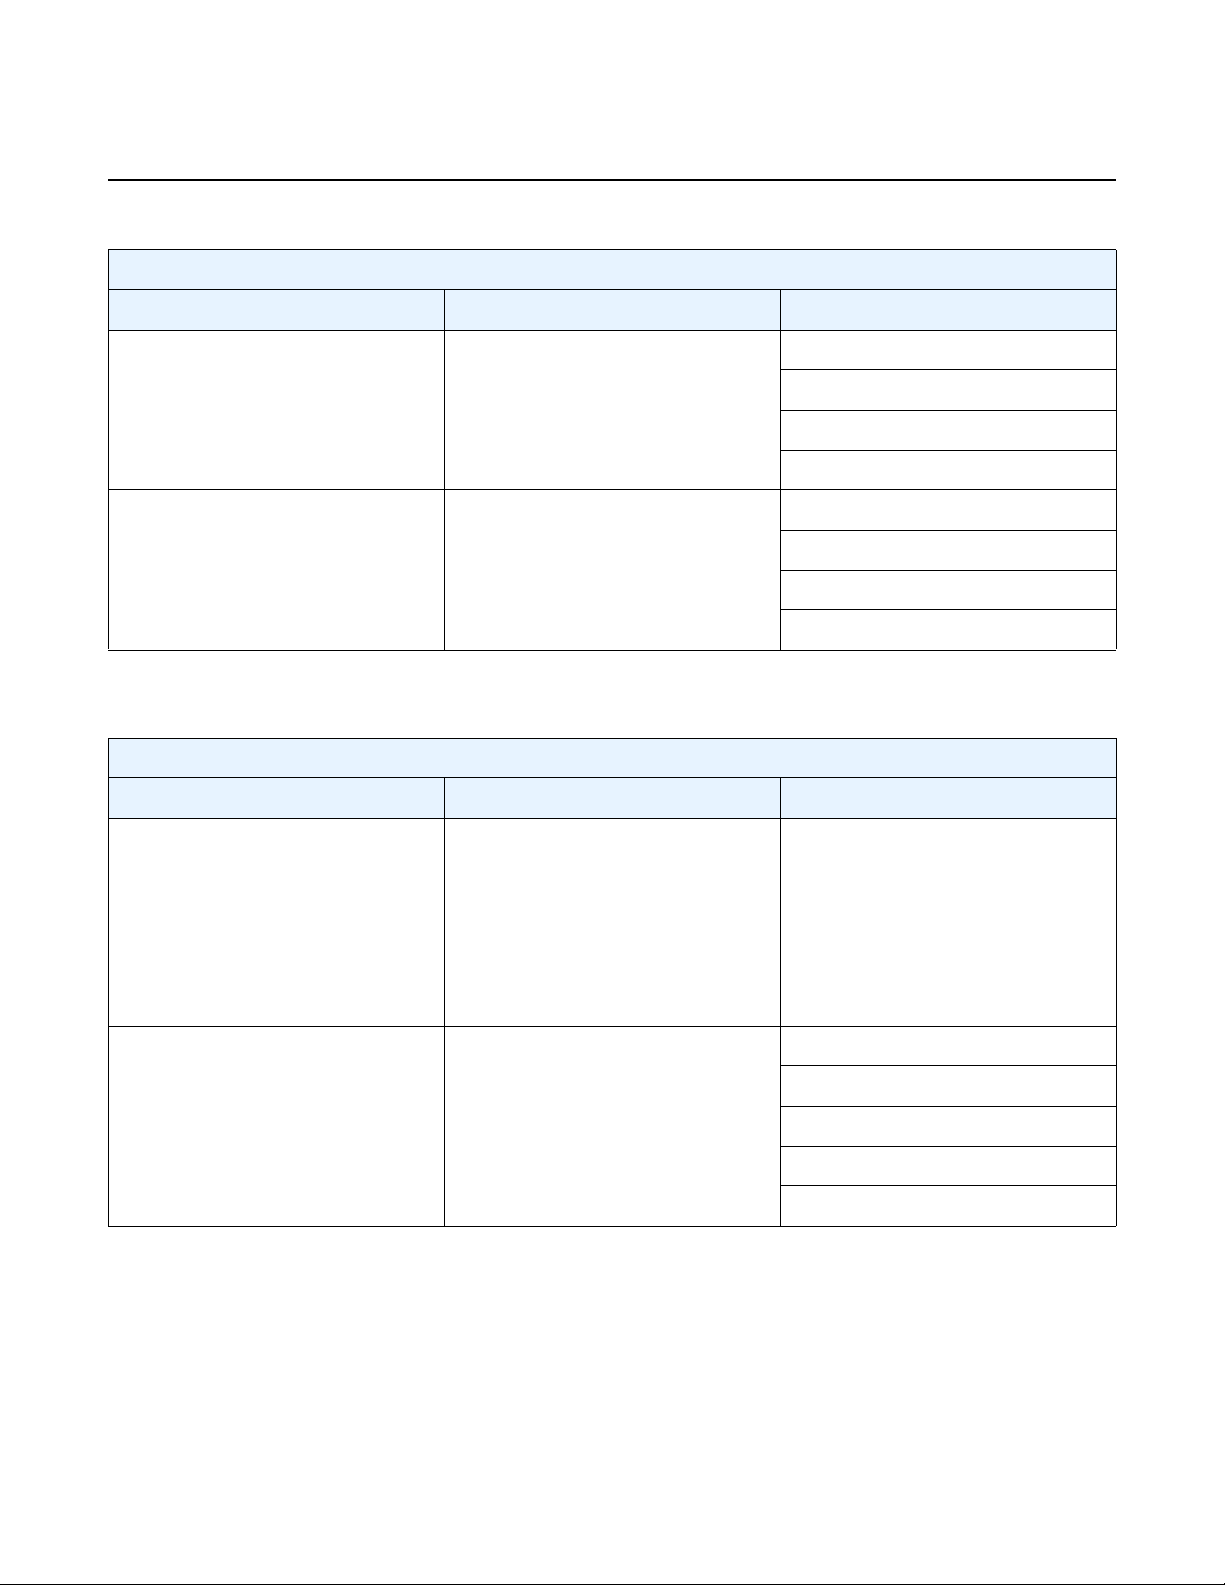
vSIM INSTALLATION AND SETUP GUIDE
RELEASE 20.10.R1
Appendix A: vSIM Supported Hardware
Table 25 7950 XRS-16 Supported Hardware (Continued)
7950 XRS-16
SFM Card MDA
sfm-x16-b xcm-x16 cx20-10g-sfp
cx2-100g-cfp
cx6-40g-qsfp
cx72-1g-csfp
sfm-x16-b xcm-x16w x2-100g-tun
x40-10g-sfp
x4-100g-cfp2
x4-100g-cxp
Table 26 7950 XRS-20/20e Supported Hardware
7950 XRS-20/20e
SFM Card MDA
sfm-x20
or
sfm-x20-b
or
sfm-x20s-b
or
sfm2-x20s
sfm-x20 xcm-x20 cx20-10g-sfp
cpm-x20 —
cx2-100g-cfp
cx6-40g-qsfp
cx72-1g-csfp
x2-100g-tun
Issue: 01 3HE 15836 AAAD TQZZA 01 93
Page 94

Appendix A: vSIM Supported Hardware
vSIM INSTALLATION AND SETUP GUIDE
Table 26 7950 XRS-20/20e Supported Hardware (Continued)
7950 XRS-20/20e
SFM Card MDA
RELEASE 20.10.R1
sfm-x20-b
or
sfm-x20s-b
or
sfm2-x20s
sfm2-x20s xcm2-x20 x12-400g-qsfpdd
xcm-x20 cx20-10g-sfp
cx2-100g-cfp
cx6-40g-qsfp
cx72-1g-csfp
x2-100g-tun
x40-10g-sfp
x4-100g-cfp2
x4-100g-cxp
x24-100g-qsfp28
x6-200g-cfp2-dco
x6-400g-cfp8
94
3HE 15836 AAAD TQZZA 01 Issue: 01
Page 95

vSIM INSTALLATION AND SETUP GUIDE
RELEASE 20.10.R1
Appendix B: Known Limitations
This section provides known limitations with respect to supported vSIM hardware
configurations.
• Only one ISA MDA is supported per IOM.
• The isa-bb is not supported as a hardware configuration for FP3+ based IOMs
(for example, imm-2pac-fp3, iom4-e).
• The imm-1pac-fp3 IOM can only be used in combination with p160-1gb-csfp
MDA.
• The isa-tms is not supported.
• The isa-video is not supported.
• Export-restricted ISA types are not supported.
• The imm40-10gb-sfp-ptp, m40-10gb-sfp-ptp and x40-10g-sfp-ptp are not
supported.
• With the 7250 IXR-R4 chassis, the integrated MDA should be defined in slot 5;
mda/5=m10-1g-sfp+2-10g-sfp+. It is automatically provisioned.
• The 7250 IXR-e 14SFP+ 4T and 7250 IXR-X1 are not supported.
Appendix B: Known Limitations
Issue: 01 3HE 15836 AAAD TQZZA 01 95
Page 96

Appendix B: Known Limitations
vSIM INSTALLATION AND SETUP GUIDE
RELEASE 20.10.R1
96
3HE 15836 AAAD TQZZA 01 Issue: 01
Page 97

vSIM INSTALLATION AND SETUP GUIDE
RELEASE 20.10.R1
Appendix C: vSIM Glossary of Key Terms
Table 27 C
Term Definition
CentOS An open source Linux distribution that reuses source code from
CPU Pinning A configuration constraint (often expressed as an affinity map),
Table 28 D
Term Definition
Distributed Model vSIM instance that uses two or more VMs, connected to a
Appendix C: vSIM Glossary of Key Terms
Red Hat Enterprise Linux.
which specifies to the scheduler the (logical) cores that can be
used to run a task or set of tasks.
common internal network, to implement a single network element.
Table 29 H
Term Definition
Haswell Intel CPU micro-architecture introduced in 2013 that uses 22-nm
process.
Huge pages A large block (2MB or 1GB) of physically contiguous virtual
memory that has a mapping (in the page table) to physical
memory.
Hyper-threading Intel technology that presents one physical CPU core as two
logical processors to the OS.
Hypervisor Software running on a host machine that creates and manages
VMs, and provides the guest O/S in each VM with an abstraction
of the physical machine.
See also VMM.
Table 30 I
Term Definition
Integrated model A vSIM instance that uses a single VM to support all the functions
of one network element.
Issue: 01 3HE 15836 AAAD TQZZA 01 97
Page 98

Appendix C: vSIM Glossary of Key Terms
Table 30 I (Continued)
Term Definition
Intel VT-d Intel Virtualization Technology for Directed I/O
Intel VT-x Intel Virtualization Technology for x86 processors
Table 31 K
Term Definition
vSIM INSTALLATION AND SETUP GUIDE
RELEASE 20.10.R1
Intel CPU MMU feature that provides hardware assist for mapping
a guest virtual address (GVA) to a guest physical address (GPA)
to a host physical address (HPA). Avoids the need for VMM to
maintain a shadow page table per guest.
Hardware virtualization support in Intel CPUs that allows guest
OS to run natively on x86. Introduces two new CPU modes: VMX
root (intended for host/VMM execution) and VMX non-root
(intended for guest).
Kernel Space A block of virtual memory strictly reserved for the OS kernel,
kernel extensions and device drivers.
KVM Kernel-based Virtual Machine
Linux kernel module that allows a user space program, such as
QEMU, to access the hardware virtualization features of the CPU.
Table 32 L
Term Definition
L3 Cache Fast on-chip memory of the CPU that stores frequently accessed
data, saving time to access main memory. It is shared by all cores
of the CPU.
Libvirt Open source Linux package that provides a common set of APIs
for creating and managing the VMs on one host, independent of
hypervisor. Libvirt uses XML files to define the properties of VM
instances, networks, and other devices; the virsh command line
toolset is provided.
Linux Bridge Software implementation of a bridge that forwards Ethernet
frames based on destination MAC address; bridging is performed
by a kernel module controlled by the brctl userspace program
installed with the bridge-utils package. A Linux bridge is
supported by various Linux OS.
98
3HE 15836 AAAD TQZZA 01 Issue: 01
Page 99

vSIM INSTALLATION AND SETUP GUIDE
RELEASE 20.10.R1
Table 33 M
Term Definition
MANO Management and Orchestration
Table 34 N
Term Definition
NUMA Non-Uniform Memory Access
Appendix C: vSIM Glossary of Key Terms
A reference architecture defined by ETSI NFV study group that
gives generic names to the functional components of a complete
NFV solution.
An optimization for multi-CPU systems where each processor has
its own memory.
Table 35 O
Term Definition
OpenStack An open source cloud orchestration platform (VIM) managed by
the non-profit OpenStack Foundation, it includes various
components such as Nova (compute), Neutron (networking),
Glance (image service), Cinder (block storage), and Dashboard
(GUI).
OVA Open Virtual Application
A tar archive of an OVF package.
OVF Open Virtualization Format
A DMTF standard format for packaging software to be run in VMs.
An OVF package contains an XML-based OVF descriptor file
(.ovf), one or more disk images, and other auxiliary files. The O VF
descriptor file specifies HW requirements and lists references to
other files in the OVF package.
Issue: 01 3HE 15836 AAAD TQZZA 01 99
Page 100

Appendix C: vSIM Glossary of Key Terms
Table 35 O (Continued)
Term Definition
OVS Open Virtual Switch
vSIM INSTALLATION AND SETUP GUIDE
RELEASE 20.10.R1
Open-source software implementation of a multi-layer switch, it
supports standard bridging protocols, monitoring protocols
(sFlow, Netflow), and programmatic extensions (Openflow,
OVSDB).
Main OVS components are: userspace daemon (ovs-vswitchd),
database daemon (ovsdb-server), and kernel module.
The kernel module implements 'fast path' using a flow cache table
populated by ovs-vswitchd. The first packet of a flow goes to ovsswitchd for slow-path processing. ovs-vswitchd communicates
with the kernel using the netlink protocol, and with ovsdb-server
using the OVSDB protocol.
Release is 2.3.1 is the latest stable OVS release.
Table 36 P
Term Definition
Paravirtualization Technique where the guest and hypervisor coordinate to optimize
performance in a virtualized environment.
Table 37 Q
Term Definition
QCOW2 A virtual disk image format supported by QEMU.
QEMU Quick Emulator
Open source hypervisor typically used with KVM that emulates a
broad range of devices including CPUs, disks, PCIe chipsets,
USB devices, and serial ports.
Table 38 R
Term Definition
RHEL Red Hat Enterprise Linux
100
3HE 15836 AAAD TQZZA 01 Issue: 01
 Loading...