

Page 1

Customer Care Solutions
Technical Documentation
5-Disassembly Instructions
Issue 1 11/2004COMPANY CONFIDENTIAL1
Copyright © 2004 Nokia. All Rights Reserved.
Page 2

RM-12
Table of Contents
SW-Update.................................................................................................................... 3
Flash Concept – (Point of Sales) ................................................................................. 3
Disassembly instructions............................................................................................... 4
2 COMPANY CONFIDENTIAL Issue 1 11/2004
Copyright © 2004 Nokia. All Rights Reserved.
Page 3
RM-12
SW-Update
To use FLS-4S Flash Dongle you have to follow the user guide inside the sales package.
Please check always for the latest version of flash software, which is available on Nokia
Partner Web Site / Nokia Online.
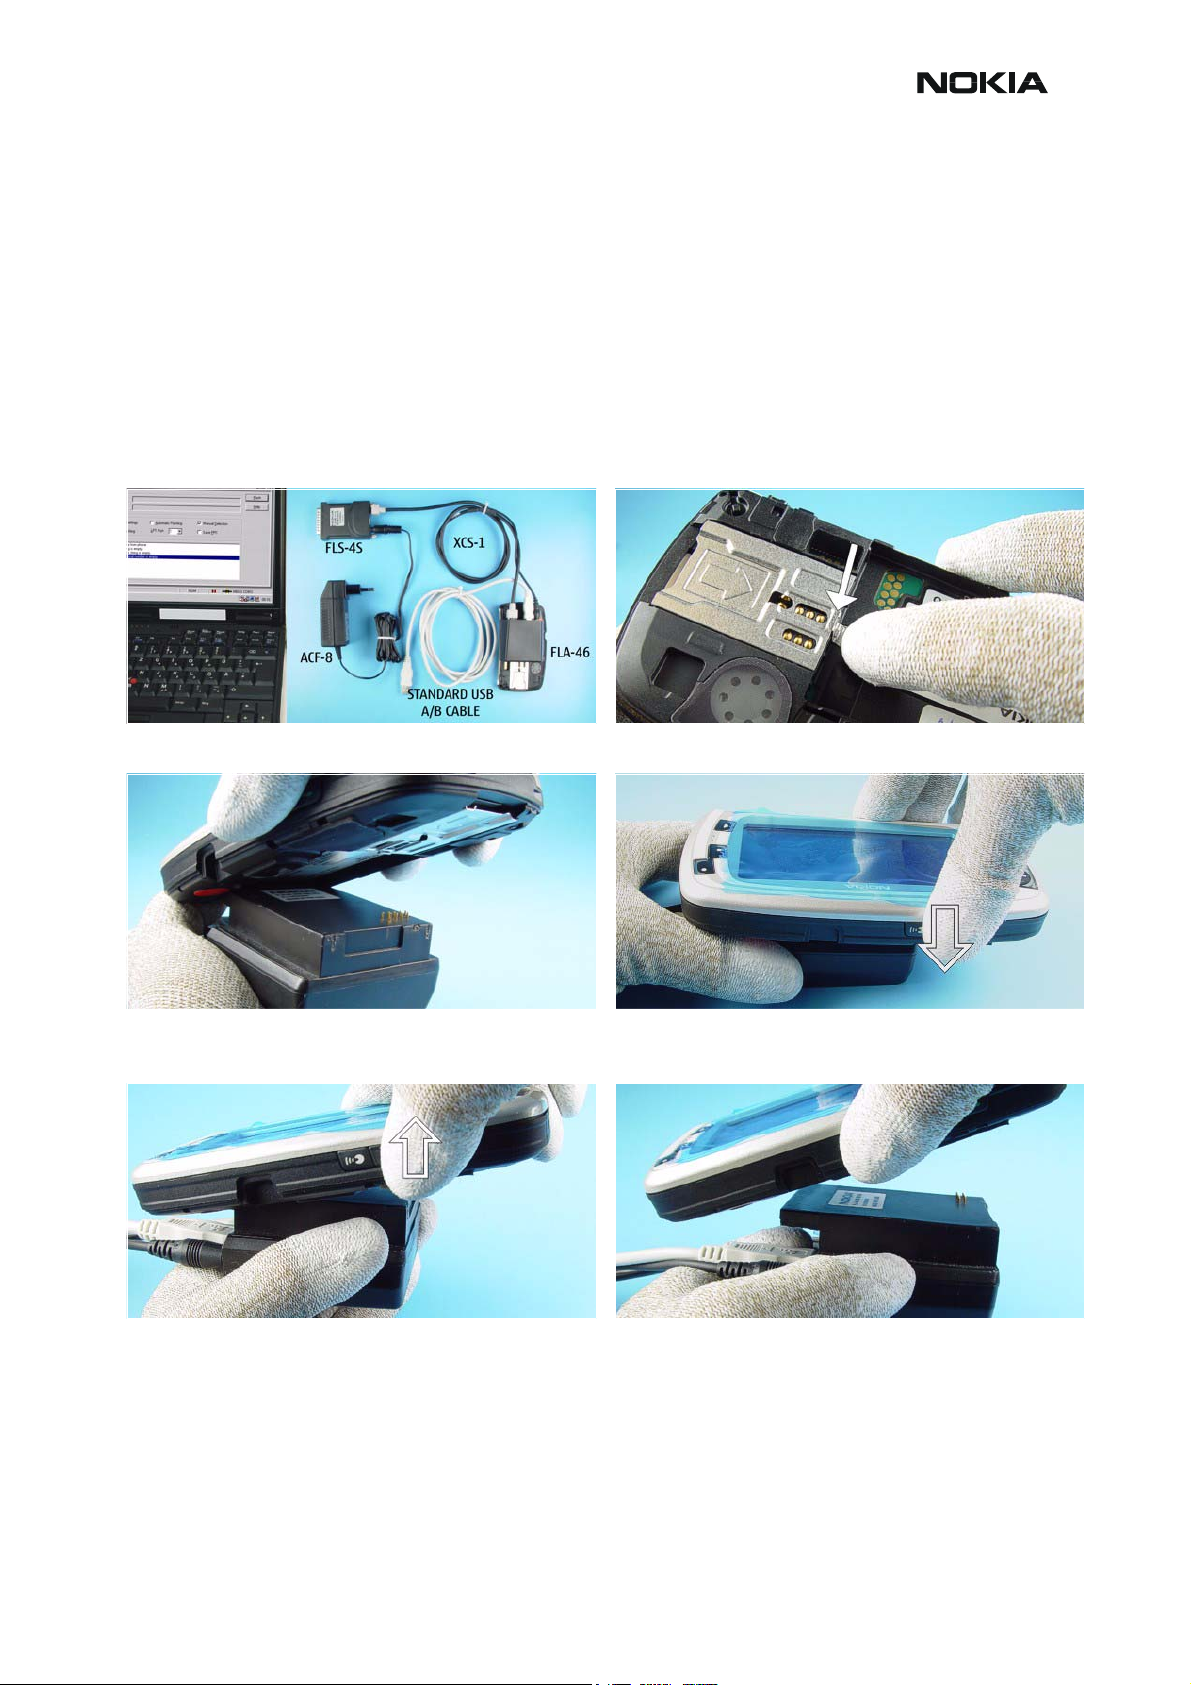
Flash Concept – (Point of Sales)
It is very important to follow this insertion and removal procedure, otherwise the contact
pins of Flash Adapter will be damaged.
CCS Technical Documentation
Insert the Flash Adapter like a battery, start at the Battery
Connector side.
Close SIM Latch before inserting the Flash Adapter.
Now, push down the phone carefully.
Remove the phone as shown in the picture. Take away the unit now.
Issue 1 11/2004COMPANY CONFIDENTIAL3
Copyright © 2004 Nokia. All Rights Reserved.
Page 4

RM-12
Disassembly instructions CCS Technical Documentation
Disassembly instructions
Note! Also see the video clips on care point.
1) Needed tools for disassembly/assembly.
3) Unlock and lift the B-Cover Assy. 4) Push the B-Cover Assy in shown direction.
5) Protect the Camera Window with a plastic film.
2) Remove the Stylus.
6) Unlock the clips of the A-Cover with the SRT-6.
7) Remove the Keymats.
8) Protect the LCD with a plastic film.
Page 4 ©Nokia Corporation Issue 1 11/2004
Page 5

RM-12
CCS Technical Documentation Disassembly instructions
9) Unlock the Domesheet Sidekey on both sides carefully.
11) Lift up the Domesheet Sidekey with the dental tool,
beginning from the left side.
10) Prevent damaging the IHF Frontvolume Gasket when
releasing the second sidekey clip.
12) Unscrew and remove the screws in the shown order, for
assembly use the reverse order, always use new screws
and a torque of 21 Ncm.
13) Carefully separate the A-Frame Assy with the LCD, take
great care of the flex foil. Remove the protecting film from
the LCD.
15) Protect the LCD with a film. Put it onto the A-Frame
Assy, mind the flex foil.
14) Push out the LCD with a clean piece of cloth carefully.
16) Unscrew the two screws in the shown order, mind the
flex foil. For assembly use the reverse order, always use
new screws and a torque of 21 Ncm.
Issue 1 11/2004 ©Nokia Corporation Page 5
Page 6

RM-12
Disassembly instructions CCS Technical Documentation
17)Turn over the B-Frame Assy carefully first.
19) Unlock and pull out the Power Key. 20) Remove the Microphone with tweezers.
21) Remove the Vibra Motor. 22) Use the DC plug to remove the DC Jack. Additional
18) Then remove the B-Frame assy.
force may be required.
23) For Side Key Assy removal lift up the IHF Backvolume
Gasket first.
24) Pull out the Sidekey Assy.
Page 6 ©Nokia Corporation Issue 1 11/2004
Page 7

CCS Technical Documentation Disassembly instructions
For assembly only!
26) Remove the IHF Frontvolume Gasket.
25) For Assembly lift up the IHF Backvolume first , then
place the Sidekey Assy.
RM-12
27) Push out and take away the IHF Speaker. 28) Disconnect the 3 Flex connectors with the SS-34.
29) Remove the Engine Module.
31) Remove the LCD Module Assy. 32) Unlock the 4 clips of the Earpiece Adapter with the
30) Remove the Shield Assy.
SRT-6.
Issue 1 11/2004 ©Nokia Corporation Page 7
Page 8

RM-12
Disassembly instructions CCS Technical Documentation
33) Remove the Earpiece Adapter Assy, use the SRT-6 if
necessary.
35) Use the Shield Assy as support while removing the
Camera Module.
34) Open the Flex connector of the Camera Module with
the SS-34.
36) Push out the Camera Module with the SRT-6.
37) Take away the Camera Module.
Page 8 ©Nokia Corporation Issue 1 11/2004
 Loading...