

Page 1
SALORA
L
UXOR
SCHAUB WREN2
7291 28F8
dent-No. 5439 47 20
:OC) Ident-No. 5439 47 40
UK) Ident-No. 5439 98 40
8291
dent-No. 5439 46 70
:OC) Ident-No. 5439 47 00
'#IV\ #A^_. &I_ rr"n no cn
,un, ,"ellL-IY". 3455 JO 3"
9291
dent-No. 5430 82 80
dent-No. 5439 46 50
:OC) Ident-No. 5430 83 20
:OC) Ident-No. 5439 46 60
UK) Ident-No. 5430 83 00
I..._. . . . . _.^^ ^^ ^^
,UKJ raenr-No. 34s~ ~6 bu ,
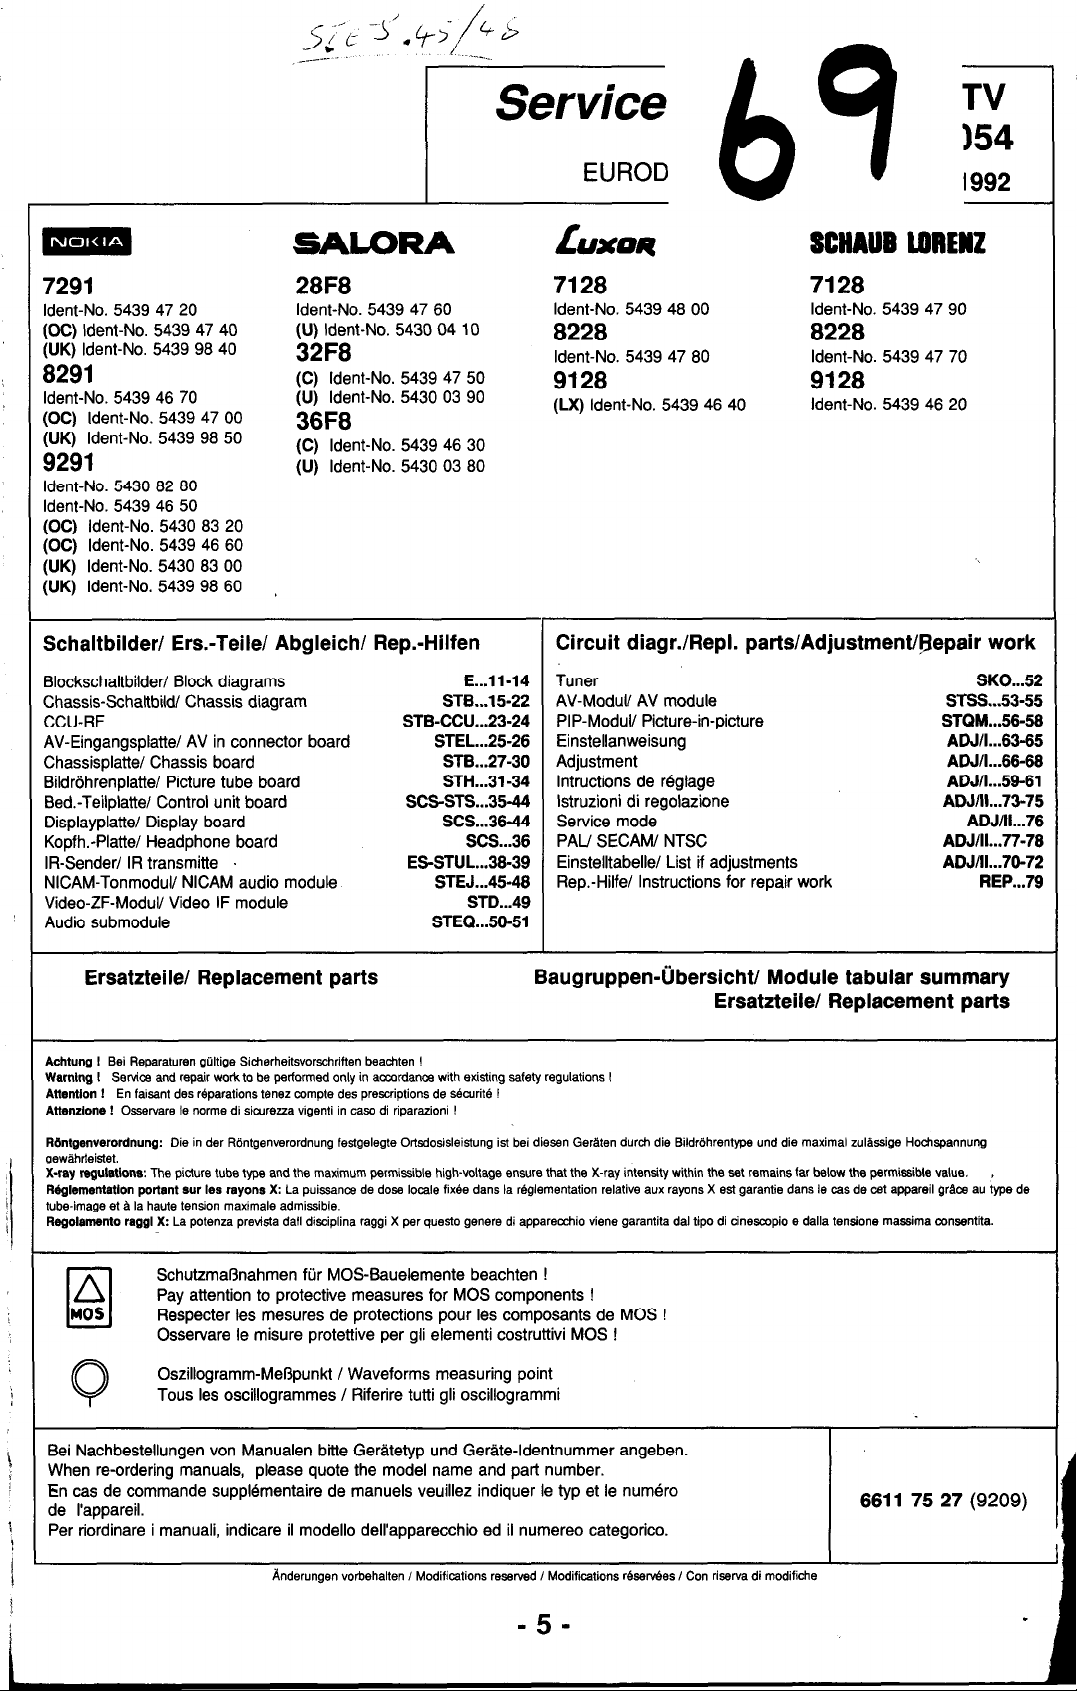
Schaltbilder/ Ers.-Teile/ Abgleich/ Rep.-Hilfen
3lockschaltbilderl Block diagrams
>hassis-Schaltbildl Chassis diagram
CCU-RF
1\V-Eingangsplattel AV in connector board
Chassisplatte/ Chassis board
3ildrbhrenplatte/ Picture tube board
aed.-Teilplattel Control unit board
Displayplatte/ Display board
Kopfh.-Platte/ Headphone board
IR-Sender/ IR transmitte
NICAM-Tonmodull NICAM audio module
Video-ZF-Mod& Video IF module
Audio submodule
Ident-No. 5439 47 60
(U) Ident-No. 5430 04 10
32F8
(C) Ident-No. 5439 47 50
(U) Ident-No. 5430 03 90
36F8
Ident-No. 5439 46 30
(C) Ident-No. 5430 03 (U) 80
STB...15-22
STB-CCU...23-24
STEL...25-26
STB...27-30
STH...31-34
SCS-sTS...35-44
SCS...3644
EESTUL...36-39
STEJ...45-48
STEQ...50-51
E...ll-14
SCS...36
STD...49
7128 7128
Ident-No. 5439 48 00
8228
Ident-No. 5439 47 80
9128
(LX) Ident-No. 5439 46 40 Ident-No. 5439 46 20
Circuit diagr./Repl. parts/Adjustment@epair work
Tuner
AV-ModuV AV module
PIP-Modull Picture-in-picture
Einstellanweisung
Adjustment
Intructions de reglage
lstruzioni di regolazione
Service mode
PAL! SECAM/ NTSC
Einstelltabellel List if adjustments
Rep.-Hilfe/ Instructions for repair work
Ident-No. 5439 47 90
8228
Ident-No. 5439 47 70
9128
SK0...52
sTSS...53-55
STQM...56-66
ADJ/l...63-65
ADJ11...66-66
ADJ/l...59-61
ADJ/ll...73-75
ADJ/ll...76
ADJ/ll...77-78
ADJ/ll...76-72
REP...79
Ersatzteiie/ Replacement parts
Baugruppen-Ubersichtl Moduie tabuiar summary
__
Ersatzteilei Replacement parts
Achtung I Bei Reparaturen gijltige Sicherheitsvorschriften beachten !
Warning I Service and repair work to be performed only in armrdance with existing safety regulations I
Anmtlon ! En faisant des reparations tenez compte des prescriptions de skurite !
Anenzlone ! Osservare Ie norms di sicurezza vigenti in case di riparazioni !
Rbntgenverordnung: Die in der Rontgenverordnung festgelegte Ortsdosisleistung ist bei diesen Geraten durch die Bildrohrentype und die maximal zulassige Hochspannung
gewahrleistet.
X-ray regulations: The picture tube type and the maximum permissible high-voltage ensure that the X-ray intensity within the set remains far below the permisstble value. ,
Mglementatlon portant cur les rayons X: La puissance de dose locale fixbe dans la kglementation relative aux rayons X es4 garantie dans le cas de cet appareil Q&e au type de
tubs-image et 1 la haute tension maximale admissible.
Regolamento raggl x: La potenza prevista dall disciplina raggi X per quest0 geners di apparecchio viene garantits dal tip0 di cinescopio e dalla tensfone massima consentita.
SchutzmaOnahmen fur MOS-Bauelemente beachten !
n
MOS Respecter les mesures de protections pour les composants de MOS !
0
@
Bei Nachbestellungen von Manualen bitte Geratetyp und Gerate-ldentnummer angeben.
When re-ordering manuals, please quote the model name and part number.
En cas de commande supplementaire de manuels veuillez indiquer le typ et le numero
de l’appareil.
Per riordinare i manuali, indicare il modello dell’apparecchio ed il numereo categorico.
Pay attention to protective measures for MOS components !
Osservare le misure protettive per gli elementi costruttivi MOS !
Oszillogramm-MeBpunkt / Waveforms measuring point
Tous les oscillogrammes / Riferire tutti gli oscillogrammi
6611 75 27 (9209)
kderungsn vorbehalten / Modifications reserved I Modifications r&e&es / Con riserva di modifiche
Page 2
- _ - - _ _
_
L
1
II861
IC
mea
l 3oov
08705
;;
L
IP SAL0
HYBRID
HE701
_-_----_-_______________
START
OSCILLATOR =
IC1/1.1/2 1
27kHt
,
I I
A I
r"" I
IC1/3
IC2/1 v
r
,I?,,,
.“_, _
PNY 2
IC3/1
IC3/2
IC3/4
ClO/T2
I
r
L___c____________________________________________~~~~~~
-
5
2,
II
0a.W
8
in St-bv
10
_____'______________'-______________~
@ 21
d R47 -
c1.7.3v
L" St-bv
11
w i
oa;L+
2
z
I
I
I
I
I
I
I
I
I
I
TREIBER M _
TWTB
4/15/21
tt8713
010
I
I
I
I
I
I
' 15.525kHz
I
I
I
I
1
NUR IN'EIN'ZUSTAND
IN'ON'CONOITION ONLY
g
k
TB701
Q(
-L-
22v
l-
9
,!
II
B
!
%
0
c
-..-...
Jr=m-b
OV=ON
ma
ma
TB
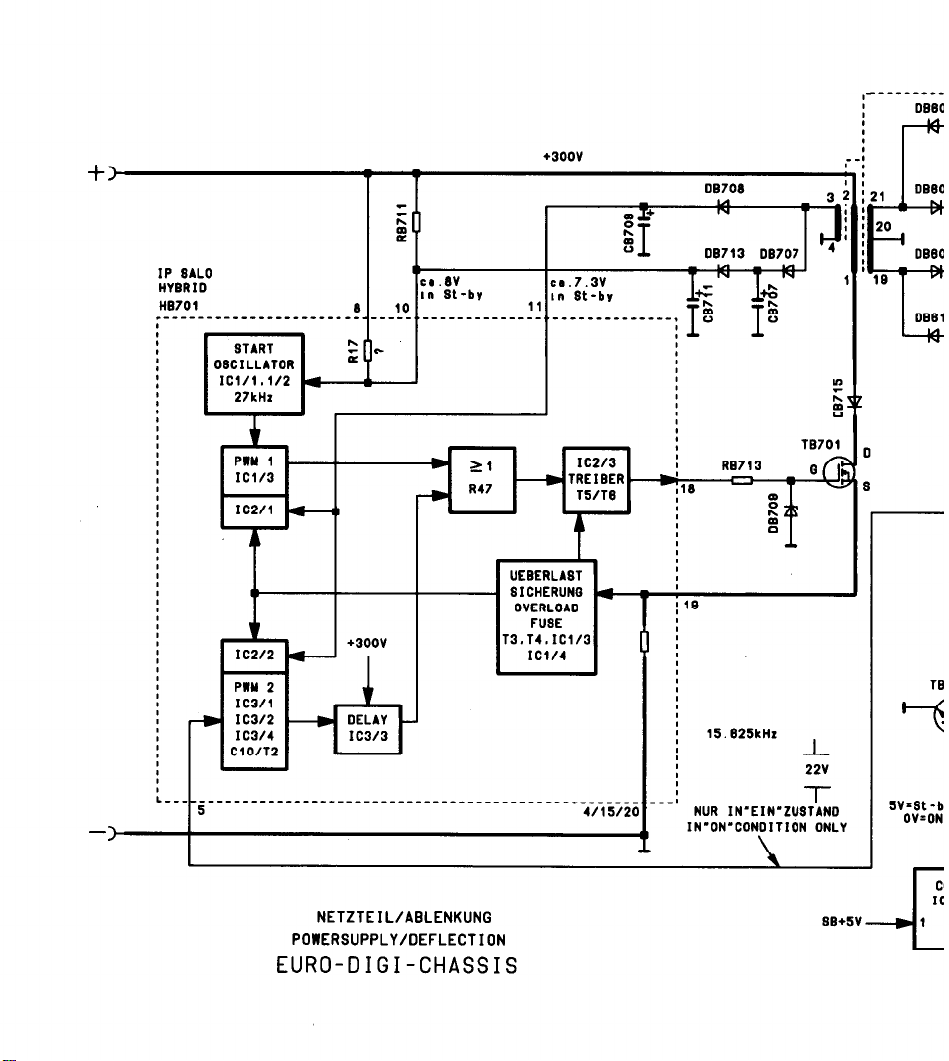
NETZTEIL/ABLENKUNG
POWERSUPPLY/OEFLECTION
s3+5v
1
-+
EURO-DIGI-CHASSIS
Page 3
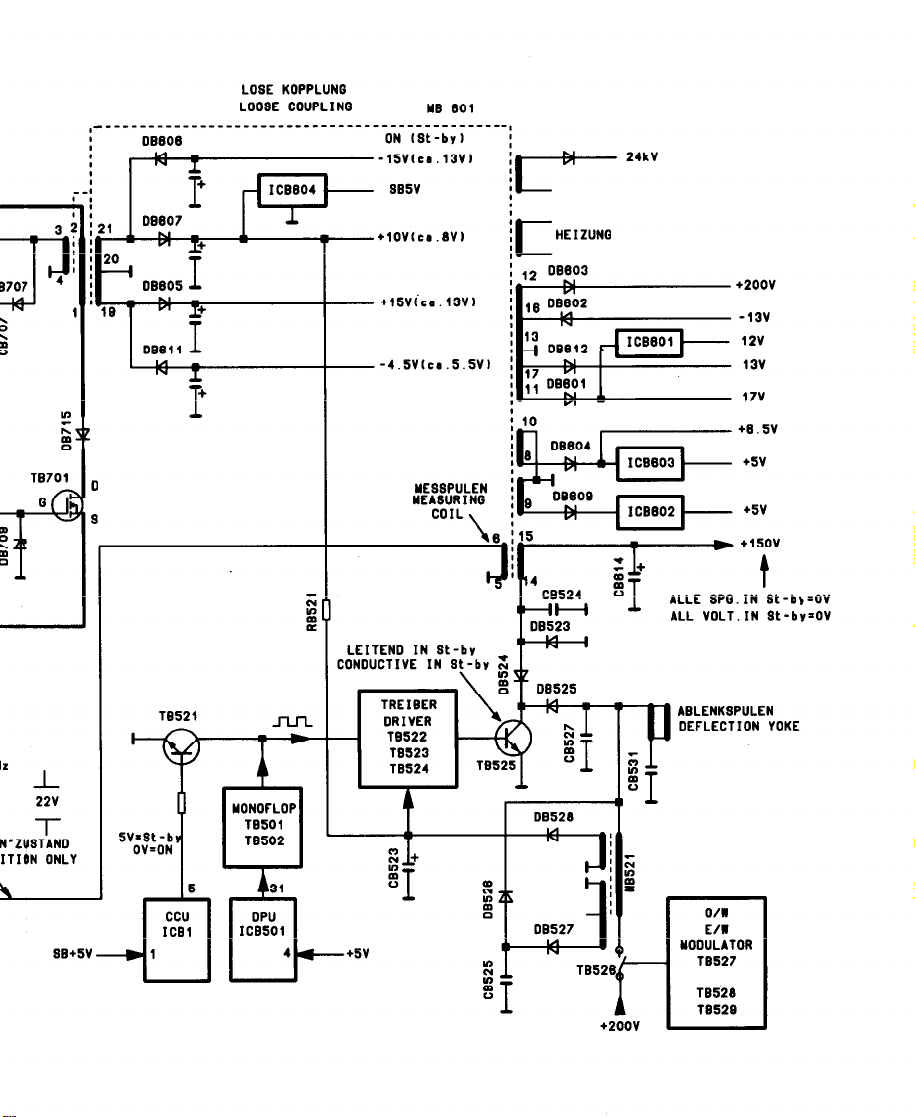
LOSE KOPPLUNS
LOOSE COUPLINS
,________________________________________________,
.jil ~~+-!:?:::I
YE SO1
24kV
I
-9
8707 4
J
TS701
22v
l-
N’ZUSTAND
ITION ONLY
TS521
-+15vica.13vI
J-LI-L
i
- TO522
YESSPULEN
YEASURINS
COIL
\
. . . _ ^_^ . . . ^.
lLLL BF”.,ra Lit-br=O’r’
ALL VOLT.IN St-bY’OV
i
+2oov
-13v
12v
13v
17v
AOLENKSPULEN
DEFLECTION YOKE
O/I
E/U
YOOULATOR
TES27
TO528
TB52S
Page 4
_--
r
L
f,
_=
023
100’
t
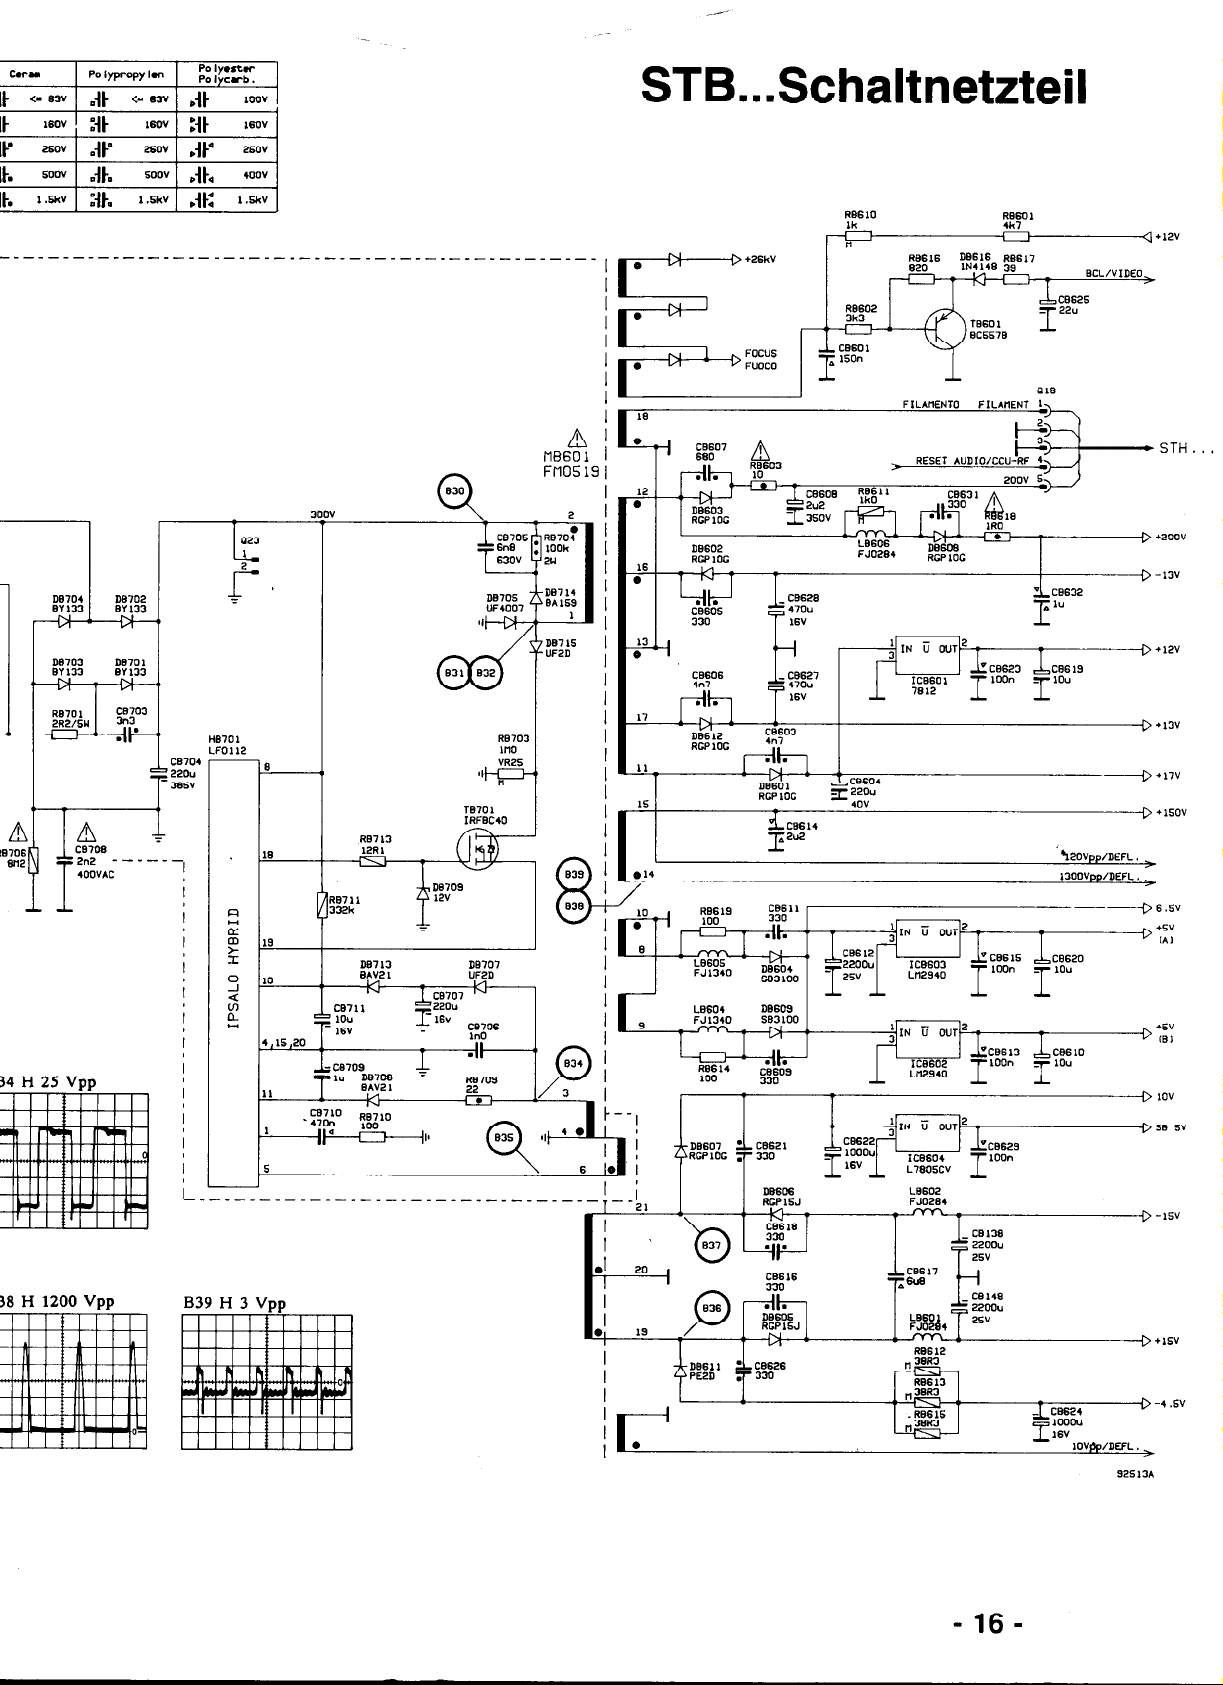
STB...SchaltnetzteiI
FflO5 19 1
I,
CB705
1
-p&
DB7OS :
LlF4007
11,
631 632
Gcf
D67LS
“FPD
+2oov
-13”
t i
34 H 2.5 Vpp
38 H 1200 Vpp
,701
‘0112
6
J--
06713 DB707
c0711
52 IOU
BA”2L
N
16V
co707 N
220”
zlIsv C8706
10
4,15,20
i-
L_______________________________
B39 H 3 Vpp
UF2D
I”0
. .
15
I
I
N I I
VI - &
D860 1
RGP LOG
08606
C6604
z 220”
40”
-+ +I,”
+1sov
‘%0vpp/nEFL.
130O”pp/DEFL.
LB602
-16-
Page 5
Adjustment procedure for 16:9 TV sets
p1 c Pincushion
Pincushion
grid
(c~
tc
1
memo
1
General
The adjustments of the receiver are performed with a remote control handset. Only focus and G2 adjustments are potentiomter adjustments.
The settings have been distributed among 16 adjustment planes. The usual colour and geometry adjustment routines are performed in
5 adjustment groups on adjustment planes 1 - 7. Every adjustment group has its own separate adjuster buttons, which trigger different
adjuster functions, depending on the adjustment plane you are currently on (NOKIA/SALORA/LUXOR/SCHAUB LORENZ Fig. 3 /
Page 72). The digit display blinks during adjusting until the extreme value is reached.
The adjustments are performed in service mode.
Adjustments required for different standards
Certain adjustments must be made for each standard separately on the respective programme position. When the TV is in normal mode,
select the menu display to check the programme standard. In order to adjust different standards you have to preset such a standard to a
programme position (e.g. programme position 1: PAL, programme position IO: SECAM etc.). The tables ( Page 77-78) shows the adjustment
values to be used with each colour system and standard.
Service mode
Access to the service mode is obtained by switching on the receiver with the mains switch
within 6 seconds: (Fig. 1 - Page 76/N.B.! Note the type of remote control handset involved !). The display shows the programme
memorys version (01...79). Depending on the type of remote control handset you have , the following buttons are operative in service mode:
(NOKIA/SALORA/LUXOWSCHAUB LORENZ Fig. 3 / Page 72)
Q, and by keying in the following command
Option bytes
The TV configuration is determined with option bytes. These byte settings are effective on all programme positions when not otherwise stated
(NOKIAISALORAILUXOWSCHAUB LORENZ Fig. 3/ Page 70-71). An option byte consists of 8 bits.The state of each bit is indicated by the
corresponding segment in the right-hand digit display.
The state of each bit can be toggled with numeric keys 0 to 7. If the segment lights up, corresponding bit is set to “1”. The effect of option
bytes is not visible until returning to the TV mode !
Detailed description of how to adjust colour and geometry,
Using the adjusting table (NOKIA/SALORA/LUXOR/SCHAUB LORENZ Fig. 3 ! Page 70-72)
Geometry adjustments must be carried out completely after replacement or initialization of memory IC X24C16P (ICB 50). The following
order of adjustments has been found to produce the desired result with the minimum of effort. Adjustments can also be made in another order
or completely separately.
Upon completion of adjustments the settings can be stored all with a single depression of the memory key (MENU or OK/->M) before leaving
the service mode.
Exception
Grey scale adjustments have to be stored separately on adjustment group S/adjustment plane 5 or 6.
-
Selecting another programme position is possible in the middle of an adjustment. Non-memorized adjustments are not retained if the
-
new programme position has different adjustment values (e.g. another colour system).
SA Colour oscillator synchronization: Adjust the colours “upright” ( Adjust. plane 1 /Adjust. group 3 )
dL Luminance delay: For adjustment use an external RGB source and video signal in MIX mode. Select programme position 0. Apply the
R signal to EXTI input pin 15 and video signal to EXTl input pin 20. Connect the Fast Blanking pin 16 to R input pin 15 at the EXT socket,
Adjust the RGB and video pictures to the same position ( Adjust. plane 1 /Adjust. group 2 )
dC Chrominance delay: Using RF test picture, adjust the colour transition to the same position with the luma transition (Adjust plane
Adjust. group 4 )
Note: If there is no DTI circuit in the system, perform the whole adjustment with ud !
Coarse adjustment of dL and dC without external RGB signal: Adjust dC to the maximum with, then decrease 10 steps. Adjust dL to
same phase.
1 /
ud Chroma/luma delay (DTI or no DTI): Adjust ud to align the colour transient to the position of the luminance transition ( Adjust. plane
/Adjust. group 4 )
SP Horizontal centering: Center the picture with SP. If the adjustment is not possible, check dL adjustment ( Adjust. plane 7 /Adjust.
group 1 1
Note: It helps picture centering if the centre point of the screen is marked on the tube e.g. with a piece of tape.
A0 Vertical shift: Adjust the top border of test pattern ( Adjust. plane 2 /Adjust. group 1 )
HO Picture height: Adjust the bottom border of the test pattern the amount of half a square beyond the screen ( Adjust. plane 2 /Adjust
group 2 )
SO Vertical linearity: Adjust the bottom border of test pattern (Fig. 4 / Page 69) ( Adjust. plane 2 /Adjust. group 3 )
Cl Pincushion distortion correction 2: Depending on the remote control handset type involved, use the AUDIO button (NOKIA) or W
( SALORA) or -
to increase by three steps (Fig. 5 / Page 69) ( Adjust. plane 3 /Adjust group 5 )
5 :’
rapezium distortion correction 2: Depending on the remote control handset type involved, use button
( SALORA) or 44 ( LUXORSCHAUB LORENZ) to stretch the picture far enough to render the bending points (summing points Kl and
K2) clearly visible (Fig. 6a / Page 69). At this juncture, pay no attention to the picture distortion ( Adjust. plane 3 /Adjust group 4 )
( LUXOWSCHAUB LORENZ) to adjust to the extreme value (picture distortions will occur!), then use VIDEO or b
0 (NOKIA) or 44
Kl Summing point 1: Adjust summing point Kl to position shown in Fig. 6a (2,5 squares from top). It may be necessary to adjust Zl too
( Adjust. plane 4 /Adjust group 7 ) (Fig. 6a + 6b I Page 69)
7
Page 6
K2 Summing point 2: Adjust summing point K2 to position shown in Fig. 6a (2,5 squares from bottom). It may be necessary to adjust 21
260
22
dC
224:
2250
(Chromina
273!
2131
(Gair
255:
817:
306
onvolvec
1
F
Modificatic
i:
blu’ = Maxin
Maxin
Maxin
too ( Adjust. plane 4 /Adjust. group 2 ) (Fig. 6a + 6b / Page 69)
Zl Trapezium distortion correction 2: Adjust the lines between the summing points as straight as possible; adjustment usually at
minimum ( Aausf. plane 3 / Ac$ust. group 4 ) (Fig. 6a + 6b / Page 69)
ZO Trapezium distortion correction 1: Straighten the vertical lines at the upper half of the picture without paying attention to what
happens to the lower half of the picture ( Adjust. plane 3 /Adjust. group 2 ) (Fig. 6a + 6b / Page 69)
CO Pincushion distortion correction 1: Straighten the vertical lines at the lower half of the picture. Vertical lines can be straightened by
alternately adjusting 20 and CO ( Adjust. plane 3 /Adjust. group 3 ) (Fig. 5 + 6b / Page 69)
YO Picture width: Adjust the top corners to correct position ( Adjust. plane 3 /Adjust. group 1 )
CO Pincushion distortion correction 1: Check the position of the bottom corners. If the picture is not straight between the summing
points, check Cl and 21 adjustments ( Adjust. plane 3/Adjust. group 3 )
St DTl start time adjustment: Use normal RF signal. Adjust the transients of colour bars to the same postion as the transitions of B/W
picture ( Adjust plane 4 /Adjust. group 4 )
Sp DIT stop time adjustment: Use normal RF signal. Adjust the transients of colour bars to the same position as the transitions of BNV
picture ( Adjust. plane 4 /Adjust. group 5 )
Grey Scale Adjustments
G2 Screen grid voltage: Adjust brightness and contrast to minimum. Adjust G2 trimmer of the potentiometer unit on the tube base panel.
Adjustment is correct when neither of the dot LEDs are illuminated in the display. At the same time, the most efficient gun is clamped to a
reference level (cut off voltage approx. 150 V), which is fixed at the lowlight adjustment and cannot be adjusted ( Adjust. plane S/Adjust.
group 7 )
CT, CG, cb Black level adjustments: Increase contrast to a level where picture is slightly visible. The gun which was set fixed at G2
adjustment can be found at adjustment in which both dot LEDs are illuminated i.e. black level of this particular colour cannot be adjusted.
Adjust the grey scale of test pattern to grey by changing the black level of the two remaining guns ( Adjust. plane 5 /Adjust. group
1+2+3 )
dr, dG, db Highlight adjustments: Measure with an oscilloscope at the bases of transistors TH 13, TH 23 and TH 33 to check which
colour channel has the maximum preset gain. Leave the oscilloscope to the appropriate base and adjust contrast control for a reading of 60 V
from black level to white. Disconnect the oscilloscope. Adjust for normal brightness (all grey bars are discernible) ( Adjust. plane 6 /Adjust.
group 1+2+3 )
If the picture is too
red, decrease red with dr adjustment until white parts of test pattern turn to white;
green, decrease green with dG adjustment until white parts of test pattern turn to white;
-
blue, decrease blue with dB adjustment until white parts of test pattern turn to white.
-
Check black level adjustments. If you have to adjust these, then check the highlight adjustments too.
Note: Grey scale adjustments must be stored on adjustment group 5/adjustment plane 5 or 6 with the key MENU or OK/-rM.
Other Adjustments
HA Horizontal adjustment of text page: Center the teletext page within the screen. At the same time also menus and screen displays are
shifted ( Adjust plane 7 /Adjust. group 7 )
CA Relative contrast of menus: Adjust the contrast of menus, screen displays and teletext (only MIX mode) relative to the contrast of
normal picture ( Adjust. plane 7iAdjust. group 2 )
CL Maximum contrast of teletext page: Adjust the contrast of test pattern to mid-position, then adjust white characters of text for equal
brightness to the white in the test pattern ( Adjust. plane 7/Adjust group
3 )
PH Centering the PIP screen ( Adjust. plane 74 )
PA Colour oscillator sync. of PIP screen: Adjust the colours “upright” ( Adjust. plane 14 )
Note: The PH and PA adjustments are missing if there is no PIP module in the set.
Focus adjustment
Set contrast close to maximum and brightness for a well balanced grey scale. Adjust focus to optimum using the Focus potentiometer of the
trimming unit on the tube base panel.
IC identification
On adjustment planes 12 and 13, you can check which ICs are connected to the PC and the bus respectively This feature can also be
utilized for fault finding (NOKIAISALORA/LUXOFt/SCHAUB LORENZ Fig. 3 / Page 70-71)
IC replacement
X24C16P Memory IC ICB 50 (= STB / IC 50): If you suspect that some adjustment value prevents the set from starting up
replace the memory IC with one which is O.K. and contains sufficient initializing values - e.g. preprogrammed spare memory IC (Fig. 7 /
Page 62)
NVM 3060 EEPROM memory ICBM 1
lnitializing memory ICs ICB 50 and ICBM 1 : lnitializing replaces the values stored in memory IC ICB 50 with new ones (from ICB 2). The
picture will not be perfect when using the initialized values.
1. Disconnect the mains plug.
2. Switch the TV on with the mains switch.
3. Reinsert the mains plug and within 6 seconds press the following buttons consecutively (depending on the type of remote control
handset involved): (NOKIA) MUTE / m / m / or ( SALORA) II / I / b / lb or (LUXOWSCHAUB LORENZ)
+/l /I,/,,/.
The TV is switched on to programme position 1 after initializing. Channel 24 and PAL B/G standard will have been stored on all programme
positions. After initialization check the options and perform all adjustments.
Page 7

ecu 3000 Control unit ICB l!
FA... Programme memory ICB 2: Check whether the new IC is of the same type. If the spare IC differs from the older one, other
modifications may be necessary. Check to see whether corresponding modification instructions have been supplied with the IC or c0ns.L
service bulletins.
MCU 2600 Clock generator ICB 80: Check SA (Colour synchronization)
ACVP 2205 Video processor ICB 230: Check SA (Colour synchronization), ud (Chrominance delay / not DTI) or dL ( Luminance
delay) and dC (Chrominance delay / DTI present)
SPU 2243 SECAM prozessor ICB 220: Check ud (Chrominance delay / no DTI) of the SECAM standard or dL (Luminance delay)
dC (Chrominance delay / DTI present)
DTI 2250 Transient improvement processor ICB 240: Check St (DTI start time) and Sp (DTI stop time) of the standards in use.
ud (Chrominance delay/no DTI), dL (Luminance delay) and dC (Chrominance delay / DTI present)
TPU 2735 Teletxte processor ICB 250: Check HA (Teletext horizontal centering) and CA (Contrast, Menu & MIX)
VCU 2136 Video coder/decoder ICB 201: Check G2, cr (Black level, red), cG (Black level, green), cb (Black level, blue), dr (Gain
red), dG (Gain, green), db (Gain, blue) and CA (Contrast, Menu & MIX)
DPU 2553 Deflection processor: Check the geometry adjustments of all standards in use
TDA 8172 Vertical output stage ICB 570: Check picture height, position of top border and thereafter East/West adjustments
NVM 3060 EEPROM memory, PIP ICQM 203: lnitialize the IC and perform PH (Horizontal centering, PIP) and PA (Colour
synchronization, PIP) adjustments
lnitialization
1.
Switch the TV on with the mains switch.
2.
Within 6 seconds after switching on the TV press the following buttons consecutively (depending on the type of remote control hand,
onvolved): (NOKIA) MUTE /c@ / m or ( SALORA) II / I / b / lb or ( LUXOWSCHAUB LORENZ) + / I / lb I
lnitialize the IC and perform PH (Horizontal centering, PIP) and PA (Colour synchronization, PIP) adjustments
%...Tuner TU 1011
STD... IF amplifier: Check automatic channel search, EXTl, different receiving bands and tuner AGC (tuner pin 2) 7 V for 1,5 - 2 mV
aerial signal
STH... Tube base panel: Check G2, Focus, cr (Black level, red), cG (Black level, green), cb (Black level, blue), dr (Gain, red), dG
(Gain, green) and db (Gain, blue)
Instruction for NVEDIT programme (16:9 TV sets / phase I)
The colour menu software from version FA20 on (SALORA, LUXOR and SCHAUB LORENZ) and the TV Mouse software from version
FA102.0 on (NOKIA) include NVRAM (EEPROM) editing software. NVRAM (EEPROM) memories include user settings, initial values for Ill
chip set and production data. These values can be changed from the user interface in the service mode by using the production computer
the NVEDIT programme.
Warning ! The NVEDIT programme is a very dangerous tool. It reads and writes directly to EEPROM memories. If you do not exactly
know what you are doing, please do not use the NVEDIT programme !
Modifications in EEPROM register bits may be needed in following cases:
- In production has been used unproper value that has be corrected as a service treatment;
- The EEPROM initialization programme does not match to the DSP and other It’s status, mask versions etc.;
- In service is used older or newer DSP IC mask version that predicts some register value adaption;
- The TV is customized by some special demand.
To start the NVEDIT programme
1. Go to the service mode
2. Select the NVEDIT programme. The password is:
red I blue / green I yellow
ZOOM I VOLUME - I TEXT
3. The display shows
- status row
- warning info
- EEPROM selection row (preset is TV EEPROM)
To use the NVEDIT programme
1. The active EEPROM memory can be selected using the following colour buttons:
- Red = TV (The size is 16 KBits and it is located on the main board)
- Green = PIP
- Yellow = NVM
2. Decimal address and data can be given to the active field using the number buttons. Unfinished or incorrect addresses and unfinished
data selection can be aborted using the ” i ” button (SALORA, LUXOR, SCHAUB LORENZ) or the “ALl” button (NOKIA). After the last
address digit has been entered, the programme shows the current data and after the last data digit, the programme stores automatically
the new data to the active EEPROM memory.
3. Note the maximum values which can not be exceeded:
- Maximum address value for TV memory = 2047
- Maximum address value for PIP and NVM memories = 0511
- Maximum data for all memories = 255
To exit from NVEDIT programme
- Press the STANDBY button
(SALORA, LUXOR. SCHAUB LORENZ)
(NOKIA)
(The size is 4 KBits and it is located on the PIP module)
(The size is 4 KBits and it is located on the main board)
Page 8

Einstelltabelle / List of adjustments / Liste de reglage / Elenco delle regolazioni
1
L-a
STEP +I-
Horizontal centering
Horizontale Bildverschiebung
Cadraga horizontal
Centratura orizzontale Ritardo di luminanza
A0 i-717
Vertical centering
2. ~~~ Cadragevertica,e
Vertikale Bildverschiebung
Centratura verticale
@~
YO %!7
Ed “!
3. %I
Width
Breite
Largeur
Ampiezza orizzontale COrreziOne dell’effetto trapezia 1
Kl [I
I ‘.
m _‘.’
0.‘ cl ‘-’
4.1’ I
5. 1: 1’
6. t:h-
Summing point 1
Summierungspunkt 1
Point d’addition 1
Punto di somma 1 Punto di somma 2
.’ cr cf-
EE~~~g$~;ouge
Cut-off del rosso Cut-off del Verde
9 dr L+- dG 66
Gain, red
Verstlrkung, Rot
Gain, Rouge
Guadagno del rosso
HA NR
7.1-11-r
Teletext horizontal centering
Horizontale Bildverschiebung, Videotext
Centrage horizontal de t&texte
Cpntratura orizzontale dal t&video
SF+
.
R “.
x .’
enu
Luminance delay
Luminanzverzogerung
Retardemant de la luminance
: HO HL?
“” if;;:,
Ampiezza verticale
zo 1’17
Trapezium distortion correction 1
1. Korrektur der Trapezverzerrung
Correction de trapeze 1
ta ‘*”
Colour synchronization
Farbsynchronisierung
Syncronisation couleurs
Sincronizzazione colore
so so
Vertical linearity
Vertikale Linearitiit
Linearit verticale
Linearit& verticale
“‘. co c L7
Pincushion distortion correction 1
1. Korraktur der Kissenverzerrung
Correction ast-ouast 1
Correzione dell’affetto cuscino 1
.:. K2 I- i’
Summing point 2
Summierungspunkt 2
Point d’addition 2
I.
.‘l CG c ci
Black level, green
Schwarzpegel, GrOn
Blocage du canal vert
‘(i
Gain. green
Verstlrkung. GrOn
in *. Gain, vert
. Guadagno del Verde
m .‘I
cl ;
CA CN
Contrast, Menu & MIX
Kontrast. Menu 8 MIX
.” i.
Contraste Menu 8 MIX
Contrasto del menu 8 MIX
Bii 2 UHF only IO = no I 1 = yes Bii 5 A2 Stereo IO = no / 1 = yes
Bit 3 TUNER / 0 = Salcomp / 1 = NSF
Bii 4 DTI IC IO = no I 1 = yes
Menu i”’
:(
)I
:_” cb ch
Black level. blue
Schwarzpegel, Blau
Blocaga du canal bleu
Cut-off del blu
G
db ulb
Gain, blue
VerstPrkung, Blau
Gain, bleu
Guadagno del blu
(> “<.~ CL c L
Contrast, Teletext
MIX 1; :
Kontrast, Videotext
Contraste tbl&xte
Contrast0 del t&video
Bii6 AVConnectorsIO=no/~ =yes
IElI
: 1_
0 i.,
B
a
Textn/
Max
Chrominance del
ChrominancelLu
Zl i-1
Trapezium distor
2. Korraktur der
Correction de tra
Correzione dell%
St 5r
DTI start time
Einschaltzeitpunl
Moment de d4mr
Punto d’inizio del
co l-0
Contrast
Kontrast
Contraste
Contraste
co l-a
Contrast
Kontrast
Contrast9
Contraste
co
Contrast
Kontrast
Contraste
Contras&
L
lb
.
.b
b
b
b
b
Byte 4
“’ ,” 1 M ( & 1 I C)
.^
Centratura oriztontale
Bit0 PALCClR/O=no/l =yes
Biil PALUK/O=no/l =yes
Bii2 SECAMElO=noIl =yes
Bit3 SECAMLIO=no/l =yes
Bit 1 16:9 / 0 = no I 1 = yes
BP 2 0 = Normal use I 1 = Production mode
Bit 3 Video identfication start from standby (EXTl)
o=no/1 =yes
Bit0 WIDE/O=noll =yes
Bii 1 LOUDNESS IO = no I 1 = yes
Bii 2 PROGRAMME INFO IO = no I l= yes
Bit3 VOLUMEBAR/O=no/l=yes
Bit 0 Tuner/ IC2/ TV tuner PLU TSA 551 I
Bit 1 STEJ/ IC401/ IF I-O/ PCF 65741 FM radio
Bit 2 STEJi ICZOO/ FM PLU TSA 60571 FM radio
Bit 3 STSS/ ICOO3/ Cross point 1 switch/ TEA 6415/
SCART3. Record select
Bit 0 STB/ IC250/ TPUl TPU 2735
Bit 1 STEM/ IC301/ PIP DPU/ VSP 2660/ PIP
Bit 2 STQM/ IC203/ PIP memory/ NVM 3060/ PIP
Bit 3 STBM/ ICl/ Added memory/ NVM 3060/
PIP
Sincronizzazione colore, PIP
Bit4 NTSC4,4MHzIO=no/i =yes
Bit5 NTSC3,56MHz/O=no/l =yes
.Bt 6 SECAM video / 0 = no I 1 = yes
BR7 NTSC3,58MHzVideo/O=no/l =yes
v.9l/o=lvpp/l=2vpp
ACVP) / 0 = no / 1 = yes
Bit 4 DTI / 0 = no / 1 = yes
Bit 5 Time out / 0 = no / 1 = yes
Bit 6 Vertical blanking / 0 = DPU / 1 = PIP
Bit 7 S-Filter IO = no I 1 = yes
Bit 4 STSSl ICOO7/ Crosspoint 2 switch/ TEA 64151 Record select
Bit 5 STSS/ ICOOl/ Interface I-O/ PCF 6574/ Rec. select, SCARTP &
SCART3 video & SCARTl3 16:9 identification
Bit 6 STSS/ ICOO5/ Interface 2 I-O/ PCF 6574/ Fixed level RCA output
Bit 7 STSSi ICOOZ/ Audio c&s 11 TEA 64201 SCARTS, Record select
STSSl ICOO6/ Audio cross 21 TEA 6420/ Ramrd select
Bit 4
Bit 5 free
STQMl ICZOl/ Video switch IC/ TEA 6415
Bit 6
?‘,
’ ‘:
: ‘1
Selezione programma PIP
b
16.+17. ::.G
Satellite
,“a
I :
Page 9

!ioni
Einstelleben
F n Einstelleben
rl
r(
Einstellgrl
adjustmc
t
grupp
Einstellgr
adjustrr
group
gn
Einstellgr
adjustm
group
grupp
Einstellgr
adjustm
group
grup
Einstellgr
adjustm
group
grup 1 1:
11 p Ausfiihrung
d
fonction
funzione
Ausfiihrung
d
fonction
futuione
d a 16
I(
de
se s r
r*r
4. Elnstallgruppe
4th adjustment group
4Bma groupa de r&laga
Quarta gruppo dl ngolazlone
*n
.:‘ Zl I' I
“3 Trapezium distortion correction 2 Pincushion distortion correction 2
;
2. Korrektur der Trapezverzerrung
:‘,
* Correction da trap&e 2 Correction ast-ouest 2
j:_;
Correzione dall’effetto trapezia 2
C """"
5. Elnstallgruppa
Sti adJustmenl group
S&me groupe da rbglsge
321 Cl
2. Korrektur der Kissenverzerrung
Correzione dell’effetto cuscino 2
n,: lIl,lzl
mmrxl
v ..
t .".,-I
o;m
1. ;” Programme selection
Programmwahl
“_
SBlection du
^) programme
Selezione di
programma
:”
‘,
-/--
l/2 digits
l/2 Nummer
112 numbros
112 cifre
s 413 picture
’ 16/9 Full screen
4/3 pict.+multlPOP
4/3 picture RGB
4/3 Full screen
413 Full screen+Lift I,
4/3 Wide screen
4/3 Wide screen+Lift
:.
,’
y
Speichern
Memorizing
Memorizzazione
: DTI start time
Einschaltzeitpunkt der Farbschwferege ung Abschaltzeitpunkt der Farbschlrferege ung
:
Moment de dbmarraga DTI
Punto d’inizio del DTI :_ : Punto di fine del DTI
() (“1 co Ccl _ ‘I&?.
Contrast
,.:
Kontrast
.:
‘~“j
Contraste Luminosit6 Tension G2
Contraste
,: j
m
“:; co l- n (> ““’ br ht-
Contrast Brightness
Kontrast
Contrast0
:^ i
Contrasta Luminosita
dll
^.! co c a
x Contrast
.^
Kontrast
-Xi::
Contraste
a”
Contrast0
:.:
11
il
:,
_,)
a;
Moment da la fin DTI
Brightness G2 voltage
_” Helligkeit
Luminositti
Halligkait
Luminositb
.,
^>_
"a~
;
“”
:.
ii
3:”
1~ “;) .
“‘,.
-r, I--
~”
:.
n. -
: :
i”,
: Page selection
“, Seitanwahl
Selection de page :zl.l’
Selezione pagina
“.
: ‘”
GPSpannung
Tensione di G2
‘“_
,i:
.;:
n'"
'"Z
"
:
MENU
,:‘,;;” 0
OK/+M
“‘.
i‘
2, ‘"
:"
~2
,I:
,;,:
"%"
Page 10

Einstellelemente / Adjusting elements /
s1
del
VI
l%mentes de hglage / Elementi di regolazione
Funktion / Function Tasten/ Buttons/
Fonction I Funzione
Einstellebenen aufw&ts
Adjustment planes upwards
Plaines de rbglage en montant
Pianura di regolazione in alto
Einstellebenen abwarts
Adjustment planes downwards
Plaines de r6glage en bas
Pianura di regolazione di decline
1. Einstellgruppe
1st adjustment group
ler groupe de r6glage
Prima gruppo di regolazione
2. Einstellgrupps
2nd adjustment group
2&me groupe de r6glage
Seconda gruppo di regolazione
NOKIA SALORA SCHAUB LORENZ
TVt
TV +
I+L1/x [=)/I, ))/)
Touches/ Tasti
A
+
v-
.
LUXOR /
4b+
db-
3. Einstellgruppe
3rd adjustment group
36me groupe de rbglage
Tena gruppo di regolazione
4. Einstellgruppe
4th adjustment group ~
4&me groupe de r6glage
Quarta gruppo di regolazlone
5. Einstellgruppe
5th adjustment group
S&me groupe de rbglage
Quinta gruppo di regolazione
Zuriick zu 1. Einstellgruppe (Anzeihe SP)
Return to 1st adjustment group (Displ. SP)
Retour au ler groupe de r6glage (Indlc. SP)
Ritorno al prima di regolaz. (Ind. SP)
Ausfiihrung hlngt von der Einstellebene ab
Operation depends on adjustment plane
Le fonction depend du plaine de r6glage
La funzione dipende dal pianura di regolaz.
Ausfiihrung hiingt von der Einstellebene ab
Operation depends on adjustment plane
Le fonction depend du plaine de rbglage
La funzione dipende dal pianura di regolaz.
Speichern der Einstellungen
Stores the adjustments
MOmorise le r6glages
Menorizza le regolaziones
AUDIO /
VIDEO
m
-I- - --
0 . . . 9
bb /) -/lb
i
l
0...9
MENU OK/->M
i
-I--
0...9
OK/->M
Beenden des Service-Mode ( -> Standby )
Exit from service mode
Permet de sortir du mode de rbglage
Ritorno all normale funzione TV
Page 11

Service mode
Ein
le
I&Sender / IR-Transmitter
kmetteur IR / Trasmettitore IR
NOKIA
SALORA
LUXOFVSCHAUB LORENZ
*) Nahezu horizontale Position des R-Senders ! / Almost horizontal position of the IR-Transmitter !
Position quasiment horizontale de I’bmetteur IR / Posizione quasi orizzontale del trasmettitore IR
m ir
/
II
+
Tasten / Buttons / Touches / Tasti
*) MENU *’ TV *)
I
b bb
I,
Fig. 1
Page 12

ijbersicht fur Einstellungen im PALISECAMINTSC-Betrieb in Verbindung mit den versch. Gerltekonfigurationen
Overview of adjustment options in PALISECAWNTSC operating mode, in conjunction with the various set configurations
Synoptique des reglages en mode PALISECAWNTSC en liaison avec les differentes configurations d’appareil
Sommario per le regolazioni nel servizio PAL/SECAM/NTSC unitamente alle diverse configurazioni di apparecchio
m
Co Kantrostregelung/Controst odtustment/RCgloge du contaste/Regalazlone cantrosto
br H.lligk.its’.g/Er~gh..s odi./Riglog. de lo lumino.~t6/Rsgolorione lum1nor1+6
db =
d’ W
dG m
“* B
CA =
CL Es
_ Au.wahlbvl.l/Option bvlel/Oc>et d. tslsci~onl /Evl# r.lsz8on.l
: Aurwahtb&2~Opt~on b;t.2)0ct.t de selection2jB~t. selezion.2
: Auswahtbyts3/Option byt.3/0ct.t d. sslsct~on3/6yt. ..t.z8on.J
L1 Zus6tzhche Auswahtbyte/Addlt~onnol option byte/
Oct.1 d. s6lsction rupplsmsntairs/Byts sslsz~ons supplsm.
L I’C-Schattungen/clrcu~ts/Cicuitr/Circultl
t tM(kt’C)Schallungsn/circu~ts/C~rculfr/Clrcultl
Cinescreen-Geometrien
SP
SA
A0
HO
so
YO
zo
co
21
Cl
Kl
K2
s+ R
sp Es
C’
cc
cb
Co Konlra.tregetung/Contra.t odjusiment/R4glage du contast./Regolozlone contnxto
br H.ltigk.~tsr.g/Br~ghn... odl./Rbglog. de IO lum~nosll4/Regolozion. lummos~fD
db
dr
dC
HA
CA
CL
Au.wahlbyt.l/Opt~on byt.t/Oct.t d. s.t.ct,onl/Byt. t.l.z,on.l
; Auswahlbyt.l/Optlon byte2/0ct.t de .etsction2/Byt. relezion.2
: Auswahtbyt.J/Optlon byt.S/Oct.t d. ..t.ctionJ/gyt. s.t.r1on.3
5 Zus6tzl#chs Auswahlbyte/Addltlonnal option byte/
Oct.1 d. siisctton suobl.m.nta~r./8vt. s.t.~,on. rupplsm.
L I’C-Schaltungsn/clrcultr/Cicults/Clreullu
t IM(kl’C)Schaltung~/c~rcu~ts/C~rcultr/Clrcultl
PR
0 PIP-Auswohlblts/PIP optlon blls/&ts de ..t.ct,o” PIP/Ed. ..t.z,one PIP
5 Sotellitenb~ts/Sotsllits bits/Bits satstl~ts/B~ts soteltd.
5F Au.w.3hl.n vo” Sot.ll,t.n-LNE und LNB-f’.qu.nz
Selection of eotsll~te LNB and LNB frequency
Sslsctlon du LNg sat.lt,t. St d. lo frsqusnc. LNB
Sslsz~on. LNB satslltt. s f’squsnzo LNB
Basis.ln.tsllwsrts fusr m-Fe’nsshgsrosts mat 16:9-Eildes~lmvsrhasltnlr / BDSIC Adlurtmsnt value. for PAL 16:9 plctu’. ratio TV ssts
V&de rtglogs de bore pour tCItv.P& b format xmogs lm / Valori rsgolozlone bass per telsvlrori Pxcon ‘oppo’to d’lmmogin. (6:9
Gssonds’ts Einstsltwsrts lus’ PAL-Fsrnsshgsroets ml1 42-Eildssitsnvs’hosltnlr / Sspo’ots odtu.tmnt votu.. for PA u picture rotlo
m
a, ,‘,
I
SECAM
lIaIuun.
V&d. rCgloge rp4cialer pour TTisv.PAJ 6 format d’imog. 4> / Volor~ rsgolozione patricolori per televltorl PA con ropporto d’immoglne 4:3
Cssondsrts Emstsllwsrt. fusr PA-Fsrnsshgsrosts md 4:3-FtM..dsnvsrhosItn~s Votltormot / Ssporois adtuslmsnt voluss for PAL I:3 full ec’sm plcturs ‘alto
ot.ds rig. .pic. pour tiliv.pnl b formal d’ smogs 4Amrmat mt~sr / V&WI ‘sgotazion. polricolon per tslev. PAL con ‘oo~to7’immogms formoto mo.simo Q
Gssonds’ts E~nstsltwsrt. fusr PAL-Fsmsshgsrosts md 4>-B~ldss~tmvsrhosltnts Vollformat l Blldvsrschisbung noch obsn
Ssporots adjustmsnt valuss fo_AL 4:J full tcrssn + itft pictu’s ratio
VoLde r4giogs .p&. pour t&ICv.F%i b’formot d’tmogs +J + d4plocemml d’lmage Y.‘. 1. bout
Volori rsgolozlons potrcolor~ ps~lsv~sor~ PA con ‘apporto d’immogins form&o mo..imo 9 + rpostamsnto Immogan. vsreo I’otto
Csrondert. Eln.t.tlwerte fusr PAL-Fsrn..hgsra.t. mit 4:3-Btfdr.itsnv.rhaeltni. Breitformat / Separate adturtmsnt value. for pAL s *rids sc’em picture ratio
Vol de r&g .pCc pour tCICv.~~ fo’mot d’imoge Iflormot lorg. / Volo’i rsgolozione potrlcolorl per tefsv. PAL con rapporto d’lmmaglns 43 fo’moto pano’amnco
Gesondsrts EinatstIws’t. fuer SECAM-Fsrnsshgeroste mit 4:S-Bildtsitenvsrhasltnis / Separate adlurtment v&es for SECAM 4:3 picture rotlo
Vol de regloge .pCciols. pour wm b format d’imogs 43 / Volori regolazmn. pot’icolarl per televisori SB con rapporto d’#mmogtn. 43
Gssondsrl. Ee~stsllwsrls fusr SECAM-Fsrnsshgsrosls mat 42-Eildssitsnv.‘haeItnis POP / Ssparot. odtustmsnt YOIU.. for SECAM 4:J POP picturs ratio
Valds riglog. npiciols. pour -5 ir format d’imoge 42 POP / Volor, rsgolozlons pat’isolo’l per tslsviso’i SW con ‘opporlo d’immogms POP s
fusr PAL-Fsrnsshgs’oste mit 4~-Btldrsitenvsrhasltnl. POP / Ssporots odturtment vatus. for PA 4:J POP picture rotio
pour Tiiir.P& d formal d’lmog. 4:J POP / Volo’~ rsgolaz!ons patrlcolo’~ p.’ tslsvisori pnl con ‘oppo’to d’tmmogin. POP &J
tusr PA-Fsrmshgsrasts mit 42-B~lds.~tmv.rhosltn~s RGB / Sspo’ats adtustmsnt votus. for pnC s RGB plctu’s ‘atlo
pour tiliv.P& 6 format d’lmog. G RVB / Volor~ rsgolozlons pot’icolorl p.’ tstsvtro’~ pAL con rapporto d’immoglns BVB G
fur w-Fsrnsshgs’ost. mlt 16:9-Bills~tmv.rhosltn~. / BOSIC Adlvrtmsnt ~&es lor SECAM t6:9 pustu’s ratio TV ssts
boss pour til&.SECAM ir formot mmog. lm / Voto’l rsgotaznons boss psr t.l.v~.or~ SGco7ropporlo d’immogms 16:9
0 PIP-Au.wahlbats/PtP optlo” b,tr/tWr de ..t.ct,on PIP/E,t. ..t.z,one PIP
5 Sotsltitsnbits/Sotelkts blts/B1ts satellite/Bits satellite
5F Autwdhlm won Satetttten-LNB und LNB-frsquenr
Sslsctlon of sotelllte LNB and LNE frequency
Sslsctlon du LNB satsltd. st d. la f’squsnc. LNB
S.l.z,one LNE sotsll~t. . frequsnza LNB
-
odystmsnt voluee for SECAM I:3 wide screen pactu’s ‘atlo
t&v. Sm con ‘oppYjX7l,%inogms 4:3 fo’moto pana’am~co
Page 13

LtH;ICAI- OUTPUT STPGt
F IIvAI t LtRiICALt
B26 1,2 Vpp DIV iO0 ns B27 H 5 Vpp
I
I I’
C‘
1,
~6 d
Focus dynamic
STPQ 03104
Diode module
STBQ 03
‘1
H 155 Vpp
B49 H 26 Vpp
BSl H 75 Vpp
iI!
a
ETPG’O3
----------
B52 H 160 Vpp
&ii
_J
BS3 V 160 Vpp
- 18-
Page 14

BlS H 7 Vpp B16 H 1,s Vpp
DPU-Platte/Board
STBQ 02
B17 V 4 Vpp B18 H 3.5 Vpp
B21 ti 4.6 V
r rrrnT
s mc
I I-
-
DPU2553S
+LSO”
_ *2wv
1 I
I 1
rovpp/Pww u.msNr.
B40 H VPP
B43 H
6 Vpp
LINE OUTPLlT STACt
FINALE OK;770NTALt
845 H 1100 Vpp
I I I I I I I
I I II
B47 H 48 Vpp
B48 H 155 Vpp
I
.
B49 H 26 VI
Page 15

NetzteiliPower supply
4
AblenkungiDeflection
Bildspeicher-Modul
Geometry memory module
STBM 01
j STB... 1
AUDIO/VIDEO )
Page 16

STB...VIDEO
C
E
A!JX,CCU-RF
ICB230
ACVP2205
I
J
,
Es
-
/
/
/
SECAN
sc
/
J
I~C/CCU-RF _ _
SW/CC”-RF
- 20 -
2
3
5
6
8
9
11
Page 17

4
(1
(1
1:
/, ;
I RADIO 2
- --- L
STB..AUDIO
,R 1 IN
ZLlIN
1 rCR
I EL i I161 I
A
I I-
31 I J
131 I
f .
1, I I4266
I 115
I -
-17 I I
I I
STB...
Bll DIV 250 ns
I
Connector specifications
EXTl (/EC 933-l)
1
Audio out, right channel 0.5 V,,,
2
Audio In, right channel 0.5 V,,,
3
Audio out, left channel 0.5 V,,,
4
Ground (audio)
5
Ground (blue)
6
Audio in, left channel 0.5 Vn,,
7
RGB input, blue
a
Switching voltage
9
Ground (green)
11
RGB Input, green
13 Ground (red)
14
Ground (blankmg)
15
RGB input, red
16
Switching voltage, RGB (blanking)
17
Ground (video out)
18
Ground (video in)
19
Video out 1 Vpp/75 ohm
20
Video in 1 Vppi75 ohm
21
Screen
12 Not used - 21 -
10,
EXT2 (/EC 933-l)
Audio out, right channel 0.5 V,,,
2
Audro in, right channel 0.5 Vn,,
3
Audro out, left channel 0.5 V,,,
4
Ground (audio)
5
Ground
6
Audio In,
9
Ground
13
Ground
15
S-VIDEO input (croma)
left channel 0.5 V,,,
’
17 Ground
18 Ground
19 Vrdeo out
20 Video rn
21 Screen
7, 8, 10. 11,
Page 18

1 STB... 1
F
F
S
RGI
RG’
STY
Bll DIV 250 ns
STEL 97
I
. In
l s +5 l s II I
11
C RESET AUDIO
APU247 1s
1
AUDIO SUBflOD .
SUBnOD , AUDIO
I
i-
IC0140
X”
I.9142
fdu424
(8
F
AUDIO POWER
AflPLIFIERS
7; 7;ADC2301
‘XT2 (/EC 933-l)
Audio out, right channel 0.5 V,,, 17 Ground (video out) I 3 5 7 v II Ii 15 17 IL) ?I
Audio in, right channel 0.5 VnM, 16 Ground (video in)
Audio out, left channel 0.5 V,,,
Ground (audio)
Ground 21 Screen Audio in, left channel 0.5 V,,, 7, 6, 10, 11, 12, 14, 16 Not used [wd
19 Video out 1 Vpp/75 ohm
20 Video in 1 Vpp/75 ohm
:::::
FS ,RGS/VIDEO
‘t”Ic)
I
bWDEFl.. <
FS ,RGS/VIDEG
52528
Ground
Ground
S-VIDEO input (croma)
? ? h x 10 I? II I(, IX ?O
- 22 -
Page 19

STB...CCU-RF
SCWSTS
A
243 sv
I
5ER1u
TO Acu
nAlR2
ON/OFF
- 23 -
Page 20

r
X24C 16P
STEJ s .
SOUND
IF .tIOD .
UOD. AUDIC
cwslEo
I
_ _ In-ew PIP/STrn
/
/ rn-eus/Au210,v1D2o,wL.
snc/sTw*
,
*
VIDEO IF
IF VIDEO
am%w
- 24 -
 Loading...