

Page 1

Nokia Customer Care
5 - Disassembly Instructions
5-Disassembly and Reassembly
Instructions
ISSUE 1 11/04 Copyright © 2004 Nokia. All Rights Reserved.
Page 2

RM-14
Nokia Customer Care Disassembly and Reassembly Instructions
[This page left intentionally blank]
2 COMPANY CONFIDENTIAL ISSUE 1 11/04
Copyright © 2004 Nokia. All Rights Reserved.
Page 3

RM-14
Disassembly and Reassembly Instructions Nokia Customer Care
Table of Contents
Page No
Disassembly Instructions................................................................................... 5
Display Exchange Instructions........................................................................ 11
Reassembly Instructions.................................................................................. 13
ISSUE 1 11/04 COMPANY CONFIDENTIAL 3
Copyright © 2004 Nokia. All Rights Reserved.
Page 4

RM-14
Nokia Customer Care Disassembly and Reassembly Instructions
[This page left intentionally blank]
4 COMPANY CONFIDENTIAL ISSUE 1 11/04
Copyright © 2004 Nokia. All Rights Reserved.
Page 5

RM-14
Disassembly and Reassembly Instructions Nokia Customer Care
Disassembly Instructions
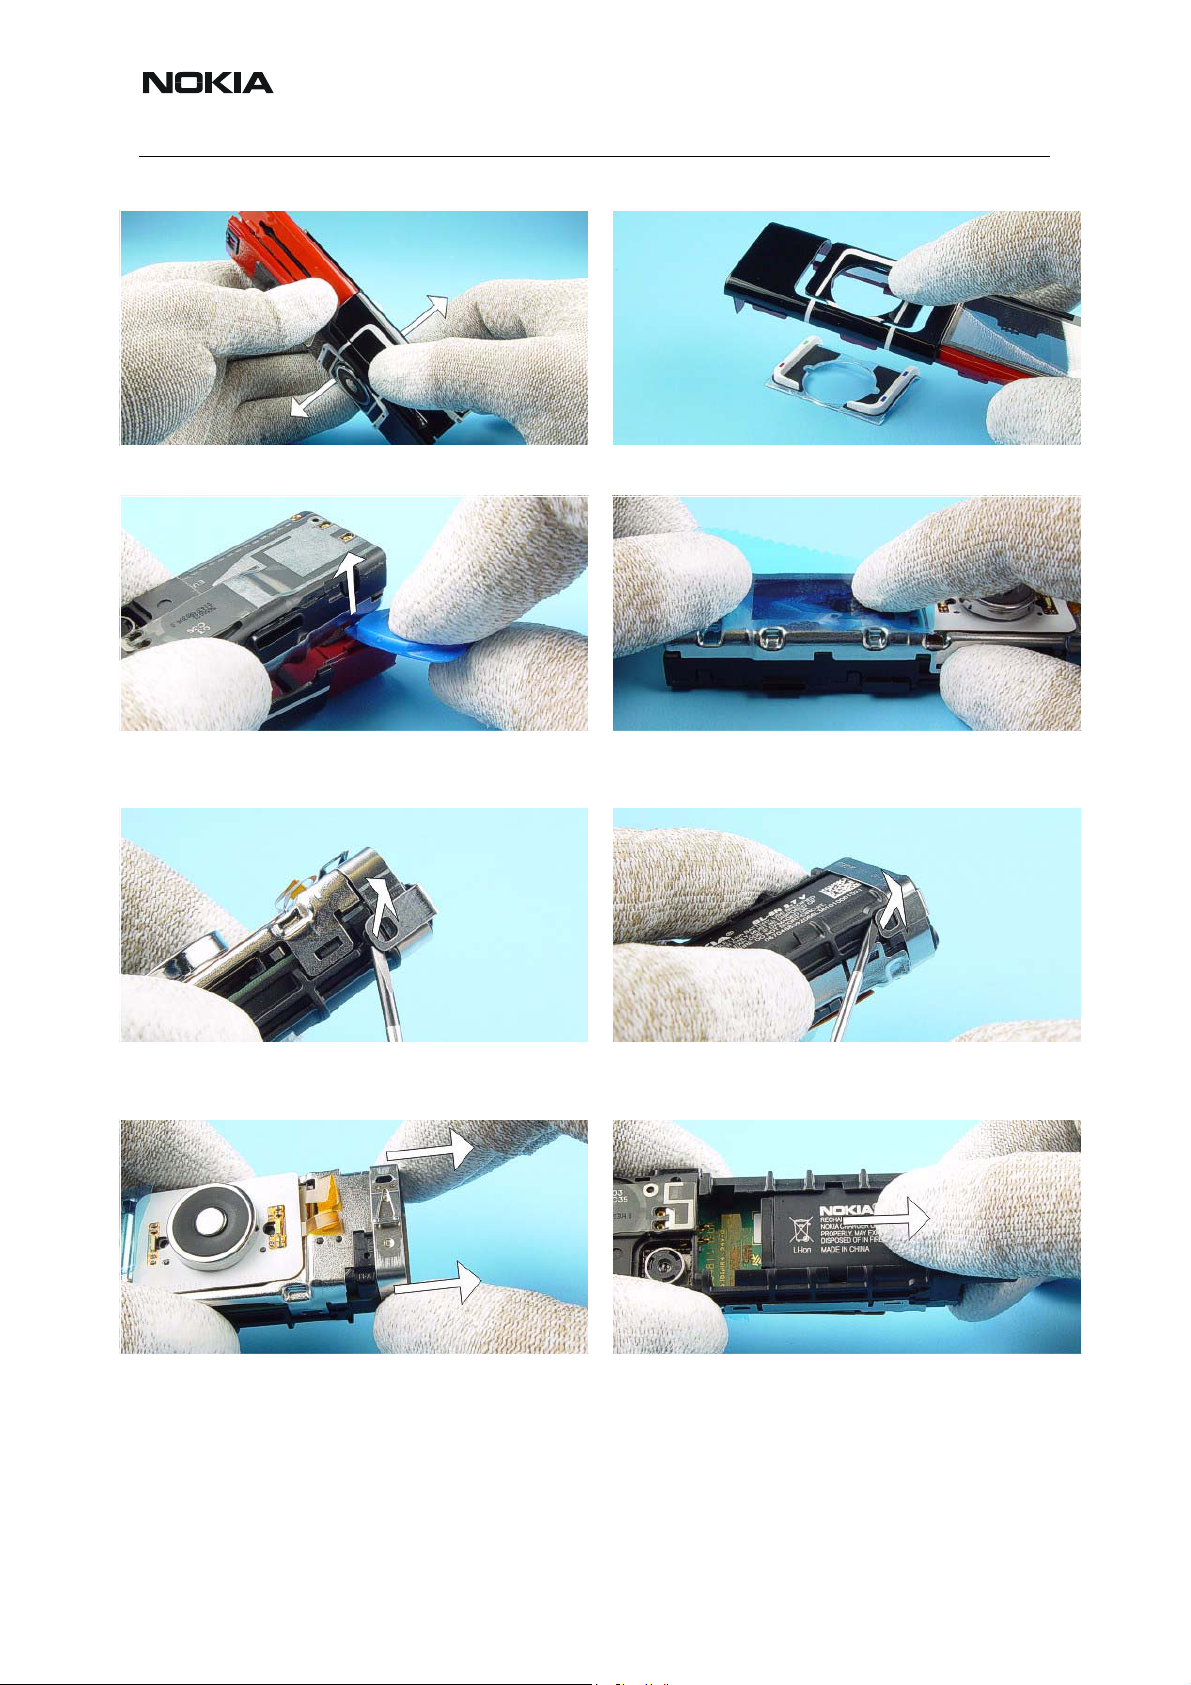
1.) Use the SIM tray release tool to open the SIM
Holder.
3.) Use the SRT-6 as a lever to remove the Slide
Cover.
2.) Open the Slide Cover.
4.) First shift the Slide Cover as far as it will go and
then remove it from its guide.
5.) Place SRT-6 between the A-Cover and B-Cover
and shift it along the edge. Use always a new A-
Cover and a new B-Cover when reassembling.
ISSUE 1 11/04 COMPANY CONFIDENTIAL 5
Copyright © 2004 Nokia. All Rights Reserved.
6.) Open the other snaps.
Page 6
RM-14
Nokia Customer Care Disassembly and Reassembly Instructions
7.) Separate the both covers from each other. 8.) The Keymat drops out when turning the A-Cover.
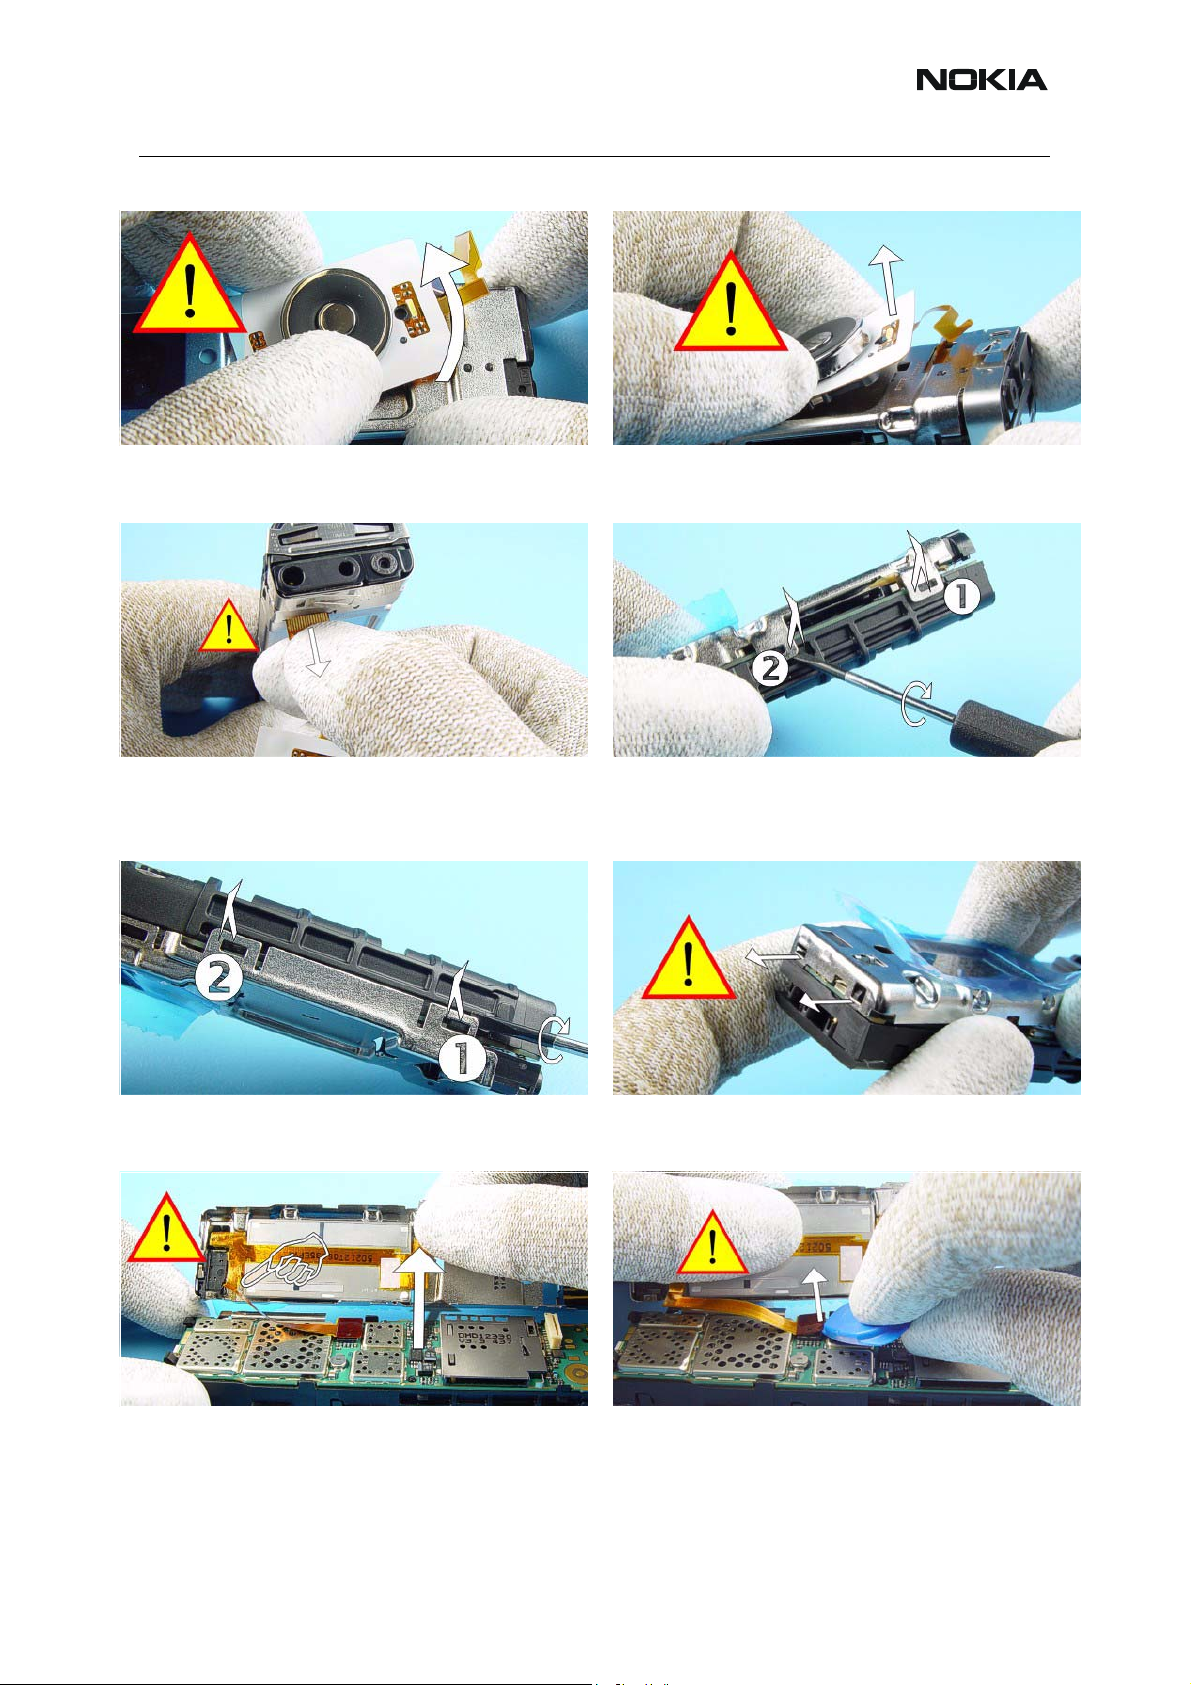
9.) Lift the modules from the B-Cover by using SRT-6.10.) Protect the LCD Cell with a film.
11.) Use a slotted screwdriver to lift the Battery
Lock.
12.) Do the same on the other side.
13.) Remove the Locking Ring. 14.) Remove the Battery.
6 COMPANY CONFIDENTIAL ISSUE 1 11/04
Copyright © 2004 Nokia. All Rights Reserved.
Page 7
RM-14
Disassembly and Reassembly Instructions Nokia Customer Care
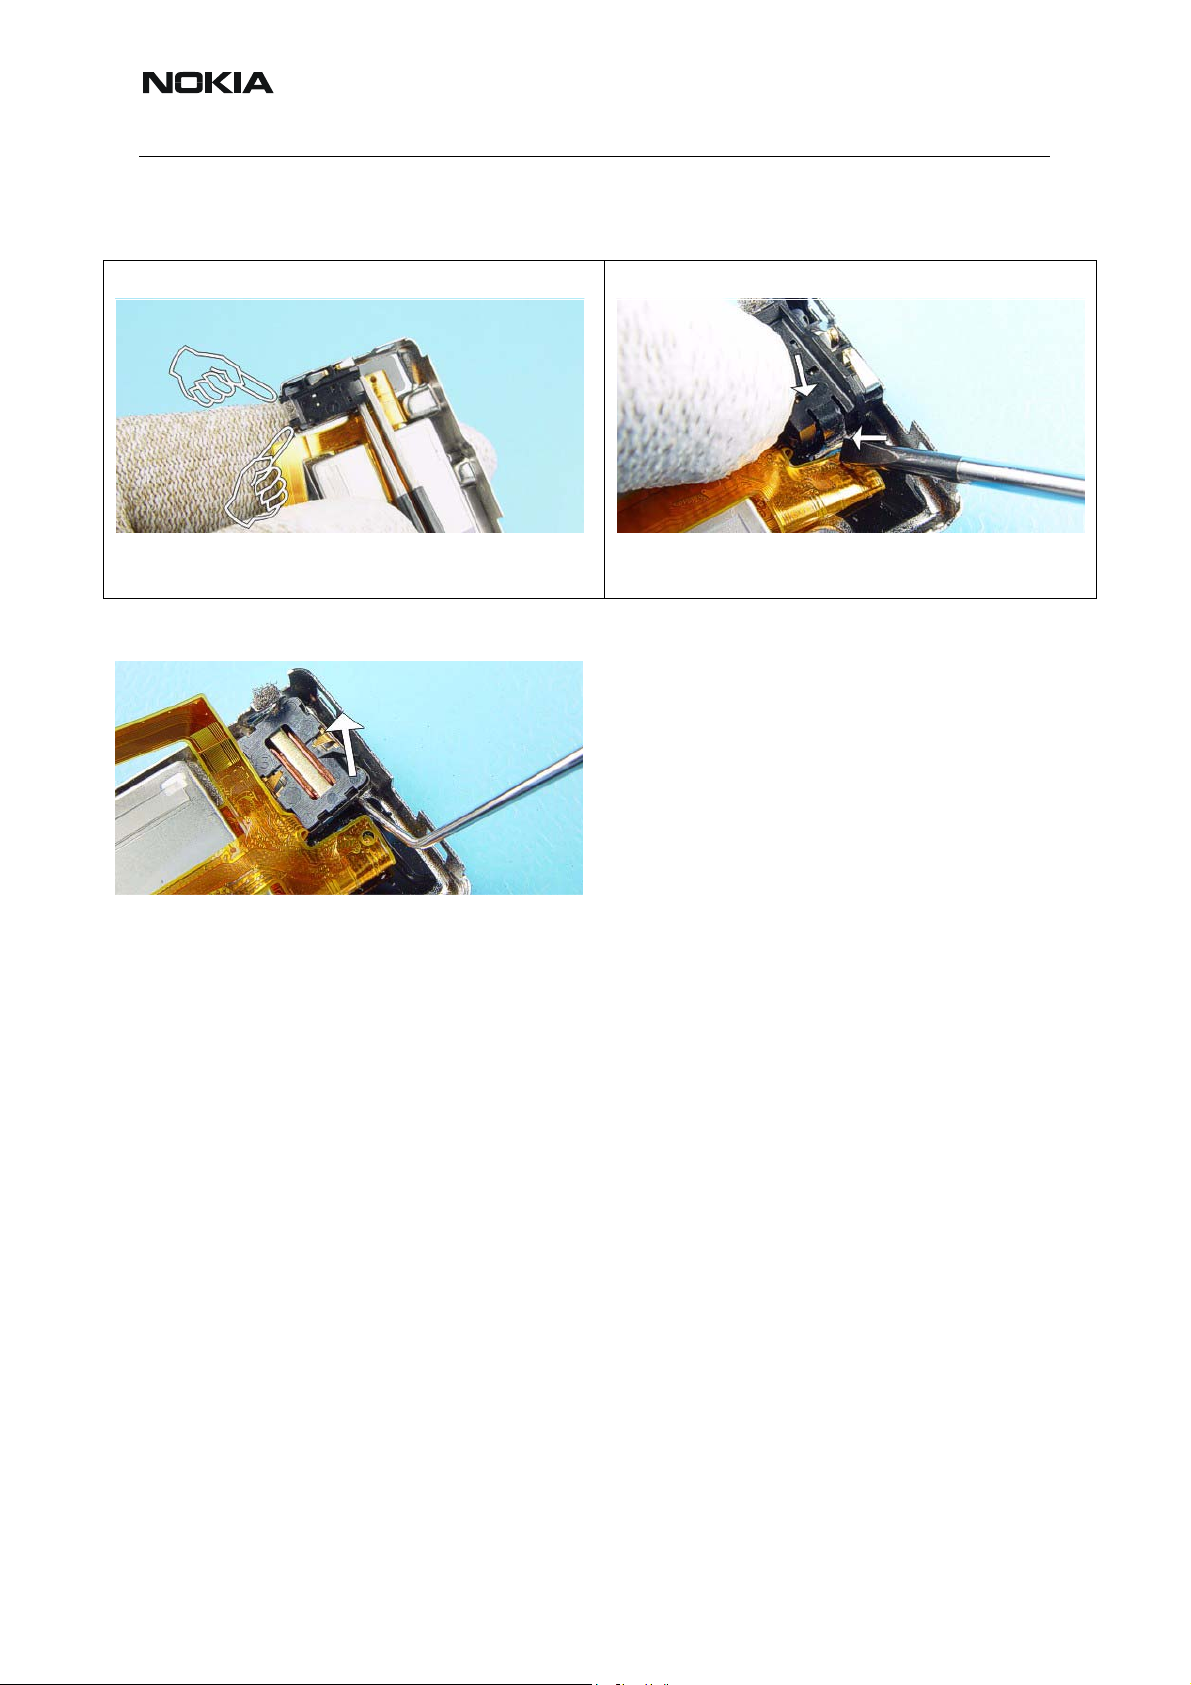
15.) Unlock the UI Module by turning it a bit. 16.) Now, lift the UI-Module as shown in the picture.
Take care not to damage the Rotator Flex.
17.) Be carefully when removing the Rotator Flex.
Note the right position of the contacts when assembling.
19.) The same procedure on the other side. 20.) Move the C-Cover Assy a bit to the left as
18.) Use a slotted screwdriver to open the C-Cover
clips.
shown in the picture.
21.) Turn over the C-C over Assy carefully. Do not
damage the Flex Assy.
ISSUE 1 11/04 COMPANY CONFIDENTIAL 7
Copyright © 2004 Nokia. All Rights Reserved.
22.) Open the Display Connector carefully by using
the SRT-6.
Page 8
RM-14
Nokia Customer Care Disassembly and Reassembly Instructions
23.) Release the Engine Module by bending slightly
both plastic battery guides of the D-Cover.
For assembly only!
Put the Engine Module on the Pogo pins of the D-
Cover.
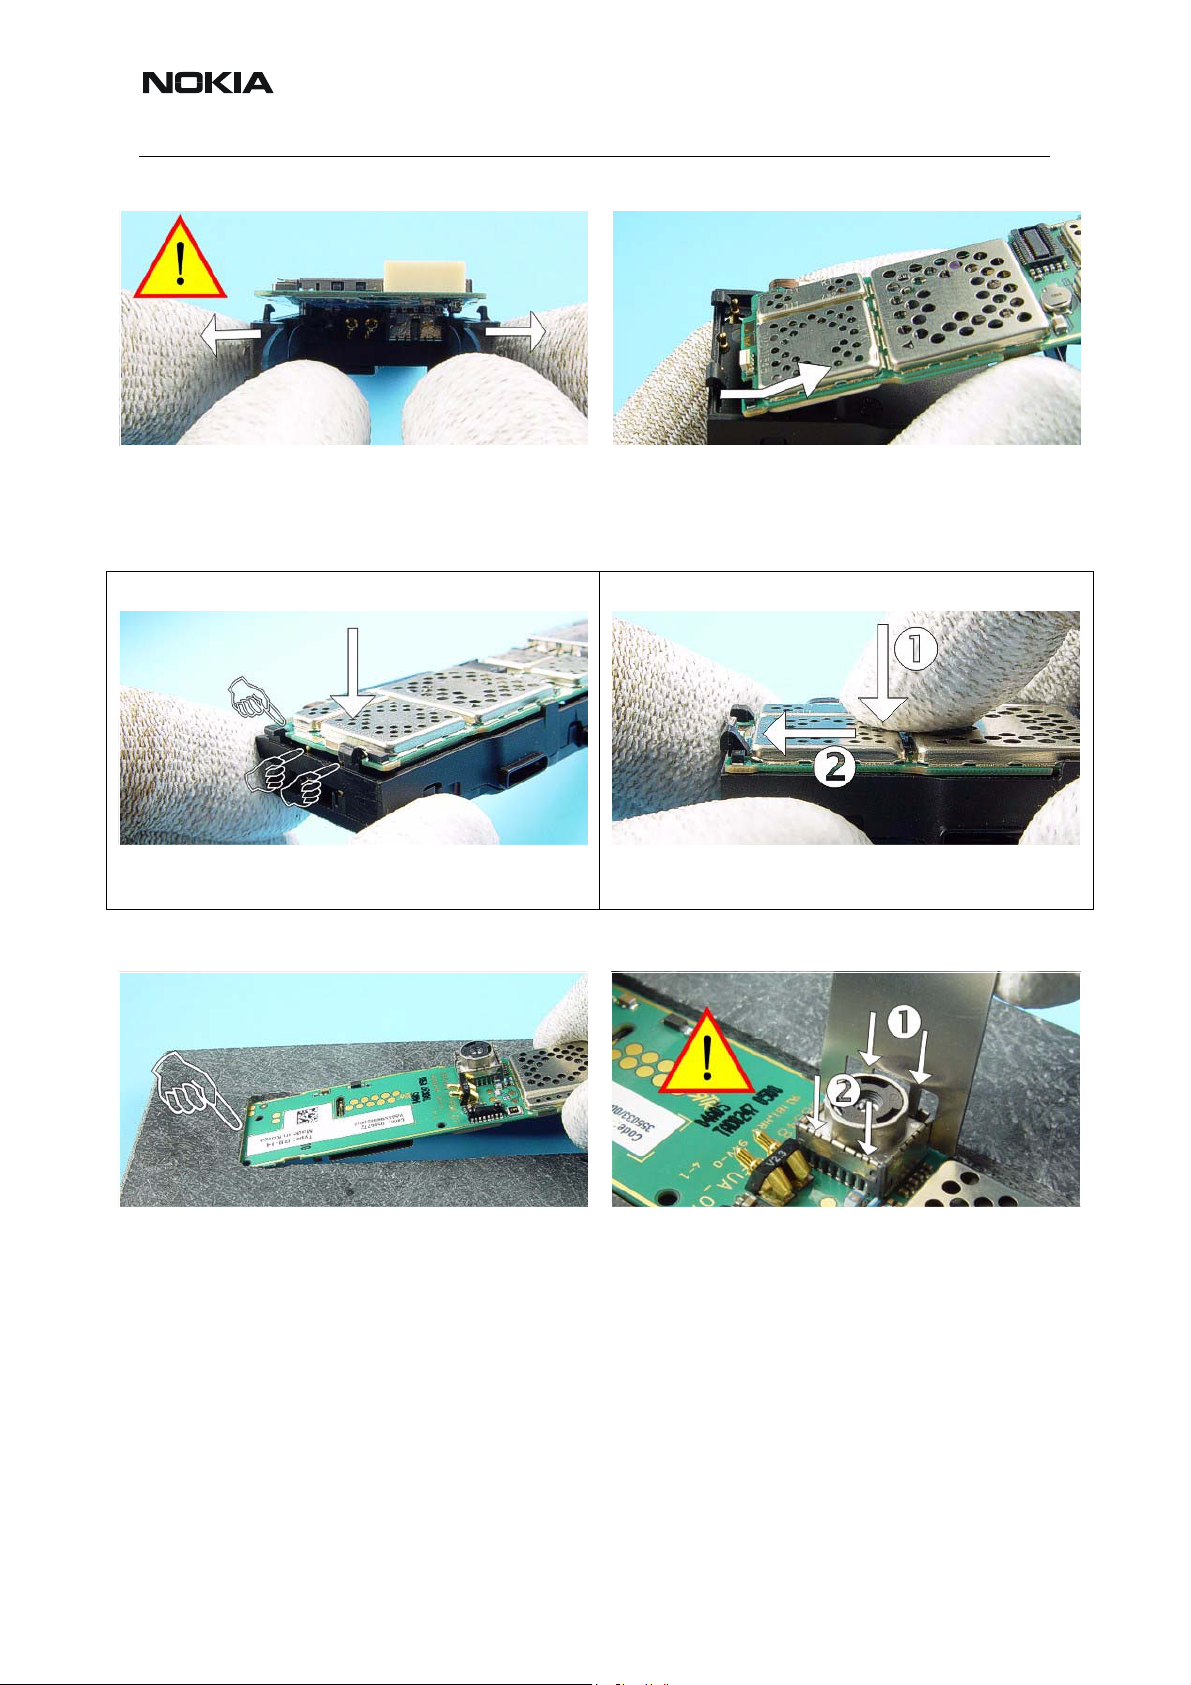
24.) Remove the Engine Module from the D-Cover.
For assembly only!
Place the Engine Module in the clamps of the D-
Cover by pressing it slightly.
25.) Put the Engine Module in to the soldering jig.
8 COMPANY CONFIDENTIAL ISSUE 1 11/04
Copyright © 2004 Nokia. All Rights Reserved.
26.) Use the SRT-10 to release the VGA Camera.
Page 9
RM-14
Disassembly and Reassembly Instructions Nokia Customer Care
27.) Remove the VGA Camera by using the
corrugated tweezers.
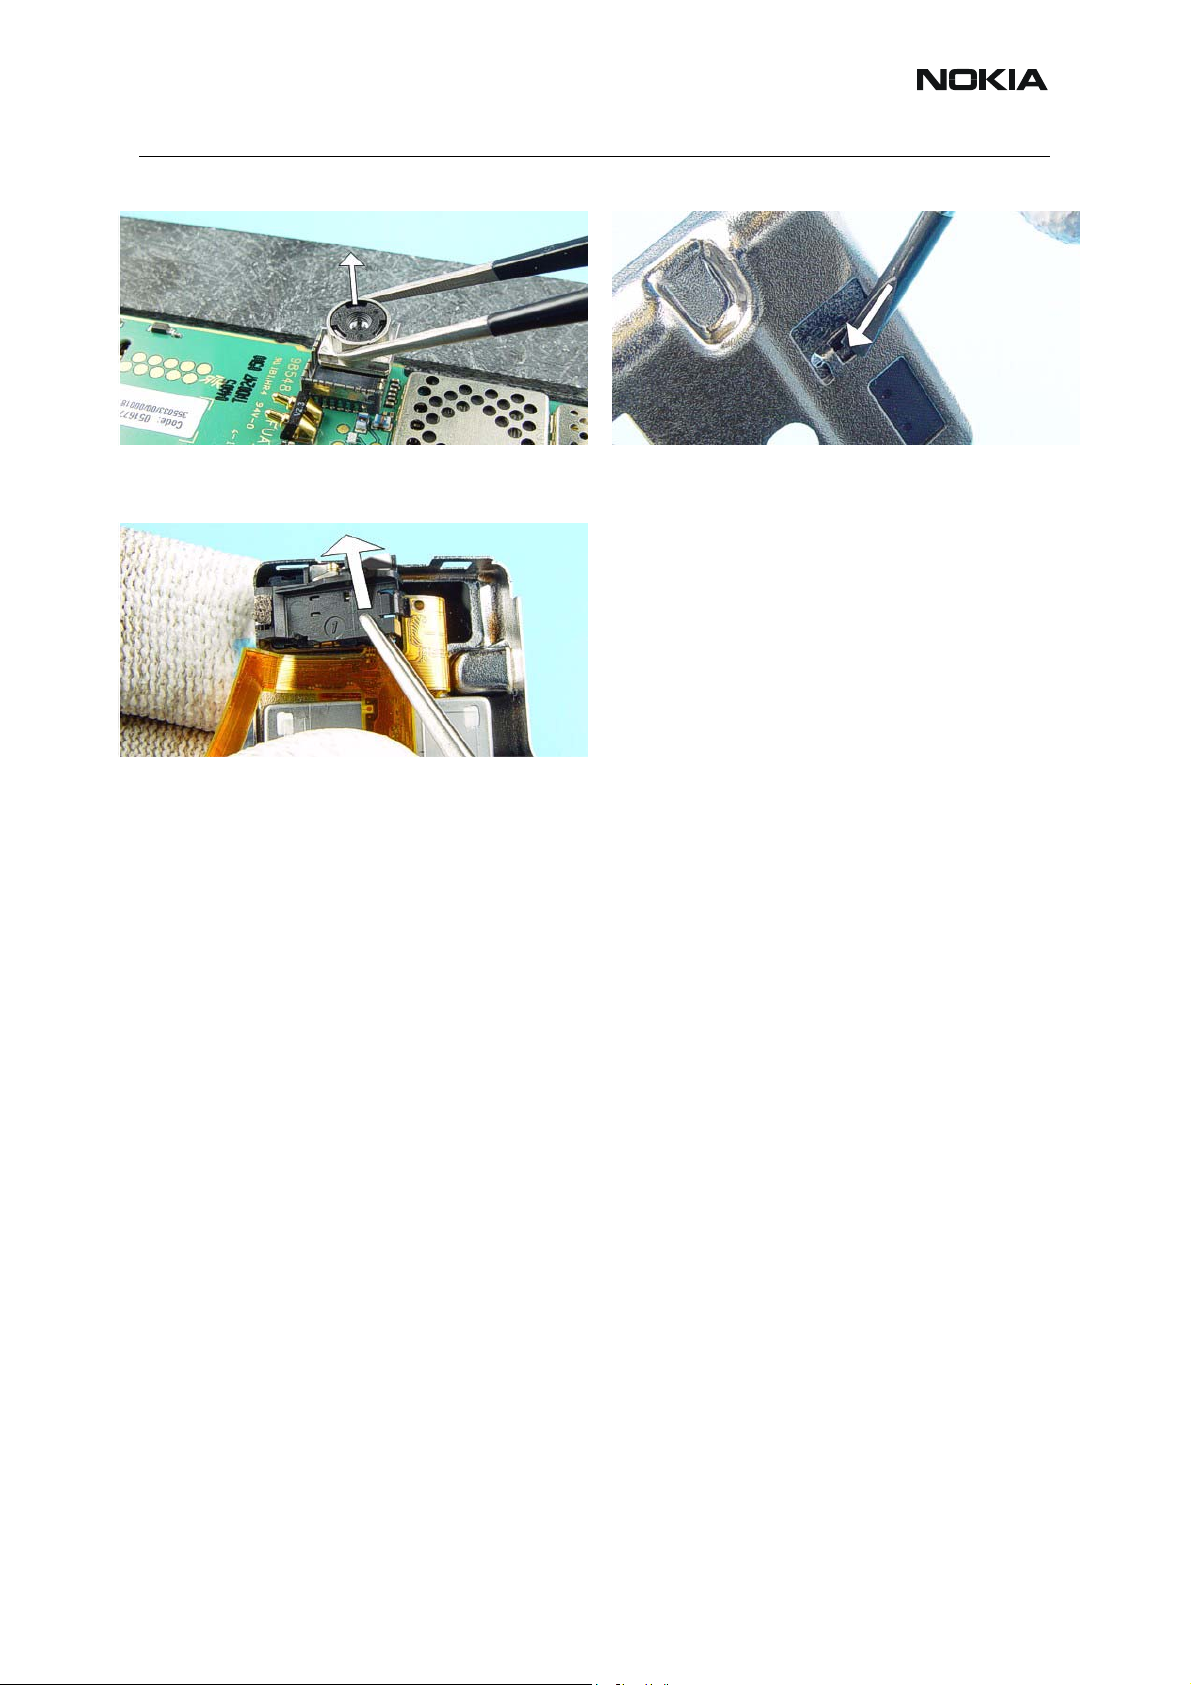
29.) Remove the Earpiece Connector
28.) Release the snap of Earpiece Connector by
using the slotted screwdriver.
.
ISSUE 1 11/04 COMPANY CONFIDENTIAL 9
Copyright © 2004 Nokia. All Rights Reserved.
Page 10
RM-14
Nokia Customer Care Disassembly and Reassembly Instructions
For assembly only!
Place the Earpiece Connector in its guidance.
For assembly only!
Lock the snap of the Earpiece Connector by using a
slotted screwdriver. Take care of the Flex Assy.
30.) Remove the Earpiece.
10 COMPANY CONFIDENTIAL ISSUE 1 11/04
Copyright © 2004 Nokia. All Rights Reserved.
Page 11
RM-14
Disassembly and Reassembly Instructions Nokia Customer Care
Display Exchange Instructions
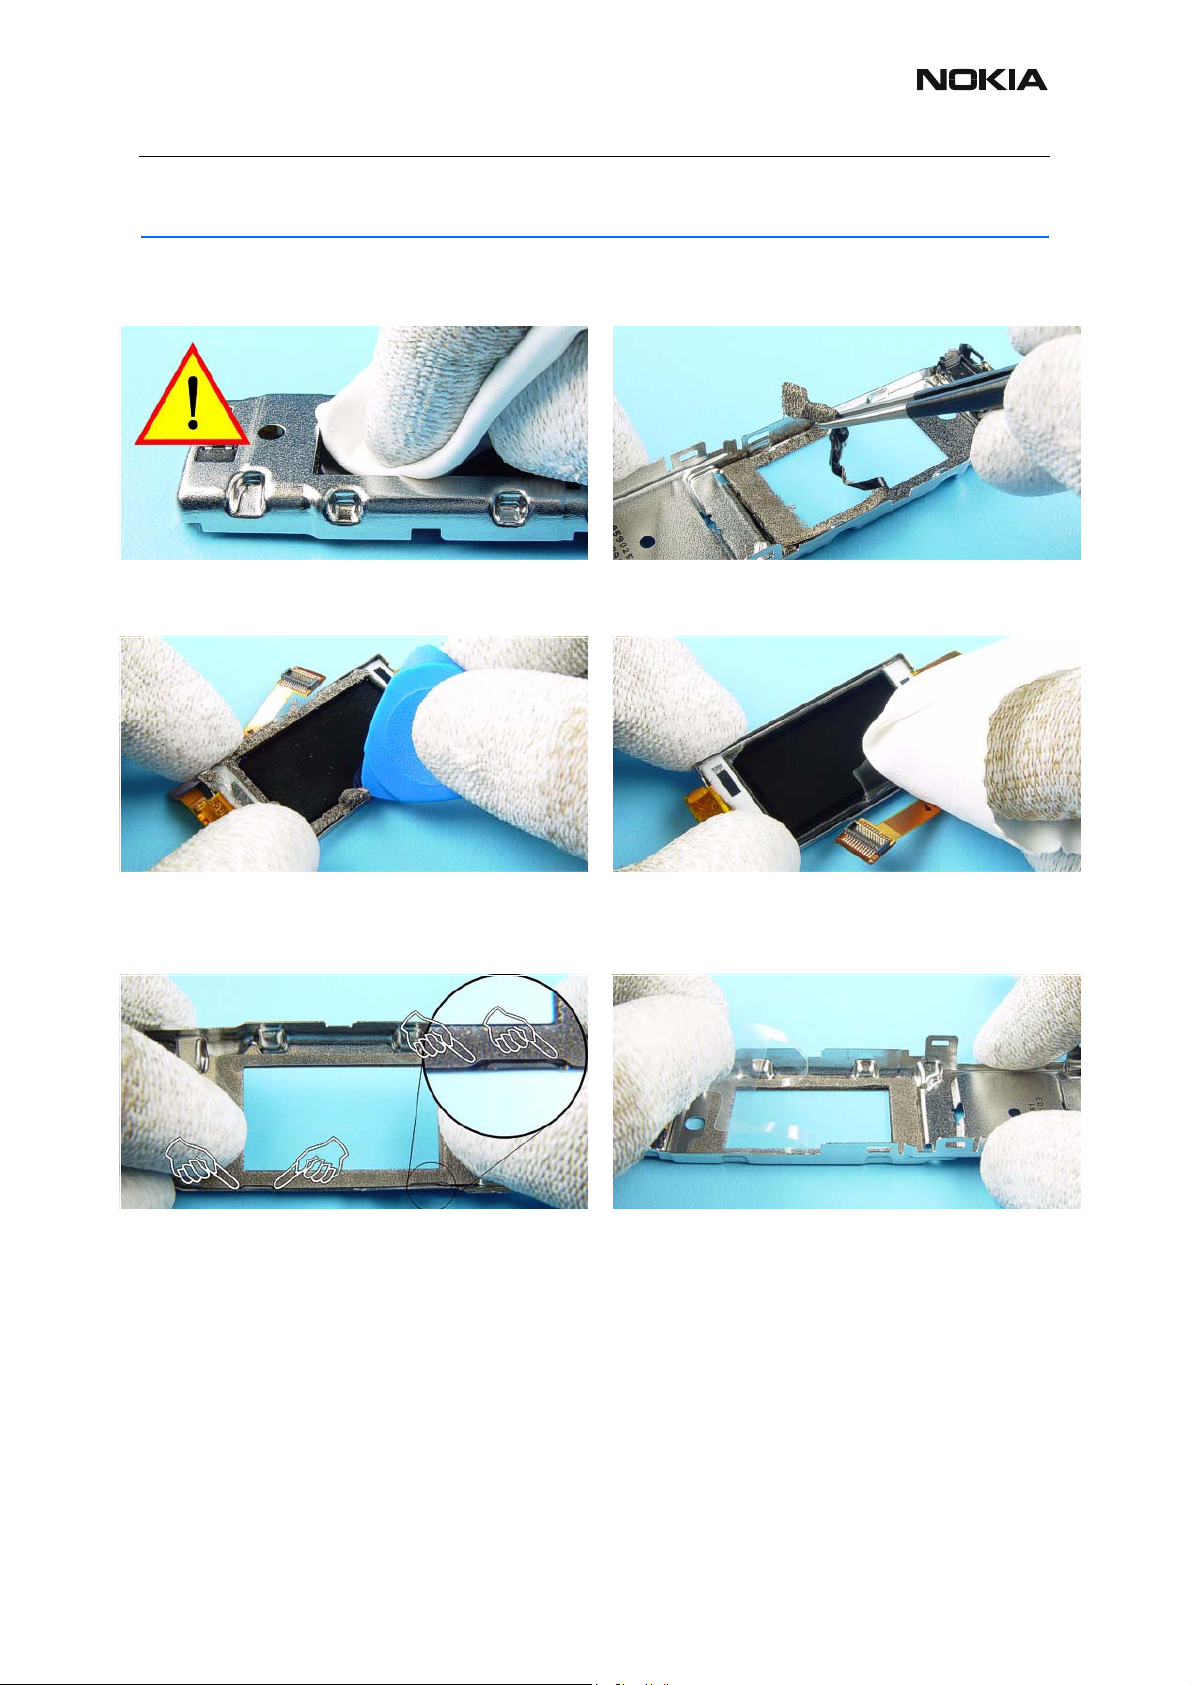
1.) Push out the LCD Cell carefully by using a clean
cloth.
3.) Be carefully when removing the remaining adhe-
sive from the LCD CELL. Do not scratch the its surface.
2.) Remove the remaining adhesive of Display
Conductive Tape.
4.) Clean the LCD CELL with a clean micro fibre
cloth carefully.
5.) Fit the Display Conductive Tape to the C-Cover.
Note the right position.
ISSUE 1 11/04 COMPANY CONFIDENTIAL 11
Copyright © 2004 Nokia. All Rights Reserved.
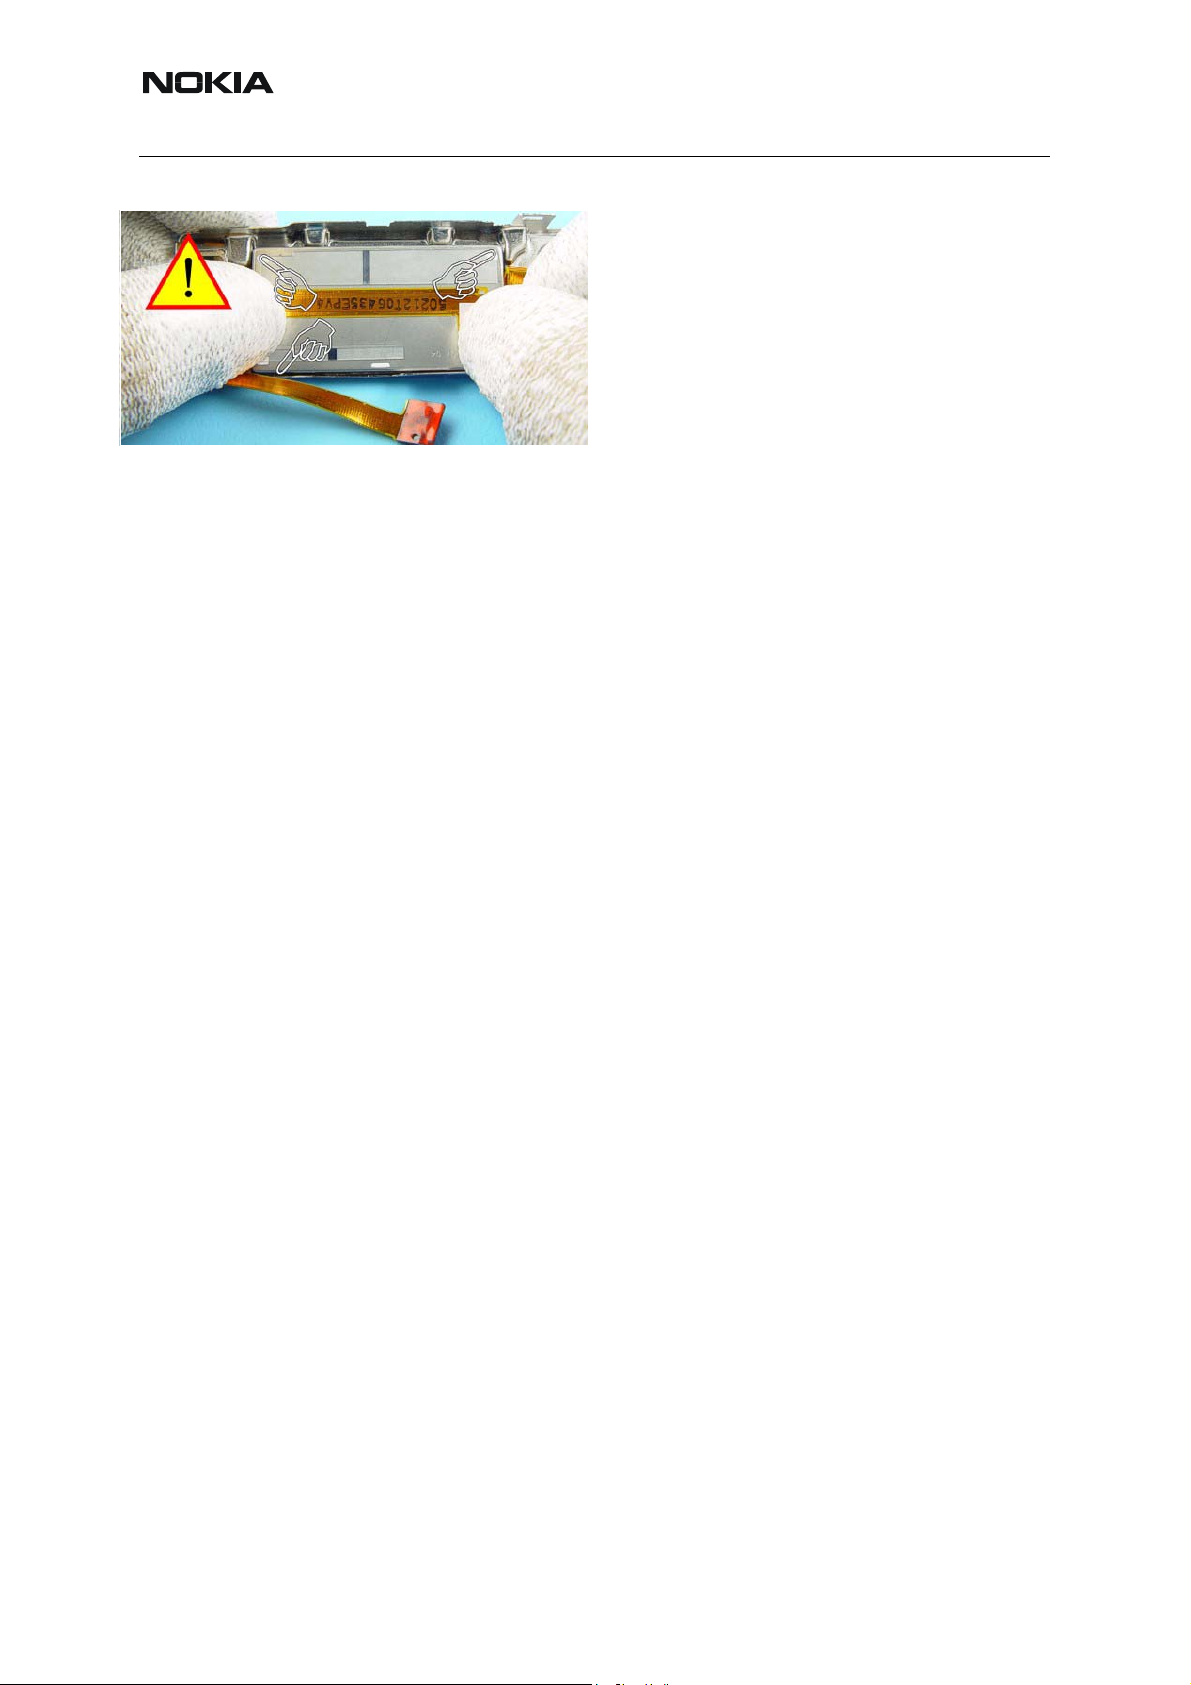
6.) Remove the protective film.
Page 12
RM-14
Nokia Customer Care Disassembly and Reassembly Instructions
7.) Place the LCD-Cell in the C-Cover.
12 COMPANY CONFIDENTIAL ISSUE 1 11/04
Copyright © 2004 Nokia. All Rights Reserved.
Page 13

RM-14
Disassembly and Reassembly Instructions Nokia Customer Care
Reassembly Instructions
Reassembly should be done in reversed order to disassembly.
ISSUE 1 11/04 COMPANY CONFIDENTIAL 13
Copyright © 2004 Nokia. All Rights Reserved.
Page 14

RM-14
Nokia Customer Care Disassembly and Reassembly Instructions
[This page left intentionally blank]
14 COMPANY CONFIDENTIAL ISSUE 1 11/04
Copyright © 2004 Nokia. All Rights Reserved.
 Loading...