


c1caus.frm Page 1 Thursday, December 19, 1996 12:46 PM
OWNER’S MANUAL
NOKIA 636
1

c1caus.frm Page 2 Thursday, December 19, 1996 12:46 PM
NOKIA and the Arrows logo are registered trademarks of Nokia
Corporation, Finland.
© 1996 Nokia Mobile Phones. All rights reserved.
Nokia Mobile Phones operates a policy of continuous improve-
ment, therefore, we reserve the right to make changes and improvements to any of the products described in this guide
without prior notice.
Issue 4
2

c1caus.frm Page 3 Thursday, December 19, 1996 12:46 PM
Contents
IMPORTANT SAFETY INFORMATION................... 5
KEYS AND DISPLAY INDICATORS......................... 9
List of Keys..................................................................................... 9
Display Indicators...................................................................... 10
Display Editing........................................................................... 11
GETTING STARTED............................................... 12
Installing the Battery............................................................... 12
Battery Charge Indication....................................................... 12
Charging a Battery.................................................................... 12
Signal Strength Indication...................................................... 13
GENERAL FUNCTIONS......................................... 14
Switching On/Off....................................................................... 14
Making a Call............................................................................. 14
Receiving a Call......................................................................... 15
Adjusting the Earpiece Volume............................................. 15
Last Number Redial................................................................... 16
Speed Dialing.............................................................................. 16
9 Key Emergency Dialing......................................................... 17
Keyguard...................................................................................... 18
Calling Card Call........................................................................ 19
USING THE MEMORY.......................................... 20
Standard Memory Locations.................................................. 20
Dialed Calls Memory Location............................................... 20
Notepad Memory Location..................................................... 21
Entering Names.......................................................................... 22
Storing Names and Phone Numbers.................................... 22
Memory Scrolling...................................................................... 24
Recalling Names and Phone Numbers................................ 25
Moving Names and Phone Numbers................................... 26
Erasing a Memory Location.................................................... 27
3

c1caus.frm Page 4 Thursday, December 19, 1996 12:46 PM
USING THE MENU FACILITY............................... 30
Menu Method............................................................................. 30
Shortcut Method....................................................................... 30
List of Menu Functions............................................................ 31
Descriptions of Menu Functions........................................... 31
STORE TO MEMORY (MENU 1)................................ 32
FIND NAME (MENU 2)................................................ 32
ERASE NAME (MENU 3)............................................. 33
LOCK PHONE (MENU 4)............................................. 34
SYSTEM SELECT (MENU 5)........................................ 35
CALL TIMERS (MENU 6)............................................. 36
LIGHTS (MENU 7)......................................................... 37
KEYPAD TONES (MENU 8)......................................... 38
RINGING VOLUME (MENU 9)................................... 38
RINGING TYPE.............................................................. 39
EMERGENCY KEY 9..................................................... 39
NAM SELECT................................................................. 40
CALLING CARD............................................................. 41
ADDITIONAL FEATURES...................................... 42
Sending DTMF Tones................................................................ 42
Call Waiting................................................................................ 43
BATTERY INFORMATION..................................... 44
Battery Options.......................................................................... 44
Discharging a Battery............................................................... 45
Recharging a Battery................................................................ 45
Using Batteries........................................................................... 45
ACCESSORIES....................................................... 47
General......................................................................................... 47
Accessory Options..................................................................... 47
Vehicle Accessories................................................................... 49
APPENDIX............................................................. 53
Care and Maintenance............................................................. 53
Troubleshooting......................................................................... 54
Technical Information.............................................................. 54
4

c1caus.frm Page 5 Thursday, December 19, 1996 12:46 PM
1. IMPORTANT SAFETY
INFORMATION
Traffic Safety
Do not use a hand-held phone while driving a vehicle. If using
•
a hand-held phone, park the vehicle before conversing.
Always secure the phone in its holder; do not place the phone
•
on the passenger seat or where it can break loose in a collision
or sudden stop.
The use of an alert device to operate a vehicle's lights or horn
•
on public roads is not permitted.
Remember, road safety always comes first!
•
Operating Environment
Remember to follow any special regulations in force and al-
•
ways switch off your phone whenever it is forbidden to use it,
or when it may cause interference or danger.
Operation of any radio transmitting equipment, including cel-
•
lular phones, may interfere with the functioning of inadequately protected medical devices. Consult a physician or the
manufacturer of the medical device if you have any questions.
Other electronic equipment may also be subject to interference.
As with other mobile radio transmitting equipment, users are
•
advised that for the satisfactory operation of the equipment
and for the safety of personnel, it is recommended that the
equipment should only be used in the normal operating position.
Users are advised to switch off the phone while at a refueling
•
point (service station). Users are reminded of the need to observe restrictions on the use of radio equipment in fuel depots
(fuel storage and distribution areas), chemical plants or where
blasting operations are in progress.
5

c1caus.frm Page 6 Thursday, December 19, 1996 12:46 PM
Do not store or carry flammable liquids, gases or explosive ma-
•
terials in the same compartment as a cellular phone or any of
its parts or accessories.
Only qualified personnel should install or service the phone in
•
a vehicle. Faulty installation or service may be dangerous and
may invalidate any warranty which may apply to the unit.
Electronic fuel injection systems, electronic anti-lock braking
•
systems, electronic cruise control systems and other electronic
systems can malfunction due to the lack of protection from radio signals. Check regularly that all cellular phone equipment
in your vehicle is mounted and operating properly.
Switch off your cellular phone when in an aircraft. The use of
•
cellular phones in an aircraft may be dangerous to the operation of the aircraft, may disrupt the cellular networks, and is illegal.
Failure to observe these instructions may lead to the suspen-
•
sion or denial of cellular telephone services to the offender, or
legal action or both.
Emergency Calls
IMPORTANT!
This phone, like any cellular phone, operates by using radio signals,
cellular and landline networks, as well, as user-programmed functions which cannot guarantee connection in all conditions. Therefore, you should never rely solely upon any cellular phone for
essential communications (e.g., medical emergencies).
Remember, that to make or receive any calls, the phone must be
switched on and in a service area with adequate cellular signal
strength.
Emergency calls may not be possible on all cellular phone networks or when certain network services and/or phone features are
in use. Check with your local service providers.
6

c1caus.frm Page 7 Thursday, December 19, 1996 12:46 PM
To make an emergency call:
If the phone is not on, switch it on by pressing and holding the
1
PWR key.
Press and hold the CLR key for several seconds to ready the
2
phone for calls.
Enter the emergency number for your present location (e.g.,
3
911 or another official emergency number). Emergency numbers vary by location.
Press the SEND key.
4
If certain features are in use (e.g., Keyguard), you may first need
to turn those features off before you can make an emergency call.
Consult this document and your local cellular service provider.
When making an emergency call, remember to give all the necessary information as accurately as possible. Remember, that your
cellular phone may be the only means of communication at the
scene of an accident - do not cut off the call until given permission to do so.
Regulations
FCC/Industry Canada Notice
Your phone may cause TV or radio interference (e.g. when using a
phone in close proximity to receiving equipment). The FCC/Industry Canada can require you to stop using your phone if such interference cannot be eliminated. If you require assistance, please
contact your local service facility.
This phone complies with part 15 of the FCC rules. Operation is
subject to the condition that this device does not cause harmful
interference.
7

c1caus.frm Page 8 Thursday, December 19, 1996 12:46 PM
Using This Guide
The cellular phone described in this guide is approved for use in
AMPS networks.
A number of features included in this guide are called Network
Services. They are special services provided by cellular service providers. Before you can take advantage of any of these Network
Services, you must subscribe to the service(s) you require from
your home service provider. You may then activate and use the
functions as described in this guide.
The manual activation commands for various network services are
not presented in this guide (e.g., using * and # characters for activating or deactivating network services). The phone nevertheless
is capable of handling commands given in that form. For these
commands, please consult with your service providers.
8
c1caus.frm Page 9 Thursday, December 19, 1996 12:46 PM
2. KEYS AND DISPLAY INDICATORS
List of Keys
PWR Press and hold the key to switch the phone on and off.
ABC Used to switch between alpha and numeric modes.
MENU Used to enter the menu facility. Press the MENU key
and then scroll through the menu functions by using
the arrow key ( ), or press first the MENU key and
then a menu shortcut number. (See Shortcut Method
on page 30.)
OK Used to confirm a setting in the menu facility.
Also used to store information in the phone memory.
Used to adjust the earpiece volume during a call.
Press to increase and to decrease the volume.
Press the key to scroll through the memory
locations when the display is clear. Press to scroll
forward and to scroll backward.
Press the MENU key and then scroll through the
menu functions with the key. Press to scroll
forward and to scroll backward. (Hold the key
down for continuous scrolling.)
CLR Used to delete characters one at a time or to clear
the whole display by pressing and holding the key.
This key is also used to exit the menu functions.
SEND Used to dial a phone number and answer a call. With
the display clear, this key recalls the five last dialed
phone numbers.
END Used to end a phone call. Note: When you press and
hold the END key, the keyguard is activated.
0 - 9 Used to enter numbers and alpha characters.
, # Used for special purposes in special functions. (For
✱
example, the keypad can be locked/unlocked by first
pressing the MENU key and then pressing the ✱ key.)
9

c1caus.frm Page 10 Thursday, December 19, 1996 12:46 PM
Display Indicators
AB Indicates which network is
currently in use:
A system only
B system only
AB both systems
Blank home area only
ABC Indicates that the phone is in ALPHA mode and letters
can be entered or displayed.
MENU Indicates that the MENU key has been pressed and
you are in the menu facility.
Indicates the number of a menu function or phone
directory memory location.
ON Indicates that the phone is switched on.
ROAM The symbol is constantly displayed when the phone is
outside its home service area and is connected to a
home type system. The symbol flashes when the
phone is connected to a non-home type system.
IN USE Indicates that a call is in progress.
NO SVC Indicates that cellular service is not available.
S and bar Indicates the cellular signal strength of the location
where you are using your phone. The higher the bar,
the stronger the signal.
B and bar Indicates the battery charge level. The higher the bar,
the more charge in the battery. When the battery is in
a full charge, the whole bar is displayed.
10

c1caus.frm Page 11 Thursday, December 19, 1996 12:46 PM
Display Editing
The display can be edited using the CLR key.
Press the CLR key once to delete the last digit.
•
Press the CLR key repeatedly to delete digits one by one.
•
Press and hold the CLR key to clear the whole display. Clearing
•
the whole display restores the display to the numeric mode.
The phone can display up to 16 digits. If you enter more than this
(max. 32 digits), the first digits will run-off the display, and you
cannot view them.
11
c1caus.frm Page 12 Thursday, December 19, 1996 12:46 PM
3. GETTING STARTED
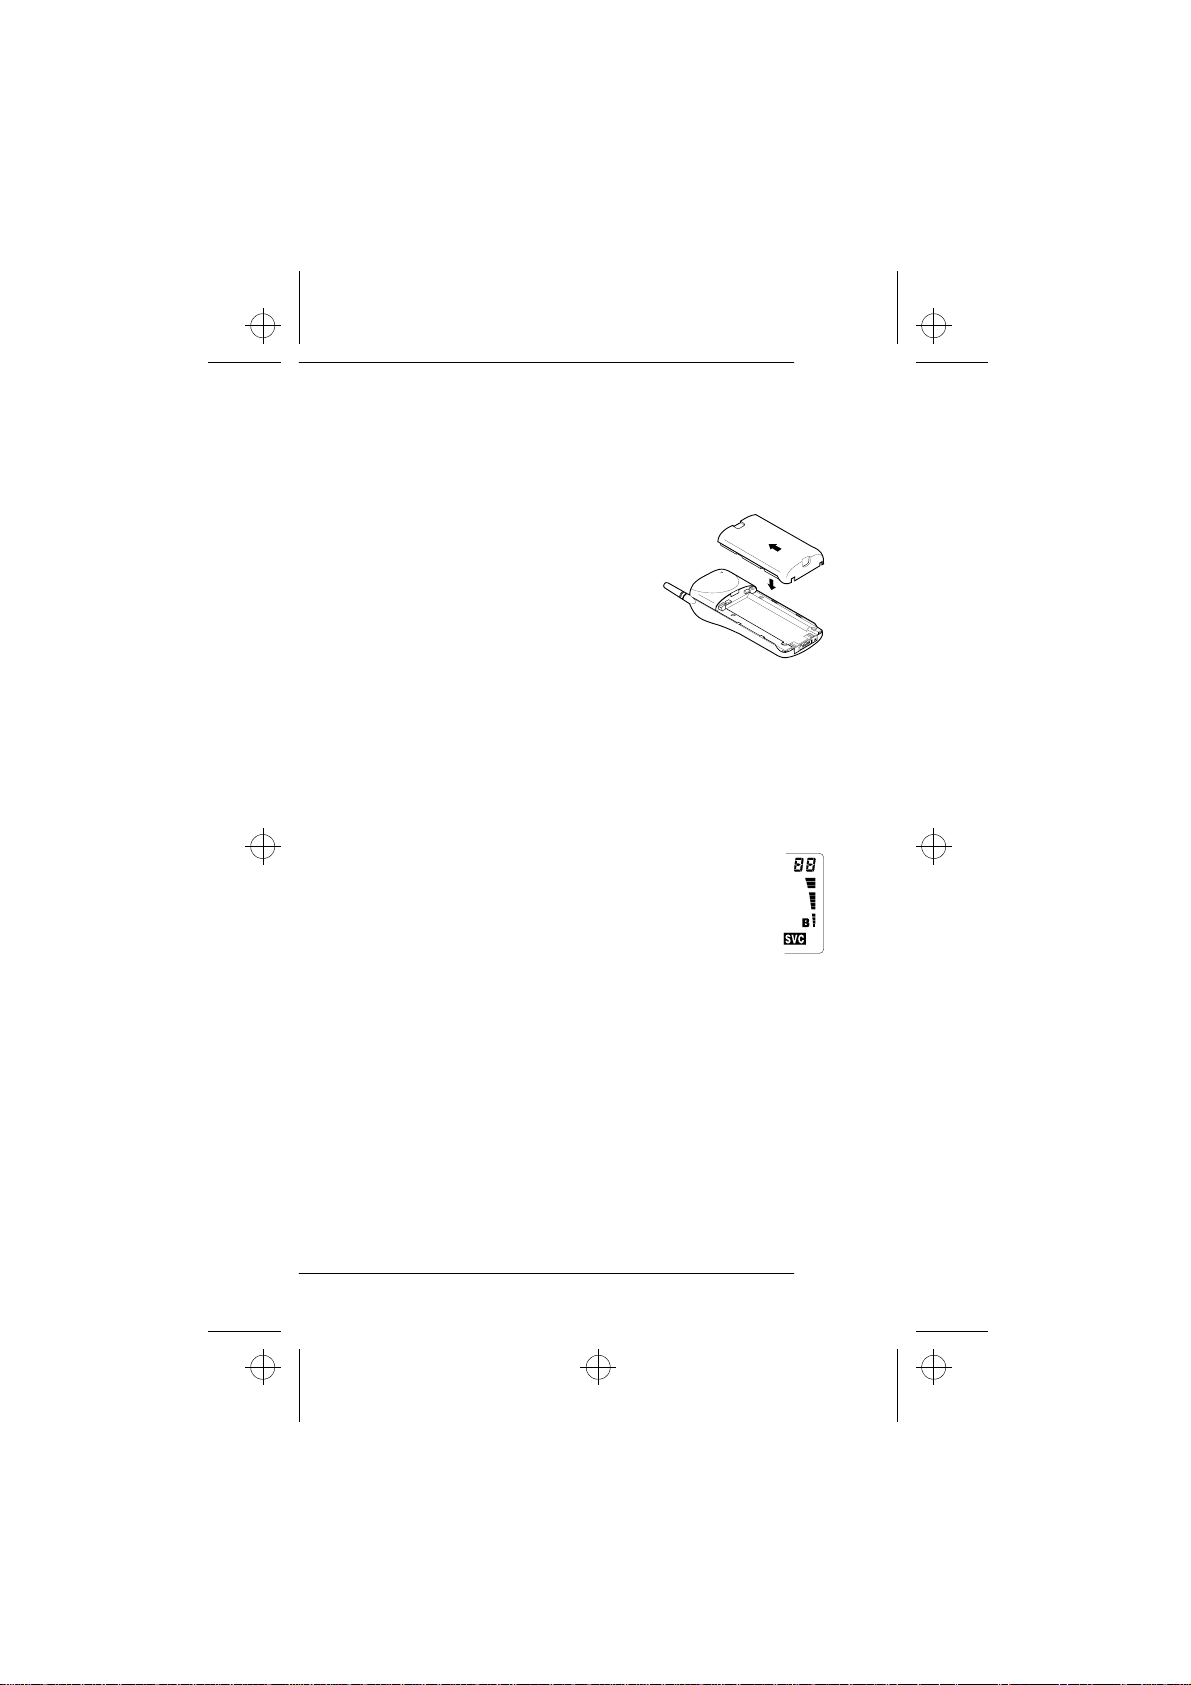
Installing the Battery
To install the Battery:
Place the battery onto the rear of
1
the phone (1).
Push the battery towards the catch
2
until it clicks into place (2).
Make sure the battery is properly
3
installed.
To remove the Battery:
Switch off the power before removing the battery.
1
Press the locking catch at the top of the battery and slide the
2
battery down and off the phone.
Battery Charge Indication
The vertical bar to the right of the indicator B on the right
side of the phone display shows the battery charge level.
The higher the bar, the more power left in the battery.
2.
1.
Charging a Battery
Install the battery and connect the charger to the base of the
1
phone.
Connect the charger to a standard AC wall outlet. Segments of
2
the battery indicator bar on the right-hand side of the display
start scrolling and a confirmation tone is emitted.
You can use the phone during the charging, but the charging
•
process will be reduced for the duration of the call.
After the segments of the battery indicator bar stop scrolling
•
and the bar is entirely displayed, the battery is fully charged.
Disconnect the charger from the power outlet and phone.
3
12

c1caus.frm Page 13 Thursday, December 19, 1996 12:46 PM
Note: A new battery must be fully charged before being used
•
for the first time.
Battery charging times depend on the type of battery and
•
charger used. Battery operation times depend greatly on how
you use the batteries, as well as on the coverage of the network
and network parameters set by the cellular service provider.
If the battery is too hot or cold, the charging may be interrupt-
•
ed until the battery reaches its normal operating temperature.
For more information on batteries, see Battery Information on
page 44.
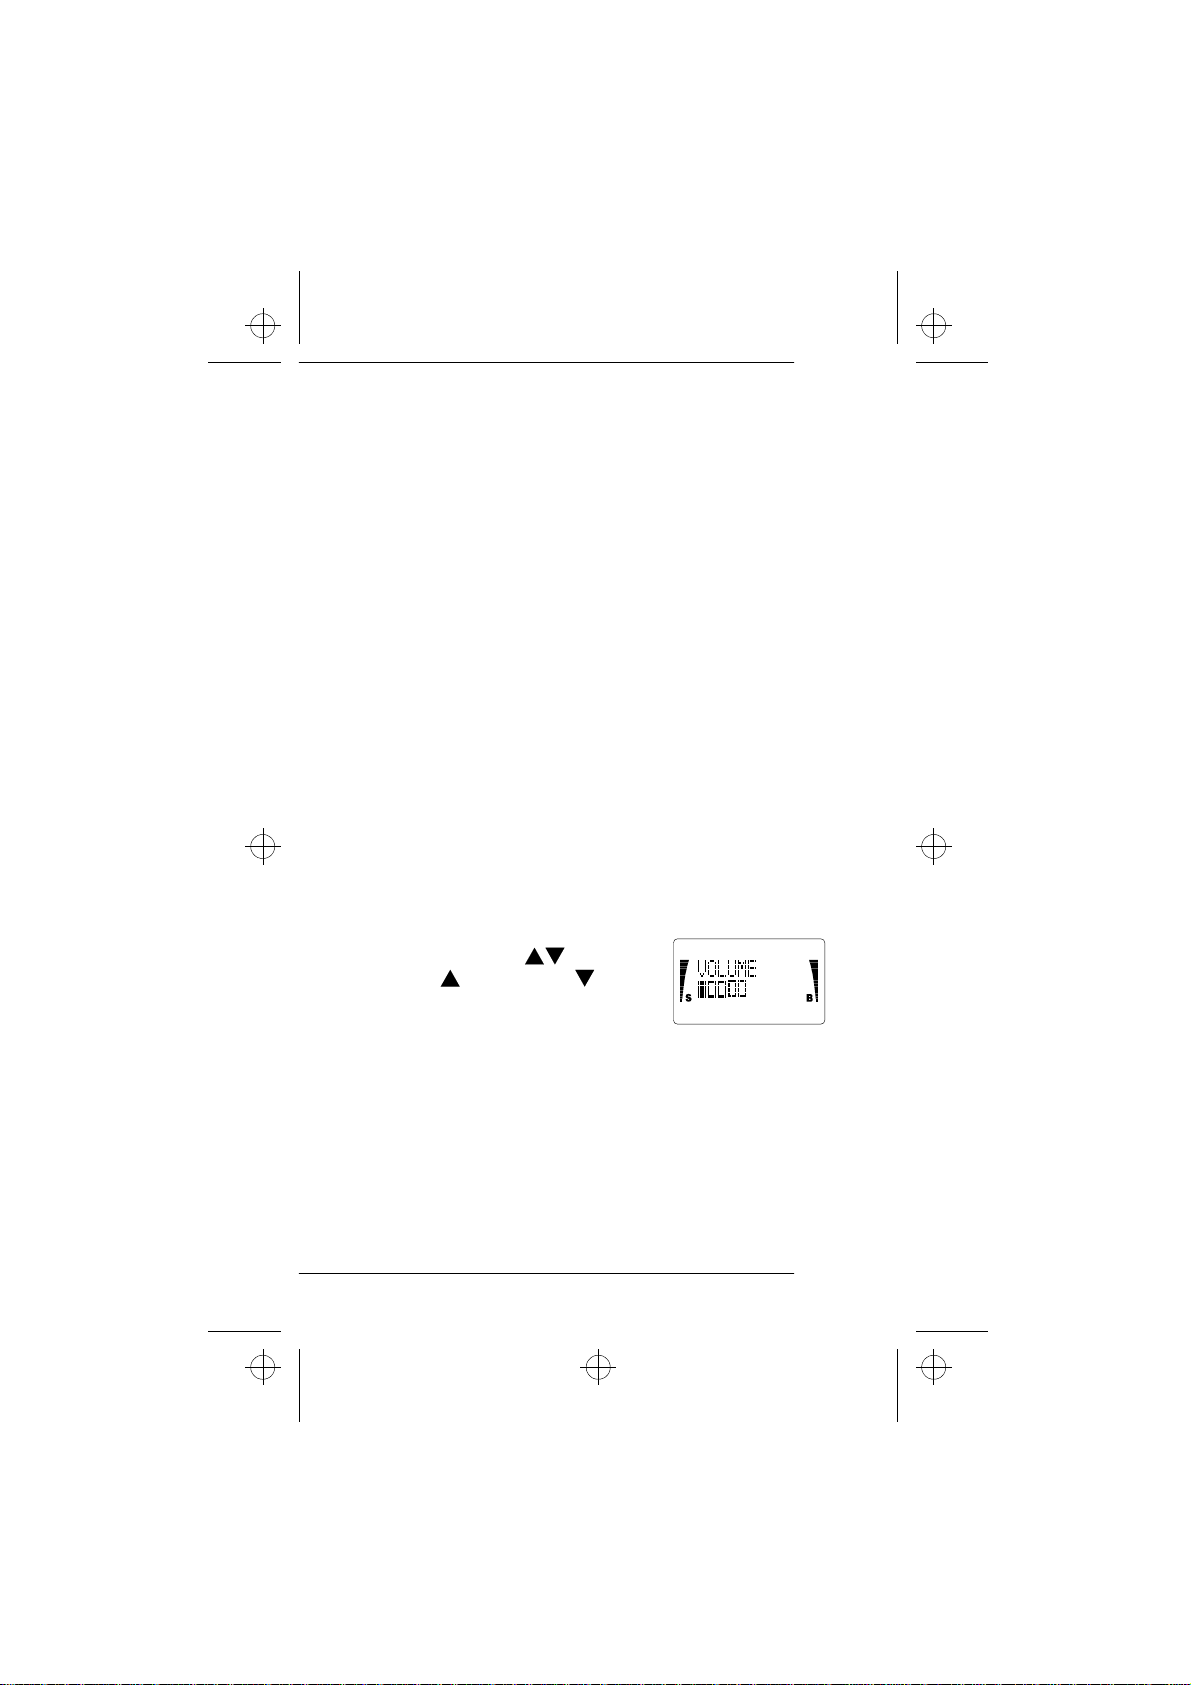
Signal Strength Indication
Your phone sends and receives radio signals. As with all
radio equipment, the quality of radio reception depends
on the strength of the radio signal in the area where you
are operating your cellular phone.
The strength of the cellular signal is shown by the vertical
S
indicator on the left-hand side of
bar to the left of the
the display. The higher the bar, the stronger the signal
is at the location where you are operating your phone.
When the NO SVC indicator is displayed, the phone is outside
•
of the cellular service area and calls cannot be made or received.
If the signal is poor and you are using the phone in a building,
•
it may be beneficial to move near a window for better reception.
13

c1caus.frm Page 14 Thursday, December 19, 1996 12:46 PM
4. GENERAL FUNCTIONS
Switching On/Off
If your phone has an extendable antenna, extend the antenna fully. As with any other radio transmitting device, avoid unnecessary
contact with the antenna when the phone is switched on.
Press and hold the PWR key for one second to switch on the
1
phone.
The phone will carry out a short self-test briefly displaying its
•
activated phone number. The phone is ready for use when the
indicators ON, S and B are displayed.
Press and hold the PWR key for one second to switch off the
2
phone.
IMPORTANT! Do not switch on the phone when cellular phone
use is prohibited or when it may cause interference or danger.
Making a Call
Enter the area code and the desired phone number.
1
If you make a mistake, press the CLR key repeatedly to delete
•
digits one by one or press and hold the CLR key to clear the
whole display.
Press the SEND key to dial the phone number.
2
The text NO SERVICE appears and an error tone is given if you
•
try to make a call when no cellular service is available.
The text LOCKED appears if you try to make a call and your
•
phone is locked. (See Lock Phone on page 34.)
The text KEYGUARD ACTIVE appears if the keyguard feature is
•
activated. (See Keyguard on page 18.)
End the call by pressing the END key.
3
Note: If you press and hold the END key, the keyguard feature
is activated.
14
c1caus.frm Page 15 Thursday, December 19, 1996 12:46 PM
Receiving a Call
When there is an incoming call, the phone will give a ringing tone
and the CALL message will flash on the display.
If you have set the menu function Ringing Volume to SILENT
•
SERVICE, the keypad and display lights will flash, the CALL
message will flash on the display and only a short beep tone
will be given.
You can answer a call any time, even while using the memory
or menu functions.
To answer a call:
Press the SEND key or any key except PWR and lift the phone
1
to your ear.
Note: If the Keyguard is activated, a call can only be answered
by pressing the SEND key.
To end a call, press the END key.
2
If you don't answer a call, the message 1 CALL MISSED or NN
•
CALLS MISSED will remain on the display until you press any
key (except PWR) to clear the display.
Adjusting the Earpiece Volume
The volume of the earpiece can be controlled by scrolling the key during a
call. Press to increase and to decrease the volume level.
Note: This key acts as a scrolling key for
the memory and the menu functions when not in a call.
15
c1caus.frm Page 16 Thursday, December 19, 1996 12:46 PM
Last Number Redial
The last five phone numbers you called or attempted to call (and
associated names if entered) are stored in the phone's memory location 0 (L0-L4). This stack of the five last dialed numbers remains
in the phone's memory when the phone is switched off.
To redial a last number dialed:
If there are any characters on the display, clear the display by
1
pressing and holding the CLR key.
Press the SEND key to display the last dialed number. Use the
2
key to scroll through the last dialed numbers. To view the
associated names, if stored in the phone’s memory, press the
ABC key first and then start scrolling by using the key.
The location number is displayed in the upper right corner of
the display (L0-L4).
If the stack of the last dialed numbers is empty, the message
•
LOCATION EMPTY will be displayed.
To make a call to the displayed number or name, press the
3
SEND key.
See also Dialed Calls Memory Location on page 20.
Speed Dialing
Speed dialing is a handy way to call frequently-used phone numbers stored in the phone’s memory locations. (To store phone numbers, see Storing Names and Phone Numbers on page 21.)
Enter the number of the memory location where you have
1
stored the desired phone number.
Press the SEND key.
2
The phone recalls the phone number from the specified memory location, displays it briefly, and then dials it.
If the memory location is empty, the message LOCATION EMP-
•
TY will be displayed.
16

c1caus.frm Page 17 Thursday, December 19, 1996 12:46 PM
9 Key Emergency Dialing
If the menu function emergency Key 9 is set to on (EMERG. 9 ON),
you can make an emergency call to the emergency number programmed into your phone by pressing and holding the 9 key.
The phone dials the the emergency programmed into the phone
•
displays the message EMERG. CALL TRY .
Note: The official emergency numbers vary by location (e.g., 911
or another official emergency number). However, only one
emergency number is programmed into your phone to be dialed automatically by one-touch emergency dialing, which
may not be the proper number in all circumstances.
Note: The one-touch 9 Key Emergency Dialing operates even
when your phone is LOCKED.
Note: The 9 Key Emergency Dialing does not operate when the
keyguard feature is activated. However, an emergency call
can be made without deactivating the keyguard by entering
the whole emergency number programmed into your phone
and then pressing the SEND key.
To make an emergency call when keyguard is activated:
Enter the emergency number programmed into your phone and
1
press the SEND key.
The emergency number is displayed only after you have entered
•
the last digit of the number.
The phone dials the emergency number and the message
•
EMERG. CALL TRY is displayed.
17
 Loading...