

Page 1

Nokia Customer Care
6255/6255i/6256/6256i (RM-19)
Mobile Terminal
Reassembly
Issue 2 05/2005 Company Confidential ©2005 Nokia Corporation
Page 2

6255/6255i/6256/6256i (RM-19)
Reassembly Nokia Customer Care
This page intentionally left blank.
Page 2 ©2005 Nokia Corporation Company Confidential Issue 2 05/2005
Page 3

6255/6255i/6256/6256i (RM-19)
Nokia Customer Care Reassembly
Before You Begin
You need the following equipment to reassemble the 6255/6255i/6256/6256i:
• ESD protection = Always follow ESD protection guidelines when disassembling
and assembling the mobile terminals. To avoid potential ESD damage, the
recommendation is to treat all assemblies and components as if they are
sensitive to ESD.
• SRT-6 opening tool
• Screwdriver
• Tweezers
Reassembly Instructions
1. Attach the Rubber Grommet
Insert the rubber grommet in the D-cover using the slot for the small end of the
grommet.
2. Insert the D-cover Card Trap
a. Insert the guide pin into the slot of the D-cover.
Issue 2 05/2005 ©2005 Nokia Corporation Company Confidential Page 3
Page 4
6255/6255i/6256/6256i (RM-19)
Reassembly Nokia Customer Care
b. After inserting the bottom pin, snap the upper guide pin into the D-cover
slot.
3. Attach the Whip Antenna
a. Insert the whip antenna into the D-cover using the notch that is circled
below.
b. Twist the antenna stub clockwise to snap it into the D-cover. Be sure not to
grip or damage the connectors on the whip antenna.
Page 4 ©2005 Nokia Corporation Company Confidential Issue 2 05/2005
Page 5

6255/6255i/6256/6256i (RM-19)
Nokia Customer Care Reassembly
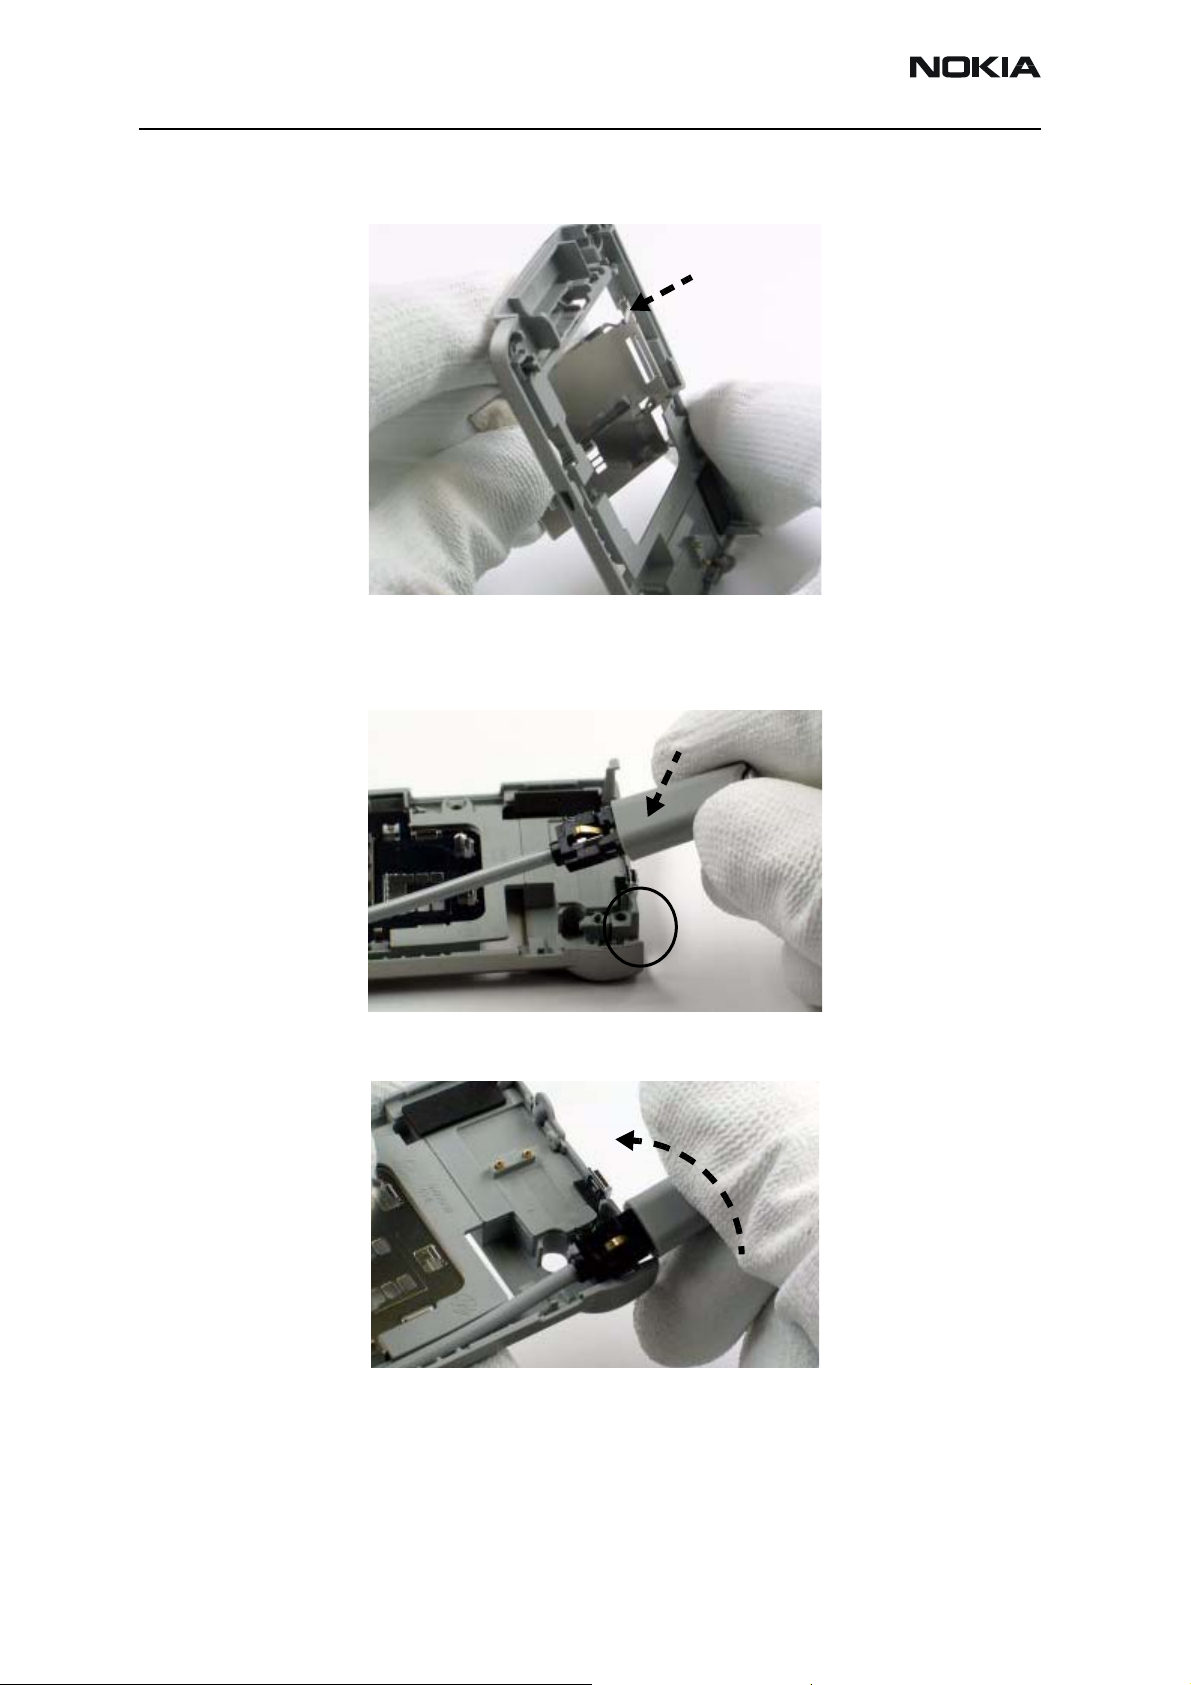
4. Insert the IR Window
Use your fingers to insert the IR window into the notch in the D-cover.
5. Insert the DC Jack, Vibra Motor, and Microphone
Use tweezers to insert the DC jack, vibra motor, and microphone into the D-cover. Ensure
that you do not touch the electrical connectors on the top of each part.
6. Insert the Hinge
Use a screwdriver to push the hinge into the hinge assembly of the D-cover.
Microphone
Vibra
Removal point
Issue 2 05/2005 ©2005 Nokia Corporation Company Confidential Page 5
Page 6

6255/6255i/6256/6256i (RM-19)
Reassembly Nokia Customer Care
7. Insert the Speaker
Insert the speaker (with rubber gasket) by using the guide slots in the B-cover.
Insert the speaker
using the slots in
the B-cover
8. Place the Secondary LCD Display into the B-cover
9. Attach the Camera Lid
Attach the camera lid to the PWB assembly by connecting the inside edge of the cover.
Press down on the outside edge to click the locking point into place.
Locking point
Insert this side first
Page 6 ©2005 Nokia Corporation Company Confidential Issue 2 05/2005
Page 7

6255/6255i/6256/6256i (RM-19)
Nokia Customer Care Reassembly
10. Attach the UI PWB to the B-cover
a. Attach the UI PWB to the B-cover using the guide pins. Carefully slip the flex
cable through the opening in the PWB, and attach both LCD flex cables. Be
careful not to scrape the PWB with the tweezers.
Guide pin
11. Attach the Secondary LCD Display
Place the secondary LCD display on the PWB, and carefully attach the LCD connector flex
pad.
Carefully slip the flex cable
through the opening in the PWB.
Issue 2 05/2005 ©2005 Nokia Corporation Company Confidential Page 7
Page 8

6255/6255i/6256/6256i (RM-19)
Reassembly Nokia Customer Care
12. Attach the Inner Housing to the B-cover
Use the guide pins and screw holes to attach the inner housing to the PWB.
Guide pin
13. Add the Four Screws to the A-cover
Page 8 ©2005 Nokia Corporation Company Confidential Issue 2 05/2005
Page 9

6255/6255i/6256/6256i (RM-19)
Nokia Customer Care Reassembly
14. Connect the B-cover and C-cover
With the mobile terminal in the open position:
a. Insert the flex cable into the hinge assembly slot of the C-cover.
b. Connect the assembly side without the hinge first.
c. While applying pressure on the hinge with the screwdriver, apply opposing
pressure to the middle of the B/C-cover assembly to snap the hinge into
place.
Issue 2 05/2005 ©2005 Nokia Corporation Company Confidential Page 9
Page 10

6255/6255i/6256/6256i (RM-19)
Reassembly Nokia Customer Care
15. Attach the Hinge Cap
Align the hinge cap with the rivets on the inside of the hinge assembly, and press the
hinge cap into place.
16. Assemble the PWB Engine and the C-cover
Insert the PWB by aligning it using the screw holes and C-cover clasp.
Insert the PWB in
this corner under
the clasp.
Screw holes
Page 10 ©2005 Nokia Corporation Company Confidential Issue 2 05/2005
Page 11

6255/6255i/6256/6256i (RM-19)
Nokia Customer Care Reassembly
17. Attach the Flex Cable
Carefully lock the flex cable onto PWB.
18. Assemble the D-cover and C-cover
Align the screw holes and combine the D-cover and C-cover. Be careful of the guide
latch on the D-cover.
Issue 2 05/2005 ©2005 Nokia Corporation Company Confidential Page 11
Page 12

6255/6255i/6256/6256i (RM-19)
Reassembly Nokia Customer Care
19. Add the Screws
Add four screws as indicated below. Use torque driver set to 24Ncm ± 2 @ 600 rpm.
Caution: Do NOT insert
the screwdriver here
Torque: 24Ncm ± 2 @ 600 rpm
20. Attach the Screw Grommet
Use tweezers to attach the rubber screw grommet.
Page 12 ©2005 Nokia Corporation Company Confidential Issue 2 05/2005
Page 13

6255/6255i/6256/6256i (RM-19)
Nokia Customer Care Reassembly
21. Attach the A-cover
Starting with one side, attach the A-cover using the four locking locations and the screw
hole (not shown). Press firmly until you hear and feel the A-cover click into place.
Locking locations
22. Add the B-cover Base Screw and Co-label
a. Open the mobile terminal, and add the single screw at the base of the B-
cover.
b. Attach the co-label to the base of the B-cover.
Issue 2 05/2005 ©2005 Nokia Corporation Company Confidential Page 13
Page 14

6255/6255i/6256/6256i (RM-19)
Reassembly Nokia Customer Care
23. Insert the Battery and Attach the Battery Cover (E-cover)
a. Insert the battery.
b. Align E-cover tabs with the slots, and slide it towards the top while pressing
down until you feel it click into place.
Page 14 ©2005 Nokia Corporation Company Confidential Issue 2 05/2005
 Loading...