

Nokia 6200 User Manual

User Guide
User Guide for
Nokia 6200 phone

Phone notes
My Nokia information Notes Information source
My number Wireless service provider
Voice mail number Wireless service provider
Provider’s customer care Wireless service provider
Message center number Wireless service provider
Default recipient number
(e-mail gateway number)
International Mobile
Equipment Identifier (IMEI)
Model number 6200
Phone type NPL-3
Wireless service provider
Label on back of phone
(under battery). See “Find
your phone label” on
page 16.

The wireless phone described in this guide is approved for use in GSM/GPRS/EDGE 850, 1800, and
1900 networks.
LEGAL INFORMATION
Part No. 9356027, Issue No. 1
Copyright © 2003 Nokia. All rights reserved.
Nokia, Nokia Connecting People, Nokia 6200, and Pop-Port are trademarks or registered trademarks
of Nokia Corporation. All other product and company names mentioned herein may be trademarks
or tradenames of their respective owners.
Printed in Canada 03/2003
US Patent No 5818437 and other pending patents.
T9 text input software Copyright ©1999-2003. Tegic Communications, Inc. All rights reserved.
Includes RSA BSAFE cryptographic or security protocol software from RSA Security.
Java is a trademark of Sun Microsystems, Inc.
The information in this user guide was written for the Nokia 6200
of continuous development. Nokia reserves the right to make changes and improvements to any of
the products described in this document without prior notice.
UNDER NO CIRCUMSTANCES SHALL NOKIA BE RESPONSIBLE FOR ANY LOSS OF DATA OR INCOME
OR ANY SPECIAL, INCIDENTAL, AND CONSEQUENTIAL OR INDIRECT DAMAGES HOWSOEVER CAUSED.
THE CONTENTS OF THIS DOCUMENT ARE PROVIDED “AS IS.” EXCEPT AS REQUIRED BY APPLICABLE
LAW, NO WARRANTIES OF ANY KIND, EITHER EXPRESS OR IMPLIED, INCLUDING, BUT NOT LIMITED
TO, THE IMPLIED WARRANTIES OF MERCHANTABILITY AND FITNESS FOR A PARTICULAR PURPOSE,
ARE MADE IN RELATION TO THE ACCURACY AND RELIABILITY OR CONTENTS OF THIS DOCUMENT.
NOKIA RESERVES THE RIGHT TO REVISE THIS DOCUMENT OR WITHDRAW IT AT ANY TIME WITHOUT
PRIOR NOTICE.
phone. Nokia operates a policy
EXPORT CONTROLS
This product contains commodities, technology or software exported from the United States in
accordance with the Export Administration regulations. Diversion contrary to U.S. or Canadian law
is prohibited.
FCC/INDUSTRY CANADA NOTICE
Your phone may cause TV or radio interference (for example, when using a telephone in close
proximity to receiving equipment). The FCC or Industry Canada can require you to stop using your
telephone if such interference cannot be eliminated. If you require assistance, contact your local
service facility. This device complies with part 15 of the FCC rules. Operation is subject to the
condition that this device does not cause harmful interference.

Manufactured or sold under one or more following US Patents.
Asterisk (*) indicates design patents pending.
4868846 5519885 5827082 5966378 6112099 6266330
4969192 5526366 5835889 5970059 6115 617 6282436
5001372 5553125 5839101 5987137 6118775 6285888
5045973 5557639 584884 5991716 6121846 6292668
5101175 5565821 5845219 5991857 6122498 6295286
5212834 5570369 5857151 5999523 6128322 6308084
5230091 5581244 5862178 6005857 6128509 6310609
5233634 5597102 5870683 6011853 6138091 6311054
5241284 5625274 5887266 6014573 6140966 6314166
5241583 5640395 5889770 6018277 6144243 6324412
5266782 5664004 5892475 6026161 6144676 6347218
5311151 5664053 5898925 6028567 6148209 6356759
5311179 5669069 5907823 6029128 6151485 6359904
5317283 5677620 5914690 6038238 6151507 6363259
5331638 5678224 5914796 6043760 6163609 6370362
5335362 5692032 5915440 6047196 6164547 6370390
5353328 5699406 5917868 6049796 6167248 6377803
5378935 5699482 5920826 6050415 6170073 6393121
5384782 5701392 5926138 6055439 6178535 6430721
5390223 5729534 5926769 6060193 6185295 6434133
5396657 5729541 5930233 6069923 6188909 *29170209
5400949 5734683 5946651 6072787 6195338 *29170227
5416435 5754976 5956332 6081534 6199035 *29170247
5442521 5760568 5956625 6084962 6201876 *29170248
5444816 5782646 5956633 6088746 6219560
5446364 5794142 5960354 6094587 6240076
5479476 5802465 5960389 6097964 6240079
5487084 5805084 5963901 6105784 6249584
5493255 5805301 5966374 6108553 6259312

Contents
1 For your safety . . . . . . . . . . . . . . . . . . . . . . . . . . . . . . . . . . 1
2 Overview of functions . . . . . . . . . . . . . . . . . . . . . . . . . . . . . 3
Multimedia messaging service (MMS) . . . . . . . . . . . . . . . . . . . . . . . . . . . . 3
Polyphonic sound (MIDI) . . . . . . . . . . . . . . . . . . . . . . . . . . . . . . . . . . . . . . .3
(E)GPRS and EDGE . . . . . . . . . . . . . . . . . . . . . . . . . . . . . . . . . . . . . . . . . . . . 3
Speakerphone. . . . . . . . . . . . . . . . . . . . . . . . . . . . . . . . . . . . . . . . . . . . . . . . 4
JavaTM applications . . . . . . . . . . . . . . . . . . . . . . . . . . . . . . . . . . . . . . . . . . .4
FM radio . . . . . . . . . . . . . . . . . . . . . . . . . . . . . . . . . . . . . . . . . . . . . . . . . . . .4
3 Welcome and quick guide . . . . . . . . . . . . . . . . . . . . . . . . . .5
Get the most out of this guide . . . . . . . . . . . . . . . . . . . . . . . . . . . . . . . . . . 5
Understand wireless network services . . . . . . . . . . . . . . . . . . . . . . . . . . . .6
Register your phone . . . . . . . . . . . . . . . . . . . . . . . . . . . . . . . . . . . . . . . . . . 6
Learn about accessibility solutions . . . . . . . . . . . . . . . . . . . . . . . . . . . . . .6
Understand your phone . . . . . . . . . . . . . . . . . . . . . . . . . . . . . . . . . . . . . . . .7
Get started with the Quick Guide . . . . . . . . . . . . . . . . . . . . . . . . . . . . . .14
Menu shortcuts . . . . . . . . . . . . . . . . . . . . . . . . . . . . . . . . . . . . . . . . . . . . .15
Get help . . . . . . . . . . . . . . . . . . . . . . . . . . . . . . . . . . . . . . . . . . . . . . . . . . .16
4 Basic operations . . . . . . . . . . . . . . . . . . . . . . . . . . . . . . . .18
Switch your phone on or off . . . . . . . . . . . . . . . . . . . . . . . . . . . . . . . . . . .18
Make and answer calls . . . . . . . . . . . . . . . . . . . . . . . . . . . . . . . . . . . . . . .18
Options during a call . . . . . . . . . . . . . . . . . . . . . . . . . . . . . . . . . . . . . . . . .20
Check the Start screen . . . . . . . . . . . . . . . . . . . . . . . . . . . . . . . . . . . . . . .22
Browse phone menus . . . . . . . . . . . . . . . . . . . . . . . . . . . . . . . . . . . . . . . .24
Set up your phone . . . . . . . . . . . . . . . . . . . . . . . . . . . . . . . . . . . . . . . . . . . 29
5 Text entry . . . . . . . . . . . . . . . . . . . . . . . . . . . . . . . . . . . . . 31
Standard mode. . . . . . . . . . . . . . . . . . . . . . . . . . . . . . . . . . . . . . . . . . . . . .31
Predictive text input . . . . . . . . . . . . . . . . . . . . . . . . . . . . . . . . . . . . . . . . .32
6 Manage phone security . . . . . . . . . . . . . . . . . . . . . . . . . . .35
Security levels . . . . . . . . . . . . . . . . . . . . . . . . . . . . . . . . . . . . . . . . . . . . . .35
Fixed dialing. . . . . . . . . . . . . . . . . . . . . . . . . . . . . . . . . . . . . . . . . . . . . . . .36
Access codes . . . . . . . . . . . . . . . . . . . . . . . . . . . . . . . . . . . . . . . . . . . . . . . 38
[ i ]

7 Contacts . . . . . . . . . . . . . . . . . . . . . . . . . . . . . . . . . . . . . . 41
View the contacts list . . . . . . . . . . . . . . . . . . . . . . . . . . . . . . . . . . . . . . . 41
Save contacts . . . . . . . . . . . . . . . . . . . . . . . . . . . . . . . . . . . . . . . . . . . . . . 42
Copy contact list entries . . . . . . . . . . . . . . . . . . . . . . . . . . . . . . . . . . . . . 46
1-touch dialing . . . . . . . . . . . . . . . . . . . . . . . . . . . . . . . . . . . . . . . . . . . . 47
Voice dialing. . . . . . . . . . . . . . . . . . . . . . . . . . . . . . . . . . . . . . . . . . . . . . . 49
View info, service, and own numbers . . . . . . . . . . . . . . . . . . . . . . . . . . . 52
Set up a caller group . . . . . . . . . . . . . . . . . . . . . . . . . . . . . . . . . . . . . . . . 53
8 Menu functions . . . . . . . . . . . . . . . . . . . . . . . . . . . . . . . . 54
Messages (Menu 1) . . . . . . . . . . . . . . . . . . . . . . . . . . . . . . 54
Tips for composing a message . . . . . . . . . . . . . . . . . . . . . . . . . . . . . . . . 56
Text messages . . . . . . . . . . . . . . . . . . . . . . . . . . . . . . . . . . . . . . . . . . . . . 56
Picture messages . . . . . . . . . . . . . . . . . . . . . . . . . . . . . . . . . . . . . . . . . . . 59
E-mail . . . . . . . . . . . . . . . . . . . . . . . . . . . . . . . . . . . . . . . . . . . . . . . . . . . . 61
Multimedia messages . . . . . . . . . . . . . . . . . . . . . . . . . . . . . . . . . . . . . . . 63
Voice messages . . . . . . . . . . . . . . . . . . . . . . . . . . . . . . . . . . . . . . . . . . . . 69
Message options . . . . . . . . . . . . . . . . . . . . . . . . . . . . . . . . . . . . . . . . . . . 71
Organize messages with folders . . . . . . . . . . . . . . . . . . . . . . . . . . . . . . . 72
Delete messages . . . . . . . . . . . . . . . . . . . . . . . . . . . . . . . . . . . . . . . . . . . . 74
Change text, e-mail, and picture message settings . . . . . . . . . . . . . . . 75
Use the info message service . . . . . . . . . . . . . . . . . . . . . . . . . . . . . . . . . 77
Call log (Menu 2) . . . . . . . . . . . . . . . . . . . . . . . . . . . . . . . 78
Call log options . . . . . . . . . . . . . . . . . . . . . . . . . . . . . . . . . . . . . . . . . . . . 78
View missed calls . . . . . . . . . . . . . . . . . . . . . . . . . . . . . . . . . . . . . . . . . . . 79
View received calls. . . . . . . . . . . . . . . . . . . . . . . . . . . . . . . . . . . . . . . . . . 79
View dialed numbers . . . . . . . . . . . . . . . . . . . . . . . . . . . . . . . . . . . . . . . . 80
Delete call lists . . . . . . . . . . . . . . . . . . . . . . . . . . . . . . . . . . . . . . . . . . . . . 80
View call duration . . . . . . . . . . . . . . . . . . . . . . . . . . . . . . . . . . . . . . . . . . 81
Profiles (Menu 3) . . . . . . . . . . . . . . . . . . . . . . . . . . . . . . . 82
Select a profile . . . . . . . . . . . . . . . . . . . . . . . . . . . . . . . . . . . . . . . . . . . . . 82
Customize a profile . . . . . . . . . . . . . . . . . . . . . . . . . . . . . . . . . . . . . . . . . 82
Set a timed profile . . . . . . . . . . . . . . . . . . . . . . . . . . . . . . . . . . . . . . . . . . 83
[ ii ]

Settings (Menu 4) . . . . . . . . . . . . . . . . . . . . . . . . . . . . . . .85
Right selection key settings . . . . . . . . . . . . . . . . . . . . . . . . . . . . . . . . . . .85
Time and date settings . . . . . . . . . . . . . . . . . . . . . . . . . . . . . . . . . . . . . . .86
Call settings . . . . . . . . . . . . . . . . . . . . . . . . . . . . . . . . . . . . . . . . . . . . . . . .88
Phone settings . . . . . . . . . . . . . . . . . . . . . . . . . . . . . . . . . . . . . . . . . . . . . .92
Display settings . . . . . . . . . . . . . . . . . . . . . . . . . . . . . . . . . . . . . . . . . . . . .95
Tone settings . . . . . . . . . . . . . . . . . . . . . . . . . . . . . . . . . . . . . . . . . . . . . . . 97
Enhancement settings . . . . . . . . . . . . . . . . . . . . . . . . . . . . . . . . . . . . . . . .97
Security settings . . . . . . . . . . . . . . . . . . . . . . . . . . . . . . . . . . . . . . . . . . .100
Restore factory settings . . . . . . . . . . . . . . . . . . . . . . . . . . . . . . . . . . . . .100
Alarm clock (Menu 5) . . . . . . . . . . . . . . . . . . . . . . . . . . . 101
Set an alarm. . . . . . . . . . . . . . . . . . . . . . . . . . . . . . . . . . . . . . . . . . . . . . .101
Radio (Menu 6) . . . . . . . . . . . . . . . . . . . . . . . . . . . . . . . .103
Turn the radio on and off . . . . . . . . . . . . . . . . . . . . . . . . . . . . . . . . . . . .103
Use the radio . . . . . . . . . . . . . . . . . . . . . . . . . . . . . . . . . . . . . . . . . . . . . .103
Save a radio channel . . . . . . . . . . . . . . . . . . . . . . . . . . . . . . . . . . . . . . . .104
Gallery (Menu 7) . . . . . . . . . . . . . . . . . . . . . . . . . . . . . . .105
Open the gallery . . . . . . . . . . . . . . . . . . . . . . . . . . . . . . . . . . . . . . . . . . .105
View folders . . . . . . . . . . . . . . . . . . . . . . . . . . . . . . . . . . . . . . . . . . . . . . .106
Organizer (Menu 8) . . . . . . . . . . . . . . . . . . . . . . . . . . . . .107
Use the calendar . . . . . . . . . . . . . . . . . . . . . . . . . . . . . . . . . . . . . . . . . . .107
Send and receive calendar notes . . . . . . . . . . . . . . . . . . . . . . . . . . . . . .110
Make a to-do list . . . . . . . . . . . . . . . . . . . . . . . . . . . . . . . . . . . . . . . . . . .111
Games (Menu 9) . . . . . . . . . . . . . . . . . . . . . . . . . . . . . . . 113
Launch a game. . . . . . . . . . . . . . . . . . . . . . . . . . . . . . . . . . . . . . . . . . . . .113
Applications (Menu 10) . . . . . . . . . . . . . . . . . . . . . . . . . . 115
Launch an application . . . . . . . . . . . . . . . . . . . . . . . . . . . . . . . . . . . . . . .115
Download applications . . . . . . . . . . . . . . . . . . . . . . . . . . . . . . . . . . . . . .116
View application memory status . . . . . . . . . . . . . . . . . . . . . . . . . . . . . .117
Extras (Menu 11) . . . . . . . . . . . . . . . . . . . . . . . . . . . . . .118
Use the calculator . . . . . . . . . . . . . . . . . . . . . . . . . . . . . . . . . . . . . . . . . .118
Use the currency converter . . . . . . . . . . . . . . . . . . . . . . . . . . . . . . . . . . .119
[ iii ]

Voice recorder . . . . . . . . . . . . . . . . . . . . . . . . . . . . . . . . . . . . . . . . . . . . 120
Voice commands . . . . . . . . . . . . . . . . . . . . . . . . . . . . . . . . . . . . . . . . . . 121
Connectivity (Menu 12) . . . . . . . . . . . . . . . . . . . . . . . . . 124
Infrared . . . . . . . . . . . . . . . . . . . . . . . . . . . . . . . . . . . . . . . . . . . . . . . . . . 124
(E)GPRS . . . . . . . . . . . . . . . . . . . . . . . . . . . . . . . . . . . . . . . . . . . . . . . . . . 125
Synchronization . . . . . . . . . . . . . . . . . . . . . . . . . . . . . . . . . . . . . . . . . . . 128
Nokia PC Suite . . . . . . . . . . . . . . . . . . . . . . . . . . . . . . . . . . . . . . . . . . . . 131
Services (Menu 13) . . . . . . . . . . . . . . . . . . . . . . . . . . . . . 133
Notes on wireless Internet access . . . . . . . . . . . . . . . . . . . . . . . . . . . . 133
Sign on to the wireless Internet . . . . . . . . . . . . . . . . . . . . . . . . . . . . . . 134
Use browser options . . . . . . . . . . . . . . . . . . . . . . . . . . . . . . . . . . . . . . . 134
Navigate the wireless Internet . . . . . . . . . . . . . . . . . . . . . . . . . . . . . . . 135
Use bookmarks . . . . . . . . . . . . . . . . . . . . . . . . . . . . . . . . . . . . . . . . . . . . 137
Security issues . . . . . . . . . . . . . . . . . . . . . . . . . . . . . . . . . . . . . . . . . . . . 137
9 Reference information. . . . . . . . . . . . . . . . . . . . . . . . . . . 139
Battery statements . . . . . . . . . . . . . . . . . . . . . . . . . . . . . . . . . . . . . . . . 139
Use proper care and maintenance . . . . . . . . . . . . . . . . . . . . . . . . . . . . 140
Understand important safety information . . . . . . . . . . . . . . . . . . . . . . 141
Emergency calls . . . . . . . . . . . . . . . . . . . . . . . . . . . . . . . . . . . . . . . . . . . 144
Certification information (SAR) . . . . . . . . . . . . . . . . . . . . . . . . . . . . . . 145
Battery information . . . . . . . . . . . . . . . . . . . . . . . . . . . . . . . . . . . . . . . . 147
Technical information . . . . . . . . . . . . . . . . . . . . . . . . . . . . . . . . . . . . . . 148
Enhancements . . . . . . . . . . . . . . . . . . . . . . . . . . . . . . . . . . . . . . . . . . . . 149
Glossary . . . . . . . . . . . . . . . . . . . . . . . . . . . . . . . . . . . . . . . . . . . . . . . . . 153
Frequently asked questions . . . . . . . . . . . . . . . . . . . . . . . . . . . . . . . . . . 155
Troubleshooting . . . . . . . . . . . . . . . . . . . . . . . . . . . . . . . . . . . . . . . . . . . 158
Nokia One-Year Limited Warranty . . . . . . . . . . . . . . . . . . 159
Appendix A Message from the CTIA
to all users of mobile phones. . . . . . . . . . . . . . . . . . . . . . 165
Appendix B Message from the FDA
to all users of mobile phones. . . . . . . . . . . . . . . . . . . . . . 169
Index . . . . . . . . . . . . . . . . . . . . . . . . . . . . . . . . . . . . . . . 175
[ iv ]
1 For your safety
Read these simple guidelines. Breaking the rules may be dangerous or
illegal. Further detailed information is given in this manual.
Do not switch on the phone when wireless phone use is
prohibited or when it may cause interference or danger.
ROAD SAFETY COMES FIRST
Don't use a handheld phone while driving.
INTERFERENCE
All wireless phones may get interference, which could affect
performance.
SWITCH OFF IN HOSPITALS
Follow any regulations or rules. Switch the phone off near
medical equipment.
SWITCH OFF IN AIRCRAFT
Wireless devices can cause interference in aircraft.
SWITCH OFF WHEN REFUELING
Don't use the phone at a refueling point. Don't use near fuel or
chemicals.
SWITCH OFF NEAR BLASTING
Don't use the phone where blasting is in progress. Observe
restrictions, and follow any regulations or rules.
USE SENSIBLY
Use only in the normal position. Don't touch the antenna
unnecessarily.
QUALIFIED SERVICE
Only qualified personnel may install or repair phone
equipment.
[ 1 ]
ENHANCEMENTS AND BATTERIES
Use only approved enhancements and batteries. Do not connect
incompatible products.
WATER-RESISTANCE
Your phone is not water-resistant. Keep it dry.
BACKUP COPIES
Remember to make backup copies of all important data.
CONNECTING TO OTHER DEVICES
When connecting to any other device, read its user guide for
detailed safety instructions. Do not connect incompatible
products.
CALLING
Ensure the phone is switched on and in service. Enter the phone
. To end a call,
number, including the area code, then press
press
EMERGENCY CALLS
Ensure the phone is switched on and in service. Press i as many
times as needed (for example, to exit a call, to exit a menu) to
clear the display. Enter the emergency number, then press
Give your location. Do not end the call until told to do so.
. To answer a call, press h.
i
h
h
.
[ 2 ]

Overview of functions
2 Overview of functions
• MULTIMEDIA MESSAGING SERVICE (MMS)
Your phone can send and receive multimedia messages made up of text
and pictures. You can also save pictures and ringing tones to personalize
your phone. You may also be able to receive polyphonic ringing tones.
See “Multimedia messages” on page 63 for more information.
Important:
memory” on page 12 for more information.
• POLYPHONIC SOUND (MIDI)
Polyphonic sounds are used in ringing tones and message alert tones.
They consist of several sound components played at the same time, like
an actual melody through a speaker. Your phone has sound components
from over 40 instruments that can be used for polyphonic sounds and the
phone can play up to eight instruments simultaneously. The phone supports
scalable polyphonic MIDI (SP-MIDI) format.
You can receive polyphonic ringing tones via multimedia service (see “Read
and reply to a multimedia message” on page 67), or download them via the
gallery menu (see “Gallery (Menu 7)” on page 105).
• (E)GPRS AND EDGE
General packet radio service (GPRS) and enhanced general packet radio
service (EGPRS), also known as enhanced data rates for global evolution
(EDGE), technology allows mobile phones to send and receive data over a
mobile network.
Applications such as xHTML, MMS, text messaging, and Java
(E)GPRS/EDGE. Your phone supports up to three simultaneous (E)GPRS/
EDGE connections. For more information, see “(E)GPRS” on page 125.
This feature uses shared memory. See “Shared
TM
use
[ 3 ]

Before using (E)GPRS technology:
• Contact your network operator or service provider for availability and
subscription to the (E)GPRS service.
• Save the (E)GPRS settings for each of the applications used over
(E)GPRS.
PRICING FOR (E)GPRS AND APPLICATIONS
Your wireless provider may charge for (E)GPRS services. For more information
on pricing, contact your wireless provider.
• SPEAKERPHONE
You can use your phone as a speakerphone during a call. Do not hold the
phone to your ear during speakerphone operation.
• To activate the speakerphone, press
• To deactivate the speakerphone during a call, press
The speakerphone deactivates automatically when you end the call,
attempt to make a new call, or when you connect a headset.
Loudsp
.
Handset
•JAVATM APPLICATIONS
Your phone supports JavaTM and includes some Java applications and games
that have been specially designed for mobile phones. You may be able to
download new applications and games to your phone from a PC with Java
installer software or from some mobile Internet services. See “Applications
(Menu 10)” on page 115 for more information.
Important:
on page 12 for more information.
This feature uses shared memory. See “Shared memory”
.
• FM RADIO
Your phone has an FM radio. You can listen to the radio through a headset
or the handsfree speaker (with the headset attached). See “Radio (Menu 6)”
on page 103 for more information.
[ 4 ]
Welcome and quick guide
3 Welcome and quick guide
Congratulations on your purchase of the Nokia 6200 mobile phone.
Your phone provides many functions which are practical for daily use,
such as a calendar, radio, alarm clock, calculator, voice recorder, speakerphone
and more. Your phone can also connect to a PC, laptop, or other device
using the data cable or built-in IR port.
• GET THE MOST OUT OF THIS GUIDE
The following tips can help you get the most from this guide as you learn
to use your phone.
Learn text conventions
This user guide provides text clues to help make instructions clear and
easy to follow. These clues are called conventions.
Convention What it means
bold
bold and blue
italics Indicates emphasis. Pay close attention to any
The word or phrase appears on the phone display.
The text refers to an address on the world wide web.
information in italics.
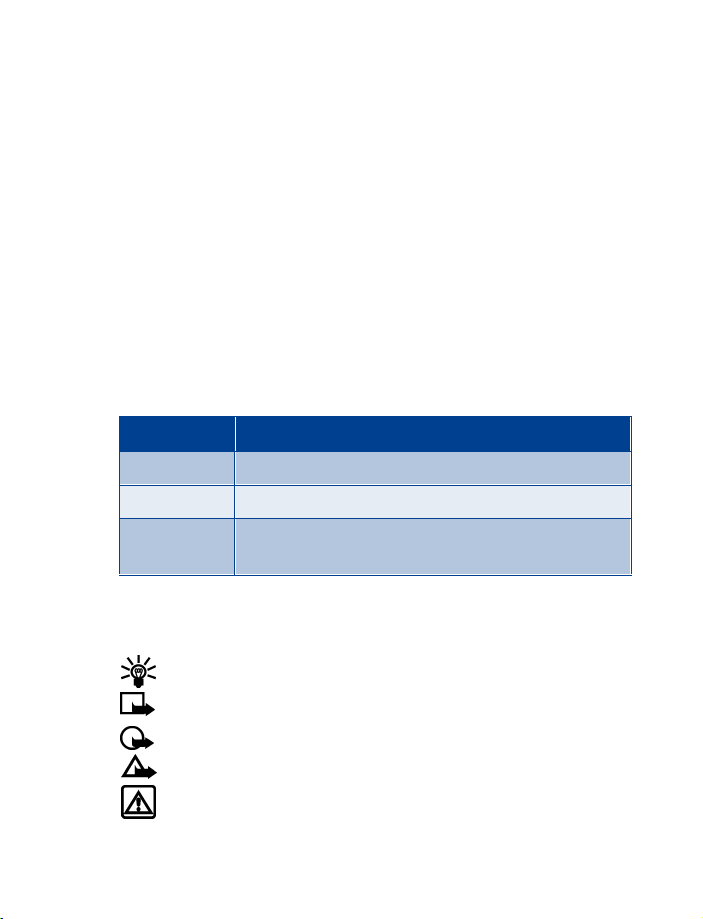
Follow graphic clues
This guide uses certain icons to alert you to important information.
Indicates a shortcut or alternate method of doing something.
Tip:
Explains a feature or points out an important concept.
Note:
Important:
Caution:
Warning:
or property damage.
Indicates critical information on using a feature.
Warns when you may lose information.
Helps you avoid personal injury, damage to the phone,
[ 5 ]

Look for updates
From time to time, Nokia updates this guide to reflect changes. The latest
version may be available at
tutorial may be available at
www.nokia.com/us
www.nokiahowto.com
. Also, an interactive
.
• UNDERSTAND WIRELESS NETWORK SERVICES
A number of features in this guide are called network services. These are
special services that you arrange through your wireless service provider.
Before you can take advantage of any of these network services, you must
subscribe to them through your wireless provider and obtain instructions
for their use from your service provider.
• REGISTER YOUR PHONE
Make sure to register your phone at
1-888-NOKIA-2U (1-888-665-4228) so that we can serve your needs
better if you should need to call the center or have your phone repaired.
www.warranty.nokiausa.com
E-Newsletters
When you register your phone, you can sign up for Nokia's e-newsletter,
Nokia Connections, if you would like. You will receive tips and tricks on
using your phone, enhancement information, and special offers.
• LEARN ABOUT ACCESSIBILITY SOLUTIONS
Nokia is committed to making mobile phones easy to use for all
individuals, including those with disabilities. Nokia maintains an
internet site that is dedicated to accessibility solutions. For more
information about phone features, enhancements, alternate format
user guides, and other Nokia products designed with your needs
in mind, visit the website at
call 1-888-665-4228 for more information.
www.nokiaaccessibility.com
or
or
[ 6 ]
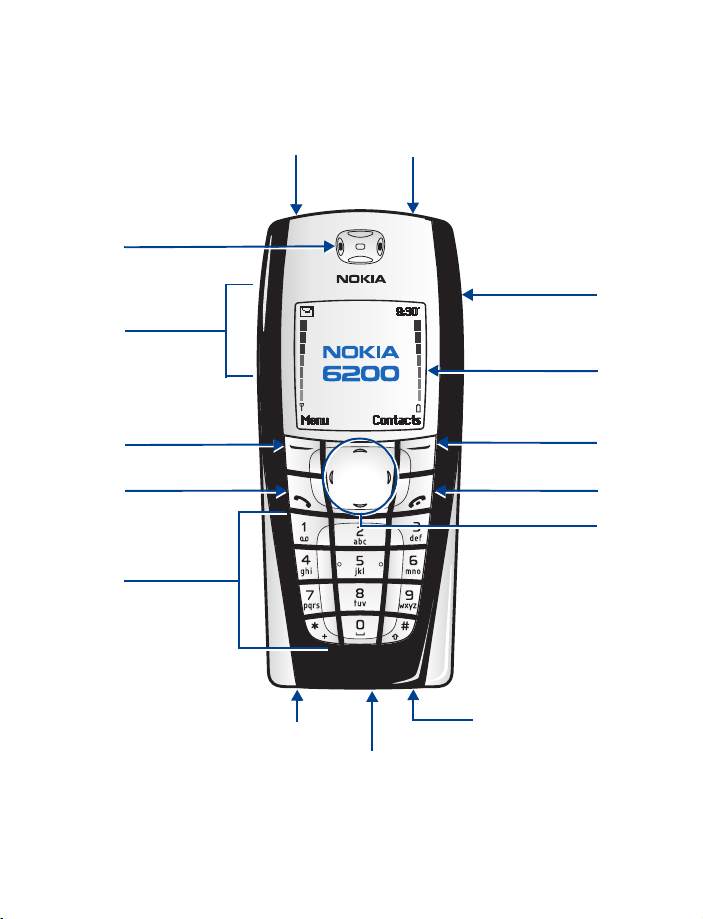
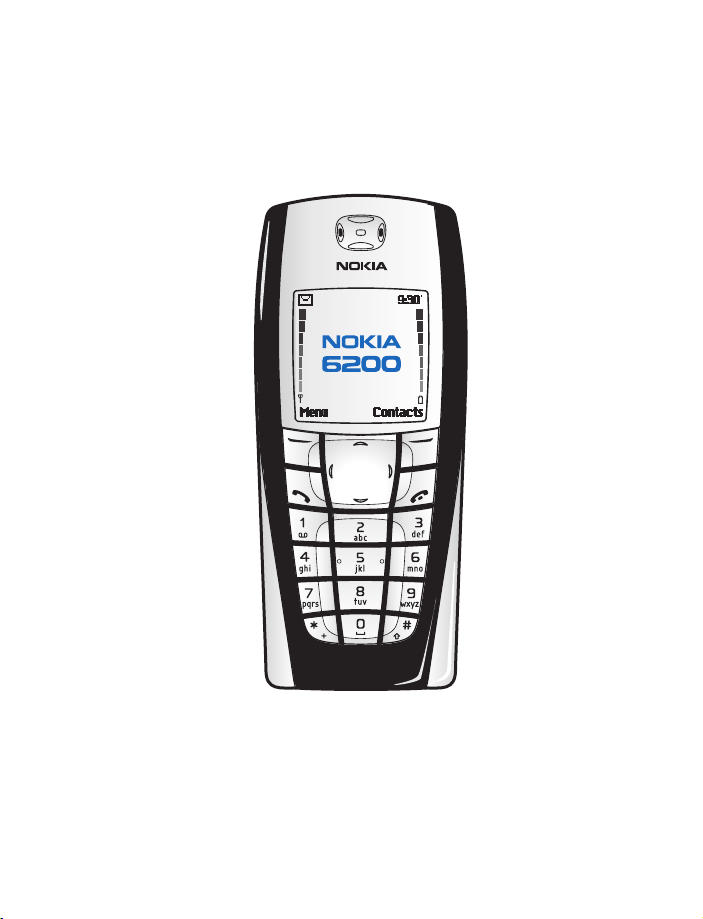
• UNDERSTAND YOUR PHONE
Welcome and quick guide
Earpiece
Volume keys
Left
selection key
Talk key
Number keys
IR Port
+
-
Charger jack
Pop-PortTM connector
Power key
Handsfree
speaker
Display screen
Right
selection key
End key
4-way scroll keys
Microphone
[ 7 ]
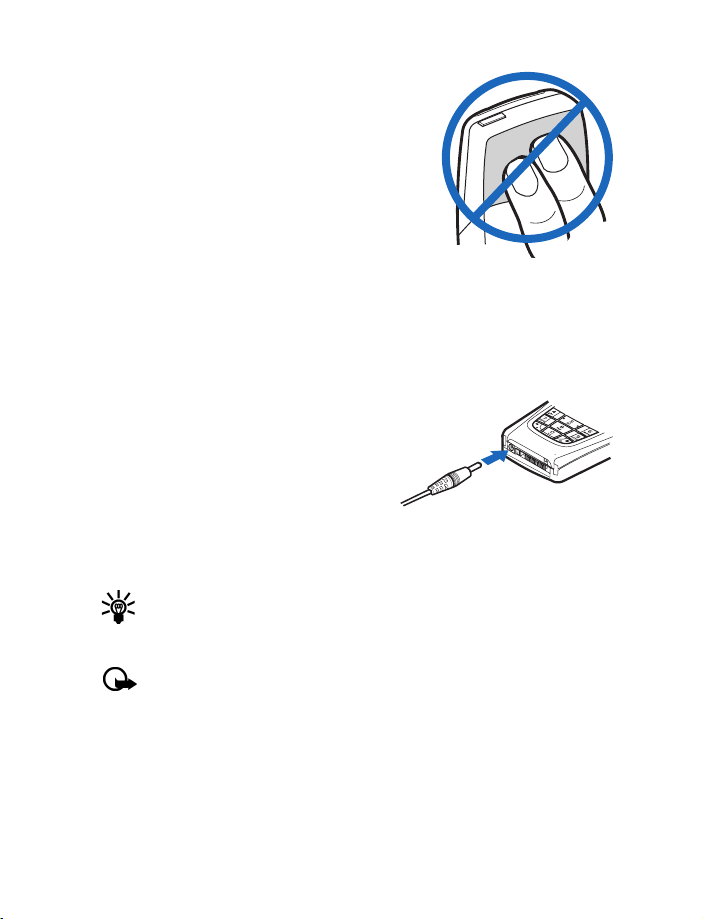
Use the antenna
Your phone has a built-in antenna. As with any
other radio transmitting device, avoid touching
the antenna unnecessarily when the phone is
switched on. Contact with the antenna affects
call quality and may cause the phone to operate
at a higher power level than otherwise needed.
Not touching the antenna area during a phone
call optimizes the antenna performance and the
talk time of your phone.
Use the battery
CHARGE THE BATTERY
Plug the charger into a standard ac outlet.
1
Insert the charger output plug into
2
the round connector at the bottom
end of the phone.
After a few seconds, the battery
indicator in the display starts to
scroll from bottom to top. If the
battery is completely empty, it may take a few minutes before the
charging indicator appears on the display or any calls can be made.
You can use the phone while the charger is connected.
Tip:
IMPORTANT BATTERY INFORMATION
Important:
Use only batteries approved by Nokia and recharge your battery
only with the chargers approved by Nokia. Never use any charger
or battery which is damaged.
The battery can be charged and discharged hundreds of times but it will
eventually wear out. When the operating time (talk-time and standby
time) is noticeably shorter than normal, it is time to buy a new battery.
Your phone is powered by a rechargeable battery.
[ 8 ]

Welcome and quick guide
PROLONG THE BATTERY
Use the following guidelines to obtain the best performance from
your battery:
• With your phone turned off, charge your new battery for three hours
before its first use. Use the battery until it is fully discharged. Repeat
this procedure twice for a total of three charging cycles.
• Note that the full performance of a new battery is achieved only after
two or three complete charge and discharge cycles. Battery operation
times may be less than the estimated times during the first charges.
This condition is normal.
• You can use your phone while the battery is charging. However, if the
battery is completely empty, it may need to recharge a few minutes
before you can make or receive calls or the battery indicator appears.
• After the first charge, you can make and receive calls during the
charging cycle, but the calls lengthen the charging time. When the
phone call ends, the charge will resume.
• The bars on the screen stop scrolling and remain constant when the
phone is fully charged. If you leave the phone connected to the charger,
the battery receives an additional charge. If you switch the phone on
when charging is complete, the
appears in the display.
The battery will accept a “trickle charge" for an additional
Note:
two hours.
REPLACE THE BATTERY
You will need to remove the existing battery if you want to replace the
battery or insert the SIM card. Make sure the phone has been turned off
for 10 seconds before removing the battery.
Before removing the phone cover, always switch off the
Note:
power and disconnect the phone from the charger or any other
device. Always store and use the phone with the covers attached.
Battery full
message momentarily
[ 9 ]
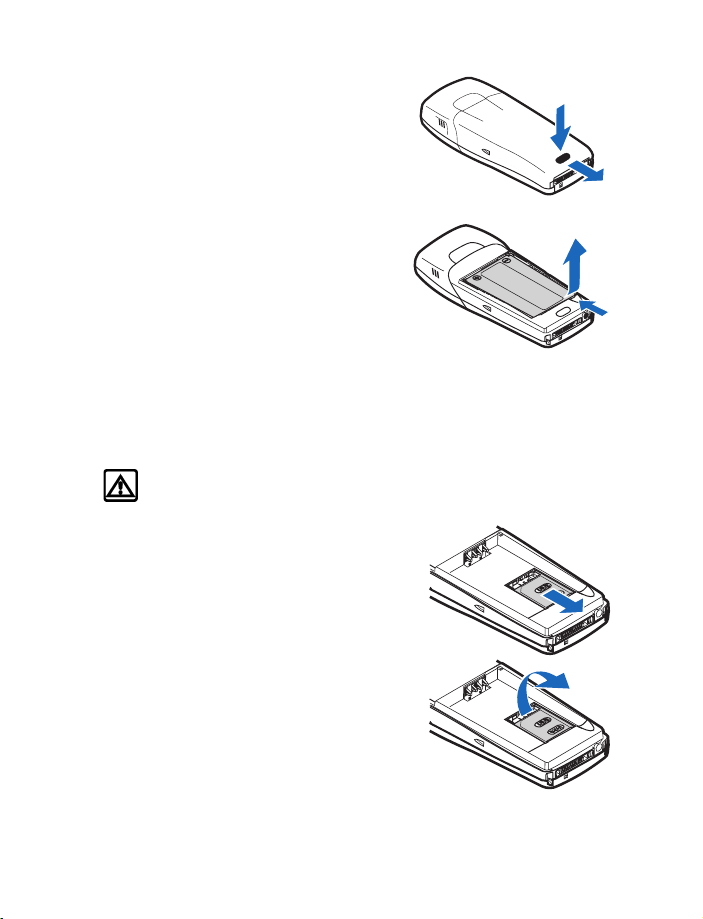
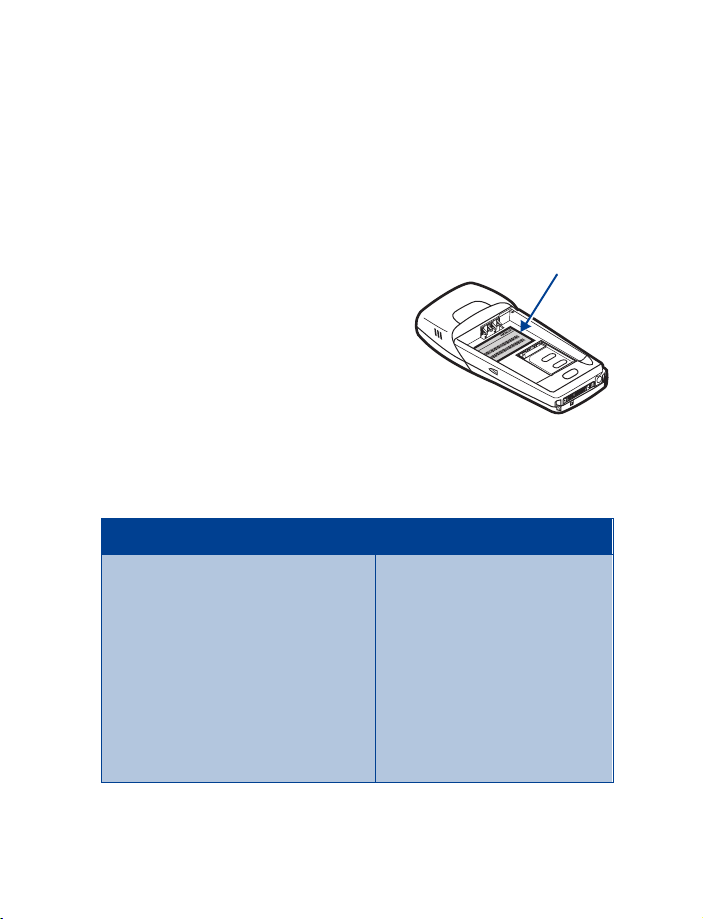
REMOVE THE BACK COVER
1
2
3
1
2
With the back of the phone facing
1
you, push down on the back cover
release button.
Slide the back cover toward the
2
bottom of the phone and remove.
REMOVE THE BATTERY
After you have removed the back
3
cover, insert your finger into the
finger grip and lift the battery
from its compartment.
Install the SIM card
The SIM card and its contacts can easily be damaged by scratches or
bending, so be careful when handling, inserting, or removing the card.
Before installing the SIM card, always make sure that the phone is
switched off and that you have removed the cover and battery.
Warning:
Slide the SIM card holder toward
1
the bottom end of the phone until
it unlocks.
Keep all SIM cards out of reach of small children.
Swing the SIM card holder open.
2
[ 10 ]
Welcome and quick guide
3
4
5
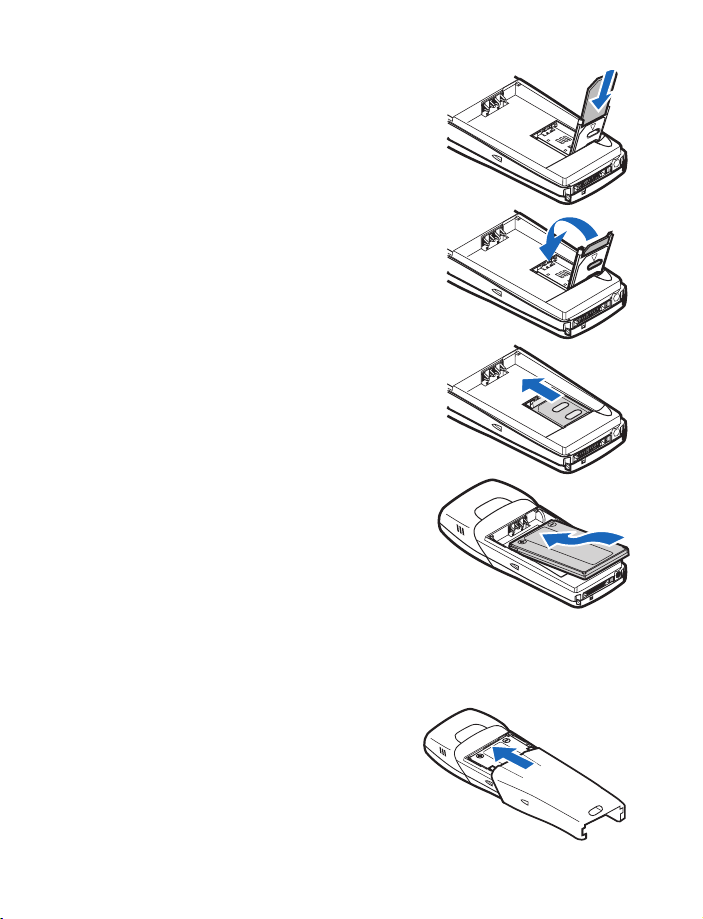
Insert the SIM card into the holder
3
(beveled corner last) with the gold
contacts facing toward the top end
of the phone.
Close the SIM card holder.
4
Slide the SIM card holder toward
5
the top end of the phone until it
locks into place.
INSTALL THE BATTERY
The SIM card must be installed before
installing the battery.
Position the battery so the gold
1
contacts match up with those on
the phone. The battery label should
be facing away from the phone.
Insert the battery, contact end first
2
into the battery slot.
Snap the other end of the battery into place.
3
REPLACE THE BACK COVER
Slide the back cover toward the
4
top of the phone until you hear a
click and see the back cover
release button.
[ 11 ]

Use the selection and scroll keys
Below each corner of the display
are the selection keys. Press
when
show the first of numerous menus.
Page through the rest of the
menus using the up and down
scroll keys (
when
appears above it to
Menu
or g). Press c
d
Contacts
appears above it to enter the contacts list.
The function of the right selection key (
Note:
so that your most frequently used functions can be quickly
accessed from the Start screen. See “Right selection key settings”
on page 85 for details.
Press an up or down scroll key (
Tip:
screen to view any entries in your contacts list.
b
Left
select
) can be modified
c
or g) from the Start
d
Right
select
Use four-way scrolling
In features, such as the calendar monthly view, text
messages, and special characters, you can move the
cursor up and down as well as left and right. To move the
cursor:
Up, press
f
Left, press
Down, press
d
g
Right, press
e
Shared memory
The following features in this phone may share memory: contacts, text
and multimedia messages, images and ringing tones in gallery, calendar
and to-do notes, Java games and applications, and voice recorder and
commands. Using any such features may reduce the memory available for
any features sharing memory. This is especially true with heavy use of any
of the features (although some of these features may have a certain
amount of memory specially allotted to them in addition to the amount
of memory shared with other features).
[ 12 ]

Welcome and quick guide
For example, saving many images, bookmarks, Java applications, or other
features sharing memory may take all of the shared memory and your
phone may display a message that the memory is full. In this case, delete
some of the information or entries stored in the shared memory features
before continuing.
The following functions use shared memory that is dependent on the
data quantity per item and shared memory available at a time in the
Nokia 6200 phone:
•Contacts
• Short messaging service (SMS) messages
•Calendar notes
• To-do list
• Voice tags for commands
• Voice tags for contacts
• Multimedia messages (MMS)
• MIDI ringing tones
•Images
• Java applications
[ 13 ]

• GET STARTED WITH THE QUICK GUIDE
Make a call
Answer a call
Answer a call with a
call waiting
End a call
Ignore a call
Redial last number
Adjust call volume
Use the in-call menu
Use 1-touch dialing
(if activated)
Save a contact
Recall a contact
Check voice mail
Write and send a text
message
Write and send an
e-mail message
Read a new message
Reply to a message
Reply to an e-mail
message
Send a business card
Enter a phone number and press
h
Press
Answer
Press
i
Press
Silence
Press
h
Press
Press up or down on the side volume key.
While in a call, press
Press and hold any key 2 through 9.
Enter a number, press
name and press OK.
Contacts
Press
the name.
Press and hold
Menu 01-1-1
Press
Options
Press
recipient’s number, and press OK.
Menu 01-1-3
Press
e-mail address. Press OK, enter a subject, and press OK.
Write your e-mail message, press
e-mail
, and press
if necessary, and press OK. The e-mail message is sent.
Show
Press
Options
Press
Options
, select
Options
Press
your message and press
and press
Highlight your e-mail profile and press
Options, Accept
Recall a contact from the contacts list. Press
Options
press
Scroll to
recipient’s number or press
from the contacts list. Press OK. The business card is sent.
Options
or press
h
.
or
.
i
when your phone rings.
or
twice.
Options
Options
and select
or dial your voice mailbox number.
1
. After a pause, write the message.
, scroll to
. After a pause, enter the recipient’s
Select
and, if necessary, press
Reply
, select
Send
, and press OK.
Reply
, scroll to
Select
Via text message
Options
. Scroll to
, enter the e-mail address, and press OK.
, scroll to
h
and select
.
,
and select
Find
or press
Send
, press
. Enter the e-mail server number
Send bus. card
Options
, write the reply, press
, and press
. Scroll to
Sending profile
, and press
Find
to retrieve a number
.
Answer call
Save.
g
and select
Select
, enter the
, scroll to
Select
.
Select
Sending options
and press
Select
, and press
Select
. Enter the
.
Enter a
Send
. Compose
Select
. Press
Details
,
Select
.
.
[ 14 ]

• MENU SHORTCUTS
To access a menu or item, press
with the desired menu or item. For example, press
Missed calls
) to view any missed calls.
, then enter the numbers associated
Menu
Welcome and quick guide
Menu 2-1 (Call log >
1 MESSAGES
Text messages. . . . . . . . . . . . 01-1
Multimedia msgs . . . . . . . . . 01-2
Voice messages. . . . . . . . . . . 01-3
Info messages
Message settings . . . . . . . . . 01-5
Service commands . . . . . . . . 01-6
1
. . . . . . . . . . . 01-4
2 CALL LOG
Missed calls. . . . . . . . . . . . . . . 2-1
Received calls . . . . . . . . . . . . . 2-2
Dialed numbers. . . . . . . . . . . . 2-3
Delete recent call lists . . . . . . 2-4
Call timers . . . . . . . . . . . . . . . . 2-5
GPRS data counter . . . . . . . . . 2-6
GPRS connection timer . . . . . 2-7
3PROFILES
Normal . . . . . . . . . . . . . . . . . . 3-1
Silent . . . . . . . . . . . . . . . . . . . . 3-2
Meeting . . . . . . . . . . . . . . . . . . 3-3
Outdoor . . . . . . . . . . . . . . . . . . 3-4
Pager . . . . . . . . . . . . . . . . . . . . 3-5
4 SETTINGS
Right selection key settings. . 4-1
Time and date settings. . . . . . 4-2
Call settings . . . . . . . . . . . . . . 4-3
Phone settings . . . . . . . . . . . . 4-4
Display settings . . . . . . . . . . . 4-5
Tone settings. . . . . . . . . . . . . . 4-6
Enhancement settings . . . . . . 4-7
Security settings. . . . . . . . . . . 4-8
Restore factory settings. . . . . 4-9
5 ALARM CLOCK
1 For availability, contact your wireless provider.
6RADIO
7 GALLERY
8 ORGANIZER
Calendar . . . . . . . . . . . . . . . . . . 8-1
To-do list . . . . . . . . . . . . . . . . . 8-2
9 GAMES
Select game . . . . . . . . . . . . . . . 9-1
Game downloads. . . . . . . . . . . 9-2
Memory . . . . . . . . . . . . . . . . . . 9-3
Settings . . . . . . . . . . . . . . . . . . 9-4
10 APPLICATIONS
Select application . . . . . . . . . 10-1
App. downloads. . . . . . . . . . . 10-2
Memory . . . . . . . . . . . . . . . . . 10-3
11 E X T R A S
Calculator . . . . . . . . . . . . . . . 11-1
Voice recorder . . . . . . . . . . . . 11-2
Voice commands . . . . . . . . . . 11-3
12 CONNECTIVITY
Infrared . . . . . . . . . . . . . . . . . 12-1
GPRS. . . . . . . . . . . . . . . . . . . . 12-2
Synchronization. . . . . . . . . . . 12-3
13 SERVICES
Home . . . . . . . . . . . . . . . . . . . 13-1
Bookmarks . . . . . . . . . . . . . . . 13-2
Download links . . . . . . . . . . . 13-3
Service inbox . . . . . . . . . . . . . 13-4
Settings . . . . . . . . . . . . . . . . . 13-5
Go to address. . . . . . . . . . . . . 13-6
Clear the cache . . . . . . . . . . . 13-7
[ 15 ]
•GET HELP
Type label
If you need help, Nokia Customer Care is available for assistance.
Before calling, please read “Frequently asked questions” on page 155
and “Troubleshooting” on page 158.
We also recommend that you write down the following information and
have it available if you call:
• The International Mobile Equipment
Identifier (IMEI) on the type label of
your phone
• Your zip code
Find your phone label
The IMEI information can be found on the
type label, which is located on the back of
the phone, beneath the battery.
Contact Nokia
Please have your phone or Nokia product with you when contacting any
of the numbers below:
Nokia Customer Care Center, USA Customer Care Centre, Canada
Nokia Mobile Phones
7725 Woodland Center Boulevard
Suite #150
Tampa, Florida 33614
Tel: 1-888-NOKIA-2U
(1-888-665-4228)
Fax: 1-813-249-9619
For TTY users: 1-800-24-NOKIA
(1-800-246-6542)
[ 16 ]
Nokia Products Ltd.
601 Westney Road South
Ajax, Ontario L1S 4N7
Tel: 1-888-22-NOKIA
(1-888-226-6542)
Fax: 1-905-427-1070
Web site: www.nokia.ca

Welcome and quick guide
Contact your service provider
To use the network services available in your phone, you will need to sign
up with a wireless provider. In many cases, the wireless provider will
make available descriptions of their services and instructions for using
features such as:
• Voice mail and voice privacy
• Call waiting, call forwarding, and caller ID
• Messaging
• News and information services
• Selected Internet services
Wireless providers may differ in their support of features. Before you sign
up, make sure a wireless provider supports the features that you need.
[ 17 ]
4 Basic operations
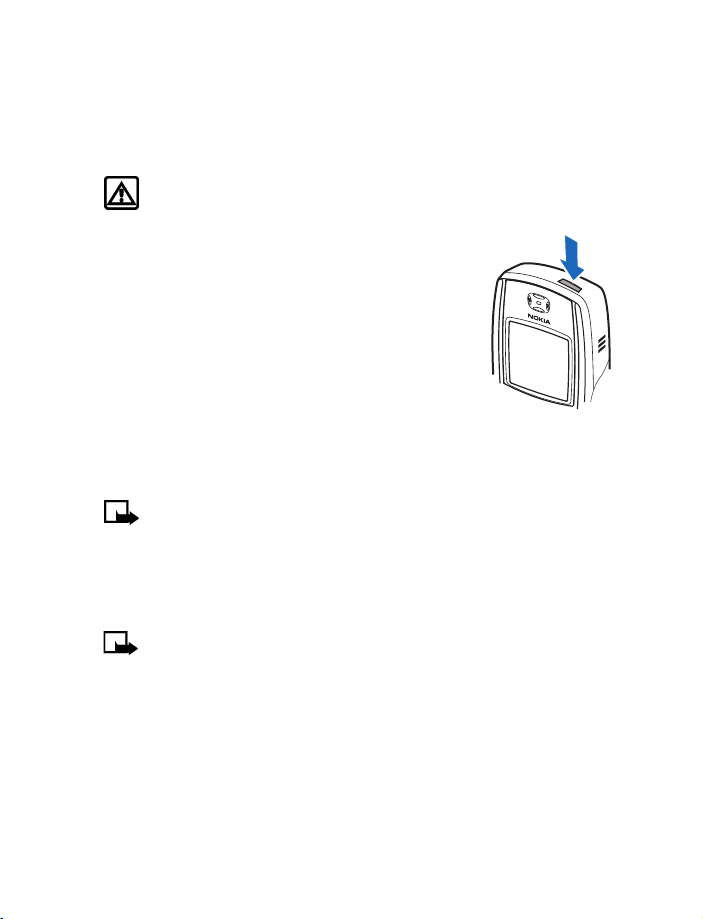
• SWITCH YOUR PHONE ON OR OFF
Warning:
prohibited or when it may cause interference or danger.
To turn your phone on or off, press and hold the
1
power key (
4 seconds until the display light comes on.
If the phone displays
the SIM card is properly inserted, or
supported
Enter the PIN code if necessary and press OK.
2
For information on the PIN code, see “PIN code”
on page 39.
Enter the security code if necessary and press OK. For information on
3
the security code, see “Security code” on page 38.
Note:
see “Set the display language” on page 92 for information on
changing your phone’s display language.
• MAKE AND ANSWER CALLS
Note:
switch the phone on when wireless phone use is prohibited or
when it may cause interference or danger.
Do not switch the phone on when wireless phone use is
) on top of the phone for at least
a
Insert SIM card
, contact your wireless provider.
If the language that appears in your display is not correct,
Your phone must be switched on to use this function. Do not
even though
SIM card not
Use the keypad
Enter the phone number (including the area code) and press h.
1
(To delete a character to the left of the cursor, press
2
Press i
to end the call or to cancel the call attempt.
[ 18 ]
Clear
.)
Basic operations
Use the contacts list
At the Start screen, press d or g and scroll to the entry you wish
1
to view.
to make the call or press
h
Press
2
To quickly search the list of entries while in your contacts list,
Tip:
press any key in which the letters match the first letter of the name
for which you are searching.
to view details of the entry.
Details
Answer or reject an incoming call
•Press h to answer the call.
•Press
to reject the call; the call is diverted to your voice mail if
i
you have activated call forwarding to your voice mailbox number
(see “Call forwarding” on page 88 for details).
If you press
You can then either press
reject the incoming call.
If the HDB-4 or HDS-3 headset is connected, you can answer
Tip:
or end a call by pressing the key on the headset.
c
to
the call, only the ringing tone is muted.
Silence
to answer the call or
Options
Decline
to
Answer a call with the keypad locked
To answer a call with Keyguard on, simply press h. During the call, all
features function as normal. When you end or reject the call, the keypad
automatically relocks. For more information on Keyguard, see “Lock the
keypad (Keyguard)” on page 35.
When the phone is locked, calls may be possible to the
Note:
emergency number programmed into your phone (for example,
. The number is
911). Key in the emergency number and press
displayed only after you have keyed in the last digit.
h
Redial the last number
At the Start screen, press h to display the last 20 numbers dialed.
1
to redial the last number, or scroll to the number (or name)
Press
2
h
you wish to redial and press
h
.
[ 19 ]
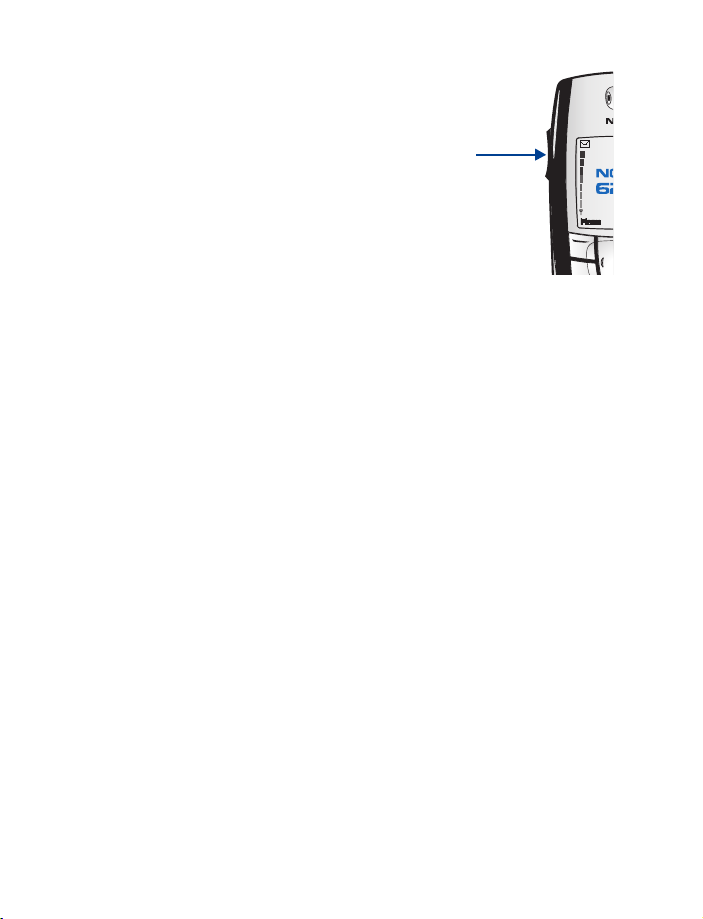
Adjust the earpiece volume
V o l u m e
key
• To increase the volume of a call, press the
volume up key on the left side of the phone.
• To decrease the volume of a call, press
the volume down key on the left side of
the phone.
When adjusting the volume, a bar chart appears in
the display screen indicating the volume level.
Make a conference call
Conference calling is a network service that allows up to six persons to
take part in a conference call.
Make a call to the first participant.
1
To call a new participant, press
2
press
Enter the phone number of the new participant (or press
3
retrieve a number from your contacts list) and press
is put on hold.
When the new call picks up, press
4
press
To add a new participant to the call, repeat Steps 2 through 4.
5
HAVE A PRIVATE CONVERSATION WITH ONE OF THE PARTICIPANTS:
Press
6
Rejoin the conference call as described in Step 4.
To end the conference call, press
7
.
Select
to connect the calls.
Select
, select
Options
Private call
, scroll to
Options
Options
, and select the desired participant.
.
i
New call
, scroll to
, and
Find
. The first call
Call
Conference
to
, and
• OPTIONS DURING A CALL
Many of the options that you can use during a call are network services.
Contact your service provider for more information.
[ 20 ]

Basic operations
Press
1
Option Function
Hold/Unhold
Loudspeaker/
Handset
Lock keypad
Record
End call/En d all
calls
New call
Touch tones
Contacts
Menu
Mute
Scroll to an option and press
2
submenu.
Press
3
press
from all calls.
during a call to display those in the following table:
Options
Places the current call on hold or takes the current
call off hold.
Enables one of the handsfree features in your phone.
Locks the keypad to prevent accidental key-presses.
Voice recorder records an active phone conversation.
Disconnects the current call or all participants in a
conference call.
Places a new call; the first call is put on hold.
Sends touch tones generated by your phone keypad.
Displays the contacts list.
Displays the main menus.
Mutes your voice; you can hear the other party but
they can not hear you.
to switch between the active call and the call on hold,
Swap
to connect a call on hold, and press i
Transfer
to activate the option or enter its
Select
to disconnect
[ 21 ]
 Loading...