


After Sales Technical Documentation
THF–7/8/9 Series Transceivers
Service Software
Instructions
and
Subdata User Guide
Original 43/96
NMP Part No. 0275267

THF–7/8/9
After Sales
Service Software Instructions
CONTENTS
Service Software – 5. . . . . . . . . . . . . . . . . . . . . . . . . . . . . . . . . . . . . . . .
General – 5. . . . . . . . . . . . . . . . . . . . . . . . . . . . . . . . . . . . . . . . . . . . .
Software Structure – 5. . . . . . . . . . . . . . . . . . . . . . . . . . . . . . .
Required Servicing Equipment – 6. . . . . . . . . . . . . . . . . . . . . . .
Installation – 7. . . . . . . . . . . . . . . . . . . . . . . . . . . . . . . . . . . . . . . .
Mechanical Connections – 7. . . . . . . . . . . . . . . . . . . . . . . . . .
Installing the Software on PC Hard Disk – 9. . . . . . . . . . . .
Using the Software with a Hard Drive – 9. . . . . . . . . . . . . . . . .
Starting – 9. . . . . . . . . . . . . . . . . . . . . . . . . . . . . . . . . . . . . . . . .
File menu – 10. . . . . . . . . . . . . . . . . . . . . . . . . . . . . . . . . . . . . . . . .
1 Open – 10. . . . . . . . . . . . . . . . . . . . . . . . . . . . . . . . . . . . . . . . .
2 Save – 10. . . . . . . . . . . . . . . . . . . . . . . . . . . . . . . . . . . . . . . . .
3 Save as – 10. . . . . . . . . . . . . . . . . . . . . . . . . . . . . . . . . . . . . . .
4 Edit – 10. . . . . . . . . . . . . . . . . . . . . . . . . . . . . . . . . . . . . . . . . .
5 Change dir – 10. . . . . . . . . . . . . . . . . . . . . . . . . . . . . . . . . . . .
6 Dos shell – 10. . . . . . . . . . . . . . . . . . . . . . . . . . . . . . . . . . . . . .
7 Exit – 10. . . . . . . . . . . . . . . . . . . . . . . . . . . . . . . . . . . . . . . . . . .
Dealer menu – 11. . . . . . . . . . . . . . . . . . . . . . . . . . . . . . . . . . . . . .
1 Subscriber Data – 11. . . . . . . . . . . . . . . . . . . . . . . . . . . . . . . .
Subscriber Number – 11. . . . . . . . . . . . . . . . . . . . . . . . . . . . . .
Delivery Date – 11. . . . . . . . . . . . . . . . . . . . . . . . . . . . . . . . . . . .
Repair Date – 11. . . . . . . . . . . . . . . . . . . . . . . . . . . . . . . . . . . . .
Language – 12. . . . . . . . . . . . . . . . . . . . . . . . . . . . . . . . . . . . . . .
Text Soft Indicator – 12. . . . . . . . . . . . . . . . . . . . . . . . . . . . . . . .
Battery Save – 12. . . . . . . . . . . . . . . . . . . . . . . . . . . . . . . . . . . .
Sleep Mode – 12. . . . . . . . . . . . . . . . . . . . . . . . . . . . . . . . . . . . .
Enhanced DTMF – 12. . . . . . . . . . . . . . . . . . . . . . . . . . . . . . . .
Own Number – 13. . . . . . . . . . . . . . . . . . . . . . . . . . . . . . . . . . . .
Welcome text – 13. . . . . . . . . . . . . . . . . . . . . . . . . . . . . . . . . . .
Lock Code – 13. . . . . . . . . . . . . . . . . . . . . . . . . . . . . . . . . . . . . .
Security Code – 13. . . . . . . . . . . . . . . . . . . . . . . . . . . . . . . . . . .
Basic Band 1 First – 13. . . . . . . . . . . . . . . . . . . . . . . . . . . . . . .
Basic Band 1 Last – 13. . . . . . . . . . . . . . . . . . . . . . . . . . . . . . .
Basic Band 2 First – 13. . . . . . . . . . . . . . . . . . . . . . . . . . . . . . .
Basic Band 2 Last – 13. . . . . . . . . . . . . . . . . . . . . . . . . . . . . . .
Car radio mute/EXT Alert – 13. . . . . . . . . . . . . . . . . . . . . . . . .
Add New Ringing Tone – 13. . . . . . . . . . . . . . . . . . . . . . . . . . .
2 Short–code Memory – 14. . . . . . . . . . . . . . . . . . . . . . . . . . . .
3 Warranty Information – 14. . . . . . . . . . . . . . . . . . . . . . . . . . .
4 Country Codes – 14. . . . . . . . . . . . . . . . . . . . . . . . . . . . . . . . .
5 Home Country – 15. . . . . . . . . . . . . . . . . . . . . . . . . . . . . . . . .
6 SMS Information – 15. . . . . . . . . . . . . . . . . . . . . . . . . . . . . . .
Technical Documentation
Page – 2
Original 43/96

After Sales
THF–7/8/9
Technical Documentation
Options menu – 15. . . . . . . . . . . . . . . . . . . . . . . . . . . . . . . . . . . . .
General – 15. . . . . . . . . . . . . . . . . . . . . . . . . . . . . . . . . . . . . . . .
Help menu – 15. . . . . . . . . . . . . . . . . . . . . . . . . . . . . . . . . . . . . . . .
Help catalog – 15. . . . . . . . . . . . . . . . . . . . . . . . . . . . . . . . . . . .
Program help – 15. . . . . . . . . . . . . . . . . . . . . . . . . . . . . . . . . . . .
Help on help – 15. . . . . . . . . . . . . . . . . . . . . . . . . . . . . . . . . . . .
Product information – 15. . . . . . . . . . . . . . . . . . . . . . . . . . . . . .
Service Menu – 16. . . . . . . . . . . . . . . . . . . . . . . . . . . . . . . . . . . . . .
1 Tunings – 16. . . . . . . . . . . . . . . . . . . . . . . . . . . . . . . . . . . . . . .
2 Testing – 16. . . . . . . . . . . . . . . . . . . . . . . . . . . . . . . . . . . . . . . .
Testing – 16. . . . . . . . . . . . . . . . . . . . . . . . . . . . . . . . . . . . . . . . . . . .
Basic Settings – 16. . . . . . . . . . . . . . . . . . . . . . . . . . . . . . . . . . .
FFSK – 17. . . . . . . . . . . . . . . . . . . . . . . . . . . . . . . . . . . . . . . . . .
PHI – 17. . . . . . . . . . . . . . . . . . . . . . . . . . . . . . . . . . . . . . . . . . . .
AFC – 17. . . . . . . . . . . . . . . . . . . . . . . . . . . . . . . . . . . . . . . . . . . .
AGC – 17. . . . . . . . . . . . . . . . . . . . . . . . . . . . . . . . . . . . . . . . . . .
Test SAK – 17. . . . . . . . . . . . . . . . . . . . . . . . . . . . . . . . . . . . . . .
A/D Readings – 17. . . . . . . . . . . . . . . . . . . . . . . . . . . . . . . . . . .
Audio control – 18. . . . . . . . . . . . . . . . . . . . . . . . . . . . . . . . . . . .
Special Settings – 18. . . . . . . . . . . . . . . . . . . . . . . . . . . . . . . . .
FFSK Data Sending Control – 19. . . . . . . . . . . . . . . . . . . . . . .
Single Tone and DTMF Control – 19. . . . . . . . . . . . . . . . . . . .
Service Software Instructions
Subdata – 21. . . . . . . . . . . . . . . . . . . . . . . . . . . . . . . . . . . . . . . . . . . . . . .
General – 21. . . . . . . . . . . . . . . . . . . . . . . . . . . . . . . . . . . . . . . . . . .
Connection to the Phone – 21. . . . . . . . . . . . . . . . . . . . . . . . . .
Required Servicing Equipment – 21. . . . . . . . . . . . . . . . . . . . . . .
Installation – 22. . . . . . . . . . . . . . . . . . . . . . . . . . . . . . . . . . . . . . . .
Connections – 22. . . . . . . . . . . . . . . . . . . . . . . . . . . . . . . . . . . .
Installing the Dealer Software on PC Hard Disk – 23. . . . . . . .
Starting – 23. . . . . . . . . . . . . . . . . . . . . . . . . . . . . . . . . . . . . . . . .
Dealer Menu – 24. . . . . . . . . . . . . . . . . . . . . . . . . . . . . . . . . . . . . . . . .
Subscriber Data – 24. . . . . . . . . . . . . . . . . . . . . . . . . . . . . . . . . . . .
Country, Subscriber Number and Password – 24. . . . . . . . .
Delivery Date – 24. . . . . . . . . . . . . . . . . . . . . . . . . . . . . . . . . . . .
Language – 25. . . . . . . . . . . . . . . . . . . . . . . . . . . . . . . . . . . . . . .
Text Soft Indicator – 25. . . . . . . . . . . . . . . . . . . . . . . . . . . . . . . .
Battery Save Allowed – 25. . . . . . . . . . . . . . . . . . . . . . . . . . . . .
Sleep Mode Allowed – 25. . . . . . . . . . . . . . . . . . . . . . . . . . . . .
CRM or EXT Alert – 25. . . . . . . . . . . . . . . . . . . . . . . . . . . . . . . .
Own Number – 25. . . . . . . . . . . . . . . . . . . . . . . . . . . . . . . . . . . .
Welcome text – 25. . . . . . . . . . . . . . . . . . . . . . . . . . . . . . . . . . .
Lock Code – 25. . . . . . . . . . . . . . . . . . . . . . . . . . . . . . . . . . . . . .
Security code – 25. . . . . . . . . . . . . . . . . . . . . . . . . . . . . . . . . . .
Original 43/96
Page – 3

THF–7/8/9
After Sales
Service Software Instructions
Add New Ringing Tone – 26. . . . . . . . . . . . . . . . . . . . . . . . . . .
Reset Timers – 26. . . . . . . . . . . . . . . . . . . . . . . . . . . . . . . . . . . .
Enhanced DTMF – 26. . . . . . . . . . . . . . . . . . . . . . . . . . . . . . . .
Short–code Memory – 26. . . . . . . . . . . . . . . . . . . . . . . . . . . . . . . .
Warranty Information – 27. . . . . . . . . . . . . . . . . . . . . . . . . . . . . . .
Country Codes – 27. . . . . . . . . . . . . . . . . . . . . . . . . . . . . . . . . . . . .
Home Country – 27. . . . . . . . . . . . . . . . . . . . . . . . . . . . . . . . . . . . .
Options menu – 27. . . . . . . . . . . . . . . . . . . . . . . . . . . . . . . . . . . . .
General – 27. . . . . . . . . . . . . . . . . . . . . . . . . . . . . . . . . . . . . . . .
Help menu – 28. . . . . . . . . . . . . . . . . . . . . . . . . . . . . . . . . . . . . . . .
Help catalog – 28. . . . . . . . . . . . . . . . . . . . . . . . . . . . . . . . . . . .
Program help – 28. . . . . . . . . . . . . . . . . . . . . . . . . . . . . . . . . . . .
Help on help – 28. . . . . . . . . . . . . . . . . . . . . . . . . . . . . . . . . . . .
Product information – 28. . . . . . . . . . . . . . . . . . . . . . . . . . . . . .
SMS Information – 28. . . . . . . . . . . . . . . . . . . . . . . . . . . . . . . . .
Technical Documentation
Page – 4
Original 43/96

After Sales
THF–7/8/9
Technical Documentation
Service Software
General
This Service software software is for THF–7/8/9 phones.
The software can be used to set the phone according to user require-
ments simply by entering commands via the keyboard of a PC/AT con-
nected to the phone. It can as easily be used for the programming of
simple user identification data, as for full–scale tuning of the phone.
This section references NMT Service software version 1.5. To receive a
free upgrade, send the disk back to Nokia Mobile Phones.
Software Structure
The software is divided into five main menus: File, service, dealer, options
and help.
Service Software Instructions
Information about these menus can be accessed by pressing ALT – F1
when a menu item is highlighted. If no menu item is highlighted, ALT – F1
gives general information about the program. Help is also available when
a dialog box is opened.
Original 43/96
Page – 5

THF–7/8/9
After Sales
Service Software Instructions
Required Servicing Equipment
– Computer: At least IBM 80386 or compatible with one unused serial
port (COM1 or COM2)*), one parallel port (LPT1), hard disk recom-
mended
– Operating System: DOS Version 3.2 or later
– If PCLStart in use: DOS 6.22 and IBM 80486 or compatible
– Display: Any 80–character text display
– Dealer software version for 3.5” disk (product code: 0774017) or
for 5.25” disk (product code: 0774000)
– Service software version for 3.5” disk (product code: 0774019) or for
5.25” disk (product code: 0774018)
– Software protection key PKD–1 (product code: 0750018)
– M2BUS adapter DAU–2 (product code: 0750006)
– Modular cable XCM–1 (product code: 4626131)
Technical Documentation
– RS–232 adapter, 9–to–25 pins (product code: 4626170)
– Modular Power Connector SCF–6 (product code 0770036)
– Dummy Battery Pack BTS–4F (product code 0770040) for THF7 and THF9
– Dummy Battery Pack BTS–9F (product code 0770035) for THF8
– Service cable SCS–1 (product code: 0770011)
– Power connector PCS–1 (product code: 0730012)
– Audio cable ADS–1 (product code: 0730011)
– (BNC – BNC cable)
– JBF–1 service module (product code. 0750074)
– Test frame JBS–8 (product code: 0770014); only the cable can be
used with THF–8
– Modular T–adapter (product code: 4626134)
*)
Note: A number of PC’s of an older generation use the Intel, National Semiconductor, or United
Microelectronics IC 8250 as the serial port UART. This is a comparatively inefficient circuit for current
purposes and does not necessarily support the M2BUS adapter at 9600 baud. The newer UART’s
NS16450 and NS16550AF of National Semiconductor offer solutions for these problems.
Page – 6
Original 43/96
After Sales
THF–7/8/9
Technical Documentation
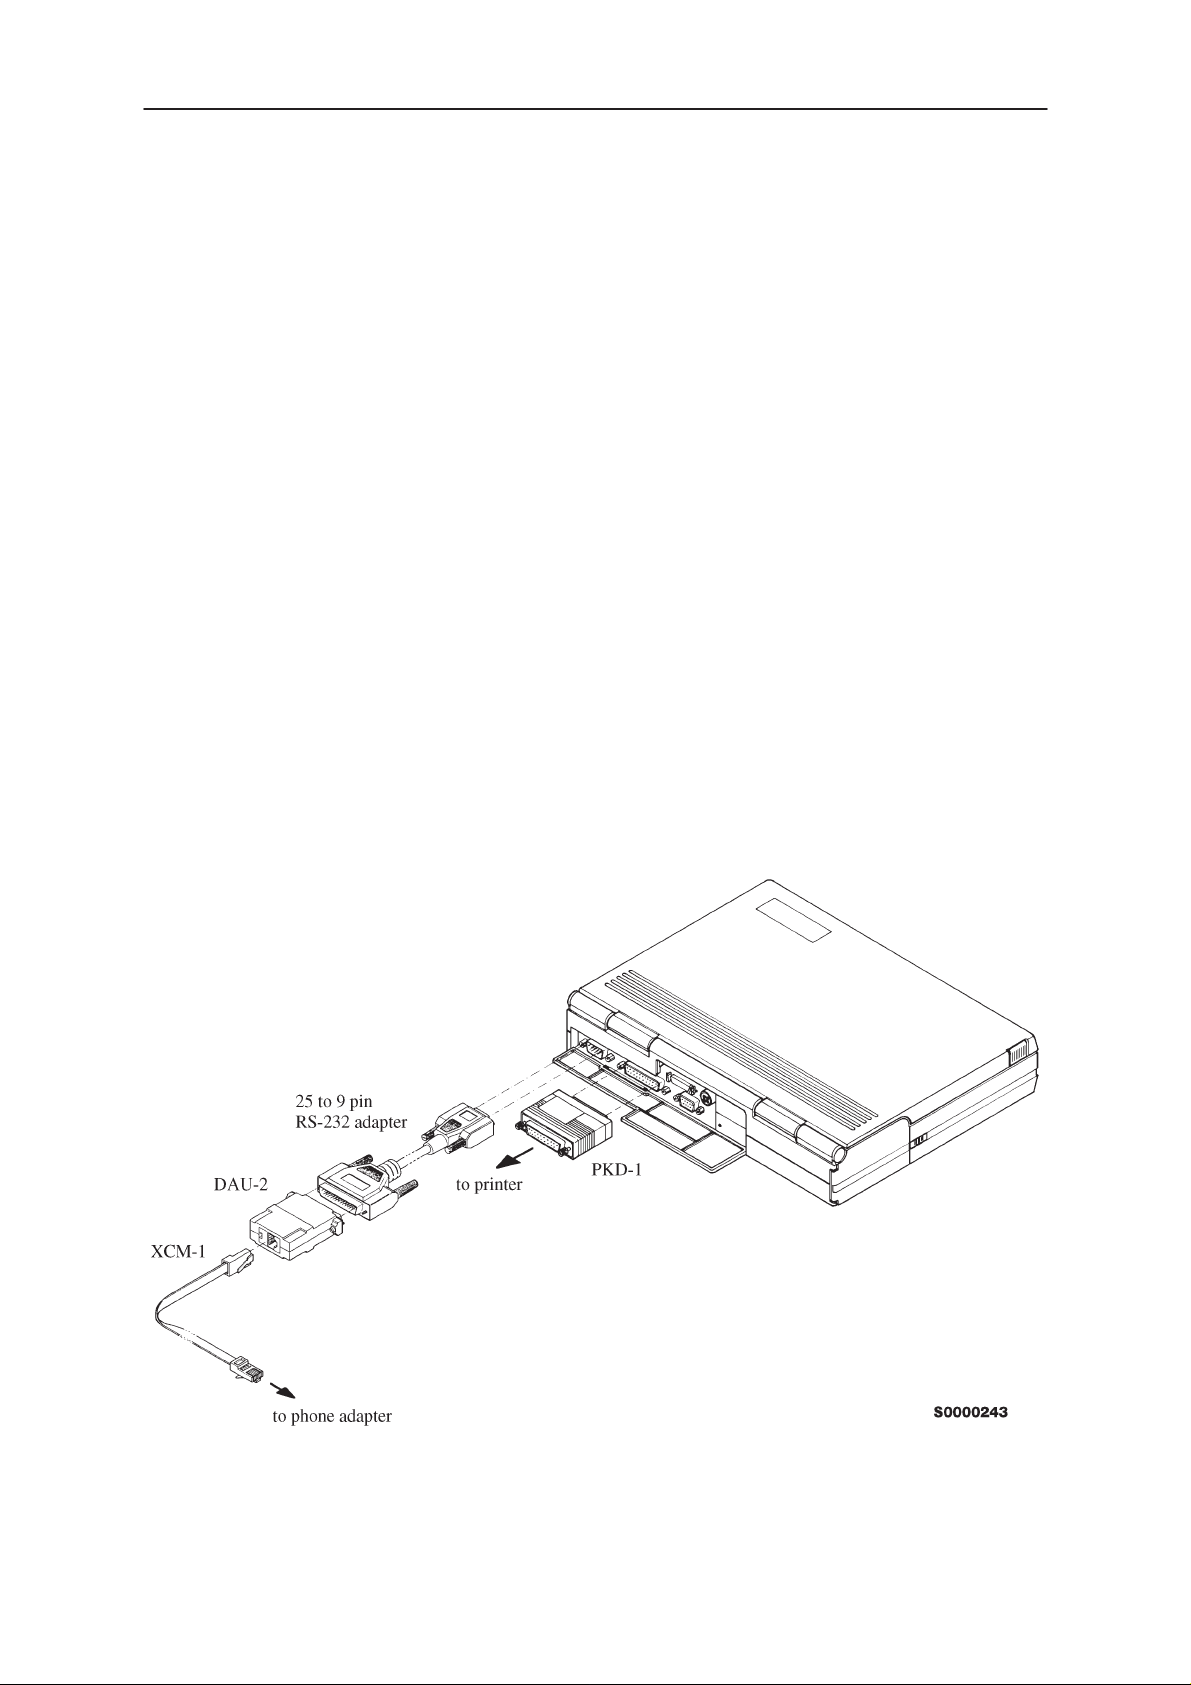
Installation
Mechanical Connections
Caution: Make sure that you have switched off the PC and the printer
before making connections.
Caution: Do not connect the PKD–1 key to the serial port. You may
damage your PKD–1 !
The software controls the phone via a separate adapter connected to the
serial port of the PC, and to the telephone’s M2BUS (DAU–2 and
XCM–1).
Attach the dongle PKD–1 to the parallel port 1 (25–pin female D–connector) of the PC. When connecting PKD–1 to the parallel port, be sure that
you insert the computer side of the PKD–1 to the PC (male side). If you
use a printer on parallel port 1, install the PKD–1 between the PC and
your printer cable.
Service Software Instructions
The PKD–1 should not affect devices working with it. If some errors occur
(errors in printing are possible) please try printing without the PKD–1. If
printing is OK without the PKD–1 please contact your dealer. We will offer
you a new PKD–1 in exchange for your old one.
Original 43/96
Page – 7
THF–7/8/9
After Sales
Service Software Instructions
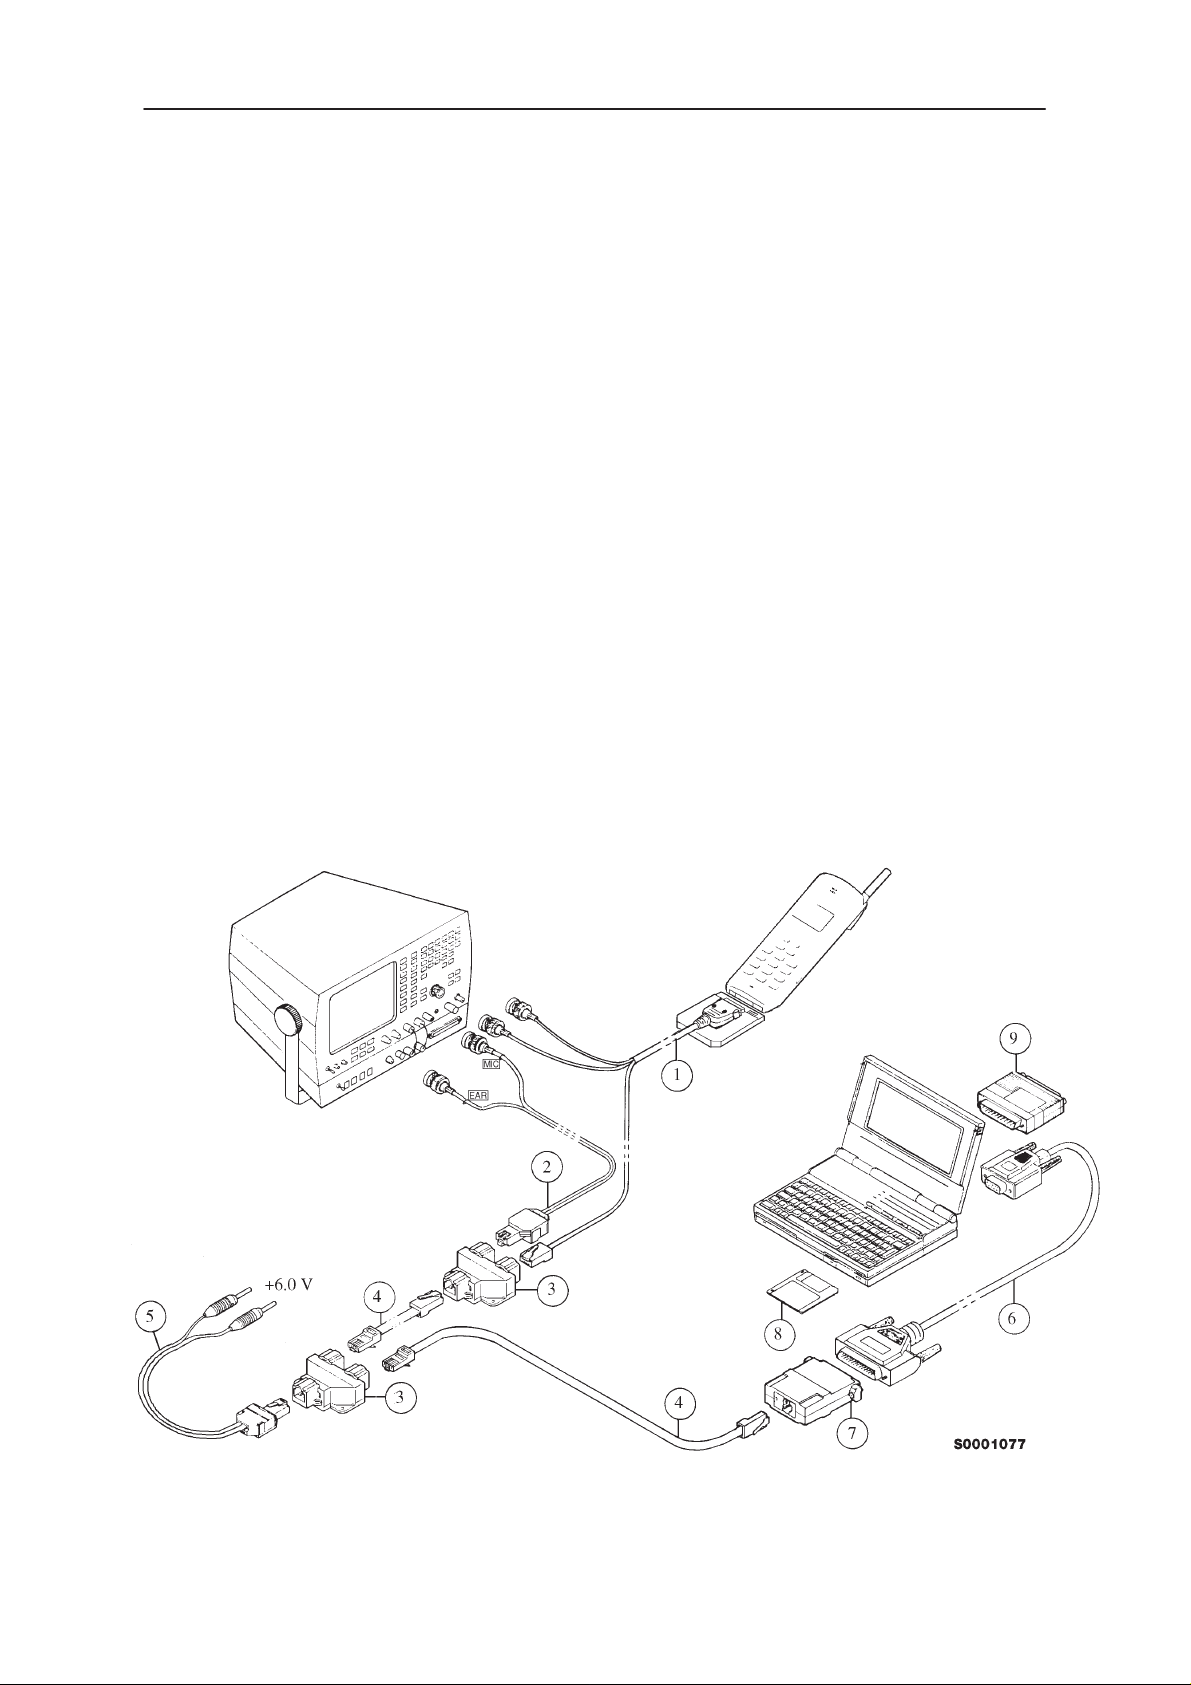
Connect the M2BUS adapter (DAU–2, item 7) to the serial port (25–pin
male D–connector). In case your PC (as AT types in general) has a 9–pin
serial port, use the special connector adapter cable provided (item 6).
Connect the modular cable XCM–1 (item 4) from the M2BUS adapter to
the modular T–connector (item 3).
Connect the modular cable XCM–1 (item 4) from the first modular T–connector to the second modular T–connector. Now connect the transceiver
THF–5 to the modular T–connector by using cable from test frame JBS–8
(item 1).
Connect external audio lines to the measurement station by using the audio cable ADS–1 (item 2).
Connect modular power connector SCF–6 (item 5) to the modular T–connector. the supply voltage must be set to 6.5 V, when the phone is tuned
because some voltage loses may occur.
Note: The supply voltage must be set to 6.0 V when battery and charger
references are tuned.
Technical Documentation
Page – 8
Original 43/96

After Sales
THF–7/8/9
Technical Documentation
Installing the Software on PC Hard Disk
The program is delivered on a diskette and is copy protected with a
dongle PKD–1. It must be present in parallel port when using Service
software.
The program can also be installed on the hard disk, which is recommendable to obtain a maximum data access rate.
Keep the original diskette safe to enable upgrading of the program !
If you plan to use PCL Start service software, you must install it before
installing Service software, see PCL Start installation instructions.
To install the new Service software program, follow the steps below:
1. insert the new Service software diskette
into drive A: of your computer
2. log into drive A:
Service Software Instructions
type A: and press <Enter>
3. start INSTALL.DAT and
install Service software to drive C:
Using the Software with a Hard Drive
Starting
The program is started by entering the following command at the DOS
prompt:
THF7SERV
Example 1. To start the program:
1. type THF7SERV and press <Enter>
type INSTALL C:
and press <Enter>
Original 43/96
Page – 9
 Loading...