

Page 1

Nokia Customer Care
SERVICE MANUAL
Level 1 and 2
RH-79 Mobile Terminal
1255
Issue 1
COMPANY CONFIDENTIAL
ISSUE 1 02/2006
Copyright © 2006 Nokia. All Rights Reserved.
Page 2

1255 (RH-79)
Nokia Customer Care
Amendment Record Sheet
Amendment No Date Inserted By Comments
001 02/2006 Frankie Yang Issue 1
Page 2 © 2006 Nokia Corporation Company Confidential Issue 1 02/2006
Page 3
1255 (RH-79)
Nokia Customer Care
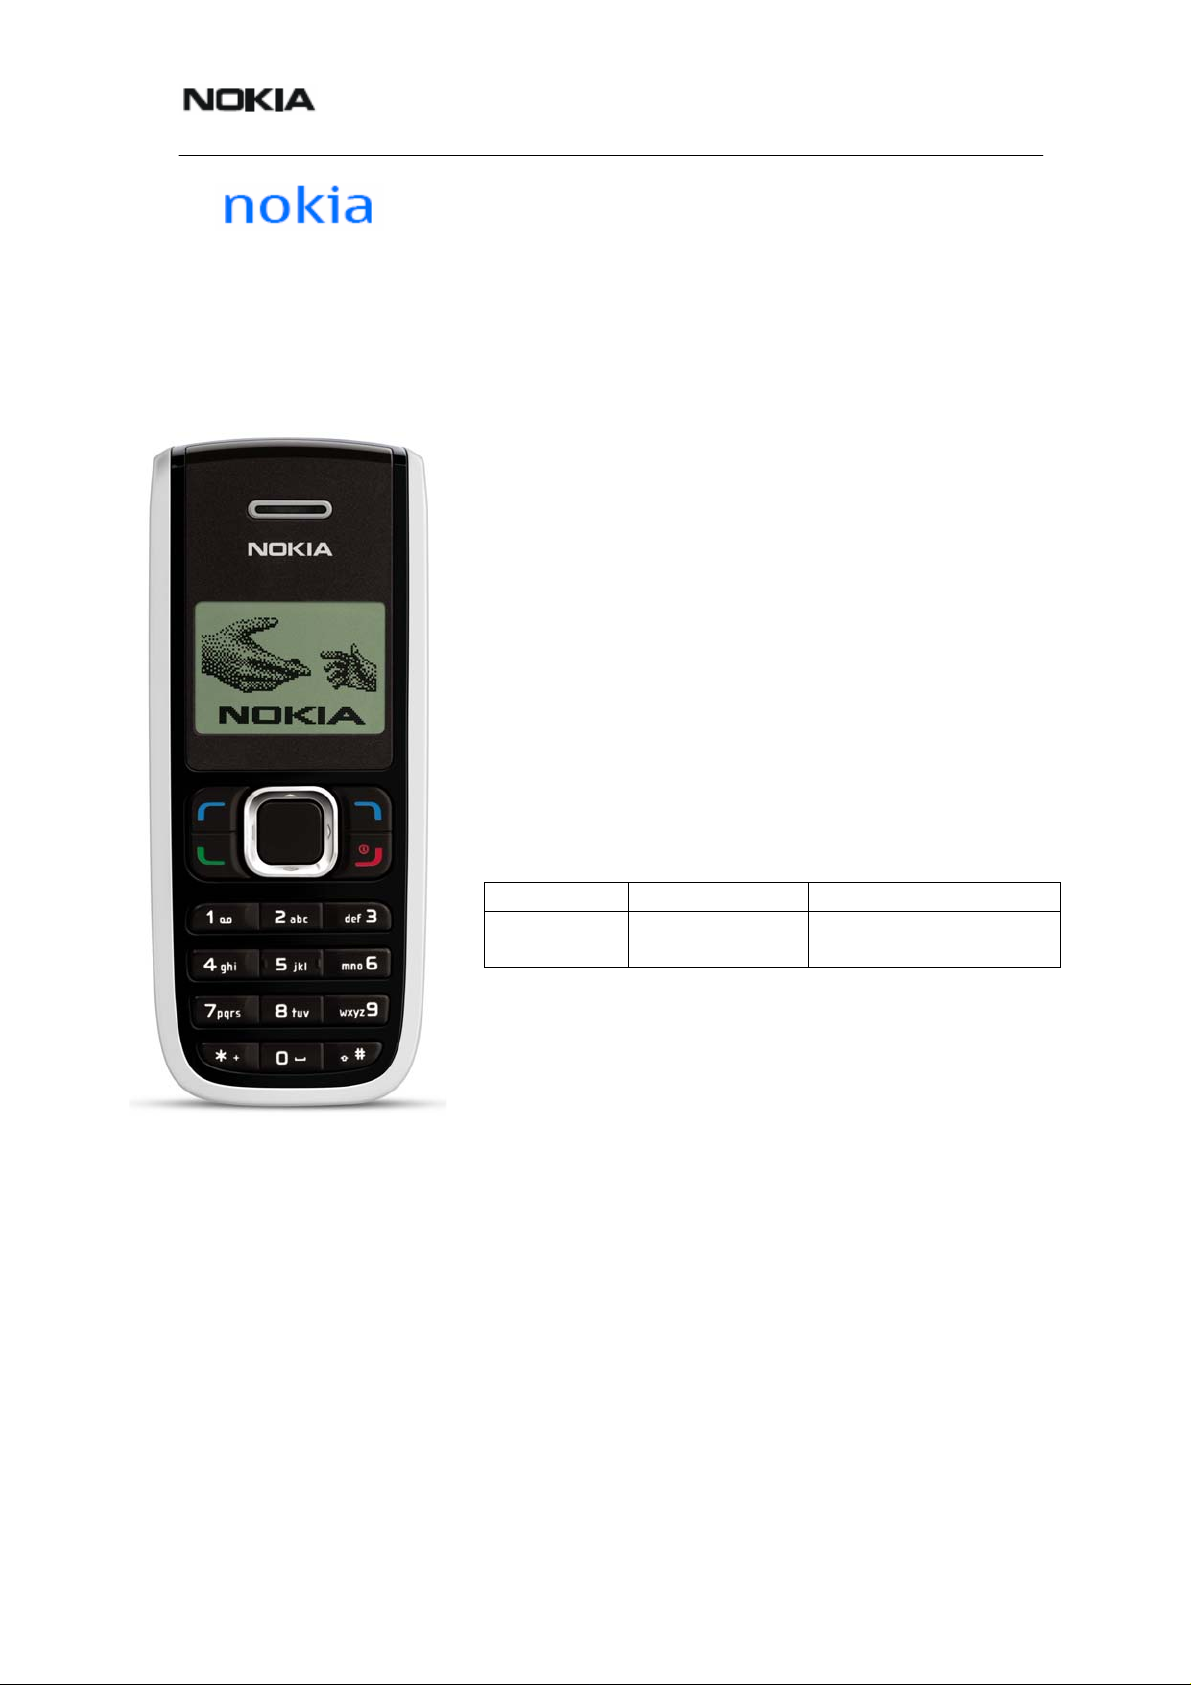
1 2 5 5
RH-79
Transceiver characteristics:
• CDMA 800MHz
• 96 x 65 pixel black and white display
• Removable User Information Module (RUIM), disabled in
non-RUIM markets
• Internal antenna
• Internal vibra
• EVRC Vocoder
• 8 polyphonic ringtones
• Predictive text
Transceiver with BL-5C 900mAh Li-Ion battery pack
Talk time Standby time Note
Up to 240
minutes
Environmental characteristics:
• Lead-free soldered
Up to 240
hours
Depends on network
parameters
Issue 1 02/2006 © 2006 Nokia Corporation Company Confidential Page 3
Page 4
1255 (RH-79)
Nokia Customer Care
Contents Page
General Repair Hints.......................................................................................... 11
Pathfinder on Nokia Online for Technicians....................................................... 12
Support Library............................................................................................12
Training........................................................................................................13
Level 1 and 2 e-learning...........................................................................13
Exploded View and Component Disposal.......................................................... 14
Spare Parts Overview......................................................................................... 15
Spare Parts List.................................................................................................. 16
Service Tools...................................................................................................... 17
Software Update................................................................................................. 18
Point of Sales Flashing................................................................................18
Flashing Instructions....................................................................................19
Disassembly Instructions.................................................................................... 22
Domesheet Exchange Instructions..............................................................25
Display Exchange Ins truction s......................................................................26
Quick Troubleshooter ......................................................................................... 27
Legend for Quick Troubleshooter.................................................................27
Quick Troubleshooter – Part 1.....................................................................28
Quick Troubleshooter – Part 2.....................................................................29
Go-No-Go Test................................................................................................... 30
Battery Test ........................................................................................................ 30
Forwarding Repairs ............................................................................................ 31
Page 4 © 2006 Nokia Corporation Company Confidential Issue 1 02/2006
Page 5
1255 (RH-79)
Nokia Customer Care
Copyright © 2006 Nokia. All rights reserved.
Reproduction, transfer, distribution or storage of part or all of the contents in
this document in any form without the prior written permission of Nokia is
prohibited.
Nokia and Nokia Connecting People are trademarks or registered trademarks
of Nokia Corporation. Other product and company names mentioned
herein may be trademarks or tradenames of their respective owners.
Nokia operates a policy of continuous development. Nokia reserves the right
to make changes and improvements to any of the products described in this
document without prior notice.
Under no circumstances shall Nokia be responsible for any loss of data or
income or any special, incidental, consequential or indirect damages
howsoever caused.
The contents of this document are provided "as is". Except as required by
applicable law, no warranties of any kind, either express or implied,
including, but not limited to, the implied warranties of merchantability and
fitness for a particular purpose, are made in relation to the accuracy, reliability
or contents of this document. Nokia reserves the right to revise this
document or withdraw it at any time without prior notice.
The availability of particular products may vary by region.
IMPORTANT
This document is intended for use by qualified service personnel only.
Issue 1 02/2006 © 2006 Nokia Corporation Company Confidential Page 5
Page 6

1255 (RH-79)
Nokia Customer Care
Warnings and Cautions
Please refer to the product’s user guide for instructions relating to operation,
care and maintenance including important safety information. Note also the
following:
Warnings:
1. IF THE DEVICE CAN BE INSTALLED IN A VEHICLE, CARE MUST BE
TAKEN ON INSTALLATION IN VEHICLES FITTED WITH ELECTRONIC
ENGINE MANAGEMENT SYSTEMS AND ANTI-SKID BRAKING SYSTEMS.
UNDER CERTAIN FAULT CONDITIONS, EMITTED RF ENERGY CAN
AFFECT THEIR OPERATION. IF NECESSARY, CONSULT THE VEHICLE
DEALER/MANUFACTURER TO DETERMINE THE IMMUNITY OF VEHICLE
ELECTRONIC SYSTEMS TO RF ENERGY.
2. THE PRODUCT MUST NOT BE OPERATED IN AREAS LIKELY TO
CONTAIN POTENTIALLY EXPLOSIVE ATMOSPHERES EG PETROL
STATIONS (SERVICE STATIONS), BLASTING AREAS ETC.
3. OPERATION OF ANY RADIO TRANSMITTING EQUIPMENT, INCLUDING
CELLULAR TELEPHONES, MAY INTERFERE WITH THE FUNCTIONALITY
OF INADEQUATELY PROTECTED MEDICAL DEVICES. CONSULT A
PHYSICIAN OR THE MANUFACTURER OF THE MEDICAL DEVICE IF
YOU HAVE ANY QUESTIONS. OTHER ELECTRONIC EQUIPMENT MAY
ALSO BE SUBJECT TO INTERFERENCE.
Cautions:
1. Servicing and alignment must be undertaken by qualified personnel only.
2. Ensure all work is carried out at an anti-static workstation and that an
anti-static wrist strap is worn.
3. Ensure solder, wire, or foreign matter does not enter the telephone as damage
may result.
4. Use only approved components as specified in the parts list.
5. Ensure all components, modules screws and insulators are
correctly re-fitted after servicing and alignment. Ensure all
cables and wires are repositioned correctly.
Page 6 © 2006 Nokia Corporation Company Confidential Issue 1 02/2006
Page 7
1255 (RH-79)
Nokia Customer Care
For Your safety
QUALIFIED SERVICE
Only qualified personnel may install or repair phone equipment.
ACCESSORIES AND BATTERIES
Use only approved accessories and batteries. Do not connect incompatible
products.
CONNECTING TO OTHER DEVICES
When connecting to any other device, read its user’s guide for detailed safety
instructions. Do not connect incompatible products.
ESD protection
Nokia requires that product service points have sufficient
ESD protection (against static electricity) when servicing products.
Any product of which the covers are removed must be handled with
ESD protection. The SIM card can be replaced without ESD
protection if the product is otherwise ready for use.
To replace the covers ESD protection must be applied.
All electronic parts of the product are susceptible to ESD.
Resistors, too, can be damaged by static electricity discharge.
All ESD sensitive parts must be packed in metallized protective bags
during shipping and handling outside any ESD Protected Area
(EPA).
Every repair action involving opening the product or handling the
product components must be done under ESD protection.
ESD protected spare part packages MUST NOT be opened/closed
out of an ESD Protected Area.
For more information and local requirements about ESD protection
and ESD Protected Area, contact your local Nokia After Market
Services representative.
Issue 1 02/2006 © 2006 Nokia Corporation Company Confidential Page 7
Page 8

1255 (RH-79)
Nokia Customer Care
Battery information
Note that a new battery's full performance is achieved only after two or three
complete charge and discharge cycles!
The battery can be charged and discharged hundreds of times but it will eventually
wear out. When the operating time (talk-time and standby time) is noticeably shorter
than normal, it is time to buy a new battery.
Use only batteries approved by the phone manufacturer and recharge the battery
only with the chargers approved by the manufacturer. Unplug the charger when not
in use. Do not leave the battery connected to a charger for longer than a week,
since overcharging may shorten its lifetime. If left unused a fully charged battery will
discharge itself over time.
Temperature extremes can affect the ability of your battery to charge.
For good operation times with Ni-Cd/NiMh batteries, discharge the battery from time
to time by leaving the product switched on until it turns itself off (or by using the
battery discharge facility of any approved accessory available for the product). Do
not attempt to discharge the battery by any other means.
Use the battery only for its intended purpose.
Never use any charger or battery that is damaged.
Do not short-circuit the battery. Accidental short-circuiting can occur when a
metallic object (coin, clip or pen) causes direct connection of the + and – terminals
of the battery (metal strips on the battery) for example when you carry a spare
battery in your pocket or purse. Short- circuiting the terminals may damage the
battery or the connecting object.
Leaving the battery in hot or cold places, such as in a closed car in summer or
winter conditions, will reduce the capacity and lifetime of the battery.
Always try to keep the battery between 15°C and 25°C (59°F and 77°F). A phone
with a hot or cold battery may temporarily not work, even when the battery is fully
charged. Batteries' performance is particularly limited in temperatures well below
freezing.
Do not dispose of batteries in a fire!
Dispose of batteries according to local regulations (e.g. recycling). Do not dispose
as household waste.
Page 8 © 2006 Nokia Corporation Company Confidential Issue 1 02/2006
Page 9

1255 (RH-79)
Nokia Customer Care
Care and Maintenance
The product is a product of superior design and craftsmanship and should be
treated with care. The suggestions below will help you to fulfill any warranty
obligations and to enjoy this product for many years.
Keep the phone and all its parts and accessories out of the reach of small children.
Keep the phone dry. Precipitation, humidity and all types of liquids or moisture can
contain minerals that will corrode electronic circuits.
Do not use or store the phone in dusty, dirty areas. Its moving parts can be
damaged.
Do not store the phone in hot areas. High temperatures can shorten the life of
electronic devices, damage batteries, and warp or melt certain plastics.
Do not store the phone in cold areas. When it warms up (to its normal temperature),
moisture can form inside, which may damage electronic circuit boards.
Do not drop, knock or shake the phone. Rough handling can break internal circuit
boards.
Do not use harsh chemicals, cleaning solvents, or strong detergents to clean the
phone.
Do not paint the phone. Paint can clog the moving parts and prevent proper
operation.
Use only the supplied or an approved replacement antenna. Unauthorized
antennas, modifications or attachments could damage the phone and may violate
regulations governing radio devices.
All of the above suggestions apply equally to the product, battery, charger or any
accessory.
Issue 1 02/2006 © 2006 Nokia Corporation Company Confidential Page 9
Page 10

1255 (RH-79)
Nokia Customer Care
Company Policy
Our policy is of continuous development; details of all technical modifications will be
included with service bulletins.
While every endeavour has been made to ensure the accuracy of this document,
some errors may exist. If any errors are found by the reader, NOKIA MOBILE
PHONES Business Group should be notified in writing.
Please state:
Title of the Document + Issue Number/Date of publication
Latest Amendment Number (if applicable)
Page(s) and/or Figure(s) in error
Please send to:
NOKIA CORPORATION
Nokia Mobile Phones Business Group
Nokia Customer Care
PO Box 86
FIN-24101 SALO
Finland
Page 10 © 2006 Nokia Corporation Company Confidential Issue 1 02/2006
Page 11

1255 (RH-79)
Nokia Customer Care
General Repair Hints
This section provides general hints on repairs:
Read the tutorials or user guide on www.Nokia.com > Choose your location >
Support > Product Support. Select the appropriate mobile terminal model to
become familiar with the Nokia product.
y Take adequate ESD precautions before starting repairs, e.g. work in an ESD
Protected Area, and that an anti-static wrist strap is worn.
y Use gloves to avoid corrosion and fingerprints.
y Protect windows and displays with a film to avoid dust and scratches.
y Use a lint-free cloth when cleaning the LCD module (e.g. Micro-Fiber cloth).
y Use a soft cloth/ESD brush and Isopropanol when cleaning the pads. Do not
use a glass fiber pencil as it will scratch the surface and will lead to corrosion.
y Reuse mechanical parts that are not soldered if they did not repair the failure
(except shielding lids and bent parts).
y Make sure to replace the shielding lids with new ones when removing them,
so that the high-frequency leakage does not affect the device.
y Always use original Nokia spare parts.
y Check the soldering joints of the parts causing problems (e.g. soldered
connectors or switches) and resolder them if necessary (Level 2 only).
y Remove redundant soldering flux after repair.
y Meet the torque requirements when assembling the terminal (see also
"Torques for transceiver assembly" document found on Nokia Online).
y Always use properly functioning test equipment to test to be sure if it is the
mobile terminal and not faulty equipment causing the malfunction.
y A UIM card is required for all Go-No-Go tests.
y Make a note of the Item code causing the malfunction when making fault log
entries. Also complete the appropriate part code from the assembly if
needed.
y Note that some malfunctions could be software related and resolved by a
software update.
y Refer to additional documents available on Nokia Online (NOL).
Note: Check Nokia Online (NOL) for latest news and files on a regular basis.
Issue 1 02/2006 © 2006 Nokia Corporation Company Confidential Page 11
Page 12

1255 (RH-79)
Nokia Customer Care
Pathfinder on Nokia Online for Technicians
Support Library
In addition to the information in this Service Manual, refer to the main
documentation database Nokia Online (NOL) that houses additional information,
such as multimedia content (video clips and interactive tutorials).
Navigate to the Support Library section as follows:
Nokia Online > Care Services > Support Library > Under the Select Category
pulldown menu select > Support Library. Under the Subcategory pull-down menu
select the appropriate product number. Under the second the Subcategory
pull-down menu select Field Service Bulletins. Download the latest Service
Bulletins available.
Available product documentation for each product may include:
y Instructions
y General Service Bulletins
y Product related documents
y Spare Part Service Bulletins
y Service Tools Service Bulletins
y Common Software Service Bulletins
Note: Reviewing the Service Bulletins will indicate if existing documents have
become obsolete. All new information must be processed and implemented as soon
as possible.
Page 12 © 2006 Nokia Corporation Company Confidential Issue 1 02/2006
Page 13

1255 (RH-79)
Nokia Customer Care
Training
Level 1 and 2 e-learning
Content formerly found on Nokia CarePoint, such as Online Troubleshooting,
Product Information, Videos - Disassembly/Reassembly can now be found on
the Nokia Online website.
Navigate to the Training section as follows:
Nokia Online > Care Services > Training
Level 1 and 2 e-learning courses offer quick product overviews and support on
repair and use of Nokia mobile terminals:
Overview and Guides Disassembly and Assembly Troubleshooting
Basic information about
the mobile terminal,
features and
technologies
Recommendation: Download the newest versions of very large files, e.g. videos,
Phoenix packages or Service Manuals only once and distribute them for further
use.
Instructions on disassembling
and reassembling the mobile
terminal
Step-by-step instructions
on locating and repairing
the most common
problems with the mobile
terminal
Issue 1 02/2006 © 2006 Nokia Corporation Company Confidential Page 13
Page 14

1255 (RH-79)
Nokia Customer Care
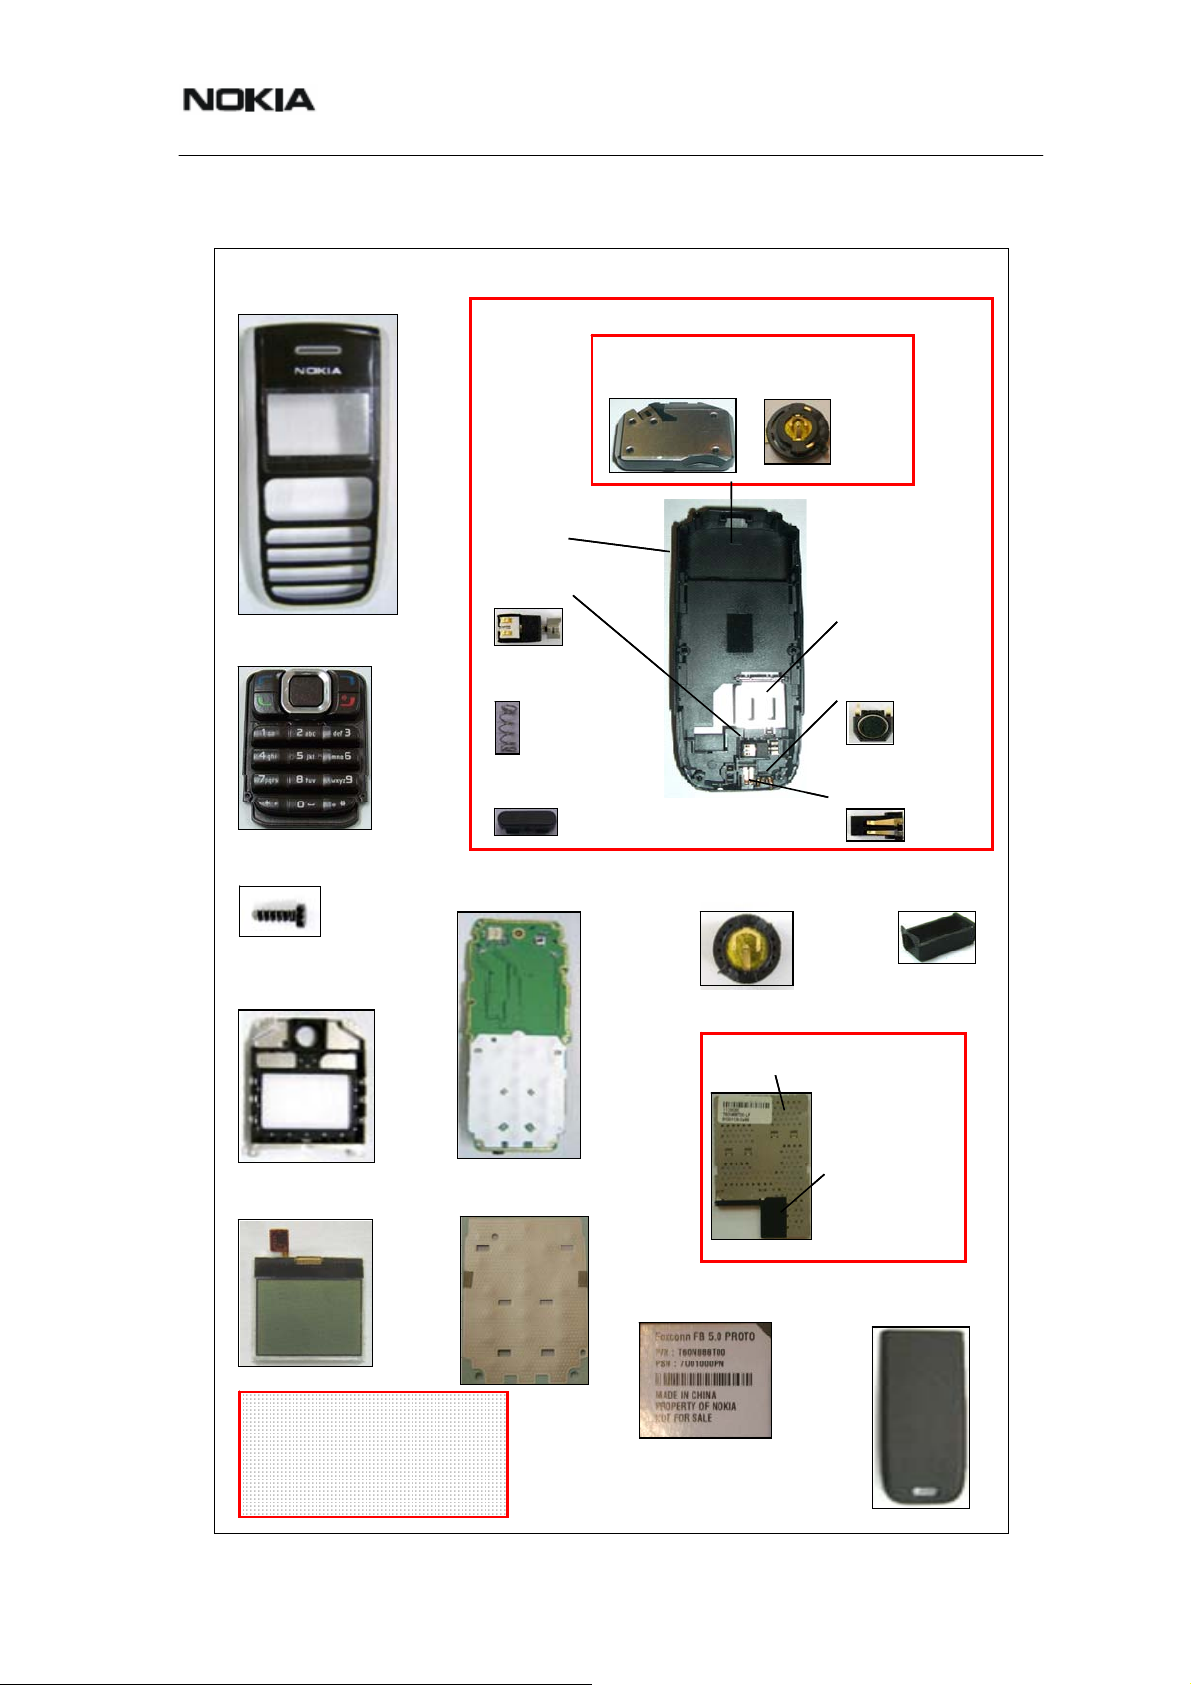
Exploded View and Component Disposal
Refer to the image below for the recommended ecologically sound disposal of
components. Colorized components show the different categories.
A-Cover Assy
A-Cover Assy
Screw (T 1.8 x 6)
Screw (T 1.8 x 6)
RUIM Label (A1)
RUIM Label (A1)
DC Jack (A2)
DC Jack (A2)
Microphone (A2)
Microphone (A2)
Vibrator (A2)
Vibrator (A2)
Release Spring (A2)
Release Spring (A2)
Release Button (A2)
Release Button (A2)
I001
I001
Keymat
Keymat
I002
I002
I003
I003
Domesheet
Domesheet
I009
I009
Rubber Cap
Rubber Cap
I008
I008
*
*
I011
I011
I017
I017
I016
I016
I015
I015
I019
I019
I020
I020
*
*
LCD Module Sh ielding Assy
LCD Module Sh ielding Assy
I004
I004
Receiver (Earpiece)
Receiver (Earpiece)
I005
I005
LCD Module
LCD Module
I006
I006
Engine Module (not supplied)
Engine Module (not supplied)
I007
I007
Speaker (A3) (A2)
Speaker (A3) (A2)
I014
I014
*
*
Antenna (A3) (A2)
Antenna (A3) (A2)
*
*
I013
I013
Shielding Case (A1)
Shielding Case (A1)
I010
I010
*
*
D-Cover Blank (A2)
D-Cover Blank (A2)
*
*
I012
I012
Type Label (Level 3 /4 only)
Type Label (Level 3 /4 only)
I021
I021
RUIM Lid (A2)
RUIM Lid (A2)
**
**
I018
I018
B-Cover Blank
B-Cover Blank
I022
I022
A1 = SHIELDING CASE ASSY
A1 = SHIELDING CASE ASSY
A2 = D-COVER ASSY
A2 = D-COVER ASSY
A3 = SAM MODULE
A3 = SAM MODULE
= ONLY AVAILABLE AS
= ONLY AVAILABLE AS
*
*
ASSEMBLY
ASSEMBLY
Page 14 © 2006 Nokia Corporation Company Confidential Issue 1 02/2006
Page 15
1255 (RH-79)
Nokia Customer Care
Spare Parts Overview
A Cover Assy
A Cover Assy
A Cover Assy
I001
I001
I001
Keymat
Keymat
Keymat
I002
I002
I002
Screw (T1.8 x 6)
Screw (T1.8 x 6)
Screw (T1.8 x 6)
I003
I003
I003
A2 = D-Cover Assy
A2 = D-Cover Assy
A3 = SAM Module
A3 = SAM Module
A3 = SAM Module
Antenna (A3)(A2)
Antenna (A3)(A2)
Antenna (A3)(A2)
*
*
*
I013
I013
I013
D-Cover Blank (A2)
D-Cover Blank (A2)
*
*
I012
I012
Vibrator (A2)
Vibrator (A2)
Vibrator (A2)
I015
I015
I015
Release Spring(A2)
Release Spring(A2)
Release Spring(A2)
*
*
*
I019
I019
I019
Release Button (A2)
Release Button (A2)
Release Button (A2)
*
*
*
I020
I020
I020
Engine Module (not supplied)
Engine Module (not supplied)
Engine Module (not supplied)
I007
I007
I007
Speaker (A3)(A2)
Speaker (A3)(A2)
Speaker (A3)(A2)
*
*
*
I014
I014
I014
Receiver (Earpiece)
Receiver (Earpiece)
Receiver (Earpiece)
I005
I005
I005
RUIM Lid(A2)
RUIM Lid(A2)
RUIM Lid(A2)
*
*
*
I018
I018
I018
Microphone(A2)
Microphone(A2)
Microphone(A2)
I016
I016
I016
DC Jack (A2)
DC Jack (A2)
DC Jack (A2)
I017
I017
I017
Rubber Cap
Rubber Cap
Rubber Cap
I008
I008
I008
LCD Module Shielding Assy
LCD Module Shielding Assy
LCD Module Shielding Assy
I004
I004
I004
LCD Module
LCD Module
LCD Module
I006
I006
I006
A1 = SHIELD CA SE ASSY
A1 = SHIELD CA SE ASSY
A1 = SHIELD CA SE ASSY
A2 = D-COVER ASSY
A2 = D-COVER ASSY
A2 = D-COVER ASSY
A3 = SAM MODULE
A3 = SAM MODULE
A3 = SAM MODULE
*
*
*
= ONLY AVAILABLE AS
= ONLY AVAILABLE AS
= ONLY AVAILABLE AS
ASSEMBLY
ASSEMBLY
ASSEMBLY
Domesheet
Domesheet
Domesheet
I009
I009
I009
A1 = Shielding Case Assy
A1 = Shielding Case Assy
Shielding Case (A1)
Shielding Case (A1)
I010*
I010*
RUIM Label (A1)
RUIM Label (A1)
I011*
I011*
Type Label (Level 3 /4 only)
Type Label (Level 3 /4 only)
Type Label (Level 3 /4 only)
I021
I021
I021
B Cover Blank
B Cover Blank
B Cover Blank
I022
I022
I022
Issue 1 02/2006 © 2006 Nokia Corporation Company Confidential Page 15
Page 16

1255 (RH-79)
Nokia Customer Care
Spare Parts List
Refer to the latest Service Bulletins (spare parts, SWAP units and service tools) on
the Nokia Online website for the 1255.
Note: Service Bulletins must be checked on daily basis to ensure that up-to-date
order codes are used.
Page 16 © 2006 Nokia Corporation Company Confidential Issue 1 02/2006
Page 17

1255 (RH-79)
Nokia Customer Care
Service Tools
CA-82DS Data Service Cable (USB)
This cable provides connection from the USB port
of the personal computer or notebook to the DB9
connector of the Flash Adapter.
CA-83DS Data Service Cable (Serial)
This cable provides connection from the serial
port of the personal computer or notebook to the
DB9 connector of the Flash Adapter.
SF-93 Flash Adapter
This device allows Point of Sale (POS) locations
to flash the mobile terminal.
SS-91 Domesheet Alignment Jig
This jig is used to align the adhesive domesheet
assembly onto the PWB in the proper location
during domesheet replacement.
Issue 1 02/2006 © 2006 Nokia Corporation Company Confidential Page 17
Page 18
1255 (RH-79)
Nokia Customer Care
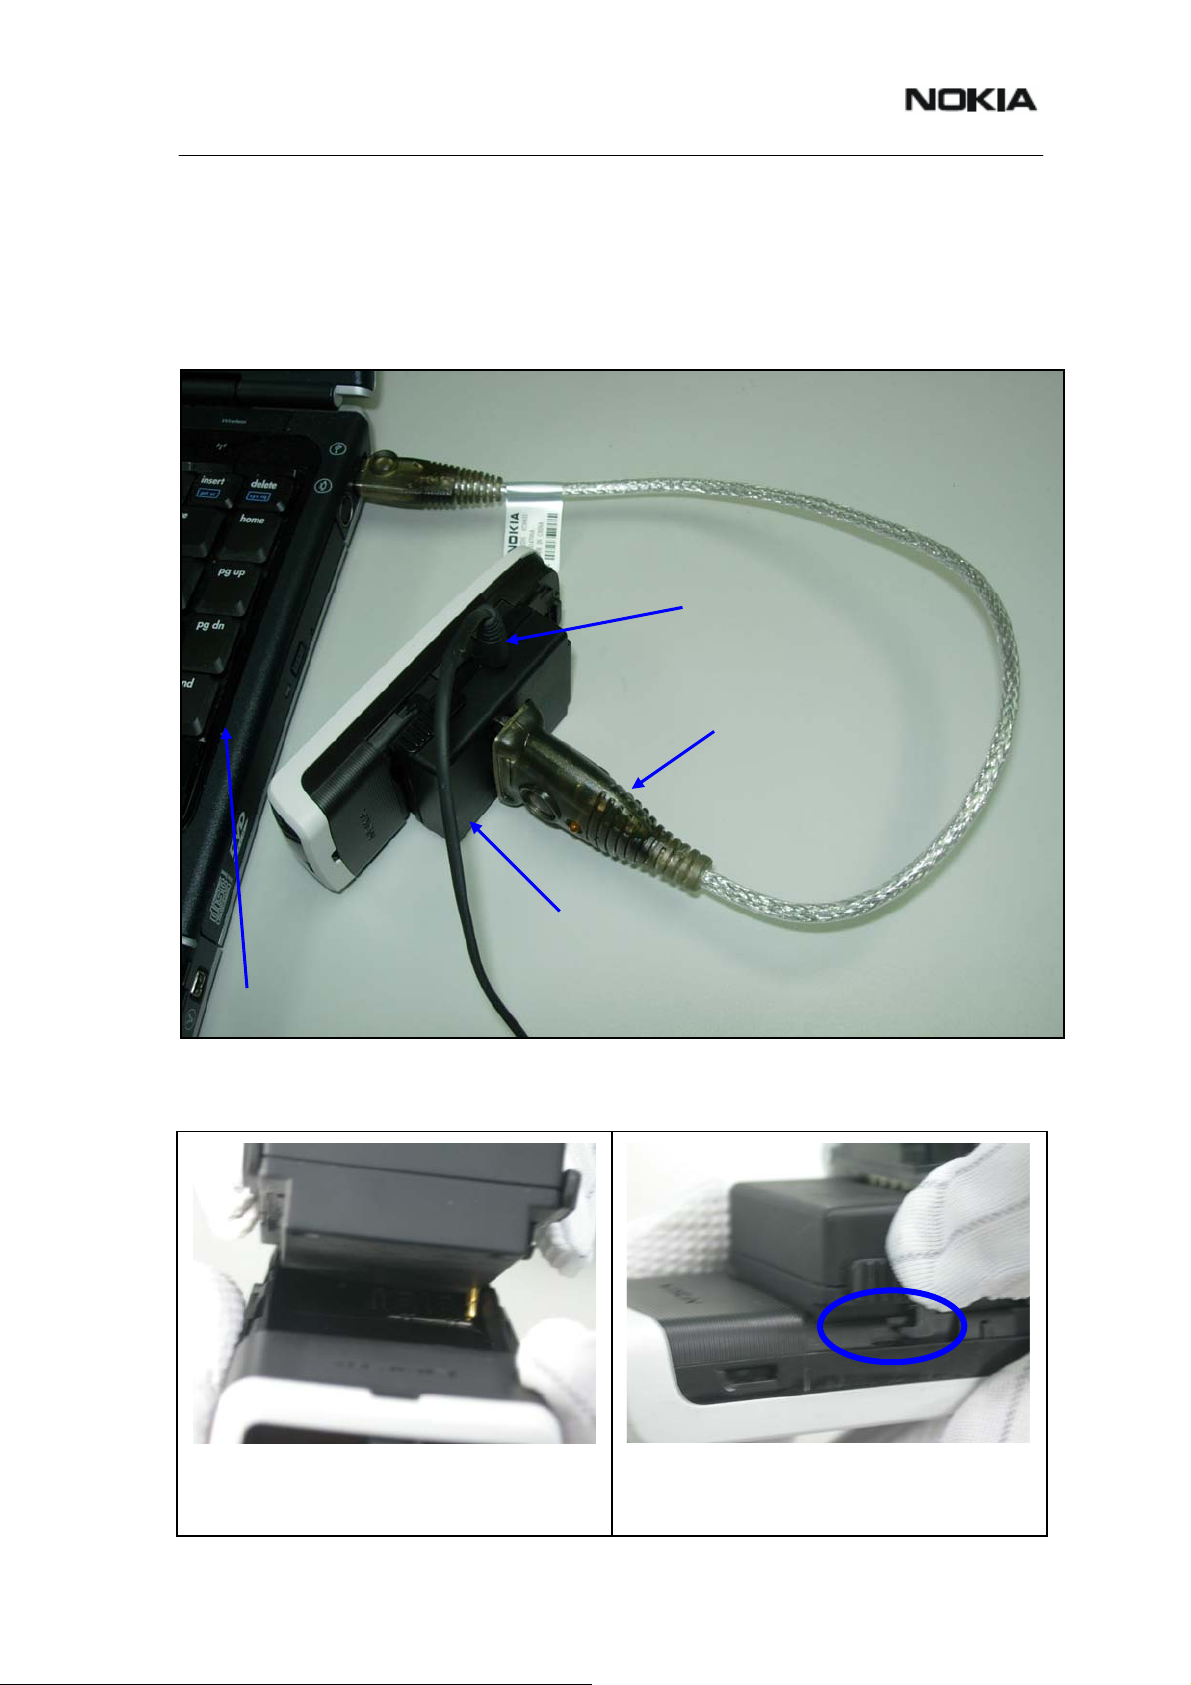
Software Update
Point of Sales Flashing
Please follow the user guide inside the sales package to use the Flash Adapter.
Check always for the latest version of flash software, which is available on NOKIA
Online.
Charger
Data Service Cable (USB)
Flash Adapter
Service SW
It is very important to follow this connection and removal procedure, otherwise, the
contact pins of the Flash Adapter will be damaged.
1. Connect the Flash Adapter to the mobile
terminal, starting from the battery connector
side.
Page 18 © 2006 Nokia Corporation Company Confidential Issue 1 02/2006
2. Press it down until the two locking tabs are
locked.
Page 19

1255 (RH-79)
Nokia Customer Care
3. Af ter flashing is finished, slide these two
locking tabs backward at the same time to
unlock them.
4. Unplug the adapter and remove it from the
mobile terminal.
Flashing function in Service Software is used for software upgrade to download
mobile terminal images from PC to target mobile terminal. Mobile terminal images
include ARMPRG, Boot Code, Application Code, Language Pack and File System.
Users only need to select the necessary images to upgrade but not all images
every time. Before the upgrade process, user can select the “automatic
backup/restore user data” function to backup or restore files of phonebook,
messages and call register, if necessary.
Flashing Instructions
z How to access Flashing screen
Click on Bundle Flashing tab.
Or select Bundle Flashing in Phone menu.
Issue 1 02/2006 © 2006 Nokia Corporation Company Confidential Page 19
Page 20

1255 (RH-79)
Nokia Customer Care
z Window displaying requirements for Bundle Flashing
z Select image files
Click button which is next to “Latest Version” to browse a folder in your PC.
Service software would automatically find the latest version bundle image in this
folder. Or click button which is next to “Bundle File Path” to browse a bundle
image file in your PC.
Note that the users can only flash file system and language pack images which
are compatible with the operator setting value of the connected phone, i.e. a
Unicom phone can’t flash Vivo’s language or file system images.
Page 20 © 2006 Nokia Corporation Company Confidential Issue 1 02/2006
Page 21

1255 (RH-79)
Nokia Customer Care
z Decide which images are to be updated
Activate or deactivate check boxes in front of the image texts to check the one
you want to update, and uncheck the one don’t need to update.
z Check the Automatic backup/restore user data or phonebook data box
z Start to upgrade
Click the Update button.
Issue 1 02/2006 © 2006 Nokia Corporation Company Confidential Page 21
Page 22

1255 (RH-79)
Nokia Customer Care
Disassembly Instructions
Dental Tool
Dental Tool
TweezersSORX T6
SRT-6
SRT-6
1. Tools for disassembly and reassembly. 2. Protect the display surface with a film.
TweezersSORX T6
3. Press the Release Button and remove the
B-cover.
5. Repeat step 4 on the other side of the mobile
terminal.
4. Place the SRT-6 into the gap between
A-cover and D-cover . Lever to separate the
snaps of A-cover and D-cover.
6. Insert the SRT-6 into the gap between
A-cover and D-cover. Slip the SRT-6 to
separate the snaps between A-cover and
D-cover.
Page 22 © 2006 Nokia Corporation Company Confidential Issue 1 02/2006
Page 23

1255 (RH-79)
Nokia Customer Care
7. Repeat step 6 on the other side of the
mobile terminal.
9. Remove the keymat.
8. Remove A-cover and take out the Engine.
3.
3.
1.
1.
5.
5.
6.
6.
10. Use a TORX T6 screwdriver to loos en and
remove the six Torx screws (T1.8x6), in the
order shown. Use torque driver set to 25Ncm
@ 700 rpm. The tolerance is +/-2Ncm. For
re-assembly, screws can be replaced in
reverse order.
2.
2.
4.
4.
11. Remove the LCD Module Shielding Assy.
12. Remove the Receiver (earpiece) from LCD
Module Shielding Assy.
Issue 1 02/2006 © 2006 Nokia Corporation Company Confidential Page 23
Page 24

1255 (RH-79)
Nokia Customer Care
13. Carefully grip both sides of the device and
gently pull out the PWB Module vertically from
D Cover As sembly.
15. Use the dental tool to remove the Vibrator. 16. Use the tweezers to remove the DC Jack.
14. Use the dental tool gently to unsnap SAM
Module and pull up to remove it from the
D-cover.
17. Use the tweezers to remove the
Microphone.
Note: The speaker is an integral part of the SAM Module to ensure optimum RF
performance and must not be replaced individually. To assemble the mobile terminal,
follow the “Disassembly Instructions” in reverse order.
Page 24 © 2006 Nokia Corporation Company Confidential Issue 1 02/2006
Page 25

1255 (RH-79)
Nokia Customer Care
Domesheet Exchange Instructions
1. Use the SRT-6 to lift the domesheet. 2. Remove the domesheet.
3. Place a new domesheet on the Domesheet
Alignment Jig.
5. Press firmly on the PWB to ensure correct
bonding of the domesheet.
4. Align the guide pins and place the PWB on
the Jig.
6. Inspect to ensure proper adhesion of
domesheet to PWB.
Note: After using the heatgun, the domesheet needs to be replaced.
Issue 1 02/2006 © 2006 Nokia Corporation Company Confidential Page 25
Page 26
1255 (RH-79)
Nokia Customer Care
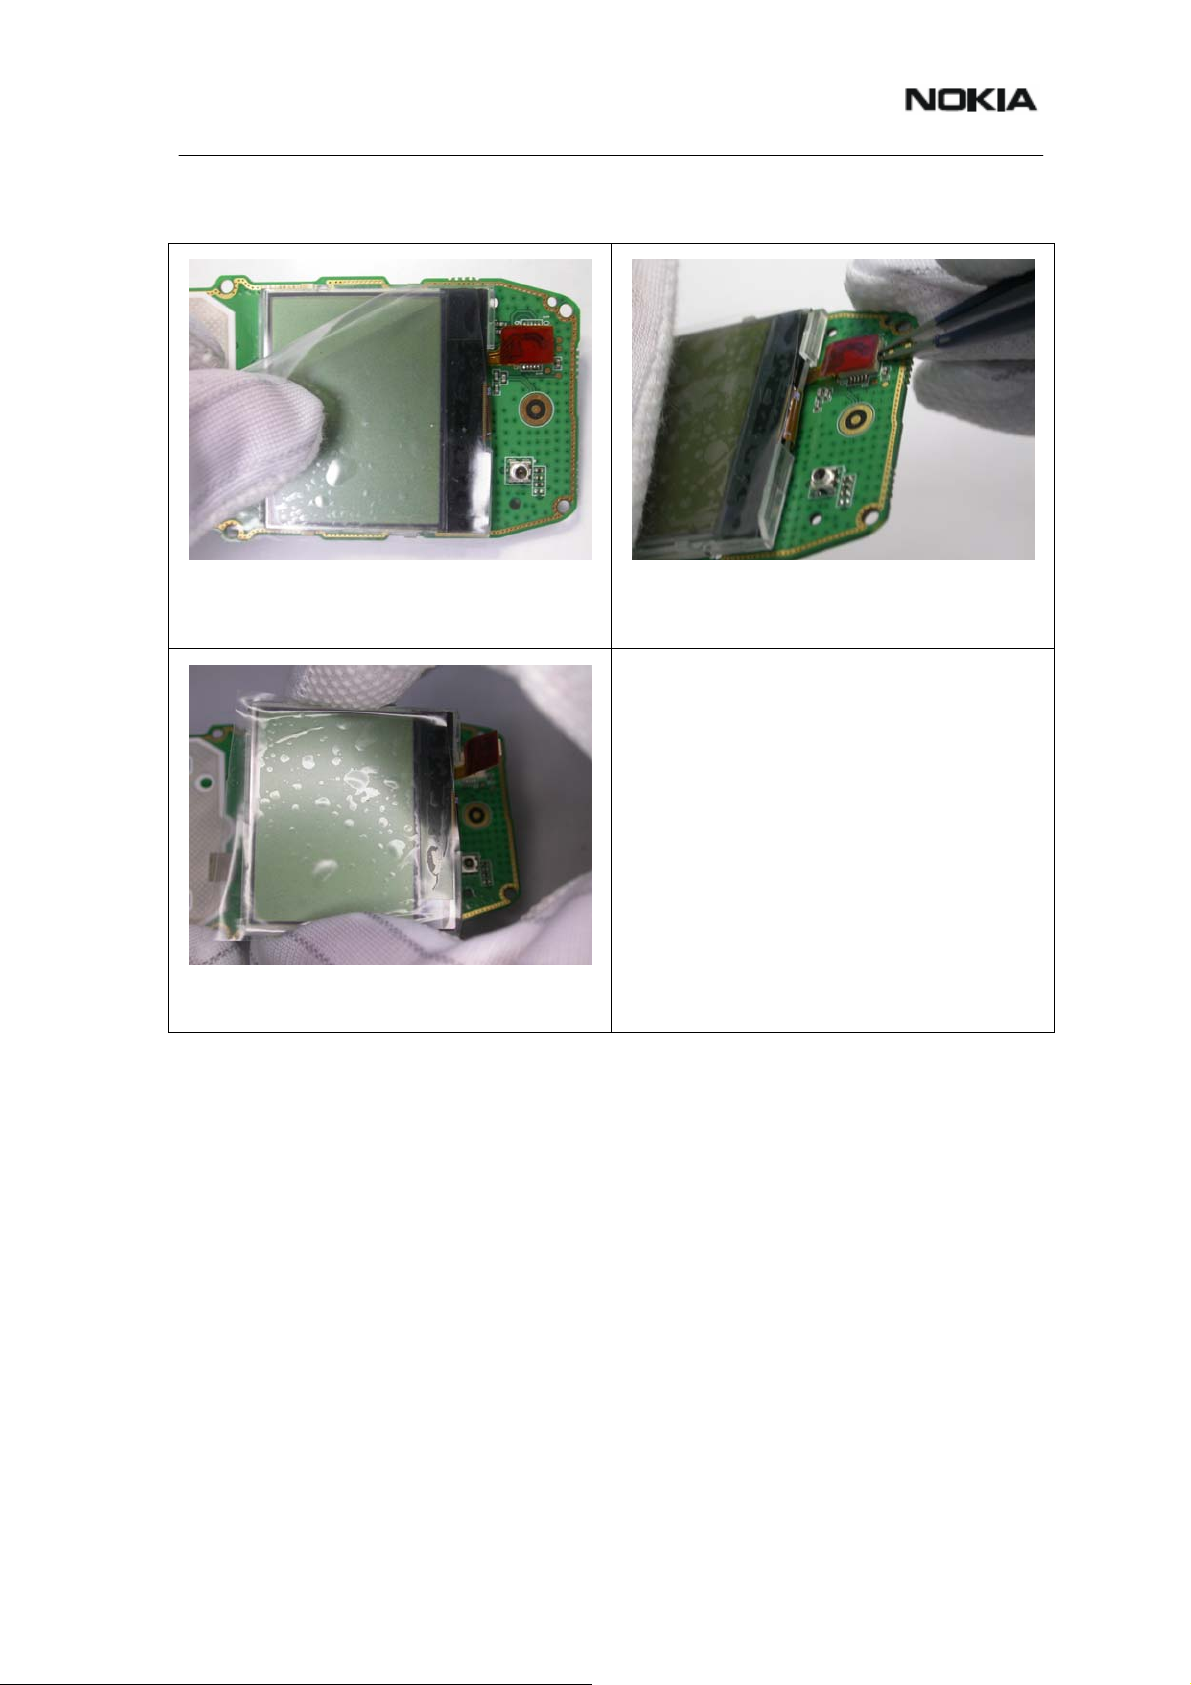
Display Exchange Instructions
1. Protect the LCD Module by covering it with a
piece of film.
3. Remove the LCD Module.
2. Disconnect the BTB connector.
Page 26 © 2006 Nokia Corporation Company Confidential Issue 1 02/2006
Page 27
1255 (RH-79)
Nokia Customer Care
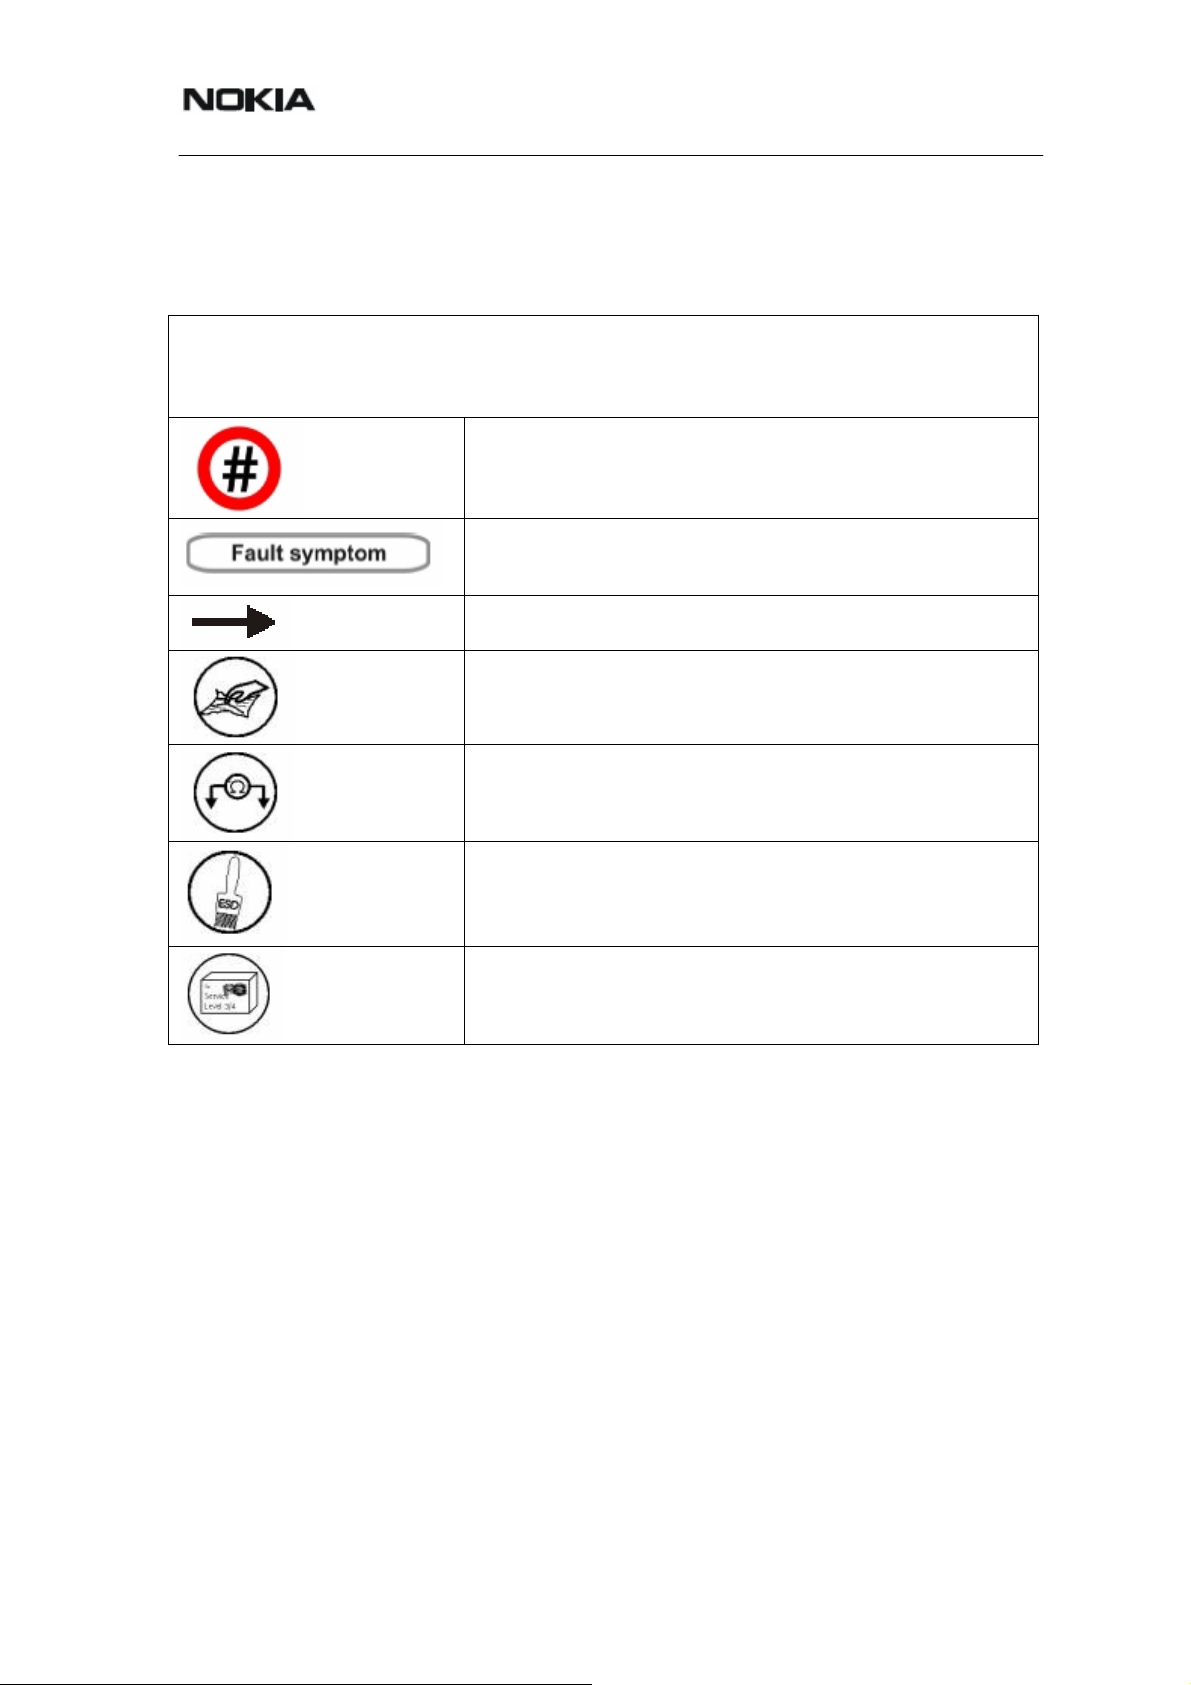
Quick Troubleshooter
Legend for Quick Troubleshooter
This legend is valid for all parts of the Quick Troubleshooter.Follow the steps until the
problem is solved. If these steps do not resolve the problem, you are not authorized to
proceed.
Only marked components can be changed.
Starting point of repair activities regarding the observed
fault symptoms.
Follow the arrows step by step.
Pads or contacts: Check optical and mechanical
condition particularly for corrosion. Clean if necessary.
Measure component for electrical functionality and
change if needed (Level 2 only).
Pads or contacts: Check optical and mechanical
condition particularly for corrosion. Clean with ESD
brush only, if necessary.
No more actions possible. Send product to the
appropriate service supplier with higher service level.
Issue 1 02/2006 © 2006 Nokia Corporation Company Confidential Page 27
Page 28
1255 (RH-79)
Nokia Customer Care
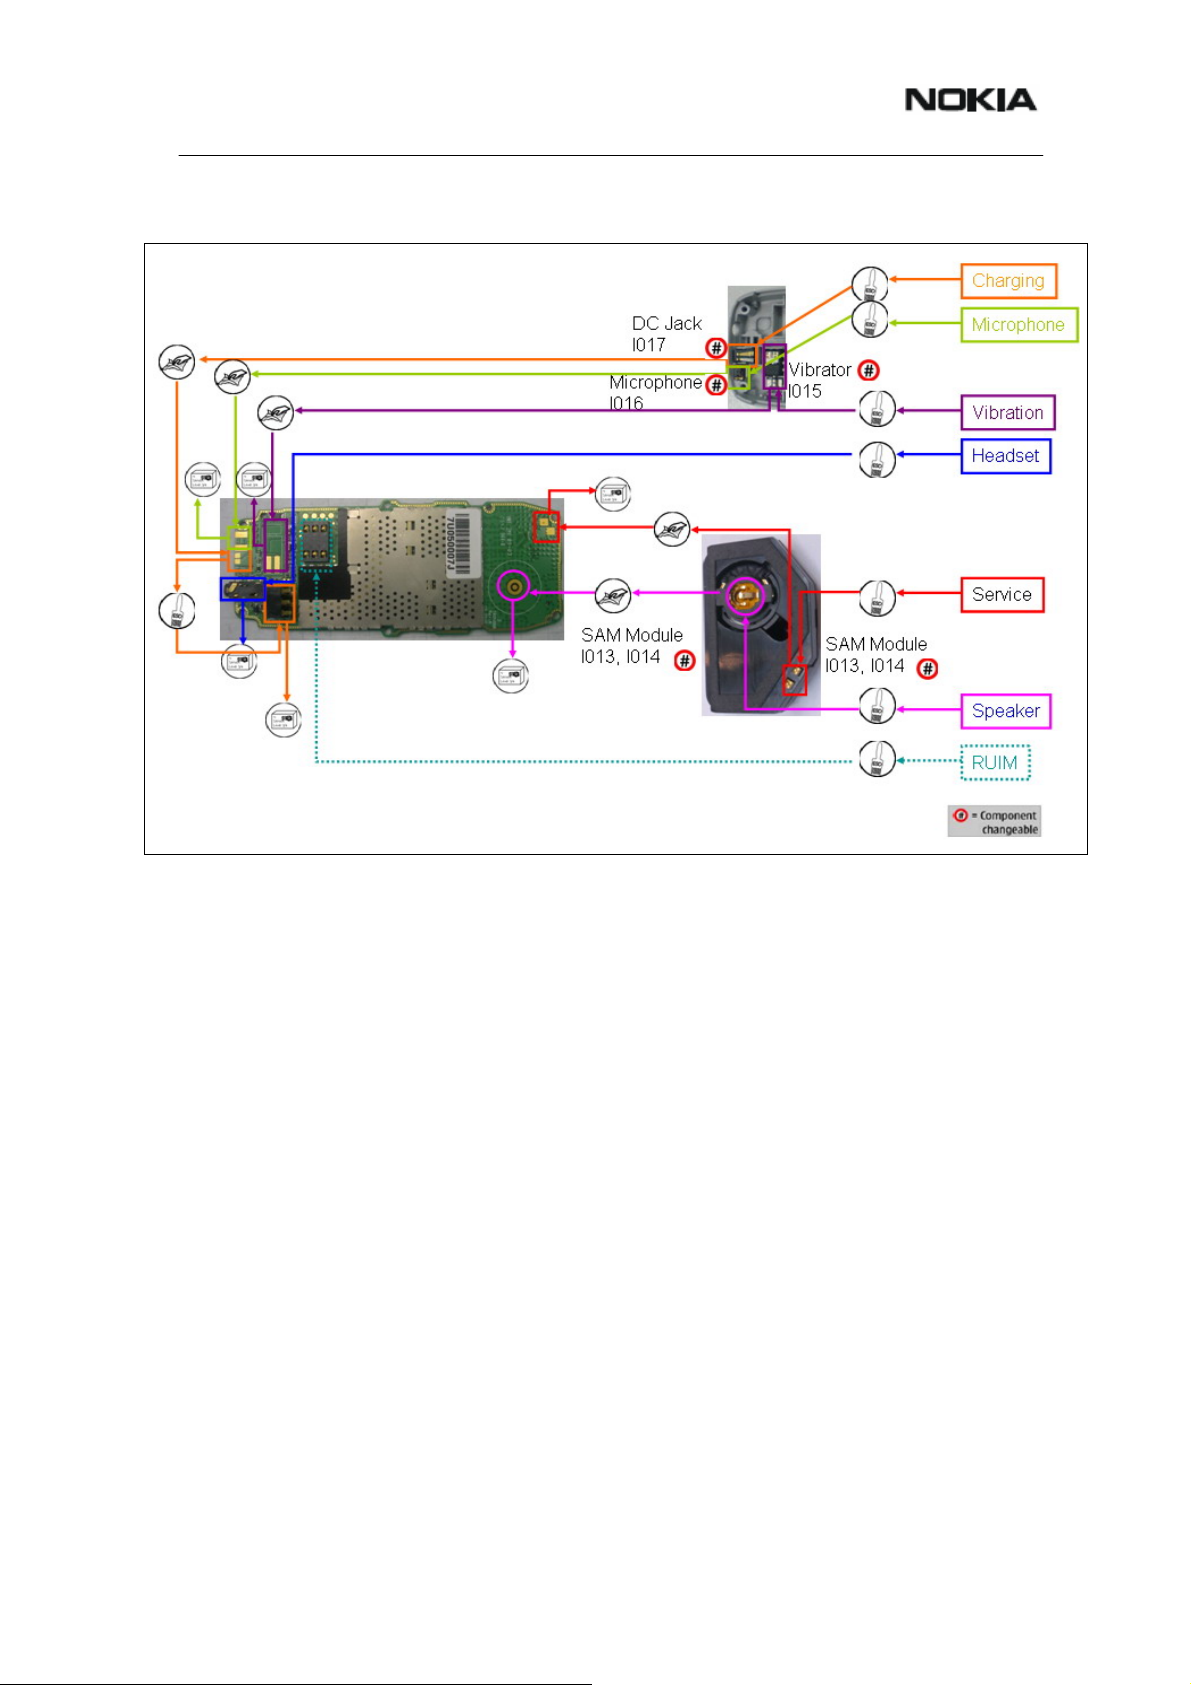
Quick Troubleshooter – Part 1
Page 28 © 2006 Nokia Corporation Company Confidential Issue 1 02/2006
Page 29

1255 (RH-79)
Nokia Customer Care
Quick Troubleshooter – Part 2
Issue 1 02/2006 © 2006 Nokia Corporation Company Confidential Page 29
Page 30

1255 (RH-79)
Nokia Customer Care
Go-No-Go Test
After a visual check, a Go-No-Go test must be carried out to guarantee the
functionality of the mobile terminal if the unit has been opened.
Battery Test
A battery tester allows you test the capacity of Nokia batteries. Refer to the
information on the Nokia Online website.
Page 30 © 2006 Nokia Corporation Company Confidential Issue 1 02/2006
Page 31

1255 (RH-79)
Nokia Customer Care
Forwarding Repairs
When forwarding the mobile terminal for repairs to a higher level service supplier
use a swap carton as shown below.
1. Always Protect the window with a protection
film.
3. Add repair documentation to the swap carton,
e.g. completed service note.
2. Put the unit under the stretch film.
4. Fold the swap carton as shown.
Note: There are two different sizes of swap cartons for common mobile terminals.
Issue 1 02/2006 © 2006 Nokia Corporation Company Confidential Page 31
Page 32
1255 (RH-79)
Nokia Customer Care
This page intentionally left blank.
Page 32 © 2006 Nokia Corporation Company Confidential Issue 1 02/2006
 Loading...