

Page 1

Nokia 1200/1208 User Guide
9207552
Issue 2
Page 2
2Contents
Contents
Safety 3
Get started 4
Insert the SIM card and battery 4
Charge the battery 4
Switch on and off 5
Your phone 6
Keys and parts 6
Main features 6
Make and answer a call 7
Write text 7
Message 8
Contacts 9
Multi-phonebook 9
Turn the flashlight on or off 9
General information 10
Accessories 10
Battery 10
Battery and charger information 10
Nokia battery authentication
guidelines 11
Taking care of your device 11
Recycle 12
Additional safety information 12
Small children 12
Operating environment 12
Medical devices 12
Vehicles 12
Potentially explosive environments 13
Emergency calls 13
Certification information (SAR) 13
© 2009 Nokia. All rights reserved.2
Page 3
Safety 3
Safety
Read these simple guidelines. Not following them may be dangerous or illegal. Read
the complete user guide for further information.
SWITCH ON SAFELY
Do not switch the device on when wireless phone use is prohibited or when
it may cause interference or danger.
ROAD SAFETY COMES FIRST
Obey all local laws. Always keep your hands free to operate the vehicle while
driving. Your first consideration while driving should be road safety.
INTERFERENCE
All wireless devices may be susceptible to interference, which could affect
performance.
SWITCH OFF IN RESTRICTED AREAS
Follow any restrictions. Switch the device off in aircraft, near medical
equipment, fuel, chemicals, or blasting areas.
QUALIFIED SERVICE
Only qualified personnel may install or repair this product.
ACCESSORIES AND BATTERIES
Use only approved accessories and batteries. Do not connect incompatible
products.
WATER-RESISTANCE
Your device is not water-resistant. Keep it dry.
© 2009 Nokia. All rights reserved. 3
Page 4
4Get started
Get started
Insert the SIM card and battery
This device is intended for use with the BL-5CA battery.
Safe removal. Always switch the device off and disconnect the charger before removing
the battery.
1 Slide the back cover downwards (1), and remove it.
2 Lift the battery, and remove it (2).
3 Carefully lift the SIM card holder, using the finger grip of the device (3). Insert the
SIM card (4). Ensure that the contact surface area is facing down and the bevelled
corner of the SIM card is on the upper right side. Close the SIM card holder, and press
it to lock it into place (5).
4 Replace the battery and back cover (6, 7).
Charge the battery
Your battery has been partially charged at the factory. If the device indicates a low
charge, do the following:
1 Connect the charger to a wall outlet.
2 Connect the charger to the device.
3 When the device indicates a full charge, disconnect the charger from the device,
then from the wall outlet.
Tip: To save energy, unplug the charger when the battery is fully charged.
© 2009 Nokia. All rights reserved.4
Page 5
Get started 5
You do not need to charge the battery for a specific length of time, and you can use the
device while it is charging. If the battery is completely discharged, it may take several
minutes before the charging indicator appears on the display or before any calls can be
made.
Switch on and off
Press and hold the end key.
Use the phone only in its normal operating position.
Your device may have internal and external antennas. Avoid touching the antenna area
unnecessarily while the antenna is transmitting or receiving. Contact with antennas
affects the communication quality and may cause a higher power level during operation
and may reduce the battery life.
© 2009 Nokia. All rights reserved. 5
Page 6
6 Your phone
Your phone
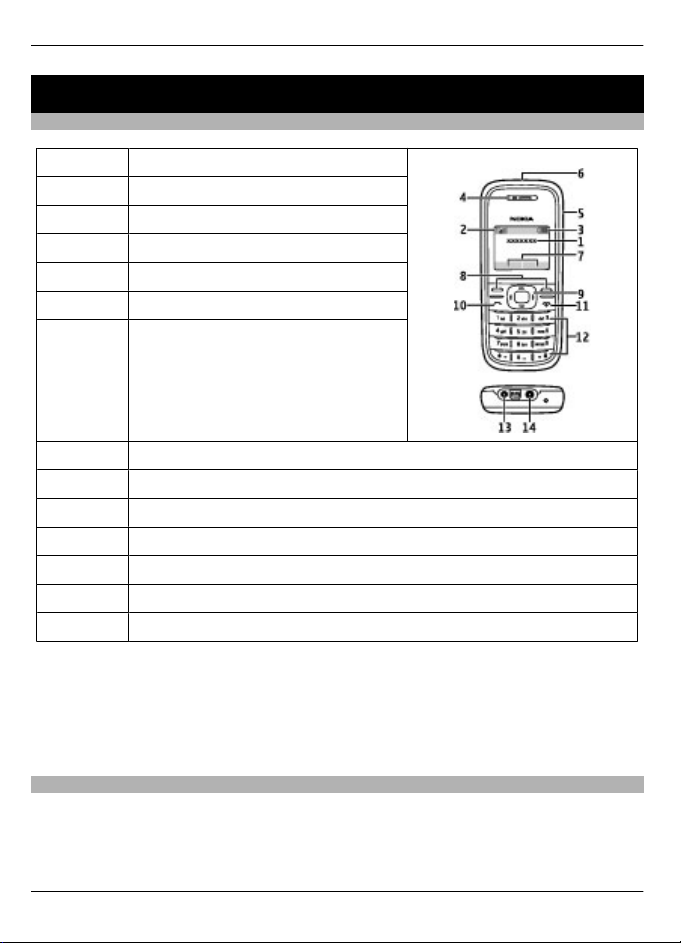
Keys and parts
1
2 Network signal strength
3 Battery charge level
4 Earpiece
5 Loudspeaker
6 Flashlight
7 Selection key functions
8 Selection keys
9 Navi™ key; hereafter referred to as scroll key
10 Call key
11 End/Power key
12 Keypad
13 Charger connector
14 Headset connector
Do not connect products that create an output signal as this may cause damage to the
device. Do not connect any voltage source to the Nokia AV Connector.
When connecting any external device or any headset, other than those approved by
Nokia for use with this device, to the Nokia AV Connector, pay special attention to volume
levels.
Network name or operator logo
Main features
Select Menu and from the following:
Messages — to create, send, open, and manage messages
Contacts — to save names and phone numbers in the SIM card and phone memory
© 2009 Nokia. All rights reserved.6
Page 7
Your phone 7
Call register — to access phone numbers of missed, received, and dialled calls
Settings — to set up various features of your phone
Alarm clock — to set the time for the alarm
Reminders — to manage reminders
Games — to set up game effects or play the games installed in your phone
Extras — to access various applications, such as the calculator or flashlight
SIM services — to use additional services, if supported by your SIM card
Make and answer a call
Make a call
Enter the phone number, including the country code and area code, if necessary, and
press the call key.
Answer a call
Press the call key.
End or reject a call
Press the end key.
Use the loudspeaker or earpiece
During a call, select Loudsp. or Hands..
Adjust the volume
During a call, scroll left or right to adjust the volume of the earpiece or headset.
Warning:
Continuous exposure to high volume may damage your hearing. Listen to music at a
moderate level, and do not hold the device near your ear when the loudspeaker is in
use.
Write text
To enter text, you can use traditional or predictive text input. Not all languages are
supported by predictive text input.
Use traditional text input
Press a key repeatedly until the desired letter is displayed.
Activate predictive text input
Select Options > Dictionary and the desired language.
© 2009 Nokia. All rights reserved. 7
Page 8
8 Your phone
Deactivate predictive text input
Select Options > Dictionary > Dictionary off.
When using predictive text input, press each key once for a single letter. If the desired
word is displayed, press 0, and start writing the next word. If ? is displayed after the
word, the word is not in the dictionary.
Change a word
Press * repeatedly until the desired word is displayed.
Add a word
Select Spell, enter the word using traditional text input, and select OK.
Add a space
Press 0.
Change text input method
Press # repeatedly, and check the indicator at the top of the display.
Add a number
Press and hold the desired number key.
Add a special character
Press * when using traditional text input; press and hold * when using predictive text
input.
Undo clearing of a message
Select Options > Undo clear.
Message
The message services can only be used if they are supported by your service provider.
Your device supports text messages beyond the limit for a single message. Longer
messages are sent as two or more messages. Your service provider may charge
accordingly. Characters with accents, other marks, or some language options take more
space, and limit the number of characters that can be sent in a single message.
Write and send a message
1 Select Menu > Messages > Create message.
2 Write the message. The message length indicator shows how many characters you
can enter in the message.
3 Select Options > Send, enter the recipient's phone number or select it from the
contacts list, and select OK.
© 2009 Nokia. All rights reserved.8
Page 9
Your phone 9
Delete messages
Select Menu > Messages > Delete messages > All read or the desired folder.
Contacts
You can save names and phone numbers in the phone and SIM card memory. The
contacts list can contain up to 200 contacts, stored in the phone memory.
Search for a contact
Scroll down in the standby mode, enter the first characters or letters of the name, and
scroll to the desired contact.
Save contacts to the contacts list
Select Menu > Contacts > Add contact.
Copy contacts between the phone and SIM card memory
Select Menu > Contacts > Copy.
Multi-phonebook
Your phone supports up to five separate phonebooks for multiple users. When the multiphonebook is activated, only the contacts in the active phonebook are visible.
A contact can belong to one or several phonebooks. The contacts in Shared contacts are
accessible from all phonebooks.
Select Menu > Contacts > Settings > Multi-Phonebook and the appropriate options.
Activate the multi-phonebook
Select Phonebook style > Multi-Phonebook.
Activate a phonebook
Select Current phonebook and the desired phonebook or Shared contacts.
Assign a contact to one or more phonebooks
Select Manage contacts and the desired contact.
Rename a phonebook
Select Rename phonebooks and the desired phonebook.
Turn the flashlight on or off
Select Menu > Extras > Flashlight.
© 2009 Nokia. All rights reserved. 9
Page 10

10 General information
General informatio n
About your device
The wireless device described in this guide is approved for
use on the GSM 850 and 1900 MHz networks. Contact your
service provider for more information about networks.
Your device may have preinstalled bookmarks and links for
third-party internet sites and may allow you to access thirdparty sites. These are not affiliated with Nokia, and Nokia
does not endorse or assume liability for them. If you access
such sites, take precautions for security or content.
Warning:
To use any features in this device, other than the alarm clock,
the device must be switched on. Do not swi tch the device on
when wireless device use may cause interference or danger.
When using this device, obey all laws and respect local
customs, privacy and legitimate rights of others, including
copyrights. Copyright protection may prevent some images,
music, and other content from being copied, modified, or
transferred.
Make back-up copies or keep a written record of all important
information stored in your device.
When connecting to any other device, read its user guide for
detailed safety instructions. Do not connect incompatible
products.
The images in this guide may differ from your device display.
Refer to the user guide for other important information about
your device.
Network services
To use the device you must have service from a wireless
service provider. Some features are not available on all
networks; other features may require that you make specific
arrangements with your service provider to use them.
Network services involve transmission of data. Check with
your service provider for details about fees in your home
network and when roaming on other networks. Your service
provider can explain what charges will apply.
Your service provider may have requested that certain
features be disable d or not activated in your device. If so,
these features will not appear on your device menu. Your
device may also have customized items such as menu names,
menu order, and icons.
Support
If you want to learn more about how to use your product or
you are unsure how your device should function, see the
support pages at www.nokia.com/sup port or your local
Nokia website, www.nokia.mobi/support (with a mobile
device), the Help application in the dev ice, or the user guide.
If this does not resolve your issue, do the following:
• Restart the device: switch off the device, and remove
the battery. After about a minute, replace the battery,
and switch on the device.
• Restore the original factory settings as explained in the
user guide.
If the issue remains unsolved, contact Nokia for repair
options.
See www.nokia.com/repair or www.nokia-
latinoamerica.com/centrosdeservicio. Before sending your
evice for repair, always back up the data in your device.
d
Accessories
Warning:
Use only batteries, chargers, and accessories approved by
Nokia for use with this particular model. The use of any other
types may invalidate any approval or guarantee, and may be
dangerous. In particular, use of unapproved chargers or
batteries may present a risk of fire, explosion, leakage, or
other hazard.
For availability of approved accessories, please check with
your dealer. When you disconnect the power cord of any
accessory, grasp and pull the plug, not the cord.
Battery
Battery and charger information
Your device is powered by a rechargeable battery. The battery
intended for use with this device is BL-5CA. Nokia may make
additional battery models available for this device. This
device is intended for use when supplied with power from
the following chargers: AC-3
may vary depending on the type of plug. The plug variant is
identified by one of the following: E, EB, X, AR, U, A, C, K, or
UB.
The battery can be charged and discharged hundreds of
times, but it will eventually wear out. When the talk and
standby times are noticeably shorter than normal, replace the
battery. Use only Nokia approved batteries, and recharge
your battery only with Nokia approved chargers designated
for this device.
If a battery is being used for the first time or if the battery has
not been used for a prolonge d period, it may be necessary to
connect the charger, then disconnect and reconnect it to
begin charging the battery. If the battery is completely
discharged, it may take several minutes before the charging
indicator appears on the display or before any calls can be
made.
. The exact charger model number
© 2009 Nokia. All rights reserved.10
Page 11

Taking care of your device 11
Safe removal. Always switch the device off and disconnect the
charger before removing the battery.
Proper charging. Unplug the charger from the electrical plug
and the device when not in use. Do not leave a fully charged
battery connected to a charger, since overcharging may
shorten its lifetime. If left unused, a fully charged battery will
lose its charge over time.
Avoid extreme temperatures. Always try to keep the battery
between 59°F and 77°F (15°C and 25°C). Extreme
temperatures reduce the capacity and lifetime of the battery.
A device with a hot or cold battery may not work temporarily.
Battery performance is particularly limited in temperatures
well below freezing.
Do not short-circuit. Accidental short-circuiting can occur
when a metallic object such as a coin, clip, or pen causes direct
connection of the positive (+) and negative (-) terminals of
the battery. (These look like metal strips on the battery.) This
might happen, for example, when you carry a spare battery
in your pocket or purse. Short-circuiting the terminals may
damage the battery or the connecting object.
Disposal. Do not dispose of batteries in a fire as they may
explode. Dispose of batteries according to local regulations.
Please recycle when possible. Do not dispose as household
waste.
Leak. Do not dismantle, cut, open, crush, bend, puncture, or
shred cells or batteries. In the event of a battery leak, prevent
battery liquid contac t with skin or eyes. If this happen s, flush
the affected areas immediately with water, or seek medical
help.
Damage. Do not modify, remanufacture, attempt to insert
foreign objects into the battery or immerse or expose it to
water or other liquids. Batteries may explode if damaged.
Correct use. Use the battery only for its intended purpose.
Improper battery use may result in a fire, explosion, or other
hazard. If the device or battery is dropped, especially on a
hard surface, and you believe the battery has been damaged,
take it to a service center for inspection before continuing to
use it. Never use any charger or battery that is damaged. Keep
your battery out of the reach of small children.
Nokia battery authentication guidelines
Always use original Nokia batteries for your safety. To check
that you are getting an original Nokia battery, purchase it
from a Nokia authorized service center or dealer, and inspect
the hologram label using the following steps:
Authenticate hologram
1 When you look at the hologram on the label, you should
see the Nokia connecting hands symbol from one angle
and the Nokia Original Enhancements logo when
looking from another angle.
2 When you angle the hologram left, right, down and up,
you should see 1, 2, 3 and 4 dots on each side
respectively.
Successful compl etion of the steps is not a total assu rance of
the authenticity of the battery. If you cannot confirm
authenticity or if you have any reason to believe that your
Nokia battery with the hologram on the label is not an
authentic Nokia battery, you should refrain from using it, and
take it to the nearest Nokia authorized service center or
dealer for assistance.
For additional information, refer to the warranty and
reference leaflet included with your Nokia device.
Taking care of your device
Your device is a produ ct of superior design and crafts manship
and should be treated with care. The following suggestions
will help you protect your warranty coverage.
• Keep the device dry. Precipitation, humidity, and all
types of liquids or moisture can contain minerals that
will corrode electronic circuits. If your device does get
wet, remove the battery, and allow the device to dry
completely before replacing it.
© 2009 Nokia. All rights reserved. 11
Page 12

12 Additional safety information
• Do not use or store the device in dusty, dirty areas. Its
moving parts and electronic components can be
damaged.
• Do not store the device in high o r cold temperatyre.
High temperatures can shorten the life of electronic
devices, damage batteries, and warp or melt certain
plastics. When the device warms to its normal
temperature from a cold temperature, moisture can
form inside the device and damage electronic circuit
boards.
• Do not attempt to open the device other than as
instructed in this guide.
• Do not drop, knock, or shake the device. Rough
handling can break internal circuit boards and fine
mechanics.
• Do not use harsh chemicals, cleaning solvents, or strong
detergents to clean the device. Only use a soft, clean,
dry cloth to clean the surface of the device.
• Do not paint the device. Pa int can clog the moving parts
and prevent proper operation.
• Use only the supplied or an approved replacement
antenna. Unauthorized antennas, modifications, or
attachments could damage the device and may violate
regulations governing radio devices.
• Use chargers indoors.
• Backup all data you want to keep, such as contacts and
calendar notes.
• To reset the device from time to time for opti mum
performance, power off the device and remove the
battery.
These suggestions apply equally to your device, battery,
charger, or any accessory.
Recycle
Always return your used electronic products, batteries, and
packaging materials to dedicated collection points. This way
you help prevent uncontrolled waste disposal and promote
the recycling of materials. Check product environmental
information and how to recycle your Nokia products at
www.nokia.com/werecycle, or www.nokia.mobi/werecycle.
Additional safety information
The surface of this device is nickel-free.
Small children
Your device and its accessories are not toys. They may contain
small parts. Keep them out of the reach of small children.
Operating environment
This device meets RF exposure guidelines in the normal use
position at the ear or at least 2.2 centimeters (7/8 inch) away
from the body. Any carry case, belt clip, or holder for body-
worn operation should not contain metal and should position
the device the above-stated distance from your body.
To send data files or messages requires a quality connection
to the network. Data files or messages may be delayed until
such a connection is available. Follow the separation distance
instructions until the transmission is completed.
Parts of the device are magnetic. Metallic materials may be
attracted to the device. Do not place credit cards or other
magnetic storage media near the device, because
information stored on them may be erased.
Medical devices
Operation of radio transmitting equipment, including
wireless phones, may interfere with the function of
inadequately protected medical devices. Consult a physician
or the manufacturer of the medical device to determine
whether they are adequately shielded from external RF
energy. Switch off your device when regulations posted
instruct you to do so. Hospitals or health care facilities may
use equipment sensitive to external RF energy.
Implanted medical devices
Manufacturers of medical devices recommend a minimum
separation of 15.3 centimeters (6 inches) between a wireless
device and an implanted medical device, such as a pacemaker
or implanted cardioverter defibrillator, to avoid potential
interference with the medical device. Persons who have such
devices should:
• Always keep the wireless device more than 15.3
centimeters (6 inches) from the medical device.
• Not carry the wireless device in a breast pocket.
• Hold the wireless device to the ear opposite the medical
device.
• Turn the wireless device off if there is any reason to
suspect that interference is taking place.
• Follow the manufacturer directions for the implanted
medical device.
If you have any questions about using your wireless device
with an implanted medical device, consult your health care
provider.
Hearing aids
Some digital wireless devices may interfere with some
hearing aids.
Vehicles
RF signals may affect improperly installed or inadequately
shielded electronic systems in motor vehicles such as
electronic fuel injection, electronic antilock braking,
electronic speed control, and air bag systems. For more
© 2009 Nokia. All rights reserved.12
Page 13

Additional safety information 13
information, check with the manufacturer of your vehicle or
its equipment.
Only qualified personnel should service the device or install
the device in a vehicle. Faulty installation or service may be
dangerous and may invalidate your warranty. Check regularly
that all wireless device equipment in your vehicle is mounted
and operating properly. Do not store or carry flammable
liquids, gases, or explosive materials in the same
compartment as the device, its parts, or accessories.
Remember that air bags inflate with great force. Do not place
your device or accessories in the air bag deployment area.
Switch off your device before boarding an aircraft. The use o f
wireless teledevices in an aircraft may be dangerous to the
operation of the aircraft and may be illegal.
Potentially explosive environments
Switch off your device in any area with a potentially explosive
atmosphere. Obey all posted instructions. Sparks in such
areas could cause an explosion or fire resulting in bodily
injury or death. Switch off the device at refueling points such
as near gas pumps at service stations. Observe restrictions in
fuel depots, storage, and distribution areas; chemical plants;
or where blasting operations are in progress. Areas with a
potentially explosive atmosphere are often, but not always,
clearly marked. They include areas where you would be
advised to turn off your vehicle engine, below deck on boats,
chemical transfer or storage facilities and where the air
contains chemicals or particles such as grain, dust, or metal
powders. You should check with the manufacturers of
vehicles using liquefied petroleum gas (such as propane or
butane) to determine if this device can be safely used in their
vicinity.
Emergency calls
Important: This device operates using radio signals,
wireless networks, landline networks and user-programmed
functions. If your device supports voice calls over the internet
(internet calls), activate both the internet calls and the
cellular phone. The device may attempt to make emergency
calls over both the cellular networks and through your
internet call provi der if both are activated. Connections in all
conditions cannot be guaranteed. You should never rely
solely on any wireless device for essential communications
like medical emergencies.
To make an emergency call:
1 If the device is not on, switch it on. Check for adequate
signal strength. Depending on your device, you may
also need to complete the following:
• Insert a SIM card if your device uses one.
• Remove certain call restrictions you have
activated in your device.
• Change your profile from Offline or Flight profile
to an active profile.
2 Press the end key as many times as needed to clear the
display and ready the device for calls.
3 Enter the official emergency number for your present
location. Emergency numbers vary by location.
4Press the call key.
When making an emergency call, give all the necessary
information as accurately as possible. Your wireless device
may be the only me ans of communication at the scene of an
accident. Do not end the call until given permission to do so.
Certification information (SAR)
This mobile device meets guidelines for exposure to
radio waves.
Your mobile device is a radio transmitter and receiver. It is
designed not to exceed the limits for exposure to radio waves
recommended by international guidelines. These guidelines
were developed by the independent scientific organization
ICNIRP and include safety margins designed to assure the
protection of all persons, regardless of age and health.
The exposure guidelines fo r mobile devices employ a unit of
measurement known as the Sp ecific Absorption Rate or SAR.
The SAR limit stated in the ICNIRP guidelines is 2.0 watts/
kilogram (W/kg) averaged over 10 grams of tissue. Tests for
SAR are conducted using standard operating positions with
the device transmitting at its highest certified power level in
all tested frequency bands. The actual SAR level of an
operating device can be below the maximum value because
the device is designed to use only the power required to reach
the network. That amount changes depending on a number
of factors such as how close you are to a network base station.
The highest SAR value under the ICNIRP guidelines for use of
the device at the ear is 0.81 W/kg
se of device accessories may result in different SAR values.
U
SAR values may vary depending on national reporting and
testing requirements and the network band. Additional SAR
information may be provided under product information at
www.nokia.com.
Your mobile device is also designed to meet the requirements
for exposure to radio waves established by the Federal
Communications Commission (USA) and Industry Canada.
These requirements set a SAR limit of 1.6 W/kg averaged over
one gram of tissue. The highest SAR value reported under this
standard during product certification for use at the ear is 1.15
W/kg and when properly worn on the body is 0.60 W/kg
.
.
© 2009 Nokia. All rights reserved. 13
Page 14

14
© 2009 Nokia. All rights reserved.
Nokia, Nokia Connecting People, and Navi are trademarks or
registered trademarks of Nokia Corporation. Nokia tune is a
sound mark of Nokia Corporation. Other product and
company names mentioned herein may be trademarks or
tradenames of their respective owners.
Reproduction, transfer, distribution, or storage of part or all
of the contents in this doc ument in any form without the prio r
written permission of Nokia is prohibited. Nokia operates a
policy of continuous development. Nokia reserves the right
to make changes and improvements to any of the products
described in this document without prior notice.
TO THE MAXIMUM EXTENT PERMITTED BY APPLICABLE LAW,
UNDER NO CIRCUMSTANCES SHALL NOKIA OR ANY OF ITS
LICENSORS BE RESPONSIBLE FO R ANY LOSS OF DATA OR INCOME
OR ANY SPECIAL, INCIDENTAL, CONSEQUENTIAL OR INDIRECT
DAMAGES HOWSOEVER CAUSED.
THE CONTENTS OF THIS DOCUMENT ARE PROVIDED "AS IS".
EXCEPT AS REQUIRED BY APPLICABLE LAW, NO WARRANTIES OF
ANY KIND, EITHER EXPRESS OR IMPLIED, INCLUDING, BUT NOT
LIMITED TO, THE IMPLIED WARRANTIES OF MERCHANTABILITY
AND FITNESS FOR A PARTICULAR PURPOSE, ARE MADE IN
RELATION TO THE ACCURACY, RELIABILITY OR CONTENTS OF THIS
DOCUMENT. NOKIA RESERVES THE RIGHT TO REVISE THIS
DOCUMENT OR WITHDRAW IT AT ANY TIME WITHOUT PRIOR
NOTICE.
The availability of particular products and applications and
services for these products may vary by region. Please check
with your Nokia dealer for details and availability of language
options. This device may contain commodities, technology or
software subject to export laws and regulations from the US
and other countries. Diversion contrary to law is prohibited.
The following FCC/IND USTRY CANADA NOTICE is for RH-100 an d
RH-106 only.
FCC/INDUSTRY CANADA NOTICE
Your device may cause TV or radio interference (for example,
when using a telephone in close proximity to receiving
equipment). The FCC or Industry Canada can require you to
stop using your telephone if such interference cannot be
eliminated. If you require assistance, contact your local
service facility. This device complies with part 15 of the FCC
rules. Operation is subject to the following two conditions:
(1) This device may not cause harmful interference, and (2)
this device must accept any interference received, including
interference that may cause undesired operation. Any
changes or modifications not expressly approved by Nokia
could void the user's authority to operate this equipment.
Issue 2 EN-US
Page 15

Guide d'utilisation du Nokia 1200/1208
9205626 - UG
Version 2
Page 16

2Table des matières
Table des matières
Sécurité 3
Avant de commencer 4
Insérer la carte SIM et la pile 4
Charger la pile 4
Allumer et éteindre l'appareil 5
Votre téléphone 6
Touches et composants 6
Fonctions principales 6
Faire et recevoir des appels 7
Écrire du texte 7
Message 8
Contacts 9
Répertoires téléphoniques
multiples 9
Allumer ou éteindre la torche 10
Renseignements généraux 11
Accessoires 11
Pile 11
Renseignements concernant la pile et
les chargeurs 11
Identification des piles d'origine de
Nokia 12
Soins à apporter à votre appareil 13
Recyclage 13
Renseignements sur la certification
(SAR) 15
Renseignements supplémentaires
concernant la sécurité 13
Jeunes enfants 13
Environnement d'utilisation 13
Appareils médicaux 13
Véhicules 14
Environnements à risques
d’explosion 14
Appels d'urgence 14
© 2009 Nokia. Tous droits réservés.2
Page 17

Sécurité 3
Sécurité
Veuillez lire ces consignes de sécurité. Il peut s’avérer dangereux, voire illégal, de ne
pas s’y conformer. Pour de l'information plus détaillée, lisez le guide d'utilisation au
complet.
ALLUMEZ VOTRE APPAREIL AVEC DISCERNEMENT
N'allumez pas l'appareil lorsque l'utilisation des téléphones sans fil est
interdite ou si elle risque de provoquer des interférences ou de présenter un
danger.
LA SÉCURITÉ ROUTIÈRE AVANT TOUT
Respectez toutes les lois locales en vigueur. Gardez toujours les mains libres
pour conduire votre véhicule. La sécurité routière est la première
responsabilité du conducteur.
INTERFÉRENCES
Tous les appareils sans fil sont sensibles aux interférences qui risquent de
perturber leur fonctionnement.
ÉTEIGNEZ VOTRE APPAREIL DANS LES ZONES RÉGLEMENTÉES
Conformez-vous à toutes les restrictions en vigueur. Éteignez votre appareil
dans les avions et à proximité d'équipements médicaux, de réservoirs
d'essence, de produits chimiques et de zones de dynamitage.
TECHNICIENS QUALIFIÉS
Ne confiez l'installation ou la réparation de ce produit qu'à des techniciens
qualifiés.
ACCESSOIRES ET PILES
Utilisez uniquement des accessoires et des piles approuvés. Ne connectez
jamais d’appareils incompatibles.
RÉSISTANCE À L'EAU
Votre appareil n'est pas imperméable. Gardez-le au sec.
© 2009 Nokia. Tous droits réservés. 3
Page 18

4 Avant de commencer
Avant de commencer
Insérer la carte SIM et la pile
Ce téléphone a été conçu pour être utilisé avec une pile de type BL-5CA.
Retrait sécuritaire. Il faut toujours éteindre l’appareil et débrancher le chargeur avant
d'enlever la pile.
1 Faites glisser la façade arrière vers le bas (1), puis retirez-la.
2 Soulevez la pile et retirez-la (2).
3 Soulevez délicatement le support de la carte SIM à l'aide de l'alvéole de l'appareil
(3). Insérez la carte SIM (4). Assurez-vous que la surface de contact est tournée vers
le bas et que le coin biseauté d e l a ca r te SI M se t ro u ve du côté supérieur droit. Fermez
le support de la carte SIM, puis appuyez pour le verrouiller en place (5).
4 Remettez en place la pile et la façade arrière (6, 7).
Charger la pile
La pile est partiellement chargée lors de sa fabrication. Si l'appareil indique que la
charge est faible, procédez comme suit :
1 Branchez le chargeur dans une prise de courant.
2 Branchez le chargeur à l'appareil.
3 Lorsque l'appareil indique que la charge est terminée, débranchez le chargeur de
l'appareil, puis débranchez le chargeur de la prise de courant.
© 2009 Nokia. Tous droits réservés.4
Page 19

Avant de commencer 5
Astuce : Pour économiser l'électricité, débranchez le chargeur lorsque la pile est
complètement rechargée.
Il n'est pas nécessaire de charger la pile pendant une durée précise, et vous pouvez
utiliser l'appareil pendant la charge. Si la pile est complètement déchargée, quelques
minutes peuvent s'écouler avant que l’indicateur de charge ne s'affiche à l’écran et que
vous puissiez faire des appels.
Allumer et éteindre l'appareil
Maintenez enfoncée la touche de fin.
Utilisez toujours le téléphone dans sa position de fonctionnement normale.
Il se peut que votre appareil soit doté d'une antenne interne et d'une antenne externe.
Évitez de toucher inutilement l’antenne lorsque l’appareil est allumé. Le contact avec
l'antenne altère la qualité de la communication et peut entraîner une consommation
excessive d'énergie, ce qui a pour effet de diminuer la durée de la pile.
© 2009 Nokia. Tous droits réservés. 5
Page 20

6 Votre téléphone
Votre téléphone
Touches et composants
1
2 Force du signal réseau
3 Niveau de charge de la pile
4 Écouteur
5 Haut-parleur
6 Torche
7 Fonctions de la touche de sélection
8 Touches de sélection
9 Touche NaviMC, appelée touche de navigation dans ce document
10 Touche de conversation
11 Touche de fin/interrupteur
12 Clavier
13 Prise du chargeur
14 Prise pour écouteur
Ne connectez pas à votre appareil des produits qui émettent des signaux, car cela risque
d'endommager ce dernier. Ne branchez aucune source d'électricité au connecteur AV
Nokia.
Lorsque vous branchez des appareils externes ou des écouteurs dans le connecteur AV
(autres que ceux approuvés par Nokia pour cet appareil), portez une attention
particulière au volume.
Nom du réseau ou logo d'opérateur
Fonctions principales
Sélectionnez Menu, puis choisissez parmi les options suivantes:
Messages — Pour rédiger, envoyer, ouvrir et gérer les messages.
© 2009 Nokia. Tous droits réservés.6
Page 21

Votre téléphone 7
Contacts — Pour enregistrer des noms et des numéros de téléphone sur la carte SIM
et dans la mémoire de l'appareil.
Journal d'appels — Pour accéder aux numéros de téléphones correspondant aux
appels manqués, reçus et composés.
Paramètres — Pour configurer divers paramètres de votre téléphone.
Alarme — Pour régler l'heure du réveil.
Rappels — Pour configurer des rappels.
Jeux — configurer les effets des jeux installés sur votre appareil et pour y jouer.
Extras — Pour accéder à diverses applications, par exemple la calculatrice ou la torche.
Services SIM — Pour utiliser des services supplémentaires, s'ils sont pris en charge par
votre carte SIM.
Faire et recevoir des appels
Faire un appel
Entrez le numéro de téléphone (précédé de l'indicatif du pays et l'indicatif régional, si
nécessaire), puis appuyez sur la touche de conversation.
Répondre à un appel
Appuyez sur la touche de conversation.
Terminer ou rejeter un appel
Appuyez sur la touche de fin.
Utiliser le haut-parleur ou l'écouteur
Durant un appel, sélectionnez Haut-p. ou Combin..
Régler le volume
Durant un appel, appuyez sur la gauche ou la droite de la touche de défilement pour
régler le volume de l'écouteur.
Avertissement :
L’exposition continue à un volume élevé peut entraîner des troubles de l’ouïe. Écoutez
de la musique à un volume modéré et ne tenez pas l’appareil contre votre oreille lorsque
le haut-parleur est activé.
Écrire du texte
Pour entrer du texte, vous pouvez utiliser les modes de texte normal ou prédictif. Le
mode de texte prédictif n'est pas offert dans toutes les langues.
© 2009 Nokia. Tous droits réservés. 7
Page 22

8 Votre téléphone
Utiliser le mode de texte normal
Appuyez autant de fois que nécessaire sur une touche jusqu'à ce que la lettre désirée
soit affichée.
Activer le mode de texte prédictif
Sélectionnez Options > Dictionnaire, puis la langue désirée.
Désactiver le mode de texte prédictif
Sélectionnez Options > Dictionnaire > Dict. désactivé.
Pour entrer du texte avec le mode de texte prédictif, appuyez une seule fois sur chaque
touche correspondant aux lettres voulues. Si le mot recherché s'affiche, appuyez sur 0,
puis commencez à écrire le mot suivant. Si un point d'interrogation s'affiche après le
mot que vous avez entré, c'est qu'il est absent du dictionnaire.
Changer un mot
Appuyez plusieurs fois sur *, jusqu'à ce que le mot recherché s'affiche.
Ajouter un mot
Sélectionnez Épeler, entrez le mot à l'aide du mode d'entrée normal, puis sélectionnez
OK.
Ajouter une espace
Appuyez sur 0.
Changer le mode de texte
Appuyez plusieurs fois sur # et vérifiez l'indicateur dans le haut de l'écran.
Ajouter un chiffre
Maintenez enfoncée la touche numérique désirée.
Ajouter un caractère spécial
Appuyez sur * lorsque vous utilisez le mode de texte normal; maintenez enfoncée la
touche * lorsque vous utilisez le mode de texte prédictif.
Annuler l'effacement d'un message
Sélectionnez Opt. > Annuler effacer.
Message
Les services de messagerie ne peuvent être utilisés que s'ils sont pris en charge par votre
fournisseur de services.
© 2009 Nokia. Tous droits réservés.8
Page 23

Votre téléphone 9
Votre téléphone peut envoyer des messages texte qui dépassent la limite normale de
caractères par message. Le cas échéant, les messages qui dépassent la limite sont
envoyés en plusieurs parties. Il se peut que votre fournisseur de services vous facture
le nombre de messages utilisés. Les caractères comportant des accents ou d’autres
marques et les options requises pour certaines langues prennent plus d'espace, ce qui
limite le nombre de caractères pouvant être insérés dans un seul message.
Rédiger et envoyer un message
1 Sélectionnez Menu > Messages > Écrire message.
2 Rédigez le message. L'indicateur de longueur de message vous indique combien de
caractères vous pouvez ajouter.
3 Sélectionnez Options > Envoyer, entrez le numéro de téléphone du destinataire
ou sélectionnez-le dans la liste de contacts, puis sélectionnez OK.
Supprimer des messages
Sélectionnez Menu > Messages > Supprimer les messages > Tous lus ou le dossier
désiré.
Contacts
Votre téléphone vous permet d'enregistrer des noms et des numéros de téléphone dans
la mémoire interne de l'appareil et dans celle de la carte SIM. Le répertoire de contacts
permet d'enregistrer jusqu'à 200 entrées dans la mémoire du téléphone.
Rechercher un contact
À partir de l'écran de démarrage, appuyez sur le bas de la touche de défilement et entrez
les premières lettres du nom, puis sélectionnez le contact désiré.
Enregistrer des contacts dans la liste de contacts
Sélectionnez Menu > Contacts > Ajouter contact.
Copier des contacts entre la mémoire du téléphone et la carte SIM
Sélectionnez Menu > Contacts > Copier.
Répertoires téléphoniques multiples
Votre appareil prend en charge jusqu'à cinq répertoires de contacts pour accommoder
plusieurs utilisateurs. Lorsque l'option de répertoires téléphoniques multiples est
activée, seuls les contacts du répertoire actif sont visibles.
Un contact peut appartenir à un ou à plusieurs répertoires. Les contacts du répertoire
Cont. partagé sont accessibles à partir de tous les répertoires.
Sélectionnez Menu > Contacts > Paramètres > Répertoires téléphoniques
multiples, puis les options appropriées.
© 2009 Nokia. Tous droits réservés. 9
Page 24

10 Votre téléphone
Activer les répertoires téléphoniques multiples
Sélectionnez Style de réper-toire téléph. > Rép. multiples.
Activer un répertoire téléphonique
Sélectionnez Répertoire télé-phonique actuel, puis le répertoire téléphonique désiré
ou Cont. partagé.
Assigner un contact à un ou plusieurs répertoires téléphoniques
Sélectionnez Gérer les contacts, puis le contact désiré.
Renommer un répertoire téléphonique
Sélectionnez Renommer les répertoires téléphoniques, puis le répertoire désiré.
Allumer ou éteindre la torche
Sélectionnez Menu > Extras > Torche.
© 2009 Nokia. Tous droits réservés.10
Page 25

Renseignements généraux 11
Renseignements généraux
À propos de votre appareil
L'appareil sans fil décrit dans le présent guide est approuvé
pour utilisation sur les réseaux réseaux GSM 850 et
. Pour plus d'information sur les réseaux,
1900 MHz
c
ommuniquez avec votre fournisseur de services.
Il est possible que votre appareil contienne déjà des signets
ou des liens qui vous permettent d'accéder à des sites
Internet tiers. Ces sites ne sont pas affiliés à Nokia et Nokia
décline toute responsabilité les concernant. Si vous décidez
d'accéder à ces sites, prenez les précautions nécessaires en
matière de sécurité ou de contenu.
Avertissement :
Pour utiliser les fonctions du téléphone, à l'exception du
réveil, l'appareil do it être allumé. N'allumez jamais votre
appareil lorsque l'utilisation d'appareils sans fil risque de
provoquer des interférences ou de présenter un danger.
Lorsque vous utilisez cet appareil, veillez à respecter toutes
les lois en vigueur, les coutumes locales ainsi que la vie privée
et les droits d'autrui, ce qui comprend les droits d'auteur.
Prenez note que la protecti on des droits d'auteur peut
empêcher la copie, la modification, le téléchargement ou le
transfert d'images, de musique ou d'autres types de fichiers.
Pr ene z s oi n de fa ir e de s c opi es de sau ve gar de ou d e n ot er p ar
écrit toutes les données importantes enregistrées dans votre
appareil.
Lorsque vous connectez votre téléphone à un autre appareil,
lisez le guide d'utilisation qui accompagne ce dernier pour
connaître les consignes de sécurité à respecter. Ne connectez
jamais d’appareils incompatibles.
Les images compri ses dans le présent guide peuvent différe r
de celles de l'appareil.
Reportez-vous au guide d'utilisation pour d'autres
renseignements importants concernant votre appareil.
Services réseau
Pour utiliser l'appareil, vous devez détenir un compte auprès
d'un fournisseur de services sans fil. Il se peut que certaines
fonctions ne soient pas offertes sur tous les réseaux ou que
vous deviez prendre des dispositions spéciales avec votre
fournisseur de services pour les utiliser. Les services réseau
font appel au transfert de données. Pour toute question
concernant les frais liés aux transferts de données au sein de
votre réseau d'origine et en itinérance sur d'autres réseaux,
communiquez avec votre fournisseur de services. Celui-ci est
en mesure de vous informer des tarifs en vigueur.
Votre fournisseur de services peut avoir demandé que
certaines fonctions de votre appareil soient désactivées. Le
cas échéant, elles ne s'afficheront pas dans le menu de votre
appareil. Votre appareil peut par ailleurs être doté d'éléments
personnalisés, notamment les noms de menus, les séquences
de menus et les icônes utilisées.
Assistance
Pour en apprendre davantage au sujet du fonctionnement de
votre produit ou si vous n'êtes pas certain de la manière dont
il doit fonctionner, vous pouvez consulter le guide
d'utilisation ou visiter les pages d'assistance à l'adresse
www.nokia.com/support ou le site Web Nokia de votre
région; sur un appareil cellulaire, visitez le site
www.nokia.mobi/support.
Si cela ne résout pas votre problème, essayez ce qui suit :
• Redémarrez l'appareil : éteignez l'appareil, puis retirez
la pile. Attendez environ une minute, replacez la pile,
puis allumez l'apparei l.
• Restaurez les paramètres d'origine en vous reportant
au guide d'utilisation.
Si le problème persiste, communiquez avec Nokia pour
connaître les options de réparation. Visitez le site
www.nokia.com/repair ou, au Canada, www.nokia.ca/
assistance-et-logiciels/reparation. Avant d'envoyer votre
appareil en réparation, effectuez toujours une sauvegarde
des données qu'il contient.
Accessoires
Avertissement :
N’utilisez que des piles, des chargeurs et des accessoires
approuvés par Nokia pour ce modèle particulier. L'utilisation
de tout autre accessoire peut annuler toute autorisation ou
garantie s’appliquant au téléphone et peut se révéler
dangereuse. Plus particulièrement, l'utilisation de piles ou de
chargeurs non approuvés présente des risques d'incendie,
d'explosion, de fuite ainsi que divers autres risques.
Pour toute question concernant la disponibilité des
accessoires approuvés, adressez-vous à votre détaillant.
Débranchez les cordons d’alimentation des appareils en
tirant sur la fiche, et non sur le cordon.
Pile
Renseignements concernant la pile et les chargeurs
Votre appareil est alimenté par une pile rechargeable. Cet
appareil est conçu pour être utilisé avec une pile BL-5CA. Il se
peut que Nokia offre différents modèles de pile pour cet
appareil. Votre appareil est conçu pour être alimenté par les
chargeurs suivants : AC-3. Le numéro du chargeur peut varier
© 2009 Nokia. Tous droits réservés. 11
Page 26

12 Pile
en fonction du type de prise. Le type de prise est indiqué par
l'un des codes suivants : E, EB, X, AR, U, A, C, K ou UB.
La pile peut être chargée et déchargée des centaines de fois,
mais elle finira par perdre sa capacité de charge avec le temps.
Lorsque l'autonomie de la pile en mode conversation et en
mode veille devient nettement inférieure à la normale,
procurez-vous une nouvelle pile. N’utilisez que des piles
approuvées par Nokia et ne rechargez votre pile qu'avec des
chargeurs approuvés par Nokia conçus pour cet appareil.
Si la nouvelle pile est utilisée pour la première fois ou si elle
n'a pas été utilisée depuis un certain temps, il se peut que
vous deviez déconnecter puis reconnecter le chargeur pour
qu'elle commence à se charger. Si la pile est complètement
déchargée, il se peut que vous deviez attendre quelques
minutes avant que l'indicateur de charge n'apparaisse à
l'écran et que vous puissiez faire des appels.
Retrait sécuritaire. Il faut toujours éteindre l’appareil et
débrancher le chargeur avant d'enlever la pile.
Procédure de recharge appropriée. Débranchez le chargeur
de la prise de courant et de l'appareil lorsqu'il n'est pas utilisé.
Ne laissez pas la pile connectée à un chargeur : la surcharge
risque d'abréger sa durée de vie. Si elle n'est pas utilisée, une
pile complètement chargée perd sa charge avec le temps.
Évitez les températures extrêmes. Essayez de toujours
conserver la pile à une température allant de 15 à 25 °C (59 à
77 °F). Les températures extrêmes diminuent la capacité et
la durée de vie de la pile. Un appareil pourrait ne pas
fonctionner tempora irement si la pile est trop chau de ou trop
froide. Le rendement de la pile est réduit considérablement
lorsque la température est bien inférieure au point de
congélation.
Ne provoquez pas de court-circuit. Un court-circuit accidentel
peut se produire si un objet métallique (tel qu'une pièce de
monnaie, un trombone ou un stylo) vient relier les bornes
positive (+) et négative (-) de la pile. (Celles-ci ressemblent à
des bandes métalliques sur la pile.) Cela peut survenir, par
exemple, si vous transportez une pile de rechange dans votre
poche ou votre porte-monnaie. Un court-circuit risque
d’endommager la pile ou l’objet à l'origine de la connexion.
Mise au rebut. Ne jetez jamais une pile au feu car elle pourrait
exploser. Débarrassez-vous-en conformément à la
réglementation locale. Recyclez-la quand c'est possible. Ne la
jetez pas avec les ordures ménagères.
Fuites. Vous ne devez en aucun cas démonter, couper, ouvrir,
écraser, plier, percer ou déchiqueter les piles ou leurs cellules.
En cas de fuite de la pile, évitez tout contact du liquide avec
les yeux ou la peau. En cas de contact avec les yeux ou la peau,
rinsez immédiatement avec de l'eau et consultez un médecin.
Dommages. Ne modifiez, réusinez ou submergez pas la pile,
n'y insérez pas d'objets et ne la gardez pas à proximité de
liquides. Les piles peuvent exploser si elles sont
endommagées.
Utilisation correcte. N'utilisez la pile qu'aux fins auxquell es
elle est destinée. Une mauvaise utilisation de la pile peut
causer un incendie, une explosion ainsi que divers autres
risques. Si vous échappez la pile, particulièrement sur une
surface dure, et vous croyez qu'elle est endommagée,
apportez-la à un centre de service pour la faire inspecter
avant de continuer à l'utiliser. N'utilisez jamais de chargeur
ou de pile endommagés. Gardez les piles hors de la portée
des jeunes enfants.
Identification des piles d'origine de Nokia
Pour assurer votre sécurité, n'utilisez que des piles d'origine
de Nokia. Afin de vous assurer que vous n’obtenez que des
piles d’origine de Nokia, achetez-les d’un détaillant ou centre
de service Nokia autorisé et inspectez l’étiquette
hologramme tel que décrit ci-après.
Hologramme d’a uthentification
1 Lorsque vous regardez l’hologramme de l’étiquette,
vous y verrez, selon l’angle, le symbole des mains se
rejoignant et le logo des accessoires d’origine de Nokia.
2 Si vous penchez l’hologramme vers la gauche, la droite,
le bas et le haut, vous devriez voir un, deux, trois et
quatre points de chaque côté, respectivement.
Les étapes suivantes n'assurent pas infailliblement
l' auth en tic ité de l a pi le. Si v ous ave z de s ra iso ns d e cr oir e que
votre pile est contrefaite ou si vous n'êtes pas en mesure d'en
© 2009 Nokia. Tous droits réservés.12
Page 27

Soins à apporter à votre appareil 13
confirmer l'authenticité au moyen de l’hologramme de
l’étiquette, ne l'utilisez pas. Apportez-la plutôt au détaillant
ou au centre de service autorisé de Nokia le plus proche.
Pour plus d'information à ce sujet, reportez-vous au livret sur
la garantie inclus dans l'emballage de votre appareil Nokia.
Soins à apporter à votre appareil
Votre appareil est un produit de conception et de fabrication
supérieures qui doit être traité avec soin. Les su ggestions qui
suivent vous aideront à assurer la validité de votre garantie.
• Maintenez l’appareil au sec. La pluie, l’humidité et les
liquides peuvent contenir des minéraux susceptibles de
détériorer les circuits électroniques. Si votre appareil
est exposé à l'eau, retirez la pile et laissez-le sécher
complètement avant de remettre la pile en place.
• N’utilisez pas et ne rangez pas l'appareil dans un
endroit poussiéreux ou sale. Vous risquez
d'endommager ses pièces mobiles et ses composants
électroniques.
• Ne rangez pas l'appareil dans un endroit très chaud ou
très froid. Les températures élevées sont susceptibles
de réduire la durée de vie utile des composants
électroniques, d'endommager les piles et de déformer
ou de faire fondre certaines pièces en plastique.
Lorsque l'appareil revient à sa température normale de
fonctionnement après avoir été exposé au froid, de
l'humidité peut se former à l'intérieur et endommager
les circuits électroniques.
• N’essayez pas d’ouvrir l'appareil à moins qu’on ne vous
l’indique dans le p résent guide.
• Ne le secouez pas, ne le heurtez pas et ne le laissez pas
tomber. Toute manœuvre brusque peut briser les
cartes de circuits internes et les petites pièces
mécaniques.
• Ne vous servez pas de produits chimiques forts, de
solvants ou de détergents puissants pour nettoyer cet
appareil. Utilisez uniquement un chiffon doux, propre
et sec pour nettoyer la surface de l'appareil.
• Ne peignez pas l'appareil. La peinture risque de bloquer
les composants mobile s et d'en empêcher le bon
fonctionnement.
• N'utilisez que l'antenne fournie ou une antenne de
rechange approuvée. L'utilisation d'antennes ou
d'accessoires non homologués ou des modifications
non autorisées pourraient endommager l'appareil et
contrevenir aux règlements régissant l'utilisation des
appareils radio.
• Utilisez les chargeurs à l'intérieur uniquement.
• Assurez-vous de faire des copies de sauvegarde de vos
données importantes, par exemple vos contacts et vos
notes d'agenda.
• De temps à autre, pour réinitialiser l'appareil, éteignezle et retirez la pile pendant un certain temps; cela
contribuera à le maintenir en bon état de
fonctionnement.
Ces suggestions s’appliquent également à l'appareil, aux
piles, aux chargeurs et à tout accessoire.
Recyclage
Lorsque vous n'utilisez plus vos appareils électroniques, vos
piles et leurs emballages, apportez-les à un point de collecte
ou à un centre de recyclage. Vous aiderez ainsi à diminuer les
risques de contamination environnementale et contribuerez
à la réutilisation saine des ressources à long terme. Vous
trouverez des renseignements environnementaux et des
directives sur la façon de recycler vos appareils Nokia sur le
site www.nokia.com/werecycle ou nokia.m obi/werecycle.
Renseignements supplémentaires concernant la sécurité
La surface de cet appareil ne contient aucun nickel.
Jeunes enfants
Votre appareil et ses accessoires ne sont pas des jouets. Ils
peuvent contenir de petites pièces. Gardez-les hors de la
portée des jeunes enfants.
Environnement d'utilisation
Cet appareil est conforme aux normes sur l’exposition aux
radiofréquences lorsqu’il est utilisé en position normale près
de l’oreille ou à au moins 2,2 centimètres (7/8 pouce) du
corps. Si vous utilisez un étui ou une pince pour ceinture afin
de transporter l’appareil sur votre corps, assurez-vous que
ces articles ne contiennent pas de métal. De plus, maintenez
toujours l’appareil à la distance indiquée ci-dessus.
Une connexion de bonne qualité au réseau est nécessaire à
l'envoi de fichiers ou de messages. Il se peut que l'envoi des
fichiers de données et des messages soit différé jusqu'à ce
qu'une connexion de bonne qualité puisse être établie. Suivez
les directives relatives à la distance de sécurité jusqu'à ce que
la transmission soit terminée.
Votre appareil comprend des pièces magnétiques. Les articles
en métal sont attirés par ces pièces. Ne placez pas de cartes
de crédit ou d’autres supports de stockage magnétiques à
proximité de l’appareil, car vous risqueriez d’effacer les
données qu’ils contiennent.
Appareils médicaux
Les appareils qui utilisent des transmissions par fréquences
radioélectriques, notamment les téléphones sans fil, peuvent
nuire au fonctionnement des appareils médicaux
insuffisamment protégés. Consultez un médecin ou le
fabricant de l'appareil médical pour déterminer s'il est
correctement protégé contre les fréquences radioélectriques
© 2009 Nokia. Tous droits réservés. 13
Page 28

14 Renseignements supplémentaires concernant la sécurité
externes. Éteignez votre appareil lorsque le règlement affiché
vous demande de le faire. Les centres hospitaliers ou de santé
peuvent utiliser des appareils sensibles aux radiofréquences
externes.
Appareils médicaux implantés
Les fabricants d'appareils médicaux recommandent de
garder une distance minimale de 15,3 centimètres (6 pouces)
entre un téléphone cellulaire et un appareil médical intracorporel, par exemple un stimulateur cardiaque ou un
défibrillateur, afin d'éviter les interférences entre les deux
appareils. Voici quelques conseils à l'intention des porteurs
de tels appareils :
• Maintenez toujours une distance d'au moins
15,3 centimètres (6 pouces) entre l’appareil médical et
votre téléphone cellulaire.
• Ne transportez pas le téléphone dans une poche à la
hauteur de la poitrine.
• Tenez votre téléphone cellulaire contre l'oreille du côté
opposé à l'appareil médical.
• Éteignez le téléphone si, pour une raison ou pour une
autre, vous soupçonnez qu'il perturbe le
fonctionnement de votre appareil médical.
• Respectez les directives du fabricant de l'appareil
médical intra-corporel.
Pour toute question concernant l'utilisation de votre
téléphone sans fil en conjonction avec votre appareil médical
intra-corporel, communiquez avec votre médecin.
Prothèses auditives
Certains appareils sans fil peuvent perturber le
fonctionnement des prothèses auditives.
Véhicules
Les signaux radio peuvent nuire au fonctionnement des
dispositifs électroniques automobiles qui sont mal installés
ou insuffisamment protégés (par exemple, les systèmes
électroniques d’injection de carburant et de freinage
antiblocage, les régulateurs de vitesse électroniques et les
sacs gonflables). Pour de plus amples renseignements à ce
sujet, communiquez avec le fabricant de votre véhicule ou de
ses accessoires.
L’installation, l'entretien et la réparation d’un appareil dans
un véhicule ne doivent être confiés qu’à des techniciens
compétents. Une installation ou un entretien mal exécutés
peuvent s'avérer dangereux et invalider la garantie. Vérifiez
régulièrement si les appareils sans fil de votre véhicule sont
bien installés et fonctionnent correctement. Ne rangez pas et
ne transportez pas de liquides ou de gaz inflammables, ni
d’explosifs dans le même compartiment que l'appareil, ses
pièces ou ses accessoires. N'oubliez pas que les sacs
gonflables se déploi ent avec beaucoup de force. N e placez pas
votre appareil ou ses accessoires dans l'aire de déploiement
d’un sac gonflable.
Éteignez votre appareil avant de monter à bord d'un avion.
L'utilisation d'un appareil sans fil à bord d'un avion peut
perturber le fonctionnement de l'avion et peut s'avérer
illégale.
Environnements à risques d’explosion
Éteignez votre appareil dans tout endroit où il y a risque
d'explosion. Respectez tous les panneaux d’avertissement.
Dans de tels endroits, une étincelle peut provoquer une
explosion ou un incendie et entraîner des blessures graves,
voire mortelles. Éteignez votre appareil dans les points de
ravitaillement en carburant, comme les stations-service.
Veillez à respecter les restrictions qui s'imposent dans les
dépôts et les centres de stockage et de distribution de
carburant, les usines de produits chimiques et les zones de
dynamitage. Les zones où il y a risque d'explosion ne sont pas
toujours identifiées clairement. Elles comprennent
notamment les zones où il est recommandé d'arrêter le
moteur de votre véhicule, les cales de navires, les installations
de transfert ou d’entreposage de produits chimiques et les
zones où l’air contient des produits chimiques ou des
particules telles que du grain, de la poussière ou des poudres
métalliques. Pour vérifier si cet appareil peut être utilisé en
toute sécurité à proximité de véhicules qui utilisent de
l'essence ou du gaz liquéfié (p. ex. du propane ou du butane),
communiquez avec leur fabricant respectif.
Appels d'urgence
Important : Cet appareil fonctionne au moyen de signaux
radio, de réseaux sans fil, de réseaux terrestres et de
fonctions programmées par l'utilisateur. Si votre appareil
prend en charge les appels par Internet (aussi appelés
« appels Internet »), activez les fonctions d'appel par Internet
et par réseaux cellulaires. Si ces fonctions sont toutes deux
activées, votre appareil peut tenter d'effectuer des appels
d'urgence tant par le réseau cellulaire que par celui de votre
fournisseur d'appels par Internet. Prenez note que les
connexions ne peuvent être garanties en toutes
circonstances. Ne vous fiez jamais exclusivement à un
appareil cellulaire pour les communications essentielles
comme les urgences médicales.
Pour faire un appel d'urgence :
1 Si l’appareil est éteint, allumez-le. Assurez-vous que la
puissance du signal est adéquate. Selon votre type de
service, il se peut que vous deviez aussi faire ce qui suit :
• Insérer une carte SIM, si votre appareil en exige
une.
• Désactiver certaines restrictions d' appel qui
pourraient être actives dans votre appareil.
© 2009 Nokia. Tous droits réservés.14
Page 29

Renseignements supplémentaires concernant la sécurité 15
• Changer votre profil du mode vol ou hors ligne à
un profil actif.
2 Appuyez sur la touche de fin autant de fois que
nécessaire pour vider l’écran et préparer l’appareil pour
les appels.
3 Entrez le numéro officiel d'urgence en vigueur dans la
région. Les numéros d'urgence peuvent varier d'une
région à l'autre.
4 Appuyez sur la touche de conversation.
Lorsque vous faites un appel d’urgence, donnez tous les
renseignements nécessaires, de la façon la plus précise
possible. Votre téléphone cellulaire peut constituer le seul
moyen de communication sur le lieu d’un accident. Ne mettez
jamais fin à la communication avant que le personnel de
sécurité ne vous dise de le faire.
Renseignements sur la certification (SAR)
Cet appareil sans fil est conforme à la réglementation en
vigueur en matière d’exposition aux fréquences
radioélectriques.
Votre appareil est également un émetteur-récepteur radio. Il
a été conçu de sorte à ne pas dépasser les limites d'exposition
aux radiofréquences recommandées dans les directives
internationales en vigueur. Ces directives s’appuient sur des
normes élaborées par l'organisation scientifique
indépendante ICNIRP (International Commission on NonIonizing Radiation Protection) et comprennent des marges
de sécurité visant à assurer la sécurité de tous,
indépendamment de l'âge et de l'état de santé.
Les normes d’exposition applicables aux appareils mobiles
utilisent une unité de mesure appelée « taux d’absorption
spécifique » (en anglais, specific absorption rate, SAR). Les
directives de l'ICNIRP fixent la limite SAR à 2,0 W/kg en
moyenne par dix grammes de tissu. Les tests relatifs à la
limite SAR sont basés sur les positions normales d’utilisation
alors que le téléphone émet à la puissance certifiée maximale
sur toutes les bandes de fréquences testées. Il se peut que le
niveau SAR réel d'un appareil en fonctionnement soit
inférieur à la valeur maximale, car celui-ci n'utilise que la
puissance requise pour se connecter au réseau. La valeur
varie en fonction d’un certain nombre de facteurs; par
exemple, la distance qui vous sépare d’une station de base
du réseau.
Pour cet appareil, la valeur SAR la plus élevée mesurée contre
l'oreille en fonction des exigences de l'ICNIRP est de 0,81 W/
kg.
L'utilisation d'accessoires peut faire varier les valeurs SAR. Les
valeurs SAR varient en fonction des exigences de chaque pays
en matière de test et de rapport ainsi que de la bande du
réseau utilisée. Vous trouverez des renseignements
supplémentaires concernant les valeurs SAR dans les
spécifications de chaque téléphone sur le site
www.nokia.com.
Votre appareil respecte également les exigences en matière
d'exposition aux radiofréquences établies par la Federal
Communications Commission (É.-U.) et Industrie Canada. Ces
exigences définissent la valeur SAR limite à 1,6 W/kg en
moye nne p ar gram me de t issu. Pour c e produ it, la valeu r SAR
la plus élevée mesurée au cours d’essais standard
d’utilisation contre l’oreille a été de 1,15 W/kg et au niveau
du corps, de 0,60 W/kg
.
© 2009 Nokia. Tous droits réservés. 15
Page 30

16
© 2009 Nokia. Tous droits réservés.
Nokia, Nokia Connecting People e t Navi sont des m arques de
commerce ou des marques déposées de Nokia Corporation.
La mélodie Nokia est une marque sonore de Nokia
Corporation. Les autres noms de produits et de sociétés
mentionnés dans le présent document sont des marques de
commerce ou des appellations commerciales de leurs
propriétaires respectifs.
Il est interdit de reproduire, de transférer, de distribuer ou de
stocker une partie ou la totalité du contenu du présent
document, sous quelque forme que ce soit, sans
l’autorisation écrite préalable de Nokia. Nokia pratique une
politique de développement continu. Nokia se réserve le droit
d'apporter des modifications et des améliorations à tout
produit mentionné dans le présent document sans avis
préalable.
DANS LA MESURE OÙ LES LOIS EN VIGUEUR LE PERMETTENT,
NOKIA NE PEUT EN AUCUN CAS ÊTRE TENUE RESPONSABLE DE
TOUTE PERTE DE DONNÉES OU DE REVENU AINSI QUE DE TOUT
DOMMAGE PARTICULIER, INCIDENT, CONSÉCUTIF OU INDIRECT.
LE CONTENU DU PRÉSENT DOCUMENT EST FOURNI « TEL QUEL ».
SOUS RÉSERVE DES LOIS APPLICABLES, AUCUNE GARANTIE SOUS
QUELQUE FORME QUE CE SOIT, EXPLICITE OU IMPLICITE, Y
COMPRIS, MAIS SANS S'Y LIMITER, LES GAR ANTIES IMPLICITES DE
QUALITÉ MARCHANDE ET D'ADÉQUATION À UN USAGE
PARTICULIER, N'EST ACCORDÉE QUANT À L'EXACTITUDE, À LA
FIABILITÉ OU AU CONTENU DU PRÉSENT DOCUMENT. NOKIA SE
RÉSERVE LE DROIT DE MODIFIER LE PRÉSENT DOCUMENT OU DE
LE RETIRER SANS AVIS PRÉALABLE.
La disponibilité des produits, des services et des applications
connexes peut varier selon les régions. Pour toute question
à ce sujet ou concernant la langue des produits, veuillez
communiquer avec votre détaillant Nokia. Cet appareil peut
contenir des marchandises, des technologies ou des logiciels
assujettis aux lois et règlements sur l’exportation en vigueur
aux États-Unis et dans d’autres pays. Il est interdit d'exporter
ce produit en contravention de la loi.
L'avis de la FCC et d'Industrie Canada ci-dessous est
uniquement applicable au produit RH-100 et RH-106.
AVIS DE LA FCC ET D'INDUSTRIE CANADA
Votre appareil peut nuire à la réception des téléviseurs et des
radios (s’il est utilisé à proximité des récepteurs, par
exemple). La FCC et Industrie Canada peuvent exi ger que vous
cessiez d'utiliser votre téléphone si vous ne parvenez pas à
éliminer l'interférence. Si vous avez besoin d’assistance,
communiquez avec un centre de service de votre région. Cet
appareil est conforme aux dispositions de la section 15 du
règlement de la FCC. Son utilisation est assujettie aux deux
conditions suivantes : 1) Ce dispositif ne doit pas causer
d'interférence nuisible; et 2) ce dispositif doit accepter toute
interférence reçue, y compris l'interférence qui pourrait
causer un fonctionnement non désiré. Toute modification ou
altération non autorisée par Nokia risque d'annuler les droits
de l'utilisateur de se servir de cet appareil.
Version 2 FR-CA
 Loading...