

Page 1
User Guide Merlin
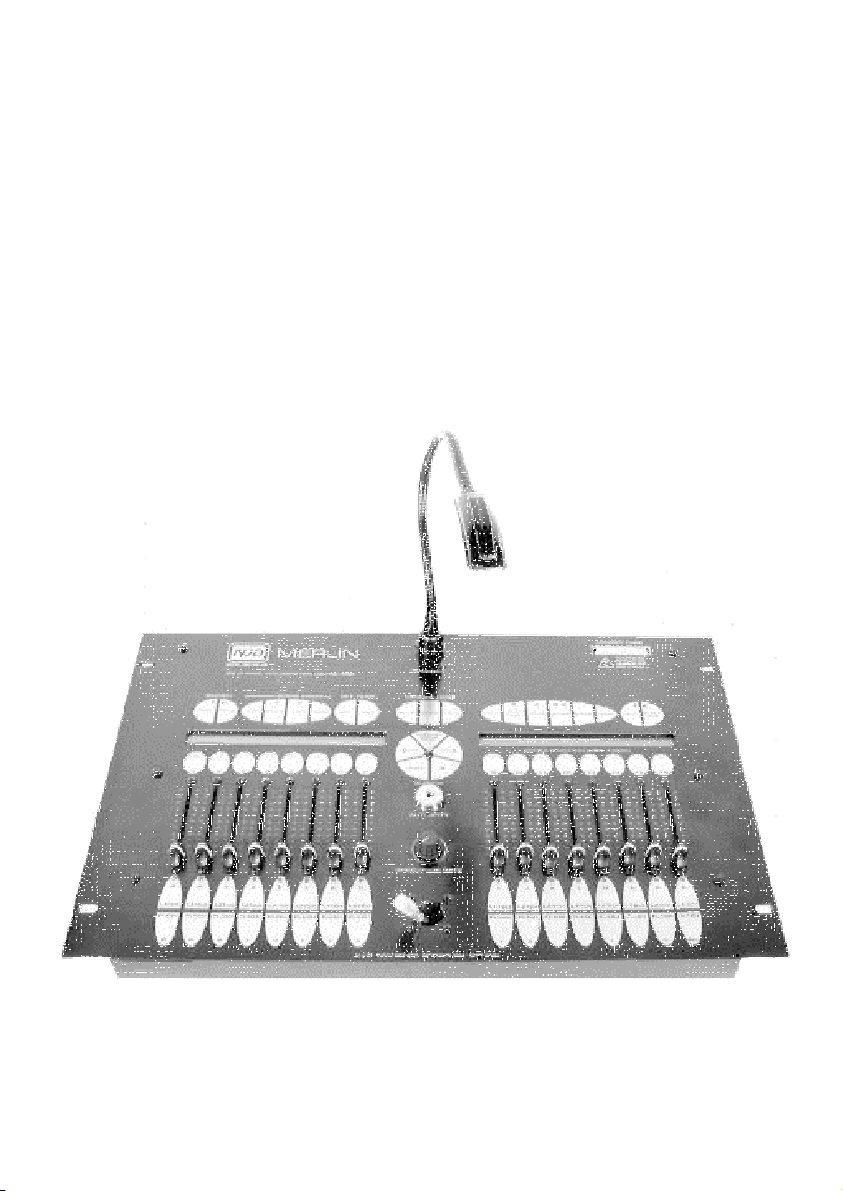
Merlin
-Page 1-
Page 2

Merlin User Guide
IMPORTANT
Installer and Users please note:
These instructions should be read carefully and left with the user
of the product for future reference.
Installation
The Merlin must be installed by a competent electrician in
accordance with the current IEE wiring regulations.
Connect the Merlin to the 230 Volt mains supply using the lead
provided:
• Brown = Live
• Blue = Neutral
• Green/yellow = earth.
The Merlin must be earthed for safe and reliable operation of the
touch pads.
The Merlin is not fitted with a mains plug. This is because:
a) it may be installed permanently
b) it is an appliance for professional use.
Connect the flexilight to the 3-pin XLR socket on the front panel.
DO NOT connect the DMX lead to this socket.
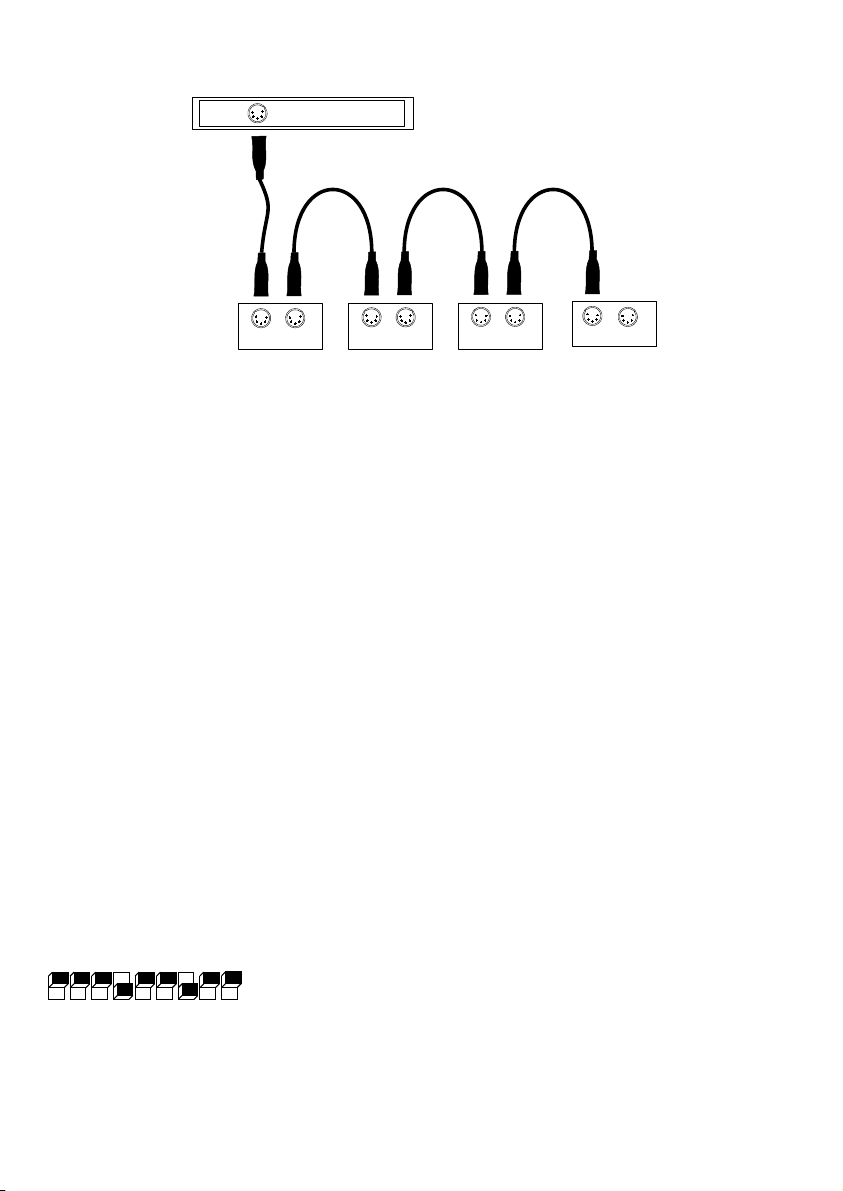
Connecting the luminaires
Arrange the DMX controlled luminaires into four "chains" with a
maximum of 32 items on each chain. Do this in such a way as to make
the cabling easy. It is not necessary to arrange the items in order of
DMX address, or to put items in one group of addresses on a particular
chain. Unless you are using a very small number of luminaires, say less
than 8, it is a good idea to use more than one DMX chain because, in
the event of a data fault due to a luminaire or cable, only a quarter of
the light show will fail.
Connect the luminaires to DMX outputs of the Merlin
(the four 5-pin XLR connectors on the rear panel)
(data + = pin 3, data - = pin 2, earth = pin1). All four
sockets output the same DMX data. A maximum of
32 DMX controlled items may be connected to each DMX output.
-Page 2-
SCREEN
DATA DATA +
Page 3
User Guide Merlin
DMX OUT
DMX IN DMX OUT DMX IN DMX OUT DMX IN DMX OUT DMX IN DMX OUT
CONTROLLER
• Do not connect one output to another
• Do not form a loop by connecting the last DMX item in the chain
back to the Merlin.
• Do not form branches in the chains.
• Use a good quality screened-twisted-pair cable suitable for data use.
• Place a DMX line terminator on the last luminaire in each chain. A
terminator is a 120W resistor connected across the Data+ and
Data− lines of the DMX connection. Some luminaires have
automatic terminators, and some have a switch to turn the
terminator on and off. If the luminaire has a terminator switch,
make sure that it is ON for the last luminaire in the chain, and OFF
for ALL others.
Set all the DMX address switches on the luminaires that you are using
to the address you wish to use to control the item. The instructions to
do this are contained in the user guides for each luminaire. As they vary
from luminaire to luminaire and manufacturer to manufacturer it is not
possible to fully describe how to do this in this user guide. As a general
rule, there are switches labelled 1, 2, 4, 8, 16, 32, 64,128 and 256
(although not all these may be present). Always refer to the numbers
printed on the label above the switches, not on the switches themselves.
Add up all the switches that are switched on, and
1248163264
add 1, to give the DMX address. This applies to all
128
256
NJD luminaires that are fitted with DIL switches. The
example shows a DMX start address of 73
If the memory card is plugged in, it will be loaded as soon as power is
applied. If you do not wish to load the memory card, do not plug it in
-Page 3-
Page 4
Merlin User Guide
before switching on. (This allows an automatic load to be carried out at
power-on to remove invalid scenes which the Merlin cannot process)
Connecting other inputs
Midi interface
If Midi control is being used connect to the 5-pin 180° DIN socket.
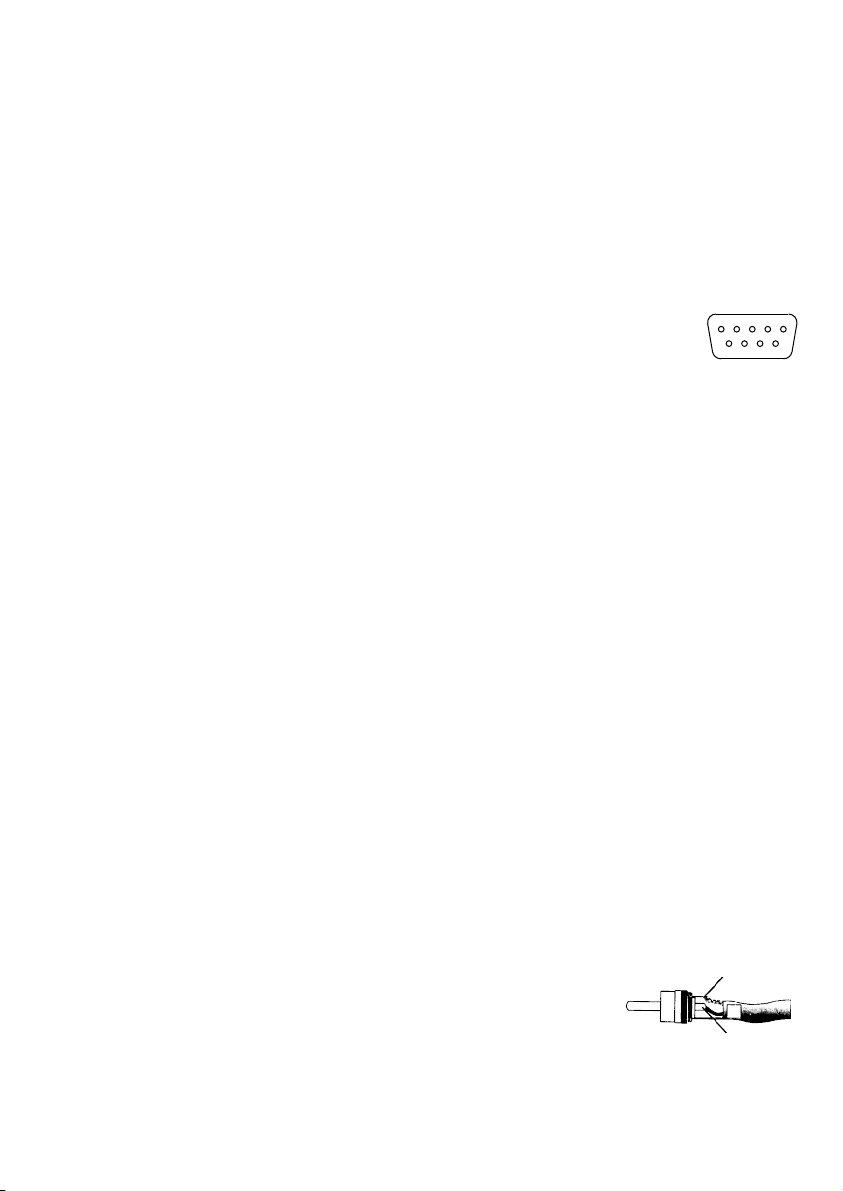
Remote Control Interface
1 2 3 4 5
If the remote control interface is to be used, connect volt-free
switch contacts such as a foot switch, to the 9-pin D-socket
on the rear panel.
Common = pin 1 Input 1 = pin Input 2 = pin 2
Input 3 = pin 7 Input 4 = pin 3 Input 5 = pin 8
Input 6 = pin 4 Input 7 = pin 9 Input 8 = pin 5
When the switch contacts close they should connect one of the inputs to
the common terminal.
The remote control inputs have the same effect as the flash pads.
Closing a switch connected to remote input 1 is the same as touching
the FLASH pad below slider 1. Input 2 corresponds to slider 2 etc.
If a latching switch is used, it will have the same effect as touching the
LATCH pad.
6 7 8 9
RS232 interface
The 5-pin domino pattern DIN socket is for an RS232 interface, which is
not as yet implemented.
It is intended to produce a computer-based editing suite for use in
conjunction with the Merlin, this will connect to the Serial port of the
computer.
Connecting a sound input
Connect a sound input of any level from 775mV rms
(0dBm) (the output level of the tape output of a mixer)
to 60V rms (the speaker output of a 450W per
channel amplifier) to the phono socket on the rear
panel. The signal is connected to the centre pin and
earth to the outside. The output of a mixer that
-Page 4-
Ground
(Screen)
(Core)
Signal
Page 5
User Guide Merlin
connects to the power amplifier may have too low a level to operate the
sound level if the master control is not turned up.
The sound input allows the Merlin to animate programs to synchronize
to the bass beat of the music. When a sound signal is present, the
green led in the SOUND pad will flash in time to the bass beat of the
music, except when writing programs.
Setting the Merlin DIL switches.
These switches are located underneath the front edge of the Merlin
fascia at the left hand side. They do not set DMX channels, they control
the way that the Merlin displays certain items, and the way it is operated
from MIDI. Switches 1 to 4 of the first group of switches set the
language. Languages available at present are shown overleaf:
Other settings of the switches will give an English display.
Switches 5 and 6 set the way that the Merlin displays channel levels.
For the moment set these 5=Off and 6=On to give a decimal display.
Switches 7, 8 and 16 arenot used at present.
Switches 9 to 15 set the Midi channel and note numbers that the Merlin
responds to, if you are not using Midi control, these do not need to be
set.
Switch 1 Switch 2 Switch 3 Switch 4
English On On On On
Danish On Off Off On
Dutch On On Off On
French Off On On On
German On Off On On
Italian Off Off Off On
Norwegian Off On Off On
Spanish On On On Off
Swedish Off Off On On
The MIDI channel and the note number of slider 1 are set on switches 9
to 15 (switches 9 -15 are in the second group of eight switches - refer
to the rear label) Note number 60 is Middle C (C3), An octave below is
-Page 5-
Page 6
Merlin User Guide
48 (C2) and an octave above is 72 (C4) Sliders number 2 to 16
correspond to the next 15 notes (on a chromatic scale) following the
note number set.
Note number
slider 1
Switch
15
Switch
14
Switch
13
1 On On On 16
17 On On Off 32
33 On Off On 48
49 On Off Off 64
65 Off On On 80
81 Off On Off 96
97 Off Off On 112
113 Off Off Off 128
Note number
slider 16
-Page 6-
Page 7

User Guide Merlin
Midi Channel
number
1 On On On On
2 On On On Off
3 On On Off On
4 On On Off Off
5 On Off On On
6 On Off On Off
7 On Off Off On
8 On Off Off Off
9 Off On On On
10 Off On On Off
11 Off On Off On
12 Off On Off Off
13 Off Off On On
14 Off Off On Off
15 Off Off Off On
16 Off Off Off Off
Switch
12
Switch
11
Switch
10
Switch
9
OPERATION
At this point the Merlin may be switched on. All leds will be lit for a
second and then a welcome message will be displayed. When this
disappears, the normal working display will replace it. If the displays are
not legible, or nothing is displayed, then adjust the contrast controls on
the rear panel for the best legibility. There are two contrast controls,
one for each display. The Merlin is now operational. Throughout this
manual, the names of touch pads will be printed like this: ENTER,
and examples of the Merlin's text displays like this: C001
If the welcome message is not in the correct language, go back to the
section on setting switches 1 to 4. After changing the switches, turn the
power off and on again in order to initialize any special characters such
as é, ß or ö correctly. (Don't forget to remove the memory card if you do
-Page 7-
Page 8

Merlin User Guide
not wish it to be automatically loaded when power is switched on)
The display should now show C001 above the first slider, C002 above
the second, C003 above the third, and so on up to C016 above the
sixteenth slider. These indicate the first slider operates channel 1
(C001), the second, channel 2 (C002), the third, channel 3 (C003)
and so on up to the sixteenth slider which operates DMX channel 16
(C016). These are called the "slider allocations"
If a lighting effect is set to operate on any of the first sixteen channels, it
can now be operated manually, by using the relevant sliders. The NJD
Predator HX intelligent scanner will be used as an example throughout
this manual; other NJD luminaires operate either identically or very
similarly. If the DIL switches on the luminaire set it to operate on channel
5, then slider 5 (with C005) displayed above it will move the mirror
horizontally, slider 6 will move it vertically, slider 7 will change the colour
and slider 8 switch the lamp on and off and change the gobo. Set slider
8 to a central position to turn on the lamp in order to see the other
effects.
To control the mirror position from the joystick instead of the sliders,
touch the joystick allocation key above the C005 slider twice (to set
joystick x axis - LED glows red) and above the C006 slider once to set
joystick y axis (LED glows green). Move the slider to zero. The mirror
position can now be set using the joystick instead of the sliders.
The joystick can be used simultaneously to control the x and y movement
of several luminaires. An offset distance can be added to the joystick
position by moving the slider position away from zero. This may reduce
the overall scan angle achievable.
If however, the Predator was set to operate on channels 129 to 132, it
is not possible to operate it using the sliders set as supplied. It may be
operated from any of the sixteen sliders by changing the Slider
allocation.
Changing the Slider allocation
The slider allocation is the four-character display above each slider
which shows which channel, scene or program it is operating. C001
represents channel 1, S654 represents scene 654, P044 represents
program 44.
• Choose a group of four sliders that you wish to use to operate the
-Page 8-
Page 9

User Guide Merlin
Predator, say sliders 9 to 12.
• touch the < or > keys until the cursor (flashing black block in the
display) appears above slider 9. Then touch DIGIT, to move the
cursor to the zero.
• Now using the "joystick allocation" keys (which now have become
numeric keys once "DIGIT" has been touched) type "1" "2" "9".
"C129" should now appear above slider 9, instead of C009. If a
mistake is made, touch digit until the underline cursor is below the
incorrect digit, and then touch the correct number. This slider will
now operate channel 129.
• Move the cursor to slider 10 using the > key, touch digit and type
"130". (To enter a zero, touch the joystick allocation pad labelled
10)
• Repeat for sliders 11 and 12 and channels 131 and 132.
The sliders will now operate the Predator as before. To change the
joystick allocation, touch DIGIT until the cursor returns to the C and
changes from and underline to a black block. The joystick allocation keys
will now change the joystick allocations as before. You can now allocate
sliders to any channel you wish to control. As the Merlin only has 256
channels, you cannot allocate a slider to a channel number more than
256. If this is attempted, the allocation will change to C256. This may
happen whilst changing an allocation from say C077 to C211. After the
"2" is touched you would expect the display to read C277, but this
channel is not available, and C256 is displayed. Just continue to type
the "11".
If more than one slider is allocated to the same channel (two sliders
have C001 displayed above them) then no harm will be done, whichever
is at the higher setting will control channel 1.
The LATCH and FLASH pads perform the same function as
moving the slider to full level: touch the latch or flash pad on the slider
used for the mirror x axis, and see the mirror move to full deflection.
Keyswitch.
The keyswitch prevents unauthorized access to editing functions, but still
allows the sliders, LATCH and FLASH pads to be used normally.
-Page 9-
Page 10

Merlin User Guide
In order to proceed any further with programming the Merlin, the
Authority keyswitch must be turned clockwise.
Storing a scene:
Any combination of channels allocated to the sliders making a certain
lighting display or pattern can be stored as a "scene".
• First make sure that the authority key switch is in the clockwise
position.
• Then touch the "STORE" key, and "Scene to Store:" will be
displayed as a prompt for the scene number you wish to use to
store this scene.
• Type in the scene number using the numeric pads (1 to 10, with 10
representing 0 of the joystick allocation pads). There are one
thousand scenes available. The first one is scene zero S000 and
the last S999.
• Then select the sliders you wish to include in the scene by touching
the latch pads on the sliders. If the scene includes just the position,
colour and gobo of the Predator HX, then select just the four sliders
which control it. If it includes the position, colour and gobo for two
Predators, include all 8 sliders.
• Touch "STORE" again, You can now choose whether the scene is to
be non-dimmable, dimmable or fading. For the moment, choose
"dimmable" by touching the DIM pad.
At this point the scene can be given a name:
• Touch the NAME pad.
• Then use the LATCH and FLASH pads to type the scene
name, of up to twelve characters; if numbers are required, the first
nine joystick allocation pads allow the numbers 1 to 9 to be typed.
The DEL pad deletes the last character typed.
• When the name has been typed, touch the NAME pad again.
• Touch "STORE" again the scene is now stored.
Always keep a record of the last scene number used, to avoid the
possibility of accidentally overwriting your programming. Keep
regular backups on a memory card.
-Page 10-
Page 11

User Guide Merlin
Replaying a scene
To replay the scene, choose a slider that is not being used, and allocate
the scene to it.
• Move the cursor to it using the < and > keys.
• Then touch the "CHANNEL/SCENE/PROG" key until S
(for Scene) appears as the first character of the display above the
slider.
• Then touch DIGIT and type in the scene number using the
numeric pads. If you stored scene 1 the display should read S001.
touch the "LATCH" pad and the Predator should move to the
position/colour/gobo that you stored.
Make sure that the sliders that control the Predator individually are set
to zero, as they will override the scene.
• Touch "LATCH" again and the Predator will turn off.
Now move the slider for S001 slowly from zero. The Mirror will move
from the bottom left corner to the position stored and the colours will
change slowly from magenta. This is the effect of a dimmable scene. If
the scene had been stored as non-dimmable, the mirror colour and gobo
would remain off and then take up the position stored as soon as the
slider reached half of full level.
Using Fade
If a fade rate is set, the scene will fade in or out at the rate set. This
allows a smooth fade-in or fade-out to be achieved simply by touching the
LATCH pad of a slider operating a scene. The time displayed
assumes that the scene will fade from fully off to fully on. If it is not
fading as far, it will take correspondingly less time to achieve.
The "Auto" setting achieved by rotating the SPEED/FADE RATE control
fully anticlockwise allows the Merlin to calculate the fade rate
automatically whilst running programs. The fade rate is adjusted so that
the fade takes exactly the length of the program step to complete,
allowing continuous smooth movement of mirrors in intelligent lighting.
This applies only to fixed speed, variable speed or timed programs.
Automatic fading is not available for obvious reasons on single step and
sound animated programs.
-Page 11-
Page 12

Merlin User Guide
Writing a program.
The example given will write a program to make a Predator HX draw a
square.
• Firstly, repeat the procedure for storing a scene three more times,
and store scenes with the predator mirror positioned to give each
of the four corners of a square.
• Give each of these scenes different scene numbers. For example,
S001, S002, S003 and S004, although they do not have to be
consecutive numbers.
• Touch the WRITE pad. The display will show "Program to
edit:" as a prompt for the program number.
• Use the DIGIT and numeric pads to select the program number,
there are one hundred programs.
• When the program number is correct touch the WRITE pad
again. The step number will be shown, which starts at step 0, and
the display will prompt for the scene number.
Step 0 is only required for Single Step, Sound Animated, or Auto-fading
programs. If your program is none of these, then any scene can be
entered: it will not be used.
For Sound animated or Single Step programs, Step 0 is the scene that
is displayed before the first bass beat (or touch of the "STEP" key) after
the program is started. If you require all luminaires to be off until the
first bass beat, enter a scene number which is a blank scene, one with
nothing stored on the sliders.
For Auto fading programs, Step 0 is the position from where the
luminaires start, to do their first fade.
• Type in the scene number of the first step (scene 1, S001), and
touch ENTER. If the scene number is already correct, as would
often happen when editing, just touch the STEP pad to go on to
the next step. The step number display will then show step 2.
• Type in the scene number for step 2 (S002) and touch ENTER.
• Repeat for Step 3 / scene 3.
• For this example the fourth step is the last step of the program.
Type in S004 for step 4 in the same way as S001, S002 etc on
-Page 12-
Page 13

User Guide Merlin
previous steps, but touch END instead of ENTER.
A program can have up to 100 steps.
Step 0 is only displayed at the beginning of a program, after the
program reaches the end, it starts again at step 1
The next section determines how the program is run:
At fixed speed (speed is set when the program is written)
Variable speed (speed is set when the program is run)
Sound animated (one step to every bass beat)
Single step (changes from one step to the next when the STEP key is
touched)
With step times (each step has a length set when the program is
written, or by real-time animation)
• Touch the SOUND pad until the correct option is shown.
In the case of fixed speed, rotate the SPEED/FADE RATE control until the
correct speed is shown in the display. Single step is set by selecting
fixed speed and rotating the SPEED/FADE RATE control fully
anticlockwise. Setting the step times of a timed program is covered in
the section on program editing.
At this point the program may be given a name. touch NAME and
type in the name exactly the same way as for a scene name, and touch
NAME again. When the name is stored it appears in the right hand
display. touch WRITE again to exit from program write.
The Leds in the SOUND pad indicate the animation mode during
programming:
• Both lit: Timed mode (each step has a step time)
• Red: Variable speed
• Green: Sound animated
• Neither: Fixed speed or single step
-Page 13-
Page 14

Merlin User Guide
Replaying the program.
Firstly make sure that no other sliders are controlling the luminaire. If
sliders allocated to the DMX channels that control the luminaire or
scenes which affect the luminaire are active they could possibly override
the program. Move the sliders to zero. To make sure, move the cursor
to any sliders likely to cause problems and touch CHANNEL/
SCENE/PROG. until "off" is displayed.
To replay the program, select a vacant slider and move the cursor to it.
Allocate the program to the slider as follows: touch CHANNEL/
SCENE/PROG. until P is displayed as the first character. Use the
numeric keys to type in the program number that has just been written.
If variable speed was chosen then moving the slider upwards will run the
program, the speed increasing with slider movement.
If fixed speed or "with step times" was selected the program will run at
the selected speed if the LATCH pad is touched or the slider is
moved to 100%.
If sound animated was chosen, then the program will run one step per
bass beat when the LATCH pad is touched or the slider is moved to
100%. After starting the program running by touching the LATCH
pad, step 0 will be displayed, moving on to step 1 at the first bass beat.
If single step was chosen, then touching the LATCH pad or moving
the slider to 100% will activate the program, and step 0 will be
displayed. It will advance one step at a time when the STEP pad is
touched, moving on to step 1 when the STEP pad is touched for the
first time.
In the case of fixed speed, sound animated, single step or "with step
times" programs, moving the slider to a level less than 100% will "dim"
the program. If the program is a chase of Par-cans or similar, then the
chase will occur at reduced brightness. If, as in this case, the program
controls the movement of intelligent lighting projectors, the result will be
to reduce the overall movement of the beams. Unfortunately, due to the
nature of the DMX data, this does not reduce the movement from a
centre point, but tends to move the patterns towards the bottom left
corner of the available movement. It is therefore, not recommended to
run programs controlling intelligent lighting at anything other than
-Page 14-
Page 15

User Guide Merlin
100%. Dimming programs, should only be used with Par-cans, and
simple lighting where the slider position controls only the brightness or
the speed. For Dimming programs to operate, the scenes forming the
program should be stored as either dimming, or auto-fading.
Editing a scene.
This allows a previously stored scene to be edited. The slider allocations
can be changed, the levels of the sliders adjusted, the fade rate altered,
the dimmable/non-dimmable/fade status changed and the scene name to
be changed.
To edit a scene:
• Touch the EDIT pad. "Scene to Edit" will be displayed as a
prompt for the scene number to be edited (exactly as in scene
store).
• Using the numeric keys (the joystick allocation keys, 1 to 10) type in
the scene number to be edited, touch EDIT again. This will display
the slider allocations and slider levels that have been stored.
• To change the slider levels stored, touch the LATCH pad of any
slider that you wish to adjust. When the red LED is lit, the slider
may be moved and the new level will be displayed.
• Use the cursor < and > pads, DIGIT and the numeric keys to
change the allocations of the sliders as required, as before.
• When levels and slider allocations are correct, touch the EDIT
pad again. The display will show the scene name and the dimmable/
non-dimmable status of the scene, or its fade rate.
• Use the DIM and FADE pads to change as required.
• To change the scene name, touch the NAME pad. Then use the
latch and flash pads to type the scene name, of up to twelve
characters, or numbers (numbers are typed using the first nine
joystick allocation pads). The DEL pad deletes the last character
typed.
When the name has been typed, touch the NAME pad again.
When the name, fade rate and dimmable/non-dimmable status are
correct, touch the EDIT pad again to resume normal operation.
During editing, the scene being edited is output on the DMX outputs.
-Page 15-
Page 16

Merlin User Guide
Decimal or Percentage display
The levels will be shown as the DMX data that is sent to the luminaires.
0 is the lowest level and 255 is the highest. These numbers correspond
to the DMX data required for various colours, gobos, or mirror positions
as described in the luminaire's user guide.
This is the best setting to use for intelligent luminaires where built-in
programs can be accessed by sending various DMX levels. The levels
shown on the Merlin display will correspond to the levels shown in the
manual for the luminaire to select the programs.
For light dimming work using theatre luminaires or Par cans a
percentage display may be more useful giving a display from 0% to
100% for off and fully on respectively. If this is required change the
settings of the DIL switches 5 and 6 to 5=ON and 6=ON.
[For the more computer-literate programmer the option of hexadecimal
or octal displays is also available, these tend to correspond more
conveniently to the levels required for various functions on intelligent
lighting.}
Switch 5 Switch 6
Percentage On On
Decimal Off On
Hexadecimal On Off
Octal Off Off
-Page 16-
Page 17

User Guide Merlin
Copying a scene
Whilst a scene is being edited as described above, it can be copied to a
new scene number. To copy the scene being edited:
• touch STORE when the dimmable and fading data is displayed,
and enter the Scene number to which the scene is to be copied.
• touch STORE again to copy the scene. The new scene will
contain the edited version of the old scene. The old scene will
remain the same as it was before it was edited
To escape from copy, touch EDIT, instead of touching STORE for
the second time, and the edited scene will be stored back to its original
scene number.
To escape from edit, touch HELP, and no changes will be made to the
scene.
Editing Programs
Editing a program is exactly the same as writing a program!
• touch WRITE
• enter the program number
• touch WRITE again.
The program steps will be shown along with the scene number for each
step. If it is not wished to change the scene stored, touching STEP
will go to the next step without changing anything.
To change the scene stored:
• Type the new scene number by using the numeric pads
• touch ENTER.
If changing the last step of a program touch END instead of
ENTER.
To extend a program, touch STEP until the last step is reached, and
then touch ENTER. New steps can then be added as before (by
typing the scene number and touching ENTER). When the new last
step is reached, touch END instead of ENTER.
To shorten a program, touch STEP until the step which will be the
new end of the program is reached and touch END.
-Page 17-
Page 18

Merlin User Guide
Step insert and Delete
Whilst a program is being edited as described above, the < and > keys
will delete and insert steps into the program. < will delete the current
step and move all the other steps along one to fill the gap. For example,
if the current step is step 5, and < is touched, step 5 disappears, step
6 takes its place. Step 7 replaces step 6 and so on
> will insert a new step after the current step, and move all other steps
along by one. The new step is a copy of the current step, and is placed
between the current step and the next step. For example, if the current
step is step 3, and > is touched, a copy of step 3 is placed in step 4,
step 4 is moved to step 5, step 5 to step 6 etc. Step 4, will then be
displayed, and can be changed to the required scene number. When
this has been done, touch ENTER.
Note: If the present step has been edited, ensure that ENTER is
touched to store the edited version, before using Insert.
Step Times.
"With step times" allows a different duration to be set for each step.
This is useful if the program has to change exactly with a change of song
on a compilation of music, or in advertising, if a luminaire is illuminating
different objects in a shop window, and has to spend 30 seconds on the
first, 1 minute on the second etc.
Whilst editing a program as described above, the step times can be
entered either manually or automatically in real time. To enter the time
manually:
The time duration for each step is shown in the left hand display in hours
minutes and seconds. An underline cursor shows which digit is to be
adjusted; touch the "SET TIMER SEL" pad until the cursor
appears under the digit to be changed. Then touch "SET TIMER
ADJ" until the digit is correct. Repeat until the step time is correct.
Then touch "ENTER".
To enter the times automatically: touch "STEP" until Step: 001 is
displayed (the program starts at Step 0). Then touch "RUN TIMER"
and at the same time start the music or other events to which the
program is to be synchronized. The hours minutes seconds clock will
-Page 18-
Page 19

User Guide Merlin
start to run. At the point that the program is required to change to the
next step, touch ENTER. If it is the last step in the program, touch
END. If you run out of steps that have been programmed before
reaching the end of the music, keep touching ENTER when the next
step is required, and the program will be extended by repeating from
step 1. If these are not the steps required, they can be edited later, and
the recorded times will be kept intact.
The scenes required must be created, and written into the program in
the correct order before the program may be real-time animated.
Do not forget to change the program mode to "with step times" to
run a program that has been animated in this way.
Switching Off.
Ensure that no programs are running before switching off the Merlin
(return sliders with programs allocated to them to zero, and turn off the
latch pads)
-Page 19-
Page 20

Merlin User Guide
Using the memory card.
To use the memory card, the Authority keyswitch must be in the "ON"
position.
The memory card is supplied containing the Merlin's initial set up, to use
it to save programs, it must be erased first.
To erase the memory card, touch the ERASE pad. The display will
prompt you to touch ERASE again to confirm. The message Erasing
memory card will appear, and the card will be erased. This takes about
30 seconds, during which time the DMX outputs will be set to a
"blackout" state.
If you have touched ERASE by mistake and do not intend to erase the
memory card, touch HELP to exit. If the card is not present or is
faulty, the message Memory Card not present or Faulty
will be displayed, and the command will be ignored.
To save the internal memory to the memory card, touch SAVE. If
the memory card is not blank, or is not plugged in, the message
Memory Card not blank will be displayed, the memory
card will not be overwritten and the command will be ignored. If the
memory card is blank, the message Saving to memory card will
be displayed and the entire memory will be saved, including slider
allocations. This will take around 30 seconds, during which time all DMX
outputs will be set to a "blackout" state. If it is intended to overwrite the
memory card, erase it first.
To load the memory card into internal memory, touch LOAD. The
display will prompt you to touch LOAD again to confirm, as loading
the memory card into internal memory will overwrite the internal
memory. If it is not intended to load the memory card into internal
memory, touch HELP to exit. If the memory card is faulty, the
message Memory Card not present or Faulty will be
displayed, and the memory card will not be loaded.
The internal memory is protected by a battery, so that data will not be
lost when mains power is removed. The memory back-up battery will
retain the data for about 1 year if the Merlin is not turned on, and up to
four years if the Merlin is used regularly. It is therefore recommended
that regular back-ups are made on to memory cards. Memory cards
-Page 20-
Page 21

User Guide Merlin
contain FLASH EPROM, which will retain data for up to forty years
without a battery, and can be erased and re-written up to 100,000
times.
Additional memory cards are available allowing a quick change between
different shows by loading the memory card required.
As supplied, memory cards contain the factory initialisation settings. This
can be loaded into the MERLIN to produce a cold start with everything
reset to the factory initialisation settings. If this facility is not required,
just erase the memory card before use. If the memory card is plugged
in when power is applied, it will be loaded automatically. Erasing
and saving to memory cards can take as long as half a minute, loading
into memory from a memory card is almost instantaneous.
A memory card generated from the previous version of the software will
be automatically detected, and translated to the new format. Scenes
above 1000 will be lost, as will program steps above 100. It should be
noted that program speeds have been altered to allow a higher
maximum speed, so that variable speed and fixed speed programs will
tend to run more quickly on the new version of the software.
Memory cards cannot be erased by magnetic fields, are not affected by
x-rays, and are not particularly sensitive to static electricity, but if they
are to be transported where they may rub against plastic objects, for
example, loose in a brief case, it is recommended that they be placed in
an antistatic case, or alternatively, wrapped in aluminium foil (kitchen foil)
-Page 21-
Page 22

Merlin User Guide
Scene Recall.
If you wish to save the slider allocations that are in use, in order to use
them later, then select a scene that you do not intend to use, and store
the current set up as a scene using STORE. To return these
allocations to the sliders, touch SEL, and you will be prompted Scene
to Recall. Enter the scene number where the allocations were
stored and touch SEL again. The slider allocation will be re-loaded
onto the sliders. This allows a "bank select" of channels to be
implemented. If Channels 1 to 16 are allocated to the sliders and stored
as a scene, and then Channels 17 to 32 are stored as a different
scene, and so on, any group of 16 channels can be recalled to the
sliders by using scene recall. An advantage of this technique is that you
are not limited to using 16 consecutive channels, any combination of 16
channels, scenes and programs may be stored.
When supplied, the Merlin will have suitable banks programmed into
scenes 922 to 999. These can be recalled as shown in Appendix A.
Alternatively, they may be overwritten by your own selections, or if large
numbers or scenes are required for programming, they may be deleted
and used as any other scene.
Scene Merge.
This works the same way as recall, except that any slider which was
selected as off in the scene that is to be merged will not be recalled
leaving the present allocation unchanged, allowing a stored set of slider
allocations to be merged with the present set. To use Scene Merge,
touch the ADJ pad, and you will be prompted Scene to Merge.
Enter the scene number and touch ADJ again, as before.
Blackout.
Touching the BLACKOUT pad forces all 256 DMX outputs to zero,
and lights the blackout LED. Touching the BLACKOUT pad again
returns to the same operation as was present before BLACKOUT
was touched. Timing is not suspended during Blackout, so that
programs and fades do not start from where they were before blackout
was touched, they continue to run but produce no output. This way,
timing remains synchronized.
-Page 22-
Page 23

User Guide Merlin
Help.
To obtain a brief description of the function of any pad, touch the
HELP pad, then touch the pad for which you need further information.
A message will then be displayed. To remove the message and resume
normal operation, touch the HELP pad again.
Find.
The find facility allows the scene or program to be found from its name.
• Touch FIND. The display will prompt for a scene or program
name.
• Use the LATCH and FLASH pads to type in the name to be
searched for.
• When correct, touch the FIND pad again.
The Merlin will find a scene or program with the name entered and
display its scene or program number. Note that if two scenes or
programs are given the same name only the one with the lower number
will be found, and if a scene and a program are given the same name,
only the scene will be found. Touch FIND again to remove the display
and resume normal operation.
-Page 23-
Page 24

Merlin User Guide
More Advanced Operation.
Storing a program to a scene.
If a program is allocated to one or more of the sliders (P001 to P099
displayed) then this can be stored into a scene, just the same as a
selection of channels. When the scene is replayed (by allocating it to a
slider and moving the slider or touching the LATCH pad), the
program will run. This is the same as touching the LATCH pad or
moving the slider which has a program allocated to it, except that the
scene can contain more than one program. All the programs stored in
the scene will run at once, thus allowing some to run at fixed speed or
some to run at different speeds or animated to sound. Channels and
scenes could be stored as well to turn on background lighting when a
program is run, or to turn on a non-intelligent lighting effect at the same
time as running a program on an intelligent luminaire.
Example: If P001 contains a program to draw a square using a
Predator HX, P002 contains a sound animated colour change, and it is
intended to run a Blitzer (or any non-intelligent, or non-externally
controlled luminaire) at the same time (which is connected to a slave
pack on channel C254), all that is necessary is to allocate C254, P001
and P002 to three sliders and save to a scene, say S021. When
S021 is allocated to a slider, it can be used to run all three effects
together.
This technique is used when compiling a lighting show. Individual short
programs which produce certain effects are saved as scenes, these
scenes are then incorporated into a Master program, which when run,
replays the whole lighting show. Step one contains S021, which runs
P001 and P002 and turns on the Blitzer on Channel C254. Step 2 can
contain a different scene which runs other programs.
Note: It is very important when saving scenes containing programs
to remember not to save the scene to a scene number that is used
anywhere in the program. This produces a loop which the Merlin
cannot process. For instance, if the scene to be stored contains
P001 storing it to a scene number which is used anywhere in
program P001 will cause a problem.
If this happens, the Merlin will start to run very slowly, and the touch
pads will take a long time to respond when touched. Turn off the mains
-Page 24-
Page 25

User Guide Merlin
power, insert the memory card in the socket and turn the power back
on. The Merlin will automatically re-load the memory card, allowing you
to start again from your last backup.
A further use for saving programs into scenes is to select the correct
running speed of a program. If the program is saved as "Variable speed"
then the position of its slider when replayed determines the speed. The
slider is then moved to set the speed which produces the best effect.
Then this slider is saved on its own as a scene. By allocating the scene
to a slider, and touching the LATCH pad, the program will run at the
correct speed, because the position of the slider which selects the
speed has been stored in the scene.
Note: Make sure that other sliders that are controlling the same
luminaires are set to off, to make sure that they do not interfere
with program running.
Note: Keep a record of the scene and program numbers that have
been used. It is a good idea to use scenes and programs
sequentially starting at 1 or zero, and just note the last number
used. This avoids accidentally overwriting important scenes or
programs or creating loops which the Merlin cannot process.
Storing a scene into a scene.
It is just as possible to store Scenes into other scenes, as it is programs
and channels. It is done by allocating the required scene to a sliders and
storing the scene using STORE. The main purpose of doing this is to
allow channels to be grouped together to make things easier to
program, or alternatively to replay back more than one scene from a
program step.
For example, if you had a luminaire that occupied 12 DMX channels, it
would not normally be possible to control four of these luminaires
together from the Merlin, because you would in theory need 48 sliders
and the Merlin has only 16. It is likely that most of the DMX channels
occupied would not be required in the program that you are writing, for
instance irises and frost filters would be set the same on all four
luminaires, and maybe you want all the colours and gobos the same.
• Allocate the sliders to the DMX channels controlling the irises for all
4 luminaires, and the frost filters, and any other effect that you will
-Page 25-
Page 26

Merlin User Guide
not be changing during the program.
• Set these to the levels required and save as a scene using
STORE.
By allocating this scene to the sliders, instead of the channels controlling
the unused effect directly; all the irises, frost filters etc. that you do not
want to change, are set with one slider, leaving the others sliders free
to control mirror positions of all four luminaires, or effects that you do
want to change.
Having stored all these items as a scene, it is still possible to control
them directly from their channel numbers if it is necessary to set them
independently. Just set the slider that controls them as a group to off.
Only one scene can be stored as a program step: if you have two scenes
that you want to replay together on a single program step, this can be
achieved as follows:
• Allocate both scenes to sliders,
• Store the sliders as a different scene, with the sliders set to full
level. This new scene can be included in the program step, and will
then activate both scenes that were required.
Note: It is very important when saving scenes containing other
scenes to remember not to save the scene to a scene number that
has already been used. This produces a loop which the Merlin
cannot process.
Use of auto fade
To write a program to produce smooth movement of a x/y mirror
scanner.
• Write a scene containing the x and y positions of the beam from
where you wish the movement to start. In this scene set the Fade
rate to "auto" using the DIM and FADE pads and the SPEED/
FADE RATE control. Enter this scene as step 0 in the program.
• Write scenes containing the x and y positions of the beam at
various points between which it is to scan. In these scenes set the
Fade rate to "auto". Enter these scene into the program.
• Set the program to "variable speed", "fixed speed" or "with step
times".
-Page 26-
Page 27

User Guide Merlin
When the program is run it will start from the scene in step 0, and then
scan smoothly through the other scenes programmed.
For simplicity, it is recommended that any colour and gobo changes are
written in a separate program (otherwise it will also fade between
colours). The two programs can be saved into one scene. When the
scene is activated by allocating it to a slider and touching the LATCH
pad, it will run both movement and colour changing programs together.
If you want to include the colour changing information in the same
program, proceed as follows:
If an auto fade was set, then the colour would also auto-fade, and a slow
colour scroll would take place, taking exactly the same length of time as
the movement
If the effect required were a "snap" colour change, then proceed as
follows:
• Rewrite the program with step 2 moved to step 3
• Then write a new scene for step 2. Use the same x and y positions
as step 1 and the colour from the new step 3.
• Set the length of this step to 0.0 seconds, a zero-length step will
actually take 25ms (a fortieth of a second) so will not be noticeable
When the program is run, it will produce a colour change that takes
place immediately, followed by a smooth sweep between two position
This technique can only be used with the "step times" option set on the
program.
In order to calculate the intermediate positions necessary to
produce the smooth movement, the Merlin requies that the slider
allocations are identical in all scenes which it is to auto-fade
between. If a DMX channel is required to be at zero as part of the auto-
fade program, then it must be included in the scene with the slider at
zero. Otherwise the auto-fade cannot be calculated. In other words, if
the x and y positions of a scanner mirror are controlled by DMX
channels 5 and 6, and are allocated to the first two sliders, then they
must be allocated to the first two sliders in all scenes involved in the
auto-fade (although the sliders may, of course, be at any level)
-Page 27-
Page 28

Merlin User Guide
Continuous rotation on a Datamoon, (or any product where the DMX
data sets the position, not the speed)
• To achieve this, write two scenes for the channel that controls the
rotation of the dish (or gobo in the case of the RAP 250)
For a clockwise rotation, write the first scene at zero, and the second
scene at full level.
For an anticlockwise rotation, write the first scene at full level and the
second scene at zero.
• Write the two scenes into a program, setting the time for the
second scene to be the time required for a full rotation of the dish,
and the first scene to 0.0 seconds.
When run, this will produce continuous rotation of the dish.
Ensure that the time set is sufficiently long for the product to
rotate its dish, otherwise the results may be unpredictable!
When auto-fade programs are run, they will start with the levels set on
the step zero, they do not fade up to the levels set on the first step. This
allows the starting point for a program controlling intelligent lighting to
be defined, otherwise it would start from the bottom left corner and fade
to the levels stored. After the length of time specified for the first step,
it will fade to the levels stored for the second step, taking the length of
time specified for the second step to complete the fade.
It is therefore likely in most applications, that step zero should be given a
very short step time, possibly 0.0 seconds, just to force the luminaires
to start in the correct place when the program is run.
Using specified fade rates instead of Auto
inside programs
If it is required to produce a fade that is triggered by the STEP pad,
or bass beat, then this can only be done by using scenes with fixed fade
times.
Only scenes can fade this way, channels cannot fade. Start off by saving
the channels that you wish to fade individually into scenes, each with the
level at 100% and the fade rate set to the required value. Then make up
the scenes for the program steps using the scenes that you have just
stored, instead of the channel numbers, saving them as "dimmable"
with no fade rate set. Incorporate these new scenes into the program.
-Page 28-
Page 29

User Guide Merlin
When run, the program will fade at the levels specified in the individual
channel scenes, not at any speed relating to the speed of the program.
For example, if the program is to move the Predator HX in white, from
side to side, and the Predator is on channels 5, 6, 7 and 8.
• Write a scene containing just channel 5 at 100%, with the required
fade rate, to Scene 50,
• Write a scene containing just channel 6 at 100%, with the required
fade rate, to Scene 51.
• Now write the scenes forming the steps of the program. Where you
would normally allocate a slider to channel 5 to control the x
movement, allocate it to Scene 50 instead.
• Repeat with Scene 51 instead of Channel 6. Scenes 50 and 51 can
even be allocated to the joystick.
Channel 7 which controls the colour, need not be replaced by a scene,
as it does not fade. The scenes forming the program steps should
contain Scene 50, Scene 51, Channel 7 and Channel 8.
• Store Scene 53 with the beam at the left.
• Store scene 54 with the beam at the right.
• Then write a program containing Scenes 53 and 54. Do not leave
any sliders allocated to scene 50 or scene 51 because they will
prevent the program from running.
When this is run, the beam will move at the speeds written into scenes
50 and 51. Allow enough time in the program step for the scene to
complete its travel. Otherwise, it may start from the wrong place the
next time the scene is used.
For all other applications where fading is required it is recommended
that "auto-fade" is used.
Running two programs simultaneously
If the effect required is the drawing of a pattern in red, then again in
blue, and then green, it becomes time-consuming to program, if the
steps that make the pattern have to be programmed over and over
again. To make the effect quicker to program, it is best written as two
separate programs, which can be run simultaneously.
• Write one program saving only the x and y beam positions in the
-Page 29-
Page 30

Merlin User Guide
scenes that make up the program.
• Write another program saving just the colour and gobo information
If the two programs are then run simultaneously with the "colour"
program run much slower than the beam movement program, the effect
will be the drawing of a pattern in first one colour then the next.
The two programs then could be saved into a scene.
If the scene is activated by allocating it to a slider, it will run both
programs together. If absolute accuracy as to when the colour change
takes place is required, then the "step times " option should be used.
Otherwise, it allows one program to be sound animated, whilst the other
occurs at a constant speed.
This could then be a sound animated beam movement, whilst a colour
scroll takes place at a fixed speed.
RTP1
The RTP1 remote touch panel is the ideal solution where a simplified
user interface to the Merlin is required. Each of the 16 touch pads
remotely operates the corresponding LATCH or FLASH pad on
the Merlin. Thus the Merlin can be programmed and installed out of
reach, and the user can operate is via the RTP1, with no danger of
settings being accidentally changed.
The RTP1 also has 16 inputs for remote switches, ideal in "special
needs" applications.
Details of all other NJD products can be seen on our website:
http://www.njd.co.uk/njd
-Page 30-
Page 31

User Guide Merlin
Appendix A
S922 Channels 1 to 16 S923 Channels 17 to 32
S924 Channels 33 to 48 S925 Channels 49 to 64
S926 Channels 65 to 80 S927 Channels 81 to 96
S928 Channels 97 to 112 S929 Channels 113 to 128
S930 Channels 129 to 144 S931 Channels 145 to 160
S932 Channels 161 to 176 S933 Channels 177 to 192
S934 Channels 193 to 208 S935 Channels 209 to 224
S936 Channels 225 to 240 S937 Channels 241 to 256
S938 Scenes 1 to 16 S939 Scenes 17 to 32
S940 Scenes 33 to 48 S941 Scenes 49 to 64
S942 Scenes 65 to 80 S943 Scenes 81 to 96
S944 Scenes 97 to 112 S945 Scenes 113 to 128
S946 Scenes 129 to 144 S947 Scenes 145 to 160
S948 Scenes 161 to 176 S949 Scenes 177 to 192
S950 Scenes 193 to 208 S951 Scenes 209 to 224
S952 Scenes 225 to 240 S953 Scenes 241 to 256
S954 Scenes 257 to 272 S955 Scenes 273 to 288
S956 Scenes 289 to 304 S957 Scenes 305 to 320
S958 Scenes 321 to 336 S959 Scenes 337 to 352
S960 Scenes 353 to 368 S961 Scenes 369 to 384
S962 Scenes 385 to 400 S963 Scenes 401 to 416
S964 Scenes 417 to 432 S965 Scenes 433 to 448
S966 Scenes 449 to 464 S967 Scenes 465 to 480
S968 Scenes 481 to 496 S969 Scenes 497 to 512
S970 Scenes 513 to 528 S971 Scenes 529 to 544
S972 Scenes 545 to 560 S973 Scenes 561 to 576
S974 Scenes 577 to 592 S975 Scenes 593 to 608
-Page 31-
Page 32

Merlin User Guide
S976 Scenes 609 to 624 S977 Scenes 625 to 640
S978 Scenes 641 to 656 S979 Scenes 657 to 672
S980 Scenes 673 to 688 S981 Scenes 689 to 704
S982 Scenes 705 to 720 S983 Scenes 721 to 736
S984 Scenes 737 to 752 S985 Scenes 753 to 768
S986 Scenes 769 to 784 S987 Scenes 785 to 800
S988 Scenes 801 to 816 S989 Scenes 817 to 832
S990 Scenes 833 to 848 S991 Scenes 849 to 864
S992 Scenes 865 to 880 S993 Scenes 881 to 896
S994 Programs 1 to 16 S995 Programs 17 to 32
S996 Programs 33 to 48 S997 Programs 49 to 64
S998 Programs 65 to 80 S999 Programs 81 to 96
-Page 32-
Page 33

User Guide Merlin
Index
ADJ 22
auto fade 26
Blackout 22
Changing the Slider allocation 8
CHANNEL/SCENE/PROG 11, 14
Connecting a sound input 4
Connecting other inputs 4
Connecting the luminaires 2
Continuous rotation 28
contrast 7
Copying a scene 17
Decimal 16
DEL 10
Delete 18
DIGIT 9
DIL switches 5
DMX 2
EDIT 15
Editing a scene 15
Editing Programs 17
END 13
ENTER 12, 17
ERASE 20
Fade 11
Find 23
fixed speed 13, 14
FLASH 9
Help 23
hexadecimal 16
insert 18
Installation 2
joystick 8
Keyswitch 9
Languages 5
LATCH 9
LOAD 20
luminaires 2
memory card 20
Merge 22
MIDI 5
Midi interface 4
NAME 10, 13
octal 16
-Page 33-
Page 34

Merlin User Guide
OPERATION 7
Percentage 16
Recall 22
Remote Control Interface 4
Replaying a scene 11
Replaying the program 14
RS232 interface 4
RTP1 30
RUN TIMER 18
Running two programs simultaneously 29
SAVE 20
Scene Merge 22
Scene Recall 22
screened-twisted-pair cable 3
SEL 22
Setting the Merlin DIL switches 5
single step 13, 14
slider allocations 8
smooth movement of a x/y mirror 26
sound animated 13, 14
sound input 4
specified fade rates 28
Standards 35
STEP 12, 17
Step 0 12
Step insert and Delete 18
Step Times 18
STORE 10
Storing a program to a scene 24
Storing a scene 10
Storing a scene into a scene 25
Switching Off 19
Technical Specification 35
terminator 3
Variable speed 13
website 30
With step times 13, 14
WRITE 12, 17
Writing a program 12
XLR 2
-Page 34-
Page 35

User Guide Merlin
Technical Specification
Dimensions: 19" x 7U
483 x 310 x 100mm
Minimum mounting
depth:
Weight: 6kg
Power supply: 230V AC 50Hz 20VA
Fuse: T250mA HRC to
Audio Input: RCA Phono connector
Input Impedance: 15kW
Sensitivity: 775mV - 60V rms
DMX outputs: 4 x 5-pin XLR
SCREEN
DATA DATA +
Channels: 256
Scenes: 1000
Programs: 100
Program steps: 10,000 (100 in each
75mm
IEC127
Pin 1 = 0V Ground
(Screen)
Pin 2 = Data−
Pin 3 = Data+
of 100 programs)
Standards
The Merlin complies with:
EN60950 Electrical safety of Information Technology Apparatus
EN20297 Fascia panel Dimensions
EN55103 Electromagnetic Compatibility
-Page 35-
Page 36

Merlin User Guide
Guarantee
This product is guaranteed for a period of two years against faulty components
or manufacture (excluding DMX output drivers) from the date of purchase.
Upon proof of purchase, NJD shall, at its own option, repair or replace the
defective item at no cost to the purchaser.
This guarantee is contingent upon the proper use of the product in the
application for which it is intended and does not cover products that have been
modified, subjected to unusual physical conditions, or electrical conditions
outside its specification, or damaged in any way.
This guarantee is limited to the product only and does not cover carriage costs,
installation costs or travel expenses. Your statutory rights are not affected.
In the event of any problems with this product contact the retailer from which it
was purchased for technical assistance, or e-mail technical@njd.co.uk
NJD Products are distributed by:
Electrovision Ltd.,
Lancots Lane,
Sutton Oak,
St. Helens,
Merseyside,
England.
WA9 3EX
Telephone: +44 1744 745000
Fax: +44 1744 745002
E-mail: sales@electrovision.co.uk
© Copyright N.J.D. Electronics.
Neither the whole nor any part of the information contained in, nor the
product described in this User Guide may be adapted, copied or
reproduced in any form except with the prior written approval of N.J.D.
Electronics.
-Page 36-
 Loading...