

Page 1

QUICK REFERENCE GUIDE
2012 ROGUE
Page 2
01
03
04
05
02
06
07
10
11
12
14
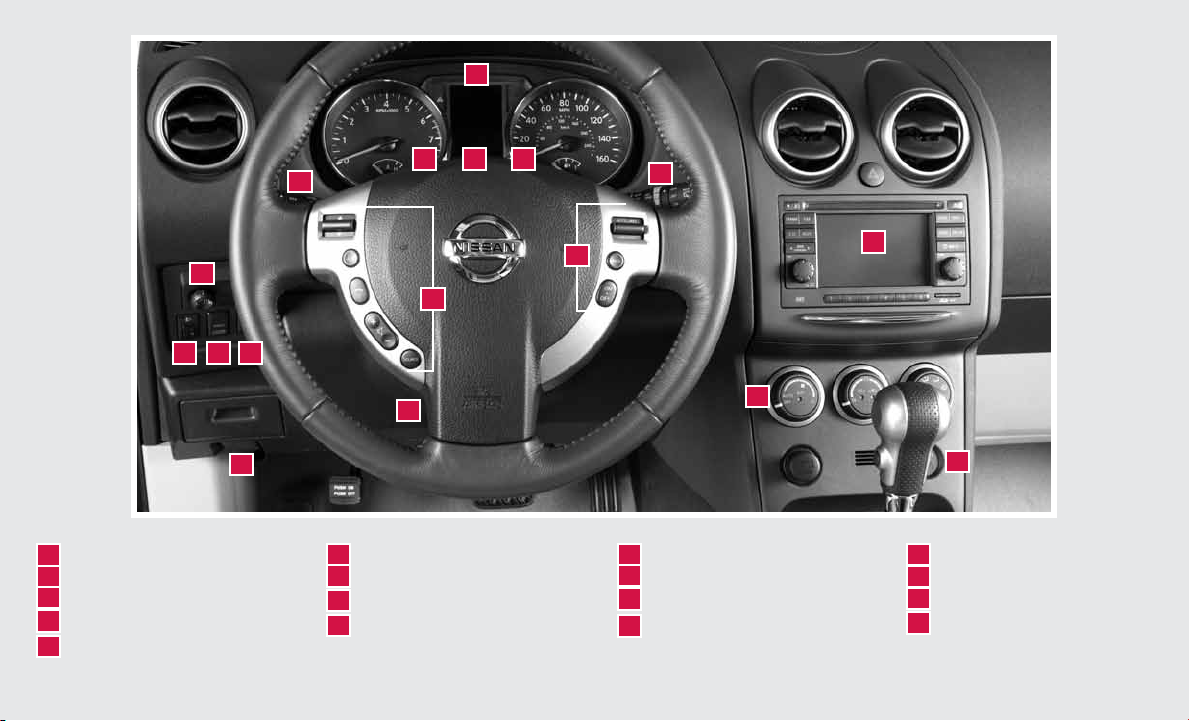
VEHIC LE INFORMATION DISP LAY*
01
HEADLIG HT AND TURN SIGNAL CONTROL
02
LOW TIRE PRESSURE WARNING LIGHT
03
INSTRU MENT BR IGHTNES S CONTROL
04
SWITCH*
TRIP CHAN GE BUTTON*
05
*See your Owner’s Manual for information.
08
13
WINDSHIELD WIPER / WASHER SWITCH
06
OUTSIDE MIRROR CONTROL SWITCH
07
STEERI NG WHEE L SWITCHES FOR
08
AUDIO CONTR OL* / BLUETOOTH
CRUISE CONTROL
09
09
15
16
17
HEADLIG HT AIMING CONTROL*
10 14
AWD LOCK SWITCH*
11
VEHIC LE DYNAMIC CONTROL (VDC)
®
12
OFF SWITCH*
STEERING WHEEL TILT ADJUSTMENT*
13
HOOD RE LEASE*
AUDIO AND NAVIGATION SYSTEM
15
AUTOMATIC CLIMATE CONTROLS
16
FRONT PASSENG ER AIR BAG
17
STATUS LIGHT*
Page 3

NEW SYSTEM FEATURES
Around View™ Monitor (AVM) (if so equipped).......................2
Sport Mode ...................................................2
USB/iPod
®
Interface (if so equipped) ..............................3
Navigation System (if so equipped) ................................3
ESSENTIAL INFORMATION
Loose Fuel Cap . . . . . . . . . . . . . . . . . . . . . . . . . . . . . . . . . . . . . . . . . . . . . . . . 4
Tire Pressure Monitoring System (TPMS)...........................4
Towing Your Vehicle.............................................5
Outside Temperature Display .....................................5
FIRST DRIVE FEATURES
NISSAN Intelligent Key
®
System (if so equipped) ....................6
Liftgate Release (NISSAN Intelligent Key
Power Seat Adjustments (if so equipped)........................... 7
Outside Mirror Control Switch ....................................7
Starting/Stopping the Engine (NISSAN Intelligent Key
if so equipped) .................................................7
Headlight Control Switch ........................................ 8
Windshield Wiper/Washer Switch.................................8
Automatic Climate Controls (if so equipped) ........................9
FM/AM/XM
®
Satellite Radio with CD Player (if so equipped) .........10
Cruise Control ................................................11
Parking Brake.................................................11
TABLE OF CONTENTS
Fuel-Filler Door................................................12
SYSTEM GUIDE
Trip Computer ................................................13
Bluetooth
• A cellular telephone should not be used for any purpose while
driving so full attention may be given to vehicle operation.
• Always wear your seat belt.
• Supplemental air bags do not replace proper seat belt usage.
• Children 12 and under should always ride in the rear seat
properly secured in child restraints or seat belts according to
their age and weight.
• Do not drink and drive.
For more information, refer to the “Safety –– Seats, seat belts and
supplemental restraint system (section 1)”, “Center display, heater, air
conditioner, audio, phone and voice recognition systems (section 4)”
and “Starting and driving (section 5)” of your Owner’s Manual.
Additional information about your vehicle is also available in your
Owner’s Manual, Navigation System Owner’s Manual
®
Hands-free Phone System (if so equipped)...............13
and at www.nissanusa.com.
®
models only - if so equipped) .....6
®
models only -
To view detailed
instructional videos, go to
www.nissanownersinfo.mobi/2012/rogue
or snap this barcode with an
appropriate barcode reader.
This easy-to-use Quick Reference Guide is intended to help you more fully appreciate some of the unique features and functions of your new vehicle. However, it is not intended to replace your Owner’s Manual. The Owner’s Manual contains more
detailed information to help you better understand the important safety warnings, features, operation and maintenance of your
vehicle. All information, specifications, photographs and illustrations in this publication are those in effect at the time of
printing. NISSAN reserves the right to change specifications or design without notice and without obligation.
Page 4
new system features
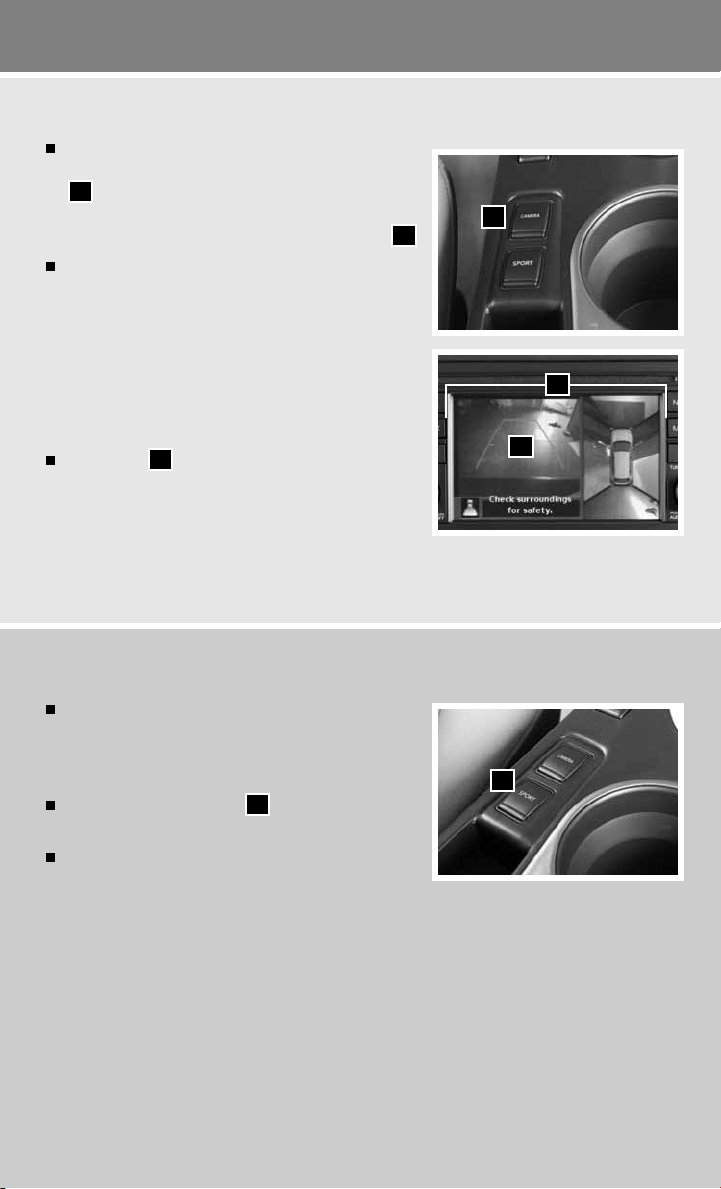
AROUND VIEW™ MONITOR (AVM) (if so equipped)
With the ignition switch in the ON position, the
AVM is activated by pushing the CAMERA switch
01
shift lever to the R (REVERSE) position. The monitor
displays various views of the position of the vehicle
Available views are as follows:
• Bird’s-eye View - The surrounding view of the
vehicle.
• Front-side View - The view around and ahead of
the front passenger’s side wheel.
• Front View - The view to the front of the vehicle.
• Rear View - The view to the rear of the vehicle.
Guide lines
to objects with reference to the vehicle body line.
Note: There are some areas where the system will not
detect objects.
For more information, refer to the “Center display, heater, air conditioner, audio, phone and voice recognition systems
(section 4)” of your Owner’s Manual.
, located on the center console, or by moving the
02
indicate vehicle width and distances
03
.
01
02
03
SPORT MODE
In the SPORT mode, the engine and transmission are
controlled to set the engine speed higher than in the
D (DRIVE) position. This enhances throttle response
for “sporty” driving feeling.
The SPORT mode switch
is located on the
01
center console.
To turn the SPORT mode on, push the SPORT
mode switch. The SPORT mode indicator light in
the instrument panel illuminates. To turn the SPORT mode off, push the SPORT mode
switch again. The SPORT mode indicator light on the instrument panel will turn off.
For more information, refer to the “Starting and driving (section 5)” of your Owner’s Manual.
2
To view detailed instructional videos regarding these and other features,
please go to www.nissanownersinfo.mobi.
01
Page 5
USB/IPOD® INTERFACE (if so equipped)
The USB jack is located in the center
console under the arm rest.
When a compatible USB memory device
or iPod® is plugged into the USB jack
compatible audio files stored on the device
can be played through the vehicle’s audio
system.
For more information, refer to the “Center display, heater, air
conditioner, audio, phone and voice recognition systems
(section 4)” of your Owner’s Manual.
01
,
NAVIGATION SYSTEM (if so equipped)
Your Navigation System can calculate a route from the current location to a preferred destination.
The real-time map display and turn-by-turn voice guidance will lead you along the route.
The Navigation System will continually update your vehicle’s position. If you have deviated
from the original route, it will recalculate the route from your current location.
For more information, refer to your Navigation System Owner’s Manual.
To view detailed instructional videos regarding these and other features,
please go to www.nissanownersinfo.mobi.
3
Page 6

essential information
LOOSE FUEL CAP
A LOOSE FUEL CAP warning message will appear
in the vehicle information display
when the fuel-
01
filler cap is not tightened correctly.
To tighten, turn the cap clockwise until a single click
is heard.
The warning message will disappear when the vehicle
detects the fuel-filler cap is properly tightened and the
reset button
02
is pressed.
If the cap is not properly tightened, the Malfunction Indicator Light may illuminate.
For more information, refer to the “Instruments and controls (section 2)” and the “Pre-driving checks and adjustments
(section 3)” of your Owner’s Manual.
TIRE PRESSURE MONITORING SYSTEM (TPMS)
A CHECK TIRE PRESSURE warning message will
appear in the vehicle information display
low tire pressure warning light
02
one or more tires are low on pressure and air is needed.
After tire pressures are adjusted, drive the vehicle at
speeds above 16 MPH (25km/h) and the warning
and indicator light will disappear.
When the low tire pressure warning light flashes for
approximately 1 minute and then remains on, the
TPMS is not functioning properly. Have the system
checked by a NISSAN dealer.
Tire pressure rises and falls depending on the heat
caused by the vehicle’s operation and the outside
temperature. Low outside temperature can lower the
temperature of the air inside the tire, which can cause
a lower tire inflation pressure. This may cause the low
tire pressure warning light to illuminate. If the warning
light illuminates in low ambient temperature, check
the tire pressure in your tires.
For more information, refer to the “Instruments and controls (section 2)” and the “Starting and driving (section 5)” of your
Owner’s Manual.
01
and the
will illuminate when
01
02
01
02
4
To view detailed instructional videos regarding these and other features,
please go to www.nissanownersinfo.mobi.
Page 7

TOWING YOUR VEHICLE
For proper towing and to avoid accidental damage to your vehicle, NISSAN recommends
that a service operator tow your vehicle after carefully reading the Owner’s Manual precautions.
For more information, refer to the “In case of emergency (section 6)” of your Owner’s Manual.
OUTSIDE TEMPERATURE DISPLAY
When the ignition switch is in the ON position, the
outside air temperature will appear in the vehicle
information display
01
.
If the outside air temperature is below 27°F (-3°C),
the outside temperature display will blink for 20
seconds when the ignition is switched on.
If the outside air temperature is between 27°F and
37°F (-3°C and +3°C), the outside temperature
display will blink continuously with the ignition switch
in the ON position.
To stop the outside temperature display from blinking, perform the following procedure:
1. Press the control change button
until the Settings mode is displayed.
02
2. Turn the control button until it reaches the Alarms mode, then press to select.
3. Turn the control button until it reaches the Outside temp mode, then press to select.
4. Turn the control button until it reaches the Off mode, then press to select.
5. To exit, press the control button again.
For more information, refer to the “Instruments and controls (section 2)” of your Owner’s Manual.
01
02
To view detailed instructional videos regarding these and other features,
please go to www.nissanownersinfo.mobi.
5
Page 8

first drive features
NISSAN INTELLIGENT KEY® SYSTEM (if so equipped)
The NISSAN Intelligent Key® System allows you to lock or
unlock the vehicle, open your liftgate and start the engine.
NOTE: It is important to make sure the Intelligent Key is
with you (that is, in your pocket or purse).
To lock the vehicle, push either door handle request
switch
press the
, push the liftgate request switch
01
button
on the keyfob.
03
To unlock the vehicle, perform one of the following
procedures:
• Push either door handle request switch
or the liftgate request switch
02
corresponding door will unlock. Push the request
switch again within 5 seconds; all other doors
will unlock, or
• Press the
the driver’s side door. Press the
button
on the keyfob to unlock
04
all other doors will unlock.
The Intelligent Key can also be used to activate the
panic alarm by pressing and holding the
for more than 1 second. Once activated, the panic alarm and headlights will stay on for 25 seconds.
For more information, refer to the “Pre-driving checks and adjustments (section 3)” of your Owner’s Manual.
02
, or
once
01
once; the
button again;
button
03
04
05
05
01
02
LIFTGATE RELEASE (NISSAN Intelligent
Key® models only – if so equipped)
To open the liftgate, unlock the liftgate using one
of the following methods:
• Press the button 01 on the keyfob twice.
• Push the liftgate request switch 02 .
Then push the liftgate release switch 03 just above
the license plate and pull the liftgate up.
Note: It is important to make sure the Intelligent Key is
with you (that is, in your pocket or purse).
For more information, refer to the “Pre-driving checks and adjustments
(section 3)” of your Owner’s Manual.
6
To view detailed instructional videos regarding these and other features,
please go to www.nissanownersinfo.mobi.
01
02
03
Page 9

POWER SEAT ADJUSTMENTS (if so equipped)
To slide the seat forward or backward, push the
control switch
To adjust the angle of the seatback, push the switch
02
forward or backward.
forward or backward.
01
01
02
03
SEAT LIFTER (if so equipped for driver’s seat)
To adjust the angle and height of the seat cushion,
push the front or rear end of the switch
01
up or down.
LUMBAR SUPPORT (if so equipped for driver’s seat)
To adjust the seat lumbar area, push the front or back end of the switch
For more information, refer to the “Safety –– Seats, seat belts and supplemental restraint system (section 1)” of your
Owner’s Manual.
03
.
OUTSIDE MIRROR CONTROL SWITCH
To select the right or left side mirror, turn the control
switch right or left.
To adjust the mirror angle, move the control switch
up, down, right or left.
To prevent accidentally moving the mirror, turn and
set the switch to the middle “neutral” position.
For more information, refer to the “Pre-driving checks and adjustments (section 3)” of your Owner’s Manual.
STARTING/STOPPING THE ENGINE (NISSAN Intelligent Key®
models only - if so equipped)
Depress the brake pedal.
Push the ignition switch in.
Turn the ignition switch to START.
NOTE: It is important to make sure the NISSAN Intelligent
Key® is with you (that is, in your pocket or purse).
TURNING THE ENGINE OFF
Move the shift lever to the P (PARK) position, apply the parking brake and turn the ignition
switch to the LOCK position.
For more information, refer to the “Starting and driving (section 5)” of your Owner’s Manual.
To view detailed instructional videos regarding these and other features,
please go to www.nissanownersinfo.mobi.
7
Page 10

first drive features
HEADLIGHT CONTROL SWITCH
Turn the headlight control switch
position to turn on the front parking, side marker, tail,
license plate and instrument panel lights.
Turn the switch
the headlights.
AUTOLIGHT SYSTEM (if so equipped)
The autolight system will automatically turn the headlights on when it is dark and off when
it is light.
The autolight system will keep the headlights on for a period of time after you turn the ignition
off and all doors are closed.
To activate the autolight system, turn the headlight control switch
then turn the ignition switch to ON. To deactivate the autolight system, turn the headlight
control switch
FOG LIGHT SWITCH (if so equipped)
NOTE: The headlights must be on and the low beams
Turn the switch (inside collar)
Turn the switch (inside collar)
For more information, refer to the “Instruments and controls (section 2)” of your Owner’s Manual.
to the
01
01
to the OFF, or
to the
01
position to turn on
to the
02
02
to the OFF position to turn the fog lights off.
01
01 to
position.
selected for the fog lights to operate.
position to turn the fog lights on.
02
the AUTO position
WINDSHIELD WIPER/WASHER SWITCH
Move the lever to the following positions to operate
the windshield wipers:
01 Intermittent (INT) – Front wipers operate
intermittently.
02 Low (LO) – Front wipers operate at a
continuous low-speed.
03 High (HI) – Front wipers operate at a
continuous high-speed.
04 Rear Wiper (REAR) – Twist the end section to
operate the first (INT) or second (ON) speed settings for the rear wiper.
Pull the lever toward you to activate the front washer. The front wipers will operate several times.
Push the lever forward to activate the rear washer. The rear wiper will operate several times.
For more information, refer to the “Instruments and controls (section 2)” of your Owner’s Manual.
8
To view detailed instructional videos regarding these and other features,
please go to www.nissanownersinfo.mobi.
01
02
03
04
Page 11

01
02
03
05
04
AUTOMATIC CLIMATE CONTROLS (if so equipped)
01
FAN SPEED CONTROL DIAL/A/C BUTTON
Turn the fan speed control dial to the left (low) or right (high) to control fan speed.
Turn the dial all the way to the left to turn the system off.
02
TEMPERATURE CONTROL DIAL
Turn the temperature control dial
dial to the left for cooler air or right for warmer air.
03
AIR FLOW CONTROL DIAL
The air flow control dial allows you to select the air flow outlets. Air will flow from center
vents, side vents, foot outlets and defroster outlets as indicated by the icons.
04
DEFROSTING/DEFOGGING FRONT AND S IDE WINDOWS
Turn the air flow control dial
05
REAR WINDOW AND OUTSIDE MIRROR (if so equipped) DEFROSTE R SWITCH
Push the rear window defroster switch
For more information, refer to the “Instruments and controls (section 2)” and the “Center display, heater, air conditioner,
audio, phone and voice recognition systems (section 4)” of your Owner’s Manual.
02
to select the desired temperature. Turn the control
03
to the front window defroster mode
to turn the system on or off.
.
To view detailed instructional videos regarding these and other features,
please go to www.nissanownersinfo.mobi.
9
Page 12

first drive features
05 06
03
01
04
02
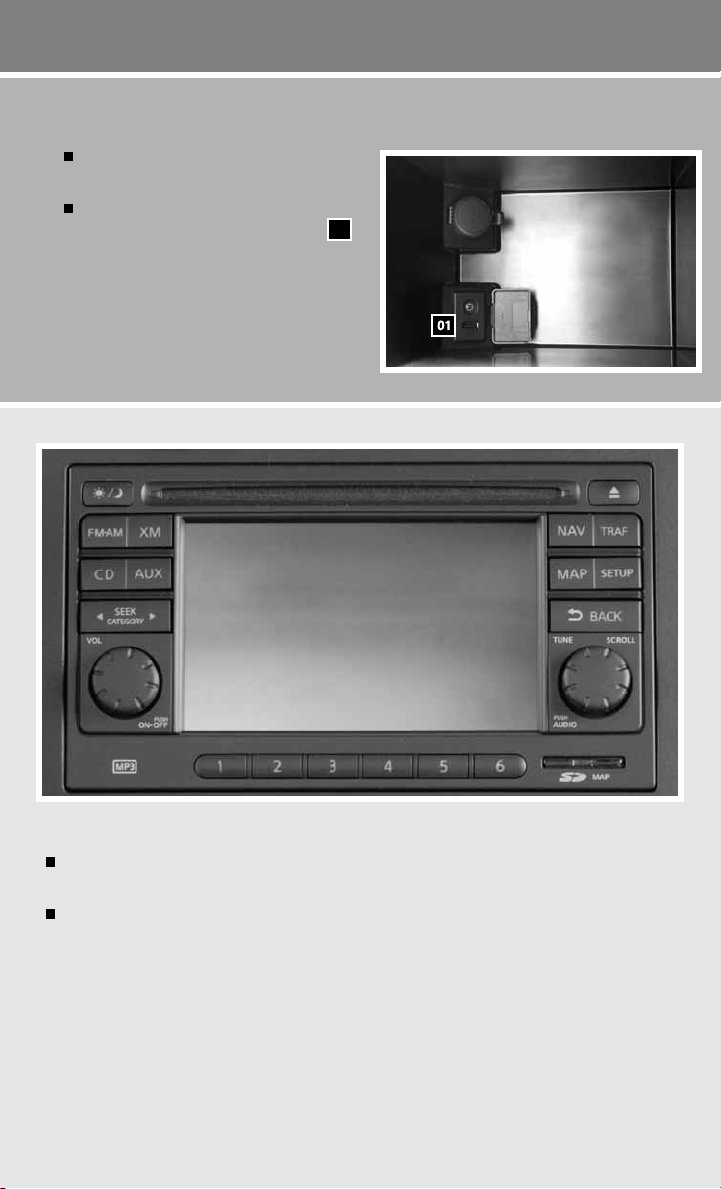
FM/AM/XM®* SATELLITE RADIO WITH CD PLAYER (if so equipped)
01
VOL/ON•OFF CONTROL KNOB
Press the VOL/ON•OFF control knob to turn the system on or off.
Turn the VOL/ON•OFF control knob to the right or left to increase or decrease the volume.
02
TUNE/SCROLL/AUDIO KNOB
To manually tune the radio, turn the TUNE/SCROLL/AUDIO knob left or right.
03
SEEK/CATEGORY BUTTONS
To scan through each broadcasting station, press the SEEK/CATEGORY buttons.
To skip from one track to another on a CD, press the SEEK/CATEGORY buttons.
When the SEEK/CATEGORY buttons are pressed and held while a CD is playing, the CD
will rewind or fast forward. When the button is released, the CD will play at normal speed.
04
STATION SELECT BUTTONS
Twelve stations can be set for the FM band, six for the AM band and eighteen for XM®
satellite radio.
To store a station in a preset you must first select a radio band by pressing the FM•AM
button 05 or XM button
06
, then tune to the desired AM, FM or XM satellite radio station.
Then press and hold the desired station select button (1-6) until a beep is heard and the
sound is briefly muted. The channel indicator will appear on the display and the sound will
resume. Programming is now complete.
To retrieve a previously set station, select the radio band where the preset was stored
then press the corresponding station select button (1-6).
*XM® Satellite Radio is only available on vehicles equipped with optional XM® satellite subscription service.
For more information, refer to the “Center display, heater, air conditioner, audio, phone and voice recognition systems
(section 4)” of your Owner’s Manual.
10
To view detailed instructional videos regarding these and other features,
please go to www.nissanownersinfo.mobi.
Page 13

CRUISE CONTROL
The cruise control system enables you to set a
constant cruising speed.
The system will automatically maintain the set speed
until you tap the brake pedal, accelerate, cancel or
turn the system off.
To activate the cruise control, push the ON•OFF
switch. The CRUISE indicator light in the instrument
panel will illuminate.
To set cruising speed, accelerate the vehicle to
the desired speed, push the COAST/SET switch and release. The SET indicator light in the
instrument panel will illuminate.
To reset at a faster cruising speed, push and hold the ACCEL/RES switch. When the
vehicle attains the desired speed, release the switch.
To reset at a slower cruising speed, push and hold the COAST/SET switch. Release the
switch when the vehicle slows to the desired speed.
To turn off cruise control, push the ON•OFF switch. Both the CRUISE indicator light and
the SET indicator light in the instrument panel will turn off.
For more information, refer to the “Starting and driving (section 5)” of your Owner’s Manual.
PARKING BRAKE
To apply, firmly depress the parking brake pedal
01
.
To release, firmly press the foot brake
press the parking brake pedal
02
01
and the parking
, then
brake will release.
For more information, refer to the “Starting and driving (section 5)” of your
Owner’s Manual.
To view detailed instructional videos regarding these and other features,
please go to www.nissanownersinfo.mobi.
01
02
11
Page 14

first drive features
FUEL-FILLER DOOR
The fuel-filler door is located on the right, rear side of
the vehicle.
To open the fuel-filler door, pull the left side of the door.
For more information, refer to the “Pre-driving checks and adjustments
(section 3)” of your Owner’s Manual.
12
To view detailed instructional videos regarding these and other features,
please go to www.nissanownersinfo.mobi.
Page 15

system guide
TRIP COMPUTER
With the ignition switch in the ON position, trip
computer
control change button
The following modes can be selected in the display:
• Fuel Economy – displays the current and average
fuel consumption.
• Average Speed – displays the average vehicle
speed since the last reset.
• Driving Distance – displays the distance driven since the last reset.
• Elapsed Time – displays the time since the last reset.
• Range – displays an estimation of the distance that can be driven before refueling.
• Settings – This menu allows you to set the clock, preferences for alerts, maintenance intervals
or language displays. Turn the control change button
and press the button to set.
For more information, refer to the “Instruments and controls (section 2)” of your Owner’s Manual.
BLUETOOTH® HANDS-FREE PHONE SYSTEM (if so equipped)
With an overhead microphone and sound
transmitted through the audio system speakers,
the Bluetooth
Bluetooth wireless technology and voice recognition
to provide hands-free cellular phone communication.
A cellular telephone should not be used while driving
so full attention may be given to vehicle operation.*
01
modes can be selected by pressing the
®
Hands-free Phone System utilizes
02
on the instrument panel.
01
02
02
to select or adjust menu items
CONNECTING PROCEDURE
NOTE: The vehicle must be stationary when connecting the phone.
1. Press the
2. Say: “Connect phone”. The system acknowledges the command and announces the next set
of available commands.
3. Say: “Add phone”. The system acknowledges the command and asks you to initiate connecting
from the phone handset.
4. Initiate connecting from the phone:
The connecting procedure varies according to each cellular phone model. For detailed connecting
instructions and compatible phones, please visit www.nissanusa.com/bluetooth.
When prompted for a Passkey code, enter “1234” from the handset. (The Passkey code is
assigned by NISSAN and cannot be changed.)
5. Say a name for the phone when the system asks you to provide one. You can give the phone
a name of your choice.
*Some jurisdictions prohibit the use of cellular telephones while driving.
For more information, refer to the “Center display, heater, air conditioner, audio, phone and voice recognition systems
(section 4)” of your Owner’s Manual.
button on the steering wheel. The system announces the available commands.
To view detailed instructional videos regarding these and other features,
please go to www.nissanownersinfo.mobi.
13
Page 16

go to www.nissanownersinfo.mobi/2012/rogue
or snap this barcode with an appropriate barcode reader.
Nissan, the Nissan Brand Symbol, Z and
Nissan model names are Nissan trademarks.
© 2011 Nissan North America, Inc.
QR2E 0S35U0
Printing: July 2011 (10)
To view detailed instructional videos,
 Loading...