

Page 1

Thank you for purchasing a NISSAN automobile. This user’s manual is for the navigation
system only.
Please read this manual carefully to ensure safe
operation of the navigation system.
쐌 Please read your vehicle’s owner’s manual
first.
쐌 Do not remove this manual from the vehicle
when selling this vehicle. The next user of
this navigation system may need the
manual.
쐌 Because of possible specification changes,
parts of this manual may not apply to your
vehicle.
쐌 All information, specifications and illustra-
tions in this manual are those in effect at the
time of printing. NISSAN reserves the right
to change specifications or design at any
time without notice.
Page 2

CONTENTS
INTRODUCTION .............................................................................. 1-1
HOW DOES THE NISSAN NAVIGATION SYSTEM WORK?............................. 2-1
WHAT FEATURES ARE AVAILABLE ON THE NISSAN NAVIGATION SYSTEM? .... 3-1
HOW DO I OPERATE THE NISSAN NAVIGATION SYSTEM? .......................... 4-1
HOW DO I PROGRAM A DESTINATION?................................................. 5-1
HOW DO I USE THE POINT OF INTEREST (POI) FEATURE? ......................... 6-1
HOW DO I USE THE ADDRESS BOOK FEATURE? ...................................... 7-1
HOW DO I USE THE AVOID AREA FEATURE? .......................................... 8-1
HOW DO I USE THE AUTOMATIC REROUTING FEATURE? ........................... 9-1
HOW DO I USE THE VOICE GUIDANCE FEATURE? ................................... 10-1
HOW DO I ADJUST THE DISPLAY? ..................................................... 11-1
HOW DO I OPERATE THE AUTOMATIC TEMPERATURE CONTROLS?............. 12-1
HOW DO I OPERATE THE AUDIO SYSTEM? ........................................... 13-1
INFORMATION ON MAP DATA DISCS.................................................. 14-1
TROUBLESHOOTING GUIDE .............................................................. 15-1
INDEX ........................................................................................ 16-1
Page 3

Page 4

How to use this manual .............................. 1-2
For safe operation ................................. 1-2
Reference symbols................................. 1-2
Safety note................................................... 1-2
1 INTRODUCTION
Page 5

INTRODUCTION
HOW TO USE THIS
MANUAL
This manual uses special words and icons, organized by function. Please refer to the following items and familiarize yourself with them.
The display and control panel are combined for
Pathfinder model navigation system.
FOR SAFE OPERATION
WARNING
This is used to indicate the presence
of a hazard that could cause death or
serious personal injury. To avoid or
reduce the risk, the procedures must
be followed precisely.
1-2
CAUTION
This is used to indicate the presence
of a hazard that could cause minor or
moderate personal injury or damage
to your vehicle. T o avoid or reduce
the risk, the procedures must be followed carefully.
NOTE:
This indicates an item to help you understand the maximum performance of your
vehicle. If ignored, it may lead to a
breakdown or poor performance.
REFERENCE SYMBOLS
INFO:
This indicates information necessary for efficient use of your vehicle or accessories.
DEST button
This is a button on the control panel.
View key
This is a select key on the screen. By selecting this key you can proceed to the
next function.
SAFETY NOTE
This system is primarily designed to help you
reach your destination, and also performs other
functions as outlined in this manual. However,
you, the driver , must use the system safely and
properly. Information concerning road conditions, traffic signs and the availability of services may not always be up-to-date. The sys-
tem is not a substitute for safe, proper,
and legal driving.
Before using the navigation system, please
read the following safety information. Always
use the system as outlined in this manual.
Page 6

WARNING
쐌
When the driver operates the navigation system or uses the joystick
(screen function), first park the vehicle in a safe place and set the
parking brake. Using the system
while driving can distract the
driver and may result in a serious
accident. Destinations cannot be
set while the vehicle is in motion.
쐌
Do not rely on voice guidance
alone. Always be sure that all driving maneuvers may be made legally and safely to avoid an accident.
쐌
Do not disassemble or modify this
system. If you do, it may result in
accidents, fire, or electrical
shock.
쐌
Do not use this system if you notice any malfunction such as a frozen screen or lack of sound. Continued use of the system may result in accident, fire, or electrical
shock.
쐌
In case you notice any foreign object in the system hardware or
spilled liquid, or notice smoke or
a smell coming from it, stop using
the system immediately and contact your nearest NISSAN dealer.
Ignoring such conditions may lead
to accidents, fire, or electrical
shock.
NOTE:
Some states/provinces may have laws
limiting the use of video screens while
driving. Use this system only where legal.
INTRODUCTION
1-3
Page 7

Page 8

2 HOW DOES THE NISSAN NAVIGATION SYSTEM WORK?
What is a navigation system?..................... 2-2
About the navigation system ................ 2-2
What is GPS (Global Positioning
System)? .................................................... 2-2
Accuracy of positioning.......................... 2-2
Positioning adjustment........................... 2-3
Receiving signals from GPS satellites ... 2-3
Display of GPS informa tion ................... 2-3
Detailed map coverage areas (MCA) for the
navigation system ....................................... 2-4
Page 9
HOW DOES THE NISSAN NAVIGATION SYSTEM WORK?
WHAT IS A NAVIGATION
SYSTEM?
ABOUT THE NAVIGATION SYSTEM
This navigation system combines the data obtained from the vehicle (by gyro sensor) and
from GPS (Global Positioning System) satellites to calculate the current location of the vehicle. This position is then displayed on the
screen, allowing route guidance to a destination.
WHAT IS GPS (GLOBAL POSITIONING SYSTEM)?
GPS is a system developed and operated by the
U.S. government, covering the entire globe.
This navigation system receives three or more
different radio signals from NAVSTAR (GPS
satellites), orbiting the earth 13,049 miles
(21,000 km) above ground. The data from different sets of signals will be trigonometrically
calculated to obtain the position of the vehicle.
2-2
INFO:
The tracking center in the US, controls signals
transmitted from GPS satellites. This control
sometimes results in reduced accuracy or no
signal received at all.
ACCURACY OF POSITIONING
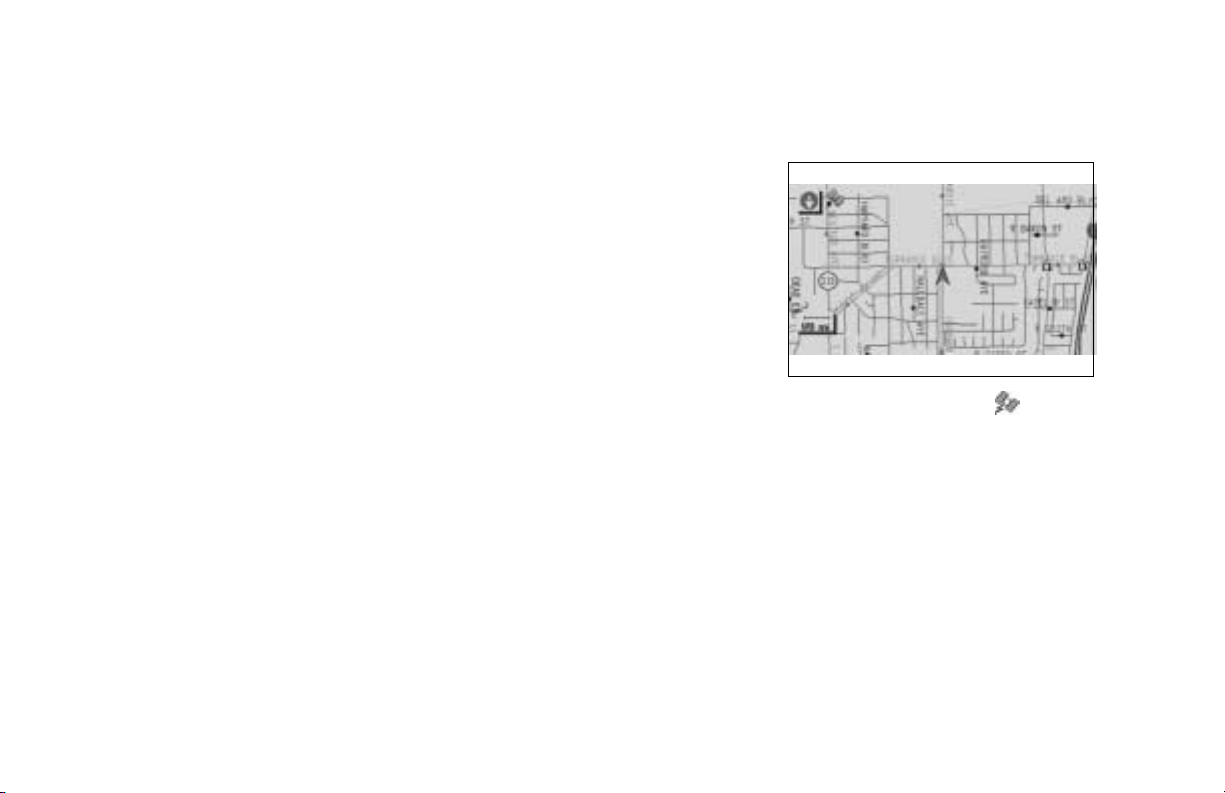
INV0255
The color of the GPS Indicator on the upper left corner of the screen indicates positioning as follows:
쐌 Green: When positioning is possible and
accurate
쐌 Yellow: When positioning is possible but
not accurate
쐌 Gray: When positioning is not possible
Page 10

HOW DOES THE NISSAN NAVIGATION SYSTEM WORK?
INFO:
For approximately 3 or 4 minutes after system
startup, the GPS indicator
even if accurate positioning is possible.
remains gray,
POSITIONING ADJUSTMENT
When the system judges that the vehicle position information is not accurate based on vehicle speed and gyro sensor data calculations,
the system will adjust the vehicle position information using GPS signals.
RECEIVING SIGNALS FROM
GPS SATELLITES
Sometimes, satellite reception is weak. The following are places where signals tend to be
weak:
쐌 Inside tunnels and parking lots in buildings
쐌 Areas with numerous tall buildings
쐌 Under multi-layered highways
쐌 In a dense forest
Vehicles in these areas may not receive GPS
signals (Indicator color: gray).
INFO:
The antenna for GPS is located in the instrument panel inside the vehicle. Do not place
any object, especially mobile phones or
transceivers, on the instrument panel.
Because the strength of the GPS signals is approximately one billionth of that of TV waves;
phones and transceivers will decrease the
strength or may totally disrupt the signals.
DISPLAY OF GPS INFORMATION
This system displays GPS information.
Please refer to “GPS information display” on
page 11-12.
NOTE:
The navigation system does not take
driving in carpool lanes into consideration for the guidance.
2-3
Page 11

HOW DOES THE NISSAN NAVIGATION SYSTEM WORK?
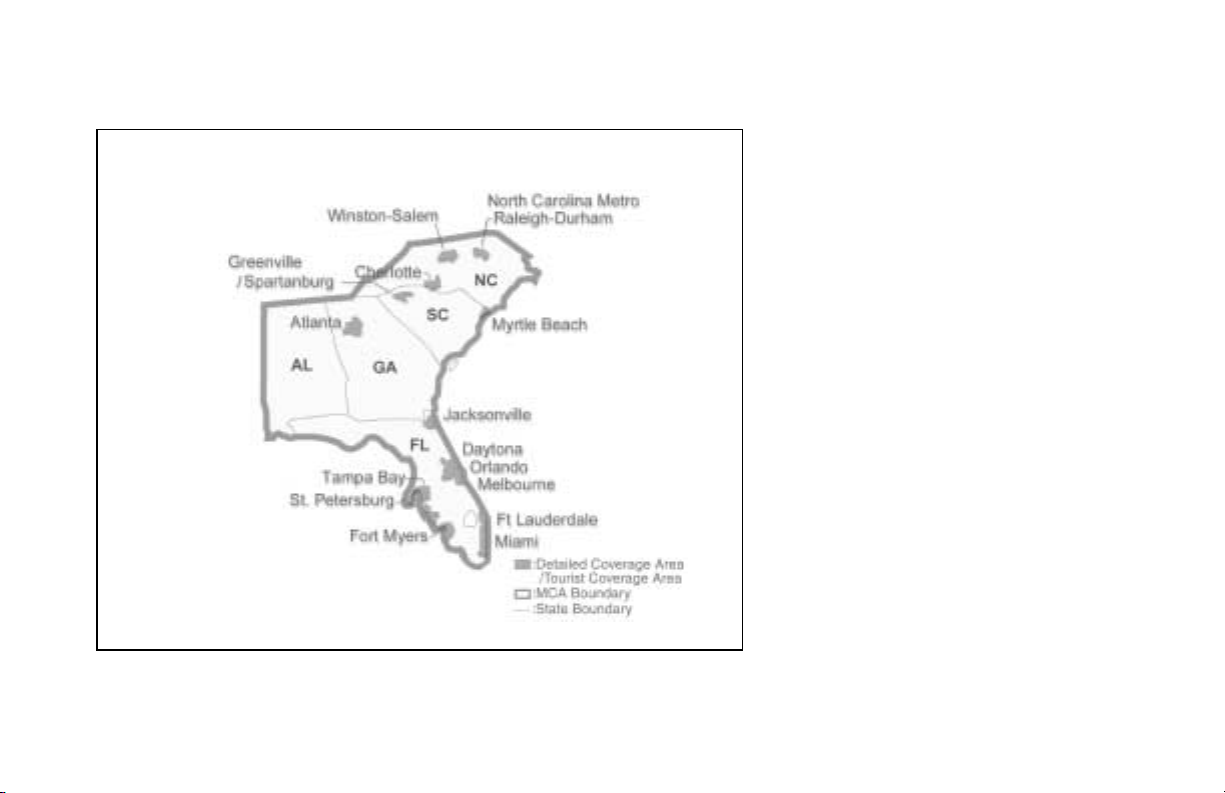
DETAILED MAP COVERAGE
AREAS (MCA) FOR THE
NAVIGATION SYSTEM
This system is primarily designed to help you
reach your destination, and also performs other
functions as outlined in this manual. However,
you, the driver , must use the system safely and
properly. Information concerning road conditions, traffic signs and the availability of services may not always be up-to-date. The system is not a substitute for safe, proper, and legal driving.
Map data includes major metropolitan areas in
the United States.
Map data consists of map CD-ROM MCA1 to
MCA9. For information about map CD-ROMs,
contact a NISSAN dealer.
Map data includes 2 types of areas: “Detailed
coverage areas” providing all detailed road
data and other areas showing main roads only.
2-4
The route calculation may not be made on the
border of the map coverage area and the other
areas.
When driving from one map coverage area
(MCA) into another: No map information is
displayed on the screen when the vehicle is
driven past the mapping border into the new
area. Only the vehicle position icon is displayed on the screen. The screen will become
gray indicating that you are outside the MCA
covered by the mapping CD. Replace the current map CD with the new map CD that contains the information for the new area in which
you are driving. Map information will then be
displayed on the screen for the new area.
NOTE:
Waypoints and destinations cannot be
set for positions outside of a map coverage area. Once the new Map CD is installed, you will need to reprogram the
waypoints and final destination.
Page 12
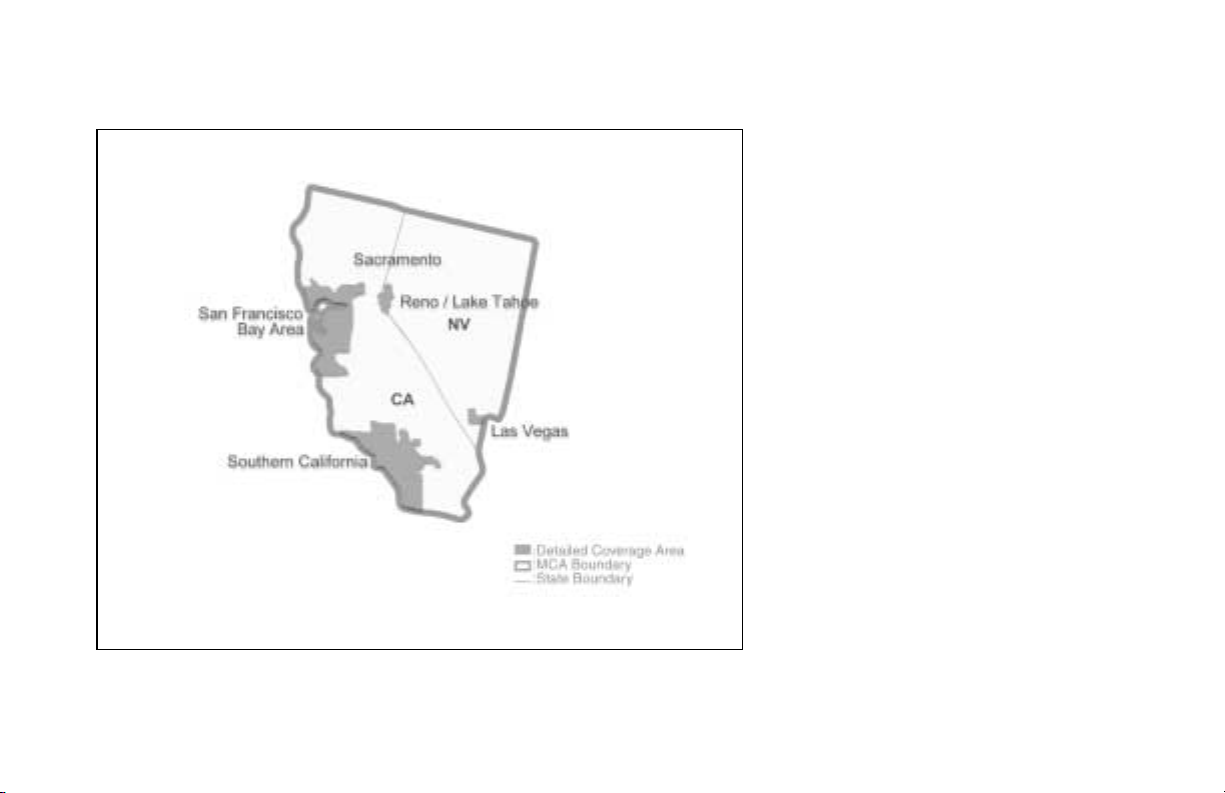
HOW DOES THE NISSAN NAVIGATION SYSTEM WORK?
Map Coverage Area (MCA) 1
INI0040
2-5
Page 13
HOW DOES THE NISSAN NAVIGATION SYSTEM WORK?
INI0041
Map Coverage Area (MCA) 2
2-6
Page 14
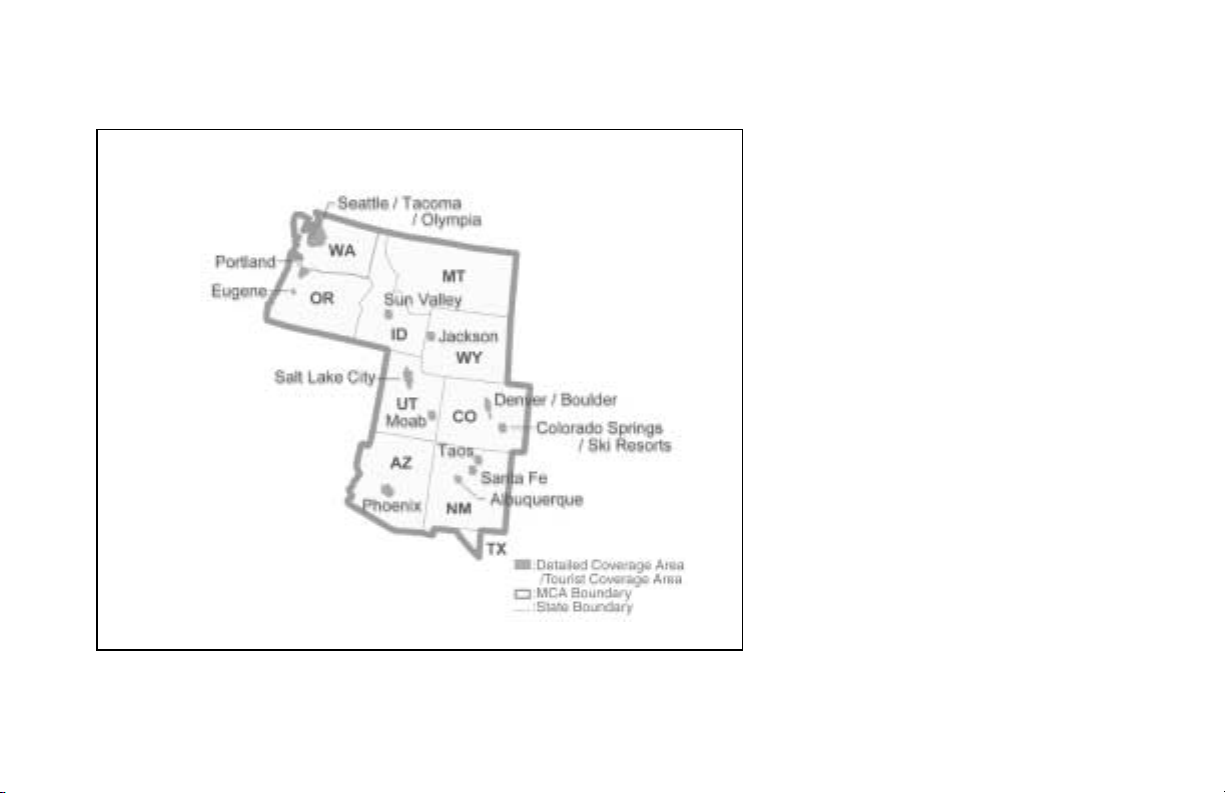
HOW DOES THE NISSAN NAVIGATION SYSTEM WORK?
Map Coverage Area (MCA) 3
INI0042
2-7
Page 15
HOW DOES THE NISSAN NAVIGATION SYSTEM WORK?
INI0043
Map Coverage Area (MCA) 4
2-8
Page 16
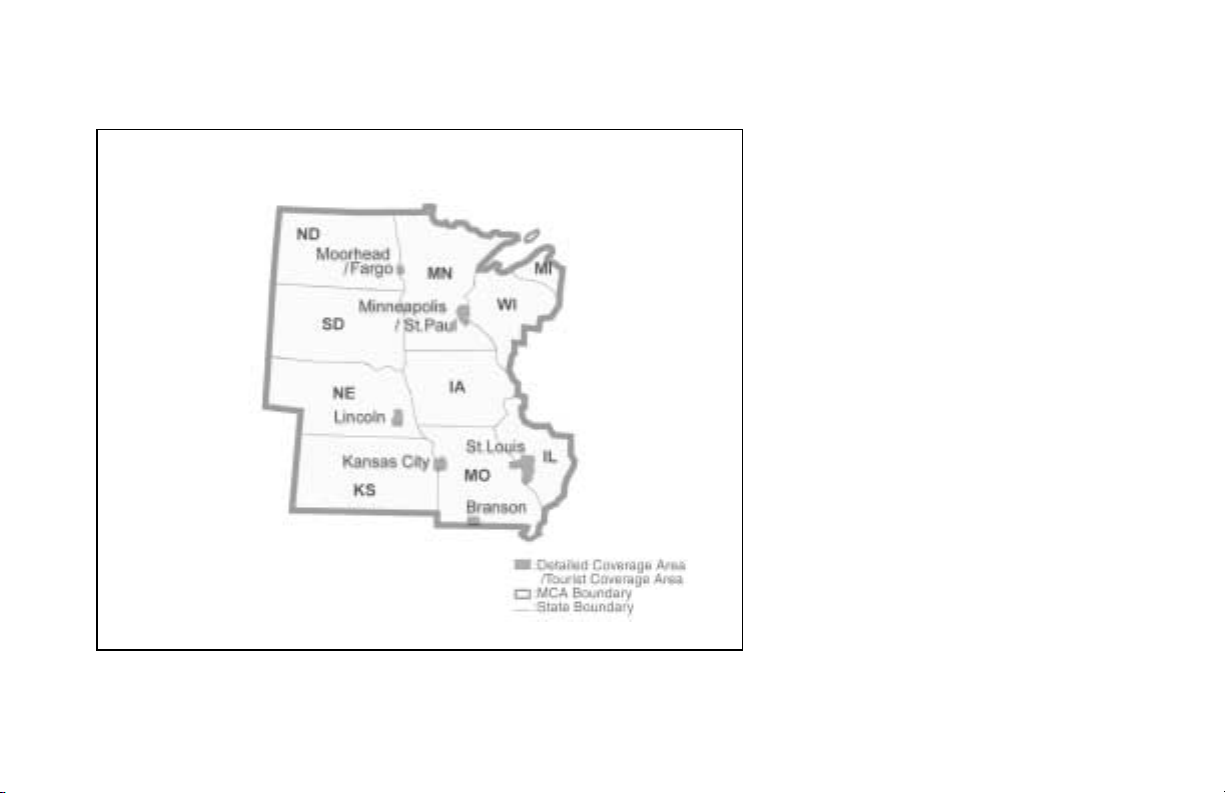
HOW DOES THE NISSAN NAVIGATION SYSTEM WORK?
Map Coverage Area (MCA) 5
INI0044
2-9
Page 17

HOW DOES THE NISSAN NAVIGATION SYSTEM WORK?
INI0039
Map Coverage Area (MCA) 6
INFO:
Map data also contains part of the information
about the vicinity of Detroit.
2-10
Page 18
HOW DOES THE NISSAN NAVIGATION SYSTEM WORK?
Map Coverage Area (MCA) 7
INFO:
Map data also contains part of the information
about the vicinity of Philadelphia.
INI0045
2-11
Page 19
HOW DOES THE NISSAN NAVIGATION SYSTEM WORK?
INI0046
Map Coverage Area (MCA) 8
INFO:
Map data also contains part of the information
about the vicinity of New York City.
2-12
Page 20
HOW DOES THE NISSAN NAVIGATION SYSTEM WORK?
Map Coverage Area (MCA) 9
INI0047
2-13
Page 21

Page 22

3 WHAT FEATURES ARE AVAILABLE ON THE NISSAN
Route guidance............................................ 3-2
Point of interest (POI) directory ................ 3-2
Address book............................................... 3-2
Avoid area.................................................... 3-2
Automatic re-route ...................................... 3-3
Detour.......................................................... 3-3
TM
Birdview
Voice guidance ............................................ 3-3
................................................... 3-3
NAVIGATION SYSTEM?
Page 23

WHAT FEATURES ARE AVAILABLE ON THE NISSAN NAVIGATION SYSTEM?
ROUTE GUIDANCE
The main feature of the Nissan Navigation System is Visual and Audio Route Guidance. Utilizing a network of GPS (Global Positioning
System) satellites, the Nissan Navigation System tracks your location on the map and directs
you where you want to go.
Once you program a destination, The Nissan
Navigation System will determine a route from
your current location to your destination. The
moving map display and turn-by-turn voice
commands helps the driver determine upcoming turns.
This feature can be especially helpful in finding
unfamiliar locations or businesses. The system
may be unable to set a destination and/or calculate distance when a destination is outside
a detailed map coverage area. Additionally, audio route guidance may not be available if the
destination is outside a detailed map coverage
area. For more information on how to program
3-2
a destination, please refer to section 5.
POINT OF INTEREST (POI)
DIRECTORY
The Nissan Navigation System offers an extensive Point of Interest directory for your convenience. This directory includes a wide variety
of destinations ranging from gas stations,
ATMs, and restaurants to casinos, ski resorts,
shopping centers and businesses. By accessing the Point of Interest directory, you can
search for addresses and phone numbers for
a destination, and with a press of a button, the
Nissan Navigation System will calculate a route
to the destination.
The Point of Interest directory offers many
uses. For example, the directory can be sorted
by the various types of restaurants near your
current location. If you need an ATM or gas
station, the Nissan Navigation System can
point you to the closest one or the closest one
of your favorite brand.
For more information on how to use the Point
of Interest directory, please refer to section 6.
ADDRESS BOOK
Using the Address Book feature, you will have
the ability to store up to 50 locations into a personal directory. This is especially useful for
frequently visited locations, such as your clients, relatives, or friends. The Address Book
feature will provide you with easy access to
these frequently visited locations when setting
them as your destination.
For more information on how to use your address book, please refer to section 7.
AVOID AREA
By using the Avoid Area feature, you can identify areas or freeways that you would like the
Nissan Navigation System to avoid when plotting routes. For example, if you know of a freeway or area that is always congested with traffic, you can program the Nissan Navigation
Page 24
WHAT FEATURES ARE AVAILABLE ON THE NISSAN NAVIGATION SYSTEM?
System to plot routes that go around that particular freeway or area.
For more information on the Avoid Area feature, please refer to section 8.
AUTOMATIC RE-ROUTE
If you miss a turn while using the Route Guidance feature, the Nissan Navigation System will
automatically re-calculate a new route to your
destination.
For more information on the Automatic ReRoute feature, please refer to section 9.
DETOUR
If you hear about a traffic accident on the radio
that is 4 miles (6 km) ahead of you and traffic
is backing up fast, you can use the Detour function to calculate an alternative route that will
help you avoid the gridlock caused by the traffic accident. The Nissan Navigation System has
the ability to find an alternative route using secondary roads that will return you to primary
roads after a specified number of miles.
For more information on the Detour feature,
please refer to section 9.
BIRDVIEW
TM
INV0256
The Nissan Navigation System gives you a
choice of two map viewing styles, a normal
2-dimensional PLANVIEW map and the
3-dimensional BIRDVIEW
BIRDVIEW
TM
map depicts a geographic area as
TM
map. The 3-D
seen from an elevated perspective, so you will
get a better feel for the route ahead.
TM
For more information on the BIRDVIEW
fea-
ture, please refer to section 11.
VOICE GUIDANCE
INV0257
Route guidance is executed using voice and
screen instruction. When the vehicle approaches an intersection where you need to
turn, the voice guidance tells you the direction
to take.
The system also has the following useful features:
쐌 Enlarged display of intersections.
3-3
Page 25

WHAT FEATURES ARE AVAILABLE ON THE NISSAN NAVIGATION SYSTEM?
쐌 Automatic re-routing when a vehicle is off
the course (when map is displayed).
For more information on the Voice Guidance
feature, please refer to section 10.
3-4
Page 26

4 HOW DO I OPERATE THE NISSAN NAVIGATION SYSTEM?
Control panel button functions .................. 4-2
Names of the components .................... 4-2
How to use the joystick/touch screen.... 4-3
How to use the keys that appear on the
display .................................................... 4-3
How to change the disc ...................... 4-10
Setting up the start-up screen............. 4-12
Clearing the memory............................ 4-12
About route guidance ................................ 4-13
Notes on route guidance...................... 4-14
About the display error ........................ 4-15
Page 27
HOW DO I OPERATE THE NISSAN NAVIGATION SYSTEM?
CONTROL PANEL BUTTON
FUNCTIONS
4-2
INI0070
NAMES OF THE COMPONENTS
1. OPEN button
Allows access to the mapping software
CD-ROM drive.
Push the OPEN button, and then press
to remove the CD-ROM.
2. MAP button; refer to page 4-3.
Toggles between the intersection and the map
during route guidance. Returns the setting
screen to the map screen.
3. DEST button; refer to page 4-7.
Sets a destination using various methods.
4. ZM− / ZM+ button; refer to page 11-5.
Alters the scale of the map display.
5. JOYSTICK; refer to page 4-3.
Alters the displayed part of the map.
6. D/N button (Day/Night)
Page 28
HOW DO I OPERATE THE NISSAN NAVIGATION SYSTEM?
Changes display brightness.
7. OFF button
Turns off the display.
8. AUTO button; refer to page 12-3.
Displays automatic temperature control.
9. ECON button; refer to page 12-4.
The air conditioner does not activate. When
you need to heat only , use the ECON button.
10.Temperature set knob; refer to page 12-3.
Changes the temperature setup.
11.
Recirculates air within vehicle.
12.
Controls air flow.
13.
Activates the defroster.
button; refer to page 12-4.
button; refer to page 12-5.
button; refer to page 12-5.
14. OFF button
Cancels the display relative to air conditioner
or turns the automatic temperature control off.
HOW TO USE THE
JOYSTICK/TOUCH SCREEN
The system’s basic operation is to select
(touch) the keys displayed on the screen.
The joystick is used to make selections.
Touch the key on the screen with your finger.
NOTE:
To select the key displayed on the
screen, touch it lightly.
Touching the screen with hard objects
such as your finger nails or a pen will
damage or adversely affect the system.
Please refer to “How to handle the display” on page 11-20.
HOW TO USE THE KEYS THAT
APPEAR ON THE DISPLAY
When the buttons on the control panel are
pressed, the display shows keys which are
used for various settings. The keys that appear
on the display when each button is pressed are
explained in this section, while the detailed operations of keys are explained in each section.
Keys that appear when the
MAP
button is pressed
INV0484
4-3
Page 29

HOW DO I OPERATE THE NISSAN NAVIGATION SYSTEM?
After route calculation, the following keys will
appear when the MAP button is pressed in
the enlarged map screen to change to the map
screen.
key:
This will let you choose the orientation of the
map display. One is set with North up, and the
other with the current travel direction up.
INFO:
You do not have a choice when the Birdview
TM
display is selected.
Please refer to “Changing the display direction” on page 11-6.
View key:
This will let you choose between Birdview
TM
display and Planview display.
Please refer to “Switching between Birdview
TM
and planview displays” on page 11-3.
4-4
Voice key:
Provides updated voice command at the current location.
Please refer to “Requesting current voice information” on page 10-4.
INV0485
Setting key:
Performs various adjustments and settings to
help you use the navigation system more effectively.
Cancel key:
Cancels the route guidance.
Please refer to “Turning off route guide temporarily” on page 9-5.
Keys that appear when the
Setting
This will activate various navigational functions.
key is selected
INV0260
Page 30
HOW DO I OPERATE THE NISSAN NAVIGATION SYSTEM?
WARNING
For safety, some of the functions on
the menu will be disabled while the
vehicle is moving. To use the temporarily disabled functions, park the vehicle in a safe place and shift to P or
N, and set the parking brake.
To use the navigation system more effectively,
various adjustments and settings can be performed.
쐌 Select the
Save Current Location key:
Stores the current vehicle location in the address book.
Please refer to “Storing current vehicle position” on page 7-3.
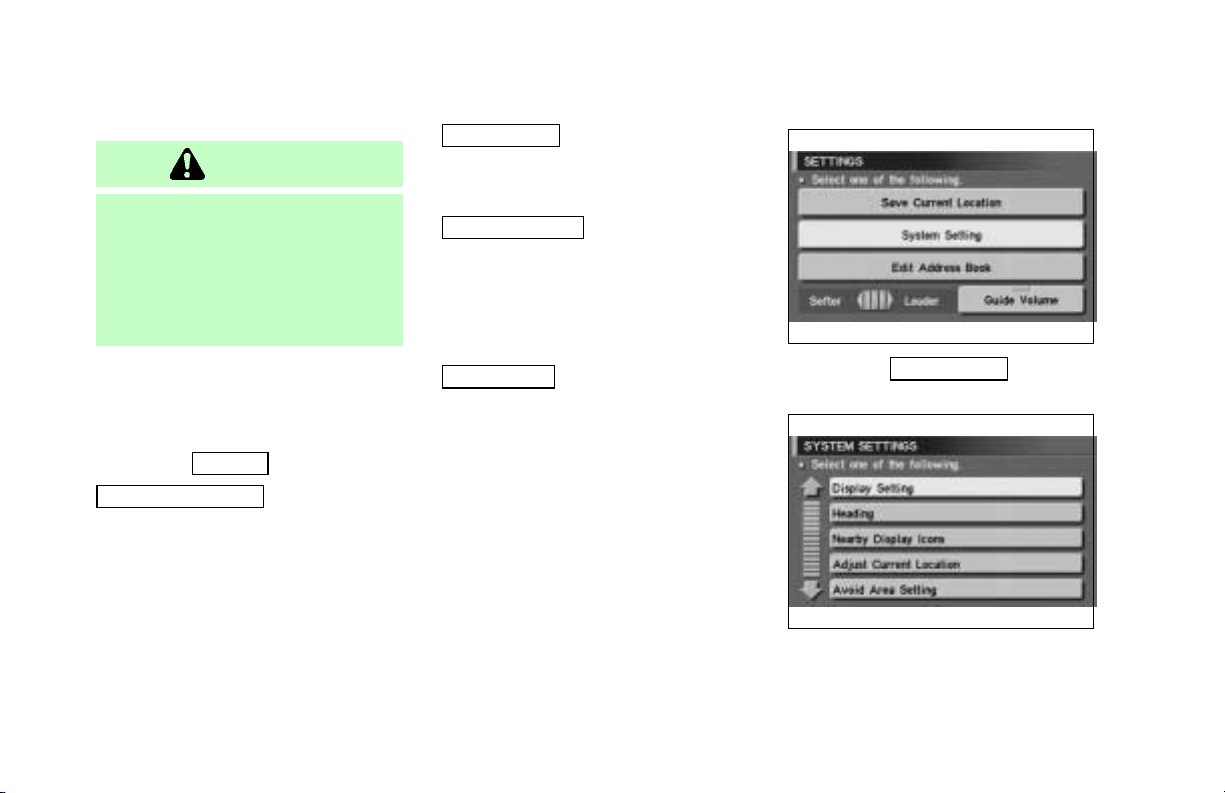
SETTING key.
System Setting key:
Changes various settings of the navigation
system.
Edit Address Book key:
Changes the names and positions of the registered locations.
Please refer to “Setting up and editing the address book” on page 7-2.
Guide Volume key:
Adjusts or turns off volume of the voice guidance.
Please refer to “Adjusting the voice guidance”
on page 10-2.
쐌 Select the
[SETTINGS] screen.
INV0259
System Setting key on the
INV0480
4-5
Page 31

HOW DO I OPERATE THE NISSAN NAVIGATION SYSTEM?
Display Setting key:
Changes the display color of the screen.
Please refer to “Changing the display color” on
page 11-16.
Adjusts the screen brightness.
Please refer to “Adjusting the display brightness” on page 11-18.
Heading key:
You can set the map either to show the vehicle’s current forward direction up, or to show
North up.
Please refer to “Changing the display direction” on page 11-6.
Nearby Display Icons key:
Displays five types of points of interest around
the current location.
Please refer to “Setting the nearby display
icons” on page 6-9.
4-6
Adjust Current Location key:
Corrects the location and direction of the vehicle icon.
Please refer to “Updating the current vehicle location and the direction” on page 11-13.
Avoid Area Setting key:
Defines areas to avoid when calculating a
route.
Please refer to “Avoid area” on page 8-2.
Beep on/off key:
Turns ON/OFF beep sound which occurs automatically.
Please refer to “Setting automatic beep sound”
on page 11-19.
Clear Memory key:
Clears all the stored memory (Address Book,
Avoid Area, Previous Dest.).
Please refer to “Clearing the memory” on page
4-12.
GPS Information key:
GPS information will be displayed.
Please refer to “GPS information display” on
page 11-12.
Quick Stop Customer Settings key:
Sets the user-defined [Quick Stop] POI (Point
Of Interest).
Please refer to “Quick stop” on page 5-26.
Route Priorities key:
Sets the conditions for route search.
Please refer to “Making the system guide the
route with detailed options” on page 5-17.
Tracking key:
You can choose whether to display the path
from the start to the current position.
Page 32

HOW DO I OPERATE THE NISSAN NAVIGATION SYSTEM?
Please refer to “Displaying the track” on page
11-11.
Map & A/C key:
Displays both the map and the air conditioner
information at the same time (two-screen display).
Please refer to “Changing the display mode” on
page 11-15.
Keys that appear when the
DEST
button is pressed
Sets destinations (final destination and
waypoints) to search for a route.
INV0261
This will activate various navigational functions.
WARNING
For safety, some of the functions on
the menu will be disabled while the
vehicle is moving. To use the temporarily disabled functions, park the vehicle in a safe place and shift to P or
N, and set the parking brake.
쐌 Address Book key:
Use this category item if you want to go to
places stored in the address book.
Please refer to “Setting with
Address Book key” on page 5-3.
Previous Dest. key:
쐌
You can choose destinations from the last 10
destinations set.
For details, please refer to “Setting with
Previous Dest. key” on page 5-4.
쐌
Address/Street key:
Use this category item if you know the city
name, street name and house number of the
destination (waypoints).
Please refer to “Setting with
Address/Street key” on page 5-6.
쐌
Intersection key:
4-7
Page 33

HOW DO I OPERATE THE NISSAN NAVIGATION SYSTEM?
Sets a destination using the intersection of 2
streets.
Please refer to “Setting with
key” on page 5-8.
Point of Interest (POI) key:
쐌
Use this category item if you want to go to restaurant, hotel, gas station or other facilities.
Please refer to “Setting with
Points of Interest (POI) key” on page 5-11.
City key:
쐌
Sets the destination (waypoint) on the map
screen of the area around the input city.
Please refer to “Setting with
page 5-11.
Map key:
쐌
Use this category item if you want to choose
the place directly on the map display.
4-8
Intersection
City key” on
Please refer to “Setting with
page 5-13.
Map key” on
Touch keys that appear when the
screen is touched
Sets the function which is convenient for the
route guidance to the destination.
When the screen it touched with the map indicating the current location displayed, the following keys will appear on the screen.
INFO:
When no operations are executed after a few
seconds, the keys will disappear automatically .
INV0262
Quick Stop key:
Selects the destination (waypoint) from a list of
5 commonly used POI (Points of Interest).
Please refer to “Quick stop” on page 5-26.
Where am I key:
Displays the street where the vehicle is currently located, the previous intersection, and
the upcoming intersection.
Please refer to “Where am I” on page 5-29.
Page 34

HOW DO I OPERATE THE NISSAN NAVIGATION SYSTEM?
Route Info key:
Displays the route to the destination. There are
three types of display methods.
Complete Route key:
Displays all the routes from the current location to the destination.
Please refer to “Displaying the complete
route to the destination” on page 11-8.
Turn List key:
Displays a list of the guidance points in all
the routes to the destination on a simple
map.
Please refer to “Displaying turn list” on
page 11-9.
Route Simulation key:
Performs a simulation drive on the map
screen by moving a vehicle icon on all the
routes from the current location to the destination.
Please refer to “Requesting the simulation
drive to the destination” on page 11-10.
Detour key:
When the route is congested with traffic, a detour can be calculated using various distances.
Please refer to “Detouring from the route temporarily” on page 9-4.
Edit Route key:
Resets the set destination (waypoint).
Please refer to “Making the system guide the
route with detailed options” on page 5-17.
Keys that appear when the map
is scrolled with the joystick
You can scroll the map display and get information about the area near your vehicle and the
destination using the joystick.
INFO:
쐌 This function can be used when the original
map disc is inserted.
쐌 You can operate this with the map display
on.
쐌 This function cannot be used when the sys-
tem is calculating the route or drawing the
screen.
Store Place key:
You can store the location with the cross
pointer.
Please refer to “Storing current vehicle position” on page 7-3.
Destination key:
You can store the position to the destination,
using the cross pointer . The maximum number
of destinations is six, and the last one stored
will be the final destination. (# will appear on
the map to denote the selected locations from
1 to 6.) Please refer to “Making the system
guide the route with detailed options” on page
5-15.
4-9
Page 35

HOW DO I OPERATE THE NISSAN NAVIGATION SYSTEM?
Previous key:
This has two functions.
쐌 Go back to the previous display (cancel).
If you touch this key during setup, the setup
will be canceled and the display will return to
the previous screen.
쐌 Finish setup.
If you touch this key after the setup is completed, the setup will be renewed as directed,
and the display will return to the map.
4-10
Decision on destination:
INV0486
If you touch the map screen after moving the
joystick,
touch. It is possible to set that point as the destination (waypoint) by touching the
Destination key.
will be displayed at the point you
HOW TO CHANGE THE DISC
INFO:
The ignition key must be in the ON or ACC po-
sition to insert or remove CDs.
This device is provided with the map CD-ROM.
NOTE:
The ignition key must be in the ON or
ACC position to insert or remove CDs.
Page 36

How to eject/insert the disc
1. Press the OPEN button.
The display will tilt forward.
HOW DO I OPERATE THE NISSAN NAVIGATION SYSTEM?
INI0011 INI0012
2. Open the display to the fully locked position.
INI0010
3. To insert a disc:
It will be drawn in automatically. You do not
have to push it in all the way.
To eject the disc:
Press the
button.
4. Close the display.
INI0013
4-11
Page 37

HOW DO I OPERATE THE NISSAN NAVIGATION SYSTEM?
CAUTION
쐌
Close the display while driving to
prevent injury in an accident or
sudden stop.
쐌
Do not put any object on the open
display screen.
쐌
Do not allow the system to get wet.
Excessive moisture such as
spilled liquids may cause the system to malfunction.
4-12
SETTING UP THE START-UP
SCREEN
INV0487
When you turn the ignition key to ACC, the following warning is displayed on the screen:
Read the warning and select the
INFO:
쐌 If you do not touch the
system will not proceed to the next step display.
쐌 If you do not use the navigation system,
press the OFF button for the display.
ENTER key.
ENTER key, this
쐌 When the engine is turned off during route
calculation and then turned on, the [CONFIRMATION OF DEST ./WAYPOINT] screen
will be displayed after the [SYSTEM
START-UP] screen. When continuing the
previous route guidance, select the
key. To edit or delete, select the
key.
OK
Change
CLEARING THE MEMORY
All the stored data (Address Book, Avoid Area,
Previous Dest) can be cleared.
1. Change to the current vehicle location
screen.
2. Select the
Setting key.
Page 38

HOW DO I OPERATE THE NISSAN NAVIGATION SYSTEM?
INV0259 INV0268
3. Select the System Setting key on the
[SETTINGS] screen.
4. Select the Clear Memory key.
5. Select the
Yes key.
INV0269
INV0270
6. When the
Yes key is selected, the stored
data will be cleared, and the [SYSTEM SETTINGS] screen will appear.
ABOUT ROUTE GUIDANCE
NOTE:
The navigation system does not take
driving in “CAR POOL LANES” into consideration for the guidance.
4-13
Page 39

HOW DO I OPERATE THE NISSAN NAVIGATION SYSTEM?
NOTES ON ROUTE GUIDANCE
쐌 The route selected by the system may not
be the shortest, nor are other circumstances
such as traffic jams considered.
쐌 Because of the inevitable difference in road
conditions and circumstances between the
time you use this system and the time the
information was produced from the CD,
there may be discrepancies in roads and
regulations. In such cases, follow the actual
information available.
쐌 During route calculation, the map will not
scroll, however the vehicle icon will move
with the actual vehicle’s movement.
쐌 During route calculation, buttons such as
MAP , DEST , ZM− and ZM+ and
the joystick will be disabled.
쐌 In some cases, after the calculation is com-
plete, it may take some time to get the calculated route on the display.
4-14
쐌 Waypoints that have been passed will not
be covered by the re-routing calculation.
쐌 If you scroll the map while the suggested
route is being drawn, it may take more time
to finish drawing.
쐌 If waypoints are set, the system is calculat-
ing multiple routes between waypoints simultaneously, and the following may result.
— If one section (or more) of the routes be-
tween the waypoints is not found, none of
the route will be displayed.
— The route may not connect completely at
some waypoints.
— The route may require a U-turn close to
some waypoints.
쐌 Route calculation may not be completed in
the following cases.
— If there is no main road within 3.1 miles (5
km) from the vehicle, a message saying so
will appear on the screen. T ry requesting
route calculation when the vehicle is closer
to the main road.
— If there is no main road within 3.1 miles (5
km) from the destination or waypoint, a
message saying so will appear on the
screen. Try setting the location closer to the
main road.
— If the vehicle is too close to the destination
or if there are no branches of the roads to
the destination. A message saying so will
appear on the screen.
— If it is deemed impossible to reach the des-
tination or waypoints because of traffic
regulations, etc.
— If there is only an extremely complicated
route to reach the destination or waypoints.
— If the destination, current vehicle position
or waypoint is within the
— If the setting of
routes to the destination, route calculation
avoid area
avoid areas
.
covers the
Page 40

HOW DO I OPERATE THE NISSAN NAVIGATION SYSTEM?
may not be possible.
쐌 The following may occur when the route is
being displayed.
— Even if you are requesting calculation from
the main road, the origin of the route may
not exactly match the current vehicle position.
— Even if you are requesting calculation to the
destination on the main road, the end of the
route may not exactly match the destination.
— Even if you are requesting calculation from
the main road, the system may show a route
from another main road. This may be because the icon to show the current vehicle
position (vehicle icon) is not set accurately.
In that case, park the car in a safe place and
reset the vehicle icon, or continue driving
to see if the vehicle icon appears on the
main road before requesting route calculation again.
— There are cases in which the system shows
a detoured route to reach the destination or
waypoints, if you set them from memory or
facility information. In order to correct this,
you will have to be careful about the traffic
direction, especially when the lanes with
different travel directions are shown separately. Such places are interchanges and
service areas.
— This system makes no distinction between
limited traffic control and total control
(blockage). It may show a detoured route
even if the road is usable.
— Even if the freeway preference is set to OFF ,
the route may be set on them. To avoid this,
set a waypoint on another road type and request calculation.
— Even if the preference is set as OFF for a
ferry line, the route may be set on it. To
avoid this, set a waypoint on a road and request calculation.
— Ferry lines, except those which accept only
pedestrians, bicycles and motorcycles, are
stored in this system. When using them,
take into consideration the travel time required and operational condition to decide
whether to use them or not.
ABOUT THE DISPLAY ERROR
The following cases may affect the display accuracy of the vehicle’s position or travel direction. The accuracy will return to normal if the
driving conditions return to normal.
— When there is a similar road nearby.
— When the vehicle is traveling on a long
stretch of straight road or series of curves
with a large radius.
— When the vehicle is traveling in an area with
a checkerboard road system.
— When the vehicle is making consecutive S
curves.
— When the vehicle is at a large Y -shaped
junction.
4-15
Page 41

HOW DO I OPERATE THE NISSAN NAVIGATION SYSTEM?
— When the vehicle is on a loop bridge.
— When the vehicle is on a snow-covered or
unpaved road.
— When the vehicle has made several con-
secutive turns or traveled zigzag.
— When the vehicle is rotated on a parking lot
turntable while the ignition switch is OFF.
— Immediately after the vehicle is driven out
of a parking garage or underground parking
lot.
— When the vehicle has different sizes of tires
or tire chains.
— When the vehicle is moved immediately af-
ter the engine is started.
4-16
Page 42

5 HOW DO I PROGRAM A DESTINATION?
Various ways to set the destination (or
waypoint) ..................................................... 5-2
Seven categories .................................... 5-2
Setting with
Setting with
Setting with
Setting with
Setting with
key........................................................ 5-11
Setting with
Setting with
Address Book key ......... 5-3
Previous Dest. key ........ 5-4
Address/Street key ......... 5-6
Intersection key.............. 5-8
Point of Interest (POI)
City key......................... 5-11
Map key ....................... 5-13
Having the system guide you to the
destinations ............................................... 5-15
Making the system guide the route with
easy operation...................................... 5-15
Making the system guide the route with
detailed options.................................... 5-17
Adjusting and deleting the pre-set destination
(waypoints)................................................ 5-23
Quick stop.................................................. 5-26
Where am I?.............................................. 5-29
Page 43

HOW DO I PROGRAM A DESTINATION?
VARIOUS WAYS TO SET
THE DESTINATION (OR
WA YPOINT)
WARNING
To operate the navigation system or
to use the screen functions, first park
the vehicle in a safe place and set the
parking brake. Using the system
while driving can distract the driver
and may result in a serious accident.
5-2
INV0271
SEVEN CATEGORIES
To set the destinations and waypoints, you can
choose from the seven categories described
below. Use these options to choose the best
way to find the route to the destinations and
waypoints.
쐌 Address Book
쐌 Previous Dest.
쐌 Address/Street
쐌 Intersection
쐌 Point of Interest (POI)
쐌 City
쐌 Map
INFO:
쐌 If you set destinations or waypoints, they
will be displayed with icons.
쐌 If you want to go to places close to the
stored locations or facilities, use categories
such as facility, nearby facility or memory
for easier setting.
쐌 When using either the Point of Interest
(POI) or nearby Points of Interest categories, the names called up can be set as the
destination if you do not scroll the screen.
If you want to choose a different place on
the screen from the one called up, you will
have to scroll the screen.
Page 44

HOW DO I PROGRAM A DESTINATION?
SETTING WITH
Address Book
KEY
The Address Book will allow you to store locations in the memory. This is especially useful
for locations that you visit frequently.
Please refer to “Setting up and editing the address book” on page 7-2.
INV0272
1. Press the DEST button.
2. Select the
Address Book key on the
[DEST. SETTING] screen.
The [DEST. SETTING (Address book)] screen
will be displayed.
INV0273
3. Select the item key of your destination
(waypoint) on the [DEST. SETTING (Address Book)] screen to display the [DEST .
SETTING] screen.
INV0274
4. To set the destination (waypoint), select
route priorities and select
OK . Refer to
“Making the system guide the route with
detailed options” on page 5-17.
INFO:
Use the joystick or the
or key to scroll
the display.
5-3
Page 45

HOW DO I PROGRAM A DESTINATION?
INV0275 INV0276
To set new destinations or waypoints from the
previous destinations.
NOTE:
Select the
screen of the area around the specified
destination (waypoint).
5-4
Map key to display the map
쐌 If necessary, operate the joystick to adjust
the location of the destination (waypoint).
Touch the
Destination key to confirm. The
[DEST. SETTING] screen will be displayed.
To set the destination (waypoint), refer to
“Making the system guide the route with
detailed options” on page 5-17.
SETTING WITH
Set key and touch the
Previous Dest.
KEY
This system memorizes the last 10 destinations
previously chosen.
INV0277
1. Press the DEST button.
2. Select the
[DEST. SETTING] screen.
A total of 10 destinations and locations previously set will be displayed.
Previous Dest. key on the
Page 46

HOW DO I PROGRAM A DESTINATION?
INV0278 INV0274 INV0279
3. Select the item key of your destination
(waypoint) on the [DEST. SETTING (Previous Dest.)] screen to display the [DEST.
SETTING] screen.
4. To set the destination (waypoint), select
route priorities and select
“Making the system guide the route with
detailed options” on page 5-17.
OK . Refer to
NOTE:
To slightly after the destination, select
Map key to display the map screen
the
of the area around the specified destination (waypoint).
5-5
Page 47

HOW DO I PROGRAM A DESTINATION?
There are two search methods; direct search by
the street names, and search by the street
names after a city is defined.
INV0284
5. If necessary, operate the joystick to adjust
the location of the destination (waypoint).
Touch the
Setting key and touch the
Destination key to confirm. The
[DEST. SETTING] screen will be displayed.
To set the destination (waypoint), refer to
“Making the system guide the route with
detailed options” on page 5-17.
SETTING WITH
Address/Street
KEY
Sets the destination (waypoint) from the street
names and addresses that you enter.
5-6
INV0280
1. Press the DEST button.
2. Select the
Address/Street key.
NOTE:
The location displayed using the house
number is the vicinity of the locations
corresponding to the house numbers
stored in the data. It may differ from the
actual location.
INV0281
3. A keyboard will be displayed on the [DEST .
SETTING (Address/Street)] screen. Enter
the street name you want to set.
INFO:
It is not possible to enter names if they are not
stored in the CD-ROM.
Page 48

HOW DO I PROGRAM A DESTINATION?
INV0282 INV0283 INV0335
4. Enter the street name of your destination.
For example, enter
5. Enter
U , then select the List key.
The list screen of street names which have
TU at the top will appear.
T , then U.
쐌 If less than 5 suggested streets remain, they
will be displayed automatically.
쐌 The city names and street names will be
displayed.
쐌 Use the joystick or the ON-SCREEN
key to scroll the display.
쐌 Select the
display the input screen for street names.
6. Select one street of your destination.
Previous key on the screen to
7. Enter the house number.
Select the
SETTING] screen.
8. To set destination, select route priorities
or
NOTE:
To slightly after the destination, select
the
area around the house number.
Enter key to display the [DEST.
and select
tem guide the route with detailed options”
on page 5-17.
Map key to display the map of the
OK . Refer to “Making the sys-
5-7
Page 49

HOW DO I PROGRAM A DESTINATION?
쐌 An approximate location corresponding to
the entered house number is displayed. If
necessary, correct the location using the
joystick.
쐌 The location displayed by the calculation
using the house number may differ from the
actual location. In that case, correct the location using the joystick.
INV0285
쐌 Press the PUSH ENTER switch.
쐌 Select the
Dest. key.
5-8
INFO:
For streets with no house numbers stored in
the data, the map of a typical location will be
displayed.
INV0286
The [DEST . SETTING] screen will appear.
Please refer to “Making the system guide the
route with detailed options” on page 5-17.
INFO:
When the city name is known, the street name
can be defined quickly using the
City key.
SETTING WITH
Intersection
KEY
This will allow you to set an intersection as a
destination (waypoints).
INV0287
1. Press the DEST button.
2. Select the
Intersection key.
A keyboard will be displayed.
Page 50

HOW DO I PROGRAM A DESTINATION?
INV0288 INV0289 INV0290
3. Enter the first street name where the destination (waypoint) is located using the keyboard, then select the
List key.
4. Select the first street name using the same
procedures.
INFO:
쐌 For a road where lanes with different traffic
directions are shown separately, the list
shows first street name, second street
name, ...
쐌 When entering a street name, enter a minor
street name as the first street and the calculation will be easier and quicker.
5. Enter the 2nd (intersecting) street name,
then select the
INFO:
If there are less than 5 streets which intersect
the first street, they will be displayed automatically.
List key.
5-9
Page 51

HOW DO I PROGRAM A DESTINATION?
INV0291 INV0292 INV0293
6. Select the name of the second street.
The [DEST . SETTING] screen will appear.
7. To set the destination, select route priorities
then select
system guide the route with detailed options” on page 5-17.
INFO:
To adjust the location of the destination, select
Map key to display the map on which the
the
intersection is indicated.
5-10
OK . Refer to “Making the
쐌 Touch the
INFO:
If necessary, adjust the position using the joystick.
쐌 Select the
Setting key.
Destination key.
The [DEST . SETTING] screen will appear.
To set the destination, refer to “Making the system guide the route with detailed options” on
page 5-17.
INFO:
When the city name is known, the street (intersection) name can be defined quickly using
City key.
the
NOTE:
When the corresponding data does not
Page 52

HOW DO I PROGRAM A DESTINATION?
exist under the following conditions, the
street name list may not be displayed:
쐌 A street name is being input after the
City key has been selected.
쐌 List is being displayed by selection of
the
List key.
INV0294
SETTING WITH
Point of Interest (POI)
The Nissan Navigation System includes a database of Point of Interest (POI) locations such
as restaurants, hotels, and gas station. (ref.
page 6-9.)
By using this feature, you can set a Point of
Interest location as a destination. For details on
how to use the POI feature, please refer to section 6.
KEY
SETTING WITH
Sets the destination (waypoint) on the map
screen of the area in and around the input city .
1. Press the DEST button.
2. Select the
TING] screen.
City key on the [DEST. SET-
City
KEY
INV0316
5-11
Page 53

HOW DO I PROGRAM A DESTINATION?
INV0317 INV0320 INV0274
3. Enter the characters of the city name which
you wish to set as destinations (waypoints)
using the keyboard on the [DEST . SETTING
(city)] screen, then select the
INFO:
쐌 When the
the currently-listed cities will be displayed.
쐌 If less than 5 suggested cities remain, they
will be displayed automatically.
5-12
List key is selected, the data of
List key.
4. Select the city name of your destination
(waypoint) on the [DEST. SETTING (city)]
screen will appear the [DEST . SETTING]
screen.
5. To set the destination (waypoint), select
route priorities and select
“Making the system guide the route with
detailed options” on page 5-17.
OK . Refer to
Page 54

HOW DO I PROGRAM A DESTINATION?
“Making the system guide the route with
detailed options” on page 5-17.
INV0321 INV0322
INFO:
If you select the
dress and telephone number of the facility will
be displayed. If you select the
Enter key, the [DEST . SETTING] screen will
be displayed.
6. To set the destination (waypoint), refer to
“Making the system guide the route with
detailed options” on page 5-17.
Info key in step 4, the ad-
NOTE:
If you select the
map screen of the area around the
specified destination (waypoint) will be
displayed.
If necessary, operate the joystick to adjust
the location of the destination (waypoint).
Touch the
Destination key to confirm.
The [DEST . SETTING] screen will be displayed.
To set the destination (waypoint), refer to
Map key in step 6, the
Setting key and touch the
SETTING WITH
This will enable you to zoom into the map for
detail and set the desired location. This works
best when you know the location geographically, or want to check the geographical surroundings on the map before setting the destinations.
1. Press the DEST button.
2. Select the
Map key.
Map
KEY
INV0323
5-13
Page 55

HOW DO I PROGRAM A DESTINATION?
The map of the entire area will be displayed.
INV0324
3. Operate the joystick to choose the destination (waypoint).
4. Adjust the location using the joystick, and
touch the
5. Select the
Setting key.
Destination key.
The [DEST. SETTING] screen will appear.
INV0488 INV0326
6. Please refer to “Making the system guide
the route with detailed options” on page
5-17.
INFO:
When the
OK key is selected in the [DEST .
SETTING] screen, route calculation starts. If
you want to add destinations, select the
Waypoint key.
5-14
Page 56

HOW DO I PROGRAM A DESTINATION?
HAVING THE SYSTEM
GUIDE YOU TO THE DESTINATIONS
WARNING
To operate the navigation system or
to use the screen functions, first park
the vehicle in a safe place and set the
parking brake. Using the system
while driving can distract the driver
and may result in a serious accident.
The following two methods of system setting
are available for route guidance from the current location to the destination.
쐌 For simple route guidance, destinations can
be selected directly from the map.
쐌 Details can be selected from the menu.
MAKING THE SYSTEM GUIDE
THE ROUTE WITH EASY OPERATION
Direct destination setting on the map makes it
possible to find routes to destinations easily.
This section explains the method for setting
route guidance to a destination by one
waypoint setting.
1. Scroll the map using the joystick to select
the destination.
Align the waypoint to the cross point on the
screen, and touch the
INFO:
The destination (waypoint) settings with the
joystick cannot be performed in Birdview
display.
Setting key.
TM
INV0489
2. Select the
The street name of the destination will be displayed and will be set as destination 1. The
goal mark will be displayed on the map.
Destination key.
5-15
Page 57

HOW DO I PROGRAM A DESTINATION?
INFO:
OK key is selected, the system
Previous key is pressed or the
INV0329
The [DEST . SETTING] screen will appear.
INV0274
쐌 When the
will start route calculation.
쐌 When the
Waypoint key is selected, the [EDIT
ROUTE] screen will appear.
3. Press the MAP button.
4. Scroll the map using the joystick to select
the destination.
Align the destination to the cross point on
the screen, and touch the
Setting key.
INV0330
5. Select the
Destination key.
The street name of the destination will be displayed, and will be set as destination 2. The
goal mark of destination 1 will change to the
waypoint mark, and the goal mark will be displayed at destination 2.
5-16
Page 58

HOW DO I PROGRAM A DESTINATION?
INV0332 INV0333 INV0334
6. Select the OK key.
The [Route Calculation] screen will appear.
INFO:
To cancel the route calculation on the screen,
select the
The map screen will re-appear.
쐌 The suggested route is indicated with a
Stop key.
thick blue line.
When the vehicle travels on the route, the
navigation system will start voice guidance.
쐌 When the vehicle arrives in the neighbor-
hood of the destination, the route guidance
will end automatically with voice guidance.
MAKING THE SYSTEM GUIDE
THE ROUTE WITH DETAILED
OPTIONS
By choosing the destination from the menu,
you can choose detailed options such as
waypoints and calculation conditions and have
the system guide you from the current position
to the destination.
5-17
Page 59

HOW DO I PROGRAM A DESTINATION?
Setting the destination
First, you will have to set the destination. For
now, choose a location from the map display.
INFO:
There are other methods to set the destination.
Please refer to “Seven categories” on page 5-2.
1. Press the DEST button.
The [DEST. SETTING] screen will be displayed.
INV0323
2. Select the
5-18
Map key.
The map centering the current vehicle position
will be displayed.
INV0324
3. Choose the destination by scrolling the
map with the joystick.
Use the cross pointer to set the destination.
INV0491
4. After setting the destination, press the
PUSH ENTER switch to display the
Destination key on the screen.
5. Select the
Destination key.
The destination will be set.
6. Set the route priorities and select the
OK
key to calculate the route.
Page 60

HOW DO I PROGRAM A DESTINATION?
INFO:
쐌 If you select the
OK key at this point,
route calculation will start without any
waypoints.
쐌 Select the
Previous key to display the
[EDIT ROUTE] screen.
INV0274
Setting the waypoints
INV0337
After you set a destination, you can set
waypoints. For now, choose a location from the
map display.
INFO:
쐌 It is possible to display the [EDIT ROUTE]
screen by touch the screen and by selecting
Edit Route key.
the
쐌 The maximum number of destinations and
waypoints that can be set is six (6).
Please refer to “Seven categories” on page 5-2.
1. Select the
key or
key on the [EDIT ROUTE] screen.
INV0323
The [DEST SETTING] screen will be displayed.
2. Select a waypoint destination using one of
the destination selection procedures outlined earlier in the chapter.
5-19
Page 61

HOW DO I PROGRAM A DESTINATION?
INV0274
Select the conditions with high priorities.
Select the key on the screen to turn the indicator light ON or OFF.
INFO:
쐌 When you select the
OK key at this point,
route calculation will start without any additional waypoints.
쐌 Select the
Previous key to display the
[EDIT ROUTE] screen.
5-20
Setting the priorities for route
calculation
After the setting of destinations and waypoints
is completed, set the calculation conditions
such as route type with high priorities.
INV0339
1. Select the
The screen for setting calculation conditions
will appear. The conditions with the indicator
light ON will have high priority.
Priorities key.
INFO:
It is possible to display the [EDIT ROUTE]
screen by touching the screen in the map
screen and by selecting the [Edit Route] key.
INV0340
2. Select the conditions with high priorities.
Select the key on the screen to turn the indicator light ON or OFF.
Shortest Time key:
The route to the destination is calculated so
that you can reach the destination in the shortest time. In some cases, a freeway or toll road
Page 62

HOW DO I PROGRAM A DESTINATION?
with detours may be recommended.
NOTE:
It may not be the shortest time in all
cases.
key:
The route to the destination is calculated so
that it is the shortest distance.
NOTE:
It may not be the shortest distance in all
cases.
Minimize Toll Road key:
The route to the destination is calculated with
minimum use of toll roads.
Minimize FWY key:
The route to the destination is calculated with
minimum use of freeways.
Use Time-Restricted Roads key:
The route using time restricted roads is calculated.
INFO:
The system considers time restricted roads as
whole-day restricted. When the key is set to
OFF, time restricted roads will not be included
in route calculation.
WARNING
When the route is calculated with this
key ON, be sure to obey traffic regulations.
Use Ferry Route key:
Select this key if you prefer routes with ferry
lines.
Auto Reroute key:
Select this key beforehand to set the auto reroute function. The route to return to the suggested route is automatically calculated again
from the location when the vehicle is off the
suggested route during route guidance.
Route calculation and guidance
INV0341
After setting all the items required, you may
proceed to route calculation for guidance. After
the route calculation is completed, the guidance will start automatically.
5-21
Page 63

HOW DO I PROGRAM A DESTINATION?
INFO:
It is possible to display the [EDIT ROUTE]
screen by touching the map screen and by selecting the
Select the
Edit Route key.
Route calc. key.
INV0342
Route calculation screen will be displayed.
The suggested route will be displayed with a
thick blue line. If you enter this route, the voice
guide will start.
5-22
INFO:
쐌 If you want to cancel the route calculation,
select the
Stop key.
쐌 If you set a place which is not suitable as
a destination, the suggested route will not
be displayed. In such a case, the
OK key
will be displayed on the screen. Select the
OK key and press the MAP button. Re-
set a correct destination.
INV0343
쐌 In case the route calculation is not possible
with all the set preferences, the system may
look up a route that does not exactly correspond to the preferences.
쐌 To cancel the setting of destinations or
waypoints, touch the screen, then select the
Edit Route key.
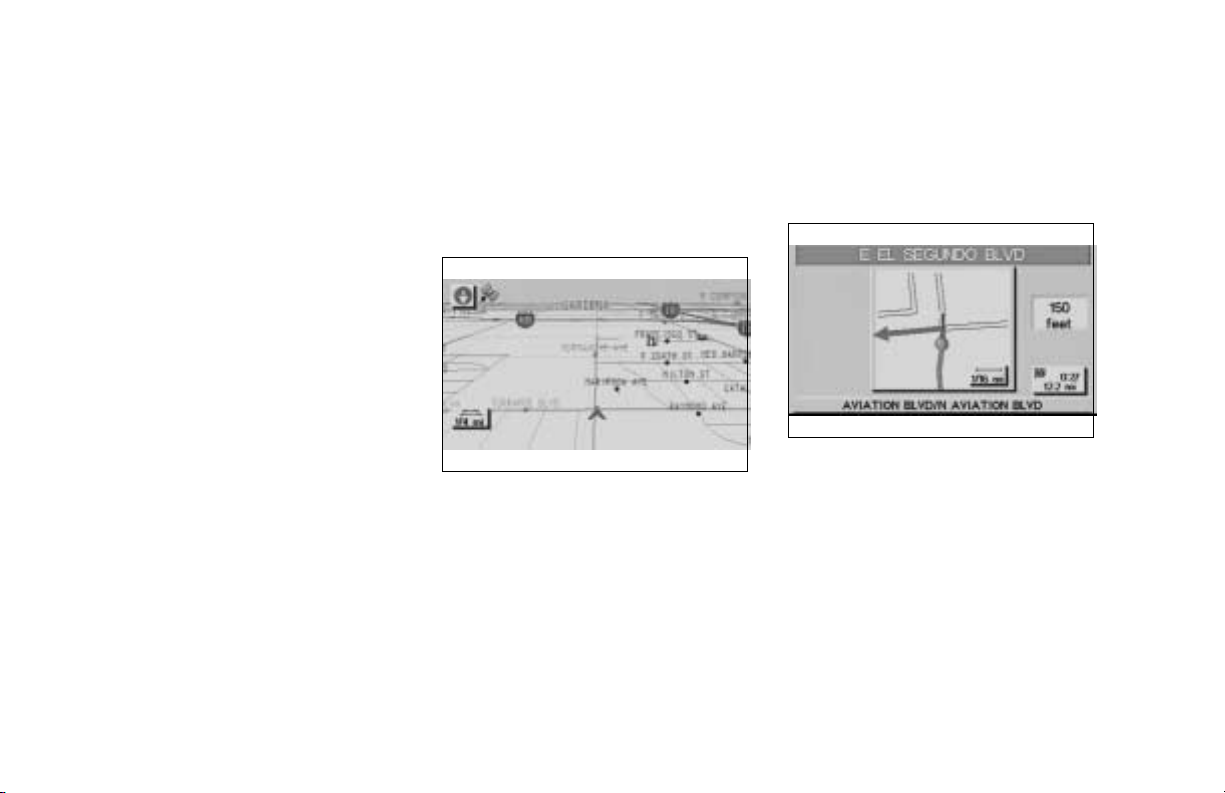
Enlarged intersection display
When the vehicle approaches a guide point
such as an intersection, the enlarged map of
the point will be displayed.
INV0492
Page 64

HOW DO I PROGRAM A DESTINATION?
INFO:
쐌 When no operation is executed with the en-
larged map displayed, the map stays displayed.
쐌 If a street name is too long to display on the
upper part of the screen, select the
key located beside the clock indication. The street name will be displayed in
two lines to the last letter.
쐌 If route numbers are included in the map
data, route numbers will be displayed on
the left side of the screen.
쐌 If street names are displayed in two lines,
route numbers will not be displayed.
NOTE:
쐌 When the guide point is close to the
guidance start point, the enlarged
map may not be displayed.
쐌 The guide point name may not be dis-
played.
쐌 The position of the vehicle icon (red
circle) on the enlarged map may differ from the position on the current
display.
1. Press the MAP button.
The map screen will appear.
INV0345
INFO:
To display the enlarged map, press the MAP
button.
2. When the vehicle arrives at the neighborhood of the destination, the route guidance
will end automatically with voice guidance.
INFO:
To alternate between the map and the enlarged
screen, press the MAP button or touch the
screen.
ADJUSTING AND DELETING
THE PRE-SET DESTINATION
(WA YPOINTS)
Using the joystick, you can adjust the destination (waypoints).
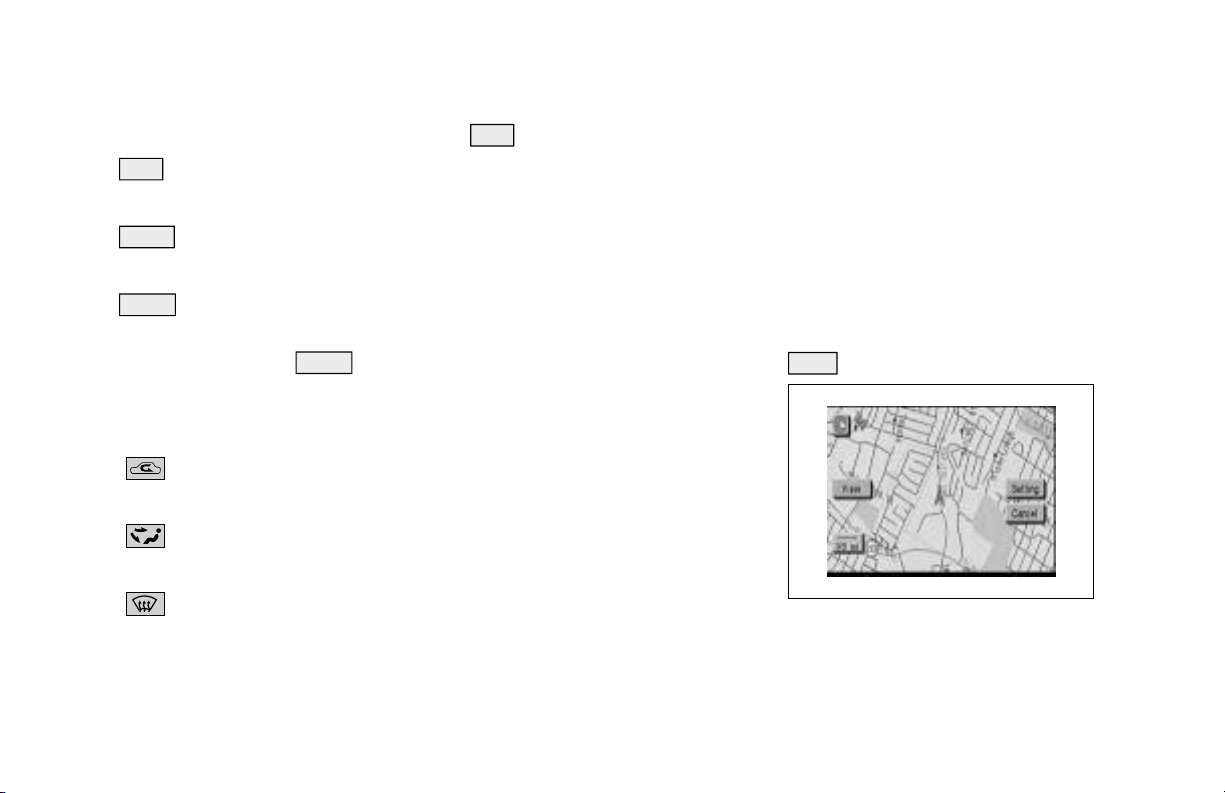
1. Touch the screen.
5-23
Page 65

HOW DO I PROGRAM A DESTINATION?
3. Choose the destination (waypoints) you
want to adjust on the [EDIT ROUTE] screen.
2. Select the Edit Route key.
5-24
INV0346
INV0347
INV0348
4. The map screen will be displayed for adjusting. Use the joystick to adjust the location.
INFO:
When you move the joystick, the
Adjust key
will be displayed.
INV0349
5. Select the
Adjust key.
The new destination (waypoints) will be set.
Page 66

HOW DO I PROGRAM A DESTINATION?
INV0350 INV0351 INV0352
6. To delete the destination (waypoint),
choose the destination (waypoint) in step 3
and select the
Delete key.
7. Select the
The pre-set destination (waypoints) will be deleted.
Yes key.
8. Press the Map button to return to the map
screen.
INFO:
쐌 To set a new destination (waypoints), refer
to “Seven categories” on page 5-2.
쐌 If you reset the new destination (waypoints),
the older destination (waypoints) will be deleted. If you have requested a route calculation, the previous suggested route will be
deleted from memory.
5-25
Page 67

HOW DO I PROGRAM A DESTINATION?
쐌 To delete all the suggested routes, select
the
All Clear key.
INV0353
QUICK STOP
The system will display pre-defined POI’s
(Points of Interest) in the current vicinity of the
vehicle and the distances to them. These POI’s
can be gas stations, hotels, restaurants, ATM’s
or customer-programmed facilities. This function will operate while the vehicle is moving.
5-26
1. Touch the screen.
The display shows several keys on the right of
the screen.
Select the
Quick Stop key.
INV0354
2. The display shows the [QUICK STOP]
screen.
Select the category of your choice.
INFO:
Five categories are displayed on the screen.
The lowest one can be customized. When you
set facility you frequently visit as a destination
(waypoint), it is convenient to use the quick
stop function. Please refer to “Quick stop customer setting” on page 5-27.
INV0483
3. The cuisine selection screen is displayed
only when the
lected. Select the
RESTAURANT key is se-
All key or Fast Food
key.
Page 68

HOW DO I PROGRAM A DESTINATION?
INV0355 INV0274 INV0259
4. The display shows the direction and distance from the current vehicle position to
the selected facility.
Select the facility name you want to set as
a destination (waypoint).
5. The display shows the [ROUTE PRIORITIES] screen.
Set route priorities, then press the
key. The route calculation to the destination
will be started.
INFO:
If quick stop is set after the destination was set,
the system starts the route calculation to the
location as the waypoint. Five waypoints can be
registered at the same time.
OK
Quick Stop Customer Setting
1. For example, set “RESTAURANT”.
Change to the current vehicle location screen.
Select the
2. Select the
Setting key.
System Setting key on the
[SETTINGS] screen.
5-27
Page 69

HOW DO I PROGRAM A DESTINATION?
INV0356 INV0357 INV0359
3. Select the
Quick Stop Customer Settings key on
the [SYSTEM SETTINGS] screen.
5-28
4. Select a facility you frequently visit. For example, select the
When it is set, the screen returns to the previous screen.
Press the MAP button to return to the
map.
RESTAURANT key.
5. When the map is displayed, touch the
screen. Then, select the
and press the PUSH ENTER switch. The
display shows the selected facility in the
last low.
Quick Stop key,
Page 70

HOW DO I PROGRAM A DESTINATION?
INV0360 INV0361
WHERE AM I?
This key is used to find the name of the street
on which the vehicle is currently located.
1. Touch the screen.
Several keys appear on the right of the screen.
Select the
Where am I? key.
2. The display shows the [WHERE AM I?]
screen which includes the next, current, and
previous streets. Each one shows the
streets which the vehicle is approaching,
currently running on, and those past.
Press the MAP or PREVIOUS button to
return to the map.
5-29
Page 71

Page 72

6 HOW DO I USE THE POINT OF INTEREST (POI) FEATURE?
Setting with Point of Interest (POI) key... 6-2
Setting with the
Setting with the
Setting with the
Setting with the
POI categories ............................................. 6-8
List key.................... 6-2
Category key............ 6-4
City key .................. 6-6
Nearby key............... 6-7
Page 73

HOW DO I USE THE POINT OF INTEREST (POI) FEATURE?
SETTING WITH
Point of Interest (POI) KEY
The keys in Point of Interest (POI) are List, Category, Nearby, and City, explained below.
INV0294
1. First press the DEST button.
2. Select the
the [DEST . SETTING (POI)] screen.
6-2
Point of Interest (POI) key on
INV0295
SETTING WITH THE
List
KEY
The List key is used when you know the
names of the destinations and waypoints.
1. Input the facility name for your destination.
INFO:
When names of facilities or cities are input, if
the system detects that the number of corresponding facilities or cities is five or less, the
display shows the list screen automatically.
INV0296
2. The display shows the screen to select a facility or
Info. key.
Page 74

HOW DO I USE THE POINT OF INTEREST (POI) FEATURE?
INV0297 INV0298 INV0299
3. When a facility name is selected, the display
shows the [DEST. SETTING] screen to set
the destination.
Set priorities, select the
the route calculation will be started.
When you alter the destination or set
waypoints, select the
Please refer to “Making the system guide
the route with detailed options” on page
5-17.
OK key. Then,
Waypoint key.
INFO:
When the
of your choice is selected in step 2, the display
shows the detailed [Address] and [Phone number] of the selected facility, and the
Map key.
Info. key next to the facility name
Enter and
쐌 When setting the facility as the destination,
select the
the [DEST. SETTING] screen to set the destination.
Set priorities and select the
Then, the route calculation will be started.
When you alter the destination or set
waypoints, select the
Please refer to “Making the system guide
the route with detailed options” on page
5-17.
Enter key. The display shows
OK key.
Waypoint key.
6-3
Page 75

HOW DO I USE THE POINT OF INTEREST (POI) FEATURE?
INV0300 INV0301 INV0302
쐌 When the Map key is selected in step 4,
the display shows the map. When the PUSH
ENTER switch is pressed, the display shows
Dest. key.
the
6-4
SETTING WITH THE
Category
KEY
The Category key is used when you select a
facility category to set the destination.
1. Select the
the [DEST . SETTING (POI)] screen.
Select the
Point of Interest (POI) key on
Category key.
2. The display shows the screen to select categories.
Input a category name.
Page 76

HOW DO I USE THE POINT OF INTEREST (POI) FEATURE?
쐌 It may take some time to show the list, de-
pending on categories.
INV0303 INV0304
3. The display shows the category list.
Select a category name.
INFO:
When a
RESTAURANT key is selected, the
screen to input the cuisine type will be displayed.
4. The screen returns to the [DEST. SETTING
(POI)] screen.
When the category is set, the display shows
the selected category under the
Category
key.
Input the facility name.
INFO:
쐌 If you do not know the facility name you
want to go to, select the
List key so that
the facility names in the category will be
listed in alphabetical order.
INV0305
5. When a facility name is input, the system
retrieves the facility name according to the
selected category and the input letters.
Then, the display shows the screen to select
a facility and
Please refer to “Setting with the
Info. key.
List key”
on the previous section.
6-5
Page 77

HOW DO I USE THE POINT OF INTEREST (POI) FEATURE?
INV0306 INV0307
SETTING WITH THE
City
KEY
The City key is used to retrieve a facility from
the specified city to set the destination.
1. Select the
Point of Interest (POI) key on
the [DEST . SETTING (POI)] screen.
Select the
City key.
쐌 The display shows the screen to retrieve cit-
ies.
2. Input a city name.
4. The screen returns to the [DEST. SETTING
INFO:
쐌 If you do not know the facility name, select
INV0308
3. The display shows the city list.
Select a city of your choice.
INV0309
(POI)] screen.
When the city is set, the display shows the
selected city under the
City key.
Input the facility name of your choice.
Category key to retrieve a facility.
the
When the facility is set from the
Category
key, the display shows the selected facility
6-6
Page 78

HOW DO I USE THE POINT OF INTEREST (POI) FEATURE?
under the Category key.
쐌 It may take some time to show the list, de-
pending on categories.
INV0310
5. When the facility name is input, the system
retrieves the facility name according to the
selected city and the input letters. Then, the
display shows the screen to select a facility
Info. key.
and
Please refer to “Setting with the
List key”
in the previous section.
INV0311
SETTING WITH THE
Nearby
KEY
The Nearby key is used to retrieve a facility
within 25 miles (40 km) from the current vehicle location.
1. Select the
Point of Interest (POI) key on
the [DEST . SETTING (POI)] screen.
2. Set category according to page 6-4.
3. Select the
Nearby key.
INFO:
쐌 Facilities of selected category will be listed
in order by nearest distance.
Nearby key is available only when a
쐌 The
category is set. Set a category first.
INV0312
쐌 When there are any nearby facilities based
on the selected category, the display shows
the list of facility names, directions and distance from the current vehicle location, and
Info keys.
Please refer to “Setting with the
List key”
in the previous section.
6-7
Page 79

HOW DO I USE THE POINT OF INTEREST (POI) FEATURE?
POI CATEGORIES
AIRPORT FERRY TERMINAL PARK/RECREATION AREA
AMUSEMENT PARK GAS STATION PARKING GARAGE
ATM GOLF COURSE PARKING LOT
AUTO SERVICE & MAINTENANCE GROCERY STORE PERFORMING ARTS
AUTOMOBILE CLUB HISTORICAL MONUMENT POLICE STATION
BANK HOSPITAL RENTAL CAR AGENCY
BORDER CROSSING HOTEL REST AREA
BOWLING CENTER ICE SKATING RINK RESTAURANT
BUS STATION INFINITI DEALER SCHOOL
BUSINESS FACILITY LIBRARY SHOPPING
CASINO MARINA SKI RESORT
CITY CENTER MOVIE THEATER SPORTS CENTER
CITY HALL MUNICIPAL AIRPORT SPORTS COMPLEX
COLLEGE AND UNIVERSITY MUSEUM TOURIST ATTRACTION
COMMUNITY CENTER NIGHTLIFE TOURIST INFORMATION
COMMUTER RAIL STATION NISSAN DEALER TRAIN STATION
CONVENTION/EXHIBITION CENTER PARK & RIDE WINERY
COURT HOUSE
6-8
Page 80

HOW DO I USE THE POINT OF INTEREST (POI) FEATURE?
Setting the nearby display icons
Five types of facilities can be displayed on the
map using respective icons, including:
— ATMs
— Gas stations
— Hotels
— Restaurants
— Rest areas
1. Change to the current vehicle location
screen.
2. Select the
Setting key.
3. Select the
[SETTINGS] screen.
INV0259 INV0313
System Setting key on the
4. Select the Nearby Display Icons key on
the [SYSTEM SETTINGS] screen.
The [NEARBY DISPLAY ICONS] screen will be
displayed.
6-9
Page 81

HOW DO I USE THE POINT OF INTEREST (POI) FEATURE?
INV0314 INV0315
5. Select the facility you wish to display, and
press the PUSH ENTER switch.
INFO:
Every time the PUSH ENTER switch is pressed,
the indicator lights of the items are turned ON
and OFF alternately.
ON: To display nearby icons.
OFF: To stop displaying nearby icons.
6-10
쐌 The icons of the selected facilities will be
displayed.
INFO:
When the MAP button is pressed, the current
location will be displayed.
When the PREVIOUS button is pressed, the
previous screen will re-appear.
Page 82

7 HOW DO I USE THE ADDRESS BOOK FEATURE?
Setting up and editing the address book .... 7-2
Setting up the address book.................. 7-2
Confirming the stored locations ........... 7-4
Editing the address book ....................... 7-5
Adjusting the stored address book
entries................................................... 7-10
Deleting stored locations ..................... 7-11
Page 83

HOW DO I USE THE ADDRESS BOOK FEATURE?
SETTING UP AND EDITING
THE ADDRESS BOOK
You can store locations in the address book for
quicker access, or name the location and set
a special icon on the map.
SETTING UP THE ADDRESS
BOOK
You can store your favorite places or the places
you frequently visit. By storing them, you can
call them quickly on the display, enabling
easier setting of these destinations.
Using various categories to store
locations
You can choose various categories in the menu
to store the locations. The categories are:
Address/Street, Points of Interest (POI), Map,
Intersection, City and Previous dest.
1. Change to the current vehicle map.
Select the
Setting key on the screen.
2. Select the
Edit Address Book key. The [EDIT ADDRESS BOOK] screen will be dis-
INV0363 INV0364
played.
3. Choose the storing number from the unused number list.
7-2
Page 84

HOW DO I USE THE ADDRESS BOOK FEATURE?
POI, it is quicker to use the
Points of Interest (POI) key .
Storing current vehicle position
1. Change to the current vehicle map.
2. Select the
Setting key.
INV0365
4. Store location.
Set a location to be stored in the same way as
when setting destinations (waypoints).
Please refer to “Seven categories” on page 5-2.
INFO:
쐌 Press the MAP button to go back to get
the current vehicle display.
쐌 The maximum number of the stored loca-
tions is 50, including your home and office.
쐌 If you want to store places close to
INV0481
3. Select the
Save Current Location key.
The storing number will be displayed at the vehicle icon on the screen, and the current location of the vehicle will be stored.
INV0362
INFO:
쐌 If the number of the stored locations ex-
ceeds 50, a message will appear “Memory
is full. Delete old one to store new one”.
쐌 If you store more than one location at the
same place, the location with the largest
stored number will be displayed.
쐌 If you store the location by the location
store function, the stored name may differ,
depending on the scale used in the display.
쐌 The smallest and unused number will be
7-3
Page 85

HOW DO I USE THE ADDRESS BOOK FEATURE?
assigned to the newly set location.
Storing locations of your choice
INV0499
You can use the joystick to store desired locations.
1. Scroll the map to the desired location with
the joystick, then press the PUSH ENTER
switch. The display shows several keys on
the right of the screen.
2. Select the
7-4
Store Place key.
INV0455
The registered number will be displayed at that
location on the map.
INFO:
Press the MAP button or select the
Previous key to go back to get the current
vehicle display.
CONFIRMING THE STORED
LOCATIONS
To confirm that the locations have been stored:
1. Change to the current vehicle map.
Select the
2. Select the
Setting key on the screen.
INV0363
Edit Address Book key.
Page 86

INV0366 INV0367
3. Choose the Map key next to the location
that you want to confirm.
HOW DO I USE THE ADDRESS BOOK FEATURE?
The stored location will be displayed on the
map.
INFO:
쐌 If you want to confirm several stored loca-
tions, select the
쐌 To go back to the map display, press the
MAP button.
Previous key.
EDITING THE ADDRESS BOOK
INV0363
You can alter the names or the icons of the
stored locations.
Changing stored names
1. You can alter the names of the stored locations.
Change to the current vehicle location
screen.
Select the
2. Select the
Setting key on the screen.
Edit Address Book key.
7-5
Page 87

HOW DO I USE THE ADDRESS BOOK FEATURE?
INV0368 INV0369 INV0370
3. Choose the stored location you want to
change the name of.
7-6
4. Select the Rename key.
The change name screen will be displayed.
5. Select the Set key after entering the new
name.
INFO:
To go back to the map display, press the
MAP button.
Changing the icons
1. You can display the icon at a stored location.
Change to the current vehicle location screen.
Page 88

2. Select the Setting key.
The [SETTINGS] screen will be displayed.
HOW DO I USE THE ADDRESS BOOK FEATURE?
INV0371 INV0372
3. Select the
Edit Address Book key.
INV0363
4. Choose a stored location where you want to
set the icon.
5. Select the
Landmark Icon key.
6. Choose an icon.
INV0373
7-7
Page 89

HOW DO I USE THE ADDRESS BOOK FEATURE?
The left one on the key is a planview icon and
the right one on the key is a Birdview
TM
icon.
The icon of the stored location will be set.
INV0374
INFO:
쐌 To go back to the screen displaying the cur-
rent vehicle position, press the
MAP button.
쐌 If you select the
Previous key, the screen
will go back to the one in procedure 5.
쐌 If you alter the icon of the stored location,
7-8
the icon on the map will also change.
Page 90

HOW DO I USE THE ADDRESS BOOK FEATURE?
Legend of icons which can be set for the stored locations
INV0251
7-9
Page 91

HOW DO I USE THE ADDRESS BOOK FEATURE?
ADJUSTING THE STORED ADDRESS BOOK ENTRIES
You can easily adjust the point of the stored
location by the joystick.
1. Change to the current vehicle location
screen.
2. Select the
The [SETTINGS] screen will be displayed.
3. Select the
Setting key.
Edit Address Book key.
INV0363
4. Choose the
Map key next to the stored
location you want to adjust.
INV0376 INV0377
5. Use the joystick to set the new location.
INV0378
6. Select the
Adjust key.
7-10
Page 92

The location is updated, and the screen goes
back to the one in step 5 after the update message is shown.
INFO:
To go back to the screen displaying the current
vehicle position, press the MAP button.
HOW DO I USE THE ADDRESS BOOK FEATURE?
DELETING STORED LOCATIONS
You can delete from memory the stored locations you no longer need.
1. Change to the current vehicle location
screen.
2. Select the
The [SETTINGS] screen will be displayed.
Setting key.
INV0363
3. Select the
Edit Address Book key.
INV0379
4. Select the location you want to delete.
INV0380
5. Select the Delete key.
INV0381
6. The system will ask for a confirmation. If
7-11
Page 93

HOW DO I USE THE ADDRESS BOOK FEATURE?
correct, touch the Yes key. The location
will be deleted, and the screen goes back
to the one in step 4 after the deletion message is shown.
INFO:
To go back to the screen displaying the current
vehicle position, press the MAP button.
7-12
Page 94

8 HOW DO I USE THE AVOID AREA FEATURE?
Avoid area.................................................... 8-2
Setting avoid areas ................................ 8-2
Altering and deleting the avoid areas .... 8-5
Page 95

HOW DO I USE THE AVOID AREA FEATURE?
AVOID AREA
SETTING AVOID AREAS
Setting avoid areas will give you a route around
certain areas.
INFO:
If the vehicle icon is in the avoid area, route
calculation cannot be completed.
1. Change to the current vehicle location
screen.
2. Select the
Setting key.
3. Select the
System Setting key. 4. The display shows the [SYSTEM SET-
INV0259 INV0382
TINGS] screen.
Select the
Avoid Area Setting key.
8-2
Page 96

HOW DO I USE THE AVOID AREA FEATURE?
INV0383 INV0384 INV0386
5. The display shows the [AVOID AREA SETTING] screen.
Select a key which is not set as an avoid area.
INFO:
It is possible to set up to 10 areas.
6. The display shows categories which can be
used to set an avoid area.
For example, use the
area.
Select the
INFO:
For setting with other categories, please refer
to “Seven categories” on page 5-2.
Map key.
Map key to set an avoid
7. The display shows the map which centers
the area to be set as an avoid area.
Use the ZM+ or ZM− button to adjust the
map reduction scale.
8-3
Page 97

HOW DO I USE THE AVOID AREA FEATURE?
INV0493 INV0388 INV0389
8. Use the joystick to adjust the location.
INFO:
Area size: Max.5x5miles (8x8km)
8-4
9. The display shows the keys on the right of
the screen.
Select the
INFO:
쐌 If you want to avoid the freeway in that area,
쐌 When altering the size of the avoid area,
Set key.
select the
dicator on the key. (Indicator ON: avoid,
OFF: do not avoid)
touch the
tered by three scales.
key to turn on the green in-
Area key. The area size is al-
쐌 The avoid area is set, and the grid will be
displayed on the screen.
INFO:
The grid color will be displayed in green or
blue.
(Avoid Freeway ON: green, OFF: blue)
If the route guidance is set, the display shows
the [DEST . SETTING] screen.
Page 98

INV0390
쐌 Please refer to “Making the system guide
the route with detailed options” on page
5-17.
If the route guidance is not set, the display
shows the current vehicle location.
HOW DO I USE THE AVOID AREA FEATURE?
ALTERING AND DELETING THE
AVOID AREAS
Setting with the selected location
key
When the stored avoid area is selected, the
avoid area can be renamed or deleted.
1. Change to the current vehicle location
screen.
2. Select the
Renaming the avoid areas
3. Select the
Setting key.
INV0259
System Setting key.
INV0382
4. The display shows the [SYSTEM SETTINGS] screen.
Select the
Avoid Area Setting key.
8-5
Page 99

HOW DO I USE THE AVOID AREA FEATURE?
INV0393 INV0394
5. The display shows the [AVOID AREA SETTING] screen.
Select a key which is set as an avoid area.
6. Select the
Rename key.
Enter the area name using the keyboard.
When the
Set key is selected, the avoid area
is renamed, and the screen returns to the previous screen.
INFO:
When the
Back Space key is selected, the
cursor moves back to the previous letter. When
Space key is selected, the cursor pro-
the
ceeds to make one space.
8-6
7. The display shows the keyboard.
INV0395
INV0396
Page 100

HOW DO I USE THE AVOID AREA FEATURE?
Deleting the avoid areas
1. Select the
Delete key on the screen in
step 6 under “Renaming the avoid areas”.
INV0397
2. Select the
Yes key.
The avoid area is deleted.
If the route guidance is set, the display shows
the [DEST . SETTING] screen.
INFO:
When the
No key is selected, the avoid area
will not be deleted, and the screen returns to
the previous screen.
INV0398
3. Please refer to “Making the system guide
the route with detailed options” on page
5-17.
If the route guidance is not set, the display
shows the current vehicle location.
Setting with
Map
key
When the stored avoid area is selected, the
avoid area can be adjusted or deleted.
1. Change to the current vehicle location
screen.
2. Select the
Setting key.
INV0259
Adjusting the stored avoid areas
3. Select the
System Setting key.
8-7
 Loading...