


2013 LEAF
NAVIGATION SYSTEM OWNER'S MANUAL
For your safety, read carefully and keep in this vehicle.

FOREWORD
NISSAN NAVIGATION SYSTEM
HELPDESK CONTACT INFORMATION
For assistance or inquiries about the NISSAN
Navigation System, or to order updated map
data, contact the NISSAN NAVIGATION SYSTEM HELPDESK at:
. ADDRESS: P.O. Box 1588, Orem, UT
84059-992
. E-MAIL: Nissan-Navi-Info@navteq.com
. WEB SITE: www.NissanNavigation.com or
www.nissan.ca
. PHONE: 1-888-661-9995
. HOURS: 6:00 AM to 5:00 PM (Pacific
Time)
NISSAN CONSUMER AFFAIRS DEPARTMENT
For assistance or inquiries about the NISSAN
warranty, service or general questions, contact
the NISSAN Consumer Affairs Department at:
For U.S. customers
Nissan North America, Inc.
Consumer Affairs Department
P.O. Box 685003
Franklin, TN 37068-5003
1-877-NOGASEV
1-877-664-2738
For Canadian customers
Nissan Canada Inc.
5290 Orbitor Drive
Mississauga, Ontario L4W 4Z5
1-877-NOGASEV
1-877-664-2738
Thank you for purchasing a NISSAN vehicle.
This user’s manual is for the navigation system
only. This manual contains operating instructions
for the NISSAN Navigation System offered in
your NISSAN vehicle.
Please read this manual carefully to ensure safe
operation of the navigation system.
. Because of possible specification changes
and optional equipment, sections of this
manual may not apply to your vehicle.
. All information, specifications and illustra-
tions in this manual are those in effect at the
time of printing. NISSAN reserves the right
to change specifications or design at any
time without notice.
. Do not remove this manual from the vehicle
when selling this vehicle. The next user of
this navigation system may need the manual.
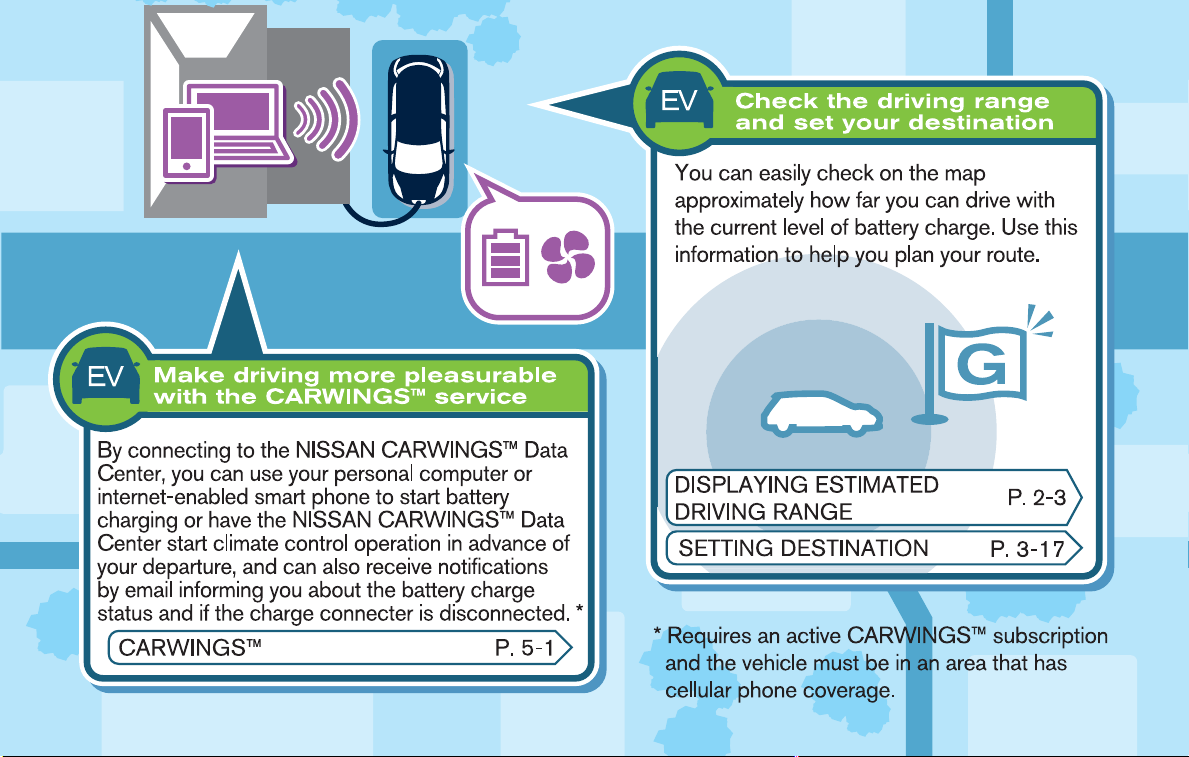
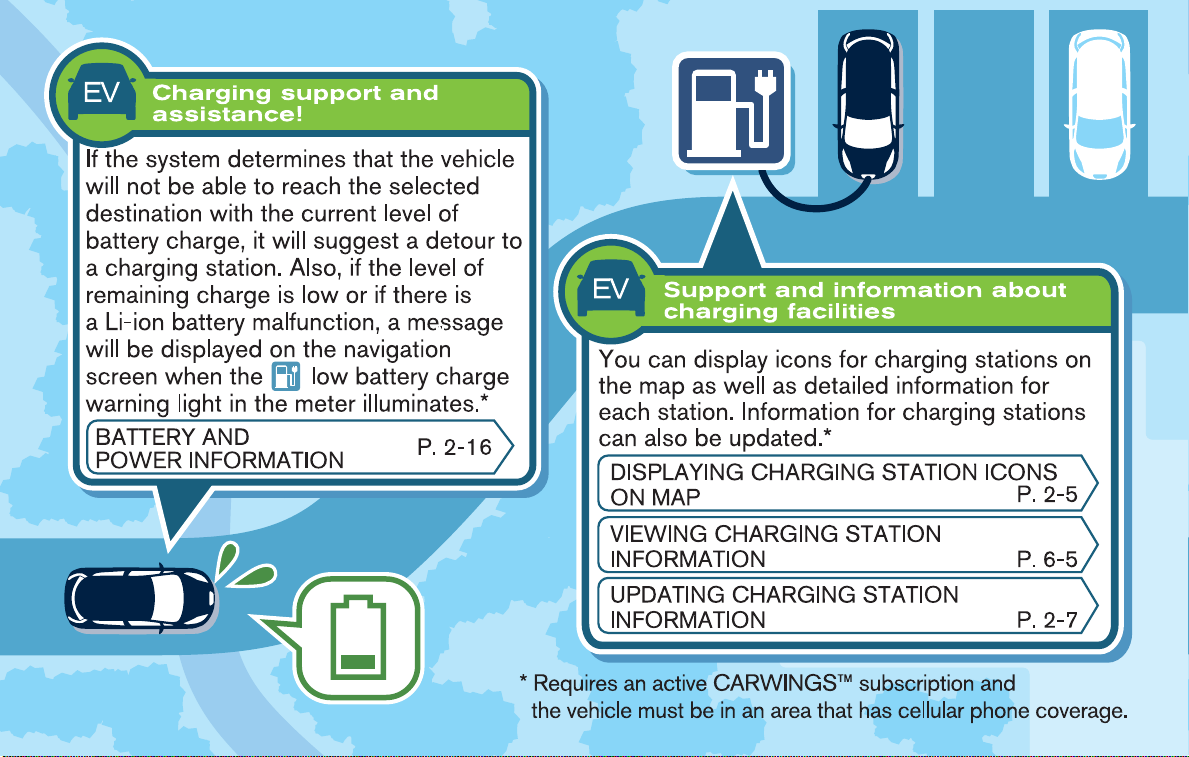


Table of
Introduction
0
Contents
LEAF Navigation System overview
Getting Started
Unique EV functions
Navigation
Audio system
CARWINGS
Viewing technical information
Bluetooth
Voice recognition
Monitor system (if so equipped)
Troubleshooting guide/General system information
Index
TM
®
Hands-Free Phone System
IT
1
2
3
4
5
6
7
8
9
10
11


0 Introduction
How to use this manual........................................................... 0-2
For safe operation................................................................ 0-2
Reference symbols .............................................................. 0-2
Safety information ..................................................................... 0-2
Laser product ............................................................................. 0-4
HOW TO USE THIS MANUAL SAFETY INFORMATION
This manual uses special words, symbols and
icons, organized by function.
Please refer to the following items and familiarize
yourself with them.
FOR SAFE OPERATION
WARNING
This is used to indicate the presence of
a hazard that could cause death or
serious personal injury. To avoid or
reduce the risk, the procedures must
be followed precisely.
CAUTION
This is used to indicate the presence of
a hazard that could cause minor or
moderate personal injury or damage to
your vehicle. To avoid or reduce the risk,
the procedures must be followed carefully.
NOTE:
Indicates items that help you understand
and maximize the performance of your
vehicle. If ignored, they may lead to a
malfunction or poor performance.
REFERENCE SYMBOLS
INFO:
This indicates information that is necessary for
efficient use of your vehicle or accessories.
Reference page:
This indicates the title and page that you should
refer to.
[]:
This indicates a key/item displayed on the
screen.
Voice Command:
This indicates an operation by voice command.
This system is primarily designed to help you
reach your destination, and it also performs
other functions as outlined in this manual.
However, you, the driver, must use the system
safely and properly. Information concerning road
conditions, traffic signs and the availability of
services may not always be up-to-date. The
system is not a substitute for safe, proper and
legal driving.
Before using the navigation system, please read
the following safety information. Always use the
system as outlined in this manual.
WARNING
. When the driver wants to operate
the navigation system, first park the
vehicle in a safe location and set the
parking brake. Operating the system while driving can distract the
driver and may result in a serious
accident.
. Do not rely on route guidance alone.
Always be sure that all driving
maneuvers are legal and safe in
order to avoid accidents.
. Do not disassemble or modify this
system. If you do, it may result in
accidents, fire or electrical shock.
0-2 Introduction

. If you notice any foreign objects in
the system hardware, spill liquid on
the system or notice smoke or a
smell coming from it, stop using the
system immediately and contact a
NISSAN certified LEAF dealer.
Ignoring such conditions may lead
to accidents, fire or electrical shock.
CAUTION
. Do not use this system if you notice
any malfunctions such as a frozen
screen or the lack of sound. Continued use of the system may result
in accidents, fire or electrical shock.
. Some states/provinces may have
laws limiting the use of video
screens while driving. Use this system only where it is legal to do so.
. Extreme temperature conditions
[below − 48F(−208C) and above
1588F (708C)] could affect the performance of the system.
INFO:
Do not keep the navigation system running with
the READY to drive indicator light is OFF. Doing
so may discharge the 12-volt battery. When you
use the navigation system, always make sure the
READY to drive indicator light is ON.
NOTE:
. Establishing the CARWINGS
TM
service
is necessary before using this service.
. To check the Li-ion battery charging
status or to use the remote heater and
air conditioner using an internet enabled smart phone or personal computer, the following conditions must be
met:
— The vehicle must be located in a
cellular phone or smart phone coverage area.
— The internet enabled cellular phone
or smart phone must be located in a
cellular phone or smart phone coverage area.
— The computer must be connected to
the internet.
— A cellular phone must be used to
communicate with the vehicle.
— A cellular phone capable of text
messaging must be used to receive
text message regarding vehicle
charge status.
. When the remote heater and air condi-
tioner is set, the system operates the
heater and air conditioner to adjust the
in-cabin temperature to a set temperature.
. When the charge connector is discon-
nected from the vehicle, the heater and
air conditioner operates using vehicle
Li-ion battery electric power.
. If the remote heater and air conditioner
function and Li-ion battery charging are
performed at the same time, Li-ion
battery charging will take longer than
usual due to the power used to heat or
cool the vehicle.
. Certain remote functions require a
compatible smart phone, which is not
included with vehicle.
. CARWINGS
TM
information system features are included through a subscription service which requires owner
consent to activate. The subscription
must be active to use these features.
Introduction 0-3

. CARWINGSTMcommunications may be
received at a verified e-mail address or
by SMS/text messaging-enabled cellular phone.
. Standard text rates and/or data usage
may apply depending on your carrier.
LASER PRODUCT
This navigation system is certified as a Class 1
laser product.
The navigation system complies with DHHS
Rules 21 CFR Chapter 1, Subchapter J.
WARNING
. Do not disassemble or modify this
system. There are no user serviceable parts in this navigation system.
. If maintenance, adjustments and
operations other than those specified in this manual are attempted,
injury due to laser radiation and
exposure could occur.
Required SiriusXM Satellite
Radio and NavTraffic monthly
subscriptions are sold separately. NavTraffic are only available in select markets. For more
information,
see www.siriusxm.com/navtraffic.
SiriusXM Satellite Radio requires
subscription, sold separately.
Not available in Alaska, Hawaii or
Guam. For more information, visit
www.siriusxm.com.
Bluetooth®is a trademark owned
by Bluetooth SIG, Inc., and
licensed to Clarion.
0-4 Introduction

LEAF Navigation System overview
Features of LEAF Navigation System.................................. IT-2
Unique EV functions .......................................................... IT-2
Telematics service............................................................... IT-4
FEATURES OF LEAF NAVIGATION
SYSTEM
UNIQUE EV FUNCTIONS
In addition to the conventional navigation functions, the LEAF navigation system also offers
specific support for driving an EV.
CAUTION
Charging station information may not
be detailed in all areas or reflect current
charging station locations. For up to
date information about charging stations, such as business hours or charging equipment, NISSAN recommends
that you directly access the information
on your own. Additionally, always check
the remaining amount of battery charge
and set a reasonable driving schedule.
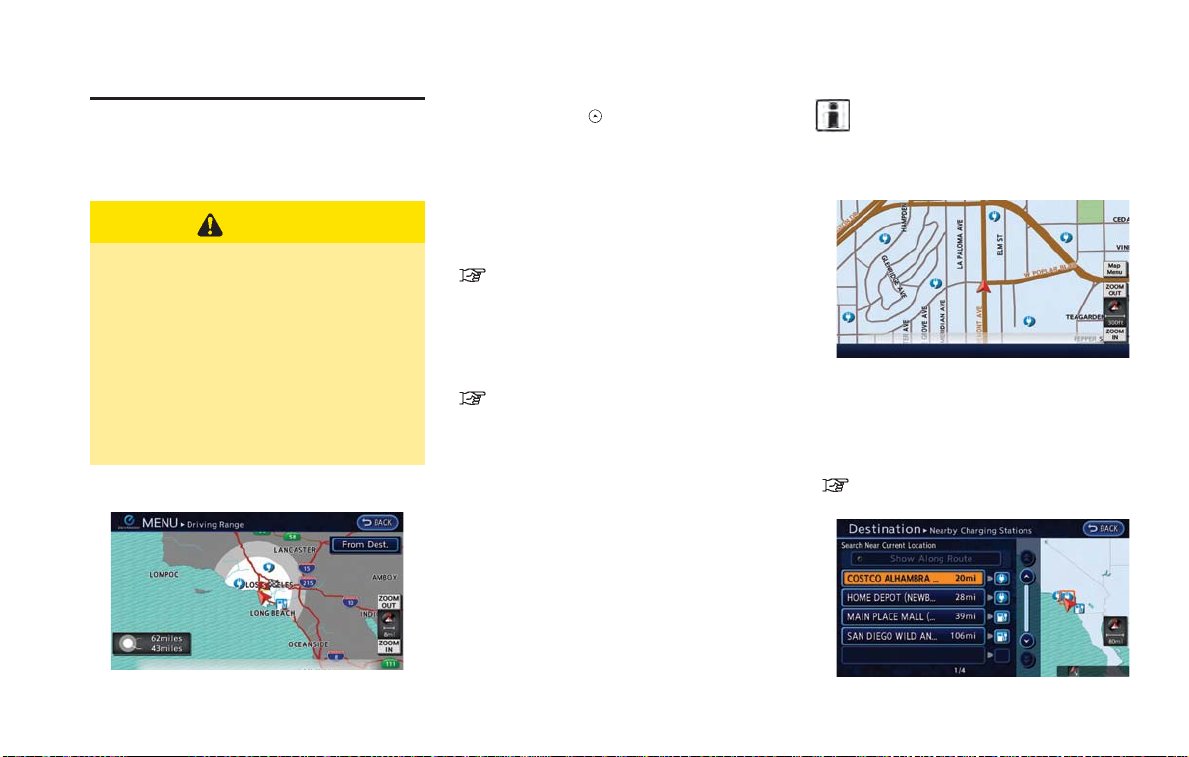
Driving range display
By pressing the button on the steering
wheel, you can display the estimated one way
range that the vehicle can be driven from the
current location based on the amount of
remaining battery charge. When a destination
or a waypoint has been set, the driving area will
be displayed with the destination or waypoint in
the center.
“Displaying estimated driving range”
(page 2-3)
Charging stations located within the driving area
will also be displayed. By moving the map, you
can set a charging station as a destination or
waypoint.
“Setting a charging station as destination”
(page 2-4)
Charging station information
NOTE:
Charging stations that have been searched
for using this function are not necessarily
equipped with devices that can be used to
charge a LEAF. Be sure to confirm this in
advance before setting a charging station
as the destination.
INFO:
Charging station information is updated monthly
to add newly installed charging stations locations.
Icons for charging stations can be displayed on
the map. You can also display only charging
stations that are equipped with quick charge
devices or only charging stations that are
equipped with normal charge devices.
“Displaying charging station icons on map”
(page 2-5)
IT-2 LEAF Navigation System overview
You can search for charging stations near the
current location, set a charging station as a
destination or waypoint, and check detailed
information about charging stations.
“Finding charging station” (page 3-25)
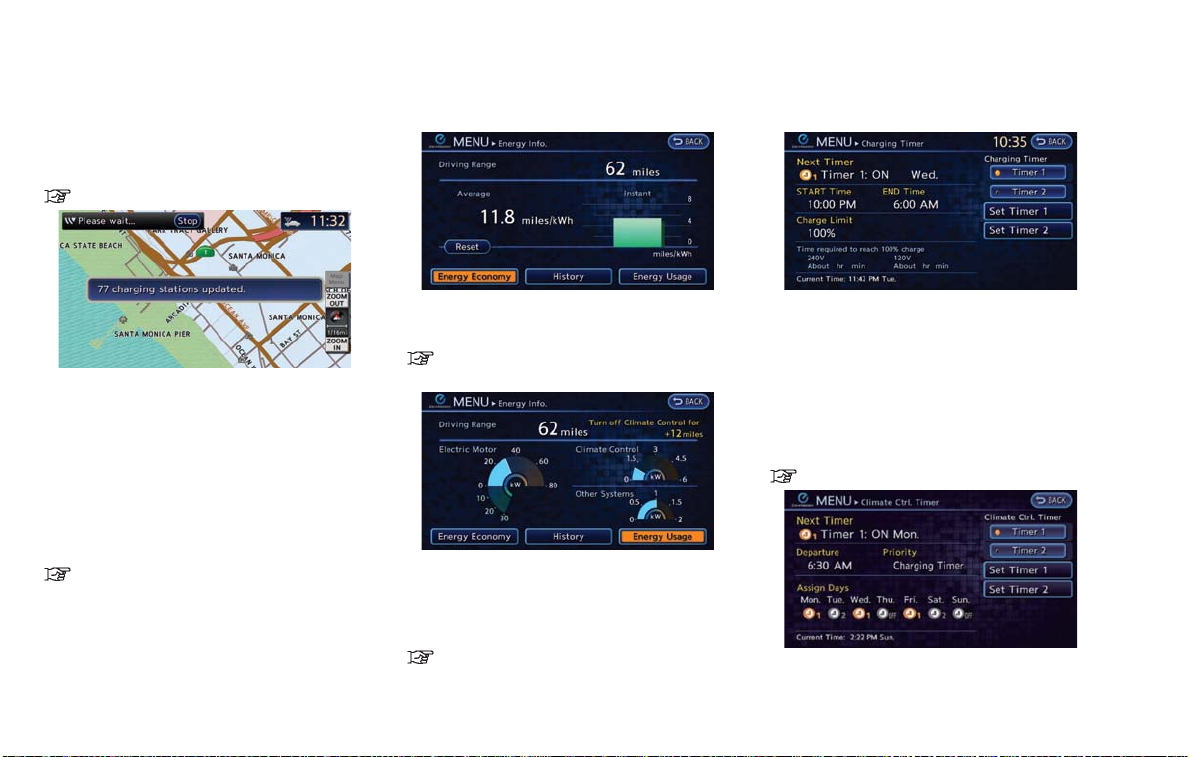
Energy information display
Timer functions
When connecting to the NISSAN CARWINGS
Data Center, the system will periodically perform
an automatic update of information for charging
stations near your home. The system will also
automatically update information for charging
stations near the current vehicle location when
the Li-ion battery charge is low. You can also
manually update the charging stations around
your current vehicle location at any time.
“Updating charging station information”
(page 2-7)
Estimated driving range, average energy economy and instant energy economy are displayed.
“Viewing energy economy information”
(page 2-8)
Estimated driving range and energy usage of
various systems are displayed. Also, variation of
the estimated driving distances between the
climate control ON and OFF is displayed.
“Viewing energy usage information”
(page 2-9)
Charging of the Li-ion battery will automatically
start at a scheduled time according to the start
time, end time and day of the week set. The
timer charge function allows two different timer
settings. Each timer charge can be set to
activate on a different day of the week. If no
timer is set, the charge will start immediately
after connecting the charge connector.
“Setting timer charge” (page 2-10)
The air conditioner starts to operate at the time
of day and day of the week specified in the
LEAF Navigation System overview IT-3

settings. This pre cools or heats the passenger
compartment before starting to drive. Electric
power consumption from the Li-ion battery
resulting from heater and air conditioner operation can be reduced because the temperature in
the passenger compartment is adjusted before
starting to drive.
“Setting Climate Ctrl. Timer” (page 2-12)
TELEMATICS SERVICE
This vehicle incorporates a communication
device that is called a TCU (Telematics Communication Unit). The communication connection between this unit and the NISSAN
CARWINGS Data Center allows for various
services.
NOTE:
. Establishing the CARWINGS
is necessary before using this service.
. To check the Li-ion battery charging
status or to use the remote heater and
air conditioner using an internet enabled smart phone or personal computer, the following conditions must be
met:
— The vehicle must be located in a
cellular phone or smart phone coverage area.
IT-4 LEAF Navigation System overview
TM
service
— The internet enabled cellular phone
or smart phone must be located in a
cellular phone or smart phone coverage area.
— The computer must be connected to
the internet.
— A cellular phone must be used to
communicate with the vehicle.
— A cellular phone capable of text
messaging must be used to receive
text message regarding vehicle
charge status.
. When the remote heater and air condi-
tioner is set, the system operates the
heater and air conditioner to adjust the
in-cabin temperature to a set temperature.
. When the charge connector is discon-
nected from the vehicle, the heater and
air conditioner operates using vehicle
Li-ion battery electric power.
. If the remote heater and air conditioner
function and Li-ion battery charging are
performed at the same time, Li-ion
battery charging will take longer than
usual due to the power used to heat or
cool the vehicle.
. Certain remote functions require a
compatible smart phone, which is not
included with vehicle.
. CARWINGS
TM
information system features are included through a subscription service which requires owner
consent to activate. The subscription
must be active to use these features.
. CARWINGS
TM
communications may be
received at a verified e-mail address or
by SMS/text messaging-enabled cellular phone.
. Standard text rates and/or data usage
may apply depending on your carrier.
Remote functions
When an Internet connection is available, you

can use a personal computer or an Internetenabled smart phone to check the battery status
and operate battery charging or the heater/air
conditioner remotely from another location.
Battery status check:
The status of the battery can be checked using
your personal computer or a internet enabled
smart phone even if you are not in the vehicle.
You may also choose to have SMS messages
(text messages) sent to a cellular phone.
Unplugged status, Charge status:
By registering frequently used charging stations,
notifications can be sent to your personal
computer or cellular phone email address to
inform you when the charging connector is
disconnected or charging is stopped midcharge at those locations.
Remote charge, Remote climate control:
Remote activation of battery charging or climate
control can be set using your personal computer
or a internet enabled smart phone.
Li-ion battery warmer status:
When ambient temperature is low, the Li-ion
battery warmer operates automatically.
Notifications will be sent to the e-mail address
you have registered on the NISSAN CARWINGS Data Center the following conditions in
order to remind you to connect the charging
connector.
. Approximately 5 minutes after the Li-ion
battery warmer starts operating while the
power switch is in the OFF position and the
charging cable is not connected to the
vehicle.
. Approximately 5 minutes after the Li-ion
battery warmer stops operating due to low
remaining Li-ion battery power while the
power switch is in the OFF position and the
charging cable is not connected to the
vehicle.
NOTE:
. The remaining Li-ion battery power
lowers gradually while the Li-ion battery warmer is operating without connecting the charging connector.
. When the remaining Li-ion battery
power lowers, the Li-ion battery warmer stops operating. When this occurs,
the Li-ion battery temperature lowers
gradually, and as a result the EV
system may be disabled.
Navigation Telematics (CARWINGS
When the system connects to the NISSAN
CARWINGS Data Center, charging station
information will be automatically updated and
you can receive useful information for driving
your vehicle.
Automatic update of charging stations:
The information for the charging stations that is
recorded in the map data is automatically
updated.
All Information Feeds:
Convenient information for driving such as
weather and traffic information, ECO information
shared with the LEAF users, etc. is provided.
Favorites:
When the information of an Internet site is
selected and it is stored in the page that is
specially established in the NISSAN Owner’s
TM
service)
LEAF Navigation System overview IT-5

Portal Website, the information is converted into
an appropriate format via the NISSAN CARWINGS Data Center and provided for use in the
vehicle. The content of the information is
automatically read out. For the registration
method of information data, visit the NISSAN
Owner’s Portal Website.
IT-6 LEAF Navigation System overview

1 Getting Started
Control buttons and functions................................................ 1-2
Control panel ........................................................................ 1-2
Steering wheel switches.................................................... 1-4
USB connector and Auxiliary input jack ........................ 1-4
Start-up screen .......................................................................... 1-5
Functions disabled while driving............................................ 1-6
Basic operation .......................................................................... 1-7
Selecting item ....................................................................... 1-7
Adjusting volume and others ............................................ 1-7
Scrolling message or list ................................................... 1-7
How to input letters and numbers .................................. 1-7
Viewing display screens........................................................... 1-9
Map screen............................................................................ 1-9
Zero Emission menu screen ............................................. 1-9
Menu screen ....................................................................... 1-9
Status screen................................................................... 1-10
FM·AM radio screen....................................................... 1-10
SiriusXM Satellite Radio screen ................................. 1-10
CD·AUX screen ............................................................... 1-10
Items to be set initially.......................................................... 1-11
Subscription to CARWINGS
Inputting user ID and password ................................. 1-11
Storing home location ................................................... 1-12
Connecting cellular phone ........................................... 1-13
Display adjustment ......................................................... 1-14
Volume settings............................................................... 1-16
Clock settings.................................................................. 1-16
Language and unit settings.......................................... 1-17
TM
service.................... 1-11
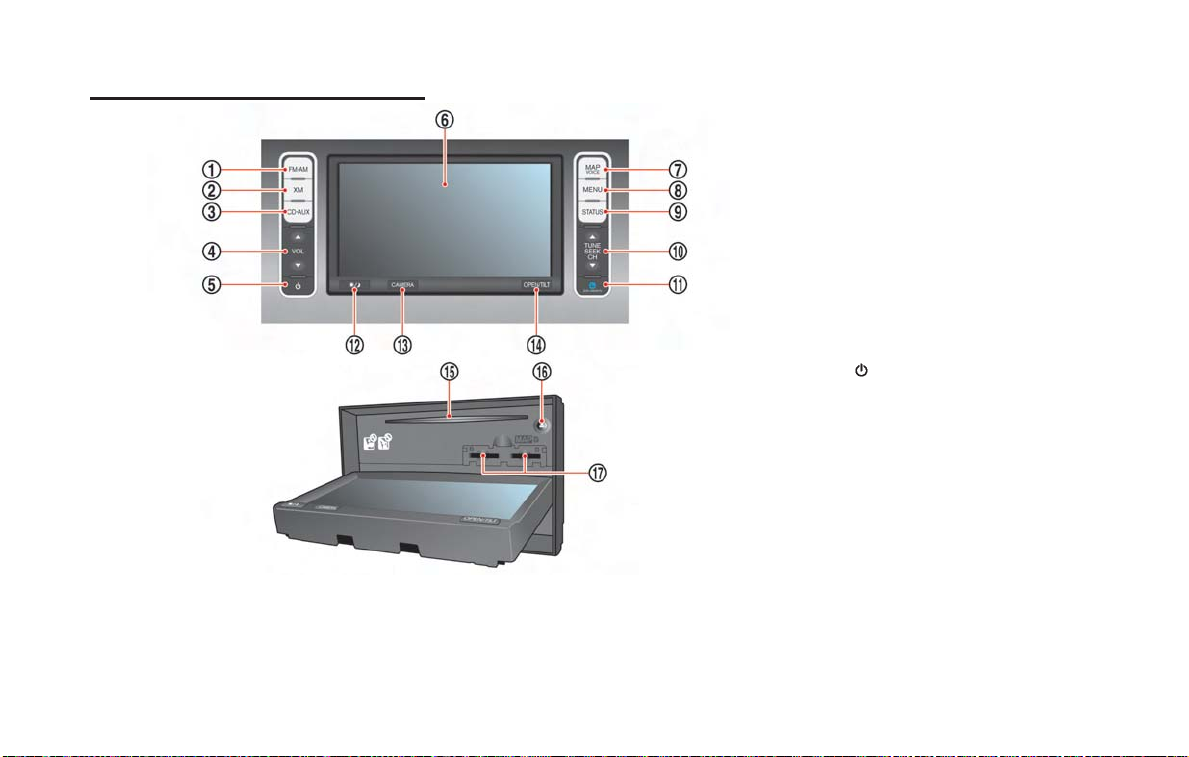
CONTROL BUTTONS AND
FUNCTIONS
1-2 Getting Started
CONTROL PANEL
1
FM·AM button:
*
Push to switch between the FM the AM radio
bands.
2
XM button:
*
Push to switch to an SiriusXM satellite radio
band.
3
CD·AUX button:
*
Push to switch between USB memory/iPod
player/CD/Bluetooth®streaming audio/AUX/
®
Pandora
4
VOL (Volume control) button:
*
Push to adjust the volume of the audio system.
5
*
Push to turn the audio system on or off.
6
Monitor:
*
7
MAP button/VOICE button:
*
Push to display the current location map screen.
Push and hold to repeat voice guidance.
8
MENU button:
*
Push to display the setting menu (destination,
route, information, settings, phone and CARWINGS
9
STATUS button:
*
Push to display the current status of the climate
control, radio, audio, vehicle information (driving
range and average energy economy) and navigation systems.
10
TUNE SEEK CH button:
*
Push to select a track/station. Push and hold to
search for a track/station automatically or to fast-
(if so equipped) screens.
(Audio system ON·OFF) button:
TM
) screen.
®
forward/rewind when listening to music.
11
*
*
*
(Zero Emission menu) button:
Push to display the menu screen where several
useful functions for electric vehicle driving are
available.
12
13
(Day/Night) button:
Push to switch between the day screen (bright)
and the night screen (dark). Push and hold to turn
off the display. Push again to turn on the display.
CAMERA button (if so equipped):
Push to switch to the Around View Monitor
screen.
“9. Monitor system”
14
OPEN/TILT button:
*
Push to open the monitor to access the CD slot
and the SD card slot. Push and hold to adjust the
monitor angle.
15
CD slot
*
16
*
17
*
(CD eject) button:
Push to eject a CD.
SD card slot:
Remove the cover to access the SD card slot.
Insert an SD card. Push the inserted SD card in
and release it to eject the SD card from the slot.
An SD card containing map data is provided with
the vehicle and is inserted in the right hand slot of
the system. To transfer the data, insert an SD
card in the left side slot.
“Transferring information to/from address
book” (page 3-70)
NOTE:
Do not remove the SD card containing map
data that is inserted in the right-hand slot.
When this SD card containing map data is
removed the navigation system will not
operate. If the SD card containing map
data is accidentally removed, after reinserting the SD card containing map data
into the right-hand slot, place the power
switch in the OFF position and then place
back in the ON position again.
INFO:
. Never remove the SD card while the monitor
is opening or closing or the angle of the
monitor is being adjusted. Doing so may
damage or deform the SD card.
. Never insert foreign objects such as coins
into the SD card slot. Doing so may result in
a malfunction of the device.
. Be careful not to drop the cover for the SD
card slot into the gap of the monitor. Doing
so may result in a malfunction of the device.
. Do not apply overload to the SD card when
inserting it to the slot. Doing so may result in
a malfunction of the device.
. The SD card may be hot when it is removed
from the device. This does not indicate a
malfunction.
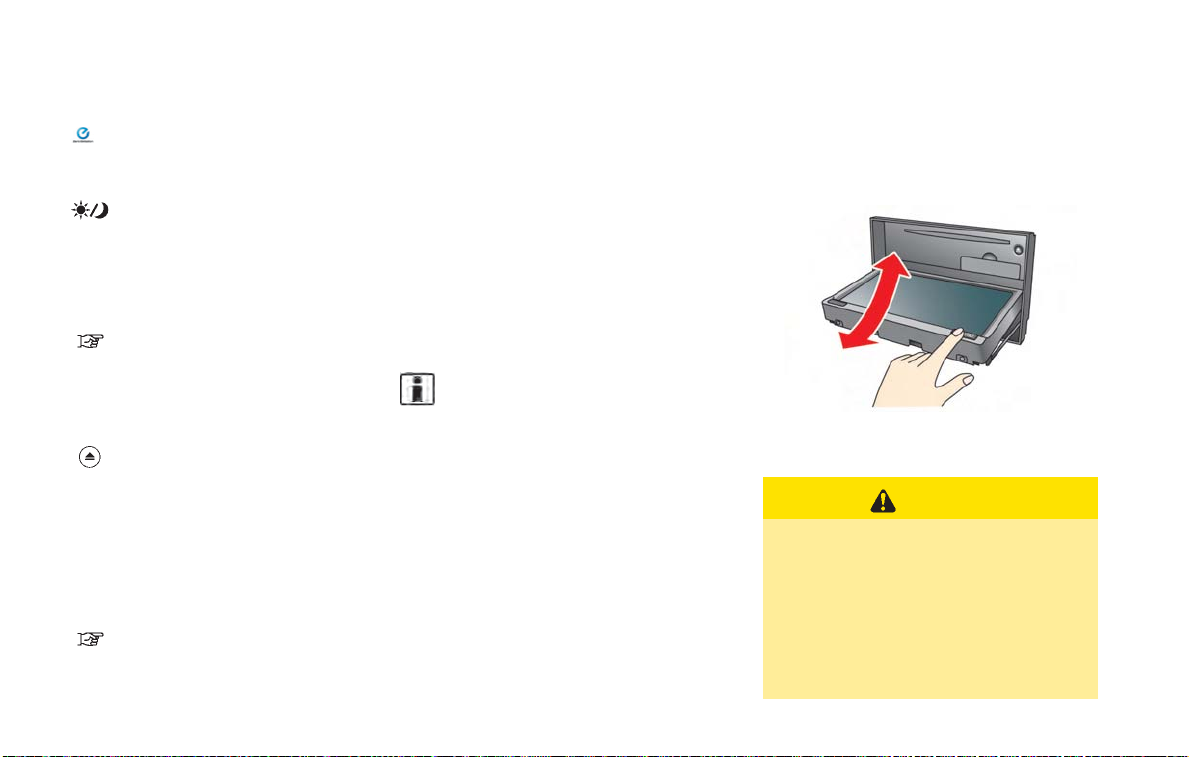
Opening/Closing monitor
Open the monitor to insert/eject a CD or an SD
card.
CAUTION
. Be careful not to pinch your hand or
fingers while the monitor is moving
to its open or closed position. This
may cause injury to your hand or
fingers.
. Do not force the monitor to open or
close. Doing so may damage the
monitor.
Getting Started 1-3
When the OPEN/TILT button is pushed while
the monitor is closed, the monitor will open.
When the OPEN/TILT button is pushed while
the monitor is open, the monitor will close.
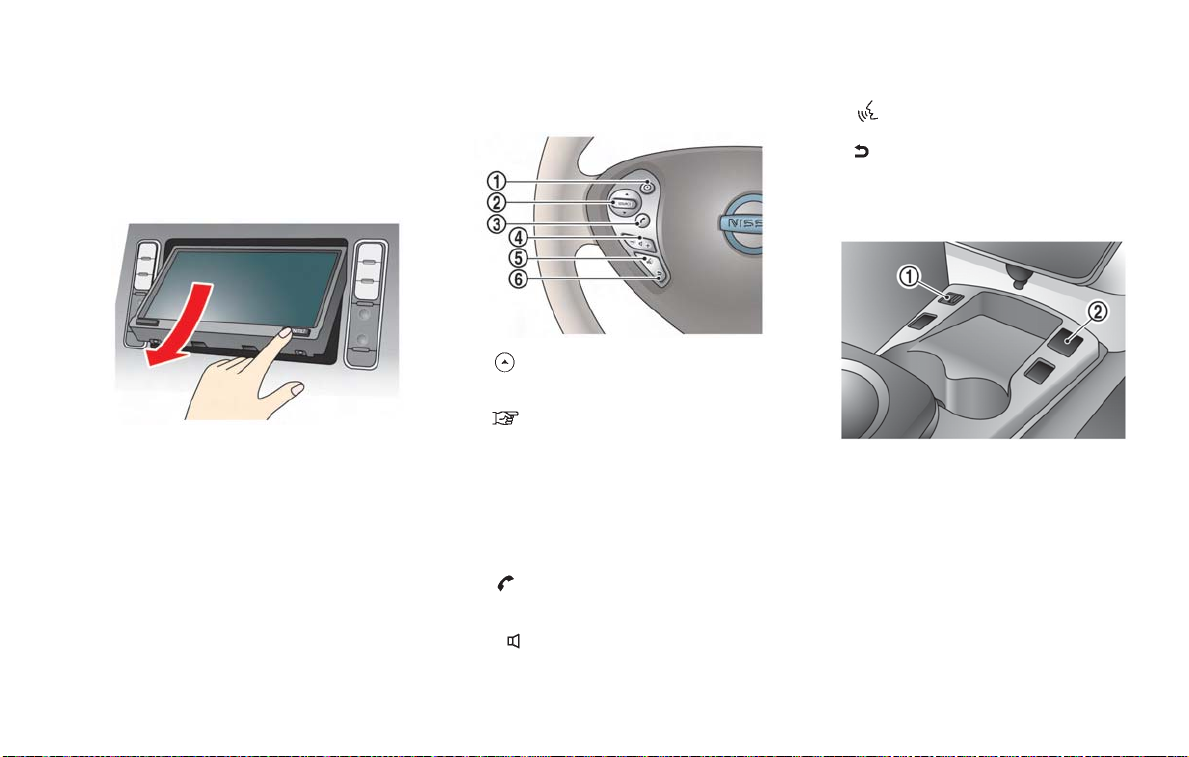
Adjusting monitor angle
STEERING WHEEL SWITCHES
*
*
5
6
(TALK) button:
Push to enter the voice recognition mode.
(CANCEL) button:
Push to cancel the voice command.
USB CONNECTOR AND AUXILIARY
INPUT JACK
The angle of the monitor can be adjusted to
select from 3 different preset angles. Once the
angle of the monitor is selected and stored in the
system, the selected angle is always set after
performing the open/close operation of the
monitor.
Push and hold the OPEN/TILT button until a
chime sounds. When the button is released, the
next preset angle will be selected. Continue this
procedure until the preferred angle is obtained.
1-4 Getting Started
*
*
*
*
1
2
3
4
(Driving range) button:
Push to display the driving range screen. Push
again to return to the previous screen.
“Displaying estimated driving range”
(page 2-3)
SOURCE button:
Push to change the mode in sequence of AM,
FM, XM, CD, USB memory, iPod
®
Pandora
streaming audio. If a mode is not ready to
function, it will be skipped. Push up or down to
select a radio station or a track.
Push to display the hands-free phone operation
screen.
- + (Volume control) button:
Allows you to adjust the volume.
(if so equipped) and Bluetooth
(PHONE) button:
®
player,
1
USB connector:
*
®
Connect to play an iPod
memory.
2
Auxiliary input jack:
*
Connect an audio player that accepts a 1/4 inch
(3.5 mm) TRS connector (such as an MP3 player
etc.) to play back music.
®
, an iPhone®or a USB
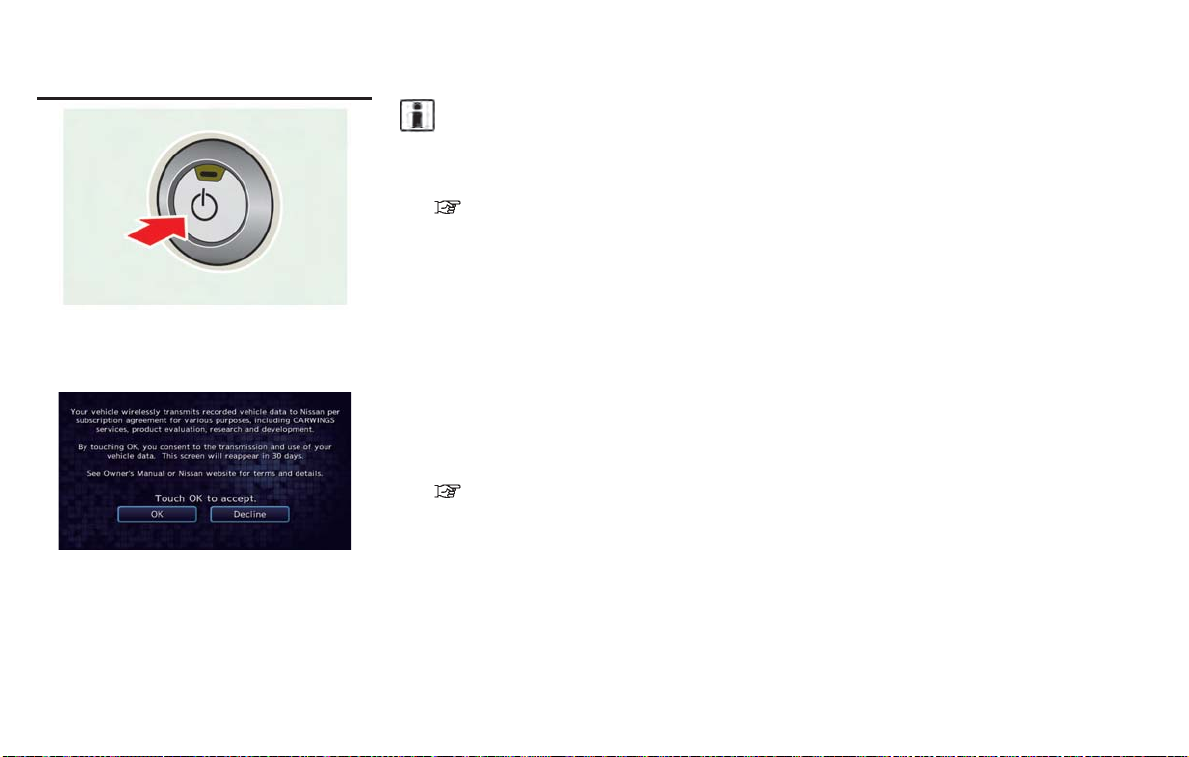
START-UP SCREEN
1. The system starts when the power switch is
pushed to the "ACC" or "ON" position. The
start-up screen is displayed.
2. Check the message that is displayed on the
screen and touch [OK].
Subject to the selected items, a different
indication may be displayed at subsequent
times. The set-up screen will be displayed
again after a given period of time.
INFO:
. The setting can be changed from [Vehicle
Data Transmission Setting] in CAR-
TM
WINGS
setting.
“CARWINGSTMsettings” (page 5-12)
. If you do not select [OK], vehicle data will
not be stored in the NISSAN CARWINGS
Data Center and you will not be able to
check it via the NISSAN Owner’s Portal
Website.
Also, if [Share Vehicle Information] is set to
OFF, vehicle data will not be uploaded.
Make sure that this setting is ON.
When [Service Reminder] is set to ON,
communication with the NISSAN CARWINGS Data Center will be performed once
daily. NISSAN recommends that you set
[Service Reminder] to ON.
“CARWINGSTMsettings” (page 5-12)
NOTE:
. Navigation functions, audio, hands-free
phone, vehicle information display, etc.
can still be operated even if [Decline] is
touched. However, if the CARWINGS
TM
function is selected, the start-up screen
will be displayed again.
. If other buttons such as the MAP
button or MENU button etc., are
pressed without [OK] or [Decline] being
touched, the corresponding screen will
be displayed and operations can be
performed. However, if the CAR-
TM
WINGS
function is selected, the
start-up screen will be displayed again.
Getting Started 1-5
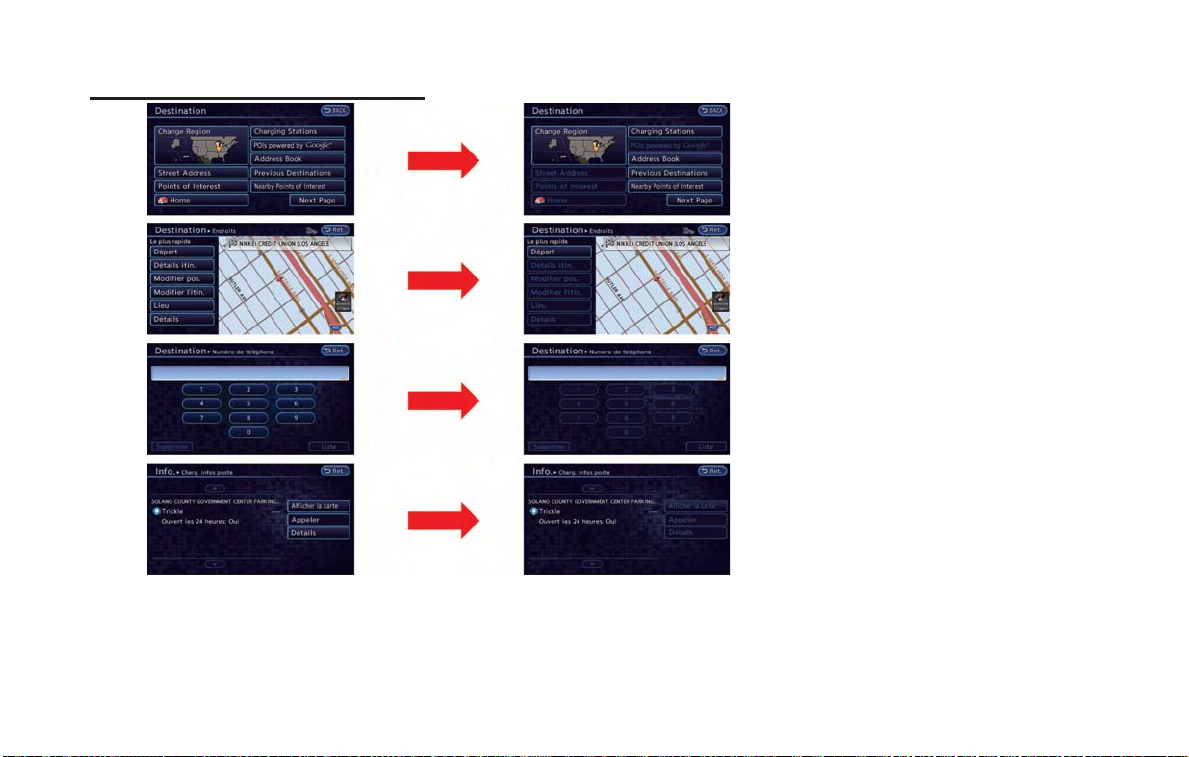
FUNCTIONS DISABLED WHILE
DRIVING
To ensure safe driving, some functions cannot
be operated or have limited operation while the
vehicle driving speed is above 5 mph (8 km/h).
The on-screen text and keys for these restricted
functions will be "grayed-out" or muted and
cannot be selected while driving. In some cases,
a screen message will appear indicating a
restricted function.
Restricted functions while driving include:
. Character (letter and number) input screen
during destination entry (street address,
point of interest, phone number, freeway
entrance/exit, intersection, city center)
. Setting route condition after setting destina-
tion
. Scrolling and viewing of certain navigation
list
. Displaying detail information and touching
item on the information screen
. Adding/editing home location
. Adding/editing address book entries
. Editing current route
. Storing current position, information, desti-
nation
. Displaying charging station information
. Registering cellular phones
1-6 Getting Started
. Making a call by dial number and handset
phonebook
. Setting phone, CARWINGS
These functions will become available again
when the vehicle speed is reduced to 5 mph (8
km/h).
Destination functions available while driving
include:
. Home
. Nearby Charging Stations
. Address Book
. Previous Destinations
. Nearby Points of Interest
. Stored Routes
. Map input
tooth
®
functions
TM
and Blue-
BASIC OPERATION
Examples of operations performed using the
touch panel operation are described here.
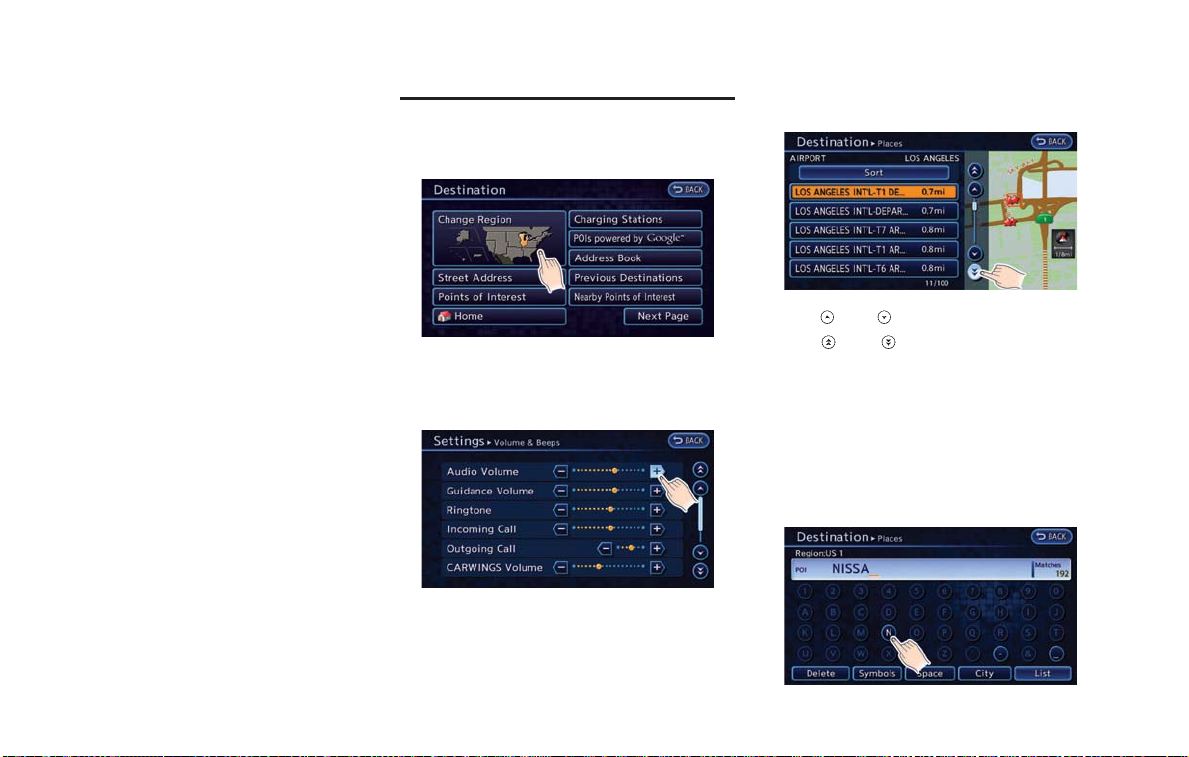
SELECTING ITEM
When the item is touched, the next screen is
displayed.
ADJUSTING VOLUME AND OTHERS
Touch [+] or [-] located on the right and left of
the bar graph to perform the adjustment.
SCROLLING MESSAGE or LIST
Touch [ ]or[ ] to scroll the message or list.
Touch [
]or[ ] to skip to the next page.
HOW TO INPUT LETTERS AND
NUMBERS
Character (letters and numbers) input screen
Alphanumeric characters are entered to set a
destination, search for a facility, edit stored
locations, etc.
Getting Started 1-7
1. Touch a character on the displayed keyboard. The selected character is entered.
INFO:
.
The list screen appears automatically
when text has been entered and the
matching list items have been narrowed
down to a number that will fit on the
screen.
.
Symbol keys are displayed by touching
[Symbols]. Alphabet keys are displayed
by touching [A-Z].
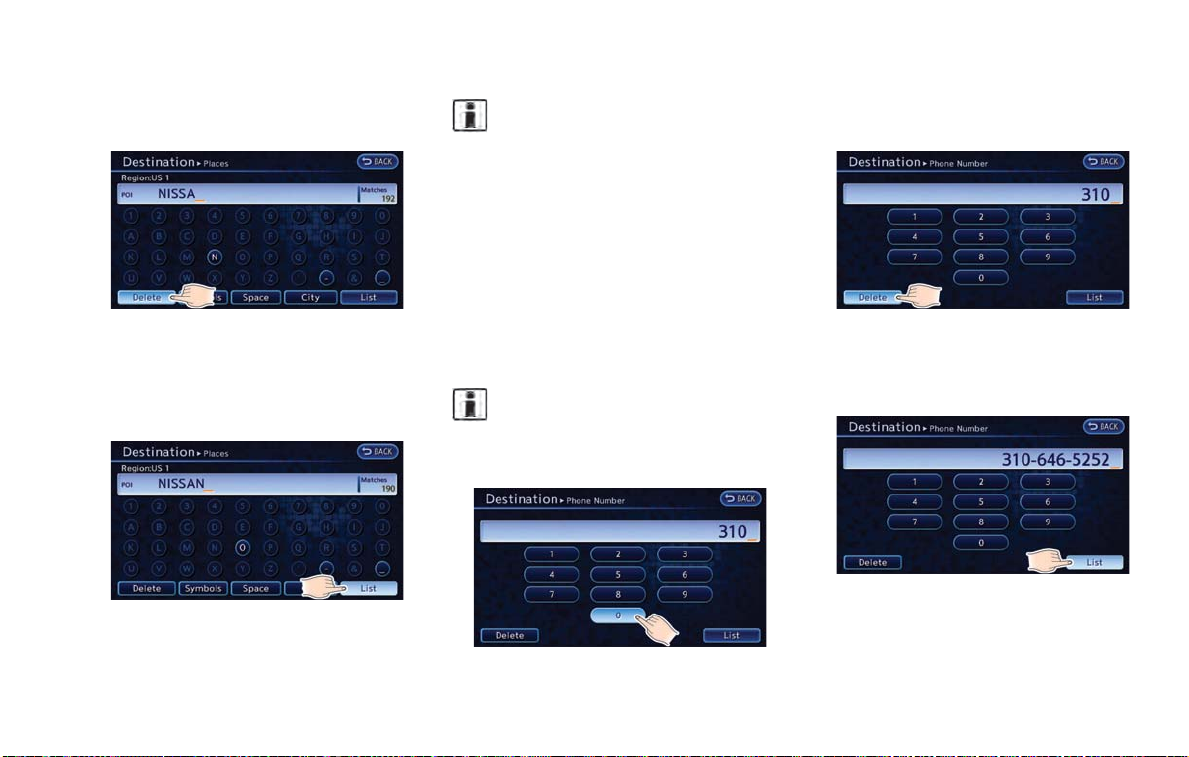
1. Touch a number on the displayed keyboard.
The selected number is entered.
2. Touch [Delete] to delete the last character
entered.
Touch and hold [Delete] to delete all the
characters entered.
Touch [Space] to enter a space.
3. After finishing the entry, touch [List].
1-8 Getting Started
Phone number input screen
Perform the following procedure to enter a
number.
INFO:
Only the locations included in the map data
database can be searched for by a phone
number.
2. Touch [Delete] to delete the last number
entered.
Touch and hold [Delete] to delete all the
numbers entered.
3. After finishing the entry, touch [List].

VIEWING DISPLAY SCREENS
This system allows you to set various functions
and check information on the screen that is
displayed by pushing each button located on the
control panel.
MAP SCREEN
When the MAP button is pushed, a map screen
where the vehicle position is centered is
displayed.
When the map is moved or the MAP button is
pushed while the menu screen is displayed, a
map indicating the current vehicle position is
displayed. Various useful information for driving
is shown on the map screen.
“Map settings” (page 3-3)
ZERO EMISSION MENU SCREEN
Push the (Zero Emission menu) button to
display the menu screen where several useful
functions for electric vehicle driving can be set.
Select a preferred menu and touch an item to be
set.
“2. Unique EV functions”
MENU SCREEN
When the MENU button is pushed, the menu
screen is displayed. Select a preferred menu
and touch an item to be set.
Available options:
. [Destination]:
There are several methods you can use to
set your destination. Understand the advantages of each method and select the best
method for finding and setting your destination.
“Setting destination” (page 3-17)
. [Route]:
During route guidance, you can modify the
route conditions or confirm the route information. Set the appropriate route condition according to your purpose.
“Route guidance” (page 3-39)
. [Info]:
This screen allows you to set or view various
information that is helpful for using the
vehicle safely and comfortably.
“6. Viewing technical information”
. [Settings]:
The system can be customized to make it
easier for you to use.
. [Phone]:
Useful functions for the Bluetooth
Free Phone System can be set.
“Phone settings” (page 7-8)
Getting Started 1-9
®
Hands-
. [CARWINGS]:
Information feeds are displayed and settings
for CARWINGS
TM
can be performed.
“5. CARWINGSTM”
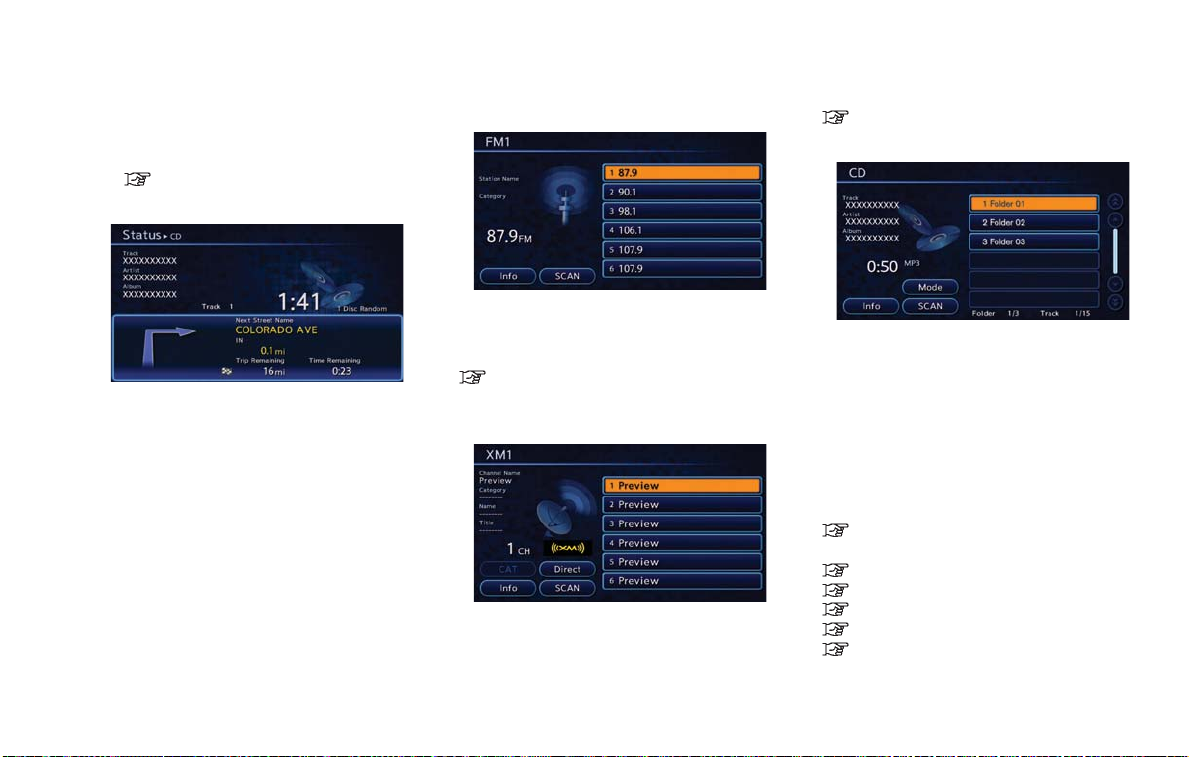
STATUS SCREEN
Push the STATUS button to display the current
status of the navigation system.
Each time the STATUS button is pushed,
displayed information is switched in the order
of climate control, vehicle information and
navigation route information.
There are different status screens displayed
depending on various factors, such as the
currently active mode, whether a destination
has been set or not, etc.
1-10 Getting Started
FM·AM RADIO SCREEN
Push the FM·AM button to turn on the radio and
display the radio screen. Push the switch to
toggle the radio mode: AM?FM1?FM2.
“FM-AM-SATradio operation” (page 4-12)
SIRIUSXM SATELLITE RADIO
SCREEN
Push the XM button to turn on the satellite radio
and display the SiriusXM Satellite Radio screen.
Push the switch to toggle the radio mode:
XM1?XM2?XM3.
“FM-AM-SATradio operation” (page 4-12)
CD·AUX SCREEN
Push the CD·AUX button to turn on the audio
system and display the audio screen. Push the
CD·AUX button to toggle the mode: iPod
*1
player
/USB memory/Pandora
®
Bluetooth
*1 Screen only displays when a device capable of
*2 The Pandora
streaming audio*1?AUX.
playback is connected.
®
is only available in U.S.
“Compact Disc (CD) player operation”
(page 4-14)
“iPod®player operation” (page 4-16)
“USB memory operation” (page 4-19)
“Bluetooth®streaming audio” (page 4-11)
“Auxiliary input jack” (page 4-23)
“Pandora®operation” (page 4-17)
®*1*2
?CD?

ITEMS TO BE SET INITIALLY
The settings included in this section should be
performed before using the system for the first
time.
SUBSCRIPTION TO CARWINGS
TM
SERVICE
It is necessary to subscribe to CARWINGSTMin
order to use the CARWINGS
details about the subscription, visit the NISSAN
Owner’s Portal Website or contact a NISSAN
certified LEAF dealer.
TM
service. For the
INPUTTING USER ID AND PASSWORD
User registration is required before using the
CARWINGS
service that provides various types of information by communicating with the NISSAN
CARWINGS Data Center. Access the NISSAN
Owner’s Portal Website before starting the
service. Confirm the terms of service and
complete the user registration form. After
registration is completed, a user ID and password are provided.
TM
service. CARWINGSTMis a
Inputting procedure
Enter the user ID and password in the system by
preforming the following procedure.
1. Push the
and touch [CARWINGS].
2. Touch [CARWINGS Settings].
3. Touch [Sign in].
4. Touch [User ID]. The user ID input screen is
displayed.
5. Enter the user ID and touch [OK]. Return to
the previous screen.
(Zero Emission menu) button
6. Touch [Password]. The password input
screen is displayed.
7. Enter your password and touch [OK]. Return
to the previous screen.
Getting Started 1-11

8. Touch [Send ID and password]. A confirmation message is displayed.
9. Confirm the contents of the message, then
touch [Yes]. It takes approximately 30
seconds to send the information. The
system connects to the NISSAN CARWINGS Data Center, and then the CAR-
TM
WINGS
service can then be used.
INFO:
. The following can be used when inputting a
user ID or password: letters of the alphanumeric characters, symbols, + , - , # , / , .
(period), _ (underscore), @, etc.
. The ID that is registered to the vehicle is
required to match the ID that is obtained
from the NISSAN Owner’s Portal Website in
order to activate the system. If the IDs do not
match, the system cannot be activated. in
this case visit the NISSAN Owner’s Portal
Website and obtain an ID again.
. The setting of the ID and password is only
required during initial registration. However,
it is recommended to regularly change the
password. For details about how to receive
a new password, refer to the NISSAN
Owner’s Portal Website.
. When selling your vehicle, be sure to delete
the ID and password in the registration
screen. To delete the user ID and the
password, touch [Clear ID and Password].
. The CARWINGS
TM
service uses the TCU
(Telematics Communication Unit) which is
like a cellular. Even if the signal strength bar
of the TCU indicates good reception, connection to the NISSAN CARWINGS Data
Center may be disabled. This does not
indicate a malfunction. Operate the system
again after a few minutes.
. The CARWINGS
TM
service cannot be used
under the following conditions:
— The vehicle moves outside the service
area of the TCU connection to the
system.
— The vehicle is in a location with poor
signal reception such as a tunnel, underground parking, behind a building or in a
mountainous area.
STORING HOME LOCATION
If your home location is already stored in the
Address Book, it can be easily retrieved to set
the route to your home. The procedure to store
your home location is the same as for storing any
other location.
As an example, the procedure for storing your
home location by searching for a destination by
map is described here.
1. Push the MENU button and touch [Destination].
2. Touch [Home]. A confirmation message is
displayed.
1-12 Getting Started

3. Confirm the contents of the message, then
touch [Yes].
4. Touch [Map]. The current location map
screen is displayed.
5. If necessary, adjust your home location by
touch panel operation.
6. After adjusting the location, touch [OK]. A
message is displayed and your home location is stored in the Address Book.
7. Adjust the location of a stored item and edit
the contents of a stored item as necessary.
8. Touch [OK] to return to the Destination
screen.
INFO:
You can also perform the same setting by
pushing the MENU button and selecting [Settings].
“Storing location” (page 3-38)
CONNECTING CELLULAR PHONE
Your vehicle is equipped with Bluetooth
Hands-Free Phone System. If you are an owner
of a compatible Bluetooth
phone, you can set up the wireless connection
between your cellular phone and the in-vehicle
phone module. With Bluetooth
nology, you can make or receive a telephone call
with your cellular phone in your pocket.
1. Push the button and touch [Connect
Phone].
®
enabled cellular
®
wireless tech-
®
Getting Started 1-13

2. When a PIN code appears on the screen,
operate the compatible Bluetooth
phone to enter the PIN code.
The procedure for cellular phone connection
varies according to each cellular phone.
Refer to the cellular phone Owner’s Manual
for the details.
You can also visit www.nissanusa.com/bluetooth or call NISSAN Consumer Affairs
Department for instructions on pairing
NISSAN recommended cellular phones.
When the connection process is completed,
the screen will return to the Phone menu
screen.
Some cellular phones or other devices may
cause interference or a buzzing noise to
come from the audio system speakers.
Storing the device in a different location
may reduce or eliminate the noise.
®
cellular
INFO:
The cellular phone connection can also be set
by performing the following procedure.
1. Push the MENU button and touch [Settings].
2. Touch [Bluetooth Connections].
3. Touch [Connect Bluetooth].
DISPLAY ADJUSTMENT
This menu turns on and off the display and
adjusts the image quality of the navigation
screen.
1. Push the MENU button and touch [Settings].
2. Touch [Display].
3. Touch the preferred adjustment item and
adjust to the preferred setting.
Available settings
. [Display]:
Turn on or off the screen.
“Display” (page 1-14)
. [Brightness]:
Adjust the screen brightness.
“Brightness” (page 1-15)
. [Contrast]:
Adjust the screen contrast.
“Contrast” (page 1-15)
. [Background Color]:
Set the background color.
“Background color” (page 1-15)
Display
To turn off the display, touch [Display].
The display can also be turned off by pushing
and holding the
seconds.
button for more than 2
1-14 Getting Started

Contrast
When any button is pushed with the display off,
the display turns on. The display will automatically turn off when there is no switch operation
for 5 seconds.
To turn on the display, push the
button.
Brightness
1. Touch [Brightness].
2. Adjust the display brightness by touching
[+] or [-].
1. Touch [Contrast].
2. Adjust the display contrast by touching [+]
or [-].
Background color
1. Touch [Background Color].
2. Touch [Day] or [Night]. The indicator of the
selected color illuminates.
Day screen
Night screen
INFO:
The background color setting can also be
changed by pushing the
button.
Getting Started 1-15

VOLUME SETTINGS
This turns on and off, as well as adjusts, the
phone function (ringer, incoming and outgoing
volume), the voice guide function and the beep
function.
1. Push the MENU button and touch [Settings].
2. Touch [Volume & Beeps].
3. Touch the item you would like to adjust.
Available settings
. [Audio Volume]:
Adjust the volume level of the audio system
by touching [+] or [-].
. [Guidance Volume]:
Adjust the volume level of voice guidance by
touching [+] or [-].
. [Ringtone]:
Adjust the volume level of the ringtone by
touching [+] or [-].
1-16 Getting Started
. [Incoming Call]:
Adjust the incoming call volume by touching
[+] or [-].
. [Outgoing Call]:
Adjust the outgoing call volume by touching
[+] or [-].
. [CARWINGS Volume]:
Adjust the volume level of the CAR-
TM
WINGS
[+] or [-].
. [Switch Beeps]:
Select to toggle the beep function between
ON and OFF. The indicator light illuminates
when the beep function is set to ON. The
beep sounds when pushing and holding a
button or when a prohibited operation is
performed.
. [Guidance Voice]:
Select to toggle the voice guidance function
between ON and OFF. The indicator light
illuminates when the voice guidance function is set to ON.
information channel by touching
CLOCK SETTINGS
This changes the clock settings.
1. Push the MENU button and touch [Settings].
2. Touch [Others].
3. Touch [Clock].
4. Touch the item you would like to adjust.
5. Adjust the preferred setting. Touch the item
to set ON or OFF.
Available settings
. [On-screen Clock]:
Select to toggle the clock display located in
the top right corner of the display between
ON and OFF. The indicator light illuminates
when the clock display is set to ON.
. [Clock Format (24h)]:
Select the clock format between 12-hour
and 24-hour times. The indicator light

illuminates when the clock is set to the 24hour format.
. [Offset (hour)]:
Touch [+] or [−] to adjust the offset value
(between −12 and +12).
. [Offset (min)]:
Touch [+] or [−] to adjust the offset value
(between −59 and +59).
. [Daylight Savings Time]:
Select to toggle the daylight savings time
setting between ON and OFF. The indicator
light illuminates when the daylight savings
time setting is set to ON.
. [Time Zone]:
Select an appropriate time zone from the list
that appears when this item is highlighted.
LANGUAGE AND UNIT SETTINGS
This changes the language and measurement
unit used in the system.
Language settings
1. Push the MENU button and touch [Settings].
2. Touch [Others].
3. Touch [Language & Units].
4. Touch [Select Language].
5. Touch the item you would like to set. The
indicator light of the selected item illuminates.
Available languages
.
English
.
Franc¸ais
.
Espan˜ol
INFO:
Do not push power switch while changing the
language.
Unit settings
1. Push the MENU button and touch [Settings].
2. Touch [Others].
3. Touch [Language & Units].
4. Touch [Select Units].
Getting Started 1-17

5. Touch the preferred unit. The indicator of the
selected unit illuminates.
Available units
.
US: mile, 8F, mile/kWh
.
Metric: km, 8C, km/kWh
6. Push the MAP button to return to the
current location map screen.
1-18 Getting Started

2 Unique EV functions
Zero Emission menu screen ................................................... 2-2
Displaying estimated driving range and charging
station information ..................................................................... 2-3
Displaying estimated driving range ................................. 2-3
Displaying charging station icons on map .................... 2-5
Confirming charging station availability .......................... 2-6
Updating charging station information ........................... 2-7
Energy information display....................................................... 2-8
Viewing energy economy information ............................. 2-8
Viewing energy economy history ................................... 2-9
Viewing energy usage information ................................ 2-9
Timer function operation ...................................................... 2-10
Setting timer charge ...................................................... 2-10
Setting Climate Ctrl. Timer........................................... 2-12
Unique EV function settings................................................ 2-15
Setting messages that are displayed on screen .... 2-16
Battery and power information .................................... 2-16

ZERO EMISSION MENU SCREEN
Push the (Zero Emission menu) button to
display the menu that includes useful functions
for electric vehicle driving.
Available settings
. [Driving Range]:
The estimated driving area within range,
including the current position is displayed on
the map screen.
“Displaying estimated driving range”
(page 2-3)
. [Nearby Stations]:
Charging station information for the current
position area is displayed.
“Finding charging station” (page 3-25)
. [Update Stations]:
Charging station information is updated
through connection to the Nissan CARWINGS Data Center.
“Updating charging station information” (page 2-7)
2-2 Unique EV functions
. [Energy Info]:
Energy information is displayed on the
screen.
“Energy information display”
(page 2-8)
. [Charging Timer]:
The timer charge function can be set.
“Setting timer charge” (page 2-10)
. [Climate Ctrl. Timer]:
The Climate Ctrl. Timer function can be set.
“Setting Climate Ctrl. Timer”
(page 2-12)
. [CARWINGS]:
Information feeds are displayed and settings
for CARWINGS
TM
can be performed.
“5. CARWINGSTM”
. [Settings]:
Set messages that are displayed on the
screen and email messages that can by
received using a personal computer or
cellular phone.
“Unique EV function settings”
(page 2-15)
NOTE:
. Establishing the CARWINGS
TM
service
is necessary before using this service.
. To check the Li-ion battery charging
status or to use the remote heater and
air conditioner using an internet enabled smart phone or personal computer, the following conditions must be
met:
— The vehicle must be located in a
cellular phone or smart phone coverage area.
— The internet enabled cellular phone
or smart phone must be located in a
cellular phone or smart phone coverage area.
— The computer must be connected to
the internet.
— A cellular phone must be used to
communicate with the vehicle.
— A cellular phone capable of text
messaging must be used to receive
text message regarding vehicle
charge status.
. When the remote heater and air condi-
tioner is set, the system operates the
heater and air conditioner to adjust the
in-cabin temperature to a set temperature.

. When the charge connector is discon-
nected from the vehicle, the heater and
air conditioner operates using vehicle
Li-ion battery electric power.
. If the remote heater and air conditioner
function and Li-ion battery charging are
performed at the same time, Li-ion
battery charging will take longer than
usual due to the power used to heat or
cool the vehicle.
. Certain remote functions require a
compatible smart phone, which is not
included with vehicle.
. CARWINGS
tures are included through a subscription service which requires owner
consent to activate. The subscription
must be active to use these features.
. CARWINGS
received at a verified e-mail address or
by SMS/text messaging-enabled cellular phone.
. Standard text rates and/or data usage
may apply depending on your carrier.
TM
information system fea-
TM
communications may be
DISPLAYING ESTIMATED DRIVING
RANGE AND CHARGING STATION
INFORMATION
The estimated driving range and charging
station information are displayed on the map
screen.
CAUTION
Charging station information may not
be detailed in all areas or reflect current
charging station locations. For up to
date information about charging stations, such as business hours or charging equipment, NISSAN recommends
that you directly access the information
on your own. Additionally, always check
the Li-ion battery available charge and
set a reasonable driving schedule.
DISPLAYING ESTIMATED DRIVING
RANGE
The estimated driving range including the
current position or the destination is displayed
on the map screen depending on the charging
status of the vehicle. A destination or a waypoint
can be set on this screen.
INFO:
The estimated driving range map shows the
predicted area the vehicle can reach on the
basis of the estimated driving range that is
indicated in the meter. Driving habits, the actual
road environment (hills, etc.), and traffic conditions (traffic jams, etc.) will affect the actual
available range.
The Driving Range screen is displayed by
performing the following procedure.
. Push the
. Push the
and touch [Driving Range].
INFO:
Models with Li-ion battery warmer:
The estimated driving range will increase or
decrease when the air conditioner, heater or Liion battery warmer is turned on or off, or the
vehicle is shifted between D (Drive) and ECO, or
when any other accessory is turned on or off
based on driving.
button on the steering wheel.
(Zero Emission menu) button
Unique EV functions 2-3

How to view driving range screen
1
The extended estimated driving range is dis-
*
played using the possible driving distance on the
meter as a radius.
2
The normal estimated driving range is displayed
*
based on the current charging condition.
3
[From Dest.]:
*
The estimated driving range around the destination is displayed while setting the route. If some
waypoints are set, the nearest waypoint from the
current vehicle position is centered on the
estimated driving range map.
[Go Here]:
Any locations that are displayed within the
2-4 Unique EV functions
estimated driving range can be set as a destination or a waypoint.
4
Charging station icons:
*
: Normal charge icon
: Quick charge icon (for vehicle equipped for
quick charging)
5
The possible driving distance is displayed for
*
each estimated driving range.
INFO:
When a route is set that includes waypoints, the
estimated driving range will be displayed based
on the nearest waypoint.
Setting a charging station as destination
While the estimated driving area is displayed on
the map screen, the spot where the cross
pointer is placed by moving the map can be
set for the destination.
1. Scroll the map, place the cross pointer over
the preferred location, and touch [Go Here].

2. The system sets the destination to the
selected location and starts calculating a
route.
INFO:
. This procedure only allows you to set a
destination or waypoint on the driving range
screen. The system does not automatically
set a desired charging station as a destination or waypoint. When a charging station
displayed on the map is set as a destination
by moving the map, zoom in the map and set
a point as a destination as precisely as
possible. If the destination is not set
precisely, the system may provide guidance
to a location that is not a charging station.
. The driving range is displayed as a numeric
value above the destination or waypoint that
has been set. The values displayed here are
approximate and should only be used as a
guide.
. If setting a destination when the Li-ion
battery power level may be insufficient to
reach the set destination, the information for
charging stations is displayed, allowing you
to set a charging station as the destination.
DISPLAYING CHARGING STATION
ICONS ON MAP
The charging station icons are displayed on the
map screen. There are two types of icons: quick
charge (for vehicle equipped for quick charging)
and normal charge.
1. Touch [Map Menu] while the current location
map screen is displayed.
2. Touch [Map Icons].
3. Touch [Charging Station]. The indicator
illuminates when the item is set.
4. Push the MAP button to return to the
current location map screen. The charging
station icons are displayed on the map.
: Normal charge icon
: Quick charge icon (for vehicle equipped for
quick charging)
Unique EV functions 2-5

INFO:
When a charging icon on the map is touched, a
pop-up screen will appear.
. Touch [Go Here] to set the destination.
. Touch [Place Info] to display charging
station information.
Other settings
The charging station icon can be also set by
performing the following procedure.
1. Push the
(Zero Emission menu) button
and touch [Settings].
2. Touch [Map icons for charging stations].
or
1. Push the MENU button and touch [Settings].
2. Touch [Navigation].
3. Touch [Map Icons].
INFO:
. The map icons are not displayed on the map
screen when the map scale is set to 1/4 mile
(500 m) or higher in the 2D map and the
TM
Birdview
map.
. Display of icons for charging stations
registered in the address book cannot be
removed using this procedure.
“Show Icon on Map” (page 3-63)
CONFIRMING CHARGING STATION
AVAILABILITY
It is possible to confirm the availability of
charging stations via the NISSAN CARWINGS
Data Center. This allows you to reduce the time
spent waiting to charge.
Viewing from Zero Emission button
1. Push the (Zero Emission menu) button
and touch [CARWINGS].
2. Touch [Charging Availability].
3. Select the area for searching for charging
station locations.
.
[Near Current Location]:
Displays a list of charging stations that
are near the current vehicle location.
.
[Near Destination]:
Displays a list of charging stations that
are near the destination, when a destination has been set.
.
[Near Scroll Position]:
Displays a list of charging stations that
are near the cursor when the map has
been moved.
2-6 Unique EV functions

charging stations in the area near the current
vehicle location will also be automatically
updated.
“Unique EV function settings” (page 2-15)
Charging station information for the area around
a location set can be updated manually by using
the following procedure.
4. A list screen is displayed. Confirm the
charging station information from the list.
Full/vacant information of charging station is
indicated by icon color.
/ :
Fully vacant
/ :
Partly vacant
/ :
Full
/ :
Closed or out of service
/ : No information or unclear
Viewing from map menu
Charging station information can also be obtained from map menu.
1. Touch [Map Menu] while the current location
map screen is displayed and then touch
[Charge Avail.].
2. The system connects to NISSAN CARWINGS Data Center, a list of search results
will be displayed.
UPDATING CHARGING STATION INFORMATION
An active CARWINGSTMsubscription in
needed to update charging station information.
Information about the charging stations that are
located around the current position, destination
and your home is updated through connection to
the NISSAN CARWINGS Data Center.
While the vehicle is connecting to the NISSAN
CARWINGS Data Center, information related to
charging stations in the area around your home
will be automatically updated. Also, when the
driving range is restricted, information related to
1. Push the (Zero Emission menu) button
and [Update Stations].
2. Touch the preferred setting item. The system
then connects to the NISSAN CARWINGS
Data Center and the update of charging
station information will start.
Available settings
.
[Near Current Location]:
Charging station information for the area
around the current position is updated.
.
[Near Destination]:
Charging station information for the area
Unique EV functions 2-7

around the destination is updated.
.
[Near Home]:
Charging station information for the area
around your home is updated. Registration of your home in the Address Book is
necessary before using this item.
“Storing home location”
(page 1-12)
.
[Near a location on the Map]:
Charging station information for the area
where the cross pointer is placed by
moving the map is updated.
3. When [Stop] is touched while updating
information, connection to the NISSAN
CARWINGS Data Center is disconnected.
INFO:
If communication with the NISSAN CARWINGS Data Center is disconnected due to
poor signal reception, a message will be
displayed. Touch [Yes] to restart the download.
4. When the update is completed, a message
is displayed.
ENERGY INFORMATION DISPLAY
Energy economy and energy usage information
are displayed.
VIEWING ENERGY ECONOMY INFORMATION
Estimated driving range, average energy economy and instant energy economy are displayed.
1. Push the
2. Touch [Energy Info].
3. Touch [Energy Economy].
1
Driving Range:
*
The possible driving distance based on the
current charging status is displayed.
2
Average:
*
The average energy economy from the previous
to the next resets is displayed.
3
Instant:
*
The system shows the distance that the vehicle
can travel using 1kWh.
(Zero Emission menu) button.
2-8 Unique EV functions

4
[Reset]:
*
Touch [Reset] to reset the average energy
economy. After resetting the average energy
economy, it is stored in the history.
INFO:
Battery power is generated and stored by the
cooperative regenerative brake while driving.
When this occurs, the instant value will be
displayed as the maximum. The maximum value
will be displayed until the generated power is
consumed.
VIEWING ENERGY ECONOMY HISTORY
The previous 10 histories of the average energy
economy are displayed.
1. Push the
2. Touch [Energy Info].
3. Touch [History].
(Zero Emission menu) button.
1
Driving Range:
*
The possible driving distance based on the
current charging status is displayed.
2
Previous Reset Intervals:
*
The average energy economy history is displayed
from along with the average for previous Resetto-Reset period.
3
Current Period:
*
The average energy economy from the previous
to the next resets is displayed.
VIEWING ENERGY USAGE INFORMATION
Estimated driving range and energy usage of
various systems are displayed.
1. Push the
2. Touch [Energy Info].
(Zero Emission menu) button.
1
Driving Range:
*
The possible driving distance based on the
current charging status is displayed.
2
Variation of the possible driving distances be-
*
tween the climate control ON and OFF is
displayed.
3
Electric Motor:
*
Energy usage by the motor and regenerated
energy are displayed.
4
Climate Control:
*
Energy usage by the climate control function is
displayed.
5
Other Systems:
*
Energy usage by other equipment (headlights,
windshield wiper, etc.) is displayed.
Unique EV functions 2-9

TIMER FUNCTION OPERATION
This function enables the batteries to be
charged and the climate control to be turned
on automatically at a regular time and day of the
week.
SETTING TIMER CHARGE
Use charging timer to schedule when the Li-ion
battery charges. You can save two timer settings
that include the charging start time and end
time. One of the timer settings can be applied to
each day of the week. The vehicle automatically
begins charging at the scheduled times when
the charge connector is connected to the
vehicle. The timers do not need to be reset
each time the Li-ion battery needs charged.
1. Push the
and touch [Charging Timer].
2. Touch [Set Timer 1] or [Set Timer 2]. The
following explains the procedure for setting
Timer 1.
(Zero Emission menu) button
3. Enter the Li-ion battery charge start time.
Touch [% Charge] to change the amount of
charging. Touch [END Time] to change the
time to stop charging.
INFO:
.
Charging timer is performed according to
the current time setting on the bottom left
of the display. When setting the charging
timer function, be sure to check that the
current time displayed is correct.
.
In the default setting, [100% Charge
(Maximizes Driving Range)] is selected.
This is called long distance mode. To
maximize vehicle range, NISSAN recommends using the default setting, long
distance mode (100% charge). To extend the life span of the Li-ion battery,
use long life mode by selecting [80%
Charge (Improves Battery Longevity)].
For details, see the LEAF Owner’s
Manual.
.
If OFF is selected for a day of the week,
the charging timer will not operate on
that day. The system will wait until the
next set charging time to perform charging.
4. To set the timer charge for different days of
the week, touch [Assign Days]. Select the
preferred timer setting for each day of the
week. When the settings are completed,
touch [OK].
5. When the settings are completed, touch
[Save Timer]. The settings confirmation
screen will be displayed.
2-10 Unique EV functions

6. If the settings shown on the screen are
correct, touch [Yes].
7. The [Timer 1] indicator illuminates after the
charging timer is set. Use the same procedure to set the Timer 2 setting.
8. Place the power switch in the OFF position,
and then connect the charge connector to
the vehicle.
INFO:
. Always place the power switch in the OFF
position after setting the charging timers.
When the power switch is in the ON
position, the Li-ion battery will not start
charging.
. The Li-ion battery may not be charged to the
expected level (80% or 100%) if the
charging timer start time and end time are
set so there is not enough time to charge the
Li-ion battery.
. When either the charge start time or charge
end time is set, the charging timer function is
activated.
. When only the charging timer end time is
set, the system automatically determines
when to begin charging based on the Liion battery charge level. The Li-ion battery
may not be charged to the expected level
(80% or 100%) if the charging timer end
time is set so there is not enough time to
charge the Li-ion battery.
. When only the charging timer end time is
set, the system automatically stops charging
when the Li-ion battery charges to the
selected level (80% or 100%). Charging
may stop before the scheduled end time.
. Touch [Timer 1] or [Timer 2] to turn off the
charging timer function. Touch [Yes] if the
settings shown on the screen are correct.
After this operation has been performed, the
indicator disappears and the charging timer
function is turned off. The start and stop time
settings are not deleted, even if the charging
timer function is turned off.
. If charging timer and the Climate Ctrl. Timer
are operating at the same time due to an
overlap of the timer settings, you can
prioritize which function receives electrical
power first.
“Unique EV function settings”
(page 2-15)
. The timer setting can be changed while
timer charge is in operation. When the
setting is changed while timer charge is in
operation, the new settings are applied
immediately and charge operation stops
once. After this, if the power position is
switched to OFF, charge operation starts or
enters waiting mode depending on the new
timer settings.
. When charging is set as the first priority, the
Climate Ctrl. Timer does not start until 10
segments (80%) of the Li-ion battery available charge gauge are illuminated.
Unique EV functions 2-11

. When the climate control is set as the first
priority, the Climate Ctrl. Timer will not
operate until the remaining Li-ion battery
power displayed in the meter is 2 segments
(15%) or higher.
. The Li-ion battery will not charge when the
charge connector is connected to the
vehicle until the next scheduled charge start
time when the charge timer is active. If
necessary, use immediate charge or remote
charge to charge the Li-ion battery.
. Some charging stations used to perform
normal charge are equipped with timer
functions. If the charger timer function and
the vehicle timer are both set, and the two
timers are not set to operate at the same
time, it is possible that the charger will not
start or the battery will not be charged to the
level expected.
. The Li-ion battery may not charge to the
expected level when the Li-ion battery
warmer operates while charging using the
Charging Timer.
. Set only the Charging Timer End time when
charging in cold weather. The vehicle
automatically determines when to start
charging to fully charge the Li-ion battery,
even if the Li-ion battery warmer operates.
Charging ends before the set End time if the
2-12 Unique EV functions
Li-ion battery is fully charged.
SETTING CLIMATE CTRL. TIMER
While the charger is connected to vehicle, this
function pre-heats or pre-cools the passenger
compartment of the vehicle to the set temperature before driving. This helps reduce power
consumption from the Li-ion battery.
“Temperature settings” (page 2-14)
The Climate Ctrl. Timer operates the air conditioner using power from the charger. Electric
power from the Li-ion battery is not used.
The Climate Ctrl. Timer function allows two
different timer settings. Each timer charge
function can be set to activate on a different
day of the week.
Once the Climate Ctrl. Timer is set, it will
complete air conditioning by the time that is set.
It is not necessary to set the Climate Ctrl. Timer
everyday.
WARNING
Even if the Climate Ctrl. Timer is set, the
temperature in the passenger compartment may become high if the system
automatically stops. Do not leave children or adults who would normally
require the support of others alone in
your vehicle. Pets should not be left
alone either. On hot, sunny days, temperatures in a closed vehicle could
quickly become high enough to cause
severe or possibly fatal injuries to
people or animals.
Timer settings
1. Push the (Zero Emission menu) button
and touch [Climate Ctrl. Timer].
2. Touch [Set Timer 1] or [Set Timer 2]. The
following explains the procedure for setting
Timer 1.

3. Enter the departure time.
4. To set the Climate Ctrl. Timer for different
days of the week, touch [Assign Days].
Select the preferred timer setting for each
day of the week. After setting, touch [OK].
The previous screen is displayed.
5. When the settings are completed, touch
[Save Timer]. The settings confirmation
screen will be displayed.
6. If the settings shown on the screen are
correct, touch [Yes].
7. The [Timer 1] indicator illuminates after the
Climate Ctrl. Timer is set. Use the same
procedure to set the Timer 2 setting.
8. Turn the power switch to the "OFF" position,
and then connect the charge connector to
the vehicle.
INFO:
. The Climate Ctrl. Timer will only start when
the power switch is in the “OFF” position.
Always turn the power switch to the “OFF”
position after the Climate Ctrl. Timer is set.
. Touch [Timer 1] or [Timer 2] to turn off the
Climate Ctrl. Timer function. After this
operation has been performed, the indicator
turns off and the Climate Ctrl. Timer function
will be turned off. The start and stop time
settings are not deleted even if the Climate
Ctrl. Timer function is turned off.
. While the Climate Ctrl. Timer operates, the
Climate Ctrl. Timer indicator and the charging status indicator lights flash. If the
Climate Ctrl. Timer is set to activate, the
Climate Ctrl. Timer indicator illuminates.
. If the timer charge function and the Climate
Ctrl. Timer are in operation at the same time
due to an overlap of the timer settings, either
function can be set to be preferentially
provided with electric power.
“Unique EV function settings”
(page 2-15)
. When the climate control is set as the first
priority, the Climate Ctrl. Timer will not
operate until the remaining Li-ion battery
power displayed in the meter is 2 segments
(15%) or higher.
Unique EV functions 2-13

. If the Climate Ctrl. Timer starts operating
while the vehicle is being charged, the time
required for charging will be longer.
. Operating the Climate Ctrl. Timer or remote
climate control in an environment where the
temperature is low may decrease the rate of
battery charge.
. Timer setting can also be changed while
Climate Ctrl. timer is operated. When the
power position is switched to OFF, the air
conditioner starts or enters waiting mode
depending on the new timer settings.
. When charging is set as the first priority, the
Climate Ctrl. Timer does not start until 10
segments (80%) of the Li-ion battery available charge gauge are illuminated.
. When the difference in temperature be-
tween the air conditioner setting temperature and the temperature outside the vehicle
is large, the temperature inside the vehicle
may not be maintained at the setting
temperature.
. The charging status indicator lights illumi-
nate in a specific pattern when the Li-ion
battery warmer operates. The charging
status indicator lights use the same pattern
to indicate 12-volt battery charging, Climate
Ctrl. Timer operation or Remote Climate
Control operation. The charging status
indicator lights do not change if the Li-ion
battery warmer operates at the same time as
the above features. See LEAF Owner’s
Manual for details of the charging status
indicator lights.
Temperature settings
1. Push the (Zero Emission menu) button.
Touch [Settings].
2. Touch [Timer/Remote - Set Climate Temp].
3. Set the temperature and touch [OK].
INFO:
. The temperature in the passenger compart-
ment may not be comfortable if entering the
vehicle too soon before or too long after the
scheduled time of departure.
. Air conditioning is limited to the capacity of
the electric power when the charge connector is connected. Therefore, the temperature may not reach the set temperature
due to limitations in air conditioning performance, if ambient temperature is excessively
high or low, or if the charge connector is
connected to a 120 V plug outlet.
. The Climate Ctrl. Timer operates the climate
control function so that a comfortable
temperature is provided in the passenger
compartment at the scheduled time of
departure. The climate control is set to stop
at the scheduled time of departure.
2-14 Unique EV functions

UNIQUE EV FUNCTION SETTINGS
An active CARWINGSTMsubscription is
needed to remotely check charge status, battery
status, use remote charging, remote start Heat
and cooling and to receive e-mails/text messages.
1. Push the (Zero Emission menu) button
and Touch [Settings].
2. Touch the item you want to set.
Available settings
. [Battery & Power Alerts]:
When an indicator light located in the meter
illuminates, messages are displayed and
actions are provided on the navigation
screen.
“Setting messages that are displayed
on screen” (page 2-16)
. [Charging Messages]:
Sends a notification to a preset e-mail
address. This notification includes the
charge connector status and the charge
completion.
“CARWINGSTMsettings” (page 5-12)
. [Map icons for charging stations]:
The charging station icons are displayed on
the map screen.
“Displaying charging station icons on
map” (page 2-5)
. [Long Life Mode (80% Charge)]:
The long life mode (80% charge) is always
applied for charging operation other than for
timer charge. Refer to the LEAF Owner’s
Manual.
INFO:
When ambient temperature is approximately
148F (108C) or less, 100% charge is recommended since the battery deterioration effects
are small.
. [Timer/Remote - Set Climate Temp]:
Sets the temperature in the passenger
compartment for Climate Ctrl. Timer and
Remote Climate Control.
“Temperature settings” (page 2-14)
. [Other Settings]:
— [Autosave New Charging Stations]:
If charging station information you have
used is not stored in the system, the
location will be automatically registered
in the Address Book.
Turn this setting off if you do not want the
charging location to be stored automatically.
You can set charging stations that are
automatically registered by type. Select
from [Quick], [Trickle] or [Standard].
— [Auto-Update Stations]:
While the vehicle is connecting to the
NISSAN CARWINGS Data Center, information related to charging stations
near your home will be automatically
updated.
— [Timer With Priority]:
If the timer charge function and the
Climate Ctrl. Timer function are in operation at the same time due to an overlap of
the timer settings, either function can be
set to be preferentially provided with
electric power.
— [Charging Port Types to Include in
Station Searches]:
When [Quick Charge] is set to OFF, the
quick charge icon will not be displayed.
“How to view charging station
information” (page 3-27)
Unique EV functions 2-15

INFO:
For vehicles without the quick charge port,
NISSAN recommends turning off the quick
charging station icons by setting [Quick Charge]
to OFF.
SETTING MESSAGES THAT ARE
DISPLAYED ON SCREEN
When an indicator light located in the meter
illuminates, messages are displayed and actions
are provided on the navigation screen.
1. Touch [Battery & Power Alerts].
2. Touch the item you want to set. The indicator
of the selected item is illuminated.
Available settings
. [Use All Battery & Power Alerts]:
Displays all information on the navigation
screen.
. [Limited Power]:
Displays a message on the navigation
screen when the power limitation indicator
light illuminates in the meter.
“Limited Power Notice” (page 2-17)
. [Low Battery]:
Displays the Low Battery message when the
low battery charge warning light
nates in the meter.
“Low Battery” (page 2-17)
. [Dest. out of Range]:
Displays a message on the navigation
screen to inform the driver that the battery
should be charged soon. This will be
indicated if the estimated driving range is
less than the remaining distance to the
destination when a route to the destination
is set.
“Charge recommendation guidance”
(page 2-16)
illumi-
BATTERY AND POWER INFORMATION
For detail information about the warning/indicator lights, see the LEAF Owner’s Manual.
Charge recommendation guidance
If the remaining driving range is less than the
distance to the destination that is entered while
setting the route, the system displays a message
on the navigation screen that recommends
battery charging.
1. The notification is displayed on the upper left
side of the screen. Touch [Show] to display
the detailed information screen.
2-16 Unique EV functions

2. The system displays a message screen and
announces the contents of the message to
recommend battery charging. Check the
message displayed on the screen.
Touch [Nearby Charging Station] to search
all charging stations that are located near
the current vehicle position.
“Finding charging station” (page 3-25)
3. Touch [BACK] or push the MAP button to
return to the current location map screen.
INFO:
. The charge recommendation guidance can
be set to off.
“Setting messages that are displayed
on screen” (page 2-16)
. When the route is changed to avoid a traffic
jam or the possible driving distance indicated in the meter is changed, the charge
recommendation guidance is displayed
again.
Low Battery
When the Low battery charge warning light
and the master warning light (yellow)
illuminate, the system displays a message on
the navigation screen that notices the driver that
the Li-ion battery charge is low.
1. The notification is displayed on the upper left
side of the screen. Touch [Show] to display
the detailed information screen.
2. The system displays a message screen and
announces the contents of the message to
warn that the Li-ion battery charge is low.
Check the message displayed on the
screen.
Touch [Nearby Charging Station] to search
all charging stations that are located near
the current vehicle position.
“Finding charging station” (page 3-25)
3. Touch [BACK] or push the MAP button to
return to the vehicle location screen.
INFO:
. The Low Battery message display can be
set to off.
“Setting messages that are displayed
on screen” (page 2-16)
. When the Li-ion battery charge is low, the
system automatically obtains charging station information.
Limited Power Notice
When the power limitation indicator and the
master warning light (yellow)
system displays a message on the navigation
screen that notices the driver that power output
is restricted for various reasons. See LEAF
Owner’s Manual for details of the indicator/
Unique EV functions 2-17
illuminate, the

warning lights.
1. The notification is displayed on the upper left
side of the screen. Touch [Show] to display
the detailed information screen.
2. The system displays a message screen and
announces the contents of the message to
warn that power output is restricted and
inform the driver of the reason for this
occurrence and what action is to be taken.
INFO:
The Limited Power Notice display can be set to
off.
“Setting messages that are displayed on
screen” (page 2-16)
2-18 Unique EV functions

3 Navigation
Map settings ............................................................................... 3-3
Map types .............................................................................. 3-3
Displaying current vehicle location .................................. 3-5
Moving map ........................................................................... 3-5
Changing scale of map ...................................................... 3-7
Changing map view............................................................. 3-8
Map view settings................................................................ 3-9
Looking at information on map...................................... 3-12
Map menu screen............................................................. 3-14
Map symbols ...................................................................... 3-16
Setting destination.................................................................. 3-17
Destination screen ............................................................ 3-17
Changing region................................................................ 3-18
Finding address ................................................................. 3-20
Finding points of interest ................................................ 3-21
Setting home as destination .......................................... 3-24
Finding charging station.................................................. 3-25
Searching from address book ....................................... 3-28
Searching from history..................................................... 3-28
Finding nearby Points of Interest .................................. 3-29
Using Google Map........................................................... 3-30
Using route planner.......................................................... 3-31
Setting from stored routes ............................................. 3-31
Setting by phone number ............................................. 3-32
Setting intersection ........................................................ 3-32
Setting city center .......................................................... 3-34
Setting freeway entrance/exit ...................................... 3-35
Setting point on map ..................................................... 3-36
Operations after setting destination .......................... 3-36
Route guidance ...................................................................... 3-39
Procedures after setting route .................................... 3-39
About route guidance.................................................... 3-41
Guidance screen settings ............................................ 3-43
Route screen ................................................................... 3-46
Canceling/reactivating route ........................................ 3-47
Editing route..................................................................... 3-48
Confirming route ............................................................. 3-52
Voice guidance settings ................................................ 3-53
Recalculating route ........................................................ 3-53
Setting detour route....................................................... 3-54
Searching for detour route using
traffic information ............................................................ 3-54
Setting conditions for route calculation .................... 3-55
Route guidance settings............................................... 3-57
Storing a location/route........................................................ 3-58
Storing location ............................................................... 3-58

Storing route ...................................................................... 3-60
Storing avoid area ............................................................ 3-61
Editing address book....................................................... 3-62
Deleting stored item......................................................... 3-68
Transferring information to/from address book ......... 3-70
Navigation settings ................................................................ 3-72
Speed limit indication on map..................................... 3-73
Other navigation settings.............................................. 3-73
Resetting all navigation settings to default .............. 3-76
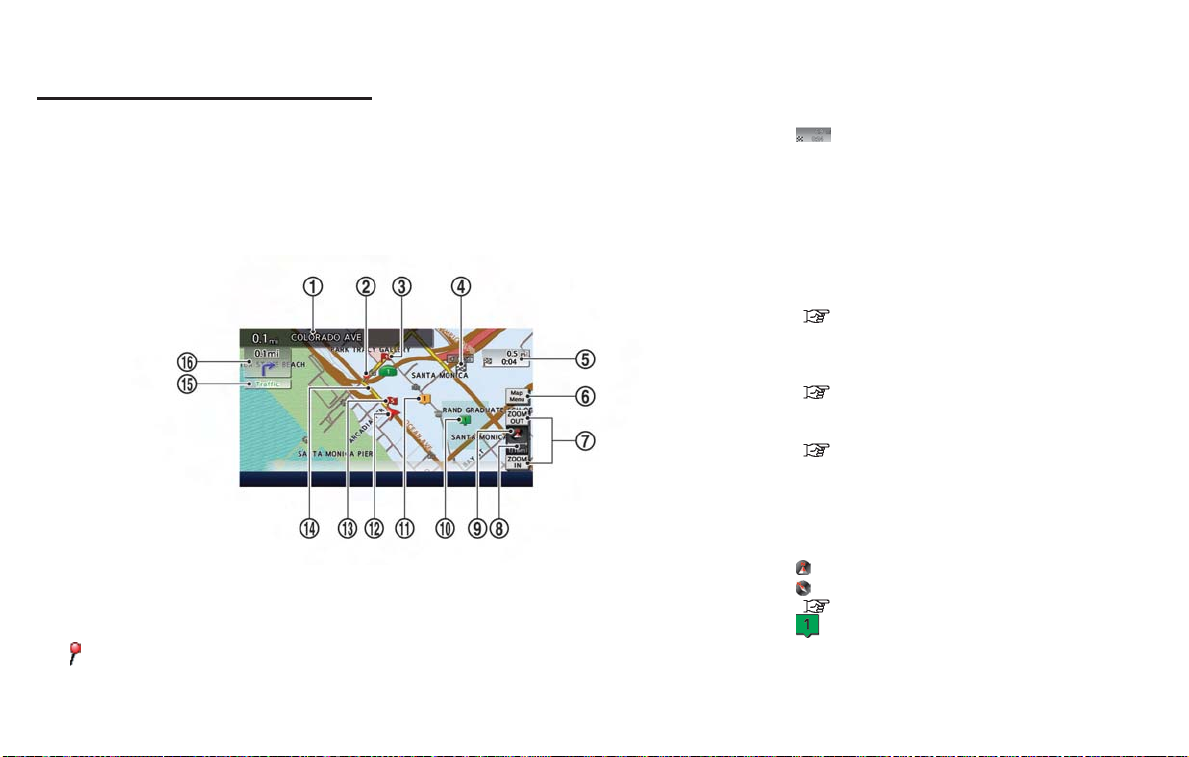
MAP SETTINGS
MAP TYPES
Two types of map views are available: 2D map
and Birdview
TM
(3D) map.
2D map
The 2D map displays the map in a 2-dimensional
environment similar to a road map.
Screen information:
1
Next street name:
*
Displays the name of the next street on the route.
2
Guide point:
*
Indicates a guide point on the route.
3
Waypoint:
*
Displays the locations that you travel past when
going to the destination. A maximum of 5
waypoints can be set.
4
Destination:
*
Indicates the destination location of the route
guidance.
*
*
*
*
*
10
*
5
6
7
8
9
Remaining time and distance to the
destination:
Indicates the approximate remaining time and
distance to the destination or waypoint. This
indicator will appear when a destination or
waypoint is set and route guidance is started.
When the vehicle is not driven on the suggested
route, the screen displays the direction to the
destination and the distance to the destination
from the current vehicle position.
“Switching estimated arrival time display”
(page 3-58)
[Map Menu]:
Touch the icon to display the Map Menu screen.
“Map menu screen” (page 3-14)
[ZOOM OUT]/[ZOOM IN]:
Touch the icon to change the map scale.
“Changing scale of map” (page 3-7)
Scale indicator:
Indicates the scale of the map.
Direction indicator:
Indicates the directional setting of the map.
Touch the icon to switch the direction of the map.
: North always pointing up.
: Direction of the vehicle always pointing up.
“Setting map orientation” (page 3-10)
Avoid Area (green or blue):
Displays the areas to avoid that are stored in the
Address Book with green or blue icons. During
the route search, the route guidance is performed
Navigation 3-3
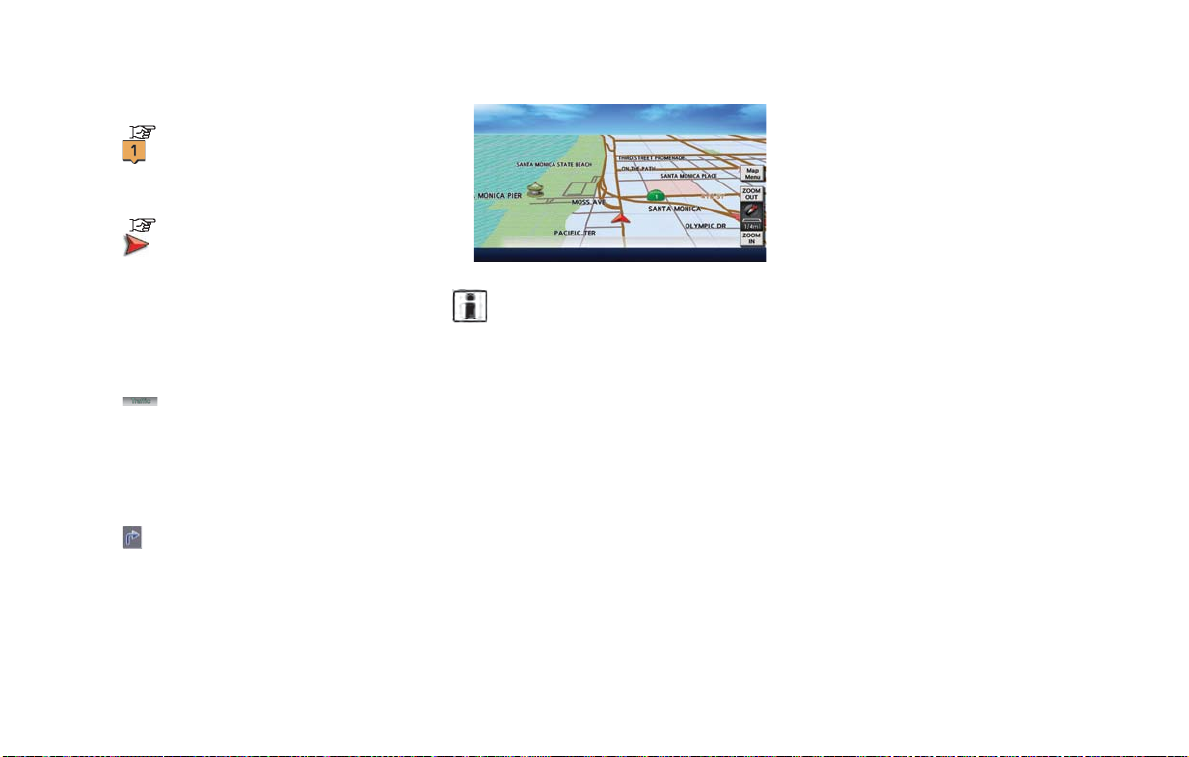
by searching for a route that avoids those areas.
“Storing avoid area” (page 3-61)
11
Stored location (orange):
*
Displays the locations that are stored in the
Address Book. Icons can be changed according
to personal preferences.
“Storing location” (page 3-58)
12
*
*
*
*
*
Vehicle icon:
Indicates the current vehicle location and the
direction of travel.
13
Starting point:
Displays the vehicle location, with which the route
is set, as the starting point.
14
Suggested route:
Appears in bold yellow during route guidance.
15
16
Traffic indicator:
Displays the reception condition of the traffic
information transmitted from the provider.
Green: Reception is good.
Gray: Reception is poor.
No mark: Subscription to NavTraffic service is not
detected.
Arrow:
Indicates the distance to the next guide point and
the turning direction at that guide point.
BirdviewTM(3D) map
BirdviewTMdisplays the map from an elevated
perspective. In Birdview
nize an image of the route because it provides a
panoramic view over a long distance.
3-4 Navigation
TM
, it is easy to recog-
INFO:
Note the following items about the Birdview
display.
. "Birdview
Clarion Co., Ltd.
. The map in Birdview
TM
" is a registered trademark of
TM
always appears with
the current forward direction facing up.
TM

DISPLAYING CURRENT VEHICLE
LOCATION
Operating with control panel
The basic map screen displays the current
location (the position where the vehicle mark is
located). Push the MAP button to display the
current location on the map while on any screen.
Operating with touch panel operation
After moving the map, touch [BACK] on the map
screen to display the current location map
screen.
MOVING MAP
The operations for moving across the map are
different between the 2D and Birdview
TM
maps.
2D map
Navigation 3-5

1. Touch the screen. The cross pointer is
displayed, and the position touched is set
as the center of the screen.
2. Touch the direction to move to. The map
continues to scroll while the screen is
touched.
INFO:
While driving, scrolling on the map is limited to a
specified distance.
Fine-tuning the cursor position:
1. Touch [Slow]. The 8-directional key is
displayed.
2. Touch the 8-directional key to adjust the
cross pointer position.
INFO:
. When [Cancel] is touched, display of the 8-
directional key will be turned off and the
system will switch to normal map scrolling
operation.
. Fine-tuning the cursor position is not pos-
sible while driving.
BirdviewTM(3D) map
1. Touch the screen. The cross pointer and 8directional key are displayed.
3-6 Navigation

2. Touch the direction to move to. The map
continues to scroll while the screen is
touched.
3. Touch [ ]or[ ] to change the direction of
the map.
: Rotates the map clockwise.
: Rotates the map counterclockwise.
INFO:
While driving, scrolling on the map is limited to a
specified distance.
CHANGING SCALE OF MAP
1. Touch [ZOOM IN] or [ZOOM OUT] to
change the scale.
INFO:
Free zoom:
The scale can be changed in smaller steps when
[ZOOM IN] or [ZOOM OUT] is touched and held
than when either key is briefly touched.
If briefly touched, the operation returns to
normal.
Map scale
Any required map scale (map coverage) between 400 miles (640 km) and 1/32 mile (50 m)
can be selected.
Scale level for 2D map and Birdview
(3D) display:
US Units Metric Units
320 miles 640 km
80 miles 160 km
32 miles 64 km
8 miles 16 km
Normal Map
Shows build-
ing footprint
graphics
Example: The most detailed level (2D map)
5 miles 10 km
2 miles 4 km
1 mile 2 km
1/2 mile 1 km
1/4 mile 500 m
1/8 mile 200 m
1/16 mile 100 m
1/32 mile 50 m
1/64 mile 25 m
TM
map
Navigation 3-7

Example: The widest level (2D map)
Example: The most detailed level (BirdviewTMmap)
Example: The widest level (BirdviewTMmap)
INFO:
The traffic information icons are not displayed on
the map screen when the map scale is set to 8
miles (16 km) or higher.
“Traffic information display and scale levels” (page 6-9)
CHANGING MAP VIEW
The map view can be changed between the 2D
and Birdview
displayed in the split screen mode.
1. Touch [Map Menu] while the current location
map screen is displayed.
2. Touch [Map View].
TM
maps. The map can also be
3. Touch the preferred map view. The indicator
of the selected map view illuminates.
4. The display automatically returns to the
current location map screen.
Available views
. [2D Map]:
Switches to the 2D map.
. [Birdview (3D)]:
Switches to the Birdview
TM
map.
. [Split: 2D Map]:
Changes to the split screen mode and both
halves display maps in 2D.
. [Split: Birdview Map]:
Changes to the split screen mode and the
left half displays the map in 2D and the right
half displays the map in Birdview
TM
.
3-8 Navigation

INFO:
. When the split screen mode is selected, the
map settings for the left screen can be
changed independently.
“Setting left screen display”
(page 3-12)
. If the split screen mode is selected, the
normal map scrolling and scale adjustment
are set in the right screen.
Other settings
The map view can also be set by performing the
following procedure.
1. Push the MENU button and touch [Settings].
2. Touch [Navigation].
3. Touch [Map View].
MAP VIEW SETTINGS
Other settings are also available for the map
screen, such as changing the map direction,
Birdview
1. Touch [Map Menu] while the current location
TM
angle, etc.
map screen is displayed.
3. Touch [Map Settings].
Split: 2D Map
Split: BirdviewTMMap
2. Touch [Map View].
4. Touch the item you would like to set.
Available settings
. [Map Orientation]:
Sets the map direction to North Up or
Heading Up.
“Setting map orientation” (page 3-10)
. [Long Range]:
Sets the long range map view display on/off.
“Settings long range map view”
(page 3-11)
Navigation 3-9

. [Birdview Angle]:
Changes the Birdview
TM
angle.
“Changing BirdviewTMangle”
(page 3-11)
. [Left Split Map Settings]:
Sets the map settings for the left screen of
the split map.
“Setting left screen display”
(page 3-12)
. [Show all Freeway Exits on Route]:
Sets the display of the freeway exit information on/off.
“Show exit information on freeways”
(page 3-44)
. [Auto. Show Turn List on Freeway]:
The turn list can be set on or off to be
displayed automatically while driving on a
freeway.
Other settings:
The orientation of the map can also be set by
performing the following procedure.
1. Push the MENU button and touch [Settings].
2. Touch [Navigation].
3. Touch [Map View].
4. Touch [Map Settings].
Setting map orientation
The map direction (orientation) can also be
changed in the 2D map. These settings are
available only in the 2D map or 2D/2D split map.
1. Touch [Map Orientation].
2. Touch the preferred map orientation. The
indicator of the selected map orientation
illuminates.
3. Push the MAP button to return to the
current location map screen.
Available map orientations
. [North Up]:
The top of the map remains oriented to the
north.
. [Heading Up]:
The top of the map follows the traveling
direction.
INFO:
The direction of the map can also be changed by
touching the icon on the map. The method for
changing the direction of the map by touching
an icon can only be used when the current
location map is displayed.
If the map orientation is switched, the icon
displayed in the lower right corner is also
switched.
: North Up
: Heading Up
3-10 Navigation

North Up
1. Touch [Long Range]. The indicator illuminates when the item is set.
2. Push the MAP button to return to the
current location map screen.
INFO:
[Long Range] is displayed only when [Heading
Up] is selected.
Changing BirdviewTMangle
The BirdviewTMangle can be changed. This
setting is available only in the Birdview
2D/Birdview
TM
split map.
TM
map or
Heading Up
Settings long range map view
The position of the vehicle icon can be changed
to view a wider area in the direction that the
vehicle is traveling. If this function is activated,
the vehicle icon is located slightly lower than the
center of the screen.
1. Touch [Birdview Angle].
Long Range Map View
Navigation 3-11

2. Adjust the BirdviewTMangle by touching
[Raise] or [Lower].
3. Push the MAP button to return to the
current location map screen.
Setting left screen display
When the split screen is displayed, the map
settings of the left screen can be changed.
1. Touch [Left Split Map Settings].
2. Touch the preferred map setting.
3. Push the MAP button to return to the
current location map screen.
Available settings
. [Map Orientation]:
The map direction can be selected as
follows.
— [North Up]:
The top of the map remains oriented to
the north.
— [Heading Up]:
The top of the map follows the direction
in which the vehicle is traveling.
. [Long Range]:
Positions the vehicle icon slightly lower than
the center of the screen. This offers a wider
view in the traveling direction.
. [Map Scale]:
Displays a scale on the left side of the
screen. Use this to change the scale of a
map.
INFO:
. The settings of the right screen are the same
as the settings of the full screen map.
. The scale of the map can also be changed
by touching [ZOOM OUT] or [ZOOM IN].
LOOKING AT INFORMATION ON
MAP
Icons can be displayed on the map, and
information about destinations and landmarks
can be displayed.
Displaying map icons
The map icons can be displayed or hidden by
type.
1. Touch [Map Menu] while the current location
map screen is displayed.
2. Touch [Map Icons].
3-12 Navigation

3. Touch the preferred icon. The indicator of
the selected icon illuminates.
4. Push the MAP button to return to the
current location map screen. The activated
icons are displayed on the map.
The following map items can be displayed.
: Restaurant
: Charging Station
: Hotel
:ATM
: Rest Area
INFO:
. The map icons are not displayed on the
map screen when the map scale is set
to 1/4 mile (500 m) or higher in the 2D
and Birdview
TM
map.
. If they are registered in the map data, the
brand icons will be displayed on the map
instead of the general map icons listed
below.
Other settings
The map icons can also be set by performing the
following procedure.
1. Push the MENU button and touch [Settings].
2. Touch [Navigation].
3. Touch [Map Icons].
Map scrolling information
Information about the location, on which the
center of the cross pointer is placed by scrolling
on the map, can be set to be displayed.
1. Push the MENU button and touch [Settings].
2. Touch [Navigation].
3. Touch [Others].
4. Touch [Map Scrolling Information].
5. Touch the preferred information item. The
indicator of the selected information item
illuminates.
The following information items are available.
.
[Address Book Icons]
.
[Destination/Waypoint Icons]
.
[Latitude/Longitude Info]
.
[CARWINGS Icons]
Navigation 3-13

6. Push the MAP button to return to the
current location map screen. Move the cross
pointer to the set location to display the
information.
MAP MENU SCREEN
Touch [Map Menu] while the current location
map screen or a scrolled map screen is
displayed to display the menu corresponding
to that screen.
This menu can be used to access helpful
functions quickly, such as setting a destination
and searching for points of interest nearby.
3-14 Navigation
Current location map screen
If [Map Menu] is touched while the current
location map screen is displayed, the following
options are available.
. [Store Location]:
Stores the current vehicle location in the
Address Book. The stored location can be
retrieved as necessary to set it as a
destination (waypoint).
“Storing location” (page 3-38)
. [Nearby Places]:
Searches for points of interest near the
current vehicle location, such as restaurants
and charging stations, etc.
“Finding nearby Points of Interest”
(page 3-29)
. [Map View]:
Performs map operations such as the
switching of map type and the setting of
map orientation and scale.
“Map settings” (page 3-3)
. [Map Icons]:
Displays map icons of certain points of
interest (such as restaurants and charging
stations, etc.) on the map around the current
vehicle location.
“Displaying map icons” (page 3-12)
. [Update Stations]:
Contact the NISSAN CARWINGS Data
Center to update charging station around
the current vehicle location.
“Updating charging station information” (page 2-7)
. [Charge Avail.]:
This allows you to obtain the availability
information of charging stations via NISSAN
CARWINGS Data Center.
“Viewing from map menu” (page 2-7)
Scrolled location map screen
If [Map Menu] is touched while a scrolled map
screen is displayed, the following options are
available.

. [New Dest.]:
Sets the destination to the map location
where [New Dest.] was touched. If a
destination is already set, the location will
be set as the new destination.
“Setting point on map” (page 3-36)
. [Add to Route]:
Sets the map location where [Add to Route]
was touched as the destination or a
waypoint. This is available only when a
suggested route is already set.
“Setting destination or waypoint”
(page 3-48)
. [Nearby Places]:
Searches for points of interest such as
restaurants and charging stations, etc. near
the location by scrolling the map.
“Finding nearby Points of Interest”
(page 3-29)
. [Store Location]:
Store the map location where [Store location] was touched in the Address Book. The
stored location can be retrieved to set it as a
destination or waypoint.
“Storing location” (page 3-38)
. [Update Stations]:
Contact the NISSAN CARWINGS Data
Center to update charging station around
the point of the cursor.
“Updating charging station information” (page 2-7)
. [Delete]:
Deletes a destination, waypoint or stored
location. To delete, place the cross pointer
over the corresponding icon.
Navigation 3-15

MAP SYMBOLS
This navigation system uses symbols to display facilities.
2-dimensional icons (Plan View)
3-16 Navigation

Road color
The road types are differentiated by colors.
Freeway:
(Red or light red (zoomed in))
Main road:
(Brown or dark yellow)
Narrow street:
(Gray)
Road with incomplete map data:
(Dark green)
Traffic information on map
With a subscription to the NavTraffic service,
traffic information is displayed.
“Viewing available traffic information”
(page 6-6)
Free Flow:
(Green)
Moderate traffic:
(Yellow)
Heavy traffic:
(Red)
Section affected by serious traffic event:
(Purple)
The following traffic information icons may be
displayed
Accident
Closed road
Information
Road work
Slippery road
Weather
Incident
SETTING DESTINATION
DESTINATION SCREEN
There are several methods that can be used to
set a destination. Understand the advantages of
each method and select the best method for
finding and setting a preferred destination.
1. Push the MENU button and touch [Destination].
2. Touch the preferred method for setting the
destination.
Available settings
. [Street Address]:
Searches for a destination by address.
“Finding address” (page 3-20)
. [Points of Interest]:
Searches for a destination from various
categories of businesses or locations.
“Finding points of interest”
(page 3-21)
Navigation 3-17

. [Home]:
Searches for a route from the current
location to the previously stored home
destination.
“Setting home as destination”
(page 3-24)
. [Charging Stations]:
Searches for charging stations located near
the current vehicle location.
“Finding charging station” (page 3-25)
. [POIs powered by Google
TM
]:
Key words can be searched for using
Google.
“Google search” (page 5-10)
. [Address Book]:
Searches for a destination from the list of the
stored locations.
“Searching from address book”
(page 3-28)
. [Previous Destinations]:
Sets the previous starting point as the
destination. Searches for the destination
from the previous destinations.
“Searching from history” (page 3-28)
. [Nearby Points of Interest]:
Searches for points of interest near the
current vehicle location, such as restaurants
and charging stations, etc.
“Finding nearby Points of Interest”
(page 3-29)
Available settings (next page screen)
. [ Google(TM) Send-To-Car]:
Searches for a destination using Google
Maps.
“Using Google Map” (page 3-30)
. [Route Planner]:
Sets a route plan downloaded from the
NISSAN Owner’s Portal Website.
“Using route planner” (page 3-31)
. [Stored Routes]:
Selects a stored route.
“Setting from stored routes”
(page 3-31)
. [Phone Number]:
Searches for a point of interest by a
telephone number.
“Setting by phone number”
(page 3-32)
. [Intersection]:
Searches for a destination from an intersection.
“Setting intersection” (page 3-32)
. [City Center]:
Sets the center of a city as the destination.
“Setting city center” (page 3-34)
. [Freeway Entrance/Exit]:
Searches for a destination from a freeway
entrance/exit.
“Setting freeway entrance/exit”
(page 3-35)
INFO:
. If the required battery power level may be
insufficient when the destination is set, the
system provides guidance to any available
charging stations.
. If setting a destination when the Li-ion
battery power level may be insufficient to
reach the set destination, the information for
charging stations is displayed, allowing you
to set a charging station as the destination.
CHANGING REGION
When setting a destination, the location can be
narrowed down by specifying the region or city.
3-18 Navigation

Specifying region
1. Push the MENU button and touch [Destination].
2. Touch [Change Region].
3. Touch the preferred region from the list.
After setting, the display automatically returns to the Destination screen.
Available settings
. US1: CA, NV
. US2: AZ, CO, ID, MT, NM, OR, UT, WA, WY
. US3: IA, KS, MN, MO, ND, NE, SD
. US4: AR, LA, MS, OK, TX
. US5: IL, IN, MI, WI
. US6: DC, DE, KY, MD, OH, PA, VA, WV
. US7: CT, MA, ME, NH, NJ, NY, RI, VT
. US8: AL, FL, GA, NC, SC, TN
. US9: AK
. US10: HI
. Canada
. Puerto Rico
INFO:
. It is also possible to select a region by
touching the map on the right side of the
screen.
. It is not possible to search for a route from
the continental United States to Hawaii.
Specifying city
When searching for a destination, the search
can be narrowed down by specifying the city.
1. Touch [City]. A character input screen is
displayed.
2. Enter the name of the city, touch [List]. A list
screen is displayed.
INFO:
.
The same screen will be displayed when
a location is searched from a street.
.
Touch [Last 5 Cities] to display the last 5
cities recently set as destinations.
3. Touch the city of the destination from the list.
Navigation 3-19

INFO:
In some cases, when a city name has been
entered, the number of matching destinations in
the “Matches” column may be different from the
number displayed on the list screen. If this
occurs, enter more characters to further reduce
the number of matches.
FINDING ADDRESS
When the address of the destination is known,
use the following method to enter the address
and then have the system calculate a route. A
location near the preferred destination can also
be searched by entering the house number if the
map data contains the relevant data.
1. Push the MENU button and touch [Destination].
2. Touch [Street Address].
3. Touch [House No.]. A character input screen
is displayed.
INFO:
Touch [Region] or [City] to narrow down the
specified region and city.
“Changing region” (page 3-18)
6. Enter the name of the street. After finishing
the entry, touch [List]. A list of streets is
displayed.
4. Enter the house number, then touch [OK]. If
the house number is not available, touch [No
House #].
5. Touch [Street]. A street name input screen is
displayed.
7. Touch the correct street of the destination
from the list.
3-20 Navigation
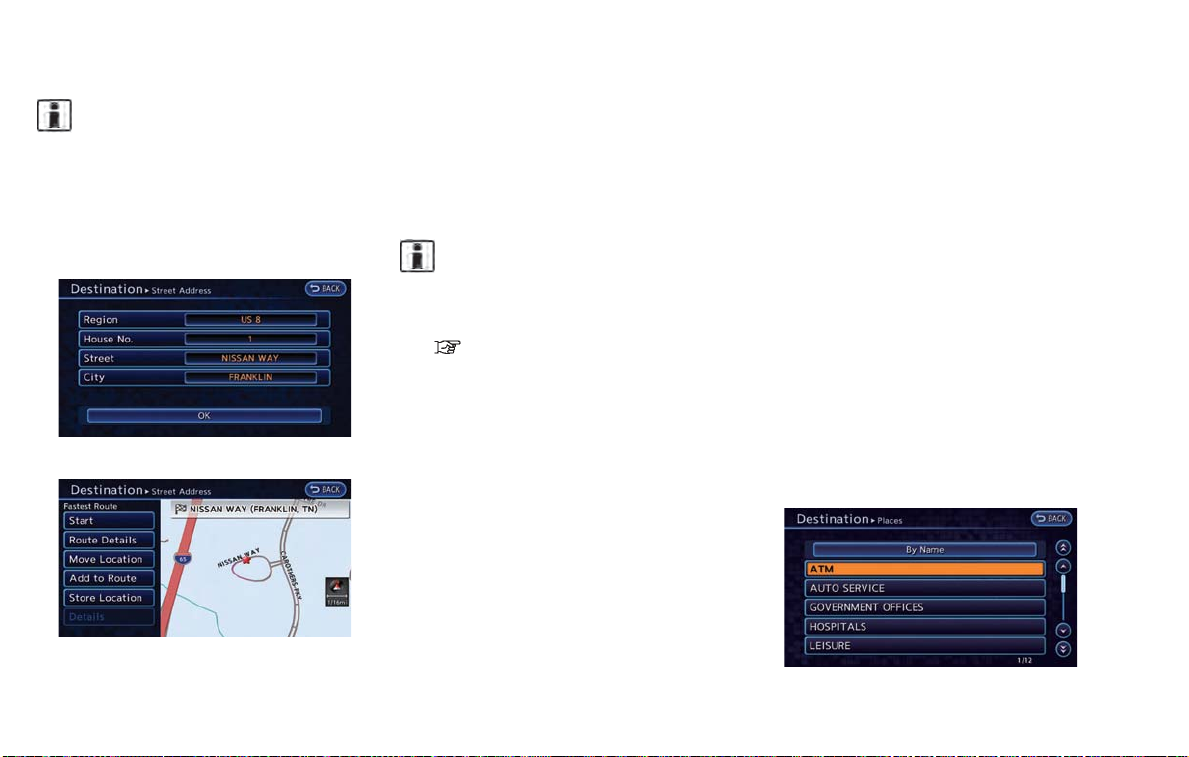
INFO:
In some cases, when a street name has
been entered, the number of matching
destinations in the "Matches" column may
be different from the number displayed on
the list screen. If this occurs, enter more
characters to further reduce the number of
matches.
8. Touch [OK].
9. The selected destination is displayed at the
center of the map. Touch [Start] after
confirming the location of the displayed
destination. The system sets the destination
to the selected location and starts calculating a route.
INFO:
After setting a destination, the location of the
destination can be adjusted and the location
can be stored in the Address Book, etc.
“Operations after setting destination”
(page 3-36)
FINDING POINTS OF INTEREST
This allows you to find a facility by type, and then
have the system calculate a route to that
destination. Specify the region and city of the
destination to find it more quickly.
NOTE:
Locations and business hours of facilities
are subject to change, which may not be
reflected in the map data. Double-check
this information before you go to an
emergency facility to ensure that you can
receive the proper support. Otherwise, you
may not receive emergency help even
when you arrive at the destination.
A confirmation message also appears on
the navigation screen. Follow the displayed instructions and check the items
required.
Searching by a landmark name
1. Push the MENU button and touch [Destination].
2. Touch [Points of Interest].
Navigation 3-21

3. Touch [By Name]. A character input screen
is displayed.
4. Enter the name of the destination facility.
After finishing the entry, touch [List]. A list
screen is displayed.
INFO:
When [City] is touched, a city can be
specified by typing the city name.
“Specifying city” (page 3-19)
5. Touch the preferred destination facility from
the list.
INFO:
.
In some cases, when a POI name has
been entered, the number of matching
destinations in the "Matches" column
may be different from the number displayed on the list screen. If this occurs,
enter more characters to further reduce
the number of matches.
.
By selecting [By Distance], you can sort
the list by the nearest distance. The
position of the selected location is
displayed in the preview on the right side
of the screen.
.
By selecting [By Category], you can
display the list that summarizes the
entered names into categories. Select
the category to narrow down the search.
6. The selected destination is displayed at the
center of the map. Touch [Start] after
confirming the location of the displayed
destination. The system sets the destination
to the selected location and starts calculating a route.
INFO:
After setting a destination, the location of the
destination can be adjusted and the location can
be stored in the Address Book, etc.
“Operations after setting destination”
(page 3-36)
Searching from the landmark category
1. Push the MENU button and touch [Destination].
2. Touch [Points of Interest]. The main category
list is displayed.
3-22 Navigation

3. Touch the main category. The subcategory
list is displayed.
4. Touch the subcategory from the list.
5. Set the narrow down conditions for the
landmarks.
An example of choosing [By Name] is
explained below.
Narrow down conditions:
.
[By Name]:
Input the facility name to narrow down
the target facility.
.
[Select a City]:
Input the city to narrow down the target
city.
.
[Near Current Location]:
Shows a list of facilities that are near
current vehicle location.
.
[Near Destination]:
When the destination is set, indicates the
facility list around the destination.
6. Touch [By Name]. A character input screen
is displayed.
7. Enter the name of the destination facility.
After finishing the entry, touch [List]. A list
screen is displayed.
8. Touch the preferred destination facility from
the list.
INFO:
.
In some cases, when a POI name has
been entered, the number of matching
destinations in the "Matches" column
may be different from the number displayed on the list screen. If this occurs,
enter more characters to further reduce
the number of matches.
.
By selecting [By Distance], you can sort
the list by the nearest distance. The
position of the selected location is
displayed in the preview on the right side
of the screen.
.
By selecting [New Category], you can
perform a search from another category.
Navigation 3-23

1. Puch the MENU button and touch [Destination].
9. The selected destination is displayed at the
center of the map. Touch [Start] after
confirming the location of the displayed
destination. The system sets the destination
to the selected location and starts calculating a route.
INFO:
After setting a destination, the location of the
destination can be adjusted and the location can
be stored in the Address Book, etc.
“Operations after setting destination”
(page 3-36)
SETTING HOME AS DESTINATION
The home location can be set as the destination
to which the system calculates a route. This
function is especially useful when searching for
a route to return to the home location.
3-24 Navigation
2. Touch [Home].
3. The home location is displayed, and the
system sets the home location as the
destination.
INFO:
If the home location is not stored yet, the
system will automatically display a screen for
storing it.
“Storing home location” (page 1-12)
4. The entire route to the home location is
shown on the map. Touch [Start] after
confirming the displayed route. The system
starts route guidance to the home location.
INFO:
Before starting route guidance, the route condition can be changed and the route can be
stored in the Address Book, etc.
“Procedures after setting route”
(page 3-39)
Setting by voice command
1. Push the
wheel.
2. After the tone sounds, speak a command.
To set the home location as the destination:
"Navigation" "Home"
button located on the steering

FINDING CHARGING STATION
It is possible to set the destination to a charging
station and then have the system calculate a
route.
There are many ways to search for a charging
station.
. Find from MENU button.
. Find from
. Find from [CARWINGS]*.
. Find from [Map Menu]* on current location
*: Full/vacant information of charging station can
be checked.
“Nearby current location” (page 3-25)
(Zero Emission menu) button.
“Specifying search condition ”
(page 3-26)
“Viewing from Zero Emission button”
(page 2-6)
map.
“Viewing from map menu” (page 2-7)
CAUTION
Detailed charging station information
may not be available in all areas and
current charging station locations may
not be up to date. For up to date
information about charging stations,
such as business hours or charging
equipment, NISSAN recommends that
you directly access the information on
your own. Additionally, always check
the Li-ion battery available charge and
set a reasonable driving schedule.
Nearby current location
1. Push the MENU button and touch [Destination].
2. Touch [Nearby Points of Interest] and then
touch [Charging Station].
3. A list screen is displayed. Touch the
preferred charging station from the list.
INFO:
.
If the suggested route is already set,
when [Show Along Route] is touched,
the system only displays the facilities
located along the route.
.
The charging station information screen
is displayed when an icon is touched.
“How to view charging station
information” (page 3-27)
4. The entire route is shown on the map. Touch
[Start] to confirm after checking the displayed route. The system starts route
guidance to the selected destination.
Navigation 3-25

INFO:
Before starting route guidance, the route condition can be changed and the route can be
stored in the Address Book, etc.
“Procedures after setting route”
(page 3-39)
NOTE:
Charging stations that have been searched
for using this function are not necessarily
equipped with devices that can be used to
charge a LEAF. Be sure to confirm this in
advance before setting a charging station
as the destination.
Specifying search condition
1. Push the (Zero Emission menu) button
and touch [Nearby Station].
2. Select the method for searching for
charging station locations.
.
[Near Current Location]:
Displays a list of charging stations that
are near the current vehicle location.
.
[Near Destination]:
Displays a list of charging stations that
are near the destination, when a destination has been set.
.
[Near Scroll Position]:
Displays a list of charging stations that
are near the cursor when the map has
been moved.
.
[Near City Center]:
Displays a list of charging stations when
a city name has been entered.
.
[Nearby Charging Availability]:
Displays a list of charging stations and
icons that shows their current availability
by connecting to NISSAN CARWINGS
Data Center.
“Confirming charging station availability” (page 2-6)
INFO:
The same menu can also be displayed
according to the following procedures.
1. Push the MENU button and then touch
[Destination].
2. Touch [Charging Stations].
3. A list screen is displayed. Touch the
preferred charging station from the list.
INFO:
Touch [Options] to change search conditions.
.
[Show Along Route]:
ON: Charging stations are displayed in
the order of location closest to the route
from the current vehicle position.
OFF: Charging stations are displayed in
the order of closest location from the
current vehicle position.
3-26 Navigation

.
[Show Quick Charging Stations Only]:
ON: Only the Quick Charge Stations are
displayed in the order of closest location
from the current vehicle position.
OFF: All charging stations are displayed
in the order of the closest location from
the current vehicle position.
4. The entire route is shown on the map.
Touch [Start] to confirm after checking the
displayed route. The system starts route
guidance to the selected destination.
How to view charging station information
Touch any icon displayed on the list screen to
show the charging station information screen.
Detailed information about a charging station
can be checked.
Contents of charging station information
. Facility name
. Type of charging devices
: Normal charge icon
: Quick charge icon (for vehicle equipped for
quick charging)
. Type and number of charge connectors
. Whether this facility is open 24 hours a day,
whether the business hours are fixed
Available settings
The following settings are available from the
information screen. Displayed items vary depending on the received information.
. [Show Map]:
Displays a map screen for the selected
charging station. The charging station on
this screen can be set as the destination.
“Operations after setting destination”
(page 3-36)
. [Call]:
Makes a call to the selected charging
station. A cellular phone needs to be
connected beforehand.
“Connecting cellular phone”
(page 1-13)
. [Details]:
Displays the following information about the
selected charging station.
— Address
— Phone number
— Whether there is a charge for using
charging equipment at this facility or not
NOTE:
Equipment that is displayed on the charging station information screen is not
necessarily compatible with a LEAF. Be
sure to check whether equipment can be
used with a LEAF beforehand.
Navigation 3-27

INFO:
As maintenance of data for charging station
information is carried out periodically, detailed
information for a charging station selected may
not always be displayed.
SEARCHING FROM ADDRESS
BOOK
Storing frequently used destinations in the
Address Book makes it easy for the system to
set and calculate a route. To utilize this function
more effectively, destinations that are often
traveled to should be stored in advance.
1. Push the MENU button and touch [Destination].
2. Touch [Address Book].
3. Touch the preferred location from the list.
INFO:
Selecting [Sort] displays a list of various sort
functions. To use the sort functions, stored
locations must be set in advance.
“Storing location” (page 3-38)
.
[Sorted By Number]:
The Address Book entries are displayed
in ascending numerical order.
.
[Sorted By Name]:
The Address Book entries are displayed
in alphabetic order.
.
[Sorted By Icon]:
By selecting a particular icon, a list that
contains only the Address Book entries
associated with that icon is displayed.
.
[Sorted By Group]:
By selecting a particular group (family,
friends, leisure, etc.), the selected group
is displayed at the top of the list.
4. The selected destination is displayed at the
center of the map. Touch [Start] after
confirming the location of the displayed
destination. The system sets the destination
to the selected location and starts calculating a route.
INFO:
After setting a destination, the location of the
destination can be adjusted and the location can
be stored in the Address Book, etc.
“Operations after setting destination”
(page 3-36)
Setting by voice command
1. Push the
button located on the steering
wheel.
2. After the tone sounds, speak a command.
To set the destination from the Address Book:
"Navigation" "Address Book"
SEARCHING FROM HISTORY
It is possible to set destinations using the former
route guide starting location, as well as destination lists that were set in the past. Up to 100
previous destinations will be automatically
stored. If the number of previous destinations
exceeds 100, the oldest one will be replaced by
3-28 Navigation

the newest one.
1. Push the MENU button and touch [Destination].
2. Touch [Previous Destinations]. A list screen
is displayed.
3. Touch the previous start point or the
previous destination from the list.
4. The selected destination is displayed at the
center of the map. Touch [Start] after
confirming the location of the displayed
destination. The system sets the destination
to the selected location and starts calculating a route.
INFO:
After setting a destination, the location of the
destination can be adjusted and the location can
be stored in the Address Book, etc.
“Operations after setting destination”
(page 3-36)
Setting by voice command
1. Push the
wheel.
2. After the tone sounds, speak a command.
To display the previous destinations list:
"Navigation" "Previous Destinations"
button located on the steering
FINDING NEARBY POINTS OF INTEREST
This allows you to set the destination to a facility
located near the current vehicle location or
another location that you move to by scrolling
the map, and then have the system calculate a
route.
If there is any particular Points of Interest type
that you intend to use frequently, you can store it
in the list of nearby Points of Interest.
“Customizing Nearby Places” (page 3-74)
1. Push the MENU button and touch [Destination].
2. Touch [Nearby Points of Interest]. The
category list is displayed.
3. Touch the preferred category. A facility list
screen is displayed.
4. Touch the preferred destination from the list.
The position of the selected location is
displayed in the preview on the right side
of the screen.
Navigation 3-29

INFO:
.
If the suggested route is already set, by
touching [Show Along Route], the system displays only the facilities located
along the route.
.
A maximum of 100 facilities can be
displayed on the list screen.
5. The entire route is shown on the map. Touch
[Start] after confirming the displayed route.
The system starts route guidance to the
selected destination.
INFO:
. Before starting route guidance, the route
condition can be changed and the route can
be stored in the Address Book, etc.
“Procedures after setting route”
(page 3-39)
. If the route is already set, the selected
location becomes a waypoint.
. You can also set the destination by touching
[Map Menu] in the current location map
screen and selecting [Nearby Places].
USING GOOGLE MAP
It is possible to search for a location using
Google maps, and to download the information
to set the destination via the NISSAN CARWINGS Data Center.
1. Push the MENU button and touch [Destination].
2. Touch [Next Page].
3. Touch [Google(TM) Send-To-Car].
The system connect to the NISSAN CARW-
INGS Data Center and the destination list
will be downloaded.
4. Select the preferred destinations from the
list. The position of the selected location is
displayed in the preview on the right side of
the screen.
INFO:
Select [Download] to update the list information.
5. The select destination is displayed. Touch
[Start] after confirming the location of the
displayed destination. The system sets the
selected location as the destination and
starts calculating a route.
3-30 Navigation

INFO:
Refer to the NISSAN Owner’s Portal Website
for details on destination setting using Google
maps.
USING ROUTE PLANNER
It is possible to set the route according to the
route plan created in advance by the NISSAN
Owner’s Portal Website.
1. Push the MENU button and touch [Destination].
2. Touch [Next Page].
3. Touch [Route Planner].
4. Select the preferred route plan from the list.
INFO:
Select [Download] to update the list information.
5. Touch [Start] after confirming the location of
the displayed.
INFO:
Refer to the NISSAN Owner’s Portal Website
for details on the route planner.
SETTING FROM STORED ROUTES
It is possible to select a preferred route from the
stored routes.
1. Push the MENU button and touch [Destination].
2. Touch [Next Page].
3. Touch [Stored Routes]. A list screen is
displayed.
4. Touch the preferred route from the list. The
route to the destination is set.
5. The entire route is shown on the map. Touch
[Start] after confirming the displayed route.
The system starts route guidance to the
selected destination.
INFO:
. Before starting route guidance, the route
condition can be changed and the route can
be stored in the Address Book, etc.
“Procedures after setting route”
(page 3-39)
. The stored route only includes locations
(destination and waypoints) and route calculation conditions, not the route itself.
Therefore, when the destination is set using
a stored route, a different route may be
suggested if the current vehicle location is
different from the one when the route was
Navigation 3-31

stored.
SETTING BY PHONE NUMBER
If the phone number of a facility is known, it is
possible to search for a facility by entering the
phone number, and have the system calculate a
route.
INFO:
. If the area code of the specified telephone
number does not exist in the map data, the
system cannot search for the location.
. Only the locations included in the database
in the map data can be searched by the
phone number. Residential phone numbers
cannot be used to search for a location.
1. Push the MENU button and touch [Destination].
2. Touch [Next Page].
3. Touch [Phone Number]. The telephone
number input screen is displayed.
3-32 Navigation
4. Enter the telephone number including the
area code. After finishing the entry, touch
[List].
“Phone number input screen”
(page 1-8)
INFO:
A list screen is displayed if there are two or
more search results. Touch the preferred
destination from the list.
A confirmation screen for the place name
and the location is displayed, and the system
starts calculating.
5. The selected destination is displayed at the
center of the map. Touch [Start] after
confirming the location of the displayed
destination. The system sets the destination
to the selected location and starts calculating a route.
INFO:
After setting a destination, the location of the
destination can be adjusted and the location can
be stored in the Address Book, etc.
“Operations after setting destination”
(page 3-36)
SETTING INTERSECTION
It is possible to set an intersection of any two
streets as the destination and have the system
calculate a route.
1. Push the MENU button and touch [Destination].

2. Touch [Next Page].
3. Touch [Intersection].
8. Enter the name of the 2nd street. After
finishing the entry, touch [List]. A list screen
is displayed.
6. Touch a street as the 1st street from the list.
4. Touch [1st Street]. A character input screen
is displayed.
INFO:
Touch [Region] or [City] to narrow down the
specified region and city.
5. Enter the name of the 1st street. After
finishing the entry, touch [List]. A list screen
is displayed.
9. Touch a street as the 2nd street from the list.
7. Touch [2nd Street.]. A character input
screen is displayed.
10. Touch [OK].
Navigation 3-33

11. The select destination is displayed at the
center of the map. Touch [Start] after
confirming the location of the displayed
destination. The system sets the selected
location as the destination and starts calculating a route.
INFO:
After setting a destination, the location of the
destination can be adjusted and the location can
be stored in the Address Book, etc.
“Operations after setting destination”
(page 3-36)
SETTING CITY CENTER
It is possible to set the center of a city as a
destination and have the system calculate a
route.
1. Push the MENU button and touch [Destination].
2. Touch [Next Page].
3. Touch [City Center]. A character input
screen is displayed.
4. Enter the name of the city, touch [List]. A list
screen is displayed.
INFO:
Touch [Last 5 Cities] to display the last 5
cities recently set as destinations.
5. Touch the preferred destination from the list.
INFO:
Select [By Distance] to sort the list by the
nearest distance.
6. The selected destination is displayed at the
center of the map. Touch [Start] after
confirming the location of the displayed
destination. The system sets the destination
to the selected location and starts calculating a route.
INFO:
After setting a destination, the location of the
destination can be adjusted, the location
can be stored in the Address Book, etc.
“Operations after setting destination”
(page 3-36)
3-34 Navigation

SETTING FREEWAY ENTRANCE/
EXIT
It is possible to set the destination to an
entrance or exit of a freeway and have the
system calculate a route.
1. Push the MENU button and touch [Destination].
2. Touch [Next Page].
3. Touch [Freeway Entrance/Exit]. A character
input screen is displayed.
5. Touch the freeway of the destination from
the list.
7. Select the preferred destination from the list.
The position of the selected location is
displayed in the preview on the right side
of the screen.
INFO:
Select [By Distance] to sort the list by the
nearest distance.
4. Enter the name of the freeway. After finishing
the entry, touch [List].
6. Touch [Entrance] or [Exit]. A list screen is
displayed.
8. The selected destination is displayed at the
center of the map. Touch [Start] after
confirming the location of the displayed
Navigation 3-35

destination. The system sets the destination
to the selected location and starts calculating a route.
INFO:
After setting a destination, the location of the
destination can be adjusted and the location can
be stored in the Address Book, etc.
“Operations after setting destination”
(page 3-36)
SETTING POINT ON MAP
It is possible to set a location scrolled to on the
map as the destination and have the system
calculate a route.
1. Scroll the map, place the cross pointer over
the preferred location, and touch [Map
Menu].
3-36 Navigation
INFO:
.
The map scale should be adjusted to
search for a location more effectively.
.
The point on the blinking road where the
center of the cross pointer is located can
be set as a destination.
2. Touch [New Dest.].
3. The entire route is shown on the map. Touch
[Start] after confirming the displayed route.
The system starts route guidance to the
selected destination.
INFO:
. If a point on a freeway is set as the
destination, a confirmation message is displayed.
. Before starting route guidance, the route
condition can be changed and the route can
be stored in the Address Book, etc.
“Procedures after setting route”
(page 3-39)
OPERATIONS AFTER SETTING
DESTINATION
The following operations are available after you
set a destination.
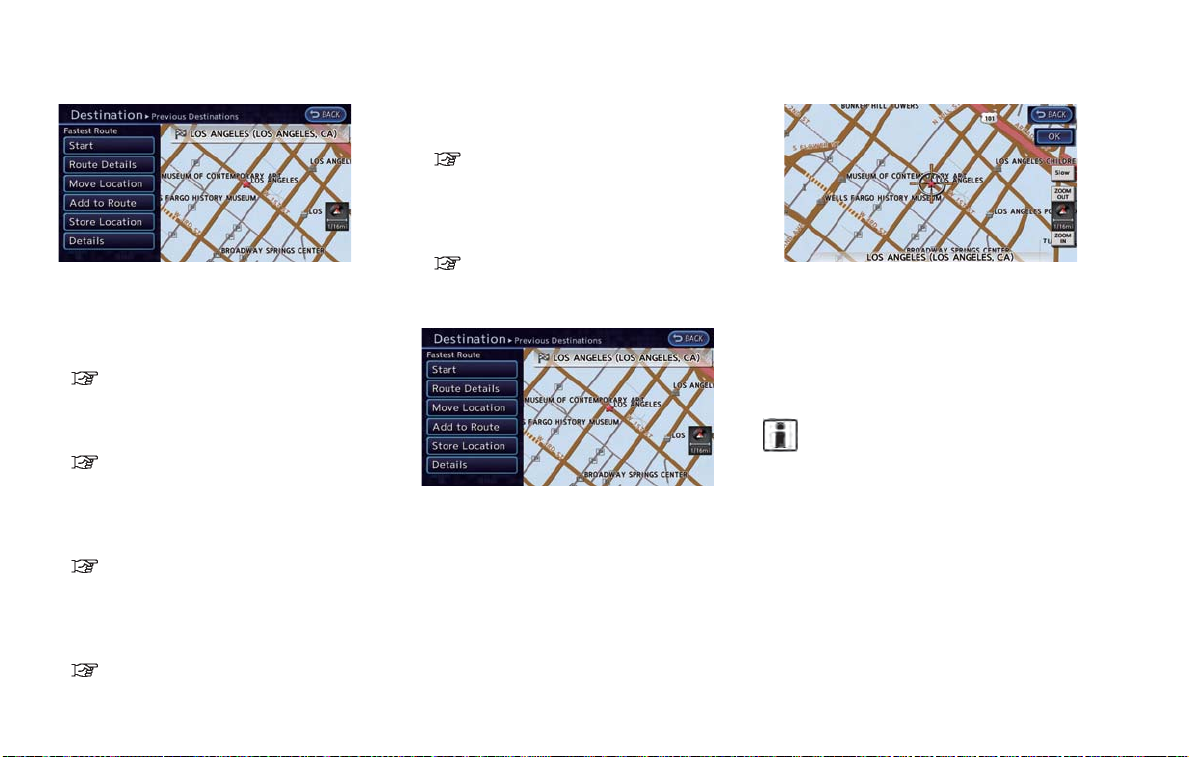
Available items after setting destination
. [Start]:
Starts route guidance to the selected
destination.
“Starting route guidance” (page 3-37)
. [Route Details]:
Allows you to change the route search
conditions or to check the route information.
“Procedures after setting route”
(page 3-39)
. [Move Location]:
Displays a map screen. The location of the
destination can be adjusted.
“Moving location of destination”
(page 3-37)
. [Add to Route]:
Edits the route by adding a waypoint or a
destination.
“Adding additional destinations to a
route” (page 3-37)
. [Store Location]:
Stores the location in the Address Book.
“Storing location” (page 3-38)
. [Details]:
Displays information about the facility that
has been set as the destination, if it is
included in the map data.
“Viewing information about searched
location” (page 3-38)
Starting route guidance
1. Touch [Start]. Route guidance starts. If the
route is already set, the location becomes
the new destination, and the route is
recalculated.
Moving location of destination
The location of the destination can be adjusted
by moving the cross pointer across the map.
1. Touch [Move Location]. A map screen with
the destination located on the map center is
displayed.
2. Adjust the location by moving the cross
pointer across the map and touch [OK]. The
location of the destination is modified.
INFO:
. The screen for adjusting the location also
changes when the map screen displayed on
the right side of the screen is touched.
. The map scale can be changed by touching
[ZOOM OUT] or [ZOOM IN].
Adding additional destinations to a
route
Even after the route is already set, you can add a
searched location as a new destination or
waypoint to that route.
If the route has not been set, [Add to Route]
Navigation 3-37

cannot be selected.
1. Touch [Add to Route].
2. Touch [Add Destination] or [Add Waypoint].
The system starts calculating a route that
includes the added destination or waypoint.
When the calculation is finished, the route is
displayed.
Storing location
A searched location can be stored in the
Address Book. Then it can be easily retrieved
and set as a destination (or waypoint).
3-38 Navigation
1. Touch [Store Location]. A message is
displayed, the location is stored in the
Address Book. The corresponding icon is
displayed at the set location on the map.
Viewing information about searched
location
Information (street address and phone number)
about points of interest stored in the map data
can be displayed.
1. Touch [Details]. Information about the location is displayed.
2. Touch the item you would like to set.
Available settings
.
[Show Map]:
Returns to the previous screen.
.
[Call]:
Makes a call to the selected charging
station. A cellular phone needs to be
connected beforehand.
“Connecting cellular phone”
(page 1-13)
.
[Details]:
This appears only when a charging
station is set as a destination. Displays
detailed information including the type
and number of charging devices existing
at the selected charging station.
INFO:
Information about locations is not displayed
while driving.
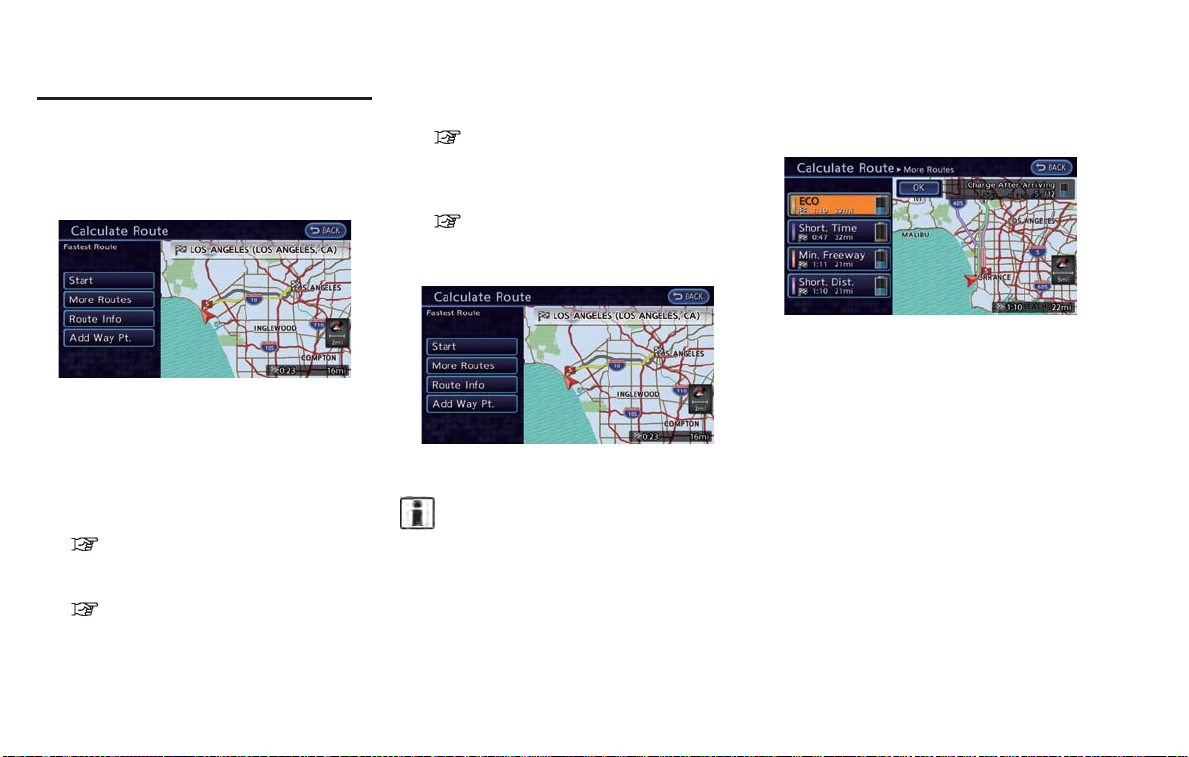
ROUTE GUIDANCE
PROCEDURES AFTER SETTING
ROUTE
After performing a route search, route guidance
can be started. Also, it is possible to confirm or
change a route.
1. Touch [Route Details].
2. Touch the item you would like to set.
Available items after setting route
. [Start]:
Starts route guidance to the selected
destination.
“Starting route guidance” (page 3-39)
. [More Routes]:
Displays 3 alternative routes.
“Changing route condition”
(page 3-39)
. [Route Info]:
Displays the route information. A calculated
route can also be stored in the Address
Book.
“Confirming route” (page 3-40)
. [Add Way Pt.]:
Allows you to edit the route by adding a
destination or waypoint.
“Adding destination or waypoint”
(page 3-41)
Starting route guidance
1. Touch [Start]. Route guidance starts.
INFO:
If no operations have been performed on the
system for several seconds, [Start] is automatically selected, and the system starts route
guidance. When the vehicle is being driven,
[Start] is automatically selected and the system
will start the route guidance function.
Changing route condition
1. Touch [More Routes].
2. Touch the preferred route condition. When
the route is selected, a preview is displayed
on the right side of the screen. After
selecting the route condition, touch [OK].
Available route conditions
.
[ECO] (green):
Prioritizes the least amount of electrical
consumption.
.
[Short. Time] (purple):
Prioritizes the shortest time.
.
[Min. Freeway] (orange):
Minimizes the use of freeways.
.
[Short. Dist.] (pink):
Prioritizes the shortest distance.
Navigation 3-39

INFO:
.
The 4 routes may not always be different.
.
When using waypoints, [More Routes] is
disabled. After route guidance is started,
change the route between each waypoint.
“Editing route” (page 3-48)
3. Touch [OK].
INFO:
The remaining battery power estimation function
cannot be used confirm condition changes that
arise after driving starts. Utilize the function as a
reference when selecting driving routes.
. After starting to drive, refer to the driving
range on the meter and perform battery
charging allowing for some leeway.
. The remaining battery power estimation
function cannot be used confirm condition
changes that arise after driving starts. Utilize
the function as a reference when selecting
driving routes.
. In the following instances, the actual battery
power may differ from the remaining battery
power estimation.
— Frequent repetition of sudden accelera-
tion and sudden braking
— Change of air conditioner operating
conditions
— Change of traffic conditions and driving
routes that differ from the one used for
the estimation
— Strong wind, cold, and snow weather
conditions
— Tires that do not comply with specifica-
tions, low air pressure tires, worn tires,
studless tires, and others.
— Decreased capacity of the Li-ion battery
— Installation of equipment that does not
comply with specifications (carriers and
others)
Confirming route
1. Touch [Route Info].
2. Touch the preferred information item.
Available information
. [Turn List]:
Displays the details of the suggested route.
“Using turn list” (page 3-52)
. [Store Route]:
Stores a calculated route. A maximum of 5
routes can be stored. Stored routes can be
easily retrieved and set as the suggested
route. If no waypoints are set on the route,
the route cannot be stored.
“Storing route” (page 3-60)
. [Map Scroll]:
Displays a map screen where the location of
the destination can be confirmed.
3-40 Navigation

INFO:
The stored route includes only locations (destination and waypoints) and route calculation
conditions, not the route itself. Therefore, when
the destination is set using a stored route, a
different route may be suggested if the current
vehicle location is different from the one when
the route was stored.
Adding destination or waypoint
Before starting route guidance, destinations
and/or waypoints can be added. A total of 6
destinations or waypoints can be set.
1. Touch [Add Way Pt.].
2. Set additional destinations or waypoints.
The method of searching for a location is the
same as the one for a destination.
“Setting destination” (page 3-17)
3. Touch [Add to Route].
4. Touch [Add Destination] or [Add Waypoint].
5. The system starts calculating a route that
includes the added destination or waypoint.
When the calculation is finished, the route is
displayed.
INFO:
.
If a waypoint was added, [More Routes]
cannot be selected.
.
If a destination was added, the prior
destination becomes a waypoint.
ABOUT ROUTE GUIDANCE
After setting the route, select [Start] to begin
route guidance.
Throughout route guidance, the system navigates you through the guide points using visual
and voice guidance.
CAUTION
. The navigation system’s visual and
voice guidance is for reference purposes only. The contents of the
guidance may be inappropriate depending on the situation.
. Follow all traffic regulations when
driving along the suggested route
(e.g., one-way traffic).
Navigation 3-41

“Route guidance” (page 10-33)
Voice guidance during route guidance
When approaching a guide point (intersection or
corner), destination, etc. during route guidance,
voice guidance announces the remaining distance and/or turning direction. Push and hold
the VOICE button to repeat voice guidance.
direction)."
"Freeway entrance on your right onto (road
number and direction)."
3
"In about one mile (2 kilometers), exit on your
*
right."
"Exit on your right."
4
"You have arrived at your destination. Ending
*
route the guidance."
Guidance screens and preview
mode
Route guidance displays map screens and
various information according to the situation.
Example of voice guidance:
1
"In about one quarter mile (400 meters), right
*
(left) turn."
3-42 Navigation
"Right (left) turn ahead."
2
"In about one quarter mile (400 meters) freeway
*
entrance on your right onto (road number and

Enlarged intersection view:
Junction guidance:
Turn list:
When approaching a guide point, the system
automatically changes to the split screen and
shows an enlarged view of the intersection on
the left screen. To switch to the full screen mode
while the enlarged intersection view is displayed, push the MAP button. Pushing the
MAP button again displays the enlarged intersection view.
While driving on a freeway, when the vehicle is
approximately 1 mile (approximately 2 km) from a
junction, the system automatically switches to
the split screen and displays an enlarged view of
the junction on the left screen. After passing the
junction, the system automatically returns to the
full screen mode. To switch to the full screen
mode while the enlarged junction view is
displayed, push the MAP button. Pushing the
MAP button again displays the enlarged junction view.
Depending on the setting, the system can
constantly display the split screen and show
the turn list on the left screen. When approaching a guide point, the left screen automatically
switches to an enlarged view of the intersection.
To switch to the full screen mode, push the
MAP button. Pushing the MAP button again
displays the turn list.
GUIDANCE SCREEN SETTINGS
The guidance screen can be displayed at all
times even when the vehicle is located away
from the guide point. Various types of screens
can be set.
Split screen settings
The display setting on the left-hand side screen
shown during route guidance can be changed.
Navigation 3-43

1. Touch [Map Menu] while the current location
map screen is displayed.
2. Touch [Map View].
3. Touch [View Settings].
4. Touch the preferred screen. The indicator of
the selected screen illuminates.
. Intersection
The map screen and the enlarged intersection
view can be displayed at the same time.
Push the MAP button to switch to the full map
screen.
. Turn list
The list screen for showing the guide points to
the destination and the map screen can be
displayed at the same time. An enlarged
intersection view is automatically displayed
when the vehicle approaches the guide point.
The turn list can be scrolled by touching [
]or
] on the screen.
[
Push the MAP button to switch to the full map
screen. Push the MAP button again to display
the turn list.
. Full map
The current location map is displayed. An
enlarged intersection view is automatically displayed when the vehicle approaches the guide
point.
When an enlarged intersection view is displayed, pushing the MAP button returns to the
map screen.
Show exit information on freeways
When the vehicle travels on a highway or a toll
road, the display automatically provides exit
information in the turn list.
1. Touch [Map Menu] while the current location
map screen is displayed.
3-44 Navigation
 Loading...