

Page 1

Page 2

PLEASE CAREFULLY READ THE SEPARATE HEALTH AND SAFETY
PRECAUTIONS BOOKLET INCLUDED WITH THIS PRODUCT BEFORE
USING YOUR NINTENDO
®
HARDWARE SYSTEM, GAME CARD OR
ACCESSORY. THIS BOOKLET CONTAINS IMPORTANT HEALTH AND
SAFETY INFORMATION.
IMPORTANT SAFETY INFORMATION: READ THE FOLLOWING
WARNINGS BEFORE YOU OR YOUR CHILD PLAY VIDEO GAMES.
WARNING - Battery Leakage
The Nintendo DS contains a rechargeable lithium ion battery pack. Leakage of ingredients contained within the
battery pack, or the combustion products of the ingredients, can cause personal injury as well as damage to your
WARNING - Repetitive Motion Injuries and Eyestrain
Playing video games can make your muscles, joints, skin or eyes hurt after a few hours. Follow these
instructions to avoid problems such as tendinitis, carpal tunnel syndrome, skin irritation or eyestrain:
• Avoid excessive play. It is recommended that parents monitor their children for appropriate play.
• Take a 10 to 15 minute break every hour, even if you don't think you need it.
• When using the stylus, you do not need to grip it tightly or press it hard against the screen. Doing so
may cause fatigue or discomfort.
• If your hands, wrists, arms or eyes become tired or sore while playing, stop and rest them for several
hours before playing again.
•
If you continue to have sore hands, wrists, arms or eyes during or after play, stop playing and see a doctor.
WARNING - Seizures
• Some people (about 1 in 4000) may have seizures or blackouts triggered by light flashes or patterns,
such as while watching TV or playing video games, even if they have never had a seizure before.
• Anyone who has had a seizure, loss of awareness, or other symptom linked to an epileptic condition
should consult a doctor before playing a video game.
• Parents should watch when their children play video games. Stop playing and consult a doctor if you or
Page 3

The official seal is your assurance
that this product is licensed or
manufactured by Nintendo. Always
look for this seal when buying
video game systems,
accessories, games
and related
products.
Nintendo does not license the sale or use of products
without the Official Nintendo Seal.
© 2006 OPERA SOFTWARE ASA. © 2006 NINTENDO. TM, ® AND THE NINTENDO DS LOGO ARE TRADEMARKS OF
NINTENDO. © 2007 NINTENDO. ALL RIGHTS RESERVED.
THIS PRODUCT CONTAINS THE OPERA BROWSER DEVELOPED BY OPERA SOFTWARE ASA. OPERA IS A
TRADEMARK OF OPERA SOFTWARE ASA. FOR MORE DETAILED INFORMATION ABOUT OPERA, PLEASE VISIT
HTTP://WWW.OPERA.COM.
THIS PRODUCT EMPLOYS “DECUMA®” HANDWRITING RECOGNITION ENGINE FROM ZI
CORPORATION. “DECUMA®” IS A REGISTERED TRADE MARK OF ZI CORPORATION.
THIS PRODUCT USES THE LC FONT BY SHARP CORPORATION. LCFONT, LC FONT AND THE LC
LOGO MARK ARE TRADEMARKS OF SHARP CORPORATION.
THIS PRODUCT INCLUDES RSA BSAFE CRYPTOGRAPHIC SOFTWARE FROM RSA SECURITY INC. RSA
IS A REGISTERED TRADEMARK OF RSA SECURITY INC. BSAFE IS A REGISTERED TRADEMARK OF
RSA SECURITY INC. IN THE UNITED STATES AND/OR OTHER COUNTRIES. © 2005 RSA SECURITY
INC. ALL RIGHTS RESERVED.
For additional information
on the Nintendo Wi-Fi
Connection, setting up your
Nintendo DS, or a list of
available Internet hotspots,
visit www.nintendowifi.com
(USA, Canada and Latin America)
or call 1-800-895-1672
(USA/Canada only).
Consumer Information
Memory Expansion Pak
What is the Nintendo DS Browser?
Basic Controls
Preparing to Use the Browser
Using the Browser for the First Time
The Browser Screen
Screen Modes
Displaying Pages and Jumping to Pages
The URL Input Screen
Text Input Methods: Handwriting Recognition
Text Input Methods: Software Keyboard
Bookmarks
Searching
Settings
Nintendo Wi-Fi Connection Setup
Using the Nintendo Wi-Fi USB Connector
Using a Wireless Access Point
Using Options
Transferring User Information to Another DS
Q & A
PREPARATION SCREENS FUNCTIONS
NINTENDO Wi-Fi
CONNECTION
04
05
06
08
10
12
14
16
22
24
26
30
32
34
36
40
42
44
48
49
50
Page 4

MEMORY EXPANSION PAK
The Nintendo DS Browser must be used with a Memory Expansion Pak. The Memory Expansion Pak
is a peripheral device for expanding the memory of games supporting the Memory Expansion Pak.
Note: The Memory Expansion Pak only functions with games that specifically support it.
Note: If you start a game that supports the Memory Expansion Pak without loading
the Memory Expansion Pak, the functions of the game may be restricted and/or may
not function properly.
There are two types of Memory Expansion Paks, one for the Nintendo DS Lite, and one for the
original Nintendo DS System.
Note: If you load a Nintendo DS Memory Expansion Pak into the Nintendo DS Lite, it will protrude
from the system. This is normal. do not try to force it in further.
Memory Expansion Pak inserted in
Nintendo DS
Memory Expansion Pak inserted in
Nintendo DS Lite
Memory Epansion Pak for
Nintendo DS Lite
Memory Epansion Pak for original
Nintendo DS
0 1 2 3
Weak Strong
30 FT
Nintendo WFC
Access Point
• Be careful not to give out personal information about yourself such as your last name, phone
number, birth date, age, e-mail, home address or school when on the Internet.
• If you decide to provide personal information to any party other than Nintendo, it is subject to the
privacy policy of that company, not Nintendo’s privacy practices. Be cautious before providing any
personal information over the Internet.
IMPORTANT PRIVACY INFORMATION
• If the software is to be used by a child, the settings should always be configured by the child's
parent or guardian.
• Please be aware that Nintendo accepts absolutely no liability for any loss arising from your using
the Nintendo DS Browser to connect to the Internet, or from your inability to connect, and that
Nintendo has no control over email, bulletin boards, blogs, and other general content.
• Internet websites may contain information that viewers may find offensive, or that is inaccurate,
dangerous, or illegal. If a child will be viewing websites, we strongly encourage the child's parent
or guardian to supervise their use of the Internet. For information on content filtering options,
please refer to the Astaro Content Filtering booklet.
•If you discard or give away your Nintendo DS system or your Nintendo DS Browser software, we
suggest you delete search history and other information generated from your use of the Internet.
•Using the Nintendo DS Browser may cause your system's battery to become depleted more
quickly than usual.
• The distance between the Nintendo DS system and the access point should be no more than 30
feet. Adjust the distance so that the signal strength icon shows at least two bars.
• Hold your Nintendo DS system so that it points toward the access point, and make sure that there
are no people, objects, or other obstacles between the Nintendo DS system and the access point.
• If your network connection is excessively slow, or is being shared with another computer or
device using the same network connection, the software may stall or you may not be able to
communicate effectively.
• When the Wi-Fi communication function is ON, the power indicator LED will blink rapidly.
IMPORTANT USER INFORMATION
Page 5

WHAT IS THE NINTENDO DS BROWSER?
PREPARATION
PREPARATION
The Nintendo DS Browser is software that enables
you to view Internet websites easily.
FEATURES OF THE NINTENDO DS BROWSER
The Nintendo DS Browser delivers
good visibility and easy operation
using the two screens of the
Nintendo DS system.
TWO SCREEN MODES
EASY OPERATION
USING THE STYLUS
There are two enhanced visibility
screen modes using the upper and
lower screens.
The Nintendo DS Browser can be
operated easily just by using the
SEE PAGE 16
SEE PAGE 08
DEVICES AND CONNECTION ENVIRONMENT REQUIRED
To use the Nintendo DS Browser at home and outdoors, you will need the
following devices and connection environment. To connect to the Internet, you
will also need to configure the Wi-Fi settings (see page 40).
• The Nintendo DS Browser can connect to the Internet using
USING THE BROWSER AT HOME
USING THE BROWSER OUTDOORS
To use the Nintendo DS Browser at
home, you will need the following:
Note: For details on obtaining a
Nintendo Wi-Fi USB Connector,
see www.nintendowifi.com.
• A broadband Internet
connection
• A wireless LAN access
point or a Nintendo Wi-Fi
USB Connector and a
computer
The Nintendo DS Browser can be used
with the access points listed below:
Note: for a list of Nintendo Wi-Fi
connection hotspots, go to
www.nintendowifi.com.
• Nintendo Wi-Fi Connection
hotspots
• Other hotspots sponsored by
Nintendo (which may charge
a fee)
Page 6

Operate by tapping or sliding
Move cursor
Confirm
Cancel/reload
Swap upper and lower screens
Move to top (bottom) of page
Move cursor to toolbar (Operate toolbar
using Control Pad and Button)
Scroll (up/down/left/right) on upper screen
BASIC CONTROLS
PREPARATION
PREPARATION
All operations can be carried out with the Touch
Screen. From now on, the term Nintendo DS system
will be used to refer to both the Nintendo DS and
the Nintendo DS Lite.
CONTROLS
PARTS OF THE NINTENDO DS SYSTEM
TOUCH SCREEN
CONTROL PAD
BUTTON
BUTTON
BUTTON
BUTTON
/ + CONTROL PAD
UPPER SCREEN
TOUCH SCREEN
Nintendo DS
Nintendo DS Lite
SELECT
START
BUTTONS
CONTROL PAD
Page 7
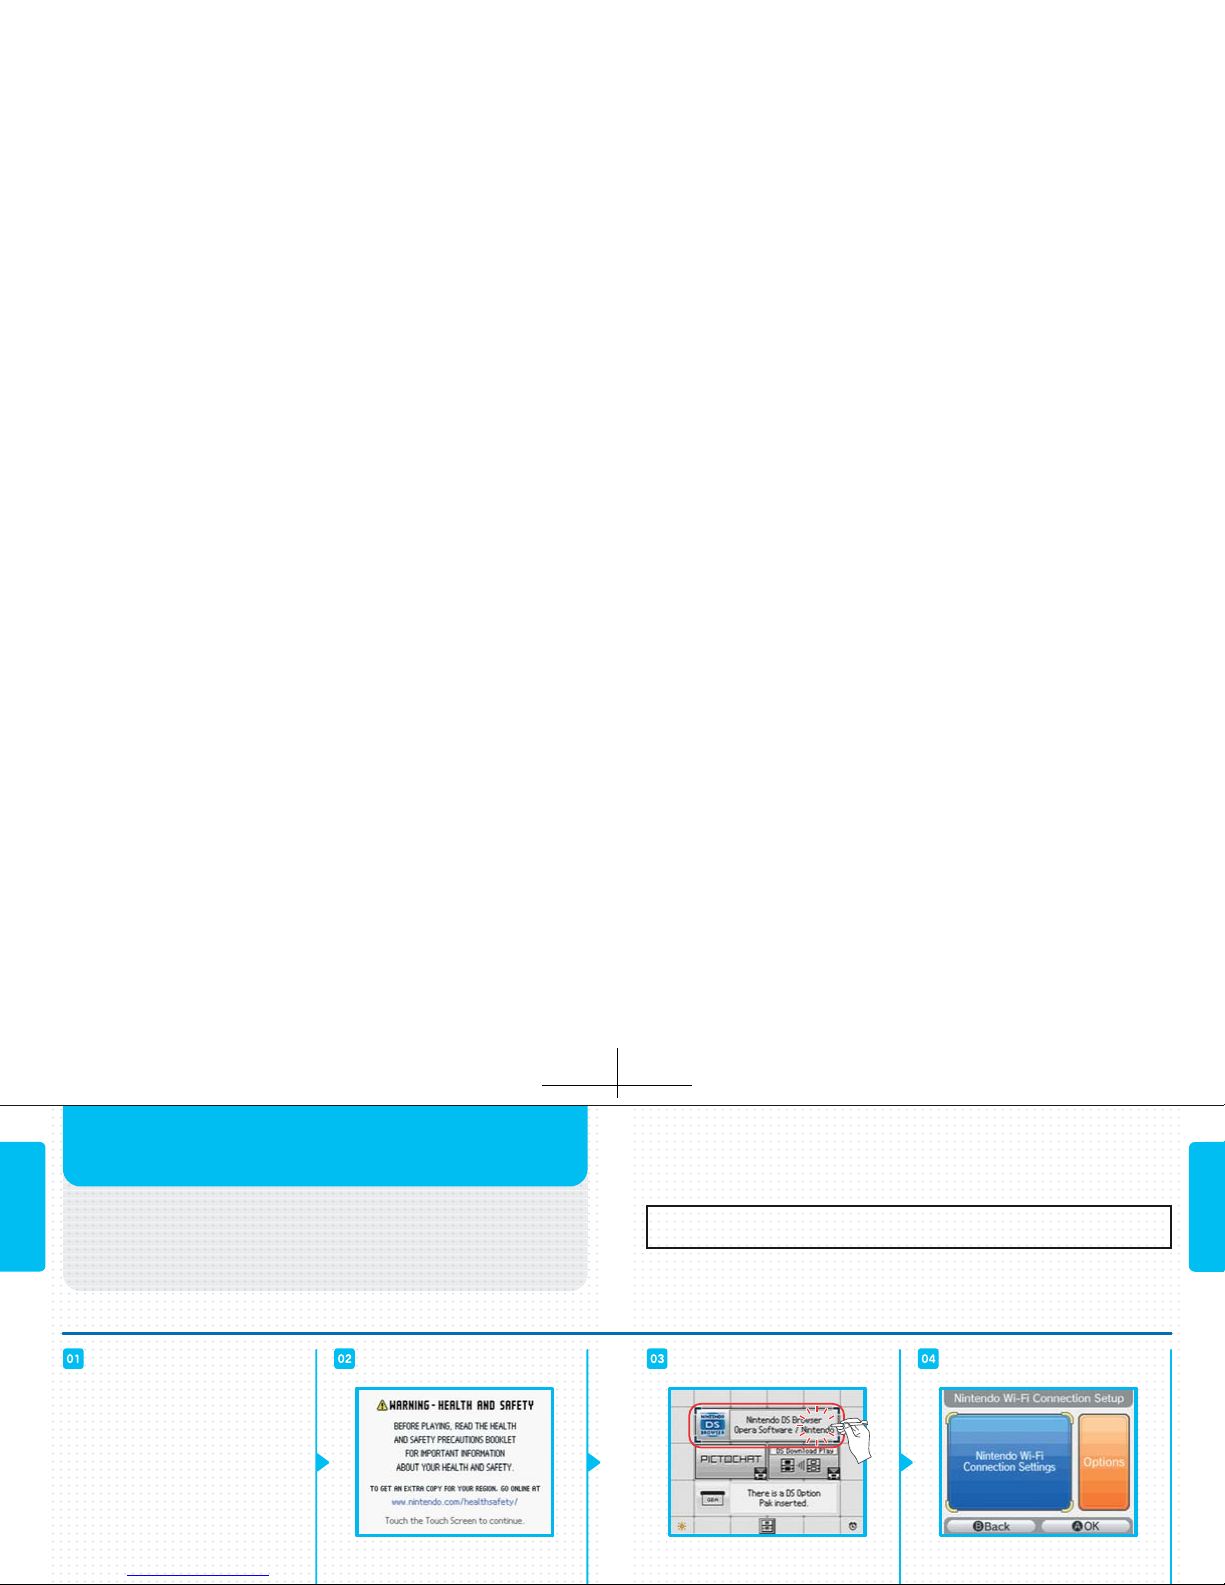
PREPARE YOUR NINTENDO
DS SYSTEM
First check that the system is
switched OFF, then insert the
Nintendo DS Browser DS Card into
the DS Game Card slot until you hear
it click. Next, insert the Nintendo DS
Memory Expansion Pak into the
Game Pak slot (see pg. 4).
PROCEED TO THE NINTENDO DS
MENU SCREEN
When you switch your Nintendo DS
system ON, the Health and Safety
LAUNCH THE BROWSER
Launch the browser by tapping
NINTENDO DS BROWSER on the
PROCEED TO THE
SETUP SCREEN
When you launch the browser for
the first time, you will be taken
PREPARING TO USE THE BROWSER
PREPARATION
PREPARATION
This section explains how to launch the Nintendo
DS Browser. The first time you launch it, you will
automatically be taken to the Setup Screen
(see page 12).
LAUNCHING PROCEDURE
If you close the DS while using the software, it will go into Sleep Mode to
conserve batteries. Sleep Mode is canceled when you open the system.
Note: In Sleep Mode, communications are cut off.
Page 8

KEYBOARD LANGUAGE
SETTING
This sets the language for the
Software Keyboard displayed
when you input text.
Note: See page 30 for more information
TIME ZONE SETTING
This sets the time zone for
your location.
LAUNCH-RESTRICTING
PASSWORD SETTING
This is the password used to launch
the Nintendo DS Browser. Once the
password is set, you will not be able
to launch the browser unless you
NINTENDO WI-FI CONNECTION
SETTINGS (SEE PAGE 40)
These are the Nintendo Wi-Fi
Connection settings to be configured
USING THE BROWSER
FOR THE FIRST TIME
PREPARATION
PREPARATION
The first time you launch the browser, you will be
taken automatically to the Setup Screen. Here you
can change the setup at any time using
(Settings) (see page 36).
SETTINGS
Cautions about Passwords
• Take care not to forget your password.
• Do not tell your password to anyone else.
Page 9

THE BROWSER SCREEN
The Browser Screen displays items like those
shown below.
BROWSER SCREEN
This shows the reception strength signal
(see page 57) and the title of the page
currently displayed. When communications are in progress or an operation is
being carried out, the icon on the far
right will move.
TITLE BAR
On the lower screen, you can either
tap a link to jump to another page or
input text in the text box.
LOWER SCREEN
When you tap this, the Text Input
Screen appears.
TEXT BOX
TOOLBAR
By tapping the icons on the toolbar, you can use the functions listed below. If you
hold the stylus against the icon, an explanation of that function will be displayed
on the lower screen.
BACK
FORWARD
STOP
RELOAD
HISTORY
URL
BOOKMARK
SEARCH
SETTINGS
HELP
SWITCH
DISPLAY MODE
Return to the previous page.
Proceed to the next page.
Stop loading this page.
Reload the page currently displayed and update its content.
Display a list of the pages viewed so far, so you can
select a page and jump to it (see page 22).
Input the URL of the desired page (see page 24).
Register pages you visit often (see page 32).
Search in the website or in a page (see page 34).
Check or change the settings for Nintendo DS Browser (see page 36).
Display pages explaining Nintendo DS Browser operations and linking to Nintendo
contact information.
Switch the Screen Mode (see page 16).
SCREENS
SCREENS
Page 10

There are two screen display modes: Overview
Mode and SSR Mode. You can switch between
them at any time by tapping or .
SCREEN MODES
THE SCREEN MODES
In this mode, a page displayed at
reduced size (the Shrink page) and a
page displayed at normal size (the
Magnify page) are shown separately on
the upper and lower screens. The page
is displayed as designed so you can
view the whole page or divide it up into
blocks and look for the part you want
within a block.
OVERVIEW MODE
SCREENS
SCREENS
SEE PAGE 18
In this mode, the upper and lower
screens are combined to make a single
screen in which the page is displayed.
This is useful when reading long pages.
SSR MODE
SEE PAGE 20
Page 11

By tapping (Swap Screens) or
pressing the Button, you can
swap the upper and lower screens.
When you tap (Zoom), the Zoom
Setting Screen is displayed.
Select whether to display the text
and images on the page at a
magnification of 50% (small), 80%
(slightly reduced), 100% (normal),
120% (slightly enlarged), or 150%
You can move the Scope by sliding
the stylus, activate the DIRECT EVENT
MODE by pressing the and
Buttons, and move the Scope with
the Control Pad. The Direct Event
Mode enables you to click on links
Make the Shrink page the lower
screen, and move the Scope to the
OVERVIEW MODE
Here the part of the Shrink page
framed by the Scope is displayed at
an enlarged size. This is useful when
you want to click links on the page
or view images.
THE MAGNIFY PAGE
SWAP THE UPPER AND
LOWER SCREENS
USING ZOOM
Here the whole page is displayed,
and you move the Scope to select
the part you want to display on the
Magnify page. This is useful for
looking for the particular part of the
page you want to view, and for
viewing lots of images at once.
THE SHRINK PAGE
THE SCOPE
SCREENS
SCREENS
HANDY HINT
Page 12

SSR MODE
By holding down the or
Button and pressing the Control
Pad, you can scroll along the screen.
SSR stands for Small Screen
Rendering, and is a rendering mode
developed specifically for small
screen devices – such as the Nintendo
DS system. In SSR Mode, the page
layout is changed so that no horizontal
scrolling is needed. In addition,
irrelevant parts of the page such as
background images are removed. In
SSR Mode, panning can be performed
with the stylus by placing it anywhere
on the page and moving it in the
desired direction.
Note: In this mode, the design of the Web
page is adjusted to suit the size of the
Nintendo DS system screen, so images may
sometimes fail to display properly.
THE SSR MODE SCROLLING USING BUTTONS
By pressing the Button, you can
move to the top or the bottom of
the page displayed. Each time you
press the Button, you will be
moved from the top to the bottom
or vice-versa.
MOVING WITHIN THE PAGE
SCREENS
SCREENS
Page 13

Within the page, there will be links for
jumping to other pages. These links
are usually marked using text in a
different color or in bold font, or by a
button image or something similar. By
tapping a link, you can jump to another
page. By pressing the Button to
display the cursor on the page and
then pressing the Control Pad, you
If you have jumped from one page to
another, tapping (Back) will return
you to the page displayed previously.
If you then tap (Forward), you will
be moved on to the next page.
By tapping (History), you can
bring up a list of pages visited since
You can display and jump to pages you want to view
using the methods explained below.
DISPLAYING PAGES AND
JUMPING TO PAGES
TO DISPLAY A PAGE
If you know the URL (address) of the
page, enter it directly.
ENTER THE URL
If you use Bookmark to register the
URL of a page you visit often, you will
be able to bring
the page up
right away.
USE BOOKMARK
Using Web Search, you can use a
keyword to find the page you want
USE WEB SEARCH USE HISTORY
FUNCTIONS
FUNCTIONS
TO JUMP TO ANOTHER PAGE
JUMP FROM A LINK
JUMP TO A PREVIOUS OR
SUBSEQUENT PAGE
Page 14

By entering the URL (address) of the desired page on
the URL Input Screen, you can jump to that page.
THE URL INPUT SCREEN
WHAT IS A URL?
ENTER THE URL
FUNCTIONS
FUNCTIONS
http://www.nintendowifi.com/
http://
http://
THE URL INPUT SCREEN
Colon
Slash
Period (dot)
Hyphen
Underscore
Ampersand
Tilde
Yen sign
At
When you tap (URL), the URL Input Screen is displayed. This is where you
input URLs, using Handwriting Recognition or the Software Keyboard. For more
information on Handwriting Recognition, see pages 26-29. For more
information on the Software Keyboard, see pages 30-31.
When you tap this, the character
string displayed is input. This is a
handy place to register character
strings used frequently in URLs.
URL SHORTCUT
This deletes the character string you
are currently entering.
CLEAR
This displays the URLs
INPUT HISTORY
SEND
Page 15

There are two ways to input text: Handwriting
Recognition and the Software Keyboard.
TEXT INPUT METHODS:
HANDWRITING RECOGNITION
THE HANDWRITING RECOGNITION SCREEN
The stylus is used to write
characters (see page 28).
FUNCTIONS
FUNCTIONS
EDITING AREA
This is where the character you have input is displayed.
CLEAR
CLOSE
SEND
SWITCH INPUT
MODE
BACKSPACE
NEWLINE
SPACE
Clear all characters from the editing area.
Terminate the character-input operation.
Send the characters in the editing area to the text box.
Switch the character-input method from Handwriting Recognition to
Software Keyboard, or vice-versa.
Delete the character to the left of the cursor.
Insert a new line at the cursor position in the editing area. If the text box is
a single line, this will terminate the character-input operation.
Input a blank space.
Page 16

USING HANDWRITING RECOGNITION
Using the Character Type Selection keys, switch the
type of character to be input, then write the character
in either the right or left side of the input area.
TIPS FOR HANDWRITING RECOGNITION
To ensure that your handwritten characters are recognized easily, make sure to
write slowly and neatly, and write the character as large as you can.
The character most closely resembling the character
you have written will be displayed in both the input
and editing areas. If you have more to write, write the
next character in the adjacent area.
If the character displayed is not the one you want to
input, tap the in the lower right corner of the
input area, then select the correct character from the
list of candidates. If the desired character is not
among the candidates, tap backspace and write the
character again.
FUNCTIONS
FUNCTIONS
Page 17

This is where the character you have input is displayed.
Operate this keyboard by choosing a character and then tapping it.
Clear all the characters in the editing area.
Terminate the character-input operation. Any characters in the character-
On the Software Keyboard, text is input by tapping a
keyboard displayed on the lower screen.
TEXT INPUT METHODS:
SOFTWARE KEYBOARD
THE SOFTWARE KEYBOARD SCREEN
ALPHANUMERIC KEYBOARD
FUNCTIONS
FUNCTIONS
EDITING AREA
KEYBOARD
CLEAR
SWITCH INPUT
MODE
BACKSPACE
NEWLINE
CAPS
SHIFT
Switch the character-input method from Handwriting Recognition to
Software Keyboard, or vice-versa.
Tap this to delete the character to the left of the cursor.
Tap this to insert a new line at the cursor position in the editing area. If the
text box is a single line, this will terminate the character-input operation.
Tap this to switch between uppercase and lowercase letters of the alphabet.
Tap this to switch characters on the keyboard. After you have input the
character, it reverts.
USING THE SOFTWARE KEYBOARD
Using the character
type selection keys,
select the type of
When you select a
character from the
keyboard and tap it,
When you have input
all the characters, tap
send (see page 27).
Page 18

Your bookmarks are a kind of address book in which
you keep notes of your favorite URLs. You can
organize your bookmarks in separate folders.
BOOKMARKS
BOOKMARK SCREEN REGISTERING BOOKMARKS
FUNCTIONS
FUNCTIONS
EDITING BOOKMARKS
When you tap (Bookmark), the
Bookmarks Screen will be
displayed. By selecting and tapping
the desired page from those
registered in your bookmarks, you
can move to that page. If you register
If you tap (Bookmark) when the
browser is displaying a page you
want to bookmark, you can register
that page by sliding the information
about the page currently displayed to
your bookmarks, or to a particular
By tapping EDIT MODE on the
Bookmarks Screen, you can edit
your bookmarks. By sliding the
names of pages you have registered,
you can rearrange their order. If you
register a bookmark in the Start
Page folder, a link will be displayed
on the Start Page.
Use this to change
details of your
bookmarks and folders.
If you check this box, the
images on the page will be
displayed.
LOAD IMAGES
Force to display in SS R
Mode (see page 20).
Force to display in
Overview Mode
(see page 18).
SCREEN MODE
EDIT
PAGE URL
PAGE TITLE
Page 19

SEARCH
BACK
Tap (Search).
Tap FIND IN PAGE.
Input a keyword and then tap send
(see page 27).
Check the search results. The
instances of the keyword will be
highlighted on the page.
Using (Search), you can search by keyword for
the Web page you want, or search for a particular
word within the page displayed.
Tap (Search).
Tap SEARCH THE WEB.
Input a keyword and then tap send
SEARCHING
DOING A WEB SEARCH
FUNCTIONS
FUNCTIONS
Not all the pages displayed in
your search results will
necessarily have content relevant
to your keyword. Be aware that
some websites might have
offensive content.
Nintendo accepts no responsibility
for the content of websites
displayed in your search results.
NOTES ON WEB SEARCHES
SEARCHING WITHIN A PAGE
In Search Mode, the Search Bar will
be displayed on the lower screen.
THE SEARCH BAR
Tap this to display the
Keyword Input Screen.
Tap this to move to the
previous keyword.
Page 20

When you tap (Settings), the Settings Screen will
be displayed. You can then tap the desired setting
from a list of categories of settings.
This enables or disables the display
of images on the page. The pages
will be displayed faster if you
choose to disable this option. You
can also change this setting by
tapping on the toolbar.
PROXY
PORT
USE FOR HTTPS
USE AUTOMATIC
AUTHENTICATION
USERNAME
PASSWORD
SETTINGS
WEB SETTINGS
FUNCTIONS
FUNCTIONS
This specifies the use of a proxy server.
PROXY SETTINGS
This sets the password for the
proxy server.
Proxy Password -
This is where you input the URL or IP address of the proxy
server to be used.
This is where you input the port number for communications
with the proxy server to be used.
Check this box if you want to use a proxy server for HTTPS
communications.
Check this box if you want to use automatic authentication
for proxy servers requiring authentication.
This is where you input the user ID for an automatic-connection
proxy server.
This is where you input the password for an automaticconnection proxy server.
LOAD IMAGES
This sets Overview Mode as your
normal display mode.
OVERVIEW MODE
This automatically adjusts the
FIT TO WIDTH
This sets the encoding method.
Usually we recommend leaving it set
ENCODING SETTING
This specifies the website to be used when doing Web
searches. If you want to use a website other than the one
originally set, input the URL of the desired search engine in
the User-Specified Engine box.
SEARCH ENGINE SETTING
Page 21

Notes on Passwords
This is used to set the time zone for your location.
Use the + and – icons to set the time. If a summertime system is used in the time zone you have set,
check the DAYLIGHT SAVING TIME box.
In case of incorrect Network Connection settings, see
the Error Code Explanation Table on pages 50-51.
CONNECTION This sets up your network connection (see page 40).
DISCONNECT Use this to disconnect from the network.
FUNCTIONS
FUNCTIONS
SHOW TIPS
If you check this box, helpful hints
on operations will be displayed on
the upper screen.
PLAY EVENT SOUNDS
If you check this box, sounds will
be played.
HELP DIALOGS
If you check this box, explanations
of operations will be displayed on
input screens and so forth.
SHOW DIALOG ON LOW MEMORY
If you check this box, a Warning
Screen will be displayed when
there is not enough memory to save
the data for the page. If the system
runs out of memory, sometimes the
HANDWRITING AS DEFAULT
If you check this box, Handwriting
Recognition will be set as the default
input method.
LOCK BROWSER
This is used to set a password that
must be entered to launch the
Nintendo DS Browser.
USER INTERFACE SETTINGS NETWORK CONNECTION SETTINGS
TIME ZONE SETTING
ADDRESS ENTRY
• Try not to forget your password.
Page 22

To use the browser, you will need to configure the Nintendo
Wi-Fi Connection settings. These settings can be configured
easily on the Nintendo Wi-Fi Connection Setup Screen.
When you launch the browser for the first time, or if you select NETWORK CONNECTION SETUP from the settings and then select CONNECTION, the Nintendo Wi-Fi
Connection Setup Screen will be displayed. As shown below, select a setup method,
then proceed through the setup on the Nintendo Wi-Fi Connection Setup Screen.
NINTENDO WI-FI CONNECTION SETUP
Choose a Setup Method
Do you have a broadband
Internet connection?
To use the
browser at
home
To use the
Do you have a wireless
LAN access point?
Is your wireless access
point compatible with
AOSS™?
Do you have a computer
running Windows® XP,
Search for your wireless
access point and configure
the settings.
Perform the easy setup
using AOSS.
Use the Nintendo Wi-Fi USB
Connector (sold separately)
to configure the settings easily.
If you go to a Nintendo Wi-Fi Connection
hotspot, you will be able to use the
browser without any special setup.
Check the Internet connection
environment required (see page 13).
YES
YES
NO
YESYES
YES
NO
NO
Page 23

Before carrying out the procedure explained below, you
will need to install the Nintendo Wi-Fi USB Connector
Registration Tool on your computer and configure it for
use. For details, refer to the Nintendo Wi-Fi USB Connector
Instruction Booklet. Note: If your access point supports AOSS (by Buffalo
Inc.), you can configure the settings easily using the functions of the system in
question. For details, refer to the instruction booklet for your access point.
USING THE NINTENDO WI-FI USB
CONNECTOR (SOLD SEPERATELY)
NINTENDO WI-FI
CONNECTION
SETUP SCREEN
NINTENDO WI-FI
CONNECTION
SETTINGS SCREEN
NINTENDO WI-FI
CONNECTOR
CONNECTION SCREEN
NOTIFICATION AREA
ON WINDOWS TASKBAR
CONNECTION TEST SCREEN
REGISTRATION TOOLSCREEN
When you double-click the Nintendo Wi-Fi
If the connection test fails,
Broadband Internet
connection
DSL or cable modem or
equivalent
Computer + Nintendo
Wi-Fi USB Connector
OPERATIONS CARRIED OUT
ON THE COMPUTER
Click on the names
you want to allow
access to!
Double-click here!
Tap to begin
connection test!
Page 24

When you have
completed the
setup, tap
(BACK) to exit
from the
configuration
operation.
Broadband Internet
connection
Note: If your access point supports AOSS (by Buffalo Inc.), you can configure the
settings easily using the functions of the system in question. For details, refer to the
instruction booklet for your access point.
CONFIGURATION METHOD : USING AOSS
USING A WIRELESS ACCESS POINT
NINTENDO WI-FI
CONNECTION
SETUP SCREEN
NINTENDO WI-FI
CONNECTION
SETTINGS SCREEN
CONNECTION
SETTINGS SCREEN
WIRELESS ACCESS POINT
CONNECTION
TEST SCREEN
DSL or cable modem or
equivalent
Wireless Access Point
Press the AOSS button on
your access point until the
corresponding indicator light
blinks (or comes on).
Note: If you have configured the settings using AOSS but failed several times to establish a
connection, wait about three minutes before trying again.
OPERATIONS CARRIED OUT ON THE ACCESS POINT
SETUP COMPLETE
Page 25

CONFIGURATION METHOD :
CONFIGURING THE SETTINGS MANUALLY OR CHANGING THE SETTINGS
Tap (BACK)
to exit
from the
configuration
Tap the NINTENDO
WI-FI CONNECTION
SETTINGS Panel.
CONFIGURATION METHOD :
CONFIGURING THE SETTINGS BY SEARCHING FOR AN ACCESS POINT
NINTENDO WI-FI
CONNECTION
SETUP SCREEN
You do not need to input the WEP key (see page 53).
An encryption method not supported by the Nintendo DS system has been set (see page 53).
ACCESS POINT LIST SCREEN
SETUP
COMPLETE
Tap (BACK)
to exit
from the
configuration
SETUP
COMPLETE
NINTENDO WI-FI
CONNECTION
SETTINGS SCREEN
CONNECTION
SETTINGS SCREEN
Tap an UNCONFIGURED
connection.
Tap the SEARCH FOR AN
ACCESS POINT Panel.
Tap the NINTENDO
WI-FI CONNECTION
SETTINGS Panel.
NINTENDO WI-FI
CONNECTION
SETUP SCREEN
NINTENDO WI-FI
CONNECTION
SETTINGS SCREEN
CONNECTION
SETTINGS SCREEN
Tap an UNCONFIGURED
connection.
Tap the MANUAL
SETUP Panel.
CONNECTION
TEST SCREEN
If you ta p an access point
that has a next to it, the
WEP Key Input Screen will
be disp layed. You should
then input the same WEP
CONNECTION SETTINGS SCREEN CONNECTION
SETTINGS SCREEN
Note: You can also tap a
CONFIGURED connection
and change it.
Page 26

The OPTIONS Panel on the Nintendo Wi-Fi Connection
Setup Screen enables you to view system information,
delete your Nintendo WFC user information, or move your
user information to another Nintendo DS system.
If you want to check the MAC
Address and Nintendo WFC ID
of your Nintendo DS system,
tap this.
To delete your user
information, tap this.
If you want to transfer your
user information to another
USING OPTIONS
TRANSFERRING USER INFORMATION
TO ANOTHER NINTENDO DS
NINTENDO WI-FI
CONNECTION
SETUP SCREEN
OPTIONS SCREEN
Your user information is transferred using DS Wireless Communications
(Single-Card Play). Note: Bear in mind that when user information is
transferred, the information on the destination Nintendo DS system is overwritten by
the information from the source Nintendo DS system.
Choose one and tap it!
SYSTEM
INFORMATION
ERASE
NINTENDO WFC
CONFIGURATION
TRANSFER
NINTENDO WFC
CONFIGURATION
Note: Once the Nintendo DS system is no longer
connected to Nintendo WFC, it no longer contains any
user information other than the connection point
settings, so your information cannot be deleted or
TRANSFER SOURCE Nintendo DS system and Nintendo DS Browser DS Card
TRANSFER DESTINATION Nintendo DS system (no DS Card required)
TRANSFER
SOURCE
TRANSFER
DESTINATION
EQUIPMENT REQUIRED
TRANSFER SOURCE
TRANSFER DESTINATION
TRANSFER SOURCE
OPTIONS SCREEN
GAME LIST SCREEN
Tap TRANSFER NINTENDO WFC CONFIGURATION on the Options Screen.
A transfer caution message will be displayed. If there is no problem, tap OK.
During the tra nsfer, a co nfirmation re quest will be dis played. Confirm, th en tap OK.
Check the user name for the destination Nintendo DS system, and if it is correct, tap YES.
When you turn the Nintendo DS system power switch ON, the Nintendo DS Menu
Screen is displayed.
When you tap DS DOWNLOAD PLAY, the Game List Screen is displayed.
When you tap NINTENDO WFC CONFIGURATION TRANSFER, the Download
Confirmation Screen is displayed.
Check the game, then tap YES.
Page 27

Q & A
QUESTION ANSWER
WEP KEY INFORMATION
• On the Connection Point Settings Screen, the WEP key will be displayed as a string
of asterisks (*).
• Normally, up to four WEP keys can be registered for an access point. In the
Nintendo DS system’s connection point settings, the WEP key should be input in the
first of the four slots, and the access point settings should also be configured for the
use of the same WEP key.
• The WEP key can be input using either ASCII characters or hexadecimal code
consisting of the numbers 0 to 9 and the letters “a” to “f.”
• The number of characters to be used for the WEP key is as follows:
ASCII: either 5, or 13, or 16 characters
Hexadecimal: either 10, or 26, or 32 characters
• The only encryption system supported by the Nintendo DS system uses the WEP
key. If the access point uses some other encryption system, the encryption system
used on the access point will need to be changed.
• For information on configuring the access point settings, refer to the instruction
booklet provided with your access point.
I still can’t connect to the
Internet. What should I do?
Can I use the wireless
access point at school or
the office?
Some websites won’t display
on the browser.
Movies and sound won’t play
on the browser.
Websites seem slow to display
on the browser.
Can I use e-mail on the
browser?
Can I use the browser to write
to bulletin boards and update
my blog?
Can I save images and
Web pages?
Visit www.nintendowifi.com for additional information
and instructions.
It depends on the connection environment. Contact
your network manager for more information.
Websites using Flash, pdfs and so forth cannot be
displayed.
Movies and sound are not supported.
Depending on their specifications, certain
image-heavy websites may not be able to display
comfortably on the browser. Deactivating the Image
Display will speed things up.
You can use ordinary Web mail services.
Yes .
No: when the Nintendo DS system is switched OFF,
the images and Web pages are lost.
Page 28

TERMINOLOGY
SSID
The name assigned to an access point. Also known as the ESS-ID or network name.
WEP key
The WEP key is a numerical value used to encrypt the communications data between the
Nintendo DS system and the access point. The same value must be set on the access point
and the Nintendo DS system. It is also known as an encryption key or a network password.
IP address
The number used to specify the destination and transmission source of communications
data on the network.
Subnet mask
The numerical value indicating which part of the IP address is the number identifying the
network it belongs to.
Gateway
The exit / entrance to the network in question. Its IP address is specified in the connection
point settings.
Primary DNS / Secondary DNS
MAC Address
The unique number assigned to each device on the network. Your Nintendo DS system
also has a MAC Address.
URL
A string of text expressing the location of a website on the Internet. Also known as
an address.
Proxy server
A server from which your Nintendo DS system acquires information instead of acquiring
it directly from the Internet.
Time zone
Indicates how many hours’ difference there are between GMT (Greenwich Mean Time)
and the local time in your own region.
Encoding
A system for converting information so that errors will not be generated when communications are carried out. Encoding methods differ depending on the language to be
represented. If the encoding has not been set correctly, the text on the page will not
be displayed properly.
Search engine
Page 29

TERMS OF USE AGREEMENT TERMS OF USE AGREEMENT (cont.)
Submissions
All User Content posted on, transmitted through, or linked from the Service, whether or not solicited by Nintendo (collectively, "Submissions"), is
the sole responsibility of the person from whom such Submissions originated. Nintendo is not obligated: (a) to maintain any Submissions in
confidence; (b) to store or maintain the Submissions, electronically or otherwise, (c) to pay any compensation for any Submissions or any use
thereof; or (d) to respond to any user in connection with or to use any Submissions. Nintendo shall not be liable for any use or disclosure of any
Submissions.
Disclaimer of Warranty; Limitation of Liability; Indemnification
THE SERVICE AND THE NINTENDO CONTENT, USER CONTENT, DATA OR SOFTWARE AVAILABLE THROUGH IT (COLLECTIVELY, THE "CONTENT")
ARE PROVIDED ON AN “AS IS” AND “AS AVAILABLE” BASIS. USE OF THE SERVICE, INCLUDING ALL CONTENT, DISTRIBUTED BY, DOWNLOADED
OR ACCESSED FROM OR THROUGH IT, IS AT YOUR SOLE RISK AND NINTENDO ASSUMES NO RESPONSIBILITY FOR THE CONTENT OR YOUR
USE OR INABILITY TO USE ANY OF THE FOREGOING. WE DO NOT GUARANTEE THE CONTENT ACCESSIBLE OR TRANSMITTED THROUGH, OR
AVAILABLE FOR DOWNLOAD FROM THE SERVICE WILL REMAIN CONFIDENTIAL OR IS OR WILL REMAIN FREE OF INFECTION BY VIRUSES,
WORMS, TROJAN HORSES OR OTHER CODE THAT MANIFESTS CONTAMINATING OR DESTRUCTIVE PROPERTIES. TO THE FULLEST EXTENT
PERMISSIBLE PURSUANT TO APPLICABLE LAW, NINTENDO DISCLAIMS ALL WARRANTIES OF ANY KIND, WHETHER EXPRESS OR IMPLIED,
WITH RESPECT TO THE SERVICE AND ALL CONTENT AVAILABLE THROUGH THE SERVICE, INCLUDING WITHOUT LIMITATION ANY WARRANTY
OF MERCHANTABILITY, FITNESS FOR A PARTICULAR PURPOSE OR NON-INFRINGEMENT.
NINTENDO ASSUMES NO RESPONSIBILITY FOR ANY DAMAGES SUFFERED BY A USER, INCLUDING, BUT NOT LIMITED TO, LOSS OF DATA
FROM DELAYS, NONDELIVERIES OF CONTENT, ERRORS, SYSTEM DOWN TIME, MISDELIVERIES OF CONTENT, NETWORK OR SYSTEM OUTAGES,
FILE CORRUPTION, OR SERVICE INTERRUPTIONS CAUSED BY THE NEGLIGENCE OF NINTENDO OR A USER’S OWN ERRORS AND/OR
OMISSIONS EXCEPT AS SPECIFICALLY PROVIDED HEREIN. YOU UNDERSTAND AND AGREE THAT YOU WILL BE SOLELY RESPONSIBLE FOR ANY
DAMAGE TO YOUR DS OR LOSS OF DATA THAT RESULTS FROM THE DOWNLOAD OF ANY CONTENT.
UNDER NO CIRCUMSTANCES, INCLUDING, WITHOUT LIMITATION, NEGLIGENCE, SHALL NINTENDO OR ITS OFFICERS, DIRECTORS, OR
EMPLOYEES BE LIABLE FOR ANY DIRECT, INDIRECT, INCIDENTAL, SPECIAL OR CONSEQUENTIAL DAMAGES ARISING FROM OR IN CONNECTION
WITH THE USE OF OR THE INABILITY TO USE THE SERVICE OR ANY CONTENT CONTAINED THEREON, OR RESULTING FROM UNAUTHORIZED
ACCESS TO OR ALTERATION OF YOUR TRANSMISSIONS OR CONTENT THAT IS SENT OR RECEIVED OR NOT SENT OR RECEIVED, INCLUDING BUT
The Nintendo DS System (“DS”) comes equipped with the ability for wireless game play through the use of the Nintendo Wi-Fi Connection service
and access to the Internet through the use of the Nintendo DS Browser, which must be purchased separately, (collectively the "Service"). Such
Service is provided by Nintendo of America Inc., together with its subsidiaries, affiliates, agents, licensors and licensees (collectively, "Nintendo,"
and sometimes referenced herein by "we" or "our"). Nintendo provides the Service to you subject to the terms of use set forth in this
agreement ("Agreement").
PLEASE READ THIS AGREEMENT CAREFULLY BEFORE USING THE SERVICE AND/OR DS. BY USING THE SERVICE
AND/OR DS, YOU ARE AGREEING TO BE BOUND BY THIS AGREEMENT.
The terms of use contained in this Agreement shall apply to you until you no longer use or access the Service, or until your use of the Service is
terminated. If at any time you no longer agree to abide by these or any future terms of use, your only recourse is to immediately cease use of the
Service. We reserve the right, at our sole discretion, to change, modify, add, or delete portions of this Agreement and to discontinue or modify the
Service at any time without further notice. Your continued use of the Service after any such changes, constitutes your acceptance of the new terms
of use. It is your responsibility to regularly review this Agreement. You can review the most current version of this Agreement at any time by
visiting www.NintendoWiFi.com/terms.
User Conduct
It is important that you do your part to keep the Service a friendly and clean environment. In particular, you may not use the Service to:
• Upload, transmit, or otherwise make available any content that is unlawful, harmful, harassing, or otherwise objectionable;
• harm minors in any way;
• misrepresent your identity or impersonate any person, including the use or attempt to use another’s user ID, service or system;
• manipulate identifiers in order to disguise the origin of any content transmitted through the Service;
• upload, post, email, transmit or otherwise make available: (a) any content that you do not have a legal right to make available; (b) any
content that infringes any patent, trademark, trade secret, copyright or other proprietary rights of any party; (c) any unsolicited or
unauthorized advertising or promotional materials (e.g. "spam"); or (d) any material that contains software viruses or similar code or
programs designed to interrupt, destroy or limit the functionality of any computer software or hardware or telecommunications equipment.
• use any portion of the Service for any unlawful purpose;
• engage in any activity that disrupts, diminishes the quality of, interferes with the performance of, or impairs the functionality of, the Services
Page 30

Warranty & Service Information
You may need only simple instructions to correct a problem with your product. Try our website at www.nintendo.com or call our
Consumer Assistance Hotline at 1-800-255-3700, rather than going to your retailer. Hours of operation are 6 a.m. to 7 p.m., Pacific
Time, Monday - Sunday (times subject to change). If the problem cannot be solved with the troubleshooting information available online or over the
telephone, you will be offered express factory service through Nintendo. Please do not send any products to Nintendo without contacting
us first.
HARDWARE WARRANTY
Nintendo of America Inc. ("Nintendo") warrants to the original purchaser that the hardware product shall be free from defects in material and
workmanship for twelve (12) months from the date of purchase. If a defect covered by this warranty occurs during this warranty period, Nintendo
will repair or replace the defective hardware product or component, free of charge. The original purchaser is entitled to this warranty only if the date
of purchase is registered at point of sale or the consumer can demonstrate, to Nintendo's satisfaction, that the product was purchased within the last
12 months.
GAME & ACCESSORY WARRANTY
Nintendo warrants to the original purchaser that the product (games and accessories) shall be free from defects in material and workmanship for a
period of three (3) months from the date of purchase. If a defect covered by this warranty occurs during this three (3) month warranty period,
Nintendo will repair or replace the defective product, free of charge.
SERVICE AFTER EXPIRATION OF WARRANTY
Please try our website at www.nintendo.com or call the Consumer Assistance Hotline at 1-800-255-3700 for troubleshooting information and repair or
replacement options and pricing. In some instances, it may be necessary for you to ship the complete product, FREIGHT PREPAID AND INSURED FOR
LOSS OR DAMAGE, to Nintendo. Please do not send any products to Nintendo without contacting us first.
WARRANTY LIMITATIONS
THIS WARRANTY SHALL NOT APPLY IF THIS PRODUCT: (a) IS USED WITH PRODUCTS NOT SOLD OR LICENSED BY NINTENDO (INCLUDING, BUT NOT
LIMITED TO, NON-LICENSED GAME ENHANCEMENT AND COPIER DEVICES, ADAPTERS, AND POWER SUPPLIES); (b) IS USED FOR COMMERCIAL PURPOSES
(INCLUDING RENTAL); (c) IS MODIFIED OR TAMPERED WITH; (d) IS DAMAGED BY NEGLIGENCE, ACCIDENT, UNREASONABLE USE, OR BY OTHER CAUSES
UNRELATED TO DEFECTIVE MATERIALS OR WORKMANSHIP; OR (e) HAS HAD THE SERIAL NUMBER ALTERED, DEFACED OR REMOVED.
ANY APPLICABLE IMPLIED WARRANTIES, INCLUDING WARRANTIES OF MERCHANTABILITY AND FITNESS FOR A PARTICULAR PURPOSE, ARE
HEREBY LIMITED IN DURATION TO THE WARRANTY PERIODS DESCRIBED ABOVE (12 MONTHS OR 3 MONTHS, AS APPLICABLE). IN NO EVENT SHALL
REV–P
Access to Third Party Content
Through your access to the Service, you may obtain, or third parties may provide, access to other World Wide Web resources where you may be
able to upload or download content, data or software. Because Nintendo has no control over such sites and resources, we explicitly disclaim any
responsibility for the accuracy, content, or availability of information found on such sites or through such resources. We do not make any
representations or warranties as to the security of any information (including, without limitation, credit card and other Personal Information) you
may provide to any third party, and you hereby irrevocably waive any claim against us with respect to such sites and third-party content.
Friend Roster
As part of the Service, Nintendo may provide you with access to and use of a friend roster where you may store user IDs provided to you by others
(“Friend Roster”). We cannot and do not represent the security of the contents of such Friend Roster from unauthorized third parties. Transfer or
disposal of your DS, or failure to safeguard your DS from loss or misuse, may lead to unauthorized access to and use of your Friend Roster. In
addition, unauthorized persons may gain access to one or more Friend Rosters that contain your information without your knowledge. Nintendo
will not monitor use of or access to individual Friend Rosters and it is your responsibility to monitor your interactions with other users of the Service.
Privacy
Nintendo cares about the privacy of its users. By using the Service you agree to our Privacy Policy which is available at www.nintendo.com/privacy.
Disclaimer of Responsibility for User Content and Submissions
We have the right, but are not obligated, to strictly enforce this Agreement through self-help, active investigation, litigation and prosecution.
Nintendo does not warrant, verify or guarantee, and is not liable for, the quality, accuracy or integrity of any User Content or Submissions that
you may access. However, we reserve the right to, at our sole discretion, remove, take down, destroy or delete any User Content or Submissions
at any time and for any reason. We may access, use and disclose any Submissions or User Content transmitted by you via or in connection with the
Service, to the extent permitted by law, in order to comply with the law (e.g., a lawful subpoena); to protect our rights or property, or to protect
users of the Service from fraudulent, abusive, or unlawful use of the Service. Any use of the Service in violation of the foregoing is in violation of
these terms and may result in, among other things, the termination or suspension of your rights to use the Service.
General
This Agreement constitutes the entire agreement between you and Nintendo and governs your use of the Service, superseding any prior
agreements between you and Nintendo with respect to use of the Service. You also may be subject to additional terms and conditions that may
TERMS OF USE AGREEMENT (cont.)
 Loading...