

Page 1
Nintendo of Europe GmbH
Nintendo Center, 63760 Groß ostheim
www.nintendo-europe.com
UK and Ireland:
Nintendo UK
PO Box 952, Por tsmout h, PO6 9DY
www.nintendo.co.uk
Operations Manual
Please read this Operations Manual, including the Health and Safety Information section (pages 12 to 21),
before use and follow all the instructions carefully. If this product is to be used by young children, this
manual should be read and explained to them by an adult. Please keep this manual for future reference.
Note: See page 4 for a complete list of items included with the system.
Preparations Using Software Adjusting System Settings Troubleshooting
PRINTED IN CHINA
MAA-CTR-S-UK V-C4
Page 2
This seal is your assurance that Nintendo has reviewed this
product and that it has met our standards for excellence in
workmanship, reliability and entertainment value. Always look
for this seal when buying games and accessories to ensure
complete compatibility with your Nintendo Product.
Thank you for selecting the Nintendo 3DS™ system.
[1110/UKV/CTR-HW]
Please note that Nintendo may amend or update the manual included with this product from time to time. Nintendo therefore recommends
checking for the latest version of this manual on your local Nintendo website in the support section for this product. Please note this service
may not be available in some countries.
Trademarks are property of their respective owners.
Nintendo 3DS is a trademark of Nintendo.
© 2012 Nintendo.
Page 3
Thank you for purchasing the Nintendo 3DS™ system. Please read this Operations Manual before use, paying careful attention to the
Health and Safety Information section on pages 12 – 21, and follow all the instructions carefully. If this product is to be used by
young children, this manual should be read and explained to them by an adult. Please keep this manual for future reference.
Note: In this manual, the term “Nintendo DSi™ system” also refers to the Nintendo DSi™ XL system.
Set Contents
Before using this system, ensure that the contents listed below are all present.
Nintendo 3DS system x 1
(CTR-001(EUR))
Nintendo 3DS charging cradle x 1
(CTR-007)
Nintendo 3DS AC adapter x 1
(WAP-002(UKV) / WAP-002(EUR))
Note: The Nintendo DSi Power Supply is also compatible with this system.
Nintendo 3DS stylus x 1
(CTR-004)
Note: The stylus is located in the stylus holder next to the Game Card slot (page 25).
SD Memory Card (2GB) x 1
Note: The SD Card is inserted in the SD Card slot (page 34).
The SD Card is a third-party accessory not manufactured by Nintendo.
AR Cards x 6
Note: These are used in conjunction with the built-in application,
AR Games: Augmented Reality (page 65).
Quick-Start Guide x 1
Nintendo 3DS Operations Manual x 1
Parental Controls Leaet x 1
or
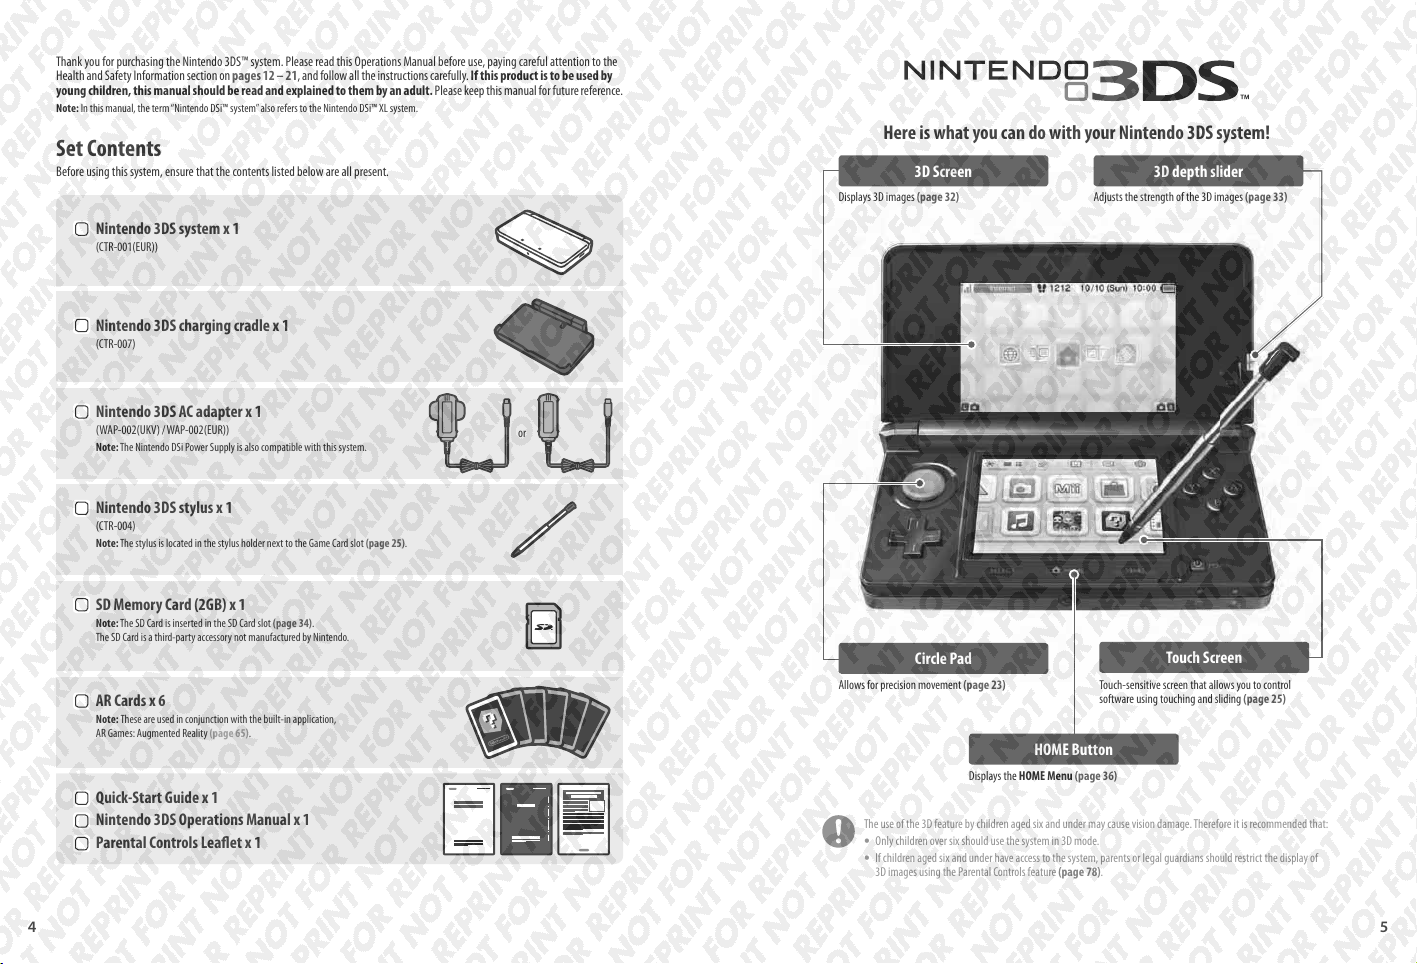
Here is what you can do with your Nintendo 3DS system!
3D Screen
Displays 3D images (page 32) Adjusts the strength of the 3D images (page 33)
Circle Pad
Allows for precision movement (page 23) Touch-sensitive screen that allows you to control
HOME Button
Displays the HOME Menu (page 36)
The use of the 3D feature by children aged six and under may cause vision damage. Therefore it is recommended that:
Only children over six should use the system in 3D mode.
t
If children aged six and under have access to the system, parents or legal guardians should restrict the display of
t
3D images using the Parental Controls feature (page 78).
3D depth slider
Touch Screen
software using touching and sliding (page 25)
4 5
Page 4

Enjoy games in vivid 3D (page 32).
The following software comes pre-installed on the system.
Note: 3D content will only be displayed on Nintendo 3DS software titles. Nintendo DS™ / Nintendo DSi software titles cannot display 3D content.
Take 3D photos and videos using the two outer cameras (page 58).
Outer cameras
Use software from other systems in the Nintendo DS family (page 44).
Take 3D photos and videos using this application. Page 58
Listen to music and record sounds. Page 61
Make yourself and other people into Mii™ characters! Page 62
Mii characters you meet through StreetPass will appear here.
Page 63
View information and videos about various software, and
wnload new software. Page 64
do
Use the AR Cards that come with the system together with the outer
camer
as to create believable augmented reality games. Page 65
A shooting game that turns your face, or the faces of your friends,
to the enemies! Page 66
in
Record the number of steps you take while carrying your
Nintendo 3DS system and the length of time you spend using
software. Page 67
The downloadable title Nintendo Letter Box is pre-installed on the SD Card.
Exchange handwritten letters with registered friends (page 49) using SpotPass and
StreetPass functionality.
Note:
For detailed information on this software, refer to its electronic manual (page 40).
t
For more information on downloadable software, see page 47.
t
There may also be other downloadable content pre-installed on the SD Card, such as 3D videos. Such 3D videos can be played by selecting
their icons from the HOME Menu.
Note: If you delete Nintendo Letter Box or other pre-installed downloadable content, they can be redownloaded from Nintendo eShop. (There are
certain cases where software may be temporarily or permanently withdrawn from Nintendo eShop. Should this happen, you will no longer be able
to redownload that software.)
Nintendo 3DS software Nintendo DS / Nintendo DSi software
6 7
Page 5
SpotPass™
StreetPass™
Your Nintendo 3DS system will automatically search for wireless access points and connect to the internet and ex-
change data at various times, including while in Sleep Mode (when the system is closed but the power is on).
Note: Data received via SpotPass is saved to the SD Card.
3D content
Free software
You must congure Internet Settings to be able to connect to wireless access points (page 70).
Note:
Data cannot be transmitted if the power or wireless functions are o (page 22).
t
SpotPass functionality may not be available if an active software title is using certain features or functionality.
t
SpotPass functionality is not available during local wireless communication (page 37) or while playing Nintendo DS / Nintendo DSi software.
Depending on the type of data received, the notication LED may not light up.
t
Notications
System
updates
Other
information
Flashes blue when
receiving notications
Everyday Recharging
A charging cradle is included as an easy means to keep the battery fully charged (page 27).
If the system is attached to the charging cradle when not in use, the battery won’t lose
power during Sleep Mode.
Note: For information about battery life, see page 31.
Note: The illustration above shows the UK version of the AC adapter.
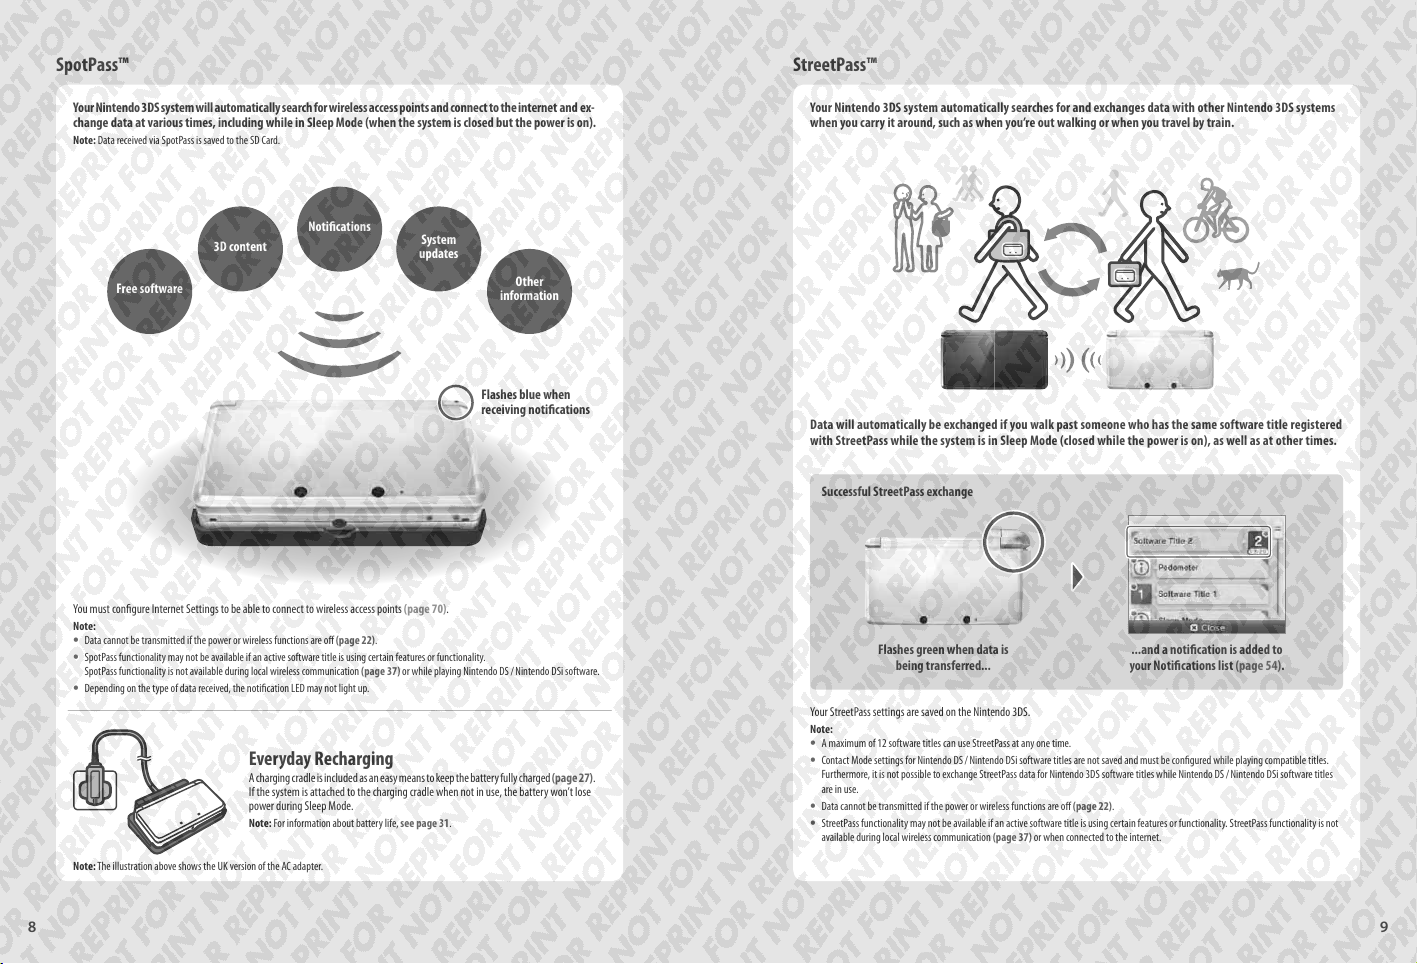
Your Nintendo 3DS system automatically searches for and exchanges data with other Nintendo 3DS systems
when you carry it around, such as when you’re out walking or when you travel by train.
Data will automatically be exchanged if you walk past someone who has the same software title registered
with StreetPass while the system is in Sleep Mode (closed while the power is on), as well as at other times.
Successful StreetPass exchange
Flashes green when data is
being transferred...
Your StreetPass settings are saved on the Nintendo 3DS.
Note:
A maximum of 12 software titles can use StreetPass at any one time.
t
Contact Mode settings for Nintendo DS / Nintendo DSi software titles are not saved and must be congured while playing compatible titles.
t
Furthermore, it is not possible to exchange StreetPass data for Nintendo 3DS software titles while Nintendo DS / Nintendo DSi software titles
are in use.
Data cannot be transmitted if the power or wireless functions are o (page 22).
t
StreetPass functionality may not be available if an active software title is using certain features or functionality. StreetPass functionality is not
t
available during local wireless communication (page 37) or when connected to the internet.
...and a notication is added to
your Notications list (page 54).
8 9
Page 6
Contents
Set Contents 4
t
Health and Safety Information
t
(Please read) 12
Preparations
Component Names and Functions 22
Using the Touch Screen 25
Touch Screen Controls 25
Recharging 26
How to Recharge your Nintendo 3DS System 27
Turning the power on and o 28
Conguring the System for the First Time 28
Using the Keyboards 30
Power LED 31
Battery Life 31
Adjusting 3D Images 32
How to View 3D Images Properly 32
Adjusting the Strength of 3D Images 33
Using SD Cards 34
If Your SD Card is Full... 35
Using Software
HOME Menu 36
Software Icons 38
Opening Software 39
Electronic Manuals 40
Adjusting Brightness / Power-Saving Mode 40
Taking Photos 41
10 11
Creating Folders on the HOME Menu 42
Card-Based Software 44
Using Game Cards 45
Download Software 47
Opening Software 47
Game Notes 48
Friend list 49
Friend List 49
Friend Registration 50
Editing your Friend Card / Viewing Friend Cards 51
Communicating with Friends 52
Friend List Settings 53
Notications 54
Receiving Notications 54
Viewing Notications 55
Stopping Notications 55
Internet Browser 56
Using the Browser 57
Nintendo 3DS Camera 58
Taking Photos and Videos 58
Viewing Photos and Videos 60
Nintendo 3DS Sound 61
Mii Maker 62
StreetPass Mii Plaza 63
Nintendo eShop 64
AR Games: Augmented Reality 65
Face Raiders 66
Activity Log 67
Download Play 68
Adjusting System Settings
System Settings 69
Internet Settings 70
Required Items for Internet Connection 71
Connecting to the Internet 72
SpotPass Settings 76
Nintendo DS Connections 77
If an Error Code Appears 77
Parental Controls 78
Options That Can Be Restricted 78
Conguring Parental Controls 79
Removing Parental Controls Restrictions 80
Data Management 82
Other Settings 83
Outer Cameras 84
System Transfer 86
System Update 91
Format System Memory 91
Troubleshooting
Replacing the Nintendo 3DS Battery Pack 92
Troubleshooting 94
Technical Specications 104
t
Index 106
t
Contact Information 109
t
Preparations Using Software Adjusting System Settings Troubleshooting
Page 7
Health and Safety Information
Be sure to observe the following Health and Safety Information carefully during use of the product.
Failure to do so could result in accidents and / or injury.
The use of this produc t by children
IF THIS PRODUCT IS TO BE USED BY YOUNG CHILDREN, THIS MANUAL SHOULD BE READ AND EXPLAINED TO THEM BY AN ADULT OR
LEGAL GUARDIAN. PARENTS OR LEGAL GUARDIANS SHOULD MONITOR CHILDREN WHEN PLAYING VIDEO GAMES. YOUNG CHILDREN
SHOULD BE SUPERVISED AND ASSISTED WHILE PLAYING.
WARNING – 3D Feature Not Suitable for Children aged six and under
Please refer to the warning regarding the 3D feature (page 13).
If the system doesn’t operate properly
Health and Safety Information
If you suspect your system isn’t functioning as it should, refer to the Troubleshooting section on pages 94 – 102.
If you notice any damage to the system, or any unusual sounds, smells or smoke emanating from it, please do the
following:
1. Turn o 2. Remove 3. Contact
Press and hold the POWER Button
to turn o the power
Note: Touching the product in this state
could be dangerous, so be careful when
pressing the POWER Button.
Remove the AC adapter and any
other accessories
Note: Be sure to remove the AC adapter
plug from the plug socket before
detaching the DC connector plug from
the system.
(Please read)
Contact Nintendo Customer
Support (pages 109 – 111)
Note: Do not attempt to repair the system
yourself. To do so could cause injury.
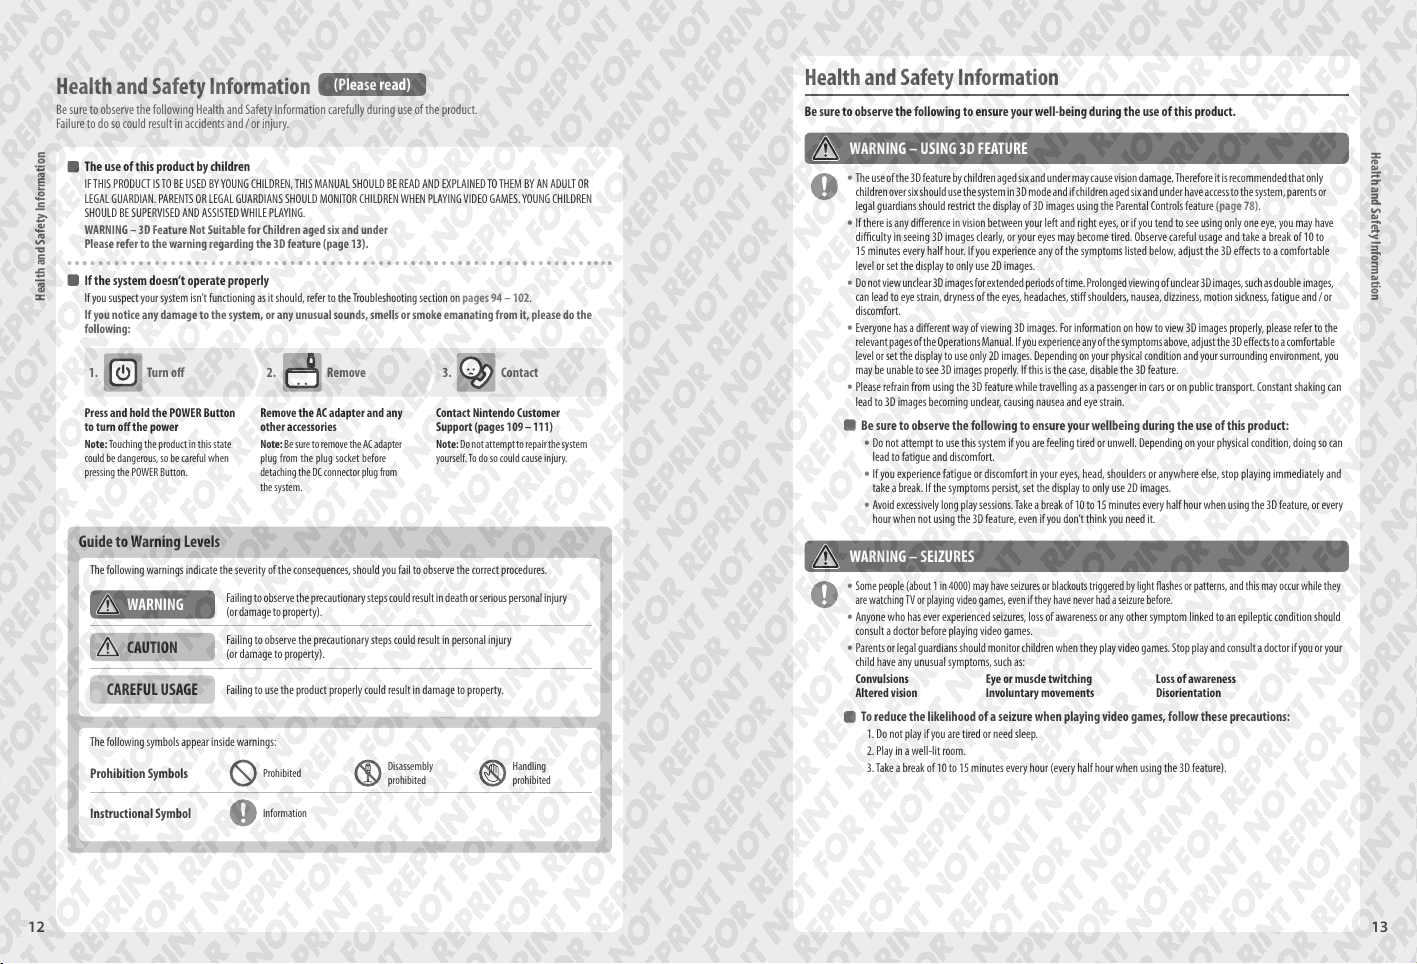
Guide to Warning Levels
The following warnings indicate the severity of the consequences, should you fail to observe the correct procedures.
WARNING
CAUTION
CAREFUL USAGE
The following symbols appear inside warnings:
Prohibition Symbols
Instructional Symbol
Failing to observe the precautionary steps could result in death or serious personal injury
(or damage to property).
Failing to observe the precautionary steps could result in personal injury
(or damage to property).
Failing to use the product properly could result in damage to property.
Prohibited
Information
Disassembly
prohibited
Handling
prohibited
Health and Safety Information
Be sure to observe the following to ensure your well-being during the use of this product.
WARNING – USING 3D FEATURE
The use of the 3D feature by children aged six and under may cause vision damage. Therefore it is recommended that only
t
children over six should use the system in 3D mode and if children aged six and under have access to the system, parents or
legal guardians should restrict the display of 3D images using the Parental Controls feature (page 78).
If there is any dierence in vision between your left and right eyes, or if you tend to see using only one eye, you may have
t
diculty in seeing 3D images clearly, or your eyes may become tired. Observe careful usage and take a break of 10 to
15 minutes every half hour. If you experience any of the symptoms listed below, adjust the 3D eects to a comfortable
level or set the display to only use 2D images.
Do not view unclear 3D images for extended periods of time. Prolonged viewing of unclear 3D images, such as double images,
t
can lead to eye strain, dryness of the eyes, headaches, sti shoulders, nausea, dizziness, motion sickness, fatigue and / or
discomfort.
Everyone has a dierent way of viewing 3D images. For information on how to view 3D images properly, please refer to the
t
relevant pages of the Operations Manual. If you experience any of the symptoms above, adjust the 3D eects to a comfortable
level or set the display to use only 2D images. Depending on your physical condition and your surrounding environment, you
may be unable to see 3D images properly. If this is the case, disable the 3D feature.
Please refrain from using the 3D feature while travelling as a passenger in cars or on public transport. Constant shaking can
t
lead to 3D images becoming unclear, causing nausea and eye strain.
Be sure to obser ve the following to ensure your wellbeing during the use of this product:
Do not attempt to use this system if you are feeling tired or unwell. Depending on your physical condition, doing so can
t
lead to fatigue and discomfort.
If you experience fatigue or discomfort in your eyes, head, shoulders or anywhere else, stop playing immediately and
t
take a break. If the symptoms persist, set the display to only use 2D images.
Avoid excessively long play sessions. Take a break of 10 to 15 minutes every half hour when using the 3D feature, or every
t
hour when not using the 3D feature, even if you don’t think you need it.
WARNING – SEIZURES
Some people (about 1 in 4000) may have seizures or blackouts triggered by light ashes or patterns, and this may occur while they
t
are watching TV or playing video games, even if they have never had a seizure before
Anyone who has ever experienced seizures, loss of awareness or any other symptom linked to an epileptic condition should
t
consult a doctor before playing video games.
Parents or legal guardians should monitor children when they play video games. Stop play and consult a doctor if you or your
t
child have any unusual symptoms, such as:
Convulsions Eye or muscle twitching Loss of awareness
Altered vision Involuntary movements Disorientation
To reduce the likelihood of a seizure when playing video games, follow these precautions:
1. Do not play if you are tired or need sleep.
2. Play in a well-lit room.
3. Take a break of 10 to 15 minutes every hour (every half hour when using the 3D feature).
.
Health and Safety Information
12 13
Page 8
WARNING – EYE STRAIN AND MOTION SICKNESS
Playing video games can make your eyes hurt after a sustained period of time, and perhaps sooner if using the 3D feature. Playing
video games can also cause motion sickness in some players. Follow these instructions to avoid eye strain, dizziness or nausea:
Avoid excessively long play sessions. Parents or legal guardians should monitor their children for appropriate play.
t
Take a break of 10 to 15 minutes every half hour when using the 3D feature, or every hour when not using the 3D feature,
t
even if you don’t think you need it.
If your eyes become tired or sore while playing, or if you feel dizzy or nauseated, stop and rest for several hours before playing
t
again.
If you continue to have any of the above symptoms or other discomfort during or after play, stop playing and see a doctor.
t
WARNING – REPETITIVE MOTION INJURIES
Health and Safety Information
Playing video games can make your muscles, joints or skin hurt after a few hours. Follow these instructions to avoid problems
such as tendonitis, carpal tunnel syndrome or skin irritation:
Avoid excessively long play sessions. Parents or legal guardians should monitor their children for appropriate play.
t
Take a break of 10 to 15 minutes every hour (every half hour when using the 3D feature), even if you don’t think you need it.
t
When using the stylus, you do not need to grip it tightly or press it hard against the screen. Doing so may cause fatigue or
t
discomfort.
If your hands, wrists, or arms become tired or sore while playing, or if you feel symptoms such as tingling, numbness,
t
burning or stiness, stop and rest them for several hours before playing again.
If you continue to have any of the above symptoms or other discomfort during or after play, stop playing and see a doctor.
t
WARNING – BATTERY LEAKAGE
The Nintendo 3DS system contains a rechargeable lithium ion battery pack. Leakage or combustion of the battery pack can
cause personal injury as well as damage to your Nintendo 3DS system.
To avoid battery leakage and / or combustion:
Do not damage the battery.
t
Do not expose the battery to excessive physical shock, vibration, or liquids.
t
Do not disassemble, deform or attempt to repair the battery.
t
Do not expose the battery to heat or dispose of it in a re.
t
Do not touch the terminals of the battery or cause a short circuit between the terminals with a metal object.
t
Do not peel or damage the battery label.
t
Use a compatible AC adapter.
t
The battery pack of the Nintendo 3DS system is only to be recharged under adult supervision.
t
The battery is to be removed from the Nintendo 3DS system before disposing of the unit.
t
If the battery pack leaks, do not touch it. To ensure any leaked uid on the system doesn’t come into contact with your hands,
wipe the exterior of the system thoroughly with a soft, slightly damp cloth. If the leaked uid comes into contact with your
hands or any other part of your body, rinse it away with water. If liquid leaking from a battery pack comes into contact with
your eyes, it can cause injury. Immediately rinse your eyes with plenty of water and consult a doctor.
WARNING – RADIO FREQUENCY INTERFERENCE
The Nintendo 3DS system can emit radio waves that can aect the operation of nearby electronics, including cardiac pacemakers.
Do not operate the Nintendo 3DS system within 25 centimetres (10 inches) of a pacemaker while using wireless communication.
t
If you have a pacemaker or other implanted medical device, do not use wireless communication without rst consulting your
doctor or the manufacturer of your medical device.
Impor tant Safety Information for use of Nintendo 3DS on board aeroplanes, in hospitals and airports
Operation of the Nintendo 3DS system with wireless communication NOT active may be allowed on board aeroplanes,
t
in hospitals, and in airports as with any other non-wireless device.
You will know when wireless communication is active on your Nintendo 3DS system when the yellow wireless LED is lit,
t
to indicate that communication is enabled, or is blinking, to indicate that wireless communication is in progress. The wireless
LED will blink when you are using in-game multiplayer features or transferring a game / feature to / from another unit.
Observe and follow all regulations and rules regarding the use of wireless devices in locations such as hospitals, airports,
or on board an aeroplane.
In order to comply with airline regulations, do not use wireless communication functions while on board an aeroplane.
t
Operation in these locations may interfere with or cause malfunctions of equipment, with resulting injuries to persons
or damage to property.
IMPORTANT: The Nintendo 3DS system allows you to disable wireless communication for all system features. To enable / disable
wireless communication, use the wireless switch on the system.
WARNING – WIRELESS COMMUNICATION
The Nintendo 3DS system oers various applications allowing your Nintendo 3DS system to communicate using wireless com-
munication. You can disable wireless communication by using the wireless switch of the Nintendo 3DS system.
IMPORTANT: The Nintendo 3DS system may automatically connect to the internet when wireless communication is enabled. If
you want to avoid such connection, please disable all wireless communication by using the wireless switch of the Nintendo 3DS
system. A broadband internet connection and a wireless access point or a Nintendo Wi-Fi USB Connector are required in order to
enjoy certain Nintendo 3DS Services. You are responsible for any internet connection fees. We therefore recommend you make
sure that you have high-speed internet access, with no restrictions on usage and downloading time, before using such services
in order to avoid additional internet charges being incurred when using such services. The Nintendo 3DS Services are not available
in all countries; visit http://3dsservices.nintendo-europe.com for details.
The Nintendo 3DS Services are governed by the Nintendo 3DS Service User Agreement and Privacy Policy. For more details please
visit http://3dsservices.nintendo-europe.com.
Keep the following in mind regarding the use of wireless communication:
If you post, send or otherwise make available any information or content through wireless communication please make
t
sure not to include any information that can be used to identify you personally, such as your name, email address, your
address or your telephone number, as others may be allowed to see such information and content. In particular, when
choosing a user name or nickname for your Mii characters, please do not use your real name as others may be able to view
your user name and the nicknames of your Mii characters when using wireless communication.
Friend codes and friend cards are a part of a system that allows you to establish a friendship with other users, so that you
t
can play, communicate and interact with people you know. If you exchange friend codes or friend cards with strangers,
there is a risk that you could receive information or messages with oensive language or inappropriate content and that
strangers may see information about you that you do not want strangers to see. We therefore recommend that you do
not give your friend codes to people you don’t know and that you do not share friend cards with people you don’t know.
Do not engage in harmful, illegal, oensive or otherwise inappropriate activity that might cause problems for other users.
t
In particular, do not post, send or otherwise make available any information or content that threatens, abuses or harasses
other persons, infringes on the rights of others (such as copyrights, portrait rights, privacy rights, rights of publicity or
trademarks) or that may make other people feel uncomfortable. In particular, when sending, posting or making available
photos, images or videos displaying other people, make sure to obtain their permission beforehand. If inappropriate conduct
is reported or conrmed, you may be subject to penalties such as being banned from the Nintendo 3DS Services.
As far as Nintendo servers are involved in any wireless communication, please note that Nintendo servers may become temporarily
unavailable without prior notice due to maintenance following any problems.
Health and Safety Information
14 15
Page 9
Please read the following carefully to ensure the correct use of this product.
WARNING
Do not disassemble or tr y to repair the system
Do not expose the battery to heat or dispose of it in a re
Do not expose the system to heat sources such as heaters or stoves, and try not to expose the system
to direct sunlight for extended periods of time
Failure to observe this precaution could result in the battery pack leaking, combusting or exploding, which can in turn lead
to re and / or electrocution. Also, certain degrees of heat can lead to the battery pack becoming deformed or damaged.
Use a compatible AC adapter and battery pack
Health and Safety Information
Using an incompatible AC adapter or battery pack can lead to battery leakage, combustion or explosion, which can in turn
lead to re and / or electrocution.
Use the Nintendo 3DS Battery Pack (CTR-003), Nintendo 3DS AC adapter (WAP-002(UKV) / WAP-002(EUR)) and Nintendo 3DS
charging cradle (CTR-007) only.
Do not touch the terminals of the battery with any foreign materials
or metal objects, and do not damage the battery pack
Doing so can lead to combustion, explosions, electrocution and / or short-circuits.
Do not use the system with travel transformers, incandescent-specic light dimmers,
or in-car AC / DC adapters or chargers.
Use the AC adapter and battery pack only with compatible systems
Using the AC adapter and / or battery pack with an incompatible unit can cause re, battery leakage, combustion, explosion
or electric shocks.
The Nintendo 3DS Battery Pack (CTR-003) is for use with the Nintendo 3DS system only.
t
The included AC adapter (WAP-002(UKV) / WAP-002(EUR)) can be used with the following:
t
Nintendo 3DS (CTR-001(EUR))
t
Nintendo 3DS charging cradle (CTR-007)
t
Nintendo DSi (TWL-001(EUR))
t
Nintendo DSi XL (UTL-001(EUR))
t
Do not spill liquids on, or inser t any foreign materials into, the system
This can lead to re, electric shocks and / or malfunctions.
If the Nintendo 3DS system comes into contact with liquids, immediately turn the power o, remove the AC adapter,
remove the battery cover and battery, then wipe the exterior clean with a soft, slightly damp cloth (use water only).
Do not wipe the interior of the Nintendo 3DS system with any liquids.
Do not touch the AC adapter connector or any other connector on the system with your ngers or
metal objects
Doing so can lead to re, electrocution, short-circuits and / or malfunctions.
Do not touch the system or AC adapter while charging during a thunderstorm
Doing so could lead to electrocution from conducted lightning.
Do not use the system in very humid environments or in places with high levels of dust or soot
This could lead to re, electrocution and / or malfunction. This could also cause mould to grow on the camera lenses.
Do not expose the system to excessive physical shock such as dropping it or treading on it
This could lead to damaged screens or the battery pack overheating, which could lead to burns or other injuries.
Note: Touching the system while it is damaged can be dangerous. Doing so can lead to injuries, so do not attempt to touch
damaged areas.
Do not get too close to the infrared transceiver
Looking directly into the infrared transceiver can lead to impaired vision and other problems.
Do not use excessive volume for headphones
Using headphones at loud volumes for long periods of time could result in impaired hearing. When using headphones,
keep the volume at a level that allows you to hear background sounds. If you notice problems such as fatigue or ringing in
the ears, discontinue use. If the symptoms persist, consult a doctor.
Touching the system more than necessary while it is damaged can lead to injury
Make no attempt to touch the areas that have sustained damage.
Stop playing if you experience skin irritation
A stainless steel alloy is used in the stylus and may cause irritation to certain skin types. If you experience such irritation,
stop playing immediately and consult a doctor.
Do not place the system, or accessories such as SD Cards, within easy reach of young children or pets,
or in places where there is a risk it could fall into their reach
Children may place the AC adapter, stylus, system accessories or other parts into their mouths and cause themselves harm
as a result.
Keep the cradle connec tor clean
Failure to do so could lead to re, overheating, electric shocks, inability to charge and
other malfunctions. Clean at regular intervals to ensure the cradle connector remains
clean. Avoid applying unnecessary pressure as this could lead to damage.
Impor tant safety information for use of Nintendo 3DS on board aeroplanes, in hospitals and airports
Operation of the Nintendo 3DS system with wireless communication NOT active may be allowed on board aeroplanes,
t
in hospitals, and in airports as with any other non-wireless device.
You will know when wireless communication is active on your Nintendo 3DS system when the yellow wireless LED is lit,
t
to indicate that communication is enabled, or is blinking, to indicate that wireless communication is in progress. The
wireless LED will blink when you are using in-game multiplayer features or transferring a game / feature to / from another
unit. Observe and follow all regulations and rules regarding the use of wireless devices in locations such as hospitals,
airports, or on board aeroplanes.
In order to comply with airline regulations, do not use in-game multiplayer functions, or use wireless communication
t
in any other way while on board an aeroplane. Operation in these locations may interfere with or cause malfunctions of
equipment, with resulting injuries to persons or damage to property.
Health and Safety Information
16 17
Page 10

Health and Safety Information
Do not use while driving, c ycling or walking
Use of the system while driving is an oence and it is dangerous.
t
Use of the system while walking or cycling can lead to accidents.
t
Be aware of your surroundings while using the system
Failing to take care could lead to injury, damage to household equipment and other
malfunctions.
You will probably move around while using the camera function to take photographs
t
or play certain games, so be careful that all areas that you might move into are
clear. Make sure that furniture, objects and people are out of the play area so you
don’t accidentally bump into them while playing.
Do not expose the Nintendo 3DS system to high temperatures
The Nintendo 3DS system is designed for use at temperatures of 5 –35° C. Using the system in hot environments (eg. under
a duvet or other non-ventilated environment) can lead to the system temperature rising sharply, which may cause burns.
Use of the system for prolonged periods while charging, can increase the temperature of the system. Touching the system
while it is hot may cause burns.
Use the stylus properly
Incorrect use can lead to injury or damage.
Do not use the stylus for any purpose other than to operate the Nintendo 3DS system.
t
Do not bend or apply unnecessar y force to the stylus during use.
t
Do not use damaged or distorted st yli.
t
Be sure to connec t the AC adapter to the correct voltage (AC 220 – 240V)
Failure to do so could lead to re, overheating, electrocution and other malfunctions.
Do not use voltage transformers intended for use abroad or plugs that deliver reduced amounts of electricity.
Do not use the AC adapter if the cable or plug is damaged
Doing so can lead to re and / or electrocution.
Avoid tightly wrapping, treading on, pulling, twisting or making adjustments to the cord.
t
Avoid placing heavy objects on the cord, especially on the DC connector plug.
t
If the system has been damaged or the cord broken, do not attempt to use it.
t
Do not expose the cord to extreme heat sources such as heaters or stoves.
t
If the external exible cable or cord of the AC adapter becomes damaged, please contact Nintendo Customer Support for
t
information about replacement parts. In order to avoid any potential hazards, do not attempt to repair the adapter yourself.
If the system is charging while being used, be careful not to pull on or entangle the power cord.
t
Use of the AC adapter by children should only be allowed with the full supervision of a parent or legal guardian.
t
Keep the AC plug clean by wiping with a dry cloth
Attempting to use the system when it is unclean or dusty could lead to re, electrocution or short circuits.
Do not plug too many devices into the plug sockets or multi-plug adaptors, and do not connect multiple
multi-plugs together
Doing so could lead to re or electrocution.
Be sure to plug in and remove the AC adapter properly
Failure to do so could lead to re, electrocution or short circuits.
Failing to insert the AC adapter properly into the plug socket may allow metal objects (such as paperclips or metallic straps)
to come into contact with the prongs of the plug.
To remove the AC adapter, grip the body of the plug securely and pull it straight out of the plug socket.
If the system is to be used by children, a parent or legal guardian should ensure that they do not allow the child to touch
the prongs of the plug with metal objects when plugging the AC adapter in.
The AC adapter should be plugged into an easily accessible socket that is near the equipment to be charged.
Do not use the system with wet hands
This can lead to accidents, malfunction, injury or damage to property.
CAUTION
Do not apply unnecessar y pressure to the LCD screens or subject them to extreme shock
Doing so could lead to injury or malfunction.
If the LCD screens should break, avoid contact with any leaking uid. Repair of damaged LCD screens is not covered by the
warranty and must be paid for separately.
Do not put the system into your back pocket
Subjecting the system and LCD screens to excessive force, for example sitting on
them, can damage them and lead to injury or malfunction.
Keep your ngers clear of the hinge
Purchase a strong wrist strap
Should you use a wrist strap, please be aware that home-made or weak straps may break, leading to injury or damage.
Do not swing the system by its strap
Doing so could lead to the strap breaking and the system being dropped or thrown. This could result in damage to the
system or surrounding objects, and injury to yourself or others.
Health and Safety Information
18 19
Page 11
CAREFUL USAGE
The AC adapter used with the Nintendo 3DS system should be regularly examined for damage to the cord, plug enclosure and
t
other parts.
The Nintendo 3DS system is not intended for children under 3 years old.
t
The AC adapter is for indoor use only.
t
Do not repeatedly turn the power on and o
Doing so can lead to malfunction and loss of data on SD Cards and in the System Memory.
First, always turn the power of your Nintendo 3DS system o before loading or removing a Game Card /
SD Card. Insert the Game Card / SD Card completely without forcing either the Game Card / SD Card or the
Nintendo 3DS system
Failure to do so can aect save data and cause damage to the system or accessories.
Health and Safety Information
Only use compatible accessories
The use of the following devices can lead to malfunction or incorrect functionality:
Accessories which are incompatible with the software being used.
t
Devices and accessories that are not approved for use by Nintendo.
t
Broken or damaged accessories.
t
Do not move the Circle Pad violently from side to side
This may damage the controller and could aect game play.
Do not use hard or pointed objec ts to press buttons
Do not use pens, metal objects, ngernails, styluses or other hard or pointed objects to press
the HOME Button, START or SELECT. Doing so may cause damage.
Do not damage the Touch Screen
Doing so can lead to malfunction.
Use either the included stylus (CTR-004) or the item specied by the software for on-screen commands. Do not use pens, metal
t
objects or any other instrument (including ngernails) that could leave scratches on the screen.
Do not apply unnecessar y pressure to, scrape objects across or stab at the Touch Screen.
t
Do not use the Touch Screen with sand, lint, crumbs or other abrasive materials on it as these could leave scratches. If the Touch
t
Screen is dirty, use a soft cloth to wipe it clean.
The upper screen is not touch sensitive. Do not attempt to use the stylus on it.
t
Do not expose the cameras to direct sunlight for an extended period of time, and do not directly photograph
the Sun or other intense light sources
Doing so could lead to malfunction of the cameras or discolouration of the photographed images.
Images taken by the cameras may be brighter or darker or have slightly dierent colours than the actual objects photographed.
t
There may also be permanent light or dark spots on the images. Neither of these cases indicates a defective product.
If the lenses get dirt y, wipe them gently with a dry, soft cloth or cotton swab to clean them. Be very careful not to press on the
t
camera lenses when cleaning, as this may cause damage.
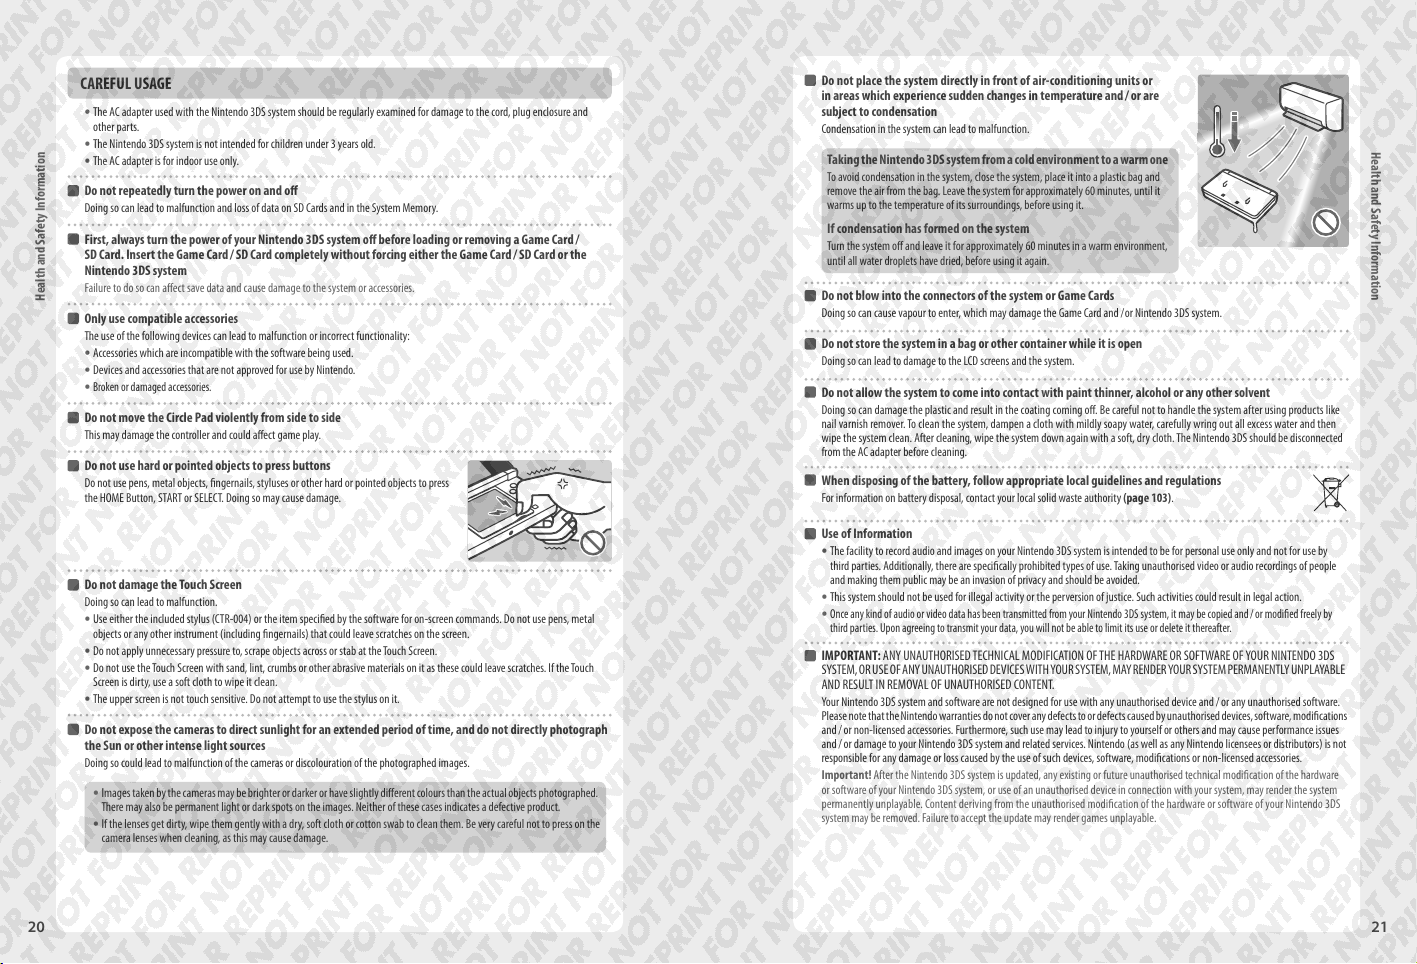
Do not place the system directly in front of air-conditioning units or
in areas which experience sudden changes in temperature and / or are
subject to condensation
Condensation in the system can lead to malfunction.
Taking the Nintendo 3DS system from a cold environment to a warm one
To avoid condensation in the system, close the system, place it into a plastic bag and
remove the air from the bag. Leave the system for approximately 60 minutes, until it
warms up to the temperature of its surroundings, before using it.
If condensation has formed on the system
Turn the system o and leave it for approximately 60 minutes in a warm environment,
until all water droplets have dried, before using it again.
Do not blow into the connectors of the system or Game Cards
Doing so can cause vapour to enter, which may damage the Game Card and /or Nintendo 3DS system.
Do not store the system in a bag or other container while it is open
Doing so can lead to damage to the LCD screens and the system.
Do not allow the system to come into contact with paint thinner, alcohol or any other solvent
Doing so can damage the plastic and result in the coating coming o. Be careful not to handle the system after using products like
nail varnish remover. To clean the system, dampen a cloth with mildly soapy water, carefully wring out all excess water and then
wipe the system clean. After cleaning, wipe the system down again with a soft, dry cloth. The Nintendo 3DS should be disconnected
from the AC adapter before cleaning.
When disposing of the battery, follow appropriate local guidelines and regulations
For information on battery disposal, contact your local solid waste authority (page 103).
Use of Information
The facility to record audio and images on your Nintendo 3DS system is intended to be for personal use only and not for use by
t
third parties. Additionally, there are specically prohibited types of use. Taking unauthorised video or audio recordings of people
and making them public may be an invasion of privacy and should be avoided.
This system should not be used for illegal activity or the per version of justice. Such activities could result in legal action.
t
Once any kind of audio or video data has been transmitted from your Nintendo 3DS system, it may be copied and / or modied freely by
t
third parties. Upon agreeing to transmit your data, you will not be able to limit its use or delete it thereafter.
IMPORTANT: ANY UNAUTHORISED TECHNICAL MODIFICATION OF THE HARDWARE OR SOFTWARE OF YOUR NINTENDO 3DS
SYSTEM, OR USE OF ANY UNAUTHORISED DEVICES WITH YOUR SYSTEM, MAY RENDER YOUR SYSTEM PERMANENTLY UNPLAYABLE
AND RESULT IN REMOVAL OF UNAUTHORISED CONTENT.
Your Nintendo 3DS system and software are not designed for use with any unauthorised device and / or any unauthorised software.
Please note that the Nintendo warranties do not cover any defects to or defects caused by unauthorised devices, software, modications
and / or non-licensed accessories. Furthermore, such use may lead to injury to yourself or others and may cause performance issues
and / or damage to your Nintendo 3DS system and related services. Nintendo (as well as any Nintendo licensees or distributors) is not
responsible for any damage or loss caused by the use of such devices, software, modications or non-licensed accessories.
fter the Nintendo 3DS system is updated, any existing or future unauthorised technical modication of the hardware
Important! A
or software of your Nintendo 3DS system, or use of an unauthorised device in connection with your system, may render the system
permanently unplayable. Content deriving from the unauthorised modication of the hardware or software of your Nintendo 3DS
system may be removed. Failure to accept the update may render games unplayable.
Health and Safety Information
20 21
Page 12
Component Names and Functions
The functions of these components are explained in this Operations Manual.
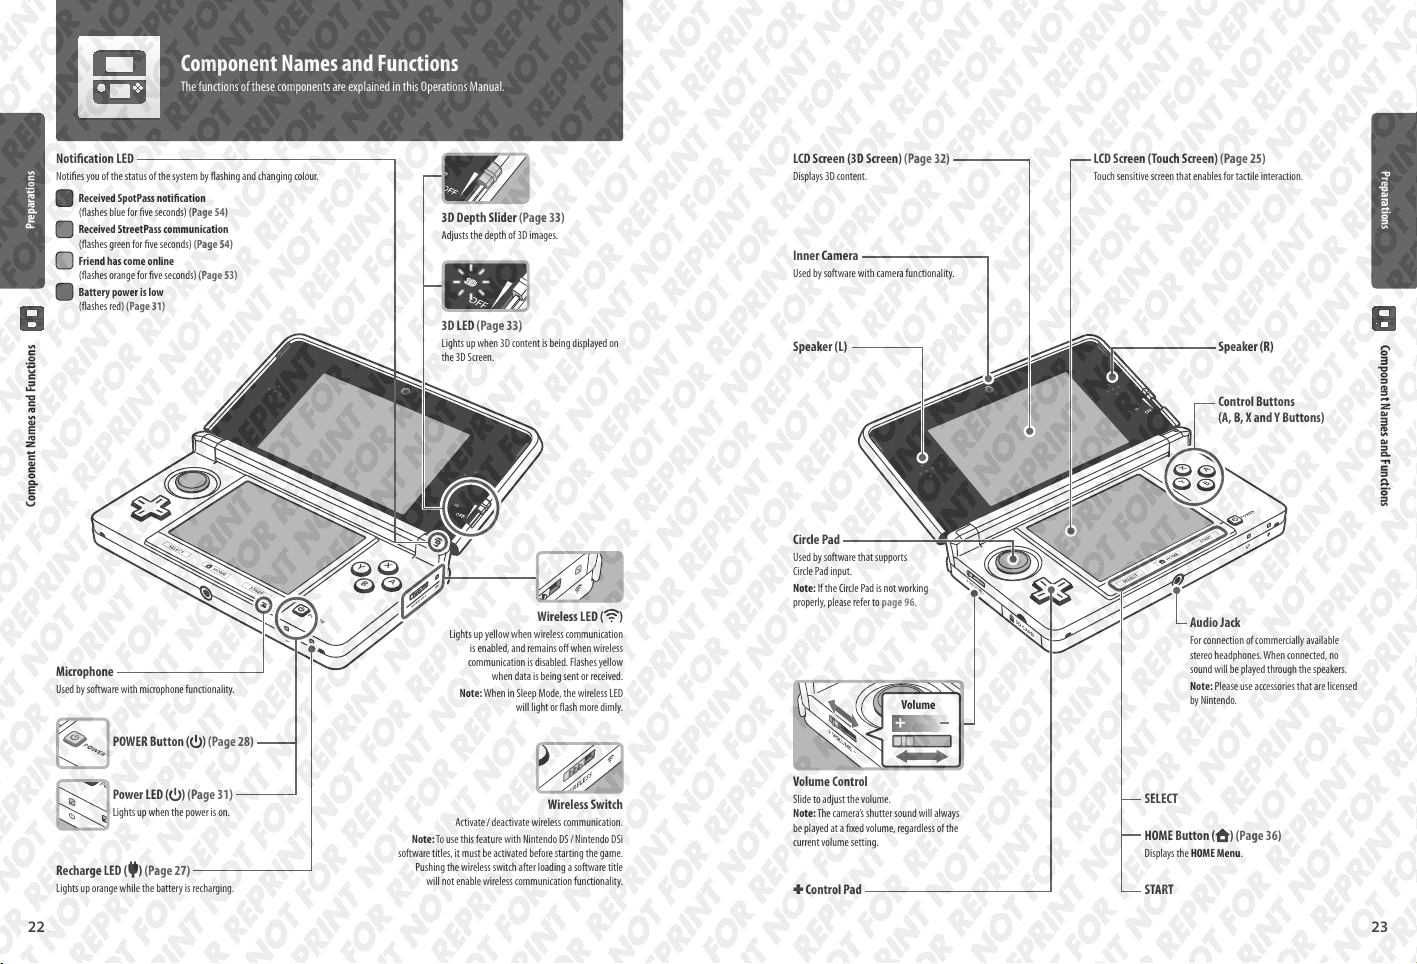
Notication LED
Noties you of the status of the system by ashing and changing colour.
Received SpotPass notication
(ashes blue for ve seconds) (Page 54)
Preparations
Received StreetPass communication
(ashes green for ve seconds) (Page 54)
Friend has come online
(ashes orange for ve seconds) (Page 53)
Battery power is low
(ashes red) (Page 31)
Component Names and Functions
Microphone
Used by software with microphone functionality.
3D Depth Slider (Page 33)
Adjusts the depth of 3D images.
3D LED (Page 33)
Lights up when 3D content is being displayed on
the 3D Screen.
Wireless LED ( )
Lights up yellow when wireless communication
is enabled, and remains o when wireless
communication is disabled. Flashes yellow
when data is being sent or received.
Note: When in Sleep Mode, the wireless LED
will light or ash more dimly.
LCD Screen (3D Screen) (Page 32)
Displays 3D content.
Inner Camera
Used by software with camera functionality.
Circle Pad
Used by software that supports
Circle Pad input.
Note: If the Circle Pad is not working
properly, please refer to page 96.
Volume
LCD Screen (Touch Screen) (Page 25)
Touch sensitive screen that enables for tactile interaction.
Speaker (R)Speaker (L)
Control Buttons
(A, B, X and Y Buttons)
Audio Jack
For connection of commercially available
stereo headphones. When connected, no
sound will be played through the speakers.
Note: Please use accessories that are licensed
by Nintendo.
Preparations
Component Names and Functions
POWER Button ( ) (Page 28)
Power LED (
Lights up when the power is on.
Recharge LED ( ) (Page 27)
Lights up orange while the battery is recharging.
22
) (Page 31)
Activate / deactivate wireless communication.
Wireless Switch
Note: To use this feature with Nintendo DS / Nintendo DSi
software titles, it must be activated before starting the game.
Pushing the wireless switch after loading a software title
will not enable wireless communication functionality.
Volume Control
Slide to adjust the volume.
Note: The camera’s shutter sound will always
be played at a xed volume, regardless of the
current volume setting.
- Control Pad
SELECT
HOME Button (
Displays the HOME Menu.
START
) (Page 36)
23
Page 13
Preparations
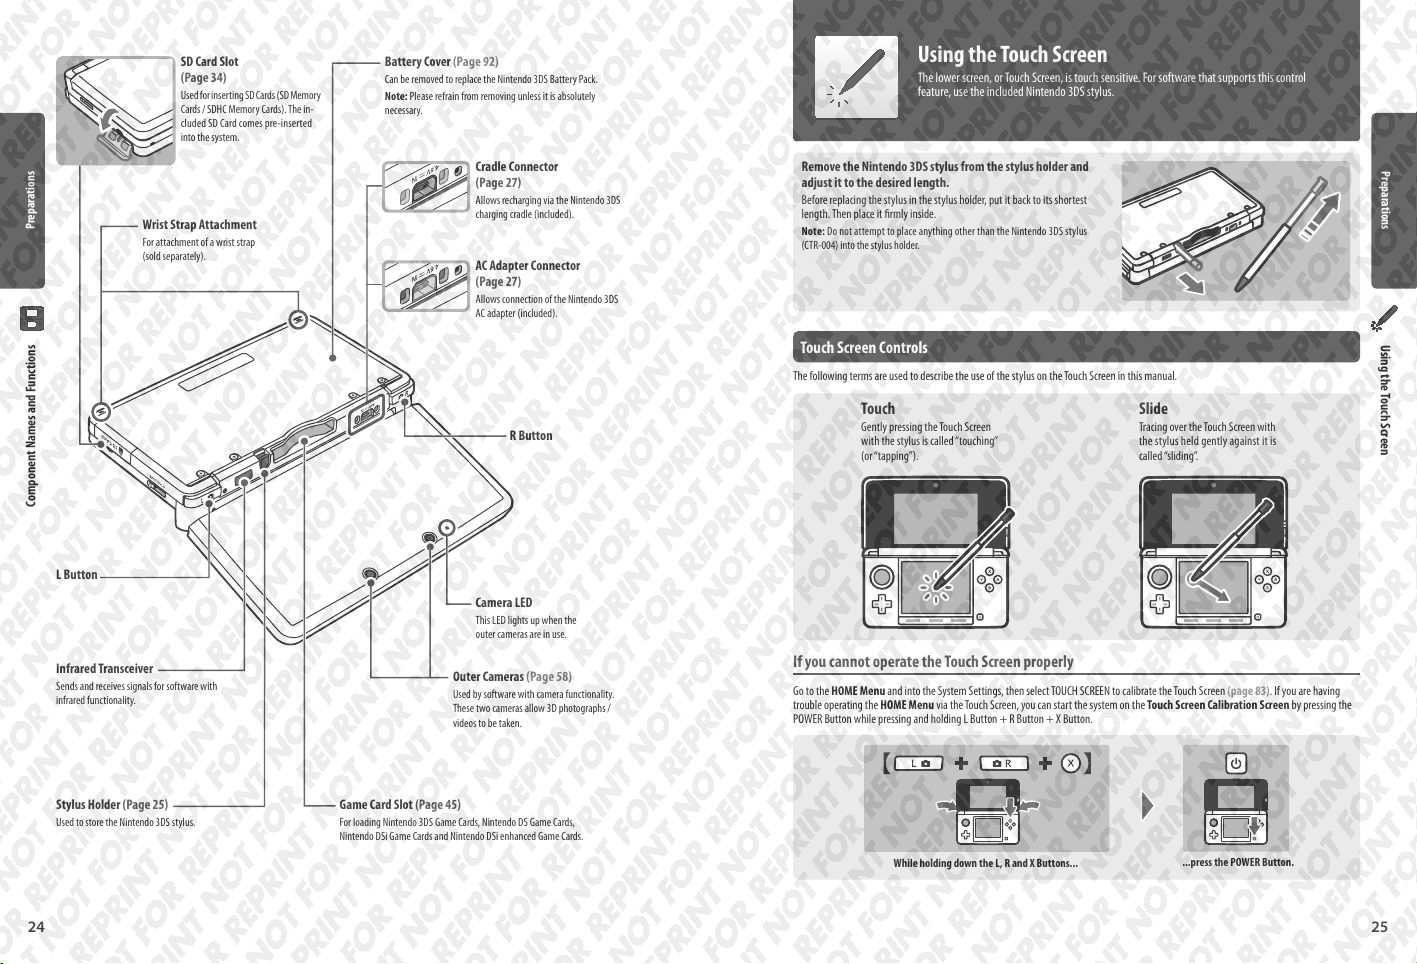
SD Card Slot
(Page 34)
Used for inserting SD Cards (SD Memory
Cards / SDHC Memory Cards). The in-
cluded SD Card comes pre-inserted
into the system.
Wrist Strap Attachment
For attachment of a wrist strap
(sold separately).
Battery Cover (Page 92)
Can be removed to replace the Nintendo 3DS Battery Pack.
Note: Please refrain from removing unless it is absolutely
necessary.
Cradle Connector
(Page 27)
Allows recharging via the Nintendo 3DS
charging cradle (included).
AC Adapter Connector
(Page 27)
Allows connection of the Nintendo 3DS
AC adapter (included).
Using the Touch Screen
The lower screen, or Touch Screen, is touch sensitive. For software that supports this control
feature, use the included Nintendo 3DS stylus.
Remove the Nintendo 3DS stylus from the stylus holder and
adjust it to the desired length.
Before replacing the stylus in the stylus holder, put it back to its shortest
length. Then place it rmly inside.
Note: Do not attempt to place anything other than the Nintendo 3DS stylus
(CTR-004) into the stylus holder.
Touch Screen Controls
The following terms are used to describe the use of the stylus on the Touch S creen in this manual.
Preparations
Using the Touch Screen
Component Names and Functions
L Button
Infrared Transceiver
Sends and receives signals for software with
infrared functionality.
Stylus Holder (Page 25)
Used to store the Nintendo 3DS stylus.
24
R Button
Camera LED
This LED lights up when the
outer cameras are in use.
Outer Cameras (Page 58)
Used by software with camera functionality.
These two cameras allow 3D photographs /
videos to be taken.
Game Card Slot (Page 45)
For loading Nintendo 3DS Game Cards, Nintendo DS Game Cards,
Nintendo DSi Game Cards and Nintendo DSi enhanced Game Cards.
Touch
Gently pressing the Touch Screen
with the stylus is called “touching”
(or “tapping”).
Slide
Tracing over the Touch Screen with
the stylus held gently against it is
called “sliding”.
If you cannot operate the Touch Screen properly
Go to the HOME Menu and into the System Settings, then select TOUCH SCREEN to calibrate the Touch Screen (page 83). If you are having
trouble operating the HOME Menu via the Touch Screen, you can start the system on the Touch Screen Calibration Screen by pressing the
POWER Button while pressing and holding L Button + R Button + X Button.
While holding down the L, R and X Buttons...
...press the POWER Button.
25
Page 14

Recharging
You must charge the battery pack before you use your Nintendo 3DS system for the rst time.
Recharging Time: 3 Hrs 30 Mins (Approx.)
The system takes approximately 3 hours 30 minutes to fully recharge when o. Charging time may vary if the system is being
used while charging, or depending on the level of charge remaining in the battery.
Preparations
Recharging Temperature: 5 – 35 degrees Celsius
Attempting to charge the battery pack while the ambient temperature is outside this range may degrade the battery pack and
prevent it from charging. If the ambient temperature is low, the batteries may not charge completely.
How to Recharge your Nintendo 3DS System
Charging cradle
DC plug
(logo facing upwards)
Preparations
AC plug connectors
Repeated Recharging and Battery Life
Battery life decreases slightly over time as the battery is continually used and recharged. After 500 recharges, battery life may be
reduced to 70% of the battery life at the time of purchase.
Recharging
Greatly Decreased Usage Time
If you feel the usage time has noticeably reduced, replace the battery pack. Replacement battery packs are sold separately (page 92).
Please contact Nintendo Customer Support for further information on where to purchase a replacement (pages 109 – 111).
26
(The LED will go out when
charging is complete.)
Note: The illustration above shows the UK version of the AC adapter.
Connect the DC connector plug to the charging cradle
1
Note:
Be sure the DC connector plug is the right way up before inserting it into the charging cradle to avoid damaging either the DC connector plug
t
or charging cradle.
Be sure to place the charging cradle on a level surface.
t
Place the Nintendo 3DS system on top of the charging cradle
2
Note: Place the front edge of the system into the cradle rst. Starting from the back or sides may
not allow the system to sit correctly in the cradle, and using excessive force to correctly position
the system in such cases may cause damage.
Insert the AC adapter plug into a standard 220 – 240V AC plug socket
3
Be sure the AC adapter plug is fully inserted. Please see pages 16 – 20 for precautions regarding use of the AC adapter.
When Recharging is Complete
Remove the AC adapter plug from the plug socket and take the Nintendo 3DS system o
of the charging cradle.
Note: If you play a game while the system is recharging, the recharge LED may not always turn
o once charging has completed. This is not a malfunction.
Place starting from front edge
Detach from the charging cradle
starting with the rear of the system
Recharging using the AC Adapter
The Nintendo 3DS can also be recharged by plugging the AC adapter directly into the system. To do this,
simply connect the DC connector plug into the AC adapter connector on the rear of the system.
Note: To detach the system from the AC adapter, hold the system and the DC connector plug, not the cable, while
you remove it.
Recharging
Recharge LED lit
27
Page 15
Turning the power on and o
The POWER Button is used to turn the system both on and o. You must congure
the System Settings the rst time the power is turned on.
Turn the system on by pressing the POWER Button. The power LED will light up when
the system has been turned on.
Note:
It may take several seconds for the HOME Menu to display after the power is turned on.
t
For information about the power LED and battery life, see page 31.
t
Preparations
Sleep Mode and Turning the Power O
Sleep Mode
Close your Nintendo 3DS system during play to activate Sleep Mode. SpotPass (page 8) and StreetPass (page 9) remain active when
the system is in Sleep Mode, but power consumption is greatly reduced.
Note: Some software cannot enter Sleep Mode while in use or while carrying out specic tasks. For example, Nintendo 3DS Sound cannot enter
Sleep Mode during playback.
Turning the power o
Press the POWER Button to display the POWER Menu. From here, touch POWER OFF to turn the
power o. Alternatively, pressing and holding the POWER Button has the same eect.
Turning the power on and o
Conguring the system for the rst time
You must congure the system after turning it on for the rst time. If this system is to be used by children, an adult should perform these steps.
The following steps should be performed with the stylus on the Touch Screen (page 25).
Set the system language
1
Touch the language you would like to use, then touch OK.
Power on
Lit
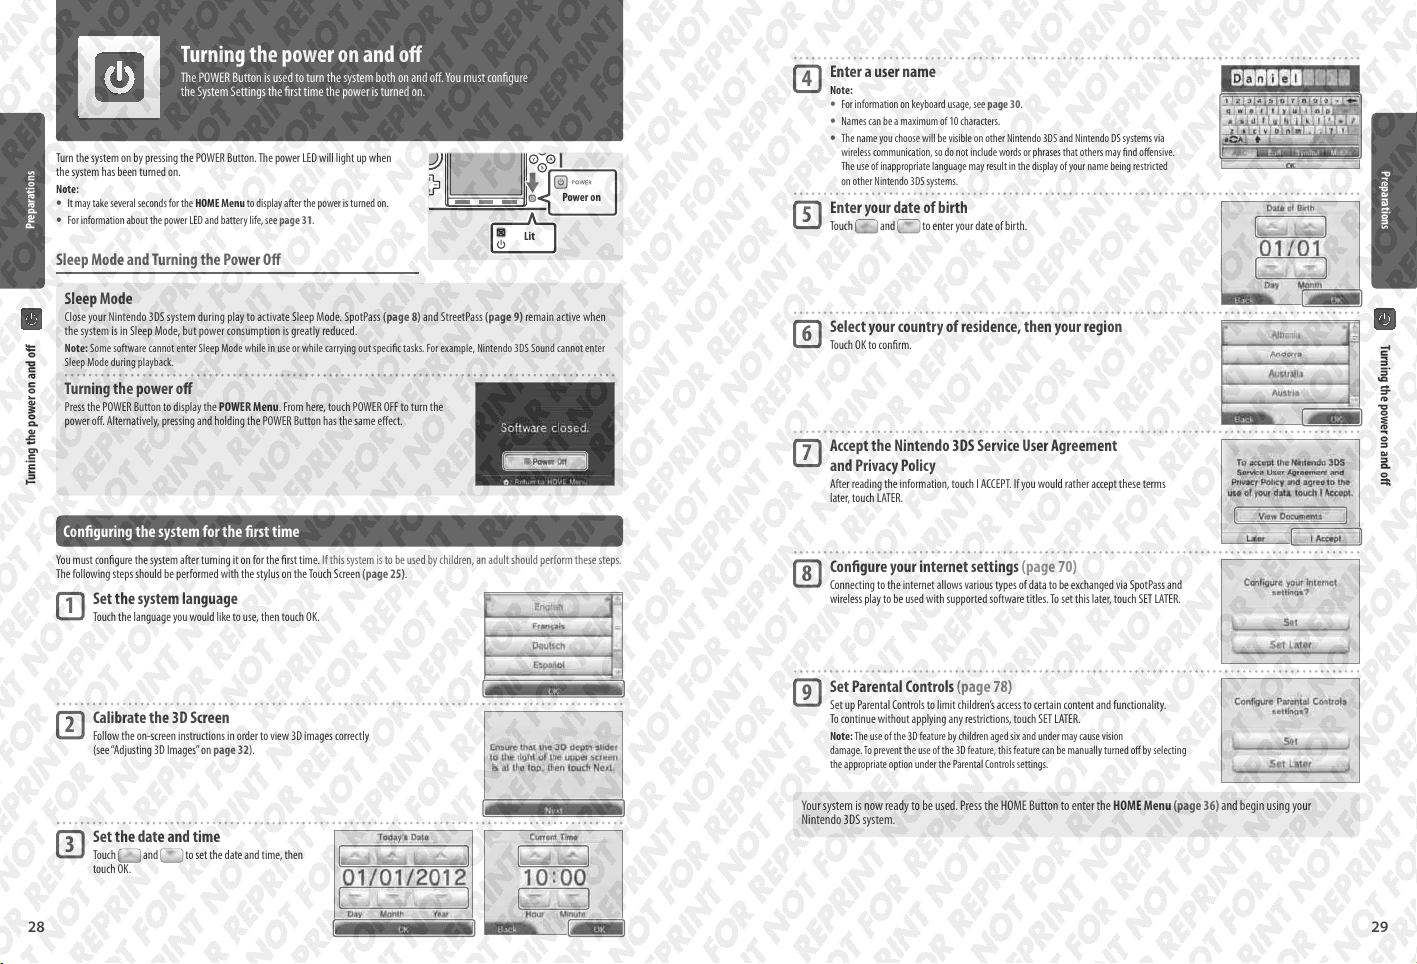
Enter a user name
4
Note:
For information on keyboard usage, see page 30.
t
Names can be a maximum of 10 characters.
t
The name you choose will be visible on other Nintendo 3DS and Nintendo DS systems via
t
wireless communication, so do not include words or phrases that others may nd oensive.
The use of in appropriate language may result in the display of your name being restricted
on other Nintendo 3DS systems.
Enter your date of birth
5
Touch and to enter your date of birth.
Select your country of residence, then your region
6
Touch OK to conrm.
Accept the Nintendo 3DS Service User Agreement
7
and Privacy Policy
After reading the information, touch I ACCEPT. If you would rather accept these terms
later, touch LATER.
Congure your internet settings (page 70)
8
Connecting to the internet allows various types of data to be exchanged via SpotPass and
wireless play to be used with supported software titles. To set this later, touch SET LATER.
Preparations
Turning the power on and o
28
Calibrate the 3D Screen
2
Follow the on-screen instructions in order to view 3D images correctly
(see “Adjusting 3D Images” on page 32).
Set the date and time
3
Touch and to set the date and time, then
touch OK.
Set Parental Controls (page 78)
9
Set up Parental Controls to limit children’s access to certain content and functionality.
To continue without applying any restrictions, touch SET LATER.
Note: The use of the 3D feature by children aged six and under may cause vision
damage. To prevent the use of the 3D feature, this feature can be manually turned o by selecting
the appropriate option under the Parental Controls settings.
Your system is now ready to be used. Press the HOME Button to enter the HOME Menu (page 36) and begin using your
Nintendo 3DS system.
29
Page 16
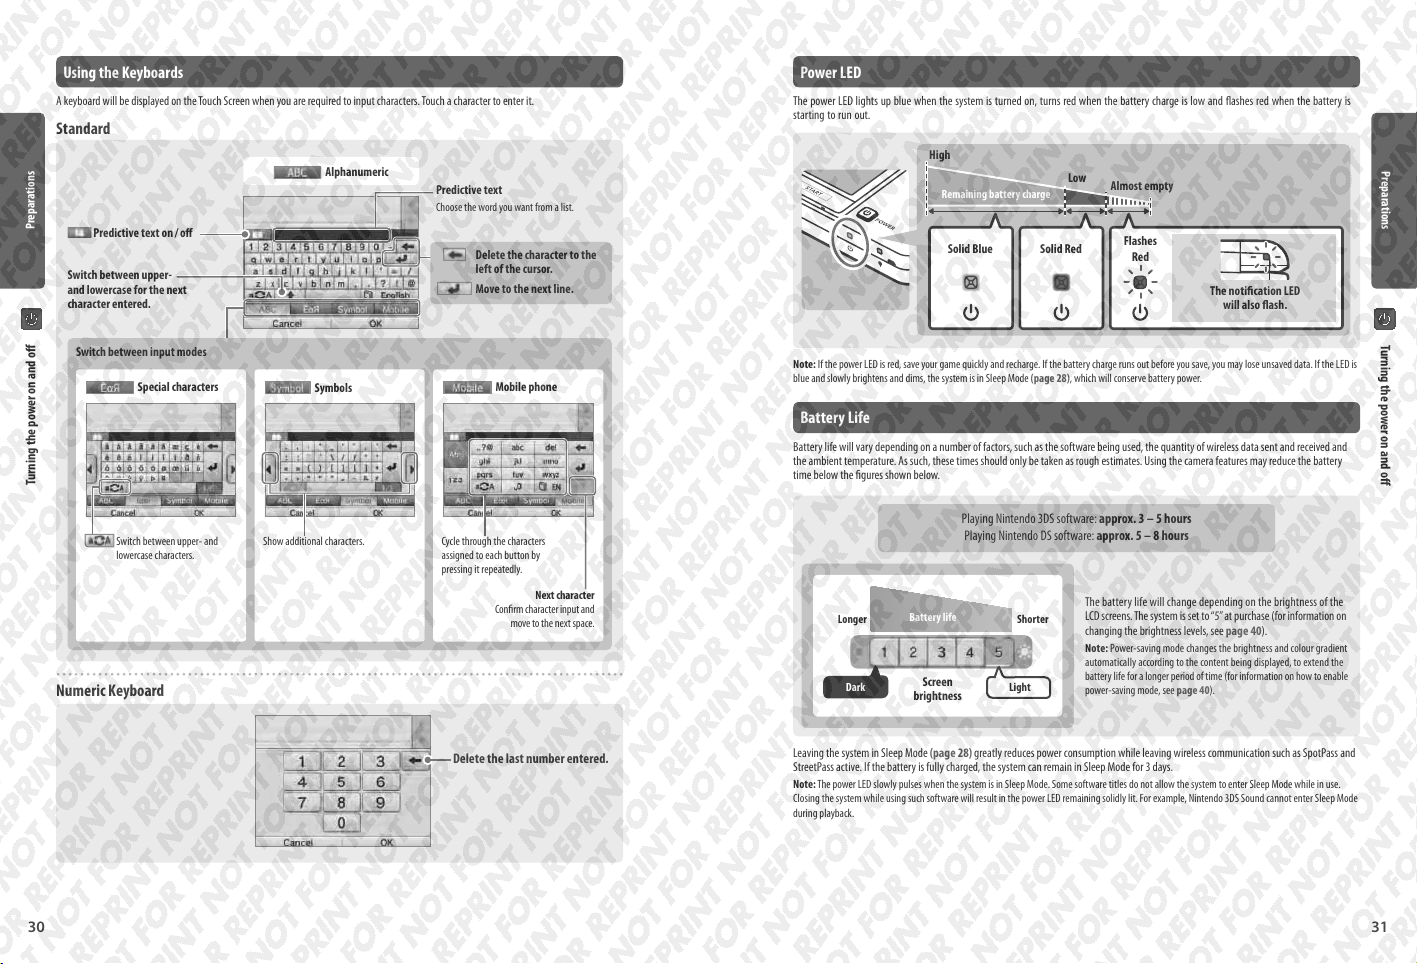
Using the Keyboards Power LED
A keyboard will be displayed on the Touch Screen when you are required to input characters. Touch a character to enter it.
Standard
Preparations
Predictive text on / o
Switch between upper-
and lower case for the next
character entered.
Alphanumeric
Predictive text
Choose the word you want from a list.
Delete the character to the
left of the cursor.
Move to the next line.
The power LED lights up blue when the system is turned on, turns red when the battery charge is low and ashes red when the battery is
starting to run out.
High
Low
Remaining battery charge
Solid Blue Solid Red
Almost empty
Flashes
Red
The notication LED
will also ash.
Preparations
Switch between input modes
Turning the power on and o
Numeric Keyboard
Special characters
Switch between upper- and
lowercase characters.
Symbols
Show additional characters. Cycle through the characters
Mobile phone
assigned to each button by
pressing it repeatedly.
Conrm character input and
move to the next space.
Delete the last number entered.
Next character
Note: If the power LED is red, save your game quickly and recharge. If the battery charge runs out before you save, you may lose unsaved data. If the LED is
blue and slowly brightens and dims, the system is in Sleep Mode (page 28), which will conserve battery power.
Battery Life
Battery life will vary depending on a number of factors, such as the software being used, the quantity of wireless data sent and received and
the ambient temperature. As such, these times should only be taken as rough estimates. Using the camera features may reduce the battery
time below the gures shown below.
Playing Nintendo 3DS software: approx. 3 – 5 hours
Playing Nintendo DS software: approx. 5 – 8 hours
The battery life will change depending on the brightness of the
Longer Shorter
Dark
Leaving the system in Sleep Mode (page 28) greatly reduces power consumption while leaving wireless communication such as SpotPass and
StreetPass active. If the battery is fully charged, the system can remain in Sleep Mode for 3 days.
Note: The power LED slowly pulses when the system is in Sleep Mode. Some software titles do not allow the system to enter Sleep Mode while in use.
Closing the system while using such software will result in the power LED remaining solidly lit. For example, Nintendo 3DS Sound cannot enter Sleep Mode
during playback.
Battery life
Screen
brightness
Light
LCD screens. The system is set to “5” at purchase (for information on
changing the brightness levels, see page 40).
Note: Power-saving mode changes the brightness and colour gradient
automatically according to the content being displayed, to extend the
battery life for a longer period of time (for information on how to enable
power-saving mode, see page 40).
Turning the power on and o
30
31
Page 17

Adjusting 3D Images
The 3D Screen allows you to view 3D images. Use the 3D depth slider to adjust the 3D eects to a
comfortable level.
The 3D eects generated by the Nintendo 3DS
are created using the binocular disparity of the
eyes (the ability to interpret 3D images due to
the dierence in position of the left and right
eye). By manipulating the 3D Screen so that
Preparations
the left eye sees only the left image and the
right eye only sees the right image, vivid and
convincing 3D eects can be produced.
Adjusting 3D Images
Tilting the screen or viewing it from an angle interferes with the 3D eect, and can
cause the screen to appear dark or cause you to see a double image.
How to View 3D Images Properly
Follow the steps below to ensure that 3D images appear properly.
Look directly into the 3D Screen.
1 2
Left eye image 3D image Right eye image
Hold the 3D Screen 25 – 35 cm away from your eyes. Adjust
the distance until you can see the 3D images easily.
Adjusting the Strength of 3D Images
Use the 3D depth slider next to the 3D Screen to increase or decrease the 3D eect. If placing the 3D depth slider at the top (strongest 3D eect)
makes the 3D images dicult to see, move it downwards little by little until you reach a point where the 3D images are distinct and easy to see.
As you become more accustomed to the 3D feature, you may nd that raising the 3D depth slider results in better eects.
3D LED
This lights up when the 3D Screen can display
3D content.
Strong
3D Strength
Weak
Move the 3D depth slider to the lowest point to display images in 2D.
t
Note:
Adjusting the 3D depth slider while the 3D LED is o will not result in 3D images being displayed.
t
Certain t ypes of content, including 3D videos and photos, do not allow adjustments in 3D strength. When viewing such content, adjusting the slider will
t
only switch between 2D and 3D images. If you nd the 3D eect to be uncomfortably strong while viewing these types of content, it may help to hold
the system at a greater distance from your face. If you still nd it dicult to see, then try viewing the content in 2D.
Display of 3D images can be disabled in Parental Controls (page 78).
t
Do not view 3D images in direct sunlight or in the direct path of other strong light sources. This may make the 3D images dicult to see.
t
3D images may be dicult to see depending on your surroundings (page 96).
t
Precautions for viewing 3D Images
The use of the 3D feature by children aged six and under may cause vision damage. Everyone will have a dierent way of viewing 3D images.
If you see a double image or are unable to see 3D images even when viewing them correctly and with the proper settings, please use the
2D display only. You may need to adjust the 3D depth depending on your physical condition, the content of the images and your surrounding
environment. If you experience double vision, headaches, nausea, tired eyes or any sudden changes in your condition, stop playing immediately
and take a break.
For health and safety advice on 3D images, see page 13.
Preparations
Adjusting 3D Images
32
33
Page 18

Using SD Cards
Nintendo 3DS supports SD Memory Cards (hereafter SD Cards) up to 2 GB, and SDHC Memory Cards
(hereafter SD Cards) between 4 GB and 32 GB.
The included SD Card comes pre-inserted into the SD Card slot on your Nintendo 3DS system. You can use an SD Card to back up photo data or to
store music to play back (the type of data you can save varies between software titles).
Note: With the exception of Nintendo DSiWare (page 64), all downloaded software is stored on the SD Card. Downloaded software (including its save data)
cannot be moved or copied individually between SD Cards.
Preparations
Using MiniSD / MicroSD Cards
An SD Card adapter is required to use miniSD or microSD Cards.
When using an SD Card adapter, be sure to remove the entire adapter (not just the card) from the system
after use. Leaving the adapter in the system could result in damage or malfunction.
How to Remove
Turn the power o before attempting to insert or remove
Using SD Cards
an SD Card. Failure to observe this step could damage the
system or the SD Card and destroy data.
Note: If prompted during a game to remove the SD Card, there is
no need to turn o the power.
Click
Press on the SD Card until it makes a clicking sound
and pops out, then remove it.
How to Insert
Open the SD Card slot cover
1
Do not pull or twist the slot cover forcefully. Doing so could stretch or deform it, and you will
not be able to close it fully.
If your SD Card is full...
To free up space on a full SD Card, delete photo, video or sound les you no longer need via Data Management in the System Settings
(page 82). Alternatively, transfer all of the data from your current SD Card to one with a larger capacity. You can save software to another
SD Card, but cannot later combine the contents of multiple SD Cards.
In order to transfer data, you will need a computer and a commercially available SD Card reader / writer and should transfer the entire
“Nintendo 3DS” folder to the target SD Card.
Computer
“Nintendo 3DS” folder Target SD Card (larger capacity)
Note:
Always copy the folder to the root of the SD Card.
t
Download software (including save data) is stored inside the “Nintendo 3DS” folder. Photo data is not stored in this folder.
t
Do not modify, move, delete or change the names of les in this folder.
Precautions for Copying Software
Always copy the entire ”Nintendo 3DS“ folder.
If updated data is saved on the new SD Card, you may not be able to use the same software with the original SD Card.
You should only use one SD Card with a software title at a time; the same software cannot be copied to multiple SD Cards for use as
backups of your progress. Ensure that you only use the new SD Card.
You cannot copy data using the following methods
Download software saved on multiple SD Cards cannot be consolidated onto a single SD Card.
Copying new data over existing data will render the target data unusable.
Preparations
Using SD Cards
Insert the SD Card into the SD Card slot
2
Push it gently but rmly until it clicks into place, then replace the slot cover.
SD Card Write-Protection Switch
When the SD Card’s write-protection switch is in the lower position, it is locked and data
cannot be written to it or erased. To enable these functions, the switch should be in the
upper position.
34
Write-protection
switch
The label should
face down.
If the contents of the ”Nintendo 3DS“ folder are modied or if individual les
are copied from one ”Nintendo 3DS“ folder to another, they will be rendered
unusable.
The entire “Nintendo 3DS” folder must be copied without any modication in
order to use the data.
35
Page 19

HOME Menu
The HOME Menu is displayed when you turn on the power. Everything on the Nintendo 3DS system
can be accessed from here.
Software titles can be launched from the HOME Menu by touching the icon that corresponds to the title you want to play. The HOME Menu
also shows the time and date, current wireless communication mode and the number of steps you’ve taken that day.
Look out for
Using Software
HOME Menu
Note:
t
t
Play Coins / Today’s steps
on a software icon to instantly tell when a title has received new information or an update via SpotPass.
StreetPass (Page 37)
Signal strength (internet)
(Page 76)
Signal strength (local wireless)
(Page 37)
Wireless communication
mode (Page 37)
Screen brightness /
Power-saving mode
(Page 40)
Adjust software icon display
(Page 37)
Play Coins / Today ’s steps
Date and time
Software icons (Page 38)
New notications for software titles are
indicated with
icon (page 54).
Press the L or R Buttons to activate the cameras and take photos (page 41).
Content displayed on the upper screen diers according to the software being used. The display rotates more quickly when the microphone picks up
more noise.
If you walk around with your Nintendo 3DS system, it will count your steps. Every 100 steps you take, you earn a Play Coin. You can earn
up to 10 Play Coins per day, and a maximum of 300 in total. These can then be used in compatible software titles.
Note:
t
t
/ on the software
Steps are counted when the system is closed and the power is on.
A maximum of seven days’ worth of step data can be recorded while Nintendo DS / Nintendo DSi software titles are left running. You will have to
turn the software o once before you can record more.
Battery charge
Full
Low
Almost empty
(ashing)
Recharging (ashing)
Recharging complete
Game Notes
(Page 48)
Friend list
(Page 49)
Notications
(Page 54)
Internet browser
(Page 56)
Scrolling / Adjusting and Moving Software Icons
Scrolling
Touch an icon, then slide the stylus to the left or right to scroll
through the available software icons. Touching
sides of the screen has the same function.
/ on the
Adjusting the Display and Moving Software Icons
Adjusting software icon display
Touch / to change the layout of the software icons shown on screen.
Moving software icons
To move an icon, touch and hold the stylus over the icon until it
detaches, then drag it to where you want to place it and release
the stylus.
Dragging an icon on top of another icon will swap the two icons.
Wireless communication modes
This indicates that an internet connection has been established (page 70).
This indicates that the system is searching for other users who have StreetPass activated (page 9).
Registering Nintendo 3DS software for use with StreetPass allows the system to automatically search
for other users to exchange information with. This status will be shown together with
This indicates that the system is communicating with other Nintendo 3DS systems in your vicinity.
Features such as local friend registration (page 50) and Download Play (page 68) options make use
of the local wireless function. During wireless communication mode, the signal-strength icon
displayed. Stronger signal strength means better data transmissions.
when it is disabled. Use the wireless switch to enable / disable wireless communication (page 22).
will be displayed when wireless communication is enabled, and
will be shown when enabled, and when disabled.
Touch Slide
Using Software
HOME Menu
.
is
36 37
Page 20

Software Icons Opening Software
Free software received via SpotPass and software downloaded via Nintendo eShop are added as icons on the HOME Menu.
A maximum of 300 items can be stored on an SD Card. The dierent types of software title icon are explained below.
Touch the software icon, then touch OPEN.
Card software icons
Nintendo 3DS
Game Card
Nintendo DS / Nintendo DSi
Game Card
The software title’s icon appears after a Game Card is inserted
into the Game Card slot.
Built-in application icons
Using Software
HOME Menu
Health and Safety Information
Read important health and safety information for your
system.
Nintendo 3DS Camera (Page 58)
Take 3D photos and videos using this application.
Nintendo 3DS Sound (Page 61)
Listen to music and record sounds.
Mii Maker (Page 62)
Make yourself and other people into Mii characters!
StreetPass Mii Plaza (Page 63)
Mii characters you meet through StreetPass (page 9) will
appear here.
Nintendo eShop (Page 64)
View information and videos about various software, and
download new software.
AR Games: Augmented Reality (Page 65)
Use the AR Cards together with the outer cameras to create
believable augmented reality games.
Face Raiders (Page 66)
A shooting game that turns your face, or the faces of your
friends, into the enemies!
Activity Log (Page 67)
Record the number of steps you take while carrying your
Nintendo 3DS system and the length of time you spend
using software.
Download Play (Page 68)
Download demos and play multiplayer games!
System Settings (Page 69)
Adjust Nintendo 3DS system settings.
Others
Gift icon
This icon appears when a new application is added to the HOME Menu. Touch a gift icon to unwrap it.
Note: The icon will ash if the application has not yet nished downloading. Place the system into Sleep Mode within range of a compatible
internet access point to complete the download.
Any software or video content that is pre-installed on the SD Card will also be displayed on the HOME Menu (page 7).
t
Closing / Suspending software
Press the HOME Button during game play to suspend a software title and display
the HOME Menu. Touch RESUME or press the HOME Button again to resume play, or
touch CLOSE on the HOME Menu to close the software.
When suspended…
When a software title is suspended, you can adjust screen brightness and also access
Game Notes, the friend list, Notications, the internet browser,
camera mode and instruction manuals. Other software titles can be launched, but you
must close the suspended title to do this.
Note:
Depending on the state of the software (wireless communication or outer cameras in use, etc.), the HOME Menu may not be displayed, or certain functions
t
may not be accessible. Some software titles do not make use of certain HOME Menu functions.
Nintendo DS / Nintendo DSi software titles cannot be suspended.
t
Save before closing software
Any unsaved data will be lost if you close a software title without saving.
Do not remove suspended software or turn o the power
Do not remove suspended Game Card software, SD Card, or turn the power o while in this state. Doing so can cause data corruption or loss.
Using Software
HOME Menu
38 39
Page 21

Electronic Manuals
If a software title includes an electronic manual, the MANUAL option will be displayed when you
select its icon. Touch this to view the manual. Manuals can be viewed while a software title is
suspended.
Viewing manuals
Choose an item from the contents
1
Slide up and down to scroll through the contents of
the manual and touch the page you want to view.
Note: Press the Y Button to change the language of the
manual.
View the page
2
Slide up and down to scroll through the contents of
Using Software
the page. Slide left and right to switch pages.
Close manual
Change the font size
Brightness levels and battery life
Increasing screen brightness will decrease battery life, and vice versa. Please bear this in mind when you adjust your brightness settings
(page 31).
Note: Because brighter screen settings require more power, the power LED may change from blue to red. If the battery is nearly empty, the system
may turn o suddenly.
Brightness settings and power-saving mode with Nintendo DS / Nintendo DSi software titles
Nintendo DS / Nintendo DSi software titles cannot access the HOME Menu. Press the HOME Button to pause the software, then use the
following commands to adjust brightness and power-saving mode settings.
Press and hold START, then press the following:
Up: Increase brightness
Down: Decrease brightness
Left: Disable power-saving mode
Right: Enable power-saving mode
Taking Photos
Press the L Button or R Button on the HOME Menu to switch to camera mode.
Photos remaining
3D Icon
Indicates the outer cameras are in use
Using Software
Adjusting Brightness / Power-Saving Mode
Touch on the HOME Menu to display the brightness settings.
HOME Menu
Screen brightness
Touch a number to change the brightness level.
Darker Brighter
Storage Location
System Memory SD Card
Note: Choose the save destination in the Settings for
Nintendo 3DS Camera.
Take photo
(or press L Button / R Button / A Button)
Switch between inner / outer cameras
Only the outer cameras can take 3D photos
Merge
Use the inner and outer cameras simultaneously to take photos of two
faces and merge them together into one. For more details, refer to the
Note: If you have the brightness settings set to 4 or 5, plugging the AC adapter in will make the screen even brighter.
Power-saving mode
Enabling this mode will automatically adjust the brightness of the screen depending on what is being displayed in order to conserve battery
power. Disabling it ensures that you can maintain a constant brightness level, but results in shorter continuous play time. This function is
set to o by default.
Read QR Code
If you point the camera at a QR Code for Nintendo eShop or a QR Code with a website URL, you can go directly to the relevant page in Nintendo eShop
or the internet browser (page 56).
Note: Photos you’ve taken can be viewed in Nintendo 3DS Camera (page 60).
Nintendo 3DS Camera electronic manual.
Open Nintendo 3DS Camera (Page 58)
40 41
HOME Menu
Page 22

Creating Folders on the HOME Menu
You can create folders on the HOME Menu to organise your software icons. You can create up to a maximum of 60 separate folders, and each
folder can hold up to 60 software icons.
Adjusting software icon display
Touch / to change the layout of the software icons shown on screen.
1
2
Using Software
3
HOME Menu
4
On the HOME Menu, touch
Touch CREATE FOLDER
(a folder icon) will appear in the
empty space.
Move software icons into
the new folder
To move an icon, touch and hold the stylus
t
over the icon until it detaches. Drag it above
the folder icon, and the folder will open.
Finally, drag the icon to wherever you would
like to place it within the folder, and release
the stylus.
If you would like to move an icon back out
t
of a folder, simply drag it in the same way
out of the folder area.
Touch to close
the folder
When you want to open the folder again,
simply select it and touch OPEN.
(an empty slot)
Drag an icon out of the folder area to remove it from the folder
Icons that cannot be moved into folders
The following software icons cannot be moved into folders. In addition, you cannot place a folder inside another folder.
The Game Card icon
t
The Nintendo eShop icon
t
The System Settings icon
t
Folder Settings
Select a folder icon and then touch SETTINGS to change the
folder’s name or delete it entirely.
RENAME
DELETE
Allows you to enter a new name for the folder.
Note: The rst character of the folder’s name will be displayed on its icon in the HOME Menu.
Allows you to remove the folder from the HOME Menu.
Note: You cannot delete a folder while there are any software icons inside it.
Using Software
HOME Menu
42 43
Page 23

Card-Based Software
How to use Game Cards with your Nintendo 3DS.
Note: If the system language is set to Dutch, Portuguese or Russian, non-Nintendo 3DS titles will default
to English. In some cases, this may be adjustable within the software.
Nintendo 3DS, Nintendo DS, Nintendo DSi and Nintendo DSi enhanced software can be used on Nintendo 3DS systems.
Nintendo 3DS Game Card Nintendo DS / Nintendo DSi Game Card
Note:
3D content will only be displayed on Nintendo 3DS software titles. Nintendo DS / Nintendo DSi software titles cannot display 3D content.
t
SpotPass, StreetPass and the HOME Menu cannot be used while Nintendo DS / Nintendo DSi software is in use.
t
Only Nintendo 3DS and Nintendo DSi software titles matching the region of the system will work. Software titles from dierent regions may not function.
t
Nintendo 3DS software titles cannot be used with Nintendo DS, Nintendo DS™ Lite, Nintendo DSi or Nintendo DSi XL systems.
t
Pan European Game Information (PEGI) age rating system
Using Software
Age rating categories
Using Game Cards
Insert a Game Card into the
1
Game Card slot
Note:
If you have trouble inserting the Game Card, remove it
t
and check that it is facing the right direction with the
label facing away from the system.
Forcing the card in when it is facing the wrong direction
could lead to damage.
Only inser t or remove Game Cards from the Game Card
t
slot while the HOME Menu is displayed or the power is
o. (If you have suspended a software title, make sure
you have closed it before removing its Game Card.)
Touch the Game Card icon, then touch OPEN
2
Nintendo DS / Nintendo DSi titles are displayed in an expanded format by default. To
load the software at its original resolution, hold down either START or SELECT, then
touch OPEN to launch the software. Keep START or SELECT held down until the soft-
ware has started.
Push the Game Card in, then remove it
Click
Check which way the
Game Card is facing
The Nintendo 3DS / Nintendo DS /
Nintendo DSi logos on the card and
on the system should face in the
same direction.
Using Software
Titles rated 3 are
suitable for ages 3
and older
Content descriptors
Content descriptors are shown on the game packaging where applicable. These icons indicate the main reasons for a game’s age rating.
Titles rated 7 are
suitable for ages 7
and older
Titles rated 12 are
suitable for ages 12
and older
Titles rated 16 are
suitable for ages 16
and older
Titles rated 18 are
suitable for ages 18
and older
For further information, refer to the instruction manual for the software you are using.
3
Closing Software
Card-Based Software
The ‘Online’ logo indicates that a game allows the player to have access to
online game play with other players.
The PEGI system was established to help parents and guardians make informed decisions when buying computer and video games. It
replaced a number of national age rating systems with a single system now used throughout most of Europe. For further information
about PEGI visit http://www.pegi.info.
Note: The PEGI rating does not indicate diculty of a game; it provides information about the age suitability of a game based on its content.
Press the HOME Button to bring up the HOME Menu, then touch CLOSE to end a soft-
ware title. (Any unsaved data will be lost if you close a software title without saving.)
Touch RESUME to return to the point where the software title was suspended.
t
To close Nintendo DS / Nintendo DSi software titles, rst save your data, then press
t
the HOME Button and touch OK.
Note: If you press the POWER Button, the software title will close and the POWER Menu
will be displayed.
44 45
Card-Based Software
Page 24

Game Card System Updates
Some Game Cards contain system update data. Such Game Cards will display a message if a system
update is required in order to use the Game Card. Follow the instructions to update your system
(page 91).
Incompatible Nintendo DS Software and Accessories
The following software titles and accessories are not compatible with Nintendo 3DS.
Nintendo DS Browser
Nintendo DS Memory Expansion Pak (NTR-011)
Nintendo DS Lite Memory Expansion Pak (USG-007)
Using Software
In addition to these products, it is not possible to use any accessories that would connect to the Nintendo DS or Nintendo DS Lite systems
via the Game Boy Advance™ Game Pak slot or anything that functions in conjunction with a Game Boy Advance Game Pak. For more details,
visit support.nintendo.com.
Nintendo DS Rumble Pak
(NTR-008)
Download Software
Enjoy free software downloaded via SpotPass or software purchased via Nintendo eShop.
Nintendo 3DS is equipped with RF module (802.11), which has a radiated output power of less than 10 mW e.i.r.p. and a maximum spectrum
power density of less than -30 dBW/1MHz e.i.r.p. These parameters can be maintained when operated within a temperature range of 0 to
40 degrees Celsius. In accordance with this, Nintendo 3DS is categorised as Class 1 equipment according to Commission Decision 2000/299/EC.
With the exception of Nintendo DSiWare (page 64), downloaded software is saved to an SD Card. The corresponding icons are displayed in the
HOME Menu (page 36).
You can get new software by...
Receiving free software via SpotPass (page 8).
t
Purchasing software via Nintendo eShop (page 64).
t
Downloading demo versions.
t
Precautions for Download Software
Because some software is transmitted automatically via SpotPass (page 8), it is advised that you keep an SD Card inserted at all times.
t
Up to 40 Nintendo DSiWare™ titles (page 64) can be stored in the System Memory and up to 300 download software titles can be
t
stored on an SD Card.
Download software (including its save data) can only be used on the system it was originally downloaded to. Software that you
t
save on an SD Card cannot be used with other Nintendo 3DS systems.
Demo versions of software may have limitations such as a time limit or number of uses. If you exceed this limit and try to open the
t
software, a message will be displayed. Follow the instructions to delete the software or open Nintendo eShop.
If the system language is set to Dutch, Portuguese or Russian, Nintendo DSiWare titles will default to English. In some cases, this
t
may be adjustable within the software.
Only Nintendo 3DS software and Nintendo DSiWare matching the region of the system will work. Software titles from dierent regions
t
may not function.
Opening Software
Using Software
Download Software
Card-Based Software
Touch the software icon, then touch OPEN
1
Nintendo DSiWare titles are displayed in an expanded format by default. To load the
software at its original resolution, hold down either START or SELECT when launching
the software. Keep START or SELECT held down until the software has started.
For further instructions, refer to the instruction manual for the software you are using
2
How to view the software manual (page 40)
t
About software ratings (page 44)
t
How to close a software title (page 45)
t
46 47
Page 25

Game Notes
Use this application to take notes, even while playing a Nintendo 3DS software title! Just suspend
the software and take notes while looking at the software screen.
Friend List
Play and communicate with registered friends via the internet, wherever they may be.
Touch on the HOME Menu to show a list of all the notes you’ve created.
You can save up to 16 pages of notes. Note pages can be saved as photo data and viewed
t
in Nintendo 3DS Camera (page 58).
To create a note while a Nintendo 3DS software title is running, press the HOME Button
t
to suspend the software title and bring up the HOME Menu, then launch Game Notes.
Select a note to edit
1
Using Software
Game Notes
Pens
Eraser
Choose from three coloured pens to write with,
and erase things with the eraser.
Switching screens
Touch this icon during a suspended game to
change the display on the upper screen.
Display both screens
Display upper screen
Display lower screen
Notes saved as photo data on an SD Card
can be viewed in Nintendo 3DS Camera
(page 58).
Make this note blank.
You can receive notications via the friend list when registered friends go online (connect to the internet).
Touch
on the HOME Menu to open your friend list. When you open it for the rst time, you’ll be
asked to create a friend card by following the on-screen prompts.
To view the friend list while a Nintendo 3DS software title is running, press the HOME Button to bring up
the HOME Menu, then launch the friend list.
Note: The friend list can only be used with Nintendo 3DS software titles. To use wireless play with Nintendo DS /
Nintendo DSi software titles, the relevant settings need to be congured within the software.
Things you’ll need...
Personal Mii
Internet Connection
In order to create your own friend card, you rst need to create your own Personal Mii
using Mii Maker (page 62).
This is required to see when friends go online (page 70).
Friend List
Register Friend (Page 50)
Viewing Friend Cards (Page 51)
Edit your friend card
t
View a friend’s friend card
t
Friend List Settings (Page 53)
Friend notication settings
t
Delete friend card
t
Using Software
Friend List
Touch when nished
2
This saves the note and sends you back to the Game Notes Screen.
48 49
Page 26

Friend Registration
You can register up to 100 friends on your friend list.
Local
Touch LOCAL to connect to another Nintendo 3DS user within range and register each other.
Do not share your friend code with people you do not know
The friend list is a system intended for use by you and people you know. Posting your friend code on online forums or sharing it with people
you do not know can result in you receiving unwanted data or status messages containing language that you may nd oensive. Do not
share your friend code with people you do not know.
Editing Your Friend Card / Viewing Friend Cards
Select your friend card from the friend list to edit your details, or view friend cards belonging to other people. Your friend card is indicated by .
Find the friend card of the person you want to register as a friend and touch it.
Your friend cards will be exchanged and you will be registered on each other’s friend lists.
Internet
Touch INTERNET to register friends by exchanging friend codes.
Using Software
You can check your friend code by looking at your friend card.
Enter the friend code belonging to the person you want to register.
Friend List
You are not yet registered on the other system
Your friend will be provisionally registered. Enter the name of the person you
want to register. (When the person registers you in return, the status will change
and you will become fully registered friends. That person’s name and Mii will
then be displayed.)
You are already registered
on the other system
The data from the other person’s friend card
will be received automatically and they will be
registered as a friend.
Editing your friend card
Select your friend card to edit your message and favourite title.
Choose your favourite title (from
software titles you’ve played).
Note:
Touch in the lower screen to register a new friend.
t
Please refrain from including personal information or language that other people may nd oensive in your status messages. Certain words are
t
prohibited by the system and cannot be entered.
If you receive a Mii whose name is shown as ???, this means that the creator is probably a blocked user. For more information, please refer to the
t
Mii Maker electronic manual.
Enter a status message of up to
16 characters. This will be visible
to your friends.
Viewing friend cards
Select the friend card you’d like to view.
The friend’s favourite title or title he /
she is currently playing will be displayed
on the upper screen.
Using Software
Friend List
50 51
Page 27

Communicating with Friends
When a friend goes online, the information shown on his / her friend card changes and you can see the title he / she is currently playing, if any.
Online Oine
Note:
To see a friend’s online status, that friend must have selected YES when asked if they want to show friends their online status. This can be changed
t
at any time in the friend list settings.
Using Software
To participate in the game your friend is playing, you must have the same Game Card inserted in your system, or have the same software saved on
t
your system.
If you are currently using a software title which cannot connect to the internet, you will not be able to go online.
t
Notication LED
The notication LED on the system will ash orange for ve
seconds when a friend goes online.
If a friend is playing a game you can join, a
over the
icon.
will appear
Friend Card Order
When you are online, friend cards will be displayed in the following order:
Your friend card
Provisionally registered friends
Friends whose game you can join Friends playing a game Online friends Oine friends
Friend List Settings
Set your status notications and delete friends from your friend list.
Flashing
Choose whether to show your online status and
the title you’re playing.
Using Software
Joining a Friend’s Game
If you can join in a game that one of your friends is playing, the information shown on his / her friend
card will change. Touch JOIN FRIEND’S GAME to join the game.
Note: You can only join if you have a compatible software title. For more information, refer to the software
instruction manual.
Friend List
Delete friend cards from your list.
Note: Friends will not be notied if their friend
cards are deleted.
52 53
Friend List
Page 28

Notications
You can receive notications from SpotPass, StreetPass and other sources.
Touch on the HOME Menu to show a list of notications.
To view notications while a Nintendo 3DS software title is running, press the HOME Button to bring
up the HOME Menu, then launch the Notications application.
Viewing Notications
Touch a notication to view it.
Slide the slider up or down to scroll through
the notications.
Notication Types
SpotPass
StreetPass
Notications from Nintendo and software titles.
Notications received via StreetPass (see page 9 for more information on StreetPass).
Receiving Notications
Using Software
Your Nintendo 3DS system can receive notications when...
The power is on (page 28).
t
Wireless communication has been enabled using the wireless switch (page 22).
t
An internet connection has been congured (page 70). StreetPass notications
t
do not require an internet connection.
Note:
Soft ware titles may send some notications while you are not connected to the internet.
t
StreetPass notications do not require an internet connection.
t
Notications cannot be sent from Nintendo DS / Nintendo DSi software titles.
t
Notications
Receiving Notications
The notication LED ashes when the Nintendo 3DS system receives a notication. It will
ash green for StreetPass notications and blue for SpotPass notications. In both cases, it
will ash for ve seconds. Additionally, when a notication is received,
be displayed on the notication icon and icons for the respective software titles on the
HOME Menu.
Note: When receiving notications while the system is in Sleep Mode, the notication LED will
ash for ve seconds, then remain lit. When you open the system, it will go out.
or will
Notication
Flashing
Unread notications will be indicated by for StreetPass or for SpotPass notications.
t
A maximum of 12 StreetPass and 100 SpotPass notications can be stored on the system. If these limitations or the storage size is
t
exceeded (eg. if there are a lot of notications containing images), older notications will be erased, starting with the oldest.
Stopping notications
Stopping notications from software titles
Touch OPT OUT OF NOTIFICATIONS FOR THIS SOFTWARE inside a notication then follow
the on-screen prompts.
Note: Notications that do not require an internet connection, such as those from software titles,
cannot be stopped from the Notications list. These are delivered during play and the method of
stopping these notications diers between software titles.
Stopping notications from StreetPass
Touch DEACTIVATE StreetPass FOR THIS TITLE, then adjust the settings in StreetPass Management in the System Settings to deactivate
StreetPass. Once StreetPass has been deactivated, you will no longer receive these notications for this title (page 82).
Note:
To restart notications, adjust the settings within the software. Refer to the instruction manual for more detailed information.
t
Notications from Nintendo contain important information for all users and cannot be opted out of.
t
Using Software
Notications
54 55
Page 29

Internet Browser
View web pages on the internet using intuitive stylus controls.
Touch on the HOME Menu to start the internet browser. When using the browser for the rst
time, follow the on-screen setup instructions.
Note:
An internet connection is required in order to view web pages (page 70).
t
The browser can be launched while playing Nintendo 3DS software by pressing the HOME Button and
t
selecting it from the HOME Menu.
Depending on the soft ware, it may not be possible to launch the browser during play.
t
When you start the browser, the menu shown below will be displayed. Touch an option to select it.
Menu
Search
Enter text to search for.
Using Software
(shown with search engine set to Google)
Bookmarks
View the list of pages you have bookmarked and open
pages from the list.
Add Bookmark
Bookmark the current page.
Settings
Page Info
Enter URL
Internet Browser
Instruction Manual
The browser contains an instruction manual with
detailed information on how to use it.
Hide Menu
Change browser settings.
View the title, address and security information of the current page.
Enter a web address (URL) directly.
Using the Browser
Slide the stylus on the lower screen to move around the page. Touch links on the lower screen to open them.
Slide to move Touch links
Toolbar
Display the menu (Page 56).
Displayed as while loading the page; touch to stop loading the page.
Displayed as
Display the previous / next page in the browser history.
Note:
Content requiring plug-ins, such as video or music les, cannot be played or displayed.
t
Large pages may not be fully downloaded or displayed. If this happens, try reloading the page by touching RELOAD.
t
This may load the rest of the page.
once the page has loaded; touch to reload the page.
Decrease / increase the zoom level.
Protecting Children from Harmful Sites
You can use the Parental Controls settings of your Nintendo 3DS system (page 78) to restrict use of the browser in order to prevent children
from accessing harmful or inappropriate sites.
Using Software
Internet Browser
56 57
Page 30

Take photos and videos in full 3D!
For detailed controls information, consult the electronic manual.
Taking Photos and Videos
The two cameras mounted on the exterior of the system are used to take 3D photos. Each camera takes one photo: the left camera takes one for
the left eye, and the right camera for the right eye. These photos are then combined and appear in 3D on the 3D Screen (page 32).
Right eye photo Left eye photo
Using Software
Tips for the best 3D visuals
Ensure that you leave a minimum of 30 cm between the subject and the Nintendo 3DS system when taking photos / videos. Getting too
close to the subject will cause it to become blurred and out of focus, and can result in a blurred photo / video with a double image.
Taking Photos / Videos
Touch / or press L Button / R Button / A Button to take a picture or start recording video.
Nintendo 3DS Camera Features
Nintendo 3DS Camera contains a number of features to ensure you make the most unique creations possible!
Camera Modes Video Modes
Sparkle Merge
Dream Pinhole
Frame Pick (take multiple photos to create
a stop-motion video)
Using Software
Nintendo 3DS Camera
Nintendo 3DS Camera
Clip Link (record several segments and link
them together)
Low-light Mystery
Taking a photo / video while
too close to the subject will
result in a blurred or double
image.
The closer the subject is when
you take the photo / video, the
stronger the 3D eect.
One metre is the optimal
distance for 3D photos / videos
and will give a vivid image.
Having objects far away
in the background while
taking a photo / video will
add to the 3D eect.
Note:
You can use the Low-light camera mode when taking videos.
t
There are also other features not listed here, such as crosshairs, a timer, brightness and contrast adjustment, etc.
t
58 59
Page 31

Viewing Photos and Videos
Touch VIEW PHOTOS / VIDEOS to view the photos and videos you’ve taken.
Touch a thumbnail to display the photo / video.
Photo Video
With Nintendo 3DS Sound, you can play music stored on SD Cards. You can also record sounds using
the microphone and then edit them to create entirely new sounds!
Note: For information on the types of music le that can be played, consult the electronic manual.
For detailed controls information, consult the electronic manual.
Using Software
Select VIDEO TOOLS to play the video with
extra options.
Extra Features
Grati Tweaking Videos
Nintendo 3DS Camera
Create your own unique images by decorating your photos. Adjust the playback speed and sound pitch, or even play videos
You can also view a slideshow, which will automatically transition between your photos and videos.
t
in reverse!
Listen to Music
Listen to music stored on an SD Card. You can adjust the music as
you go along, such as changing playback speed and sound pitch,
and turning on a karaoke mode.
You can record sounds of up to 10 seconds. You can then adjust the
sound by changing playback speed, sound pitch and even voice.
StreetPass
This software contains two StreetPass features: StreetPass Hit Parade and StreetPass
Compatibility. StreetPass Hit Parade lets you see the most popular songs around, while
StreetPass Compatibility compares your music tastes with other users.
To use these features, add music to a StreetPass playlist and activate StreetPass.
t
Record Sounds
Using Software
Nintendo 3DS Sound
60 61
Page 32

Create Mii characters for yourself, family members and friends using the wealth of facial features available!
Bring Mii characters together in the plaza! Mii characters you meet through StreetPass (page 9) and
wireless play will appear here – and you can even play some simple games via StreetPass!
For detailed controls information, consult the electronic manual.For detailed controls information, consult the electronic manual.
Use a Photo Register up to 100!
Take a photo of your face to create your Mii, then tweak the facial
features as much as you want. You can also design a new Mii from
scratch.
Using Software
Mii Maker
You can also receive Mii characters from a friend’s Nintendo 3DS system or from the Mii Channel on the Wii™ console.
t
These Mii characters can even show up in Mii-compatible games!
The screenshots above are from PILOTWINGS RESORT™ for Nintendo 3DS.
All Mii features and likenesses are the intellectual property of Nintendo and cannot be distributed freely or used for personal gain.
You can register up to 100 Mii characters in Mii Maker.
Use StreetPass to collect Mii characters and send
your StreetPass Mii to others!
Mii characters will gather here. These Mii characters may be from StreetPass Mii Plaza, or even from other software titles.
Play Games
Play some small games with the Mii characters you encounter!
Puzzle Swap StreetPass Quest
Using Software
StreetPass Mii Plaza
62 63
Page 33

Connect to the internet and view information and videos about various software, and download software for
your Nintendo 3DS system. To purchase software, you need to add funds to your Nintendo eShop account.
Note:
Nintendo 3DS software and Nintendo DSiWare from regions other than Europe / Australia may not function.
t
If a child will be using the system, you can restrict the use of credit cards, or the purchase of goods and services,
t
via Parental Controls (page 78).
For detailed controls information, consult the electronic manual.
Downloadable Software
Nintendo 3DS download software
You can download software exclusively available via Nintendo eShop.
Virtual Console
Using Software
Play classic titles from systems such as Game Boy™ and Game
Boy™ Color on your Nintendo 3DS system!
These augmented reality games use the AR Cards that come packaged with the Nintendo 3DS system.
Place an AR Card in the sights of your system’s outer cameras, and boxes, monsters, everything will
come bursting out!
For detailed controls information, consult the electronic manual.
There are six AR Cards included with the system. Begin with the ? Card.
? Card
Character Cards
Using Software
Nintendo DSiWare
You can purchase Nintendo DSiWare straight from Nintendo eShop. Nintendo DSiWare includes a range of software titles, from useful tools
to quick and simple games!
Precautions Regarding the Use of Nintendo eShop
In order to use Nintendo eShop, you must rst agree to the Nintendo 3DS Service User Agreement and Privacy Policy, and then set up an internet
Nintendo eShop
t
connection.
You can add funds using a credit card or Nintendo eShop Card.
t
Nintendo eShop Cards sold in the European Economic Area and Switzerland can only be used with Nintendo systems sold in the same regions.
t
You cannot add an amount of funds that would cause the balance of your Nintendo eShop account to exceed the maximum allowed funds.
t
The fund value of a Nintendo eShop Card cannot be split between multiple accounts.
t
Nintendo will not reissue, refund or accept inquiries regarding Nintendo eShop Cards except under circumstances where this is required by law.
t
Nintendo eShop Cards, funds and purchased software cannot be refunded, returned, transferred or exchanged for cash.
Once registered on a Nintendo 3DS system, Nintendo eShop activation numbers cannot be used again.
t
The purchasing of software on Nintendo eShop constitutes a licence agreement between Nintendo and the purchaser. For details, open the
t
System Settings from the HOME Menu, select INTERNET SETTINGS, OTHER INFORMATION, then USER AGREEMENT.
Age rating information is displayed before con rmation of software purchase. Please take this information into consideration when making
t
purchases (page 44).
If you use the DELETE ACCOUNT option in the Nintendo eShop application, your remaining funds, purchased / downloaded software and purchase /
t
download history will all be deleted.
To play the AR Games, place an AR Card on a at, well-lit surface. Adjust the distance and angle, keeping the AR Card within the sights of
the outer cameras, until it is recognised correctly. The games are played by moving the system around while keeping the AR Card in sight.
Get the right distance
and angle.
35 cm
30°
Game Selection Screen
Keep the AR Card on screen.
64 65
AR Games: Augmented Reality
Page 34

Gather lots of faces and battle them in this fast-paced game!
The Activity Log keeps track of the number of steps taken when you take your Nintendo 3DS system
out with you. It also records your play time on software titles.
Note: Steps are counted when the system is closed and the power is on.
For detailed controls information, consult the electronic manual.
Face Raiders involves moving your system around and shooting the relentless hordes of attacking faces! Begin the game by taking a photo.
Note: For more information about facial recognition, see page 100.
Take a photo then play the game,
moving the system around as you play!
Using Software
Face Raiders
For detailed controls information, consult the electronic manual.
Display the number of steps you’ve taken while carrying your
Nintendo 3DS system and the time you’ve spent on software titles.
Display a list of software titles you’ve played, including the time
spent on each and the number of times it’s been played.
Daily Records Software Library
Using Software
Activity Log
After you win a stage, the face you used for that round will be saved. Collect lots of faces to unlock new stages and add more variety to
t
the enemies you encounter! Try taking pictures of your family and friends to expand your collection.
See the amount of time spent on each software title. See various charts related to the software you’ve used on
your system.
66 67
Page 35

System Settings
INTERNET SETTINGS
Congure your connection to the internet (page 70).
PARENTAL CONTROLS
Restrict the use of soft ware, content that can be purchased and downloaded, and system functions such as
3D images (page 78).
DATA MANAGEMENT
Manage data such as Nintendo 3DS download software, Nintendo DSiWare and StreetPass data. You can also
clear your blocked-user settings (page 82).
OTHER SETTINGS
PROFILE Change your user name, date of birth and other settings (page 83).
DATE & TIME Change the date and time (page 83).
TOUCH SCREEN Calibrate the Touch Screen (page 83).
3D CALIBRATION Calibrate the 3D Screen (page 83).
SOUND
Change the sound output settings (page 83).
MIC
TEST Check that the microphone is working correctly (page 83).
OUTER C
AMERAS Calibrate the outer cameras (page 84).
CIRCLE P
AD Calibrate the Circle Pad (page 83).
SY
STEM TRANSFER
Transfer data from your Nintendo DSi or Nintendo DSi XL system to your
Nintendo 3DS system, or between Nintendo 3DS systems (page 86).
LANGU
AGE Change the language of the system (page 83).
SY
STEM UPDATE Update the system software (page 91).
FORM
AT SYSTEM
MEMORY
Format the system to erase data stored in the System Memory, such as photographs,
software and save data (page 91).
Congure your internet settings, Parental Controls and other basic system settings here.
With Download Play, you can play certain multiplayer games with other users even if you have only one
copy of the game. You can also send and receive demos of certain software titles.
Download Play is compatible with Nintendo 3DS, Nintendo DS, Nintendo DS Lite, Nintendo DSi and
Nintendo DSi XL systems.
Note: Download Play content from Nintendo 3DS titles can only be played on a Nintendo 3DS system.
Download Play-compatible
Using Software
Steps for the Host System
Download Play
Note: Nintendo DS / Nintendo DSi titles are displayed in an ex-
panded format by default. To load the software at its original reso-
lution, hold down either START or SELECT, then touch OPEN if
you are using the host system, or
the client system, to launch the software. Keep START or SELECT
held down until the software has started.
software (host)
Launch the software title from the
HOME Menu.
Follow the instructions in the instruction
manual of the software you are using.
if you are using
Steps for Client Systems
Open Download Play from the
11
HOME Menu.
For Nintendo 3DS software
2
titles, touch
For Nintendo DS /
Nintendo DSi software
titles, touch
Touch the panel for the soft-
3
ware you want to use.
Follow the instructions in
the instruction manual of
the software you are using.
No software (client)
.
.
Touch the System Settings icon on the HOME Menu to open the System Settings.
For detailed information, consult the
electronic manual.
Adjusting System Settings
System Settings
6968
Page 36

Internet Settings
Connect your Nintendo 3DS system to the internet to open up even more options.
There are lots of fun and useful options to enjoy, such as shopping for content using Nintendo eShop, receiving notications and free software
through SpotPass and playing online with people all over the world.
Nintendo eShop SpotPass
Required Items for Internet Connection
A wireless connection is required to connect your Nintendo 3DS system to the internet. A computer is needed to congure the settings on your
wireless access point (router).
Internet
Broadband internet connection
(ADSL, cable or bre optic)
Broadband
internet connection
Modem
and / or router
Wireless
communic
ation
Purchase content for your Nintendo 3DS system, such as
Nintendo 3DS download software, Nintendo DSiWare and classic
games from other systems with Virtual Console (page 64).
By leaving your system turned on, it can automatically receive data
even if the system is closed (page 8).
Online Play Internet Browser
Adjusting System Settings
Connect to the internet to play with friends and people all over
the world.
Note: Functionality diers depending on the software. For more
Internet Settings
information, please refer to the software manual.
Gives you easy access to online content.
70
Wireless access points
Note:
It is easiest to connect to wireless access points which support AOSS™ or Wi-Fi Protected Setup™ (WPS).
t
Use an access point which supports the 802.11b and / or 802.11g standards. Access points which only support 802.11a
t
are incompatible.
To see a list of compatible access points (routers) that have been conrmed to work with the Nintendo 3DS system,
t
visit support.nintendo.com.
Adjusting System Settings
Internet Settings
71
Page 37

Connecting to the Internet
Once you have everything you need to connect to the internet, you can start conguring the settings on your Nintendo 3DS system.
Note: In order to connect to the internet when using a Nintendo DS Game Card, you must congure Nintendo DS Connections (page 77).
Touch CONNECTION SETTINGS
1
Touch NEW CONNECTION
2
Find your Ideal Settings with the Tutorial
Touch TUTORIAL to receive help with the connection setup process. Follow the instructions
on-screen and select options to congure the right settings for your connection.
For AOSS guidance, see page 73.
t
For WPS guidance, see page 74.
t
For guidance on searching for and conguring access points, see page 75.
t
Setting Up a Connection without the Tutorial
If you would rather set up your connection without assistance, touch MANUAL SETUP instead,
then select from the options displayed to congure your connection.
Adjusting System Settings
For AOSS guidance, see page 73.
t
For WPS guidance, see page 74.
t
For guidance on searching for and conguring access points, see page 75.
t
Connecting using AOSS
If your access point supports AOSS, you can set up a connection quickly and easily. Refer to the instruction manual for your access point in
addition to this manual.
Note: Using AOSS may cause your access point settings to change. If your computer is connected to the access point without using AOSS, it may no longer
be able to connect after using AOSS. Establishing a connection using an access point found through a search will not change any of the access point’s settings
(page 75).
Touch AOSS
1
Note: If you are using the tutorial and you have selected , start from step 2.
Steps for the access point
2
Press and hold the AOSS button on the access point until the AOSS light
ashes twice in succession.
Note: If you have tried and failed several times to set up a connection using AOSS, wait
approximately 5 minutes before trying again.
Once the Setup Complete Screen appears, touch OK to begin a connection test
3
If the test is successful, setup is complete.
t
Failure to establish a connection can sometimes occur after AOSS setup is complete. If this happens, please wait a short while
t
before trying to reconnect.
AOSS button
Adjusting System Settings
Internet Settings
72
Internet Settings
73
Page 38

Connecting using WPS
You can set up a connection quickly and easily using WPS. Refer to the instruction manual of your access point for further information.
Touch
1
Note: If you are using the tutorial and you have selected , start from step 2.
Touch the connection method supported by your
2
access point
Steps for the access point
3
Note: It may take around 2 minutes to complete setup.
For Push-Button Connection
Press and hold the WPS button on the access point until the LED blinks.
WPS button
Searching for and Connecting to an Access Point
You can use this method to search for and connect to an access point if your access point does not support AOSS or WPS. You should also consult
the instruction manual that came with your access point.
Touch SEARCH FOR ACCESS POINT
1
Note: If you are using the tutorial and have selected DON’T KNOW / NONE OF THESE or
OTHER, start from step
Select an access point
2
Note: Touch the name of the access point you want to connect to (its SSID, ESSID
or network name). If you do not know this name, please consult the settings of the
access point you are using.
Enter the security key and touch OK
3
This step only applies if the access point is secured. If you do not know the security key, please consult the settings of the access
t
point you are using.
The characters for the key you entered will be hidden by asterisks (*).
t
Note: A security key is the password set for your access point and is required to enable your Nintendo 3DS system to make an internet connection.
It may also be called an encryption key or network password.
Touch OK to save your settings
4
2
.
Adjusting System Settings
Adjusting System Settings
Internet Settings
74
For PIN Connection
A PIN will be displayed on the Touch Screen. Enter the code into
the access point settings, then touch NEXT.
Note: After conguring the access point, touch NEXT on the Touch Screen of your
Nintendo 3DS system.
Once the Setup Complete Screen appears, touch OK to begin a connection test
4
If the test is successful, setup is complete.
t
Failure to establish a connection can sometimes occur after WPS setup is complete. If this happens, please wait a short while
t
before trying to reconnect.
Touch OK to perform a connection test
5
If the test is successful, setup is complete.
t
If connection fails and an error appears, follow the instructions given in the error message.
t
Internet Settings
75
Page 39

About the and icons
Secured access point. A key is required.
Key not required.
Access points marked with require you to enter the
security key registered with the access point.
The icon is an indicator of the current wireless signal strength. There are four levels of signal strength. Stronger reception will provide
smoother wireless communications play.
Stronger
Nintendo DS Connections
Set up an internet connection for use with Nintendo DS software.
Note: The only access point security type supported by Nintendo DS software is WEP.
Touch NINTENDO DS CONNECTIONS
1
Weaker
Signal Strength Icons
Signal Strength
Security Types
The Nintendo 3DS system is compatible with the following security types. You must choose the correct security t ype for your access point
to be able to establish a connection.
Encryption
Method
Security Strength
Note: Nintendo DS software only supports WEP. To connect to the internet using Nintendo DS software, touch NINTENDO DS CONNECTIONS to set up an
Adjusting System Settings
access point using WEP (page 77).
WEP
Weaker Stronger
WPA™-PSK
(TKIP)
WPA2™-PSK
(TKIP)
WPA-PSK
(AES)
SpotPass Settings
Set whether to receive software automatically and whether to send system information to Nintendo.
Select AUTOMATIC SOFTWARE DOWNLOADS, and then YES, and you will be able to receive soft-
t
ware distributed via SpotPass.
Select SENDING OF SYSTEM INFORMATION and then YES, and information about software you
t
play and your system settings, etc. will be sent to Nintendo automatically. This information
will be used to help in the development of future products.
Internet Settings
WPA2-PSK
(AES)
Refer to the Nintendo Wi-Fi Connection Instruction Booklet
2
included with Nintendo DS software titles for details on how
to connect
Note: Nintendo Wi-Fi Connection conguration cannot be deleted or moved from the
Nintendo DS Connections option on the Nintendo 3DS system.
If an Error Code Appears
An error message and error code will appear if the internet connection settings are incorrect or if the connection test fails.
Follow the instructions given in the on-screen error message.
For error codes that appear when setting up Nintendo DS Connections or when
playing Nintendo DS software
Nintendo DS Connections may not have been congured correctly. Check the Nintendo Wi-Fi
Connection Instruction Booklet included with Nintendo DS software for details on the error code
given.
For error codes that appear when playing Nintendo DSi software
The internet connection congured for the Nintendo 3DS system may not be correct. Select CONNECTION TEST from Internet Settings to
start the connection test, then follow the instructions given in the error message.
Adjusting System Settings
Internet Settings
76
77
Page 40

Parental Controls
SOFTWARE RATING
Restricts the use of Nintendo 3DS and Nintendo DSi software based on software rating systems (page 44).
Note: Nintendo 3DS software received via Download Play is also restricted, but this setting cannot restrict
Nintendo DS software or software received via DS Download Play.
INTERNET BROWSER
Restricts use of the internet browser and prevents the viewing of web pages.
NINTENDO 3DS
SHOPPING SERVICES
Prevents the purchase of goods and services, and the use of credit cards with Nintendo 3DS shopping services.
DISPLAY OF 3D IMAGES
Restricts the display of 3D images. All images will display in 2D.
SHARING IMAGES /
AUDIO / VIDEO /
LONG TEXT DATA
Restricts the wireless transfer of data that could be used to carry personal information, such as photos,
images, sounds, videos and long messages.
Note: This setting cannot restrict Nintendo DS software.
ONLINE INTERACTION
Restricts communication with other Nintendo 3DS, Nintendo DSi and Nintendo DSi XL systems over the internet.
Note: This setting cannot restrict Nintendo DS software.
StreetPass
Restricts communication with other Nintendo 3DS systems using StreetPass.
Note: This setting cannot restrict Nintendo DS / Nintendo DSi software.
FRIEND REGISTRATION
Restricts the registration of new friends.
DS DOWNLOAD PLAY
Restricts the use of DS Download Play.
VIEWING DISTRIBUTED
VIDEOS
Restricts viewing of distributed videos to those suitable for all ages. This setting does not apply to game-
related videos found on Nintendo eShop, which can be restricted using the separate Software Rating setting.
Note: For some distributed video playback software, this setting may also restrict the use of the software itself.
Use this option to restrict children from playing games, making purchases or using certain functions
of the Nintendo 3DS system (such as the display of 3D images).
Options that can be restricted
The following options can be restricted. Please congure these options as necessary
when allowing children to use the Nintendo 3DS system.
Note: Setting Parental Controls restrictions for any of the options below will also restrict the
Internet Settings, Outer Cameras, System Transfer and Format System Memory functions. You
will have to enter the Parental Controls PIN in order to use these functions.
Adjusting System Settings
Note: You can only use one conguration per system. Should you need to create restrictions for several children, we suggest setting up Parental Controls
for the youngest child.
Parental Controls
78
Conguring Parental Controls
Touch PARENTAL CONTROLS to begin the conguration (page 69).
Follow the instructions on the screen
1
Information about Parental Controls will appear on the screen. Follow the instructions to proceed with conguration.
Enter a four-digit PIN, then touch OK
2
To ensure the information entered is correct, you will be asked to enter your PIN twice.
Note: Your PIN is required to change Parental Controls settings as well as remove them tempo-
rarily. Be careful not to forget it.
Select a secret question, then touch OK
3
Enter an answer of at least four characters to the secret
4
question, then touch OK
Note:
You must answer the secret question if you forget the PIN. Be careful not to forget your
t
answer.
See page 30 for details on using the keyboard.
t
Touch PARENTAL CONTROLS SETTINGS
5
Touch the option you want to congure and follow the
6
instructions on-screen
Touch DONE to nish conguring Parental Controls settings.
Adjusting System Settings
Parental Controls
79
Page 41

Removing Parental Controls Restrictions
Enter the PIN to temporarily remove Parental Controls restrictions, or change the Parental Controls settings in System Settings.
Temporarily removing Parental Controls restrictions
Select a restricted item. The PIN Entry Screen will appear. Enter the PIN and then touch OK.
Changing settings
Touch PARENTAL CONTROLS in System Settings
1
Touch CHANGE
2
Enter the PIN
3
Adjusting System Settings
If you have forgotten your PIN or secret question answer...
If you have forgotten your PIN or secret question answer, follow the steps below.
Touch FORGOT PIN on the rst screen that appears after
1
touching PARENTAL CONTROLS in System Settings, or touch
I FORGOT on the PIN Entry Screen
Enter the answer to your secret question
2
Note: You will then be taken to Parental Controls settings.
If you have forgotten your secret question answer
Touch I FORGOT
3
An enquiry number will be displayed
4
For further information about obtaining
the master key, please contact Nintendo
Customer Support by phone or email
(pages 109 – 111).
For detailed information, please
refer to the Support section at
support.nintendo.com.
Adjusting System Settings
4
5
Parental Controls
80
Touch OK
Touch the option for the setting you want to change
Touch PARENTAL CONTROLS SETTINGS to change restriction settings, CHANGE PIN
to change the PIN or CLEAR SETTINGS to cancel Parental Controls restrictions.
Follow the instructions on-screen to proceed.
Touch OK
5
Enter the master key, then touch OK
6
Note: You will then be taken to Parental Controls settings.
Parental Controls
81
Page 42

Data Management
Nintendo 3DS
Data Management
SOFTWARE
Check or delete Nintendo 3DS download software or Virtual
Console software.
Note: You can store up to 300 Nintendo 3DS titles on an SD Card.
EXTRA DATA
Check or delete extra data (e.g. data received via SpotPass)
on your Nintendo 3DS system.
ADD-ON CONTENT
Check or delete add-on content (including software update
data) downloaded for compatible Nintendo 3DS software.
Nintendo DSiWare
Data Management
Check Nintendo DSiWare saved to the System Memory or an SD Card. You can also copy
Nintendo DSiWare between the System Memory and an SD Card or delete it.
Note: You can store up to 40 Nintendo DSiWare titles in the System Memory.
StreetPass MANAGEMENT
View a list of software that supports StreetPass. You can also deactivate StreetPass for
any software title.
RESET BLOCKED-USER SETTINGS
Resetting blocked-user settings will remove all previously applied restrictions and allow
the receipt of data from all users.
PROFILE
Set your user name, date of birth, region and Nintendo DS prole.
Note: Your Nintendo DS prole includes a colour and message that are used in some Nintendo DS and Nintendo DSi
software. (Characters that are not supported by Nintendo DS or Nintendo DSi software will be displayed as ‘?’.)
DATE & TIME Change the date and time.
TOUCH SCREEN Calibrate the Touch Screen when it is not working properly.
3D CALIBRATION Calibrate the 3D Screen.
SOUND Change the speaker sound output settings.
MIC TEST
Check that the microphone is working correctly. If the icon on the lower screen changes colour when you
speak or gently blow into the microphone, the microphone is functional.
OUTER CAMERAS Calibrate the outer cameras (page 84).
CIRCLE PAD
Calibrate the Circle Pad when controls do not seem to operate properly or when in-game movement seems
to occur even when not using the Circle Pad.
SYSTEM TRANSFER
Transfer data from your Nintendo DSi or Nintendo DSi XL system to your Nintendo 3DS system, or between
Nintendo 3DS systems (page 86).
LANGUAGE Change the language of the system.
SYSTEM UPDATE Update the system software (page 91).
FORMA
T SYSTEM MEMORY
Format the system to erase data stored in the System Memory, such as photographs, software and save data
(page 91).
Check or delete software, data and settings saved to the System Memory or the SD Card.
Other Settings
Change your user information and congure various other settings.
You can check or delete downloaded software, check or congure software using StreetPass
functionality and reset the blocked-user settings. Select DATA MANAGEMENT from System
Settings, then select the corresponding option.
Note:
Adjusting System Settings
You can store over 300 pieces of extra data / add-on content on an SD Card, but only the rst 300 will be shown in Data Management.
t
Nintendo DSiWare cannot be launched from an SD Card. Copy it to the System Memory before playing.
t
If you copy a software title to a location where the same software title is already saved, the existing software will be overwritten by the one you are
t
copying. Be careful when copying software in order to avoid overwriting save data.
Data Management
82
Touch / at the sides of the screen to change pages.
Adjusting System Settings
Other Settings
83
Page 43

Outer Cameras
Exposing the Nintendo 3DS system to shocks or placing it in hot environments when using the outer cameras can result in poorly focused 3D
images. For the best results when using the cameras, follow the steps below.
Note: Incorrectly calibrating the cameras can lead to these problems worsening. Recalibrate the cameras whenever necessary.
Ensure the 3D depth slider is at the top,
1
then touch NEXT
Touch AUTOMATIC SETUP
2
Touch REVERT TO DEFAULT SET TINGS to restore the default settings.
Touch NEXT to take a photo to be used as the basis of the calibration
3
Taking care not to have anything in the foreground, choose a bright, outdoor object that is over 20 metres from the Nintendo 3DS
that lls the screen. Auto-calibration will begin when the three lights
steady until the auto-calibration process is complete.
on the upper screen to become lit. Hold the system
Over 20 metres
Adjusting System Settings
Other Settings
The three lights
Note: There may be other problems in addition to those above that prevent the auto-calibration process from completing. If you experience
problems, try using a dierent object for auto-calibration (for cases where auto-calibration doesn’t complete, you can calibrate the
cameras manually (page 85)).
Note: The auto-calibration process can be completed without taking an ideal photo, but this may result in incorrect calibration. Repeat the
auto-calibration process with a dierent subject if you notice problems with the 3D images.
on the upper screen may not become lit in the following cases.
When contrast levels are low When objects appear in the foreground
Calibrating the Outer Cameras Manually
Vertical axis issues in the 3D images can be corrected using manual calibration. Use this when automatic calibration doesn’t correct the issues.
Ensure the 3D depth slider is at the top,
1
then touch NEXT
Touch MANUAL SETUP
2
Touch NEXT, then use the L Button or R Button to take a photo of the image you want to
3
use during the calibration
Note:
Place the system on a steady surface, with the image you want to take appearing directly in front and in the centre of the screen.
t
Using a simple, yet distinct image like the one shown below, can help the calibration process proceed smoothly.
t
Approx. 25 cm
Adjusting the image on the upper screen to overlap properly
4
Adjustments can be made to the vertical axis. The left and right arrows can be used to
t
help align the image properly, but these adjustments will not be saved.
Even if other objects appearing in the image being used for calibration do not overlap
t
properly, the calibration process will still work.
Images used for calibration that are taken from above or from an angle might not
t
line up perfectly.
Touch TEST 3D and follow the on-screen instructions
5
Adjusting System Settings
Other Settings
84
85
Page 44

System Transfer
Nintendo Wi-Fi Connection
Conguration
Transfers Internet Settings (Nintendo DS Connections) and Nintendo Wi-Fi Connection ID.
Photos & Recordings
Transfers photos and recordings from the Nintendo DSi Camera and Nintendo DSi Sound software
pre-installed on the Nintendo DSi or Nintendo DSi XL system.
Nintendo DSiWare Transfers Nintendo DSiWare.
Transfer data from your Nintendo DSi or Nintendo DSi XL system to your Nintendo 3DS system, or transfer
data between Nintendo 3DS systems.
Note:
You will need to be connected to the internet to transfer data. The systems will also connect to each other via
t
Local Play. It is recommended that both systems be placed close together in an area with stable internet access
(page 76).
To prevent the systems from running out of power during the transfer, ensure that the battery on each system
t
is well charged, or plug in the AC adapter before starting the transfer. If the battery charge is too low, you will
not be able to transfer data.
Closing your Nintendo 3DS system at this time will not activate Sleep Mode. Additionally, please do not turn the
t
power o while data transfer is taking place.
Transfer
Source System
(Nintendo DSi or
Nintendo DSi XL)
Target System
(Nintendo 3DS)
Nintendo DSi / Nintendo DSi XL Nintendo 3DS Transfer
The following data can be transferred.
Precautions for Transferring Nintendo Wi-Fi Connection Conguration
The Nintendo Wi-Fi Connection Conguration on the Nintendo 3DS system that you want to transfer the data onto will be overwritten.
t
Your Nintendo Wi-Fi Connection ID will be deleted from the source system during transfer. For more information about your
t
Nintendo Wi-Fi Connection ID, please refer to your Nintendo DSi or Nintendo DSi XL Operations Manual.
Settings for Advanced Setup (connections 4 – 6) will not be transferred.
t
Transfer Nintendo DSiWare and photos / recordings from a Nintendo DSi / Nintendo DSi XL system to a
Transfer from a
Nintendo DSi System
Nintendo 3DS system.
Note: You cannot transfer from a Nintendo 3DS system to a Nintendo DSi or Nintendo DSi XL system. Also, be
aware that once a transfer has been performed, it cannot be undone.
Download the Transfer Tool
In order to transfer data from a previous system (Nintendo DSi or
Nintendo DSi XL) to your Nintendo 3DS system, you rst need to
download the free Nintendo 3DS System Transfer tool from the
Nintendo DSi Shop on the previous system.
Note: For more information on the Nintendo DSi Shop, please refer to
your Nintendo DSi or Nintendo DSi XL Operations Manual.
Adjusting System Settings
Source System
(Nintendo 3DS)
Transfer between
Nintendo 3DS Systems
Other Settings
86
Transfer save data for built-in applications, Nintendo eShop balance / account activity etc. between Nintendo 3DS
systems.
Note:
All data on the source system is transferred to the target system. You cannot choose individual items to transfer
t
between Nintendo 3DS systems.
You can transfer Nintendo 3DS system data a maximum of ve times. The remaining available transfers will be
t
displayed before the transfer begins.
Even if individual software / settings on the system are changed between transfers (e.g. you download new software
t
from Nintendo eShop), the transfer count will not be reset.
Transfer
Target System
(Nintendo 3DS)
Precautions for Transferring Photos & Recordings
All the photos and recordings saved to the System Memory of the Nintendo 3DS system will be deleted. If you do not want any of the
photos and recordings on your Nintendo 3DS to be deleted, copy them onto an SD Card before carrying out the transfer.
Existing photos and recordings deleted from System Memory of target system
Photo & Recording Data
Source System
(Nintendo DSi or Nintendo DSi XL)
If There Are Photos & Recordings in the System Memory of the Nintendo 3DS System
Copy any photos and recordings from
the System Memory to an SD Card
before performing the transfer.
Note: If you want to transfer photos which you have saved to an SD Card being used with the source system, you will rst need to copy them to
the System Memory of the source system.
Photos and recordings on the
SD Card will not be deleted
during transfer.
Target System
(Nintendo 3DS)
Adjusting System Settings
Other Settings
87
Page 45

Precautions for Transferring Nintendo DSiWare
Nintendo DS
Software Settings
Transfers Internet Settings (Nintendo DS Connections) and Nintendo Wi-Fi Connection ID.
Pre-installed Application
Save Data
Transfers data such as the friend list, Nintendo 3DS Camera photos, Nintendo 3DS Sound recordings and
Mii Maker Mii characters from the pre-installed applications on the Nintendo 3DS system.
Nintendo DSiWare Transfers Nintendo DSiWare (and its save data) stored on the System Memory.
SD Card Data Usage Rights
Transfers usage rights for data stored on the SD Card (e.g. download software and its save data, add-on
content, etc.). The SD Card can then be used with the target system.
Nintendo eShop Account
Activity / Balance
Transfers your Nintendo eShop account activity and balance to the target system. This will be merged with
that of the target system.
Only the software itself will be transferred to the target system. Save data is not transferred. Both the software and the save data will
be deleted from the source system. Please be sure that it is OK to have your save data deleted before you start the transfer process.
Nintendo DSiWare and save data deleted Nintendo DSiWare (without save data) transferred
Note: The data will be saved on the System Memory of the target system. If there is not enough space in the target system’s System Memory, you
will not be able to transfer data. To free up space, go to Data Management in the System Settings to copy any Nintendo DSiWare already saved on
the system to the SD Card and delete them from the System Memory (page 82).
Nintendo 3DS Nintendo 3DS Transfer
All of the following data is transferred.
If purchased Nintendo DSiWare has been deleted or copied to an SD Card
If you have purchased any Nintendo DSiWare titles that have subsequently been deleted or copied to an SD Card, you can still transfer
the software even though it is no longer in the System Memory of the source system. For such software, the actual software will
not be transferred to the target system, but it will be downloadable from the Nintendo eShop at no extra cost.
Only Account Activity (record of purchased Nintendo DSiWare) transferred
Nintendo DSiWare
on SD Card
(see note below)
Deleted
Nintendo DSiWare
(see note below)
Note: In order to play Nintendo DSiWare titles on the source Nintendo DSi system after they have been transferred, you will need to use
Nintendo DSi Points to purchase them again.
Adjusting System Settings
Note:
Nintendo DSiWare that is free or is not available on Nintendo eShop cannot be transferred. For details on Nintendo DSiWare that cannot be
t
transferred, visit the Nintendo website.
You cannot transfer Nintendo DSi Points or any software that was pre-installed on the source Nintendo DSi or Nintendo DSi XL system.
t
Soft ware that already exists on the target system will not be transferred.
t
Other Settings
88
Download from Nintendo eShop at
no extra cost
Precautions for Transferring
After transferring data, all data on the source system will be deleted. The SD Card from the source system will be usable only with the
target system.
System Memory data deleted System Memory data overwritten
Nintendo 3DS (Source) Nintendo 3DS (Target)
Use the source system’s SD Card with the target system
Note: With the exception of Nintendo DSiWare, the data in the target system’s System Memory (e.g. pre-installed application save data) will be
deleted and overwritten with the data from the source system. If you have data such as photos and recordings, copy these to an SD Card rst.
Download Software Precautions
Data stored on the target system’s SD Card, such as Nintendo 3DS download software and its save data, will not be usable after the
t
transfer. The software can be re-downloaded from Nintendo eShop.
Nintendo DSiWare and its save data on the target system’s SD Card should be moved to the target system’s System Memory before
t
the transfer. It will then remain usable after the transfer.
If the same download software has been downloaded on both systems, its data on the target system’s Account Activity will be
t
deleted and replaced with the data from the source system. Also, the old save data on the target system (and / or SD Card) will
no longer be usable.
Nintendo eShop Balance Precautions
If the total Nintendo eShop balance of the source and target systems exceeds the maximum allowed funds, the system transfer will
not proceed.
Adjusting System Settings
Other Settings
89
Page 46

Transferring
Nintendo DSi
1
2
3
Nintendo 3DS
On the Nintendo 3DS System
Touch TRANSFER FROM A NINTENDO DSi SYSTEM.
Read the warning message about transferring data, then touch NEXT.
Touch RECEIVE FROM A NINTENDO DSi SYSTEM.
Follow the on-screen instructions to proceed.
On the Nintendo DSi / Nintendo DSi XL System
Select the Nintendo 3DS Transfer Tool icon on the
Nintendo DSi Menu.
Follow the on-screen instructions to proceed.
System Update
Update the HOME Menu and applications, and add new applications.
You must be connected to the internet to perform system updates. Congure your internet connection settings before using system update
(page 70). (When performing a system update from a Game Card, an internet connection is not necessary.)
Note: System updates cannot be carried out if the battery charge is running low.
REGARDING SYSTEM UPDATES
IMPORTANT: After the Nintendo 3DS system is updated, any existing or future unauthorised technical modication of the hardware or soft-
ware of your Nintendo 3DS system, or use of an unauthorised device in connection with your system, may render the system permanently
unplayable. Content deriving from the unauthorised modication of the hardware or software of your Nintendo 3DS system may be removed.
Failure to accept the update may render games unplayable.
REGARDING AUTOMATIC SYSTEM UPDATES
From time to time, the Nintendo 3DS system will carry out automatic updates, such as updates to a list which prevents the use of words that
may cause users discomfort, and / or updates to an internal database of wireless access points which allow you to access online services
provided by Nintendo.
No prior notice for these or other such minor automatic updates will be displayed on the screen. For other system updates, a notice will be
displayed on the screen, and you will need to select I ACCEPT to install such updates.
Format System Memory
Select this option to delete all data saved to the system, and return it to factory settings.
Note: The system version will remain at the current version even if you format the System Memory.
Nintendo 3DS
Adjusting System Settings
Other Settings
90
Nintendo 3DS
Source / Target Systems
1
Touch TRANSFER BETWEEN NINTENDO 3DS SYSTEMS.
Read the warning message about transferring data, then touch I AGREE.
Source System
2
Touch SEND FROM THIS SYSTEM.
Target System
Touch RECEIVE FROM A NINTENDO 3DS SYSTEM.
Follow the on-screen instructions to proceed.
If you opt to format your system, the following data will be
deleted and cannot be recovered:
Content saved in the System Memory such as friend list, notication and step data
t
Application save data
t
All photos saved to the System Memory
t
Changes made to the System Settings
t
Software saved to the system (see rst note below) and its save data
t
Software saved to the SD Card (see rst note below) and its save data (if an SD Card that
t
contains software or save data is not inserted when the formatting occurs, the data on
that SD Card will not be deleted but it will become unusable.)
Note:
Soft ware can be redownloaded from Nintendo eShop at no extra cost. Please note that there are certain cases where software may be temporarily or
t
permanently withdrawn from Nintendo eShop. Should this happen, you will no longer be able to redownload that software.
When you format the System Memory, photos and recordings on the SD Card and your Nintendo eShop Account Activity and balance will not be deleted.
t
When giving your Nintendo 3DS system to another person permanently, please ensure you delete your Account Activity in Nintendo eShop and use a
computer to delete data on the SD Card.
Adjusting System Settings
Other Settings
91
Page 47

Replacing the Nintendo 3DS Battery Pack
Repeated charging will decrease battery life and reduce the length of time you can use the system before recharging.
If usage time is noticeably reduced, replace the battery pack using the procedure detailed below.
Please contact Nintendo Customer Support for further information on where to purchase a replacement (pages 109 – 111).
Replacing the Nintendo 3DS Battery Pack
If the system is used by a young child, a parent or legal guardian should replace the battery pack for them.
t
Always turn the power o and disconnect the AC adapter before replacing the battery pack.
t
Unscrew the battery cover
1
Use a screwdriver to loosen the four screws securing the battery cover, then lift it o.
Note: Using the wrong type of screwdriver may damage the head of the screw, leaving you unable to remove the battery cover.
Remove the battery pack
2
Remove the battery pack as shown.
Replacing the Nintendo 3DS Battery Pack
Replace the battery cover, and tighten
4
the four screws
After removing the battery, the date and time settings will be reset.
You should set them again by opening System Settings from the
HOME Menu, selecting OTHER SETTINGS and then DATE & TIME.
Note: Always replace the battery cover. If the system is subjected to
a shock while the cover is o, the battery could be damaged leading to
re or explosion.
Battery Disposal
Apply some tape over the positive (+) and negative (–) connectors.
t
Do not remove the label.
t
Do not attempt to disassemble the battery pack.
t
Do not damage the battery.
t
The Nintendo 3DS system contains a lithium-ion rechargeable battery pack. Please dispose of this product in accordance with local regulations.
Discarding batteries in your general household waste can be harmful to the environment. When disposing of the battery pack, follow
t
appropriate local guidelines and regulations.
In accordance with the Directive on Batteries and Accumulators and Waste Batteries and Accumulators (2006/66/EC), battery collection
t
and recycling schemes should be in place in all EU Member States.
Replacing the Nintendo 3DS Battery Pack
3
Troubleshooting
Wait at least 10 seconds, then insert
a new battery pack
Insert the new battery pack as shown.
Note:
Ensure that the battery is facing in the right direction.
t
Inser ting the new battery pack immediately after removing the old
t
one can result in the power LED not functioning correctly.
Troubleshooting
9392
Page 48

Troubleshooting
I can’t recharge the
Nintendo 3DS Battery Pack /
The recharge LED is not lit
t
Are you using a Nintendo 3DS AC adapter?
Use the Nintendo 3DS AC adapter (WAP-002(UKV) / WAP-002(EUR)). The Nintendo DSi Power
Supply is also compatible.
t
Is the Nintendo 3DS AC adapter rmly inserted into the system and a plug socket?
Unplug the AC adapter and wait approximately 30 seconds before plugging it in again.
Make sure the AC adapter is securely connected to both the Nintendo 3DS system and the
plug socket.
t
Is the battery pack being recharged in a location with an ambient temperature
between 5 – 35° C?
Recharge the battery pack in a location with an ambient temperature between 5 – 35° C.
You may not be able to recharge the battery pack in a location outside of this temperature range.
t
Is the battery pack connected properly?
If the system won’t turn on and, when you plug in the AC adapter, the recharge LED lights up
then immediately turns dark, the battery pack may not be connected correctly. Make sure that
the battery pack is connected properly (page 92).
t
Is the recharge LED lit?
If the recharge LED is blinking, there is a chance that the battery pack is not connected properly.
If you experience this, contact Nintendo Customer Support (pages 109 – 111).
The Nintendo 3DS
system will not turn on
t
Is the battery pack connected properly?
If the system won’t turn on and, when you plug in the AC adapter, the recharge LED lights up
then immediately turns dark, the battery pack may not be connected correctly. Make sure that
the battery pack is connected properly (page 92).
The Nintendo 3DS system is hot
t
Is the battery pack being charged in an area with a high temperature, or being
charged for extended periods of time?
Doing so can lead to the system temperature rising sharply. Charge the battery pack in a
location with an ambient temperature between 5 – 35° C. Touching the system while it is
hot may cause burns.
I charged the Nintendo 3DS
Battery Pack, but I can’t play
for long periods of time /
It takes a long time to charge
the battery pack
t
Are you playing a game or recharging the battery pack in a location with an ambient
temperature less than 5° C?
In environments with a temperature less than 5° C, you will not be able to play games for long
periods of time, and the battery pack will take longer than usual to recharge.
Battery Life
Repeated charging will decrease battery life, reducing the length of time you can use the system.
If usage time is noticeably reduced, replace the battery pack. Contact Nintendo Customer Support
for further information on where to purchase a replacement (pages 109 – 111).
The battery pack has expanded
Lithium-ion batteries are subject to degradation over time and can expand through repeated
recharging. This is not a malfunction or a potential safety hazard. Please replace the battery pack
if its expansion is aecting battery life (page 92).
If the battery pack leaks, do not touch it and contact Nintendo Customer Support
(pages 109 – 111).
There is no video or audio output
t
Is the power LED lit?
Press the POWER Button to turn the power on.
t
Has the system been charged?
Recharge the system.
t
Has the Game Card been correctly inserted?
Insert the Game Card gently but rmly until it clicks into place.
t
Is the system in Sleep Mode?
If the system is in this state, exit Sleep Mode. For more information on how to exit Sleep Mode,
refer to the manual of the software title you are using.
There are black or bright dots on the
LCD screens that do not go away /
There are dark or light patches on
the LCD screens
Small numbers of stuck or dead pixels are a characteristic of LCD screens. These are normal and
should not be considered as a defect. The 3D Screen and Touch Screen have dierent specica-
tions, so their colour displays and levels of brightness may dier.
The brightness diers between
LCD screens
The technical specications of the upper and lower screens are dierent, which means their
brightness levels can also be dierent. This is normal and should not be considered as a defect.
The screen hue changes suddenly
The brightness changes and it be-
comes dicult to see bright colours
t
Is power-saving mode on?
Power-saving mode changes the brightness and colour gradient automatically according to
the content being displayed, to extend the battery charges for longer periods of time. This
can lead to pale colours whitening and other colours changing. To maintain xed colour and
brightness level, turn power-saving mode o (page 40).
3D images cannot be seen or
are dicult to see
t
Are you using Nintendo DS / Nintendo DSi software?
Nintendo DS / Nintendo DSi software titles cannot display 3D content.
t
Is the 3D LED lit?
If the 3D LED isn’t lit, is means that the images being displayed cannot be rendered in 3D.
t
Is the 3D depth slider set to the lowest level?
Adjust the 3D depth slider to a level that is comfortable for you (page 33).
t
Is the 3D Screen properly calibrated?
Hold the 3D Screen 25 – 35 cm away from your eyes (page 32).
(If there is any dierence in vision between your left and right eyes, or if you tend to see using
only one eye, the 3D eects may not work properly or at all. For users with any dierence in vision
between their left and right eyes, it is advised that you correct your vision before use, for example
using spectacles.)
t
Is the 3D Screen dirty?
If there are ngerprints or other marks on the screen, wipe it using a soft, clean cloth.
Before contacting Nintendo Customer Support, please use this section of the manual to determine the cause of the problem.
Note: If the problem involves a game or accessory, please also refer to the corresponding manual / documentation.
Problem Solution
Troubleshooting
Problem Solution
Troubleshooting
9594
Page 49

The Touch Screen doesn’t
work properly
t
Have you attached a commercially available protective sheet to the Touch S creen?
If you have applied a commercially available protective sheet to the Touch Screen, refer to its
instruction manual and be sure it has been applied correctly before attempting to calibrate
the Touch Screen. Please make sure you only use a protective sheet that has been licensed by
Nintendo.
Not aligned Trapped air or dirt
When playing a game that requires
you to move the system, the game
responds when the system is not
being moved or the game doesn’t
respond correctly to the movements
t
The built-in motion sensor may be producing incorrect input.
If the system is subjected to sudden changes in temperature or physical shocks, the sensor
can start to produce false responses. In these cases, carry out the following steps to recalibrate
the sensor.
Place the system on a level surface
and touch CALIBRATE
Press and hold Y Button and
B Button for 3 seconds
Note: When CALIBRATE is touched, the system will consider the position it is in to be level.
The settings for the motion sensor will be adjusted accordingly.
On the HOME Menu, press and hold the Y Button and B Button for 3 seconds to open
the Motion Sensor Calibration Screen. Place the system on a level surface and touch
CALIBRATE or REVERT TO DEFAULT SETTINGS.
The screen goes completely black
and the system won’t respond /
The system freezes up
If the screen stays black when you turn the system on or when you exit Sleep Mode (reopen
the system after closing it while the power is on), or the screen suddenly goes black during
gameplay and the system stops responding, turn the system o by holding the POWER Button
down until the Power LED goes out, then press the POWER Button again to turn the system
back on.
No sound from the speakers
t
Is the volume set to the lowest level?
Try adjusting the volume by using the volume control on the side of the system.
t
Are headphones connected?
If headphones are attached to the Nintendo 3DS, no sound will come through the speakers.
Note: The camera’s shutter sound will always be played at a xed volume, regardless of the current
setting of the volume control and even if headphones are connected.
No audio from headphones
t
Is the volume set to the lowest level?
Try adjusting the volume by using the volume control on the side of the system.
t
Is the plug of the headphones rmly inserted?
Make sure the plug of the headphones is securely plugged into the audio jack.
3D images cannot be seen
or are dicult to see
t
Have you attached a commercially available protective sheet to the 3D Screen?
Certain products can obscure the clarity of 3D images. Please make sure you only use a protective
sheet that has been licensed by Nintendo. Refer to the instruction information that comes with
the product for details on how to apply.
t
Are you in direct sunlight or an area with a strong light source?
Using the system in areas with strong light sources can cause the light to reect on the screen,
rendering it dicult to see.
t
Are Parental Controls congured?
Disable the Parental Controls item which restricts the display of 3D images (page 80).
t
Are you looking at the lower screen?
This screen cannot display 3D content.
The 3D eects generated by the Nintendo 3DS are created using the binocular disparity
of the eyes. Everyone will have a dierent way of viewing 3D images. If you see a double
image or are unable to see 3D images even when viewing them correctly and with the
proper settings, please use the 2D display only (page 33).
The Circle Pad doesn’t
work properly
t
Does Circle Pad input match what you see on screen?
In rare cases, the Circle Pad’s input may stop working properly after long periods of use or
being used forcefully. If the in-game movements do not match the Circle Pad input, use the
CIRCLE PAD option in System Settings to calibrate the input (page 69).
Note: If movements are being input despite the Circle Pad not being used, and you are unable to use
the buttons or Touch Screen, turn the system o, then start it again on the Circle Pad Calibration
Screen by pressing the POWER Button while pressing and holding L Button + R Button + Y Button.
The Touch Screen doesn’t
work properly
t
Does the Touch Screen input match what you see on screen?
If the in-game movements do not match the Touch Screen input, use the TOUCH SCREEN option
in System Settings to calibrate the input (page 69).
Note: If you are unable to use the Touch Screen to perform this procedure, turn the system o, then
start it again on the Touch Screen Calibration Screen by pressing the POWER Button while pressing
and holding L Button + R Button + X Button.
Troubleshooting
Problem Solution Problem Solution
Troubleshooting
9796
Page 50

My SD Card is not responding
t
Has the SD Card been correctly inserted into the system?
Insert the SD Card gently but rmly until it clicks into place in the SD Card slot on the side of
the system (page 34).
t
Is the SD Card broken?
Use a computer or digital camera to conrm that you can correctly see les on the SD Card.
I can’t view the photos stored on
the SD Card
t
Are there photos on the SD Card that can be displayed using Nintendo 3DS Camera?
Nintendo 3DS Camera can only display photos taken on the Nintendo 3DS system. Photos taken
on a digital camera or mobile phone cannot be displayed.
Even though a Game Card has been
inserted, the icon for the software title
does not appear and the HOME Menu
displays: “There is nothing inserted
into the Game Card slot.”
t
Is the Game Card inserted properly?
Remove the Game Card and properly reinsert it until it clicks into place. If this doesn’t work,
try reinserting it a few more times (page 45).
t
Are you using a software title from a dierent region?
Only Nintendo 3DS and Nintendo DSi software titles matching the region of the system will
work. Software titles from dierent regions may not function.
I can’t play my game
t
Are Parental Controls set to restrict the use of software based software ratings?
Enter the PIN and disable Parental Controls temporarily, or disable the Parental Controls option
that restricts the use of software based on software ratings (page 80).
This message appears while playing
Nintendo DS / Nintendo DSi
software: “An error has occurred.
Press and hold the POWER Button to
turn the system o. Please refer to
the Operations Manual for details.”
Turn o the power, then turn it back on and try again, carrying out the same procedure
as before. If the error message still appears, there may be a fault with your system. Please
contact the Nintendo Customer Support for assistance (pages 109 – 111).
My system suddenly enters
Sleep Mode
It may have entered Sleep Mode as the result
of an external magnetic eld. Move your system
away from magnetic objects, including other
Nintendo 3DS systems.
Note: Stacking this system on top of other
Nintendo DS systems may also result in the system
entering Sleep Mode.
I am having diculty using wireless
communications (communications
are interrupted and the game cannot
be played smoothly)
t
Is one of the following signal strength icons or shown on screen?
Signal strength appears to be poor. Move closer to the other player(s), and remove obstructions
between the systems.
I can’t use the microphone /
My voice isn’t recognised
t
Does this software title or section of it use the microphone?
The microphone is only usable in software titles or sections of software titles that support it.
t
Is the microphone working properly?
Select MIC TEST in System Settings to conrm that the microphone is functioning properly
(page 69).
t
Are voices other than your own, such as those of family and friends, recognised
correctly?
There are individual dierences in speech recognition rates. Some voices are more dicult to
recognise than others.
t
Is a headset with microphone attached?
Try removing the headset with microphone and using the system microphone instead.
The microphone reacts
unexpectedly / There is feedback*
coming from the speakers
t
Is the system being used in a noisy environment, or in a place where the volume
is very high?
The microphone may be reacting to audio output from the speaker or ambient noise. Tr y to
move away from the source of the noise, reduce the speaker volume, use headphones or try
to prevent any background noises.
* What is “feedback”?
Feedback is the term used to refer to the high-pitched screeching sound caused by a loop being
created when sounds picked up by the microphone are played back through the speakers and are
then picked up again by the microphone.
t
Is a headset with microphone attached?
Headsets with microphones can sometimes cause feedback. Try removing the headset with
microphone.
My steps aren’t being counted
t
Is the Nintendo 3DS system open?
Your steps will only be counted if the power to the system is on and it is closed.
t
Is the system in a loosely-hanging bag, or is it hanging from a wrist strap?
There may be cases where the system cannot correctly count your steps. If it is put in a loosely-
hanging bag while walking, step data may not be counted accurately. If you want to put the
system in a bag while carrying it around, use a tight-tting bag such as a belt pouch.
Note:
t
Depending on the conditions, the step count might be higher or lower than the number of actual
steps taken.
t
Do not put the system into your back pocket. Subjecting the system and LCD screens to excessive
force, for example sitting on them, can damage them and lead to injury or malfunction.
t
Are you continuing to use the system while a Nintendo DS / Nintendo DSi software
title is in use?
If Nintendo DS / Nintendo DSi software titles aren’t closed for a period of, or exceeding, seven
consecutive days, only steps for the initial seven days will be recorded. After saving your game,
turn the software o.
Troubleshooting
Problem Solution Problem Solution
Troubleshooting
9998
Page 51

Nintendo 3DS Sound does not
display audio les and folders
t
Has the SD Card been correctly inserted into the system?
Insert the SD Card gently but rmly until it clicks into place in the SD Card slot on the side
of the system.
t
Does the SD Card contain saved audio les that can be played using
Nintendo 3DS Sound?
Nintendo 3DS Sound can play AAC les with a le extension of .m4a, .mp4 and .3gp, or MP3
les with a le extension of .mp3. Other audio les, such as copy-protected ones, cannot be
played back.
t
Are the audio les saved to the “Private” folder found in the “Nintendo 3DS” folder
on the SD Card?
Audio les saved to the “Private” folder found in the “Nintendo 3DS” folder will not be displayed
in Nintendo 3DS Sound. Files should be saved to a dierent folder.
t
Are there more than 3,000 audio les saved?
No more than 3,000 audio les can be displayed.
t
Are there more than 1,000 folders with saved audio les?
No more than 1,000 folders can be displayed.
t
Are there more than 100 audio les saved in a single folder?
No more than 100 les can be displayed for a single folder. If there are folders with the same
name on the SD Card, the audio les in those folders will be consolidated and displayed as a
single folder. No more than 100 les can be displayed for this single consolidated folder.
t
Are audio les saved to a folder that is more than eight levels deep?
Nintendo 3DS Sound will only check for les up to eight directories deep.
I can’t play back audio les using
Nintendo 3DS Sound
t
Are the audio les in a format that can be played by Nintendo 3DS Sound?
Nintendo 3DS Sound can play audio les which meet the following requirements:
t
File format:
AAC (.m4a, .mp4 or .3gp), MP3 (.mp3)
t
Bit rate:
16 – 320 kbps
t
Sampling rate:
32 kHz – 48 kHz
t
Are the audio les protected by DRM (Digital Rights Management)?
DRM-protected audio les cannot be played using Nintendo 3DS Sound.
I can’t disable Parental Controls
t
Did you enter the correct PIN?
Enter the correct PIN (if you have forgotten your PIN, see page 81).
t
Did you enter the correct answer to your secret question?
Enter the correct answer to your secret question (if you have also forgotten the answer to your
secret question, see page 81).
Photos taken by the camera have
strange colours
t
Have you changed the colour settings in Nintendo 3DS Camera?
Check the camera mode and / or Manual Settings in Nintendo 3DS Camera (page 58).
t
Photo results can dier depending on your surroundings, particularly if taking
pictures in dimly-lit areas where the screen is lled with similarly-coloured objects.
Try to take a picture of something else. If the colours are still strange, contact the Nintendo
Customer Support (pages 109 – 111).
Nintendo 3DS Camera repeatedly
asks for a photo of my face, but does
not respond
This occurs when your face cannot be recognised properly. Please take note of the following
factors which may aect facial recognition.
Move to a well-lit area
Move hair to fully reveal your face
Face the camera straight on
Remove your glasses
Facial recognition hints
To improve the chances of your face being recognised, follow the advice below.
Other factors, such as hairstyle, the colour, shape and volume of facial hair, and jewellery, also
aect successful facial recognition.
Note: Even taking the aforementioned factors into account, individual features and certain environments
can make accurate recognition dicult.
3D images from the outer cameras
aren’t in 3D or are dicult to see
t
Are you using the inner camera?
The inner camera cannot produce 3D images.
t
Are the outer cameras dirty?
If the outer cameras are dirty, wipe them with a soft cloth.
t
Are the outer cameras in direct sunlight or in the direct path of other strong light
sources?
This can cause the 3D images to become distorted and dicult to see.
t
The outer cameras might not be calibrated properly.
Subjecting the Nintendo 3DS system to excessive physical shock, or exposing it to high
temperatures can cause the outer cameras to display unclear 3D images. If you notice such
a problem, recalibrate the outer cameras in System Settings (page 84).
Troubleshooting
Problem Solution Problem Solution
Troubleshooting
101100
Page 52

Problem Solution
The system doesn’t recognise my
AR Cards / I lost my AR Cards
If your AR Card cannot be recognised...
Check the following and try again.
t
AR Cards cannot be recognised if you hold the system too close to them or too far away.
t
Ensure that the whole AR Card is visible on the screen. If part of it is o the screen, it may
not be recognised.
t
Ensure you are in a well-lit area.
t
Keep AR Cards out of direct sunlight, as this can interfere with the outer cameras’ ability to
recognise them properly.
t
If an outer camera is dirty, wipe it with a soft cloth before you begin.
t
If the AR Cards are bent or folded, they cannot be recognised by the system. Ensure that any
AR Cards in use are at on the surface.
If your AR Card still cannot be recognised, or you have lost an AR Card...
You can download AR Card images from support.nintendo.com. Print out these images in
colour and use them as replacements.
I can’t use Download Play
t
Have Parental Controls restricted the use of software based on software ratings,
or restricted the use of DS Download Play?
If you are having issues with Nintendo 3DS software titles, disable the Parental Controls
option which restricts the use of software by software rating (page 80).
If you are having issues with Nintendo DS / Nintendo DSi software titles, disable the
Parental Controls option which restricts DS Download Play (page 80).
If you need further help...
If your Nintendo 3DS still does not operate correctly after trying these troubleshooting steps, we recommend to call Nintendo Customer
Support for assistance and additional troubleshooting and repair options (pages 109 – 111).
Please note that if you return the console to the retailer and the retailer oers to exchange your console, you may eventually lose save
t
data and all Nintendo eShop downloads and account balance.
Disposal of this product at the end of its life
At the end of this product’s life, please do not dispose of this product in your general household waste. Instead, please dispose of this product
separately in accordance with your local recycling laws and regulations. For more information on the separate collection systems for waste electrical
and electronic equipment that are available for consumers, free of charge, near your home, please contact your local municipal authority.
As an alternative and if you plan to buy an equivalent new product, you may be able to bring this product to your local retailer who, in exchange
for your buying an equivalent new product, may take back this product and arrange for its recycling. However, we would suggest that you rst
double-check with your local retailer whether they will oer you this service.
Either way, this product will then be treated in an environmentally sound manner at a licensed recycling plant and its components will be re-
covered, recycled or reused in the most ecient way possible, in compliance with the requirements of the Directive on Waste Electrical and
Electronic Equipment (2002/96/EC) of 27 January 2003.
Under applicable environmental laws, you should always use the available separate collection systems for waste electrical and
electronic equipment. In some countries, failure to use these systems may even result in sanctions being taken against you.
Note:
1. Waste electrical and electronic equipment may contain hazardous substances, which, if not treated properly, can be harmful to the environment
and human health. Specic treatment of waste electrical and electronic equipment is therefore indispensable.
2. All Nintendo electrical and electronic equipment that is subject to the above Directive is designed in a way which takes full account of, and
facilitates, its possible repair, upgrading, reuse, dismantling and recycling.
3. Nintendo and its ocial distributors support recycling schemes in each European country and are committed to using the best available treatment,
recovery and recycling techniques in order to ensure both human health and high environmental protection.
4. The crossed-out wheeled bin symbol (see below) is axed to all relevant Nintendo electrical and electronic equipment that has been put
onto the market by Nintendo or its ocial distributors on or after 13 August 2005. The symbol means that these products must be collected
separately from other waste at the end of their life, in order to ensure maximum recovery and environmentally sound disposal.
Troubleshooting
103102
Page 53

Technical Specications
Model Number CTR-001(EUR)
LCD Screens
Upper Screen: 3D-enabled widescreen LCD (can display 16.7 million colours)
Lower Screen: Touch-screen LCD (can display 16.7 million colours)
Screen Size / Resolution
Upper Screen: 3.53 inches (76.8mm wide x 46.08mm high)
800 x 240 pixels (400 pixels per eye when using 3D feature)
Lower Screen: 3.02 inches (61.4mm wide x 46.08mm high)
320 x 240 pixels
AC Adapter / Battery
Nintendo 3DS AC adapter (WAP-002(UKV) / WAP-002(EUR))
Nintendo 3DS Battery Pack (CTR-003)
Wireless Frequency 2.4GHz Band (11b: 1 – 13ch / 11g: 1 – 11ch)
Communication Standard IEEE802.11b/g
Output Power 11b: 5.5dBm / 11g: 5.0dBm maximum
Recommended
Communication Distance
Within 30m
Note: The maximum distance at which communication is possible may be reduced depending on the
surroundings. Only use these gures as a rough estimate.
Camera Feature
Lens: Fixed focal length
Image sensor: CMOS
Eective pixels: About 300,000
Clock Feature Max. Daily Variation of ± 4 seconds (when used within the “Usable Environment” below)
Speakers Stereo (supports pseudo-surround)
Input / Output Terminals Game Card slot, SD Card slot, AC adapter connector, audio jack (stereo output)
Sensors Motion sensor, gyro sensor
Maximum Power Consumption Approx. 4.1W (when charging)
Usable Environment
Temperature: 5 – 35 degrees Celsius
Humidity: 20 – 80 %
Dimensions 74mm high x 134mm wide x 21mm thick (when closed)
Mass Approx. 235g (including battery pack, stylus and SD Card)
Charge Time Approx. 3.5 hours
Battery Life Please see page 31.
Model Number CTR-003
Battery Type Lithium Ion
Battery Capacity 5Wh
Model Number CTR-007
Input / Output DC 4.6v 900mA
Dimensions 86.5mm high x 138.2mm wide x 31.8mm thick
Mass Approx. 87.4g
Model Number CTR-004
Material Plastic parts (ABS/PE), metal parts (stainless steel)
Length Approx. 101mm (when extended)
Mass Approx. 2.7g
Model Number WAP-002(UKV) / WAP-002(EUR)
Input / Output
AC 220 – 240V 50/60Hz
DC 4.6v 900mA
Dimensions 70.5mm long x 51.0mm wide x 79.5mm thick
Mass Approx. 86g
Cord Length Approx. 1.9m
Compatible Systems
Nintendo 3DS (CTR-001(EUR))
Nintendo DSi XL (UTL-001(EUR))
Nintendo DSi (TWL-001(EUR))
Note: These specications may be changed without prior notice in order to make improvements.
Nintendo 3DS system
Nintendo 3DS Charging Cradle
Nintendo 3DS AC Adapter
Nintendo 3DS Battery Pack
104 105
Nintendo 3DS Stylus
Page 54

Index
- Control Pad ..............................................23
0 – 9
2D display ....................................................33
3D Calibration ..............................................83
3D depth slider .......................................22, 33
3D Icon .........................................................41
3D images ..............................................32, 96
3D images (health and safety) .....................13
3D LED .................................................... 22, 33
3D photo(s) ............................................41, 58
3D Screen .....................................................23
A
AC adapter connector .............................24, 27
AC plug.........................................................27
access point ............................................ 71, 75
Activity Log ..................................................67
age ratings ...................................................44
AOSS .............................................................73
AR Card(s) ............................................65, 102
AR Games: Augmented Reality.....................65
audio jack ..................................................... 23
automatic system updates ...........................91
B
balance (Nintendo eShop)............................64
battery cover ..........................................24, 92
battery life ...................................................31
binocular disparity .......................................32
blocked-user settings ...................................82
bookmarks ...................................................56
brightness settings.......................................40
built-in applications .....................................38
C
camera LED ..................................................24
camera mode (HOME Menu) ........................41
camera mode (Nintendo 3DS Camera) .........59
card-based software ...............................38, 44
card software icon ........................................38
charging cradle ............................................27
charging / recharging ...................................26
Circle Pad .....................................................23
calibration ...............................................83
collected Mii characters ................................ 63
colour (Nintendo DS Prole) .........................83
content descriptors (PEGI) ............................44
cradle connector ..........................................24
credit cards ...................................................64
D
Daily Records ................................................67
Data Management .......................................82
date........................................................28, 83
date of birth ...........................................29, 83
DC plug ........................................................27
Download Play .............................................68
downloadable software ...............7, 47, 64, 82
Dream (camera mode) .................................59
DS Download Play ........................................68
E
error code ..................................................... 77
error message ..............................................77
F
Face Raiders .................................................66
facial recognition .......................................100
feedback (audio) ..........................................98
folders ..........................................................42
creating ...................................................42
settings ................................................... 43
Format System Memory ...............................91
friend card .................................................... 51
friend code ...................................................50
friend list ...................................................... 49
settings ................................................... 53
friend ...........................................................49
online status ...........................................53
registration .............................................50
G
Game Boy .....................................................64
Game Card slot .......................................24, 45
Game Card........................................44, 45, 99
Game Notes..................................................48
gift icon ........................................................38
Grati ..........................................................60
H
Health and Safety Information ...............12, 38
HOME Button ...............................................23
HOME Menu .................................................36
I
infrared transceiver ......................................24
initial conguration .....................................28
inner camera ..........................................23, 41
input modes .................................................30
instruction manuals .....................................40
internet browser ..........................................56
Entering URLs ..........................................56
Page Info .................................................56
Settings ...................................................56
Internet Settings ..........................................70
K
keyboard ......................................................30
L
L Button .......................................................24
LCD screen .................................................... 95
local wireless ................................................37
lower screen ........................................... 23, 25
Low-light (camera mode) ............................59
M
master key ...................................................81
Merge (camera mode)............................41, 59
Message (Nintendo DS Prole) ..................... 83
Mic Test ........................................................83
microphone ..................................................22
microSD Card ................................................34
Mii Maker .....................................................62
Mii characters...............................................62
miniSD Card .................................................34
motion sensor ..............................................97
Mystery (camera mode) ...............................59
N
Nintendo 3DS AC Adapter .............................27
Nintendo 3DS Battery Pack.....................26, 92
Nintendo 3DS Camera ..................................58
Nintendo 3DS download software ................64
Nintendo 3DS Game Card(s) ...................38, 44
Nintendo 3DS Service User
Agreement and Privacy Policy ......................29
Nintendo 3DS software ..........................44, 47
Nintendo 3DS Sound ....................................61
Nintendo 3DS stylus .....................................25
Nintendo DS Connections .............................77
Nintendo DS Prole ......................................83
Nintendo DS /
Nintendo DSi Game Card(s) ....................38, 44
Nintendo DS /
Nintendo DSi software ...............41, 44, 77, 83
Nintendo DSiWare ...................... 47, 64, 82, 86
Nintendo eShop ...........................................64
Nintendo eShop Card ...................................64
Nintendo eShop Card activation number ......64
Nintendo Letter Box .......................................7
Nintendo Wi-Fi Connection Conguration ....87
Nintendo Wi-Fi Connection ID ......................87
note (Game Notes) .......................................48
notications .................................................54
stopping notications .............................55
Notications (application)............................54
notication LED ................................ 22, 53, 54
O
Other Settings ..............................................83
outer cameras ..................................24, 41, 58
calibration ...............................................84
P
Parental Controls ..........................................78
remove restrictions..................................80
restrictable items .................................... 78
settings ................................................... 79
PEGI ratings .................................................. 44
photo distance .............................................58
photo(s) .......................................................58
taking ......................................................59
viewing ................................................... 60
photo-taking ..........................................41, 58
PIN .........................................................79, 81
Pinhole (camera mode) ................................ 59
Play Coin ......................................................36
power (system) ............................................28
POWER Button .......................................22, 28
power LED ........................................ 22, 28, 31
power-saving mode .....................................40
prole (Nintendo DS) ...................................83
protective sheet .....................................96, 97
Q
quick camera ..........................................36, 41
R
R Button .......................................................24
recharge LED ..........................................22, 27
recordings ....................................................61
region ....................................................29, 83
remaining battery power .......................31, 36
remaining photos .........................................41
router ...........................................................71
S
sscreen brightness..................................31, 40
SD Card ....................................... 34, 47, 61, 82
Copying Data ...........................................35
SD Card slot cover ......................................... 34
SD Card slot ............................................24, 34
SDHC Memory Card ......................................34
search ..........................................................56
security ........................................................76
security key ..................................................75
security type ................................................76
SELECT (button) ...........................................23
set contents....................................................4
signal strength icon..........................36, 37, 76
Sleep Mode ......................................28, 31, 99
slide (Touch Screen) .....................................25
slideshow .....................................................60
software .......................................................38
closing ...............................................39, 45
electronic manual ...................................40
opening ....................................... 39, 45, 47
suspending..............................................39
software icons ........................................36, 38
Software Library (Activity Log).....................67
Software Management ................................82
Sound (System Settings) ..............................83
Sparkle (camera mode) ................................59
speakers .................................................23, 83
SpotPass...................................................8, 76
START (button) .............................................23
status message ............................................51
steps ................................................36, 67, 98
storage location ...........................................41
StreetPass ..........................................9, 63, 82
StreetPass Compatibility ..............................61
StreetPass Hit Parade ...................................61
StreetPass icon .............................................36
stylus holder ..........................................24, 25
System Memory ...........................................82
System Settings ...........................................69
System Transfer ............................................86
system update..............................................91
T
taking photos and videos .............................58
technical specications ..............................104
thumbnails ..................................................60
time .......................................................28, 83
toolbar .........................................................57
touch (Touch Screen) ....................................25
Touch Screen ................................................25
calibration .........................................83, 96
transfer ........................................................86
U
upper screen ..........................................23, 32
Usage Precautions ........................................ 20
user name ....................................................29
V
viewing photos and videos...........................60
Virtual Console .............................................64
volume control .............................................23
W
WEP .............................................................76
wireless access point ....................................71
wireless communication modes ...................37
wireless LED .................................................22
wireless play .............................. 52, 68, 70, 99
wireless security ..................................... 75, 76
wireless switch ............................................. 22
WPA .............................................................76
WPS (Wi-Fi Protected Setup) .......................74
wrist strap attachment .................................24
write-protection switch ...............................34
106 107
Page 55

Warranty UK and Ireland [0212/UKV-HW] Contact information UK and Ireland [0212/UKV]
CONSUMER WARRANTY
This warranty covers Nintendo consoles, including the original built-in software included with the respective Nintendo consoles at the time
of purchase (the “Nintendo Operating Software”). In this warranty, the Nintendo console and the Nintendo Operating Software are
referred to together as the “Product”.
Subject to the terms and exclusions below, Nintendo warrants to the original consumer purchasing the Product (“you”) that, for a period
of 12 months from the date of the purchase of the Product by you, the Product will be free from defects in materials and workmanship.
To make a valid claim under this warranty, you must notify Nintendo of the defect in the Product within 12 months of the date of the purchase
of the Product by you, and you must return the Product to Nintendo within 30 days of notifying Nintendo of that defect. If, having inspected
the Product, Nintendo accepts that the Product is defective, Nintendo will (at its sole discretion) either repair or replace the part causing
the defect, or replace the Product without charge.
This warranty does not affect any statutory rights which you may have as the purchaser of consumer goods.
EXCLUSIONS
This warranty does not cover:
s¬ SOFTWARE¬OTHER¬THAN¬THE¬.INTENDO¬/PERATING¬3OFTWARE¬OR¬GAMES¬WHETHER¬INCLUDED¬WITH¬THE¬0RODUCT¬AT¬THE¬TIME¬OF¬PURCHASE¬OR¬NOT
s¬ ¬ACCESSORIES¬PERIPHERALS¬OR¬OTHER¬ITEMS¬THAT¬ARE¬INTENDED¬FOR¬USE¬WITH¬THE¬0RODUCT¬BUT¬ARE¬NOT¬MANUFACTURED¬BY¬OR¬FOR¬.INTENDO¬WHETHER¬
s¬ THE¬0RODUCT¬IF¬IT¬WAS¬PURCHASED¬OUTSIDE¬THE¬%UROPEAN¬%CONOMIC¬!REA¬AND¬3WITZERLAND
s¬ THE¬0RODUCT¬IF¬IT¬HAS¬BEEN¬RESOLD¬OR¬USED¬FOR¬RENTAL¬OR¬COMMERCIAL¬PURPOSES
s¬ ¬DEFECTS¬IN¬THE¬0RODUCT¬THAT¬ARE¬CAUSED¬BY¬ACCIDENTAL¬DAMAGE¬YOUR¬ANDOR¬ANY¬THIRD¬PARTYS¬NEGLIGENCE¬UNREASONABLE¬USE¬MODIFICATION¬
s¬ ¬DEFECTS¬IN¬THE¬0RODUCT¬THAT¬ARE¬CAUSED¬BY¬THE¬USE¬OF¬FAULTY¬DAMAGED¬OR¬LEAKING¬BATTERIES¬OR¬BATTERY¬PACKS¬OR¬ANY¬OTHER¬USE¬OF¬BATTERIES¬
s¬ ¬GRADUAL¬DECREASE¬OVER¬TIME¬IN¬THE¬CAPACITY¬AND¬PERFORMANCE¬OF¬BATTERIES¬AND¬BATTERY¬PACKS¬FOR¬THE¬0RODUCT¬INCLUDING¬.42¬53'¬
s¬ ¬THE¬0RODUCT¬IF¬IT¬HAS¬BEEN¬OPENED¬MODIFIED¬OR¬REPAIRED¬BY¬ANY¬PERSON¬OR¬COMPANY¬OTHER¬THAN¬.INTENDO¬OR¬ITS¬AUTHORISED¬PARTNERS¬OR¬IT¬
s¬ ¬LOSS¬OF¬ANY¬DATA¬THAT¬HAS¬BEEN¬LOADED¬ONTO¬OR¬STORED¬ON¬THE¬0RODUCT¬BY¬ANY¬PERSON¬OR¬COMPANY¬OTHER¬THAN¬.INTENDO¬OR¬ITS¬AUTHORISED¬
s¬ LOSS¬OF¬DATA¬OR¬SOFTWARE¬AS¬A¬RESULT¬OF¬FORMATTING¬THE¬MEMORY¬OF¬THE¬0RODUCT¬OR¬THE¬3$¬#ARD¬BEING¬USED¬WITH¬THE¬0RODUCT
HOW TO MAKE A CLAIM
To notify Nintendo of a defect covered by this warranty, please contact:
#ALLS¬TO¬THIS¬NUMBER¬ARE¬CHARGED¬AT¬NATIONAL¬RATES¬FOR¬CUSTOMERS¬IN¬THE¬5+¬AND¬AT¬INTERNATIONAL¬RATES¬FOR¬CUSTOMERS¬IN¬THE¬2EPUBLIC¬OF¬)RELAND¬
Please obtain permission from the person responsible for the bill before calling.
"EFORE¬SENDING¬THE¬0RODUCT¬TO¬.INTENDO¬#USTOMER¬3UPPORT¬YOU¬SHOULD¬REMOVE¬OR¬DELETE¬ANY¬PRIVATE¬OR¬CONFIDENTIAL¬FILES¬OR¬DATA¬9OU¬ACCEPT¬
and agree that Nintendo will not be responsible for any loss, deletion or corruption of your files or data that has not been deleted or
removed. Nintendo strongly recommends that you make a back up copy of any data that you do not remove or delete. Please note that,
depending on the type of repair, data stored in the memory of the Product may be deleted, and you may not be able to read data saved
TO¬YOUR¬3$¬#ARD¬OR¬IMPORT¬IT¬BACK¬ONTO¬THE¬0RODUCT¬FOLLOWING¬SUCH¬REPAIR
7HEN¬SENDING¬THE¬0RODUCT¬TO¬.INTENDO¬#USTOMER¬3UPPORT¬PLEASE
¬USE¬THE¬ORIGINAL¬PACKAGING¬WHERE¬POSSIBLE
¬PROVIDE¬A¬DESCRIPTION¬OF¬THE¬DEFECT
¬ATTACH¬A¬COPY¬OF¬YOUR¬PROOF¬OF¬PURCHASE¬ENSURING¬THAT¬IT¬INDICATES¬THE¬DATE¬OF¬PURCHASE¬OF¬THE¬0RODUCT¬AND
4. ensure that it is received by Nintendo within 30 days of the original notification of a qualifying defect.
If the above 12-month warranty period has expired at the time the defect is discovered or if the defect is not covered by this warranty,
Nintendo may still be prepared to repair or replace the part causing the defect or replace the Product (at its sole discretion). For further
information or, in particular, details of any charges for such services, please contact:
#ALLS¬TO¬THIS¬NUMBER¬ARE¬CHARGED¬AT¬NATIONAL¬RATES¬FOR¬CUSTOMERS¬IN¬THE¬5+¬AND¬AT¬INTERNATIONAL¬RATES¬FOR¬CUSTOMERS¬IN¬THE¬2EPUBLIC¬OF¬)RELAND¬
Please obtain permission from the person responsible for the bill before calling.
NINTENDO OPERATING SOFTWARE
4
HE¬.INTENDO¬/PERATING¬3OFTWARE¬MAY¬ONLY¬BE¬USED¬WITH¬.INTENDO¬CONSOLES¬AND¬MAY¬NOT¬BE¬USED¬FOR¬ANY¬OTHER¬PURPOSE¬9OU¬MUST¬NOT¬COPY¬
adapt, reverse-engineer, decompile, disassemble or modify the Nintendo Operating Software other than as expressly permitted by applicable
law. Nintendo may use anti-copying or other measures to protect its rights relating to the Nintendo Operating Software.
12-MONTH WARRANTY – NINTENDO HARDWARE
INCLUDED¬WITH¬THE¬0RODUCT¬AT¬THE¬TIME¬OF¬PURCHASE¬OR¬NOT
use with products not supplied, licensed or authorised for use with the Product by Nintendo (including, but not limited to, non-licensed
game enhancements, copier devices, adapters, power supplies or non-licensed accessories), computer viruses or connecting to the internet
or other forms of electronic communication, use of the Product otherwise than in accordance with the instructions in the respective
Nintendo Operations Manual or any other instructions provided with the Product, or any other cause unrelated to defects in material
AND¬WORKMANSHIP
OR¬BATTERY¬PACKS¬NOT¬IN¬ACCORDANCE¬WITH¬THE¬INSTRUCTIONS¬IN¬THE¬RESPECTIVE¬.INTENDO¬/PERATIONS¬-ANUAL¬OR¬)NSTRUCTION¬"OOKLET
47,¬54,¬#42¬WHICH¬FOR¬THE¬AVOIDANCE¬OF¬DOUBT¬WILL¬NOT¬BE¬DEEMED¬TO¬BE¬A¬DEFECT¬IN¬MATERIAL¬OR¬WORKMANSHIP¬OF¬THE¬
0RODUCT
HAS¬ITS¬SERIAL¬NUMBER¬ALTERED¬DEFACED¬OR¬REMOVED¬
PARTNERS¬OR
Nintendo Customer Support
PO Box 952, Portsmouth, PO6 9DY
Tel: +44 (0) 845 60 50 247
Nintendo Customer Support
Tel: +44 (0) 845 60 50 247
#ALL¬5+¬#USTOMER¬3UPPORT¬FOR¬ASSISTANCE¬ON¬ALL¬.INTENDO¬PUBLISHEDDISTRIBUTED¬SOFTWARE¬HARDWARE¬AND¬ACCESSORIES¬/UR¬
dedicated games coun sellors can answer all your gameplay questions, offering hints, tips and strategies to ensure that
you get the most from your Nintendo products.
¬#ALLS¬FROM¬A¬LANDLINE¬WITHIN¬THE¬5+¬ARE¬CHARGED¬AT¬THE¬STANDARD¬NATIONAL¬RATE¬OFFERED¬BY¬THE¬CALLERS¬NETWORK¬PROVIDER¬
#HARGES¬MAY¬VARY¬FOR¬CALLS¬MADE¬USING¬A¬MOBILE¬PHONE
#USTOMERS¬CALLING¬FROM¬OUTSIDE¬THE¬5+¬WILL¬BE¬CHARGED¬AT¬THE¬ INTERNATIONAL¬RATE¬OFFERED¬BY¬ THE¬PROVIDER¬OF¬THE¬ NETWORK¬
being used to make the international call.
Please obtain permission from the person responsible for paying the bill before calling.)
Lines are open Monday to Friday from 08:30 to 19:00, and Saturday from 08:30 to 15:30**.
¬#HARGES¬AND¬OPENING¬HOURS¬ARE¬CORRECT¬AT¬TIME¬OF¬PRINTING¬BUT¬ARE¬SUBJECT¬TO¬CHANGE¬WITHOUT¬PRIOR¬NOTICE
To call UK Customer Support, dial*
+44 (0) 845 60 50 247
108 109
Page 56

Warranty (South Africa) [0212/RSA-HW] Contact information South Africa [0212/RSA]
CONSUMER WARRANTY
This warranty covers Nintendo consoles, including the original built-in software included with the respective Nintendo consoles at the
time of purchase (the “Nintendo Operating Software”). In this warranty, the Nintendo console and the Nintendo Operating Software
are together referred to as the “Product”.
Subject to the terms and exclusions below, Nintendo warrants to the original consumer purchasing the Product (“you”) that, for a period
of 12 months from the date of the purchase of the Product by you, the Product will be free from defects in materials and workmanship.
To make a valid claim under this warranty, you must notify Nintendo of the defect in the Product within 12 months of the date of the
purchase of the Product by you and you must return the Product to Nintendo within 30 days of notifying Nintendo of that defect. If, having
inspected the Product, Nintendo accepts that the Product is defective, Nintendo will (at its sole discretion) without charge either repair
or replace the part causing the defect or replace the Product or, provided that the Product is returned within 6 (six) months of purchase,
at the discretion of the consumer, either repair or replace the part causing the defect, or replace the Product or refund the purchase price.
This warranty does not affect your statutory rights which you may have as the purchaser of consumer goods.
EXCLUSIONS
This warranty does not cover:
s¬ SOFTWARE¬OTHER¬THAN¬THE¬.INTENDO¬/PERATING¬3OFTWARE¬OR¬GAMES¬WHETHER¬OR¬NOT¬INCLUDED¬WITH¬THE¬0RODUCT¬AT¬THE¬TIME¬OF¬PURCHASE
s¬ ¬ACCESSORIES¬PERIPHERALS¬OR¬OTHER¬ITEMS¬THAT¬ARE¬INTENDED¬FOR¬USE¬WITH¬THE¬0RODUCT¬BUT¬ARE¬NOT¬MANUFACTURED¬BY¬OR¬FOR¬.INTENDO¬WHETHER¬
s¬ THE¬0RODUCT¬IF¬IT¬WAS¬PURCHASED¬OUTSIDE¬3OUTH¬!FRICA
s¬ THE¬0RODUCT¬IF¬IT¬HAS¬BEEN¬RESOLD¬OR¬USED¬FOR¬RENTAL¬OR¬COMMERCIAL¬PURPOSES
s¬ ¬DEFECTS¬IN¬THE¬0RODUCT¬THAT¬ARE¬CAUSED¬BY¬ACCIDENTAL¬DAMAGE¬YOUR¬ANDOR¬ANY¬THIRD¬PARTYS¬NEGLIGENCE¬UNREASONABLE¬USE¬MODIFICATION¬
s¬ ¬DEFECTS¬IN¬THE¬0RODUCT¬THAT¬ARE¬CAUSED¬BY¬THE¬USE¬OF¬FAULTY¬DAMAGED¬OR¬LEAKING¬BATTERIES¬OR¬BATTERY¬PACKS¬OR¬ANY¬OTHER¬USE¬OF¬BATTERIES¬
s¬ ¬GRADUAL¬DECREASE¬OVER¬TIME¬IN¬THE¬CAPACITY¬AND¬PERFORMANCE¬OF¬BATTERIES¬AND¬BATTERY¬PACKS¬FOR¬THE¬0RODUCT¬INCLUDING¬.42¬53'¬
s¬ ¬THE¬0RODUCT¬IF¬IT¬HAS¬BEEN¬OPENED¬MODIFIED¬OR¬REPAIRED¬BY¬ANY¬PERSON¬OR¬COMPANY¬OTHER¬THAN¬.INTENDO¬OR¬ITS¬AUTHORISED¬PARTNERS¬OR¬IT¬HAS¬
s¬ ¬LOSS¬OF¬ANY¬DATA¬THAT¬HAS¬BEEN¬LOADED¬ONTO¬OR¬STORED¬ON¬THE¬0RODUCT¬BY¬ANY¬PERSON¬OR¬COMPANY¬OTHER¬THAN¬.INTENDO¬OR¬ITS¬AUTHORISED¬
s¬ LOSS¬OF¬DATA¬OR¬SOFTWARE¬AS¬A¬RESULT¬OF¬FORMATTING¬THE¬MEMORY¬OF¬0RODUCT¬OR¬THE¬3$¬#ARD¬BEING¬USED¬WITH¬THE¬0RODUCT
HOW TO MAKE A CLAIM
To notify Nintendo of a defect covered by this warranty, please contact:
#ALLS¬TO¬THIS¬NUMBER¬ARE¬CHARGED¬AT¬NATIONAL¬RATES¬FOR¬CUSTOMERS¬IN¬3OUTH¬!FRICA¬AND¬INTERNATIONAL¬RATES¬FOR¬INTERNATIONAL¬CUSTOMERS¬n¬PLEASE¬
obtain permission from the person responsi ble for the bill before calling.
"EFORE¬SENDING¬THE¬0RODUCT¬TO¬THE¬.INTENDO¬3ERVICE¬#ENTRE¬YOU¬SHOULD¬REMOVE¬OR¬DELETE¬ANY¬PRIVATE¬OR¬CONFIDENTIAL¬FILES¬OR¬DATA¬9OU¬ACCEPT¬
and agree that Nintendo will not be responsible for any loss, deletion or corruption of your files or data that have not been deleted or
removed. Nintendo strongly recommends that you make a back up copy of any data that you do not remove or delete. Please note that,
depending on the type of repair, data stored in the memory of the Product may be deleted, and you may not be able to read data saved to
YOUR¬3$¬#ARD¬OR¬IMPORT¬IT¬BACK¬ONTO¬THE¬0RODUCT¬FOLLOWING¬SUCH¬REPAIR
7HEN¬SENDING¬THE¬0RODUCT¬TO¬THE¬.INTENDO¬3ERVICE¬#ENTRE¬PLEASE
¬USE¬THE¬ORIGINAL¬PACKAGING¬WHERE¬POSSIBLE
¬PROVIDE¬A¬DESCRIPTION¬OF¬THE¬DEFECT
¬ATTACH¬A¬COPY¬OF¬YOUR¬PROOF¬OF¬PURCHASE¬ENSURING¬THAT¬IT¬CONTAINS¬THE¬DATE¬OF¬PURCHASE¬OF¬THE¬0RODUCT¬AND
4. ensure that it is received by Nintendo within 30 days of the original notification of a qualifying defect.
If the above 12-month warranty period has expired at the time the defect is discovered or if the defect is not covered by this warranty,
Nintendo may still be prepared to repair or replace the part causing the defect or replace the Product (at its sole discretion). For further
information about this and, in particular, the details of any charges for such services, please contact:
#ALLS¬TO¬THIS¬NUMBER¬ARE¬CHARGED¬AT¬NATIONAL¬RATES¬FOR¬CUSTOMERS¬IN¬3OUTH¬!FRICA¬AND¬INTERNATIONAL¬RATES¬FOR¬INTERNATIONAL¬CUSTOMERS¬
obtain permission from the person responsible for the bill before calling.
NINTENDO OPERATING SOFTWARE
4HE¬.INTENDO¬/PERATING¬3OFTWARE¬MAY¬ONLY¬BE¬USED¬WITH¬.INTENDO¬CONSOLES¬AND¬MAY¬NOT¬BE¬USED¬FOR¬ANY¬OTHER¬PURPOSE¬9OU¬MUST¬NOT¬COPY¬
adapt, reverse engineer, decompile, disassemble or modify the Nintendo Operating Software other than as expressly permitted by applicable
law. Nintendo may use anti-copying or other measures to protect its rights in the Nintendo Operating Software.
12-MONTH WARRANTY – NINTENDO HARDWARE
OR¬NOT¬INCLUDED¬WITH¬THE¬0RODUCT¬AT¬THE¬TIME¬OF¬PURCHASE
use with products not supplied, licensed or authorised for use with the Product by Nintendo (including, but not limited to, non-licensed
game enhancements, copier devices, adapters, power supplies or non-licensed accessories), computer viruses or connecting to the internet
or other forms of electronic communication, use of the Product otherwise than in accordance with the instructions in the respective
Nintendo Operations Manual or any other instructions provided with the Product, or any other cause unrelated to defects in material
AND¬WORKMANSHIP
OR¬BATTERY¬PACKS¬NOT¬IN¬ACCORDANCE¬WITH¬THE¬INSTRUCTIONS¬IN¬THE¬RESPECTIVE¬.INTENDO¬/PERATIONS¬-ANUAL¬OR¬)NSTRUCTION¬"OOKLET
47,¬54,¬#42
ITS¬SERIAL¬NUMBER¬ALTERED¬DEFACED¬OR¬REMOVED¬
PARTNERS¬OR
Nintendo Service Centre, Core Warehouse, Block E, Wingfield Park
Geertsema Street, Jet Park 1459
Telephone: 08600 PLAY (7529)
E-mail: support@nintendo.co.za
Nintendo Service Centre
Telephone: 08600 PLAY (7529)
n¬PLEASE¬
#ALL¬OUR¬GAMES¬ HOTLINE¬ FOR¬ ASSISTANCE¬ON¬ ALL¬ .INTENDO¬ PUBLISHEDDISTRIBUTED¬ SOFTWARE¬ HARDWARE¬AND¬ ACCESSORIES¬/UR¬
dedicated games counselors can answer all your gameplay questions, offering hints, tips and strategies to ensure that
you get the most from your Nintendo products.
¬#ALLS¬FROM¬A¬LANDLINE¬WITHIN¬THE¬3OUTH¬!FRICA¬ARE¬CHARGED¬AT¬THE¬STANDARD¬NATIONAL¬RATE¬OFFERED¬BY¬THE¬CALLERS¬NETWORK¬
PROVIDER¬#HARGES¬MAY¬VARY¬FOR¬CALLS¬MADE¬USING¬A¬MOBILE¬PHONE
Please obtain permission from the person responsible for paying the bill before calling.)
Lines are open Monday to Friday from 09:00 to 16:00 **.
¬#HARGES¬ARE¬CORRECT¬AT¬TIME¬OF¬PRINTING¬BUT¬ARE¬SUBJECT¬TO¬CHANGE¬WITHOUT¬PRIOR¬NOTICE
To call the hotline, dial*
08600 PLAY (7529)
110 111
Page 57

Trademarks are property of their respective owners.
Nintendo 3DS is a trademark of Nintendo.
© 2012 Nintendo.
This product includes RSA BSAFE® Cryptographic software of EMC Corporation.
RSA and BSAFE are registered trademarks or trademarks of EMC Corporation in the United States and other countries.
©2005 EMC Corporation. All rights reserved.
SDHC Logo is a trademark of SD-3C, LLC.
This product uses certain fonts provided by Fontworks Inc.
This product uses the LC Font by Sharp Corporation.
LCFONT, LC Font and the LC logo mark are trademarks of Sharp Corporation.
This product includes speech rate conversion software developed by Toshiba corporation.
Copyright © 2008 TOSHIBA CORPORATION
Ubiquitous TCP/IP+SSL
Copyright © 2001 – 2010 Ubiquitous Corp.
Powered by Devicescape Software. Portions of this products are © 2003 – 2010 Devicescape Software, Inc. All rights reserved.
Copyright © 2003 – 2010, Jouni Malinen <j@w1.> and contributors All Rights Reserved.
WPA Supplicant licensed pursuant to BSD License.
Redistribution and use in source and binary forms, with or without modication, are permitted provided that the following conditions are met:
1. Redistributions of source code must retain the above copyright notice, this list of conditions and the following disclaimer.
2. Redistributions in binary form must reproduce the above copyright notice, this list of conditions and the following disclaimer in the documentation and /
or other materials provided with the distribution.
3. Neither the name(s) of the above-listed copyright holder(s) nor the names of its contributors may be used to endorse or promote products derived from
this software without specic prior written permission.
THIS SOFTWARE IS PROVIDED BY THE COPYRIGHT HOLDERS AND CONTRIBUTORS “AS IS” AND ANY EXPRESS OR IMPLIED WARRANTIES, INCLUDING, BUT NOT
LIMITED TO, THE IMPLIED WARRANTIES OF MERCHANTABILITY AND FITNESS FOR A PARTICULAR PURPOSE ARE DISCLAIMED. IN NO EVENT SHALL THE COPY-
RIGHT OWNER OR CONTRIBUTORS BE LIABLE FOR ANY DIRECT, INDIRECT, INCIDENTAL, SPECIAL, EXEMPLARY, OR CONSEQUENTIAL DAMAGES (INCLUDING, BUT
NOT LIMITED TO, PROCUREMENT OF SUBSTITUTE GOODS OR SERVICES; LOSS OF USE, DATA, OR PROFITS; OR BUSINESS INTERRUPTION) HOWEVER CAUSED AND
ON ANY THEORY OF LIABILITY, WHETHER IN CONTRACT, STRICT LIABILITY, OR TORT (INCLUDING NEGLIGENCE OR OTHERWISE) ARISING IN ANY WAY OUT OF
THE USE OF THIS SOFTWARE, EVEN IF ADVISED OF THE POSSIBILITY OF SUCH DAMAGE.
This product includes software developed by the OpenSSL Project for use in the OpenSSL Toolkit. (http://www.openssl.org/).
Copyright © 1998 – 2007 The OpenSSL Project. All rights reserved.
Redistribution and use in source and binary forms, with or without modication, are permitted provided that the following conditions are met:
1. Redistributions of source code must retain the above copyright notice, this list of conditions and the following disclaimer.
2. Redistributions in binary form must reproduce the above copyright notice, this list of conditions and the following disclaimer in the documentation and /
or other materials provided with the distribution.
3. All advertising materials mentioning features or use of this software must display the following acknowledgment:
“This product includes software developed by the OpenSSL Project for use in the OpenSSL Toolkit. (http://www.openssl.org/)”
4. The names “OpenSSL Toolkit” and “OpenSSL Project” must not be used to endorse or promote products derived from this software without prior written
permission. For written permission, please contact openssl-core@openssl.org.
5. Products derived from this software may not be called “OpenSSL” nor may “OpenSSL” appear in their names without prior written permission of the
OpenSSL Project.
6. Redistributions of any form whatsoever must retain the following acknowledgment:
“This product includes software developed by the OpenSSL Project for use in the OpenSSL Toolkit (http://www.openssl.org/)”
THIS SOFTWARE IS PROVIDED BY THE OpenSSL PROJECT “AS IS” AND ANY EXPRESS OR IMPLIED WARRANTIES, INCLUDING, BUT NOT LIMITED TO, THE IMPLIED
WARRANTIES OF MERCHANTABILITY AND FITNESS FOR A PARTICULAR PURPOSE ARE DISCLAIMED. IN NO EVENT SHALL THE OpenSSL PROJECT OR ITS CON-
TRIBUTORS BE LIABLE FOR ANY DIRECT, INDIRECT, INCIDENTAL, SPECIAL, EXEMPLARY, OR CONSEQUENTIAL DAMAGES (INCLUDING, BUT NOT LIMITED TO, PRO-
CUREMENT OF SUBSTITUTE GOODS OR SERVICES; LOSS OF USE, DATA, OR PROFITS; OR BUSINESS INTERRUPTION) HOWEVER CAUSED AND ON ANY THEORY OF
LIABILITY, WHETHER IN CONTRACT, STRICT LIABILITY, OR TORT (INCLUDING NEGLIGENCE OR OTHERWISE) ARISING IN ANY WAY OUT OF THE USE OF THIS SOFT-
WARE, EVEN IF ADVISED OF THE POSSIBILITY OF SUCH DAMAGE.
This product includes cryptographic software written by Eric Young. Copyright © 1995 – 1998 Eric Young (eay@cryptsoft.com).
All rights reserved.
This package is an SSL implementation written by Eric Young (eay@cryptsoft.com).
The implementation was written so as to conform with Netscapes SSL.
This library is free for commercial and non-commercial use as long as the following conditions are aheared to. The following conditions apply to all code
found in this distribution, be it the RC4, RSA, lhash, DES, etc., code; not just the SSL code. The SSL documentation included with this distribution is covered
by the same copyright terms except that the holder is Tim Hudson (tjh@cryptsoft.com).
Copyright remains Eric Young’s, and as such any Copyright notices in the code are not to be removed. If this package is used in a product, Eric Young should
be given attribution as the author of the parts of the library used. This can be in the form of a textual message at program startup or in documentation
(online or textual) provided with the package.
Redistribution and use in source and binary forms, with or without modication, are permitted provided that the following conditions are met:
1. Redistributions of source code must retain the copyright notice, this list of conditions and the following disclaimer.
2. Redistributions in binary form must reproduce the above copyright notice, this list of conditions and the following disclaimer in the documentation and /
or other materials provided with the distribution.
3. All advertising materials mentioning features or use of this software must display the following acknowledgement:
“This product includes cryptographic software written by Eric Young (eay@cryptsoft.com)”
The word cryptographic can be left out if the routines from the library being used are not cryptographic related :-).
4. If you include any Windows specic code (or a derivative thereof) from the apps directory (application code) you must include an acknowledgement:
“This product includes software written by Tim Hudson (tjh@cryptsoft.com)”
THIS SOFTWARE IS PROVIDED BY ERIC YOUNG “AS IS” AND ANY EXPRESS OR IMPLIED WARRANTIES, INCLUDING, BUT NOT LIMITED TO, THE IMPLIED WARRANTIES
OF MERCHANTABILITY AND FITNESS FOR A PARTICULAR PURPOSE ARE DISCLAIMED. IN NO EVENT SHALL THE AUTHOR OR CONTRIBUTORS BE LIABLE FOR ANY
DIRECT, INDIRECT, INCIDENTAL, SPECIAL, EXEMPLARY, OR CONSEQUENTIAL DAMAGES (INCLUDING, BUT NOT LIMITED TO, PROCUREMENT OF SUBSTITUTE GOODS
OR SERVICES; LOSS OF USE, DATA, OR PROFITS; OR BUSINESS INTERRUPTION) HOWEVER CAUSED AND ON ANY THEORY OF LIABILITY, WHETHER IN CONTRACT,
STRICT LIABILITY, OR TORT (INCLUDING NEGLIGENCE OR OTHERWISE) ARISING IN ANY WAY OUT OF THE USE OF THIS SOFTWARE, EVEN IF ADVISED OF THE
POSSIBILITY OF SUCH DAMAGE.
The licence and distribution terms for any publically available version or derivative of this code cannot be changed. i.e. this code cannot simply be copied
and put under another distribution licence [including the GNU Public Licence.]
“QR code reader” includes software deliverables of Information System Products Co., Ltd. and Institute of Super Compression Technologies, Inc. QR Code is a
registered trademark of DENSO WAVE INCORPORATED in JAPAN and other countries.
and AOSS™ are the trademarks of BUFFALO INC.
“Yahoo!” and the Yahoo! logo are registered trademarks of Yahoo! Inc.
Google™ search is a trademark of Google Inc.
This product contains NetFront Browser NX of ACCESS CO., LTD.
ACCESS, ACCESS logo and NetFront are registered trademarks or trademarks of ACCESS CO., LTD. In the United States, Japan and / or other countries.
© 2011 ACCESS CO., LTD. All rights reserved.
THIS PRODUCT IS LICENSED UNDER THE MPEG-4 SYSTEMS PATENT PORTFOLIO LICENSE FOR ENCODING IN COMPLIANCE WITH THE MPEG-4 SYSTEMS STAND-
ARD. EXCEPT THAT AN ADDITIONAL LICENSE AND PAYMENT OF ROYALTIES ARE NECESSARY FOR ENCODING IN CONNECTION WITH (i) DATA STORED OR REPLI-
CATED IN PHYSICAL MEDIA WHICH IS PAID FOR ON A TITLE BY TITLE BASIS AND / OR (ii) DATA WHICH IS PAID FOR ON A TITLE BY TITLE BASIS AND IS TRANS-
MITTED TO AN END USER FOR PERMANENT STORAGE AND / OR USE. SUCH ADDITIONAL LICENSE MAY BE OBTAINED FROM MPEG LA, LLC.
SEE <HTTP://WWW.MPEGLA.COM> FOR ADDITIONAL DETAILS.
The Wi-Fi CERTIFIED logo, Wi-Fi Protected Access® (WPA and WPA2), and the Wi-Fi Protected Setup icon are registered trademarks of the Wi-Fi Alliance.
112 113
Page 58

The Nintendo 3DS Services are operated by Nintendo of Europe GmbH
Nintendo Center, 63760 Grossostheim, Germany
Email: info@nintendo.de, Telephone: +49 06026 950-0
VAT number: DE 132095955
Company registered at Local Court of Aschaenburg HRB 4276
Managing Director: Satoru Shibata
For support in your local language, please contact the Nintendo Customer Support. Telephone: +44 (0) 845 60 50 247
(You must gain the permission of the person responsible for paying the telephone bill before phoning, please dial carefully)
Alternatively, please visit www.nintendo.co.uk and click the support tab at the top of the page or email customer-support@nintendo.co.uk
Nintendo of Europe (“Nintendo”) and its products are in compliance with all applicable European Union Directives and Regulations, many of
which are aimed at environmental protection as well as consumer health and safety with respect to the manufacture, supply and use of
Nintendo products. A brief summary of the applicable EU Directives and Regulations, and Nintendo’s compliance with them, can be found on
the Nintendo of Europe website:
http://www.nintendo-europe.com/
AC ADAPTER (WAP-002(UKV)) IS SUITABLE FOR USE IN THE UK, IRELAND AND MALTA.
AC ADAPTER (WAP-002(EUR)) IS SUITABLE FOR USE IN THE EEA AND SWITZERLAND
EXCEPT FOR THE UK, IRELAND AND MALTA.
DO NOT USE IT IN COUNTRIES WHERE VOLTAGE REQUIREMENTS ARE DIFFERENT.
DECLARATION OF CONFORMITY
Nintendo hereby declares that “Nintendo 3DS” is in compliance with the essential requirements and other relevant provisions of directive
1999/5/EC. This Declaration of Conformity is published on our website. Please visit http://docs.nintendo-europe.com
Patent Information
European Registered Design: 1249155; 1249163; 1249171; 1249684;
1249700; 1249718; 1249726; 1249742; 1259212; 1268114.
Other Patents Pending.
114 115
 Loading...