

Page 1
WSS 100
WST 100 DV
Instructions for Use Manual
C332-I-GB-F-D-E
09/2009
Page 2

WSS100 - WST100 DV
Table of contents
Instructions for use .........................................................................................................2
Operator’s safety ............................................................................................................................. 2
General recommendations .............................................................................................................. 2
Vacuum cleaner description...........................................................................................3
Labels .............................................................................................................................................. 3
Packing and unpacking ................................................................................................................... 3
Setting up - connection to the power supply ................................................................................... 4
Vacuuming liquids ........................................................................................................................... 5
Maintenance and repairs ................................................................................................................. 5
Technical specications ................................................................................................................... 5
Dimensions ...................................................................................................................................... 5
Controls, indicators and connections .............................................................................................. 6
Inspection prior to starting ............................................................................................................... 6
Starting up ....................................................................................................................................... 6
Starting the vacuum cleaner ......................................................................................................................6
Stopping - Emergency stopping ................................................................................................................. 6
Liquid vacuum stopping (g. 1) .................................................................................................................. 6
Emptying the containers .................................................................................................................. 6
Emptying the liquid container ..................................................................................................................... 6
Emptying the liquid container with the diverter valve ................................................................................. 6
Emptying the chip basket ........................................................................................................................... 7
At the end of a cleaning session ..................................................................................................... 7
Maintenance, cleaning and decontamination .................................................................................. 7
Cleaning the containers ................................................................................................................... 8
Chip basket ................................................................................................................................................ 8
Liquid container .......................................................................................................................................... 8
Cleaning or replacement of the safety lters ................................................................................... 8
Seal inspection ................................................................................................................................ 8
Vacuum cleaner disposal ................................................................................................................ 9
Wiring diagrams .............................................................................................................................. 9
Wiring diagram list - g. 14 ......................................................................................................................... 9
Troubleshooting .............................................................................................................10
1
09/2009
Page 3
WSS100 - WST100 DV
Instructions for use
Read the operating instructions and comply with the important safety recommendations identied by the word WARNING!
Operator’s safety
WARNING!
Before starting the vacuum cleaner, it is
absolutely essential to read these operating
instructions and to keep them ready at hand
for consultation.
Before using the vacuum cleaner, operators must be
informed, instructed and trained on how to work it and
for which substances its usage is permitted including
the safe method for removing and disposing of the
vacuumed material.
Proper uses
Any other use is considered improper.
This vacuum cleaner has been designed to be used by one
operator at a time. Do not carry out any operation that could
jeopardize the safety of people, property and the environment.
Comply with the safety indications and prescriptions in this
instruction manual.
General recoinendations
WARNING!
Risk of re outbreaks and explosions.
• The vacuum cleaner can only be used when active
sources of ignition are not going to be vacuumed.
• It is forbidden to vacuum the following materials:
• burning materials (embers, hot ashes, lighted
cigarettes, etc.);
• flainable liquids, aggressive fuels (e.g.
gasoline, solvents, acids, alkaline solutions,
etc.).
• It is forbidden to vacuum the following materials:
explosive dust or dust liable to spontaneous
ignition (such as magnesium or aluminium dusts,
etc.).
• The vacuum cleaner is not suitable for vacuuming
explosive or similar substances, as established
by the laws governing explosive substances,
particularly: liquid fuels and mixtures of ainable
dust and liquids.
WARNING!
Turn off the vacuum cleaner, unplug it and ask for
assistance from qualied personnel in the event of the
following:
• lter breakage;
• re outbreak;
• short-circuit;
• motor failure;
• electric shock;
WARNING!
The vacuum cleaner must not be used or stored
outdoors, or in damp places.
WARNING!
If foam or liquid spills from the vacuum cleaner, switch
it off iinediately and check for the cause.
09/2009
2
Page 4
Labels
WSS100 - WST100 DV
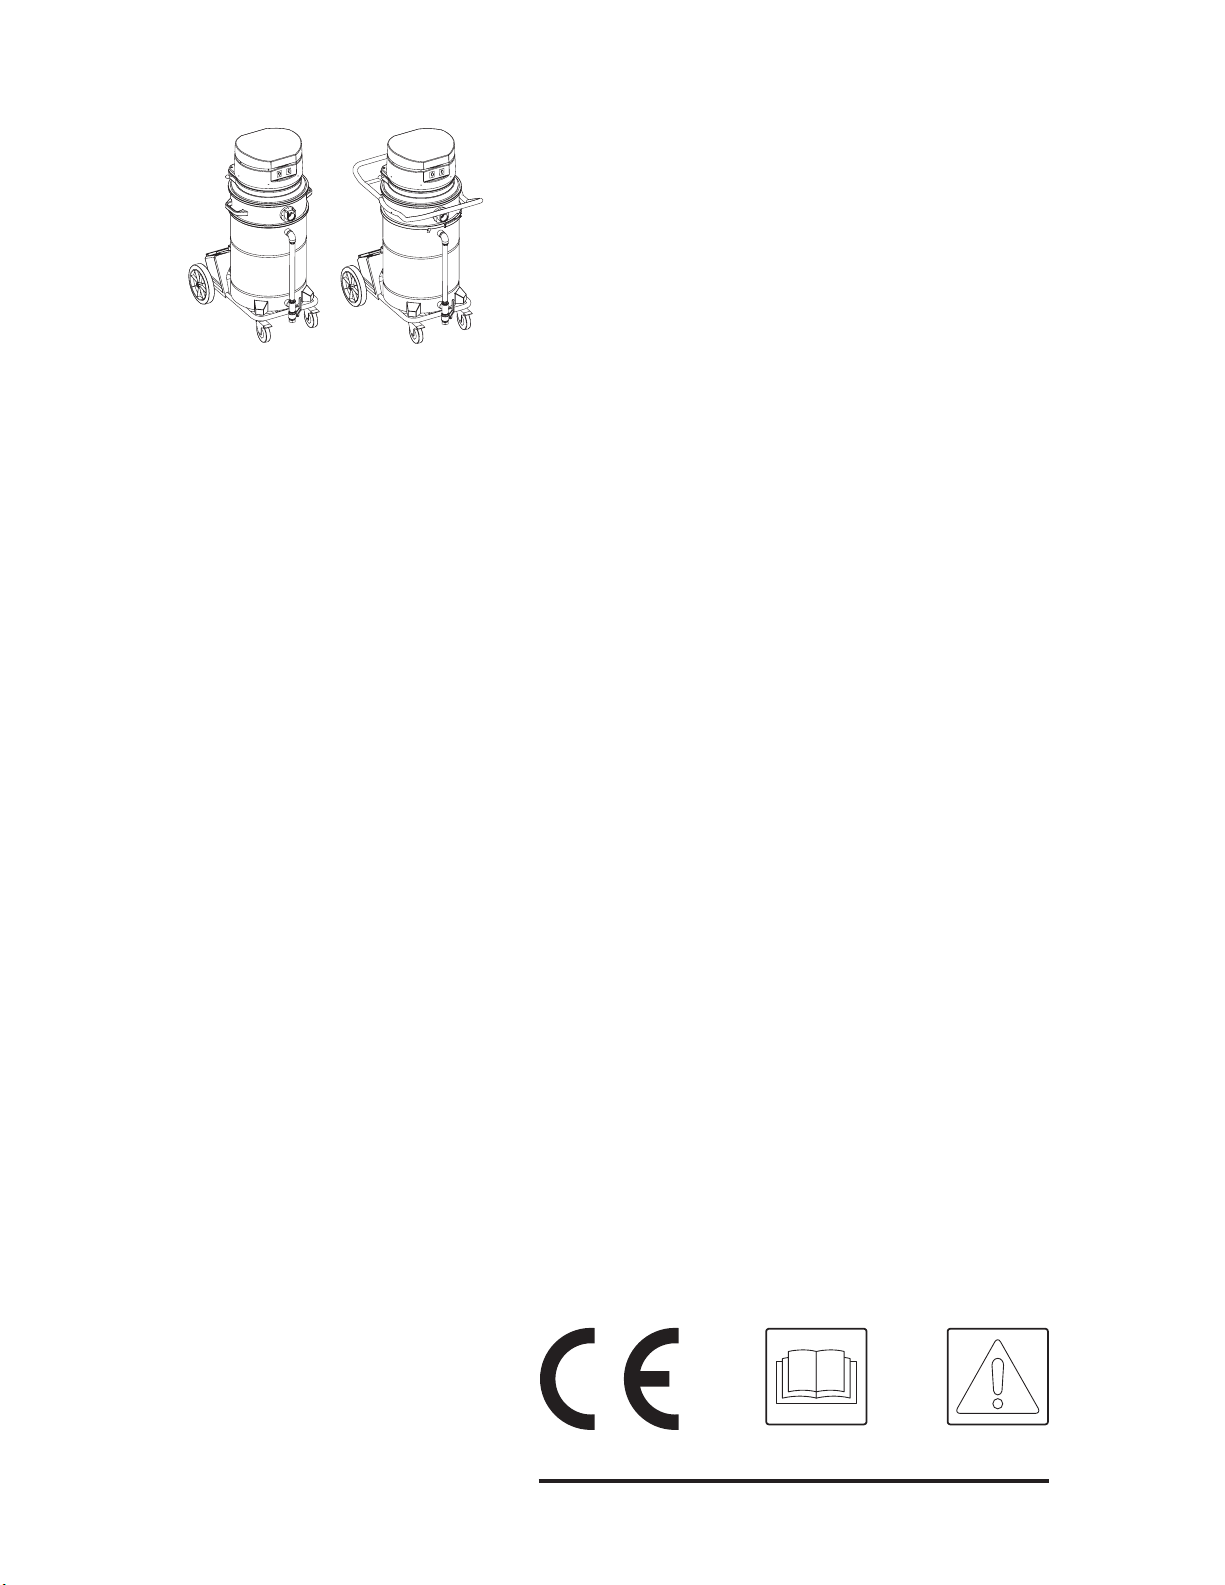
Vacuum cleaner description
Figure 1
1 Identication plate:
Code of the model, technical specications, serial
number, CE marking, year of manufacture
2 Liquid container
3 Controls (switches)
4 Inlet
5 Vacuum motors
6 Liquid container closing band
7 Diverter valve control (WST 100 DV only)
8 Liquid level indicator tube
9 Drain valve
10 Safety lters
11 Float for stopping liquids (located under chip basket)
Vacuuming of liquids and shavings
When the machine vacuums shavings and liquids produced
during the machining process, the solid shavings are captured
in the chip basket. Liquids ow into the container underneath
(2).
Before turning on the vacuum cleaner, t the vacuum hose
into the inlet (4) and then t the required tool to the end of the
hose.
The oat (11) stops the vacuuming operation (the vacuuming
units remain activated) when the liquid container (2) is full; it
is then necessary to turn off the vacuum cleaner and to empty
the liquid container (2).
Packing and unpacking
Dispose of the packing materials in compliance with the laws
in force.
Figure 2
Model A (in) B (in) C (in) Lbs
WSS 100 28 34 59 143
WST 100 DV 28 47 59 165
3
09/2009
Page 5
WSS100 - WST100 DV
Setting up - connection to the power
supply
WARNING!
• Make sure that the vacuum cleaner is in good
condition before starting work.
• Before plugging the vacuum cleaner into the
electrical mains, make sure that the voltage rating
indicated on the data plate corresponds to that of
the electrical mains.
• Plug the vacuum cleaner into a socket with a
properly installed ground connection. Make sure
that the vacuum cleaner is off.
• The plugs and connectors of the connection
cables must be protected against splashing water.
• Make sure that connections to the electrical mains
and plug are correct.
• Use the vacuum cleaner only when the cables
that connect to the electrical mains are in good
condition (damaged cables could lead to electric
shocks!).
• Regularly check that the electric cable does not
show signs of damage, excessive wear, cracks or
aging.
WARNING!
The vacuum cleaner’s power socket must be protected
by a differential circuit-breaker with surge current
limitation, that shuts off the power supply when the
current discharged to the ground exceeds 30 mA for
30 msec. or an equivalent protection circuit.
WARNING!
Never spray water on the vacuum cleaner: this could
be dangerous for persons and could short circuit the
power supply.
WARNING!
When the vacuum cleaner is operating:
• Do not crush, pull, damage or tread on the cable
that connects to the electrical mains.
• Only disconnect the cable from the electrical
mains by removing the plug (do not pull the cable).
• Only replace the electric power cable with one of
the same type as the original (H05 VV-F); the same
rule applies if an extension is used.
• The cable must be replaced by the manufacturer’s
Service Centre staff or by equivalent qualied
personnel.
09/2009
4
Page 6

WSS100 - WST100 DV
Vacuuming Liquids
WARNING!
Comply with the safety regulations governing the
materials for which the vacuum cleaner is used.
WARNING!
• Before vacuuming, check that the oat is present.
• If foam forms, turn off the vacuum cleaner
iinediately and empty the container.
• Warning: switch off the vacuum cleaner iinediately
if foam or liquid leaks out.
• Warning: the dirty liquid collected by the vacuum
cleaner must be considered conductive.
WARNING!
Do not use the vacuum cleaner without the oat!
If it’s used without the oat, the vacuum cleaner may
be seriously damaged.
Maintenance and repairs
WARNING!
Disconnect the vacuum cleaner from its power
source before cleaning, servicing, replacing parts or
converting it to obtain another variant.
• Carry out only the maintenance operations
described in this manual.
• Use only original spare parts.
• Do not modify the vacuum cleaner in any way.
Failure to comply with these instructions could
jeopardize your safety. Moreover, such action
would iinediately void the EC declaration of
conformity issued with the vacuum cleaner.
WARNING!
To carry out maintenance operations which are not
described in this manual contact the manufacturer’s
Service Centre or our sales network.
Technical specications
Parameter Units
Voltage / frequency V/Hz 120/60
Power rating kW 1.6
Noise level dB(A) 73
Protection IP 44
Insulation Class I
Shaving capacity
(optional)
Max liquid capacity gallons 26
Inlet (diameter) in 2
Max vacuum in H2O 70
Maximum air ow rate
(without hose and reductions)
gallons 6.6
cfm 150
WSS 100 /
WST 100 DV
Dimensions
Figure 3
Model WSS 100 WST 100 DV
A (in) 22.8 22.8
B (in) 31.5 34.7
C (in) 48.4 48.4
.
lbs
• Storageconditions:
Temperature:-10°C÷+40°C
Humidity:≤85%
• Operatingconditions:
Maximumaltitude:800m
(Upto2,000mwithreducedperformances)
Temperature:-10°C÷+40°C
Humidity:≤85%
110 132
[ NOTE ]
5
09/2009
Page 7

WSS100 - WST100 DV
Controls, indicators and connections
Figure 4
1 ON/OFF switches
2 Diverter valve (WST 100 DV only)
Inspection prior to starting
Figure 5
1 Inlet
Prior to starting, check that:
• All latches are tightly closed;
• The vacuum hose and tools have been properly tted into
the inlet (1);
• The chip basket is present,
• The liquid container is not full.
• The oat inside the liquid container is present and
installed correctly
Starting up
Figure 6
1 Castor brakes
Lock the castor brakes before starting the vacuum cleaner (1).
• Activate the diverter valve (2), and move it to position A,
in order to reverse the ow of air.
• Push both switches (1) to start the machine.
• Holding the drain hose rmly, open the valve on the drain
hose to start the ow of liquid.
• At the end of the emptying operation push both switches
(1) to stop the vacuum units.
• To start the vacuum operation, close the drain valve (3),
take the valve (2) to B position, then push both switches
(1).
WARNING!
Do not operate the diverter valve “2” when the vacuum
units are activated.
If the ow is inverted when the vacuum units are
activated, the machine may be damaged.
Starting the vacuum cleaner
• Push one of the switches or both of them (1 - gure 4) to
start the vacuum cleaner. The related warning lights will
turn on.
Stopping - Emergency stopping
• Push the switches (1 - gure 4) once again to stop the
vacuum cleaner.
Emptying the containers
Figure 7
1 ON/OFF switches
2 Diverter valve (WST 100 DV only)
3 Drain valve
Emptying the liquid container (WSS 100) Figure 1
• When the tank is full, the oat (11-gure 1) stops the
vacuuming operation; nevertheless, the vacuum motors
(5-gure 1) remain activated.
• Switch off the vacuum units by pushing the switches (3).
• Open the drain valve (9) to drain the container.
• After emptying, close the drain valve (9).
Emptying the liquid container with the diverter
valve (WST 100 DV) Figure 7
• When the tank is full, the oat stops the vacuuming
operation; nevertheless, the vacuum motrs remain
activated.
• Switch off the vacuum motors by pushing the switches
(1).
Note: Drain any excess liquid from inside the suction hose
back into the container before activating the diverter valve.
• Make sure the discharge hose (4-gure 7) is properly
attached to the drain valve (3-gure 7) and the valve on
the handle is closed.
• Open the drain valve (3)
09/2009
6
Page 8

WSS100 - WST100 DV
Emptying the chip basket
Figure 8
1 Chip basket
2 Container closing band
3 Motorhead (WST 100 DV)
4 Motorhead (WSS 100)
WARNING!
Before proceeding with these operations, turn off the
vacuum cleaner and remove the plug from the power
socket.
Lift the container with a suitable lifting device.
• Open the container closing band (2) and lift off/tilt back
the vacuum cleaner motor head.
• Remove the chip basket.
• Empty the basket and clean it (see “Cleaning the
containers” paragraph).
• Place the chip basket back in position, making sure it is
correctly positioned.
At the end of a cleaning session
• Turn off the vacuum cleaner and remove the plug from
the socket.
• Wind up the power cord.
• Empty the container as described in the “Emptying
the containers” paragraph. Clean the vacuum cleaner
as described in the “Maintenance, cleaning and
decontamination” paragraph.
• Store the vacuum cleaner in a dry place, out of reach of
unauthorized personnel.
Maintenance, cleaning and
decontamination
WARNING!
The precautions described below must be taken during
all the maintenance operations, including cleaning and
replacing of the safety lters.
• To allow the user to carry out the maintenance
operations, the vacuum cleaner must be
disassembled, cleaned and overhauled as far as
is reasonably possible, without causing hazards
for the maintenance staff or others. The suitable
precautions include decontamination before
disassembling the vacuum cleaner, adequate
ltered ventilation of the exhaust air from the
room in which it is disassembled, cleaning of
the maintenance area and suitable personal
protection.
Compartments that are not dust-tight must be opened
with suitable tools (screwdrivers, wrenches, etc.) and
thoroughly cleaned.
• Carry out a technical inspection at least once a
year, for example: check the lters to nd out
whether the seal of the vacuum cleaner has
been impaired in any way and make sure that
the electric control panel operates correctly.
This inspection must be carried out by the
manufacturer or by a qualied technician.
WARNING!
Use only genuine spare parts supplied and authorized
by the manufacturer.
7
09/2009
Page 9

WSS100 - WST100 DV
Cleaning the containers
WARNING!
Before proceeding with these operations, turn off the
vacuum cleaner and remove the plug from the power
socket.
Chip Basket
• Clean the container after each emptying (see “Emptying
the chip basket” paragraph).
• Check that the holes are free of dirt; clean them if
necessary.
Liquid container
Figure 9
1 Float ball and support plate
2 Chip basket
3 Container closing band
4 Drain valve
• Empty the liquid container (see “Emptying the containers”
paragraph).
• Open the liquid container closing band (3).
• Lift the motor head.
• Remove the oat, its support (1) and the chip basket (2)
• Wash the container with water to remove deposits.
• Open the valve (4) to empty the container.
• Close the drain valve (4).
• Place the oat drain, its support and the chip basket back
into position.
• Lock the motor head by using the liquid container closing
band (3).
Cleaning or replacement of the safety
lters
Figure 10
1 Safety lters
2 Separator
3 Filter cover
• Open the container closing band (3 g 9).
• Lift off the motor head
• Remove the lter cover (3) and the separator (2) after
removing the screws.
• Clean the lters (1) with water or replace them if
necessary.
• Install the lter cover (3), the separator (2) and the lters
(1) by replacing the xing screws.
• Reinstall the motor head and close the container with the
appropriate closing band.
Seal inspection
Figure 11
1 Vacuum hose
2 Sight level hose
• Hoses check
Make sure that the suction connecting hose (1) and the
sight level hose (2) are in a good condition and correctly
xed.
If the hose is damaged or broken, it must be replaced.
Figure 12
1 Gasket
2 Liquid container
3 Motor head
Replace the seal (1) between the container (2) and the
motor head (3) if it is torn, cut, etc.
09/2009
8
Page 10

WSS100 - WST100 DV
Vacuum cleaner disposal
Dispose of the vacuum cleaner in compliance with the laws in
force.
The symbol (gure 13), which is present on the product or
in its documentation, indicates that the product cannot be
disposed of together with other domestic waste at the end of
its life cycle.
To prevent damages to the environment or the health caused
by improper waste disposal, please separate this product from
other waste and recycle it responsibly in order to support the
sustainable reuse of material resources.
Domestic users should contact the retailer or the local ofce
providing information on separate collection and recycling of
this product.
Companies should contact the supplier and check the
purchase contract terms and conditions.
This product can not be disposed of together with other
coinercial waste.
Wiring diagrams
Wiring diagram list - g. 14
Reference
number
1 Armature
2 Coil
3 Terminal strip
4 Condenser
5 Bipolar switch
6 Thermal protection
7 Grounding cable
Internal wires 18 AWG
Power Cable 14 AWG
Part
9
09/2009
Page 11

WSS100 - WST100 DV
Troubleshooting
Problem Cause Remedy
The vacuum cleaner suddenly stops. Activation of the level monitoring
system.
Intervention of thermal protection
devices.
The vacuum cleaner performance has
decreased.
Electrostatic current on the vacuum
cleaner.
The vacuum cleaner does not start
after emptying the container.
Clogged lters. Replace them.
Clogged vacuum hose. Check the vacuum hose and clean it.
Non existent or inefcient grounding. Check all grounding, particularly the union to
The vacuum hose is not free from
debris.
The shaving container is full. Empty the shaving container and check the
Emptying of the liquid container.
Push the switches to stop the vacuum
cleaner, wait until the motors cool down,
then start it again.
the inlet.
Make sure that the oat does not close the
hose and/or the hose is not clogged.
seals.
09/2009
10
Page 12

1
WSS100 - WST100 DV
1
7
3
6
4
2
8
9
2 3
C
11
5
BB
A
5
10
4
C
A
B
WSS100 WST100 WST100 - WSS100
1
2
09/2009
11
Page 13

WSS100 - WST100 DV
1
1
2
2
WST100 WSS100
5
7
6
1
6
3
8
5
1
B
A
2
4
3
3
4
12
09/2009
Page 14

WSS100 - WST100 DV
1
3
2
9
11
10
1
2
1
3
1
12
2
13
09/2009
13
Page 15

WSS100 - WST100 DV
1
2 2
6
3
4
5
7
5
4
3
6
2
2
1
14
14
09/2009
 Loading...