

Page 1
SC750, SC800
SC750 ST, SC800 ST
Instructions for Use - Original Instructions / Instrucciones de uso
Manual de Utilização / Mode d‘ emploi
Advance Models: 56112000(SC750-26D), 56112004(SC750-28D)
56112006(SC750-28C), 56112012(SC750 ST-26D)
56112013(SC750 ST-28C), 56112016(SC800-28D)
56112018(SC800-28C), 56112024(SC800-32C)
56112028(SC800-34D), 56112032(SC800 ST-34D)
56112780(SC750-28R)
A-English
B-Español
C-Português
D-Français
7/10 revised 11/12 Form No. 56041820
Page 2

A-2 / ENGLISH
TABLE OF CONTENTS
Page
Introduction ..............................................................................A-3
Parts and Service ....................................................................A-3
Nameplate ...............................................................................A-3
Unpacking the Machine ...........................................................A-3
Cautions and Warnings ..................................................A-4 - A-5
Know Your Machine ....................................................... A-6 – A-7
Control Panel – SC750, SC800 ...............................................A-8
Control Panel – SC750 ST, SC800 ST ....................................A-9
Preparing the Machine for Use
Batteries ................................................................................A-10
Installing the Brushes and Pads ..................... A-11 – A-12 – A-13
Filling the Solution Tank .........................................................A-15
Squeegee Installation ............................................................A-15
Detergent System (EcoFlex™) .................................. A-16 – A-17
Operating the Machine
Wet Scrubbing ........................................................... A-18 – A-19
Wet Vacuuming .....................................................................A-19
After Using the Machine ........................................................A-20
Maintenance Schedule ..........................................................A-20
Servicing the Vacuum Motor ..................................................A-20
Lubricating the Machine ........................................................A-20
Maintenance
Charging the Batteries (Wet) .................................................A-21
Charging the Batteries (Gel) ..................................................A-21
Servicing the Squeegee ........................................................A-22
Adjusting the Squeegee ........................................................A-22
Troubleshooting .....................................................................A-23
Technical Specifi cations ........................................................A-24
Material Composition .............................................................A-24
A-2 - FORM NO. - 56041820 - SC750, SC800, SC750 ST, SC800 ST
Page 3

ENGLISH / A-3
INTRODUCTION
This manual will help you get the most from your Advance™ automatic scrubber/dryer. Read it thoroughly before operating the machine.
Note: Bold numbers in parentheses indicate an item illustrated on pages 6-9 unless otherwise noted.
This product is intended for commercial use only.
PARTS AND SERVICE
Repairs, when required, should be performed by your Authorized Advance Service Center, who employs factory trained service personnel, and
maintains an inventory of Advance original replacement parts and accessories.
Call Advance for repair parts or service. Please specify the Model and Serial Number when discussing your machine.
MODIFICATIONS
Modifi cations and additions to the cleaning machine which affect capacity and safe operation shall not be performed by the customer or user
without prior written approval from Nilfi sk-Advance Inc. Unapproved modifi cations will void the machine warranty and make the customer liable for
any resulting accidents.
NAMEPLATE
The Model and Serial Number of your machine are shown on the Nameplate in the battery compartment. This information is needed when
ordering repair parts for the machine. Use the space below to note the Model and Serial Number of your machine for future reference.
Model _________________________________________
Serial Number ___________________________________
UNPACKING THE MACHINE
When the machine is delivered, carefully inspect the shipping packaging and the machine for damage. If damage is evident, save the shipping
carton (if applicable) so that it can be inspected. Contact the Advance Customer Service Department immediately to fi le a freight damage claim.
Refer to the unpacking instruction sheet included with the machine to remove the machine from the pallet.
WARNING!
The Products sold with this Manual contain or may contain chemicals that are known to certain governments (such as the State of California, as
identifi ed in its Proposition 65 Regulatory Warning Law) to cause cancer, birth defects or other reproductive harm. In certain locations (including
the State of California) purchasers of these Products that place them in service at an employment job site or a publicly accessible space are
required by regulation to make certain notices, warnings or disclosures regarding the chemicals that are or may be contained in the Products at
or about such work sites. It is the purchaser’s responsibility to know the content of, and to comply with, any laws and regulations relating to the
use of these Products in such environments. The Manufacturer disclaims any responsibility to advise purchasers of any specifi c requirements that
may be applicable to the use of the Products in such environments.
revised 7/11
FORM NO. - 56041820 - SC750, SC800, SC750 ST, SC800 ST - A-3
Page 4
A-4 / ENGLISH
CAUTIONS AND WARNINGS
SYMBOLS
Advance uses the symbols below to signal potentially dangerous conditions. Read this information carefully and take the necessary
steps to protect personnel and property.
DANGER!
Is used to warn of immediate hazards that will cause severe personal injury or death.
WARNING!
Is used to call attention to a situation that could cause severe personal injury.
CAUTION!
Is used to call attention to a situation that could cause minor personal injury or damage to the machine or other property.
Read all instructions before using.
GENERAL SAFETY INSTRUCTIONS
Specifi c Cautions and Warnings are included to warn you of potential danger of machine damage or bodily harm.
This machine is for commercial use, for example in hotels, schools, hospitals, factories, shops and offi ces other than normal
residential housekeeping purposes.
WARNING!
* This machine should only be used by properly trained and authorized persons.
* This machine is not intended for use by persons (including children) with reduced physical, sensory or mental capabilities, or
lack of experience and knowledge.
* While on ramps or inclines, avoid sudden stops. Avoid abrupt sharp turns. Use low speed down ramps.
* Observe the Gross Vehicle Weight, GVW, of the machine when loading, driving, lifting or supporting the machine.
* Keep sparks, fl ame and smoking materials away from batteries. Explosive gases are vented during normal operation.
* Charging the batteries produces highly explosive hydrogen gas. Charge batteries only in well-ventilated areas, away from open
fl ame. Do not smoke while charging the batteries.
* Remove all jewelry when working near electrical components.
* Turn the key switch off (O) and disconnect the batteries before servicing electrical components.
* Never work under a machine without safety blocks or stands to support the machine.
* Do not dispense fl ammable cleaning agents, operate the machine on or near these agents, or operate in areas where fl ammable
liquids exist.
* Do not clean this machine with a pressure washer.
* Do not operate this machine on ramps or inclines of more than a 2 percent gradient.
* Only use the brushes provided with the appliance or those specifi ed in the instruction manual. The use of other brushes may
impair safety.
* Do not stare into laser. Class 1 Laser Product IEC 60825-1, 2007 AND 21CFR1040.10
A-4 - FORM NO. - 56041820 - SC750, SC800, SC750 ST, SC800 ST
revised 11/12
Page 5

ENGLISH / A-5
CAUTION!
* This machine is not approved for use on public paths or roads.
* This machine is not suitable for picking up hazardous dust.
* Use care when using scarifi er discs and grinding stones. Advance will not be held responsible for any damage to fl oor surfaces
caused by scarifi ers or grinding stones.
* When operating this machine, ensure that third parties, particularly children, are not endangered.
* Before performing any service function, carefully read all instructions pertaining to that function.
* Do not leave the machine unattended without fi rst turning the key switch off (O), removing the key and securing the machine.
* Turn the key switch off (O) and remove the key, before changing the brushes, and before opening any access panels.
* Take precautions to prevent hair, jewelry, or loose clothing from becoming caught in moving parts.
* Use caution when moving this machine in below freezing temperature conditions. Any water in the solution, recovery or
detergent tanks or in the hose lines could freeze, causing damage to valves and fi ttings. Flush with windshield washer fl uid.
* The batteries must be removed from the machine before the machine is scrapped. The disposal of the batteries should be
safely done in accordance with your local environmental regulations.
* Do not use on surfaces having a gradient exceeding that marked on the machine.
* All doors and covers are to be positioned as indicated in the instruction manual before using the machine.
* Refer to the battery charger OEM product manual for additional specifi c battery charger warnings.
* Any use or adjustments of the Laser other than those specifi ed herein may result in hazardous radiation exposure.
SAVE THESE INSTRUCTIONS
revised 11/12
FORM NO. - 56041820 - SC750, SC800, SC750 ST, SC800 ST - A-5
Page 6
A-6 / ENGLISH
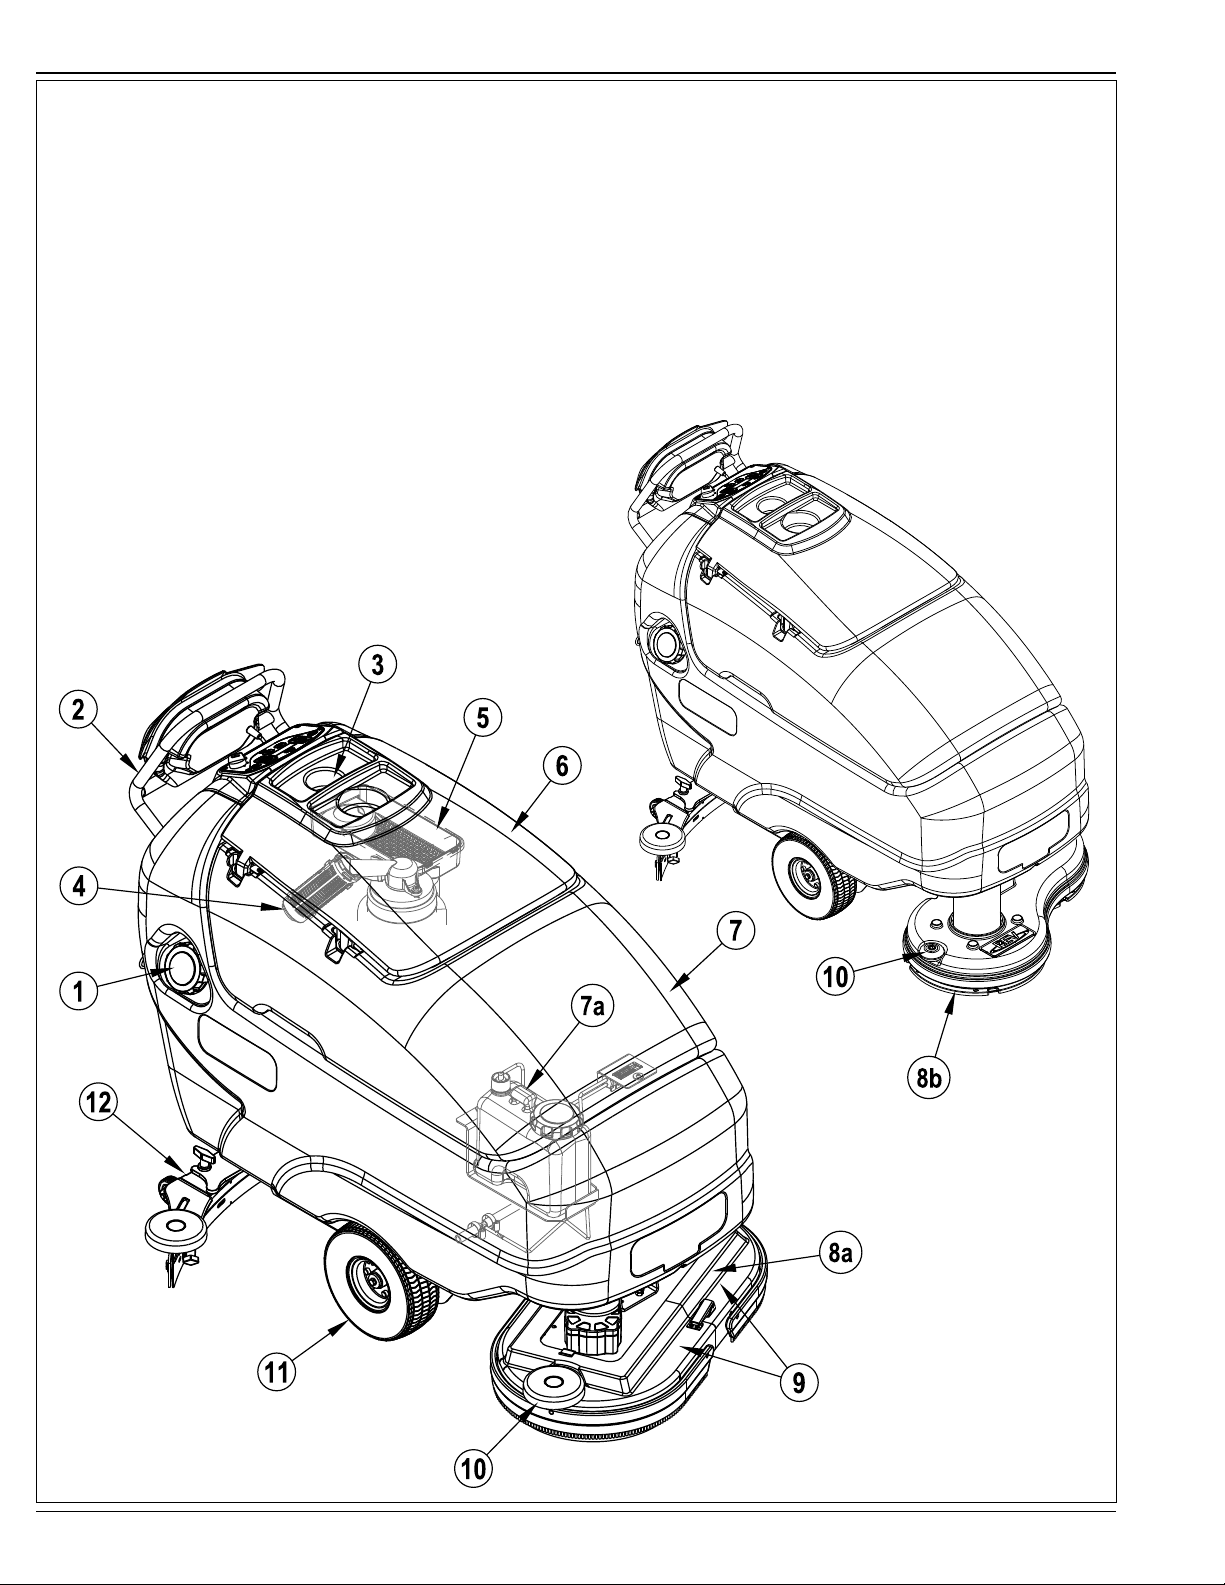
KNOW YOUR MACHINE
As you read this manual, you will occasionally run across a bold number or letter in parentheses - example: (2). These numbers refer to an item
shown on these pages unless otherwise noted. Refer back to these pages whenever necessary to pinpoint the location of an item mentioned in
the text. NOTE: Refer to the service manual for detailed explanations of each item illustrated on the next 4 pages.
1 Solution Tank Fill
2 Operator Control Handle
3 Bottle Holders
4 Recovery Tank Shutoff Float
5 Debris Tray
6 Recovery Tank Lid
7 Recovery Tank (Detergent Cartridge Access Cover)
7a Detergent Cartridge (EcoFlex models only)
8a Scrub Deck (Disc models)
8b Scrub Deck (REV model)
9 Brush Housings (include Bristle Skirt)
10 Scrub Deck Bumper Wheel
11 Drive Wheel
12 Squeegee Assembly
A-6 - FORM NO. - 56041820 - SC750, SC800, SC750 ST, SC800 ST
Page 7
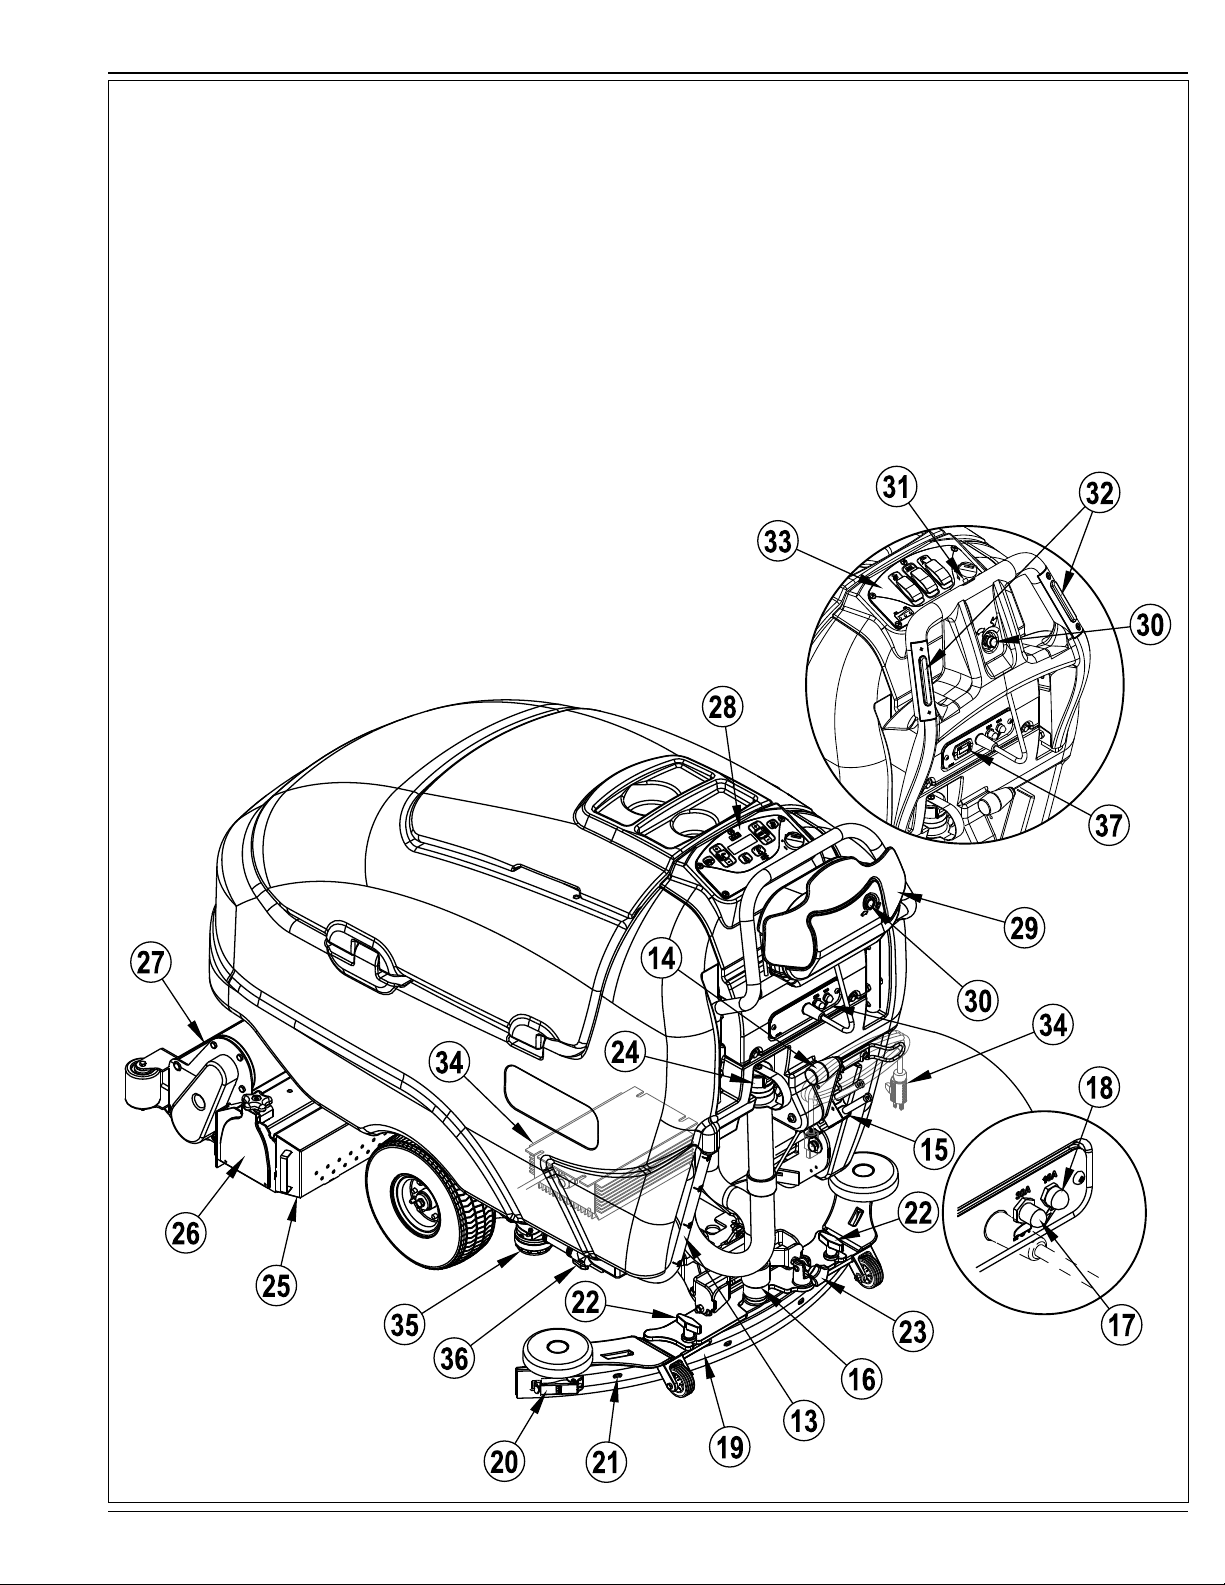
KNOW YOUR MACHINE
ENGLISH / A-7
13 Solution Drain Hose / Level Indicator
14 Squeegee Raise / Lower Lever
15 Battery Pack Connector
16 Recovery Hose
17 Wheel Drive Circuit Breaker (30 Amp)
18 Control Circuit Circuit Breaker (10 Amp)
19 Squeegee Blade Tension Strap
20 Squeegee Blade Latch
21 Squeegee Blade Alignment Pins
22 Squeegee Mount Thumb Nut
23 Squeegee Adjustment Knob
24 Recovery Tank Drain Hose
25 Debris Hopper (Cylindrical Models Only)
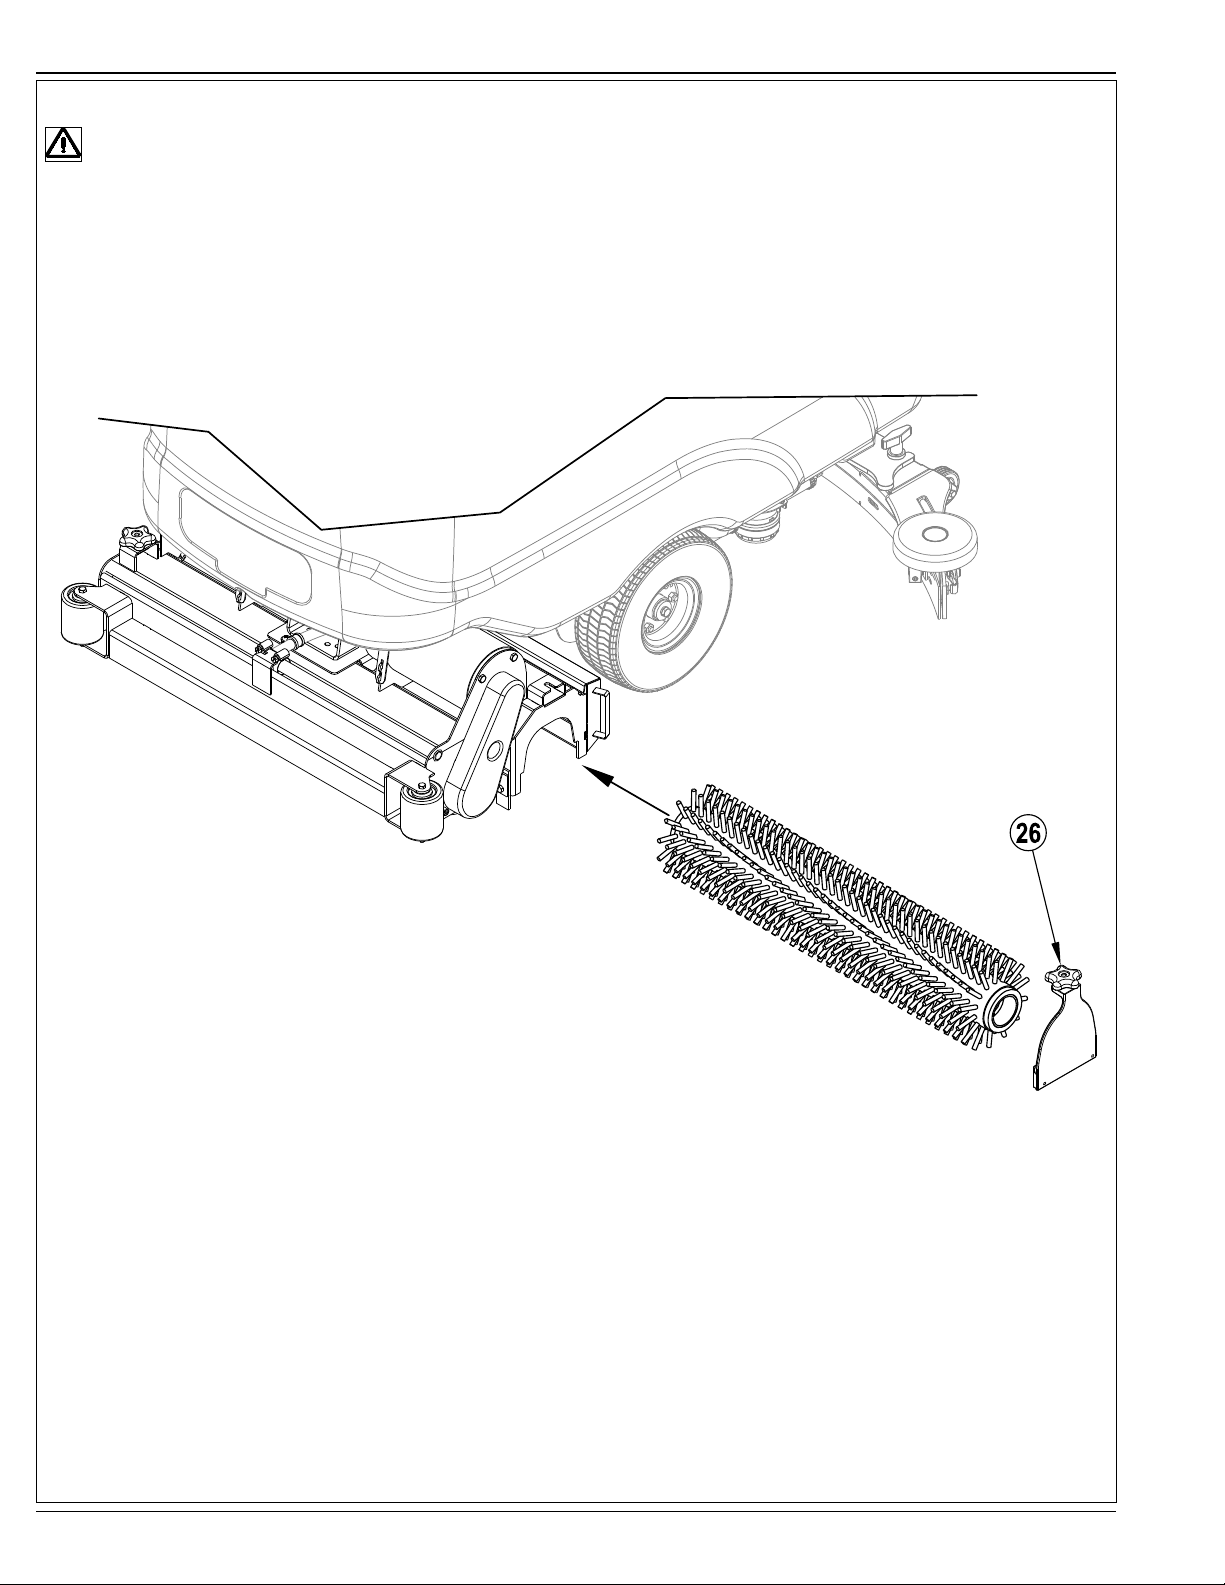
26 Idler Assembly (Cylindrical Models Only)
27 Solution Manifold (Cylindrical Models Only)
28 Control Panel (SC750, SC800)
29 Drive Paddle
30 Speed Limit Control Knob
31 Reverse Button (SC750 ST, SC800 ST)
32 Palm Drive Buttons (SC750 ST, SC800 ST)
33 Control Panel (SC750 ST, SC800 ST)
34 Onboard Battery Charger (Not found on all models)
35 Solution Filter
36 Solution Shut-off Valve
37 Hour Meter (Optional on ST Models)
FORM NO. - 56041820 - SC750, SC800, SC750 ST, SC800 ST - A-7
Page 8
A-8 / ENGLISH
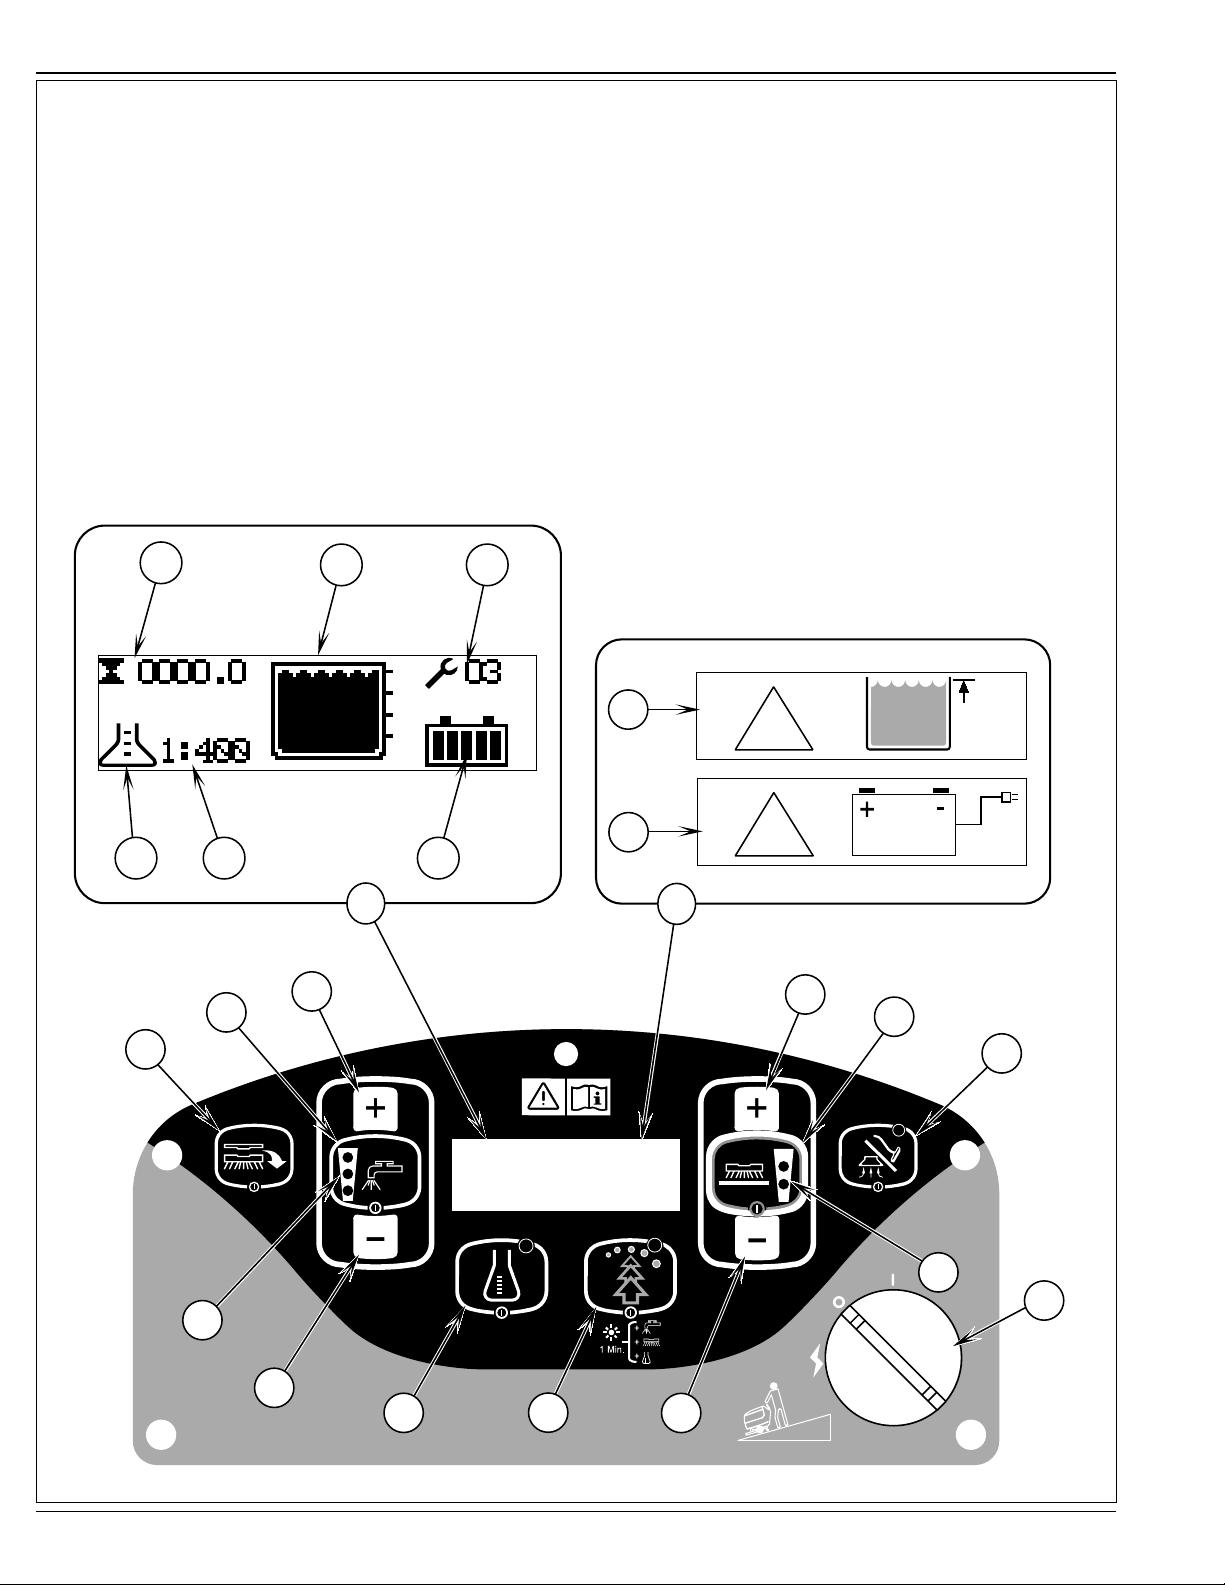
CONTROL PANEL – SC750, SC800
A Key Switch (Main Power)
B Solution Increase Switch
C Solution ON/OFF Switch
C1 Solution Flow Indicators (Normal, Heavy & Extreme)
D Solution Decrease Switch
E Detergent ON/OFF Switch
F Display Panel
F1 Hour Meter
F2 Solution Tank Level Indicator
F3 Fault Codes
F4 Detergent Indicator (if so equipped)
F5 Detergent Ratio Indicator
F6 Battery Indicator
F7 Recovery Tank FULL Indicator
F8 Battery Low Indicator
F1
F2 F3
G Scrub Pressure Increase Switch
H Scrub ON/OFF Switch
(Disc System - Regular & Heavy)
(Cylindrical System - 1 Pressure Sensing)
H1 Scrub Pressure Indicator
I Scrub Pressure Decrease Switch
J EcoFlex Switch
K Brush Remove Switch (Disc Decks Only)
(Brush Remove Switch is disabled on REV model)
L Vacuum/Wand Switch
F7
!
F4 F5 F6
F
B
C
K
C1
D
E
F8
!
F
G
H
L
H1
A
J
I
max.2%
A-8 - FORM NO. - 56041820 - SC750, SC800, SC750 ST, SC800 ST
Page 9
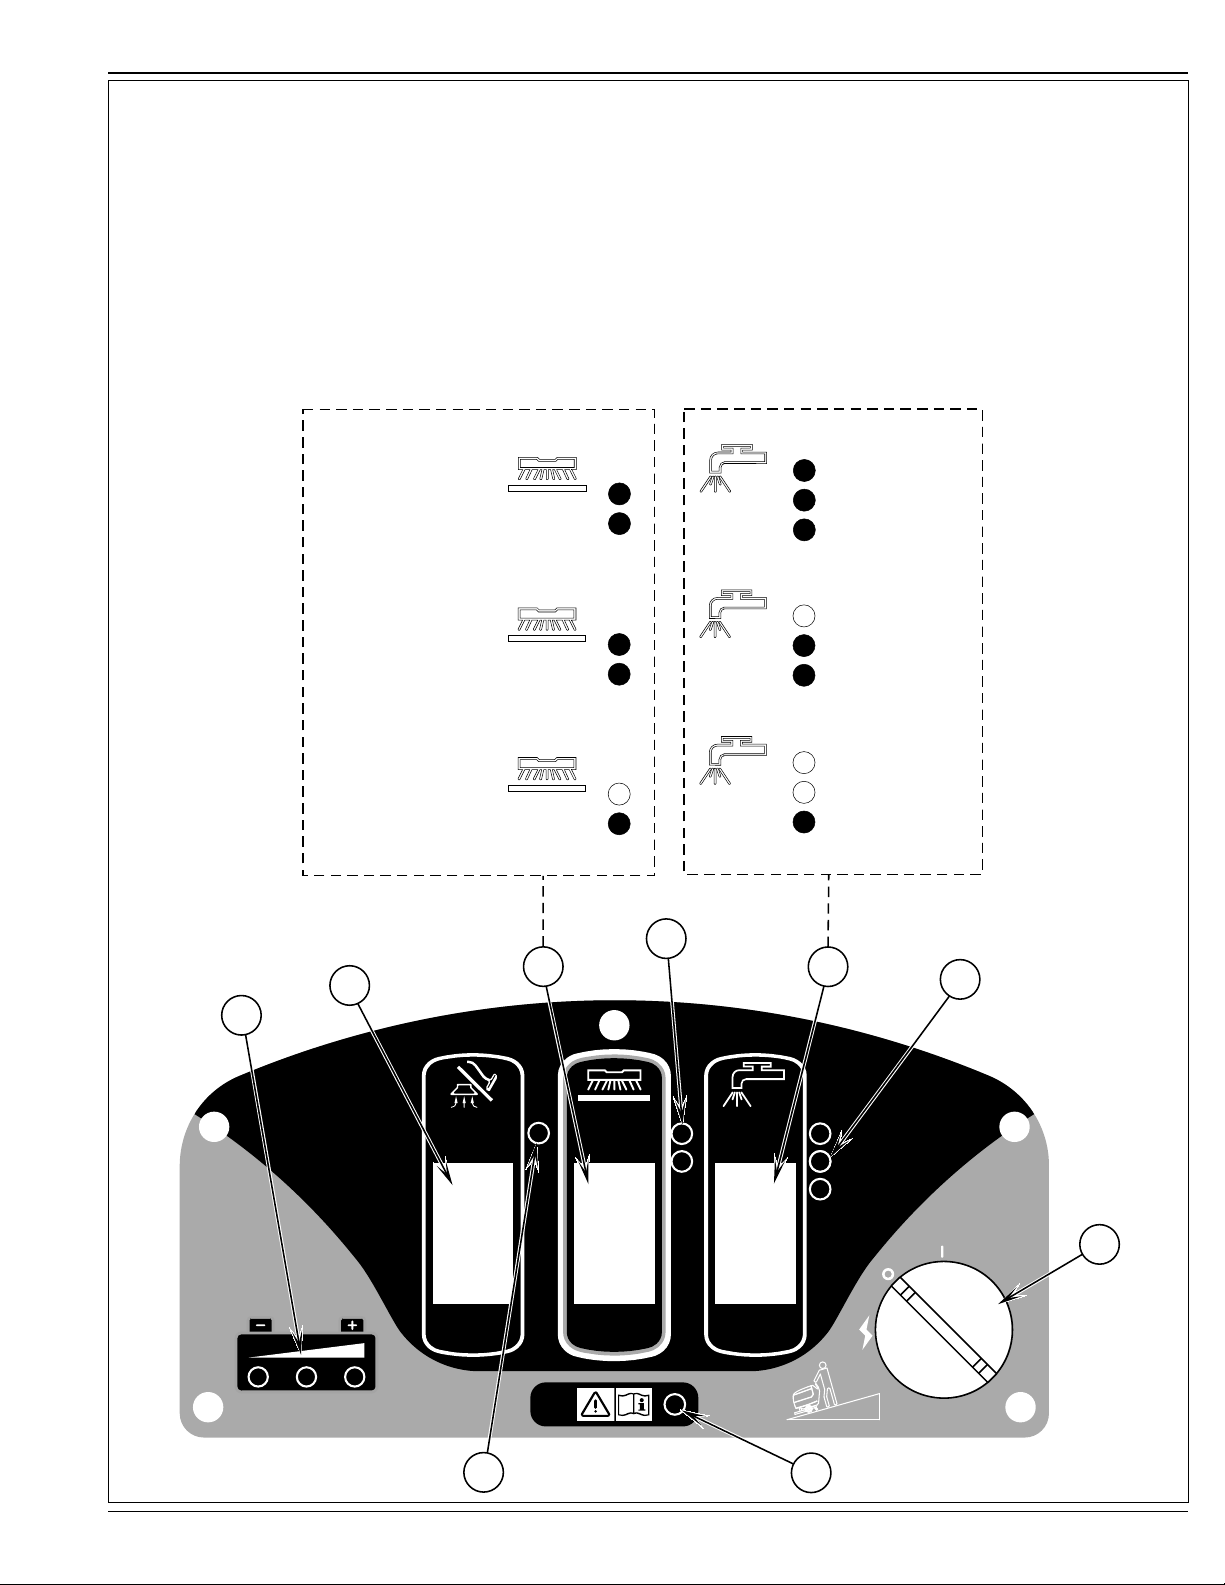
CONTROL PANEL – SC750 ST, SC800 ST
A Key Switch (Main Power)
B Solution ON/OFF Switch (Low, Medium & High)
B1 Solution Flow Indicator
C Vacuum/Wand Switch
C1 Vacuum Motor Disabled Indicator
D Scrub ON/OFF Switch
(Disc System - Regular & Heavy)
(Cylindrical System - 1 Pressure Sensing)
D1 Scrub Pressure Indicator
E Battery Indicator
F Fault Code Indicator
ENGLISH / A-9
Cylindrical Scrub
Pressure
(press once)
Heavy Disc Scrub
Pressure
(press twice)
Regular Disc Scrub
Pressure
(press once)
High
Solution
Flow
(press three times)
Medium
Solution
Flow
(press twice)
Low
Solution
Flow
(press once)
D1
C
D
B
B1
E
C1
A
x.2%
ma
F
FORM NO. - 56041820 - SC750, SC800, SC750 ST, SC800 ST - A-9
Page 10
A-10 / ENGLISH
BATTERIES
If your machine shipped with batteries installed do the following:
Check that the batteries are connected to the machine (15).
Turn ON the Key Switch (A) and check the Battery Indicator (F6 or E). If the gauge is completely fi lled or the green light is ON, the batteries are ready for
use. If the gauge is less than full or the green light is OFF, the batteries should be charged before use. See the “Charging The Batteries” section.
IMPORTANT!: IF YOUR MACHINE HAS AN ONBOARD BATTERY CHARGER REFER TO THE OEM PRODUCT MANUAL FOR INSTRUCTIONS
REGARDING SETTING THE CHARGER FOR BATTERY TYPE.
If your machine shipped without batteries installed do the following:
Consult your Authorized Advance dealer for recommended batteries.
Install the batteries by following the instructions below.
IMPORTANT!: IF YOUR MACHINE HAS AN ONBOARD BATTERY CHARGER REFER TO THE OEM PRODUCT MANUAL FOR INSTRUCTIONS
REGARDING SETTING THE CHARGER FOR BATTERY TYPE.
WARNING!
Use extreme caution when working with batteries. Sulfuric acid in batteries can cause severe injury if allowed to contact the skin
or eyes. Explosive hydrogen gas is vented from the batteries through openings in the battery caps. This gas can be ignited by
any electrical arc, spark or fl ame. Do not install any lead-acid battery in a sealed container or enclosure. Hydrogen gas from
overcharging must be allowed to escape.
When Servicing Batteries...
• Remove all jewelry
• Do not smoke
• Wear safety glasses, rubber gloves and a rubber apron
• Work in a well-ventilated area
• Do not allow tools to touch more than one battery terminal at a time
• ALWAYS disconnect the negative (ground) cable fi rst when replacing batteries to prevent sparks.
• ALWAYS connect the negative cable last when installing batteries.
CAUTION!
Electrical components in this machine can be severely damaged if the
batteries are not installed and connected properly. Advance, a qualifi ed
electrician, or the battery manufacturer should install batteries.
1 Remove the batteries from their shipping crate and carefully inspect them for cracks or
other damage. If damage is evident, contact the carrier that delivered them or the battery
manufacturer to fi le a damage claim.
2 Turn the Master Key Switch (A) OFF and remove the key.
3 Disconnect the Battery Pack Connector (15)
4 Tip the recovery tank to the side, locked position. Remove the battery cables from inside
the battery compartment.
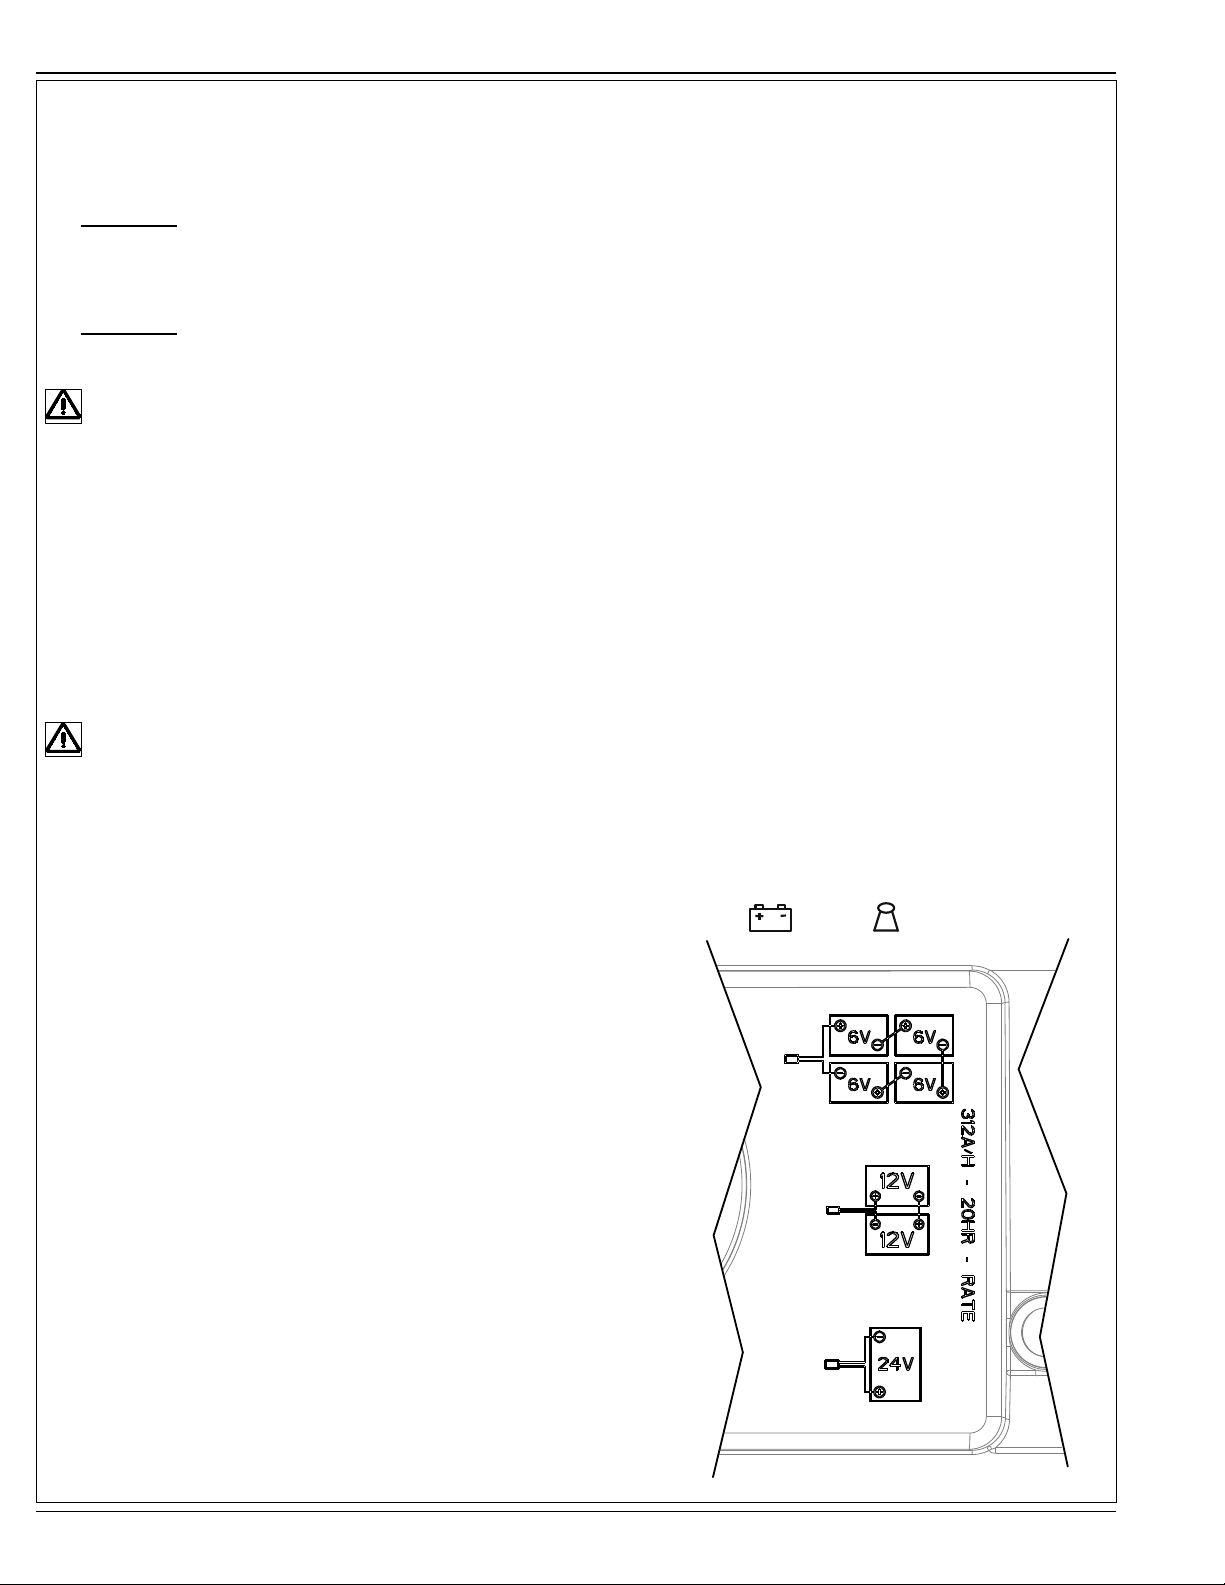
5 Your machine comes from the factory with enough battery cables to install four 6 volt
batteries. Carefully lift the batteries into the battery compartment and arrange them
exactly as shown in FIGURE 1. Secure the batteries as close to the back of the machine
as possible.
6 Install the battery cables as shown. Position the cables so the battery caps can be easily
removed for battery service.
7 Carefully tighten the nut in each battery terminal until the terminal will not turn. Do not
over-tighten the terminals, or they will be very diffi cult to remove for future service.
8 Coat the terminals with spray-on battery terminal coating (available at most auto parts
stores).
9 Put one of the black rubber boots over each of the terminals and connect the Battery
Pack Connector (15).
When changing batteries or the charger, please contact your local authorized
service center for correct battery, charger and machine settings to prevent
battery damage.
FIGURE 1
312 AH @ 20 HR RATE
(4) MAX 158KG/348LB
A-10 - FORM NO. - 56041820 - SC750, SC800, SC750 ST, SC800 ST
revised 11/12
Page 11
ENGLISH / A-11
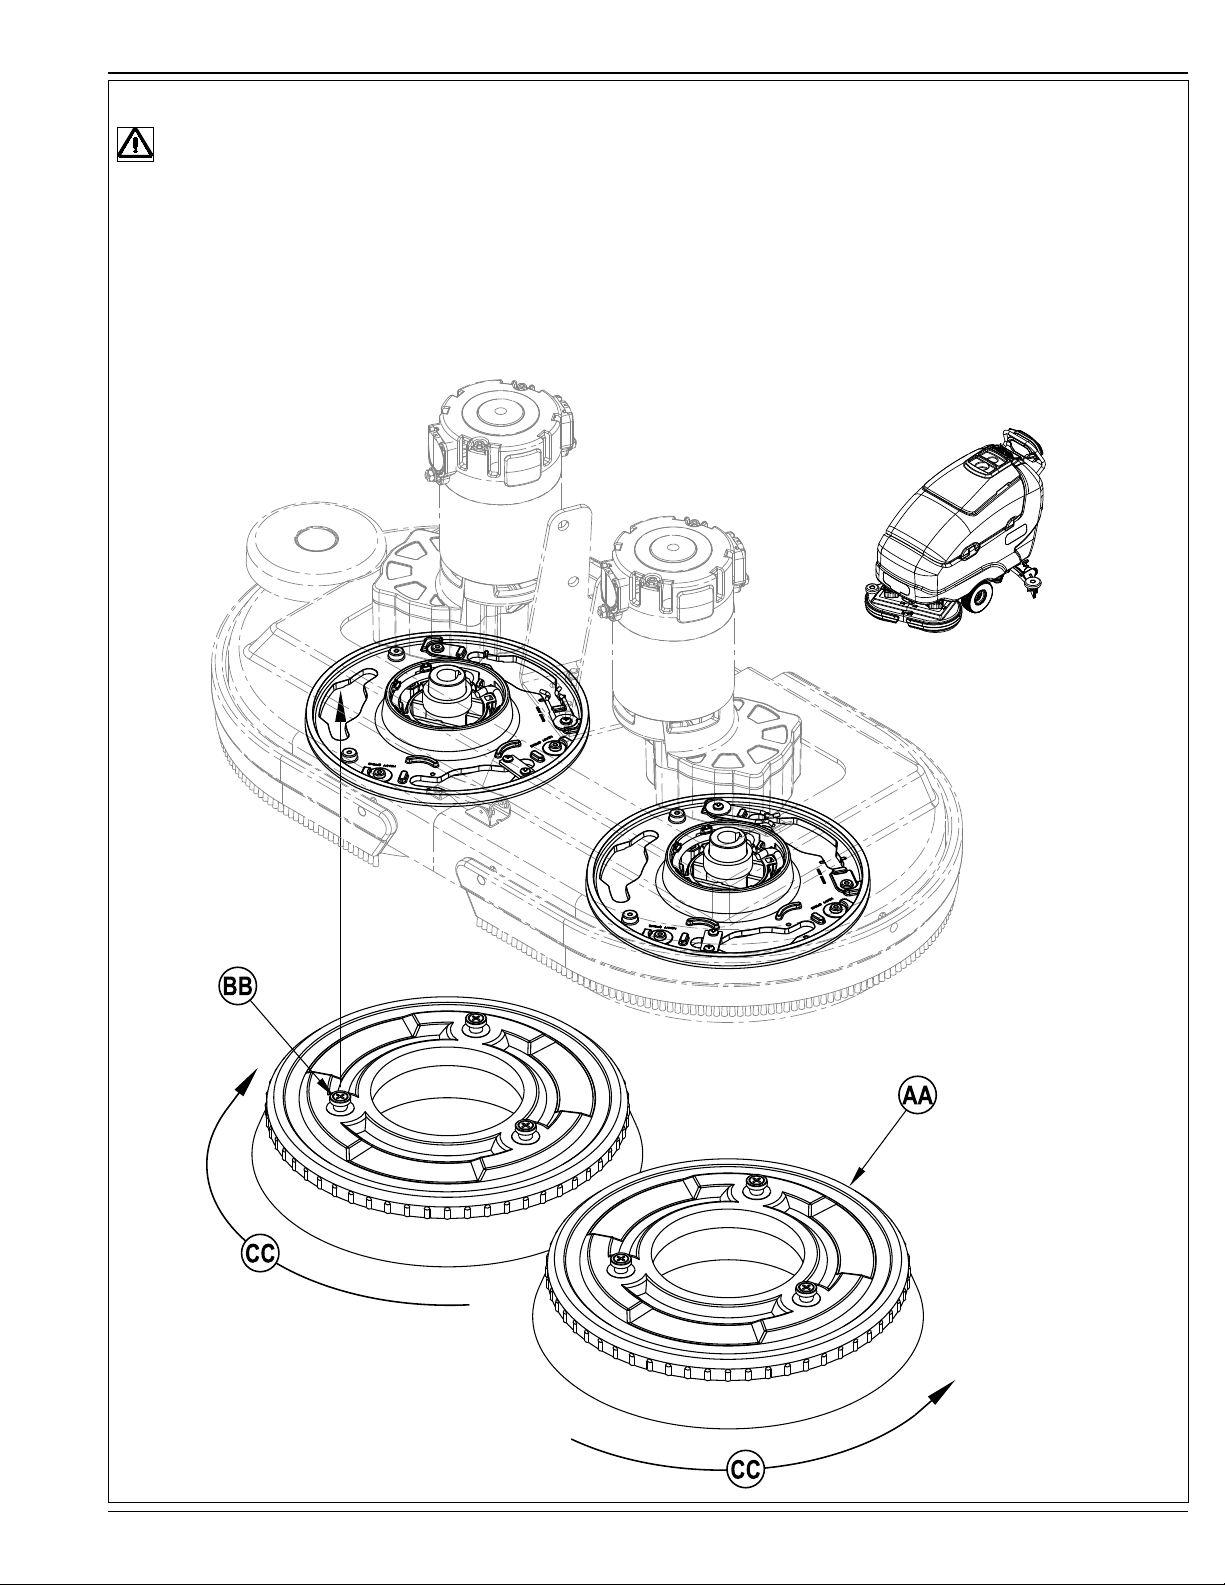
INSTALLING THE BRUSHES (DISC SYSTEM)
CAUTION!
Turn the key switch off (O) and remove the key, before changing the brushes, and before opening any access panels.
1 Make sure the Scrub Deck (8a) is in the RAISED position. Make sure the Key Switch (A) is off (O).
2 If using pads, install the pads on the pad holders.
3 See Figure 2. To mount the Brushes (AA) (or pad holders) align the Lugs (BB) on the brush with the holes on the mounting plate and turn to
lock in place (turn the outside edge of brush towards the rear of machine as shown (CC)).
FIGURE 2
FORM NO. - 56041820 - SC750, SC800, SC750 ST, SC800 ST - A-11
Page 12
A-12 / ENGLISH
INSTALL THE BRUSHES (CYLINDRICAL SYSTEM)
CAUTION!
Turn the key switch off (O) and remove the key, before changing the brushes, and before opening any access panels.
1 Make sure the Brush Deck is in the RAISED position. Make sure the Key Switch (A) is off (O).
2 See Figure 3. To access the brushes loosen the black knobs (one on each side) on top of the idler assemblies (26) and remove the idler
assemblies. Slide the brush into the housing, lift slightly, push and turn until it seats. Re-install the idler assemblies.
FIGURE 3
A-12 - FORM NO. - 56041820 - SC750, SC800, SC750 ST, SC800 ST
Page 13
ENGLISH / A-13
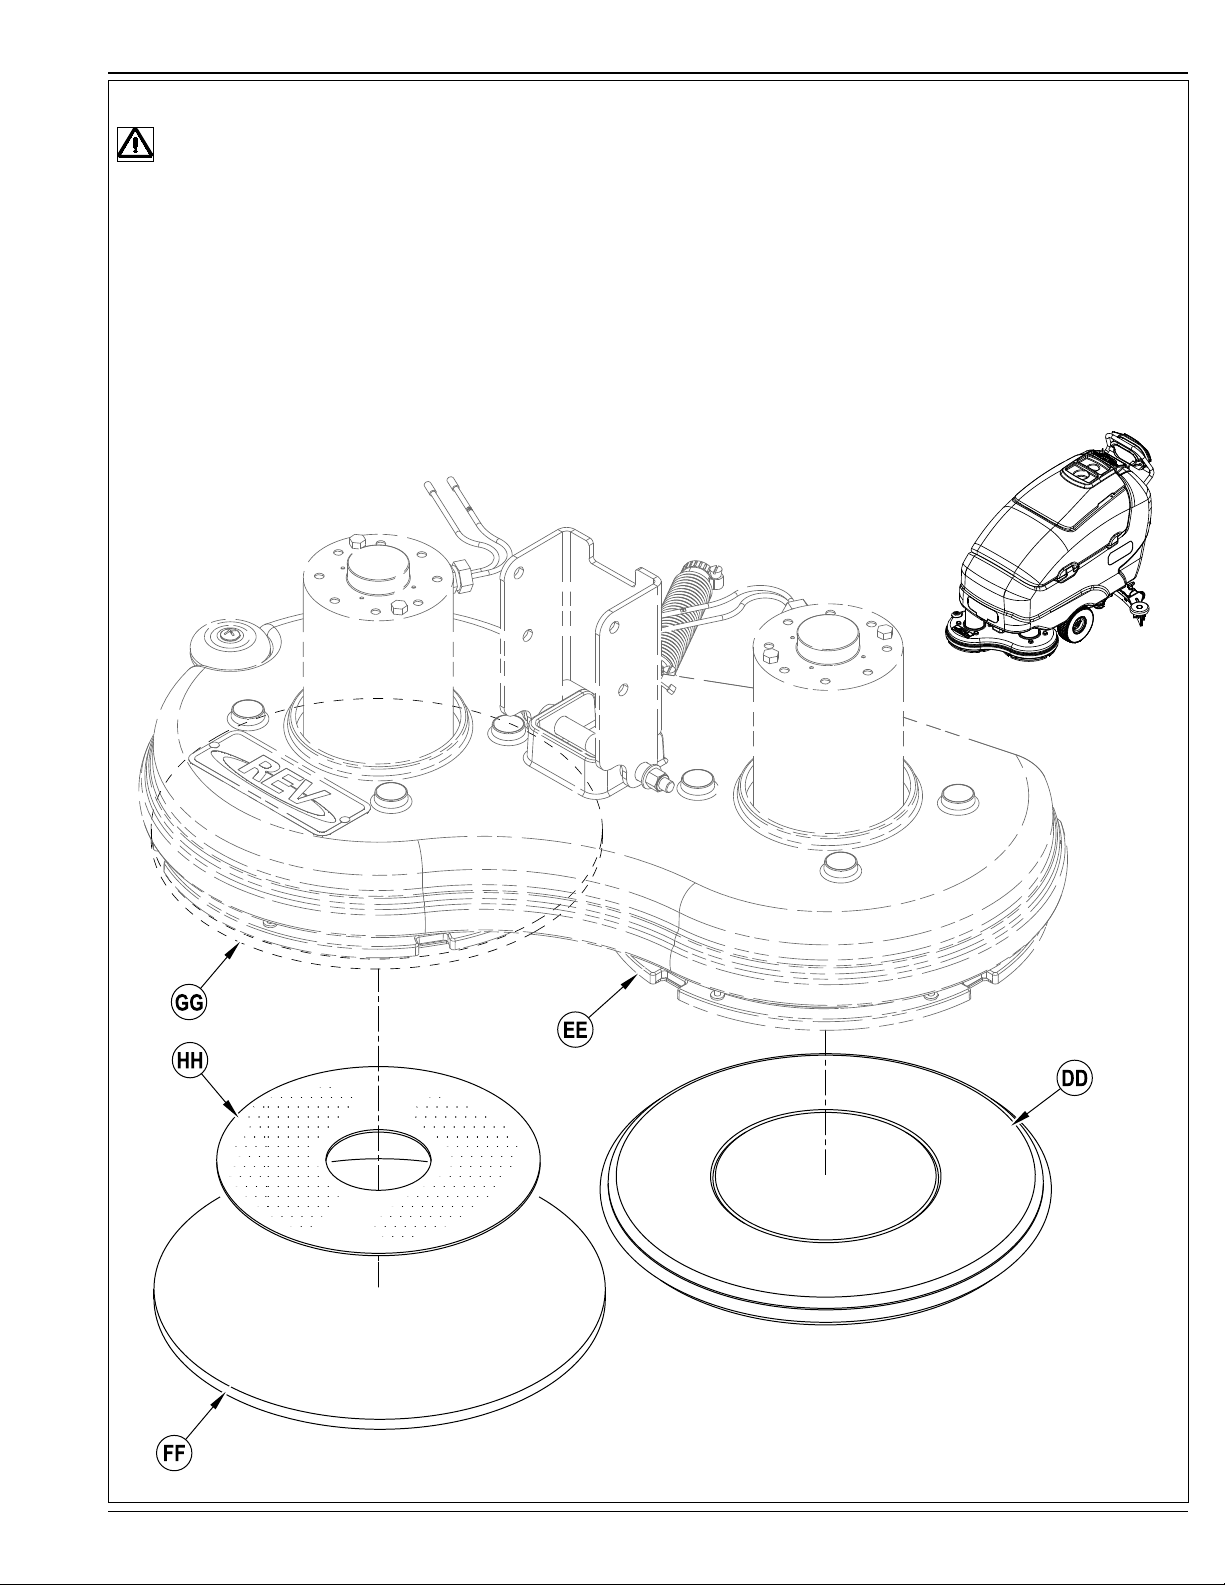
INSTALLING THE PADS (REV SYSTEM)
CAUTION!
Turn the key switch off (O) and remove the key, before changing the pads, and before opening any access panels.
1 Make sure the Scrub Deck (8b) is in the RAISED position. Make sure the Key Switch (A) is off (O).
2 See Figure 4. If using the Microfi ber Pad (DD), install directly to the Pad Driver Assembly (EE).
3 If using the Maroon Pad (FF), install the standard Red Pad (GG) to the Pad Driver Assembly (EE) fi rst and use the 2 Sided Velcro (HH)
between the red pad and maroon pad to hold it in place.
NOTE: If the Maroon SPP pad is not installed as defi ned above, damage to the pad driver will result!
FIGURE 4
FORM NO. - 56041820 - SC750, SC800, SC750 ST, SC800 ST - A-13
Page 14

A-14 / ENGLISH
A-14 - FORM NO. - 56041820 - SC750, SC800, SC750 ST, SC800 ST
Page 15
ENGLISH / A-15
FILLING THE SOLUTION TANK
Fill the solution tank with a maximum of 21 gallons (79.5 Liters) for SC750/SC750 ST models and 25 gallons (94.6 Liters) for SC800/SC800 ST
models of cleaning solution. Do not fi ll the solution tank above 7.5 cm (3 inches) from the bottom of the Solution Fill (1). The solution should be
a mixture of water and the proper cleaning chemical for the job. Always follow the dilution instructions on the chemical container label. NOTE:
EcoFlex machines can either be used conventionally with detergent mixed in the tank or the detergent dispensing system can be used. When
using the detergent dispensing do not mix detergent in the tank, plain water should be used.
CAUTION!
Use only low-foaming, non-fl ammable liquid detergents intended for machine application. Water temperature should not exceed 130
degrees Fahrenheit (54.4 degrees Celsius)
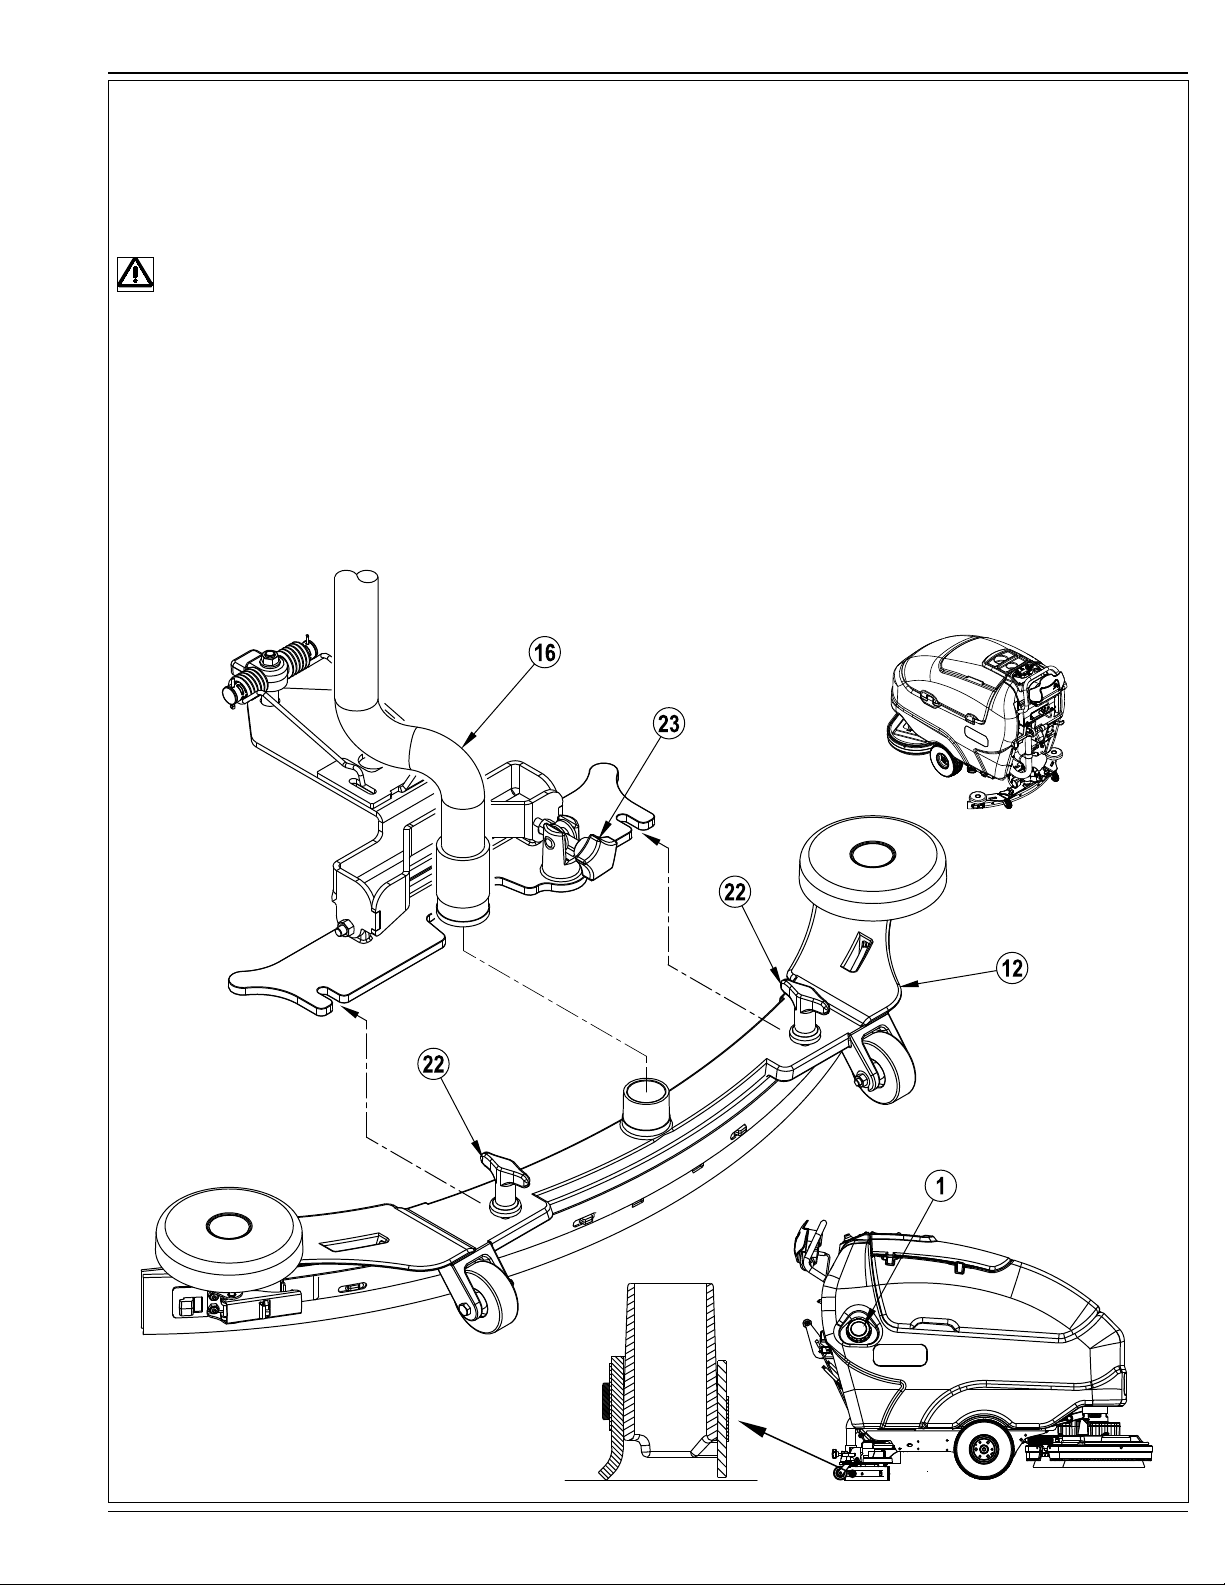
SQUEEGEE INSTALLATION
1 See Figure 5. Slide the Squeegee Assembly (12) onto the squeegee mount bracket and tighten the Squeegee Mount Thumb Nuts (22).
2 Connect the Recovery Hose (16) to the squeegee inlet.
3 Lower the squeegee, move the machine ahead slightly and adjust the squeegee tilt using the Squeegee Adjustment Knob (23) so that the
rear squeegee blade touches the fl oor evenly across its entire width and is bent over slightly as shown.
FIGURE 5
FORM NO. - 56041820 - SC750, SC800, SC750 ST, SC800 ST - A-15
Page 16

A-16 / ENGLISH
DETERGENT SYSTEM PREPARATION AND USE (ECOFLEX MODELS ONLY)
COMMON INSTRUCTIONS:
Pressing and releasing the Detergent Switch (E) while the solution system is active will cause the detergent system to alternately turn on and off.
The system should be purged of previous detergent when switching to a different detergent. SERVICE NOTE: Move machine over fl oor drain
before purging because a small amount of detergent will be dispensed in the process.
To Purge When Changing Chemicals:
1 Disconnect and remove the detergent cartridge.
2 Turn the Key Switch (A) ON. Press and hold the Solution Switch (C) and the Detergent Switch (E) down for 3 seconds. NOTE: Once
activated the purge process takes 10 seconds. See illustration on next page for Detergent System indicators. Normally one purge cycle is
adequate to purge the system.
To Purge Weekly:
1 Disconnect and remove the detergent cartridge. Install and connect a Cartridge fi lled with clean water
2 Turn the Key Switch (A) ON. Press and hold the Solution Switch (C) and the Detergent Switch (E) down for 3 seconds. NOTE: Once
activated the purge process takes 10 seconds. See illustration on next page for Detergent System indicators. Normally one purge cycle is
adequate to purge the system.
When the Detergent Cartridge is almost empty a Display Panel (F) indicator will come on. This “Low Detergent” indicator will remain on until you
reset the system. Once this indicator comes on you should be able to simply pour an entire gallon bottle of detergent into the Cartridge to refi ll
without worrying about measuring. NOTE: Only reset the system when the cartridge is full. When switching cartridges, the “Low Detergent”
indicator is only accurate if the replacement cartridge is at the same level as the cartridge being replaced.
To Reset:
1 Turn the Key Switch (A) ON. Press and hold together the Solution Increase Switch (B) and the Solution Decrease Switch (D) down for 3
seconds. See illustration on next page for Detergent System indicators.
Detergent Ratio:
The detergent ratio is locked at 1:400, except while overriding the EcoFlex cleaning mode. The pre-programmed ratio that is used during 1
EcoFlex override can be adjusted. With the detergent system OFF, press and hold the Detergent ON/OFF Switch (E) for 2 seconds. The
detergent indicator will fl ash and each press of the switch will cycle through the available ratios (1:32, 1:50, 1:64, 1:100, 1:128, 1:150, 1:200,
1:256, 1:300, 1:400). Once the desired ratio is displayed on the screen (F5), stop and it will lock in after 5 seconds.
2 With EcoFlex in the OFF/disabled state (LED off) the detergent ratio is adjustable. With the detergent system OFF, press and hold the
Detergent ON/OFF Switch (E) for 2 seconds. The detergent indicator will fl ash and each press of the switch will cycle through the available
ratios (see above). Once the desired ratio is displayed on the screen (F5), stop and it will lock in after 5 seconds.
CARTRIDGE SPECIFIC INSTRUCTIONS:
Fill the detergent cartridge with a maximum of 1.25 gallons (4.73 Liters) of detergent. SERVICE NOTE: Remove the detergent cartridge from the
detergent box prior to fi lling to avoid spilling detergent on the machine.
It is recommended that a separate cartridge be used for each detergent you plan to use. The detergent cartridges have a white decal on them so
you can write the detergent name on each cartridge to avoid mixing them up. When installing a new cartridge, remove the Cap (AA) and place the
cartridge in the detergent box. Install the Dry Break Cap (BB) as shown.
A-16 - FORM NO. - 56041820 - SC750, SC800, SC750 ST, SC800 ST
Page 17

DETERGENT SYSTEM PREPARATION AND USE (ECOFLEX MODELS ONLY)
ENGLISH / A-17
DETERGENT ENABLED
DETERGENT DISABLED
FULL (RESET)
DETERGENT LOW
PURGE
Press and hold (C) & (E)
for 3 seconds to purge.
D
C
B
E
Press and hold (B) & (D) for 3
seconds to reset.
F
Detergent system is ON
when indicator is ON.
A
%
2
max.
FORM NO. - 56041820 - SC750, SC800, SC750 ST, SC800 ST - A-17
Page 18

A-18 / ENGLISH
WET SCRUBBING
WARNING!
Be sure you understand the operator controls and their functions. While on ramps or inclines, avoid sudden stops when loaded.
Avoid abrupt sharp turns. Use low speed down hills. Clean only while ascending (driving up) the ramp.
To Scrub…
1 Follow the instructions in the “Preparing the Machine for Use” section of this manual.
2a SC750, SC800 models: Turn the Master Key Switch (A) ON (I). This will display the control panel indicator lights, reference the Battery Condition Indicator (F6) and Hour Meter
(F1) before proceeding.
3a To transport the machine to the work area, push the Drive Paddle (29) forward to go forward or pull the Drive Paddle (29) backward to move the machine in reverse. Vary the
pressure on the Drive Paddle (29) to obtain the desired speed.
NOTE: Speed Control Knob (30) is used to control the maximum speed in either forward or reverse.
4a Press and hold the Solution Switch (C) for 5 seconds to pre-wet the fl oor. NOTE: This must be done prior to pressing the Scrub ON/OFF Switch (H).
5a Press the Scrub ON/OFF Switch (H), the scrub pressure will default to Normal (one scrub pressure indicator lit). Use the Scrub Pressure Increase Switch (G) and Scrub
Pressure Decrease Switch (I) to change between Regular and Heavy Scrub modes. Only one pressure sensing is available for cylindrical machines.The solution fl ow rate will
automatically adjust to coincide with the scrub pressure.
NOTE: The solution fl ow rate can be changed independently of the scrub pressure by pressing the Solution Increase Switch (B) or Solution Decrease Switch (D). Any
subsequent scrub pressure adjustments will reset the solution fl ow rate to correspond with the scrub pressure.
NOTE: The scrub, solution, vacuum and detergent (EcoFlex models) systems are automatically enabled when the Scrub ON/OFF Switch (H) is pressed. Any individual system
can be turned OFF or back ON by simply pressing its switch at any time during scrubbing. No further action is required other than lowering the squeegee (12).
6a Lower the squeegee with the Squeegee Raise / Lower Lever (14).
7a When the Drive Paddle (29) is in the neutral position, the scrub, vacuum, solution and detergent (EcoFlex models) systems are activated but not running. Grip the Operator
Control Handle (2) and push the Drive Paddle (29) forward to start the scrub, vacuum, solution and detergent (EcoFlex models), and to move the machine forward. For best
results, move the machine at a slow walking speed. Press the Solution Switch (C) once to turn OFF while making sharp turns. Pull the Drive Paddle (29) backward to move the
machine in reverse. The brushes will run while moving the machine in reverse, but solution and chemical will not be dispensed.
2b ST models: Turn the Master Key Switch (A) ON (I). This will display the control panel indicator lights, reference the Battery Indicator (E) before proceeding.
3b To transport the machine to the work area, push either of the Palm Buttons (32) to go forward or press either Palm Button (32) and the Reverse Button (31) to move the machine
in reverse.
NOTE: Speed Control Knob (30) is used to control the maximum speed in either forward or reverse.
4b Press and hold the Solution Switch (B) for 5 seconds to pre-wet the fl oor. NOTE: This must be done prior to pressing the Scrub ON Switch (D).
5b Press the Scrub ON Switch (D) once for Regular Scrub Pressure (one scrub pressure indicator lit) or twice for Heavy Scrub Pressure (two scrub pressure indicators lit). Only one
pressure sensing is available for cylindrical machines. Once the scrub system is activated, pressing the Solution Switch (B) will toggle between solution off, low, medium and
high solution fl ow rates.
NOTE: The solution and vacuum systems are automatically activated when the Scrub ON Switch (D) is pressed. No further action is required other than lowering the squeegee
(12). Any individual system can be turned OFF or back ON by simply pressing its switch at any time during scrubbing.
6b Lower the squeegee with the Squeegee Raise / Lower Lever (14).
7b When the Palm Buttons (32) are not being pressed (machine stationary), the scrub, vacuum and solution systems are activated but not running. Grip the Operator Control
Handle (2) and press either of the Palm Buttons (32) to start the scrub, vacuum, solution, and to move the machine forward. For best results, move the machine at a slow
walking speed. Press either palm button plus the reverse button to move the machine in reverse. The brushes will run while moving the machine in reverse, but solution will not
be dispensed.
CAUTION!
To avoid damaging the fl oor, keep the machine moving while the brushes are turning.
8 When scrubbing, check behind the machine occasionally to see that all of the waste water is being picked up. If there is water trailing the machine, you may be dispensing too
much solution, the recovery tank may be full, or the squeegee tool may require adjustment.
9 EcoFlex models only: The machine defaults to the EcoFlex cleaning mode (EcoFlex Switch Indicator is lit GREEN) conserving solution and detergent. Press the EcoFlex
Switch (J) to override the EcoFlex cleaning mode and temporarily increase scrub pressure, solution fl ow and the detergent ratio. This will cause the indicator to fl ash (YELLOW)
for one minute, solution fl ow rate will increase to the next level, scrub pressure will increase to the next level and the detergent ratio will increase to the pre-programmed ratio.
The pre-programmed ratio that is used during EcoFlex override can be adjusted. With the detergent system OFF, press and hold the Detergent ON/OFF Switch (E) for 2
seconds. The detergent indicator will fl ash and each press of the switch will cycle through the available ratios (1:32, 1:50, 1:64, 1:100, 1:128, 1:150, 1:200, 1:256, 1:300,
1:400). Once the desired ratio is displayed on the screen (F5), stop and it will lock in after 5 seconds.
NOTE: Pressing and holding the EcoFlex Switch (J) for 2 seconds disables the EcoFlex system. The only way to re-enable is to push the EcoFlex Switch (J) again. Cycling the
Key Switch (A) does not re-enable the system. The EcoFlex system will only function if the Scrub System (H) has been enabled.
10 For extremely dirty fl oors, a one-pass scrubbing operation may not be satisfactory and a “double-scrub” operation may be required. This operation is the same as a one-pass
scrubbing except on the fi rst pass the squeegee is in the up position. This allows the cleaning solution to remain on the fl oor to work longer. The fi nal pass is made over the
same area, with the squeegee lowered to pick up the accumulated solution.
11a SC750, SC800 models: The recovery tank has a shut-off fl oat (4) that causes ALL systems to turn OFF except the drive system when the recovery tank is full. When this fl oat is
activated, the recovery tank must be emptied. The machine will not pick up water or scrub with the fl oat activated.
NOTE: All other indicators vanish and a “Recovery Tank FULL” Indicator (F7) turns on in the Display Panel when the switch is activated on “EcoFlex” models.
11b SC750 ST, SC800 ST models: The recovery tank has a shut-off fl oat (4) that causes ALL systems to turn OFF except the drive system when the recovery tank is full. When this
fl oat is activated, the recovery tank must be emptied. The machine will not pick up water or scrub with the fl oat activated.
12 When the operator wants to stop scrubbing or the recovery tank is full;
SC750, SC800 models: Press the Scrub ON/OFF Switch (H) once. This will automatically stop the scrub motors and the solution fl ow and the deck will raise to its upper limit.
NOTE: The vacuum will stop after a 10 second delay. This is to allow any remaining water to be picked up without turning the vacuum back on.
SC750 ST, SC800 ST models: Press the Scrub ON/OFF Switch (D) once to the down position when it is in the regular scrub mode. This will automatically stop the scrub motors
and the solution fl ow and the deck will raise to its upper limit. NOTE: The vacuum will stop after a 10 second delay. This is to allow any remaining water to be picked up without
turning the vacuum back on.
13 Raise the squeegee with the Squeegee Raise / Lower Lever (14). and drive the machine to a designated wastewater “DISPOSAL SITE” and empty the recovery tank. To empty,
pull the Recovery Tank Drain Hose (24) from its hanger and open the cap (hold the end of the hose above the water level in the tank to avoid sudden, uncontrolled fl ow of waste
water). The Recovery Tank Drain Hose (24) can be squeezed to regulate the fl ow. Refi ll the solution tank and continue scrubbing.
A-18 - FORM NO. - 56041820 - SC750, SC800, SC750 ST, SC800 ST
Page 19

ENGLISH / A-19
WET SCRUBBING
NOTE: Make sure the Recovery Tank Lid (6) and the Recovery Tank Drain Hose (24) cap are properly seated or the machine will not pick-up water correctly. When
the batteries require recharging the Battery LOW Indicator (F8) will come on (SC750, SC800 models) or the Battery Indicator (E) will fl ash red (Standard models)
and the vacuum motor will shut off after 30 seconds. Transport the machine to a service area and recharge the batteries according to the instructions in the Battery
section of this manual.
WET VACUUMING
Fit the machine with optional attachments for wet vacuuming.
1 Disconnect the Recovery Hose (16) from the Squeegee (12).
2 Attach suitable wet pick-up tools to the hose (Available from Advance).
3 Turn the Master Key Switch (A) ON.
4 Press the Vacuum/Wand Switch (L) (SC750, SC800 models)
or (C) (SC750 ST, SC800 ST models) once to turn ON the vacuum motor.
The vacuum motor will run continuously until the switch
is pressed again to turn it OFF.
NOTE: The “Recovery Tank FULL” indicator is disabled
when the wand mode is activated.
The fl oat will stop the fl ow into the recovery tank.
F7
F8
F1
!
!
F5
F
F6
H
G
B
H1
C
L
I
D
A
J
6
4
SERVICE NOTE: Refer to the service manual
for detailed functional descriptions of all
controls and optional programmability.
29
30
2
24
14
12
16
FORM NO. - 56041820 - SC750, SC800, SC750 ST, SC800 ST - A-19
Page 20

A-20 / ENGLISH
AFTER USE
1 Raise the brushes (or pads) and raise the squeegee. Move the machine to a service area.
2 Turn the Master Key Switch (A) OFF and remove the key.
3 To empty the solution tank, pull the Solution Drain Hose (13) off the upper connector. Direct the hose to a fl oor drain or bucket. Rinse the tank with clean
water. Inspect the solution hoses; replace if kinked or damaged.
4 To empty the recovery tank, remove the Recovery Tank Drain Hose (24) from its hanger and remove the cap (hold the end of the hose above the water level
in the tank to avoid sudden, uncontrolled fl ow of waste water). The Recovery Tank Drain Hose (24) can be squeezed to regulate the fl ow. Rinse the recovery
tank and shut-off fl oat (4) with clean water. Inspect the recovery and vacuum hoses; replace if kinked or damaged.
5 Remove the brushes or pad holders. Rinse the brushes or pads with warm water and hang up to dry. Allow buffi ng pads to dry completely before using again.
NOTE: You can either remove the brushes manually or automatically by pressing the Brush Remove Switch (K) (SC750, SC800 disk models only).
6 Remove the squeegee, rinse it with warm water and hang it up to dry.
7 Check the maintenance schedule below and perform any required maintenance before storage.
MAINTENANCE SCHEDULE
MAINTENANCE ITEM Daily Weekly Monthly Yearly
Charge Batteries X
Check/Clean Tanks & Hoses X
Check/Clean/Rotate the Brushes/Pads X
Check/Clean the Squeegee X
Check/Clean Vacuum Shut-Off Float X
Empty/Clean Debris Tray In Recovery Tank X
Clean Hopper on Cylindrical System X
Check Each Battery Cell(s) Water Level (does not apply to gel cell batteries) X
Inspect Scrub Housing Skirts X
Inspect and clean Solution Filter X
Clean Solution Manifolds on Cylindrical System X
Purge Detergent System (EcoFlex only) X
Lubricate the Machine X
* Check Carbon Brushes X
* Have Advance check the vacuum motor carbon motor brushes once a year or after 300 operating hours. The brush and drive motor carbon brushes check every
500 hours or once a year.
NOTE: Refer to the Service Manual for more detail on maintenance and service repairs.
8 Store the machine in a clean, dry place.
9 Turn the Master Key Switch (A) OFF (O) and remove the key.
SERVICING THE VACUUM MOTOR
Have your Advance Dealer check the carbon motor brushes
once a year or after 300 operating hours.
IMPORTANT!
Motor damage resulting from failure to service the
carbon brushes is not covered under warranty.
See the Limited Warranty Statement.
LUBRICATING THE MACHINE
Once a month, apply light machine oil to lubricate the:
• General Pivot Points For the Squeegee Linkage (A).
• Squeegee mount angle adjustment knob threads (B).
• Squeegee Tool end wheels (C).
• General Pivot Points For the Brush Linkage (D).
• Pivot points on REV Deck (G).
• Scrub deck bumper wheels (F).
Once per quarter, Grease the following
• Rear Caster Wheel Swivels (E).
C
D
G
F
A
B
C
E
A-20 - FORM NO. - 56041820 - SC750, SC800, SC750 ST, SC800 ST
revised 11/12
Page 21

ENGLISH / A-21
CHARGING WET BATTERIES
SC750, SC800 - Charge the batteries each time the machine is used or when the Battery Indicator (F6) is reading less than full.
SC750 ST, SC800 ST - Charge the batteries each time the machine is used or when the Battery Indicator (E) is fl ashing RED.
WARNING!
Do not fi ll the batteries before charging.
Charge batteries in a well-ventilated area.
Do not smoke while servicing the batteries.
When Servicing Batteries...
* Remove all jewelry
* Do not smoke
* Wear safety glasses, rubber gloves and a rubber apron
* Work in a well-ventilated area
* Do not allow tools to touch more than one battery terminal at a time
* ALWAYS disconnect the negative (ground) cable fi rst when replacing batteries to prevent sparks.
* ALWAYS connect the negative cable last when installing batteries.
If your machine shipped with an onboard battery charger do the following:
Turn the Key Switch (A) OFF. Unwind the electrical cord from the side of the onboard charger and plug it into a properly grounded outlet. Refer to the OEM product manual for more
detailed operating instructions.
If your machine shipped without an onboard battery charger do the following:
Disconnect the batteries from the machine and push the connector from the charger into the Battery Pack Connector (15). Follow the instructions on the battery charger.
CAUTION!
To avoid damage to fl oor surfaces, wipe water and acid from the top of the batteries after charging.
CHECKING THE BATTERY WATER LEVEL
Check the water level of the batteries at least once a week.
After charging the batteries, remove the vent caps and check the water level in each battery cell. Use distilled or demineralized water in a battery
fi lling dispenser (available at most auto parts stores) to fi ll each cell to the level indicator (or to 10 mm over the top of the separators). DO NOT
over-fi ll the batteries!
CAUTION!
Acid can spill onto the fl oor if the batteries are overfi lled.
Tighten the vent caps. Wash the tops of the batteries with a solution of baking soda and water (2 tablespoons of baking soda to 1 liter of water).
CHARGING GEL (VRLA) BATTERIES
SC750, SC800 - Charge the batteries each time the machine is used or when the Battery Indicator (F6) is reading less than full.
SC750 ST, SC800 ST - Charge the batteries each time the machine is used or when the Battery Indicator (E) is fl ashing RED.
WARNING!
Charge batteries in a well-ventilated area.
Do not smoke while servicing the batteries.
When Servicing Batteries...
* Remove all jewelry
* Do not smoke
* Wear safety glasses, rubber gloves and a rubber apron
* Work in a well-ventilated area
* Do not allow tools to touch more than one battery terminal at a time
* ALWAYS disconnect the negative (ground) cable fi rst when replacing batteries to prevent sparks.
* ALWAYS connect the negative cable last when installing batteries.
CAUTION!
Your voltage regulated lead acid (VRLA) battery will deliver superior performance and life ONLY IF IT RECHARGED PROPERLY! Under or
overcharging will shorten battery life and limit performance. Be sure to FOLLOW PROPER CHARGING INSTRUCTIONS! DO NOT ATTEMPT
TO OPEN THIS BATTERY! If a VRLA battery is opened, it loses its pressure and the plates become oxygen contaminated. THE WARRANTY
WILL BE VOIDED IF THE BATTERY IS OPENED.
If your machine shipped with an onboard battery charger do the following:
Turn the Key Switch (A) OFF. Unwind the electrical cord from the side of the onboard charger and plug it into a properly grounded outlet. Refer to the OEM product manual for more
detailed operating instructions.
If your machine shipped without an onboard battery charger do the following:
Disconnect the batteries from the machine and push the connector from the charger into the Battery Pack Connector (15). Follow the instructions on the battery charger. SERVICE
NOTE: Make sure you plug the battery charger into the connector with the handle attached to it.
IMPORTANT: Make sure you have an appropriate charger for use on Gel cell batteries. Use only “voltage-regulated” or “voltage-limited” chargers. Standard constant
current or taper current chargers MUST NOT be used. A temperature-sensing charger is recommended, as manual adjustments are never accurate and will damage any
VRLA battery.
FORM NO. - 56041820 - SC750, SC800, SC750 ST, SC800 ST - A-21
Page 22

A-22 / ENGLISH
SERVICING THE SQUEEGEE
If the squeegee leaves narrow streaks or water, the blades may be dirty or damaged. Remove the squeegee, rinse it under warm water and
inspect the blades. Reverse or replace the blades if they are cut, torn, wavy or worn.
To Reverse or Replace the Rear Squeegee Wiping Blade...
1 See Figure 6. Raise the squeegee tool off the fl oor, and then unsnap the Rear Squeegee Blade Removal Latch (20) on the squeegee tool.
2 Remove the Tension Strap (19).
3 Slip the rear blade off the Alignment Pins (21).
4 The squeegee blade has 4 working edges. Turn the blade so a clean, undamaged edge points toward the front of the machine. Replace the
blade if all 4 edges are nicked, torn or worn to a large radius.
5 Install the blade, following the steps in reverse order and adjust the squeegee tilt.
To Reverse or Replace the Front Squeegee Blade...
1 Raise the squeegee tool off the fl oor, then loosen the (2) Thumb Nuts (22) on top of the squeegee tool. Disconnect the Recovery Hose (16)
and remove the squeegee tool (12) from the mount.
2 Loosen the Front Squeegee Blade Removal Knob (AA), then remove Tension Strap (AB) and blade..
3 The squeegee blade has 4 working edges. Turn the blade so a clean, undamaged edge points toward the front of the machine. Replace the
blade if all 4 edges are nicked, torn or worn to a large radius.
4 Install the blade, following the steps in reverse order and adjust the squeegee tilt.
ADJUSTING THE SQUEEGEE
Adjust the squeegee angle whenever a blade is reversed or replaced, or if the squeegee is not wiping the fl oor dry.
To Adjust the Squeegee Angle...
1 Park the machine on a fl at, even surface and lower the squeegee.
2 While moving the machine forward slowly, turn the Squeegee Adjustment Knob (23) until the rear squeegee blade folds over evenly across
the entire width of the squeegee as shown below.
FIGURE 6
A-22 - FORM NO. - 56041820 - SC750, SC800, SC750 ST, SC800 ST
Page 23

GENERAL MACHINE TROUBLESHOOTING
Problem Possible Cause Remedy
Worn or torn squeegee blades Reverse or replace
Squeegee out of adjustment Adjust so blades touch fl oor evenly
across entire width
Recovery tank full Empty recovery tank
Poor water pick-up
Poor scrubbing performance
Inadequate solution fl ow
or no solution
Recovery tank drain hose leak Secure drain hose cap or replace
Recovery tank cover gasket leak Replace gasket / Seat cover properly
Debris caught in squeegee Clean squeegee tool
Vacuum hose clogged Remove debris
Using too much solution Adjust solution fl ow at control panel
Foam fi lter cover not seated Seat cover properly
Worn brush or pad Rotate or replace brushes
Wrong brush or pad type Consult Advance
Wrong cleaning chemical Consult Advance
Moving machine too fast Slow down
Not using enough solution Increase solution fl ow at control panel
Solution tank empty Fill solution tank
Solution lines, valves, fi lter or trough
clogged
Solution shutoff valve closed Open solution shutoff valve
Solution solenoid valve Clean or replace valve
Flush lines, trough and clean solution fi lter
ENGLISH / A-23
Machine does not run
No FWD/REV wheel drive
Vacuum shuts off and display shows
“Recovery Tank FULL indicator” when
recovery tank is not full
Poor Sweeping Performance
(Cylindrical System)
No Detergent Flow (EcoFlex models only)
Battery connector disconnected Reconnect battery connectors
Main system controller Check error fault codes
(see service manual)
Tripped 10 Amp circuit breaker Check for electrical short circuit & reset
Drive system speed controller Check error fault codes
(see service manual)
Tripped 30 Amp circuit breaker
Emergency stop switch tripped Reset the Emergency Stop Switch
Plugged squeegee hose Clear debris
Vacuuming large amounts of water
at a high travel speed
Hopper Full Empty and clean hopper
Brushes worn Replace brushes
Bristles have taken a set Rotate brushes
Empty detergent cartridge Fill detergent cartridge
Plugged or kinked detergent fl ow line Purge system, straighten lines to
Dry seal cap on detergent cartridge not
sealed
Detergent pump wiring
disconnected or backwards
Check for drive motor overload
Slow down or disable auto shut-off feature
(see service manual)
remove any kinks
Reseat dry seal cap
Connect or reconnect wiring
Variability of the Pad Rotation
(REV System)
Pad changes rotation speed at various
times
FORM NO. - 56041820 - SC750, SC800, SC750 ST, SC800 ST - A-23
Dependant on fl oor substrate,
Pad type and down pressure setting
Page 24

A-24 / ENGLISH
TECHNICAL SPECIFICATIONS (as installed and tested on the unit)
Model SC750-26D
SC750 ST-26D SC750-28D
SC750-28C SC750 ST-28D SC750-28R
Model No. 56112000
56112012 56112004
56112006 56112013 56112780
Voltage, Batteries V 24V 24V 24V 24V
Battery Capacity Ah 312 312 312 312
Protection Grade IPX4 IPX4 IPX4 N/A
Sound Pressure Level
(IEC 60704-1)
Sound Pressure Level
(IEC 60704-1) Uncertainty
Gross Weight lbs / kg 942/427.3 942/427.3 942/427.3 969/439.5
Transport Weight lbs / kg 932/422.7 932/422.7 932/422.7 959/435.0
Maximum Wheel Floor Loading (right front) psi N/mm
Maximum Wheel Floor Loading (left front) psi N/mm
Maximum Wheel Floor Loading (center rear) psi N/mm
Vibrations at the Hand Controls
(ISO 5349-1)
Vibrations at the Hand Controls
(ISO 5349-1) Uncertainty
Gradeability Transport 2% (1.15º) 2% (1.15º) 2% (1.15º) 2% (1.15º)
Gradeability Cleaning 2% (1.15º) 2% (1.15º) 2% (1.15º) 2% (1.15º)
Model
Model No.
Voltage, Batteries V
Battery Capacity Ah
Protection Grade
Sound Pressure Level
(IEC 60704-1)
Sound Pressure Level
(IEC 60704-1) Uncertainty
Gross Weight lbs / kg 994/450.9 994/450.9 994/450.9
Transport Weight lbs / kg 984/446.3 984/446.3 984/446.3
Maximum Wheel Floor Loading (right front) psi N/mm
Maximum Wheel Floor Loading (left front) psi N/mm
Maximum Wheel Floor Loading (center rear) psi N/mm
Vibrations at the Hand Controls
(ISO 5349-1)
Vibrations at the Hand Controls
(ISO 5349-1) Uncertainty
Gradeability Transport 2% (1.15º) 2% (1.15º) 2% (1.15º)
Gradeability Cleaning 2% (1.15º) 2% (1.15º) 2% (1.15º)
dB(A) 61 61 61 64
dB(A) 3.0 3.0 3.0 3.0
m/s
m/s
2
2
2
2
2
59.08/0.407 59.08/0.407 59.08/0.407 56.88/0.392
60.10/0.414 60.10/0.414 60.10/0.414 69.61/0.480
287.56/1.983 287.56/1.983 287.56/1.983 268.39/1.85
Less than 2.5 Less than 2.5 Less than 2.5 Less than 2.5
.02 .02 .02 .02
SC800-28D SC800-32C
SC800-28C SC800-34D SC800 ST-34D
56112016 56112024
56112018 56112028 56112032
24V 24V 24V
312 312 312
IPX4 IPX4 IPX4
dB(A) 61 61 61
dB(A) 3.0 3.0 3.0
m/s
m/s
2
2
2
2
2
71.0/.490 71.0/.490 71.0/.490
66.6/.459 66.6/.459 66.6/.459
287.6/1.983 287.6/1.983 287.6/1.983
.09 .09 .09
.02 .02 .02
MATERIAL COMPOSITION
LBS KG
Aluminum 13.58 6.16
Rubber 15.888 7.21
Plastic 23.037 10.45
Polyethylene 116.4 52.79
Ferrous Metal & Copper
Transaxle 23 10.43
Brush Motor 17.25 7.82
Vac Motor 6 2.72
Other Electric 19.41 8.80
A-24 - FORM NO. - 56041820 - SC750, SC800, SC750 ST, SC800 ST
Page 25

Page 26

B-2 / ESPAÑOL
ÍNDICE
Página
Introducción ........................................................................................ B-3
Componentes y servicio .....................................................................B-3
Placa de identifi cación ........................................................................ B-3
Desembalaje de la máquina ...............................................................B-3
Precauciones y advertencias .................................................... B-4 – B-5
Conozca su máquina ................................................................ B-6 – B-7
Panel de control – SC750, SC800 ...................................................... B-8
Panel de control – SC750 ST, SC800 ST ...........................................B-9
Preparación de la máquina para su utilización
Baterías ............................................................................................ B-10
Instalación de los cepillos y las bayetas ................................B-11 – B-13
Llenado del depósito de solución .....................................................B-15
Instalación de la boquilla ..................................................................B-15
Sistema de detergente (EcoFlex™) .................................... B-16 – B-17
Manejo de la máquina
Fregado en húmedo ............................................................. B-18 – B-19
Aspiración en húmedo ......................................................................B-19
Después de la utilización de la máquina ..........................................B-20
Programa de mantenimiento ............................................................B-20
Mantenimiento del motor de aspiración ............................................ B-20
Lubricación de la máquina ................................................................ B-20
Mantenimiento
Recarga de las baterías (líquido) .....................................................B-21
Recarga de las baterías (gel) ...........................................................B-21
Mantenimiento de la boquilla ............................................................B-22
Ajuste de la boquilla .........................................................................B-22
Resolución de problemas .................................................................B-23
Especifi caciones técnicas ................................................................. B-24
Composición Del Material ................................................................. B-24
B-2 - FORM NO. - 56041820 - SC750, SC800, SC750 ST, SC800 ST
revised 7/11
Page 27

ESPAÑOL / B-3
INTRODUCCIÓN
Este manual le ayudará a obtener el máximo rendimiento de su limpiadora/secadora automática Advance™. Léalo con atención antes de utilizar la máquina.
Nota: Los números que aparecen en negrita entre paréntesis indican elementos ilustrados en las páginas 5-8, a menos que se indique lo contrario.
Este producto está destinado exclusivamente a uso comercial.
COMPONENTES Y SERVICIO
Las reparaciones, cuando sean necesarias, deben ser realizadas por su Centro Autorizado de Servicio Advance que utiliza personal de servicio formado en
fábrica y lleva un inventario de piezas de repuesto y accesorios Advance originales.
Llame a Advance para lo referente a piezas de repuesto y servicio. Por favor, especifi que el Modelo y Número de Serie cuando hable de su máquina.
MODIFICACIONES
Las modifi caciones y los agregados a la máquina de limpieza que afecten su capacidad y su funcionamiento seguro no serán realizados por el cliente o el usuario
sin la autorización previa y por escrito de Nilfi sk-Advance Inc. Las modifi caciones que no cuenten con la aprobación correspondiente anularán la garantía de la
máquina y harán que el cliente sea responsable de cualquier accidente resultante.
PLACA DE IDENTIFICACIÓN
El Número de Modelo y de Serie de la máquina se indican en la placa de identifi cación instalada en el compartimento de las baterías.
Esta información es necesaria a la hora de solicitar repuestos para la máquina. Utilice el siguiente espacio para anotar el Modelo y el Número de Serie de su
máquina para futuras consultas.
Modelo _____________________________________________
Número de Serie _____________________________________
DESEMBALAJE DE LA MÁQUINA
Cuando reciba la máquina, examine con atención el embalaje y la máquina, con el fi n de comprobar si existe algún daño. Si observa algún daño, guarde la caja
de embalaje (si procede) para que se pueda inspeccionar. Póngase en contacto inmediatamente con el Departamento de Servicio al Cliente de Advance para
presentar una reclamación por daños en transporte. Consulte la hoja de instrucciones de desembalaje incluida con la máquina para sacar la máquina del palet.
ADVERTENCIA:
Los Productos a la venta en este Manual contienen, o pueden contener, productos químicos reconocidos por algunos gobiernos (como el Estado
de California, según lo indica en su Proposición 65, Ley de Advertencia Regulatoria) como causantes de cáncer, defectos de nacimiento u
otros daños reproductivos. En algunas jurisdicciones (incluido el Estado de California), los compradores de estos Productos que los coloquen
en servicio en un emplazamiento laboral o en un espacio de acceso público tienen la obligación regulatoria de realizar determinados avisos,
advertencias o divulgaciones respecto de los productos químicos contenidos o posiblemente contenidos en los Productos utilizados en tal lugar.
Es la responsabilidad del comprador conocer y cumplir con todas las leyes y reglamentaciones relacionadas con el uso de estos Productos en
tales entornos. El Fabricante niega toda responsabilidad de informar a los compradores sobre requisitos específi cos que pueden regir el uso de
los Productos en tales entornos.
revised 7/11
FORM NO. - 56041820 - SC750, SC800, SC750 ST, SC800 ST - B-3
Page 28

B-4 / ESPAÑOL
PRECAUCIONES Y ADVERTENCIAS
SÍMBOLOS
Advance utiliza los símbolos que aparecen a continuación para indicar situaciones potencialmente peligrosas. Lea cuidadosamente
esta información y emprenda las acciones que resulten necesarias para proteger a personas y objetos.
¡PELIGRO!
Se utiliza para advertir de peligros inmediatos que pueden producir graves daños personales o la muerte.
¡ADVERTENCIA!
Se utiliza para llamar la atención sobre una situación que puede causar graves daños personales.
¡PRECAUCIÓN!
Se utiliza para llamar la atención sobre una situación que puede causar daños personales leves o daños a la máquina u otros
objetos.
Lea todas y cada una de las instrucciones antes de utilizar el aparato.
INSTRUCCIONES GENERALES DE SEGURIDAD
Se incluyen Precauciones y Advertencias específi cas que le advierten de los posibles riesgos de daño a la máquina o daño corporal.
Esta máquina es para uso comercial, por ejemplo en hoteles, colegios, hospitales, fábricas, tiendas y ofi cinas, y no para usos
relacionados con el mantenimiento doméstico.
¡ADVERTENCIA!
* Sólo deben utilizar esta máquina las personas autorizadas y con la formación adecuada.
* Esta máquina no debe ser utilizada por personas (incluidos niños) con capacidades físicas, sensoriales o mentales reducidas, o con falta de experiencia y
conocimientos.
* Al circular sobre rampas o pendientes, evite las paradas bruscas. Evite las curvas muy cerradas. Circule lentamente al bajar rampas.
* Observe el peso bruto del vehículo (GVW) de la máquina cuando cargue, maneje, eleve o sostenga la máquina.
* Mantenga las chispas, llamas y materiales de fumadores alejados de las baterías. Durante el funcionamiento normal se desprenden gases explosivos.
* Al recargar las baterías se produce gas de hidrógeno altamente explosivo. Recargue las baterías exclusivamente en zonas bien ventiladas, lejos de llamas
sin proteger. No fume mientras recarga las baterías.
* Quítese todas las joyas cuando trabaje cerca de componentes eléctricos.
* Ponga el conmutador en posición de apagado (O) y desconecte las baterías antes de revisar los componentes eléctricos.
* No trabaje nunca debajo de la máquina sin colocar antes bloques o soportes de seguridad en los que apoyar la máquina.
* No aplique sustancias limpiadoras infl amables ni utilice la máquina sobre estas sustancias, cerca de ellas, ni en zonas en las que haya líquidos infl amables.
* No lave la máquina con una limpiadora a presión.
* No haga funcionar esta máquina en rampas o en pendientes superiores al 2 por ciento.
* Use solamente los cepillos suministrados junto con el aparato o aquellos especifi cados en el manual de instrucciones. El uso de otros cepillos puede afectar
a la seguridad.
* No mire directamente al láser. Producto Láser Clase 1 IEC 60825-1, 2007 Y 21CFR1040.10.
B-4 - FORM NO. - 56041820 - SC750, SC800, SC750 ST, SC800 ST
revised 11/12
Page 29

ESPAÑOL / B-5
¡PRECAUCIÓN!
* Esta máquina no ha sido aprobada para su uso en vías públicas.
* Esta máquina no es apta para la recogida de polvo peligroso.
* Tenga cuidado cuando utilice discos de escarifi cación y piedras abrasivas. No se podrá responsabilizar a Advance de daño alguno a las superfi cies de los
suelos causado por escarifi cadores o piedras abrasivas.
* Cuando utilice la máquina, asegúrese de que no existe peligro para terceras personas, especialmente niños.
* Antes de proceder a cualquier función de servicio, lea con atención todas las instrucciones relativas a dicha función.
* No deje la máquina sin vigilancia sin antes haber puesto el conmutador en posición de apagado (O), haber quitado la llave y haber aplicado el freno de
estacionamiento.
* Apague el conmutador de llave (O) y quite la llave antes de cambiar los cepillos y antes de abrir cualquiera de los paneles de acceso.
* Tome las debidas precauciones para evitar que el pelo, las joyas o las prendas sueltas queden atrapados entre los componentes móviles.
* Tome las precauciones adecuadas cuando esté moviendo esta máquina mientras hiela. El agua de la solución, los depósitos de recuperación o detergente
y de las tuberías puede congelarse, causando daños a las válvulas y accesorios. Limpie con limpiaparabrisas.
* Retire las baterías de la máquina antes de su desguace. Las baterías deben desecharse de forma segura, de acuerdo con la reglamentación
medioambiental local.
* No utilice la máquina en superfi cies con pendientes superiores a las indicadas en la máquina.
* Antes de utilizar la máquina, todas las puertas y cubiertas deberían estar colocadas como se indica en el manual de instrucciones.
* Consulte el manual del producto OEM del cargador de batería para obtener advertencias adicionales sobre el cargador de batería específi co.
* Cualquier uso o ajustes del láser distinto a los especifi cados aquí pueden resultar en exposición riesgosa a la radiación.
GUARDE ESTAS INSTRUCCIONES
revised 11/12
FORM NO. - 56041820 - SC750, SC800, SC750 ST, SC800 ST - B-5
Page 30

B-6 / ESPAÑOL
CONOZCA SU MÁQUINA
A lo largo de este manual encontrará números o letras en negrita entre paréntesis – por ejemplo: (2). Estos números se refi eren a un objeto que se muestra
en dicha página, a menos que se indique lo contrario. Consulte estas páginas siempre que lo necesite para localizar los elementos citados en el texto.
NOTA: Consulte el manual de servicio para obtener explicaciones más detalladas de cada objeto ilustrado en las siguientes 4 páginas.
1 Llenado del depósito de solución
2 Manilla de control del operario
3 Portabotellas
4 Flotador de cierre del depósito de recuperación
5 Cesta del fi ltro
6 Tapa del depósito de recuperación
7 Cubierta de acceso al cartucho de detergente (EcoFlex)
7a Cartucho (sólo modelos EcoFlex) de detergente (EcoFlex)
8a Plataforma de limpieza (modelos de disco)
8b Plataforma de limpieza (modelo REV)
9 Zócalo de la plataforma de limpieza
10 Parachoques de la plataforma de limpieza
11 Rueda motriz
12 Conjunto de boquilla
B-6 - FORM NO. - 56041820 - SC750, SC800, SC750 ST, SC800 ST
Page 31

CONOZCA SU MÁQUINA
ESPAÑOL / B-7
13 Tubería de drenaje de la solución / Indicador de nivel
14 Palanca de elevación/descenso de la boquilla
15 Conector del conjunto de baterías
16 Tubería de recuperación
17 Disyuntor del motor de la tracción de rueda (30 A)
18 Disyuntor del circuito de control (10 A)
19 Correa de tensión de la cuchilla de la boquilla
20 Pestillo de la cuchilla de la boquilla
21 Pasadores de alineación de la cuchilla de la boquilla
22 Tuerca de palomilla de montaje de la boquilla
23 Botón de ajuste de la boquilla
24 Tubería de drenaje del depósito de recuperación
25 Tolva de residuos (sólo modelos cilíndricos)
26 Conjunto en vacío (sólo modelos cilíndricos)
27 Colector de la solución (sólo modelos cilíndricos)
28 Panel de control (SC750, SC800)
29 Paleta de tracción
30 Botón de control del límite de velocidad
31 Botón marcha atrás (SC750 ST, SC800 ST)
32 Botones de transmisión de palma (SC750 ST, SC800 ST)
33 Panel de control (SC750 ST, SC800 ST)
34 Cargador de batería a bordo (no se encuentra en todos los modelos)
35 Filtro de la solución
36 Válvula de cierre de la solución
37 Cronómetro (opcional en modelos ST)
FORM NO. - 56041820 - SC750, SC800, SC750 ST, SC800 ST - B-7
Page 32

B-8 / ESPAÑOL
PANEL DE CONTROL – SC750, SC800
A Interruptor de contacto (principal)
B Interruptor de aumento de la solución
C Interruptor de encendido/apagado de la solución
C1 Indicadores de fl ujo de la solución (normal, duro y extremo)
D Interruptor de reducción de la solución
E Interruptor de encendido/apagado de detergente
F Pantalla
F1 Medidor de horas de funcionamiento
F2 Indicador de nivel del depósito de solución
F3 Códigos de error
F4 Indicador detergente (si está instalado)
F5 Indicador de mezcla de detergente
F6 Indicador de batería
F7 Indicador de depósito de recuperación lleno
F8 Indicador de batería baja
F1
F2 F3
G Interruptor de aumento de la presión de fregado
H Interruptor de encendido/apagado de fregado
(Sistema de discos – normal y duro)
(Sistema cilíndrico – 1 Detector de presión)
H1 Indicadores de presión de fregado
I Interruptor de reducción de la presión de fregado
J Interruptor EcoFlex
K Interruptor de extracción de cepillo (plataformas de disco únicamente)
(El interruptor de extracción de cepillo está
desactivado en el modelo REV)
L Interruptor de aspiración/varilla
™
F7
!
F4 F5 F6
F
B
C
K
C1
D
E
F8
!
F
G
H
L
H1
A
.2%
J
I
max
B-8 - FORM NO. - 56041820 - SC750, SC800, SC750 ST, SC800 ST
Page 33

PANEL DE CONTROL – SC750 ST, SC800 ST
A Interruptor de contacto (principal)
B Interruptor de encendido/apagado de la solución (Bajo, mediano y alto)
B1 Indicadores de fl ujo de la solución
C Interruptor de aspiración/varilla
C1 Indicador de desactivación de motor de aspiración
D Interruptor de encendido/apagado de fregado
(Sistema de discos – normal y duro)
(Sistema cilíndrico – 1 Detector de presión)
D1 Indicadores de presión de fregado
E Indicador de batería
F Indicador de errores
ESPAÑOL / B-9
Presión
de fregado cilíndrico
(pulse una vez)
Presión
de fregado de disco
duro
(pulse dos veces)
Presión
de fregado de disco
normal
(pulse una vez)
Flujo de
solución
alto
(pulse 3 veces)
Flujo de
solución
medio
(pulse dos veces)
Flujo de
solución
bajo
(pulse una vez)
D1
C
D
B
B1
E
C1
A
max.2%
F
FORM NO. - 56041820 - SC750, SC800, SC750 ST, SC800 ST - B-9
Page 34

B-10 / ESPAÑOL
BATERÍAS
Si su máquina se entrega con baterías instaladas, realice lo siguiente:
Compruebe que las baterías estén conectadas a la máquina (15).
Encienda el conmutador de llave (A) y compruebe el indicador de batería (F6 o E). Si el indicador está completamente lleno o la luz verde está encendida,
las baterías están listas para el uso. Si el indicador no está completamente lleno o la luz verde está apagada, las baterías deberían recargarse antes del
uso. Consulte la sección “Recarga de las baterías”.
¡IMPORTANTE!: SI SU MÁQUINA ESTÁ EQUIPADA CON UN CARGADOR DE BATERÍA A BORDO, CONSULTE EL MANUAL DEL PRODUCTO OEM
PARA OBTENER INSTRUCCIONES SOBRE EL AJUSTE DEL CARGADOR PARA EL TIPO DE BATERÍA.
Si su máquina se entrega sin baterías instaladas, realice lo siguiente:
Consulte con su distribuidor autorizado Advance en cuanto a las baterías recomendadas.
Instale las baterías siguiendo las instrucciones indicadas a continuación.
NO instale 3 baterías de 12 voltios en su máquina. Esto afectará a la estabilidad de la máquina.
¡IMPORTANTE!: SI SU MÁQUINA ESTÁ EQUIPADA CON UN CARGADOR DE BATERÍA A BORDO, CONSULTE EL MANUAL DEL PRODUCTO OEM
PARA OBTENER INSTRUCCIONES SOBRE EL AJUSTE DEL CARGADOR PARA EL TIPO DE BATERÍA.
¡ADVERTENCIA!
Tome las máximas precauciones cuando trabaje con las baterías. El ácido sulfúrico de las baterías puede causar daños graves si
entra en contacto con la piel o con los ojos. Desde el interior de las baterías se libera gas explosivo de hidrógeno a través de unas
aperturas en las tapas de las baterías. Este gas puede incendiarse con cualquier arco eléctrico, chispa o llama. No instale baterías
de plomo-ácido en un contenedor cerrado. El gas de hidrógeno debido a la sobrecarga debe poder liberarse.
Cuando revise las baterías...
* Quítese todas las joyas
* No fume
* Lleve gafas de seguridad, un delantal de goma y guantes de goma
* Trabaje en una zona bien ventilada
* No permita que las herramientas toquen simultáneamente más de un terminal de batería
* Al sustituir las baterías, desconecte SIEMPRE en primer lugar el cable (de tierra) negativo para evitar chispas.
* Al instalar las baterías, conecte SIEMPRE el cable negativo al fi nal.
¡PRECAUCIÓN!
Los componentes eléctricos de esta máquina pueden dañarse seriamente si las
baterías no están instaladas o conectadas correctamente. Las baterías deben
ser instaladas por Advance, un electricista cualifi cado o el fabricante de las
baterías.
1 Retire las baterías de su caja de embalaje e inspecciónelas para ver si existen grietas u
otros daños. Si los daños son evidentes, póngase en contacto inmediatamente con el
transportista que se las entregó para presentar una reclamación por daños en transporte.
2 Apague el conmutador principal de llave (A) y quite la llave.
3 Desconectar el conector del paquete de baterías (15).
4 Incline el depósito de recuperación hacia la posición lateral cerrada. Retire los cables de la
batería del interior del compartimento de las baterías.
5 Su máquina viene de fábrica con sufi cientes cables para instalar 4 baterías de 6 voltios.
Levante las baterías con cuidado para meterlas en el compartimento de las baterías y
colóquelas exactamente como se muestra en la FIGURA 1. Ponga las baterías tan cerca
de la parte trasera de la máquina como pueda.
6 Instale los cables de las baterías como se muestra. Ponga los cables de forma que las
cubiertas de las baterías puedan retirarse fácilmente para el mantenimiento de las baterías.
7 Apriete con cuidado las tuercas de los terminales de las baterías hasta que el terminal
no gire. No apriete demasiado los terminales; de lo contrario será muy difícil retirarlos en
futuras operaciones de mantenimiento.
8 Bañe los terminales con revestimiento para terminales de baterías en pulverizador
(disponible en la mayoría de las tiendas de material para coches).
9 Ponga un manguito de goma negro encima de cada terminal y conecte el conector del
conjunto de las baterías (15).
FIGURA 1
312 AH @ 20 HR RATE
(4) MAX 158KG/348LB
Cuando cambie las baterías o el cargador, consulte con su centro local de
servicios autorizado los valores correctos para la batería, el cargador y la
máquina, a fi n de evitar daños a la batería.
B-10 - FORM NO. - 56041820 - SC750, SC800, SC750 ST, SC800 ST
revised 11/12
Page 35

ESPAÑOL / B-11
INSTALACIÓN DE LOS CEPILLOS (SISTEMA DE DISCO)
¡PRECAUCIÓN!
Apague el conmutador de llave (O) y quite la llave antes de cambiar los cepillos y antes de abrir cualquiera de los paneles de
acceso.
1 Asegúrese de que el portacepillos (8a) se encuentre en la posición ELEVADA. Asegúrese de que está apagado (O) el conmutador de llave (A).
2 Si utiliza bayetas, instale las bayetas en los portabayetas
3 Ver la Figura 2. Para montar los cepillos (AA) (o los portabayetas), alinee las lengüetas (BB) del cepillo con las ranuras de la bandeja de montaje y gire
para que se bloquee en su posición (gire el borde exterior del cepillo hacia la parte trasera de la máquina como se muestra (CC)).
FIGURA 2
FORM NO. - 56041820 - SC750, SC800, SC750 ST, SC800 ST - B-11
Page 36

B-12 / ESPAÑOL
INSTALACIÓN DE LOS CEPILLOS (SISTEMA CILÍNDRICO)
¡PRECAUCIÓN!
Apague el conmutador de llave (O) y quite la llave antes de cambiar los cepillos y antes de abrir cualquiera de los paneles de
acceso.
1 Asegúrese de que el portacepillos se encuentre en la posición ELEVADA. Asegúrese de que está apagado (O) el conmutador de llave (A).
2 Ver la Figura 3. -Para acceder a los cepillos, afl oje los botones negros (uno a cada lado) que están en la parte superior de los conjuntos en vacío (26) y
retire los conjuntos. Deslice el cepillo en el contenedor, levante ligeramente, empuje y gire hasta que se asiente. Vuelva a instalar los conjuntos en vacío.
FIGURA 3
B-12 - FORM NO. - 56041820 - SC750, SC800, SC750 ST, SC800 ST
Page 37

ESPAÑOL / B-13
INSTALACIÓN DE LAS BAYETAS (SISTEMA REV)
¡PRECAUCIÓN!
Apague el interruptor de contacto (O) y quite la llave antes de cambiar las bayetas y antes de abrir cualquiera de los paneles de
acceso.
1 Asegúrese de que la plataforma de limpieza (8b) se encuentre en la posición ELEVADA. Asegúrese de que está apagado (O) el conmutador de llave (A).
2 Consulte la fi gura 4. Si usa la bayeta de microfi bra (DD), instálela directamente en el conjunto del portabayetas (EE).
3 Si usa la bayeta marrón (FF), instale la bayeta roja estándar (GG) en el conjunto del portabayetas (EE) primero y luego use el velcro de dos caras (HH)
entre la bayeta roja y la marrón, para sostenerla en su lugar.
NOTA: Si la bayeta SPP marrón no se instala como se indica más arriba, se dañará el portabayetas.
FIGURA 4
FORM NO. - 56041820 - SC750, SC800, SC750 ST, SC800 ST - B-13
Page 38

B-14 / ESPAÑOL
B-14 - FORM NO. - 56041820 - SC750, SC800, SC750 ST, SC800 ST
Page 39

ESPAÑOL / B-15
LLENADO DEL DEPÓSITO DE SOLUCIÓN
Llenar el depósito de solución con un máximo de 21 galones (79,5 litros) para los modelos SC750/SC750 ST y 25 galones (94,6 litros) para los modelos SC800/
SC800 ST con la solución de limpieza. No llene el depósito de solución por encima de 7,5 cm (3 pulgadas) de la parte inferior del depósito (1). La solución debe
ser una mezcla de agua y el limpiador químico apropiado para la aplicación. Siga siempre las instrucciones que aparecen en la etiqueta del envase del producto
químico. NOTA: Las máquinas EcoFlex pueden utilizarse normalmente con detergente mezclado en el depósito o con el sistema de aplicación de detergente
EcoFlex. Al utilizar el sistema de aplicación de detergente EcoFlex, no mezcle detergente en el depósito; utilice agua.
¡PRECAUCIÓN!
Utilice únicamente detergentes líquidos no infl amables de bajo poder espumante que estén diseñados para aplicaciones de fregado
automático. La temperatura del agua no deberá superar los 130 grados Fahrenheit (54,4 grados Celsius)
INSTALACIÓN DE LA BOQUILLA
1 Ver la Figura 5. Deslice en conjunto de la boquilla (12) sobre la abrazadera de montaje de la boquilla y apriete las tuercas de palomilla de montaje de la
boquilla (22).
2 Conecte la tubería de recuperación (16) a la entrada de la boquilla.
3 Baje la boquilla, desplace la máquina hacia delante y ajuste la inclinación de la boquilla utilizando el botón de ajuste de la boquilla (23), de modo que la
cuchilla de la boquilla trasera toque el suelo homogéneamente en toda la anchura y se doble ligeramente como se muestra.
FIGURA 5
FORM NO. - 56041820 - SC750, SC800, SC750 ST, SC800 ST - B-15
Page 40

B-16 / ESPAÑOL
REPARACIÓN Y USO DEL SISTEMA DE DETERGENTE (ECOFLEX)
INSTRUCCIONES COMUNES:
Si se presiona y se suelta el interruptor de detergente (E) mientras el sistema de la solución está activo, el sistema de detergente se encenderá y apagará
alternativamente. Elimine del sistema el detergente utilizado anteriormente antes de cambiar a un detergente diferente. NOTA DE SERVICIO: desplace la
máquina sobre un punto de drenaje en el suelo antes de eliminar el detergente, porque saldrá una pequeña cantidad durante el proceso.
Purgar al cambiar productos químicos:
1 Desconecte y retire el cartucho de detergente.
2 Encienda el interruptor de contacto (A). Pulse y mantenga pulsado el interruptor de la solución (C) y el interruptor de detergente (E) durante 3 segundos.
NOTA: una vez activado, el proceso de purga dura 10 segundos. Observe los indicadores del sistema de detergente en la ilustración de la página
siguiente. Por lo general, un solo ciclo de purga es sufi ciente para purgar el sistema.
Purgar semanalmente:
1 Desconecte y retire el cartucho de detergente. Instale y conecte un cartucho lleno de agua limpia
2 Encienda el interruptor de contacto (A). Pulse y mantenga pulsado el interruptor de la solución (C) y el interruptor de detergente (E) durante 3 segundos.
NOTA: una vez activado, el proceso de purga dura 10 segundos. Observe los indicadores del sistema de detergente en la ilustración de la página
siguiente. Por lo general, un solo ciclo de purga es sufi ciente para purgar el sistema.
Cuando el cartucho de detergente esté casi vacío se encenderá un indicador del panel de visualización (F). Este indicador de “detergente bajo” permanecerá
encendido hasta que reinicie el sistema. Cuando se encienda este indicador, sólo tiene que verter una botella completa de un galón (3,7 litros) de detergente
en el cartucho para rellenarlo sin preocuparse de las medidas. NOTA: reinicie el sistema únicamente cuando el cartucho esté lleno. Al cambiar de cartuchos, el
indicador de “detergente bajo” únicamente es exacto si el cartucho de repuesto está al mismo nivel que el cartucho sustituido.
Para reiniciar:
1 Encienda el interruptor de contacto (A). Pulse y mantenga pulsado el interruptor de aumento de solución (B) y el interruptor de reducción de solución (D)
durante 3 segundos. Observe los indicadores del sistema de detergente en la ilustración de la página siguiente.
Mezcla de detergente:
La mezcla de detergente está bloqueada en 1:400, excepto si se anula el modo de limpieza EcoFlex. Es posible ajustar la mezcla preprogramada que 1
se utiliza durante la anulación del modo EcoFlex. Con el sistema de detergente apagado, presione y mantenga presionado el interruptor de encendido/
apagado de detergente (E) durante 2 segundos. El indicador de detergente parpadeará y cada pulsación del interruptor realizará un ciclo a través de las
mezclas disponibles (1:32, 1:50, 1:64, 1:100, 1:128, 1:150, 1:200, 1:256, 1:300, 1:400). Cuando la mezcla deseada se muestre en la pantalla (F5), pare y se
bloqueará tras 5 segundos.
2 Estando EcoFlex en la posición de APAGADO/desactivado (LED apagado), puede ajustarse la mezcla de detergente. Con el sistema de detergente
apagado, presione y mantenga presionado el interruptor de encendido/apagado de detergente (E) durante 2 segundos. El indicador del detergente
parpadeará y cada vez que se pulse el interruptor irá pasando por todas las mezclas disponibles (ver arriba) Cuando la mezcla deseada se muestre en la
pantalla (F5), pare y se bloqueará tras 5 segundos.
INSTRUCCIONES ESPECÍFICAS PARA EL CARTUCHO:
Llene el cartucho de detergente con 1,25 galones (4,73 litros) de detergente como máximo. NOTA DE SERVICIO: retire el cartucho de la caja de detergente
antes de llenarlo para no derramar detergente sobre la máquina.
Se recomienda utilizar un cartucho individual para cada detergente que planee usar. Los cartuchos de detergente tienen una pegatina blanca, de modo que
puede escribir el nombre del detergente en cada cartucho para no mezclarlos. Al instalar un nuevo cartucho, retire la tapa (AA) y coloque el cartucho en la caja
de detergente. Instale la tapa sellada (BB) como se muestra.
B-16 - FORM NO. - 56041820 - SC750, SC800, SC750 ST, SC800 ST
Page 41

ESPAÑOL / B-17
REPARACIÓN Y USO DEL SISTEMA DE DETERGENTE (SOLO MODELOS ECOFLEX)
DETERGENTE ACTIVADO
LLENO (REINICIO)
DETERGENTE BAJO
DETERGENTE DESACTIVADO
PURGA
Presione y mantenga
presionados (C) y (E) durante
3 segundos para purgar.
D
C
B
E
Presione y mantenga
presionados (B) y (D) durante 3
F
segundos para reiniciar.
El sistema de detergente
está encendido cuando el
indicador está encendido.
A
.2%
max
FORM NO. - 56041820 - SC750, SC800, SC750 ST, SC800 ST - B-17
Page 42

B-18 / ESPAÑOL
FREGADO EN HÚMEDO
¡ADVERTENCIA!
Asegúrese de que comprende los controles del operador y sus funciones. Si se encuentra sobre una rampa o inclinación, evite las paradas bruscas cuando lleve carga.
No tome las curvas bruscamente. Utilice una velocidad lenta si va cuesta abajo. Limpie sólo yendo cuesta arriba.
Para fregar...
1 Siga las instrucciones de la sección Preparación de la máquina para el uso de este manual.
2a Modelos SC750, SC800: Encienda (I) el interruptor de contacto principal (A). Se encenderán las luces indicadoras del panel de control, el indicador de condición de las baterías (F6) y el
cronómetro (F1) antes de proceder.
3a Para desplazar la máquina a la zona de trabajo, empuje la paleta de tracción (29) hacia delante o tire de la paleta de tracción (29) hacia atrás para desplazar la máquina marcha atrás.
Varíe la presión sobre la paleta de tracción (29) para obtener la velocidad deseada.
NOTA: el botón de control de velocidad (30) se utiliza para controlar la velocidad máxima, tanto en marcha adelante como marcha atrás.
4a Pulse y mantenga pulsado el interruptor de la solución (C) durante 5 segundos para mojar previamente el suelo. NOTA: Esto debe realizarse antes de pulsar el interruptor de encendido/
apagado del fregado (H).
5a Pulse el interruptor de encendido/apagado de fregado (H), la presión de fregado se ajustará por defecto a Normal (un indicador de presión de fregado se ilumina). Use el interruptor de
aumento de la presión de fregado (G) o el interruptor de reducción de la presión de fregado (I) para cambiar entre los modos de fregado normal y duro. Solamente está disponible un
detector de presión para máquinas cilíndricas. El fl ujo de solución se ajustará automáticamente para que coincida con la presión de fregado.
NOTA: el fl ujo de solución puede cambiarse independientemente de la presión de fregado presionando el interruptor de aumento de la solución (B) o el interruptor de reducción de la
solución (D). Los ajustes posteriores de la presión de fregado restablecerán el fl ujo de la solución para que se corresponda con la presión de fregado.
NOTA: los sistemas de fregado, solución, aspiración y detergente (modelos EcoFlex) se activan automáticamente cuando se presiona el interruptor de encendido/apagado del fregado (H).
Cualquier sistema individual puede apagarse o volver a encenderse con sólo presionar su interruptor en cualquier momento durante el fregado. No se requiere ninguna acción adicional
aparte de bajar la rasqueta (12).
6a Baje la rasqueta con la palanca de elevación / descenso de la rasqueta (14).
7a Cuando la paleta de tracción (29) está en la posición neutra, los sistemas de fregado, aspiración, solución y detergente (modelos EcoFlex) se activan pero no funcionan. Agarre la manija
de control del operador (2) y empuje la paleta de tracción (29) hacia delante para encender los sistemas de fregado, vacío, solución y detergente (modelos EcoFlex) y para mover la
máquina hacia delante. Para lograr los mejores resultados, mueva la máquina a velocidad de paseo lento. Pulse el interruptor de la solución (C) una vez para apagarlo cuando tome
curvas cerradas. Tire de la paleta de tracción (29) hacia atrás para mover la máquina marcha atrás. Cuando mueva la máquina marcha atrás, los cepillos funcionarán pero no se aplicará
ni solución ni producto químico.
2b Modelos ST: Encienda (I) el interruptor de contacto principal (A). Esto mostrará las luces indicadoras del panel de control, consulte el Indicador de la Batería (E) antes de proceder.
3b Para llevar la máquina a la zona de trabajo, empuje cualquiera de los botones palma (32) para desplazarse hacia delante o pulse cualquiera de los botones palma (32) y el botón marcha
atrás (31) para desplazar la máquina marcha atrás.
NOTA: La perilla de control de velocidad (30) se utiliza para controlar la velocidad máxima, tanto en marcha adelante como marcha atrás.
4b Pulse y mantenga pulsado el interruptor de la solución (B) durante 5 segundos para mojar previamente el suelo. NOTA: Esto debe realizarse antes de pulsar el interruptor de encendido
del fregado (D).
5b Pulse el interruptor de encendido de fregado (D) una vez para la presión de fregado normal (se ilumina un indicador de presión de fregado) o dos veces para la presión de fregado duro (se
iluminan dos indicadores de presión de fregado). Está disponible solo un detector de presión para las máquinas cilíndricas. Una vez que el sistema de fregado se ha activado, al pulsar el
conmutador de la solución (B) se alterna entre sin solución, caudal de fl ujo de solución bajo, medio y alto.
NOTA: Los sistemas de solución y de aspiración se activan automáticamente cuando se pulsa el interruptor de encendido del fregado (D). No se requiere ninguna acción adicional aparte
de bajar la rasqueta (12). Cualquier sistema individual puede apagarse o volver a encenderse con sólo presionar su interruptor en cualquier momento durante el fregado.
6b Baje la rasqueta con la palanca de elevación / descenso de la rasqueta (14).
7b Cuando los botones palma (32) no se están pulsando (máquina parada), los sistemas de fregado, aspiración y solución están activados pero no en funcionamiento. Agarre la manilla de
control del operador (2) y pulse cualquiera de los botones palma (32) para encender los sistemas de fregado, aspiración y solución, y para mover la máquina hacia delante. Para lograr
los mejores resultados, mueva la máquina a velocidad de paseo lento. Pulse cualquiera de los botones palma y el botón marcha atrás para desplazar la máquina marcha atrás. Cuando
mueva la máquina marcha atrás, los cepillos funcionarán pero no saldrá solución.
¡PRECAUCIÓN!
Para evitar dañar el suelo, mantenga la máquina en movimiento cuando los cepillos estén girando.
8 Cuando friegue, compruebe de vez en cuando que detrás de la máquina se está recogiendo el agua residual. Si queda agua en la trayectoria de la máquina, puede que esté aplicando demasiada
solución, que el depósito de recuperación esté lleno o que la rasqueta necesite un ajuste.
9 Exclusivamente para modelos EcoFlex: de manera predeterminada, la máquina pasa al modo de limpieza EcoFlex (indicador del interruptor EcoFlex se ilumina en VERDE) para conservar solución
y detergente. Presione el interruptor EcoFlex (J) para anular el modo de limpieza EcoFlex y aumentar temporalmente la presión de fregado, el fl ujo de la solución y la mezcla de detergente. Esto hará
que el indicador parpadee (AMARILLO) durante un minuto, el fl ujo de la solución aumentará al siguiente nivel, la presión de fregado aumentará al siguiente nivel y la mezcla de detergente aumentará a
la mezcla preprogramada. Es posible ajustar la mezcla preprogramada que se utiliza durante la anulación del modo EcoFlex. Con el sistema de detergente apagado, presione y mantenga presionado
el interruptor de encendido/apagado de detergente (E) durante 2 segundos. El indicador de detergente parpadeará y cada pulsación del interruptor realizará un ciclo a través de las mezclas disponibles
(1:32, 1:50, 1:64, 1:100, 1:128, 1:150, 1:200, 1:256, 1:300, 1:400). Cuando la mezcla deseada se muestre en la pantalla (F5), pare y se bloqueará tras 5 segundos.
NOTA: Al presionar y mantener pulsado el interruptor EcoFlex (J) durante 2 segundos se desactivará el sistema EcoFlex. La única manera para volver a activarlo es presionar el interruptor EcoFlex (J)
nuevamente. Alternar el interruptor de llave (A) no vuelve a activar el sistema. El sistema EcoFlex solo funcionará si el Sistema de Fregado (H) ha sido activado.
10 Para los suelos muy sucios, puede que una operación de fregado de una sola pasada no sea sufi ciente y que se necesite un “doble fregado”. Esta operación es igual al fregado de una sola pasada,
salvo que en la primera pasada la rasqueta está elevada. Esto permite que la solución de limpieza permanezca en el suelo y actúe más tiempo. La última pasada se hace en la misma zona, con la
rasqueta bajada para recoger la solución acumulada.
11a Modelos SC750, SC800: el depósito de recuperación tiene un fl otador de cierre (4) que apaga TODOS los sistemas excepto el sistema de tracción cuando el depósito de recuperación está lleno. Hay
que vaciar el depósito de recuperación cuando se activa este fl otador. La máquina no recogerá agua ni fregará con el fl otador activado.
NOTA: Todos los demás indicadores desaparecen y un indicador de “LLENADO del depósito de recuperación” (F7) se enciende en el panel de visualización cuando el interruptor se activa en modelos
“EcoFlex”.
11b Modelos SC750 ST, SC800 ST: el depósito de recuperación tiene un fl otador de cierre (4) que apaga TODOS los sistemas excepto el sistema de tracción cuando el depósito de recuperación está lleno.
Hay que vaciar el depósito de recuperación cuando se activa este fl otador. La máquina no recogerá agua ni fregará con el fl otador activado.
12 Cuando el operario desea detener la limpieza o el depósito de recuperación está lleno;
Modelos SC750, SC800: presione el interruptor de encendido/apagado de fregado (H) una vez. Esto automáticamente detendrá los motores de fregado y el fl ujo de solución y la plataforma se elevará
a su límite superior. NOTA: La aspiración se detendrá después de un plazo de 10 segundos. Esto permite recoger el agua que haya podido quedar sin tener que volver a encender la aspiración.
Modelos SC750 ST, SC800 ST: Pulse el interruptor de ENCENDIDO/APAGADO de fregado (D) una vez a la posición abajo cuando esté en el modo de fregado normal. Esto automáticamente detendrá
los motores de fregado y el fl ujo de solución y la plataforma se elevará a su límite superior. NOTA: La aspiración se detendrá después de un plazo de 10 segundos. Esto permite recoger el agua que
haya podido quedar sin tener que volver a encender la aspiración.
13 Eleve la rasqueta con la palanca de Elevación/Descenso de la rasqueta (14), y lleve la máquina a un lugar designado para la ELIMINACIÓN DE AGUAS RESIDUALES y vacíe el depósito de
recuperación. Para vaciarlo, tire de la tubería de drenaje del depósito de recuperación (24) para sacarla de su soporte y abra la tapa (sostenga el extremo de la tubería por encima del nivel de agua para
evitar el fl ujo súbito e incontrolado de agua residual). Para regular el fl ujo, puede apretar el tubo de vaciado del depósito de recuperación (24). Vuelva a llenar el depósito de solución y siga fregando.
B-18 - FORM NO. - 56041820 - SC750, SC800, SC750 ST, SC800 ST
Page 43

ESPAÑOL / B-19
FREGADO EN HÚMEDO
NOTA: Asegúrese de que la tapa del depósito de recuperación (6) y de la tubería de drenaje del depósito de recuperación (24) están asentadas correctamente; de lo contrario, la
máquina no recogerá correctamente el agua. Cuando las baterías necesiten recargarse, el indicador de batería baja (F8) se encenderá (modelos SC750, SC800) o el indicador
de batería (E) estará en rojo intermitente (modelos estándar) y el motor de aspiración se cerrará después de 30 segundos. Lleve la máquina a una zona de mantenimiento y
recargue las baterías de acuerdo con las instrucciones en la sección de Baterías de este manual.
ASPIRACIÓN EN HÚMEDO
Añada a la máquina accesorios opcionales para la aspiración en húmedo.
1 Desconecte de la boquilla (16) la tubería de recuperación (12).
2 Añada a la manguera las herramientas de recogida adecuadas (disponibles en Advance).
3 Encienda el conmutador de llave principal (A).
4 Pulse el interruptor de aspiración/varilla (L) (modelos SC750, SC800)
o (C) (modelos SC750 ST, SC800 ST) una vez para ENCENDER el motor
de aspiración. El motor de aspiración funcionará de forma continua hasta
que se vuelva a pulsar el interruptor para apagarlo. NOTA: el indicador “Depósito
de recuperación LLENO” está desactivado si está activado el modo de varilla.
El fl otador detendrá el líquido que fl uye al depósito de recuperación.
B
C
H
G
H1
L
I
F7
F8
!
!
F1
F5
NOTA DE SERVICIO: Consulte el manual
de servicio para obtener las descripciones
funcionales detalladas de todos los controles
y la programabilidad opcional .
F6
D
A
J
F
6
4
29
30
2
24
14
12
16
FORM NO. - 56041820 - SC750, SC800, SC750 ST, SC800 ST - B-19
Page 44

B-20 / ESPAÑOL
DESPUÉS DE LA UTILIZACIÓN
1 Levante los cepillos (o las bayetas) y levante la boquilla. Lleve la máquina a una zona de mantenimiento.
2 Apague el conmutador principal de llave (A) y quite la llave.
3 Para vaciar el depósito de solución, retire la tubería de drenaje de la solución (13) del conector superior. Dirija la tubería a un punto de drenaje en el suelo o a un cubo.
Enjuague el depósito con agua limpia. Inspeccione las mangueras de solución y sustitúyalas si están torcidas o dañadas.
4 Para vaciar el depósito de recuperación, extraiga la tubería de drenaje del depósito de recuperación (24) de su soporte y retire la tapa (sostenga el extremo de la tubería
por encima del nivel de agua para evitar el fl ujo súbito e incontrolado de agua residual). Para regular el fl ujo, puede apretar el tubo de vaciado del depósito de recuperación
(24). Enjuague el depósito de recuperación y desconecte el fl otador (4) con agua limpia. Inspeccione los tubos de recuperación y aspiración y sustitúyalos si están torcidos o
dañados.
5 Retire los cepillos o los portabayetas. Enjuague los cepillos o las bayetas con agua templada y tiéndalos para que sequen. Deje que las bayetas de pulido se sequen por
completo antes de volver a usarlas. NOTA: Puede extraer los cepillos manualmente o automáticamente pulsando el interruptor de extracción de cepillo (K) (únicamente
modelos de disco SC750, SC800).
6 Retire la boquilla, enjuáguela con agua templada y tiéndala para que seque.
7 Compruebe el programa de mantenimiento que viene a continuación y realice cualquier operación de mantenimiento necesaria antes de guardar la máquina.
PROGRAMA DE MANTENIMIENTO
OPERACIÓN DE MANTENIMIENTO Diaria Semanal Mensual Anual
Recarga de baterías X
Limpiar e inspeccionar depósitos y tuberías X
Comprobar, limpiar y girar los cepillos y las bayetas X
Comprobar y limpiar la boquilla X
Comprobar y limpiar el fl otador de cierre de la aspiración X
Vacíe/limpie el fi ltro de la cesta en el depósito de recuperación. X
Limpiar la tolva del sistema cilíndrico X
Comprobar el nivel de agua de todas las células de las baterías
(no se aplica a baterías de células de gel) X
Inspeccionar las faldillas contenedoras de fregado X
Inspeccionar y limpiar el fi ltro de la solución X
Limpiar los colectores de la solución del sistema cilíndrico X
Purgar el sistema de detergente (sólo modelos EcoFlex) X
Lubricar la máquina X
* Comprobar los cepillos de carbono X
* Haga que Advance compruebe los cepillos de carbono del motor de aspiración una vez al año o después de 300 horas de funcionamiento. Compruebe los cepillos de carbono de
los motores de tracción y fregado cada 500 horas o una vez al año.
NOTA: Para más información sobre reparaciones de mantenimiento y servicio, consulte el Manual de Servicio.
8 Almacene la máquina en un lugar limpio y seco.
9 Apague (O) el conmutador principal de llave (A) y quite la llave.
MANTENIMIENTO DEL MOTOR DE ASPIRACIÓN
Haga que su Distribuidor de Advance revise los cepillos de carbono
del motor
una vez al año o después de 300 horas de funcionamiento.
¡IMPORTANTE!
Los daños al motor causados por no haber revisado y
mantenido
los cepillos de carbono no están cubiertos por la
garantía.
Consulte la Declaración de Garantía Limitada.
LUBRICACIÓN DE LA MÁQUINA
Una vez al mes, aplique aceite ligero de máquina para lubricar lo siguiente:
• Puntos generales de pivotaje de la junta de boquilla (A).
• Roscas del botón de ajuste del ángulo de montaje de la boquilla (B).
• Ruedas del extremo de la boquilla (C).
• Puntos generales de pivotaje de la junta de cepillo (D).
• Puntos de pivotaje en la plataforma REV (G).
• Ruedas del parachoques de la plataforma de limpieza (F).
Una vez al trimestre, engrase lo siguiente
• Ruedas giratorias de la roldada trasera (E).
G
D
F
A
B
C
E
C
B-20 - FORM NO. - 56041820 - SC750, SC800, SC750 ST, SC800 ST
revised 11/12
Page 45

ESPAÑOL / B-21
RECARGA DE BATERÍAS DE LÍQUIDO
SC750, SC800 – Recargue las baterías cada vez que se utilice la máquina o cuando el indicador de batería (F6) presente un nivel inferior al de carga completa.
SC750 ST, SC800 ST – Recargue las baterías cada vez que se utilice la máquina o cuando el indicador de batería (E) esté en ROJO intermitente.
¡ADVERTENCIA!
No rellene las baterías antes de recargarlas.
Recargue las baterías exclusivamente en una zona bien ventilada.
No fume mientras maneja las baterías.
Cuando revise las baterías...
* Quítese todas las joyas
* No fume
* Lleve gafas de seguridad, un delantal de goma y guantes de goma
* Trabaje en una zona bien ventilada
* No permita que las herramientas toquen simultáneamente más de un terminal de batería
* Al sustituir las baterías, desconecte SIEMPRE en primer lugar el cable (de tierra) negativo para evitar chispas.
* Al instalar las baterías, conecte SIEMPRE el cable negativo al fi nal.
Si su máquina se entrega con cargador de baterías a bordo, realice lo siguiente:
Apague el conmutador de llave principal (A). Desenrolle el cable eléctrico del lado del cargador a bordo y enchúfelo en la toma a tierra correspondiente. Consulte el manual del
producto OEM para obtener más instrucciones de funcionamiento detalladas.
Si su máquina se entrega sin cargador de baterías a bordo, realice lo siguiente:
Desconecte las baterías de la máquina e introduzca el conector del cargador en el conector del conjunto de baterías (15). Siga las instrucciones que aparecen encima del cargador
de las baterías. NOTA DE SERVICIO: Asegúrese de que enchufa el cargador de batería en el conector con el asa integrada.
¡PRECAUCIÓN!
Para evitar daños a la superfi cie del suelo, limpie siempre el agua y el ácido de la parte superior de las baterías después de la recarga.
COMPROBACIÓN DEL NIVEL DE AGUA DE LAS BATERÍAS
Compruebe el nivel de agua de las baterías al menos una vez a la semana.
Después de cargar las baterías, retire las cubiertas de ventilación y compruebe el nivel de agua de todas células de las baterías. Utilice agua destilada o
desmineralizada en un dispensador de relleno de baterías (disponible en la mayoría de las tiendas de materiales para coches) para llenar todas las células hasta
el indicador de nivel (o hasta 10 mm por encima de la parte superior de los separadores). ¡NO rellene demasiado las baterías!
¡PRECAUCIÓN!
Si las baterías están demasiado llenas se puede salpicar ácido al suelo.
Apriete las cubiertas de ventilación. Limpie la parte superior con una solución de levadura química y agua (2 cucharadas de levadura química en 1 litro de agua).
RECARGA DE BATARÍAS DE GEL (VRLA)
SC750, SC800 – Recargue las baterías cada vez que se utilice la máquina o cuando el indicador de batería (F6) presente un nivel inferior al de carga completa.
SC750 ST, SC800 ST – Recargue las baterías cada vez que se utilice la máquina o cuando el indicador de batería (E) esté en ROJO intermitente.
¡ADVERTENCIA!
Recargue las baterías exclusivamente en una zona bien ventilada.
No fume mientras maneja las baterías.
Cuando revise las baterías...
* Quítese todas las joyas
* No fume
* Lleve gafas de seguridad, un delantal de goma y guantes de goma
* Trabaje en una zona bien ventilada
* No permita que las herramientas toquen simultáneamente más de un terminal de batería
* Al sustituir las baterías, desconecte SIEMPRE en primer lugar el cable (de tierra) negativo para evitar chispas.
* Al instalar las baterías, conecte SIEMPRE el cable negativo al fi nal.
¡PRECAUCIÓN!
La batería de plomo ácido con regulación de tensión (VRLA) ofrece una vida útil y unas prestaciones superiores ¡SÓLO SI SE RECARGA CORRECTAMENTE!
Una recarga insufi ciente o excesiva reducirá la vida útil de la batería y limitará sus prestaciones. Asegúrese de SEGUIR AL PIE DE LA LETRA LAS
INSTRUCCIONES DE RECARGA. ¡NO INTENTE ABRIR ESTA BATERÍA! Si la batería VRLA se abre, pierde su presión y las placas se contaminan de oxígeno.
LA GARANTÍA QUEDA ANULADA SI LA BATERÍA SE ABRE.
Si su máquina se entrega con cargador de baterías a bordo, realice lo siguiente:
Apague el conmutador de llave principal (A). Desenrolle el cable eléctrico del lado del cargador a bordo y enchúfelo en la toma a tierra correspondiente. Consulte el manual del
producto OEM para obtener más instrucciones de funcionamiento detalladas.
Si su máquina se entrega sin cargador de baterías a bordo, realice lo siguiente:
Desconecte las baterías de la máquina e introduzca el conector del cargador en el conector del conjunto de baterías (15). Siga las instrucciones que aparecen encima del cargador
de las baterías. NOTA DE SERVICIO: Asegúrese de que enchufa el cargador de batería en el conector con el asa integrada.
IMPORTANTE: Asegúrese de que dispone de un cargador adecuado para su uso con baterías de células de gel. Utilice únicamente cargadores de “regulación de
tensión” o de “limitación de tensión”. NO DEBEN utilizarse cargadores de corriente variable o de corriente constante estándar. Se recomienda el uso de un cargador
sensible a la temperatura, dado que los ajustes manuales nunca son precisos y dañarán cualquier batería VRLA.
FORM NO. - 56041820 - SC750, SC800, SC750 ST, SC800 ST - B-21
Page 46

B-22 / ESPAÑOL
MANTENIMIENTO DE LA BOQUILLA
Si la boquilla deja bandas estrechas de agua, puede que las cuchillas estén sucias o dañadas. Retire la boquilla, enjuáguela con agua tibia e inspeccione las
cuchillas. Sustituya o invierta las cuchillas si están cortadas, rasgadas, onduladas o gastadas.
Para invertir o sustituir
1 Ver la Figura 6. . Eleve la rasqueta del suelo y a continuación abra el pestillo de retirada de la hoja de la rasqueta trasera (20) en la rasqueta.
2 Retire las correas de tensión (19).
3 Deslice la cuchilla posterior para sacarla de las clavijas de alineación (21).
4 La cuchilla de la boquilla tiene 4 bordes de trabajo. Gire la cuchilla de manera que un borde limpio e intacto apunte hacia la parte frontal de la máquina.
Sustituya la cuchilla si los 4 bordes están mellados, desgastados o reducidos al mínimo.
5 Instale la cuchilla siguiendo los pasos en orden inverso y ajuste la inclinación de la boquilla.
Para invertir o sustituir la cuchilla de la boquilla delantera...
1 Eleve la rasqueta del piso, luego afl oje las (2) tuercas mariposa (22) sobre la parte superior de la rasqueta. Desconecte la manguera de recuperación (16) y
extraiga la rasqueta (12) del montaje.
2 Afl oje la perilla de extracción de la hoja de rasqueta delantera (AA), y luego retire la correa de tensión (AB) y la hoja.
3 Retire todas las tuercas de palomilla que sujetan la cuchilla delantera y a continuación retire las correas de tensión y la cuchilla.
4 La cuchilla de la boquilla tiene 4 bordes de trabajo. Gire la cuchilla de manera que un borde limpio e intacto apunte hacia la parte frontal de la máquina.
Sustituya la cuchilla si los 4 bordes están mellados, desgastados o reducidos al mínimo.
5 Instale la cuchilla siguiendo los pasos en orden inverso y ajuste la inclinación de la boquilla.
AJUSTE DE LA BOQUILLA
Ajuste el ángulo de la boquilla siempre que sustituya o invierta la cuchilla o cuando la boquilla no deje seco el suelo.
Para ajustar el ángulo de la boquilla...
1 Aparque la máquina en una superfi cie plana e igualada y baje la boquilla.
2 Moviendo la máquina lentamente hacia adelante, gire el tornillo de ajuste de la boquilla (23) hasta que la cuchilla de la boquilla trasera se pliegue
homogéneamente en toda la anchura de la boquilla, como se indica a continuación.
la cuchilla secadora de la boquilla trasera...
FIGURA 6
B-22 - FORM NO. - 56041820 - SC750, SC800, SC750 ST, SC800 ST
Page 47

SOLUCIÓN DE PROBLEMAS GENERALES DE LA MÁQUINA
Problema Posible causa Solución
Recogida escasa del agua
Fregado poco efi caz
Flujo de solución inadecuado
o falta de solución
La máquina no funciona
Ausencia de tracción de las ruedas
marcha alante/atrás
La aspiración se apaga y la pantalla indica
“Recovery Tank FULL indicator” (indicador
de depósito de recuperación LLENO)
cuando el depósito de recuperación no
está lleno
Barrido poco efi caz (sistema cilíndrico)
No hay fl ujo de detergente
(Sólo modelos EcoFlex)
Variabilidad de la rotación de bayetas
(sistema REV)
Cuchillas de la boquilla gastadas o
Desgarradas
Boquilla mal ajustada en toda su anchura Ajuste la boquilla de manera que las
Depósito de recuperación lleno Vacíe el depósito de recuperación
Fuga en la tubería de drenaje del
depósito de recuperación
Fuga en la junta de la tapa del tanque
de recuperación
Residuos atrapados en la boquilla Limpie la herramienta de boquilla
Manguera de aspiración obstruida Retire los residuos
Uso de demasiada solución Ajuste el fl ujo de la solución en el panel
Tapa del fi ltro de espuma mal puesta Ponga la tapa correctamente
Cepillo o bayeta desgastados Gire o sustituya los cepillos
Tipo de cepillo o bayeta incorrecto Consulte a Nilfi sk-Advance
Limpiador químico incorrecto Consulte a Nilfi sk-Advance
Movimiento demasiado rápido de la
máquina
No se está utilizando sufi ciente solución. Aumente el fl ujo de la solución en el
Depósito de solución vacío Llene el depósito de solución
Tuberías, válvulas, fi ltro o canal de la
solución
Válvula de cierre de la solución cerrada Abra la válvula de cierre de la solución
Válvula de solenoide de la solución Limpie o sustituya la válvula
Conector de las baterías desconectadas Vuelva a conectar los conectores de las
Controlador principal del sistema Compruebe los códigos de averías
Disyuntor de 10 amp. desconectado Compruebe si hay algún cortocircuito
Controlador de velocidad del sistema de
tracción
Disyuntor de 30 A saltado Compruebe si se ha producido una
Interruptor de parada de emergencia
saltado
Tubo de la rasqueta obstruido Limpie los residuos
Aspiración de grandes cantidades
de agua a alta velocidad de
desplazamiento
La tolva está llena Vacíe y limpie la tolva
Cepillos gastados Sustituya los cepillos
Las cerdas han adquirido una forma Invierta los cepillos
Cartucho de detergente vacío Llenar cartucho de detergente
Línea de fl ujo de detergente obstruida o
torcida
Tapa de junta seca en cartucho de
detergente sin sellar
Cableado de la bomba de detergente
desconectado o hacia atrás
La velocidad de rotación de las bayetas
cambia varias veces
Invierta o sustituya las cuchillas
cuchillas toquen
el suelo de manera uniforme
Sujete la tapa de la tubería de drenaje o
sustitúyala
Sustituya la junta / Asiente correctamente
la tapa
de control
Reduzca la velocidad
panel de control
Lave las tuberías y el canal y limpie el
fi ltro de solución
obstruidos
baterías
(véase el manual de servicio)
eléctrico y reinicie
Compruebe los códigos de error
(consulte el manual de servicio)
sobrecarga del motor de tracción
Restablezca el interruptor de parada de
emergencia
Reduzca la velocidad o desactive la
función de agua pagado automático
(véase el manual de servicio)
Purgar el sistema, enderezar las líneas
para
eliminar pliegues
Sellar tapa de junta seca
Conectar o reconectar cableado
Depende del sustrato del piso,
el tipo de bayeta y el valor de presión
descendente
ESPAÑOL / B-23
FORM NO. - 56041820 - SC750, SC800, SC750 ST, SC800 ST - B-23
Page 48

B-24 / ESPAÑOL
ESPECIFICACIONES TÉCNICAS (según la instalación y las pruebas de la unidad)
Modelo SC750-26D SC750-28D
SC750 ST-26D SC750-28C SC750 ST-28D SC750-28R
Nº de modelo 56112000 56112004
56112012 56112006 56112013 56112780
Tensión, baterías V 24V 24V 24V 24V
Capacidad de la batería Ah 312 312 312 312
Grado de protección IPX4 IPX4 IPX4 N/A
Nivel de potencia acústica
(IEC 60704-1)
Nivel de potencia acústica
(IEC 60704-1) – Incertidumbre
Peso bruto lb/kg 942/427.3 942/427.3 942/427.3 969/439.5
Peso del transporte lb/kg 932/422.7 932/422.7 932/422.7 959/435.0
Carga máxima en suelo de rueda (frontal derecha) psi N/mm
Carga máxima en suelo de rueda (frontal izquierda) psi N/mm
Carga máxima en suelo de rueda (trasera central) psi N/mm
Vibración en los controles manuales
(ISO 5349-1)
Vibración en los controles manuales
(ISO 5349-1) – Incertidumbre
Inclinación en transporte 2% (1.15º) 2% (1.15º) 2% (1.15º) 2% (1.15º)
Inclinación en limpieza 2% (1.15º) 2% (1.15º) 2% (1.15º) 2% (1.15º)
Modelo SC800-28D SC800-32C
Nº de modelo 56112016 56112024
Tensión, baterías V 24V 24V 24V
Capacidad de la batería Ah 312 312 312
Grado de protección IPX4 IPX4 IPX4
Nivel de potencia acústica
(IEC 60704-1)
Nivel de potencia acústica
(IEC 60704-1) – Incertidumbre
Peso bruto lb./kg 994/450.9 994/450.9 994/450.9
Peso del transporte lb./kg 984/446.3 984/446.3 984/446.3
Carga máxima en suelo de rueda (frontal derecha) psi N/mm
Carga máxima en suelo de rueda (frontal izquierda) psi N/mm
Carga máxima en suelo de rueda (trasera central) psi N/mm
Vibración en los controles manuales
(ISO 5349-1)
Vibración en los controles manuales
(ISO 5349-1) – Incertidumbre
Inclinación en transporte 2% (1.15º) 2% (1.15º) 2% (1.15º)
Inclinación en limpieza 2% (1.15º) 2% (1.15º) 2% (1.15º)
dB(A) 61 61 61 64
dB(A) 3.0 3.0 3.0 3.0
2
59.08/0.407 59.08/0.407 59.08/0.407 56.88/0.392
2
60.10/0.414 60.10/0.414 60.10/0.414 69.61/0.480
2
287.56/1.983 287.56/1.983 287.56/1.983 268.39/1.85
2
m/s
m/s
2
Menos de 2.5 Menos de 2.5 Menos de 2.5 Menos de 2.5
.02 .02 .02 .02
SC800-28C SC800-34D SC800 ST-34D
56112018 56112028 56112032
dB(A) 61 61 61
dB(A) 3.0 3.0 3.0
m/s
m/s
2
2
2
2
2
71.0/.490 71.0/.490 71.0/.490
66.6/.459 66.6/.459 66.6/.459
287.6/1.983 287.6/1.983 287.6/1.983
.09 .09 .09
.02 .02 .02
COMPOSICIÓN DEL MATERIAL
LBS KG
Aluminio 13.58 6.16
Goma 15.888 7.21
Plástico 23.037 10.45
Polietileno 116.4 52.79
Metal ferroso y cobre
Transeje 23 10.43
Motor del cepillo 17.25 7.82
Motor de aspiración 6 2.72
Motor de aspiración 19.41 8.80
B-24 - FORM NO. - 56041820 - SC750, SC800, SC750 ST, SC800 ST
Page 49

Page 50

C-2 / PORTUGUÊS
ÍNDICE
Página
Introdução ............................................................................... C-3
Peças e Serviços .................................................................... C-3
Placa de Identifi cação ............................................................ C-3
Remoção da embalagem ....................................................... C-3
Precauções e avisos .....................................................C-4 – C-5
Conheça seu equipamento ............................................C-6 – C-7
Painel de controle – SC750, SC800 ....................................... C-8
Painel de controle – SC750 ST, SC800 ST ............................ C-9
Preparação para uso
Baterias ................................................................................ C-10
Instalando as escovas e os suportes ........................C-11 – C-13
Enchimento do tanque de solução ....................................... C-15
Instalação do rodo ................................................................ C-15
Sistema de detergente (EcoFlex™) ..........................C-16 – C-17
Operação do equipamento
Limpeza a úmido .......................................................C-18 – C-19
Aspiração úmida ................................................................... C-19
Após usar o equipamento ..................................................... C-20
Cronograma de manutenção ................................................ C-20
Manutenção do motor de aspiração ..................................... C-20
Lubrifi cação do equipamento ............................................... C-20
Manutenção
Como carregar as baterias (líquida) ..................................... C-21
Como carregar as baterias (gel) ........................................... C-21
Manutenção do rodo ............................................................. C-22
Ajuste do rodo ...................................................................... C-22
Detecção e solução de problemas ....................................... C-23
Especifi cações técnicas ...................................................... C-24
Composição dos materiais ................................................... C-24
C-2 - FORM NO. - 56041820 - SC750, SC800, SC750 ST, SC800 ST
 Loading...