

Page 1
SC2000
Instructions for Use - Original Instructions
Instrucciones de Uso
Instructions d’Utilisation
Instruções de Uso
Model: 9087361020
English
Español
Français
Português
01/2015 (1)
FORM NO. 9100000386
Page 2

Page 3

INSTRUCTIONS FOR USE ENGLISH
TABLE OF CONTENTS
INTRODUCTION .............................................................................................................................................................. 2
MANUAL PURPOSE AND CONTENTS .......................................................................................................................................... 2
TARGET ........................................................................................................................................................................................... 2
HOW TO KEEP THIS MANUAL .......................................................................................................................................................2
IDENTIFICATION DATA ................................................................................................................................................................... 2
OTHER REFERENCE MANUALS ................................................................................................................................................... 2
SPARE PARTS AND MAINTENANCE ............................................................................................................................................. 2
CHANGES AND IMPROVEMENTS ................................................................................................................................................ 2
OPERATION CAPABILITIES ........................................................................................................................................................... 3
CONVENTIONS .............................................................................................................................................................................. 3
UNPACKING/DELIVERY ................................................................................................................................................. 3
SAFETY ........................................................................................................................................................................... 3
VISIBLE SYMBOLS ON THE MACHINE ......................................................................................................................................... 3
SYMBOLS THAT APPEAR ON THIS MANUAL ............................................................................................................................... 4
GENERAL INSTRUCTIONS ............................................................................................................................................................ 4
MACHINE DESCRIPTION ............................................................................................................................................... 6
MACHINE STRUCTURE ................................................................................................................................................................. 6
CONTROL PANEL ........................................................................................................................................................................... 8
ACCESSORIES/OPTIONS .............................................................................................................................................................. 9
TECHNICAL DATA ........................................................................................................................................................................... 9
WIRING DIAGRAM ........................................................................................................................................................................ 10
USE ................................................................................................................................................................................ 11
BATTERY CHECK/SETTING ON A NEW MACHINE .....................................................................................................................11
BATTERY INSTALLATION ..............................................................................................................................................................11
BEFORE MACHINE START-UP .................................................................................................................................................... 12
MACHINE START AND STOP ....................................................................................................................................................... 14
MACHINE OPERATION (SCRUBBING/DRYING) ......................................................................................................................... 14
TANK EMPTYING .......................................................................................................................................................................... 17
AFTER USING THE MACHINE ..................................................................................................................................................... 17
PUSHING/TOWING THE MACHINE ............................................................................................................................................. 17
MACHINE LONG INACTIVITY ...................................................................................................................................................... 17
MAINTENANCE ............................................................................................................................................................. 18
SCHEDULED MAINTENANCE TABLE .........................................................................................................................................18
BATTERY CHARGING .................................................................................................................................................................. 19
SUPER USER KEY (yellow) .......................................................................................................................................................... 20
SQUEEGEE CLEANING ............................................................................................................................................................... 22
SQUEEGEE BLADE CHECK AND REPLACEMENT .................................................................................................................... 22
CLEANING THE BRUSH ............................................................................................................................................................... 23
RECOVERY TANK CLEANING ..................................................................................................................................................... 23
WASHING WATER FILTER CLEANING ........................................................................................................................................ 24
DETERGENT TANK CLEANING ................................................................................................................................................... 24
DRAINING THE ECOFLEX™ SYSTEM ........................................................................................................................................ 25
FUSE CHECK/REPLACEMENT .................................................................................................................................................... 25
SAFETY FUNCTIONS ................................................................................................................................................... 26
EMERGENCY PUSH-BUTTON ..................................................................................................................................................... 26
ANTI-SKID SAFETY SYSTEM ...................................................................................................................................................... 26
DRIVER’S SEAT MICROSWITCH ................................................................................................................................................. 26
ELECTROMAGNETIC BRAKE ...................................................................................................................................................... 26
TROUBLESHOOTING ................................................................................................................................................... 27
SCRAPPING .................................................................................................................................................................. 28
01/2015
9100000386 - SC2000 1
Page 4
ENGLISH INSTRUCTIONS FOR USE
INTRODUCTION
NOTE
The numbers in brackets refer to the components shown in Machine Description chapter.
MANUAL PURPOSE AND CONTENTS
The purpose of this Manual is to provide the operator with all necessary information to use the machine properly, in a safe and
autonomous way. It contains information about technical data, safety, operation, storage, maintenance, spare parts and disposal.
Before performing any procedure on the machine, the operators and qualied technicians must read this Manual carefully. Contact
Advance in case of doubts concerning the interpretation of the instructions and for any further information.
TARGET
This Manual is intended for operators and technicians qualied to perform the machine maintenance.
The operators must not perform procedures reserved for qualied technicians. Advance will not be answerable for damages coming
from the non-observance of this prohibition.
HOW TO KEEP THIS MANUAL
The Instructions for Use Manual must be kept near the machine, inside an adequate case, away from liquids and other substances
that can cause damage to it.
IDENTIFICATION DATA
The machine serial number and model name are marked on the plate (23).
Product number and year of production are marked on the same plate.
This information is useful when requiring machine spare parts. Use the following table to write down the machine identication data.
MACHINE model
PRODUCT code
MACHINE serial number
OTHER REFERENCE MANUALS
– Electronic battery charger Manual, to be considered as integral part of this Manual
– Spare Parts List (supplied with the machine)
– Service Manual (that can be consulted at Advance Service Centers)
SPARE PARTS AND MAINTENANCE
All necessary operating, maintenance and repair procedures must be performed by qualied personnel or by Advance Service
Centers. Only original spare parts and accessories must be used.
Contact Advance for service or to order spare parts and accessories, specifying the machine model, product code and serial
number.
CHANGES AND IMPROVEMENTS
Advance constantly improves its products and reserves the right to make changes and improvements at its discretion without being
obliged to apply such benets to the machines that were previously sold.
Any change and/or addition of accessories must be approved and performed by Advance.
2 SC2000 - 9100000386
01/2015
Page 5
INSTRUCTIONS FOR USE ENGLISH
OPERATION CAPABILITIES
The SC2000 scrubber-dryer is used to clean (scrubbing and drying) smooth and solid oors, in civil or industrial environment, under
safe operation conditions by a qualied operator.
The scrubber-dryer cannot be used for tted carpet and carpet cleaning.
CONVENTIONS
Forward, backward, front, rear, left or right are intended with reference to the operator’s position, that is to say on the driver’s seat
(12).
UNPACKING/DELIVERY
To unpack the machine, carefully follow the instructions on the packing.
To move the machine manually, see the Pushing/Towing The Machine paragraph.
When the machine is delivered, check that the packing and the machine were not damaged during transportation.
In case of visible damages, keep the packing and have it checked by the carrier that delivered it. Call the carrier immediately to ll
in a damage claim.
Please check that the following items have been supplied with the machine:
– Technical documents:
• Scrubber-dryer Instructions for Use Manual
• Scrubber-dryer Spare Parts List
– No. 2 lamellar fuses
– No. 1 splash guard
WARNING!
The Products sold with this Manual contain or may contain chemicals that are known to certain governments
(such as the State of California, as identied in its Proposition 65 Regulatory Warning Law) to cause cancer,
birth defects or other reproductive harm. In certain locations (including the State of California) purchasers of
these Products that place them in service at an employment job site or a publicly accessible space are required
by regulation to make certain notices, warnings or disclosures regarding the chemicals that are or may be
contained in the Products at or about such work sites. It is the purchaser’s responsibility to know the content
of, and to comply with, any laws and regulations relating to the use of these Products in such environments.
The Manufacturer disclaims any responsibility to advise purchasers of any specic requirements that may be
applicable to the use of the Products in such environments.
SAFETY
The following symbols indicate potentially dangerous situations. Always read this information carefully and take all necessary
precautions to safeguard people and property.
The operator’s cooperation is essential in order to prevent injury. No accident prevention program is effective without the total
cooperation of the person responsible for the machine operation. Most of the accidents that may occur in a factory, while working
or moving around, are caused by failure to comply with the simplest rules for exercising prudence. A careful and prudent operator is
the best guarantee against accidents and is essential for successful completion of any prevention program.
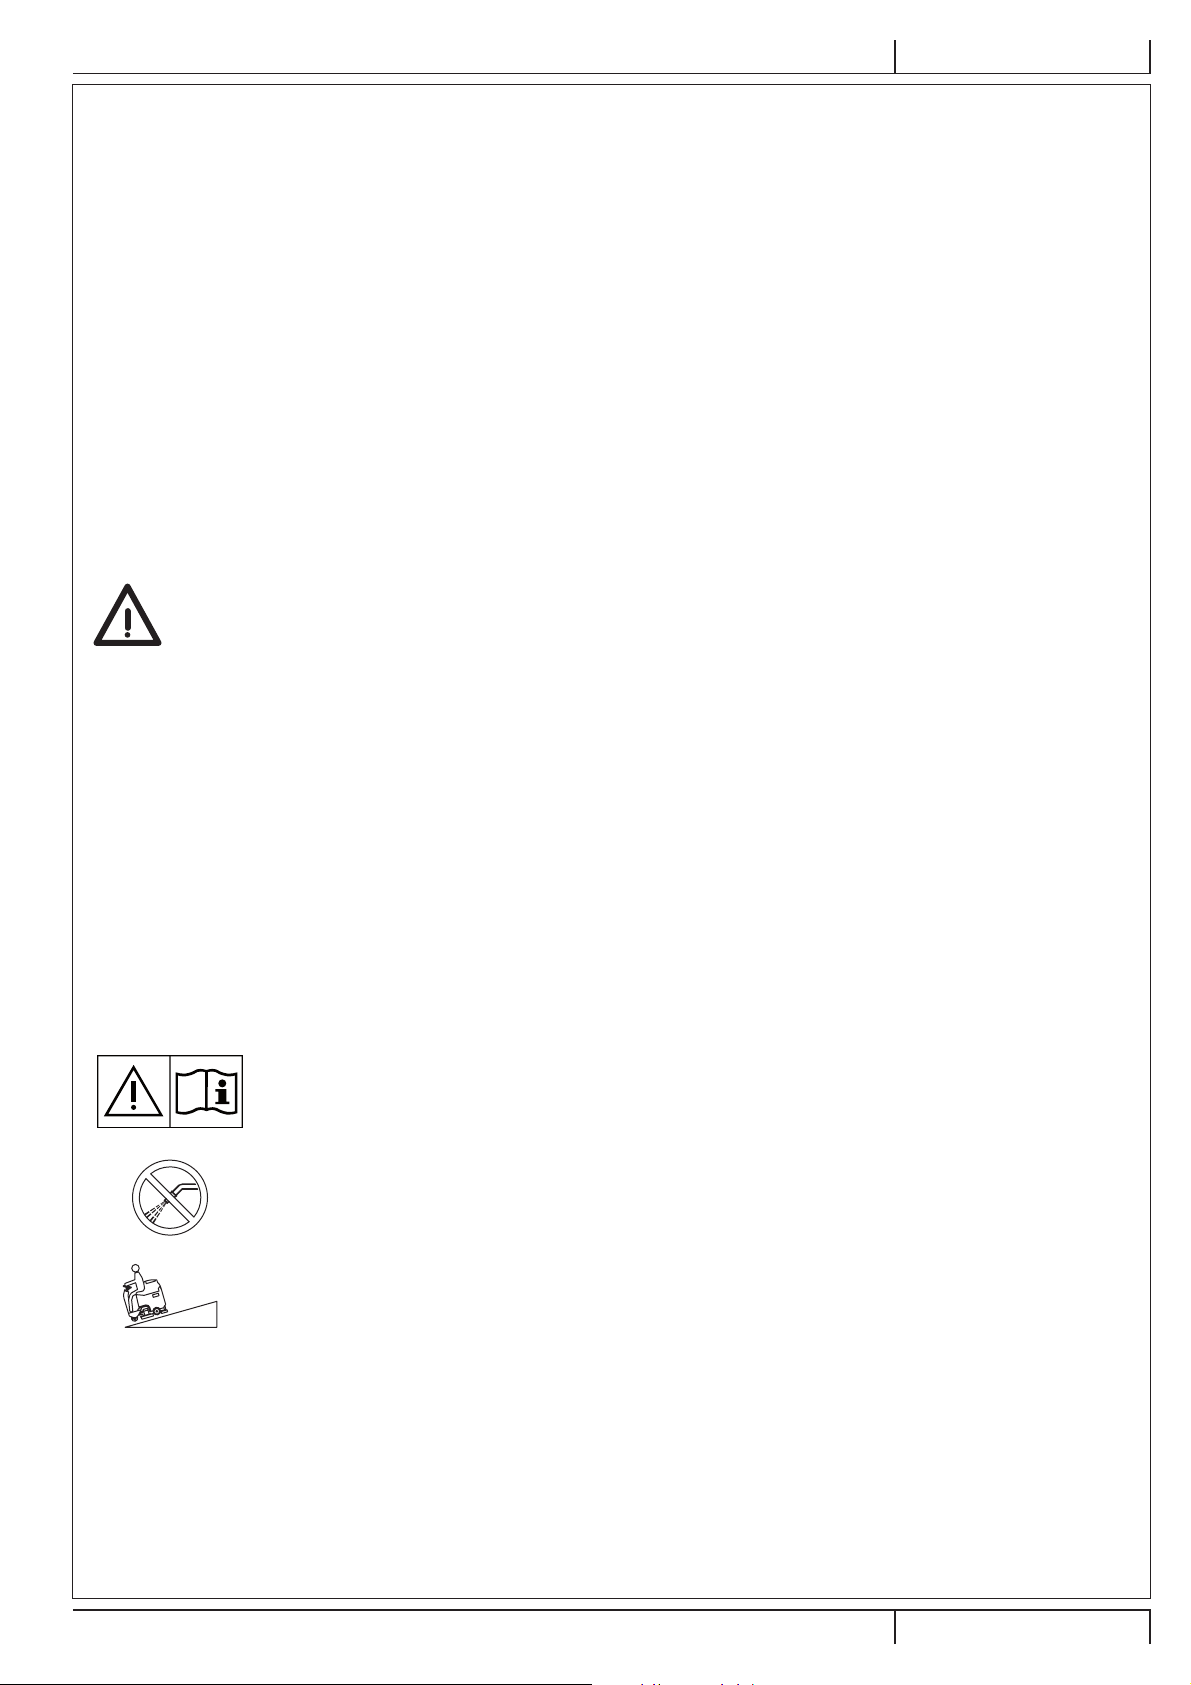
VISIBLE SYMBOLS ON THE MACHINE
WARNING!
Carefully read all the instructions before performing any operation on the machine.
WARNING!
Do not wash the machine with direct or pressurized water jets.
WARNING!
max.2%
Do not use the machine on slopes with a gradient exceeding the specications.
01/2015
9100000386 - SC2000 3
Page 6
ENGLISH INSTRUCTIONS FOR USE
SYMBOLS THAT APPEAR ON THIS MANUAL
DANGER!
It indicates a dangerous situation with risk of death for the operator.
WARNING!
It indicates a potential risk of injury for people.
CAUTION!
It indicates a caution or a remark related to important or useful functions.
Pay careful attention to the paragraphs marked by this symbol.
NOTE
It indicates a remark related to important or useful functions.
CONSULTATION
It indicates the necessity to refer to the Instructions for Use Manual before performing any procedure.
GENERAL INSTRUCTIONS
Specic warnings and cautions to inform about potential damages to people and machine are shown below.
DANGER!
– Before performing any maintenance, repair, cleaning or replacement procedure, remove the ignition key and
disconnect the battery connector.
– This machine must be used by properly trained operators only.
– Do not wear jewels when working near electrical components.
– Do not work under the lifted machine without supporting it with safety stands.
– Do not operate the machine near toxic, dangerous, ammable and/or explosive powders, liquids or vapors.
This machine is not suitable for collecting dangerous powders.
– When using lead (WET) batteries, keep sparks, ames and smoking materials away from the batteries. During
the normal operation explosive gases are released.
– When using lead (WET) batteries, battery charging produces highly explosive hydrogen gas. During battery
charging, lift the recovery tank and perform this procedure in well-ventilated areas and away from naked
ames.
WARNING!
– Carefully read all the instructions before performing any maintenance/repair procedure.
– The machine ignition key has a built-in magnet. Do not place objects having magnetic bands (such as credit
cards, electronic keys, phone cards) near the key. The built-in magnet can damage or erase the data stored
on the magnetic bands.
– Before using the battery charger, ensure that frequency and voltage values, indicated on the machine serial
number plate, match the electrical mains voltage.
– Do not pull or carry the machine by the battery charger cable and never use the battery charger cable as
a handle. Do not close a door on the battery charger cable, or pull the battery charger cable around sharp
edges or corners. Do not run the machine on the battery charger cable.
– Keep the battery charger cable away from heated surfaces.
– Do not charge the batteries if the battery charger cable or the plug are damaged.
– To reduce the risk of re, electric shock, or injury, do not leave the machine unattended when it is plugged
in. Before performing any maintenance procedure, disconnect the battery charger cable from the electrical
mains.
– Do not smoke while charging the batteries.
– To avoid any unauthorized use of the machine, remove the ignition key.
– Do not leave the machine unattended without being sure that it cannot move independently.
4 SC2000 - 9100000386
01/2015
Page 7

INSTRUCTIONS FOR USE ENGLISH
WARNING!
– Always protect the machine against the sun, rain and bad weather, both under operation and inactivity
condition. This machine must be used in dry conditions, it must not be used or kept outdoors in wet
conditions.
– Before using the machine, close all doors and/or covers as shown in the Instructions for Use Manual.
– This machine is not intended for use by persons (including children) with reduced physical, sensory or
mental capabilities, or lack of experience and knowledge, unless they have been given supervision or
instruction concerning use of the machine by a person responsible for they safety.
Children should be supervised to ensure that they do not play with the machine.
– Close attention is necessary when used near children. Use only as shown in this Manual. Use only Advance’s
recommended accessories.
– Check the machine carefully before each use, always check that all the components have been properly
assembled before use. If the machine is not perfectly assembled it can cause damages to people and
properties.
– Take all necessary precautions to prevent hair, jewels and loose clothes from being caught by the machine
moving parts.
– Do not use the machine on incline.
– Do not tilt the machine more than the angle indicated on the machine itself, in order to prevent instability.
– Do not use the machine in particularly dusty areas.
– Use the machine only where a proper lighting is provided.
– If the machine is to be used where there are other people besides the operator, it is necessary to install the
pivoting light (optional).
– While using this machine, take care not to cause damage to people or objects.
– Do not bump into shelves or scaffoldings, especially where there is a risk of falling objects.
– Do not lean liquid containers on the machine, use the relevant can holder.
– The machine operating temperature must be between +32 °F and 104 °F (0 °C and +40 °C).
– The machine storage temperature must be between +32 °F and 104 °F (0 °C and +40 °C).
– The humidity must be between 30 % and 95 %.
– When using oor cleaning detergents, follow the instructions on the labels of the detergent bottles.
– To handle oor cleaning detergents, wear suitable gloves and protections.
– Do not use the machine as a means of transport.
– Do not allow the brush/pad to operate while the machine is stationary to avoid damaging the oor.
– In case of re, use a powder re extinguisher, not a water one.
– Do not tamper with the machine safety guards and follow the ordinary maintenance instructions
scrupulously.
– Do not allow any object to enter into the openings. Do not use the machine if the openings are clogged.
Always keep the openings free from dust, hairs and any other foreign material which could reduce the air
ow.
– Do not remove or modify the plates afxed to the machine.
– To manually move the machine, the electromagnetic brake must be disengaged. After moving the machine
manually, engage the electromagnetic brake again. Do not use the machine when the electromagnetic brake
handwheel is screwed down.
– When the machine is to be pushed for service reasons (missing or discharged batteries, etc.), the speed
must not exceed 2.5 mi/h (4 km/h).
– This machine cannot be used on roads or public streets.
– Pay attention during machine transportation when temperature is below freezing point. The water in the
recovery tank or in the hoses could freeze and seriously damage the machine.
– Use brushes and pads supplied with the machine or those specied in the Instructions for Use Manual.
Using other brushes or pads could reduce safety.
– In case of machine malfunctions, ensure that these are not due to lack of maintenance. If necessary, request
assistance from the authorised personnel or from an authorised Service Center.
– If parts must be replaced, require ORIGINAL spare parts from an Authorised Dealer or Retailer.
– To ensure machine proper and safe operation, the scheduled maintenance shown in the relevant chapter of
this Manual, must be performed by the authorised personnel or by an authorised Service Center.
– Do not wash the machine with direct or pressurised water jets, or with corrosive substances.
– The machine must be disposed of properly, because of the presence of toxic-harmful materials (batteries,
etc.), which are subject to standards that require disposal in special centres (see Scrapping chapter).
01/2015
9100000386 - SC2000 5
Page 8
ENGLISH INSTRUCTIONS FOR USE
18 11
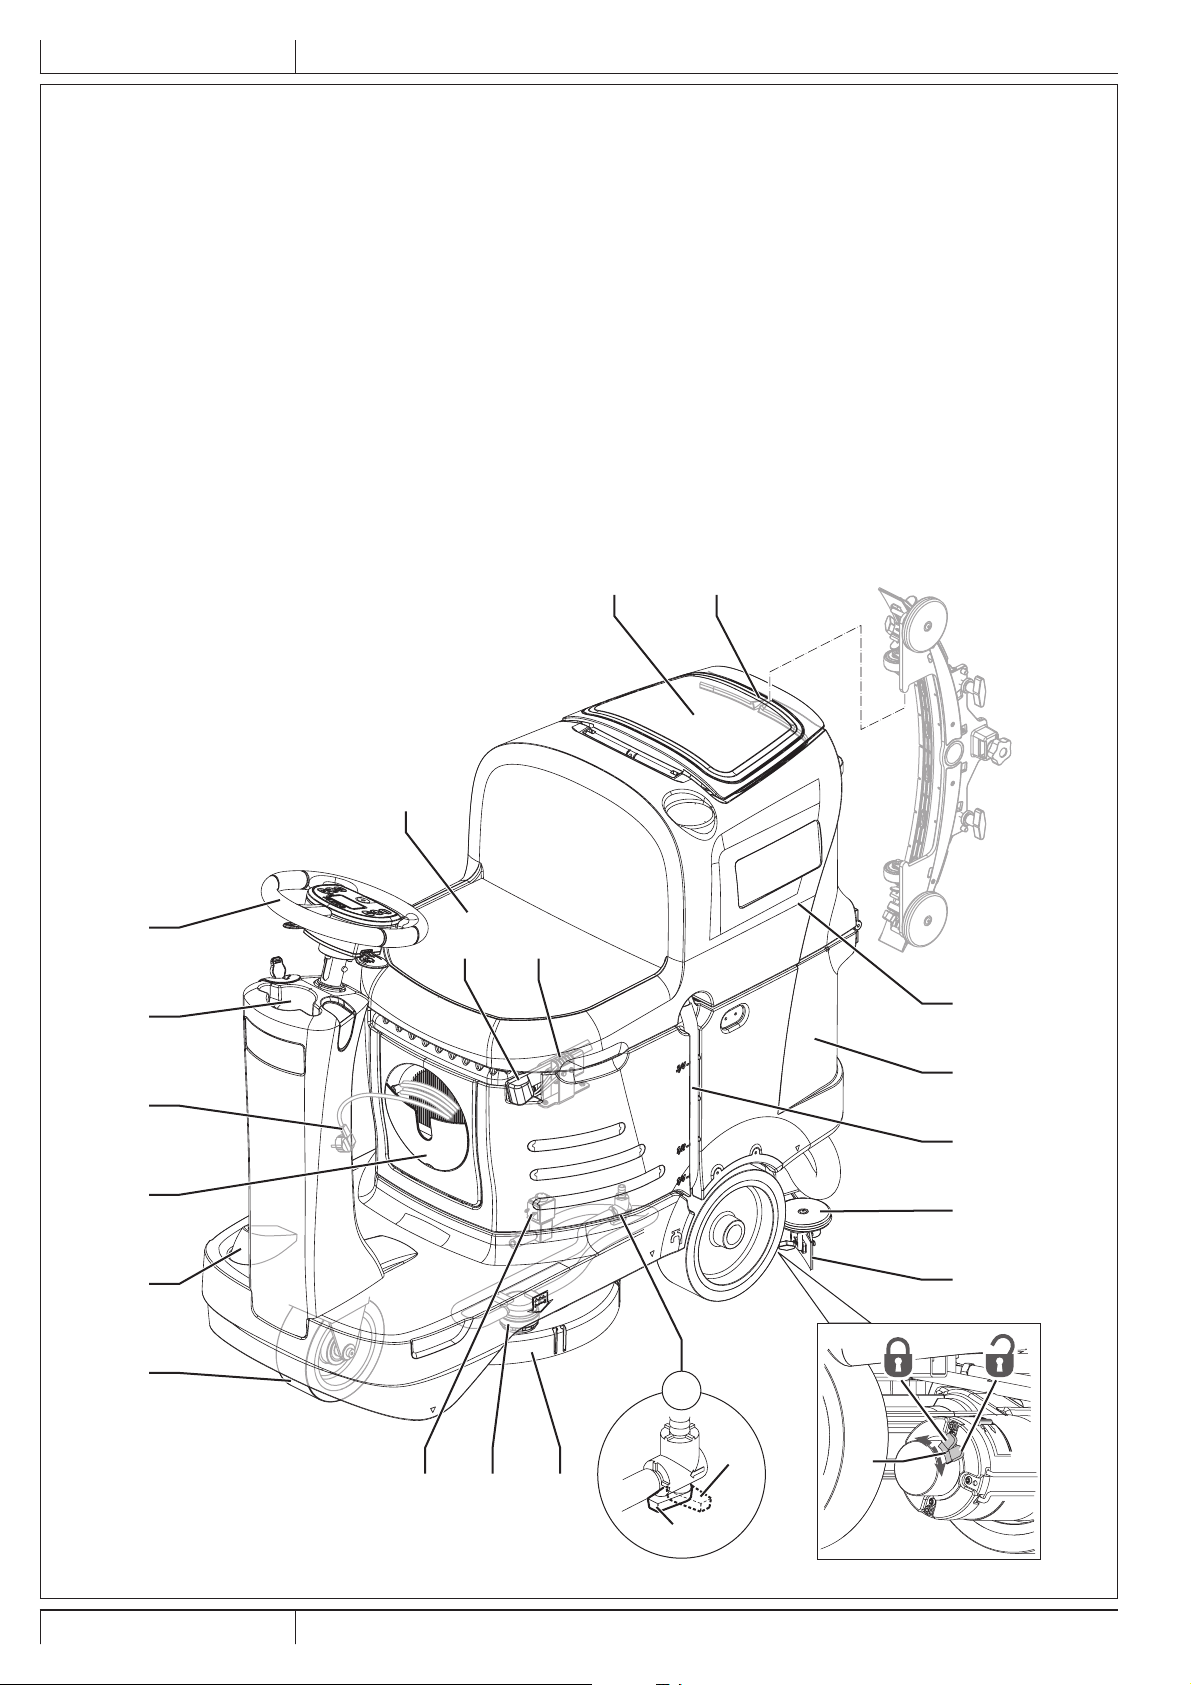
MACHINE DESCRIPTION
MACHINE STRUCTURE
1. Steering wheel with control panel (see the following
paragraph)
2. Drive pedal
3. Front steering wheel
4. Electromagnetic brake locking/unlocking lever
5. EMERGENCY push-button, to stop immediately all
functions
6. Battery connector
7. Brush deck
8. Washing water lter
9. Washing water valve
A) Open valve
B) Closed valve
10. Solenoid valve
11. Squeegee hook
12. Seat
13. Squeegee
14. Squeegee bumper wheels
15. Washing water tank
16. Washing water level and drain hose
17. Dumping recovery tank assembly
18. Recovery tank cover
19. Can holder
20. Battery charger cable housing and document holder
21. Battery charger cable
1
19
21
20
2
12
5 6
17
15
16
14
13
3
10 8 7
6 SC2000 - 9100000386
A
9
B
4
P100859
01/2015
Page 9
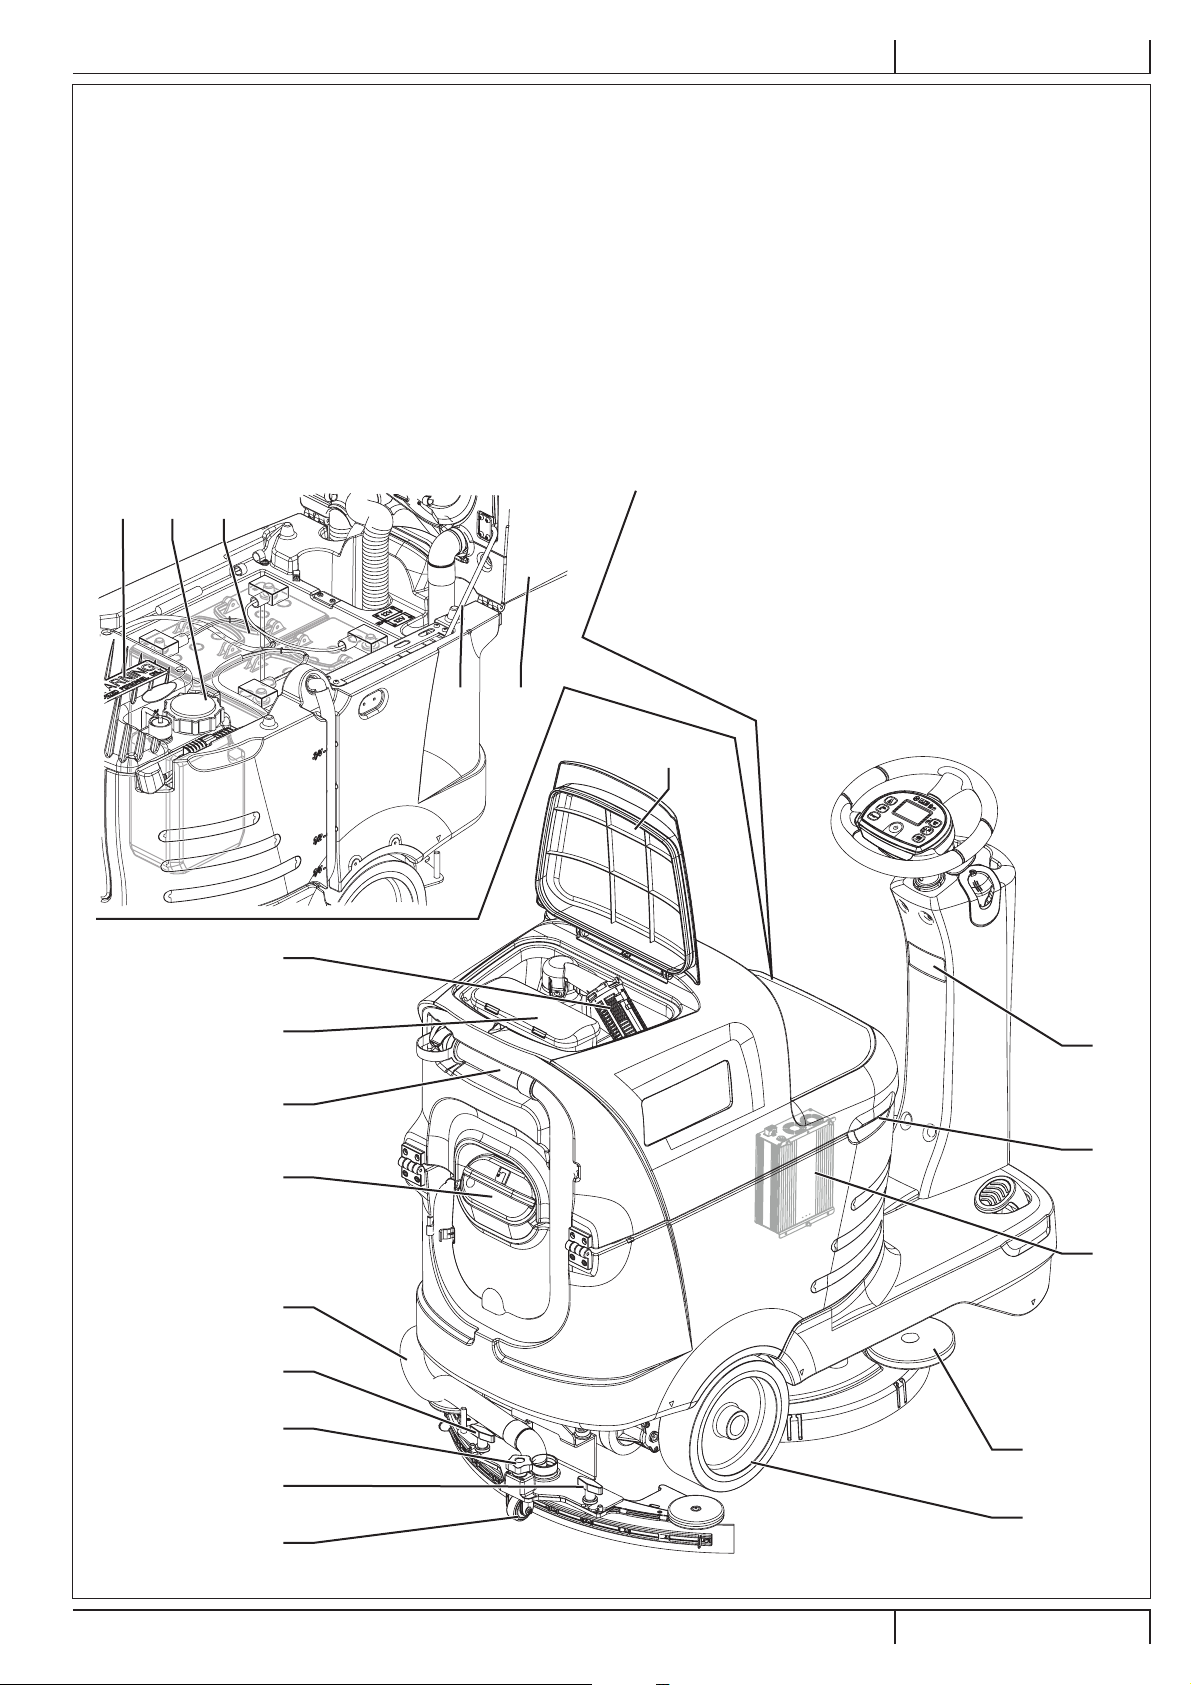
MACHINE STRUCTURE (Continues)
373839
22. Battery charger
23. Serial number plate/technical data/conformity certication
24. Rear driving wheels
25. Washing water tank ller
26. Recovery water drain hose
27. Container with debris collection grid
28. Vacuum grid with automatic shut-off oat
29. Recovery water tank cover (open)
30. Squeegee vacuum hose
INSTRUCTIONS FOR USE ENGLISH
31. Squeegee support wheel
32. Squeegee mounting handwheels
33. Squeegee adjusting knob
34. Brush deck bumper wheel
35. Tank assembly and seat lifting handle
36. Tank assembly and seat support rod
37. Batteries (optional)
38. EcoFlex™ detergent tank
39. Electronic component compartment cover
40. Lifted recovery tank assembly and driver’s seat
28
27
26
25
4036
29
23
35
22
01/2015
30
32
33
34
32
24
31
P100860
9100000386 - SC2000 7
Page 10
ENGLISH INSTRUCTIONS FOR USE
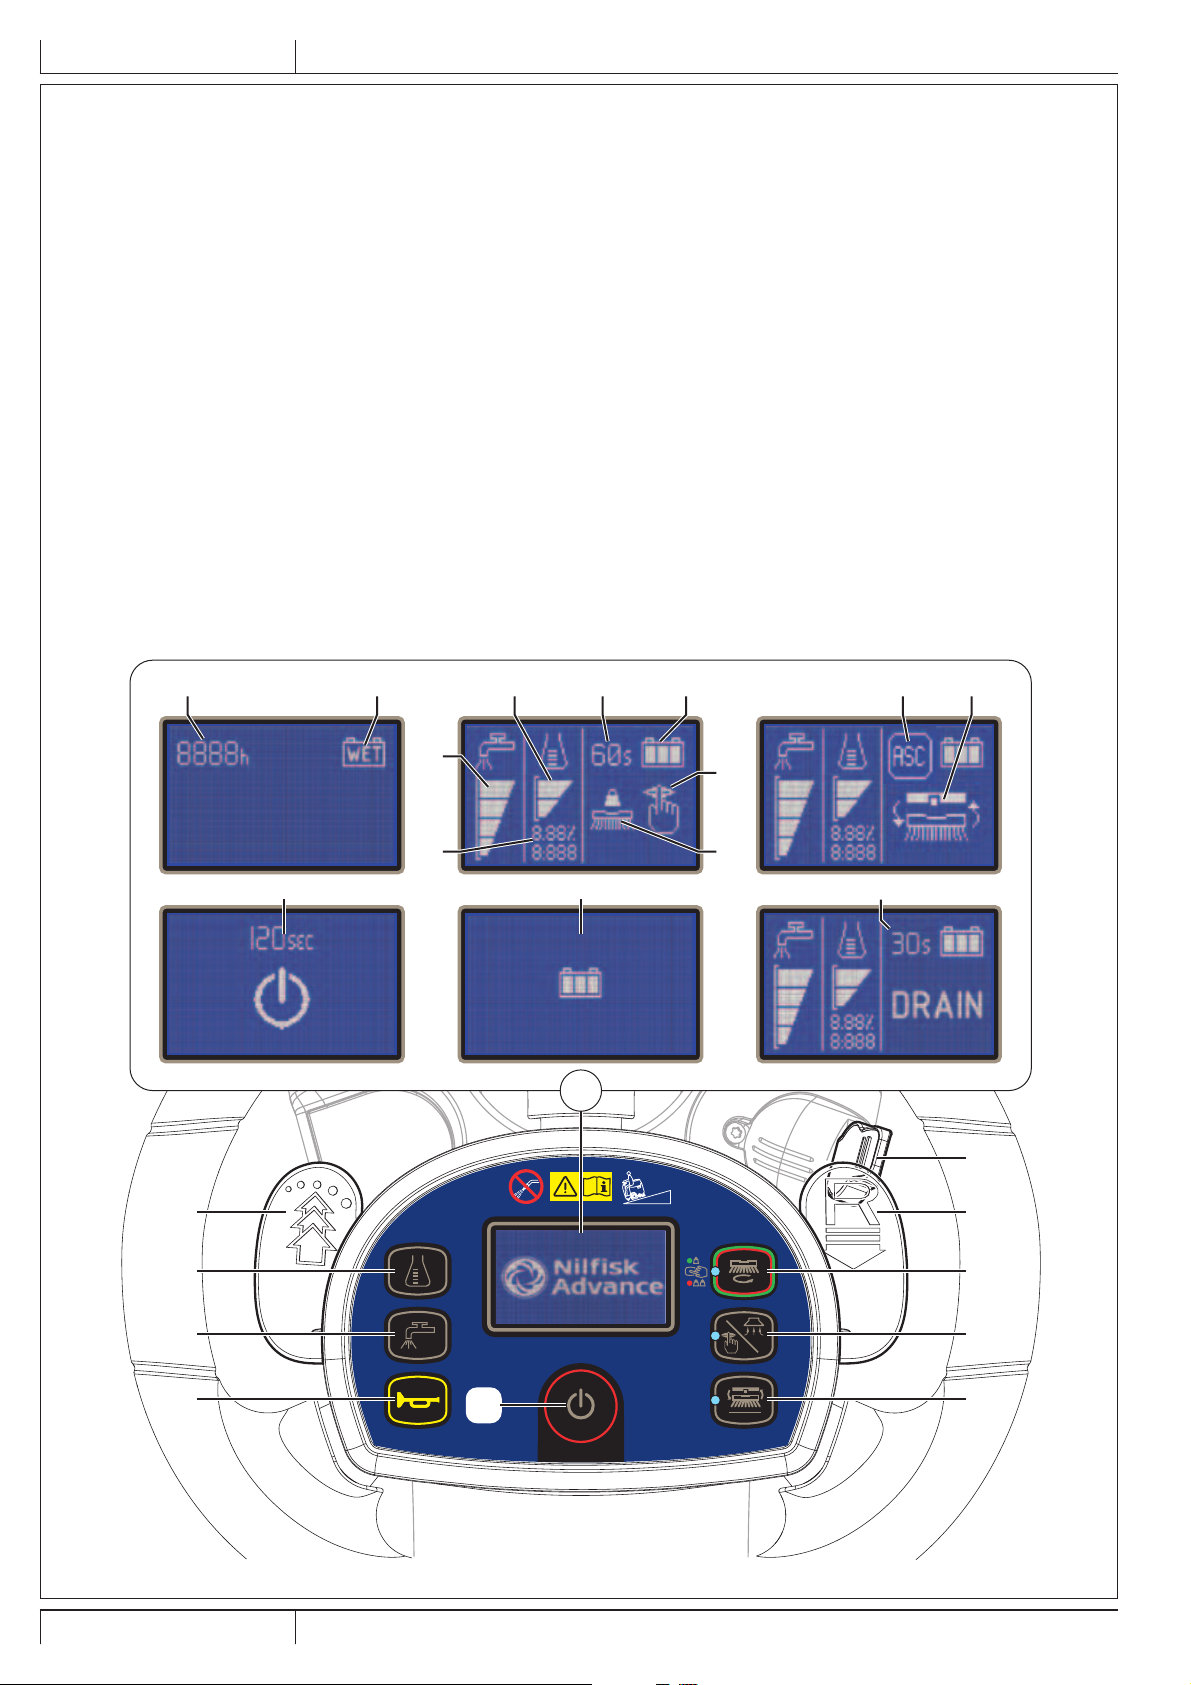
CONTROL PANEL
41. Machine ignition key:
• Operator key (grey)
• Super User key (yellow) (see Maintenance chapter)
42. Machine start/stop push-button
43. One-Touch™ Scrub ON/OFF push-button
• Flashing green LED: Brush deck moving up/down
• Steady green LED: Ready for work
• Steady red LED: Extra pressure active (hold for one
second)
44. Vacuum system adjustment/deactivation push-button:
• LED on - solution ow activated
45. Brush engage/disengage push-button:
• Flashing LED - system activated
46. Detergent percentage adjustment push-button
47. Detergent ow adjustment push-button
48. Horn switch
49. Reverse gear activation/deactivation lever
50. EcoFlex™ activation/deactivation lever
51. Multifunction display
Items displayed:
A) Hours worked
B) Battery type
C) Battery charge level
D) Vacuum mode
E) Brush work mode
F) Detergent solution ow quantity
G) Detergent quantity
H) Percentages of detergent in the washing water
I) EcoFlex™ system override timer
J) Anti-skid control
K) Maximum machine speed setting
L) Auto shut-off timer
M) Battery charging with on-board battery charger
N) EcoFlex™ system drain activation
A B
L
50
H
G
C KI J
F
D
E
M
N
51
41
max.2%
49
46
47
48
8 SC2000 - 9100000386
42
1s
43
44
45
P100861
01/2015
Page 11

INSTRUCTIONS FOR USE ENGLISH
ACCESSORIES/OPTIONS
In addition to the standard components, the machine can be equipped with the following accessories/options, according to the
machine specic use:
– GEL/AGM batteries
– Brushes of different materials
– Pads of different materials
– Squeegee blades of different materials
– Pivoting light
– Mop a trash kit
– TrackClean system
– USB port
– Filling hose
For further information concerning the optional accessories, contact an authorised Retailer.
TECHNICAL DATA
Model SC2000 53 B
Washing water tank capacity 18.5 US gal (70 liters)
Recovery tank capacity 18.5 US gal (70 liters)
Machine length 50 in (1,270 mm)
Machine width with squeegee 28.3 in (720 mm)
Machine width without squeegee 21.6 in (550 mm)
Machine height 40.1 in (1,020 mm)
Turning space for U-turns 71 in (1,800 mm)
Cleaning width 21 in (530 mm)
Rear driving wheel diameter 10 in (254 mm)
Rear driving wheel specic pressure on the oor 145 psi (1.0 N/mm2)
Front steering wheel diameter 7.9 in (200 mm)
Front wheel specic pressure on the oor 188 psi (1.3 N/mm2)
Brush/pad diameter 21 in (530 / 508 mm)
Brush pressure with extra-pressure function turned off 33 lb (15 kg)
Brush pressure with extra-pressure function turned on 66 lb (30 kg)
Solution ow values 0.75 cl/m / 1.5 cl/m / 3.0 cl/m / (2.8 l/min, if enabled)
EcoFlex™ system detergent percentage 0.25 % - 3 %
Sound pressure level at workstation (ISO 11201, ISO 4871, EN 60335-2-72) (LpA) 68 ± 3 dB(A)
Sound pressure level at workstation in silent mode (LpA) 62 ± 3 dB(A)
Machine sound power level (ISO 3744, ISO 4871, EN 60335-2-72) (LwA) 84 dB(A)
Vibration level at the operator’s arms (ISO 5349-1, EN 60335-2-72) 130 in/s2 (3.3 m/s2)
Vibration level at the operator’s body (ISO 5349-1, EN 60335-2-72) 35.4 in/s2 (0.9 m/s2)
Maximum gradient when working 2 %
Drive system motor power 0.53 hp (400 W)
Drive speed (variable) 0 - 3.7 mi/h (0 - 6 km/h)
Vacuum system motor power 0.4 hp (310 W)
Vacuum system circuit capacity 39 in H2O (1,000 mm H2O)
Brush motor power 0.6 hp (450 W)
Brush motor speed 155 rpm
Total absorbed power (*) 26 A (620 W)
IP protection class X4
Protection class (electric) III (I for the battery charger)
Battery compartment size 13.8x14.2x11 in (350x360x280 mm)
System voltage 24V
Standard batteries (2) Discover 12V-105Ah
Battery charger 100-240Vac 50-60Hz, 24Vdc 13A
Operating time (standard batteries) (*) 2.5 hour
Weight without batteries and with empty tanks 267 lb (121 kg)
Gross vehicle weight (GVW) 754 lb (342 kg)
Shipping weight 342 lb (155 kg)
(*) Values reect standard operating conditions (EN 60335-2-72)
01/2015
9100000386 - SC2000 9
Page 12
ENGLISH INSTRUCTIONS FOR USE
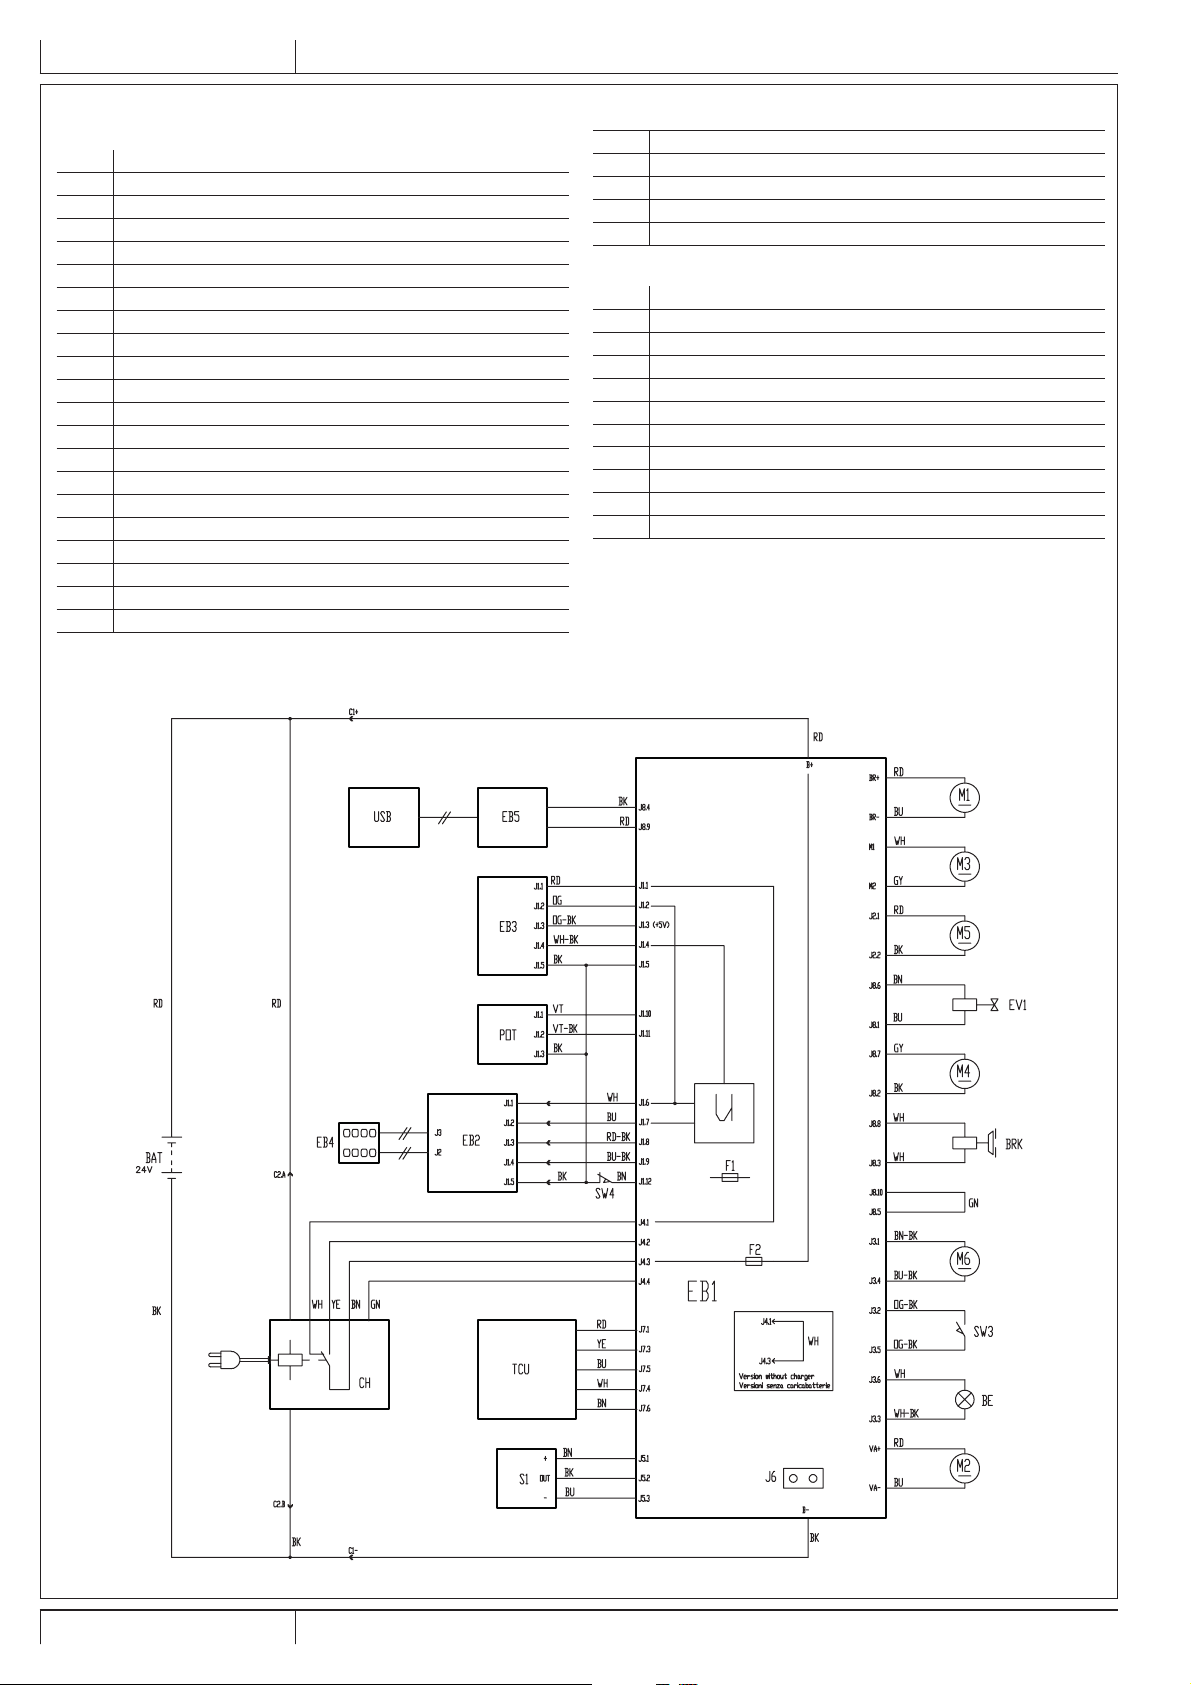
WIRING DIAGRAM
Key
BAT 24V batteries
BE Pivoting light (optional)
BRK Electromagnetic brake
C1 Battery connector
C2 Battery charger connector
CH Battery charger
EB1 Function electronic board
EB2 Display electronic board
EB3 Key electronic board
EB4 Dashboard instrument electronic board
EB5 5V power unit (optional)
EV1 Solenoid valve
F1 Main electronic board fuse
F2 Signal circuit fuse
M1 Brush motor
M2 Vacuum system motor
M3 Drive system motor
M4 EcoFlex™ pump
M5 Brush deck actuator motor
M6 Squeegee actuator motor
POT Drive pedal potentiometer
S1 Washing water level sensor
SW3 Seat microswitch
SW4 Anti-skid control sensor
TCU TrackClean™ (optional)
USB USB port (optional)
Color codes
BK Black
BU Blue
BN Brown
GN Green
GY Grey
OG Orange
PK Pink
RD Red
VT Violet
WH White
YE Yellow
10 SC2000 - 9100000386
P100862
01/2015
Page 13
INSTRUCTIONS FOR USE ENGLISH
USE
WARNING!
On some points of the machine there are some adhesive plates indicating:
– DANGER
– WARNING
– CAUTION
– CONSULTATION
While reading this Manual, the operator must pay particular attention to the symbols shown on the plates (see Visible Symbols On
The Machine paragraph).
Do not cover these plates for any reason and immediately replace them if damaged.
BATTERY CHECK/SETTING ON A NEW MACHINE
WARNING!
The electric components of the machine can be seriously damaged if the batteries are either improperly installed
or connected. The batteries must be installed by qualied personnel only.
Set the machine according to the type of batteries used.
Check the batteries for damage before installation.
Disconnect the battery connector and the battery charger plug.
Handle the batteries with great care.
Install the battery terminal protection caps supplied with the machine.
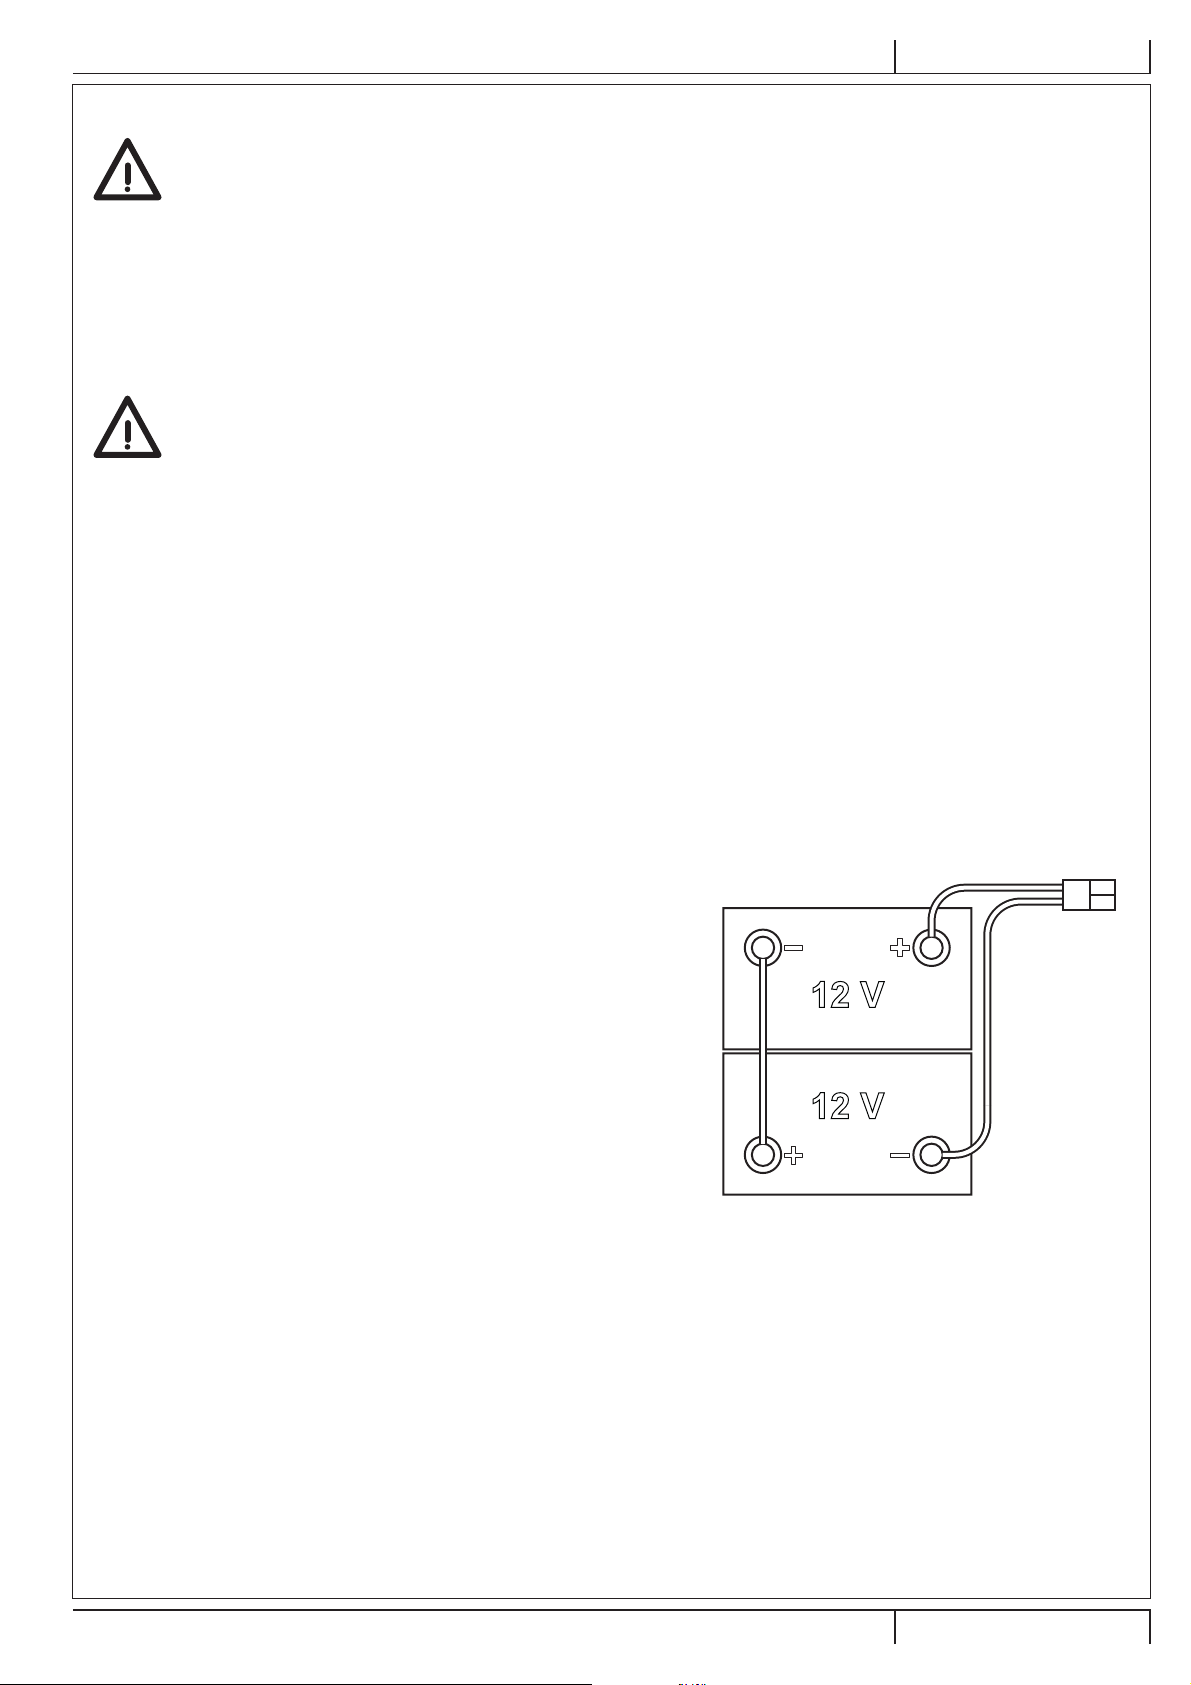
The machine requires 2 12V batteries, connected according to the diagram shown in Figure 1.
The machine can be supplied in one of the following modes:
Batteries already installed on the machine
1. Ensure that the battery connector (6) is connected.
2. When rst using the machine with new batteries, perform a full charging cycle (see the procedure in Maintenance chapter).
Without batteries
1. Buy appropriate batteries (see “Technical Data” paragraph). For battery choice and installation, apply to qualied battery
Retailers.
2. Set the machine according to the type of batteries installed as shown in the Super User key section of the Maintenance
chapter.
BATTERY INSTALLATION
Battery Installation
1. Remove the operator key (41).
2. Disconnect the battery connector by pressing the
emergency push-button (5).
3. Lift the cover (18) and check that the recovery tank (17) is
empty, otherwise empty it with the drain hose (26).
4. Close the cover (18).
5. Grasp the handle (35) and carefully lift the recovery tank
assembly (17).
6. The machine is supplied with cables suitable to install 2
12V batteries.
7. Carefully lift the batteries until the relevant compartment,
then place them properly.
8. Route and install the battery cable as shown in Figure 1,
then carefully tighten the nut on each battery terminal.
9. Place the protection cap on each terminal, then connect
the battery connector (6).
10. Disengage the support rod (36), then grasp the handle (35)
and carefully lower the recovery tank assembly (17).
BACK
Figure 1
FRONT
P100863
Battery Charging
11. Fully charge the batteries (see the procedure in
Maintenance chapter).
01/2015
9100000386 - SC2000 11
Page 14
ENGLISH INSTRUCTIONS FOR USE
BEFORE MACHINE START-UP
WARNING!
When starting the machine, or before operating the One-Touch™ push-button (43), make sure that there is
no foreign material between the deck and the tank assembly which could obstruct the deck movement. If the
machine has been turned off without lifting the deck, the deck would lift automatically at next machine start-up.
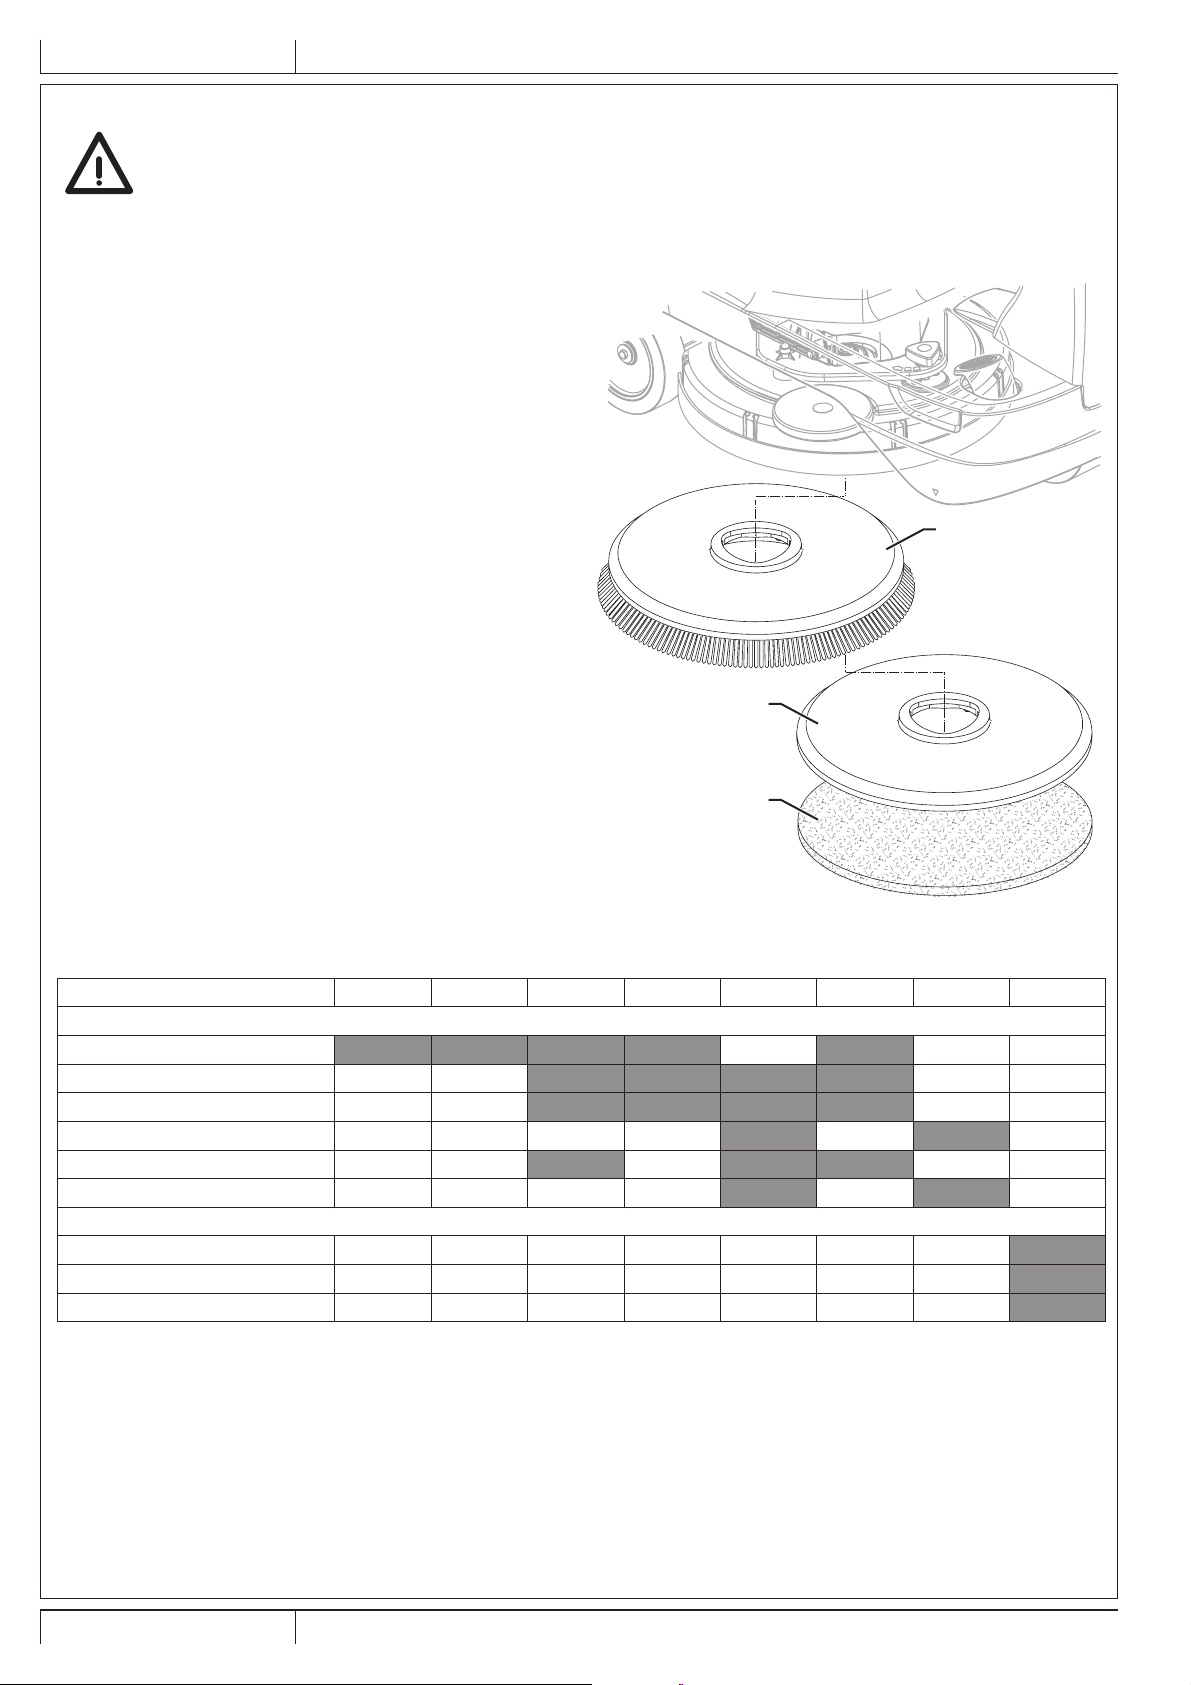
Brush or pad-holder removal/installation
1. According to the kind of cleaning to be performed, the
machine can be equipped either with the brush (A, Fig.
2) or the pad-holder (B) with pad (C) together with the
appropriate deck.
2. Place the brush (A) or the pad-holder (B) under the deck
(7).
3. Insert the operator key (41) in its slot.
4. Press the push-button (43) to lower the deck on the brush.
5. Press the switch (45) to engage the brush.
6. To remove the brush, the deck must be lifted by pressing
the push-button (43), then press the release push-button
(45).
7. When the display shows the icon (51-K), wait for the brush
to fall on the oor.
A
B
C
Figure 2
P100864
Available brushes and their relevant application guides (suggestions only)
Models 46 GRIT 80 GRIT 180 GRIT 240 GRIT 500 GRIT PROLENE PROLITE UNION MIX
General cleaning:
Concrete
Terrazzo oor
Ceramic tiles/quarrystones
Marble
Vinyl tiles
Rubber tiles
Polishing:
Rubber tiles
Marble
Vinyl tiles
12 SC2000 - 9100000386
01/2015
Page 15
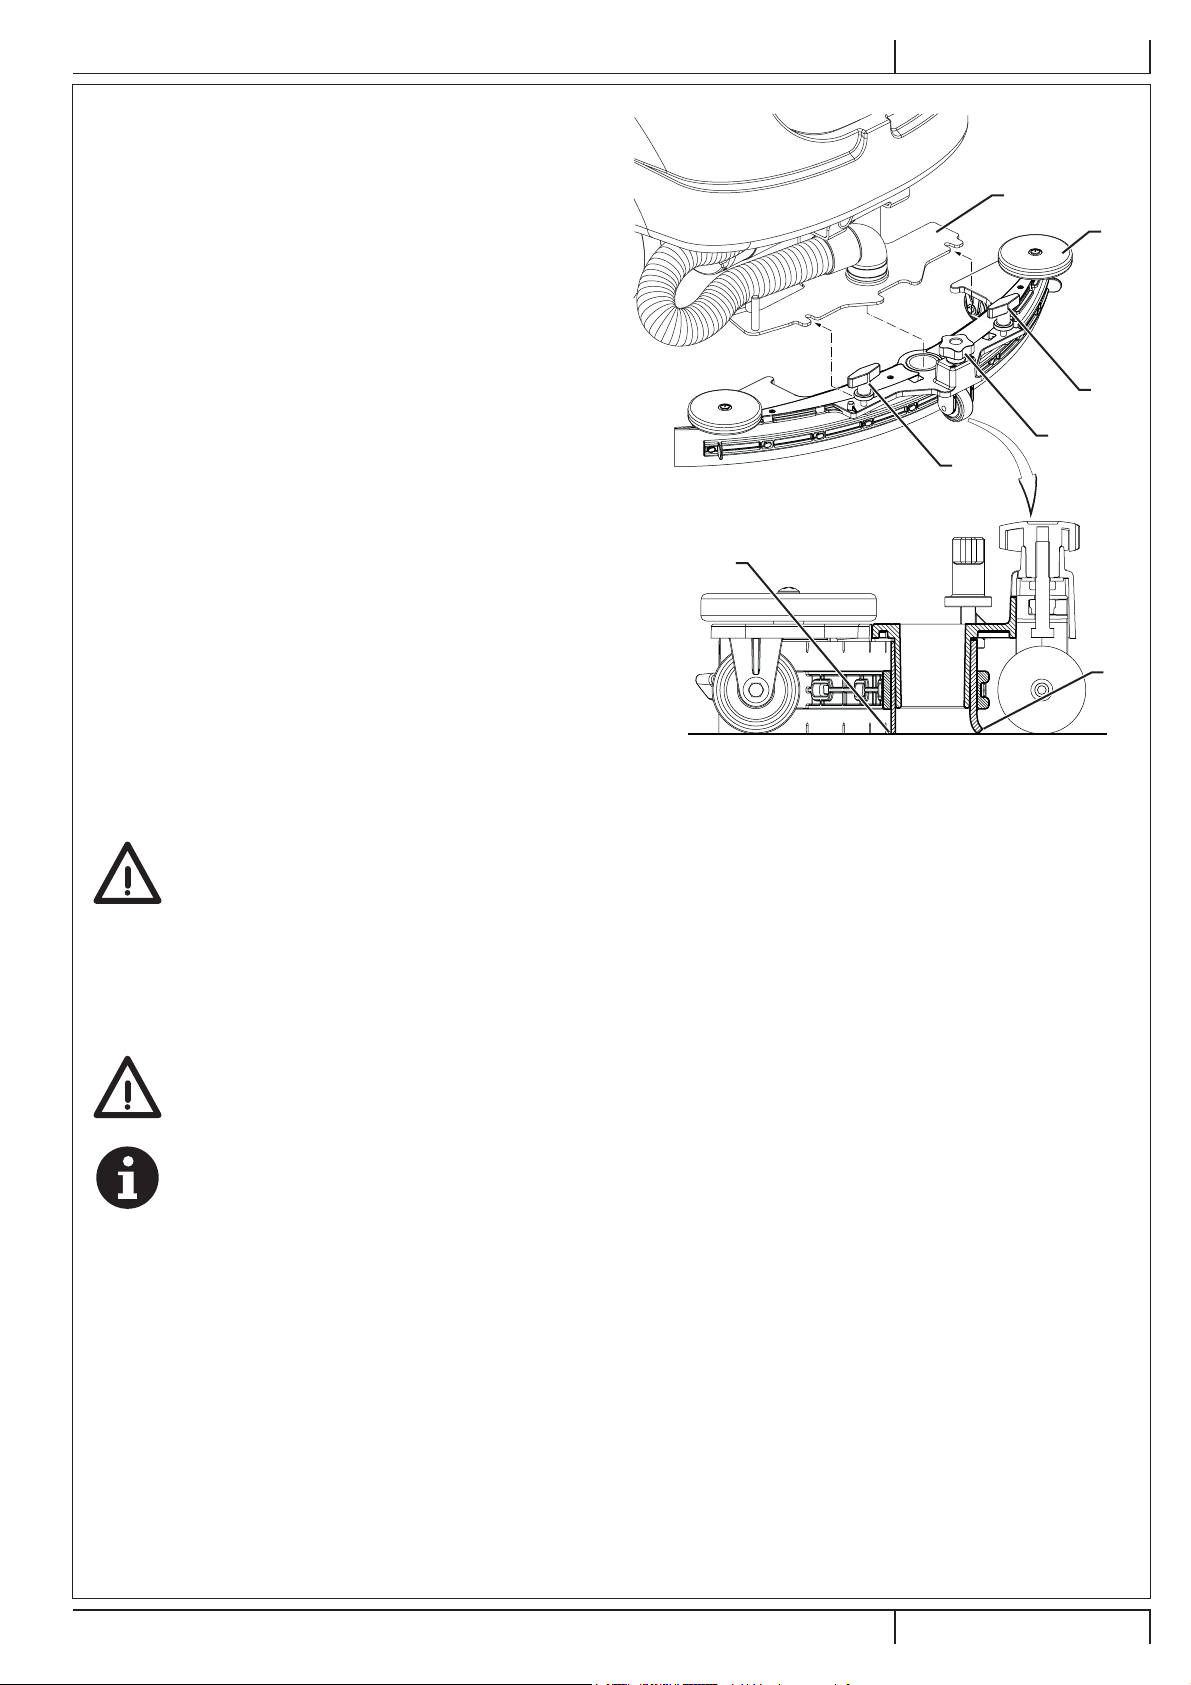
Squeegee installation
1. Install the squeegee (A, Fig. 3) and fasten it to the bracket
(C) with the handwheels (B).
2. If necessary, adjust the squeegee with the knob (D) so that
the rear blade (E) and front blade (F) touch the oor as
shown in the gure.
Washing water tank lling
1. Ensure that the washing water valve (9) is open (9-A).
2. To ll the washing water tank (15) remove the ller neck
plug (25).
3. Fill the tank (15) with clean water. If equipped, use the
water ller hose (optional) located in the ller neck (25).
Do not ll the tank completely, leave a few inches from the
edge. Use the level hose (16) as reference.
The water temperature must not exceed 40 °C.
INSTRUCTIONS FOR USE ENGLISH
C
A
B
D
B
F
Figure 3
EcoFlex™ detergent tank lling
WARNING!
When using oor cleaning detergents, follow the instructions on the labels of the detergent bottles.
To handle oor cleaning detergents, wear suitable gloves and protections.
4. Lift the cover (18) and check that the recovery tank (17) is empty, otherwise empty it with the drain hose (26).
5. Close the cover (18).
6. Grasp the handle (35) and carefully lift the recovery tank assembly (17).
7. Fill the tank (38) with a detergent suitable for the work to be performed (highly concentrated detergent).
Do not ll the detergent tank completely, leave a few inches from the edge.
CAUTION!
Use only low-foam and non-ammable detergents, intended for automatic scrubber applications.
NOTE
To accelerate lling of the hoses and system operation (with a new system, if the system has been emptied for cleaning,
etc.), it is a good idea to drain the EcoFlex™ system once or several times (see the procedure in the Maintenance
chapter).
E
P100865
01/2015
9100000386 - SC2000 13
Page 16
ENGLISH INSTRUCTIONS FOR USE
MACHINE START AND STOP
Starting the machine
1. Prepare the machine as shown in the previous paragraph.
2. To turn on the machine, insert the operator key (41); if the key is already inserted, press the push-button (42).
3. In the rst 2 seconds after machine start-up, the multifunction display (51) indicates the machine working hours (51-A) and the
type of batteries installed (51-B).
NOTE
Check the battery charge level.
When the multifunction display shows at least one segment of the battery symbol (51-C) which is on but not ashing, the
machine is ready for use.
When the battery symbol (51-C) shows just one segment ashing, the batteries have to be charged (see the procedure in
Maintenance chapter).
4. Drive the machine to the working place, by starting it with both hands on the steering wheel (1) and by pressing the drive pedal
(2).
The drive speed can be adjusted from zero to maximum speed according to the pressure on the drive pedal (2).
5. The forward/reverse gear is selected with the relevant lever (49) which is at the right of the steering wheel.
NOTE
The driver’s seat (12) is equipped with a safety sensor, which allows the machine to be driven by pressing the pedal (2)
only when the operator is on the driver’s seat.
NOTE
The machine is equipped with an anti-skid safety system (display icon (51-J)) that reduces the speed when turning and
when the machine tilts laterally, irrespectively of the pressure on the pedal.
In this case, the reduction of speed is not a malfunction but a characteristic that improves the machine stability and
safety in every condition.
Stopping the machine
6. Stop the machine by releasing the drive paddle (2). It is not necessary to lock the machine during stopping or parking, because
the electromagnetic brake on the wheels turn on automatically when the drive pedal is not pressed.
7. Turn off the machine by removing the operator key (41), or by pressing the push-button (42).
NOTE
If the machine is on but not working, it automatically turns off after 2 minutes.
CAUTION!
In the event of an emergency, to stop all machine functions immediately, press the push-button (5).
To reset the machine functions, connect the connector (6) again.
MACHINE OPERATION (SCRUBBING/DRYING)
1. Start the machine as shown in the previous paragraph.
2. Press the One-Touch™ button (43) to lower the brush deck (7) and the squeegee (13) and start scrubbing and drying.
3. Start scrubbing, by starting it with both hands on the steering wheel (1) and by pressing the drive pedal (2) as necessary.
4. If necessary, to reduce the noise, turn on the vacuum system mute function by pressing the push-button (44).
NOTE
The machine is equipped with a safety system that turns on the brush and vacuum system only when the machine is
moving.
14 SC2000 - 9100000386
01/2015
Page 17

INSTRUCTIONS FOR USE ENGLISH
5. Adjust the solution ow by pressing the push-button (47) as necessary, depending on the type of cleaning to be performed.
NOTE
For the rst 3 ow levels (Fig. 4), the amount of solution dispensed is automatically adjusted according to the machine
speed, in order to obtain a constant amount of solution per linear meter of cleaning.
Level 4 (when enabled) supplies the maximum possible quantity of detergent solution, regardless of the machine speed
(to enable or disable this, see the Super User key section in the Maintenance chapter).
The level 0 closes the solution ow completely.
Lev.
4
Lev.Lev.
Lev.
2
Lev.
3
1 0
0,75 cl/m OFF1,5 cl/m 3,0 cl/m 2,8 l/min
Figure 4
P100866
NOTE
For correct scrubbing/drying of oors at the sides of the walls, Advance suggests to go near the walls with the right side
of the machine as shown in gure 5.
A
B
Figure 5
6. To stop scrubbing/drying, press the push-button (43) and wait for the brush deck (7) to lift. After 10 seconds, the vacuum
system turns off too and the squeegee (13) lifts.
P100867
01/2015
9100000386 - SC2000 15
Page 18

ENGLISH INSTRUCTIONS FOR USE
Adjusting of detergent concentration in the washing
water
(For machines with EcoFlex™ system)
The system for mixing the detergent in the washing water is
automatically activated when the brush is running.
The percentage of detergent added to the washing water is set
to level 1 (Fig. 6).
By pressing the push-button (46), it is possible to set the
percentage level to 2, or reset it to level 0.
The set percentages are shown on the multifunction display
(51-G).
1
Lev.
2
Lev.Lev.
0
OFF
Figure 6
P100868
EcoFlex™ system
Use the EcoFlex™ lever (50) when a temporary stronger washing power is needed.
With the EcoFlex ™ system activated, increased solution ow, activation of the extra pressure of the brush and an increase in the
solution detergent concentration (level 2 if the level was set to 1 - level 1 if the level was set to 0) is obtained.
By using the EcoFlex™ lever (50) again, the original settings (LED on) are restored.
NOTE
If the lever (D) is not used once again, the original settings are restored automatically after 60 seconds.
NOTE
All of the above solution ow and detergent concentration values are factory settings.
To change these settings, see the Super User key section in the Maintenance chapter.
Working with brush extra pressure function turned on
If the oor proves to be particularly difcult to clean, it is possible to turn on the brush extra pressure function, according to the
following procedure:
1. Press the push-button (43) to lower the brush deck as shown in “Starting The Machine” paragraph.
2. Press and hold the push-button (43) for more than 1 second. The extra pressure function activation is shown by LED which
turns from green to red, and by the icon on the display (51).
3. To return to normal pressure, press and hold the push-button (43) for more than 1 second.
4. To lift the brush deck without returning to the normal pressure, press the push-button (43) and release it immediately.
CAUTION!
In case of brush motor overload, due to foreign bodies which prevent them from turning, or to excessively
aggressive oors/brushes, the safety system stops the brush after about one minute of continuous overload.
If the overload takes place when the extra pressure function is on, the system automatically turns the extra
pressure function off.
If the overload persists, the brush stops.
To start scrubbing again after a brush stop due to overload, turn off and then on the machine with the pushbutton (42).
Battery discharge during operation
When there is only one segment turned on and ashing on the battery symbol (51-C), it is advisable to charge the batteries,
because the residual autonomy will last for a few minutes (depending on battery characteristics and work to be performed).
When the battery symbol (51-C) is ashing and no segment is turned on, the battery autonomy is over. After a few seconds, the
brush is automatically tuned off, while the vacuum system and the drive system stay on, to nish drying the oor and drive the
machine to the appointed recharging area.
CAUTION!
Do not use the machine with discharged batteries, to avoid damaging the batteries and reducing the battery life.
NOTE
In case the machine drive system cannot be used in order to move the machine, see Pushing/Towing The Machine
paragraph.
16 SC2000 - 9100000386
01/2015
Page 19

INSTRUCTIONS FOR USE ENGLISH
TANK EMPTYING
An automatic oat shut-off system (28) turns off the vacuum system when the recovery tank (17) is full.
The vacuum system deactivation is signalled by a sudden increase in the vacuum system motor noise, and the oor is not dried.
CAUTION!
If the vacuum system turns off accidentally (for example, when the oat is activated because of a sudden
machine movement), to resume the operation: turn off the vacuum system by pressing the push-button (44),
then open the cover (18) and check that the oat inside the grid (28) has gone down. Then close the cover (18)
and turn on the vacuum system by pressing the push-button (44).
When the recovery tank (17) is full, empty it according to the following procedure.
Recovery tank emptying
1. Lift the brush deck and the squeegee by pressing the push-button (43).
2. Drive the machine to the appointed disposal area.
3. Turn off the machine with the push-button (42) and remove the operator key (41).
4. Empty the recovery tank (17) with the drain hose (26). Then, rinse the tank with clean water.
Washing water tank emptying
5. Perform steps 1 to 3.
6. Empty the washing water tank (15) using the level hose (16). Then, rinse the tank with clean water.
AFTER USING THE MACHINE
After working, before leaving the machine:
1. Remove the brush as shown in the relevant paragraph.
2. Remove the operator key (41).
3. Empty the tanks (17 and 15) as shown in the previous paragraph.
4. Remove the squeegee (13) and clean it with hot water. Open the recovery tank cover (18) and hang the squeegee on the tank
hook (11).
5. Perform the daily maintenance procedures (see the Maintenance chapter).
6. Store the machine in a clean and dry place, with the brush and the squeegee lifted or removed.
PUSHING/TOWING THE MACHINE
To push/tow the machine easily when the drive system cannot be used (for example in case of missing batteries, discharged
batteries, etc.), disengage the electromagnetic brake with the lever (4).
When pushing/towing procedure is over, turn the lever (4) to the original position, to engage the electromagnetic brake again.
WARNING!
If the lever (4) is not repositioned after pushing/towing the machine, the electromagnetic brake is disengaged.
WARNING!
Do not start the machine when the electromagnetic brake is disengaged.
For safety reasons, it is recommended to disengage the electromagnetic brake only for the time necessary to
manually move the machine.
MACHINE LONG INACTIVITY
If the machine is not going to be used for more than 30 days, proceed as follows:
1. Perform the procedures shown in After using the machine paragraph.
2. For versions with EcoFlex™ system, empty the detergent tank (38) and clean the system with a draining cycle (see the
procedure in Maintenance chapter).
3. Close the washing water valve (9-B).
4. Press the emergency push-button (5) to disconnect the battery connector (6).
01/2015
9100000386 - SC2000 17
Page 20

ENGLISH INSTRUCTIONS FOR USE
MAINTENANCE
The lifespan of the machine and its maximum operating safety are ensured by correct and regular maintenance.
The following table provides the scheduled maintenance. The intervals shown may vary according to particular working conditions,
which are to be dened by the person in charge of the maintenance.
WARNING!
The procedures must be performed with the machine off and the battery disconnected.
Moreover, read carefully the instructions in the Safety chapter before performing any maintenance procedure.
All scheduled or extraordinary maintenance procedures must be performed by qualied personnel, or by an authorised Service
Center.
CAUTION!
When the Service icon appears on the display (51), contact an authorised Advance Service Centre for
scheduled maintenance.
This Manual describes only the simplest and most common maintenance procedures.
For other maintenance procedures shown in the Scheduled Maintenance Table, refer to the Service Manual that can be consulted
at any Service Center.
SCHEDULED MAINTENANCE TABLE
Procedure
Battery Charging
Squeegee Cleaning
Brush/pad cleaning
Recovery tank and debris tray cleaning, and cover gasket check
EcoFlex™ system cleaning and draining
Squeegee blade check
Washing water lter cleaning
Battery (WET) uid level check
Squeegee blade replacement
Electromagnetic brake efciency check (1)
Brush/pad-holder motor carbon brush check or replacement (1)
Drive system motor carbon brush check or replacement (1)
Daily, after using
the machine
Weekly
Every six
months
Yearly
(1) This maintenance procedure must be performed by an authorised Advance Service Center.
18 SC2000 - 9100000386
01/2015
Page 21

INSTRUCTIONS FOR USE ENGLISH
BATTERY CHARGING
NOTE
Charge the batteries when there is only one ashing segment displayed in the battery symbol (51-C), or at the end of the
shift.
Keeping the batteries charged make their life last longer.
CAUTION!
When the batteries are discharged, charge them as soon as possible, as that condition makes their life shorter.
Check for battery charge at least once a week.
WARNING!
When using lead (WET) batteries, battery charging produces highly explosive hydrogen gas. Charge the
batteries in well-ventilated areas and away from naked ames.
Do not smoke while charging the batteries.
Keep the recovery tank raised until the battery charging cycle is over.
WARNING!
Pay close attention when charging WET CELL batteries, as there may be battery uid leakages. The battery uid
is corrosive. If it comes in contact with skin or eyes, rinse thoroughly with water and consult a physician.
1. Drive the machine to the appointed recharging area.
2. Ensure that the machine is off and the operator key (41) has been removed.
3. Lift the cover (29) and check that the recovery tank (17) is empty; if not, empty it using the drain hose (26).
4. Close the cover (18).
5. Grasp the handle (35) and carefully lift the recovery tank assembly (17).
6. (For WET CELL batteries only) Check the level of electrolyte inside the batteries. If necessary, unscrew the caps and top up.
When the correct level is restored, close the caps and clean the tops of the batteries.
7. Plug the battery charger cable (21) into the electrical mains (the mains voltage and frequency must be compatible with the
battery charger values shown on the machine serial number plate).
NOTE
When the battery charger is connected to the electrical mains, all machine functions are automatically cut off.
When the rst or second segment from the left in the battery symbol (51-M) is ashing, this means that the battery charger is
charging the batteries.
When the third segment from the left in the battery symbol (51-M) is ashing, this means that the battery charger is nishing
the battery charging cycle.
8. When all segments of the battery symbol (51-M) are steadily lit, the battery charging cycle is complete.
9. Disconnect the battery charger cable plug (21) from the mains and place it in its holder (20).
10. Disengage the support rod (36), then grasp the handle (35) and carefully lower the recovery tank assembly (17).
11. Now the machine is ready to be used.
NOTE
For further information about the operation of the battery charger (22), see the relevant Manual.
01/2015
9100000386 - SC2000 19
Page 22

ENGLISH INSTRUCTIONS FOR USE
E
SUPER USER KEY (yellow)
The Super User (yellow) key allows you to check some additional information on some machine operating parameters and to adjust
others to your specic requirements.
Main Screen (E, Fig. 7)
1. Insert the Super User (yellow) key in place of the operator
(grey) key to access the main screen of the multifunction
display (51).
2. Press push-button (A) to change the machine settings (see
Machine Settings Screen section).
3. Press push-button (B) to check for any stored machine
alarms (see Alarms Log Screen section).
4. Press push-button (C) to check the machine’s hours of
operation (see Operating Time Counter Screen section).
5. Press push-button (D) to exit service mode and return to
operator mode.
Machine Settings Screen (F, Fig. 7)
This function allows you to customise some parameters
described in the following table of modiable parameters.
1. Press push-button (B) to increase the value of the current
parameter.
Press push-button (C) to decrease the value of the current
parameter.
2. Press push-button (A) to move to the next parameter.
3. To return to the main screen, press and hold the pushbutton (A) for more than 1 second.
F
A
B
C
D
Figure 7
TABLE OF MODIFIABLE PARAMETERS Values
Code Description Minimum Factory Setting Maximum
CHM1 Detergent concentration level 1 0.25 % (1:500) 0.25 % (1:500) 3 % (1:33)
CHM2 Detergent concentration level 2 0.25 % (1:500) 0.80 % (1:125) 3 % (1:33)
P1/P3 Level 1 solution ow rate in relation to level 3
P2/P3 Level 2 solution ow rate in relation to level 3
P3 Level 3 solution ow rate (ow rate as function of speed) 1.0 cl/m 3.0 cl/m 5.0 cl/m
P4 Enablement of level 4 (2.8 l/min regardless of speed) OFF OFF ON
SPT EcoFlex™ function timer 0 (disabled) 60 sec. 300 sec.
XPRES Brush deck extra pressure enablement OFF ON ON
FVMAX Maximum forward speed 10 % 100 % 100 %
RVMAX Maximum reverse speed 10 % 40 % 50 %
WSMIN Minimum working speed 10 % 25 % 100 %
WSMAX Maximum working speed 10 % 100 % 100 %
BRK Electromagnetic brake activation delay 0 sec. 3 sec. 5 sec.
BAT (**) Installed battery type (see table) 0 1 5
TOFF Automatic shut-off time 0 (disabled) 300 sec. 600 sec.
BRGH Display contrast 5 20 50
VRID Silent mode setting 1 1 5
RPM (*) Reduced brush rpm activation threshold 5 9 20
RESET Restore factory settings for all parameters OFF OFF ON
(ow rate as function of speed)
(ow rate as function of speed)
0 % 25 % 100 %
0 % 50 % 100 %
(*) Increase the value of this parameter to reduce the brush motor speed in a wider range of applications and vice versa.
P100869
20 SC2000 - 9100000386
01/2015
Page 23

INSTRUCTIONS FOR USE ENGLISH
G
H
(**) As described in the Use chapter, set the machine and the on-board battery charger on the basis of the type of battery to be
installed by modifying the BAT parameter from the table below:
Installed battery type Value
WET Wet cell batteries 0
GEL / AGM Generic GEL or AGM batteries 1
GEL EXIDE GEL batteries or EXIDE®/SONNENSHINE brand 2
GEL OPTIMA GEL batteries or OPTIMA™ brand 3
GEL DISCOVER GEL batteries or DISCOVER® brand 4
GEL FULLRIVER GEL batteries or FULLRIVER® brand 5
Alarms log screen (G, Fig. 8)
This function allows you to check for any stored alarms on the
machine.
Use this function only with support from a Advance Service
Centre to solve any operating problems.
To return to the main screen (E, Fig. 7), press push-button (A)
repeatedly.
A
Operating Time Counter Screen (H, Fig. 9)
This function allows you to check the total accumulated hours of
work for each machine subsystem:
– TOTAL counter (machine running time)
– DRIVE counter (drive system usage time)
– BRUSH counter (brush rotation system usage time)
– VACUUM counter (vacuum system usage time)
To return to the main screen (E, Fig. 7), press push-button (A).
Figure 8
P100870
A
Figure 9
P100871
01/2015
9100000386 - SC2000 21
Page 24

ENGLISH INSTRUCTIONS FOR USE
SQUEEGEE CLEANING
NOTE
The squeegee must be clean and its blades must be in good conditions in order to get a good drying.
CAUTION!
It is advisable to wear protective gloves when cleaning the squeegee because there may be sharp debris.
1. Drive the machine on a level oor.
2. Ensure that the machine is off and the operator key (41) has been removed.
3. Loosen the handwheels (32) and remove the squeegee (13).
4. Wash and clean the squeegee. In particular, clean the compartments (A, Fig. 10) and the vacuum hole (B). Check the
condition of the front (C) and rear (D) blades, ensuring there are no cuts and tears; if necessary, replace them as shown below.
5. Install the squeegee in the reverse order of removal.
SQUEEGEE BLADE CHECK AND REPLACEMENT
1. Clean the squeegee as shown in the previous paragraph.
2. Check the condition of the front (C, Fig. 10) and rear (D) blades, ensuring there are no cuts and tears; if necessary, replace
them as shown below. Check that the front corner (E) of the rear blade is not worn; otherwise, turn the blade to replace the
worn corner with one of the three remaining intact corners. If the other corners are worn too, replace the blade according to the
following procedure:
• Using the tab (F), release and remove the elastic strap (G) from the fasteners (H), then turn or replace the rear blade (D).
• Install the blade in the reverse order of removal.
• Unscrew the handwheels (I) and remove the strap (J), then turn or replace the front blade (C).
• Install the blade in the reverse order of removal.
3. Install the squeegee (13) and screw down the handwheels (32).
4. Lower the squeegee to the oor to check the height of the blades, proceeding as follows:
• Check that the lip (K) of the front blade (C) and the lip (L) of the rear blade (D) are resting as shown in the gure.
• Use the knob (33) to make adjustments.
C
J
KEL
D
G
I
J
A
B
A
D
C
I
G
F
F
H
Figure 10
P100872
22 SC2000 - 9100000386
01/2015
Page 25

INSTRUCTIONS FOR USE ENGLISH
CLEANING THE BRUSH
CAUTION!
It is advisable to wear protective gloves when cleaning the brush because there may be sharp debris.
1. Remove the brush as shown in Use chapter.
2. Clean the brush with water and detergent.
3. Check the condition of the brush bristles, ensuring they are not excessively worn; if necessary, replace the brush.
RECOVERY TANK CLEANING
1. Drive the machine to the appointed disposal area.
2. Ensure that the machine is off and the operator key (41) has been removed.
3. Raise the cover (18).
4. Wash the inside of the tank (17) and the cover with clean water.
5. Drain the water in the tank through the hose (26).
6. Clean the vacuum grid (28), release the fasteners (A, Fig. 11), open the grid (B) and recover the oat (C) then clean it carefully
and reinstall it.
7. Remove the debris collection tank (D) and open its cover, then clean it carefully and reinstall it on the vacuum hose.
8. Check the condition of the tank cover gasket (E).
NOTE
The gasket (E) allows the creation of a vacuum in the tank, which is necessary to suck up the recovery water.
If necessary, replace the gasket (E) by removing it from its housing (F). When tting the new gasket, position the joint (G) in
the lower area, as shown in the gure.
9. Check that the seating surface (H) of the gasket (E) is in good condition, clean and suitable to form a seal with the gasket
itself.
10. Close the cover (18).
D
H
E
E
G
F
A
A
B
C
Figure 11
P100873
01/2015
9100000386 - SC2000 23
Page 26

ENGLISH INSTRUCTIONS FOR USE
WASHING WATER FILTER CLEANING
1. Drive the machine on a level oor.
2. Ensure that the machine is off and the operator key (41) has been removed.
3. Close the washing water valve (9). The valve is closed when it is in position (9-B) and it is open when it is in position (9-A).
4. Remove the transparent cover (A, Fig. 12), retrieve the gasket (B), then remove the lter strainer (C). Wash and rinse them
with clean water, then ret them carefully onto the lter support (D).
5. Open the valve (9-A).
D
B
C
A
Figure 12
P100874
DETERGENT TANK CLEANING
(For machines with EcoFlex™ system)
Clean the detergent tank (38) as follows.
1. Drive the machine to the appointed disposal area.
2. Ensure that the machine is off and the operator key (41) has been removed.
3. Lift the cover (29) and check that the recovery tank (17) is empty; if not, empty it using the drain hose (26).
4. Close the cover (18).
5. Grasp the handle (35) and carefully lift the recovery tank assembly (17).
6. Unscrew the cap (A, Fig. 13) from the detergent tank (B).
7. Remove the tank.
8. Rinse and wash out the tank with clean water in the appointed disposal area.
9. Replace the detergent tank (B) as shown in the gure, then ret the cap (A).
10. When the detergent tank has been drained, it may be necessary to drain the EcoFlex™ system too (see procedure in following
section).
A
B
24 SC2000 - 9100000386
Figure 13
P100875
01/2015
Page 27

INSTRUCTIONS FOR USE ENGLISH
DRAINING THE ECOFLEX™ SYSTEM
(For machines with EcoFlex™ system)
Clean the detergent tank following the procedure in the previous section.
To remove residual detergent from the detergent hoses and pump, proceed as follows.
1. To turn on the machine, insert the operator key (41) in its slot on the control panel (3); if the key is already inserted, press the
push-button (42).
2. Press the push-button (43). Check that the detergent quantity indicator (50-G) on the display has at least one segment lit.
3. Press and hold buttons (46) and (47) at the same time until screen (50-N) appears on the display (after approximately 5
seconds).
4. Release buttons (46) and (47) and wait for the countdown timer on the display to nish and the vacuum system to be activated.
5. Collect the detergent remained on the oor.
6. Remove the operator key (41).
7. Lift the recovery tank assembly (17), then check that the detergent tank hose (38) is empty, otherwise perform steps 3 to 7
again.
NOTE
The draining cycle lasts about 30 seconds, then the vacuum function automatically turns on, which allows to remove the
detergent remained.
The draining cycle can also be performed with the detergent tank (38) full of water, thus cleaning the system thoroughly.
It is advisable to perform this type of draining to clean the EcoFlex™ system from dirt and deposits if the machine has
not been used/cleaned for a long time.
The draining cycle can also be performed to quickly ll the detergent supply hose when the tank (38) is full but the
system is still empty.
If necessary, the draining cycle can be performed several times in succession.
FUSE CHECK/REPLACEMENT
NOTE
All machine electrical circuits are protected by auto-resettable electronic devices. The safety fuses activates only in case
of serious damage.
It is recommended to have the fuses replaced by qualied personnel only.
Refer to the Service Manual available at any Advance Retailer.
01/2015
9100000386 - SC2000 25
Page 28

ENGLISH INSTRUCTIONS FOR USE
SAFETY FUNCTIONS
The machine is equipped with the following safety functions.
EMERGENCY PUSH-BUTTON
The emergency push-button (5) is located in an easily accessible position. Press it rmly in case of immediate necessity to stop all
machine functions.
To reset the machine operation, lift the recovery tank assembly (17) and reconnect the battery connector (6).
ANTI-SKID SAFETY SYSTEM
This system reduces the speed when turning and when the machine tilts laterally to avoid sudden skids, this increasing the machine
stability in any condition. The system activation is shown by the icon (51-J) on the display.
DRIVER’S SEAT MICROSWITCH
It is located inside the driver’s seat (12) and it does not allow the machine drive system to operate if the operator is not seated on
the driver’s seat.
ELECTROMAGNETIC BRAKE
It is built-in the rear driving wheels (24) and keeps the machine braked when the machine is off or stopped.
26 SC2000 - 9100000386
01/2015
Page 29

INSTRUCTIONS FOR USE ENGLISH
TROUBLESHOOTING
TROUBLE POSSIBLE CAUSE REMEDY
The motors are not operating; the display (51) and
button LEDs do not turn on.
The machine does not move and the display (51)
shows the alarm:
WARNING ALARM T3
At machine start-up, the button (43) LED ashes
and the brushes do not work.
The brush does not operate; the battery symbol
(51-C) border ashes and the display shows the
alarm message:
WARNING ALARM G4
When working, the display shows the alarm
message: WARNING ALARM F2
The display (51) shows the alarm message:
WARNING ALARM T2
While recharging the batteries with the on-board
battery charger, the display (51) shows the alarm
message:
WARNING ALARM C4 or C5
The display (51) shows an alarm message of the
following type:
WARNING ALARM XX
Where “XX” is a code other than those listed
above.
The dirty water vacuuming is insufcient. The recovery tank is full. Empty the tank.
The solution ow is insufcient. The washing water tank is empty. Rell.
The squeegee leaves marks on the oor. There is debris under the squeegee blades. Remove the debris.
The battery connector is disconnected. Connect.
The batteries are completely discharged. Charge the batteries.
Machine turned on with pedal pressed. Release the drive pedal.
Machine switched off without rst raising the
brush deck.
The batteries are discharged. Charge the batteries.
Brush motor overload. Use a different/less aggressive brush and/or
There are foreign materials (tangled threads,
etc.) preventing the brush from rotating.
Drive motor overload. Turn off the machine and then turn it on again.
Battery charger not able to correctly recharge
the batteries within the maximum time.
The machine electronic control system is in
alarm condition.
The vacuum grid is clogged or the oat is
stuck closed.
Debris collection lter container clogged. Clean.
The hose is disconnected from the squeegee. Connect.
The squeegee is dirty or the squeegee blades
are worn or damaged.
The tank cover is not properly closed, or the
gasket is damaged.
The washing water lter is dirty. Clean the lter.
The EcoFlex™ system tank is dirty/encrusted. Clean with the drain cycle.
The squeegee blades are worn, chipped or
torn.
The squeegee has not been balanced with the
handwheel.
If the problem persists, contact an authorised
Service Center.
Wait for the deck to raise before turning the
brushes on again by pressing the switch.
If the problem persists, replace the batteries.
avoid working with extra pressure turned on.
Clean the brush hub.
Avoid using the machine on slopes greater
than those indicated or going over excessively
tall obstacles.
Run the battery charging cycle again.
If the problem persists, replace the batteries.
Turn off the machine and then turn it on again.
If the problem persists, contact an authorised
Service Center.
Clean the vacuum grid.
Clean the squeegee or overturn/replace the
blades.
Correctly close the cover or clean/replace the
gasket.
Overturn or replace the blades.
Adjust the squeegee.
NOTE
The machine is inoperative without the battery charger.
In case of battery charger malfunction, contact an authorised Service Center.
For any further information, contact Advance Service Centres.
01/2015
9100000386 - SC2000 27
Page 30

ENGLISH INSTRUCTIONS FOR USE
SCRAPPING
Have the machine scrapped by a qualied scrapper.
Before scrapping the machine, remove and separate the following materials, which must be disposed of properly according to the
Law in force:
– Batteries
– Brushes
– Plastic hoses and components
– Electrical and electronic components (*)
(*) Refer to the nearest Advance Center especially when scrapping electrical and electronic components.
Machine material composition and recyclability
Type Recyclable
percentage
Aluminium 100 % 3 %
Electric motors - various 29 % 32 %
Ferrous materials 100 % 23 %
Wiring harness 80 % 7 %
Liquids 100 % 0 %
Plastic - non-recyclable material 0 % 3 %
Plastic - recyclable material 100 % 3 %
Polyethylene 92 % 26 %
Rubber 20 % 2 %
SC2000 weight percentage
28 SC2000 - 9100000386
01/2015
Page 31

INSTRUCCIONES DE USO ESPAÑOL
ÍNDICE
INTRODUCCIÓN .............................................................................................................................................................. 2
FINALIDAD Y OBJETO DE ESTE MANUAL ................................................................................................................................... 2
DESTINATARIOS ............................................................................................................................................................................2
CONSERVACIÓN DEL MANUAL .................................................................................................................................................... 2
DATOS DE IDENTIFICACIÓN ......................................................................................................................................................... 2
OTROS MANUALES DE REFERENCIA .........................................................................................................................................2
PIEZAS DE REPUESTO Y MANTENIMIENTO ............................................................................................................................... 2
MODIFICACIONES Y MEJORAS .................................................................................................................................................... 2
CARACTERÍSTICAS DE FUNCIONAMIENTO ............................................................................................................................... 3
CONVENCIONES ............................................................................................................................................................................ 3
DESEMBALAJE/ENTREGA ............................................................................................................................................ 3
SEGURIDAD .................................................................................................................................................................... 3
SÍMBOLOS VISIBLES EN LA MÁQUINA ........................................................................................................................................ 3
SÍMBOLOS QUE APARECEN EN EL MANUAL .............................................................................................................................. 4
INSTRUCCIONES GENERALES .................................................................................................................................................... 4
DESCRIPCIÓN DE LA MÁQUINA ................................................................................................................................... 6
ESTRUCTURA DE LA MÁQUINA .................................................................................................................................................... 6
PANEL DE CONTROL ..................................................................................................................................................................... 8
ACCESORIOS/OPCIONES ............................................................................................................................................................. 9
DATOS TÉCNICOS ......................................................................................................................................................................... 9
ESQUEMA ELÉCTRICO ...............................................................................................................................................................10
USO ................................................................................................................................................................................ 11
CONTROL/PREPARACIÓN DE LAS BATERÍAS EN LA MÁQUINA NUEVA .................................................................................11
INSTALACIÓN DE LAS BATERÍAS ................................................................................................................................................11
ANTES DE LA PUESTA EN MARCHA DE LA MÁQUINA.............................................................................................................. 12
PUESTA EN MARCHA Y PARADA DE LA MÁQUINA ................................................................................................................... 14
MÁQUINA EN FUNCIÓN (LAVADO/SECAMIENTO) ..................................................................................................................... 14
VACIADO DE LOS DEPÓSITOS ................................................................................................................................................... 17
DESPUÉS DEL USO DE LA MÁQUINA ........................................................................................................................................ 17
DESPLAZAMIENTO DE LA MÁQUINA MEDIANTE EMPUJE/REMOLQUE................................................................................. 17
PERIODO DE LARGA INACTIVIDAD DE LA MÁQUINA ............................................................................................................... 17
MANTENIMIENTO ......................................................................................................................................................... 18
ESQUEMA DE MANTENIMIENTO PROGRAMADO ..................................................................................................................... 18
CARGA DE LAS BATERÍAS .......................................................................................................................................................... 19
LLAVE DE SERVICIO (amarilla) .................................................................................................................................................... 20
LIMPIEZA DE LA BOQUILLA ......................................................................................................................................................... 22
CONTROL Y SUSTITUCIÓN DE LOS CAUCHOS DE LA BOQUILLA.......................................................................................... 22
LIMPIEZA DEL CEPILLO ............................................................................................................................................................... 23
LIMPIEZA DEL DEPÓSITO DEL AGUA DE RECUPERACIÓN ..................................................................................................... 23
LIMPIEZA DEL FILTRO DEL AGUA DE LAVADO.......................................................................................................................... 24
LIMPIEZA DEL DEPÓSITO DEL DETERGENTE .......................................................................................................................... 24
PURGA SISTEMA ECOFLEX™ .................................................................................................................................................... 25
CONTROL/SUSTITUCIÓN DE LOS FUSIBLES ........................................................................................................................... 25
FUNCIONES DE SEGURIDAD ...................................................................................................................................... 26
PULSADOR DE EMERGENCIA .................................................................................................................................................... 26
SISTEMA DE SEGURIDAD ANTIDERRAPE ................................................................................................................................ 26
MICROINTERRUPTOR DEL ASIENTO DE CONDUCCIÓN ......................................................................................................... 26
FRENO ELECTROMAGNÉTICO .................................................................................................................................................. 26
BÚSQUEDA AVERÍAS .................................................................................................................................................. 27
ELIMINACIÓN ................................................................................................................................................................ 28
01/2015
9100000386 - SC2000 1
Page 32

ESPAÑOL INSTRUCCIONES DE USO
INTRODUCCIÓN
NOTA
Los números entre paréntesis se reeren a los componentes ilustrados en el capítulo Descripción de la máquina.
FINALIDAD Y OBJETO DE ESTE MANUAL
Este manual contiene todas las informaciones necesarias para que el operador utilice la máquina de forma adecuada, autónoma
y segura. Incluye informaciones inherentes a los datos técnicos, la seguridad, el funcionamiento, el almacenamiento, el
mantenimiento, las piezas de repuesto y la eliminación.
Antes de efectuar cualquier operación de mantenimiento, los operadores y los técnicos calicados tienen que leer cuidadosamente
las instrucciones incluidas en este manual. En caso de dudas sobre la correcta interpretación de las instrucciones, contactar con
Advance para obtener explicaciones.
DESTINATARIOS
Este manual es para los operadores y los técnicos encargados del mantenimiento de la máquina.
Los operadores no deben efectuar procedimientos reservados a los técnicos calicados. Advance no es responsable para los
daños causados a la máquina por falta de observación de esta prohibición.
CONSERVACIÓN DEL MANUAL
El Manual de instrucciones de uso y mantenimiento debe conservarse junto a la máquina, dentro de su contenedor, lejos de
líquidos y otras substancias que podrían dañarlo.
DATOS DE IDENTIFICACIÓN
El número de serie y el modelo de la máquina están marcados en la placa del número de serie (23).
En la misma placa se indican también el año de fabricación y el código del producto.
Esta información es necesaria cuando se pidan piezas de repuesto para la máquina. Usar el espacio siguiente para escribir los
datos de identicación de la máquina.
Modelo MÁQUINA
Código del PRODUCTO
Número de serie MÁQUINA
OTROS MANUALES DE REFERENCIA
– Manual del cargador de baterías electrónico, que debe considerarse parte integrante de este manual
– Catálogo piezas de repuestos (en dotación a la máquina)
– Manual de asistencia (solo los técnicos calicados lo puede consultar cerca de los Centros de asistencia Advance)
PIEZAS DE REPUESTO Y MANTENIMIENTO
Para cualquier necesidad inherente al uso, mantenimiento y reparación, consultar al personal calicado o los Centros de asistencia
Advance. Se recomienda usar sólo piezas de repuesto y accesorios originales.
Para la asistencia o para pedir piezas de repuesto y accesorios acudir a Advance, especicando siempre el modelo, el código del
producto y el número de serie de la máquina.
MODIFICACIONES Y MEJORAS
Advance está constantemente mejorando sus productos y se reserva el derecho de realizar modicaciones y mejoras a su
discreción, sin verse obligada a aplicar dichas ventajas a las máquinas vendidas previamente.
Sólo Advance puede aprobar y efectuar cualquier modicación y/o instalación de accesorios.
2 SC2000 - 9100000386
01/2015
Page 33

INSTRUCCIONES DE USO ESPAÑOL
CARACTERÍSTICAS DE FUNCIONAMIENTO
La fregadora/secadora SC2000 es adecuada para limpiar (lavar y secar) suelos lisos y sólidos, en ambiente privado o industrial, en
condiciones de seguridad, por un operador calicado.
La fregadora/secadora no es adecuada para limpiar alfombras o moqueta.
CONVENCIONES
En este manual, las indicaciones de adelante, atrás, delantero, trasero, derecho e izquierdo, se reeren al operador en posición de
conducción en su asiento (12).
DESEMBALAJE/ENTREGA
Para desembalar la máquina seguir cuidadosamente las instrucciones colocadas sobre el embalaje.
Para desplazar manualmente la máquina, consultar el párrafo Desplazamiento de la máquina mediante empuje/remolque.
Al momento de la entrega, controlar con cuidado el embalaje y la máquina por si hayan sufrido daños durante el transporte.
Si los daños son evidentes, conservar el embalaje, de forma que el transportista que lo ha entregado lo pueda inspeccionar.
Contactarlo de inmediato para compilar una indemnización daños y perjuicios.
Controlar que la máquina sea entregada junto a los siguientes componentes:
– Documentación técnica:
• Manual de instrucciones de uso de la fregadora/secadora
• Catálogo piezas de repuestos de la fregadora/secadora
– N° 2 fusibles laminares
– N° 1 parasalpicaduras
¡ATENCIÓN!
Los Productos a la venta en este Manual contienen, o pueden contener, productos químicos reconocidos por
algunos gobiernos (como el Estado de California, según lo indica en su Proposición 65, Ley de Advertencia
Regulatoria) como causantes de cáncer, defectos de nacimiento u otros daños reproductivos. En algunas
jurisdicciones (incluido el Estado de California), los compradores de estos Productos que los coloquen en
servicio en un emplazamiento laboral o en un espacio de acceso público tienen la obligación regulatoria de
realizar determinados avisos, advertencias o divulgaciones respecto de los productos químicos contenidos o
posiblemente contenidos en los Productos utilizados en tal lugar. Es la responsabilidad del comprador conocer
y cumplir con todas las leyes y reglamentaciones relacionadas con el uso de estos Productos en tales entornos.
El Fabricante niega toda responsabilidad de informar a los compradores sobre requisitos especícos que
pueden regir el uso de los Productos en tales entornos.
SEGURIDAD
La siguiente simbología sirve para señalizar situaciones de peligro potencial. Leer siempre cuidadosamente estas informaciones y
tomar las precauciones necesarias para proteger personas y cosas.
Para evitar desgracias, la cooperación del operador de la máquina es fundamental. Ningún programa de prevención de accidentes
resulta ecaz sin la total cooperación de la persona directamente responsable del funcionamiento de la máquina. La mayoría de
los accidentes que pueden ocurrir en una empresa, durante el trabajo o los traslados, son causados por no observar las reglas de
seguridad fundamentales. Un operador cuidadoso y cauto es la mejor garantía para evitar posibles accidentes y resulta más ecaz
que cualquier programa de prevención.
SÍMBOLOS VISIBLES EN LA MÁQUINA
¡ATENCIÓN!
Leer con cuidado todas las instrucciones antes de efectuar cualquier operación en la máquina.
¡ATENCIÓN!
No lavar la máquina con chorros de agua directa o presurizada.
¡ATENCIÓN!
max.2%
No usar la máquina sobre rampas o inclinaciones superiores a las especicaciones.
01/2015
9100000386 - SC2000 3
Page 34

ESPAÑOL INSTRUCCIONES DE USO
SÍMBOLOS QUE APARECEN EN EL MANUAL
¡PELIGRO!
Indica un peligro con riesgo, incluso mortal, para el operador.
¡ATENCIÓN!
Indica el riesgo potencial de infortunios para las personas.
¡ADVERTENCIA!
Indica una advertencia o una nota sobre una función importante o útil.
Tener cuidado de las partes del texto marcadas con este símbolo.
NOTA
Indica una nota sobre una función importante o útil.
CONSULTAS
Indica la necesidad de consultar el Manual de instrucciones de uso antes de efectuar cualquier operación.
INSTRUCCIONES GENERALES
Se describen aquí las advertencias y precauciones especícas por lo que se reere a los potenciales riesgos de daños a la
máquina o a las personas.
¡PELIGRO!
– Antes de efectuar cualquier operación de limpieza de la máquina, mantenimiento o sustitución de piezas,
quitar la llave de encendido (o de puesta en marcha) y desconectar el conector de las baterías.
– Sólo los operadores cualicados pueden usar esta máquina.
– Quitarse las joyas cuando se trabaja cerca de los componentes eléctricos.
– No trabajar bajo la máquina levantada si ésta no está jada con los soportes de seguridad adecuados.
– No activar la máquina en un ambiente donde haya polvo, líquidos o vapores nocivos, peligrosos, inamables
y/o explosivos: esta máquina no es adecuada para recoger polvos peligrosos.
– Si se usan baterías de plomo (WET), tener chispas, llamas y materiales fumantes lejos de las baterías.
Durante el uso normal pueden salir gases explosivos.
– Si se usan baterías de plomo (WET), cargando las baterías se produce gas hidrógeno muy explosivo.
Levantar el depósito del agua de recuperación durante las operaciones de carga de las baterías y efectuar la
carga solo en áreas muy bien ventiladas y lejos de llamas libres.
¡ATENCIÓN!
– Antes de efectuar cualquier operación de mantenimiento/reparación, leer cuidadosamente todas las
instrucciones relacionadas.
– La llave de encendido (o de puesta en marcha) de la máquina está equipada con un imán incorporado.
No colocar objetos con bandas magnéticas (tarjetas de créditos, llaves electrónicas, tarjetas telefónicas
y anes) cerca de la llave. El imán incorporado podría dañar o borrar los datos grabados en la banda
magnética.
– Antes de usar el cargador de baterías, asegurarse de que la frecuencia y la tensión indicadas en la placa del
número de serie de la máquina coincidan con la tensión de la red.
– No tirar o transportar la máquina por el cable del cargador de baterías; no utilizar el cable como manilla. No
cerrar el cable del cargador de baterías en una puerta o tirarlo sobre bordes o ángulos alados. No atropellar
el cable del cargador de baterías con la máquina.
– Tener el cable del cargador de baterías lejos de supercies calientes.
– Si el cable o el enchufe del cargador de baterías están dañados, no cargar las baterías de la máquina.
– Para reducir el riesgo de incendio, electrochoque o lesiones, no dejar la máquina conectada a la red eléctrica
cuando está sin custodia. Antes de efectuar las operaciones de mantenimiento, desconectar el cable del
cargador de baterías de la red eléctrica.
– No fumar cuando se cargan las baterías.
– Para evitar usos no autorizados de la máquina, quitar la llave de encendido.
– No dejar la máquina sin custodia y sin haberse asegurado que no pueda moverse de forma autónoma.
4 SC2000 - 9100000386
01/2015
Page 35

INSTRUCCIONES DE USO ESPAÑOL
¡ATENCIÓN!
– Proteger siempre la máquina del sol, lluvia y otras intemperies, tanto durante el funcionamiento como
durante los períodos de inactividad. Almacenar la máquina en un lugar cerrado y seco: esta máquina sólo se
puede usar en seco y no se debe usar o tener al exterior en condiciones de humedad.
– Antes de usar la máquina, cerrar todos los portillos y/o las tapas como indicado en el Manual de
instrucciones de uso.
– El aparato no está diseñado para que lo usen personas (incluidos los niños) con reducidas capacidades
físicas, mentales o sensoriales o con experiencia y/o competencias insucientes, a no ser que lo utilicen
bajo la supervisión de una persona responsable de su seguridad o que ésta les enseñe a usarlo.
Los niños deben ser supervisados para asegurarse de que no jueguen con el aparato.
– Tener mucho cuidado cuando se utiliza cerca de niños. No usar con nalidades diferentes de aquellas
indicadas en este manual. Usar sólo accesorios recomendados por Advance.
– Controlar con cuidado la máquina antes de usarla, siempre comprobar que se hayan montados
correctamente todos los componentes antes de usarla. El uso de la máquina no perfectamente montada
puede causar lesiones a personas y daños a los aparatos.
– Tomar todas las precauciones necesarias para que el pelo, las joyas y las ropas no sean capturados por las
partes móviles de la máquina.
– No usar la máquina sobre pendientes.
– No inclinar la máquina con un ángulo superior al valor indicado en la máquina misma, para no perjudicar la
estabilidad.
– No usar la máquina en ambientes demasiado polvorientos.
– Usar la máquina sólo en áreas con suciente iluminación.
– Si se va a usar la máquina en presencia de otras personas, además del operador, es necesario equipar la
máquina con la luz rotativa (opcional).
– Cuando se usa esta máquina, tener cuidado de salvaguardar la incolumidad de personas y cosas.
– No chocar contra estanterías o andamios de los que puedan caer objetos.
– No apoyar contenedores de líquidos sobre la máquina, usar el portabebidas.
– La temperatura de la máquina en trabajo debe estar entre +32 °F y 104 °F (0 °C y +40 °C).
– La temperatura de almacenamiento de la máquina debe estar entre 0 °C y +40 °C (+32 °F y 104 °F).
– La humedad debe estar entre el 30 % y el 95 %.
– Cuando se usan detergentes, seguir las instrucciones y advertencias indicadas en las etiquetas de los
frascos.
– Cuando se usan detergentes, usar guantes y protecciones adecuadas.
– No usar la máquina como vehículo de transporte.
– No permitir que el cepillo/eltro funcione mientras la máquina está parada en un punto para evitar posibles
daños al suelo.
– En caso de incendio usar un extintor de polvo, no de agua.
– No adulterar por ninguna razón la máquina, respetar escrupulosamente las instrucciones previstas para el
mantenimiento ordinario.
– No dejar que material extraño entre en las aperturas. No usar la máquina si las aperturas están obstruidas.
Las aperturas deben mantenerse libre de polvo, hilacha, pelos y cualquier otro cuerpo extraño que pueda
reducir el ujo de aire.
– No quitar ni modicar las placas colocadas en la máquina.
– Para desplazar manualmente la máquina es necesario desactivar el freno electromagnético. Tras haber
desplazado la máquina manualmente, volver a activar el freno electromagnético. Non usar la máquina si el
freno electromagnético está desactivado.
– Si se desplaza la máquina mediante empuje por causas de servicio (falta de baterías, baterías descargadas,
etc.), no superar la velocidad de 2,5 mph (4 km/h).
– Esta máquina no tiene aprobación para el uso en carreteras o vías públicas.
– Tener cuidado durante el traslado de la máquina en condiciones de temperatura muy baja. El agua en el
depósito del agua de recuperación o en los tubos, podría congelarse y dañar la máquina.
– Utilizar sólo los cepillos y los eltros suministrados con la máquina o aquellos especicados en el Manual
de instrucciones de uso. Usar otros cepillos o eltros puede perjudicar la seguridad.
– Cuando la máquina no funciona correctamente, asegurarse de que esto no sea causado por falta de
mantenimiento. En caso contrario, pedir la intervención del personal autorizado o del Centro de asistencia
autorizado.
– Si deben sustituirse piezas, solicitar piezas de repuesto ORIGINALES a un Concesionario y/o Revendedor
autorizado.
– Para asegurar condiciones de funcionamiento correcto y seguro, el personal autorizado o el Centro de
asistencia autorizado debe llevar a cabo el mantenimiento programado según las especicaciones indicadas
en el capítulo relacionado de este manual.
– No lavar la máquina con chorros de agua directa o presurizada, o con sustancias corrosivas.
– Nunca se debe abandonar la máquina al nal del ciclo vital, por la presencia de materiales tóxicos y dañinos
(baterías, aceites, etc.) sujetos a normativas que exigen que se realice la eliminación en centros especiales
(véase el capítulo Eliminación).
01/2015
9100000386 - SC2000 5
Page 36

ESPAÑOL INSTRUCCIONES DE USO
18 11
DESCRIPCIÓN DE LA MÁQUINA
ESTRUCTURA DE LA MÁQUINA
1. Volante con panel de control y mandos (véase el párrafo
siguiente)
2. Pedal de marcha
3. Rueda delantera directriz
4. Palanca de desbloqueo/bloqueo del freno
electromagnético
5. Pulsador de EMERGENCIA, para la interrupción inmediata
de todas las funciones
6. Conector de las baterías
7. Cabezal portacepillo
8. Filtro del agua de lavado
9. Grifo del agua de lavado
A) Grifo abierto
B) Grifo cerrado
10. Electroválvula
11. Gancho para boquilla
12. Asiento
13. Boquilla
14. Rueda paragolpes de la boquilla
15. Depósito del agua de lavado
16. Tubo de nivel y de descarga del agua de lavado
17. Conjunto depósito del agua de recuperación plegable
18. Tapa del depósito del agua de recuperación
19. Portabebidas
20. Vano alojamiento cable cargador de baterías y
portadocumentos
21. Cable de alimentación del cargador de baterías
1
19
21
20
2
12
5 6
17
15
16
14
13
3
10 8 7
6 SC2000 - 9100000386
A
9
B
4
P100859
01/2015
Page 37

ESTRUCTURA DE LA MÁQUINA (Sigue)
373839
22. Cargador de baterías
23. Placa número de serie/datos técnicos/marcación de
conformidad
24. Ruedas traseras de tracción
25. Boca de llenado del depósito del agua de lavado
26. Tubo de descarga del agua de recuperación
27. Contenedor con rejilla de recogida de residuos
28. Rejilla de aspiración con sistema de cierre automático de
otador
29. Tapa del depósito del agua de recuperación abierta
30. Tubo de aspiración de la boquilla
INSTRUCCIONES DE USO ESPAÑOL
31. Ruedas de apoyo de la boquilla
32. Empuñaduras de jación de la boquilla
33. Perilla de ajuste de la boquilla
34. Rueda paragolpes del cabezal portacepillo
35. Manilla de levantamiento del conjunto depósitos y asiento
de conducción
36. Barra de soporte del conjunto depósitos y asiento de
conducción
37. Baterías (opcionales)
38. Tanque detergente EcoFlex™
39. Tapa del compartimento electrónico
40. Conjunto depósito del agua de recuperación y asiento de
conducción levantados
28
27
26
25
4036
29
23
35
22
01/2015
30
32
33
34
32
24
31
P100860
9100000386 - SC2000 7
Page 38

ESPAÑOL INSTRUCCIONES DE USO
PANEL DE CONTROL
41. Llave de encendido/apagado máquina:
• Llave operador (gris)
• Llave de servicio (amarilla) (véase el capítulo
Mantenimiento)
42. Pulsador de encendido/apagado máquina
43. Pulsador One-Touch™ lavado/secado
• LED verde intermitente - subida/bajada cabezal
portacepillo
• LED verde jo - máquina en función
• LED rojo jo - (pulsar durante unos segundos) presión
cepillo suplementar
44. Pulsador regulación/desactivación sistema de aspiración:
• LED encendido - sistema de aspiración activado
45. Pulsador enganche/desenganche cepillo:
• LED intermitente - sistema activado
46. Pulsador regulación porcentaje detergente de lavado
47. Pulsador regulación del ujo del detergente
48. Pulsador de la bocina
49. Palanca de activación/desactivación marcha atrás
50. Palanca de activación/desactivación EcoFlex™
51. Pantalla multifunción
Visualizaciones:
A) Horas de trabajo
B) Tipología baterías
C) Estado de carga de las baterías
D) Modalidad de aspiración
E) Modalidad trabajo del cepillo
F) Cantidad de ujo de la solución detergente
G) Cantidad detergente
H) Porcentaje detergente en el agua de lavado
I) Anulación timer sistema EcoFlex™
J) Control antiderrape
K) Ajuste velocidad máxima de marcha
L) Timer auto apagado
M) Carga de baterías con cargador integrado
N) Activación expurgación sistema EcoFlex™
A B
L
50
H
G
C KI J
F
D
E
M
N
51
41
max.2%
49
46
47
48
8 SC2000 - 9100000386
42
1s
43
44
45
P100861
01/2015
Page 39

INSTRUCCIONES DE USO ESPAÑOL
ACCESORIOS/OPCIONES
Además de los componentes instalados en la versión estándar, la máquina puede equiparse con los siguientes accesorios/
opciones, según el uso especíco:
– Baterías GEL/AGM
– Cepillos de diferentes materiales
– Fieltros de diferentes materiales
– Cauchos de la boquilla de diferentes materiales
– Luz rotativa
– Conjunto “mop a trash”
– Sistema TrackClean
– Puerta USB
– Tubo de llenado
Para informaciones suplementarias sobre estos accesorios opcionales, acudir al Revendedor autorizado.
DATOS TÉCNICOS
Modelo SC2000 53 B
Capacidad del depósito del agua de lavado 18,5 US gal (70 litros)
Capacidad del depósito del agua de recuperación 18,5 US gal (70 litros)
Longitud de la máquina 50 in (1.270 mm)
Anchura de la máquina con boquilla 28,3 in (720 mm)
Anchura de la máquina sin boquilla 21,6 in (550 mm)
Altura de la máquina 40,1 in (1.020 mm)
Espacio de giro para vuelta en U 71 in (1.800 mm)
Anchura de barrido 21 in (530 mm)
Diámetro ruedas traseras de tracción 10 in (254 mm)
Presión especíca al suelo de las ruedas traseras de tracción 145 psi (1,0 N/mm2)
Diámetro rueda delantera directriz 7,9 in (200 mm)
Presión especíca al suelo de la rueda delantera 188 psi (1,3 N/mm2)
Diámetro cepillo/eltro 21 in (530/508 mm)
Presión del cepillo con presión suplementaria desactivada 33 lb (15 kg)
Presión del cepillo con presión suplementaria activada 66 lb (30 kg)
Valores ujo de la solución detergente 0,75 cl/m / 1,5 cl/m / 3,0 cl/m / (2,8 l/min, si habilitado)
Porcentaje de detergente sistema EcoFlex™ 0,25 % - 3 %
Presión sonora a la oreja del operador (ISO 11201, ISO 4871, EN 60335-2-72) (LpA) 68 ± 3 dB(A)
Presión sonora a la oreja del operador en modalidad silenciosa (LpA) 62 ± 3 dB(A)
Potencia acústica emitida por la máquina (ISO 3744, ISO 4871, EN 60335-2-72) (LwA) 84 dB(A)
Nivel de vibraciones al brazo del operador (ISO 5349-1, EN 60335-2-72) 130 in/s2 (3,3 m/s2)
Nivel de vibraciones al cuerpo del operador (ISO 5349-1, EN 60335-2-72) 35,4 in/s2 (0,9 m/s2)
Inclinación máxima de trabajo 2 %
Potencia del motor del sistema de tracción 0,53 hp (400 W)
Velocidad de tracción (variable) 0 - 3,7 mi/h (0 - 6 km/h)
Potencia del motor del sistema de aspiración 0,4 hp (310 W)
Vacío del circuito del sistema de aspiración 39 in H2O (1.000 mm H2O)
Potencia motor cepillo 0,6 hp (450 W)
Velocidad motor cepillo 155 rpm
Potencia total absorbida (*) 26 A (620 W)
Grado de protección IP X4
Clase de protección (eléctrica) III (I para cargador de baterías)
Dimensiones compartimiento baterías 13,8x14,2x11 in (350x360x280 mm)
Tensión del sistema 24V
Baterías estándares (cantidad 2) Discover 12V-105Ah
Cargador de baterías 100-240Vca 50-60Hz, 24Vcc 13A
Autonomía de trabajo (baterías estándar) (*) 2,5 hora
Peso sin baterías y con los depósitos vacíos 267 lb (121 kg)
Peso máximo en orden de marcha (GVW) 754 lb (342 kg)
Peso de envío 342 lb (155 kg)
(*) Valores en condiciones de trabajo estándar (EN 60335-2-72)
01/2015
9100000386 - SC2000 9
Page 40

ESPAÑOL INSTRUCCIONES DE USO
ESQUEMA ELÉCTRICO
Leyenda
BAT Baterías 24 V
BE Luz rotativa (opcional)
BRK Freno electromagnético
C1 Conector de las baterías
C2 Conector del cargador de baterías
CH Cargador de baterías
EB1 Tarjeta electrónica funciones
EB2 Tarjeta electrónica del visualizador
EB3 Tarjeta electrónica llave
EB4 Tarjeta electrónica serigrafía tablero de instrumentos
EB5 Unidad de energía de 5V (opcional)
EV1 Electroválvula
F1 Fusible tarjeta electrónica principal
F2 Fusible de los circuitos de señal
M1 Motor del cepillo
M2 Motor del sistema de aspiración
M3 Motor tracción
M4 Bomba EcoFlex™
M5 Motor actuador cabezal portacepillo
M6 Motor actuador boquilla
POT Potenciómetro pedal de marcha
S1 Sensor nivel agua de lavado
SW3 Microinterruptor asiento
SW4 Sensor de control antiderrape
TCU TrackClean™ (opcional)
USB USB puerto (opcional)
Códigos color
BK Negro
BU Azul
BN Marrón
GN Verde
GY Gris
OG Anaranjado
PK Rosado
RD Rojo
VT Morado
WH Blanco
YE Amarillo
10 SC2000 - 9100000386
P100862
01/2015
Page 41

INSTRUCCIONES DE USO ESPAÑOL
USO
¡ATENCIÓN!
En unas partes de la máquina hay unas placas adhesivas que indican:
– PELIGRO
– ATENCIÓN
– ADVERTENCIA
– CONSULTAS
Leyendo este Manual, el operador tiene que aprender el sentido de los símbolos indicados en las placas (véase el párrafo
Símbolos visibles en la máquina).
Por ninguna razón estas placas deben cubrirse y si están dañadas tienen que sustituirse de inmediato.
CONTROL/PREPARACIÓN DE LAS BATERÍAS EN LA MÁQUINA NUEVA
¡ATENCIÓN!
Si no se instalan correctamente las baterías, los componentes eléctricos de la máquina podrían dañarse. Sólo el
personal calicado puede efectuar la instalación de las baterías.
Congurar la máquina según el tipo de baterías utilizadas.
Antes de instalar las baterías, controlar que no estén dañadas.
Desconectar el conector de las baterías o el enchufe del cargador de baterías.
Desplazar las baterías con mucho cuidado.
Instalar las tapas de protección de los terminales de las baterías, en dotación a la máquina.
La máquina necesita de 2 baterías de 12 V, conectadas según el esquema que se indica en la Figura 1.
La máquina puede ser entregada con las siguientes conguraciones:
Baterías instaladas en la máquina y listas para su uso
1. Asegurarse de que el conector de las baterías (6) esté conectado.
2. Cuando se utiliza la máquina por primera vez con baterías nuevas, efectuar un ciclo de carga completa de las baterías (véase
procedimiento en el capítulo Mantenimiento).
Sin baterías
1. Comprar baterías adecuadas (véase el párrafo “Datos técnicos”). Para escoger e instalar las baterías, acudir a un Revendedor
calicado.
2. Según el tipo de baterías elegidas, congurar la máquina actuando como se indica en el párrafo Llave de servicio en el
capítulo Mantenimiento.
INSTALACIÓN DE LAS BATERÍAS
Instalación de las baterías
1. Quitar la llave operador (41).
2. Desconectar el conector de las baterías pulsando el
pulsador de emergencia (5).
3. Levantar la tapa (18) y controlar que el depósito del agua
de recuperación (17) esté vacío, si no vaciarlo mediante el
tubo de descarga (26).
4. Cerrar la tapa (18).
5. Empuñar la manilla (35) y levantar el conjunto depósito del
agua de recuperación (17) con cuidado.
6. La máquina está equipada en fábrica con cables
sucientes para instalar 2 baterías de 12 V.
7. Levantar con cuidado las baterías hasta su alojamiento,
luego colocarlas de manera correcta.
8. Colocar e instalar los cables de las baterías como se indica
en el esquema de la Figura 1, luego apretar con atención
el dado sobre cada borne de las baterías.
9. Colocar la tapa de protección encima de cada borne, luego
conectar el conector de las baterías (6).
10. Soltar la barra de soporte (36), luego empuñar la
manilla (35) y levantar el conjunto depósito del agua de
recuperación (17) con cuidado.
BACK
Figura 1
FRONT
P100863
Carga de las baterías
11. Efectuar un ciclo de carga completa de las baterías (véase
procedimiento en el capítulo Mantenimiento).
01/2015
9100000386 - SC2000 11
Page 42

ESPAÑOL INSTRUCCIONES DE USO
ANTES DE LA PUESTA EN MARCHA DE LA MÁQUINA
¡ATENCIÓN!
Cada vez que se pone en marcha la máquina o antes de accionar el pulsador One-Touch™ (43), comprobar que
no hay cuerpos extraños entre el cabezal y la estructura del depósito, que puedan obstaculizar la subida del
cabezal. Si se ha apagado la máquina sin haber levantado el cabezal, cuando se va a poner de nuevo en marcha
la máquina, el cabezal se levantará automáticamente.
Instalación/remoción del cepillo o del portaeltro
1. En la máquina se pueden instalar tanto el cepillo (A, Fig.
2) como el portaeltro (B) con eltro (C), según el tipo de
tratamiento a efectuar en el suelo.
2. Colocar el cepillo (A) o el portaeltro (B) bajo el cabezal
portacepillo (7).
3. Introducir la llave operador (41) en su alojamiento.
4. Apretar el pulsador (43), para bajar el cabezal sobre el
cepillo.
5. Apretar el pulsador (45) para enganchar el cepillo.
6. Para quitar el cepillo es necesario levantar el cabezal
apretando el pulsador (43), luego apretar el pulsador de
desenganche (45).
7. Cuando en la pantalla se visualiza el icono (51-K), esperar
a que el cepillo caiga al suelo.
A
B
C
Figura 2
P100864
Tipos de cepillos disponibles y guía para su aplicación (sólo sugerencias)
Modelos 46 GRIT 80 GRIT 180 GRIT 240 GRIT 500 GRIT PROLENE PROLITE UNION MIX
Limpieza general:
Hormigón
Suelo terraza
Baldosas de cerámica/de cantera
Mármol
Baldosas de vinilo
Baldosas de caucho
Lustrado:
Baldosas de caucho
Mármol
Baldosas de vinilo
12 SC2000 - 9100000386
01/2015
Page 43

Instalación de la boquilla
1. Instalar la boquilla (A, Fig. 3) y jarla con las empuñaduras
(B) en la abrazadera (C).
2. Si necesario, regular la boquilla con la perilla (D) para que
el caucho posterior (E) y el caucho anterior (F) toquen el
suelo como indicado en la gura.
Llenado del depósito del agua de lavado
1. Asegurarse que el grifo del agua de lavado (9) esté en la
posición de abierto (9-A).
2. Para llenar el depósito del agua de lavado (15) quitar el
tapón de la boca de llenado (25).
3. Llenar el depósito (15) con agua limpia. Si está presente,
el tubo de llenado agua (opcional) posicionado en la boca
de llenado (25).
No llenar completamente el depósito, dejar unos
centímetros del borde. Utilizar el tubo de nivel (16) como
referencia.
La temperatura del agua no debe superar los 40 °C.
INSTRUCCIONES DE USO ESPAÑOL
C
A
B
D
B
F
E
Figura 3
P100865
Llenado del depósito del detergente EcoFlex™
¡ATENCIÓN!
Cuando se usan detergentes, seguir las instrucciones y advertencias indicadas en las etiquetas de los frascos.
Cuando se usan detergentes, usar guantes y protecciones adecuadas.
4. Levantar la tapa (18) y controlar que el depósito del agua de recuperación (17) esté vacío, si no vaciarlo mediante el tubo de
descarga (26).
5. Cerrar la tapa (18).
6. Empuñar la manilla (35) y levantar el conjunto depósito del agua de recuperación (17) con cuidado.
7. Rellenar el depósito (38) con un detergente adecuado para el trabajo a realizar (detergente de alta concentración).
No llenar completamente el depósito del detergente, sino dejar unos centímetros del borde.
¡ADVERTENCIA!
Usar exclusivamente detergentes líquidos poco espumosos y no inamables, que sean adecuados para este
tipo de máquina.
NOTA
Para acelerar el procedimiento de llenado de las tuberías y el funcionamiento del sistema (en caso de sistema nuevo,
de sistema vaciado para limpieza, etc.), podría ser útil efectuar uno o más ciclos de expurgación del sistema EcoFlex™
(véase el procedimiento en el capítulo Mantenimiento).
01/2015
9100000386 - SC2000 13
Page 44

ESPAÑOL INSTRUCCIONES DE USO
PUESTA EN MARCHA Y PARADA DE LA MÁQUINA
Puesta en marcha de la máquina
1. Preparar la máquina como indicado en el párrafo antecedente.
2. Introducir la llave operador (41) para encender la máquina, o, si la llave ya se encuentra en su alojamiento, apretando el
pulsador (42).
3. Durante los 2 primeros segundos desde el encendido, la pantalla multifunción (51) indica las horas de trabajo de la máquina
(51-A) y la tipología de baterías instaladas (51-B).
NOTA
Controlar el estado de carga de las baterías.
Cuando en la pantalla multifunción se enciende por lo menos un segmento no intermitente en el símbolo batería (51-C)
la máquina está lista para su uso.
Cuando en el símbolo batería (51-C) se queda encendido un solo segmento intermitente es conveniente cargar las
baterías (véase procedimiento en el capítulo Mantenimiento).
4. Llegar al lugar de trabajo, conduciendo la máquina con ambas manos sobre el volante (1) y pisando el pedal de marcha (2).
La velocidad de marcha se puede ajustar de cero al valor máximo según la presión aplicada al pedal de marcha (2).
5. La marcha adelante/atrás se selecciona mediante la palanca (49) que se encuentra a la derecha del volante.
NOTA
El asiento (12) está equipado de un sensor de seguridad para permitir que la máquina se mueva mediante el pedal (2)
sólo cuando el operador está sentado en el asiento mismo.
NOTA
La máquina está equipada de un sistema de seguridad antiderrape [icono en la pantalla (51-J)] que reduce la velocidad
de marcha durante las vueltas y en caso de inclinación de la máquina, independientemente de la presión sobre el pedal.
La reducción de velocidad durante las vueltas, por lo tanto, no es un funcionamiento incorrecto, sino una característica
que aumenta la estabilidad y la seguridad de la máquina en cada condición.
Parada de la máquina
6. Parar la marcha de la máquina soltando el pedal de marcha (2). No es necesario bloquear la máquina durante la parada o
el estacionamiento, porque el freno electromagnético en las ruedas frena automáticamente la máquina cuando no se pisa el
pedal de marcha.
7. Apagar la máquina quitando la llave operador (41), o apretando el pulsador (42).
NOTA
La máquina que se queda encendida pero parada de cualquier actividad de trabajo, se apaga automáticamente después
de 2 minutos.
¡ADVERTENCIA!
En caso de necesidad inmediata y para parar la máquina y todas sus funciones en caso de emergencia, apretar
el pulsador (5).
Para volver a reactivar todas las funciones, reconectar el conector (6).
MÁQUINA EN FUNCIÓN (LAVADO/SECAMIENTO)
1. Poner en marcha la máquina como indicado en el párrafo antecedente.
2. Apretar el pulsador One-Touch™ (43) para bajar el cabezal portacepillo (7) y la boquilla (13) y empezar el trabajo de lavado y
secado.
3. Empezar el trabajo, conduciendo la máquina con ambas manos sobre el volante (1) y pisando adecuadamente el pedal de
marcha (2).
4. Si necesario, para reducir el ruido al mínimo, activar la función de aspiración silenciosa apretando el pulsador (44).
NOTA
La máquina está equipada de un sistema de seguridad que permite activar el cepillo y el sistema de aspiración sólo
cuando la máquina se mueve.
14 SC2000 - 9100000386
01/2015
Page 45

INSTRUCCIONES DE USO ESPAÑOL
5. Regular la cantidad de ujo del detergente apretando el pulsador (47) según las proprias necesidades, en función del trabajo
que se debe efectuar.
NOTA
Para los 3 primeros niveles de ujos (Fig. 4), la cantidad de solución detergente dispensada se ajusta automáticamente
según la velocidad de marcha de la máquina, para poder obtener una cantidad de solución detergente constante por
metro lineal de limpieza.
El nivel 4 (si habilitado) proporciona la cantidad máxima posible de solución detergente, independientemente de la
velocidad de marcha de la máquina (para modicar la habilitación véase el párrafo Llave de servicio en el capítulo
Mantenimiento).
El nivel 0 cierra completamente el ujo de la solución detergente.
Lev.
4
Lev.Lev.
Lev.
2
Lev.
3
1 0
0,75 cl/m OFF1,5 cl/m 3,0 cl/m 2,8 l/min
Figura 4
P100866
NOTA
Para un correcto lavado/secamiento de los suelos en los bordes de las paredes, Advance sugiere acercarse con el lado
derecho de la máquina como indicado en la gura 5.
A
B
Figura 5
P100867
6. Para acabar el trabajo de lavado y secamiento, apretar el pulsador (43) y esperar el levantamiento del cabezal portacepillo
(7). Después de 10 segundos se desactiva también el sistema de aspiración y se levanta la boquilla (13).
01/2015
9100000386 - SC2000 15
Page 46

ESPAÑOL INSTRUCCIONES DE USO
Ajuste de la concentración de detergente en el agua de
lavado
(Para máquinas con sistema EcoFlex™)
El sistema para la mezcla del detergente con el agua de lavado
se activa automáticamente cuando el cepillo está en función.
El porcentaje de detergente añadido al agua de lavado está
congurado en el nivel 1 (Fig. 6).
Apretando el pulsador (46) es posible incrementar el porcentaje
en el nivel 2 o ponerlo a cero en el nivel 0.
Los porcentajes congurados se visualizan en la pantalla
multifunción (51-G).
1
Lev.
2
Lev.Lev.
0
OFF
Figura 6
P100868
Sistema EcoFlex™
Activar la palanca EcoFlex™ (50) cuando se requiere provisionalmente una mayor potencia de lavado.
Con el sistema EcoFlex™ activado se obtiene un incremento de ujo de la solución detergente, la activación de la presión
suplementaria del cepillo y un incremento de la concentración de detergente en la solución (nivel 2 si el nivel de conguración era
1 - nivel 1 si el nivel de conguración era 0).
Activando nuevamente la palanca EcoFlex™ (50) se vuelve a los ajustes iniciales (LED encendido).
NOTA
Si la palanca (D) no se activa por segunda vez, se vuelve a los ajustes iniciales después de 60 segundos.
NOTA
Todos los valores indicados arriba de los niveles de las funciones del ujo del detergente y de su concentración, son de
conguración de fábrica.
Para modicar las conguraciones de los valores ver el párrafo Llave de servicio en el capítulo Mantenimiento.
Trabajo con la función de presión suplementaria del cepillo
En caso de suelo con suciedad muy resistente, es posible trabajar con una presión suplementar de los cepillos sobre el suelo,
según el procedimiento siguiente:
1. Apretar el pulsador (43) para bajar el cabezal portacepillo come se indica en el párrafo“Puesta en marcha de la máquina”.
2. Mantener apretado el pulsador (43) por más de 1 segundo. La activación de la presión suplementaria está conrmada por un
LED que cambia de verde a rojo y por un icono en la pantalla (51).
3. Para volver a un trabajo con presión normal, apretar el pulsador (43) por más de 1 segundo.
4. Para levantar el cabezal portacepillo sin volver al trabajo con presión normal, apretar y soltar de inmediato el pulsador (43).
¡ADVERTENCIA!
En caso de sobrecarga del motor del cepillo, debido a cuerpos extraños que obstaculizan su movimiento, o a
suelos/cepillos demasiados agresivos, un sistema de seguridad se encarga de bloquear el motor.
Si la sobrecarga ocurre durante el trabajo con la función de presión suplementaria activada, el sistema
desconecta automáticamente la función de presión suplementaria.
Si la sobrecarga persiste, el cepillo se para.
Para empezar de nuevo el trabajo tras la parada del cepillo por causa de la sobrecarga, es necesario apagar y
volver a encender la máquina con el pulsador (42).
Descarga de las baterías durante el trabajo
Cuando solo se queda encendido un segmento intermitente en el símbolo de la batería (51-C) es oportuno cargar las baterías,
porque la autonomía residual de la máquina es de pocos minutos (variables en función de las características de las baterías usada
y del trabajo que se debe efectuar).
Cuando el símbolo de la batería (51-C) parpadea sin ningún segmento encendido la autonomía es agotada. Tras unos segundos
el cepillo se para automáticamente; funciona solo el sistema de aspiración y el sistema de tracción, para poder secar eventuales
partes del suelo mojado y llevar la máquina en el lugar de recarga.
¡ADVERTENCIA!
Si se insiste en usar la máquina con las baterías descargadas, las baterías se pueden dañar y su vida útil se
acorta.
NOTA
Si el sistema de tracción de la máquina no se puede usar más, para desplazarla, consultar el párrafo Desplazamiento de
la máquina mediante empuje/remolque.
16 SC2000 - 9100000386
01/2015
Page 47

INSTRUCCIONES DE USO ESPAÑOL
VACIADO DE LOS DEPÓSITOS
Un sistema de cierre automático de otador (28) bloquea el sistema de aspiración cuando el depósito del agua de recuperación
(17) está lleno.
Es posible darse cuenta del bloqueo del sistema de aspiración porque el ruido del motor del sistema de aspiración aumenta y el
suelo no seca.
¡ADVERTENCIA!
Si el sistema de aspiración se apaga de forma accidental (por ejemplo por la intervención prematura del otador
durante un desplazamiento improviso de la máquina), para reactivarlo apagarlo apretando el pulsador (44),
luego abrir la tapa (18) y asegurarse de que el otador en el interior de la rejilla (28) haya bajado; por último
cerrar la tapa (18) y reactivar el sistema de aspiración pulsando el interruptor (44).
Cuando el depósito del agua de recuperación (17) está lleno, vaciarlo según el procedimiento siguiente.
Vaciado del depósito del agua de recuperación
1. Levantar el cabezal portacepillo y la boquilla apretando el pulsador (43).
2. Llevar la máquina en el área de eliminación designada.
3. Apagar la máquina con el pulsador (42) y quitar la llave operador (41).
4. Vaciar el depósito del agua de recuperación (17) mediante el tubo de descarga (26). Al nal del trabajo, enjuagar el depósito
con agua limpia.
Vaciado del depósito del agua de lavado
5. Llevar a cabo los pasos de 1 a 3.
6. Vaciar el depósito del agua de lavado (15) mediante el tubo de nivel (16). Al nal del trabajo, enjuagar el depósito con agua
limpia.
DESPUÉS DEL USO DE LA MÁQUINA
Cuando el trabajo está acabado, antes de alejarse de la máquina:
1. Quitar el cepillo, mediante el procedimiento especíco.
2. Quitar la llave operador (41).
3. Vaciar los depósitos (17) y (15) como indicado en el párrafo antecedente.
4. Quitar la boquilla (13) y lavarla con agua caliente. Abrir la tapa del depósito del agua de recuperación (18) y colgar la boquilla
al gancho del depósito (11).
5. Efectuar las operaciones de mantenimiento necesarias después del uso de la máquina (véase el capítulo Mantenimiento).
6. Guardar la máquina en un lugar seco y limpio, con el cepillo y la boquilla levantados o desmontados.
DESPLAZAMIENTO DE LA MÁQUINA MEDIANTE EMPUJE/REMOLQUE
Cuando no es posible utilizar el sistema de tracción, (por ejemplo en caso de falta de baterías, baterías descargadas, etc.) para
desplazar la máquina mediante empuje/remolque, es necesario desbloquear el freno electromagnético desplazando la palanca (4).
Tras haber desplazado la máquina, llevar la palanca (4) a la posición original para reactivar el freno electromagnético.
¡ATENCIÓN!
Si tras el desplazamiento de la máquina mediante empuje/remolque, no se cambia la posición de la palanca (4),
el freno electromagnético de la máquina se queda desactivado.
¡ATENCIÓN!
Non poner en marcha la máquina si la palanca (4) está en posición de freno electromagnético desbloqueado.
Para mayor seguridad, se recomienda desbloquear el freno electromagnético sólo durante el tiempo necesario
para desplazar la máquina manualmente.
PERIODO DE LARGA INACTIVIDAD DE LA MÁQUINA
Si se piensa que la máquina no va a ser usada durante 30 días o más, seguir las indicaciones siguientes:
1. Llevar a cabo los procedimientos indicados en el párrafo Después del uso de la máquina.
2. Para las versiones con sistema EcoFlex™, vaciar el depósito del detergente (38) y limpiar el sistema con el ciclo de
expurgación (véase los procedimientos en el capítulo Mantenimiento).
3. Cerrar el grifo del agua de lavado (9-B).
4. Desconectar el conector de las baterías (6) pulsando el pulsador de emergencia (5).
01/2015
9100000386 - SC2000 17
Page 48

ESPAÑOL INSTRUCCIONES DE USO
MANTENIMIENTO
Un mantenimiento cuidadoso y continuo garantiza la vida útil y la seguridad de funcionamiento de la máquina.
El esquema siguiente resume el mantenimiento programado. Los períodos indicados pueden variar según las condiciones de
trabajos, que el encargado del mantenimiento debe establecer.
¡ATENCIÓN!
Las operaciones deben efectuarse con la máquina apagada y con las baterías desconectadas.
Antes de efectuar las operaciones de mantenimiento, leer cuidadosamente todas las instrucciones del capítulo
Seguridad.
Todas las operaciones de mantenimiento programado o extraordinario deben ser efectuadas por el personal calicado o por un
Centro de asistencia autorizado.
¡ADVERTENCIA!
Cada vez que se visualiza el icono Service en la pantalla (51), contactar con un Centro de Asistencia
autorizado Advance para el mantenimiento programado.
En este manual, después del esquema de mantenimiento programado, se describen sólo los procedimientos de mantenimiento
más sencillos y frecuentes.
Para las operaciones de mantenimiento no indicadas en el esquema de mantenimiento programado y las operaciones de
mantenimiento extraordinario, véase el Manual de asistencia disponible en los Centros de asistencia.
ESQUEMA DE MANTENIMIENTO PROGRAMADO
Operación
Carga de las baterías
Limpieza de la boquilla
Limpieza del cepillo/eltro
Limpieza de los depósitos, del ltro del depósito del agua de
recuperación y control de la guarnición de la tapa
Limpieza y expurgación del sistema EcoFlex™
Control de los cauchos de la boquilla
Limpieza del ltro del agua de lavado
Control del nivel del líquido de las baterías (WET)
Sustitución de los cauchos de la boquilla
Control del freno electromagnético (1)
Control o sustitución de las escobillas de carbón del motor del
cepillo/portaeltro
Control o sustitución de las escobillas de carbón del motor del
sistema de tracción
Diaria, después
del uso de la
máquina
Semanaria Semestral Anual
(1)
(1)
(1) Mantenimiento de competencia de un Centro de asistencia autorizado Advance.
18 SC2000 - 9100000386
01/2015
Page 49

INSTRUCCIONES DE USO ESPAÑOL
CARGA DE LAS BATERÍAS
NOTA
Cargar las baterías cuando en el símbolo de la batería (51-C) se queda encendido solo un segmento intermitente, o
cada vez que se acaba un trabajo.
Si se mantienen las baterías cargadas, su durabilidad aumenta.
¡ADVERTENCIA!
No dejar las baterías descargadas durante mucho tiempo, porque su durabilidad podría reducirse.
Controlar la carga de las baterías por lo menos una vez por semana.
¡ATENCIÓN!
Si se usan baterías de plomo (WET), cargando las baterías se produce gas hidrógeno muy explosivo. Cargar las
baterías sólo en áreas bien ventiladas y lejos de llamas libres.
No fumar cuando se cargan las baterías.
Dejar levantado el depósito del agua de recuperación mientras que se cargan las baterías.
¡ATENCIÓN!
Durante la carga de las baterías de plomo (WET) tener mucho cuidado que el líquido de las baterías no
sobresalga. Este líquido es corrosivo. En caso de contacto con la piel o los ojos lavar a conciencia con agua y
consultar un médico.
1. Llevar la máquina en el área designada para la carga de las baterías.
2. Asegurarse que la máquina esté apagada con la llave operador (41) sacada.
3. Levantar la tapa (29) y controlar que el depósito del agua de recuperación (17) esté vacío, si no vaciarlo mediante el tubo de
descarga (26).
4. Cerrar la tapa (18).
5. Empuñar la manilla (35) y levantar el conjunto depósito del agua de recuperación (17) con cuidado.
6. (Sólo para baterías WET) controlar el nivel de electrólito de las baterías. Si necesario, desenroscar los tapones y rellenar.
Luego, cerrar los tapones y limpiar la supercie superior de las baterías.
7. Conectar el enchufe del cable del cargador de baterías (21) a la red eléctrica [la tensión y la frecuencia de la red deben ser
compatibles con los valores del cargador de baterías indicados en la placa del número de serie de la máquina].
NOTA
Cuando el cargador de baterías está conectado a la red eléctrica, todas las funciones de la máquina se paran
automáticamente.
Cuando parpadea el primero o el segundo de los segmentos (desde izquierda) (51-M) en el símbolo de la batería, indica que
el cargador de batería está cargando las baterías.
Cuando parpadea el tercer segmento (desde izquierda) en el símbolo de la batería (51-M), indica que el cargador de batería
está completando la carga de las baterías.
8. Cuando todos los segmentos en el símbolo de la batería (51-M) están encendidos con luz ja, el ciclo de carga de las baterías
se ha acabado.
9. Desconectar el enchufe del cable del cargador de baterías (21) de la red eléctrica e introducirlo en su alojamiento (20).
10. Soltar la barra de soporte (36), luego empuñar la manilla (35) y levantar el conjunto depósito del agua de recuperación (17)
con cuidado.
11. La máquina está lista para el uso.
NOTA
Para informaciones suplementarias sobre el funcionamiento del cargador de baterías (22) véase el manual relacionado.
01/2015
9100000386 - SC2000 19
Page 50

ESPAÑOL INSTRUCCIONES DE USO
E
LLAVE DE SERVICIO (amarilla)
Con la llave de servicio (amarilla) es posible controlar informaciones adicionales acerca de algunos parámetros de funcionamiento
de la máquina y modicar algunas conguraciones para adaptarlas a las necesidades especícas.
Pantalla principal (E, Fig. 7)
1. Introducir la llave de servicio (amarilla) en lugar de la llave
operador (gris) para acceder a la pantalla principal en la
pantalla multifunción (51).
2. Apretar el pulsador (A) para proceder a la modicación
de las conguraciones de la máquina (véase el párrafo
Pantalla conguración de la máquina).
3. Apretar el pulsador (B) para controlar posibles alarmas
memorizadas por la máquina (véase el párrafo Pantalla
memorias alarmas).
4. Apretar el pulsador (C) para controlar las horas de trabajo
de la máquina (véase el párrafo Pantalla contador de
horas).
5. Apretar el pulsador (D) para salir de la modalidad servicio
y volver a la modalidad operador.
Pantalla conguración de la máquina (F, Fig. 7)
Mediante esta funcionalidad es posible personalizar el valor
de los parámetros descritos en la siguiente tabla parámetros
modicables.
1. Para aumentar el valor del parámetro corriente apretar el
pulsador (B).
Para reducir el valor del parámetro corriente apretar el
pulsador (C).
2. Para pasar el parámetro siguiente apretar el pulsador (A).
3. Para volver a la pantalla principal, apretar el pulsador (A)
por más de 1 segundo.
F
Figura 7
P100869
A
B
C
D
TABLA PARÁMETROS MODIFICABLES Valores
Cod. Descripción Mínimo Conguración
CHM1 Porcentaje concentración detergente nivel 1 0,25 % (1:500) 0,25 % (1:500) 3 % (1:33)
CHM2 Porcentaje concentración detergente nivel 2 0,25 % (1:500) 0,80 % (1:125) 3 % (1:33)
P1/P3 Caudal ujo solución nivel 1 en relación con el nivel 3
P2/P3 Caudal ujo solución nivel 2 en relación con el nivel 3
P3 Caudal ujo solución nivel 3 (caudal en función de la velocidad) 1,0 cl/m 3,0 cl/m 5,0 cl/m
P4 Habilitación nivel 4 (2,8 L/min. independientemente de la velocidad) OFF OFF ON
SPT Temporizador función EcoFlex™ 0 (deshabilitado) 60 seg. 300 seg.
XPRES Habilitación presión suplementar cabezal OFF ON ON
FVMAX Máxima velocidad marcha adelante 10 % 100 % 100 %
RVMAX Máxima velocidad marcha atrás 10 % 40 % 50 %
WSMIN Velocidad de trabajo mínima 10 % 25 % 100 %
WSMAX Velocidad de trabajo máxima 10 % 100 % 100 %
BRK Retraso inserción electrofreno 0 seg. 3 seg. 5 seg.
BAT (**) Tipología baterías instaladas (ver tabla) 0 1 5
TOFF Tiempo apagado automático 0 (deshabilitado) 300 seg. 600 seg.
BRGH Contraste pantalla 5 20 50
VRID Conguración modalidad silenciosa 1 1 5
RPM (*) Límite activación giros reducidos cepillo 5 9 20
RESET Restablecimiento de todos los parámetros a los valores de conguración
(caudal en función de la velocidad)
(caudal en función de la velocidad)
de fábrica
0 % 25 % 100 %
0 % 50 % 100 %
OFF OFF ON
de fábrica
Máximo
(*) Aumentar el valor de este parámetro para reducir los giros del motor del cepillo en un rango más amplio de aplicaciones y
viceversa.
20 SC2000 - 9100000386
01/2015
Page 51

INSTRUCCIONES DE USO ESPAÑOL
G
H
(**) Como se indica en el capitulo Uso según la tipología de las baterías que se quiera instalar, congurar la máquina y el cargador
de baterías incorporado modicando el parámetro BAT como se indica en la tabla:
Tipología baterías instaladas Valor
WET Baterías con ácido líquido 0
GEL / AGM Baterías GEL o AGM genéricas 1
GEL EXIDE Baterías de GEL o marca EXIDE®/SONNENSHINE 2
GEL OPTIMA Baterías de GEL o marca OPTIMA™ 3
GEL DISCOVER Baterías de GEL o marca DISCOVER
GEL FULLRIVER Baterías de GEL o marca FULLRIVER
®
®
4
5
Pantalla memoria alarmas (G, Fig. 8)
Mediante esta función es posible averiguar posibles alarmas
memorizadas por la máquina.
Utilizar esta función solo con el soporte del Centro de
Asistencia Advance para resolver posibles problemas de
funcionamiento.
A
Para volver a la pantalla principal (E, Fig. 7) apretar el
repetidamente el pulsador (A).
Pantalla contador de horas (H, Fig. 9)
Mediante esta función es posible controlar las horas de trabajo
acumuladas para cada subsistema de la máquina:
– Contador de horas TOTAL (tiempo de encendido de la
máquina)
– Contador de horas TRACCIÓN (tiempo de uso del sistema
de tracción)
– Contador de horas CEPILLO (tiempo de uso del sistema
de rotación del cepillo)
– Contador de horas ASPIRADOR (tiempo de uso del
sistema de aspiración)
Para volver a la pantalla principal (E, Fig. 7) apretar el pulsador
(A).
Figura 8
P100870
A
Figura 9
P100871
01/2015
9100000386 - SC2000 21
Page 52

ESPAÑOL INSTRUCCIONES DE USO
LIMPIEZA DE LA BOQUILLA
NOTA
Para un buen secamiento, la boquilla debe estar limpia y con los cauchos en buenas condiciones.
¡ADVERTENCIA!
Durante estas operaciones se aconseja usar guantes de trabajo, porque residuos cortantes podrían estar en la
boquilla.
1. Llevar la máquina sobre un suelo llano.
2. Asegurarse que la máquina esté apagada con la llave operador (41) sacada.
3. Aojar las empuñaduras (32) y quitar la boquilla (13).
4. Lavar y limpiar la boquilla. Limpiar especialmente los huecos (A, Fig. 10) y el oricio (B). Controlar que los cauchos delantero
(C) y trasero (D) estén en buenas condiciones, que no estén cortados o desgarrados, de lo contrario, sustituirlos mediante el
procedimiento indicado en el párrafo siguiente.
5. Montar la boquilla en orden contrario al desmontaje.
CONTROL Y SUSTITUCIÓN DE LOS CAUCHOS DE LA BOQUILLA
1. Limpiar la boquilla como indicado en el párrafo anterior.
2. Controlar que los cauchos delantero (C, Fig. 10) y trasero (D) estén en buenas condiciones, que no estén cortados o
desgarrados, de lo contrario, sustituirlos mediante el procedimiento siguiente. Controlar también que la esquina delantera (E)
del caucho posterior no esté desgastado; de lo contrario volcar el caucho mismo, llevando en su posición uno de las otras tres
esquinas todavía enteros. Si todos los bordes están desgastados, sustituir el caucho, mediante el procedimiento siguiente:
• Utilizando el trinquete (F), desvincular y quitar la bisagra elástica (G) de los retenes (H), luego sustituir/volcar el caucho
posterior (D).
• Montar el caucho en orden contrario al desmontaje.
• Desenroscar las empuñaduras (I) y quitar la bisagra (L), luego sustituir/volcar el caucho delantero (C).
• Montar el caucho en orden contrario al desmontaje.
3. Montar la boquilla (13) y apretar las empuñaduras (32).
4. Bajar la boquilla en el suelo para controlar la altura de los cauchos, actuando mediante el procedimiento siguiente:
• Controlar que el borde (K) del caucho anterior (C) y el borde (L) del caucho posterior (D) se apoyen como indicado en la
gura.
• Para la regulación utilizar la perilla (33).
C
J
KEL
D
G
I
J
A
B
A
D
C
I
G
F
F
H
Figura 10
P100872
22 SC2000 - 9100000386
01/2015
Page 53

INSTRUCCIONES DE USO ESPAÑOL
LIMPIEZA DEL CEPILLO
¡ADVERTENCIA!
Durante estas operaciones se aconseja utilizar guantes de trabajo, porque residuos cortantes podrían estar en
el cepillo.
1. Quitar el cepillo de la máquina como indicado en el capítulo Uso.
2. Limpiar y lavar el cepillo con agua y detergente.
3. Controlar que las cerdas no estén dañadas o excesivamente desgastadas; de lo contrario, sustituirlas.
LIMPIEZA DEL DEPÓSITO DEL AGUA DE RECUPERACIÓN
1. Llevar la máquina en el área de eliminación designada.
2. Asegurarse que la máquina esté apagada con la llave operador (41) sacada.
3. Levantar la tapa (18).
4. Limpiar y lavar con agua limpia el interior del depósito (17) y de la tapa.
5. Descargar el agua del depósito mediante el tubo (26).
6. Limpiar la rejilla de aspiración (28), desenganchar los retenes (A, Fig. 11), abrir la rejilla (B) y quitar el otador (C), luego
limpiar con cuidado y volver a instalar.
7. Desmontar la cubeta para la recogida de los residuos (D) abrir la tapa y limpiar cuidadosamente y volverla a instalar en el tubo
de aspiración.
8. Controlar la integridad de la guarnición (E) de la tapa del depósito.
NOTA
La guarnición (E) permite la formación de vacío en el depósito, necesario para la aspiración del agua de recuperación.
Si necesario, sustituir la guarnición (E), quitándola de su alojamiento (F). Cuando se instala la nueva guarnición, posicionar la
unión (G) en el área inferior indicada en la gura.
9. Controlar que toda la supercie perimetral (H) de apoyo de la guarnición (E) no esté dañada, sea limpia y adecuada para la
estanqueidad de la guarnición misma.
10. Cerrar la tapa (18).
E
E
G
H
D
F
A
A
B
01/2015
C
Figura 11
P100873
9100000386 - SC2000 23
Page 54

ESPAÑOL INSTRUCCIONES DE USO
LIMPIEZA DEL FILTRO DEL AGUA DE LAVADO
1. Llevar la máquina sobre un suelo llano.
2. Asegurarse que la máquina esté apagada con la llave operador (41) sacada.
3. Cerrar el grifo del agua de lavado (9). El grifo está cerrado cuando está en la posición (9-B) y está abierto cuando está en la
posición (9-A).
4. Quitar la tapa transparente (A, Fig. 12), recuperar la guarnición (B), luego quitar la rejilla ltrante (C). Lavarlos y enjuagarlos
con agua, luego volverlos a montar con cuidado en el soporte del ltro (D).
5. Abrir el grifo (9-A).
D
B
C
A
Figura 12
P100874
LIMPIEZA DEL DEPÓSITO DEL DETERGENTE
(Para máquinas con sistema EcoFlex™)
Limpiar el depósito del detergente (38) efectuando el procedimiento siguiente.
1. Llevar la máquina en el área de eliminación designada.
2. Asegurarse que la máquina esté apagada con la llave operador (41) sacada.
3. Levantar la tapa (29) y controlar que el depósito del agua de recuperación (17) esté vacío, si no vaciarlo mediante el tubo de
descarga (26).
4. Cerrar la tapa (18).
5. Empuñar la manilla (35) y levantar el conjunto depósito del agua de recuperación (17) con cuidado.
6. Desenroscar la tapa (A, Fig. 13) del deposito del detergente (B).
7. Quitar el deposito.
8. Volver a enjaguar el depósito con agua limpia en la zona de eliminación.
9. Volver a colocar el depósito del detergente (B) en su alojamiento como indicado en la gura y volver a montar el tapón (A).
10. Después del vaciado del depósito del detergente puede ser necesario expurgar el sistema EcoFlex™ (véase el procedimiento
en el párrafo siguiente).
A
B
24 SC2000 - 9100000386
Figura 13
P100875
01/2015
Page 55

INSTRUCCIONES DE USO ESPAÑOL
PURGA SISTEMA ECOFLEX™
(Para máquinas con sistema EcoFlex™)
Limpiar el depósito del detergente como indicado en el párrafo anterior.
Para quitar los residuos de detergente en las tuberías y en la bomba del detergente, efectuar el procedimiento siguiente.
1. Introducir la llave operador (41) en su alojamiento del panel de control (3) para encender la máquina, o, si la llave ya se
encuentra en su alojamiento, apretando el pulsador (42).
2. Apretar el pulsador (43). Controlar que en pantalla el indicador de cantidad del detergente (50-G) tenga encendido por los
menos un segmento.
3. Apretar contemporáneamente los pulsadores (46) y (47), hasta que no aparece en pantalla (50-N) (después de unos 5
segundos).
4. Soltar los pulsadores (46) y (47) y esperar que len pantalla acabe la cuenta atrás y que el sistema de aspiración empiece a
funcionar.
5. Aspirar los residuos de detergente que han quedado en el suelo.
6. Sacar la llave operador (41).
7. Levantar el conjunto depósito del agua de recuperación (17), luego controlar que el tubo del depósito del detergente (38) esté
vacío, de lo contrario repetir los pasos de 3 a 7.
NOTA
El ciclo de expurgación dura unos 30 segundos, después de que se activa automáticamente la función de aspiración
que permite eliminar los residuos de detergente.
La expurgación se puede efectuar aun si el depósito del detergente (38) está lleno de agua. De esta forma, el lavado del
sistema sería total.
Es necesario efectuar esta expurgación cuando el sistema EcoFlex™ está muy sucio/incrustado después de inactividad/
falta de limpieza de la máquina durante largos períodos.
También se puede efectuar la expurgación para acelerar el llenado del tubo de aspiración del detergente cuando el
depósito (38) está lleno y el sistema está todavía vacío.
La expurgación, si necesaria, puede efectuarse varias veces consecutivamente.
CONTROL/SUSTITUCIÓN DE LOS FUSIBLES
NOTA
Todos los circuitos eléctricos de la máquina están protegidos por dispositivos electrónicos de auto-reactivación. Los
fusibles de seguridad se activan sólo en caso de avería grave.
Por lo tanto se recomienda que la sustitución de los fusibles sea efectuada sólo por el personal cualicado.
Consultar el Manual de asistencia disponible en los revendedores Advance.
01/2015
9100000386 - SC2000 25
Page 56

ESPAÑOL INSTRUCCIONES DE USO
FUNCIONES DE SEGURIDAD
La máquina está equipada de las siguientes funciones de seguridad.
PULSADOR DE EMERGENCIA
El pulsador de emergencia (5) se encuentra en una posición fácilmente accesible por el operador. Pulsarlo en caso de necesidad
inmediata para parar la máquina y todas sus funciones.
Para reactivar las funciones de la máquina levantar el conjunto depósito del agua de recuperación (17) y reconectar el conector de
las baterías (6).
SISTEMA DE SEGURIDAD ANTIDERRAPE
Disminuye, si necesario, la velocidad durante los virajes y en caso de inclinación lateral de la máquina para evitar derrape
improviso y aumentar la estabilidad de la máquina en cada condición. La activación del sistema se muestra mediante el icono (51J) en la pantalla.
MICROINTERRUPTOR DEL ASIENTO DE CONDUCCIÓN
Se encuentra al interior del asiento de conducción (12) y no permite el funcionamiento del sistema de tracción de la máquina
cuando el operador no está sentado en el asiento de conducción.
FRENO ELECTROMAGNÉTICO
Está integrado en las ruedas traseras de tracción (24) y mantiene la máquina frenada cuando está apagada o parada.
26 SC2000 - 9100000386
01/2015
Page 57

INSTRUCCIONES DE USO ESPAÑOL
BÚSQUEDA AVERÍAS
AVERÍA PROBABLE CAUSA SOLUCIÓN
Los motores no funcionan, no se enciende ni la
pantalla (51) ni los LEDs de los pulsadores.
La máquina no se mueve y la pantalla (51)
muestra el mensaje de alarma:
AVISO DE ALARMA T3
Cuando se pone en marcha la máquina, el
LED del pulsador (43) parpadea y el cepillo no
funciona.
El cepillo no funciona, el contorno del símbolo
batería (51-C) parpadea y en la pantalla se
visualiza el mensaje de alarma:
AVISO DE ALARMA G4
Durante el trabajo aparece el mensaje de alarma:
AVISO DE ALARMA F2
La pantalla (51) muestra el mensaje de alarma:
AVISO DE ALARMA T2
Durante la carga de las baterías con cargador de
baterías integrado, en pantalla (51) se visualiza el
mensaje de alarma:
AVISO DE ALARMA C4 o C5
La pantalla (51) muestra el mensaje de alarma:
AVISO DE ALARMA XX
Donde “XX” se sustituye por un código diferente
de los antecedentes.
La aspiración de agua sucia es insuciente. El depósito del agua de recuperación está
El ujo de la solución detergente al cepillo es
insuciente.
La boquilla causa estriados en el suelo. Residuos bajo de los cauchos de la boquilla. Quitar los residuos.
El conector de la batería está desconectado. Conectar.
Baterías completamente descargadas. Cargar las baterías.
Encendido de la máquina con pedal
presionado.
Apagado de la máquina sin haber levantado
previamente el cabezal portacepillo.
Baterías descargadas. Cargar las baterías.
Sobrecarga del motor del cepillo. Usar un cepillo menos duro o de tipo diferente
Cuerpos extraños (hilos enrollados, etc.) que
puedan frenar la rotación del cepillo.
Sobrecarga motor de tracción. Apagar y volver a encender la máquina.
Cargador de batería no puede cargar
correctamente las baterías en los tiempos
máximos previstos.
Condición de alarma del sistema electrónico
de control de la máquina.
lleno.
Rejilla de aspiración obstruida o otador en
cierre.
Contenedor con rejilla de recogida de
residuos obstruido.
Tubo desconectado de la boquilla. Conectarlo.
Boquilla sucia o cauchos de la boquilla
desgastados o dañados.
La tapa del depósito no está cerrada
correctamente, o la guarnición está
desgastada.
El depósito del agua de lavado está vacío. Llenarlo.
El ltro del agua de lavado está sucio. Limpiar el ltro.
El depósito del sistema EcoFlex™ está sucio/
incrustado.
Cauchos de la boquilla desgastados,
astillados o desgarrados.
Boquilla no fue equilibrada mediante la
empuñadura.
Soltar el pedal de marcha.
Si el problema sigue existiendo, contactar con
un Centro de asistencia autorizado.
Esperar que el cabezal esté levantado antes
de activar de nuevo el cepillo apretando el
pulsador.
Si el problema persiste, sustituir las baterías.
o no trabajar con la presión suplementaria
activada.
Limpiar los cubos de los cepillos.
Evitar el uso de la máquina en inclinaciones
superiores a la indicada, y de superar
obstáculos demasiado altos.
Efectuar nuevamente el ciclo de carga de las
baterías.
Si el problema persiste, sustituir las baterías.
Apagar y volver a encender la máquina.
Si el problema sigue existiendo, contactar con
un Centro de asistencia autorizado.
Vaciar el depósito.
Limpiar la rejilla de aspiración.
Limpiar.
Limpiar la boquilla o volcar/sustituir los
cauchos.
Cerrar correctamente la tapa o limpiar/sustituir
la guarnición.
Limpiar mediante ciclo de purga.
Volcar o sustituir los cauchos.
Ajustar la boquilla.
NOTA
La máquina no puede funcionar sin el cargador de baterías.
Si el cargador de baterías está averiado, acudir a un Centro de asistencia autorizado.
Para explicaciones o informaciones, contactar con los Centros de asistencia Advance.
01/2015
9100000386 - SC2000 27
Page 58

ESPAÑOL INSTRUCCIONES DE USO
ELIMINACIÓN
Eliminar la máquina en un demoledor calicado.
Antes de eliminar la máquina es necesario quitar y separar los siguientes materiales y eliminarlos según las actuales normas de
higiene ambiental:
– Baterías
– Cepillos
– Tubos y componentes de plástico
– Componentes eléctricos y electrónicos (*)
(*) En particular, para la eliminación de componentes eléctricos y electrónicos, contactar con Advance.
Composición de material de la máquina y reciclabilidad
Tipo % reciclable % de peso de la SC2000
Aluminio 100 % 3 %
Motores eléctricos - misc. 29 % 32 %
Materiales ferrosos 100 % 23 %
Cableados 80 % 7 %
Líquidos 100 % 0 %
Plástico - no reciclable 0 % 3 %
Plástico - reciclable 100 % 3 %
Polietileno 92 % 26 %
Caucho 20 % 2 %
28 SC2000 - 9100000386
01/2015
Page 59

Page 60

A Nilfisk-Advance Brand
14600 21st Avenue North
Plymouth, MN 55447-3408
www.advance-us.com
Phone: 800-989-2235
Fax: 800-989-6566
©2015 Nilfisk-Advance, Inc.
 Loading...