

Page 1

SC1500
Service Manual
Advance SC1500 Models: 56104000 (X20D), 56104001 (X20R)
Nilsk SC1500 Models: 56104002 (SC1500-51D)
English
5/13 Form No. 56043166
Page 2

Contents
General Information . . . . . . . . . . . . . . . . . . . . . . . . . . . . . . . . . . . . . 6
Machine Congurations . . . . . . . . . . . . . . . . . . . . . . . . . . . . . . . . . . . 6
Service Manual Purpose and Application . . . . . . . . . . . . . . . . . . . . . . . . . . 6
Other Reference Manuals and Information Sources . . . . . . . . . . . . . . . . . . . . 6
Diagnostic and Service Tools . . . . . . . . . . . . . . . . . . . . . . . . . . . . . . . . 6
Conventions . . . . . . . . . . . . . . . . . . . . . . . . . . . . . . . . . . . . . . . . . 7
Parts and Service. . . . . . . . . . . . . . . . . . . . . . . . . . . . . . . . . . . . . . . 7
Modications . . . . . . . . . . . . . . . . . . . . . . . . . . . . . . . . . . . . . . . . . 7
Nameplate . . . . . . . . . . . . . . . . . . . . . . . . . . . . . . . . . . . . . . . . . . 7
Cautions and Warning Symbols . . . . . . . . . . . . . . . . . . . . . . . . . . . . . . . 8
General Safety Instructions . . . . . . . . . . . . . . . . . . . . . . . . . . . . . . . . . 8
Prop Rod . . . . . . . . . . . . . . . . . . . . . . . . . . . . . . . . . . . . . . . . . . . 10
Moving the Machine . . . . . . . . . . . . . . . . . . . . . . . . . . . . . . . . . . . . .10
Transporting the Machine . . . . . . . . . . . . . . . . . . . . . . . . . . . . . . . . . .11
Specications . . . . . . . . . . . . . . . . . . . . . . . . . . . . . . . . . . . . . . . . .11
General Specications . . . . . . . . . . . . . . . . . . . . . . . . . . . . . . . . . . . . 11
Overall Dimensions . . . . . . . . . . . . . . . . . . . . . . . . . . . . . . . . . . . . . 12
Fastener Torque Specications . . . . . . . . . . . . . . . . . . . . . . . . . . . . . . . 12
Maintenance . . . . . . . . . . . . . . . . . . . . . . . . . . . . . . . . . . . . . . . . . 13
Lubrication Locations . . . . . . . . . . . . . . . . . . . . . . . . . . . . . . . . . . . . 14
Major Machine Components . . . . . . . . . . . . . . . . . . . . . . . . . . . . . . . . .15
Machine Controls. . . . . . . . . . . . . . . . . . . . . . . . . . . . . . . . . . . . . . .16
iiService Manual – SC1500
General Maintenance Information . . . . . . . . . . . . . . . . . . . . . . . . . . . 13
Maintenance Schedule. . . . . . . . . . . . . . . . . . . . . . . . . . . . . . . . . .13
Key Switch, Emergency Stop and Horn Switch . . . . . . . . . . . . . . . . . . . .16
Circuit Breakers . . . . . . . . . . . . . . . . . . . . . . . . . . . . . . . . . . . . . 17
Speed and Direction Controls and Indicators. . . . . . . . . . . . . . . . . . . . . .18
Scrub Controls and Indicators. . . . . . . . . . . . . . . . . . . . . . . . . . . . . .19
Solution Controls and Indicators . . . . . . . . . . . . . . . . . . . . . . . . . . . .20
Detergent System Controls and Indicators . . . . . . . . . . . . . . . . . . . . . . .20
Burst of Power Switch and Indicator . . . . . . . . . . . . . . . . . . . . . . . . . . 21
Vacuum Power Adjustment Switch and Indicators . . . . . . . . . . . . . . . . . .22
Information Switch . . . . . . . . . . . . . . . . . . . . . . . . . . . . . . . . . . .23
Battery Status and Charger Screens . . . . . . . . . . . . . . . . . . . . . . . . . . 23
Chassis System . . . . . . . . . . . . . . . . . . . . . . . . . . . . . . . . . . . . . . . 25
Major Chassis Components . . . . . . . . . . . . . . . . . . . . . . . . . . . . . . . . . 25
Platform Switches . . . . . . . . . . . . . . . . . . . . . . . . . . . . . . . . . . . . . .26
Control System . . . . . . . . . . . . . . . . . . . . . . . . . . . . . . . . . . . . . . . 27
Functional Description. . . . . . . . . . . . . . . . . . . . . . . . . . . . . . . . . . . .27
Component Locations . . . . . . . . . . . . . . . . . . . . . . . . . . . . . . . . . . . . 28
Troubleshooting . . . . . . . . . . . . . . . . . . . . . . . . . . . . . . . . . . . . . . . 28
Fault Codes. . . . . . . . . . . . . . . . . . . . . . . . . . . . . . . . . . . . . . . .28
Fault Code Table. . . . . . . . . . . . . . . . . . . . . . . . . . . . . . . . . . . . .29
System Disabled by Fault Codes . . . . . . . . . . . . . . . . . . . . . . . . . . . . 30
Service Test Mode . . . . . . . . . . . . . . . . . . . . . . . . . . . . . . . . . . . . 31
To Access the Service Test Mode . . . . . . . . . . . . . . . . . . . . . . . . . . 31
Service Test Mode Functions . . . . . . . . . . . . . . . . . . . . . . . . . . . . 32
To Exit the Service Test Mode . . . . . . . . . . . . . . . . . . . . . . . . . . . 33
Page 3

Programming Options . . . . . . . . . . . . . . . . . . . . . . . . . . . . . . . . . . . . 33
To Access the Main Menu . . . . . . . . . . . . . . . . . . . . . . . . . . . . . . . . 34
To Access a Submenu from the Main Menu . . . . . . . . . . . . . . . . . . . . . . 35
To Change a Programmable Option in a Submenu . . . . . . . . . . . . . . . . . .35
Deck Type . . . . . . . . . . . . . . . . . . . . . . . . . . . . . . . . . . . . . . 35
Low Battery Voltage Cutout . . . . . . . . . . . . . . . . . . . . . . . . . . . . 36
Battery Charger . . . . . . . . . . . . . . . . . . . . . . . . . . . . . . . . . . .36
Burst Of Power Operation . . . . . . . . . . . . . . . . . . . . . . . . . . . . .37
Detergent (EcoFlex™) Option . . . . . . . . . . . . . . . . . . . . . . . . . . . .37
Chemical Rate Bias . . . . . . . . . . . . . . . . . . . . . . . . . . . . . . . . .37
Open Fault Detect . . . . . . . . . . . . . . . . . . . . . . . . . . . . . . . . . .38
Display Rev Level . . . . . . . . . . . . . . . . . . . . . . . . . . . . . . . . . .38
Lock Out Brush Pressure . . . . . . . . . . . . . . . . . . . . . . . . . . . . . . 38
Lock Out Solution Flow Rate . . . . . . . . . . . . . . . . . . . . . . . . . . . . 39
Backup Alarm Volume . . . . . . . . . . . . . . . . . . . . . . . . . . . . . . . 39
Forward Alarm Volume . . . . . . . . . . . . . . . . . . . . . . . . . . . . . . .40
Horn Volume. . . . . . . . . . . . . . . . . . . . . . . . . . . . . . . . . . . . .40
Restore Defaults . . . . . . . . . . . . . . . . . . . . . . . . . . . . . . . . . . .41
Fault Recall . . . . . . . . . . . . . . . . . . . . . . . . . . . . . . . . . . . . . 41
Service Test Mode . . . . . . . . . . . . . . . . . . . . . . . . . . . . . . . . . .41
Extra Information on the Graphic Display . . . . . . . . . . . . . . . . . . . . .42
Frozen Parameters . . . . . . . . . . . . . . . . . . . . . . . . . . . . . . . . . 43
Panel Test . . . . . . . . . . . . . . . . . . . . . . . . . . . . . . . . . . . . . . 45
Save Scrub Settings . . . . . . . . . . . . . . . . . . . . . . . . . . . . . . . . .47
Removal and Installation . . . . . . . . . . . . . . . . . . . . . . . . . . . . . . . . . . 47
A1 Control Board . . . . . . . . . . . . . . . . . . . . . . . . . . . . . . . . . . . .47
E1 Curtis 1210 Speed Controller . . . . . . . . . . . . . . . . . . . . . . . . . . . . 49
A1 Control Board Shop Measurements . . . . . . . . . . . . . . . . . . . . . . . . . . . 51
Contents iiiService Manual – SC1500
Electrical System . . . . . . . . . . . . . . . . . . . . . . . . . . . . . . . . . . . . . . 53
Functional Description . . . . . . . . . . . . . . . . . . . . . . . . . . . . . . . . . . . 53
Overview . . . . . . . . . . . . . . . . . . . . . . . . . . . . . . . . . . . . . . . . . 53
On-board Battery Charger . . . . . . . . . . . . . . . . . . . . . . . . . . . . . . .53
Battery Charger Circuit Descriptions. . . . . . . . . . . . . . . . . . . . . . . . . .54
Battery Charger Not Plugged In . . . . . . . . . . . . . . . . . . . . . . . . . .54
Battery Charger Plugged In. . . . . . . . . . . . . . . . . . . . . . . . . . . . .55
Component Locations . . . . . . . . . . . . . . . . . . . . . . . . . . . . . . . . . . . . 56
Electrical Diagrams . . . . . . . . . . . . . . . . . . . . . . . . . . . . . . . . . . . . . 58
Wiring Diagram, p/n 56104081, Rev. B, Page 1 . . . . . . . . . . . . . . . . . . . . 58
Wiring Diagram, p/n 56104081, Rev. B, Page 2 . . . . . . . . . . . . . . . . . . . . 59
Wiring Harness Diagram, p/n 56104082, Rev. B . . . . . . . . . . . . . . . . . . . .60
Electrical Connector Pin-out Assignments . . . . . . . . . . . . . . . . . . . . . . . . . 61
To Locate and Identify a Connector . . . . . . . . . . . . . . . . . . . . . . . . . . .61
Connector Pin-out Assignment Tables . . . . . . . . . . . . . . . . . . . . . . . . .62
Troubleshooting . . . . . . . . . . . . . . . . . . . . . . . . . . . . . . . . . . . . . . . 68
Specications . . . . . . . . . . . . . . . . . . . . . . . . . . . . . . . . . . . . . . . . .69
Page 4

Recovery System . . . . . . . . . . . . . . . . . . . . . . . . . . . . . . . . . . . . . . 70
Functional Description. . . . . . . . . . . . . . . . . . . . . . . . . . . . . . . . . . . .70
Circuit Descriptions . . . . . . . . . . . . . . . . . . . . . . . . . . . . . . . . . . . . .71
Vacuum Motor Off . . . . . . . . . . . . . . . . . . . . . . . . . . . . . . . . . . . .71
Vacuum Motor On . . . . . . . . . . . . . . . . . . . . . . . . . . . . . . . . . . . . 72
Component Locations . . . . . . . . . . . . . . . . . . . . . . . . . . . . . . . . . . . . 73
Troubleshooting . . . . . . . . . . . . . . . . . . . . . . . . . . . . . . . . . . . . . . . 75
Removal and Installation . . . . . . . . . . . . . . . . . . . . . . . . . . . . . . . . . . 76
Vacuum Motor . . . . . . . . . . . . . . . . . . . . . . . . . . . . . . . . . . . . . . 76
Specications . . . . . . . . . . . . . . . . . . . . . . . . . . . . . . . . . . . . . . . . .77
Special Tools . . . . . . . . . . . . . . . . . . . . . . . . . . . . . . . . . . . . . . . . .77
Scrub System . . . . . . . . . . . . . . . . . . . . . . . . . . . . . . . . . . . . . . . . 78
Functional Description. . . . . . . . . . . . . . . . . . . . . . . . . . . . . . . . . . . .78
Scrub Deck and Motor . . . . . . . . . . . . . . . . . . . . . . . . . . . . . . . . . .79
20D Scrub Deck . . . . . . . . . . . . . . . . . . . . . . . . . . . . . . . . . . . 79
20R REV™ Deck . . . . . . . . . . . . . . . . . . . . . . . . . . . . . . . . . . .80
Brush Motor Contactor . . . . . . . . . . . . . . . . . . . . . . . . . . . . . . . . .81
Deck Actuator Assembly. . . . . . . . . . . . . . . . . . . . . . . . . . . . . . . . .81
Circuit Descriptions . . . . . . . . . . . . . . . . . . . . . . . . . . . . . . . . . . . . .83
Scrub Brush Motor. . . . . . . . . . . . . . . . . . . . . . . . . . . . . . . . . . . .83
Scrub Brush Motor Off . . . . . . . . . . . . . . . . . . . . . . . . . . . . . . . 83
Scrub Brush Motor On . . . . . . . . . . . . . . . . . . . . . . . . . . . . . . .84
Deck Actuator Assembly. . . . . . . . . . . . . . . . . . . . . . . . . . . . . . . . .85
Scrub Deck Up . . . . . . . . . . . . . . . . . . . . . . . . . . . . . . . . . . . .85
Scrub Deck in Vacuum-only Position . . . . . . . . . . . . . . . . . . . . . . . .85
Scrub Deck at Normal Scrub Pressure . . . . . . . . . . . . . . . . . . . . . . .86
Scrub Deck at Extra Scrub Pressure . . . . . . . . . . . . . . . . . . . . . . . . 86
Component Locations . . . . . . . . . . . . . . . . . . . . . . . . . . . . . . . . . . . . 87
Troubleshooting . . . . . . . . . . . . . . . . . . . . . . . . . . . . . . . . . . . . . . . 89
Removal and Installation . . . . . . . . . . . . . . . . . . . . . . . . . . . . . . . . . . 90
Scrub Deck . . . . . . . . . . . . . . . . . . . . . . . . . . . . . . . . . . . . . . . .90
Scrub Deck Actuator Assembly . . . . . . . . . . . . . . . . . . . . . . . . . . . . . 94
Scrub Deck Actuator Adjustment . . . . . . . . . . . . . . . . . . . . . . . . . . . . . . 95
Specications . . . . . . . . . . . . . . . . . . . . . . . . . . . . . . . . . . . . . . . . .96
Contents ivService Manual – SC1500
Solution System . . . . . . . . . . . . . . . . . . . . . . . . . . . . . . . . . . . . . . . 97
Functional Description. . . . . . . . . . . . . . . . . . . . . . . . . . . . . . . . . . . .97
Solution Tank, Water Filter and Valves . . . . . . . . . . . . . . . . . . . . . . . . 97
Solution Solenoid Valve . . . . . . . . . . . . . . . . . . . . . . . . . . . . . . . . .98
Detergent System . . . . . . . . . . . . . . . . . . . . . . . . . . . . . . . . . . . . . . 99
Circuit Descriptions . . . . . . . . . . . . . . . . . . . . . . . . . . . . . . . . . . 100
Solution Solenoid Valve Off . . . . . . . . . . . . . . . . . . . . . . . . . . . .100
Solution Solenoid Valve On . . . . . . . . . . . . . . . . . . . . . . . . . . . . 101
Detergent Pump Off . . . . . . . . . . . . . . . . . . . . . . . . . . . . . . . .102
Detergent Pump On . . . . . . . . . . . . . . . . . . . . . . . . . . . . . . . . 102
Component Locations . . . . . . . . . . . . . . . . . . . . . . . . . . . . . . . . . . . 104
Maintenance . . . . . . . . . . . . . . . . . . . . . . . . . . . . . . . . . . . . . . . . 106
Cleaning the Water Filter . . . . . . . . . . . . . . . . . . . . . . . . . . . . . . .106
Troubleshooting . . . . . . . . . . . . . . . . . . . . . . . . . . . . . . . . . . . . . . 107
Specications . . . . . . . . . . . . . . . . . . . . . . . . . . . . . . . . . . . . . . . .108
Component Specications . . . . . . . . . . . . . . . . . . . . . . . . . . . . . . . 108
Nominal Solution Flow Rates . . . . . . . . . . . . . . . . . . . . . . . . . . . . . 109
Page 5

Squeegee System . . . . . . . . . . . . . . . . . . . . . . . . . . . . . . . . . . . . . . 110
Functional Description. . . . . . . . . . . . . . . . . . . . . . . . . . . . . . . . . . .110
Component Locations . . . . . . . . . . . . . . . . . . . . . . . . . . . . . . . . . . . 111
Troubleshooting . . . . . . . . . . . . . . . . . . . . . . . . . . . . . . . . . . . . . . 112
Specications . . . . . . . . . . . . . . . . . . . . . . . . . . . . . . . . . . . . . . . .112
Steering System . . . . . . . . . . . . . . . . . . . . . . . . . . . . . . . . . . . . . . .113
Functional Description. . . . . . . . . . . . . . . . . . . . . . . . . . . . . . . . . . .113
Component Locations . . . . . . . . . . . . . . . . . . . . . . . . . . . . . . . . . . . 114
Troubleshooting . . . . . . . . . . . . . . . . . . . . . . . . . . . . . . . . . . . . . . 115
Wheel System - Traction . . . . . . . . . . . . . . . . . . . . . . . . . . . . . . . . . .116
Functional Description. . . . . . . . . . . . . . . . . . . . . . . . . . . . . . . . . . .116
Wheel Drive Motor Circuit Descriptions . . . . . . . . . . . . . . . . . . . . . . . 117
Power to the E1 Curtis 1210 Speed Controller. . . . . . . . . . . . . . . . . .117
Speed Control Drive Functions . . . . . . . . . . . . . . . . . . . . . . . . . . 118
Speed Control Communication with the A1 Control Board . . . . . . . . . . . 119
Component Locations . . . . . . . . . . . . . . . . . . . . . . . . . . . . . . . . . . . 121
Maintenance and Adjustments . . . . . . . . . . . . . . . . . . . . . . . . . . . . . . 123
Speed Control Programming Options . . . . . . . . . . . . . . . . . . . . . . . . . 123
Troubleshooting . . . . . . . . . . . . . . . . . . . . . . . . . . . . . . . . . . . . . . 124
General Troubleshooting . . . . . . . . . . . . . . . . . . . . . . . . . . . . . . . 124
E1 Curtis Speed Controller Diagnostics . . . . . . . . . . . . . . . . . . . . . . . 124
Diagnostics Method A - Graphic Display and Detergent On/Off Indicator . . . 124
Diagnostics Method B - Curtis Programmer . . . . . . . . . . . . . . . . . . . 125
Diagnostic History. . . . . . . . . . . . . . . . . . . . . . . . . . . . . . . . .125
Status LED Fault Code Table . . . . . . . . . . . . . . . . . . . . . . . . . . . . . 126
Removal and Installation . . . . . . . . . . . . . . . . . . . . . . . . . . . . . . . . . 127
Drive Wheel Assembly. . . . . . . . . . . . . . . . . . . . . . . . . . . . . . . . .127
Drive Wheel Motor. . . . . . . . . . . . . . . . . . . . . . . . . . . . . . . . . . .129
Steering Spindle Bearings. . . . . . . . . . . . . . . . . . . . . . . . . . . . . . .131
Drive Wheel Motor Maintenance . . . . . . . . . . . . . . . . . . . . . . . . . . . . . 133
Replacing the Motor Brushes . . . . . . . . . . . . . . . . . . . . . . . . . . . . . 133
Specications . . . . . . . . . . . . . . . . . . . . . . . . . . . . . . . . . . . . . . . .134
Shop Measurements . . . . . . . . . . . . . . . . . . . . . . . . . . . . . . . . . . 134
E1 Curtis 1210 Speed Controller – Low Current . . . . . . . . . . . . . . . . 134
E1 Curtis 1210 Speed Controller – Output. . . . . . . . . . . . . . . . . . . .135
General Specications . . . . . . . . . . . . . . . . . . . . . . . . . . . . . . . . .135
Special Tools . . . . . . . . . . . . . . . . . . . . . . . . . . . . . . . . . . . . . . . . 136
Contents vService Manual – SC1500
Page 6

General Information
Machine Congurations
The SC1500 machines are battery-powered commercial oor scrubbing machines suitable for use in hotels,
schools, hospitals, factories, shops, ofces, rental businesses and similar applications.
The SC1500 is available in two scrub system congurations:
• The 20D models have a 20” brush plate assembly to accommodate a variety of disc brushes. The 20D
models can also be used with several grades of pads by using the optional pad holder.
• The 20R models have a 20” REV™ scrub system that uses a pad driver for use with REV™ deck pads only.
The machine is powered by either four 6-volt batteries or two 12-volt batteries, connected in series, to
provide 24 VDC to the motors and controls.
Service Manual Purpose and Application
6Service Manual – SC1500
This Service Manual is a technical resource designed to aid service personnel in maintaining and repairing
the Advance SC1500 Scrubbers to ensure optimum performance and long service life. Please read it
thoroughly before servicing your machine.
Other Reference Manuals and Information Sources
Model Name Model Number
Advance SC1500 56104000, 56104001 56042591
Nilsk SC1500 56104002 (SC1500-51D) 56042592
These manuals can be found on the following Nilsk-Advance’s electronic supported databases:
• Nilsk-Advance Dealer Customer Zone
• Advance website: www.advance-us.com
• Nilsk website: www.nilsk.com
• EzParts service/parts CD-ROM
Parts List
Form Number
Instructions for Use
Form Number
56091047 - English, Español,
Français Português
Diagnostic and Service Tools
In addition to a full set of metric and standard tools, the following items are required in order to successfully
and quickly perform troubleshooting and repair of Advance commercial oor cleaning equipment.
• Digital voltmeter (DVM) with DC current clamp
• Hydrometer
• Battery load tester for checking batteries
• Set of torque wrenches
Page 7

General Information 7Service Manual – SC1500
These tools are also available from Nilsk-Advance, Inc.:
• Curtis 1311 hand held programmer, p/n 56409441,
• Vacuum water lift gauge, p/n 56205281.
Conventions
All references to right, left, front and rear in this manual are as seen from the Operator’s position.
Parts and Service
Repairs should be performed by an Authorized Advance Service Center that employs factory-trained service
personnel and maintains an inventory of Advance original replacement parts and accessories.
Call the Advance Dealer named below for repair parts or service. Please specify the Model Number (same as
the Part Number) and Serial Number when discussing your machine.
(Dealer, afx service sticker here.)
Modications
Modications and additions to the cleaning machine which affect capacity and safe operation shall not be
performed by the customer or user without prior written approval from Nilsk-Advance Inc. Unapproved
modications will void the machine warranty and make the customer liable for any resulting accidents.
Nameplate
The Model Number and Serial Number of the machine are
shown on the Nameplate located on the inside of the battery
compartment.
This information is needed when ordering repair parts for the
machine.
Page 8

General Information 8Service Manual – SC1500
Cautions and Warning Symbols
Nilsk-Advance uses the symbols below to signal potentially dangerous conditions. Read this information
carefully and take the necessary steps to protect personnel and property.
Danger! Is used to warn of immediate hazards that will cause severe personal injury or death.
Warning! Is used to call attention to a situation that could cause severe personal injury.
Caution! Is used to call attention to a situation that could cause minor personal injury or
damage to the machine or other property.
Read all instructions before using.
General Safety Instructions
Specic Cautions and Warnings are included to warn you of potential danger of machine damage or bodily
harm. This machine is for commercial use, for example in hotels, schools, hospitals, factories, shops and
ofces other than normal residential housekeeping purposes.
Warning! Be sure to follow these safety precautions to avoid situations that could cause
severe personal injury.
• This machine should only be used by properly-trained and authorized personnel.
• This machine is not intended for use by persons (including children) with reduced physical,
sensory or mental capabilities, or lack of experience and knowledge.
• Avoid sudden stops when on ramps or inclines. Avoid abrupt sharp turns. Use low speed down
ramps.
• Observe the Gross Vehicle Weight, GVW, of the machine when loading, driving, lifting or
supporting the machine.
• Keep sparks, ame and smoking materials away from batteries. Explosive gases are vented
during normal operation.
• Charging the batteries produces highly-explosive hydrogen gas. Charge the batteries only in
well-ventilated areas away from open ame. Do not smoke while charging the batteries.
• Remove all jewelry when working near electrical components.
• Turn the Key Switch off (O) and disconnect the batteries before servicing electrical components.
• Never work underneath a machine without safety blocks or stands to support the machine.
• Do not dispense ammable cleaning agents, operate the machine on or near these agents, or
operate in areas where ammable liquids exist.
Page 9

General Information 9Service Manual – SC1500
• Only use the brushes provided with the machine or those specied in the Instructions for Use.
The use of other brushes may impair safety.
• Do not clean this machine with a pressure washer.
Caution! Be sure to follow these safety precautions to avoid situations that could cause
personal injury, damage to property or equipment damage.
• This machine is not approved for use on public paths or roads.
• This machine is not suitable for picking up hazardous dust.
• Do not use scarier discs and grinding stones. Advance will not be held responsible for any
damage to oor surfaces caused by scariers or grinding stones (can also cause damage to the
brush drive system).
• When operating this machine, ensure that individuals in close proximity, particularly children,
are not endangered.
• Before performing any service function, carefully read all instructions pertaining to that
function.
• Do not leave the machine unattended without rst turning the Key Switch off (O), removing the
key and applying the parking brake.
• Turn the Key Switch off (O) and remove the key before changing the brushes, and before
opening any access panels.
• Take precautions to prevent hair, jewelry or loose clothing from becoming caught in moving
parts.
• Use caution when moving this machine in below-freezing temperature conditions. Any water in
the solution, recovery or detergent tanks, or in the hose lines could freeze, causing damage to
valves and ttings. Flush with windshield washer uid.
• The batteries must be removed from the machine before the machine is scrapped. The disposal
of the batteries should be safely done in accordance with your local environmental regulations.
• Do not use on surfaces having a gradient exceeding that marked on the machine.
• All doors and covers are to be positioned as indicated in the Instructions for Use before using
the machine.
• This machine should only be used and stored indoors.
Caution! Do not clean this machine with a pressure washer.
Page 10
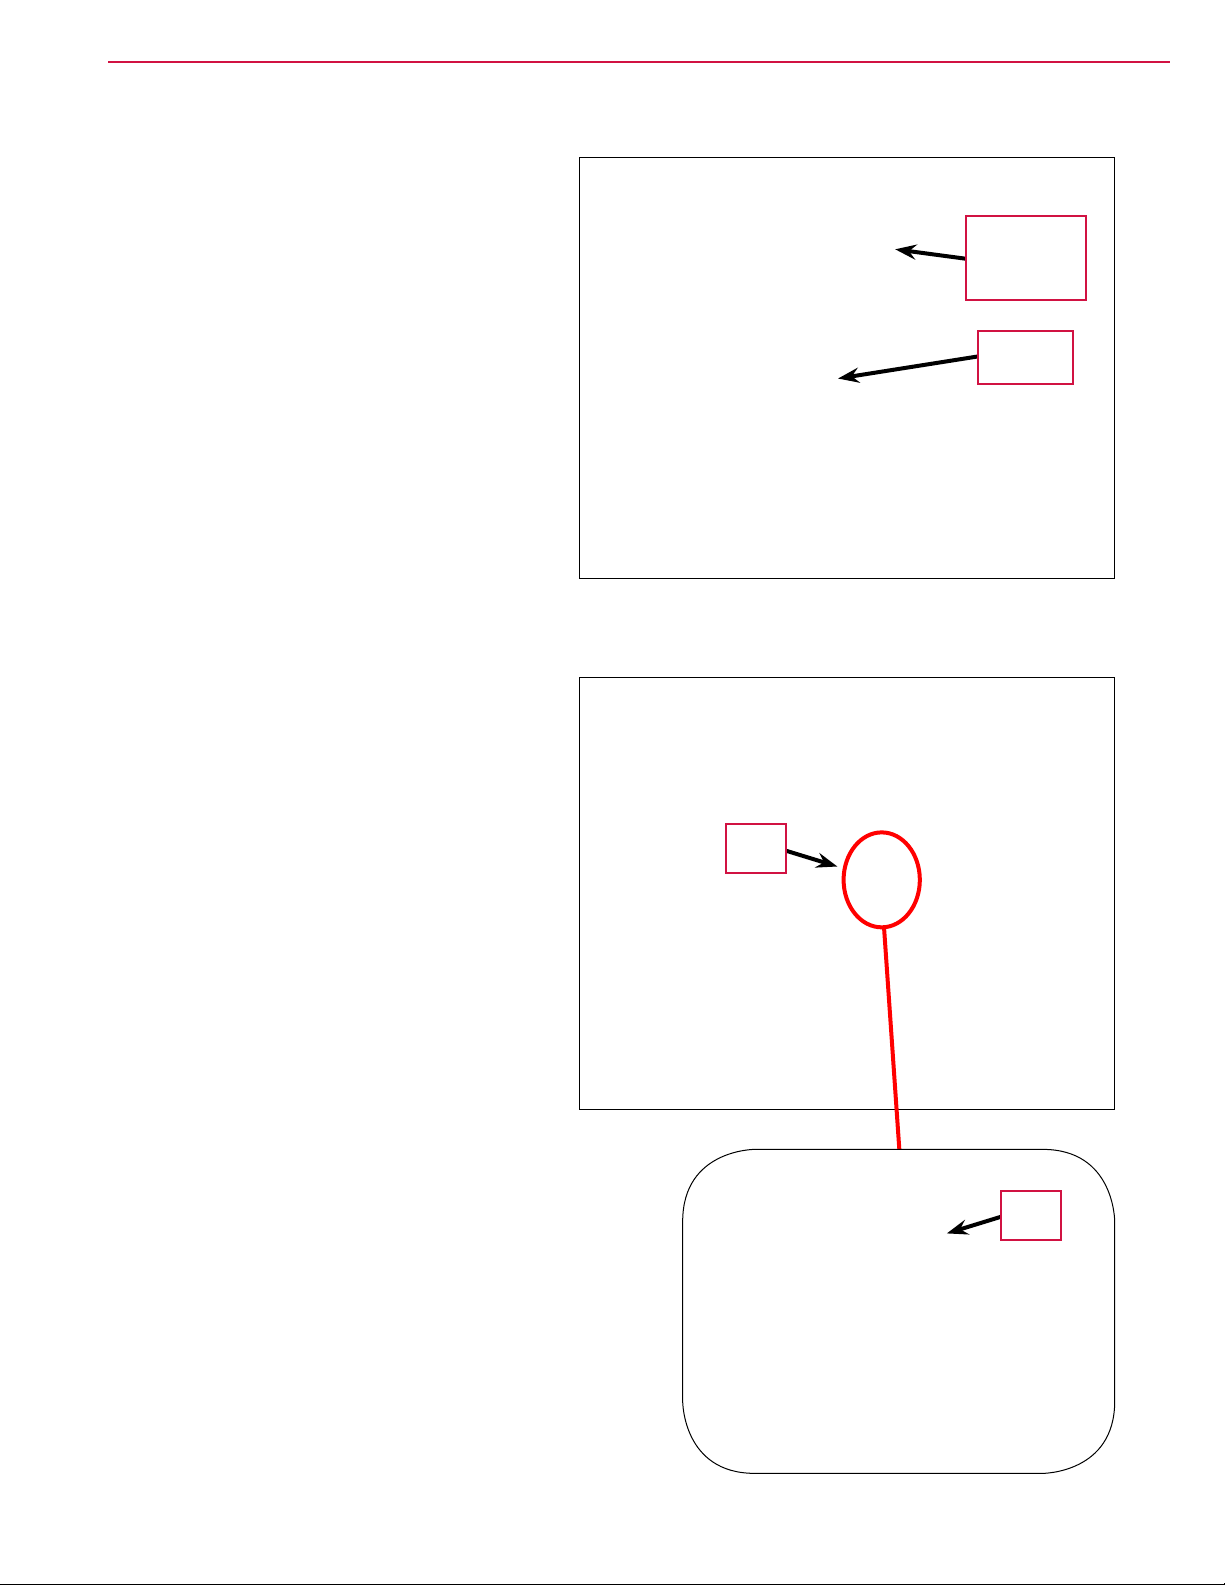
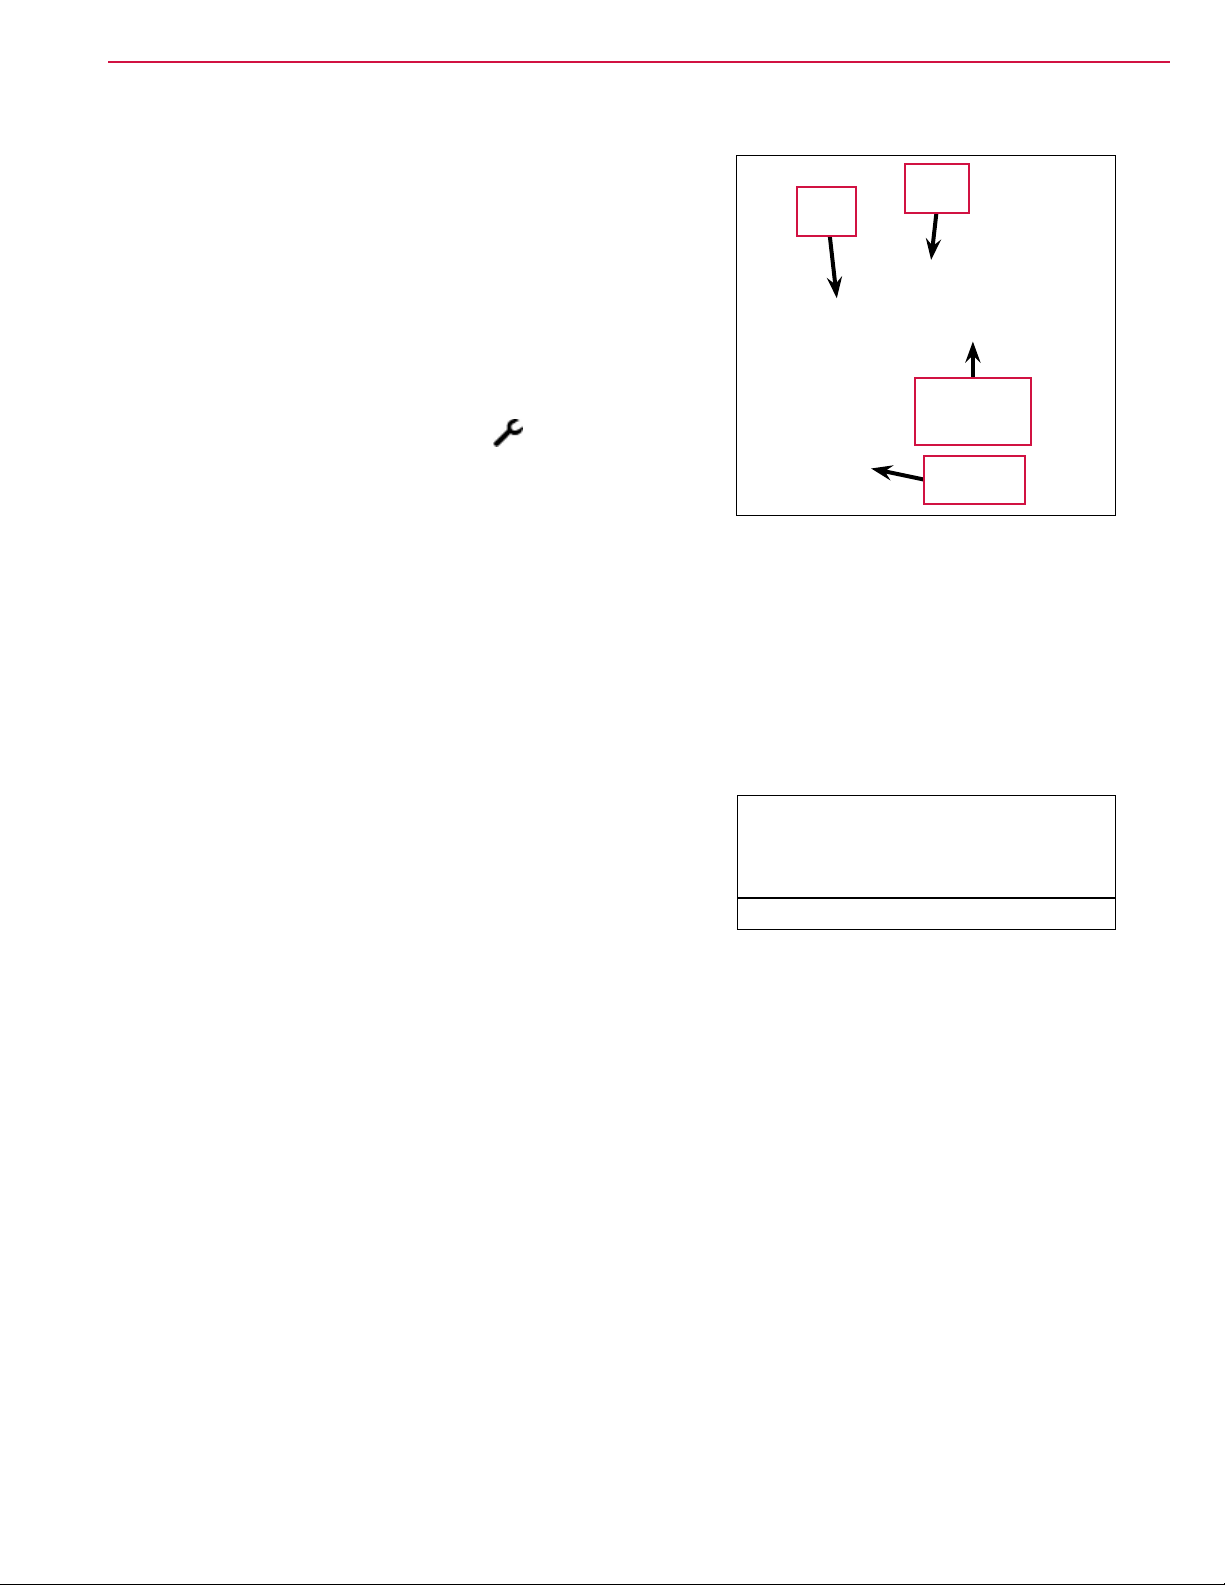
Prop Rod
To prevent the Control Panel Housing / Recovery
Tank Cover
causing injury, always engage the Prop Rod as
shown before working under the Panel Housing
/ Recovery Tank Cover
from dropping unexpectedly and
.
General Information 10Service Manual – SC1500
Control Panel
Housing/
Recovery
Tank Cover
Prop Rod
(engaged)
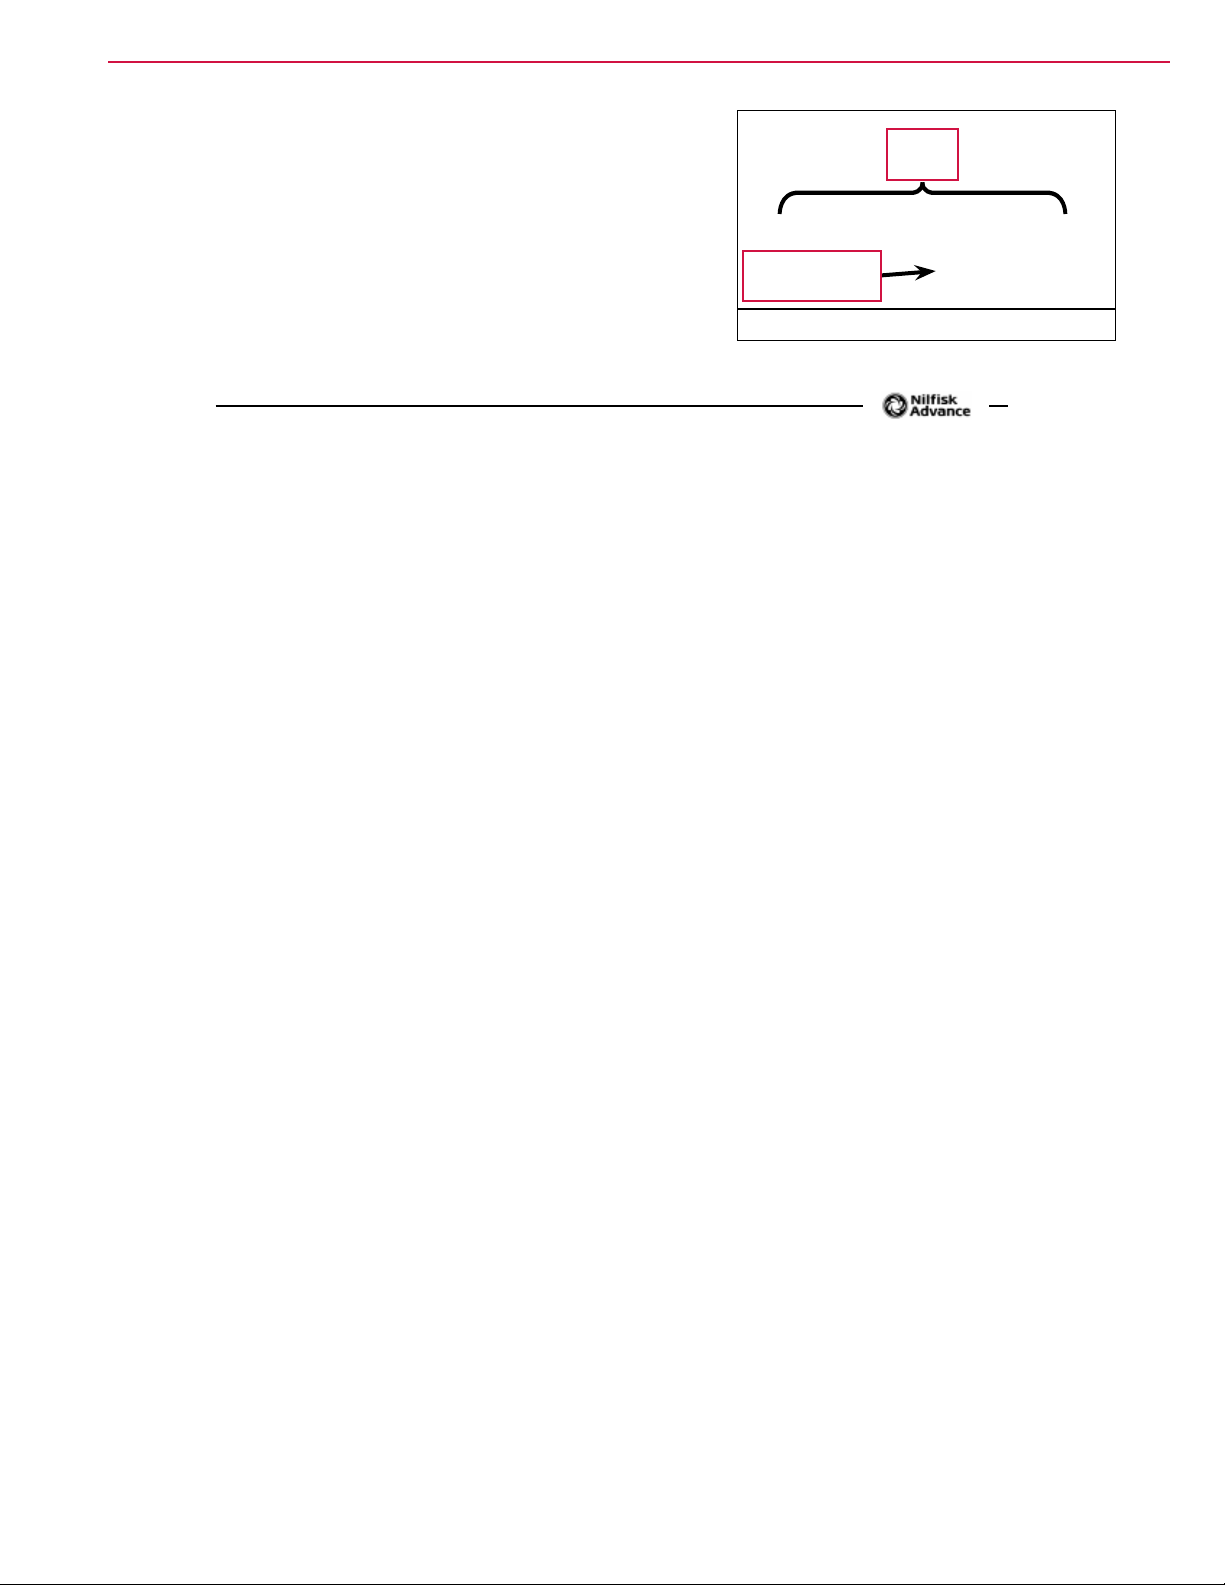
Moving the Machine
The drive wheel motor has a built-in
electromagnetic brake that engages whenever
the Key Switch is Off or the Go Pedal is
released. You can manually override this
brake if necessary by reaching up around the
back of the front drive wheel and rotating the
Brake Arm up as shown. This should only be
done if you need to push or pull the machine.
Remember to reengage the Brake Arm once you
nish moving the machine.
Note: Turn the drive wheel 45° to
the right for easier access to
the Brake Arm.
Brake
Arm
Brake
Arm
Page 11
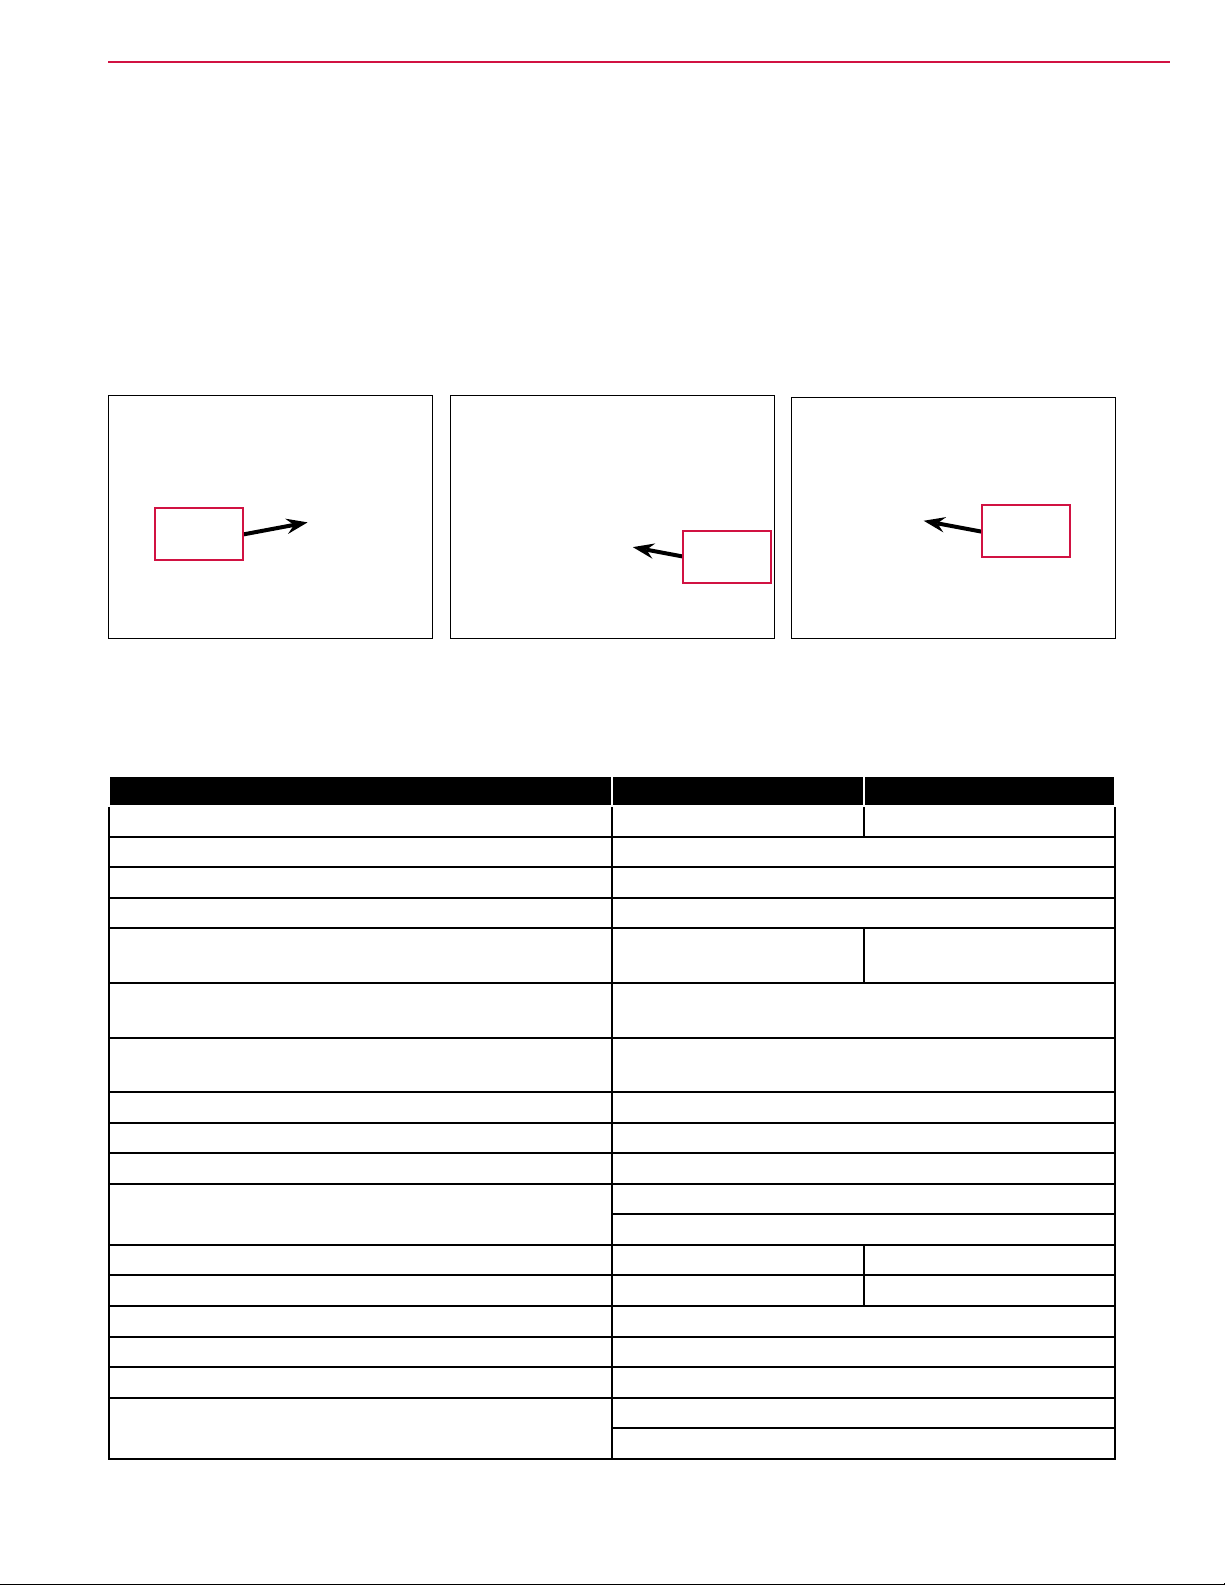
Transporting the Machine
Caution! Before transporting the machine on an open truck or trailer, make sure:
• All tanks are empty.
• The recovery tank cover is latched securely.
• The machine is tied down securely. (Refer to the Tie-down Locations below.
• The machine’s electromagnetic brake is engaged (not manually overridden).
General Information 11Service Manual – SC1500
Left
Tie-down
Front
Tie-down
Right
Tie-down
Specications
General Specications
Model SC1500-X20D SC1500-X20R
Model No. 56104000 56104001
Battery Voltage 24V
Battery Capacity - Amp Hours 260
Protection Grade IPX3
Sound Pressure Level IEC 60335-2-72: 2002 Amend.
1:2005, ISO 11201 dB(A)
Gross Vehicle Weight (w/full solution tank, empty
recovery tank, heaviest batteries, no Operator
Net Weight ((w/empty solution and recovery tanks, no
batteries or brushes
Maximum Operator/Rider Weight 250 lbs / 113.4 kg
Scrub Deck Width 20 in / 50.8 cm
Squeegee Width 26.5 in / 67.3 cm
Tank Capacities
Static Wheel Loading with 179 lb. rider Front: 362 lbs / 164 kg Rear: 275 lbs / 125 kg
Static Wheel Pressure with 175 lb. rider Front: 116 psi / 8.2 kg/cm
Sound Pressure Level (IEC 60704-1)TR12116 63.33 dB(A)/.029344 µPa
Vibrations at the Hand Controls (ISO 5349-1) <.5 m/s
Vibrations at the Seat (EN 1032) <2.5 m/s2
Gradeability
63 dB LpA, ±3 dB KpA 62 dB LpA, ±3 dB KpA
718 lbs / 326 kg
354 lbs / 161 kg
Solution Tank: 11.7 gal / 44.28 L
Recovery Tank: 13.5 gal / 46.67 L
2
Rear: 139 psi / 9.8 kg/cm
2
Transport: 14.5 percent / 8.2 degrees
Cleaning: 8.0 percent / 4.5 degrees
2
Page 12
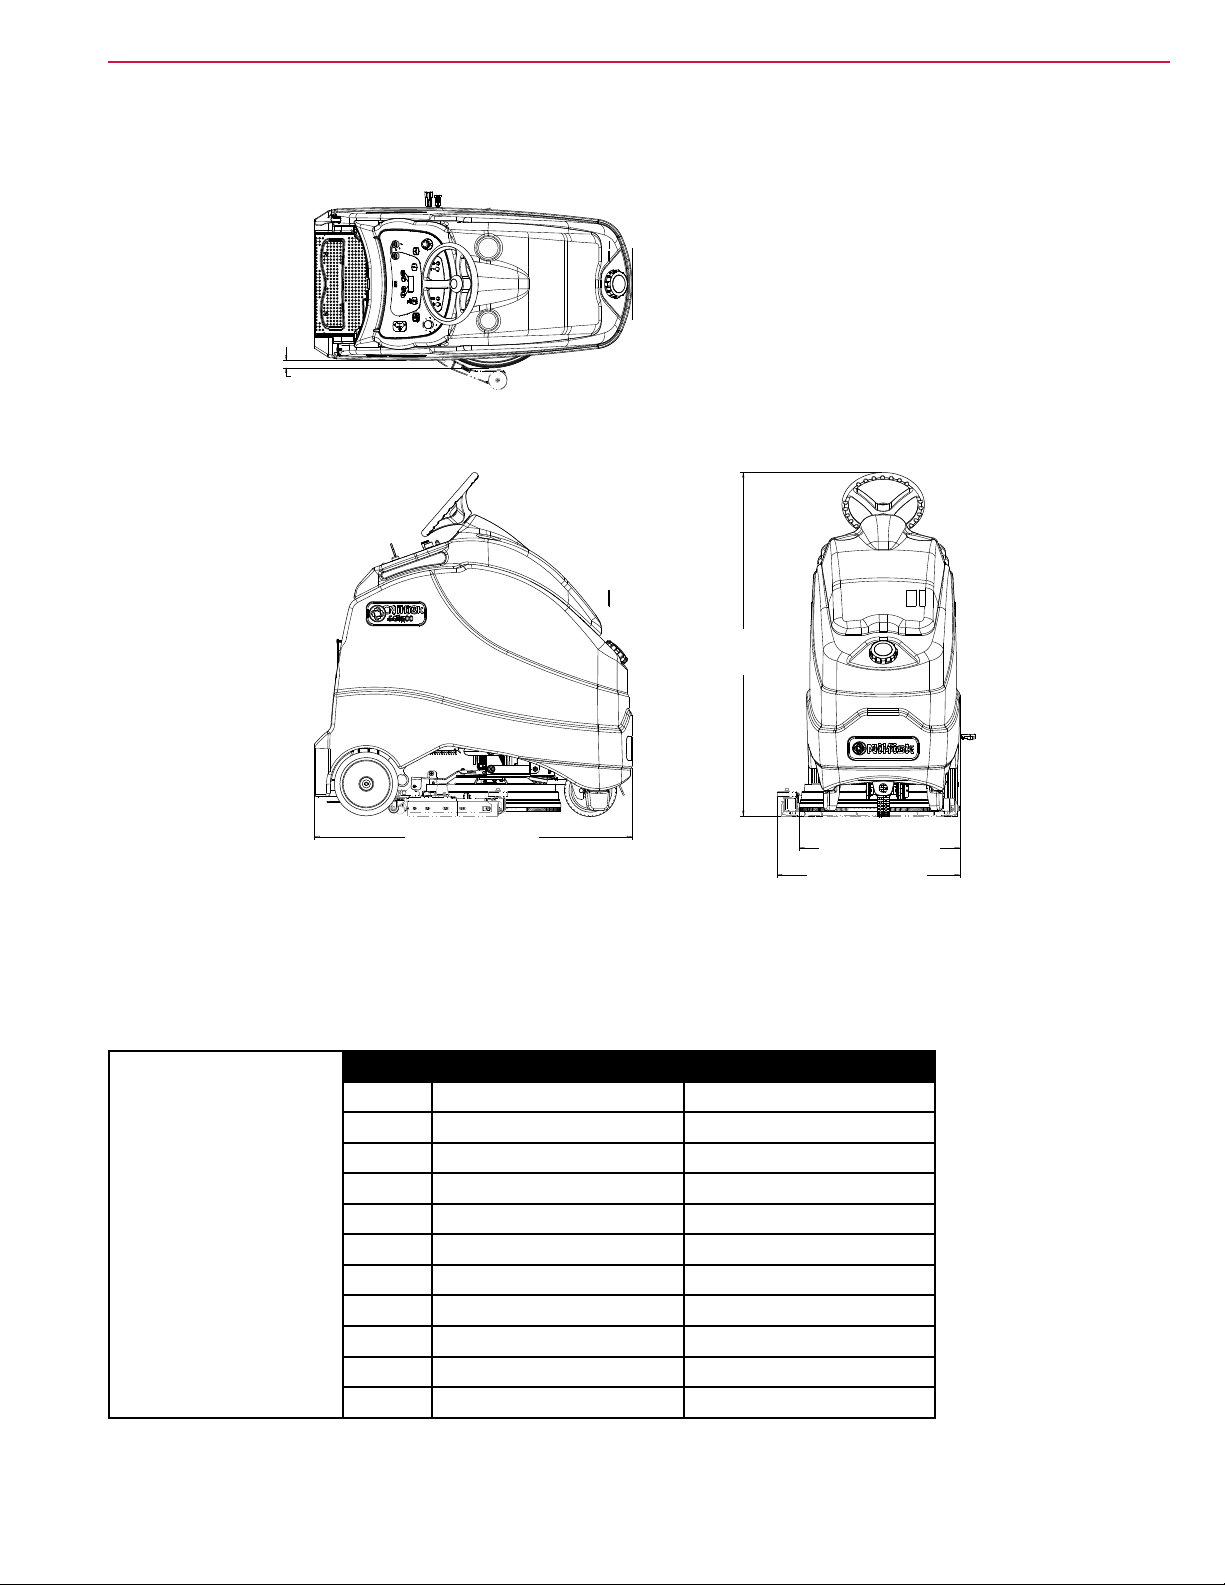
Overall Dimensions
1.13
[28,7]
1.13”
[28,7 mm]
General Information 12Service Manual – SC1500
48.5
48.5” [123,2 cm]
[1232]
Fastener Torque Specications
Size Plated Steel Stainless Steel
#10 42 in.-lb. [4.75 N-m] 28 in.-lb. [3.17 N-m]
1/4“ 100 in.-lb. [11.3 N-m] 67 in.-lb. [7.57 N-m]
5/16” 17 ft.-lb. [23.05 N-m] 11 ft.-lb. [14.91 N-m]
3/8” 31 ft.-lb. [42.03 N-m] 20 ft.-lb. [27.12 N-m]
Standard Torque
Specications (unless
otherwise specied)
1/2” 75 ft.-lb. [101.69 N-m] 50 ft.-lb. [67.79 N-m]
3/4” 270 ft.-lb. [366.07 N-m] 180 ft.-lb. [244.05 N-m]
M5 61 in.-lb. [6.89 N-m] 36 in.-lb. [4.07 N-m]
M6 9 ft.-lb. [12.2 N-m] 62 in.-lb. [7.0 N-m]
M8 22 ft.-lb. [29.83 N-m] 13 ft.-lb. [17.63 N-m]
M10 44 ft.-lb. [59.66 N-m] 25 ft.-lb. [33.9 N-m]
M12 70 ft.-lb. [94.91 N-m] 40 ft.-lb. [54.23 N-m]
52.5”
52.5
[1332]
[133,4 cm]
24.5
24.5” [62,2 cm]
[623]
27.9
27.9” [70,9 cm]
[710]
Page 13

General Information 13Service Manual – SC1500
Maintenance
General Maintenance Information
Keep the machine in top condition by closely following the maintenance schedule. Maintenance intervals
given are for average operating conditions. Machines used in severe environments may require service more
often.
Caution! Do not pressure-wash the machine
Maintenance Schedule
Maintenance Item Daily Weekly Monthly Yearly
Charge Batteries X
Check/Clean Tanks & Hoses X
Check/Clean the Brushes/Pads X
Check/Clean the Squeegee X
Check/Clean Vacuum Shutoff Float X
Empty/Clean Debris Catch Tray in Recovery Tank X
Check Each Battery Cell(s) Water Level X
Inspect Scrub Housing Skirt X
Inspect and Clean Solution Filter X
Purge Detergent System X
Lubricate Machine X
* Check Carbon Brushes X
** Replace vibration damping isolators (REV model only) X
* Have an Authorized Advance Service Center check the vacuum motor carbon motor brushes once a year or
after 300 operating hours. The brush and drive motor carbon brushes should be checked every 500 hours
or once a year.
** This maintenance procedure must be performed by an authorized Advance Service Center.
Page 14
General Information 14Service Manual – SC1500
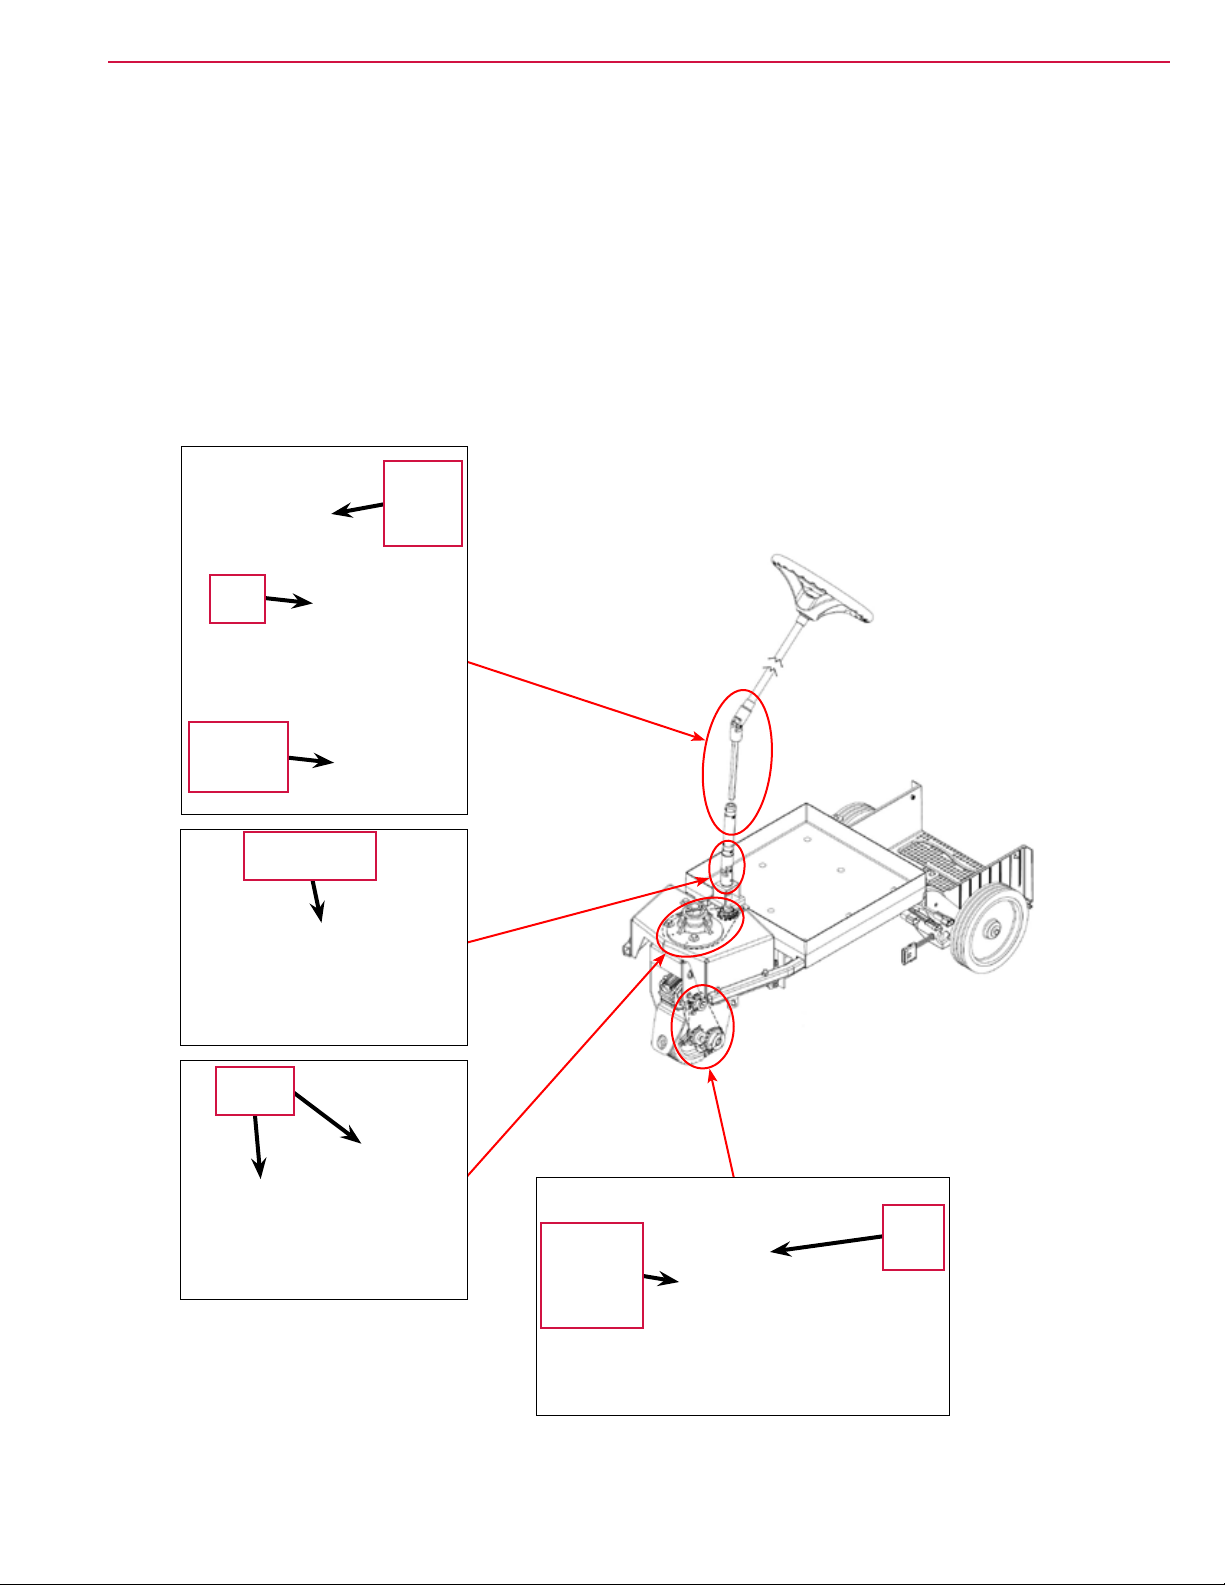
Lubrication Locations
• Once a month apply Lubriplate® 730-2 or equivalent grease to, or grease the tting on, the following
components. Avoid using too much grease.
– Hex Shaft/Steering Tube Assembly
– Drive Wheel Chain
– Drive Chain Idler Sprocket (grease tting)
– Steering Chain
• Once a month apply light machine oil to the Upper and Lower Steering Shaft Universal Joints.
Upper
Steering
Shaft
U-Joint
Hex
Shaft
Steering
Tube
Assembly
Lower Steering
Steering
Chain
Shaft U-Joint
Drive Chain
Idler
Sprocket
(grease
tting)
Drive
Wheel
Chain
Page 15
Major Machine Components
Control
System
General Information 15Service Manual – SC1500
Electrical
System
Solution
System
Recovery
System
Chassis
System
Squeegee
Assembly
Scrub
System - 20D
Scrub
System - REV
Page 16
Machine Controls
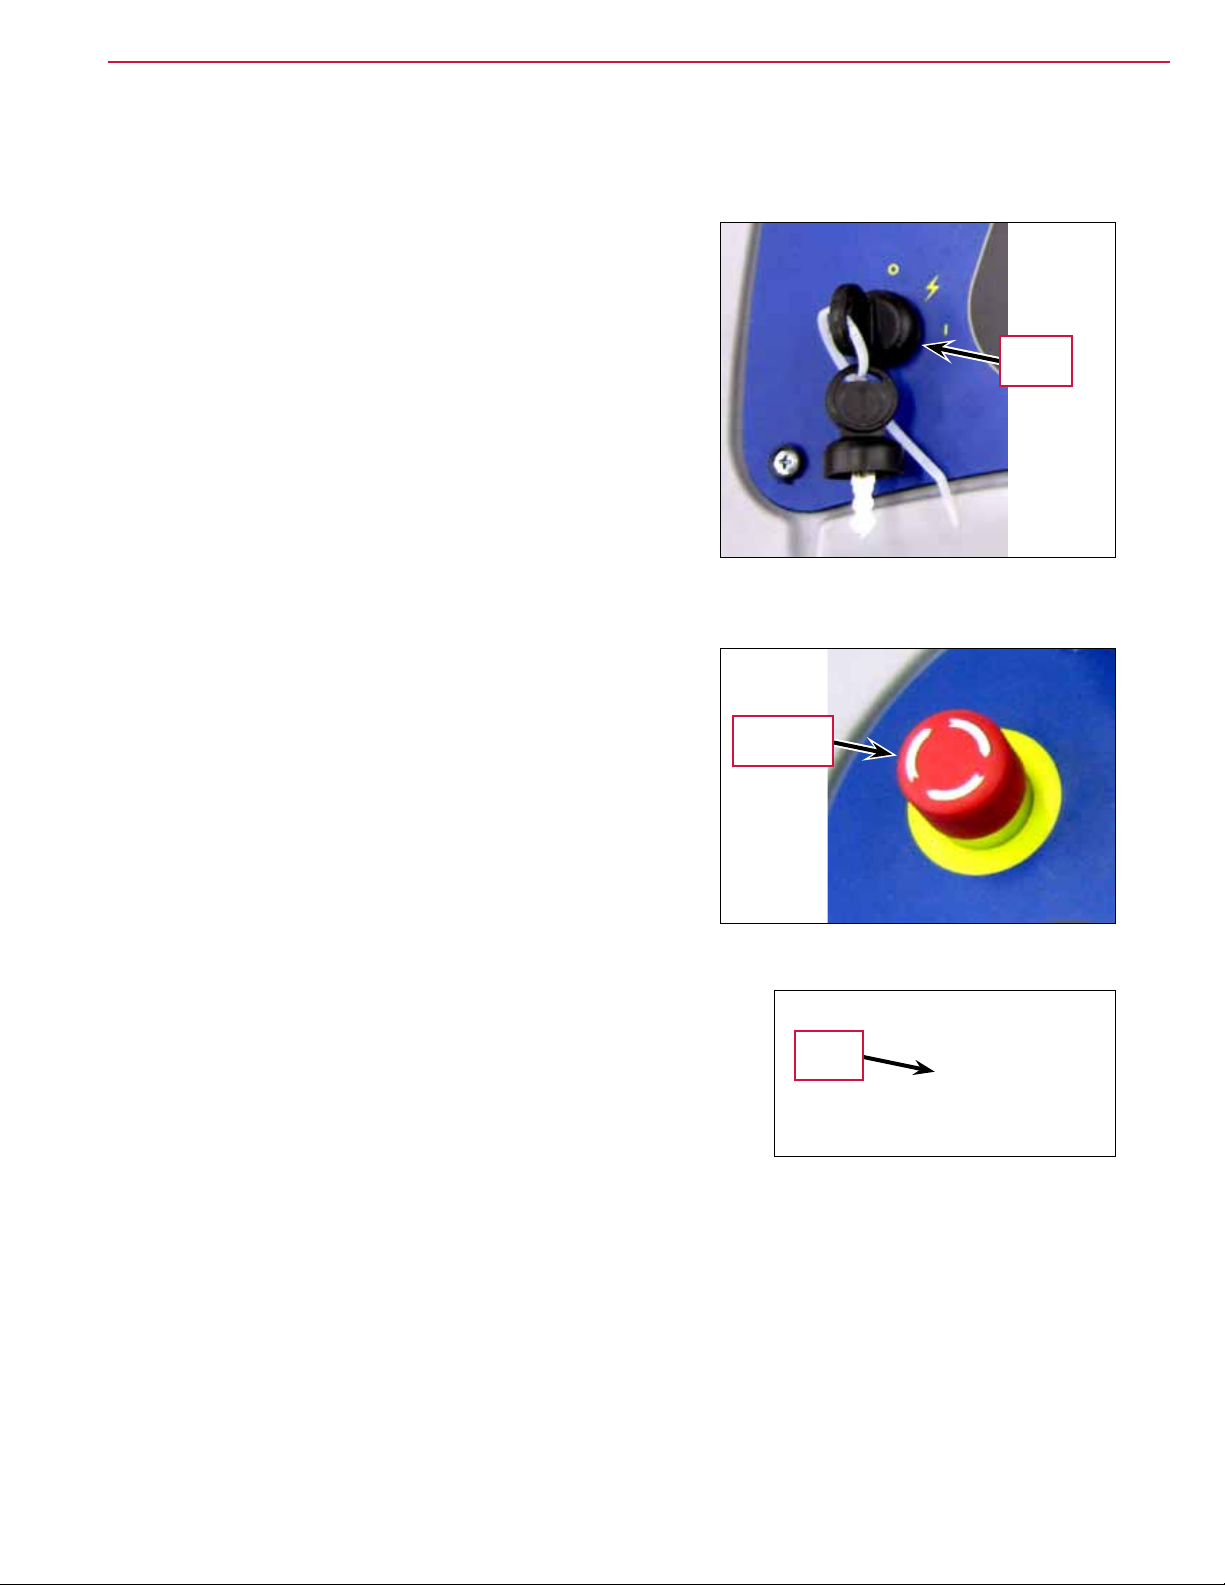
Key Switch, Emergency Stop and Horn Switch
• Key Switch – controls the battery power to the machine.
Note that you must turn the Key Switch to the on (I)
position before stepping onto the machine platform.
General Information 16Service Manual – SC1500
Key
Switch
• Emergency Stop – shuts off all battery power to the
machine when pressed. To reset the Emergency Stop, rotate
the red knob clockwise.
• Horn Switch – sounds the horn when pressed.
Emergency
Stop
Horn
Switch
Page 17
General Information 17Service Manual – SC1500
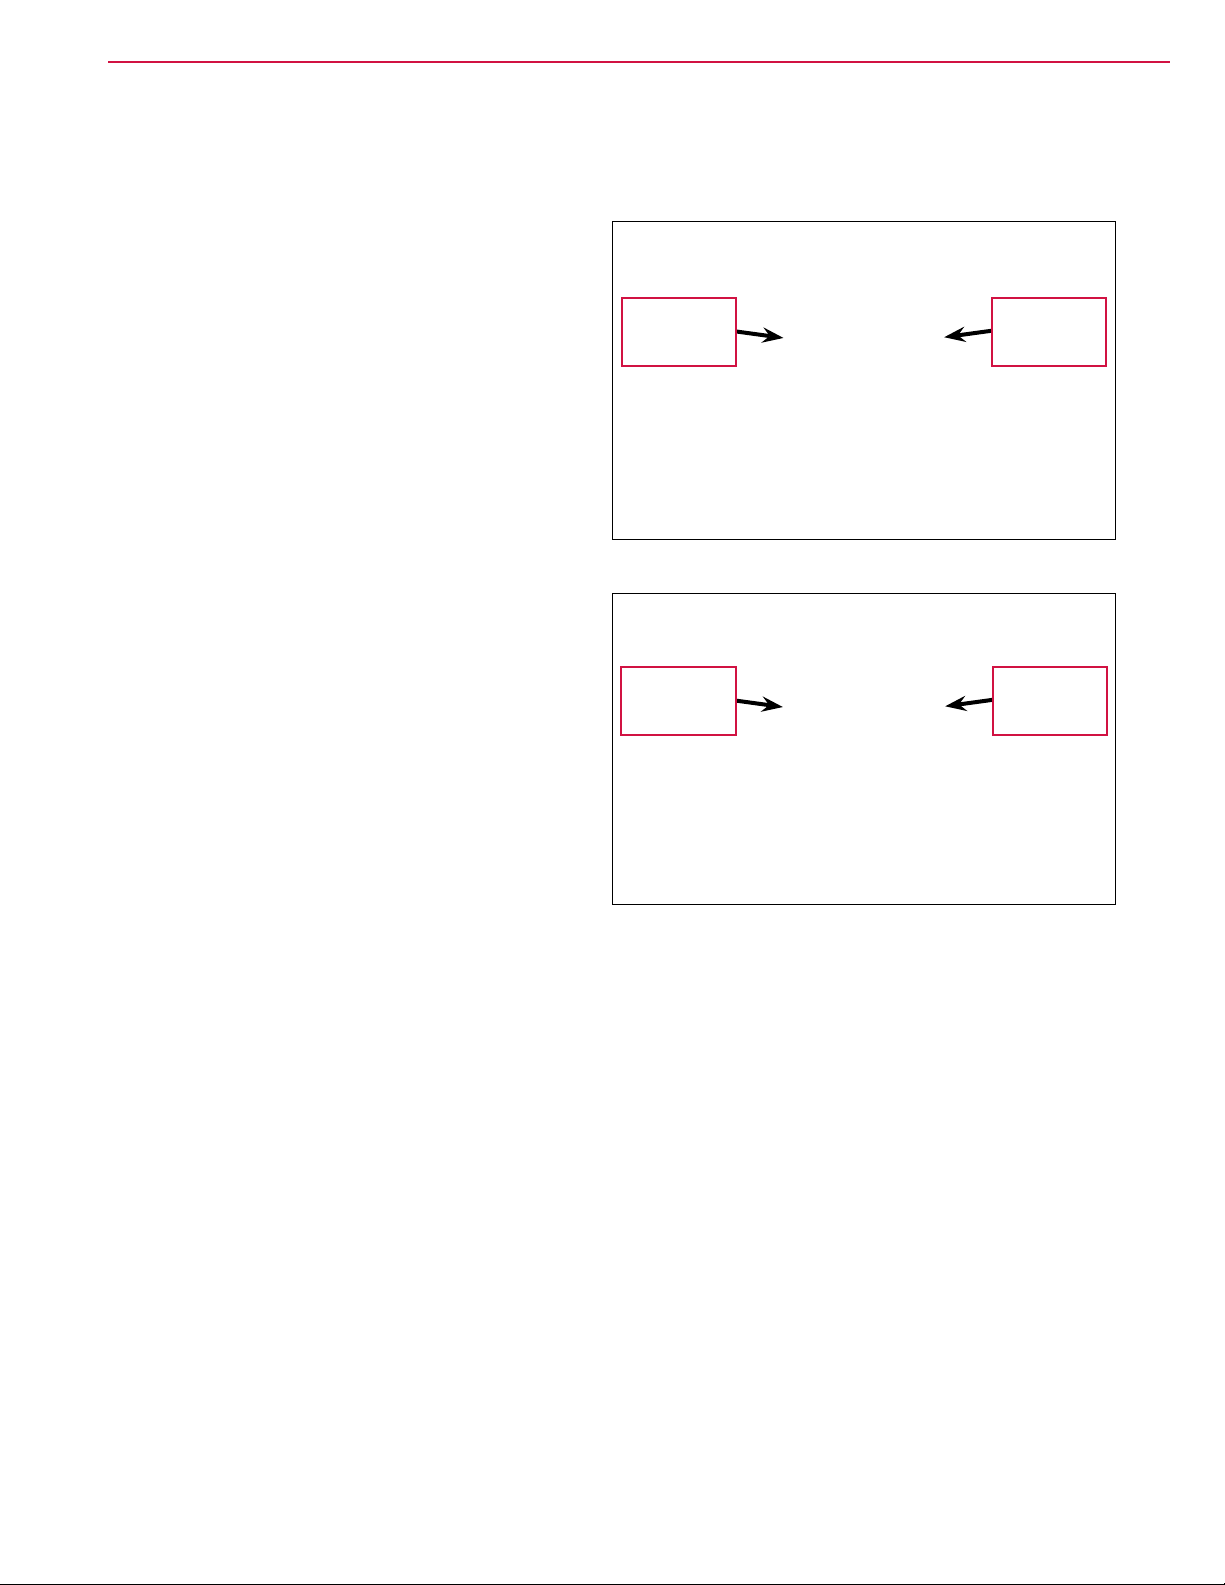
Circuit Breakers
The Circuit Breakers are mounted on the top of the control panel. To reset a Circuit Breaker, press the
corresponding reset button
• 50-amp Circuit Breaker – labeled CB1 in the
Ladder Diagram; controls the positive voltage
to the E1 Curtis 1210 Speed Controller.
• 5-amp Circuit Breaker – labeled CB2 in the
Ladder Diagram; controls the positive voltage
to the key switch and to the battery positive
inputs J3-1 and J3-8 on the A1 Control Board.
• 20-amp Circuit Breaker – labeled CB3 in the
Ladder Diagram; controls the positive voltage
to the contacts on solid state relay K1. Relay
K1 controls the positive voltage to the vacuum
motor, M4.
• 25-amp Circuit Breaker – labeled CB4 in the
Ladder Diagram; controls the positive voltage
to the contacts on relay K2. Relay K2 controls
the positive voltage to the brush motor, M5/M6.
50-amp
Circuit
Breaker CB1
20-amp
Circuit
Breaker CB3
5-amp
Circuit
Breaker CB2
25-amp
Circuit
Breaker CB4
Page 18
General Information 18Service Manual – SC1500
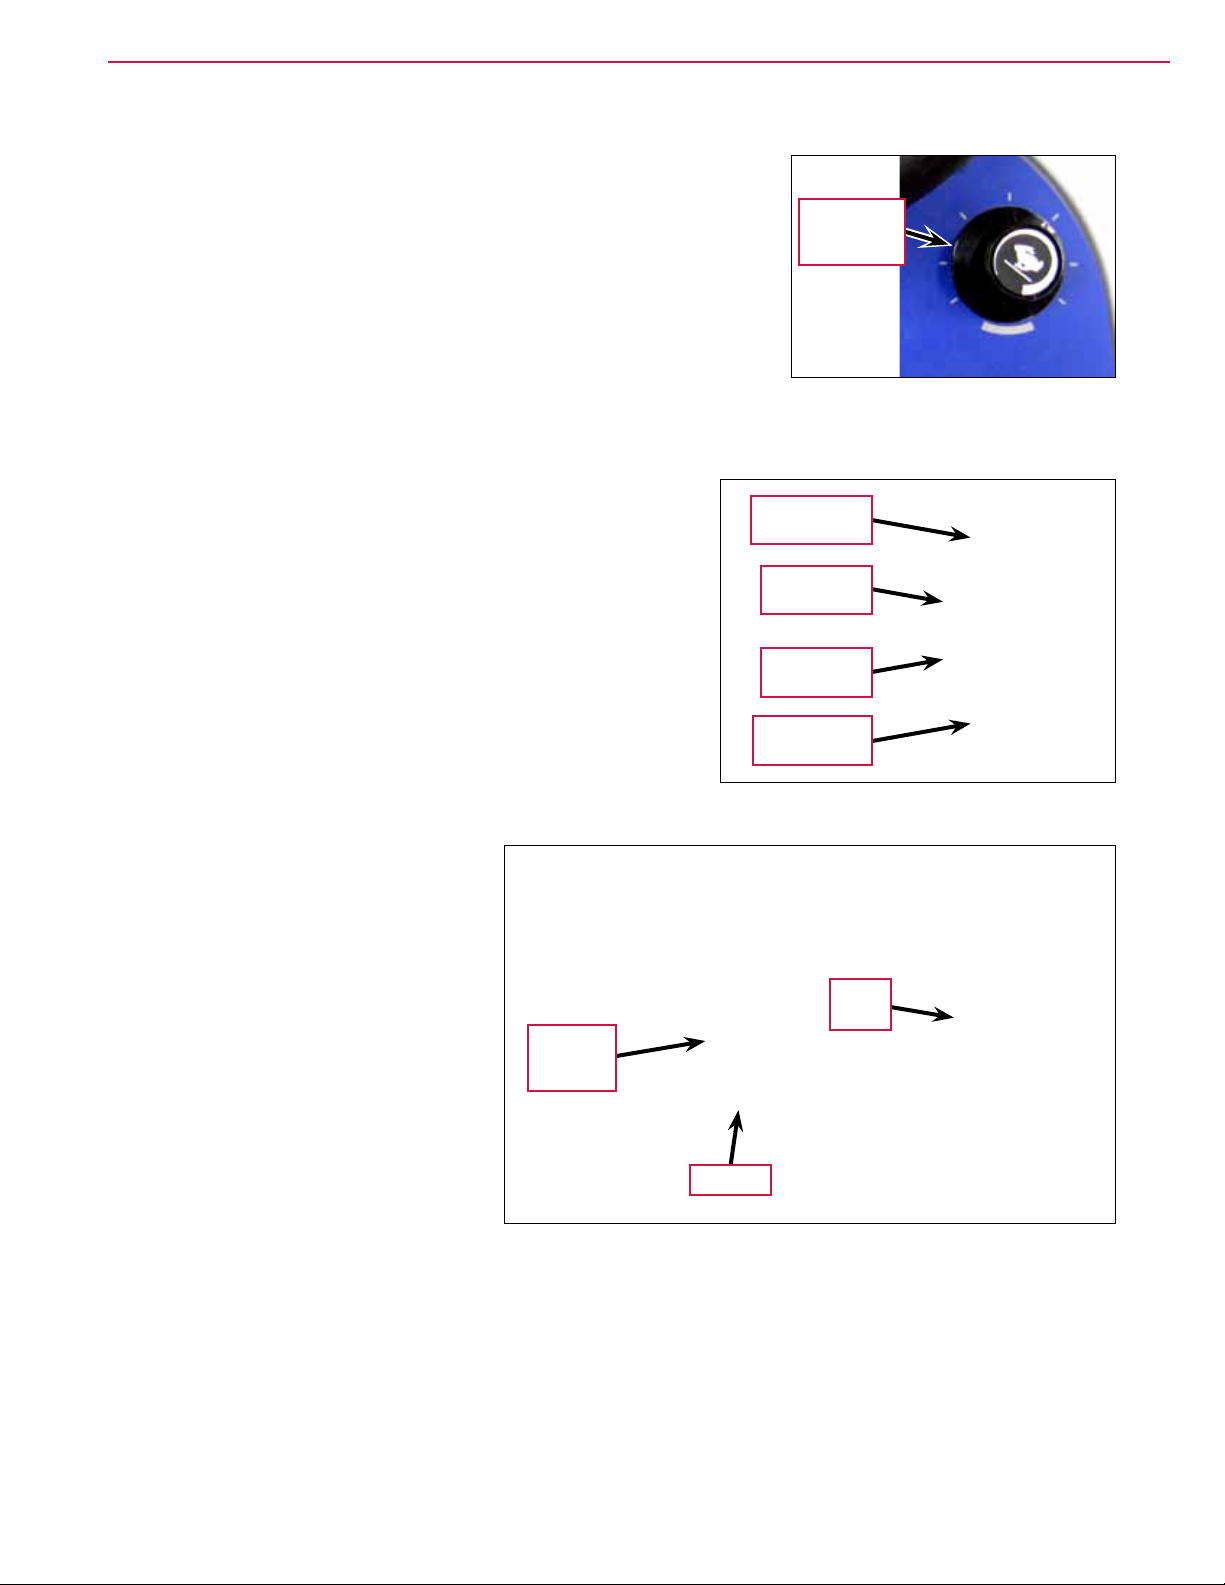
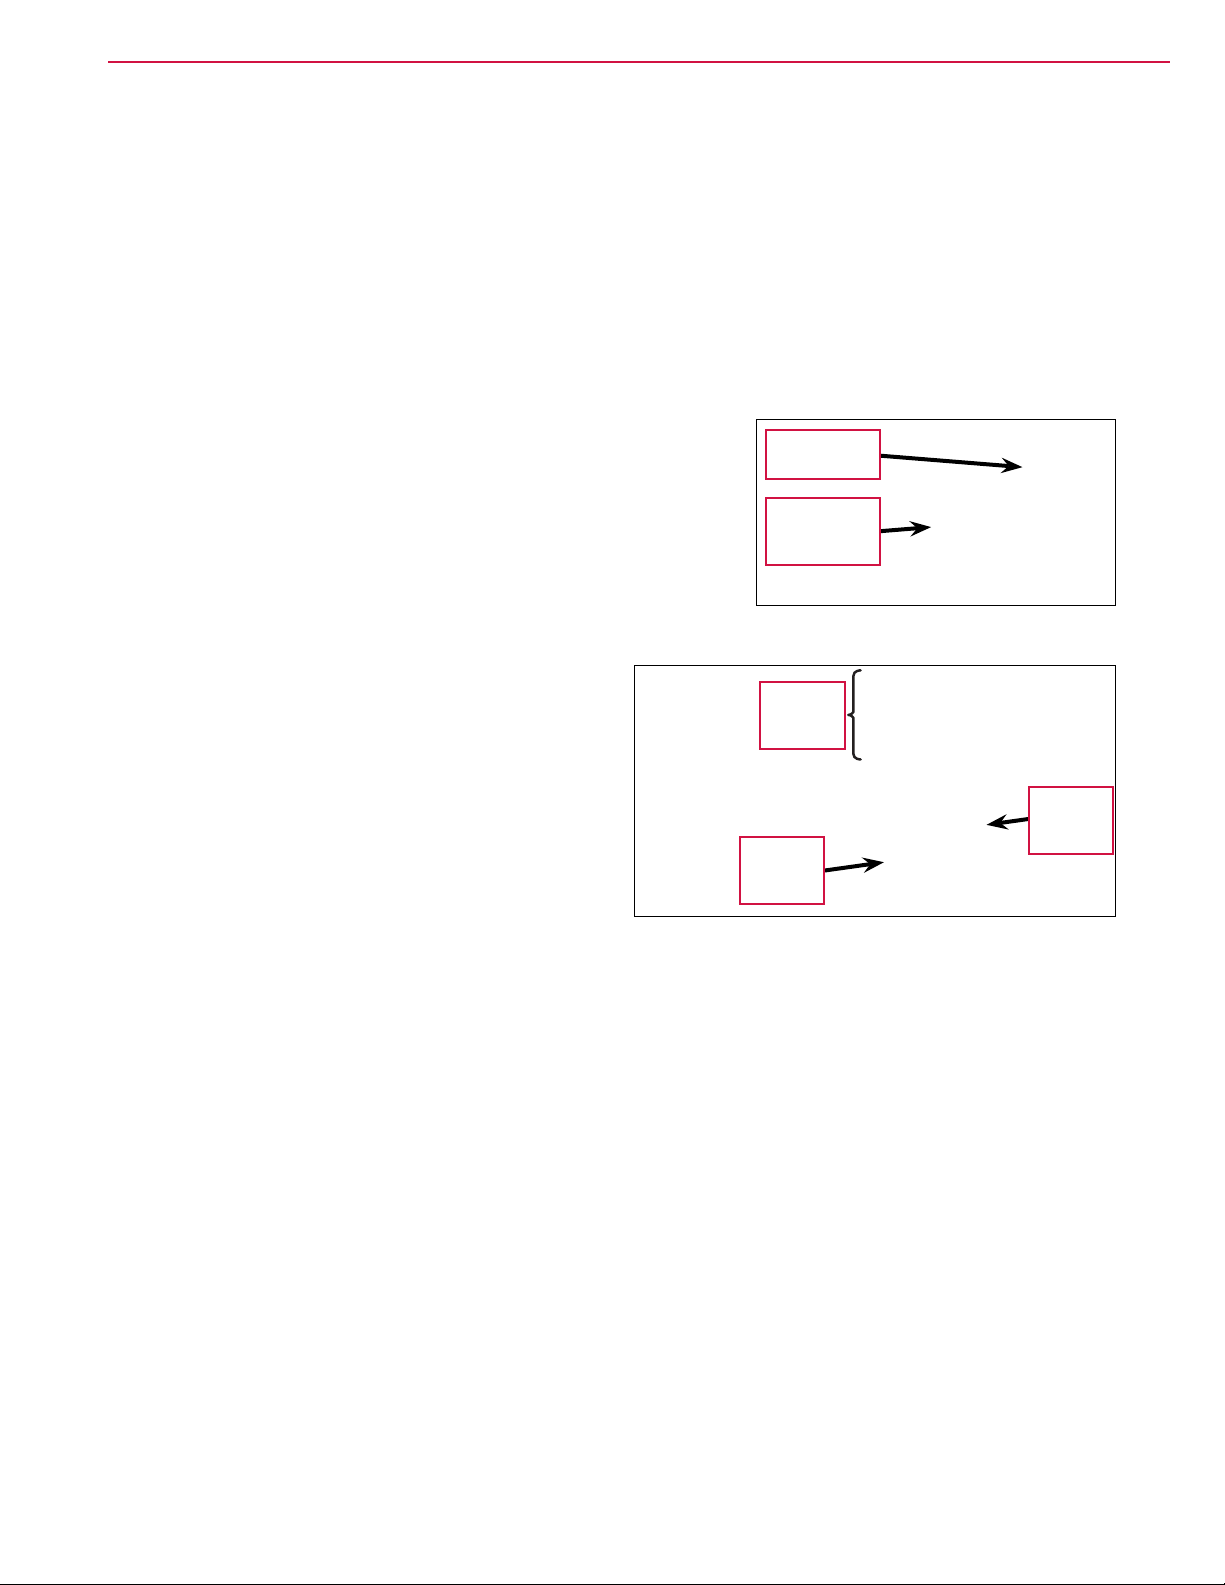
Speed and Direction Controls and Indicators
• The Speed Adjustment Knob – labeled R1 in the Ladder Diagram;
100K potentiometer that controls the machine speed in both
forward and reverse.
• The Forward and Reverse Drive Switches select the direction the machine will move when the Go Pedal is
pressed. The corresponding Drive Indicator will light when a Drive Switch is selected.
– Forward Drive Switch – selects the forward direction.
Forward Drive
– Forward Drive Indicator – lights to indicate that the
Forward Drive Switch has been selected. Note that this
indicator is lighted in the adjacent drawing.
– Reverse Drive Switch – selects the reverse direction.
Speed
Adjustment
Knob R1
Indicator
Forward
Drive Switch
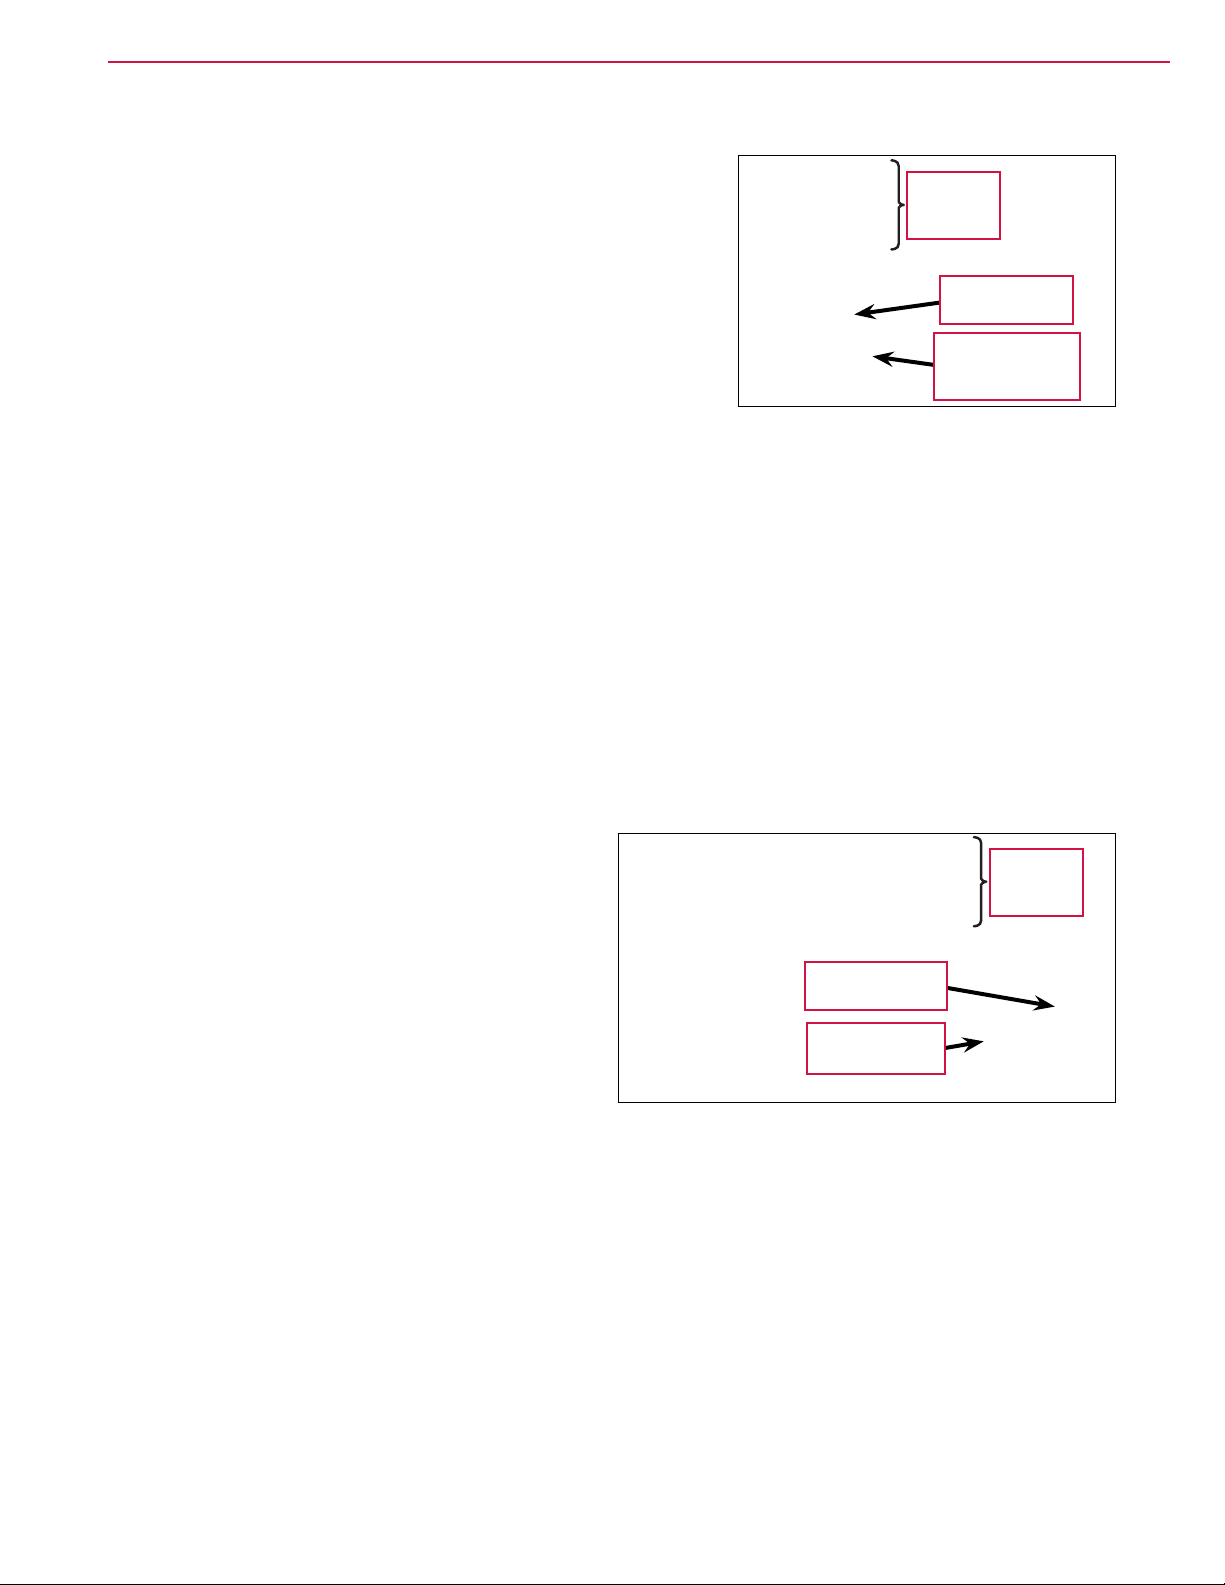
– Reverse Drive Indicator – lights to indicate that the
Reverse Drive Switch has been selected.
• Operator Presence Pedal – ensures
that the Operator is standing on
the Platform before the Go Pedal
will drive the machine forward or
reverse.
• Go Pedal – drives the machine in
the direction selected with the
Forward Drive or Reverse Drive
Switches.
Reverse
Drive Switch
Reverse Drive
Indicator
Go
Pedal
Operator
Presence
Pedal
Platform
Page 19
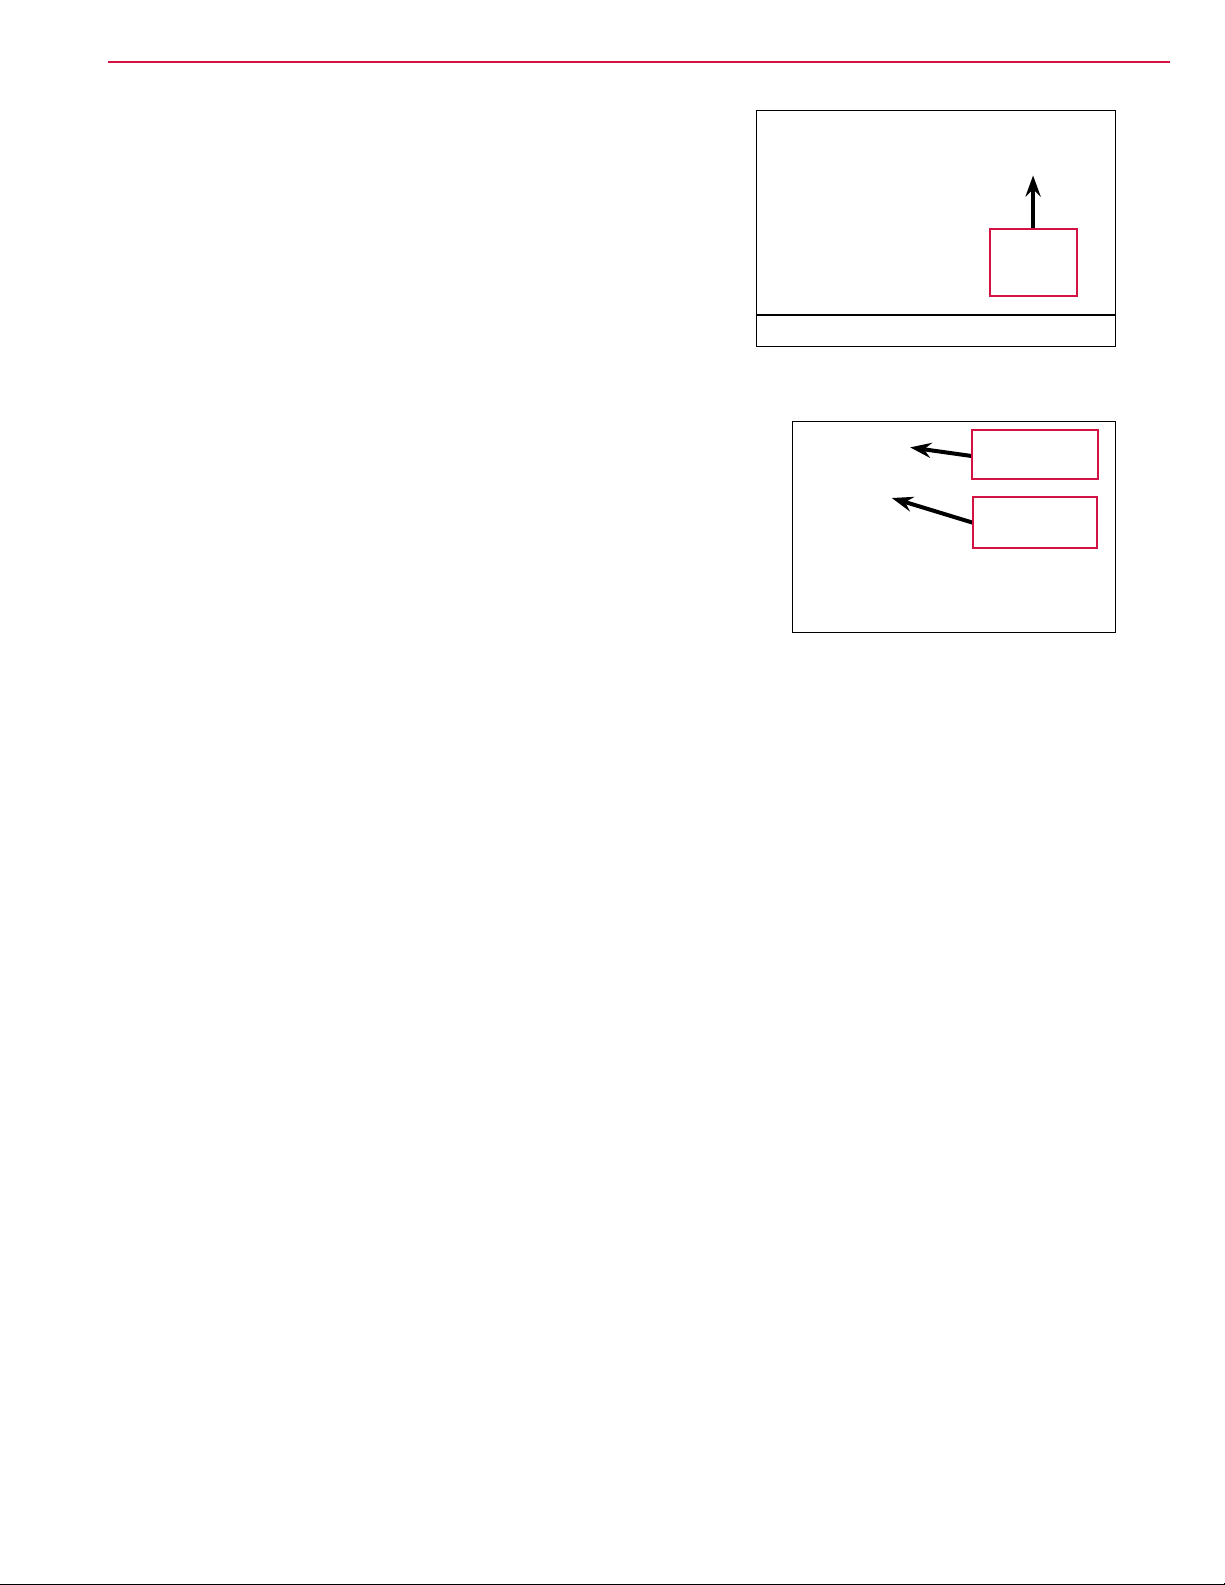
Scrub Controls and Indicators
Note: Thescrubpressure,recoveryvacuumpower,solutionowrateanddetergentstrength
settings that will be in effect when the One-touch™ Scrub On/Off Switch is pressed is
determined by the Save Scrub Settings submenu in the Programming Options.
• IfSAVE SCRUB SETTINGS/YES is selected, the machine will use the scrub settings that
were in use when the key switch was switched off.
• IfSAVE SCRUB SETTINGS/NO is selected, the machine will use the default settings.
(Refer to the Save Scrub Settings subsection in the Control System section.)
General Information 19Service Manual – SC1500
• One-touch
™
Scrub On/Off Switch – lowers the scrub deck and
squeegee to the oor and enables the scrub, vacuum, solution
and detergent systems. The scrub motor, solution system,
detergent pump and vacuum motor will start when you press
the Go Pedal.
• Scrub On/Off Indicator – lights to indicate that the scrub system
is active.
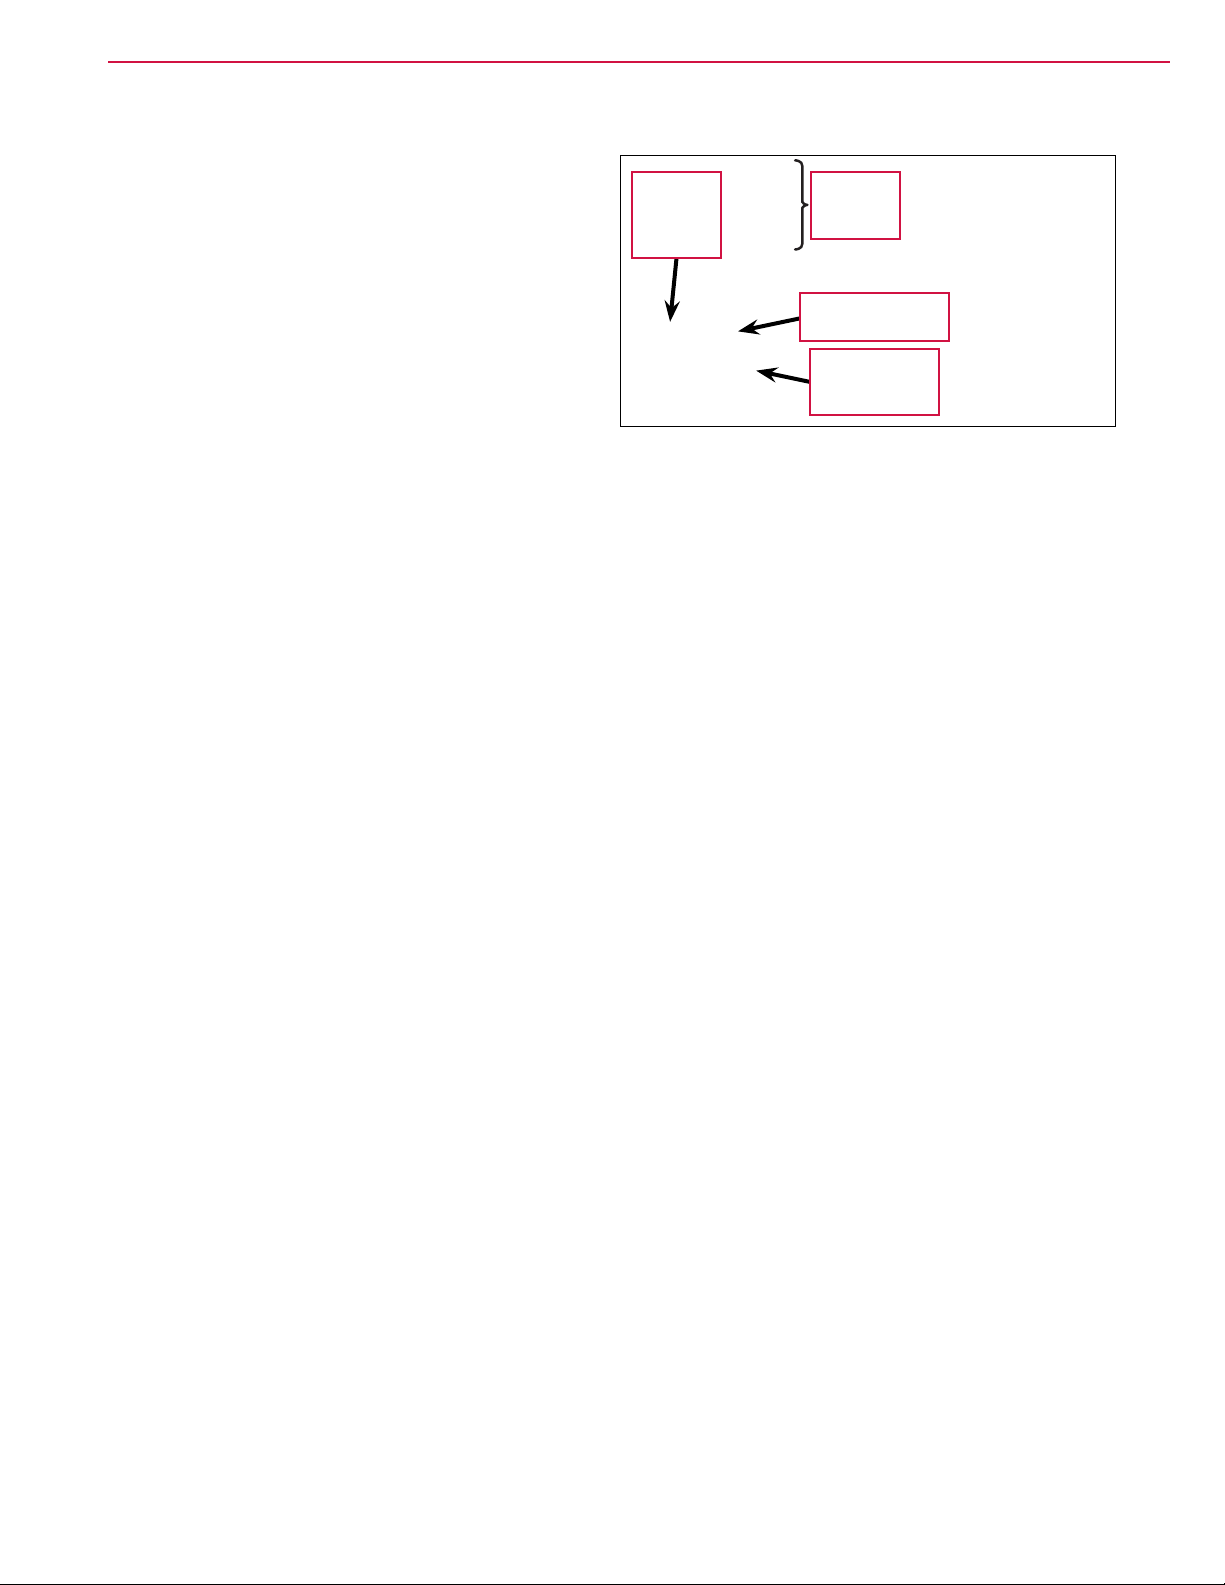
• Extra Pressure Switch – toggles the scrub pressure
between standard pressure (bottom box lled as
shown) and extra pressure (both top and bottom
boxes lled).
• Extra Pressure Indicator – lights to indicate that the
scrub system is active.
• Scrub Brush Pressure Bar Graph – displays the
scrub pressure on the graphic display as follows:
– Bottom box lled – standard scrub pressure (as
shown).
– Top and bottom boxes lled – extra scrub
pressure.
Scrub On/Off
Indicator
One-touch™
Scrub On/Off
Switch
Scrub
Pressure
Bar Graph
Extra
Pressure
Switch
Extra
Pressure
Indicator
Page 20
General Information 20Service Manual – SC1500
Solution Controls and Indicators
• Solution Flow Adjustment Switch – functions as follows:
– When the scrub system is enabled, pressing the Solution
Flow Adjustment Switch
will cycle the solution ow rates
from low (bottom box lled as shown), to medium (bottom
two boxes lled), to high (all three boxes lled), then to off
(no boxes lled).
– When the scrub system is not enabled (machine in
transport mode), pressing and holding the Solution Flow
Adjustment Switch
will dispense solution at the high ow
rate to pre-wet the oor. The solution will continue to
dispense as long as the Solution Flow Adjustment Switch is
pressed.
• Solution On/Off Indicator – lights to indicate that the solution system is active.
• Solution Flow Rate Bar Graph – displays the solution ow rate on the graphic display as follows:
– Bottom box lled – low solution ow rate (as shown).
Solution
Flow Rate
Bar Graph
Solution On/Off
Indicator
Solution
Flow Adjustment
Switch
– Bottom two boxes lled – medium solution ow rate.
– All three boxes lled – high solution ow rate.
– All three boxes empty – solution system off.
Detergent System Controls and Indicators
• Detergent Strength Switch – functions as follows:
– When the scrub system is enabled, pressing
the Detergent Strength Switch will cycle the
detergent ow rate from weak (bottom box
lled as shown), to strong (top and bottom
boxes lled), then to off (no boxes lled).
Detergent On/Off
Indicator
– When the scrub system is not enabled
(machine in transport mode), pressing
and holding the Detergent Strength Switch
Detergent
Strength Switch
and Solution Flow Adjustment Switch
simultaneously will enable the purge mode.
• Detergent On/Off Indicator – indicates that the detergent ow rate is a rate other than zero.
• Detergent Indicator Bar Graph – displays the detergent ow rate, ratio and percentage on the graphic
display as follows:
Detergent
Indicator
Bar Graph
– Bottom box lled – weak detergent ow rate (as shown).
– Top and bottom boxes lled – strong detergent ow rate.
– Both boxes empty – detergent system off.
Page 21
• Detergent Purge Screen – displays the Chemical Purge Icon to
indicate that the detergent purge cycle is active. To start
the purge cycle and display the Detergent Purge Screen, press
and hold the Detergent Strength Switch and the Solution Flow
Adjustment Switch simultaneously for three seconds. The
Detergent On/Off Indicator will ash and the purge cycle will last
for approximately 10 seconds.
Burst of Power Switch and Indicator
General Information 21Service Manual – SC1500
Chemical
Purge
Icon
Detergent Purge Screen
• Burst of Power Switch – temporarily overrides the current machine
settings to increase the machine’s cleaning aggressiveness by
performing the following:
– Increases the scrub pressure from standard pressure to extra
pressure.
Burst of Power
Indicator
Burst of
Power Switch
– Increases the solution ow rate by one level (off to low, low to
medium or medium to high).
– Increases the detergent ow rate to the strong level (off to
weak or weak to strong). Note that this will only happen if the
detergent option is installed.
– Increases the vacuum power from low/quiet to high/standard. Note that the vacuum motor will not
switch from off to low/quiet because of the assumption that if the vacuum is off, the user must be in
double-scrubbing mode and wishes to stay in that mode.
If any one of the functions listed above is already performing at its maximum possible rate, the Burst of
Power Switch
will have no effect on that function but will still affect the other functions. If the detergent
option is not installed, the Burst of Power will not affect detergent ow but will still affect the other
functions.
The Burst of Power mode lasts for a maximum duration of 60 seconds but can be terminated early by
pressing the Information Switch, Burst of Power Switch, Scrub On/Off Switch, Detergent Strength Switch,
Solution Flow Adjustment Switch, Extra Pressure Switch or the Vacuum Power Adjustment Switch.
When the Burst of Power period expires or is terminated, all scrubbing parameters that were changed
return to their original state before the Burst of Power Switch was pressed.
• Burst of Power Indicator – indicates the following:
– The Burst of Power Indicator will be off when the Burst of Power Switch switch is not functional because
it has not been enabled in the Hidden Menu, or because the machine is operating in a mode for which
the Burst of Power option does not apply.
– The Burst of Power Indicator will be solid green when the machine is operating in a reduced/normal
scrubbing mode but the Burst of Power option is available.
– The Burst of Power Indicator will change color from green to yellow and ash for 60 seconds while the
Burst of Power option is active. The Burst of Power Indicator will ash at a rate of 1 Hz for the rst 50
seconds, then at a rate of 2 Hz for the last 10 seconds to indicate that the Burst of Power option is
about to end.
Page 22
Vacuum Power Adjustment Switch and Indicators
• Vacuum Power Adjustment Switch – functions as
follows:
– Pressing the Vacuum Power Adjustment
Switch
while in the scrub mode will cycle
Quiet
Vacuum
Mode
Indicator
the vacuum mode from low/quiet (bottom
box lled as shown), to high/standard (both
top and bottom boxes lled), then to off (no
boxes lled). Note that the vacuum motor
will switch on when the machine is driven
forward. When the machine is driven in
reverse or stops, or if the Vacuum Power
Adjustment Switch
is pressed while the
vacuum motor is running, the vacuum motor
will continue to run for 10 seconds, then
switch off.
Pressing the Vacuum Power Adjustment Switch during this 10-second delay period will shut off the
vacuum motor immediately.
Vacuum
Level Bar
Graph
Standard Vacuum
Mode Indicator
Vacuum Power
Adjustment
Switch
General Information 22Service Manual – SC1500
– When the scrub system is not enabled (machine in transport mode), the Vacuum Power Adjustment
Switch
functions as follows:
◦ Pressing the Vacuum Power Adjustment Switch once will enable the wet vacuuming mode. The
vacuum power will default to the low/quiet mode and the deck actuator will drive the deck to the
“vacuum only” position.
◦ Pressing the Vacuum Power Adjustment Switch a second time will switch the vacuum motor to high/
standard mode.
◦ Pressing the Vacuum Power Adjustment Switch a third time will disable the wet vacuuming mode.
The actuator will immediately raise the deck, and the vacuum motor will turn off after a 10-second
delay.
Note: IftheOne-touch™ Scrub On/Off Switch is pressed while wet vacuuming, the wet vacuuming
mode will be disabled. The scrub deck and vacuum motor control will revert to the standard
scrub mode operation.
• Quiet Vacuum Mode Indicator – indicates that the vacuum motor is in the low/quiet mode.
• Standard Vacuum Mode Indicator – indicates that the vacuum motor is in the high/standard mode.
• Vacuum Level Bar Graph – displays the vacuum motor power mode as follows:
– Bottom box lled – low/quiet mode (as shown).
– Top and bottom boxes lled – high/standard mode.
– Both boxes empty – vacuum motor off.
Page 23
Information Switch
General Information 23Service Manual – SC1500
• Information Switch – displays the Information Screen on the
graphic display. The Information Screen will also be displayed
if a signicant error occurs that results in the shutdown of
some machine system. The graphic display will then display
Hour
Meter
Fault
Codes
the Information screen until next key switch cycle.
The Information Screen shows the Hour Meter, Fault Codes and
the Battery Charge Level Indicator.
• Hour Meter – displays the total number of run hours on the
machine.
• Fault Codes – displays the wrench icon and any active
two-digit fault code. If more than one error exists, the display
will sequence through the error codes at one-second intervals.
(Refer to the Fault Codes subsection in the Control System
Battery
Charge Level
Indicator
Information
Switch
section.)
• Battery Charge Level Indicator – indicates the charge level of the batteries according to the number of lled
“bars” in the battery icon.
– Five solid bars indicates a full battery charge.
– No solid bars (empty battery icon) indicates that the batteries are discharged.
Battery Status and Charger Screens
• Battery Low Voltage Screen – displayed when the battery
voltage drops to approximately 21.75 volts. The graphic
display will alternate between the Battery Status Screen
and the “normal” display at ve-second intervals to alert the
Operator that the batteries need charging and the remaining
battery time is very short.
Note that:
– When the voltage in AGM or Gel batteries drops to 21.75 volts, the A1 Control Board switches off the
scrub motor, solution system and detergent pump, and raises the scrub deck. The vacuum motor can
still remain on.
– When the voltage in AGM or Gel batteries drops to 21.6 volts, the A1 Control Board switches off the
vacuum motor.
– When the voltage in Wet batteries drops to 20.55 volts, the A1 Control Board switches off the scrub
motor, solution system and detergent pump, and raises the scrub deck. The vacuum motor can still
remain on.
– When the voltage in Wet batteries drops to 20.4 volts, the A1 Control Board switches off the vacuum
motor.
Battery Low Voltage Screen
Page 24
• Battery Charger Screen – displayed when AC power is applied
to the onboard charger. Note that this will disable all
machine functions. The Battery Charger Screen displays the
Battery Type and Battery Charge Level Indicator. The Battery
Charge Level Indicator
will display full once the batteries are
done charging.
General Information 24Service Manual – SC1500
Battery
Type
Battery Charge
Level Indicator
Battery Charger Screen
Page 25
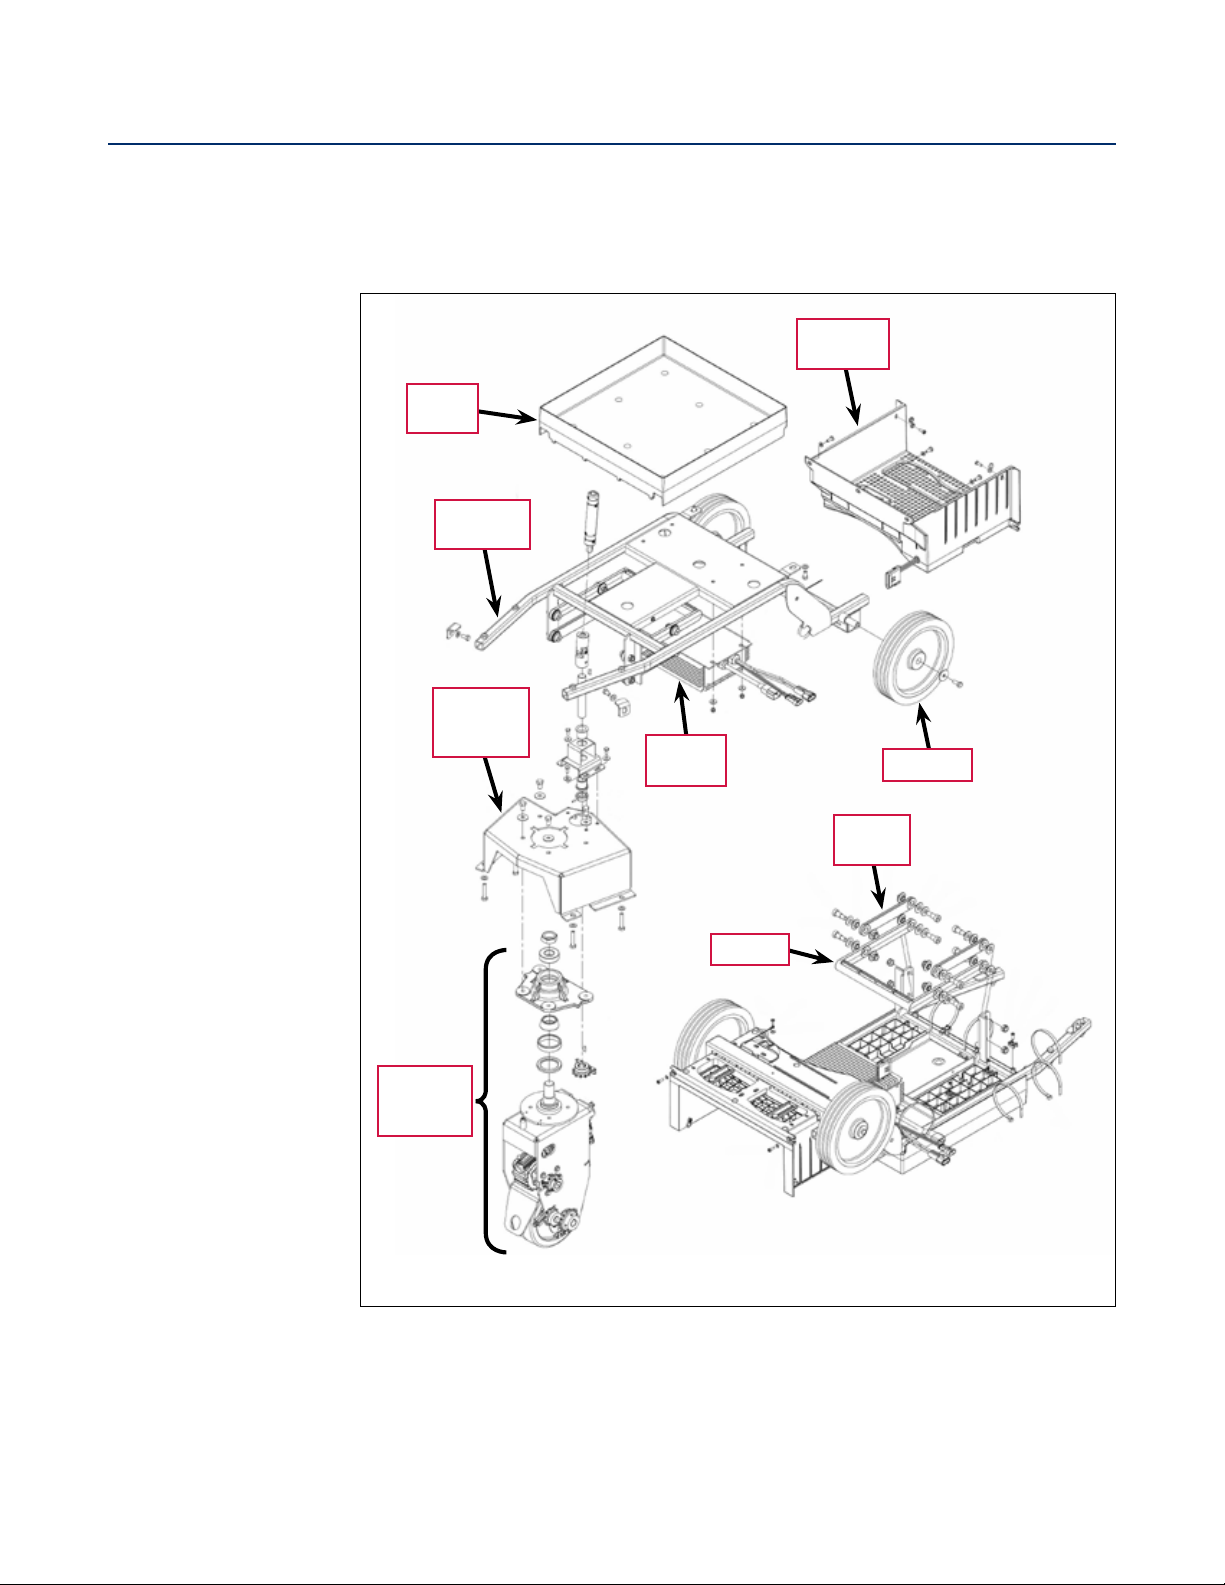
Chassis System
Major Chassis Components
The Chassis System provides the framework on which the machine components are mounted.
The Battery Tray
contains the batteries
and connectors and is
mounted to the top of
the Chassis Weldment.
The Platform Assembly
provides a place for the
Operator to stand and
houses the Operator
Presence Pedal and Go
Pedal.
The Battery Charger
is mounted to the
bottom of the Chassis
Weldment
.
The non-traction
Wheels are held by at
washers and M8 x 20
screws that thread into
the axle in the Chassis
Weldment
.
The Drive Wheel
Assembly
is fastened
to the Spindle Mount
Weldment
which
bolts to the Chassis
Weldment
.
Battery
Tray
Chassis
Weldment
Spindle
Mount
Weldment
Battery
Charger
Link Bar
Platform
Assembly
Wheel (2)
Linkage
Bar (2)
25Service Manual – SC1500
The Link Bar and the
two Linkage Bars are
bolted to vertical
plates on the bottom of
the Chassis Weldment
and support the Scrub
Deck.
Drive
Wheel
Assembly
Page 26
Chassis System 26Service Manual – SC1500
Platform Switches
The Operator Presence Pedal and Go Pedal are mounted on the top of the Platform.
• When the Operator stands on the Platform, he/she presses the Operator Presence Pedal which actuates the
Operator Presence Switch (called the “Deadman Switch S2” in the Wiring Diagram). The Operator Presence
Switch
must be actuated before the Go Pedal will drive the machine forward or reverse.
• When the Operator presses the Go Pedal it actuates the Go Switch to drive the machine in the direction
selected with the Forward Drive or Reverse Drive Switches.
Go Switch
Go Pedal
Operator
Presence
Switch
Platform
Operator
Presence
Pedal
Page 27

Control System
Functional Description
The Control System consists of the A1 Control Board (Main Machine Controller) and the E1 Curtis 1210
Speed Controller.
The A1 Control Board controls the scrubbing and wastewater recovery functions based on Operator requests,
and motion and direction inputs from the E1 Curtis 1210 Speed Controller. The A1 Control Board can store
and display a variety of fault codes to inform the Operator of any machine fault conditions. The A1 Control
Board also supports special modes of operation called the “Programming Mode” and the “Service Test Mode”.
The Programming Mode is used primarily for “telling” the A1 Control Board how the machine is equipped so
that it can operate accordingly. The Service Test Mode allows you to operate various machine components
regardless of current inputs.
The E1 Curtis 1210 Speed Controller controls the drive motor that propels the machine based on Operator
requests. (Refer to the Wheel System, Traction section for more information.)
27Service Manual – SC1500
Page 28
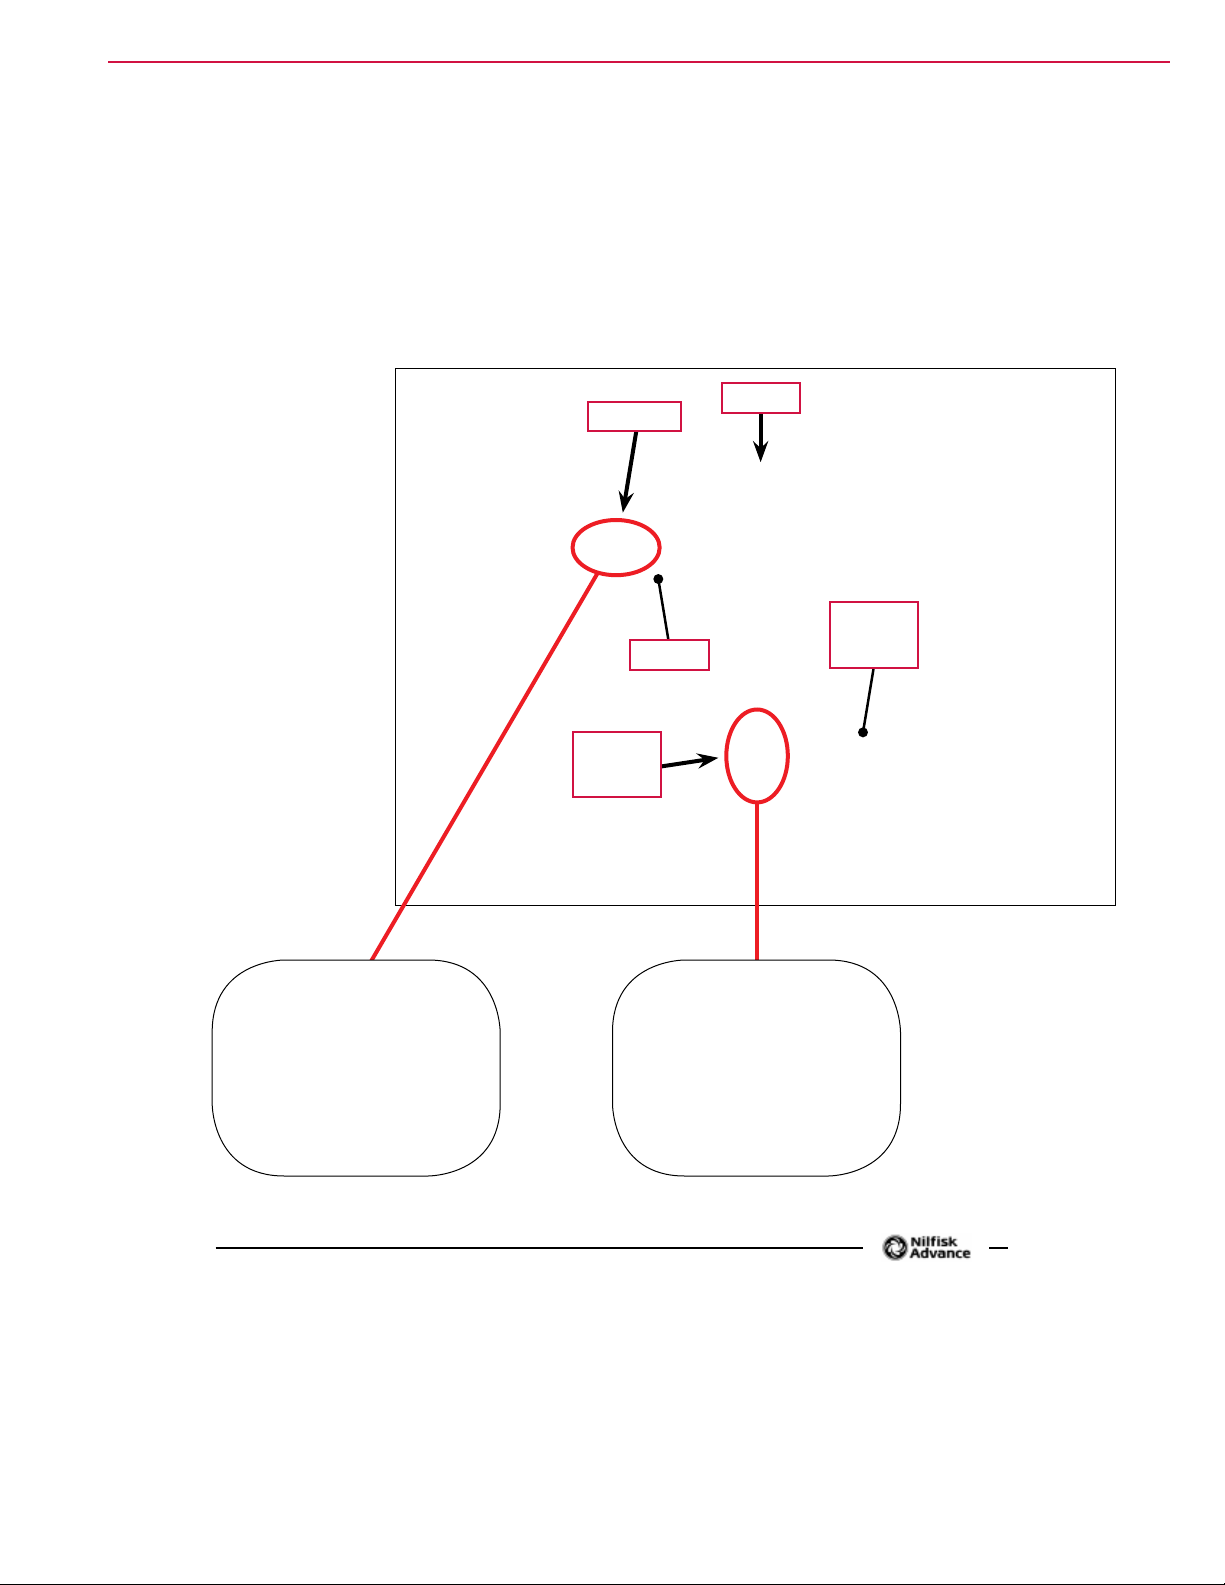
Component Locations
The following components are included in
this section:
• A1 Control Board
• E1 Curtis 1210 Speed Controller
The A1 Control Board is mounted to the
rear of the Interface Panel Assembly.
The E1 Curtis 1210 Speed Controller is
mounted inside of the Control Panel.
Interface
Panel
Assembly
A1 Control
Board
Control System 28Service Manual – SC1500
E1 Curtis
1210 Speed
Controller
Control
Panel
Troubleshooting
Fault Codes
The graphic display will show any error codes detected by
the A1 Control Board on the Information Screen as they
occur. The display will show the wrench icon and the
two-digit fault code number. The example shown here, 03,
is a speed control fault.
If more than one fault exists, the display will sequence through the fault codes at one-second intervals.
If the error is signicant and results in a machine system shutdown, the graphic display will show the
Information Screen until next key switch cycle. Otherwise the Information Screen will be active only when
the Information Switch is pressed.
Page 29

Fault Code Table
Control System 29Service Manual – SC1500
Display
Code
03 Speed Control fault
04 Scrub Deck Actuator overload The Scrub Deck Actuator has drawn more than 4.5 amps.
08 Solution Solenoid overload
09
10
11 Detergent Pump overload
21 Detergent Pump driver fault
24 Deck Actuator driver fault
30 Solution Solenoid open
32 Scrub Deck Actuator open
35 Brush Contactor (K2) coil open
36
37 Detergent Pump open
52
62 Solution Solenoid driver on
63
64
65 Detergent Pump driver stuck on
70 On-board Battery charger fault
Fault Description Conditions Needed to Set the Fault Code
The E1 Curtis Speed Controller is communicating a problem
to the A1 Control Board.
The Solution Solenoid Valve has drawn more than
approximately 1 amp.
Vacuum Contactor (SSR1) coil
overload
Brush Contactor (K2) coil
overload
Vacuum Contactor (SSR1) coil
open
Scrub Deck Actuator position
fault
Brush Contactor (K2) driver
stuck on
Vacuum Contactor (SSR1) driver
stuck on
The Vacuum Contactor has drawn more than approximately
1 amp.
The Brush Contactor has drawn more than approximately 1
amp.
The Detergent Pump has drawn more than approximately 1
amp.
The driver IC for the Detergent Pump is reporting a fault;
current limiting or shutdown is in effect due to either a
detected over-current or over-temperature condition.
The driver IC for the Deck Actuator is reporting a fault;
current limiting or shutdown is in effect due to either a
detected over-current or over-temperature condition
The measured current was below the minimum value while
the Solution Solenoid should have been on.
The measured current never exceeded the minimum
threshold while moving from one deck position to another
(only valid when the target position and the starting position
switch states should be different).
The measured current was below the minimum value while
the Brush Contactor should have been on.
The measured current was below the minimum value while
the Vacuum Contactor should have been on.
The measured current was below the minimum value while
the Detergent Pump should have been on.
The measured current was greater than or equal to the
minimum threshold value while the deck was moving, but the
software timed out looking for the new position (never saw
the actuator switch states read the target values).
The measured current was above the minimum value while
the Solution Solenoid driver should have been off.
The measured current was above the minimum value while
the Brush Contactor driver should have been off.
The measured current was above the minimum value while
the Vacuum Contactor driver should have been off.
The measured current was above the minimum value while
the Detergent Pump driver should have been off.
An error has been generated via the serial communications
between the charger and the A1 Control Board due to an
incorrect charging prole code being repeatedly sent by the
charger, or the bit timing being severely out of spec.
Page 30

System Disabled by Fault Codes
Control System 30Service Manual – SC1500
Disable System Flash Indicator
Motor
Display Code
Fault Description
03 Speed Control fault x
04 Scrub Deck Actuator overload x x x x x
08 Solution Solenoid overload x x x
09 Vacuum Contactor (SSR1) coil
overload
10 Brush Contactor (K2) coil
overload
11 Detergent Pump overload x x
21 Detergent Pump driver fault x x
24 Deck Actuator driver fault x x x x
30 Solution Solenoid open x x x
32 Scrub Deck Actuator open x x x x
35 Brush Contactor (K2) coil
open
36 Vacuum Contactor (SSR1) coil
open
37 Detergent Pump open x x
52 Scrub Deck Actuator position
fault
62 Solution Solenoid stuck closed x
63 Brush Contactor (K2) coil
stuck closed
64 Vacuum Contactor (SSR1) coil
stuck closed
65 Detergent Pump stuck closed x
70 On-board Battery charger fault
Disable Detergent
x x x x x x
x x x x x
x x x x x
x x x x x x
x x x x
x x x x x
Disable Solution
Disable Brush
Disable Recovery
Scrub Deck
Vacuum Motor
Actuator Disable
x
Detergent Indicator
Indicator
Brush Motor
Solution Indicator
Vacuum Indicator
Page 31

Control System 31Service Manual – SC1500
Service Test Mode
The Service Test Mode allows you to switch the individual electrical system components on and off
independent of the normal Operator inputs. This serves as a “shortcut” when troubleshooting the machine
systems.
Note: Once you’ve selected the Service Test Mode from the Hidden Menu,
the only way to exit the Service Test Mode is to press the Scrub On/
Off Switch six times or turn the key switch off.
To Access the Service Test Mode
1. Display the main menu. (Refer to the Programming Options/To Access the Main Menu subsection.)
2. Press the Forward (up) or Reverse (down) Drive Switches to scroll
through the PROGRAMMING OPTIONS menu until the display shows
PROGRAMMING OPTIONS / 16. SERVICE TEST MODE.
3. Press the Burst Of Power Switch to enter the Service Test Mode.
The display will show the Service Test Mode submenu.
PROGRAM OPTIONS
16. SERVICE TEST MODE
SPD: N 26.5 BRU: OFF
REV: OFF VAC: OFF
INH: ON E00 SOL: OFF
DEK: UP CP: OFF
Page 32

Control System 32Service Manual – SC1500
Service Test Mode Functions
The control panel switches are used to control various A1 Control Board output functions. The table below
lists the control panel switches, and their corresponding Service Test Mode functions and displays:
Control Panel Switch Service Test Mode Function Graphic Display Descriptions
Forward
Drive
Switch
The Forward Drive Switch enables the machine
to drive forward. The blue LED indicator will be
lit when the Switch is active. For the machine
to move forward, the Emergency Stop must be
reset, the Operator Presence Pedal must be
pressed and the Go Pedal must be pressed.
Note that the Inhibit (
INH) output must be off
(via the Information Switch – see below).
SPD: F 26.5 BRU: OFF
REV: OFF VAC: OFF
INH: ON E00 SOL: OFF
DEK: UP CP: OFF
• SPD: – indicates the drive
controller state. In this
case it would display F for
forward.
• The three digits display the
battery voltage (26.5 volts in
this example).
Reverse
Drive
Switch
The Reverse Drive Switch enables the
machine to drive in reverse. The blue LED
indicator will be lit when the Switch is active.
For the machine to move backward, the
Emergency Stop must be reset, the Operator
Presence Pedal must be pressed and the Go
Pedal must be pressed. Note that the Inhibit
(
INH) output must be off (via the Information
Switch – see below).
SPD: R 26.5 BRU: OFF
REV: ON VAC: OFF
INH: ON E00 SOL: OFF
DEK: UP CP: OFF
• SPD: – indicates the drive
controller state. In this
case it would display R for
reverse.
• The three digits display the
battery voltage (26.5 volts in
this example).
• REV: – indicates that the
reverse output is ON.
Information
Switch
Pressing the Information Switch toggles the
Inhibit output (
INH) from the A1 Control Board
to the E1 Curtis Speed Controller ON and OFF.
Note that INH must be OFF in order to test the
forward and reverse drive in the Service Test
Mode.
SPD: R 26.5 BRU: OFF
REV: ON VAC: OFF
INH: ON E00 SOL: OFF
DEK: UP CP: OFF
• INH: – indicates the state
of the inhibit signal. In this
case the inhibit signal is ON.
• E(NN) – displays any active
fault codes.
Extra
Pressure
and Horn
Switches
Pressing the Extra Pressure Switch scrolls
the
DEK: eld through the four available deck
positions:
• UP – raised (transport) position
• VAC – vacuum-only (wet vacuuming) position
• LOW – standard scrub pressure position
SPD: R 26.5 BRU: OFF
REV: ON VAC: OFF
INH: ON E00 SOL: OFF
DEK: UP CP: OFF
DEK: – indicates the scrub
deck position. In this case
the deck would be in the UP
(transport) position.
• HI – extra scrub pressure position
Pressing the Horn Switch will move the deck
to the selected position. Note that the Extra
Pressure Switch is locked out while the deck is
moving. The DEK: line will be highlighted and
inverted.
Page 33

Control System 33Service Manual – SC1500
Control Panel Switch Service Test Mode Function Graphic Display Descriptions
Scrub
On/Off
Switch
Pressing the Scrub On/Off Switch toggles the
brush motor contactor and scrub deck motor
ON and OFF.
SPD: R 26.5 BRU: OFF
REV: ON VAC: OFF
INH: ON E00 SOL: OFF
DEK: UP CP: OFF
BRU: – indicates the state of
the brush motor. In this case
the motor would be OFF.
Vacuum
Power
Adjustment
Switch
Pressing the Vacuum Power Adjustment Switch
scrolls the Solid State Relay (SSR1) and
Vacuum Motor among the three states:
OFF
(0V), LOW (16.8V) and HI (battery voltage).
SPD: R 26.5 BRU: OFF
REV: ON VAC: OFF
INH: ON E00 SOL: OFF
DEK: UP CP: OFF
VAC: – indicates the state of
the vacuum motor. In this case
the motor would be OFF.
Solution
Flow
Adjustment
Switch
Pressing the Solution Flow Adjustment Switch
toggles the solution solenoid
ON and OFF.
When the solenoid is ON it will operate at 50%
duty cycle (1 cycle = 3 seconds ON, 3 seconds
OFF).
SPD: R 26.5 BRU: OFF
REV: ON VAC: OFF
INH: ON E00 SOL: OFF
DEK: UP CP: OFF
SOL: – indicates the state of
the solution solenoid. In this
case the solenoid would be
OFF.
Detergent
Strength
Switch
Pressing the Detergent Strength Switch toggles
the Detergent Pump
ON and OFF. When the
Detergent Pump is ON, the Pump will be driven
at a rate equivalent to 1:128 (0.8%).
SPD: R 26.5 BRU: OFF
REV: ON VAC: OFF
INH: ON E00 SOL: OFF
DEK: UP CP: OFF
CP: – indicates the state of the
detergent (chemical) pump. In
this case the pump would be
OFF.
To Exit the Service Test Mode
To exit the Service Test mode, press the Scrub On/Off Switch six times or turn the key switch off.
Programming Options
The SC1500 graphic display has two “layers” of hidden menus that allow you to view and change the various
programmable machine congurations, system settings and parameters. The top “layer” is the main menu
from which you can navigate to the 20 submenus. The second “layer” is the submenus that display the
programmable options. These submenus are the screens on which you can change the congurations and
settings.
Page 34

Control System 34Service Manual – SC1500
To Access the Main Menu
1. Turn the key switch to the Off position. (If the optional on-board battery charger is installed, it must be
unplugged from the AC power).
2. Press and hold in the Solution Flow Adjustment Switch and Extra Pressure
Switch simultaneously.
3. While holding both switches, turn the key switch to the On position.
4. Continue to hold both switches for at least two seconds until the
display shows PROGRAMMING OPTIONS / 1. DECK TYPE in the main
PROGRAM OPTIONS
1. DECK TYPE
menu.
5. Release both switches.
6. Press the Forward (up) or Reverse (down) Drive Switches to scroll through the links in
the main menu.
The main menu contains the following links to the corresponding programming option
submenus:
1. DECK TYPE
2. LOW VOLTAGE CUTOUT
3. BATTERY CHARGER
4. BURST OF POWER
5. DETERGENT OPTION
6. DETERGENT RATE BIAS
7. OPEN FAULT DETECT
8. DISPLAY REV LEVEL
9. LOCKOUT BRUSH
10. LOCKOUT SOLUTION
11. BACKUP ALARM VOL
12. FWD ALARM VOL
13. HORN VOL
14. RESTORE DEFAULTS
15. FAULT RECALL
16. SERVICE TEST MODE
17. XTRA INFO ON DISPLAY
18. FROZEN PARAMETERS
19. PANEL TEST
20. SAVE SCRUB SETTINGS
Service Note: The A1 Control Board will automatically display the main menu upon machine
power-up if no scrub deck has been selected and saved in the DECK TYPE submenu.
This will occur when a new Control Board is installed into a machine, or the
RESTORE DEFAULTS has been performed. The purpose of this is to prompt the
Operator to select the appropriate deck type before using the Control Board in
the machine. Once the deck type has been selected, the controller will no longer
automatically display the main menu at machine power-up.
Page 35

To Access a Submenu from the Main Menu
1. Press the Forward (up) or Reverse (down) Drive Switches to scroll through the links in
the main menu.
2. To display the selected submenu(s) for the displayed main menu link, press the Burst of
Power Switch.
To Change a Programmable Option in a Submenu
1. Press the Forward (up) or Reverse (down) Drive Switches to scroll through the available
programming options in the submenu(s).
Control System 35Service Manual – SC1500
2. When the desired programming option submenu is displayed, press the Scrub On/Off
Switch. This will enter the displayed programming option and return to the main menu
link.
Deck Type
The SC1500 can be equipped with two different deck options. The 1. DECK
TYPE
submenus allow you to specify the type of deck installed in your
machine. Note that the type of deck selected congures the solution ow
rate settings corresponding to the deck type.
PROGRAM OPTIONS
1. DECK TYPE
PROGRAM OPTIONS
DECK TYPE
20 INCH / 51 CM DISC
PROGRAM OPTIONS
DECK TYPE
20 INCH / 51 CM REV
Page 36

Low Battery Voltage Cutout
Control System 36Service Manual – SC1500
The purpose of the low battery voltage cutout is to help prolong battery
life. The A1 Control Board will raise the deck, and switch off the brush
and vacuum motors, solution solenoid valve and detergent pump
automatically when the batteries discharge to the selected cutout level.
The 2. LOW VOLT CUTOUT submenus allow you to select the voltage cutout
level for the type of battery installed in your machine:
• The standard cutout setting for wet cell/lead acid batteries is 20.55
volts (80% discharged or 20% charge remaining).
• The alternate cutout setting for gel/maintenance free batteries is 21.75
volts (70% discharged or 30% charge remaining).
The default setting is WET BATTERY 80% / LVC=20.55V.
Battery Charger
The 3. BATTERY CHARGER submenus allow you to specify the battery type
in your machine so the on-board charger will use the charging algorithm
that is compatible with the battery type. If your machine is not equipped
with an onboard charger, select NONE (the default setting).
PROGRAM OPTIONS
2. LOW VOLT CUTOUT
PROGRAM OPTIONS
LOW VOLT CUTOUT
WET BATTERY 80%
LVC=20.55V
PROGRAM OPTIONS
LOW VOLT CUTOUT
MAIN FREE BATTERY 70%
LVC=21.75V
PROGRAM OPTIONS
3. BATTERY CHARGER
PROGRAM OPTIONS
BATTERY CHARGER
NONE
PROGRAM OPTIONS
BATTERY CHARGER
WET 25A
PROGRAM OPTIONS
BATTERY CHARGER
AGM DISCOVER 25A
PROGRAM OPTIONS
BATTERY CHARGER
GEL EXIDE 25A
PROGRAM OPTIONS
BATTERY CHARGER
GEL-AGM 25A
PROGRAM OPTIONS
BATTERY CHARGER
WET 15A
PROGRAM OPTIONS
BATTERY CHARGER
AGM FULLRIVER 25A
Page 37

Burst Of Power Operation
Control System 37Service Manual – SC1500
The 4. BURST OF POWER submenus allow you to enable or disable the
burst-of-power function. When the burst-of-power function is enabled
(YES), pressing the Burst Of Power Switch while scrubbing will attempt
to make a temporary increase in the solution ow rate, brush pressure,
vacuum level and detergent ow rate.
The default setting is NO.
Detergent (EcoFlex™) Option
The 5. ECOFLEX INSTALLED submenus allow you to enable or disable the
detergent system.
• If the menu setting is YES, the controller will expect a Detergent
Pump to be installed. If no Detergent Pump is installed, eventually the
Control Board could generate an error code.
• If the menu setting is NO, the Detergent Strength Switch has no
effect on machine operation, and the graphic display will not show
the Detergent Indicator Bar Graph. Note that if the machine has a
detergent system installed, it will not work when the menu setting NO
is selected.
PROGRAM OPTIONS
4. BURST OF POWER
PROGRAM OPTIONS
BURST OF POWER
NO
PROGRAM OPTIONS
BURST OF POWER
YES
PROGRAM OPTIONS
5. ECOFLEX INSTALLED
PROGRAM OPTIONS
ECOFLEX INSTALLED
NO
PROGRAM OPTIONS
ECOFLEX INSTALLED
YES
The default setting is NO.
Chemical Rate Bias
The 6. CHEMICAL RATE BIAS submenus allow you to increase or decrease
the detergent/chemical mix rate by 10 percent to achieve a higher or
lower mix concentration than the selected programmed ratio.
• The -10% LESS CHEMICAL
setting will increase
the wait time
between Detergent Pump delivery pulses 10 percent to decrease
detergent ow.
• The +10% MORE CHEMICAL
setting will decrease
the wait time
between Detergent Pump delivery pulses 10 percent to increase
detergent ow.
Note that the 6. CHEMICAL RATE BIAS submenus only have an effect if the
ECOFLEX INSTALLED / YES option is selected (see above).
The default setting is NONE.
PROGRAM OPTIONS
6. CHEMICAL RATE BIAS
PROGRAM OPTIONS
CHEMICAL RATE BIAS
NONE
PROGRAM OPTIONS
CHEMICAL RATE BIAS
-10% LESS CHEMICAL
PROGRAM OPTIONS
CHEMICAL RATE BIAS
+10% MORE CHEMICAL
Page 38

Open Fault Detect
Control System 38Service Manual – SC1500
Normally, the A1 Control Board will perform checks of the electrical
system during operation. If a fault occurs in a particular system,
that system (and possibly others) will be shut down. This can make
troubleshooting the system difcult. The 7. OPEN FAULT DETECT
submenus allow service personnel to disable all of the open circuit faults
to facilitate troubleshooting. Note that selecting OPEN FAULT DETECT /
OFF
will not disable the over-current protection on any of the systems.
The default setting is OFF.
Display Rev Level
The 8. DISPLAY REV LEVEL submenu displays the revision level of the
software in the A1 Control Board. This revision level is a parameter hardcoded in the software.
PROGRAM OPTIONS
7. OPEN FAULT DETECT
PROGRAM OPTIONS
OPEN FAULT DETECT
OFF
PROGRAM OPTIONS
OPEN FAULT DETECT
ON
PROGRAM OPTIONS
8. DISPLAY REV LEVEL
PROGRAM OPTIONS
DISPLAY REV LEVEL
REV A
Lock Out Brush Pressure
The 9. LOCKOUT BRUSH submenus allow you to lock out the low or high
scrub pressure settings. The Operator will not be able to select a scrub
pressure setting that is locked out.
The default setting is NONE.
PROGRAM OPTIONS
9. LOCKOUT BRUSH
PROGRAM OPTIONS
LOCKOUT BRUSH
NONE
PROGRAM OPTIONS
LOCKOUT BRUSH
LOW
PROGRAM OPTIONS
LOCKOUT BRUSH
HIGH
Page 39

Lock Out Solution Flow Rate
Control System 39Service Manual – SC1500
The 10. LOCKOUT SOLUTION submenus allow you to lock out single or
multiple solution ow rate settings. The Operator will not be able to
select ow rate(s) that are locked out during normal operation.
The default setting is NONE.
PROGRAM OPTIONS
10. LOCKOUT SOLUTION
PROGRAM OPTIONS
LOCKOUT SOLUTION
NONE
PROGRAM OPTIONS
LOCKOUT SOLUTION
LOW
PROGRAM OPTIONS
LOCKOUT SOLUTION
MEDIUM
PROGRAM OPTIONS
LOCKOUT SOLUTION
HIGH
PROGRAM OPTIONS
LOCKOUT SOLUTION
LOW & MEDIUM
PROGRAM OPTIONS
LOCKOUT SOLUTION
LOW & HIGH
Backup Alarm Volume
The 11. BACKUP ALARM VOL (volume) submenus allow you to set the
backup alarm volume.
The default setting is MEDIUM.
PROGRAM OPTIONS
LOCKOUT SOLUTION
MEDIUM & HIGH
PROGRAM OPTIONS
11. BACKUP ALARM VOL
PROGRAM OPTIONS
BACKUP ALARM VOL
OFF
PROGRAM OPTIONS
BACKUP ALARM VOL
LOW
PROGRAM OPTIONS
BACKUP ALARM VOL
MEDIUM
PROGRAM OPTIONS
BACKUP ALARM VOL
HIGH
Page 40

Forward Alarm Volume
Control System 40Service Manual – SC1500
The 12. FWD (forward) ALARM VOL (volume) submenus allow you to set
the forward alarm volume.
The default setting is OFF.
Horn Volume
PROGRAM OPTIONS
12. FWD ALARM VOL
PROGRAM OPTIONS
FWD ALARM VOL
OFF
PROGRAM OPTIONS
FWD ALARM VOL
LOW
PROGRAM OPTIONS
FWD ALARM VOL
MEDIUM
PROGRAM OPTIONS
FWD ALARM VOL
HIGH
The HORN VOLUME submenus allow you to set the horn volume.
The default setting is HIGH.
PROGRAM OPTIONS
13. HORN VOLUME
PROGRAM OPTIONS
HORN VOLUME
OFF
PROGRAM OPTIONS
HORN VOLUME
LOW
PROGRAM OPTIONS
HORN VOLUME
MEDIUM
PROGRAM OPTIONS
HORN VOLUME
HIGH
Page 41

Restore Defaults
Control System 41Service Manual – SC1500
The 14. RESTORE DEFAULTS submenus allow you to reset the programmed
options/parameters stored in the A1 Control Board EEPROM to their
factory default values. Note that selecting RESTORE DEFAULTS / YES will
not reset the hour meter.
The default setting is NO.
Note: IfyouselectYES to restore the defaults, it will be like
installinganew“outofthebox”controller.Therst
time you turn on the key switch, the graphic display will
automatically bring you to the programming options
menu. Also any “user preferences” like brush pressure
lockoutorsolutionowratelockoutwillbelost.
Fault Recall
Whenever the A1 Control Board detects an electrical system fault, one or
more error codes are displayed and stored in the Board EEPROM. The
15. FAULT RECALL submenu allows you to recall any error code(s) that
had been logged from previous machine operation. This can be useful for
troubleshooting the machine.
• Any logged fault codes will be shown on the display. (Fault codes 3, 32
and 52 are shown here in this example.)
PROGRAM OPTIONS
14. RESTORE DEFAULTS
PROGRAM OPTIONS
RESTORE DEFAULTS
NO
PROGRAM OPTIONS
RESTORE DEFAULTS
YES
PROGRAM OPTIONS
15. FAULT RECALL
PROGRAM OPTIONS
FAULT RECALL
3 32 52
• If no fault code is present, the display will show a “-“
Pressing the Burst Of Power Switch with the FAULT RECALL submenu
PROGRAM OPTIONS
FAULT RECALL
-
displayed will erase the fault history and the entire Frozen Parameters
memory. (Refer to the Frozen Parameters subsection.)
Note that there may be a slight delay after pressing the Burst Of Power Switch before the “-“ symbol
appears to conrm that the memory has been cleared. This is normal and is due to the large amount of
Frozen Parameter data that is being erased.
Service Test Mode
Pressing the Burst Of Power Switch with the 16. SERVICE TEST MODE
main menu link displayed will put the machine into the Service Test
PROGRAM OPTIONS
16. SERVICE TEST MODE
Mode and display the Service Test Mode submenu.
Refer to the Troubleshooting/Service Test Mode subsection for
information regarding the Service Test Mode functions.
SPD: N 26.5 BRU: OFF
REV: OFF VAC: OFF
INH: ON E00 SOL: OFF
DEK: UP CP: OFF
Page 42

Extra Information on the Graphic Display
Control System 42Service Manual – SC1500
The 17. EXTRA INFO ON LCD submenus allow you to display additional
information on the graphic display. This additional information is
displayed in real time on both the Scrubbing and Information screens and
can aid in troubleshooting the machine in normal operation.
The extra information is displayed in a two-letter or three-letter code that
identies the information. A number below the letter code indicates the
unit value in amps or volts.
Only one type of extra information can be displayed at any time, but the
selected information can be changed at will via the 17. EXTRA INFO ON
LCD
submenus. Descriptions of the letter codes are as follows:
• BV = Battery Voltage
• LOK = Battery Lock Level
• ACT = Deck Actuator Current
• SOL = Solution Solenoid Current
• BRU = Brush Motor Contactor Current
• VAC = Vacuum Motor Contactor Current
• DET = Detergent/Chemical Pump Current
The default setting is NONE.
PROGRAM OPTIONS
17. EXTRA INFO ON LCD
PROGRAM OPTIONS
EXTRA INFO ON LCD
NONE
PROGRAM OPTIONS
EXTRA INFO ON LCD
BATT VOLTS
PROGRAM OPTIONS
EXTRA INFO ON LCD
BATT LOCK VALUE
PROGRAM OPTIONS
EXTRA INFO ON LCD
ACTUATOR CURR
PROGRAM OPTIONS
EXTRA INFO ON LCD
SOLUTION CURR
PROGRAM OPTIONS
EXTRA INFO ON LCD
BRUSH CONT CURR
PROGRAM OPTIONS
EXTRA INFO ON LCD
VAC CONT CURR
PROGRAM OPTIONS
EXTRA INFO ON LCD
CHEM PUMP CURR
Page 43

Frozen Parameters
Control System 43Service Manual – SC1500
The 18. FROZEN PARAMETER rst and second-level submenus allow you
to view the machine parameters that were saved prior to when an error
code was detected. This can be helpful when troubleshooting intermittent
problems that are causing a code to set.
Note: Frozenparametersareonlysavedfortherstcodethatis
set, not for any subsequent codes.
Eleven different machine parameters are logged, and all but the error
code number and hour meter time are saved at 0.1 second intervals for
the 12.8 seconds leading up to the time of the error code. This results in a
total of 128 data points (one every 0.1 seconds) for each parameter. These
data points are displayed in a second-level of submenus.
The rst-level ERROR CODE submenu displays the error code number (32
in this example). The rst-level HOUR METER submenu displays the time
on the hour meter when the error code occurred (12:15 in this example).
The other nine rst-level submenus are links to the next (second) layer of
submenus that display the 128 data points corresponding to the functions
listed on the submenus.
Note that in the second-level submenus, data point #1 is the newest value
and #128 is the oldest value (that occurred 12.7 seconds earlier).
Pressing the Forward (up) or Reverse (down) Drive Switches will scroll
through the 18. FROZEN PARAMETER rst-level submenus shown here.
PROGRAM OPTIONS
18. FROZEN PARAMETER
PROGRAM OPTIONS
FROZEN PARAMETER
ERROR CODE
32
PROGRAM OPTIONS
FROZEN PARAMETER
HOUR METER
12:15
PROGRAM OPTIONS
FROZEN PARAMETER
3. BATT VOLTAGE
PROGRAM OPTIONS
FROZEN PARAMETER
4. ACTUA TOR CURR
PROGRAM OPTIONS
FROZEN PARAMETER
5. SOLUTION CURR
PROGRAM OPTIONS
FROZEN PARAMETER
6. VAC CONT CURR
PROGRAM OPTIONS
FROZEN PARAMETER
7. BRU CONT CURR
PROGRAM OPTIONS
FROZEN PARAMETER
8. DET PUMP CURR
PROGRAM OPTIONS
FROZEN PARAMETER
9. DIRECTION
PROGRAM OPTIONS
FROZEN PARAMETER
10. ACT SW 1
PROGRAM OPTIONS
FROZEN PARAMETER
11. ACT SW 2
Page 44

To display the parameter data points in a second-level submenu:
Control System 44Service Manual – SC1500
1. Press the Forward (up) or Reverse (down) Drive Switch to scroll
through the available rst-level submenus. (The rst-level submenu
3. BATT VOLTAGE is selected in this example.)
2. Press the Burst of Power Switch to display the second-level submenu.
(The second-level submenu 3. BATT VOLTAGE / 1: 20.35 is shown in this
example.) This submenu tells you that at data point 1 (0.1 seconds
PROGRAM OPTIONS
FROZEN PARAMETER
3. BATT VOLTAGE
FROZEN PARAMETER
3. BATT VOLTAGE
1: 20.35
prior to the error code), the battery voltage was 20.35 volts.
Note that if the selected rst-level submenu has no second-level submenu, the Burst of Power Switch
will have no effect.
3. To go back one level from a second-level submenu to a rst-level submenu, press the Scrub On/Off
Switch.
To scroll through the data points on a second-level submenu:
When you display a rst-level submenu, the Detergent On/Off Indicator (LED) will turn on.
When you display a second-level submenu, pressing the Detergent Strength Switch will
toggle the data point scrolling mode between the fast and slow scrolling modes. The two
scrolling modes work as follows:
• In the slow scrolling mode the
increment/decrement value is 1 (0.1
seconds). Pressing the Forward Drive
FROZEN PARAMETER
3. BATT VOLTAGE
1: 20.35
FROZEN PARAMETER
3. BATT VOLTAGE
126: 20.45
Switch will step you from data record
1 to 2, 2 to 3, etc. Pressing the Reverse
Drive Switch will step you from data
record 128 to 127, 127 to 126, etc.
FROZEN PARAMETER
3. BATT VOLTAGE
2: 20.36
FROZEN PARAMETER
3. BATT VOLTAGE
127: 20.47
• In the fast scrolling mode the
increment/decrement value is 10 (one
second). Pressing the Forward Drive
Switch will step you from data record
10 to 20, 20 to 30 etc. Pressing the
Reverse Drive Switch will step you
from data record 120 to 110, 110 to
100, etc.
The purpose of the fast-scrolling feature
is to reduce the number of switch presses
required to cycle through all 128 data
points if you choose to do so.
FROZEN PARAMETER
3. BATT VOLTAGE
3: 20.37
FROZEN PARAMETER
3. BATT VOLTAGE
10: 24.53
FROZEN PARAMETER
3. BATT VOLTAGE
20: 24.59
FROZEN PARAMETER
3. BATT VOLTAGE
30: 24.52
FROZEN PARAMETER
3. BATT VOLTAGE
128: 20.55
FROZEN PARAMETER
3. BATT VOLTAGE
100: 24.57
FROZEN PARAMETER
3. BATT VOLTAGE
110: 24.54
FROZEN PARAMETER
3. BATT VOLTAGE
120: 24.56
Page 45

Control System 45Service Manual – SC1500
This fast-scrolling feature will automatically end when you press the Scrub On/Off Switch to leave a secondlevel submenu.
The Detergent On/Off Indicator will turn off when you press the Scrub On/Off Switch again to leave the rstlevel submenu.
To capture the parameters prior to another fault condition, you’ll need to clear the current fault from the 15.
FAULT RECALL
submenu. (Refer to the Fault Recall subsection.)
Panel Test
The 19. PANEL TEST submenus allow you to verify the function of the control panel membrane switches and
LEDs, This will help identify any intermittent or non-functioning switches or LEDs.
When you display the PROGRAM OPTIONS / 19. PANEL TEST main menu
link and press the Burst of Power Switch, all LEDs will turn off.
When you press a membrane switch, the display will show the name of
the switch on the line below PANEL TEST. The display shows that the
HORN Switch has been pressed one time in this example.
PROGRAM OPTIONS
19. PANEL TEST
PROGRAM OPTIONS
PANEL TEST
HORN
1
With the exception of the Horn and Information Switches, which have no
LED indicator associated with them, the switch LED indicators will light when the corresponding membrane
switch is pressed. Note that the Vacuum Power Adjustment and Burst Of Power Switches each have two
LED indicators associated with them.
The following table lists the control panel membrane switches and the
LED indicators that will light when the switch is pressed:
Membrane Switch
LED Indicator That Will Light When the
Switch is Pressed
Horn Switch Amber LED on the
Burst Of Power Switch.
Information
Switch
Vacuum Power
Adjustment
Switch
Burst of Power
Switch
Quiet Vacuum Mode
Indicator on the Vacuum
Power Adjustment
Switch
Standard Vacuum
Mode Indicator on the
Vacuum Power
Adjustment Switch
Green Burst of Power
Indicator on the Burst
of Power Switch
Page 46

Control System 46Service Manual – SC1500
Membrane Switch
Scrub On/Off
LED Indicator That Will Light When the
Switch is Pressed
Scrub On/Off Indicator
Switch
Extra Pressure
Extra Pressure Indicator
Switch
Solution Flow
Solution On/Off Indicator
Adjustment
Switch
Detergent
Strength
Detergent On/Off
Indicator
Switch
Note that the switch name display and LED indicator will stay on until a different membrane switch is
pressed.
Each switch has its own switch counter. When you press a switch, the
corresponding counter will be displayed on the bottom line of the graphic
PROGRAM OPTIONS
19. PANEL TEST
display. Each switch press will increment the counter one digit until it
hits 255, after which the counter will roll over to 0. The
HORN
Switch is shown in this example.
Press the Scrub On/Off Switch six times to exit the 19. PANEL TEST main
menu link.
PANEL TEST /
PROGRAM OPTIONS
PANEL TEST
HORN
1
PROGRAM OPTIONS
PANEL TEST
HORN
255
PROGRAM OPTIONS
PANEL TEST
HORN
0
Page 47

Save Scrub Settings
Control System 47Service Manual – SC1500
The 20. SAVE SCRUB SETTINGS submenus allow you determine whether
the machine uses the scrub settings that were in use when the key switch
was switched off, or the default settings.
Removal and Installation
A1 Control Board
Caution! Electronic devices like the A1 Control Board are sensitive to Electrostatic Discharge
(ESD). Before handling the Control Board, touch a metal bench or shelf to discharge
any electrical charge that may have built up in your body. Do not walk around with a
Control Board in your hands.
1. Disconnect the
batteries.
2. Remove the four
Phillips Screws and
Flat Washers holding
the Interface Panel
Assembly
Control Panel.
to the
Phillips Screw
and Flat
Washer (4)
Control
Panel
PROGRAM OPTIONS
20. SAVE SCRUB SETTINGS
PROGRAM OPTIONS
SAVE SCRUB SETTINGS
YES
PROGRAM OPTIONS
SAVE SCRUB SETTINGS
NO
Interface
Panel
Assembly
Page 48

3. Carefully lift the
Interface Panel
Assembly
Control Panel.
out of the
Control System 48Service Manual – SC1500
4. Carefully disconnect the Electrical
Connectors
from the A1 Control Board.
5. Remove the Phillips Screws and
grounding strap, then remove the A1
Control Board
Assembly
from the Interface Panel
.
6. Reinstall the A1 Control Board by
following the above steps in reverse
order.
Interface Panel
Assembly
Control
Panel
Electrical
Connector
(typical)
A1
Control
Board
Phillips
Screw
(typical
Interface
Panel
Assembly
Page 49

E1 Curtis 1210 Speed Controller
1. Disconnect the
batteries.
2. Remove the four
Phillips Screws and
Flat Washers holding
the Interface Panel
Assembly
Control Panel.
to the
Phillips Screw
and Flat
Washer (4)
Control
Panel
Control System 49Service Manual – SC1500
Interface
Panel
Assembly
3. Carefully lift the
Interface Panel
Assembly
Control Panel.
out of the
Interface Panel
Assembly
Control
Panel
Page 50

4. Carefully disconnect
the Electrical
Connectors
E1 Curtis 1210 Speed
Controller
from the
.
5. Remove the two Socket
Head Screws
and
remove the E1 Curtis
1210 Speed Controller
from the Control Panel.
6. Reinstall the E1 Curtis
1210 Speed Controller
by following the above
steps in reverse order.
Control System 50Service Manual – SC1500
Electrical
Connector
(typical)
E1 Curtis
1210 Speed
Controller
Socket Head
Screw (2)
Control
Panel
Page 51

Control System 51Service Manual – SC1500
A1 Control Board Shop Measurements
The following table lists measurements taken from one SC1500. While these are not “specications”, they
can help you recognize abnormal vs. normal conditions.
Note that the black voltmeter lead is on B- unless otherwise indicated.
Pin Color Description Ref. Measurements
J1-1 RED/YEL Chemical Pump
+
J1-2 J1-3 BLU/GRY Chemical Pump B- 2.1v not on
J1-4 J1-5 J1-6 J1-7 RED/YEL Inhibit SPC B- 0.001v no direction selected
J1-8 BLK B- 0.09v Vacuum on
J1-9 BLU Brush Act. - B- 2.1v or 3.8v at rest
B- 2.1v not on
23.2v FWD or REV requested
0.2v extending
22.9v retracting
J1-10 ORN/BLK Brush Act. + B- 2.1v or 3.8v at rest
0.2v retracting
22.9v extending
J2-1 BLK B- B- 0.09v Vacuum On
J2-2 BLK B- B- 0.09v Vacuum On
J2-3 ORN Batt. Chg.
Comm.
J2-4 J2-5 J2-6 J2-7 BLK B- B- 0.09v Vacuum On
J2-8 BLK B- B- 0.09v Vacuum On
J2-9 -
J2-10 -
J2-11 BLK/WHT Act. Position 2 B- 4.99v switch open
J2-12 RED/VIO Act. Position 1 B- 4.99v switch open
B- 0.8v key off
Plug in Charger: 12v, then 3.9v, then 12 v
0.03v switch closed
0.03v switch closed
J3-1 BRN/VIO B+ B- 24.5v key off or on
J3-2 J3-3 RED/BRN Reverse B- 0v no direction request or forward request
23.1v reverse direction request
Page 52

Pin Color Description Ref. Measurements
J3-4 BRN Dead Man
Switch
J3-5 BLU/BLK Rev . Alarm B- 23.4v forward or stationary
J3-6 RED/WHT Motion B- 24v stationary
J3-7 ORN/BLU Status B- 1.77v when no code
J3-8 BRN B+ B- 24.4v key off or on
J3-9 GRN/BLK Horn - B- 14.9v horn off
J3-10 ORN/RED Horn + B- 14.9v horn off or on
J3-11 VIO/BLK Solution
Solenoid
J3-12 GRA/BLK Vacuum Control B- 23.4v Vacuum off
B- 24.4v when pressed (Key and Emergency
Switch also closed)
1.5v in reverse
0.1v moving forward or reverse
Unstable when code – max 23.5v
0.004v horn on
B- 24.4v solenoid off
0.12v solenoid on
Control System 52Service Manual – SC1500
6.9v Vacuum low
0.104 Vacuum high
J3-13 WHT/RED Brush
Contacator
J3-14 BRN Key Switch B- 0v key off
B- 24.3v off
0.2v on
24.2v key on
Page 53

Electrical System
Functional Description
Overview
The electrical system consists of the switches, circuit breakers and contactors mounted on and underneath
the control panel assembly, the 150-amp main fuse, on-board battery charger (if so equipped) and the
batteries.
The electrical system is powered by two 12-volt or four 6-volt batteries for a total of 24 volts. Heavy cables
connect the batteries in series. On machines without an on-board battery charger, a large red main battery
pack connector is used for connecting the batteries to a “shelf” battery charger unit.
The control system will turn off the scrub system and recovery systems if the battery voltage drops too low to
prevent damage to the batteries due to excessive discharging.
The circuit breakers and a 150-amp fuse protect various circuits from excessive current.
The machine wiring is color coded, and the wires are
marked corresponding to their location on the Wiring
Harness Diagram. (Wire W010 to the Brush Contactor K2
is shown in this example.)
53Service Manual – Advance SC1500
On-board Battery Charger
The optional on-board battery charger is mounted on the
bottom of the machine. The charger has an internal relay
that interrupts power to the machine when the charger
is plugged into an AC power outlet. This prevents the
machine from being operated while the batteries are
charging. Wiring changes must be made when installing
the battery charger for the interlock circuit to work
correctly.
Here is how the battery charger interlock circuit works. The interlock relay contacts inside the charger are
normally closed, allowing the current to pass in and out of the charger to the A1 Control Board and the
Speed Controller. When the AC power cord is plugged in, the relay is energized and opens the relay contacts
opening the circuit.
When the battery charger is plugged in, the graphic display will
show the battery type, and a battery icon with 0 to 5 bars to show
the charging progress.
The battery charger and A1 Control Board communicate with one
another on the YEL/ORN wire that runs between them. Each time the battery charger is plugged in, the
charger contacts the Controller by sending out a positive voltage on the communication wire to nd out what
kind of batteries are in the machine. It needs to know this in order to use the correct charging prole. The
Controller responds and provides the battery type information it has stored in memory. The charger then
tells the Controller which charging prole it will use and begins charging the batteries.
Refer to the Control System/Programming Options section for information on how to tell the controller what
kind of batteries are used in the machine. If the charger is unable to communicate with the controller it will
use the prole for a wet battery at a 25-amp rate as a default.
Page 54

Battery Charger Circuit Descriptions
Battery Charger Not Plugged In
Electrical System 54Service Manual – SC1500
F1
RED
AB
B+
Gnd
12
YEL/ORN
CB2
RED BRN/VIO WHT/BRN BLU BLK
Circuit Breaker, 5 Amp
11 1
S1
Switch
Switch J3-4
22 22
Dead Man
SPST Key
Fuse, 150 A.
12
B-
Internal Relay
in Battery Charger
3
Emergency
Stop
S4
1
RED
BLK
Dead Man Switch
S2
X161C X162C
BRN
BT1
Battery 12 VDC
+
A1
Control Board
YEL/ORN
Main Machine
Controller
J2-3 Bat Charger
On-board Communication
E1
Curtis 1210
Speed
Controller
-
Pin 5 - KSI
When the Battery Charger is not plugged in, the Internal Relay in the charger is de-energized and the
contacts on the Internal Relay are closed. This allows power from the Key Switch to enter terminal 2 on the
Internal Relay, pass through the closed contacts, then exit terminal 1. This provides power to Pin J3-4 on
the A1 Control Board and Pin 5 (key switch input) on the E1 Curtis Speed Controller to allow normal machine
operation.
Page 55

Battery Charger Plugged In
Electrical System 55Service Manual – SC1500
F1
RED
AB
B+
Gnd
12
YEL/ORN
CB2
RED BRN/VIO WHT/BRN BLU BLK
Circuit Breaker, 5 Amp
11 1
S1
Switch
Switch J3-4
22 22
Dead Man
SPST Key
Fuse, 150 A.
12
B-
Internal Relay
in Battery Charger
3
Emergency
Stop
S4
1
RED
BLK
Dead Man Switch
S2
X161C X162C
BRN
BT1
Battery 12 VDC
+
A1
Control Board
YEL/ORN
Main Machine
Controller
J2-3 Bat Charger
On-board Communication
E1
Curtis 1210
Speed
Controller
-
Pin 5 - KSI
When the Battery Charger is plugged in, the Internal Relay in the charger is energized and the contacts on the
Internal Relay open. This prevents the power from the Key Switch from reaching the A1 Control Board and E1
Curtis Speed Controller
to disable all cleaning and driving functions while the Battery Charger is plugged in.
Note that terminal 3 on the Internal Relay is the communication line (YEL/ORN wire) between the Battery
Charger
and the A1 Control Board.
Page 56

Component Locations
The following electrical components are included in this section:
• Batteries • Optional On-board battery charger
• Switches • Circuit Breakers
• Contactors/Relays • 150-amp Fuse
The Batteries sit in the
Battery Tray. To access
the Batteries, lift up the
Control Panel Housing
/ Recovery Tank Cover
,
engage the Prop Rod,
then tilt the Recovery
Tank
back.
Control Panel
Housing/
Recovery
Tank Cover
Prop Rod
Batteries
Electrical System 56Service Manual – SC1500
Recovery
Tank
Battery
Tray
The On-board Battery Charger is mounted
on the underside of the machine above the
scrub deck.
On-board
Battery
Charger
Page 57

The 25-amp Circuit Breaker
(CB4), 20-amp Circuit
Breaker
Breaker
Circuit Breaker
Speed Control Potentiometer
(CB3), 5-amp Circuit
(CB2) and 50-amp
(CB1), 100k
(R1), Emergency Disconnect
and Key Switch (S1) are all
mounted on the back of the
Control Panel.
100k Speed
Control
Potentiometer
Control
Panel
25-amp
Circuit
Breaker
20-amp
Circuit
Breaker
5-amp
Circuit
Breaker
Electrical System 57Service Manual – SC1500
50-amp
Circuit
Breaker
Emergency
Disconnect
Key
Switch
The Solid State Relay/
Vacuum Motor Power Module
(K1), Brush Contactor (K2)
and 150-amp Fuse are
located inside the control
panel assembly.
Solid State
Relay/Vacuum Motor
Power Module
150-amp
Fuse
Brush Motor
Contactor (K2)
Page 58

Electrical Diagrams
RELEASE, REV A MODIFIED
UNDERSTANDING THAT IT WILL NOT BE REPRO-
N FOR WHICH IT WAS ISSUED AND RECIPIENT
THIS DRAWING AND THE DESIGN REPRESENTED HEREON IS THE PROPERTY OF NILFISK-ADVANCE, INC.,
CONFIDENTIAL
PLYMOUTH, MINNESOTA 55447-3408
NILFISK-ADVANCE, INC.
PMO HH
PMO HH
UPDATE: A1(CONTROL BOARD) MAIN MACHINE
CONTROLLER WAS CONTROL BOARD, R2 WAS
SOLID STATE "RELAY" WAS SSR1, VACUUM
POWER MODULE WAS VACUUM, DETERGENT
PUMP WAS CHEMICAL PUMP, CHARGER SYMBOL
ADD: NOTE 2, SYMBOL AND NOTE, CONNECTORS
X143 A-B, X144 A-B, X157 A-B, X158 A-B, X161 A-F
REVISED/REDISIGNED: MOTOR BRUSH LIFT
REMOVED: MOTOR BRUSH BOOST
Note: Refer to the individual machine system sections for the system ladder diagrams and circuit
descriptions.
Wiring Diagram, p/n 56104081, Rev. B, Page 1
F1
FUSE, 150A.
CB1
RED
WHEN CHARGER IS NOT UNSTALLED
THERE NEEDS TO BE A JUMPER BETWEEN
PINS 1 AND 2 ON CONNECTOR X126
ON MAIN HARNESS
CIRCUIT BREAKER, 5 AMP
RED
12
CIRCUIT BREAKER, 50A.
B
123
YEL/ORN
CB2
12
SW, SPST KEY
BRN/VIO
BRN
S1
1 2
BRN/VIO
RED
GND
~
123
1 2
AB
B+ B-
E2
CHARGER S.P.E. (OPTIONAL)
B
EMERGENCY STOP
S4
1 2
J3-1 B+
J3-8 B+
J3-14 KEY SWITCH
RED
BLK
DEADMAN SWITCH
B
B
S2
WHT/BRN BLK
X161C
X162C
DEAD MAN
SWITCH J3-4
21
BRN
BT1
BATTERY, 24 Vdc
+ -
B
X162E
X161E
B
1 2
Y1
BRAKE
BB
X162D
ORN
BLK
X144A
X161D
B
BRN/BLK
X158A
B
PLYMOUTH, MINNESOTA AND IT HAS BEEN ISSUED WITH THE
DUCED NOR COPIED NOR USED FOR ANY PURPOSE OTHER THA
AGREES TO RETURN IT UPON REQUEST.
DWG. NO. SHEET
56104081
BRNBLU
ORN
1 OF 2
Electrical System 58Service Manual – SC1500
REV ECO DATE DFTM APPD
A
R1,
MOTOR
B
X162 A-F,
ACTUACTOR
REVISIONS
A-07411 10-19-11
A-09223 4-2-13
B
2
K2
BRN
RED
BRN
YEL/ORN
B+
WHT/RED
CONTACTOR, BRUSH
L1
1 2
VIO/BLK
VALVE, SOLENOID
H1
- +
ORN/RED
HORN
GRN/BLK
M2
+-
M
OPTIONAL
DETERGENT PUMP
BLU/GRY
RED/YEL
B
A1 (CONTROL BOARD)
MAIN MACHINE CONTROLLER
J3-13 BRUSH
CONTACTOR
J3-11 SOLUTION
SOLENOID
J3-10 HORN +
J3-9 HORN -
J1-1 + DETERGENT
PUMP
J1-3 - DETERGENT
PUMP
MOTION J3-6
STATUS J3-7
REV. ALARM J3-5
B
B
B- J2-8
B- J2-7
B- J2-1
B- J2-2
RED/WHT
100K POT
YEL
BB B B
BLK
X162B
X161B
X144B
X158B
RED/YEL
ORN/BLU
RED/BRN
1
B
2
GRN/ORG
R1
3
S5
21
BLU
X162A
GO SWITCH
NOTES UNLESS OTHERWISE
1. ALL DIMENSIONS IN INCHES.
2. DO NOT SCALE DRAWING.
3. ALL DIMENSIONS APPLY AFTER
PLATING AND HEAT TREATING,
RED/WHT
YEL
VIO
SPECIFIED
E1
CURTIS 1210 SPEED
B
CONTROLLER
B
RED/WHT
X161A
BLK
BLK
BLK
BLK
GRA
PIN 6 - BRAKE -
PIN 12 - INHIBITINHIBIT SPC J1-7
PIN 9 - STATUS
PIN 16 - REV. ALARM
PIN 17 - DRIVE SWITCH
PIN 3 - HIGH
PIN 18 - SPEED LIMIT
PIN 13 - POT. LOW
PIN 4 - GO SWITCH
DRAWN
10-19-11
CHECKED
PROJ ENG
10-19-11
B+
PIN 5 - KSI
PIN 14 - BRAKE +
B-
YEL/BLK
M1
RED/GRN
M2
B-
PMO
HH
X143B
X143A
BLKBLU/BLK
BB
X157B
BB
X157A
YEL/BLK
M1
RED/GRN
2
M
1
MOTOR, WHEEL DRIVE
Page 59

Wiring Diagram, p/n 56104081, Rev. B, Page 2
REVISIONS
REV ECO DATE DFTM APPD
SEE SHEET 1
PLYMOUTH, MINNESOTA AND IT HAS BEEN ISSUED WITH THE UNDERSTANDING THAT IT WILL NOT BE REPRO-
DUCED NOR COPIED NOR USED FOR ANY PURPOSE OTHER THAN FOR WHICH IT WAS ISSUED AND RECIPIENT
THIS DRAWING AND THE DESIGN REPRESENTED HEREON IS THE PROPERTY OF NILFISK-ADVANCE, INC.,
CONFIDENTIAL
RED
B+
YEL/ORN
CIRCUIT BREAKER, 20 AMP
CB3
12
BLU/ORN WHT
VACUUM MOTOR POWER MODULE
4-
3+
K1
SOLID STATE "RELAY"
1-
2+
D2
GRA/BLKBRN
B
B
J2-3 BAT CHARGER
ON BOARD COMMUNICATION
BRUSH ACT (-) J1-9
A1(CONTROL BOARD)
MAIN MACHINE CONTROLLER
ACT POSITION1 J2-12
ACT POSITION2 J2-11
J3-12 VACUUM MOTOR
POWER MODULE
BRUSH ACT (+) J1-10
B
B- J1-8
MOTOR, BRUSH LIFT ACTUACTOR
A
D
C
F
B
BLU
YEL/BLK
RED/VIO
POS 2
BLK/WHT
ORN/BLK
TOP LIMIT
POS 1
2 1
2 1
BOTTOM LIMIT
1 2
M4
2 1
2 1
M
MOTOR, VAC
DWG. NO. SHEET
B
-
M3
M
+
Electrical System 59Service Manual – SC1500
AGREES TO RETURN IT UPON REQUEST.
56104081
2 OF 2
B
B-
BLK
CIRCUIT BREAKER, 25 AMP
CB4
12
BRN/VIO
K2
4 3
CONTACTOR, BRUSH
M5
RED BLK
+-
M
MOTOR, BRUSH
Page 60

Wiring Harness Diagram, p/n 56104082, Rev. B
Electrical System 60Service Manual – SC1500
Page 61

Electrical System 61Service Manual – SC1500
Electrical Connector Pin-out Assignments
The following tables list the individual connector pin-out assignments. The tables include connector
illustrations to help you identify the various connectors on the machine. The connector pin-out information is
organized by connector ID in alphabetical order.
To Locate and Identify a Connector
For example, if you need to nd out which connector is on the L1 (solution) Solenoid Valve and what it looks
like, refer to the Wiring Harness Diagram. The Wiring Harness Diagram shows that connector X7 is on
the L1 (solution) Solenoid Valve. Refer to the Wiring Diagram and the appropriate table below, X7 (Delphi
12015792)
in this example, for the corresponding wire colors, and wire and connector pin assignments.
Section of Wiring
Harness Diagram
X7 (Delphi 12015792)
Pin# Conductor Wire Color
A W284 BRN
B W283 VIO/BLK
Section of Wiring Diagram
Page 62

Connector Pin-out Assignment Tables
J1 (Molex Mini Fit Jr. 39012105)
Pin# Conductor Wire Color
1 W279 RED/YEL
2 – –
3 W280 BLU/GRA
4 – –
5 – –
6
7 W302 RED/YEL
YEL/BLK
8 W165
Electrical System 62Service Manual – SC1500
9 W054 BLU
10 W055 ORN/BLK
J2 (Molex Mini Fit Jr. 39012125)
Pin# Conductor Wire Color
1 W162 BLK
2 W161 BLK
3 W174 YEL/ORN
4 – –
5 – –
6 – –
7 W163 BLK
8 W164 BLK
9 – –
10 – –
11 W218 BLK/WHT
12 W204 RED/VIO
Page 63

J3 (Molex Mini Fit Jr. 39012145)
Pin# Conductor Wire Color
1 W181 BRN/VIO
2 – –
3 W166 RED/BRN
4 W294 BRN
5 W066 BLU/BLK
6 W277 RED/WHT
7 W067 ORN/BLU
8 W182 BRN/VIO
9 W281 GRN/BLK
10 W282 ORN/RED
11 W283 VIO/BLK
12 W003 GRA/BLK
13 W010 WHT/RED
14 W183 BRN
Electrical System 63Service Manual – SC1500
Page 64

J4 (39012185)
Pin# Conductor Wire Color
1 – –
2 – –
3 W060 YEL
4 W272 GRA
5 W293 BRN
6 W276 RED/WHT
7 – –
8 – –
9 W067 ORN/BLU
10 – –
11 – –
12 W302 RED/YEL
13 W064 VIO
14 W278 ORN
15 – –
16 W066 BLU/BLK
17 W166 RED/BRN
18 W217 GRN/ORN
Electrical System 64Service Manual – SC1500
X2 (Ducon 12147067)
Pin# Conductor Wire Color
A W199 BLK
B W167 RED
Page 65

X6 (Delphi 12052613)
Pin# Conductor Wire Color
A W191 WHT
B W194 BLK
X7 (Delphi 12015792)
Electrical System 65Service Manual – SC1500
Pin# Conductor Wire Color
A W284 BRN
B W283 VIO/BLK
X126 (AMP 282087-1)
Pin# Conductor Wire Color
1 W172 BRN
2 W173 RED-VIO
3 W174 YEL-ORN
Page 66

X127 (Delphi 15363990)
Pin# Conductor Wire Color
A W170 RED
B W171 BLK
X139 (Delphi 12020786)
Electrical System 66Service Manual – SC1500
Pin# Conductor Wire Color
A W055 ORN/BLK
B W054 BLU
C W204 RED/VIO
D W165 YEL/BLK
E – –
F W218 BLK/WHT
X143 (Ducon 12147067)
Pin# Conductor Wire Color
A W273 RED/GRN
B W274 YEL/BLK
Page 67

X144 (Delphi 12015792)
Pin# Conductor Wire Color
A W278 ORN
B W275 RED/WHT
X161 (Delphi 12020926)
Electrical System 67Service Manual – SC1500
Pin# Conductor Wire Color
A W272 GRA
B W271 YEL
C W289 WHT/BRN
D W293 BRN
E W294 BRN
Page 68

Troubleshooting
Note: Refer to the individual machine system sections for electrical troubleshooting procedures.
Problem Cause Correction
No power to the
machine.
Insufcient machine
run time.
The battery charger
does not charge.
Discharged batteries. Check the battery voltage and charge as necessary.
Poor battery connection(s). Check the battery cables, terminals and connections
and tighten/repair/replace as necessary.
Batteries need to be
replaced.
Incorrect low-voltage cutout
setting.
Batteries not fully charged. If there is any question whether the batteries are
One or more weak batteries.
Poor battery connection(s). Check the battery cables, terminals and connections
Battery charger not
operating correctly.
There’s a problem with
the charger wiring and/or
connections.
One or more weak batteries Check and replace the batteries as necessary.
Perform a load test on the batteries and replace if
necessary.
Make sure the low battery voltage cutout setting is
correct for the battery type in the machine. (Refer
to the Control System/Programming Options/Low
Battery Voltage Cutout subsection.)
fully charged, they should be charged for at least 16
hours.
• Measure the voltage across each individual
battery while operating the machine. Write down
the values and compare them. A battery that has a
dead cell will typically be 1 - 2 volts lower than the
others.
• Use a battery load tester to test each battery.
• For wet batteries, a hydrometer can be used to
check the specic gravity of the electrolyte in each
cell. A dead cell is one that reads 50 points or
more lower than the other cells.
and tighten/repair/replace as necessary.
1. Check the charger 120VAC power cord and
power source to the charger and repair as
necessary.
2. If the electrical connections are OK, replace the
charger.
Check the charger connections to the machine and
repair as necessary.
Electrical System 68Service Manual – SC1500
Note:
The optional on-board battery charger will charge, even if it cannot communicate with the
A1 Control Board.
Page 69

Specications
Component Specications
Batteries (4) Six-volt, 260 amp-hour, 20-hr. Rate
Input – 100-240 VAC, 50/60Hz
Battery Charger
Output – 24V, 25A
Electrical System 69Service Manual – SC1500
Solid State Relay/Vacuum
Motor Power Module (K1)
Brush Contactor (K2) Nominal Coil Resistance – 58.3 ohms ±10%
Operating Voltage – 7-48 VDC
Rated Load Current – 40A
Page 70

Recovery System
Functional Description
The Recovery System pulls the wastewater from the squeegee and directs it into the recovery tank. The
24-volt, three-stage electric vacuum motor creates a vacuum in the recovery tank with sufcient airow to
lift the used cleaning solution from the squeegee and into the vacuum hose assembly, which then directs the
water into the recovery tank.
The Operator can select from two vacuum power levels – standard and quiet vacuum.
The Recovery System includes the Vacuum
Hose Assembly
Vacuum Motor, Solid State Vacuum Relay, Float
Cage Assembly
• The Vacuum Hose Assembly attaches to
the squeegee assembly and directs the
wastewater from the squeegee to the Debris
Cage
and Recovery Tank.
• The Vacuum Motor creates a vacuum inside
of the Recovery Tank to pull the wastewater
from the squeegee into the Recovery Tank.
• The Float Cage Assembly contains two
internal plastic oat balls that will rise to
shut off the air intake to the Vacuum Motor
if the wastewater level in the Recovery Tank
gets too high. This is to prevent water from
getting into the Vacuum Motor and possibly
damaging the Vacuum Motor.
, Debris Cage, Recovery Tank,
and Drain Hose.
Float Cage
Assembly
Recovery
Tank
Vacuum
Motor
Vacuum Hose
Assembly
Debris
Cage
70Service Manual – SC1500
• The Debris Cage inside the Recovery Tank
catches any large debris or particulates to
keep these materials out of the Recovery
Tank
. The debris tray cover can be removed
to clean out the Debris Cage.
• The Recovery Tank holds the wastewater
picked up by the squeegee. Note that the
Recovery Tank is hinged at the rear and tips
back for access to the Vacuum Motor. The
Drain Hose is used to drain the wastewater
from the Recovery Tank.
Drain
Hose
Page 71

• The Solid State Vacuum Relay (SSR1)
controls the voltage to the Vacuum
Motor
. Note that the Solid State Vacuum
Relay
has an LED that lights when the
Relay is on.
Refer to the Squeegee System section
for more information on the squeegee
components and operation.
Recovery System 71Service Manual – SC1500
Solid State
Vacuum Relay
(SSR1)
Circuit Descriptions
Vacuum Motor Off
Bat +
SPST Key
Switch
S1
BRN/VIO
Circuit Breaker, 20 Amp
When the Vacuum Motor is off:
1
2
CB3
BLU/ORN WHT
1
2
Solid State
Vacuum Relay
3+
2+
D2
SSR1
GRA/BLKBRN
4-
1-
Control Board
Vacuum
Contactor
J3-12
Motion Input 24v
12
M4
M
Vacuum Motor
24v
A1
Bat -
J3-6
RED/WHT
Pin 6
Curtis 1210
Speed
Controller
Brake -
Bat -
E1
Bat -
• The Brake - switch on Pin 6 in the E1 Curtis Speed Controller is open and is not sending the drive signal to
the Motion Input line on pin J3-6 on the A1 Control Board.
• The Vacuum Contactor switch on pin J3-12 is open, the SSR1 Solid State Vacuum Relay is de-energized and
open, and the M4 Vacuum Motor is off.
Page 72

Recovery System 72Service Manual – SC1500
Vacuum Motor On
Bat + Bat -
A1
SPST Key
Switch
BRN/VIO
Circuit Breaker, 20 Amp
S1
1
2
CB3
BLU/ORN WHT
1
2
GRA/BLKBRN
4-
3+
1-
2+
D2
SSR1
Solid State
Vacuum Relay
Vacuum Motor
Control Board
Vacuum
Contactor
J3-12
24v
Motion Input (0.1v)
12
M4
M
Bat -
J3-6
RED/WHT
Pin 6
E1
Curtis 1210
Speed
Controller
Brake -
Bat -
The following conditions must be met before the Vacuum Motor can start:
• There can be no major faults active.
• The machine must not be in a low-voltage condition.
• The Scrub System or vacuum mode must be activated (the Vacuum Mode Indicator will be on or ashing).
• The A1 Control Board must have recently detected a motion signal from the E1 Curtis Speed Controller. (The
A1 Control Board will switch off the Vacuum Motor after a maximum 10 second delay once it loses the drive
signal from the E1 Curtis Speed Controller.)
When the Operator selects a drive direction and presses the go pedal:
• The Brake - switch on Pin 6 in the E1 Curtis Speed Controller closes to ground. This drops the voltage on
the Motion Input line on pin J3-6 from 24v down to nearly 0 volts to signal the A1 Control Board that the
machine is now in motion.
• The A1 Control Board switches the Vacuum Contactor line on pin J3-12 to battery ground to energize the
SSR1 Solid State Vacuum Relay and switch on the Vacuum Motor.
Note that the output from the Vacuum Contactor line on pin J3-12 drives the SSR1 Solid State Vacuum Relay
at 100 Hz with either a 100% duty cycle for the high/standard vacuum mode, or a modulated (60%) duty
cycle to provide an average of 16.8V to the Vacuum Motor in the low/quiet vacuum mode.
“Field” Voltage Measurements with Reference to Battery Negative
Pin Number Wire Color Description Voltage
J3-12 GRA/BLK Vacuum Contactor 23.4v - Vacuum Off
6.9v - Vacuum Low/Quiet
0.104v - Vacuum High/Standard
Page 73

Component Locations
The following components are included in this section:
• Recovery Tank
• Vacuum Motor
• Debris Cage
• Float Cage Assembly
• Vacuum Hose Assembly
• Drain Hose
• SSR1 Solid State Vacuum Relay
The Recovery Tank is located
underneath the control panel.
The Vacuum Motor is mounted
below the Recovery Tank.
The Debris Cage lters any
debris out of the wastewater
before it can enter the
Recovery Tank.
The Vacuum Hose Assembly
carries the wastewater from
the squeegee to the Debris
Cage
.
Float Cage
Assembly
Vacuum Hose
Assembly
(underneath
Debris Cage)
Recovery System 73Service Manual – SC1500
Vacuum Motor
(underneath
oat support)
Debris
Cage
Recovery
Tank
Page 74

The Drain Hose allows you to drain the wastewater
from the Recovery Tank.
Recovery System 74Service Manual – SC1500
Drain
Hose
The SSR1 Solid State Vacuum Relay controls the
power to the vacuum motor and is located inside
the control panel assembly.
SSR1
Solid State
Vacuum Relay
Page 75

Troubleshooting
Problem Cause Correction
Vacuum motor not
running - the LED
on relay SSR1 is
not on.
Vacuum motor not
running - the LED
on relay SSR1 is on.
Poor water pickup. Vacuum leak(s) due to:
No voltage from the Key
Switch S1 to terminal 3+ on
relay SSR1.
Terminal 4- on relay SSR1 is
not getting ground from the
Vacuum Contactor, pin J312, on the A1 Control Board.
Relay SSR1 is faulty. Replace relay SSR1.
No voltage to terminal 2+ on
relay SSR1.
No voltage from terminal
1- on relay SSR1 to the
Vacuum Motor M4.
The Vacuum Motor M4 is
not connected to battery
ground.
Relay SSR1 is faulty. Replace relay SSR1.
• Leaky vacuum hose.
• Bad recovery tank gasket.
• Drain plug not installed
correctly.
• Damaged tank.
Restrictions due to built-up
debris in the squeegee tool
or vacuum hose.
Squeegee blades worn or
out of adjustment.
Check the wiring from the Key Switch S1 to terminal
3+ on relay SSR1 and repair as necessary.
Check the wiring from pin J3-12 on the A1 Control
Board to terminal 4- on relay SSR1 and repair as
necessary.
1. Check circuit breaker CB3 and reset if necessary.
2. Check the wiring from the Key Switch S1 to circuit
breaker CB3 and repair as necessary.
Check the wiring from SSR1 to the Vacuum Motor
M4 and repair as necessary.
Check the ground connection to the Vacuum Motor
M4 and repair as necessary.
• Check the squeegee vacuum hose assembly and
tighten/replace as necessary.
• Check the recovery tank gasket and replace as
necessary.
• Make sure drain hose plug is installed correctly.
• Check the recovery tank for damage.
• Check the squeegee tool and vacuum hose
assembly for any accumulated dirt or debris and
clean as necessary.
• Check the vacuum system airow pathway
wherever the airow is forced to make a sharp turn
for any accumulated dirt or debris and clean as
necessary.
• Check and replace the squeegee blades if
necessary.
• Readjust the squeegee as necessary.
(Refer to the Squeegee Maintenance and
Squeegee Adjustments sections in the Instructions
For Use).
Recovery System 75Service Manual – SC1500
Page 76

Removal and Installation
Vacuum Motor
Recovery System 76Service Manual – SC1500
1. Drain the recovery tank.
2. Lift the recovery tank to access the Vacuum
Cover
.
3. Remove the three M6 Screws, Flat Washers and
Cover Plates and remove the Vacuum Cover to
access the vacuum motor.
M6 Screw, Flat
Washer and
Cover Plate (3)
Vacuum
Cover
4. Disconnect the Vacuum Motor Electrical
Connector
.
5. Remove the Vacuum Motor from the Recovery
Tank
.
6. Reinstall the Vacuum Motor by following the
above steps in reverse order.
Note: Make sure you install the
Acoustic Insulation correctly
around the Vacuum Motor when
you reinstall the Vacuum Motor.
Recovery
Tank
Vacuum
Motor
Acoustic
Insulation
Vacuum Motor
Electrical
Connector
Page 77

Service Tip: Before you reinstall the Vacuum
Cover, make sure the top of the
Vacuum Motor is centered in the
matching cutout in the Recovery
Tank
as shown.
Specications
Component Specications
Recovery System 77Service Manual – SC1500
Recovery
Tank
Vacuum
Motor
Vacuum Motor Current Draw
Sealed 40 - 44 Inches of Water
Vacuum Water Lift
1” open hole 9.5 Inches of Water
Special Tools
Vacuum water lift gauge, p/n 56205281
Low Speed: 11 - 12 Amps
High Speed: 16 - 17 Amps
Page 78

Scrub System
Functional Description
The Scrub System includes the Scrub Deck, Brush or Pad Motor, Brush Motor Contactor (K2 relay) and
Deck Actuator Assembly. The Scrub System uses either disc scrub brushes or REV™ deck pads depending on
the scrub deck conguration. A 24-volt electric motor powers the brush/pad.
The scrub deck has four vertical positions:
• The scrub deck is in the fully-retracted (up) position when the machine is in the transport mode (no
scrubbing or vacuuming).
• The vacuum-only position lowers the scrub deck so the attached squeegee contacts the oor, but the
brush/pad is raised slightly above the oor. This position is used for wet vacuuming of wastewater from
the oor with no scrubbing.
• The “normal” scrub pressure position lowers the scrub deck so the brush/pad contacts the oor with
normal scrub pressure.
• The “extra” scrub pressure position lowers the scrub deck to its extension limit so the brush/pad contacts
the oor with greater than normal scrub pressure.
78Service Manual – SC1500
The SC1500 can be congured with two different scrub decks:
• The 20D Scrub Decks have a 20” brush plate assembly to
accommodate a variety of disc brushes. The 20D models can
also be used with several grades of pads by using the optional
pad holder. The brush is driven by a Brush Motor connected to
a 90-degree Gearbox.
• The 20R REV
™
Scrub Decks have a 20” pad driver for use with
REV™ deck pads only. The pad is driven directly by a 24 VDC
Motor.
Note that the two types of Scrub Decks use different Motors, but
use the same Deck Actuator Assembly and mounting hardware.
20D Scrub Deck
20R REV
™
Scrub Deck
Page 79

Scrub Deck and Motor
20D Scrub Deck
Scrub System 79Service Manual – SC1500
The 20D Scrub Decks use a
horizontally-mounted Brush Motor
with an integral gearbox to drive the
Brush Plate Assembly and attached
Brush. The Brush Motor is fastened to
the Motor Spacer, which is bolted to the
Deck Lift Plate Weldment, Brush Housing
and Lower Deck Plate.
The Solution Solenoid Valve Assembly
controls the solution ow to the Brush.
The squeegee assembly snaps onto the
Squeegee Link Weldment.
The Brush Skirt helps contain the
cleaning solution.
Brush
Motor
Motor
Spacer
Squeegee
Link
Weldment
Deck
Lift Plate
Weldment
Brush
Housing
Lower
Deck Plate
Solution
Solenoid
Valve
Assembly
Brush
Skirt
Brush Plate
Assembly
Brush
(typical)
Page 80

20R REV™ Deck
Scrub System 80Service Manual – SC1500
The 20R REV™ Scrub Decks use a
vertically-mounted Motor to drive the
Pad Driver Assembly and attached Pad
directly. The Motor is fastened to the
Motor Plate and attached Rev Lift Plate
Weldment
and Rev Housing.
The Solution Solenoid Valve Assembly
controls the solution ow to the Pad.
The squeegee assembly snaps onto the
Squeegee Link Weldment.
Note that the 20R REV™ Scrub Decks
require an additional connector
adaptor to plug into the scrub motor
wiring harness.
Rev
Housing
Motor
Squeegee
Link
Weldment
Rev Lift Plate
Weldment
Solution
Solenoid Valve
Assembly
Motor
Plate
Pad Driver
Assembly
Pad
(typical)
Page 81

Brush Motor Contactor
The Brush Motor Contactor (K2) controls the
power to the Brush/Pad Motor.
Scrub System 81Service Manual – SC1500
Brush Motor
Contactor (K2)
Deck Actuator Assembly
The Deck Actuator Assembly uses an electric Motor to run a lead screw that
extends and retracts the Plunger. The Plunger is connected to the Scrub Deck
to raise and lower the Scrub Deck to any of four different positions:
• The fully-retracted (up) position is the Scrub Deck transport position and
is used when the Scrub and Recovery Systems are not active.
• Scrub Deck position 1 is the vacuum-only position. In this position the
Deck Actuator lowers the Scrub Deck just far enough for the squeegee
to contact the oor to pick up wastewater with the Scrub, Solution and
Detergent Systems off.
• Scrub Deck position 2 is the standard scrub pressure position.
• The fully-extended (down) position is the extra scrub pressure position.
Motor
Plunger
Deck Actuator Assembly
Page 82

Two internal Position Switches, actuated by rotating Cams, provide
actuator position feedback to the A1 Control Board.
Two internal Limit Switches (top and bottom), also actuated by
rotating Cams, switch off the actuator Motor at the fully-retracted
and fully-extended positions.
Scrub System 82Service Manual – SC1500
Cams (4)
Limit
Switch
Position
Switch
Page 83

Circuit Descriptions
Scrub Brush Motor
Scrub Brush Motor Off
Scrub System 83Service Manual – SC1500
Bat +
BRN
SPST Key
Switch
S1
1
BRN/VIO
A1
Control Board
Brush
WHT/RED
2
K2
Brush
Contactor
J3-13
Contactor
24v
Motion Input 24v
Brush Motor
RED
-+
M5
M
Bat -
J3-6
RED/WHT
BLK
Pin 6
E1
Curtis 1210
Speed
Controller
Brake -
Bat -
Bat -
When the machine is stationary:
• The Brake - switch on Pin 6 in the E1 Curtis Speed Controller is open and is not sending the drive signal to
the Motion Input line on pin J3-6 on the A1 Control Board.
• The Brush Contactor switch on pin J3-13 is open, the K2 Brush Contactor is de-energized and open, and the
M5 Brush Motor is off.
Page 84

Scrub Brush Motor On
Scrub System 84Service Manual – SC1500
Bat + Bat -
Brush
J3-13
Contactor
RED
BRN
SPST Key
Switch
S1
1
BRN/VIO
WHT/RED
2
K2
Brush
Contactor
A1
Control Board
24v
Motion Input (0.1v)
M5
Brush Motor
-+
M
Bat -
J3-6
RED/WHT
BLK
Pin 6
The following conditions must be met before the Brush Motor can start:
• There can be no major faults active.
• The machine must not be in a low-voltage condition.
• The Scrub System must be enabled (the Solution On/Off Indicator is lighted).
E1
Curtis 1210
Speed
Controller
Brake -
Bat -
• The S7 POS 1 limit switch on the scrub deck actuator must be closed to indicate that the scrub deck is
below the vacuum-only position.
• The A1 Control Board must receive a motion signal from the E1 Curtis Speed Controller.
When the Operator selects a drive direction and presses the go pedal:
• The Brake - switch on Pin 6 in the E1 Curtis Speed Controller closes to ground. This drops the voltage on
the Motion Input line on pin J3-6 from 24v down to nearly 0 volts to signal the A1 Control Board that the
machine is now in motion.
• The A1 Control Board switches the Brush Contactor line on pin J3-13 to battery ground to energize the coil
side of the K2 Brush Contactor to close the contacts and switch on the Brush Motor.
“Field” Voltage Measurements with Reference
to Battery Negative
Pin Number Wire Color Description Voltage
J3-13 WHT/RED Brush Contactor 24.3v - Brush Motor Off
0.2v Brush Motor On
Page 85

Deck Actuator Assembly
Scrub Deck Up
When the Scrub System is
switched from active to not active,
the Gang Switch in the A1 Control
Board
switches on the power to the
Brush Lift Actuator Motor M3.
Note: The Gang Switch
position determines the
polarity to run the Brush
Lift Actuator Motor
appropriate direction to
raise or lower the scrub
deck. The Gang Switch
is, in reality, a “virtual”
switch that is a type of
transistor driver circuit
in the A1 Control Board.
The Deck Actuator Assembly raises
the scrub deck until the Cam opens
the Upper Limit Switch. This shuts
off the power to the Brush Lift
Actuator Motor
.
in the
A1
Control Board
B+
B-
Gang
Switch
B-
B+
+5V
Act. Position 1 (5v)
+5V
Act. Position 2 (5v)
Scrub System 85Service Manual – SC1500
Deck Actuator Assembly
Upper
Limit
Switch
Lower
Limit
Switch
B-
J1-8
J2-12
J2-11
D YEL/BLK
C RED/VIO
F BLK/WHT
Cam
M
S7 POS 1
S6 POS 2
Brush Lift
Actuator
Motor M3
Scrub Deck in Vacuum-only Position
When the Scrub System is not
active and the Vacuum Power
Adjustment Switch is pressed to
enable the wet vacuuming mode,
the Gang Switch in the A1 Control
Board
switches on the power to the
Brush Lift Actuator Motor M3. The
Deck Actuator Assembly lowers the
scrub deck to POS (position) 1.
When the deck reaches POS 1 the
Cam closes the S7 POS 1 switch,
which drops the voltage seen
at the Act. Position 1 input from
5v to 0v. The Gang Switch then
switches polarity to run the Brush
Lift Actuator Motor
in the opposite
direction for a predetermined
period of time to compensate for
“overshoot” and position the deck
at just the right height. The A1
Control Board
then shuts off the
power to the Brush Lift Actuator
Motor
.
A1
Control Board
B+
B-
Gang
Switch
B-
B+
+5V
Act. Position 1 (0v)
+5V
Act. Position 2
Deck Actuator Assembly
Upper
Limit
Switch
Lower
Limit
Switch
B-
J1-8
J2-12
J2-11
D YEL/BLK
C RED/VIO
S7 POS 1
F BLK/WHT
S6 POS 2
M
Brush Lift
Actuator
Motor M3
Cam
Page 86

Scrub Deck at Normal Scrub Pressure
When the Scrub System is active,
the Gang Switch in the A1 Control
Board
switches on the power to the
Brush Lift Actuator Motor M3. The
Deck Actuator Assembly lowers the
scrub deck to the normal scrub
pressure position, POS (position) 2.
When the deck reaches POS 2 the
Cam closes the S6 POS 2 switch,
which drops the voltage seen at
the Act. Position 2 input from 5v
to 0v. The A1 Control Board then
shuts off the power to the Brush
Lift Actuator Motor
.
A1
Control Board
B+
B-
Gang
Switch
B-
B+
+5V
Act. Position 1
Scrub System 86Service Manual – SC1500
Deck Actuator Assembly
Upper
Limit
Switch
Lower
Limit
Switch
B-
J1-8
J2-12
D YEL/BLK
C RED/VIO
S7 POS 1
M
Brush Lift
Actuator
Motor M3
Scrub Deck at Extra Scrub Pressure
When the Scrub System is active
and either the Extra Pressure
Switch or Burst of Power switch
is pressed, the Gang Switch in the
A1 Control Board switches on the
power to the Brush Lift Actuator
Motor.
The Deck Actuator Assembly
lowers the scrub deck to the extra
scrub pressure position.
When the deck reaches its lower
travel limit, the Cam opens the
Lower Limit Switch. This shuts off
the power to the Brush Lift Actuator
Motor
.
+5V
Act. Position 2 (0v)
A1
Control Board
B+
B-
Gang
Switch
B-
B+
+5V
Act. Position 1
J2-11
F BLK/WHT
S6 POS 2
Cam
Deck Actuator Assembly
Upper
Limit
Switch
Lower
Limit
Switch
B-
J1-8
J2-12
D YEL/BLK
C RED/VIO
Cam
S7 POS 1
M
Brush Lift
Actuator
Motor M3
+5V
Act. Position 2
J2-11
F BLK/WHT
S6 POS 2
Page 87

Component Locations
The following components are included in this section:
• Scrub Deck
• Scrub Deck Motor
• Brush Motor Contactor (K2)
• Scrub Deck Actuator Assembly
The Scrub Deck is suspended underneath
the machine and pivots up and down on a
mechanical mount.
Scrub
Deck
Scrub System 87Service Manual – SC1500
The Scrub Deck Motor is mounted on the
top of the Scrub Deck. Note that the 20D
Scrub Deck and Brush Motor are shown
here.
Scrub Deck
Motor
Scrub
Deck
Page 88

Scrub System 88Service Manual – SC1500
The Brush Motor Contactor (K2) controls the power
to the scrub deck motor and is located inside the
control panel assembly.
The Scrub Deck Actuator Assembly
is attached to the Scrub Deck and
machine frame and lowers and
raises the Scrub Deck.
Brush Motor
Contactor (K2)
Scrub Deck
Actuator
Assembly
Page 89

Troubleshooting
Problem Cause Correction
Brush Motor not
running
Scrub Deck Actuator
not running.
Scrub Deck not
being lowered to
the vacuum-only
position
Scrub Deck not
being lowered to
the normal scrub
position.
No voltage to the K2 Brush
Contactor coil
No voltage through the
contacts on the K2 Brush
Contactor
No voltage to the Deck
Actuator Motor
No signal from Position
Switch 1, S7, to pin J2-12
on the A1 Control Board.
No signal from Position
Switch 2, S6, to pin J2-11 on
the A1 Control Board.
1. Check the voltage on pin J3-13 on the A1 Control
Board. The signal, referenced to ground, should
be 24.3v with the Brush Motor off, 0.2v with the
Brush Motor on.
2. Check the wiring from the Key Switch to the K2
Brush Contactor coil and repair as necessary.
1. Check circuit breaker CB4 and reset if necessary.
2. Check the coil resistance on the K2 Brush
Contactor. If the coil resistance is not 58.3 ohms
±10%, replace K2.
3. Check the continuity through the contacts on the
K2 Brush Contactor with the coil energized. If the
circuit is open, replace K2.
4. Check the wiring from battery positive to circuit
breaker CB4, and from CB4 to the K2 Brush
Contactor and repair as necessary.
5. Check the wiring from the K2 Brush Contactor to
the Brush Motor and repair as necessary.
6. Check the Brush Motor ground connection and
repair as necessary.
Check the voltage on pins J1-9 and J1-10 on the A1
Control Board. The signals, referenced to ground,
should be as follows:
Pin J1-9:
• 2.1v or 3.8v – actuator at rest
• 0.2v – actuator extending
• 22.9v – actuator retracting
Pin J1-10:
• 2.1v or 3.8v – actuator at rest
• 22.9v – actuator extending
• 0.2v – actuator retracting
Check the voltage on pin J2-12 on the A1 Control
Board. The signals, referenced to ground, should be
4.99v with the switch open and 0.03v with the switch
closed.
Check the voltage on pins J2-11 on the A1 Control
Board. The signals, referenced to ground, should be
4.99v with the switch open and 0.03v with the switch
closed.
Scrub System 89Service Manual – SC1500
Page 90

Scrub System 90Service Manual – SC1500
Removal and Installation
Scrub Deck
1. Turn the key switch on, then press the Scrub On/Off Switch to lower the scrub deck to the normal scrub
position. This will relieve the tension between the scrub deck actuator and the scrub deck.
2. With the scrub deck down and the key
switch on, disconnect the Actuator Electrical
Connector
wire tie to do this.
3. Turn the key switch off.
. Note that you may need to cut a
Actuator
Electrical
Connector
4. Make sure the Ball Valve from the solution tank to the
Filter is set to the off position.
Ball
Filter
Valve
Page 91

5. Loosen the Clamp and remove the
Solution Hose from the Solution
Solenoid Valve
. Note that a small
amount of solution may leak out from
the Solution Hose when you disconnect
it from the Solution Solenoid Valve.
6. Disconnect the Solenoid Electrical
Connector
.
7. Disconnect the Detergent Hose from
the Scrub Deck.
8. Remove the Vacuum Hose from the
Scrub Deck.
9. Press the rear of the Squeegee Mount
Bracket
to disengage it from the pins
on the Squeegee Link Weldment and
remove the Squeegee from the Scrub
Deck
.
Solution
Hose
Vacuum
Hose
Solution
Solenoid
Valve
Clamp
Scrub System 91Service Manual – SC1500
Solenoid
Electrical
Connector
Detergent
Hose
Scrub
Deck
Scrub
Deck
Squeegee
Mount
Bracket
10. Remove the four Shoulder Screws
holding the Lift Plate Weldment to the
Link Bar and the two Linkage Bars.
Note that you’ll need to hold the M10
Nyloc® nuts with a 17mm wrench
while you remove the Shoulder Screws.
Link Bar
Shoulder
Screw (4)
Squeegee
Mount
Bracket
Linkage
Bar (2)
Lift Plate
Weldment
Page 92

11. Remove the Shoulder Screw and nut that
connect the scrub deck actuator to the Lift
Plate Weldment
on the scrub deck. Note that
you’ll need to hold the M8 Nyloc® nut with a
13mm wrench while you remove the Shoulder
Screw
.
Service Tip: Note of the rotational position of the
screw hole in the Plunger when you
remove the Shoulder Screw. Be careful
not to rotate the Plunger once the
Scrub Deck Actuator is disconnected
from the scrub deck. This can cause
the Scrub Deck Actuator to get out of
adjustment.
Scrub System 92Service Manual – SC1500
Shoulder
Screw
Lift Plate
Weldment
12. Lift up the link bar and rotate the scrub deck
slightly (counterclockwise as viewed from
the top) to get some slack in the Scrub Deck
Ground Wire
.
13. Disconnect the Scrub Deck Ground Wire from
the scrub deck.
Plunger
M8 Nyloc®
Nut
Scrub Deck
Ground Wire
Scrub Deck
Actuator
Shoulder
Screw
Page 93

14. Disconnect the Scrub Deck Motor Electrical
Connector
.
15. Carefully slide the deck out of the machine.
Service Tip: The scrub motors on the
20R REV™ scrub decks are slightly
taller than the motors on 20D decks.
When you remove a 20R REV™ scrub
deck you’ll need to jack up and block the
front of the machine slightly in order
to get adequate clearance to remove the
deck from the machine.
16. Reinstall the deck by following the above
steps in reverse order.
Caution: Note that the scrub deck actuator will automatically raise the scrub deck when you
reconnect the Actuator Electrical Connector.
Scrub System 93Service Manual – SC1500
Scrub Deck Motor
Electrical
Connector
Service Tip: When you reinstall
the scrub deck, make sure you
have all 16 Link Arm Bushings
and all eight 12mm Flat Washers
installed in the Link Bar and
Linkage Bars before reinstalling
the Shoulder Bolts and Nyloc
Nuts
.
®
Link Bar
Linkage
Bar (2)
Nyloc
Nut (8)
Shoulder
Bolt (8)
12mm Flat
Washer (8)
Link Arm
Bushing (16)
Page 94

Scrub System 94Service Manual – SC1500
Scrub Deck Actuator Assembly
1. Turn the key switch on, then press the Scrub On/Off Switch to lower the scrub deck to the normal scrub
position. This will relieve the tension between the scrub deck actuator and the scrub deck.
2. With the scrub deck down and the key
switch on, disconnect the Actuator Electrical
Connector
wire tie to do this.
3. Turn the key switch off.
4. Disconnect and remove the battery closest
to the scrub deck actuator to get enough
clearance to remove the actuator.
. Note that you may need to cut a
Actuator
Electrical
Connector
5. Remove the Shoulder Screw and nut that
connect the scrub deck actuator to the Lift
Plate Weldment
on the scrub deck. Note that
you’ll need to hold the M8 Nyloc® nut with a
13mm wrench while you remove the Shoulder
Screw
.
6. Remove the M10 Screw and actuator spacer
holding the Scrub Deck Actuator to the Actuator
Bracket
on the machine frame.
7. Carefully remove the Scrub Deck Actuator from
the machine.
Shoulder
Screw
Lift Plate
Weldment
M10
Screw
Actuator
Bracket
Scrub
Deck
Actuator
Page 95

Service Tip: Ifyou’regoingtoreinstalltheScrub
Deck Actuator
without readjusting
the Plunger position. be careful not to
rotate the Plunger with the Scrub Deck
Actuator
out of the machine. This can
cause the Scrub Deck Actuator to get
out of adjustment.
8. Reinstall the scrub deck actuator by following the above
steps in reverse order.
Note: Ifyou’reinstallingareplacementscrub
deck actuator assembly, or if the scrub
deck actuator assembly has gotten out of
adjustment, you’ll need to set the plunger
position as described in the Scrub Deck
Actuator Adjustment subsection below.
Caution: Note that the scrub deck actuator will
automatically raise the scrub deck
when you reconnect the Actuator
Electrical Connector and battery.
Scrub System 95Service Manual – SC1500
Scrub Deck
Actuator
Plunger
Scrub Deck Actuator Adjustment
The Scrub Deck Actuator adjustment consists of setting the plunger position with the retracted travel limit
switch actuated. To set the Actuator Plunger position:
1. Drive the actuator motor to the up (fully
retracted) position using the Service Test
Mode or a jumper to the batteries.
2. Wait until the motor stops running due to
travel limit switch opening.
Note: Do not allow the Plunger to
bottom out against the motor
housing.
3. Rotate the Plunger to 10.34” (263 mm)
measured from end to end as shown.
Service Tip: Be careful not to
rotate the Plunger
prior to installing the
Scrub Deck Actuator
into the machine. This
can cause the Scrub
Deck Actuator
to get
out of adjustment.
10.34”
[263mm]
Scrub Deck Actuator
Plunger
Page 96

Specications
Component Specications
Voltage – 24 VDC
Scrub System 96Service Manual – SC1500
20D Scrub Deck Brush
Motor
20R REV
Motor
K2 Brush Contactor Nominal Coil Resistance – 58.3 ohms ±10%
™
Scrub Deck
RPM – 140
Current Draw – 20 Amps
Output Power – 380 Watts / 1/2 HP
Voltage – 24 VDC
RPM – 2200
Current Draw – 28 Amps
Output Power – 560 Watts / 3/4 HP
Voltage – 24 VDC
Output Power – 1/6 HP
Total Travel – 4.00” ±0.15”
Scrub Deck Actuator
Gearbox Ratio – 20.23:1
Performance Data
Thrust – 0 lbs.
No load
Full load
Starting Thrust – 700 lbs.
Speed – 42.5 in/min
Current Draw – 1.8 ±1.0 Amps max.
Thrust – 600 lbs.
Speed – 34 in/min
Current Draw – 7.0 ±1.0 Amps
Page 97

Solution System
Functional Description
The Solution System is a gravity-feed system that supplies cleaning solution to the scrub brush/pad on the
scrub deck. The detergent, supplied from the detergent tank and pump, is added to the solution upstream
of the scrub deck. The Solution Solenoid Valve controls the solution ow to the scrub deck. The A1 Control
Board sends a pulsed voltage signal to the Solution Solenoid Valve that opens and closes the Valve to
regulate the solution ow according to the ow rate selected with the solution ow adjustment switch.
The Solution System includes the Solution Tank, Water Filter, Solution Solenoid Valve Assembly and
associated valves and hoses.
Solution Tank, Water Filter and Valves
The Solution Tank holds
approximately 12 gallons [45
liters] of water/solution.
97Service Manual – SC1500
The Ball Valve controls the
solution ow to the Water Filter
and downstream Solution Hose
that is plumbed to the Solution
Solenoid Valve.
The Water Filter can be
disassembled for cleaning.
Solution
Tank
Solution Hose
(to Solution
Solenoid Valve)
Water
Filter
Ball
Valve
Page 98

Solution Solenoid Valve
The L1 Solution Solenoid Valve controls the solution ow to the
scrub deck. The solution from the solution tank enters the L1
Solution Solenoid Valve
the rear port to the scrub deck as shown.
The two wires in the Electrical Connector get power from
the key switch and pin J3-11 - Solution Solenoid on the A1
Control Board.
The A1 Control Board sends a modulated signal through
Pin J3-11 to switch the L1 Solution Solenoid Valve to ground
and open the L1 Solution Solenoid Valve for a period of time
corresponding to the selected solution ow rate. The period of
time during which the solution solenoid is energized (open) is
referred to as the “duty cycle” and is a percentage of the total
six-second cycle.
through the side port and exits through
Solution System 98Service Manual – SC1500
Electrical
Connector
Outlet to
Scrub Deck
For example, a 50-percent duty cycle would energize and open
the L1 Solution Solenoid Valve for three seconds during every
six-second cycle.
Note: 100 percent duty cycle is full solution
owwiththeL1 Solution Solenoid Valve
continuously open.
Inlet from
Solution Tank
L1 Solution
Solenoid
Valve
Page 99

Detergent System
The Detergent System uses an electric diaphragm
Detergent Pump to inject detergent from the
Detergent Cartridge into the cleaning solution
upstream of the scrub deck. The A1 Control Board
sends voltage pulses to the Detergent Pump that
alternate polarity to move the pump plunger and
diaphragm in and out to control the Detergent
Pump
output. This allows the A1 Control Board
to inject the correct amount of detergent for the
solution ow rate and detergent percentage/ratio
selected by the Operator.
Solution System 99Service Manual – SC1500
Detergent
Pump
Detergent
Cartridge
Page 100

Circuit Descriptions
Solution Solenoid Valve Off
Bat +
BRN/VIO
Solution Line from
Solenoid Valve
to Scrub Deck
1
SPST Key
Switch
S1
Solution System 100Service Manual – SC1500
2
A1
Control Board
VIO/BLK
J3-11
Solution
Solenoid
Bat -
E1 Curtis
1210 Speed
Controller
+24v
Motion Input 24v
J3-6
RED/WHT
Pin 6
Brake -
Bat -
L1 Solution
Solution Line from
Solution Tank
Solenoid Valve
(closed)
When the machine is stationary:
• The Brake - switch on Pin 6 in the E1 Curtis Speed Controller is open and is not sending the drive signal to
the Motion Input line on pin J3-6 on the A1 Control Board.
• The Solution Solenoid switch on pin J3-11 is open, and the L1 Solution Solenoid Valve is de-energized and
closed. This prevents solution ow from the solution tank to the scrub deck.
If the Solution System is disabled, the Solution Solenoid switch on pin J3-11 will remain open regardless of
whether or not the A1 Control Board receives a drive signal from the E1 Curtis Speed Controller.
 Loading...