

Page 1
Instructions/Spare Parts Manual
Nilfisk Model GWD120
Nilfisk Model GWD220
(single motor)
(dual motor)
Wet/Dry Tank Vacuum
CAUTION: This Nilfisk vacuum cleaner is not to be used in explosion-hazardous areas, as
serious injury could result.
Under no circumstances may this vacuum cleaner be used safely for the collection of hazardous or
toxic materials unless equipped with a HEPA filter. Be sure to install the HEPA filter according to
Nilfisk’s written instructions.
Do not use this cleaner for the removal of hazardous substances unless you are licensed and/or
certified for this work by the all authorities having jurisdiction.
EMPTYING: If this vacuum cleaner is used to collect hazardous material, do not attempt to open
or empty its contents without personal protective clothing and respiratory protection. This
procedure must be completed in a contained environment. Contact with the cleaner, filters and all
other accessories used when picking-up hazardous materials must be handled according to federal
(EPA, OSHA), state and local regulations valid for the vacuumed substance.
ATTENTION EMPLOYER: Please ensure these instructions for use are made available and
understood by your employees or any other persons who may use this equipment.
To list all toxic and hazardous materials would be beyond the scope of these instructions. It is the
Employer’s responsibility to identify, for Employee’s and others’ information, hazardous or toxic
materials which may be collected by this equipment. Such information must be communicated to
your Employees and other potential users of this equipment.
Nilfisk-Advance America Inc.
300 Technology Drive
Malvern, PA 19355
Tel: 1.610.647.6420
Fax: 1.610.647.6427
www.pa.nilfisk-advance.com
e-mail: email@nilfisk-advance.com
Page 2
Page 3
Page 4
1
2
Figure A
3
2
4
5
3
Figure B
Figure C
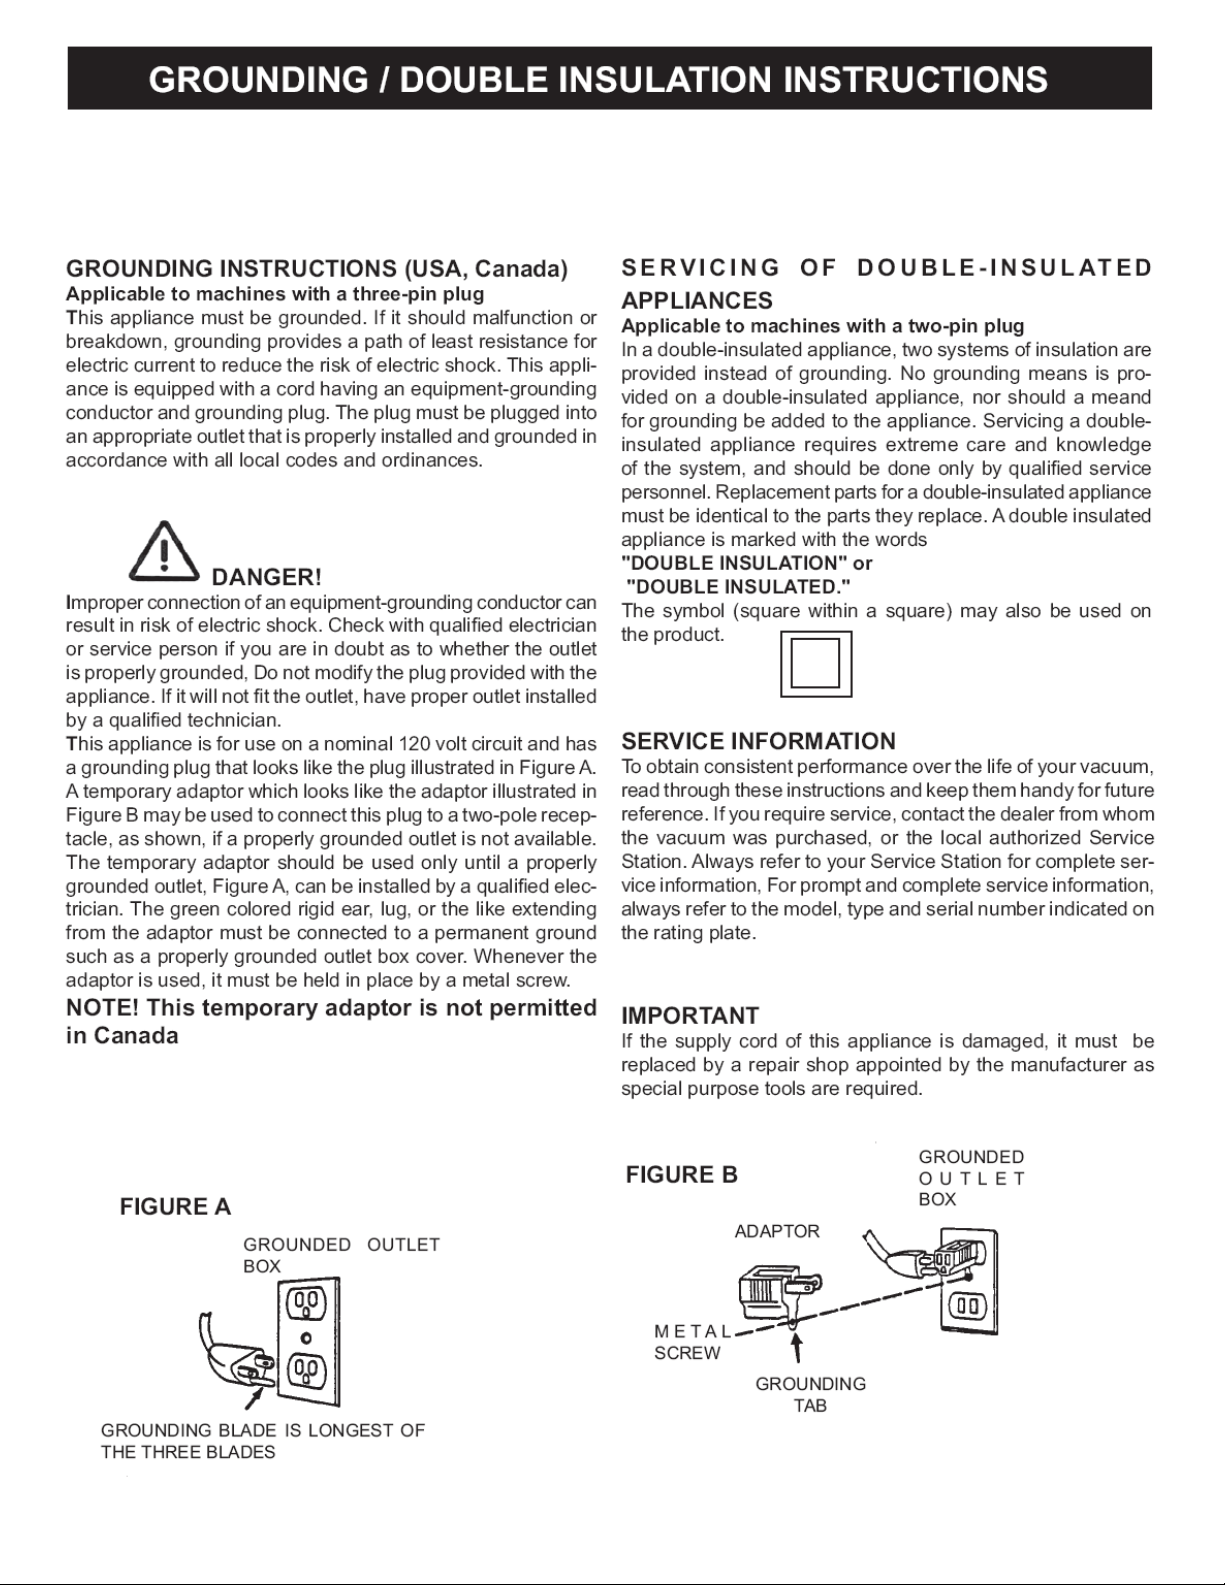
Machine Configuration
Standard Configuration (Figure A, below)
The GWD120 and 220 model vacuum cleaners are configured for wet/dry collection. The
machines are equipped from the factory with a standard float basket (1) that is designed to shut off
the flow of air when the liquid in the tank reaches the maximum level. The machines are also
equipped with a main filter (2). This filter is washable and does not need to be removed when
collecting wet materials.
Optional HEPA filter/Dust Bag for Dry Use Only (Figure B, below)
If the machines are used for dry collection only, the standard float (1) can be removed and
replaced with an optional, upstream HEPA filter (3) (see HEPA Installation on next page). [NOTE:
Do not use the vacuum cleaner to collect wet materials without the float in place. This would allow
water to enter the motorhead, which could damage the machine.] The main filter (2) should be
used when collecting dry materials. The main filter will protect and prolong the life of the HEPA
filter. Optional dust bags are available for the GWD120 and 220 machines (see parts lists for
optional filters).
Optional HEPA filter/Float Chamber for Wet/Dry Collection (Figure C, below)
If a HEPA filter is required during wet/dry collection, the standard float basket must be replaced
with the optional float chamber assembly (4). The float chamber is a float device with a protective
housing that surrounds the HEPA filter. It is designed to protect the HEPA filter from moisture
during wet collection. A foam filter (5) is included with the float chamber to prevent debris from
entering the float ball cavity. The main filter (2) can not be used with the optional float chamber
and should be removed from the machine.
(std. wet/dry use)
(dry use with HEPA)
(wet/dry use with HEPA)
Page 5
Optional
H
EPA
Filter
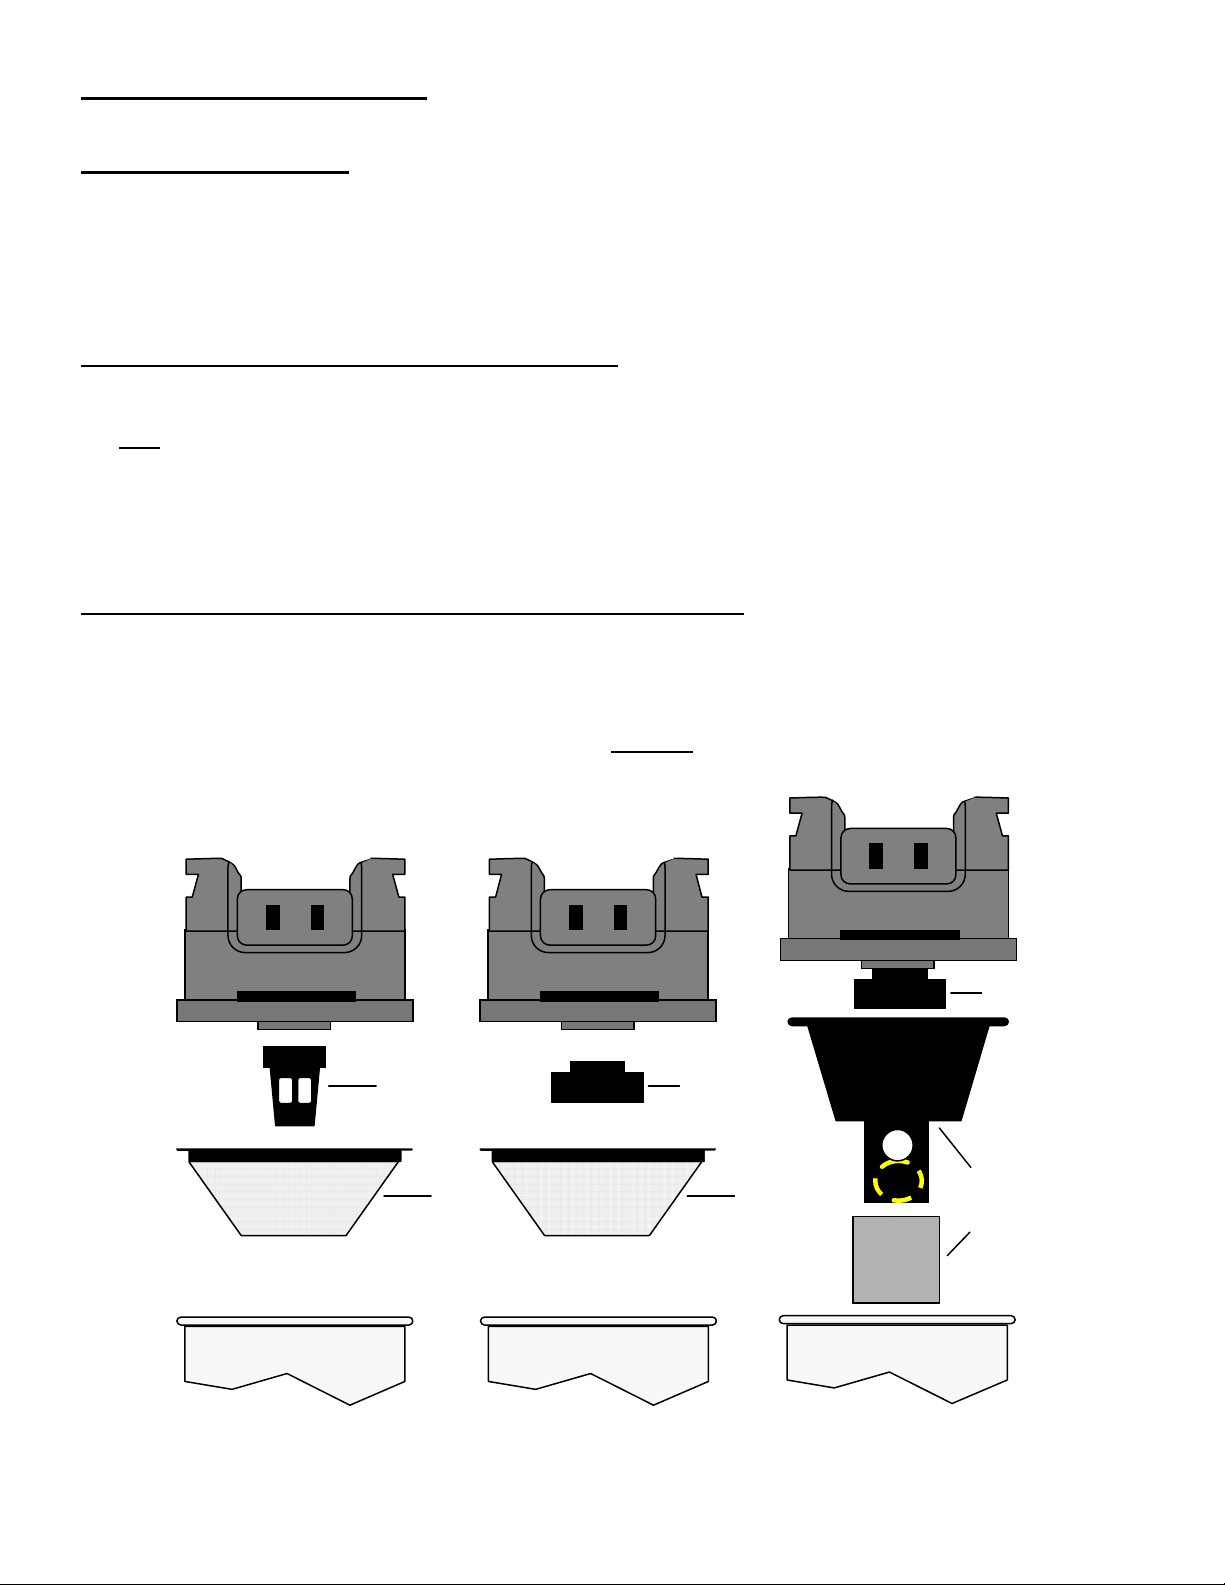
Assembly and Operation of Machine
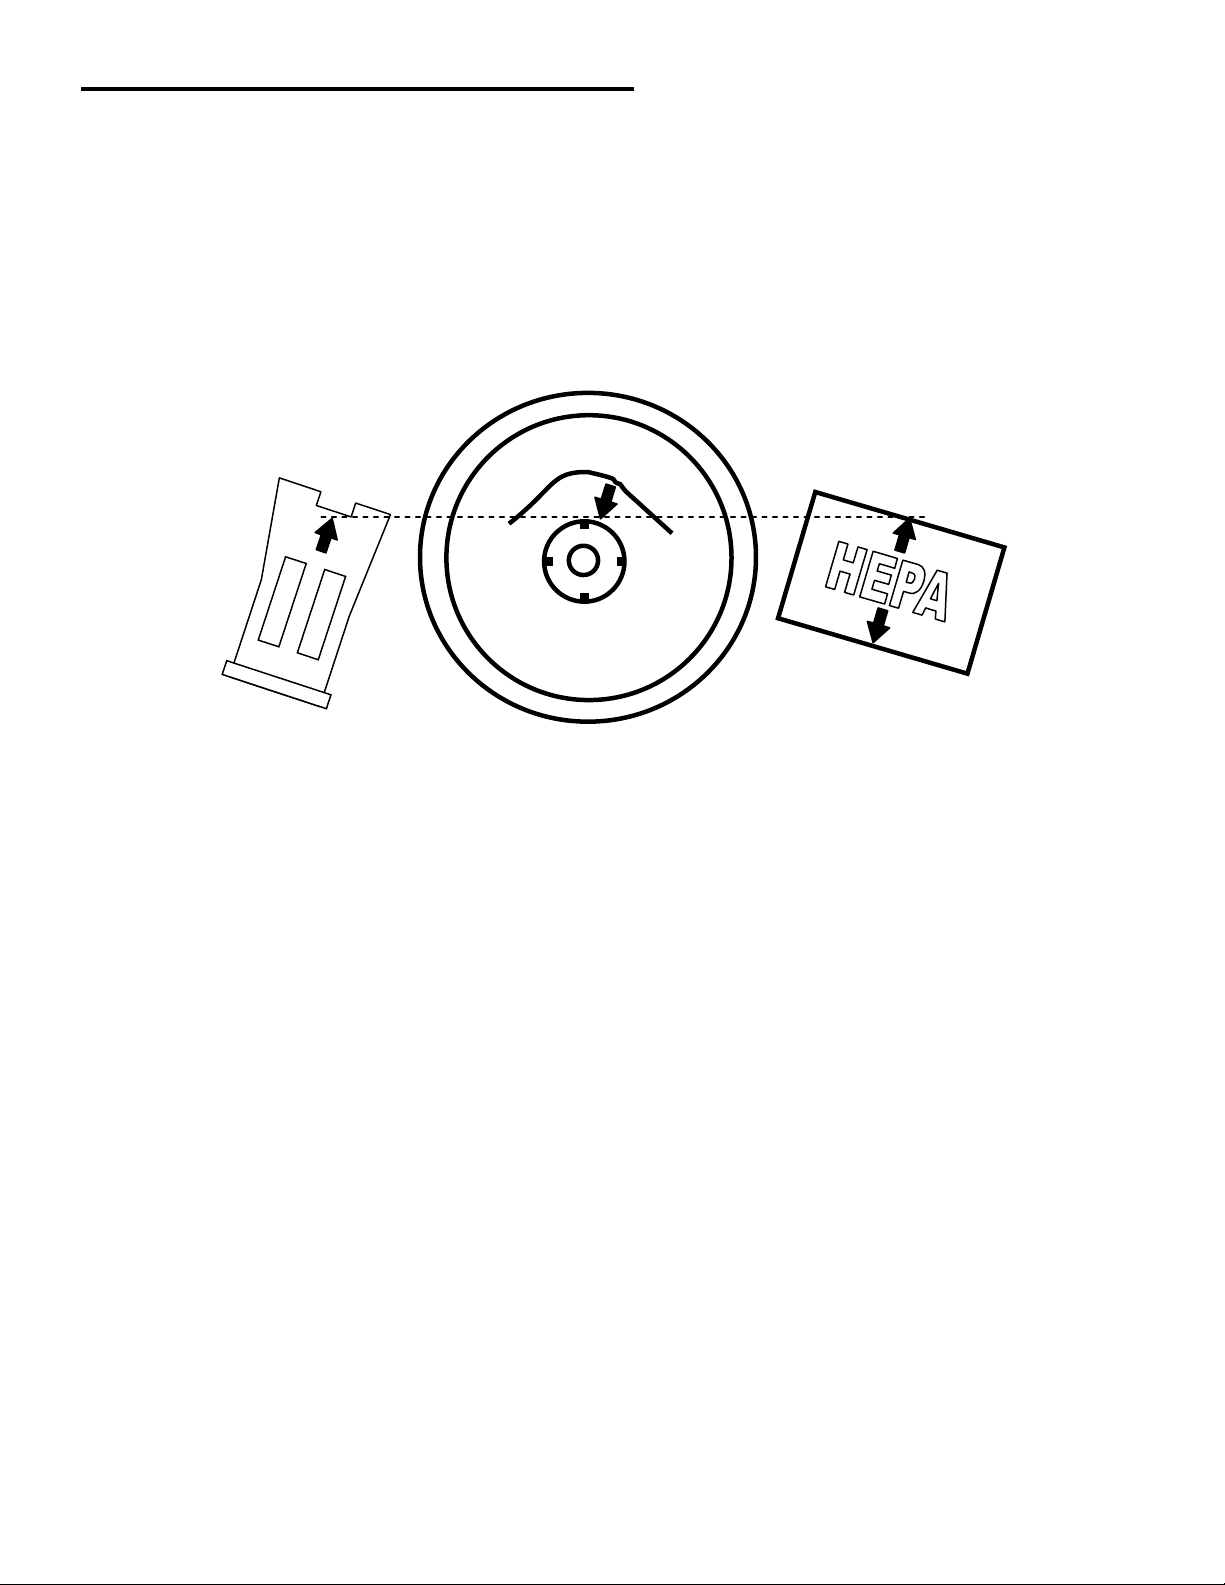
Float Basket / Optional HEPA Filter
The float basket also serves as the support for the main filter. It will prevent the filter from
collapsing under vacuum pressure. The float basket and the optional HEPA filter are mounted in
the same location under the motor head. If the optional HEPA filter is used, the float basket must
be removed. Once installed, the HEPA filter will serve as the support for the main filter. If the
HEPA filter is removed from the machine, be sure to reinstall the float basket before continuing to
use the main filter.
Installation / Removal of Float Basket
1. To install the float basket, align the arrow on the outside of the basket with the arrow on the
underside of the motor head as shown above. Make sure the float inside is oriented properly with
the open end facing downward. Twist the float basket clockwise until it locks into place.
2. To remove the float basket, twist the support counterclockwise until it unlocks from the motor
head. Remove the float basket and inspect the condition of the foam motor gasket underneath. If
gasket is dirty or damaged, replace it.
Installation / Removal of HEPA Filter
EMPTYING: If this vacuum cleaner is used to collect hazardous material, do not attempt to open
or empty its contents without personal protective clothing and respiratory protection. This
procedure must be completed in a contained environment. Contact with the cleaner, filters and all
other accessories used when picking-up hazardous materials must be handled according to federal
(EPA, OSHA), state and local regulations valid for the vacuumed substance.
1. Before installing the optional HEPA filter, make sure the float basket has been removed from
the underside of the motor head. Align the arrow on the HEPA filter with the arrow on the motor
head as shown above. Twist the HEPA filter clockwise until it locks into place.
2. To remove the HEPA filter, twist the filter counterclockwise until it unlocks from the motor head.
Remove the HEPA filter and inspect the condition of the foam motor gasket underneath. If gasket
is dirty or damaged, replace it.
Float Basket
Underside of motor head
Page 6

Assembly and Operation of Machine (continued)
NOTE: Unplug the machine before servicing, emptying or assembling.
Connect the suction hose to the tank by pushing the hose coupling directly into the machine’s inlet.
The hose should click into place. To remove the hose, press the release button at the top of the
inlet and pull the hose straight out. Slide one of the extension tubes over the hose handle and
slide the other tube over the end of the first tube. Select the appropriate insert for the floor tool and
lock the insert in place using the red sliding tabs on top of the floor tool. Plug the extension tube
into the neck of the floor tool and press the assembly together.
The height of the machine’s handle is adjustable. Loosen the locking screws on each side of the
handle and adjust height to the desired position. Tighten the screws to secure the handle in place.
Make sure the power switch(es) are off (indicated by position “0”) before connecting the machine to
its power source. Plug the power cord into a suitable electrical outlet. Turn the machine ON by
pressing the power switch(es) to the position marked “I”.
Wet Pick up
This machine is equipped with a float that shuts off the airflow through the machine when the
maximum liquid level is reached. A noticeable change in sound level will occur when the float has
actuated. This will be accompanied by a sudden loss of suction power. When this occurs, turn the
machine off.
Emptying the Container
Release the latch on each side of the motorhead and lift the motorhead off of the container.
Remove the main filter and/or float chamber (if equipped). Place one foot behind the rear wheel of
the machine to prevent the machine from moving while emptying. Grasp the handle at the bottom
of the tank and tilt the container backwards to empty. Clean or replace the filters if necessary
before reinstalling. Replace the motorhead onto the container and secure in place using the
latches.
NOTE: Inspect and clean the float system after each use to insure that the float is working
properly. Use a chemical defoaming agent when picking up water containing foaming detergents.
Use only a defoamer recommended by the detergent manufacturer.
Cleaning the Main Filter
The main filter is washable. To clean the filter, remove it from the machine and shake off all excess
debris. Wash the filter gently in water. A mild detergent can be used. Allow the filter to dry
thoroughly before collecting dry materials. To reduce drying time, replace the filter inside the
machine and turn the vacuum on. The air from the vacuum motor will help to dry the filter.
The foam filter on the float chamber is also washable. Shake off any loose debris and wash the
filter gently in water.
The HEPA filter is not washable and no maintenance should be performed on the HEPA filter.
Once the HEPA filter becomes clogged it should be disposed of in accordance with federal (EPA,
OSHA), state and local regulations.
Page 7
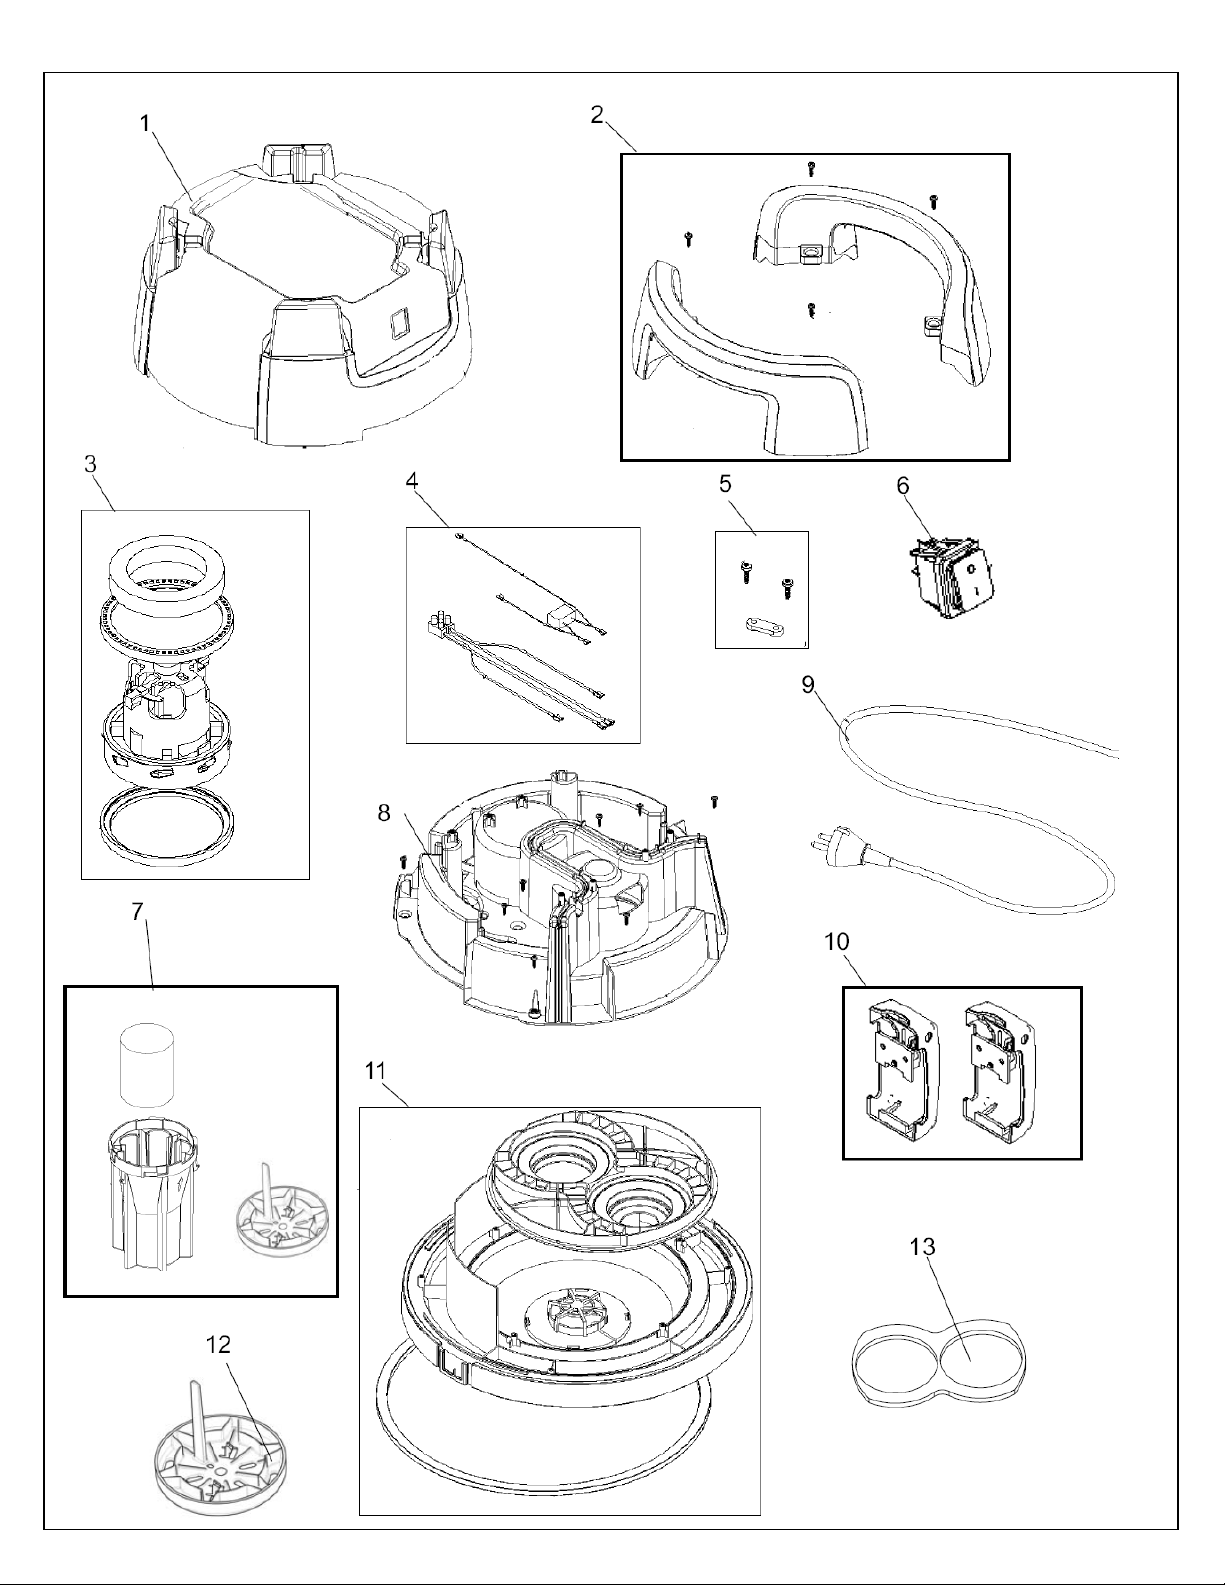
Parts Explosion – GWD120 Motorhead Assembly (single motor)
Page 8

Parts Explosion – GWD120 Motorhead Assembly (single motor)
Page 9

Parts Explosion – GWD220 Motorhead Assembly (dual motor)
Page 10

Parts Explosion – GWD220 Motorhead Assembly (dual motor)
520
Page 11

Parts Explosion – GWD120/220 Container Assembly
Page 12

Parts Explosion – GWD120/220 Container Assembly
Page 13

Parts Explosion – GWD120/220 Trolley Assembly
Page 14

Parts Explosion – GWD120/220 Trolley Assembly
Page 15

Parts Explosion – GWD120/220 Hose and Accessories
Page 16

Parts Explosion – GWD120/220 Hose and Accessories
Page 17

(Optional)
Parts Explosion – GWD120/220 Standard and Optional Filters
(Optional)
(Optional)
4
(Optional)
3
5
(Standard)
6
(Standard)
Page 18

Parts Explosion – GWD120/220 Standard and Optional Filters
1 147 0746 010 1 Dust Bag (3/pack) Optional
2 M90041 1 Float Chamber Assembly Optional - Required
w/ Foam Impact Filter when using HEPA
for wet collection
3 01786000 1 Foam Impact Filter Optional
4 140 8678 500 1 HEPA filter Optional
5 140 9512 500 1 Main Filter Standard
6 140 8682 500 1 Motor Filter Standard
Page 19

Parts Explosion – GWD120/220 Optional Fixed Front Nozzle
Page 20

Parts Explosion – GWD120/220 Optional Fixed Front Nozzle
Page 21

Warranty
The Nilfisk companies warrant that Nilfisk equipment will be free of defects in workmanship or material for a period of
two years from the date of delivery. Should any failure to conform to this warranty appear, the Nilfisk companies
shall upon notification within such time period, correct such non-conformity, at its option, either by repairing any
defective part or parts, or by replacing a part or parts provided that the equipment is returned to an authorized Nilfisk
service facility. In all cases freight both ways will be at the expense of the customer. Equipment shall not be
returned without advance notice to, and consent of the Nilfisk companies.
EXCEPT AS SPECIFICALLY SET FORTH HEREIN, THE NILFISK COMPANIES MAKE NO WARRANTIES, EITHER
EXPRESSED OR IMPLIED AS TO ANY MATTER WHATSOEVER, INCLUDING WITHOUT LIMITATION ANY AND
ALL WARRANTIES OF MERCHANTABILITY, FITNESS FOR PURPOSE, OR OTHER WARRANTIES, ALL OF WHICH
ARE EXPRESSLY DISCLAIMED AND EXCLUDED. NEITHER PARTY SHALL BE LIABLE TO THE OTHER FOR
SPECIAL, INDIRECT, INCIDENTAL OR CONSEQUENTIAL DAMAGES, INCLUDING BUT NOT LIMITED TO LOSS
OF PRODUCTION, LOSS OF TIME, LOSS OF PROFITS OR OTHER SIMILAR INDIRECT LOSSES WHICH MIGHT
OCCUR AS A RESULT OF DEFECTS, PARTIAL OR TOTAL FAILURE OF THE PRODUCT TO PERFORM AS
SPECIFIED.
Correction of non-conformities or defects in the manner and for the period of time provided above, shall constitute
fulfillment of all liabilities of the Nilfisk companies to the customer, whether based on contract, negligence or
otherwise with respect to, or arising out of such equipment. The remedies set forth herein are exclusive, and the
liability of the Nilfisk companies with respect to this sale or anything done in connection therewith, whether in
contract, in tort, under any warranty, or otherwise, shall not except as expressly provided herein, exceed the price of
the equipment or part on which such liability is based.
The warranty does not cover repairs due to normal wear and tear, accident, neglect, misuse or abuse,
incorrect installation or use other than as described in the instruction booklet. Breaks in hoses and cables
are not covered. This warranty is rendered void if the motor number plate is removed or defaced or if repairs
are made or attempted by persons not authorized by the Nilfisk companies.
Nilfisk-Advance America Inc.
300 Technology Drive
Malvern, PA 19355
Tel: 1.610.647.6420
Fax: 1.610.647.6427
www.pa.nilfisk-advance.com
e-mail: email@nilfisk-advance.com
 Loading...