

Page 1
Handy 2-in-1
Instructions for use
81942401 r (11.2018)
EN-DE-FR-ES-PT-IT-NL-SV-NO-DA-FI-EL-TR-CS-SL-SK-HU-RO-BG-PL-JA-RU
Page 2

Handy 2-in-1
Operating Instructions ................................ 3
Betriebsanleitung ...................................... 10
Instructions d’utilisation ............................ 18
Instrucciones de manejo........................... 26
Instruções de operação ............................ 33
Istruzioni sull’uso ...................................... 41
Gebruiksaanwijzing .................................. 48
Instruktionsbok ......................................... 55
Instruksjonsbok......................................... 62
Instruktionsbog ......................................... 69
Käyttöohje................................................. 76
Οδηγίες χρήσης ........................................ 83
Kullanım Kılavuzu ..................................... 91
Návod k obsluze ....................................... 99
Navodila za uporabo............................... 106
Návod na použitie ................................... 113
Használati útmutató ................................ 120
Instrucţiuni de utilizare ............................ 127
Инструкции за употреба ....................... 134
Instrukcja użycia ..................................... 142
取扱説明書 .............................................. 149
Инструкция по эксплуатации................ 156
WEEE .............................................. 164-167
Page 3
Survey
1
2
3
8
6
14
16
Only on selected models
4
5
13
15
11
12
7
10
18
21
22
20
19
9
17
23
Prepare your
vacuum
cleaner
3.2.3
Click
24
3.2.1
3.2.4
3.2.2
Click
3.2.5
Page 4
Using your
vacuum
cleaner
3.3
Charging the
battery
4.3
4.1
4.4
4.2
Waste disposal
5.3
Press
5.1 5.2
5.4
Click
5.5
Page 5

Service and
maintenance
6.4.1
6.4.2
Product disposal
6.4.3
Attach the belt
6.4.4
7.1
6.4.4
7.2
NiMH
Li-lon
NiMH Li-lon
7.3
Page 6

Handy 2-in-1
T
S
U
G
A
U
Index
1. Overview .......................................................3
2. Safety instructions .........................................3
3. Instruction for use ..........................................5
4. Charging the battery ......................................5
5. Waste disposal ..............................................6
6. Service and maintenance ..............................6
7. Product disposal ............................................7
8. Guarantee and service ..................................7
9. Technical Specifi cations ................................8
10. Accessories Kit ..............................................9
11. CE Declaration of Conformity ........................9
12. WEEE ........................................................164
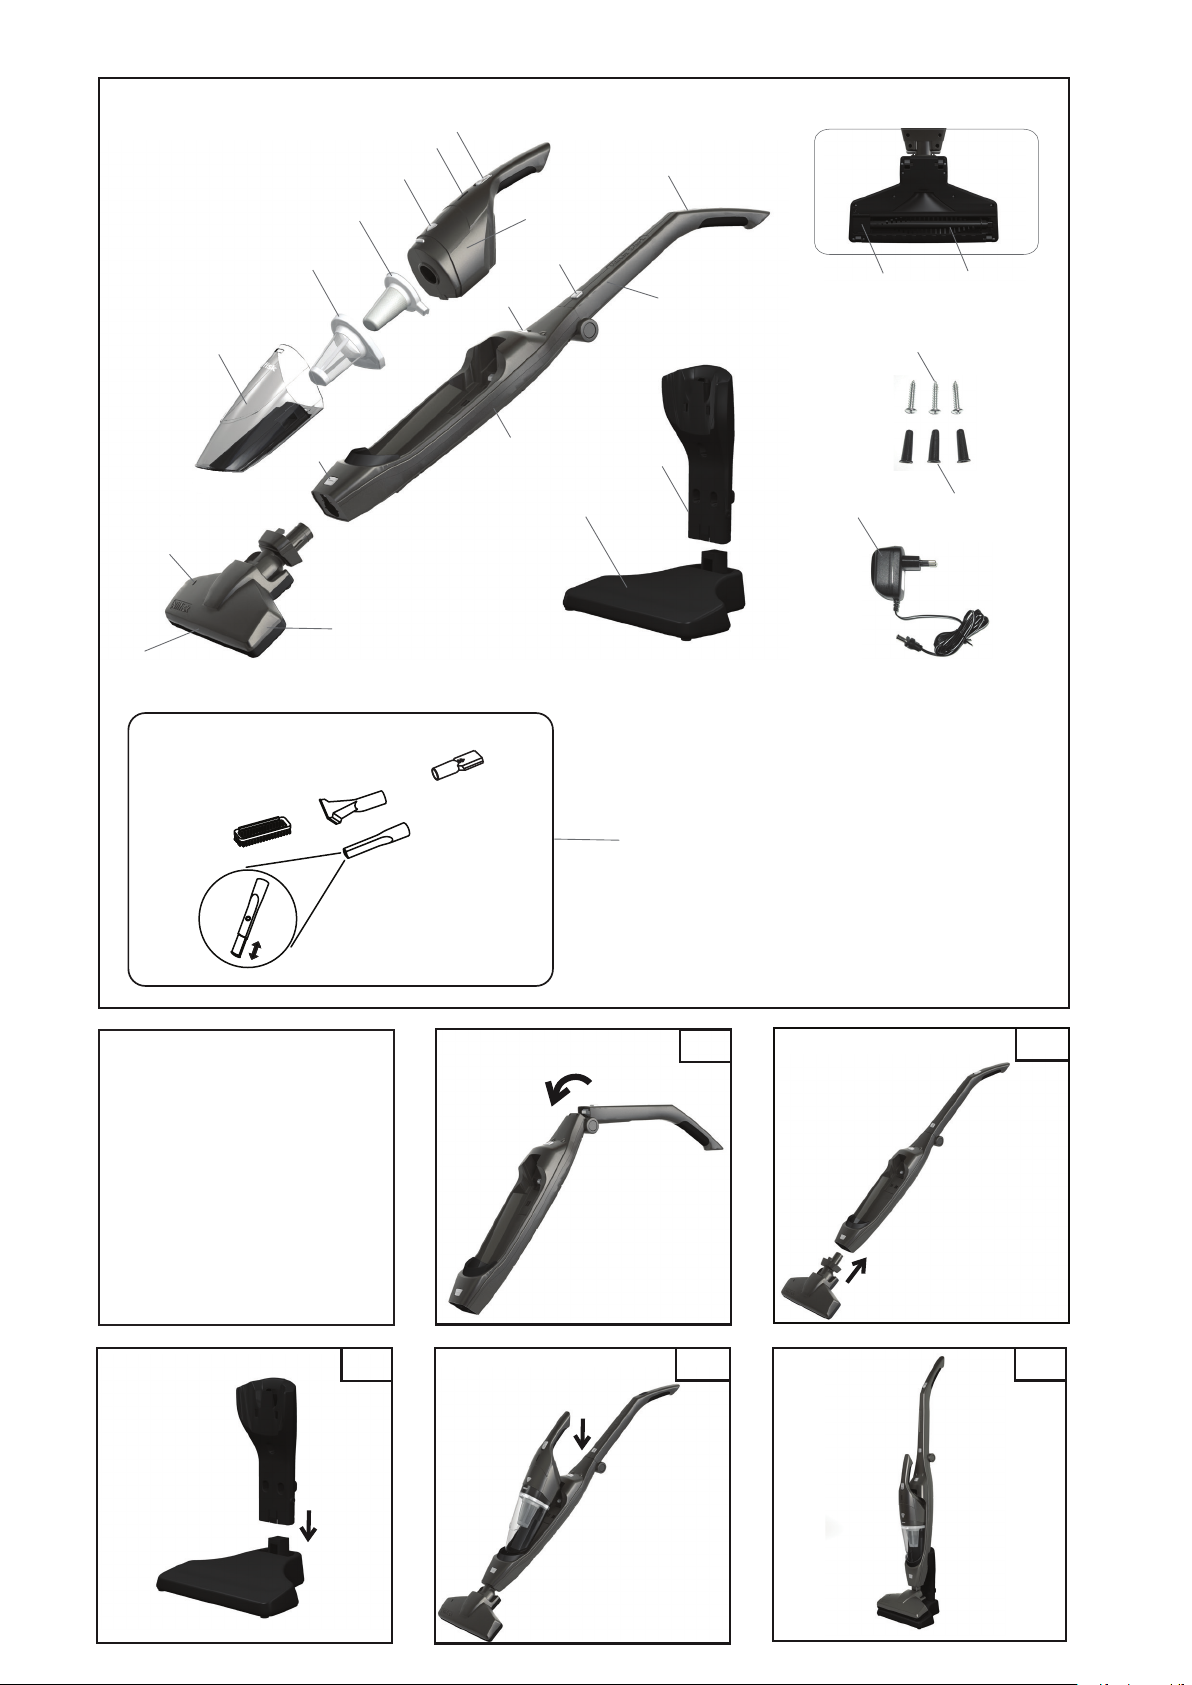
1. Survey
1 On/Off switch (hand unit)
2 Charging indication light
3 Dust container release button
4 Secondary fi lter
5 Primary fi lter
6 Dust container
7 Vacuum unit
8 On/Off switch (stick unit)
9 Folding handle
10 Handle lock button
11 Hand unit release button
12 Stick body
13 Floor brush lock button
14 Floor brush indicator
15 Floor brush
16 Light (only Li-lon models)
17 Rotating brush cover
18 Rotating brush
19 Charging stand
20 Charging base
21 Wall-mount screws
22 Wall-mount anchors
23 Adapter
24 Accesories kit (only on selected models)
2. Safety instructions
been given supervision or
instruction concerning use
of the appliance in a safe
way and understand the
hazards involved.
• Children shall be supervised to make sure that
they do not play with the
appliance.
• Cleaning and user maintenance shall not be made
by children without supervision.
• This product is designed
for vacuuming small areas
of dry material only; Do not
use for vacuuming water or
other liquids.
• Sparks inside the motor can ignite fl ammable
vapours or dust. Do not
vacuum or use this product
near fl ammable or combustible liquids (e.g., gasoline or other fuels, lighter
fl uid, cleaners, oil-based
paints), gases (e.g., natural
gas, hydrogen), or explosive dust (e.g., coal dust,
magnesium dust, grain
EN
FR
I
NL
SV
NO
FI
L
R
C
SL
SK
H
dust, gunpowder).Do not
• This appliance can be used
by children aged from 8
years and above and persons with reduced physical,
sensory or mental capabilities or lack of experience
and knowledge if they have
Original instructions
vacuum anything that is
smoking or burning (e.g.,
cigarettes, matches, hot
ashes). Never vacuum toxic materials as the vapours
or dust may cause a health
hazard.
3
RO
B
L
J
R
Page 7

Handy 2-in-1
T
S
U
G
A
U
EN
FR
I
NL
SV
NO
• Close attention is necessary when used by or near
children or pets. Never use
this product on pets.
• Only use original AC adapter.
• The appliance must only
be supplied at SELV (Safety Extra Low Voltage).
• Never use a damaged
vacuum, AC adapter, or
charging base.
• Do not mutilate or incinerate the battery packs, as
they will explode at high
temperatures.
adapter base; do not pull
on the cord.
• Do not put any stress on
the adapter cord where it
connects to the product,
as the cord could fray and
break.
• If using an extension
cord with this product, the
marked electrical rating of
the cord set or extension
cord must be at least as
great as the electrical rating of the product.
• Do not operate this product
if it has a damaged adapter
FI
C
SL
SK
H
RO
• Do not plug/unplug the
AC adapter into/from the
electrical outlet with a wet
hand. Dry the product com-
L
pletely before placing it
onto the charging base.
R
• Do not place or drop the
product into water or other
liquids. If the product falls
into water or other liquid,
do not touch or reach into
the water.
• Do not charge the product
if the power cord is cut,
damaged, or if the wires
are exposed.
cord or plug, malfunctions,
is dropped or damaged, is
left outdoors, or is dropped
in water. All repairs must
be carried out by an authorized service centre.
• Do not use this product
outdoors. For optimal operation, keep the product
in a location that does not
exceed 40°C (104°F).
• Do not operate the product
while it is charging.
• Keep the charging base
where it will not be subjected to heat, fl ames, or
B
• Keep th e adapter cord
and the product away from
L
heated surfaces.
• To disconnect the AC
J
R
adapter from an electric
outlet, pull directly on the
4
liquids.
• Never insert objects into
any of the openings in the
product. Do not use the
product if any of the openings are blocked.
Original instructions
Page 8

Handy 2-in-1
T
S
U
G
A
U
• Do not use the product to
vacuum metal objects such
as coins, screws, nails,
tacks, etc.
• Make sure to check that
the wheels and the brush
on the nozzle are clean in
order to avoid scratching of
sensitive fl oors.
• Empty the product after
each use. Keep it free of
dust, lint, hair, or anything
that reduces airfl ow.
• Keep hair, loose clothing,
and body parts away from
openings or moving parts,
especially the part of the
product where there is suction.
• Never place the vacuum
nozzle near your face, especially eyes and ears,
during operation.
• Do not use the product
without the fi lters and the
dust container in place.
• Take care when using the
product on stairs in order to
prevent falls.
• The battery charging terminals on the vacuum cleaner
and the charging base
must be kept clean and
free of debris.
• Only use the charging base
and AC adapter provided
with the product. Do not
or recommended by Nilfi sk.
3. Instructions for Use
3.1 Start and Stop
3.1.1 Start
Switch ON the unit by switching the On/Off button
downwards. Note: Li-lon models have two speed
levels. Middle position = low speed, bottom position = high speed.
Please fully charge the battery before using the
product for the fi rst time.
• NiMH models: The battery is fully charged
after 16 hours. Prolonged charging can reduce
the life time of the battery and is not optimal
for the environment.
• Please switch OFF the product when the battery is empty. The battery will be damaged if
the product is stored in “ON” position.
3.1.2 Stop
Switch OFF the unit by switching the On/Off button upwards.
3.2 Prepare your Vacuum Cleaner
Make sure the switches are in “OFF” Position.
1. Straighten up the foldable handle to ‘Click’.
2. Connect the fl oor brush to ‘Click’.
3. Assemble the charging base.
4. Insert the vacuum unit in stick body.
5. Place the Nilfi sk Handy 2-in-1 in the charging
stand for fi rst charging. (Refer to the charging
section)
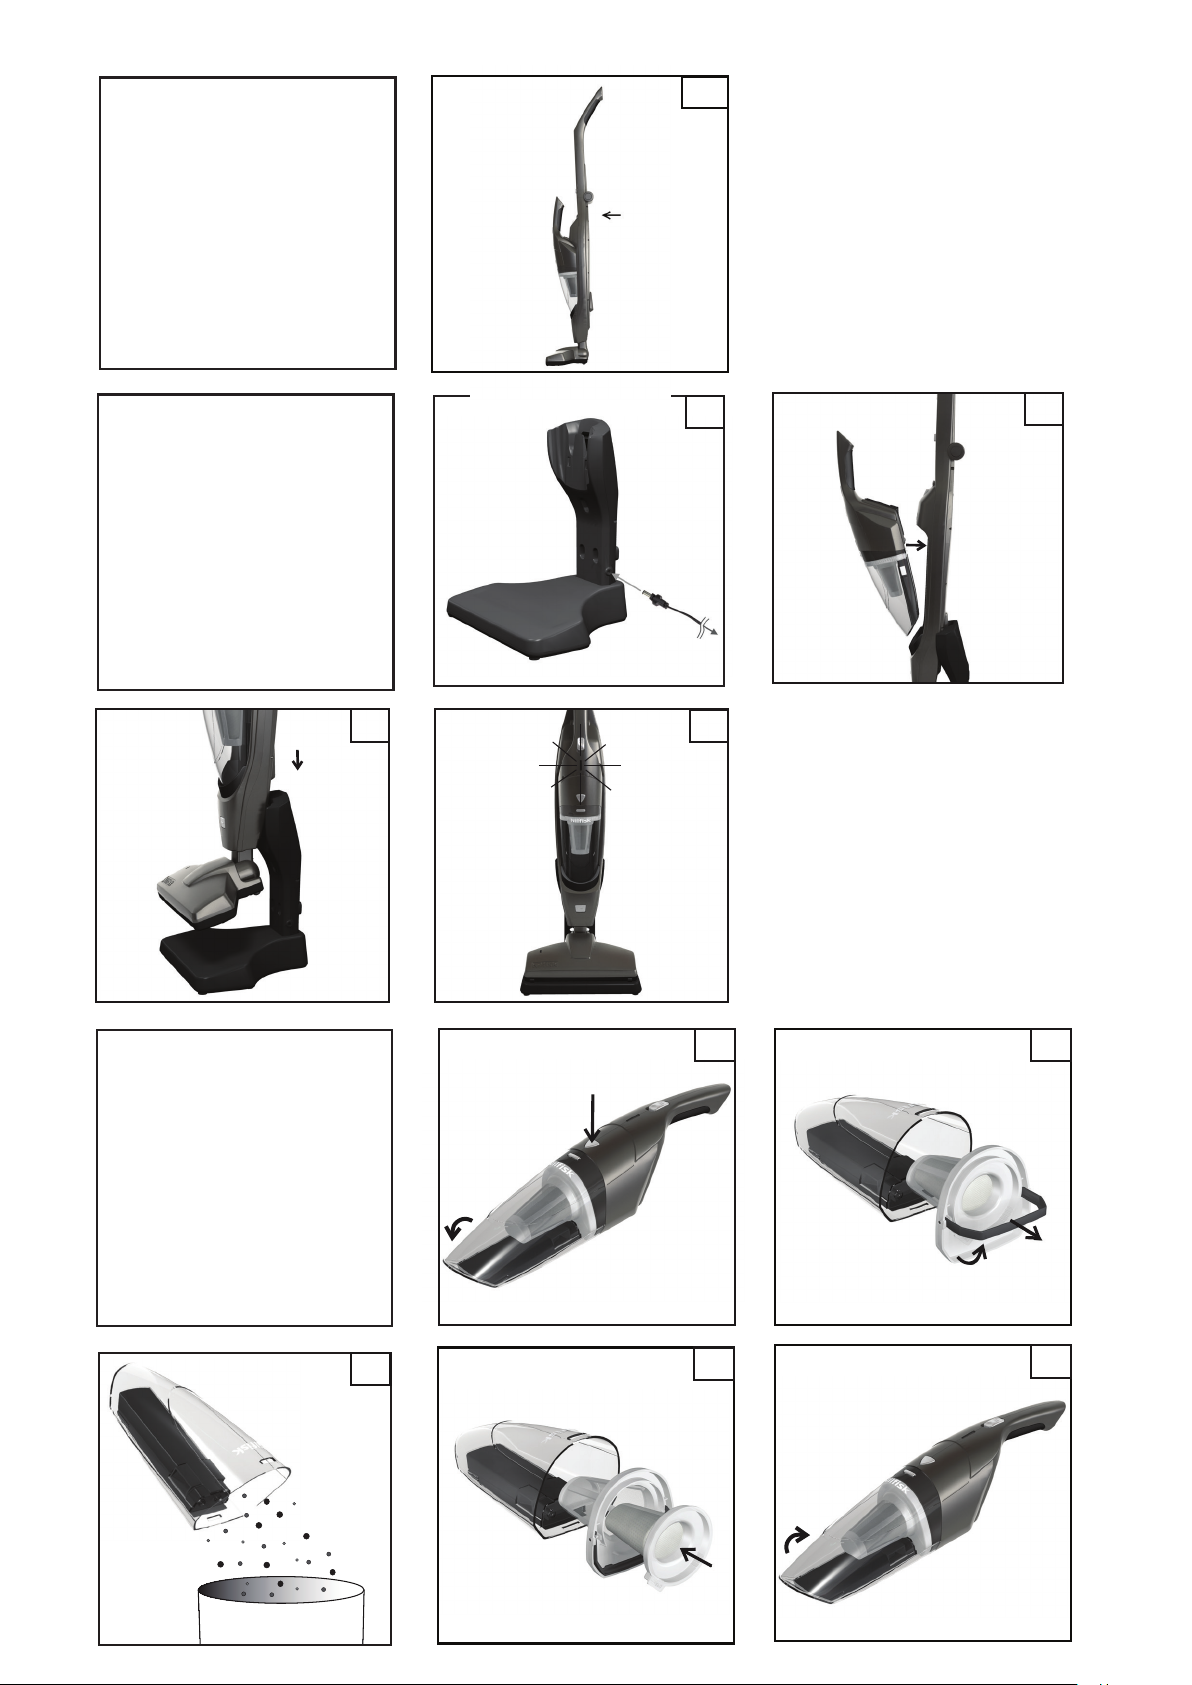
3.3 Using your vacuum cleaner
During short pauses in vacuuming, the vacuum
cleaner can be left standing by leaning it slightly
forward until it rests on the fl oor brush.
Caution ! Always switch off the vacuum cleaner
when left standing because the brush can
damage the fl oor or the carpet.
3.4 Indication light (Li-lon models)
Battery full Blue light on
Battery below 20% Blue light fl ashing
Battery low Red light fl ashing
Brush motor jammed Red light fl ashing 10
seconds (*)
(*) Please refer to page 6 to clean Power
Brush. If red light is still fl ashing, it means that
the motor is jammed. Please contact service.
EN
FR
I
NL
SV
NO
FI
L
R
C
SL
SK
H
RO
B
L
J
use any parts not provided
Original instructions
5
R
Page 9

Handy 2-in-1
T
S
U
G
A
U
EN
FR
I
NL
SV
NO
FI
C
SL
SK
4. Charging the Battery
Make sure to charge the battery in the following
situations:
• When using the product for the fi rst time after
purchase
• When the battery is low or the suction power
reaches an insuffi cient level
• When the product has been stored for a prolonged period (more than a month)
Connect the adapter to the charging stand
1.
2. Insert the vacuum unit in the stick body.
Always switch OFF the stick on the On/Off
button when inserting the hand-held unit in the
stick body.
Avoid any substances between the contacts of
single unit and stick body.
3. Place the Nilfi sk Handy 2-in-1 in the charging
stand.
If the Nilfi sk Handy 2-in-1 is not placed prop-
erly in the battery stand, it will not be charged
or it may fall over.
Avoid any unstable surfaces when charging,
otherwise the battery will not be charged due
to the insecure contact. Select a stable fl oor
for the charging stand.
Be careful not to trip over the power cable
when charging the battery.
4. Connect the power plug to the power outlet.
When the power plug of the battery charger is
L
R
connected to the AC power outlet, the indication light will light up.
Charging Red light on
Charge complete Blue light on
Bad battery Blue and red light
alternately fl ashing (**)
(**) Please contact service
The main body may become warm during charging. This is not an abnormal sign.
2. Pull out the fi lters.
3. Empty the dust container.
4. Re-install the fi lters in correct order and position.
5. Re-install the dust container to the vacuum
unit.
Caution
Do not vacuum a lot of dust at one time and do
not vacuum large objects. May cause the suction
port to clog and loose the suction power.
Do not vacuum kerosene, petrol or butts of
smoked cigarettes. This may cause a fi re.
Dispose dust frequently in order not to damage
the product.
6. Service and
Maintenance
Always switch OFF the power and disconnect the
power plug for the battery charger from the power
outlet before starting maintenance.
6.1 Vacuum Unit, Stick Body, Charging Base
Wipe off any dirt from the product using a dry and
soft rag.
In case of stubborn dirt, clean using a soft damp
rag soaked in a water solution diluted with a little
neutral detergent and then wipe with a dry rag.
Do not use solvents like thinner, benzene, and
spray type cleaners.
6.2 Dust Container
Remove any collected dust inside the dust container fi rst and wash using lukewarm water.
Make sure that the dust container is completely
dry before re-assembling.
4.1 Charging time
H
NiMH model 16
RO
B
L
J
R
Li-lon models 4 / 6 (25.2V)
5. Waste disposal
• Try to dispose the vacuumed waste as frequently as possible. The dust attached to the
fi lter can cause poor vacuuming performance
and stress the motor.
• Always switch OFF the power when operating
for disposal.
1. Detach the dust container.
6
Hours
6.3 Filter
Do not wash the fi lters in the washing machine.
Do not dry them using a hot air blower such as a
dryer or a hair dryer.
In case of stubborn dirt or loss in suction power,
wash as instructed below:
1. Remove the dust fi rst
2. Wash with water
3. Make sure that the fi lters are completely dry
before the parts are re-assembled.
6.4 Power Brush
Carry out the maintenance if any waste threads
or hair gets tangled in the brush.
Original instructions
Page 10

Handy 2-in-1
T
S
U
G
A
U
Regular Maintenance
Slowly rotate the brush manually and remove any
foreign objects tangled around the brush.
Maintenance when the power brush cannot be
manually rotated
1. Slide the lock on the brush door to
tion, hold the lock and open the brush door.
2. Lift the rotating brush and then remove the belt
from the end of the rotating brush.
3. Take out the rotating brush and remove the
blockage. Take out the wastes.
4. Re-install the rotating brush. Finally, check
that the brush cover is securely fi xed and the
rotating brush rotates properly.
direc-
7. Product Disposal
When the battery packs will no longer hold a
charge, the product has reached the end of its
useful life.
The battery pack is not replaceable. After
removing the battery pack, the product must be
discarded.
Before discarding the product, the rechargeable
battery pack must be removed and recycled in
accordance with federal and local laws, as outlined below.
WARNING: The vacuum cleaner must be disconnected from the charging station and batteries
must be run fl at before removing the battery pack.
1. Use a screwdriver to unscrew the housing
2. Cut the wires in order to free the battery compartment from the unit. Cover visible metal
areas with tape.
3. Take out the battery compartment with motor,
Unscrew the battery bracket. Remove the bat-
tery from the unit. WARNING: Do not mutilate
or incinerate the battery pack, as it will explode
at high temperatures.
WARNING-- Risk of fi re or serious injury:
Never touch both terminals of a battery pack with
metal objects and/or body parts as a short circuit
may occur. Do not attempt to destroy or disassemble a battery pack or remove any of its components. Batteries must be recycled or disposed
properly. Keep battery packs away from children.
8. Guarantee and
Service
This Nilfi sk Handy 2-in-1 Rechargeable Vacuum
Cleaner is covered by a two (2) years guarantee
on the machine, which covers the motor, Adapter,
switch and casing. The batteries, fi lters, fl oor
brush and other accessories are covered twelve
months due to manufacturing fault only and exclude wear and tear.
The guarantee includes spare parts and labour
costs, and covers manufacturing and material defects that may occur during normal domestic use.
Service under the guarantee will only be performed if it can be proven that the defect occurred within the product’s guarantee period
(a correctly completed guarantee certifi cate or
printed/stamped cash register receipt with date
and product type) and on the condition that the
vacuum cleaner was bought as a new product
and distributed by Nilfi sk. In the event of the repair of defects, the customer must contact Nilfi sk
to be directed to a service agent at the customers
own expense. Upon completion of any repairs
necessary, the vacuum cleaner will be returned to
the customer at the risk and expense of Nilfi sk.
The guarantee does not cover:
• Normal wear and tear of accessories and
fi lters.
• Defects or damage occurring as a direct or
indirect result of incorrect use - such as the
vacuuming of rubble, hot ashes or carpet deodorant powder.
• Abuse, loss or lack of maintenance as described in Instructions for use.
• If the machine has been used for home renovations.
• If the machine has been used for suction of
water, plaster dust or sawdust.
Nor will it cover incorrect or poor confi guration,
i.e. setting up or connection, nor fi re-damage,
fi re, lightning strike or unusual voltage fl uctuations or any other electrical disturbances such
as defective fuses or defective electrical installations on the supply grid, and defects or damage
in general that Nilfi sk consider to be the result of
causes other than manufacturing and material
defects.
The guarantee becomes void:
• If a defect is caused by the use of non-original
Nilfi sk parts.
• If the identity number is removed from the
vacuum cleaner.
• If the vacuum cleaner has been repaired by a
non-Nilfi sk authorized dealer.
• If the machine is used in a commercial environment, i.e. building contractors, cleaning
contractors, professional trades or any other
non-domestic usage.
EN
FR
I
NL
SV
NO
FI
L
R
C
SL
SK
H
RO
B
L
J
R
Original instructions
7
Page 11

Handy 2-in-1
T
S
U
G
A
U
EN
FR
I
NL
SV
NO
The guarantee is valid in:
Denmark, Sweden, Norway, Great Britain,
Ireland, Belgium, Holland, France, Germany, Poland, Russia, Austria, Switzerland, Spain, Portugal, Australia and New Zealand, Estonia, Latvia,
Lithuania, Hungary, Greece, Slovenia, Slovakia,
The Czech Republic, Italy, Finland, Bulgaria,
Romania and Turkey.
Addendum Australia:
Our goods come with guarantees that cannot be
excluded under the Australian Consumer Law.
You are entitled to a replacement or refund for
a major failure and for compensation for any
other reasonably foreseeable loss or damage.
You are also entitled to have the goods repaired
or replaced if the goods fail to be of acceptable
quality and the failure does not amount to a major
failure.
9. Technical Specifi cations
Nilfi sk vacuum cleaners for domestic use are warranted for 2 years from the date of purchase by:
Nilfi sk Pty Ltd
Unit 1/13 Bessemer Street
Blacktown NSW 2148
Phone: 1300 556 710
E-mail: warranty@nilfi sk.com.au
Find your local service agent here: http://www.
nilfi sk.com.au.
The bene fi ts under this warranty are in addition to
your national law of sale.
FI
C
SL
SK
H
RO
Handy 2-in-1
14.4 V
EU UK JP EU UK JP EU UK JP
Voltage V
Main frequency Hz 50 50/60 50 50/60 50 50/60
L
R
Battery capacity mAh 1800 2000 2000
Suction power, handheld W 11 13 19
Battery voltage V 14.4 18 25.2
Runtime high/low Min. 18 20/35 20/40
Sound pressure level,
IEC 60704-2-1
Dust pick up, IEC 312 % 24 37 41
Insulation class - IP20
Type of protection - II
Dust bag net fi lling l 0.5
Width mm 15
Depth mm 26
Height mm 110
Weight, cleaner only kg
dB (A)
230-
230
74±2 78±2 79±2
100 230
240
4.1 3.8 3.9
Handy 2-in-1
18 V
230-
100 230
240
Handy 2-in-1
25.2 V
230-
100
240
B
L
J
R
8
Original instructions
Page 12

Handy 2-in-1
T
S
U
G
A
U
10. Accessories Kit
Only on selected models (see www.nilfi sk.com).
1
2a
2b
3
1. Body Adapter
2a. Small Nozzle
2b. Small Brush
3. Crevice
• Insert the body adapter (1) into the inhale handheld nozzle. It acts as an adapter for the connection of accessories for diff erent purposes. To
remove the connector from the nozzle, just pull
fi rmly outwards.
• Insert the appropriate accessory (small nozzle
(2a) with or without small brush (2b) or crevice
(3) directly into the connector of the handheld
unit. To disassemble the accessories, just pull
fi rmly the part outwards.
Small Brush:
Insert and slide the small brush (2b) into the small
nozzle (2a).
Use the small brush to clean the table, hair, crumbs
or fi bers from textile sofas or carpets.
Crevice:
Insert the crevice (3) into the body adapter (1).
To clean dust/hair in small areas which are diffi cult
to reach. e.g. corners or shallow cavity.
Cleaning and Maintenance:
• Wipe off any dirt from the accessories using a
dry and soft rag.
• In case of stubborn dirt, please use a soft and
slightly damp rag soaked in a water solution diluted with a little neutral detergent and then wipe
clean with a dry rag.
• Do not use soap powder, detergent and solvents, benzene and spray cleaners.
• Dry immediately.
• Ensure that there is no water remain on the accessories after cleaning.
11. EU Declaration of
Conformity
We,
Nilfi sk A/S
Kornmarksvej 1
DK-2605 Broendby
DENMARK
Hereby declare that the
Product: Battery powered Vacuum Cleaner
Description: 100-240V, 50/60 Hz
Type: Handy 2-in-1
Is in compliance with the following standards:
EN 60335-1:2012+A11:2014
EN 60335-2-2:2010+A11:2012+A1:2013
EN 61558-1:2005+A1:2009
EN 61558-2-16:2009+1:2013
EN 55014-1:2006+A1:2009+A2:2011
EN 55014-2:1997+A1:2001+A2:2008
EN 61000-3-2:2014
EN 61000-3-3:2013
EN 50581:2012
Following the provisions of:
2014/35/EU
2014/30/EU
2011/65/EU
2009/125/EC
278/2009/EC
1275/2008/EC
Hadsund, 18-09-2017
Esben Graff
VP Portfolio Management, Consumer
EN
FR
I
NL
SV
NO
FI
L
R
C
SL
SK
H
RO
B
L
J
R
Original instructions
9
Page 13

T
S
U
G
A
U
Handy 2-in-1
12. WEEE
FR
I
NL
SV
NO
FI
C
SL
SK
H
RO
B
J
R
English
WEEE - Waste of Electric and Electronic
The symbol on the product and the batteries
indicates that they may not be treated as household waste. Instead they shall be handed over to
the applicable collection point for the recycling
of electrical and electronic equipment. By ensuring this product and the batteries are disposed of
correctly, you will help prevent potential negative
consequences for the environment and human
health, which could otherwise be caused by inappropriate waste handling. For more detailed information about recycling, please contact your local
city offi ce, your household waste disposal service
or the shop where you purchased the product.
Español
RAEE - Residuos de aparatos eléctricos y
electrónicos
El símbolo en el producto y en las baterías
indica que no debe tratarse como basura. Debe
llevarse al punto para recogida y reciclaje de
equipos eléctricos y electrónicos. Al asegurarse de que se deshace correctamente de este
producto y de las baterías, ayuda a prevenir
consecuencias negativas para el medioambiente
y para la salud, que pueden producirse cuando
los residuos no se procesan adecuadamente.
Para obtener información más detallada acerca
del reciclaje, póngase en contacto con su ayuntamiento, su servicio de recogida de basura o la
tienda en la adquirió el producto.
Deutsch
Entsorgung von Elektro- und Elektronikaltgeräten
Die Kennzeichnung am Produkt sowie an
den Akkus verweist darauf, dass eine Entsorgung über den Hausmüll untersagt ist. Die
bezeichneten Komponenten/Geräte sind in dafür
vorgesehen Sammelstellen für elektrische/elektronische Altgeräte abzugeben. Durch die sachgerechte Entsorgung dieses Produkts und der
L
R
Akkus tragen Sie dazu bei, potenzielle Umweltund Gesundheitsgefährdungen zu vermeiden,
die bei einer unsachgerechten Abfallaufbereitung auftreten können. Ausführliche Auskünfte
zur Altstoff rückgewinnung erhalten Sie von der
Stadt-/Kommunalverwaltung, Ihrer Abfallentsorgungseinrichtung oder im Geschäft, in dem
das Produkt erworben wurde.
Français
DEEE – Déchets d’équipements électriques et
électroniques
Le symbole sur le produit et les batteries
indique qu’il ne faut pas les traiter comme des
déchets ménagers. Au lieu de cela, il faut les
remettre au point de collecte approprié pour le
recyclage des équipements électriques et électroniques. En veillant à ce que ce produit et les
batteries soient correctement mis au rebut, vous
contribuerez à éviter les éventuelles conséquences négatives pour l’environnement et la
santé des personnes qui pourraient résulter sans
L
cela d’un traitement inapproprié des déchets.
Pour obtenir des informations plus détaillées sur
le recyclage, veuillez contacter les services municipaux dont vous dépendez, les services responsables de l’enlèvement des ordures ménagères
dans votre localité, ou le magasin où vous avez
acheté le produit.
Português
REEE – Resíduos de Equipamentos Eléctricos
e Electrónicos
O símbolo no produto e nas baterias indica
que estes componentes não podem ser tratados
como resíduos domésticos. Pelo contrário, devem ser entregues num ponto de recolha aplicável para reciclagem de equipamentos eléctricos e
electrónicos. Assegurando que este produto e as
baterias são eliminados correctamente, ajudará a
evitar possíveis consequências adversas para o
ambiente e a saúde humana que, de outra forma,
poderiam ser provocadas por um tratamento
incorrecto dos resíduos. Para obter informações
mais detalhadas acerca da reciclagem, contacte
o gabinete adequado da sua cidade, os serviços
de eliminação de resíduos domésticos da sua
área ou a loja onde adquiriu o produto.
Italiano
WEEE – Corretto smaltimento del prodotto
(rifi uti elettrici ed elettronici)
Il simbolo riportato sul prodotto e sulle batterie indica che essi non possono essere smaltiti
come normali rifi uti domestici. Per evitare eventuali danni all’ambiente o alla salute causati
dall’inopportuno smaltimento dei rifi uti, si invita
l’utente a riciclare prodotto e batterie presso
l’apposita struttura preposta allo smaltimento di
apparecchiature elettriche ed elettroniche. Per informazioni più dettagliate in merito alle pratiche di
riciclaggio, contattare il competente uffi cio locale,
il servizio smaltimento rifi uti domestici o il rivenditore presso il quale è stato eff ettuato l’acquisto.
164
 Loading...