

Nilfisk-ALTO SCRUBTEC R 571, SCRUBTEC R 571 C, SCRUBTEC R 586, SCRUBTEC BOOST R, 00318F Instruction Manual
...Page 1
Instructions for Use-Original Instructions
Parts List
Manual Steering Models
SCRUBTEC R 571
Models: 00318F, 00319F, 00343F, 00344F
U.S. Patent No. 6,105,192; No. RE39,581;
No. 6,557,207; No. 7,185,397; and Patents Pending
English Instructions For Use ...........................................2-28
Parts List ............................................................30-72
SCRUBTEC R 571 C
SCRUBTEC R 586
SCRUBTEC R
3/08 revised 8/11 FORM NO. 71274A
Page 2

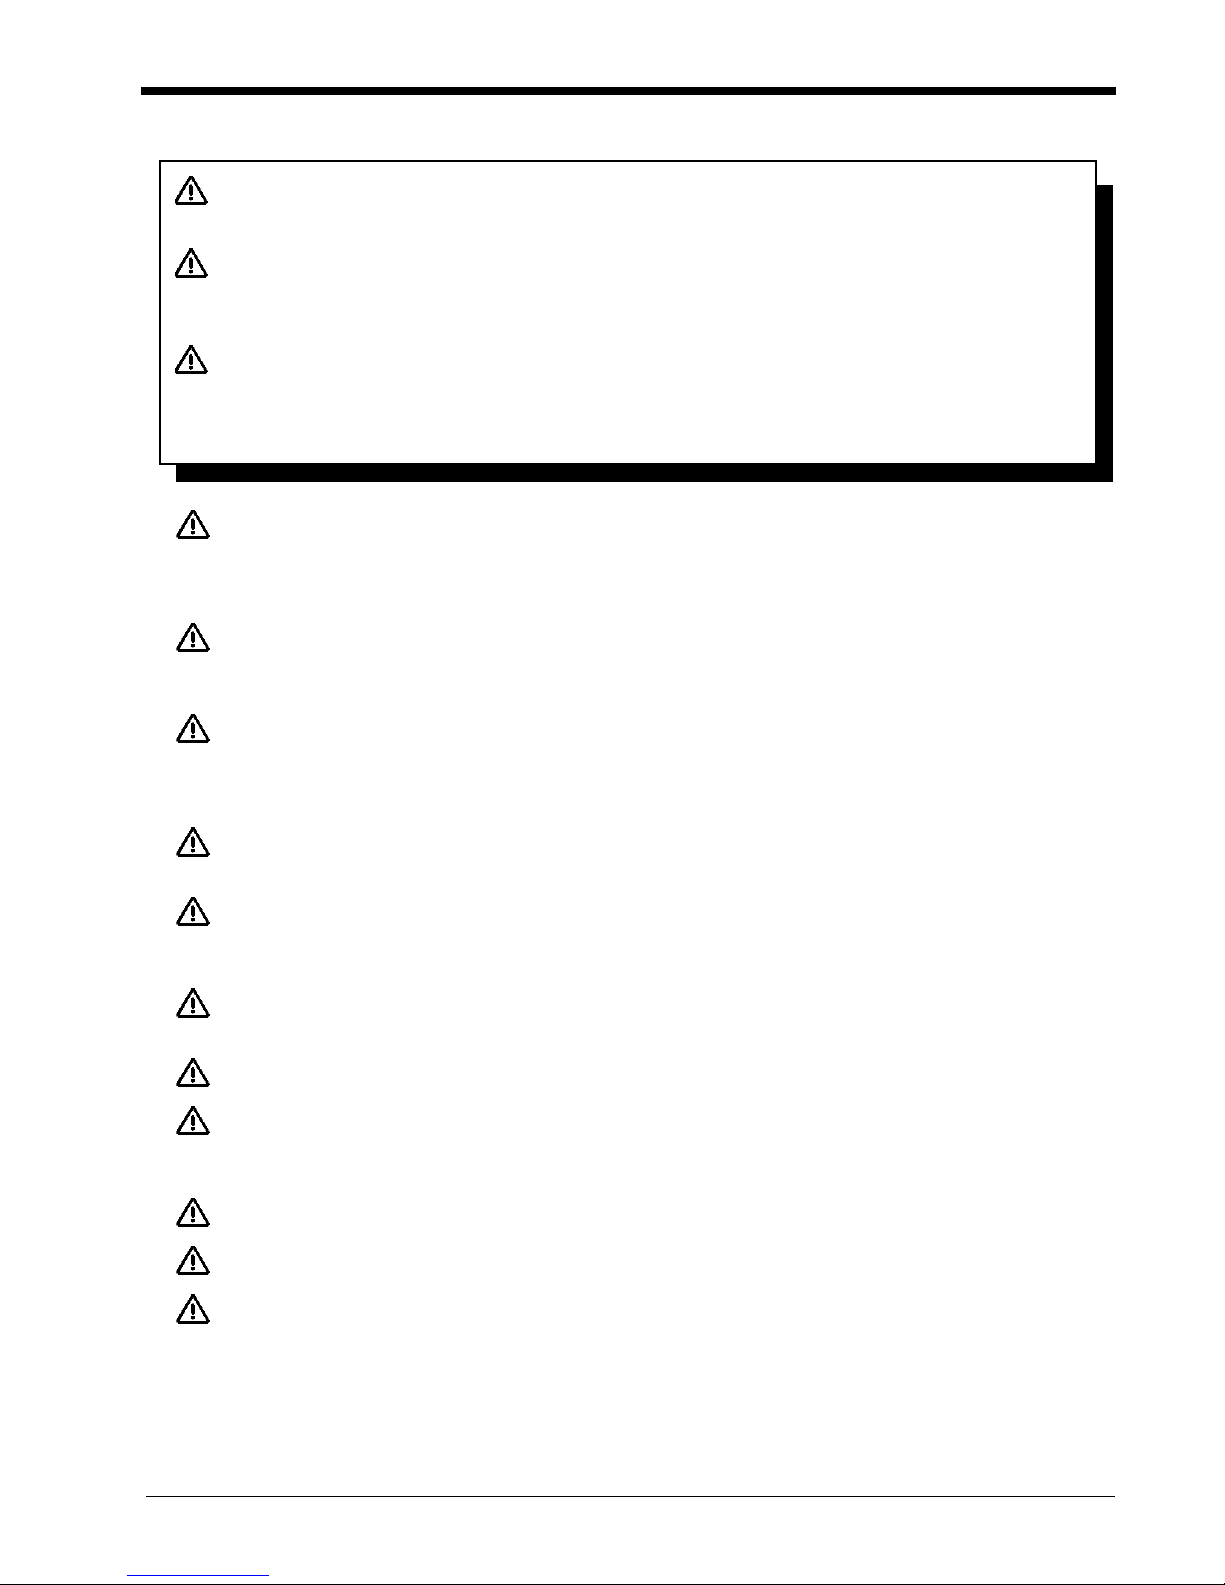
READ THIS BOOK
revised 8/10
CAUTION: Read the Operator’s Manual before using the appliance.
This book has important information for the use and safe operation of this machine. Failure to read this book prior to operating or attempting any service or maintenance procedure to your Nilfi sk ALTO machine could result in injury to you or to other personnel; damage to the
machine or to other property could occur as well. You must have training in the operation of this machine before using it. If operator(s)
cannot read this manual, have it explained fully before attempting to operate this machine.
All directions given in this book are as seen from the operator’s position at the rear of the machine.
Table of Contents
Operator Safety Instructions ................................................................................................................................................................................................................................3
Introduction & Machine Specifi cations .................................................................................................................................................................................................................5
Symbols Used on Scrubtec .................................................................................................................................................................................................................................6
Display Screens for Scrubtec ..............................................................................................................................................................................................................................7
Machine Control Panel ........................................................................................................................................................................................................................................8
Machine Controls and Features ..........................................................................................................................................................................................................................9
How to Prepare the Machine for Operation .........................................................................................................................................................................................................10
How to Handle the Packed Machine .............................................................................................................................................................................................10
How to Unpack the Machine .........................................................................................................................................................................................................10
How to Install the Batteries ...........................................................................................................................................................................................................10
Battery Maintenance .....................................................................................................................................................................................................................11
How to Charge the Batteries .........................................................................................................................................................................................................12
Recharging the Batteries ..............................................................................................................................................................................................................12
Level Indicators for the Charge on the Batteries ........................................................................................................................................................................... 13
How to Install the Squeegee .........................................................................................................................................................................................................13
How to Adjust the Squeegee .........................................................................................................................................................................................................13
How to Change or Rotate Brushes on Cylindrical Brush Head .....................................................................................................................................................14
How to Install and Remove the Brush or Pad on the Boost Head ................................................................................................................................................15
How to Operate the Machine ...............................................................................................................................................................................................................................16
How to Return One Touch to Factory Default Settings .................................................................................................................................................................16
How to Move Machine ..................................................................................................................................................................................................................16
Seat Adjustment ............................................................................................................................................................................................................................16
How to Read the Battery Meter ..................................................................................................................................................................................................... 17
How to Change Display Screens on the LCD Module ..................................................................................................................................................................17
How to Read the Solution Empty Indicator ...................................................................................................................................................................................17
How to Read the Recovery Full Indicator .....................................................................................................................................................................................17
How to Operate the Squeegee and the Vacuum Motor ................................................................................................................................................................18
How to Operate the Solution Flow ................................................................................................................................................................................................18
How to Operate Brush Pressure ...................................................................................................................................................................................................18
How to Operate the Forward / Reverse Switch ............................................................................................................................................................................. 18
How to Fill the Solution Tank .........................................................................................................................................................................................................19
Operating the Machine .................................................................................................................................................................................................................. 19
Do These Procedures When You Begin Your Work Period ...........................................................................................................................................................20
How to Clean a Floor ....................................................................................................................................................................................................................21
How to Clean a Very Dirty Floor ....................................................................................................................................................................................................22
Do These Procedures When You End Your Work Period .............................................................................................................................................................22
Maintenance ......................................................................................................................................................................................................................................................24
Maintenance to Be Done Every Week ..........................................................................................................................................................................................24
Battery Inspection and Cleaning ...................................................................................................................................................................................................24
Cleaning the Recovery Tank and Filter .........................................................................................................................................................................................24
Cleaning the Solution Tank and Filter ...........................................................................................................................................................................................25
Manually Draining the Solution Tank .............................................................................................................................................................................................25
Vac Assisted Solution Tank Draining .............................................................................................................................................................................................25
Squeegee Maintenance ................................................................................................................................................................................................................25
Front Squeegee Blade Replacement ............................................................................................................................................................................................25
Rear Squeegee Blade Replacement ............................................................................................................................................................................................26
Squeegee Maintenance ................................................................................................................................................................................................................26
Cleaning the Vac Hose .................................................................................................................................................................................................................26
How to Correct Problems in the Machine ............................................................................................................................................................................................................27
Common Error Codes .......................................................................................................................................................................................................................................... 28
SECTION II Parts and Service Manual
Final Assembly Drawing ..................................................................................32
Parts List ...................................................................................33
Main Frame Assembly Drawing (Rotary) ......................................................... 34
Parts List ...................................................................................35
Main Frame Assembly Drawing (Cylindrical) ................................................... 36
Parts List ...................................................................................37
Main Frame Assembly Drawing (BOOST) ....................................................... 38
Parts List ...................................................................................39
Optional Side Squeegee Lift (28 & 34 Rotary Models) ....................................40
Parts List ...................................................................................41
Front Wheel Assembly Drawing and Parts List ...............................................42
Squeegee Lift Assembly Drawing and Parts List ............................................. 43
Recovery Tank Assembly Drawing ..................................................................44
Parts List ...................................................................................45
Solution Tank Assembly Drawing (View 1) ......................................................46
Parts List (View 1) .....................................................................47
Solution Tank Assembly Drawing (View 2) ......................................................48
Parts List (View 2) .....................................................................49
Page -2- Form No. 71274A Nilfi sk ALTO Operator’s Manual - SCRUBTEC R Manual Steering
Steering Column Assembly Drawing ..............................................................50
Parts List ..................................................................................51
28” Rotary Brush Head Assembly Drawing and Parts List ..............................52
34” Rotary Brush Head Assembly Drawing and Parts List ..............................53
28” Cylindrical Head Assembly Drawing ..........................................................54
Parts List ...................................................................................55
32” Boost Head Assembly Drawing .................................................................56
Parts List ...................................................................................57
Squeegee Assembly Drawing ..........................................................................58
Parts List ...................................................................................59
Front Squeegee Assembly Drawing and Parts List .........................................60
Front Squeegee Arm Assembly Drawing and Parts List ..................................61
Electrical Panel Assembly Drawing and Parts List ..........................................62
Electrical Connection Diagram .......................................................................63
Electrical Schematic .......................................................................................67
Accessories and Options .................................................................................68
Page 3
OPERATOR SAFETY INSTRUCTIONS
DANGER: Failure to read and observe all DANGER statements could result in severe bodily injury or death.
Read and observe all DANGER statements found in your Owner’s Manual and on your machine.
WARNING: Failure to read and observe all WARNING statements could result in injury to you or to other per-
sonnel; property damage could occur as well. Read and observe all WARNING statements found in
your Owner’s Manual and on your machine.
CAUTION: Failure to read and observe all CAUTION statements could result in damage to the machine or to other
property. Read and observe all CAUTION
DANGER: Failure to read the Operator’s Manual prior to operating or attempting any service or maintenance procedure to your
Nilfi sk ALTO machine could result in injury to you or to other personnel; damage to the machine or to other property
could occur as well. You must have training in the operation of this machine before using it. If your operator(s) cannot read English, have this manual explained fully before attempting to operate this machine.
DANGER: Operating a machine that is not completely or fully assembled could result in injury or property damage. Do not
operate this machine unless it is completely assembled. Inspect the machine carefully before operation. Operate
only when lids, doors and access panels are securely closed.
DANGER: Machines can cause an explosion when operated near fl ammable materials and vapors. Do not use this machine
with or near fuels, grain dust, solvents, thinners, or other fl ammable materials. This machine is not suitable for pick-
ing up hazardous dust or fl ammable materials. Use only commercially available fl oor cleaning waxes intended for
machine operation. DO NOT put gasoline, combustible or fl ammable materials in the solution or recovery tank.
DANGER: Lead acid batteries generate gases which can cause an explosion. Keep sparks and fl ames away from batteries.
Do not smoke around the machine. Charge the batteries only in an area with good ventilation.
DANGER: Working with batteries can be dangerous! Always wear eye protection and protective clothing when working near
batteries. Remove all jewelry. Do not put tools or other metal objects across the battery terminals, or the tops of the
batteries.
DANGER: Using the charger with a damaged power cord could result in an electrocution. Do not use the charger if the power
cord is damaged.
WARNING: Do not turn the machine on a ramp. Do not use on surfaces having a gradient exceeding that marked on the appliance.
WARNING: Machines can topple over and cause injury or damage if guided over the edges of stairs or loading docks. Stop and leave
this machine only on a level surface. When you stop the machine, put all switches into their “OFF” position. Turn the key
switch “OFF” and remove the key.
WARNING: Skidding may occur when traveling at high speeds and attempting sharp turns, especially on wet surfaces.
WARNING: Do not move machine with forklift. Damage could occur to machine.
WARNING: Maintenance and repairs performed by unauthorized personnel could result in damage or injury. Maintenance and repairs
must be performed by authorized Nilfi sk ALTO personnel only.
Nilfi sk ALTO Operator’s Manual - SCRUBTEC R Manual Steering Form No. 71274A Page -3-
Page 4

WARNING: Any alterations or modifi cations of this machine could result in damage to the machine or injury to the operator or other bystand-
ers. Alterations or modifi cations not authorized by the manufacturer voids any and all warranties and liabilities.
WARNING: Electrical components of this machine can “short-out” if exposed to water or moisture. Keep the electrical components of the
machine dry. Wipe the machine down after each use. This appliance is for dry use only and is not to be used or stored outdoors
in wet conditions. For storage, keep the machine in a building.
WARNING: Operating a machine without observing all labels and instructional information could result in injury or damage. Read all machine
labels before attempting to operate. Make sure all of the labels and instructional information are attached or fastened to the
machine. Do not cover them for any reason. If labels or decals are missing or become damaged, get replacement labels and
decals from your Nilfi sk ALTO distributor immediately.
WARNING: Wet fl oor surfaces can be slippery. Water solutions or cleaning materials used with this type of machine can leave wet areas on
the fl oor surface. These areas can cause a dangerous condition for the operator or other persons. Always put “Caution” signs
around/near the area you are cleaning.
WARNING: Improper discharge of waste water may damage the environment and be illegal.
The United States Environmental Protection Agency has established certain regulations regarding discharge of waste water.
City, state and national regulations regarding this discharge may also be in effect in your area. Understand and follow the regulations in your area. Be aware of the environment hazards of chemicals that you dispose.
WARNING: Only use the brushes provided with the appliance or those specifi ed in the Operator’s Manual. The use of other brushes may
impair safety.
CAUTION: Use of this machine to move other objects or to climb on could result in injury or damage. Do not use this machine as a step or
furniture.
CAUTION: Your machine warranty will be voided if anything other than genuine Nilfi sk ALTO parts are used on your machine. Always use
Nilfi sk ALTO parts for replacement.
CAUTION: This machine contains lead acid batteries. The batteries must be disposed of in an environmentally acceptable manner.
WARNING: GENERAL SAFETY RULES
The rules below have to be followed carefully in order to avoid injury to the operator and damage to the
machine:
• During the operation of this machine, pay attention to other people around you, especially children.
• Use care when reversing machine in confi ned areas.
• Do not mix different kinds of detergents. Avoid harmful odors.
• Do not place any liquid containers on to the machine.
• The recommended operating temperature should be between 32° F and 104° F.
• The humidity for operating this machine should be between 30 and 95%.
• Do not use acid solutions that could damage the machine.
• In order to prevent fl oor damage, do not leave brushes running when machine is standing still.
• In case of fi re, use a powder extinguisher. Do not use water.
• Do not strike shelving or scaffoldings, where there is danger of falling objects.
• Adapt the utilization speed to the adhesion conditions.
• Do not exceed the declared hill climbing capacity, otherwise the machine could become unstable.
• For any maintenance operation take off the power supply from the machine.
• Do not disassemble any parts which require the use of a tool to be removed.
• Do not wash the machine with direct water jets or with high water pressure nor with corrosive material.
• After every 200 working hours have machine checked by an authorized service person.
Page -4- Form No. 71274A Nilfi sk ALTO Operator’s Manual - SCRUBTEC R Manual Steering
Page 5

Introduction
Introduction & Machine Specifi cations
This is a fl oor cleaning machine which, using the mechanic abrasive action of brushes or pads and the chemical action of a water-
detergent solution, is able to clean any type of fl oor. During its forward movement, it picks up the removed dirt and the detergent
solution which has not been absorbed by the fl oor.
Model SCRUBTEC R 571 SCRUBTEC R 586 SCRUBTEC R 571 C SCRUBTEC BOOST® R
Part Number 00318F 00319F 00343F 00344F
Cleaning Swath 28” (71.1 cm) 34” (86.4 cm) 28” (71.1 cm) 32” (81.3 cm)
Power Supply 36 volt system using (6) 6 volt 250, 330, or 370 AH deep cycle batteries
Battery Charger On-Board fully automatic smart charger, 115V 60 Hz or 230V 50 Hz
Brush Motors (1) 2 hp (1.5 kW) driving (1) 2.5 hp (1.9 kW) driving (2) .75 hp (.56 kW) (1) .75 hp (.56 kW)
two right angle gearboxes two right angle gearboxes
Brush Size / Speed (2) 14” (36 cm) 300 RPM (2) 17” (43 cm) 300 RPM (2) 6 x 28” (15.2 x 71.1 (1) 14 x 32” (35.6 x 81.3
cm) 300 RPM cm) 2250 RPM
Brush Pressure 12 -225 lbs. (57-102 kg) 90-130 lbs. (41-59 kg) 115-155 lbs. (52-70 kg)
Traverse Speed
Traverse 1.5 hp (1.1 kW) transaxle powering of two 10” (25.4 cm) diameter rear wheels
Max. Cleaning Grade 6 degree
Vacuum Motor 1 hp (.75 kW) 3 stage tangential discharge
Noise Level 70 dBA
Solution Tank 30 gallon (113 liter)
Recovery Tank 30 gallon (113 liter)
Length 65” (165 cm)
Width 33” (84 cm) 35.5” (90 cm) 30” (130 cm) 33” (84 cm)
Height 56” (142cm)
Machine Weight
w/330 AH batteries 1478 lbs. (670 kg) 1498 lbs. (679 kg) 1498 lbs. (679 kg) 1488 lbs. (675 kg)
& full of solution
Warranty 8 years PolydurTM tanks, 3 years parts, 1 year labor, 18 months pro-rated batteries
(max)
4.1 mph (6.6 kph)
Nilfi sk ALTO Operator’s Manual - SCRUBTEC R Manual Steering Form No. 71274A Page -5-
Page 6
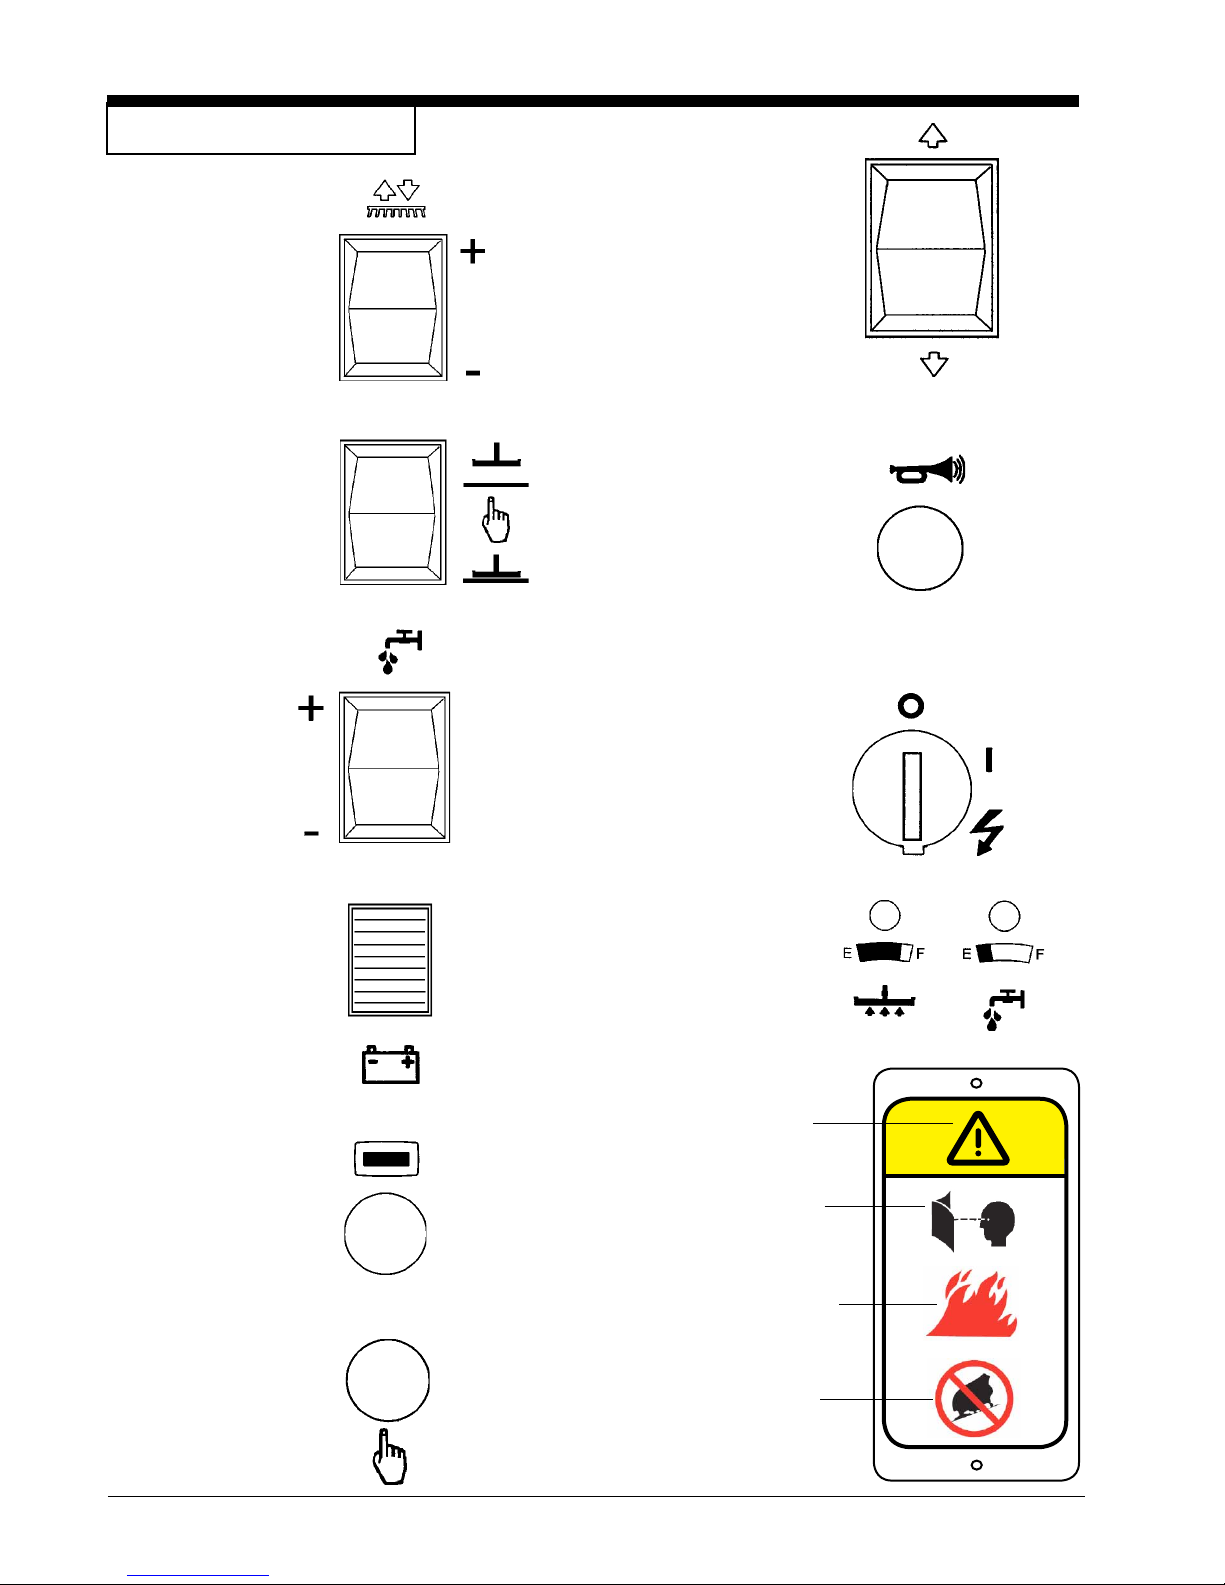
Symbols Used On Scrubtec R
Brush Up/Down
Squeegee
Up/Down
Forward /
Reverse
Horn
Solution Flow
Switch
Battery Meter
LCD Display
Button
On/Off Switch
Recovery /
Solution LED
WARNING
READ OPERATOR’S
MANUAL BEFORE OPERATING
THIS MACHINE
RISK OF FIRE
• Use only commercially available
fl oor cleaners and waxes intended for
machine operation.
• Do not use fl ammable materials.
One Touch
Button
Page -6- Form No. 71274A Nilfi sk ALTO Operator’s Manual - SCRUBTEC R Manual Steering
RISK OF INJURY OR DAMAGE TO
MACHINE
• Do not turn, stop or leave machine
on a ramp or dock.
71018A
Page 7
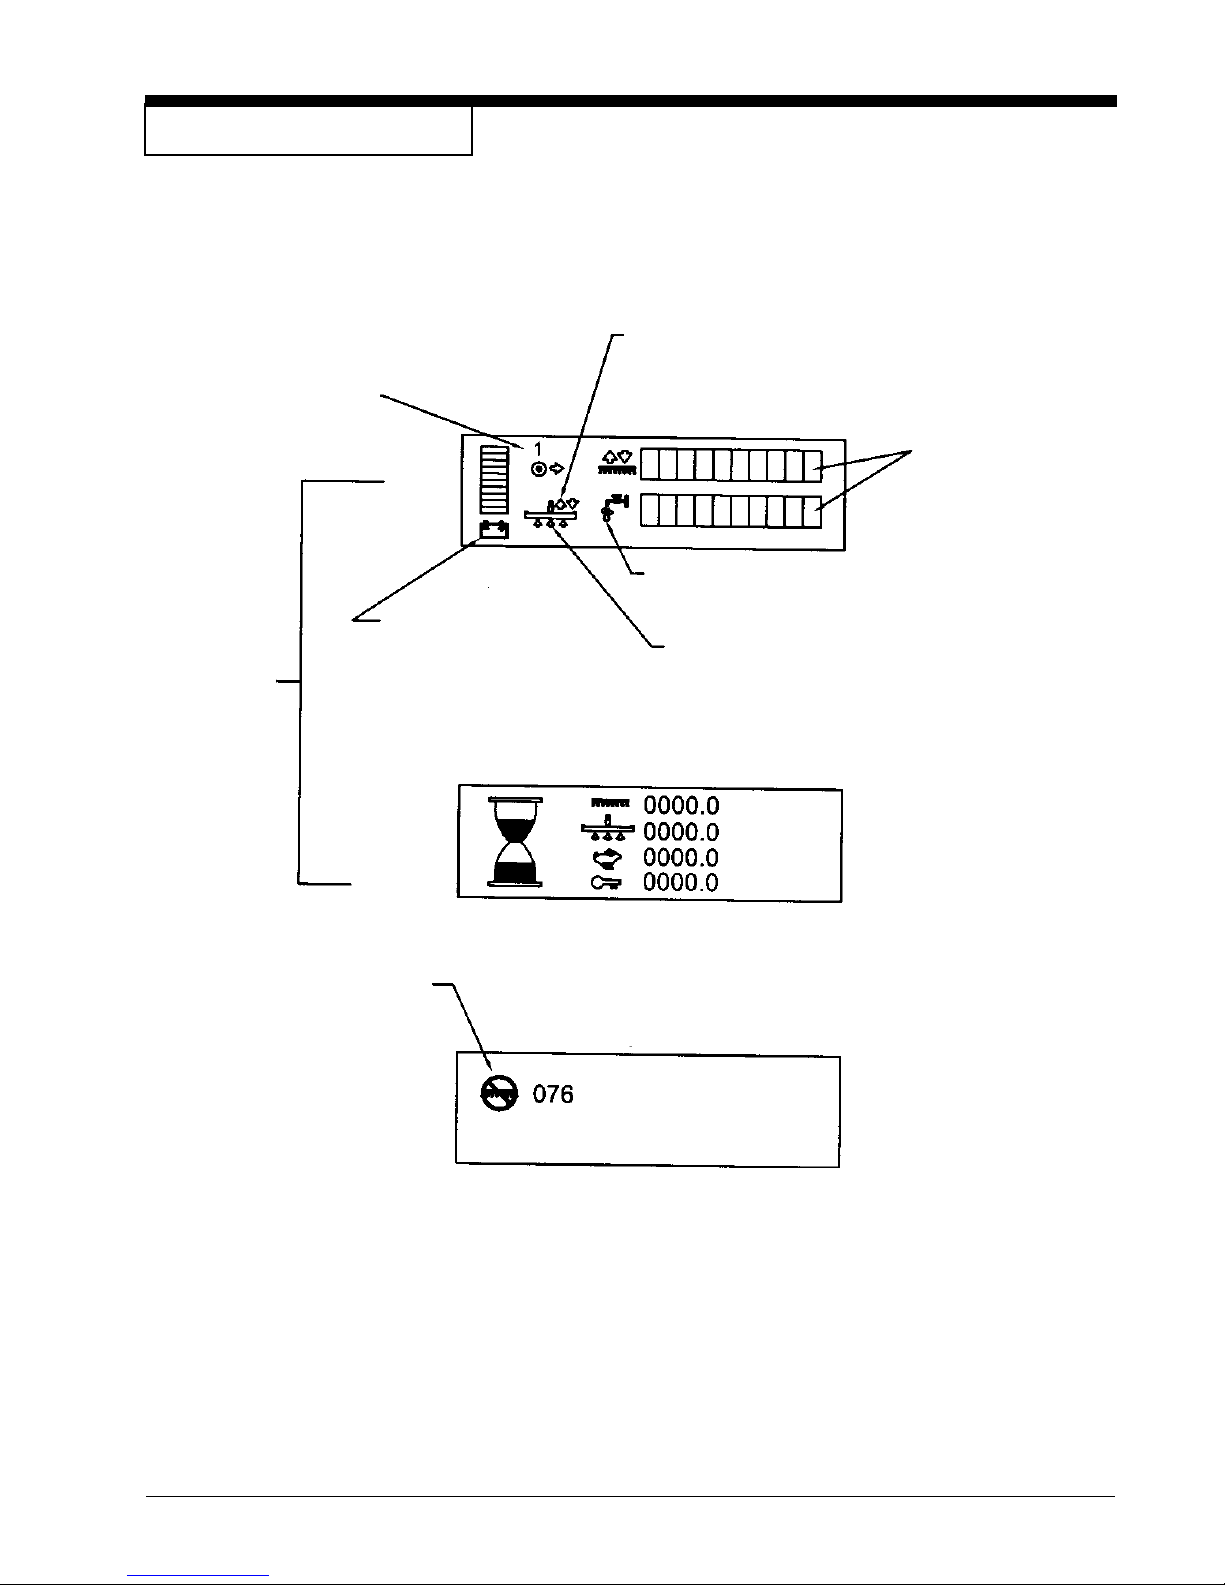
Display Screens For Scrubtec R
Traverse speed indicator
1 = low 0-3 KPH
2 = med 0-5 KPH
3 = high 0-6.4 KPH
SCREEN 1
Screens
Available
to Operator
SCREEN 2
“Battery” blinks when
low voltage occurs.
Position arrow indicating current position
of squeegee (up or down)
Indicators are on,
showing current settings.
Water “droplets” off when solution is off and
they are fl ashing when solution is on.
Arrows indicating vacuum status. They are fl ashing when vac
is on and off when vac is off.
Example
SCREEN 3 (Diagnostic)
The Diagnostic only. It will not show unless a fault with
the machine occurs. When the fault happens the icon
and error code will be displayed.
Nilfi sk ALTO Operator’s Manual - SCRUBTEC R Manual Steering Form No. 71274A Page -7-
Page 8
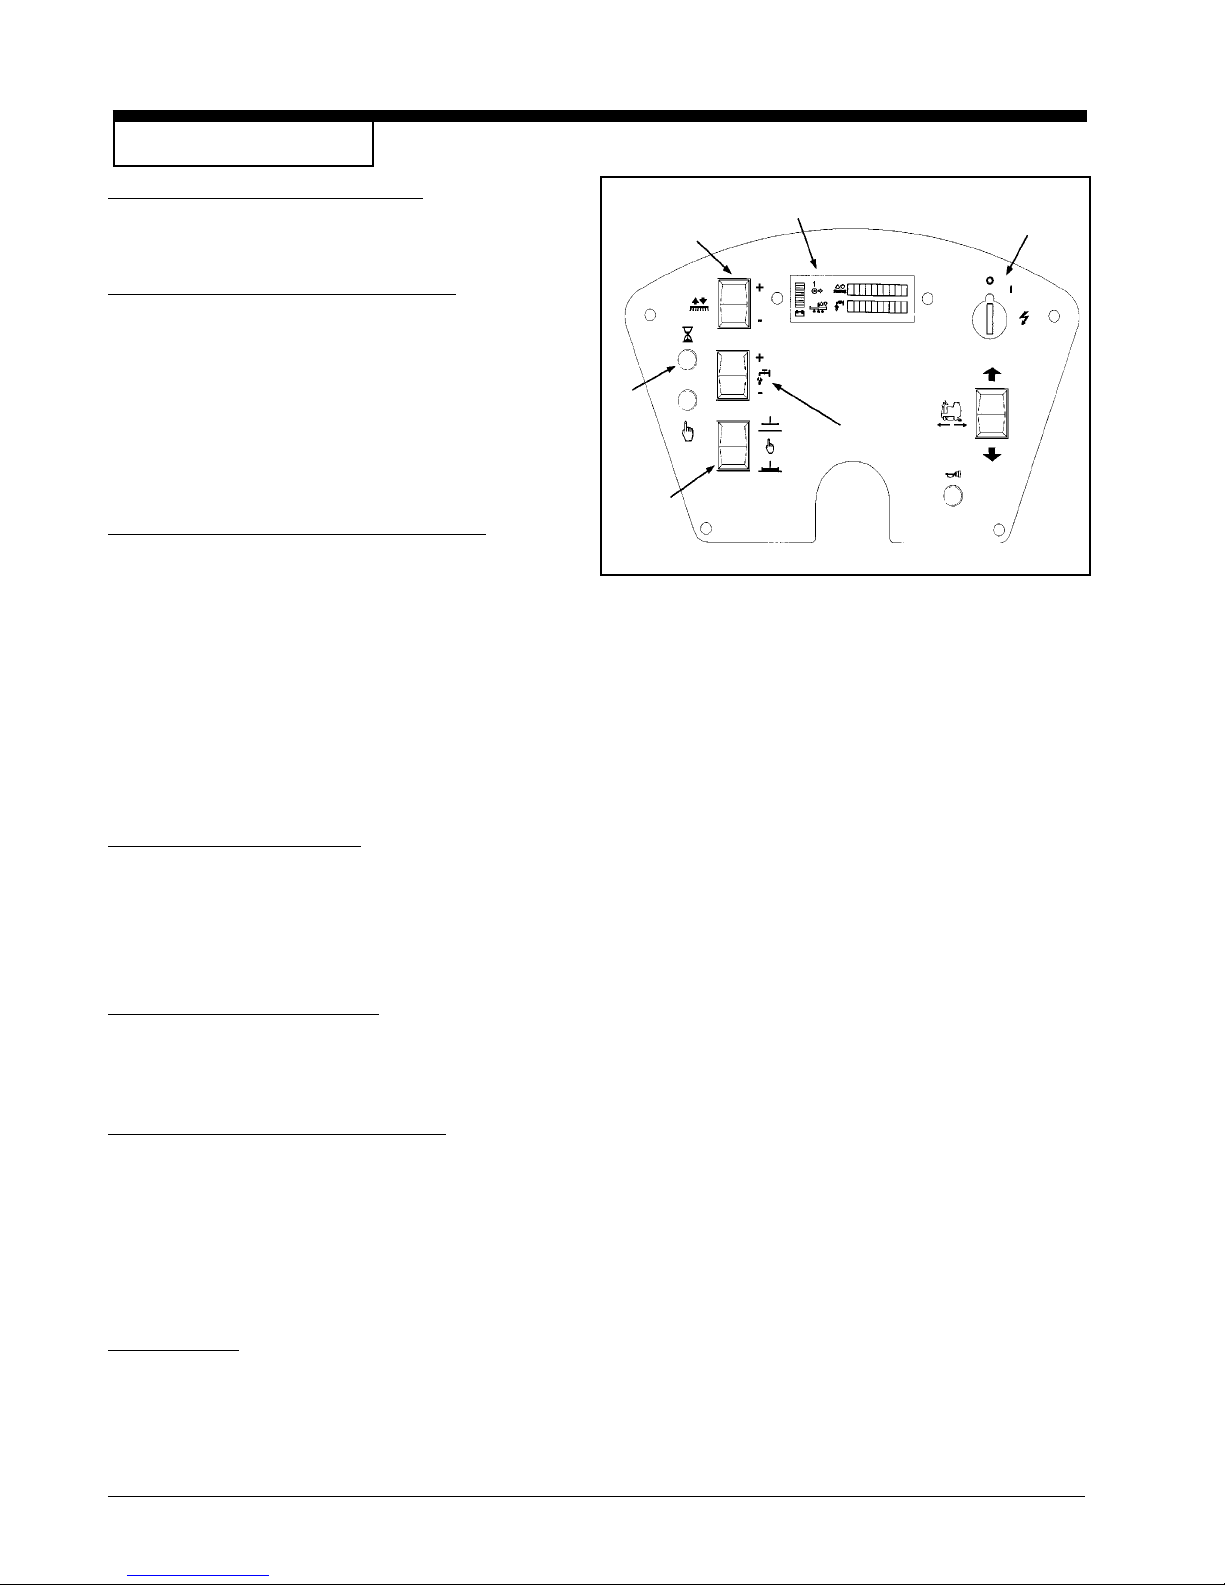
Machine Control Panel
On/Off Key Switch (See fi gure 1, Item D)
The key switch turns “ON” the power to the control panel. “O”
is the “OFF” and “I” is the “ON”.
Brush Up/Down Switch (See fi gure 1, Item A)
To lower brush head, push the brush switch in the down (+)
position. To lower the brush head to maximum brush pressure, continue to hold the switch in the down (+) position until
the travel stops. The brush motors will start and solution will
fl ow (provided the solution is turned “ON”) when the machine
begins to traverse. To raise the brush head, push the brush
switch in the up (-) position until the brush head travel stops
or desired position is reached.
Squeegee Up/Down Switch (See fi gure 1, Item B)
The squeegee switch is used to raise and lower the squeegee and to turn on and off the vacuum motor. The vacuum
motor is turned on when the switch is placed in the middle
or lower position. NOTE: When the squeegee switch is
placed in the lower position, the vacuum motor will turn
on.
To raise the squeegee, place the switch in either the middle
or up position. The middle position is used for one touch control. The vacuum motor will stop, after a short delay, when
the switch is placed in the up position.
E
B
A
E, F
D
C
Figure 1
Hour Meter (See fi gure 1, Item E)
The hour meter is located on the front display. You must
toggle screens using LCD display button. The hour meter
indicates the number of hours the machine has operated. It
displays brush motor, vacuum motor, traverse motor and total
key on times.
Battery Meter (See fi gure 1, Item F)
The battery meter indicates the relative charge on the battery
pack. The battery meter is located on screen 1 on the front
display. See page 7.
Solution Flow Control (See fi gure 1, Item C)
The solution fl ow switch regulates the fl ow of chemical solu-
tion to the fl oor. To increase the fl ow, toggle (+). To decrease
the fl ow, toggle (-). To shut off the solution, toggle - until no
indicators are visible on display. NOTE: DO NOT run dry!
NOTE: No solution will fl ow when the machine does not
traverse.
Circuit Breakers
The circuit breaker reset buttons are located on the back side
of the front cover below front display. The breakers are as
follows:
Item A - Main (5 amp)
Item B - Key Switch (5 amp)
Page -8- Form No. 71274A Nilfi sk ALTO Operator’s Manual - SCRUBTEC R Manual Steering
Page 9
Machine Controls and Features
Recovery Tank Float
The Scrubtec R is equipped with a fl oat that shuts the vacuum off when
the recovery tank is full. The squeegee will no longer pick up water. If
this should happen, raise the squeegee and empty the recovery tank.
The Traverse
The Scrubtec R is equipped with an electronically controlled traverse
system with variable speeds in forward and reverse.
1. To traverse the machine, the power to the machine must be
turned on with the key switch and the operator must be properly
seated.
2. The traverse speed can be adjusted by varying the pressure on
the foot pedal.
NOTE: During reverse motion, the squeegee raises and the solution fl ow stops automatically. Reverse also reduces maximum
traverse speed.
Brakes
The machine is equipped with an electronic braking system. The electronic braking is activated automatically. NOTE: During training, you
should allow machine to come to a full stop until you become familiar
with stopping distances required.
Figure 2
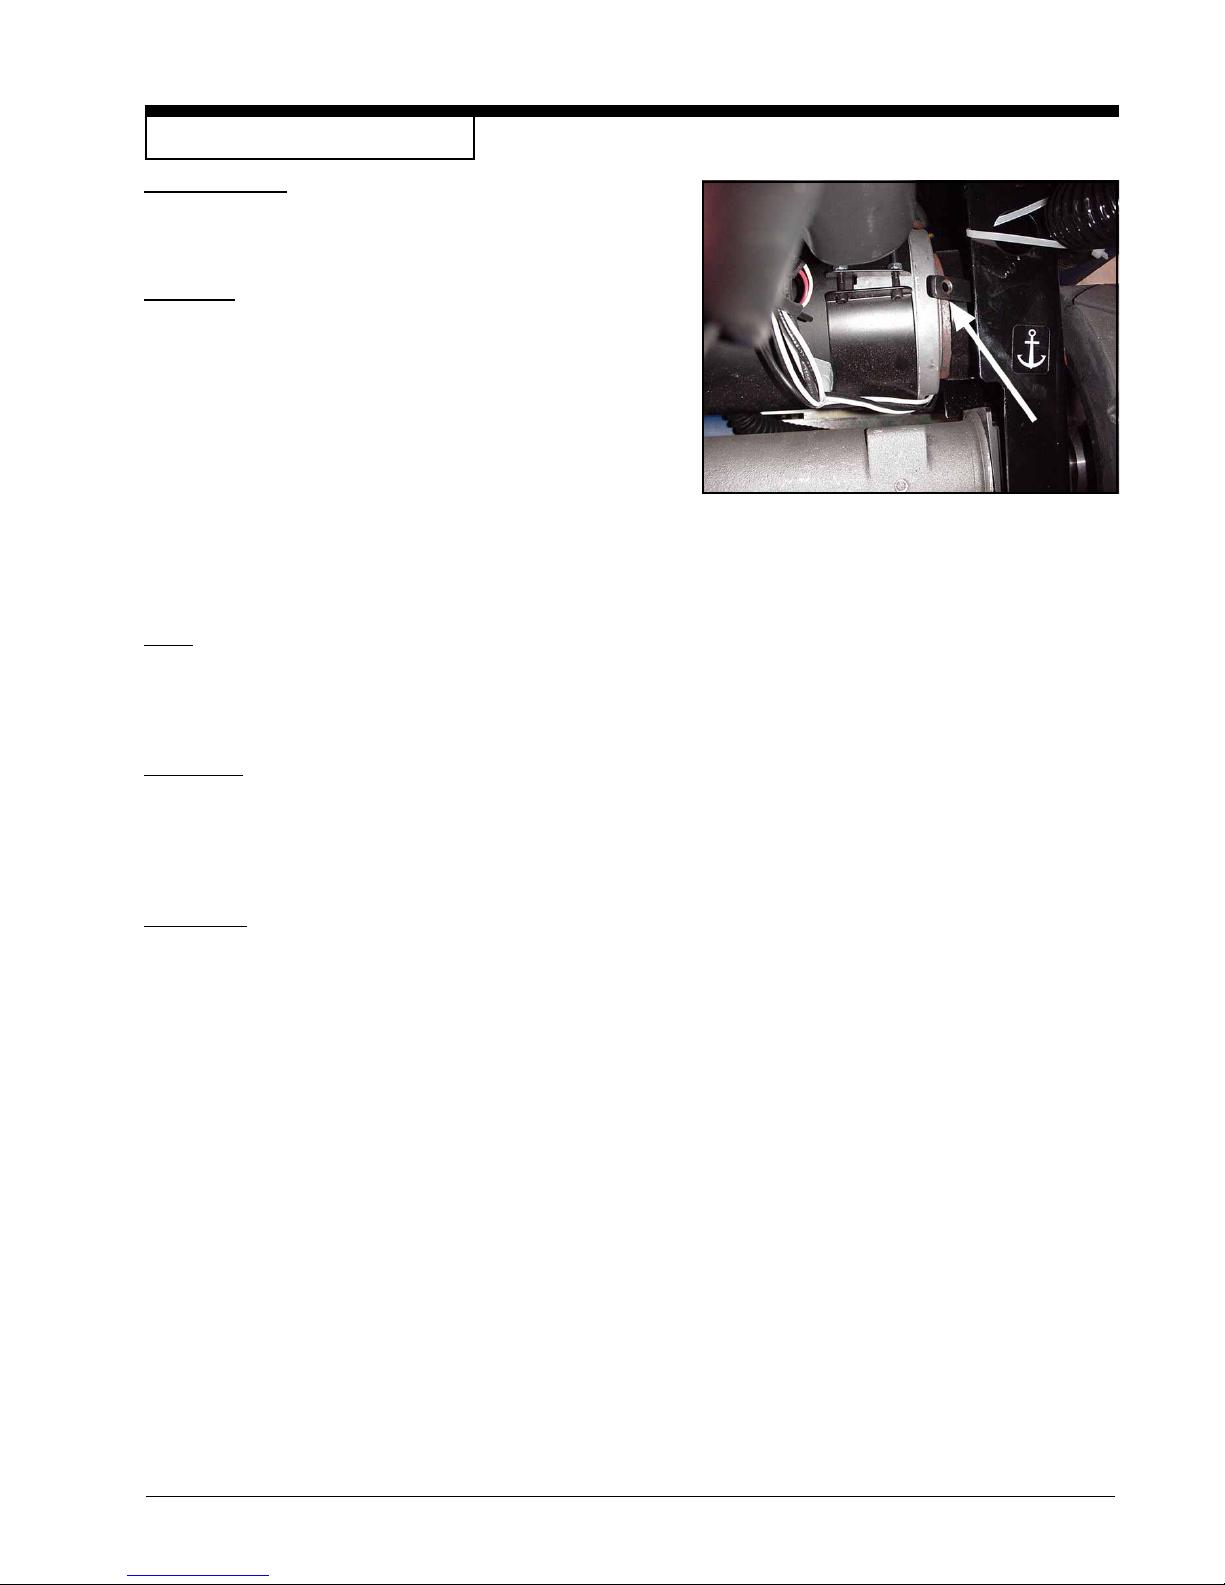
Parking Brake
The parking brake is activated automatically when the machine comes
to a stop. It disengages automatically when you begin to traverse.
The transaxle is equipped with a manual brake release. NOTE:
Machine will not function when manual brake release is engaged. See
fi gure 2.
Reverse Alarm
The reverse alarm will sound intermittently and automatically when the
machine is in reverse.
Nilfi sk ALTO Operator’s Manual - SCRUBTEC R Manual Steering Form No. 71274A Page -9-
Page 10
How To Prepare the Machine For Operation
How To Handle the Packed Machine
The machine is packed in a specifi c package provided on a pallet so that it
can be moved with a forklift.
WARNING: The packages cannot be placed on top of each other.
How to Unpack the Machine
1. Remove the outer package.
2. The machine is fi xed on the pallet with banding straps and wooden
blocks to prevent movement during shipment. Remove the bands and
blocks.
3. Remove tie down brackets.
4. Lower the ramp. The machine can be lowered off the pallet if the
operator is thoroughly familiar with its operation. Avoid violent blows
to the base unit.
5. Keep the pallet for future transport necessities.
revised 1/11
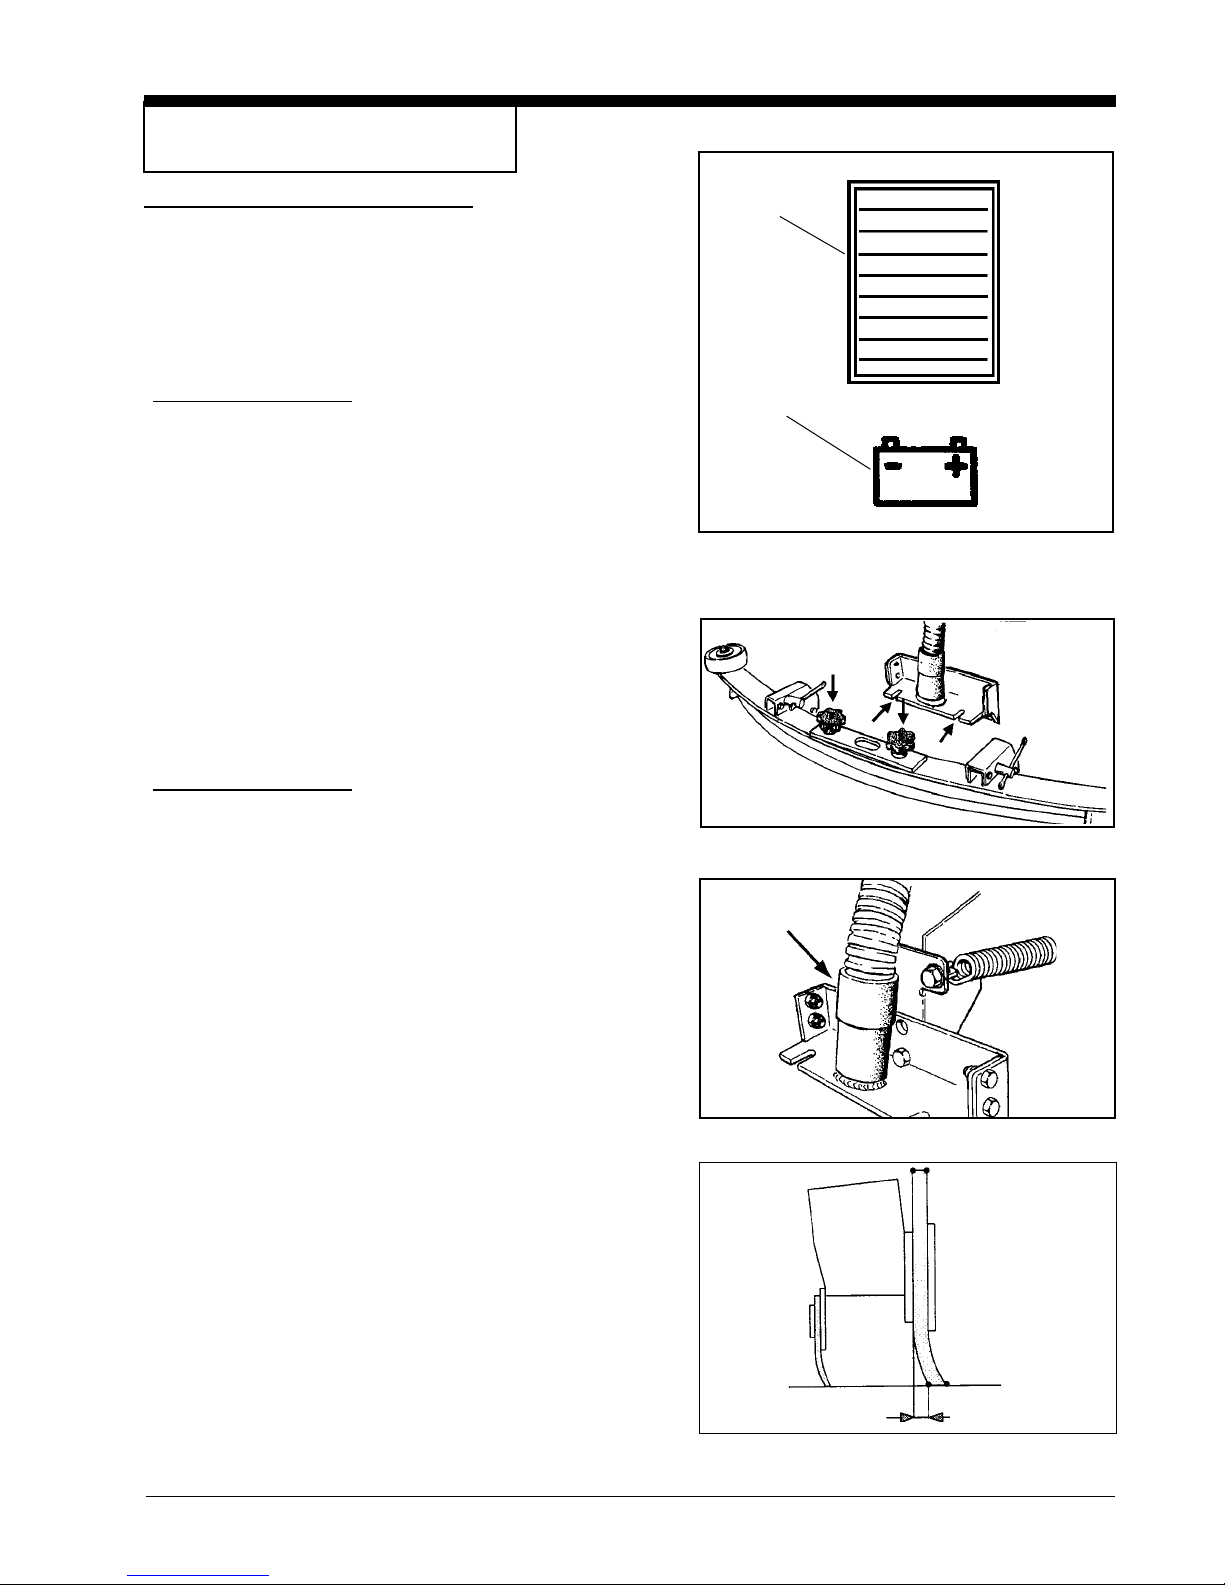
BATTERY CONNECTIONS
Front of
machine
420 AH, 6 Volt
(Battery No. 56388582 Wet)
375 AH, 6 Volt
(Battery No. 40602A Dry)
How to Install the Batteries
WARNING: The batteries are heavy. Lifting batteries without help
could result in an injury. Get help to lift the
batteries.
WARNING: Working with batteries can be dangerous. Always wear
eye protection and protective clothing when working
near batteries. NO SMOKING!
WARNING: Hydrogen gas is formed during the charging opera-
tion and is explosive. Only charge batteries in a well
ventilated area with the seat base lifted.
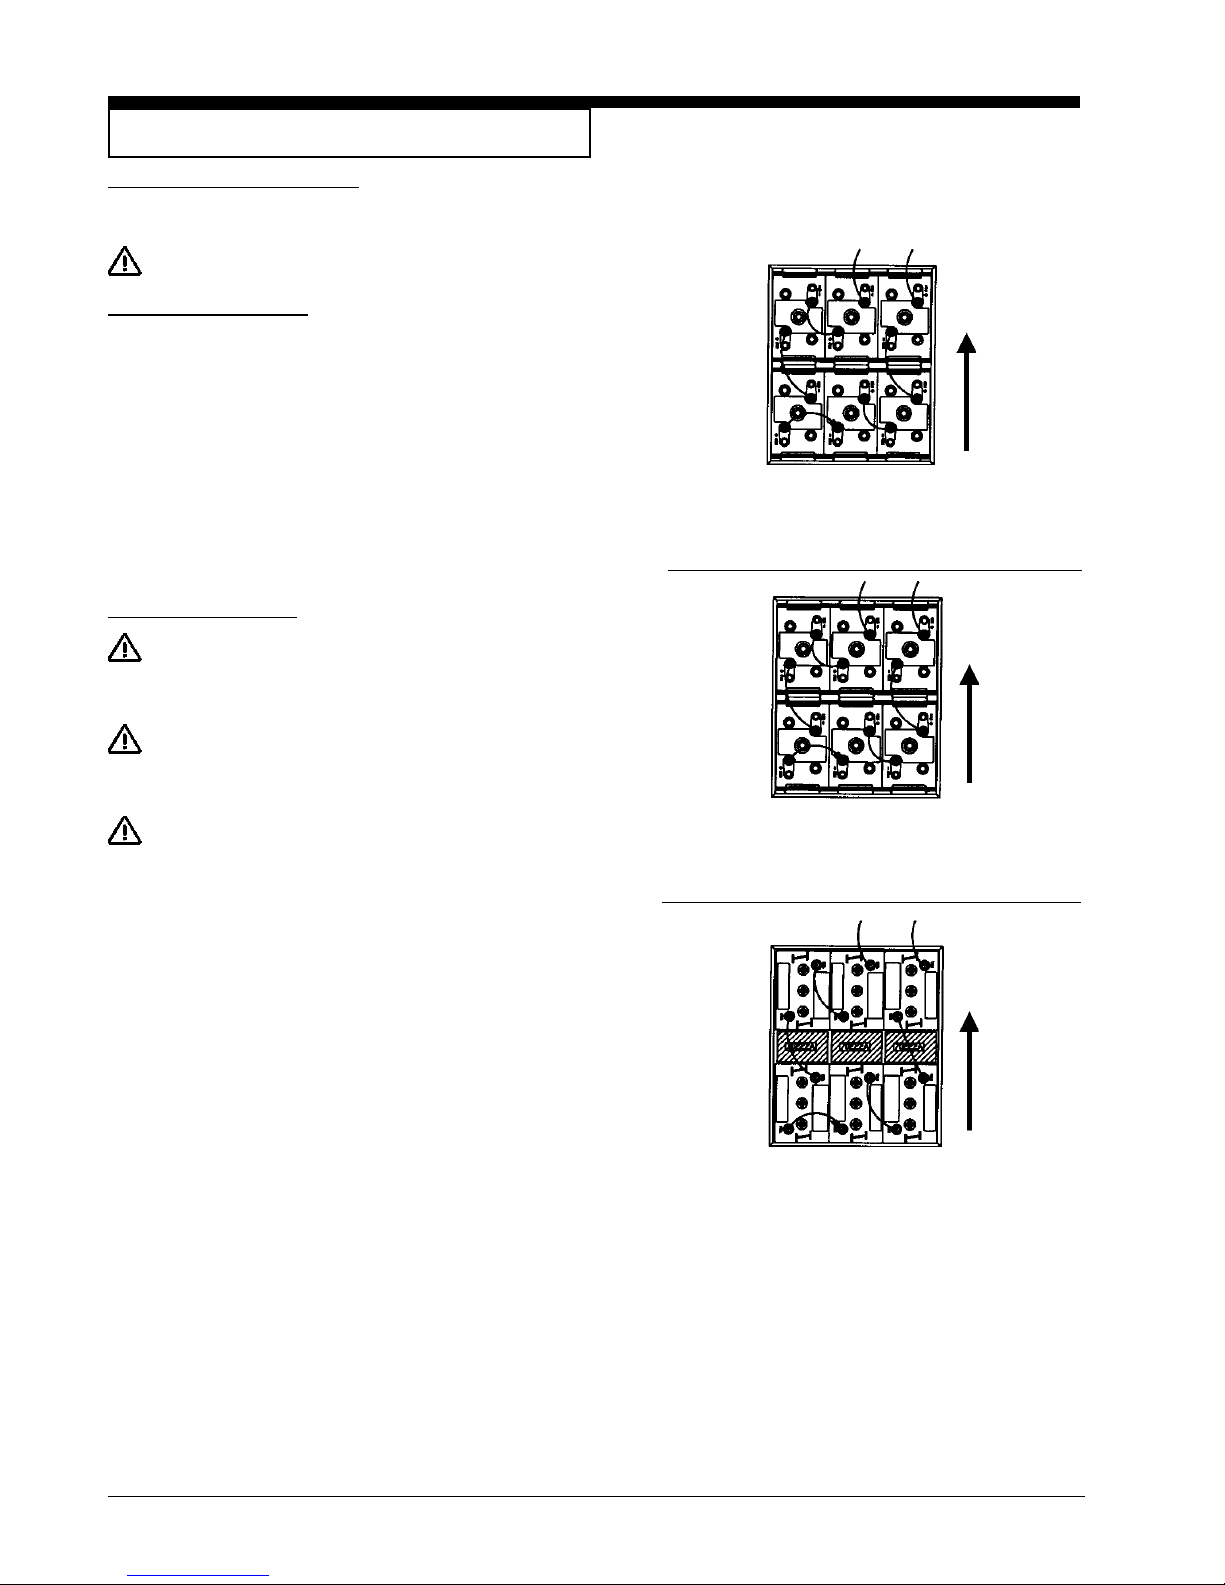
The batteries are fi tted in the battery compartment under the seat and
recovery tank (fi gure 4). The machine uses six - 6 volt batteries. They must
be handled by using appropriate lifting equipment suitable for the weight and
for the coupler system. For maintenance and daily recharge of the batteries,
it is necessary to follow all instructions given by the manufacturer.
For Battery Installation follow these steps (See fi gure 4):
1. Make sure that the key switch is in the “OFF” position.
2. Lift and rotate the base support of the seat forward.
3. Lean the seat on it’s restraint cable.
4. Lift the front of the recovery tank and rotate it towards the rear until it
rests on it’s restraint cable.
Front of
machine
310 AH, 6 Volt
(Battery No. 56391391 Wet)
305 AH, 6 Volt
(Battery No. 891385 Dry)
Front of
machine
235 AH, 6 Volt
(Battery No. 881317 Wet)
(Battery No. 881318 Dry)
Three (3) 70222A Spacers
5. Put the batteries into position and connect the battery cables as
shown in fi gure 3.
6. Rotate the recovery tank and then carefully rotate it forward to the
normal operating position.
7. Lower the base support of the seat.
NOTE: Charge the batteries before using.
Page -10- Form No. 71274A Nilfi sk ALTO Operator’s Manual - SCRUBTEC R Manual Steering
Figure 3
Page 11
How To Prepare the Machine For Operation
Battery Maintenance
The electrical power to operate the machine comes from the storage batteries. Storage batteries need preventative maintenance.
WARNING: Working with batteries can be dangerous. Always
wear eye protection and protective clothing when
working near batteries. NO SMOKING!
To maintain the batteries in good condition, follow these instructions:
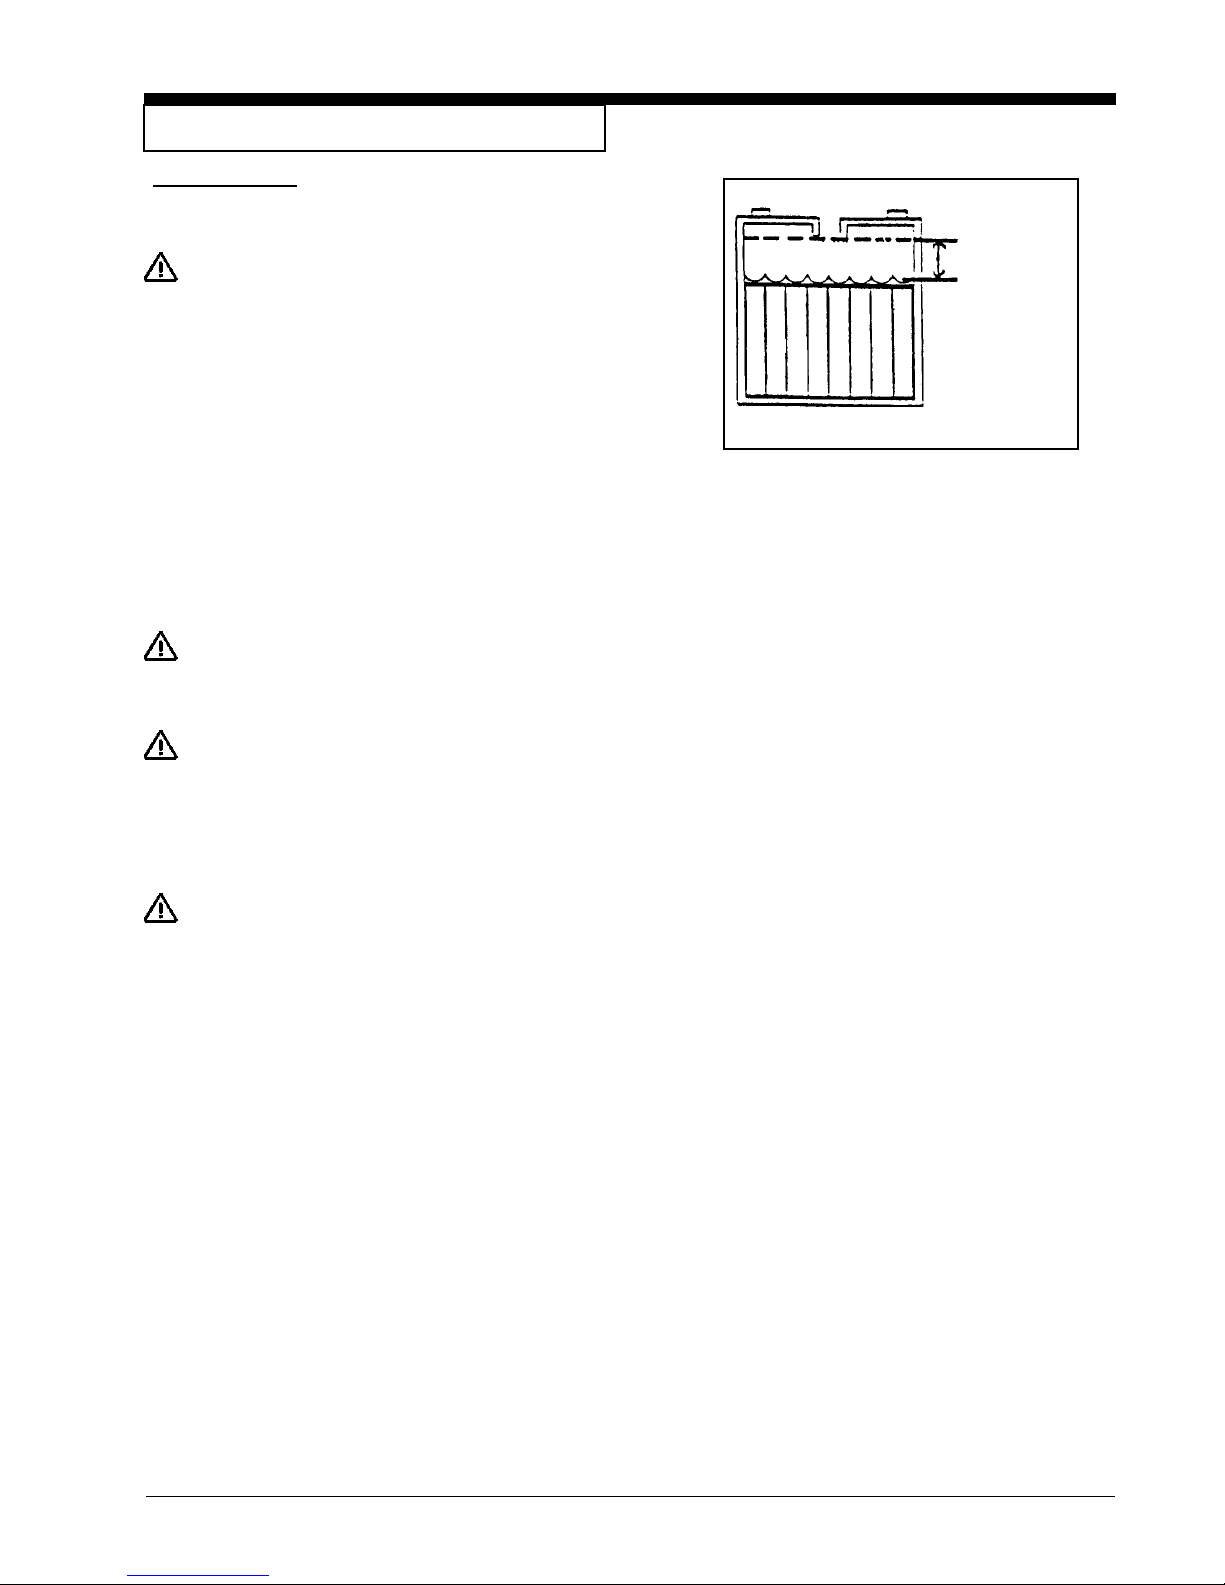
1. Keep the electrolyte at the correct level. The correct level is
between 1/4” (1/2 cm) below the bottom of the tube in each cell
and above the tops of the plates. Check the level of the electrolyte
each time you charge the batteries (see fi gure 4).
NOTE: Check the level of electrolyte prior to charging the batteries. Be
sure the plates in each cell are covered with electrolyte before charging.
Do not top off the cells prior to charging the battery. Electrolyte expands
during charging. As a result, the electrolyte could overfl ow from the cells.
Always top off the cells with distilled water after charging.
CAUTION: Irreversible damage will occur to the batteries if
electrolyte does not cover the plates. Keep the
electrolyte at the correct level.
CAUTION: Machine damage and discharge across the tops of
the batteries can occur if the batteries are over fi lled.
Do not fi ll the batteries up to the bottom of the tube
in each cell. Wipe any acid from the machine or the
tops of the batteries. Never add acid to a battery after
installation.
Correct Fill
Figure 4
CAUTION: Batteries must be refi lled with distilled water only.
Do not use tap water as it may contain contaminants
that will damage batteries.
2. Keep the tops of the batteries clean and dry. Keep the terminals
and connectors clean. To clean the top of the batteries, use a
damp cloth with a weak solution of ammonia or bicarbonate of soda
solution. To clean the terminals and connectors, use a terminal and
connector cleaning tool. Do not allow ammonia or bicarbonate of
soda to get into the batteries.
3. Keep the batteries charged.
Nilfi sk ALTO Operator’s Manual - SCRUBTEC R Manual Steering Form No. 71274A Page -11-
Page 12

How To Prepare the Machine For Operation
How to Charge the Batteries
WARNING: Charging the batteries in an area without adequate
ventilation could result in an explosion. To prevent
an explosion, charge the batteries only in an area with
good ventilation.
WARNING: Lead acid batteries generate gases which could
explode.Keep sparks and fl ames away from batteries.
NO SMOKING!
CAUTION: See Charger Owner’s Manual. All onboard battery
chargers are programmed for a specifi c type battery.
The charger may need reprogramming to properly
charge replacement batteries different than the originally equipped Nilfi sk ALTO battery.
NOTE: Only replace batteries with the identical Nilfi sk ALTO battery
pack as originally equipped. The correct Nilfi sk ALTO battery part
number can be found on the Nilfi sk ALTO battery label affi xed to the top
of each battery.
If the replacement battery is a different Nilfi sk ALTO battery, please
contact Nilfi sk ALTO Technical Service, 1-800-356-7274, for instruc-
tions.
(Shown with Optional
Chemical Mixing Sytem)
Figure 5
A
B
C
If the replacement battery is not a Nilfi sk ALTO battery, please contact
the charger manufacturer for instructions.
To charge the batteries, follow this procedure:
1. Make sure the key switch is in the “OFF” position.
2. Raise the seat base support.
3. Connect the battery charger AC cord to a properly grounded wall
receptacle matching plug confi guration (50/60 Hz).
4. Observe indicator light to ensure the charging process has started
(see fi gure 5, A - Red, B - Yellow, C - Green ). For color indications
see fi gure 6.
Recharging the Batteries
The Scrubtec R comes with an on board charger.
1. Plug into any wall socket and charging is automatic.
2. Observe indicator light to ensure the charging process has started
(see fi gure 5, A - Red, B - Yellow, C - Green ). For color indications
see fi gure 6.
NOTE: Make sure you plug into a circuit that is not loaded by other equipment. Wall breakers may be tripped and no charge will occur.
WARNING: Never charge a GEL battery with an unsuitable battery
charger. Carefully follow the instructions given by the
manufacturer of the batteries and battery charger.
Figure 6
NOTE: To prevent permanent damage to the batteries, avoid their complete
discharge. Never leave the batteries completely discharged, even if the
machine is not being used. When recharging the batteries, keep the base
support of the seat lifted. After every 20 recharging operations, check the
level of the electrolyte and if necessary top off with distilled water.
Page -12- Form No. 71274A Nilfi sk ALTO Operator’s Manual - SCRUBTEC R Manual Steering
Page 13
How To Prepare the Machine For
Operation
Level Indicators for the Charge of the Batteries
The battery meter ( see fi gure 7) on the control panel has a digital read out
with 10 fi xed positions (A) and also a blinking indicator (B). The bars that
appear on the display show the approximate charge level with icon (blinking)
discharged battery.
NOTE: A few seconds after the voltage reads 32V it will start blinking. The
brush motors will then automatically switch off.
How To Install the Squeegee
To install the squeegee onto the machine, follow this procedure:
1. The squeegee assembly has a break away feature that is also used
for mounting the squeegee. Loosen the knobs on the squeegee
(fi gure 8). Slide the stud into the slotted hole in the support frame on
the machine.
2. Attach the vacuum hose cuff to the squeegee hose fi tting (see fi gure
9).
3. Tighten knobs. NOTE: Do not overtighten or break away feature
is lost and damage may occur.
NOTE: To prevent damage to the squeegee or machine, the squeegee was
designed to break away from the machine. If the squeegee is impacted and
it breaks away from the machine, simply reinstall it by following step 1-3.
A
B
Figure 7
How to Adjust the Squeegee
During operation, the rear squeegee blade should have a constant 3/16”
minimum fl are along the entire squeegee blade (see fi gure 10).
1. The squeegee body can be tilted to adjust the squeegee blade fl are
in the middle to match the fl are on the ends. To adjust the tilt, loosen
the adjusting bolt located on the left and right side of the squeegee
(see fi gure 9).
2. Press down on the squeegee until both sets of guide wheels contact
fl oor.
3. After making adjustments, retighten the screw(s).
NOTE: It is important that the right and left wheels are contacting the fl oor in
order for the squeegee to work.
NOTE: As the rear squeegee blade wears, it can be rotated and/or fl ipped to
obtain four good edges before having to change blades.
Figure 8
Figure 9
Nilfi sk ALTO Operator’s Manual - SCRUBTEC R Manual Steering Form No. 71274A Page -13-
Figure 10
3
/16” minimum
Page 14

How To Prepare the Machine For
Operation
How To Change or Rotate Brushes on Cylindrical Brush
Head
To install or rotate brushes on the cylindrical brush head:
1. Raise the brush deck and turn the key switch “OFF”.
2. Raise the brush skirt and pull out to remove. See fi gure 11.
3. Remove thumb screw from brush door. See fi gure 12.
4. Lower door approximately 12 mm and slide door and hub assembly
from brush. See fi gure 13.
5. Slide brush off hub at opposite end. See fi gure 14.
6. Rotate brush or replace.
7. Slide brush on drive hub and insert door and hub assembly into
brush core.
8. Raise door and install thumb screw.
9. Place side skirt on retainer pins and lower in place.
10. Brushes should be rotated after every 20 hours of use.
Figure 11
Figure 12
Page -14- Form No. 71274A Nilfi sk ALTO Operator’s Manual - SCRUBTEC R Manual Steering
Figure 13
Figure 14
Page 15
How To Prepare the Machine For Operation
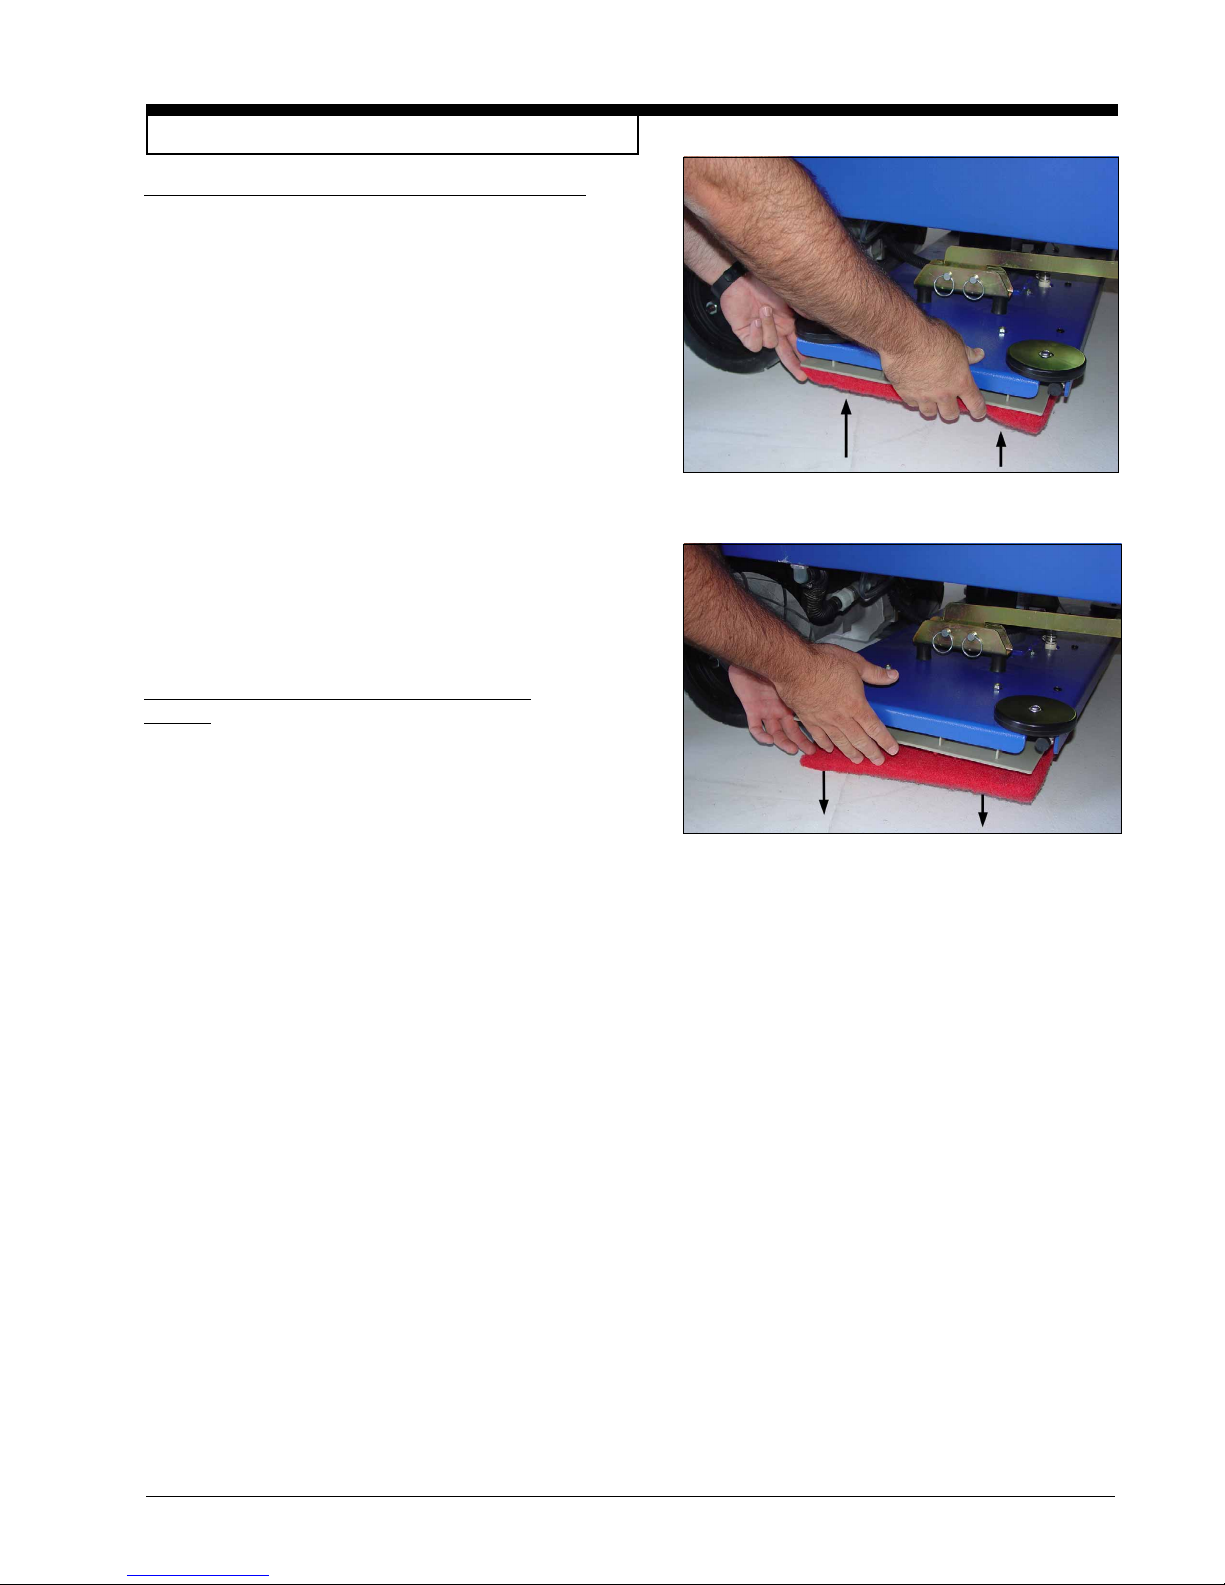
How To Install The Brush Or Pad on the BOOST machine
To install the brush or pad on the BOOST machine, follow this procedure:
1. Turn the key switch “ON”.
2. Put the brush switch in the “UP” position.
3. Turn the key switch “OFF”.
4. Go to the side of the machine.
5. Press on a brush or pad under the fl ex plates. See fi gure 15.
NOTE: When using a black pad, position pad on head.
Lower head and operate momentarily to affi x pad to
pad driver (if you have diffi culty, position pad on
fl oor and lower head then operate.)
How To Remove The Brush Or Pad on the BOOST
machine
To remove the brush or pad from the machine, follow this procedure:
1. Turn the key switch “ON”.
2. Put the brush switch in the “UP” position.
3. Turn the key switch “OFF”.
4. Go to the side of the machine.
5. Pull downward on the brush or pad until it releases from the fl ex
plates. See fi gure 16.
Figure 15
Figure 16
Nilfi sk ALTO Operator’s Manual - SCRUBTEC R Manual Steering Form No. 71274A Page -15-
Page 16
How To Operate The Machine
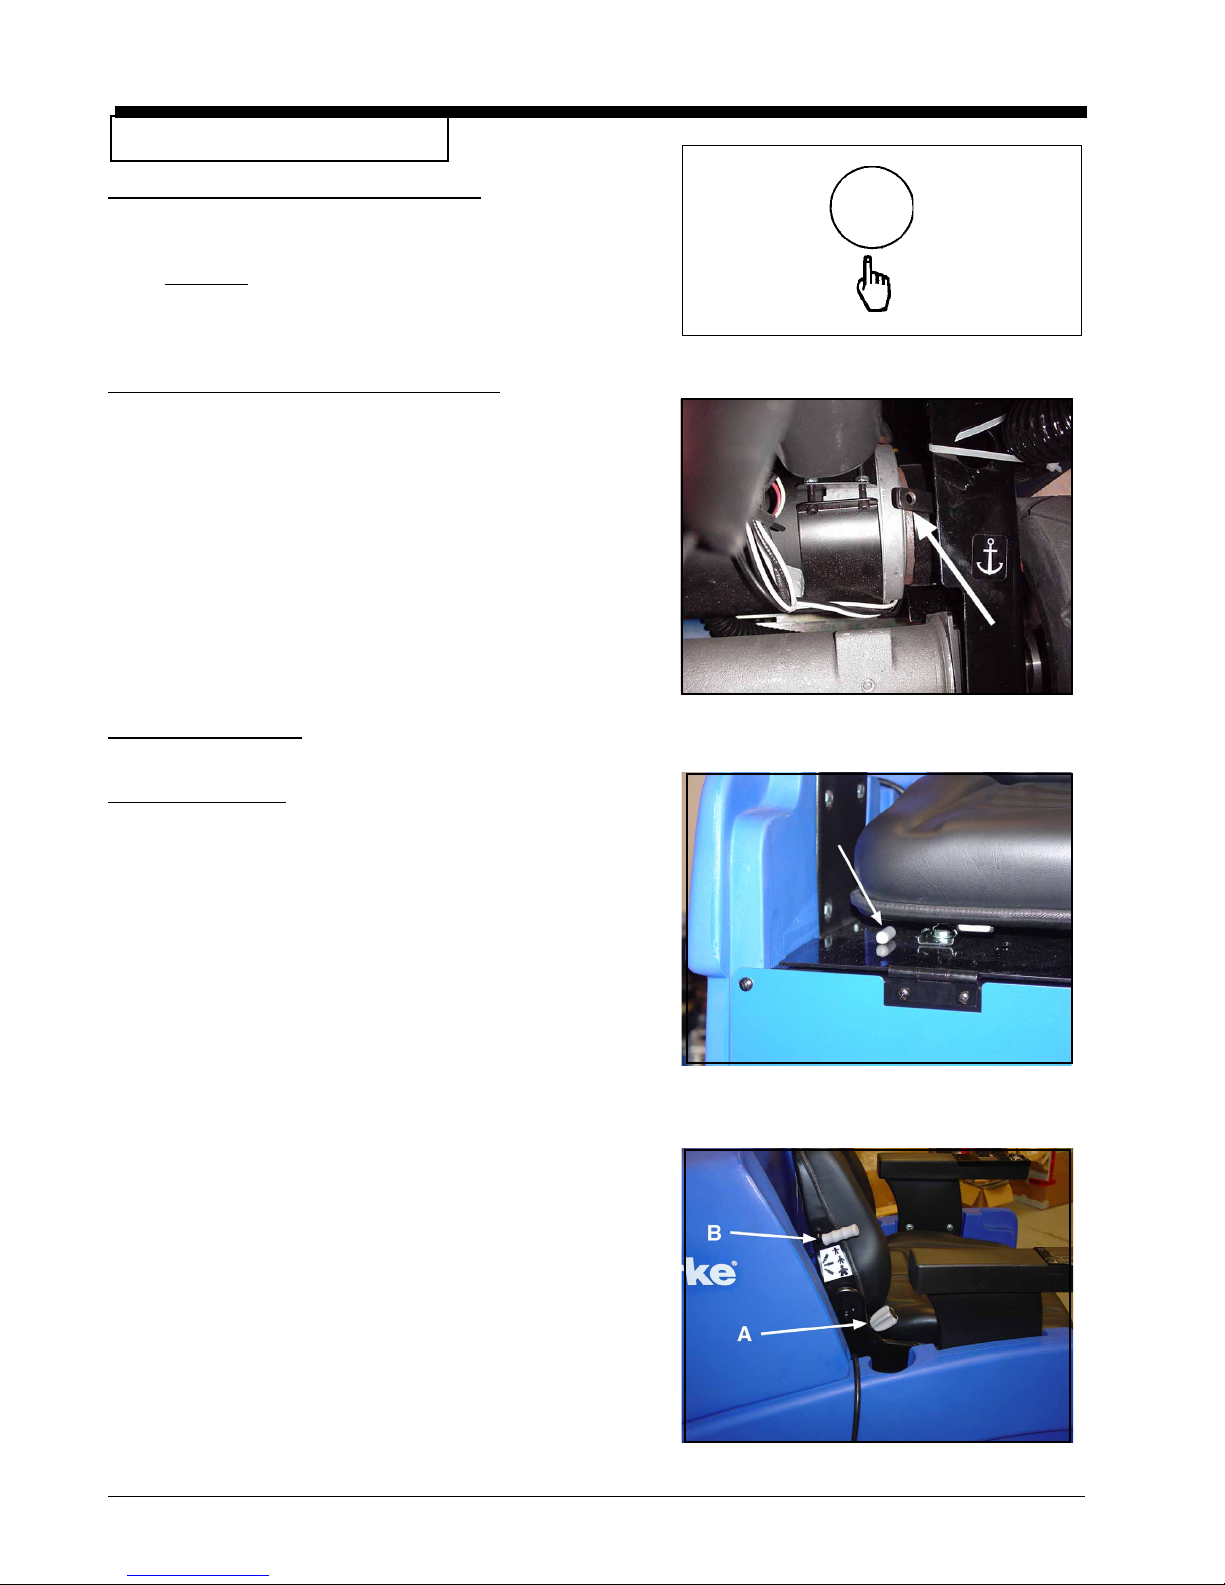
How to Return One Touch to Factory Default Settings
To restore the factory settings, follow the procedures below:
1. Press and hold the green one touch button (fi gure 17) until you hear
a double beep from the machine. NOTE: The time required for
this will be approximately 15 seconds.
2. The settings should be returned to 2 bars of solution and 1 bar of
brush pressure. NOTE: The squeegee vac switch must be in the
middle position for default settings to work.
How to Move the Machine Without Power (see fi gure 18)
1. Engage manual override on brake (see page 9, “Parking Brake”).
2. Remove foot plate and 4 screws and locate steering motor.
3. Using the knob on steering motor, turn shaft on motor in direction
you wish to turn machine.
4. Slowly push machine to desired location. NOTE: If you attempt to
push machine too fast it will limit top speed. If this happens,
stop and restart.
5. After moving machine, disengage manual brake override. NOTE:
Machine will not function if override is engaged.
Figure 17
Seat Adjustment (Standard)
The standard seat is not adjustable forward or backward.
Seat Adjustment (Deluxe)
The optional deluxe seat is adjustable in three ways:
1. The seat can be adjusted to the forward/backward position by using
the lever on the lower right side of the seat . Moving the lever will
allow the seat to slide into the preferred position. See fi gure 19.
2. To adjust the angle of the back support portion of the seat, turn the
lever located in the middle right position of the seat. Turning this
clockwise will make the seat more vertical. Turning the knob counterclockwise will tilt the seat back.
See fi gure 20 A.
3. To adjust the suspension of the seat for operator comfort, use the
lever on the side of the back support section of the seat. This has
three positions. The upper position is for light weight operators. The
middle position is for medium weight operators. The bottom position
is for heavy weight operators. See fi gure 20, B. NOTE: The lever
must be pressed fi rmly to change positions.
Figure 18
Figure 19
Page -16- Form No. 71274A Nilfi sk ALTO Operator’s Manual - SCRUBTEC R Manual Steering
Figure 20
Page 17
How To Operate the Machine
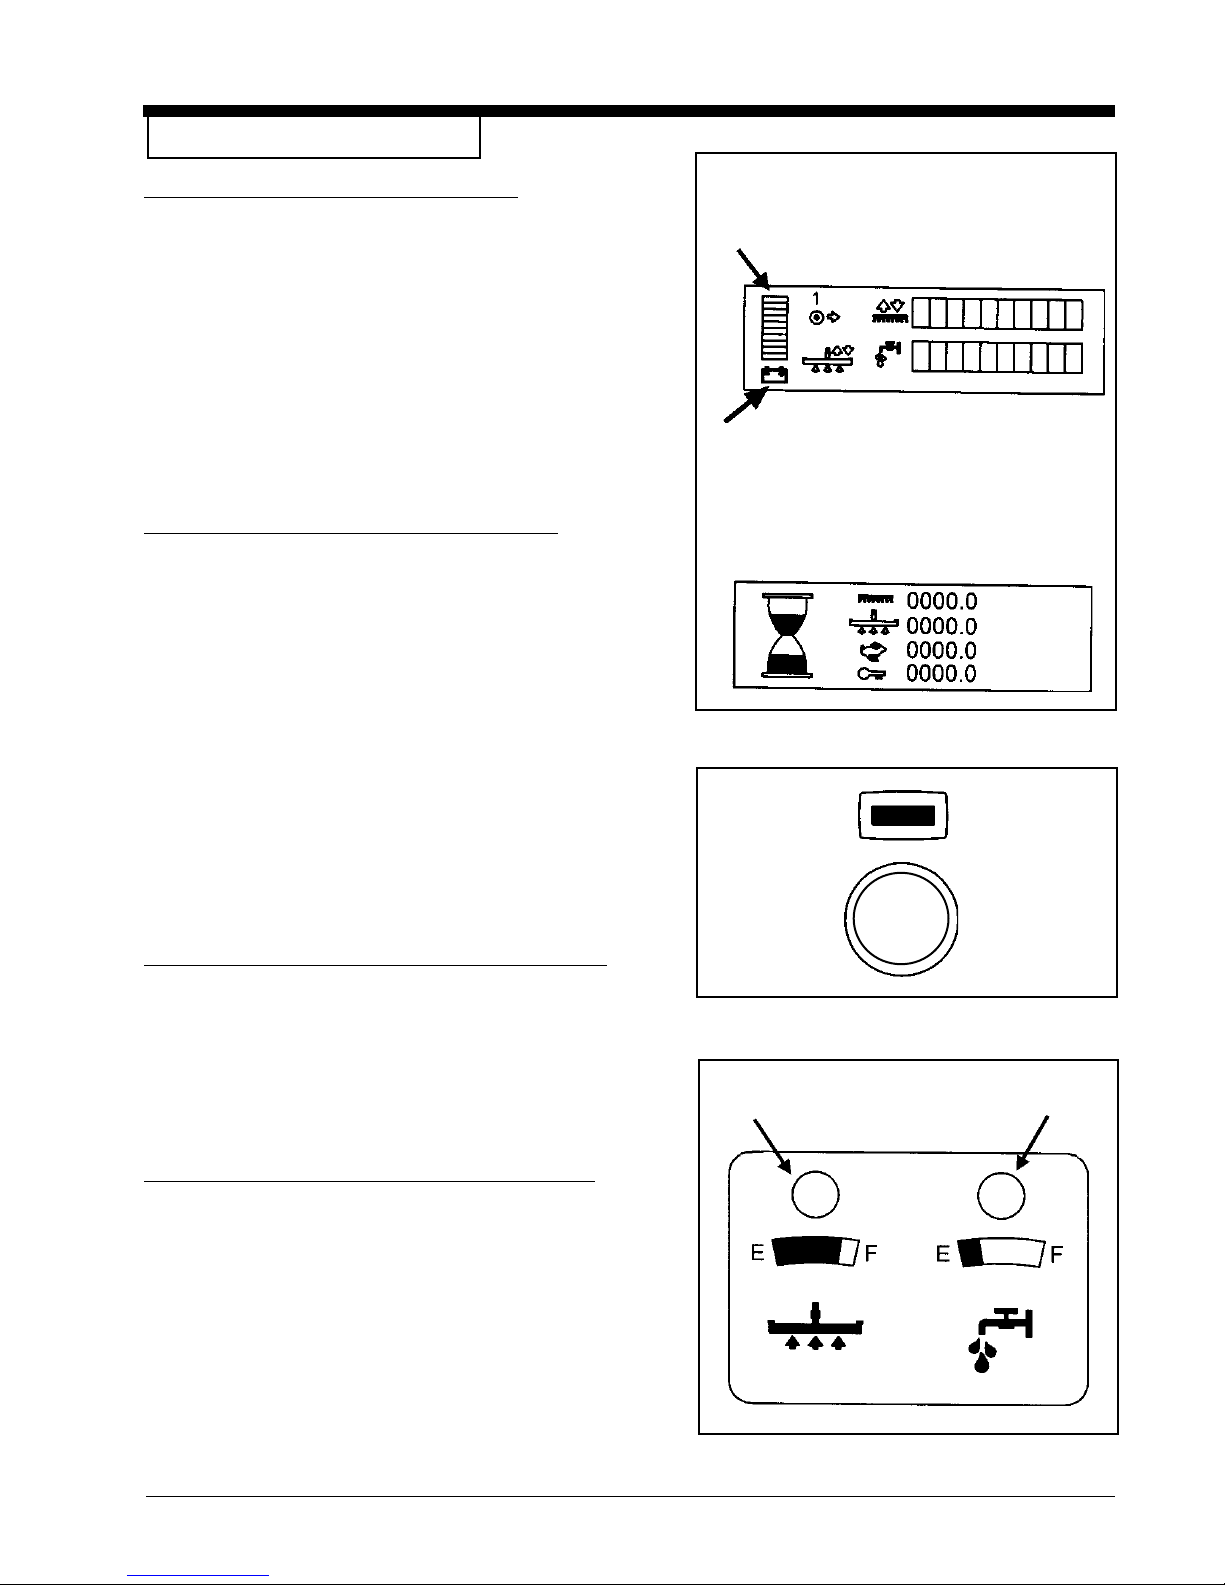
How to Read the Battery Meter (see fi gure 21, A)
The battery meter is an indicator on the LCD display. This indicator is on the LCD display on the front of the machine. It has 10
bars with 10 bars visible indicating a full charge. As you run the
machine the bars will begin to lower. The “Battery Icon” (B) will
begin to fl ash to indicate you are reaching the end of charge.
NOTE: If you continue to run the brushes they will shut
down to protect the batteries from over discharging.
NOTE: Run times will vary depending on machine variables,
battery size, brush pressure and fl oor type, etc.
How to Change Displays Screens on the LCD Module
The LCD display has three screens. Two of them can be accessed at any time the key is on. The fi rst screen shows the
machine status and the second screen shows the four hour
meters (fi gure 21).
The two screens that can be viewed by the operator can be accessed via the display button (fi gure 22) on the control panel to
the left of the key switch. Pressing this button toggles the display
between the available screens.
SCREEN 1
A
B
SCREEN 2
Figure 21
The third screen is for diagnostics only. This screen displays
any errors that might occur or if the system diagnostics fi nds
something wrong. When the diagnostic screen comes up, refer
to the trouble shooting guide for suitable action to resolve the
error code.
How to Read the Solution Empty Indicator (see fi gure 23, A)
The solution empty indicator is located on the front of the machine below the LCD display. When the solution reaches nearly
empty, the indicator will begin to fl ash, warning the operator of
the need to refi ll.
NOTE: Solution run times will vary depending on solution
fl ow setting.
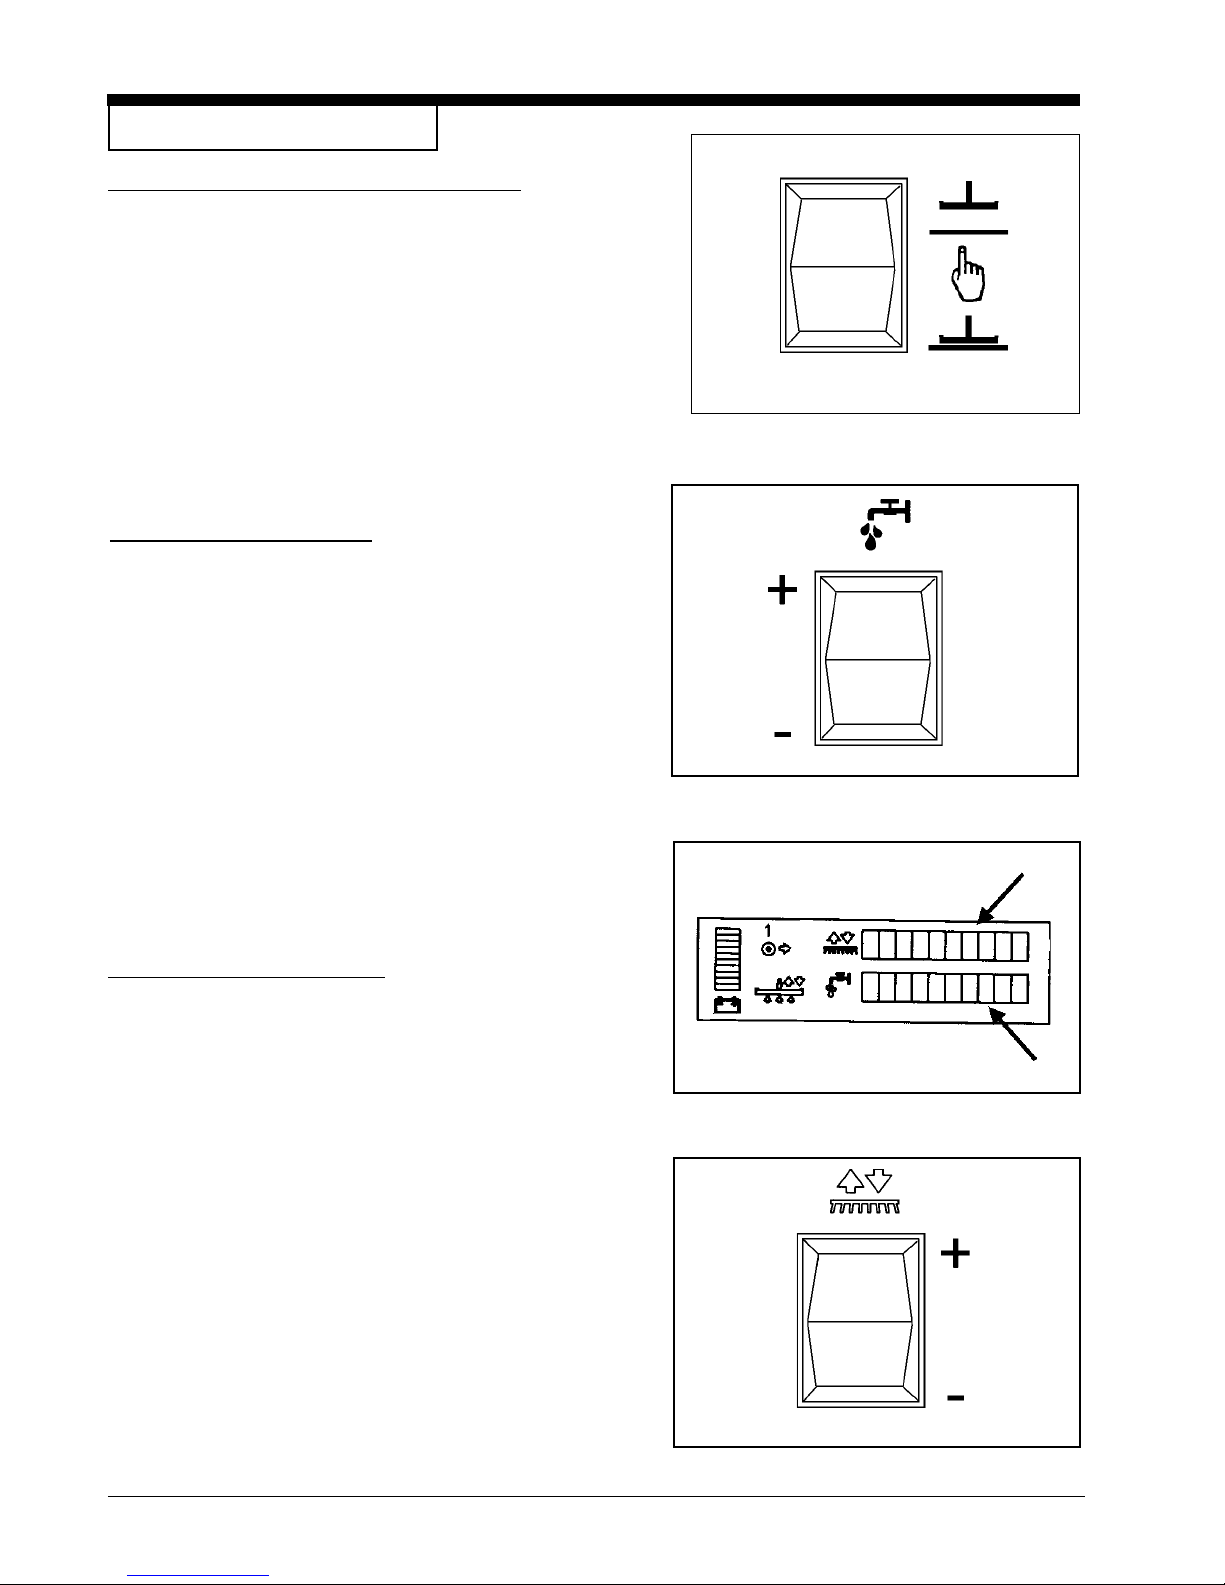
How to Read the Recovery Full Indicator (see fi gure 23, B)
The recovery full indicator is located on the front of the machine
below the LCD display. When the recover tank is near full the
indicator will begin to fl ash, warning the operator of the need to
empty the recovery tank. The vacuum motors will shut down a
few moments later.
NOTE: Recovery times will vary depending on
B
Figure 22
A
Nilfi sk ALTO Operator’s Manual - SCRUBTEC R Manual Steering Form No. 71274A Page -17-
Figure 23
Page 18
How To Operate the Machine
How to Operate the Squeegee and the Vacuum Motor
The squeegee wipes the fl oor while the vacuum motor removes the dirty
solution from the fl oor. To operate the squeegee, follow this procedure:
1. To lower the squeegee and start the vacuum motor, press the squee-
gee up/down switch to the down position (fi gure 24). NOTE: The
vacuum motor will start immediately when the down position of
the switch is pressed, and the squeegee will lower.
2. To raise the squeegee, press the squeegee up/down switch to the up
position (fi gure 24). The squeegee will then raise and the vacuum
motor will shut off after short delay NOTE: The center position of
the squeegee up/down switch is for use with one touch control.
NOTE: The squeegee will rise automatically when traversing in reverse
during scrubbing operations.
How to Operate the Solution Flow
The solution is used to loosen and remove dirt from the fl oor. The amount
of solution applied can be adjusted to fi ve different levels to accommodate
many different fl oor conditions. These different levels are shown on the
LCD display on the front of the machine. To adjust the amount of solution
applied, use the Solution Flow Switch (fi gure 25). NOTE: There are fi ve
different settings on the display. See fi gure 26, A.
To increase solution fl ow:
1. Press the “ + ” side of the switch (fi gure 25).
2. Press and hold the “ + ” switch to achieve the desired level of solution
fl ow.
To decrease solution fl ow:
1. Press the “ - “ side of the switch (fi gure 25).
2. Press and hold the “ - “ side of the switch to achieve the desired level
of solution fl ow.
Figure 24
Figure 25
B
How to Operate the Brush Pressure
The brushes are used to supply agitation for the solution, which improves
the cleaning process. The amount of brush pressure applied can be adjusted to fi ve different levels to accommodate many different fl oor condi-
tions. These different levels are shown on the LCD display on the front of
the machine (fi gure 26, B). To adjust the amount of brush pressure, use the
brush up/down switch (fi gure 27).
To increase brush pressure:
1. Press the “ + ” side of the switch (fi gure 27).
2. Press and hold the “ + ” switch to achieve maximum level of pressure.
To decrease brush pressure:
1. Press the “ - “ side of the switch (fi gure 27).
2. Press and hold the “ - “ side of the switch to achieve minimum or no
brush presssure.
Page -18- Form No. 71274A Nilfi sk ALTO Operator’s Manual - SCRUBTEC R Manual Steering
A
Figure 26
Figure 27
Page 19
How To Operate the Machine
How to Operate the Forward / Reverse Switch
(see fi gure 28).
1. To go forward, push the up arrow side of the switch.
2. To go in reverse, push the down arrow side of the switch.
How to Fill the Solution Tank
The solution tank fi ll port is located at the left side of the machine (see fi gure
29). To fi ll the solution tank, follow this procedure:
1. Turn the key switch to the “OFF” position.
2. Remove lid.
3. Add a cleaning chemical to the solution tank. For the correct amount
of chemical, follow the directions shown on the container. NOTE:
Excess foam in the recovery tank could damage the vacuum
motor, so use only the minimum amount of detergent necessary.
WARNING: Always use low foam detergent. To avoid the
production of foam, before starting to clean, put a
minimum quantity of antifoam liquid into the recovery tank. NEVER USE PURE ACID.
4. Fill the solution tank with clean water (see fi gure 29).
5. After fi lling the solution tank, replace the solution tank lid.
Figure 28
WARNING: Water solutions or cleaning materials used with this
type of machine can leave wet areas on the fl oor
surface. These areas can cause a dangerous condition for the operator or other persons. Always put
CAUTION signs near the area you are cleaning.
WARNING: Machines can ignite fl ammable materials and
vapors. Do not use with or near fl ammables such
as gasoline, grain dust, solvents and thinners. Only
use a cleaning concentration recommended by the
chemical manufacturer.
WARNING: Nilfi sk ALTO recommends a maximum water tem-
perature of 120°F (49°C).
Operating the Machine
NOTE: Before scrubbing with the machine, become familiar with the opera-
tions and handling of the machine. Run the machine at the lowest traverse
speed. Use the machine in an area that has no furniture or objects until you
can do the following:
1. Traverse the machine in a straight direction, forward and backward.
2. Stop the machine safely.
3. Turn the machine both left and right and return to a straight direction.
o
4. Turn a 180
turn where one rear wheel just pivots.
Figure 29
Nilfi sk ALTO Operator’s Manual - SCRUBTEC R Manual Steering Form No. 71274A Page -19-
Page 20
How To Operate the Machine (cont.)
To traverse the machine follow this procedure:
1. Sit on the driver seat.
the operator is not properly seated.
2. Turn the key switch to the “ON” position.
3. Raise the brush to the highest position (if necessary).
4. Raise the squeegee (if necessary).
5. Gently press the foot pedal and the machine will begin to move.
6. To stop, release pressure on the foot pedal.
7. To travel in reverse, select reverse with the forward/reverse
switch.
8. To stop, release pressure on the foot pedal.
9. When you stop the machine, turn the key switch “OFF” and
remove the key.
Do These Procedures When You Begin Your Work Period
1. Make sure the key switch is in the “OFF” position.
NOTE: The machine will not traverse if
Figure 30
2. Disconnect AC power from battery charger (follow charger
instructions).
3. Make sure the fi lter screen (1) to the vacuum motor is clean and
installed properly in the recovery tank (see fi gure 30).
4. Make sure the recovery tank lid is in place and has been tightened (see fi gure 31).
5. Close and secure the lower cleaning port cover (if so equipped)
on the recovery tank.
6. Make sure that the plug in the recovery drain hose is in place and
has been tightened (see fi gure 32).
7. Make sure that the brushes/pads are in position and installed
correctly.
8. Make sure the brush housings are in position on the brush head.
9. Check the installation of the squeegee and squeegee hose.
Figure 31
Figure 32
Page -20- Form No. 71274A Nilfi sk ALTO Operator’s Manual - SCRUBTEC R Manual Steering
Page 21

How To Operate the Machine
How to Clean a Floor
WARNING: Water solutions or cleaning materials used with this
type of machine can leave wet areas on the fl oor
surface. These areas can cause a dangerous condition for the operator or other persons. Always put
CAUTION signs near the area you are cleaning.
For one touch automatic cleaning follow this procedure:
1. Turn the key switch to the “OFF” position.
2. Put the water and a cleaning chemical in the solution tank.
3. Sit on the driver seat. NOTE: The machine will not traverse if the
operator is not properly seated.
4. Turn the key switch “ON”. NOTE: The key switch turns on the
battery and LED screen displays, which shows the machines
condition.
5. The machine has a one touch button on the control panel (see fi gure
33) that is preset for brush pressure and solution fl ow. Momentarily
depress the one touch button if you wish to use these settings.
NOTE: If this is not the settings that you desire see page 16 or
one touch operation.
For manual control of cleaning process, follow these
procedures:
1. Turn the key switch to the “OFF” position.
2. Put the water and a cleaning chemical in the solution tank.
3. Sit on the driver seat. NOTE: The machine will not traverse if the
operator is not properly seated.
4. Turn the key switch “ON”. NOTE: The key switch turns on the
battery and LED screen displays, which shows the machines
condition.
5. Lower the squeegee. NOTE: The vacuum motor will turn on
when the squeegee up/down switch is placed in the lower position.
6. Lower the brush head until it reaches the full stroke down. NOTE:
The brushes will start rotating only when the machine begins to
traverse.
7. Reset the solution fl ow valve by using the + / - solution switch.
NOTE: The solution will fl ow only if the machine is moving
forward.
8. After a few feet of scrubbing, check to see that the amount of solu-
tion being applied is correct and that the squeegee is picking up
water and drying the fl oor. Make adjustments as required.
9. Once the machine is set properly continue to scrub until the solution
low indicator comes on or until you run out of solution.
NOTE: When making multiple passes across the fl oor, overlap the brush
cleaning path approximately 2 inches (5 cm) of the area already cleaned by
the brush.
NOTE: During most cleaning procedures, apply and remove the solution in
one operation.
Figure 33
Nilfi sk ALTO Operator’s Manual - SCRUBTEC R Manual Steering Form No. 71274A Page -21-
Page 22

How To Operate the Machine
How to Clean a Very Dirty Floor
To clean a very dirty fl oor, follow this procedure:
1. Apply solution to the fl oor.
2. Do not lower the squeegee. This will keep the vacuum motor off.
3. Lower the brush or pad and scrub the fl oor.
4. Scrub the fl oor again with additional solution and lower the squeegee.
5. Pick up all the solution with the squeegee.
Do These Procedures When You End Your Work Period
Having fi nished the job and before any type of maintenance is done, follow
these procedures:
For one touch cleaning shut down process, press and release the one
touch button.
For manual shut down follow these procedures:
1. Turn the solution fl ow off by decreasing the fl ow to its minimum posi-
tion.
Figure 34
2. Press the brush up/down switch to the up position until the brush
head has reached its up most position.
3. Place the squeegee up/down switch in the up position to raise the
squeegee and allow the vacuum motor to continue to run. The
vacuum motor will run for another 20 seconds and then place the
squeegee up/down switch to the up position. This will shut the
vacuum motor off.
4. Take the machine to a water drain.
5. Turn the key switch “OFF”.
6. Remove the drain hose from the holding hook.
7. Put the end of the hose over a drain or bucket.
8. Turn the valve housing to the left (see fi gure 34).
9. To open the valve completely, turn the housing fully to the left. Pull
the housing off of the valve.
10. Empty the recovery tank. NOTE: When hose is lowered below
water level, water will fl ow.
WARNING: Use gloves to protect your hands from contact
with dangerous solutions when preforming the
steps listed above.
Page -22- Form No. 71274A Nilfi sk ALTO Operator’s Manual - SCRUBTEC R Manual Steering
Page 23
How To Operate the Machine
11. Rinse the tank. Put clean water in the tank through the
opening at the top. Be careful not to allow water into the
vacuum intake tube (with screen).
12. If the tank or recovery hose has an obstruction, use
water pressure to fl ush them. Put the water hose into
the recovery hose (fi gure 35, A). NOTE: Do not place
water hose in vacuum intake tube (see fi gure 35, B),
damage will occur.
The recovery hose (fi gure 35, A) is located to the right of
the vacuum intake tube (see fi gure 35, B). The recovery
hose is fl exible, which will allow you to move it toward
the opening for easy access to the water hose for fl ush-
ing the line.
13. Leave the tank and drain plug removed to air dry.
14. Check the squeegee blade. Use a cloth to clean the
squeegee blade. If the squeegee blade is damaged or
worn, turn or replace the blade.
NOTE: To avoid damage to the squeegee, the squee-
gee must be lifted when the machine is not in operation.
A
Figure 35
B
15. Take off the brushes and clean them with a jet stream of
water.
16. Use a clean cloth and wipe the surface of the machine.
17. Check the batteries and add distilled water as needed.
The correct level is between ¼” (½ cm) below the bottom of the tube in each cell and above the tops of the
plates. See the instructions in the section of this book
called “Battery Maintenance”.
CAUTION: Tap water may contain contaminants
that will damage batteries.Batteries
must be refi lled with distilled water only.
WARNING: Lead acid batteries generate gases
which can cause an explosion.
NO SMOKING.Always wear eye
protection and protection Clothing
when working near batteries.
18. Charge the batteries. See the instructions in the section
of this book called “How to Charge the Batteries”.
Nilfi sk ALTO Operator’s Manual - SCRUBTEC R Manual Steering Form No. 71274A Page -23-
Page 24

Maintenance
Maintenance To Be Done Every Week
WARNING: Maintenance and repairs must be done by
authorized personnel only.
Always empty the solution tank and the
recovery tank before doing
any maintenance. Keep all fasteners tight.
WARNING: Always wear eye protection and protective
clothing when working
near batteries. NO SMOKING! Do not put
tools or other metal objects
across the battery terminals or the tops of
the batteries.
CAUTION: To prevent damage to the machine, and
discharge across the tops
of the batteries, do not fi ll the batteries
above the bottom of the tube
in each cell. Wipe any acid from the machine or the tops of the batteries.
Do not add acid to batteries after installation.
Figure 36
Battery Inspection and Cleaning
1. Turn the key switch to the “OFF” position.
2. To inspect batteries, rotate seat support forward. Lift and
rotate recovery tank. Be sure the recovery tank is empty
before lifting.
3. Disconnect the batteries. Use a cloth and a solution of
ammonia or bicarbonate of soda to wipe the top of the
batteries. Clean the battery terminals. Reconnect the
batteries. See the instructions in the section of this book
called “Battery Maintenance”.
4. When battery inspection is completed, close the recovery
tank. Rotate the seat support back to the operating position.
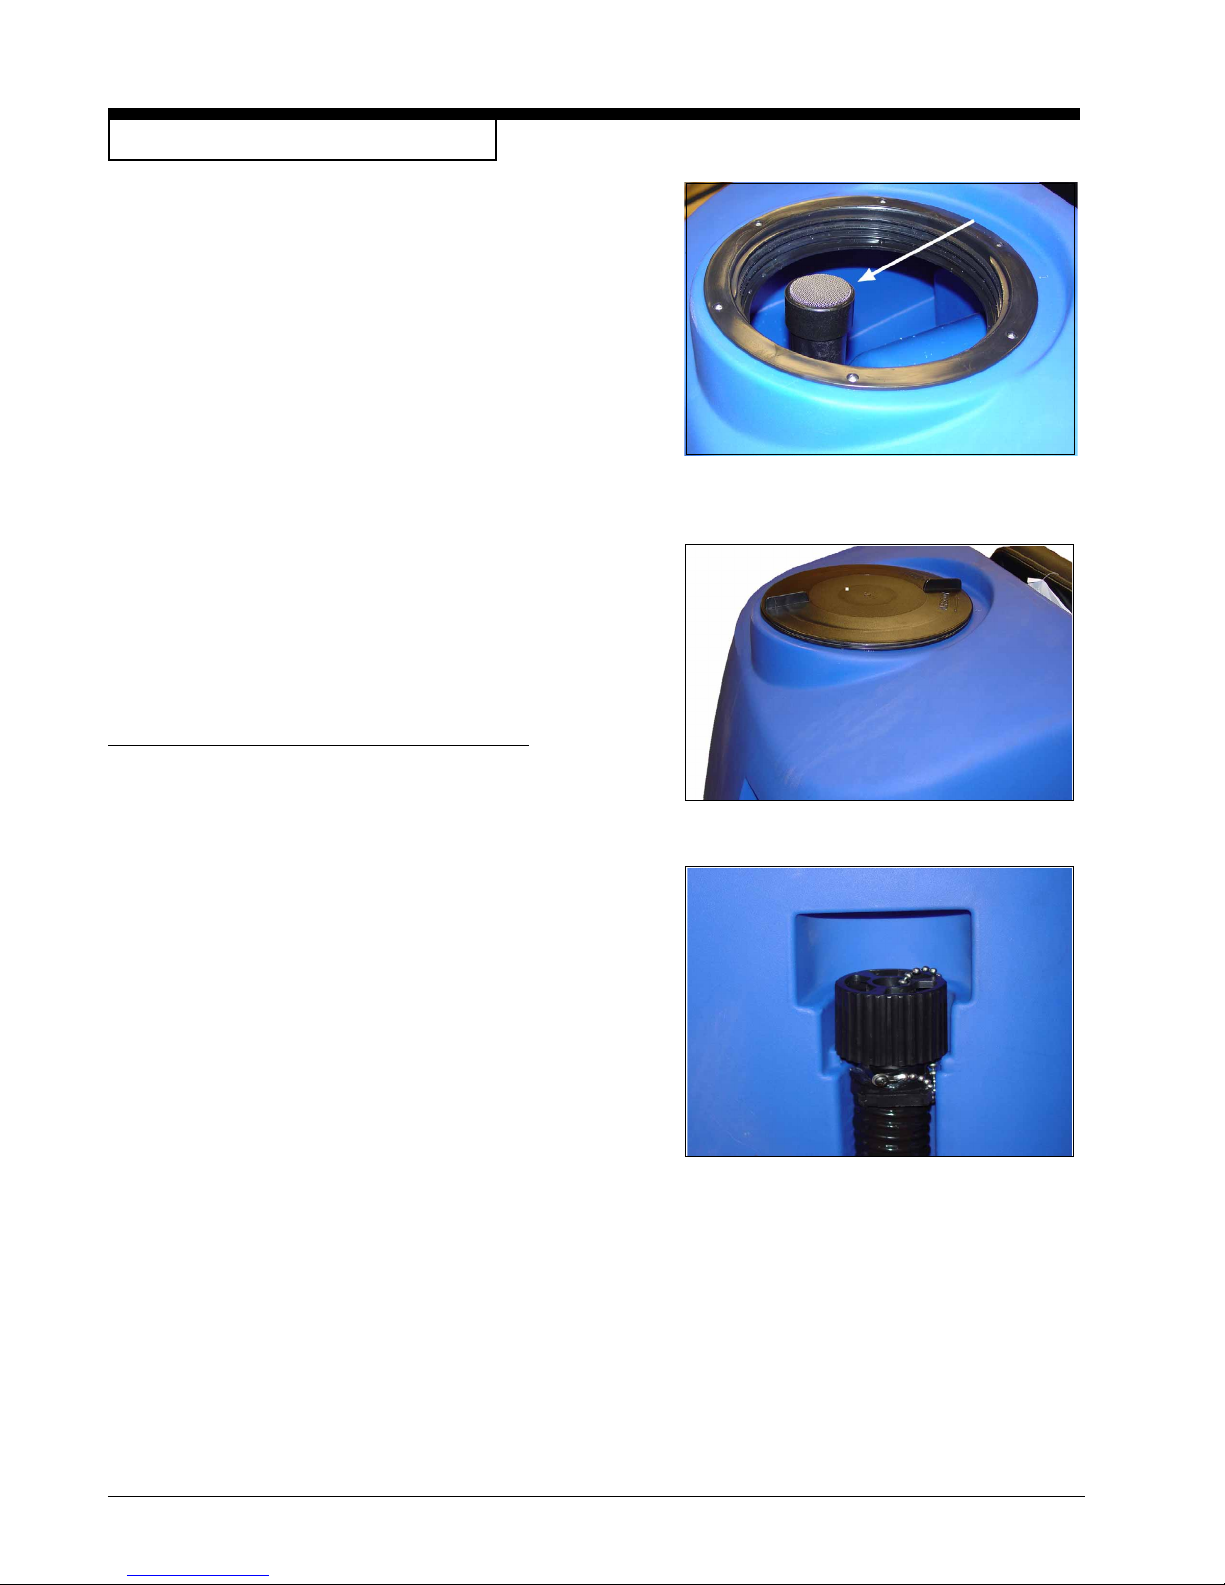
Cleaning the Recovery Tank and Filter
1. Turn the key switch to the “OFF” position.
2. Empty the recovery tank using the fl exible drain hose by
unscrewing the knob and taking off the plug (see fi gure
36).
3. If the machine is equipped with the optional clean-out port,
open the lower cleaning port cover by unscrewing the four
knobs (see fi gure 37). NOTE: Make sure that the tank is
empty fi rst.
Figure 37
4. Rinse the tank and clean the drain plug.
Page -24- Form No. 71274A Nilfi sk ALTO Operator’s Manual - SCRUBTEC R Manual Steering
Page 25
Maintenance
5. Clean the hose fi tting in the recovery tank and spray water
down the squeegee hose to clean out debris.
6. Reattach the squeegee hose.
Cleaning the Solution Tank and Filter
1. Move the machine so that the solution tank fi lter assembly is
located directly over a fl oor drain.
2. Turn the key switch to the “OFF” position.
3. Clean inside the solution tank with a jet stream of water.
7. Close the solution fl ow valve.
8. Clean the fi lter inside the housing and reinstall on machine.
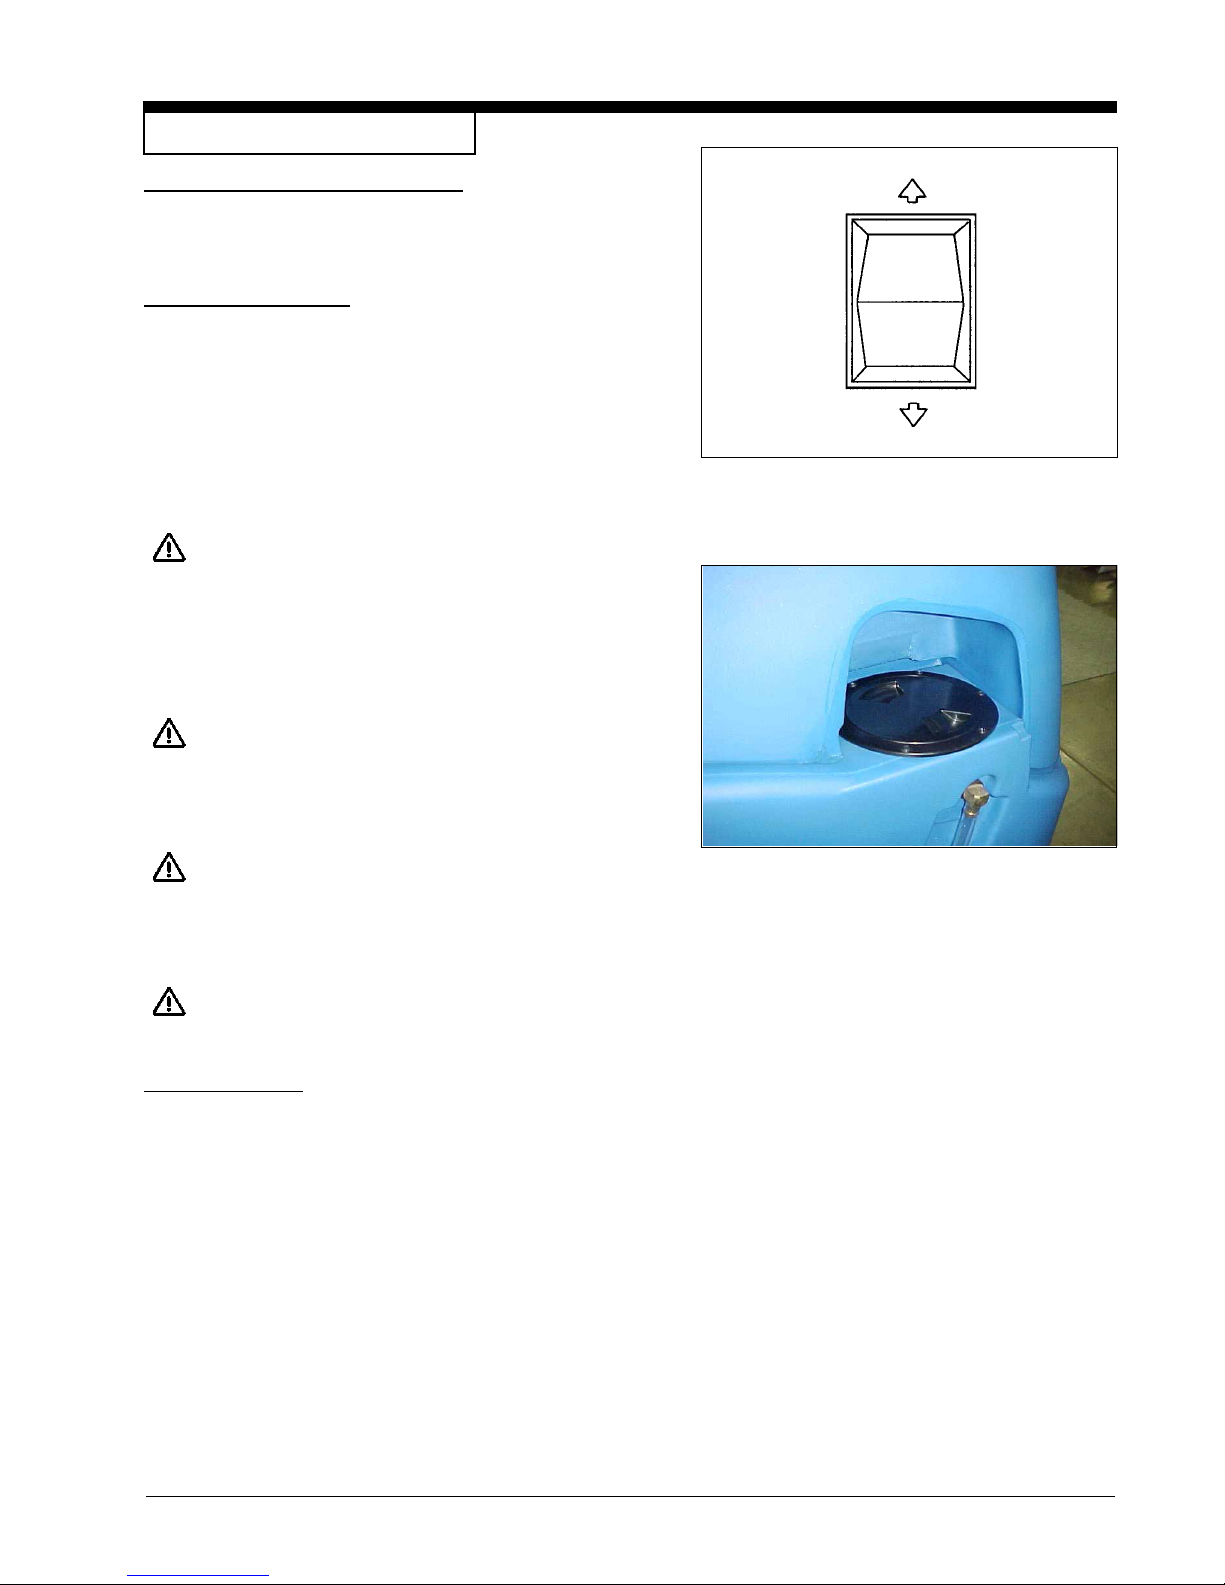
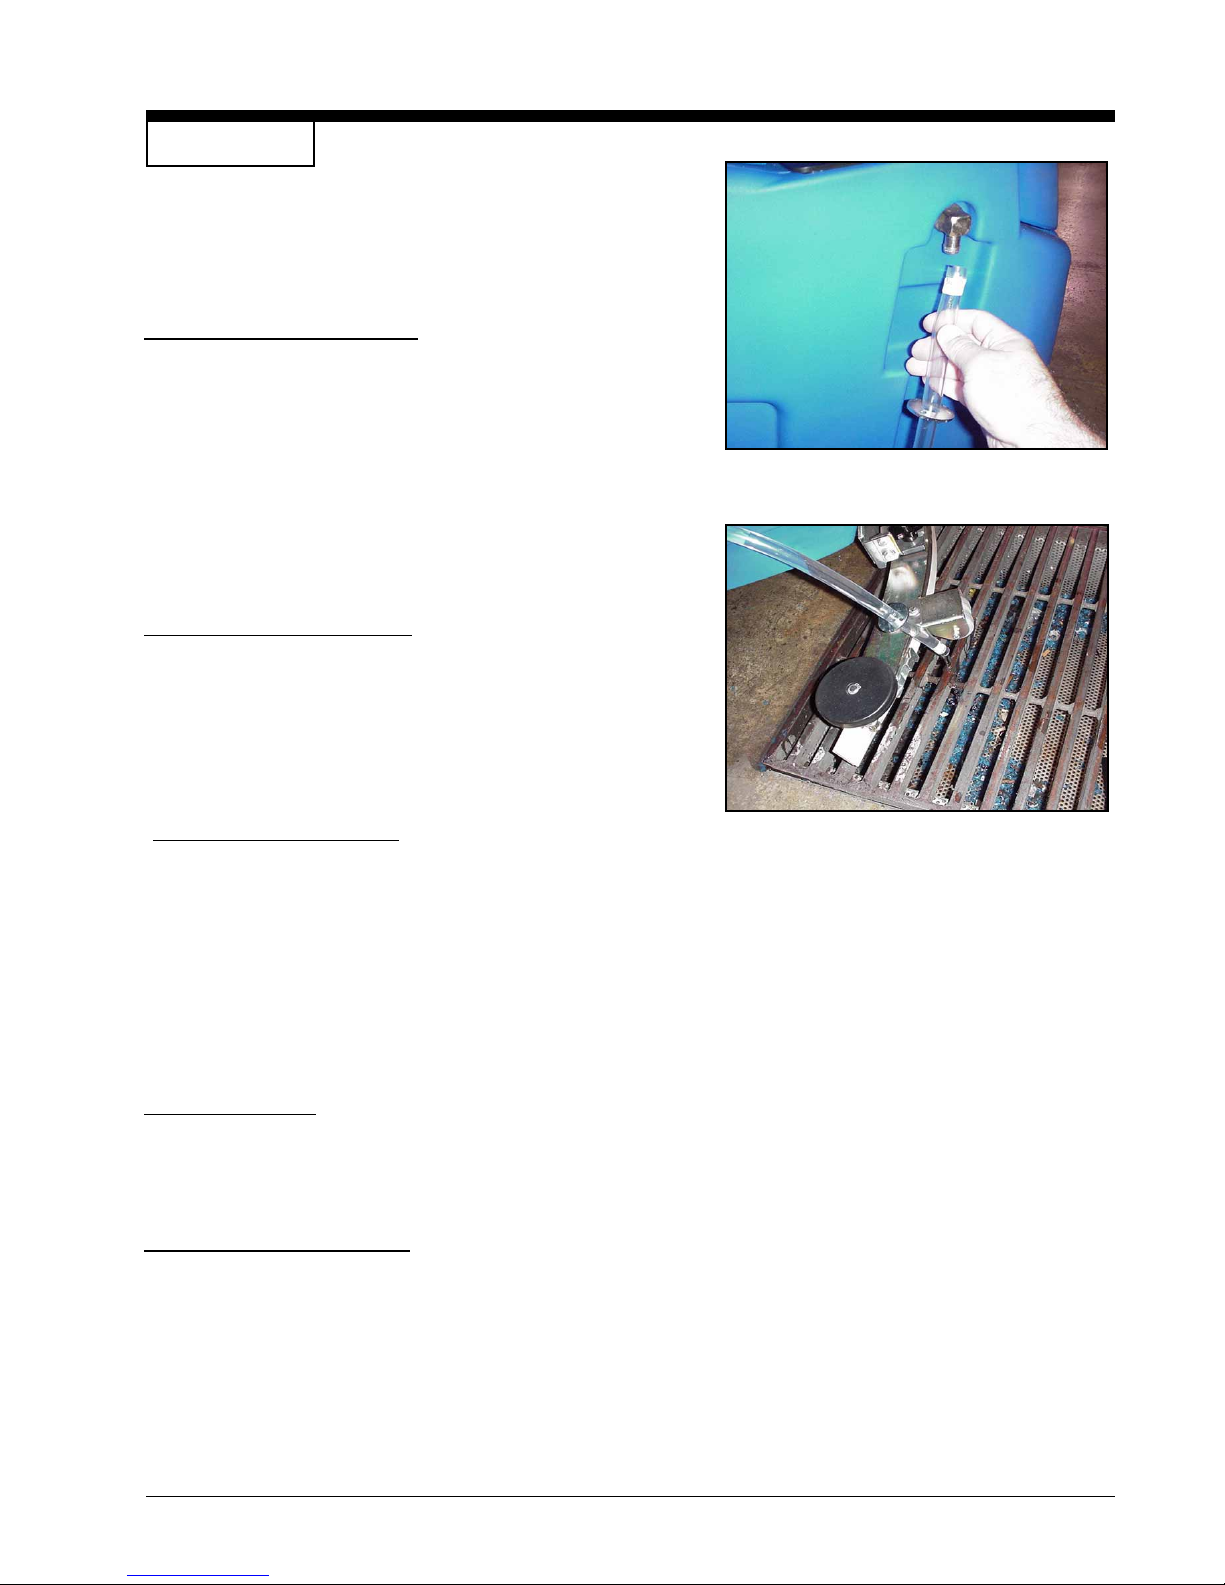
Manually Draining the Solution Tank
1. Remove sight gauge hose from top connector (see fi gure 38).
2. Rotate lower fi tting to allow drain hose to rest over drain.
3. Drain solution tank (see fi gure 39).
Vac Assisted Solution Tank Drain
1. Remove vacuum hose from squeegee plate.
2. Turn vac on.
3. Remove and place solution hose into vac hose until washer rest
against hose cuff.
NOTE: Using vac assist will help to rinse recovery tank. This will
help to reduce cleanup and maintenance times.
Figure 38
Figure 39
Squeegee Maintenance
Clean the squeegee with a jet stream of water and a damp cloth.
Inspect the front and rear squeegee blades for wear. Readjust or
replace if necessary.
Front Squeegee Blade Replacement
To replace the front squeegee blade, follow this procedure:
1. Remove the squeegee assembly from the machine.
2. Remove clamp and front squeegee blade.
3. Install new front squeegee blade and reinstall clamp.
4. Replace squeegee on machine.
Nilfi sk ALTO Operator’s Manual - SCRUBTEC R Manual Steering Form No. 71274A Page -25-
Page 26

Maintenance
Rear Squeegee Blade Replacement
If the rear squeegee blade is worn and does not dry the fl oor
well, follow this procedure:
1. Remove the squeegee assembly from the machine.
2. Remove the squeegee blade and inspect it.
3. Rotate the squeegee blade to obtain a new cleaning
edge. Replace if necessary.
4. Reinstall the squeegee blade.
5. Reinstall the squeegee assembly on the machine.
6. Readjust the settings on the squeegee as required
(see “How to Adjust Squeegee”).
Squeegee Maintenance
The squeegee blade may be rotated for longer life.
Keep sharp corner on fl oor for best cleaning
results. See fi gure 40. To rotate follow this
procedure:
Figure 40
A
B
1. Remove Clamp.
2. Remove blade and rotate to new edge.
3. Replace squeegee.
4. Replace clamp.
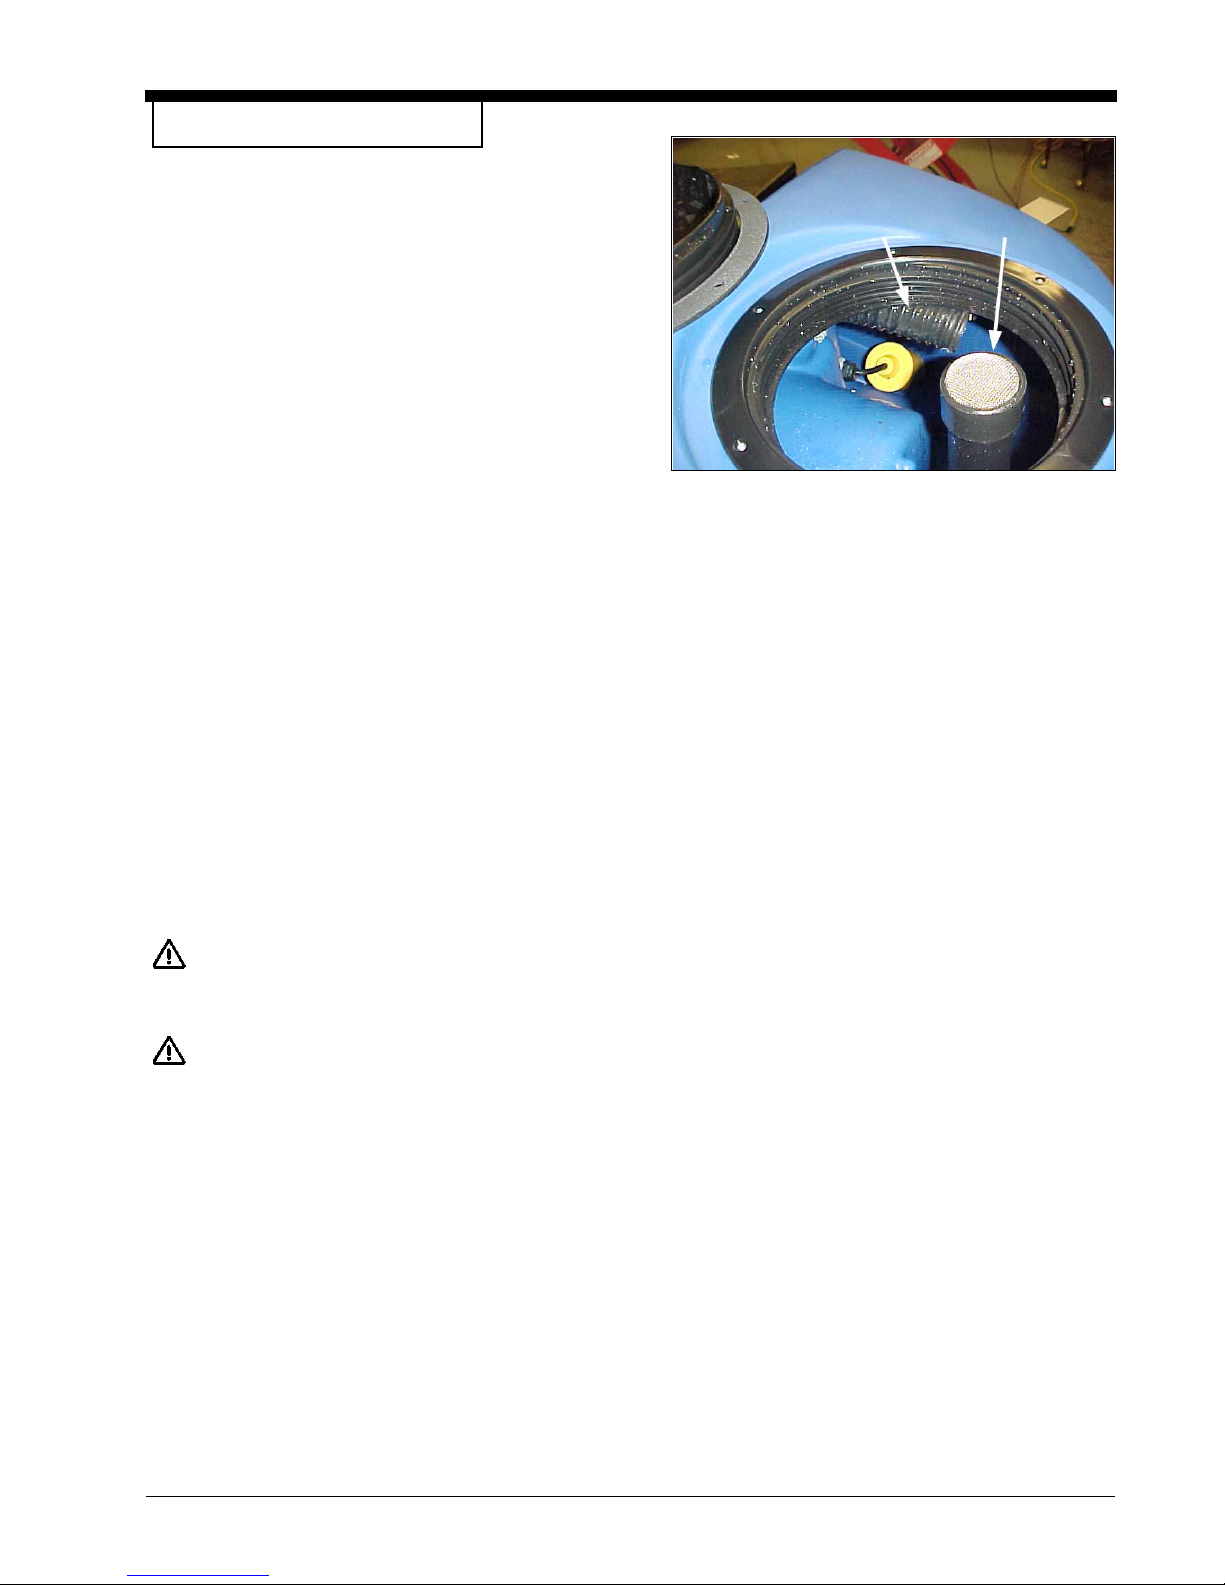
Cleaning the Vacuum Hoses
Make sure the squeegee is over a suitable drain.
1. Use a water hose to fl ush through the recovery hoses.
2. Side Squeegee - Position water hose to the squeegee side of the hose and fl ush thoroughly.
3. Recovery Hose - Position water hose
inside recovery tank. Recovery hose is located behind
threaded lip (see fi gure 40, A). NOTE: Do not place
hose in vacuum intake tube (see fi gure 41, B), dam-
age will occur.
Figure 41
Page -26- Form No. 71274A Nilfi sk ALTO Operator’s Manual - SCRUBTEC R Manual Steering
Page 27

HOW TO CORRECT PROBLEMS IN THE MACHINE
PROBLEM CAUSE ACTION
nsuffi cient water onto the brushes
The machine does not clean
satisfactorily
The squeegee does not dry the fl oor
The solution fl ow is not set
There is no water in the solution tank.
The solution fi lter is dirty.
A circuit breaker has tripped.
Insuffi cient fl ow.
The brushes are worn.
Need to use a different kind of brush/pad
The squeegee is dirty.
Recovery drain hose is not closed.
The suction hoses need to be cleaned.
The squeegee blades are worn.
Make sure the solution fl ow is set.
Fill the solution tank.
Clean the solution fi lter.
Reset the circuit breaker.
Increase fl ow with solution switch.
Check the brushes and replace if necessary.
(the brushes have to be replaced when the
bristles reach approximately .59 inches (15mm
height.)
Use a different kind of brush. For cleaning operations on fl oors where the dirt proves to be par-
ticularly resistant, we recommend using special
brushes. See Accessories page.
Clean the squeegee.
Close the drain plug.
Clean the vacuum hoses. See “Routine Maintenance” section.
Replace/ or rotate the squeegee blades. See
“Routine Maintenance” section.
The vacuum motor does not function
The machine does not start
The brush motors do not work
WARNING: To avoid damage to the fl oor, the
motor starts only when the machine is traversing.
The recovery tank is full.
The squeegee up/down switch in not in the low or
middle position.
The operator is not properly seated.
The key is not in the “ON position”.
The charger is still connected.
The batteries are not charged or not connected
properly.
The circuit breaker has tripped.
The brush head unit is not down.
The batteries are not charged or not connected
properly.
Poor electrical connection at the brush head unit.
Drain recovery tank.
Put the squeegee in the low or middle position or
reprogram “one touch”.
The operator must be properly seated in the driving position.
Turn the key to the “ON” position.
Remove the A/C cord from the wall.
Check to make sure the batteries are connected
properly and charge if necessary.
Reset the circuit breaker.
Put the brush head unit down.
Check to make sure the batteries are connected
properly and charge if necessary.
Connect the electrical connection at the brush
head unit.
Nilfi sk ALTO Operator’s Manual - SCRUBTEC R Manual Steering Form No. 71274A Page -27-
Page 28

Scrubtec R
Common Error Codes
ERROR CAUSE ACTION
CODE
1500
1501
1507
Check brake and wiring for
short circuit.
Make sure manual override is not
engaged.
1600
3100
3101
3102
3103
3104
3105
7600
7602
7603
7700
7800
7802
9000
2F01
High battery voltage.
Probable short circuit of
output device.
Open circuit on brush motors
or brush motor wiring.
Brush motor overload.
Possible short circuit on
brush motors or wiring.
Open circuit on vacuum motor.
Open circuit on traction motor.
Traction motor current has
exceeded current limit for the
fold back time.
Brushes not fi tted.
Drive system activated prior
to turning key switch “ON”.
Poor or corroded connection to the
battery.
Check the traction, brush and vac motor
connections on the trio and check wiring
from these connectors down to the traction, brush and vac motors.
Check the brush motor connection on the
trio and check the wiring from this
connector down to the brush motor.
Scrub in lower pressure setting.
Check the brush motor connection on the
trio and check the wiring from this
connector down to the brush motor.
Check connector to trio and vacuum motor.
Check the traction motor connection on
trio and wiring down to motor.
Excessive driving up an incline, or
machine driven up against an obstacle or
step.
Place brushes or pads onto machine.
Release traverse switch and reactivate.
Page -28- Form No. 71274A Nilfi sk ALTO Operator’s Manual - SCRUBTEC R Manual Steering
Page 29

Manual Steering Models
SCRUBTEC R 571
SCRUBTEC R 571 C
SCRUBTEC R 586
SCRUBTEC R
Section II
Parts and Service Manual
U.S. Patent No. 6,105,192; No. RE39,581; No. 6,557,207; No. 7,185,397; and Patents Pending
Nilfi sk ALTO Operator’s Manual - SCRUBTEC R Manual Steering Form No. 71274A Page -29-
(71274A)
Page 30

FINAL ASSEMBLY
13
3
1
12
14
2
11
10
4
5
15
6
9
8
7
8B
Page -30- Form No. 71274A Nilfi sk ALTO Operator’s Manual - SCRUBTEC R Manual Steering
8A
Page 31

FINAL ASSEMBLY
Qty Qty Qty.
Ref Part No. Description Rotary Cyl. Boost
1 pg 42-43 Recovery Tank Assembly 1 - -
2 pg 44-45 Solution Tank Assembly-1 1 1 1
pg 46-47 Solution Tank Assembly-2 1 1 1
3 pg 64 Plate, Electrical (28”) 1 - -
pg 64 Plate, Electrical (34”) 1 - -
pg 64 Plate, Electrical (Cyl.) - 1 -
pg 64 Plate, Electrical (Boost) - - 1
4 pg 32-33 Mainframe, Main Asm. (Rotary) 1 - -
pg 36-67 Mainframe, Main Asm. (Boost) - - 1
pg 34-35 Mainframe, Main Asm. (Cyl.) - 1 -
5 pg 40 Wheel, Front Steering 1 1 1
6 pg 63 Front Squeegee Arm Assy 1 - -
7 pg 62 Front Squeegee Assy 1 - -
8 pg 50 Assembly, 28” Rotary Brush Head 1 - -
pg 51 Assembly, 34” Rotary Brush Head 1 - -
8A pg 52-53 Assembly, 28” Cyl. Brush Head - 1 -
8B pg 54-55 Assembly, 32” Boost Head - - 1
9 10129L Assembly, Squeegee 81cm 1 - -
10068L Assembly, Squeegee 99cm 1 1 1
11041L Assembly, Squeegee 104cm 1 1 1
10 pg 41 Arm, Rear Squeegee Lift 1 1 1
11# NA Battery-6V 420 AH 6 6 6
12 53767A Pedal, Accelerator 1 1 1
13 pg 48-49 Column, Steering Asm. 1 1 1
14# 71018A Plate, Warning 1 - 1
15 818381 Spring Extension 1 - -
[ ]# 56372673 Boot, Battery Post 8 8 8
[ ]# 56381848 Positive Cable 1 1 1
[ ]# 56381846 Negative Cable 1 1 1
[ ]# 56381853 Cable Fuse 1 1 1
[ ] 41217A Cable, Series 4 4 4
[ ]# 40849A Suppressor EMI Split 2 2 3
[ ]# 56398090 Terminal Clamp Batt 8 8 8
[ ]# 56409485 Cable Assembly 1 x 15 4 4 4
[ ]# 56478246 Tie Cable 8 8 8
revised 8/11
[ ] = Not Shown
# = Revised or new since last update
Nilfi sk ALTO Operator’s Manual - SCRUBTEC R Manual Steering Form No. 71274A Page -31-
Page 32

revised 8/11
MAIN FRAME ASSY [ROTARY]
18B
41
43
18A
11
1
5
18
29
40
12
30
27
44
2
21
21A
38
21B
17
6
1
10
32
33
23
35
13
37
36
A
9
8
9
26
10
6
7
20
1
9
8
39
34
See Detail A
3
36
19
28
14
22
24
25
44
40
10
12
40
4
1
15
31
16
42
12
Page -32- Form No. 71274A Nilfi sk ALTO Operator’s Manual - SCRUBTEC R Manual Steering
Page 33

MAIN FRAME ASSY [ROTARY]
Item Ref. No. Qty Description
1# 170883 22 Washer, Lock 3/8”
2# 766780 1 Pin Handle Lock
3# 818381 1 Spring, Idler Tension
4# 920204 8 Nut, 3/8-24 Hex Jam
5
# 962244 6 Screw, 3/8-16 X .75 Hex
# 962288 8 Bolt, 3/8-16 X 1.00 Hex Hd.
6
7# 962929 2 Screw, 10-32 X 3/8”
8# 980205 2 Washer, .31 I.D. X 1.06 O.D.
9# 980614 3 Washer, 1/4” Starlock, External
10
# 980645 20 Washer, 3/8” S.A.E. Flat
# 980652 2 Washer, 5/16 Lock
11
12# 980657 6 Washer, Lock 1/4
13# 56109703 2 Wheel-10 Inch
14# 30445A 1 Hose, Solution (Flex)
15
# 30453A 1 Hose, Clear Vinyl
# 30558A 1 Pad, Brush Carriage Stop
16
17# 40836A 1 Horn
18# 40837B 1 Transaxle
18A# 40275A 1 Brake
18B# 40274A 1 Motor
[ ]# 56380669 1 Kit, Carbon Brush
19# 48703A 1 Valve, Electric
20# 51609A 2 Bumper, Rear
21# 53386B 1 Actuator, Head Lift
21A# 40910A 1 Potentiometer & Circuit Board
21B# 40866A 1 Housing Potentiometer
22# 53493A 1 Pin, Quick Release Actuator Btm.
23# 53760A 1 Steering Asm., Manual
24# 59614A 1 Valve, Battery Drain
25# 61473A 4 Linkage, Rod
26# 61475A 2 Clamp, Transaxle
27# 61481A 1 Weldment, Mainframe
28# 61482A 1 Weldment, Head Carriage
29# 61491A 1 Bracket, Squeegee Stop
30# 61572A 1 Mount, Front Squeegee
31# 61596A 1 Stop, Brush Head
32# 61877A 1 Stop, Steering (Left)
33# 61878A 1 Stop, Steering (Right)
34# 69639A 1 Strap, Static
35# 77267A 4 Label, Tie Down
36# 81104A 3 Nut, 1/4” Nylock
37
# 81221A 8 Nut, 1/2-20 Lug
# 82501A 1 Pin Clevis
38
39# 85700A 1 Screw, 1/4-20 X 1 H.H.C.S.
40# 85737A 8 Screw, 1/4-20 X 1/2 H.H.C.S.
# 85813A 2 Screw, 5/16-18 X 1.00 Hex Hd
41
42# 87026A 2 Washer, 1/4 Flat S.S.
43
# 87054A 2 Washer Fender .375
44# 50248A 3 Clamp, Hose
revised 8/11
[ ] = Not Shown
# = Revised or new since last update
Nilfi sk ALTO Operator’s Manual - SCRUBTEC R Manual Steering Form No. 71274A Page -33-
Page 34

revised 8/11
MAIN FRAME ASSY [CYLINDRICAL]
3
39
1
13
34
11
38
5
18B
29
18A
27
18
7
20
16
16A
26
35
16B
21
17
24
6
10
30
1
31
22
28
12
37
4
9
33
9
A
8
25
8
10
1
9
32
2
36
See Detail A
33
14
40
23
19
37
15
Page -34- Form No. 71274A Nilfi sk ALTO Operator’s Manual - SCRUBTEC R Manual Steering
Page 35

MAIN FRAME ASSY [CYLINDRICAL]
Item Ref. No. Qty Description
1# 170883 22 Washer, Lock 3/8”
# 413754 1 Grip, Sol. Tank Clamp
2
3
# 766780 1 Pin Handle Lock
# 920204 8 Nut, 3/8-24 Hex Jam
4
5
# 962244 6 Screw, 3/8-16 X .75 Hex
# 962288 8 Bolt, 3/8-16 X 1.00 Hex Hd.
6
7# 962929 2 Screw, 10-32 X 3/8”
8# 980205 2 Washer, .31 I.D. X 1.06 O.D.
9# 980614 3 Washer, 1/4” Starlock, External
10
# 980645 20 Washer, 3/8” S.A.E. Flat
# 980652 2 Washer, 5/16 Lock
11
12# 980657 2 Washer, Lock 1/4
13# 56109703 2 Wheel-10 Inch
14# 30453A 1 Hose, Clear Vinyl
15# 30649A 1 Hose, Solution
16# 40771A 1 Actuator, Head Lift
16A# 40910A 1 Potentiometer & Circuit Board
16B# 40866A 1 Housing Potentiometer
17# 40836A 1 Horn
18# 40837B 1 Transaxle
18A# 40275A 1 Brake
18B# 40274A 1 Motor
[ ]# 56380669 1 Kit, Carbon Brush
19# 48703A 1 Valve, Electric
20# 51609A 2 Bumper, Rear
21# 53493A 1 Pin, Quick Release Actuator Btm.
22# 53760A 1 Steering Asm., Manual
23# 59614A 1 Valve, Battery Drain
24# 61473A 4 Linkage, Rod
25# 61475A 2 Clamp, Transaxle
26# 61718A 1 Carriage, Weldment
27# 61719A 1 Frame, Main Weldment
28# 61736A 1 Bracket, Head Stop (Cyl)
29# 61836A 1 Bracket, Squeegee Stop
30# 61877A 1 Stop, Steering (Left)
31# 61878A 1 Stop, Steering (Right)
32# 69639A 1 Strap, Static
33# 81104A 3 Nut, 1/4” Nylock
34
# 81221A 8 Nut, 1/2-20 Lug
# 82501A 1 Pin Clevis
35
36# 85700A 1 Screw, 1/4-20 X 1 H.H.C.S.
37
# 85737A 4 Screw, 1/4-20 X 1/2 H.H.C.S.
# 85813A 2 Screw, 5/16-18 X 1.00 Hex Hd
38
39# 87054A 2 Washer Fender .375
40# 50248A 1 Clamp, Hose
revised 8/11
[ ] = Not Shown
# = Revised or new since last update
Nilfi sk ALTO Operator’s Manual - SCRUBTEC R Manual Steering Form No. 71274A Page -35-
Page 36

revised 8/11
MAIN FRAME ASSY [BOOST]
28
1
10
9
33
13B
21
4
13A
20
13
3
17
25
17B
17A
14
5
1
8
30
8
1
4
31
24
19
8
6
1
5
26
23
7
22
32
23
12
16
27
18
15
2
11
29
Page -36- Form No. 71274A Nilfi sk ALTO Operator’s Manual - SCRUBTEC R Manual Steering
Page 37

MAIN FRAME ASSY [BOOST]
Item Ref. No. Qty Description
1# 170883 14 Washer, Lock 3/8”
2# 722030 2 Clamp, Hose
3# 766780 1 Pin Handle Lock
4# 962244 8 Screw, 3/8-16 X .75 Hex
5
# 962288 8 Bolt, 3/8-16 X 1.00 Hex Hd.
# 980205 2 Washer, .31 I.D. X 1.06 O.D.
6
7# 980614 3 Washer, 1/4” Starlock, External
8# 980645 12 Washer, 3/8” S.A.E. Flat
9# 980652 2 Washer, 5/16 Lock
10
# 56109703 2 Wheel-10 Inch
# 30453A 1 Hose, Clear Vinyl
11
12# 30680A 1 Hose, Solution (Flex)
13# 40837B 1 Transaxle
13A# 40275A 1 Brake
13B
# 40274A 1 Motor
# 56380669 1 Kit, Carbon Brush (for 40274A)
[ ]
14# 40836A 1 Horn Reverse Alarm
15# 48703A 1 Valve, Electric
16# 53760A 1 Steering Asm., Manual
17# 53874A 1 Actuator, Head Lift
17A# 40910A 1 Potentiometer & Circuit Board
17B# 40866A 1 Housing Potentiometer
18# 59614A 1 Valve, Battery Drain
19# 61475A 2 Clamp, Transaxle
20# 61719A 1 Frame, Main Weldment
21# 61836A 1 Bracket, Squeegee Stop
22# 69639A 1 Strap, Static
23# 81104A 3 Nut, 1/4” Nylock
24# 81221A 8 Nut, 1/2-20 Lug
25# 82501A 1 Pin Clevis
26# 85700A 1 Screw, 1/4-20 X 1 H.H.C.S.
27# 85737A 2 Screw, 1/4-20 X 1/2 H.H.C.S.
28# 85813A 2 Screw, 5/16-18 X 1.00 Hex Hd
29# 50248A 1 Clamp, Hose
30# 61877A 1 Stop L.H. Steering
31# 61878A 1 Stop R.H. Steering
32# 77267A 4 Label Tie Down
33# 87054A 2 Washer Fender .375
revised 8/11
[ ] = Not Shown
# = Revised or new since last update
Nilfi sk ALTO Operator’s Manual - SCRUBTEC R Manual Steering Form No. 71274A Page -37-
Page 38

Nilfi sk ALTO
SCRUBTEC R 571, 586
Optional Side Squeegee Lift Assembly Drawing 5/05
17
16
1
15
2
3
12
14
4
5
6
6
13
12
11
7
8
9
10
Page -38- Form No. 71274A Nilfi sk ALTO Operator’s Manual - SCRUBTEC R Manual Steering
Page 39

Nilfi sk ALTO
SCRUBTEC R 571, 586
Optional Side Squeegee Lift Assembly Parts List 5/05
Ref Part No. Description Qty
1 87624A Washer, Nylon 1 1/2 x 1/4 x 1/8 2
2 86004A Screw, 1/4-20 x 1.50 HHCS 1
3 920296 Nut, 10-24 Elastic Stop 1
4 61699A Bracket, Sq. Lift Cable 1
5 962798 Screw, 10-24 x 1/2 PH 1
6 836711 Pin, Hair 2
7 80152A Washer, Flat 5/8 1
8 920110 Nut, 5/16-18 Hex Lock 1
9 980651 Washer, 5/16 Flat 1
10 80286A Spring, Actuator 1
11 80287A Screw, 5/16-18 x 7 Hex Head 1
12 80273A Pin, Clevis 2
13 61698A Bracket, Actuator Rear Mount 1
14 40751A Actuator, 3” Stroke 1
15 81104A Nut, 1/4” Nylock 1
16 61695A Cable, Squeegee Lift 1
17 57275A Pulley, Cable 1
Nilfi sk ALTO Operator’s Manual - SCRUBTEC R Manual Steering Form No. 71274A Page -39-
Page 40

Nilfi sk ALTO
SCRUBTEC R 571, 586, 571 C, BOOST® R
Front Wheel Assembly Drawing and Parts List 1/11
Drawing #10779A
15
13
12
11
1
2
14
3
4
5
6
10
9
Ref Part No. Description Qty
1 80267A Bolt, 3/4 - 16 Hex Head 1
2 61472A Yoke Weldment, Steering 1
3 980645 Washer, 3/8 Flat 4
4 170883 Washer, Lock 3/8 4
5 85822A Screw, 3/8 -16 x 7/8 Hex Hd. 4
6 80268A Nut, .750 ESNA 1
7 * Spacer, Center (included w/#10) 1
8 81221A Nut, 1/2 -20 Lug 4
9 56109703 Wheel, Anti-Skid 1
10 61691A Hub Assembly, Front Wheel 1
11 * Bearing (included w/#10) 2
12 * Outside Spacer (included w/#10) 2
13 85838A Bolt, 1/2 -20 Hex 4
14 61877A Stop, LH Steering 1
15 61878A Stop, RH Steering 1
*Front Wheel Hub Assembly (61691A) includes reference
#’s 7, 11 and 12.
8
7
Page -40- Form No. 71274A Nilfi sk ALTO Operator’s Manual - SCRUBTEC R Manual Steering
Page 41
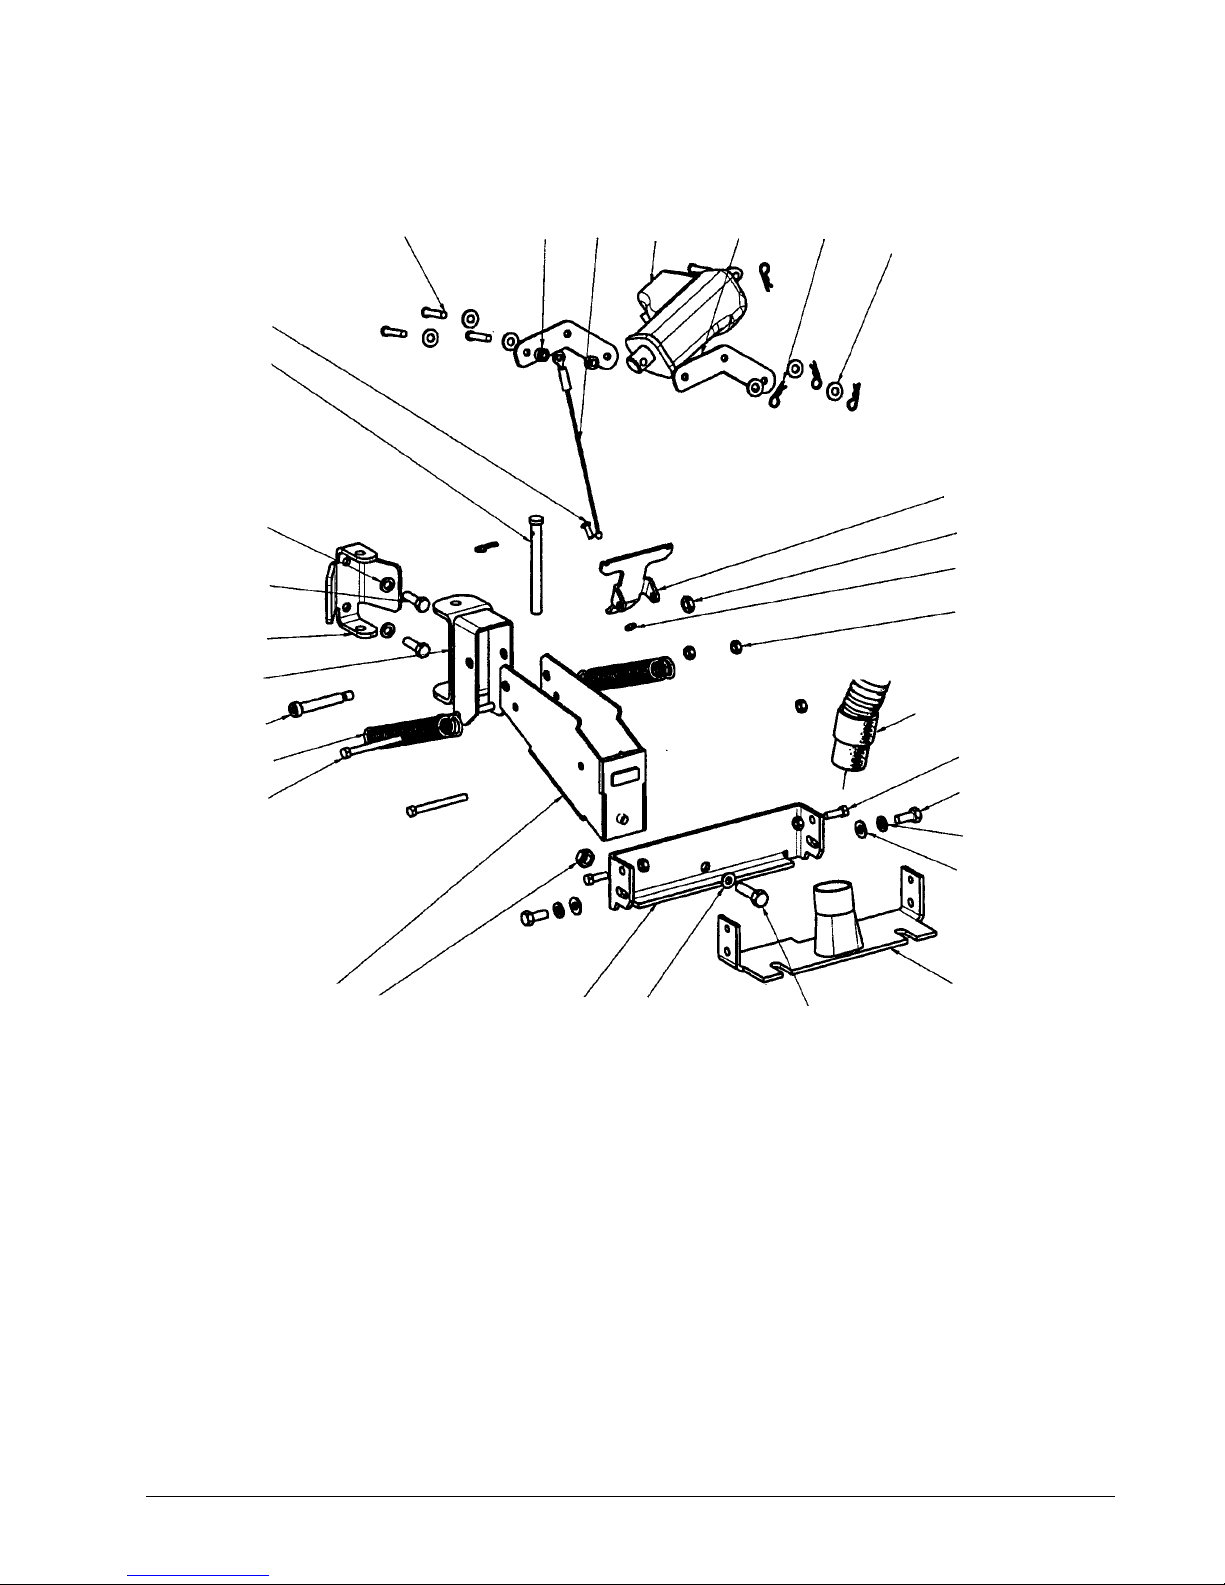
Nilfi sk ALTO
SCRUBTEC R 571, 586, 571 C, BOOST® R
Squeegee Lift Assembly Drawing and Parts List 1/11
Drawing #10787A
5
3
4
67
8
9
2
1
10
16
29
28
27
26
25
24
23
22
Ref Part No. Description Qty
1 66531A Pin, Swing Arm 1
2 962798 Screw, 10-24 x 1/2 PH 1
3 80273A Pin, Clevis 4
4 30542A Spacer 2
5 61549A Cable, Rear Squeegee 1
6 53387B Actuator, Squeegee 1
7 53446A Lever, Pivot, Squeegee 2
8 836711 Pin, Hair 5
9 87026A Washer, 1/4 Flat SS 6
10 61552A Lever, Spring 1
11 920110 Nut, 5/16-18 Hex Lock 1
12 920296 Nut, 10-24 Elastic Stop 1
13 81104A Nut, 1/4 Nylock 5
14 170915 Screw, 1/4 - 20 x 3/4 Hex HD 2
15 962620 Screw, 5/16 - 24 x 3/4 Hex HD 2
21
11
12
13
30
14
15
16
17
18
20
Ref Part No. Description Qty
16 980652 Washer, 5/16 Lock 4
17 980651 Washer, 5/16 Flat 2
18 61267A Tube, Bracket Squeegee 1
19 85730A Screw, 3/8 - 16 x 1 1/4 Hex HD 1
20 87031A Washer, 3/8 Flat SS 1
21 60678C Bracket, Squeegee Mount 11
22 81105A Nut, 3/8 - 16 SS ESNA 1
23 61551A Arm, Rear Weldment 1
24 962269 Screw, 1/4 - 20 x 2 1/2 Hex HD 2
25 53423a Spring, Extension 5,19” 2
26 80015A Screw, 3/8 -16 x 2 2
27 61550A Mount, Front Arm 1
28 61491A
61736A
29 85813A Screw, 5/16 - 18 x 1 Hex HD 2
30 30568A Hose, Recovery 1
19
Bracket, Squeegee Mount (Rotary)
Bracket, Squeegee Mount (Cylindrical) 1
1
Nilfi sk ALTO Operator’s Manual - SCRUBTEC R Manual Steering Form No. 71274A Page -41-
Page 42

revised 8/11
RECOVERY TANK ASSEMBLY
13
6
8
26
7
27
10
30
32
24
2
20
9
45
16
2
14
28
14
37
19
3
38
3
11
5
1
41
29
21
40
33
22
17
22
39
2
4
31
2
18
36
42
39
35
Page -42- Form No. 71274A Nilfi sk ALTO Operator’s Manual - SCRUBTEC R Manual Steering
43
23
21
44
39
15
Page 43

RECOVERY TANK ASSEMBLY
Item Ref. No. Qty Description
1 643418 1 Gasket. Vac Unit
2 752020 3 Clamp, Hose
3 80382A 2 O-Ring, Retainer
4 872010 1 Clamp, Hose
5
# 185USP 1 Nut, Drain Valve
6 962957 2 Screw, 10-16 X 1/2 Self Tap
7 30225a 1 Body, Drain Valve
8 30226a 1 Plug, Drain
9 30227a 1 Housing, Drain
10 30443a 1 Hose, Recovery Drain
11 30531a 1 Tank, Recovery
13 30581a 1 Lid, Recovery Tank
14 30582a 2 Gasket, Rec. Tank Lid
15 30621a 1 Hose, Vac Motor
16 30622a 1 Hose, Vac Exhaust
17 30623a 1 Adaptor Asm Vacuum
18 38731a 1 Hose, Squeegee 1 1/2 X 57.0
19 39339b 1 Tube, Stand 90 Degree
20 40002a 1 Switch, Float Electrical
21 41809a 2 Contact, Housing Connector
22 43401a 2 Housing, Connector
23 56109731 1 Motor, Vac
[ ] 56212223 1 Carbon Brush Set of 2 (for 56109731)
24 52206a 1 Chain, Drain Assembly
26 52560a 1 O-Ring, .103 X .799 I.D.
27 53371a 1 Clamp, Hose (“P” Trap)
28 58069a 1 Screen, Vac Filter
29 58533a 3 Spacer, Vac Motor
30 61477a 1 Retainer, Upper Hose
31 61478a 1 Retainer, Lower Hose
32 61498a 1 Retainer, Mid Hose
33 61565a 1 Panel, Rec. Vac Mtr
35 61573b 1 Cable, Seat/Rec. Tank
36 71014a 1 Label, Falling Parts
37 80056a 6 Screw, 4-40 X 1/2 P.H.
38 82100a 1 Locknut, 1/2” Conduit
39 85395a 8 Screw, 1/4-20 X 1/2” P.H.
40 85728a 3 Screw, 1/4-20 X 4” Hex Hd.
41 87026a 3 Washer, 1/4 Flat S.S.
42 30567a 1 Hose 1-1/2 Vac X 36 1 Cuff NOTE 1
43 30561a 1 Tee Rec. Hose Reducing NOTE 1
44 30568a 1 Hose1-1/2 Squeegee X 17 2 Cf NOTE 1
# 10816A 1 Rec Tank Cleanout Option
45
revised 8/11
[ ] = Not Shown
# = Revised or new since last update
NOTE 1: These items are only used on disk models.
Nilfi sk ALTO Operator’s Manual - SCRUBTEC R Manual Steering Form No. 71274A Page -43-
Page 44
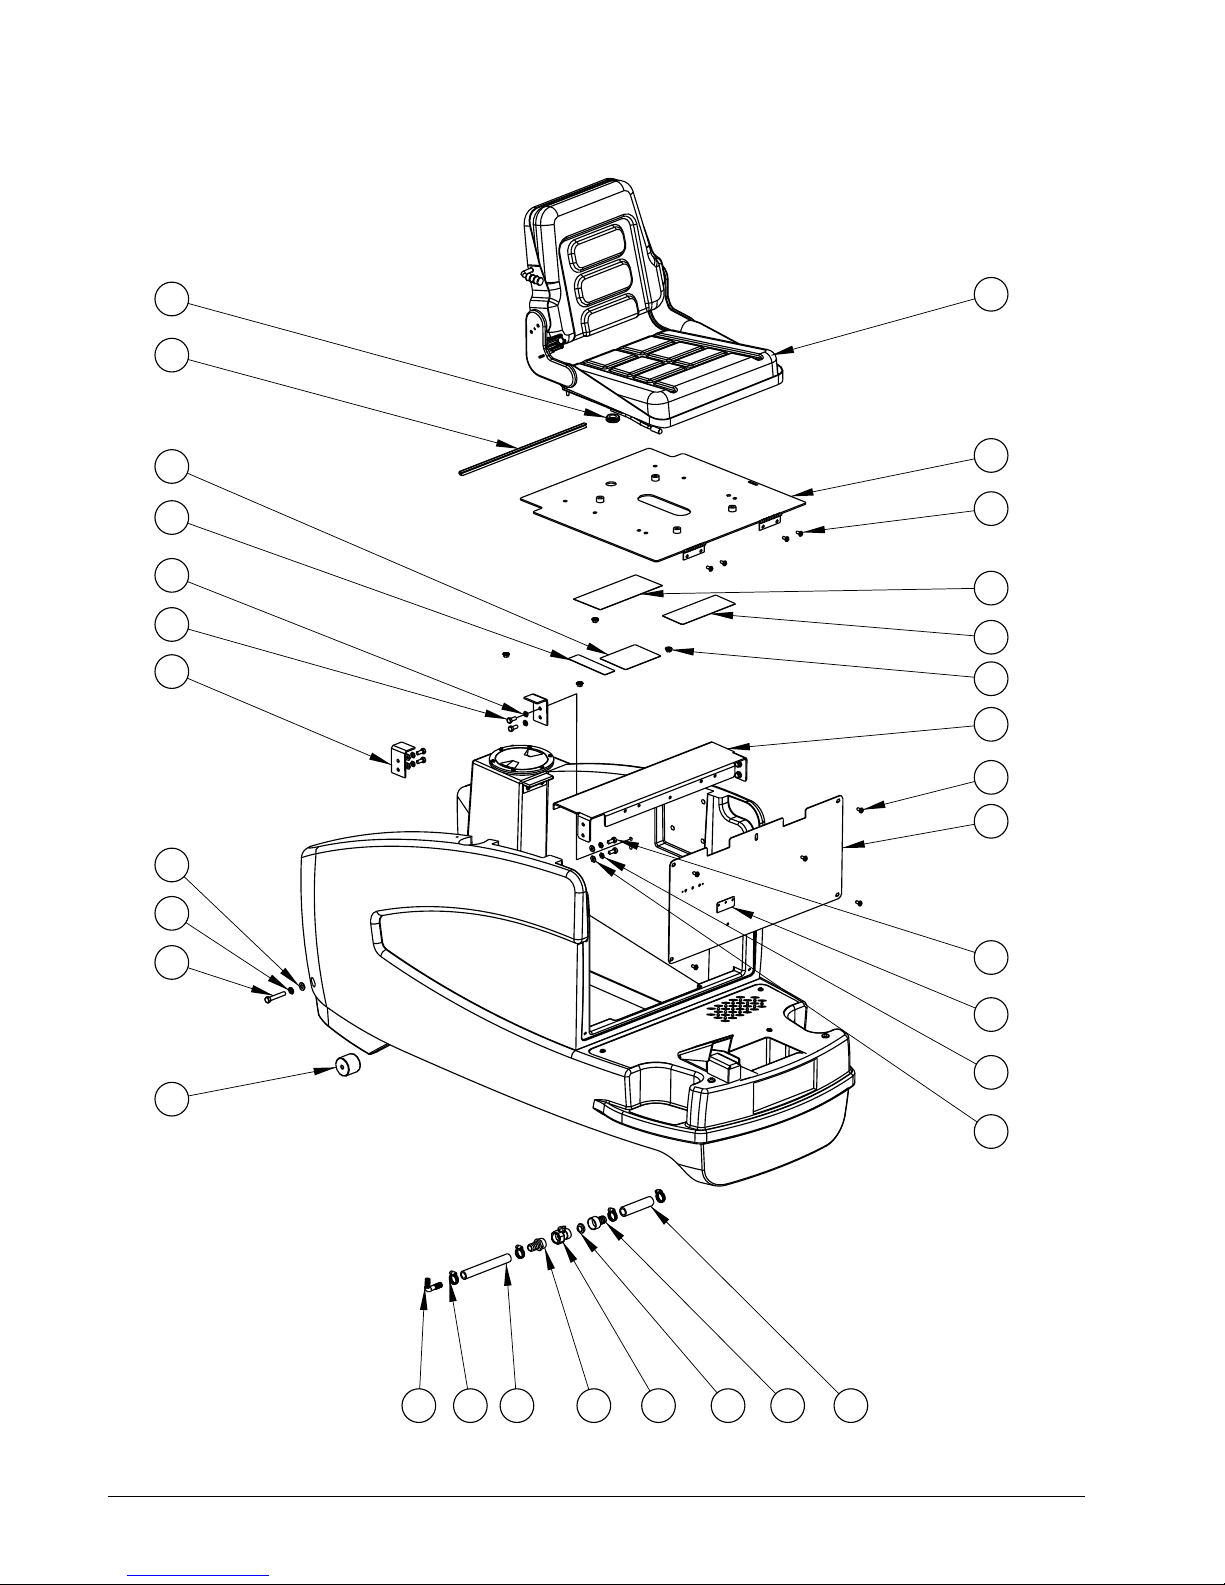
revised 8/11
SOLUTION TANK ASSEMBLY-1
2
3
42
41
11
49
34
9
14
32
45
40
38
44
31
45
30
1
48
33
26
49
39
11
10
12 25
4 5
17 24 28
Page -44- Form No. 71274A Nilfi sk ALTO Operator’s Manual - SCRUBTEC R Manual Steering
Page 45

SOLUTION TANK ASSEMBLY-1
Item Ref. No. Qty Description
1# 170883 2 Washer, Lock 3/8”
2# 193944 1 Grommet
3# 193951 1 Trim, Flexible 1.5 Ft.
4# 830214 1 Adapter, 3/4 Barb & Ght Male
5
# 838517 1 Screen, Hose Washer
# 920208 1 Nut, 1/4-20 Hex
6
7# 962957 8 Screw, 10-16 X 1/2 Self Tap
8# 980614 1 Washer, 1/4” Starlock, External
9# 980645 2 Washer, 3/8” S.A.E. Flat
10
# 980651 8 Washer, 5/16 Flat
# 980652 8 Washer, 5/16 Lock
11
12# 30445A 1 Hose, Solution (Flex)
13# 30530A 1 Tank, Solution
14# 30534B 1 Seat, Ergo/Adjustable
15
# 30539B 1 Lid, Solution
# 30564B 1 Hose, Solution Sight
16
17# 30566A 1 Hose, 5/8” Id X 7/8” Od X 4.00
18# 30578A 1 Gasket, Sol. Tank Fill
19# 30596A 1 Pad, Sol. Tank Step (Right)
20# 30597A 1 Pad, Sol. Tank Step (Left)
21# 30775A 1 Gasket, Solution Tank Lid
22# 31242A 2 Bushing
23# 40876A 1 Sensor, Water Level (Option)
24# 50358A 1 Adapter, 5/8 Barb Swivel
25# 53498A 1 Fitting, 90d Ell Pipe
26# 53571A 4 Clamp, Hose
27# 53767A 1 Pedal, Accelerator
28# 54088A 1 Valve Shutoff 3/4 Ght X 3/4 Ght
29# 30883A 2 Hosebarb, .50 X 90 Deg.
30# 61489A 1 Plate, Cover
31# 61490A 1 Mount, Seat Assembly
32# 61492B 1 Plate, Seat Assembly
33# 61561A 2 Pivot, Recovery Tank
34# 61562A 2 Stop, Seat
35# 61563A 1 Washer, Sight Tube
36# 61574A 1 Bracket, Tank Fill Gasket
37# 61843A 1 Plate, Deck
38# 70841A 1 Label, Battery Installation
39# 70883A 1 Label, Battery Charger
40# 70884A 1 Label Error Code
41# 71015A 1 Label Gases
42
# 71278A 1 Label, Brake Operation
# 80333A 2 Screw, 3/8-16 X 5/8
43
44# 81208A 4 Nut, 5/16-24 Hex Serrated Flange
45# 85395A 9 Screw, 1/4-20 X 1/2” P.H.
# 85398A 4 Screw, 1/4-20 X 1/2” P.H.
46
47# 85518A 1 Screw, 1/4-20 X 3/4 P.H.
48
# 85704A 2 Screw, 3/8-16 X 2 1/4” Hex
49# 85811A 8 Screw, 5/16-18 X 3/4 Hex Hd
50# 87036A 2 Washer, #10 Flat
# 50248A 1 Clamp, Hose
51
[ ] 61573B 1 Cable, Seat/Rec. Tank
revised 8/11
[ ] = Not Shown
# = Revised or new since last update
Nilfi sk ALTO Operator’s Manual - SCRUBTEC R Manual Steering Form No. 71274A Page -45-
Page 46

revised 8/11
SOLUTION TANK ASSEMBLY-2
47
46
27
43
37
8
6
19
13
7
50
7
15
18
21
36
35
23
16
9
1
48
51
29
22
33
Page -46- Form No. 71274A Nilfi sk ALTO Operator’s Manual - SCRUBTEC R Manual Steering
20
Page 47

SOLUTION TANK ASSEMBLY-2
Item Ref. No. Qty Description
1# 170883 2 Washer, Lock 3/8”
2# 193944 1 Grommet
3# 193951 1 Trim, Flexible 1.5 Ft.
4# 830214 1 Adapter, 3/4 Barb & Ght Male
5
# 838517 1 Screen, Hose Washer
# 920208 1 Nut, 1/4-20 Hex
6
7# 962957 8 Screw, 10-16 X 1/2 Self Tap
8# 980614 1 Washer, 1/4” Starlock, External
9# 980645 2 Washer, 3/8” S.A.E. Flat
10
# 980651 8 Washer, 5/16 Flat
# 980652 8 Washer, 5/16 Lock
11
12# 30445A 1 Hose, Solution (Flex)
13# 30530A 1 Tank, Solution
14# 30534B 1 Seat, Ergo/Adjustable
15
# 30539B 1 Lid, Solution
# 30564B 1 Hose, Solution Sight
16
17# 30566A 1 Hose, 5/8” Id X 7/8” Od X 4.00
18# 30578A 1 Gasket, Sol. Tank Fill
19# 30596A 1 Pad, Sol. Tank Step (Right)
20# 30597A 1 Pad, Sol. Tank Step (Left)
21# 30775A 1 Gasket, Solution Tank Lid
22# 31242A 2 Bushing
23# 40876A 1 Sensor, Water Level (Option)
24# 50358A 1 Adapter, 5/8 Barb Swivel
25# 53498A 1 Fitting, 90d Ell Pipe
26# 53571A 4 Clamp, Hose
27# 53767A 1 Pedal, Accelerator
28# 54088A 1 Valve Shutoff 3/4 Ght X 3/4 Ght
29# 30883A 2 Hosebarb, .50 X 90 Deg.
30# 61489A 1 Plate, Cover
31# 61490A 1 Mount, Seat Assembly
32# 61492B 1 Plate, Seat Assembly
33# 61561A 2 Pivot, Recovery Tank
34# 61562A 2 Stop, Seat
35# 61563A 1 Washer, Sight Tube
36# 61574A 1 Bracket, Tank Fill Gasket
37# 61843A 1 Plate, Deck
38# 70841A 1 Label, Battery Installation
39# 70883A 1 Label, Battery Charger
40# 70884A 1 Label Error Code
41# 71015A 1 Label Gases
42
# 71278A 1 Label, Brake Operation
# 80333A 2 Screw, 3/8-16 X 5/8
43
44# 81208A 4 Nut, 5/16-24 Hex Serrated Flange
45# 85395A 9 Screw, 1/4-20 X 1/2” P.H.
# 85398A 4 Screw, 1/4-20 X 1/2” P.H.
46
47# 85518A 1 Screw, 1/4-20 X 3/4 P.H.
48
# 85704A 2 Screw, 3/8-16 X 2 1/4” Hex
49# 85811A 8 Screw, 5/16-18 X 3/4 Hex Hd
50# 87036A 2 Washer, #10 Flat
# 50248A 1 Clamp, Hose
51
[ ] 61573B 1 Cable, Seat/Rec. Tank
revised 8/11
[ ] = Not Shown
# = Revised or new since last update
Nilfi sk ALTO Operator’s Manual - SCRUBTEC R Manual Steering Form No. 71274A Page -47-
Page 48

revised 8/11
STEERING COLUMN ASSY
40
30
5
29
54
18
3
28
23
34
19
33
33
13
8
3
15
12
1
17
47
14
46
16
11
10
14
43
37
3
3
22
32
6
51
55
56
42
41
48
27
22
39
38
44
35
31
2
45
53
20
9
Page -48- Form No. 71274A Nilfi sk ALTO Operator’s Manual - SCRUBTEC R Manual Steering
49
4
26
50
37
52
31
25
21
36
7
24
Page 49

STEERING COLUMN ASSY
Item Ref. No. Qty Description
1# 920722 4 Nut 10-32 ESNA
2
# 962430 2 Screw, 1/4-20 X 1/2 H.H.C.S.
# 962957 4 Screw, 10-16 X 1/2 Self Tap
3
4# 980645 4 Washer, 3/8” S.A.E. Flat
5# 980648 1 Washer 17/32 X 1 1/16 Plain
6# 980651 2 Washer, 5/16 Flat
7
# 980657 8 Washer, Lock 1/4
# 30733B 1 Cover, Front (Upper)
8
9# 30734B 1 Cover, Front (Lower)
10# 40706A 1 Switch, Momentary Push
11# 40748A 1 Switch, Push Button
12
# 40786A 1 Switch, Key Hobbs Focus Wb
# 40786S 1 Spacer, Key Switch
13
14# 40879A 2 Module, Solution Level (Option)
15# 40880B 1 Panel LCD Control (Trio)
16# 40885A 2 Switch, Momentary Rocker
17# 40890A 1 Switch, Maintained Rocker
18# 40940A 1 Switch, Maintained Rocker
19# 40941A 1 Horn Button
20# 41423B 2 Breaker, 5A Circuit, Cntrl./Act.
21# 53759A 1 Coupling, Sleeve (Man)
22# 55400A 4 Key 3/16 X 3/4 Dia. Hypro
23# 61835A 1 Panel, Control
24# 61837B 1 Plate, Column Adapter
25# 61838B 1 Shaft, Lower
26# 61839B 1 Column, Lower Steering
27# 61848A 1 Column Upper Steering
28# 71165A 1 Label, Control Panel
29# 80328A 1 Washer, Flat
30# 80349A 1 Nut, 1/2-13 Hex Thin Nyloc
31# 81104A 3 Nut, 1/4” Nylock
32# 81112A 2 Nut, 5/16-18 Thin ESNA
33# 84237A 4 Screw, 10-32 X .50 P.H.
34# 85518A 8 Screw, 1/4-20 X 3/4 P.H.
35# 85700A 1 Screw, 1/4-20 X 1 H.H.C.S.
36# 85737A 8 Screw, 1/4-20 X 1/2 H.H.C.S.
37# 56250414 2 Bearing, Flange
38# 56413211 2 Bearing, Flange .625 x .500 x .250
39
# 56320595 2 Bushing .32 x .50 x .28
# 56497543 1 Cap
40
41# 56367095 1 Collar, Shaft
42# 56497308 1 Cup
# 56440817 1 Knob
43
44# 56900041 1 Plug, Cap
45
# 56413658 1 Ratchet, Steering Column
46# 56003261 1 Ring, Ret Ext Type E 0.31 Dia
47# 56413664 1 Rod
# 56002086 1 Scr, Soc Set Loc 5/16-18 X .25
48
49# 80088A 4 Screw M10-1.5 X 30mm CL10.9
50
# 85812A 2 Screw 5/16-18 X 7/8 Hex Hd Gr5
51# 56420059 1 Shaft, Upper Steering
52# 56305072 1 Spring, Extension .075
# 56413661 1 Steering Pawl Weldment
53
54# 56497306 1 Steering Wheel
55
# 56454081 1 Universal Joint
56# 56497560 1 Wheel Adapter
revised 8/11
# = Revised or new since last update
Nilfi sk ALTO Operator’s Manual - SCRUBTEC R Manual Steering Form No. 71274A Page -49-
Page 50

Nilfi sk ALTO
SCRUBTEC R 571
571 Rotary Brush Head Assembly Drawing and Parts List 1/11
Drawing #10697A
27
26
25
24
29
23
1, 1A, 1B, 1C
28
22
2
5
3
4
6
7
8
9
10
11
12
13
30
16
2
21
20
Ref Part No. Description Qty
1 40904B Motor, Dual Gear Box 1
1A 915102 Key 2
1B 56407500
1C 41048A Gearbox Assembly 2
2 962244 Bolt, 3/8 - 16 x 3/4 Hex 12
3 170883 Washer, Lock 3/8 2
4 980645 Washer, 3/8 Flat 2
5 61722A Plate, Auto Side Squeegee 1
61497A Plate, Manual Side Squeegee 1
6 85613A Screw, 8 - 32 x 7/8 PH SS 4
7 55451A Keeper, Latch 2
8 61570A Spacer, Keeper 2
9 962803 Screw, 5/16-18 x 1 1/2 FH 1
10 53838A Wheel, Guide 4” 1
11 920108 Nut, 8 - 32 ESNA SS 4
12 55721A Latch, Brush Housing 2
13 30535A Housing, 28” Brush Right Main 1
14 962030 Screw, 8 - 32 x 3/8” FHCS 4
16 980638 Washer, 3/8 Lock 10
Brush Assy Kit
1
17
14
18
19
Ref Part No. Description Qty
17 59856A Washer, Rubber 2
18 61658A Collar, Brush Driver 2
19 962714 Screw, Gimbal Mount 2
20 34400B Gimbal, Motor 2
21 962989 Screw, 1/4 - 20 x 1 1/2 PH 2
22 34705A Hose, Solution 2
23 170915 Screw, 1/4 - 20 x 3/4 Hex HD 2
24 782002 Clamp, Manifold 2
25 38014A Splitter, Solution 1
26 61546B Frame, 28” Brush Motor 1
27 30536A Housing, 28” Brush Left Main 1
28 81104A Nut, 1/4 Nylock 4
29 71017A Label, Moving Parts 1
30 81109A Nut, 8-32 ESNA SS 4
[ ] 30536A Housing, 28” Left Brush 1
[ ] 30535A Housing, 28” Right Brush 1
[ ] = Not Shown
Page -50- Form No. 71274A Nilfi sk ALTO Operator’s Manual - SCRUBTEC R Manual Steering
Page 51

28
29
586 Rotary Head Assembly Drawing and Parts List 1/11
1, 1A, 1B, 1C
23
Nilfi sk ALTO
SCRUBTEC R 586
Drawing #10698A
5
4
6
7
9
8
10
27
26
25
24
4
23
22
21
20
19
Ref Part No. Description Qty
1 40905B Motor, Dual Gear Box 1
1A 915102 Key 2
1B 56407500
1C 41048A Gearbox Assembly 2
2 980645 Washer, 3/8 Flat 2
3 170883 Washer, 3/8 Lock 2
4 962244 Bolt, 3/8 - 16 x 3/4 Hex 11
5 61723A Plate, Auto Side Squeegee 1
61497A Plate, Manual Side Squeegee 1
6 85613A Screw, 8 - 32 x 7/8 PH SS 4
7 55451A Keeper, Latch 2
8 61570A Spacer, Keeper 2
9 962803 Screw, 5/16-18 x 1 1/2 FH 1
10 53838A Wheel, Guide 4” 1
11 920108 Nut, 8 - 32 4
12 55721A Latch, Brush Housing 2
13 30537A Housing, 34” Brush Right Main 1
14 962030 Screw, 8 - 32 x 3/8” FHCS 4
16 782002 Clamp, Manifold 2
Brush Assy Kit 1
18
17
11
12
13
30
14
16
Ref Part No. Description Qty
17 170915 Screw, 1/4 - 20 x 3/4 Hex HD 2
18 30210A Tubing, Vinyl 1
19 962989 Screw, 1/4 - 20 x 1 1/2 PH 2
20 962714 Screw, Gimbal Mount 2
21 34400B Gimbal, Motor 2
22 61658A Collar, Brush Driver 2
23 59856A Washer, Rubber 2
24 38014A Splitter, Solution 1
25 980638 Washer, 3/8 Lock 10
26 61547B Frame, 34” Brush Motor 1
27 30538A Housing, 34” Brush Left Main 1
28 81104A Nut, 1/4 Nylock 4
29 71017A Label, Moving Parts 1
30 81109A Nut, 8-32 ESNA SS 4
[ ] 30538A Housing, 34” Left Brush 1
[ ] 30537A Housing, 34” Right Brush 1
[ ] = Not Shown
Nilfi sk ALTO Operator’s Manual - SCRUBTEC R Manual Steering Form No. 71274A Page -51-
Page 52

Nilfi sk ALTO
SCRUBTEC R 571 C
571 Cylindrical Head Assembly Drawing 5/05
Drawing #10962A
20
19
17
18
16
21
22
15
12
11
8
7
4
3
6
5
10
9
14
13
14
28
7
23
24
25
26
27
29
30
31
2
1
4
49
10
47
20
45
46
50
42
17
22
26
38
39
40
41
23
48
44
43
37
1
2
30
36
32
33
34
35
Assembled View
Page -52- Form No. 71274A Nilfi sk ALTO Operator’s Manual - SCRUBTEC R Manual Steering
Page 53

Nilfi sk ALTO
SCRUBTEC R 571 C
571 Cylindrical Head Assembly Parts List 1/11
Drawing #10962A
Ref Part No. Description Qty
1 980638 Washer, 3/8 Lock 4
2 962244 Bolt, 3/8-16 x .75 Hex 4
3 30649A Hose, Solution 1
4 50248A Clamp, Hose 2
5 40772A Motor, Brush 2
6 980646 Washer, 1/4” Flat 6
7 980657 Washer, Lock 1/4 9
8 85806A Screw, 1.4-20 x 3/4 Hex 6
9 61738A Mainframe, Weldment 1
10 52477A Knob, 1.4-20 Clamp 2
11 80248A Key, 3/16 Sq x .50 Lg 2
12 80247A Key, 1/8 Sq x .75 Lg 2
13 61308A Bearing Carrier 2
14 51226A Bearing, Sealed 4
15 61318A Pulley, Motor 2
16 30618A Tray, 28” Cyl. Debris 1
17 61743A Cover, Cyl Head Belt 2
18 84237A Screw, 10-32 x .50 P.H. 6
19 61752A Plate, Skirt L.H. 1
20 80240A Screw, 10-32 x 3/8 F.H. 14
21 30312A Skirt, Side 2
22 61336A Spacer, Binding 4
23 962094 Screw, 10-32 x 3/8 R.H. 3
24 53661A Belt, Drive 2
25 61319A Pulley, Brush Drive 2
26 467308 Ring, Retainer 4
27 962098 Screw, 1/4-20 x 3/4 F.H. 6
28 61309A Shaft, Drive 2
29 80270A Screw, 1/4-20 Shoulder 2
30 81104A Nut, 1/4” Nylock 8
31 30049B Wheel, Squeegee 2” 6
32 80257A Washer, Neoprene 4
33 61293A Hub, Driver 2
34 980648 Washer, 17/32 x 1 1/16 Plain 2
35 980626 Washer, 1/2 Lock 2
36 170857 Nut, 1/2-13 Hex 2
37 60254A Bolt, 5/16 x 2.25 Shoulder 2
38 61299A Hub, Driven 2
39 51225A Bearing, Sealed 2
40 167312 Ring, Retainer Internal 2
41 61310A Shaft, Driven 2
42 962973 Screw, 3/8-16 x 3/4 Flat Hd. 2
43 61335A Retainer, Skirt 2
44 61751A Plate, Skirt R.H. 1
45 61742A Door, Brush 1
46 962285 Screw, 1/4-20 x 1.00 F.H. 4
47 61322A Plate, Brush Door 2
48 53182A Cap, Plug 2
49 30648A Tube, Solution Assembly 1
50 71017A Label, Moving Parts 1
Nilfi sk ALTO Operator’s Manual - SCRUBTEC R Manual Steering Form No. 71274A Page -53-
Page 54

revised 8/11
32 INCH BOOST HEAD ASSY
16
29
34
16
20
5
36
33
28
39
9
6
21
31
2
17
32
27
8
12
21
40
35
30
18
1
35
25
38
26
23
4
24
3
13
30
41
19
10
11
Page -54- Form No. 71274A Nilfi sk ALTO Operator’s Manual - SCRUBTEC R Manual Steering
14
22
7
21
22
15
37
Page 55

32 INCH BOOST HEAD ASSY
Item Ref. No. Qty Description
1 782002 3 Clamp, Manifold
2 920365 4 Nut 1/2-13 Nylock
3 925589 1 Pin, Roll
4 56001881 4 Scr, Flt Soc ¼-20 X .75 NOTE 1, TSBCL2010-12
5 962288 2 Bolt, 3/8-16 X 1.00 Hex Hd.
6 980022 4 Washer, Wave
7 85737a 1 Screw, 1/4-20 X 1/2 H.H.C.S.
8 980638 2 Washer, 3/8 Lock
9 980646 4 Washer, 1/4” Flat
10 980657 1 Washer, Lock 1/4
11 11002a 1 Tube Assembly, Drip 32”
12 30048a 4 Guide, Wheel
13# 1 Shield Boost Bearing NOTE 1, TSBCL2010-12, NOTE 2
14# 56381491 1 Plate, Driver
15 56380211 2 Kit-Flex Plate 32” NOTE 1, TSBCL2010-12
16 30735a 8 Spacer, Lift Arm
17 56380247 1 Motor-24vdc
18 50248a 1 Clamp, Hose
19 50736a 1 Bearing
20 53493a 1 Pin, Quick Release Actuator Btm.
21 56380235 1 Isolator Kit, Boost 28”,32” NOTE 1, TSBCL2010-12
22 56380173 4 Bushing-Flex Plate NOTE 1, TSBCL2010-12
23 61724a 1 Retainer, Eccentric
24 56381721 1 Plate Weldt Boost 32
25# 1 Eccentric NOTE 2
26 61775a 1 Retainer, Bearing
27 61782a 4 Sleeve, Guide Wheel
28 61816b 2 Bracket, Lift
29 61818a 1 Arm, Lift Weldment
30 56381532 2 Stud Stablizer_Short
31 71192a 2 Label No Step
32 80103a 2 Bolt, 3/8-24 X 1.0 Hex
33 80330a 4 Screw, 1/2-13 X 2 1/4 Gr. 5
34 81105a 2 Nut, 3/8-16 S.S. Esna
35 81217a 5 Nut, 1/4-20 Hex Esna
36 87618a 2 Washer, Flat .39 I.D. X .75 X .062
37 56003825 4 Scr-Button Soc Ss 10-32 NOTE 1, TSBCL2010-12
38 84237a 3 Screw, 10-32 X .50 P.H.
39 85301a 4 Screw, 1/4-20 X 1 1/4 C.R.P.H.
40 85395a 3 Screw, 1/4-20 X 1/2” P.H.
41 56381702 2 Decal-Boost Embossed
revised 8/11
# = Revised or new since last update
NOTE 1: Customers ordering parts for machines built before April 2010 need to order 32” Flex Plate Kit 56380211 to replace any or all
of these Items for repair.
NOTE 2: To replace Bearing Shield or Eccentric order 56380246 (Kit Eccentric & Shield).
Nilfi sk ALTO Operator’s Manual - SCRUBTEC R Manual Steering Form No. 71274A Page -55-
Page 56

SQUEEGEE ASSEMBLY 81cm
Page -56- Form No. 71274A Nilfi sk ALTO Operator’s Manual - SCRUBTEC R Manual Steering
Page 57

SQUEEGEE ASSEMBLY 81cm
Item Ref. No. Qty Description
1 80252A 4 Screw, ¼-20 x 1 Hex SS
2 980657 4 Washer, ¼ Lock
3 60243A 2 Bracket, Squeegee Wheel
4 30049B 4 Wheel, Squeegee
5 81104A 2 Nut, ¼-20
6 60254A 2 Bolt, Shoulder 5/16x 2¼
7 53185A 2 Ring, 3/8 ID Snap
8 30048A 2 Wheel, Guide, 4 Inch Diameter
9 60234B 1 Channel, Squeegee Weldment 32”
10 50835A 1 Latch, Squeegee Clamp
11 930086 2 Rivet, 3/16 x .450 Aluminum
12 60232A 1 Strap, Clamp, Squeegee Retainer 32
13 30556A 1 Blade, Rear, Gum Rubber, 32”
30556L 1 Blade, Rear, Linatex
14 30047A 1 Spacer, Squeegee 32
15 30066A 1 Blade, Front Ribbed 32”
30764L1 1 Blade, Front Linatex Notched 32”
16 80011A 2 Screw, 3/8-16 x 3
17 81301A 2 Nut, 3/8-16 Jam SS
18 34260B 1 Gasket
19 25201B 2 Knob
20 60358A 2 Shim, Squeegee Wheel
21 61370A 4 Weight
22 80280A 2 Nut, Squeegee Backup
Nilfi sk ALTO Operator’s Manual - SCRUBTEC R Manual Steering Form No. 71274A Page -57-
Page 58

SQUEEGEE ASSEMBLY 99cm
Page -58- Form No. 71274A Nilfi sk ALTO Operator’s Manual - SCRUBTEC R Manual Steering
Page 59

SQUEEGEE ASSEMBLY 99cm
Item Ref. No. Qty Description
1 80253A 4 Screw, ¼-20 x 1½ Hex SS
2 980657 4 Washer, ¼ Lock
3 60243A 2 Bracket, Squeegee Wheel
4 30049B 4 Wheel, Squeegee
5 81104A 2 Nut, ¼-20
6 60254A 2 Bolt, Shoulder 5/16x 2¼
7 53185A 2 Ring, 3/8 ID Snap
8 30048A 2 Wheel, Guide, 4 Inch Diameter
9 60272B 1 Channel, Squeegee Weldment 39”
10 50835A 1 Latch, Squeegee Clamp
11 930086 2 Rivet, 3/16 x .450 Aluminum
12 60252A 1 Strap, Clamp, Squeegee Retainer 39”
13 30557A 1 Blade, Rear, Gum Rubber, 39”
30717L1 1 Blade, Rear, Linatex Notched, 39”
30557L 1 Blade, Rear, Linatex
14 30058A 1 Spacer, Squeegee 39”
15 30091A 1 Blade, Front Ribbed 39”
16 80011A 2 Screw, 3/8-16 x 3
17 81301A 2 Nut, 3/8-16 Jam SS
18 34260B 1 Gasket
19 25201B 2 Knob
20 60358A 2 Shim, Squeegee Wheel
21 61370A 8 Weight
22 80280A 2 Nut, Squeegee Backup
Nilfi sk ALTO Operator’s Manual - SCRUBTEC R Manual Steering Form No. 71274A Page -59-
Page 60
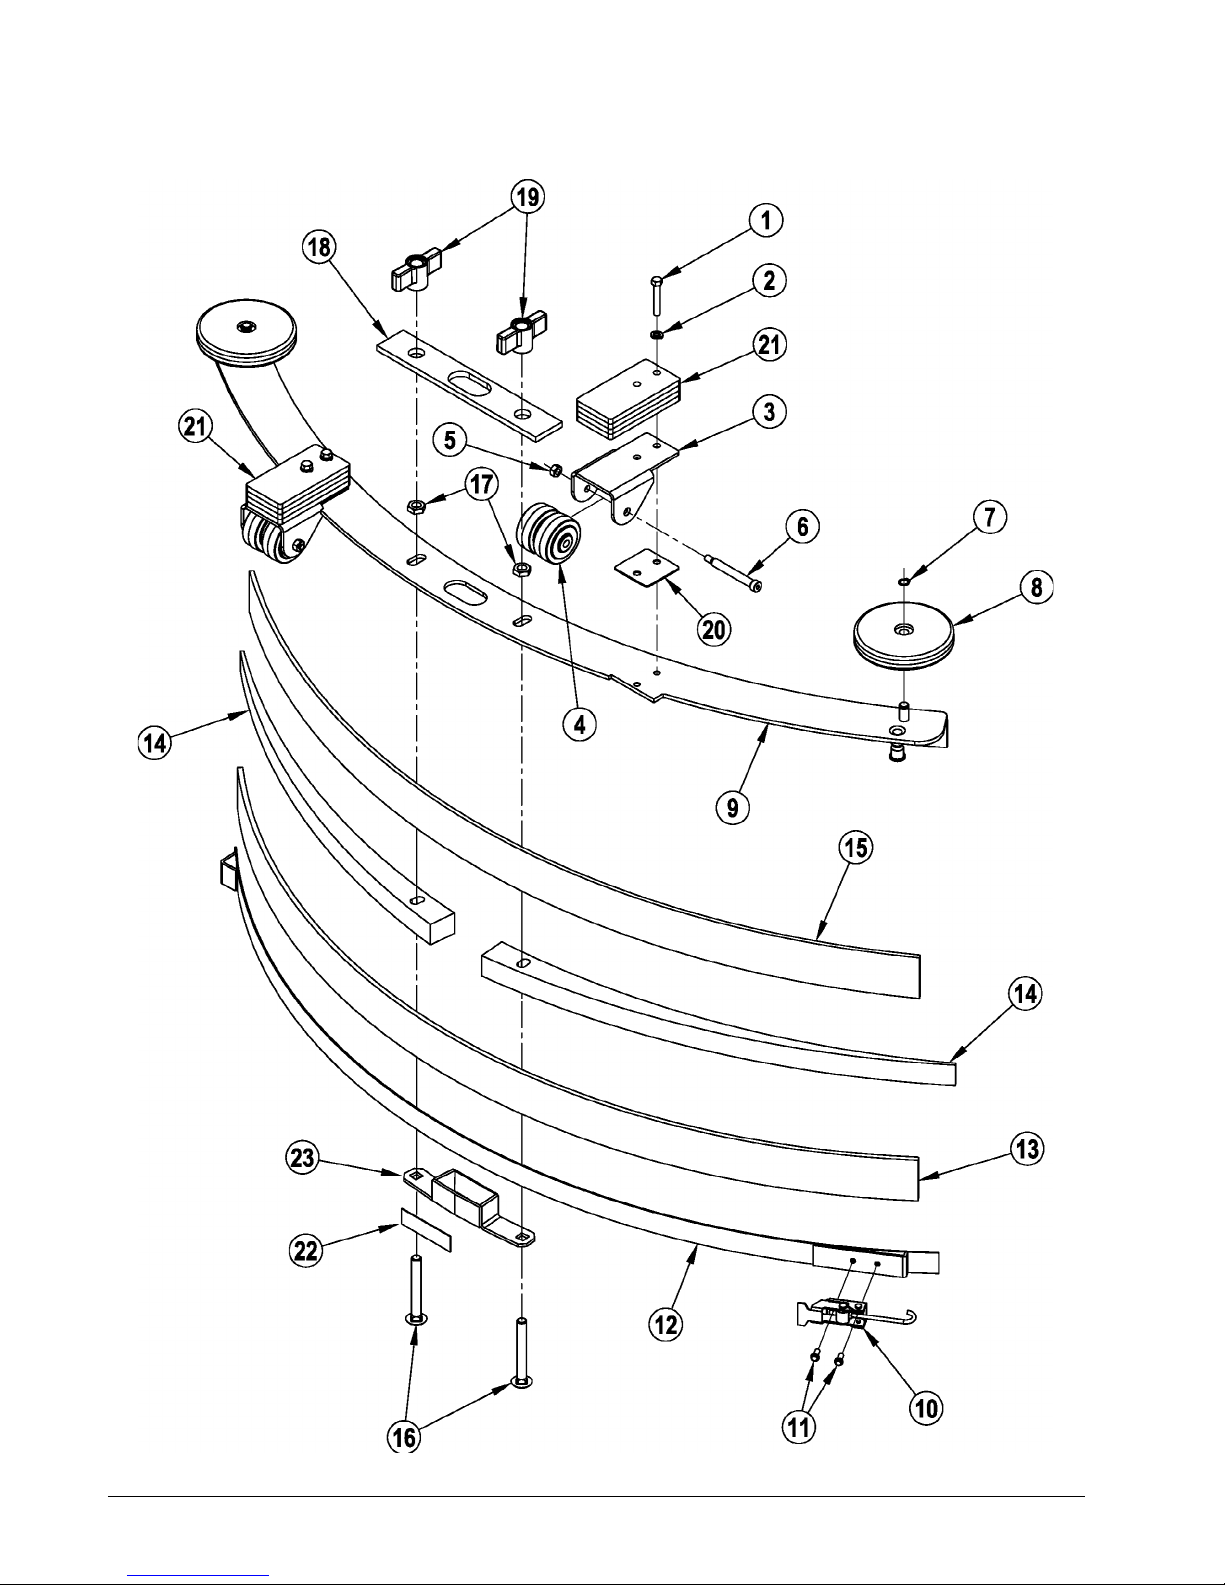
SQUEEGEE ASSEMBLY 104cm
Page -60- Form No. 71274A Nilfi sk ALTO Operator’s Manual - SCRUBTEC R Manual Steering
Page 61

SQUEEGEE ASSEMBLY 104cm
Item Ref. No. Qty Description
1 80253A 4 Screw, ¼-20 x 1½ Hex SS
2 980657 4 Washer, ¼ Lock
3 60243A 2 Bracket, Squeegee Wheel
4 30049B 4 Wheel, Squeegee
5 81104A 2 Nut, ¼-20
6 60254A 2 Bolt, Shoulder 5/16x 2¼
7 53185A 2 Ring, 3/8 ID Snap
8 30048A 2 Wheel, Guide, 4 Inch Diameter
9 61886A 1 Channel, Squeegee Weldment 41”
10 50835A 1 Latch, Squeegee Clamp
11 930086 2 Rivet, 3/16 x .450 Aluminum
12 61885A 1 Strap, Clamp, Squeegee Retainer 41”
13 30774L 1 Blade, Outer, Linatex, BOOST 41”
14 38726A 2 Spacer, Squeegee 41”
15 30773L2 1 Blade, Inner Linatex Notched , BOOST 41”
16 80011A 2 Screw, 3/8-16 x 3
17 81301A 2 Nut, 3/8-16 Jam SS
18 34260B 1 Gasket
19 25201B 2 Knob
20 60358A 2 Shim, Squeegee Wheel
21 61370A 8 Weight
22 37016A 1 Pad, Squeegee Grip
23 62712A 1 Duct, Squeegee Inlet
Nilfi sk ALTO Operator’s Manual - SCRUBTEC R Manual Steering Form No. 71274A Page -61-
Page 62

revised 8/11
FRONT SQUEEGEE ASSY – ROTARY MACHINES ONLY
13
12
14
15
2
3
1
4
5
6
7
8
11
Ref Part No. Qty Description
1 80275A 3 Screw, 1/4 - 14 x 3/4
2 53185A 1 Ring, Retainer
3 30048A 1 Wheel, Guide
4 61496A 1 Weldment, Fr. Squeegee Base
5 81104A 1 Nut, 1/4 Nylock
6 59932A 1 Wheel, Squeegee 1 5/8
7# 30540L 1 Blade, Outer Linatex
8 50835A 1 Latch, Squeegee Clamp
9 930086 2 Rivet, 3/16 x .450 Pan HD
10 61495A 1 Strap, Squeegee Weldment
11 53444A 1 Wedge, Secondary Squeegee
12 53443A 1 Spacer, Secondary Squeegee
13 30541A 1 Blade, Squeegee
14 80270A 1 Screw, 1/4 - 20 Shoulder
15 30569A 1 Hose, Sec. Squeegee
# = Revised or new since last update
10
9
Page -62- Form No. 71274A Nilfi sk ALTO Operator’s Manual - SCRUBTEC R Manual Steering
Page 63

FRONT SQUEEGEE ARM ASSY – ROTARY MACHINES ONLY
1
9
8
revised 8/11
2
3
4
10
7
Ref Part No. Qty Description
1 61548A 1 Arm, Weldment Squeegee
2 81112A 2 Nut, 5/16-18 Thin ESNA
3 67867A 1 Spacer, Squeegee Swivel
4 60256A 1 Arm, Squeegee Pivot
5 980651 3 Washer, 5/16 Flat
6 85811A 2 Screw, 5/16-18 x 3/4 Hex Head
7 53491A 1 Pin, Quick Release
8 61370A 2 Weight
9 170915 2 Screw,1/4-20 X 3/4 Hx Hd(Ss)
10# 61572A 1 Mount, Front Squeegee
# = Revised or new since last update
5
6
Nilfi sk ALTO Operator’s Manual - SCRUBTEC R Manual Steering Form No. 71274A Page -63-
Page 64

Nilfi sk ALTO
SCRUBTEC R 571, 586, 571 C, BOOST® R
Electrical Panel Assembly Drawing and Parts List 12/09
Drawing # 11091A, 10782S, 10961S, 10989S
Page -64- Form No. 71274A Nilfi sk ALTO Operator’s Manual - SCRUBTEC R Manual Steering
Page 65

Nilfi sk ALTO
SCRUBTEC R 571, 586, 571 C, BOOST® R
Electrical Panel Assembly Drawing and Parts List 1/11
Drawing # 11091A, 10782S, 10961S, 10989S
Ref Part No. Qty Description
1 980614 1 Washer, 1/4” Starlock Ext.
2 40932B 1 Harness, Main Power
40965A 1 Harness, Main Power (Cyl. Only)
3 854849 1 Post, Isolation
4 83302A 1 Stud, 1/4-20
5 87026A 8 Washer, 1/4 Flat SS
6 980657 7 Washer, Lock 1/4
7 81104A 2 Nut, 1/4” Nylock
8 41801A 1 Contactor, Main 36V
9 962430 2 Screw, 1/4-20 x 1/2 HHCS
10 56009334 1 Scr-Pan Phil 10-32 x 1.12
11 56381788 1 Main Controller, 28” NOTE 1
56381787 1 Main Controller, 34” Rotary NOTE 2
56381789 1 Main Controller, 32” BOOST NOTE 3
12 40892A 1 Relay
13 962929 4 Screw, 10-32 x 3/8”
14 40853A 1 Display, Battery Charger
15 40797A 1 Charger, 36V Battery w/display
16 61558A 1 Plate, Electrical Panel
17 962086 4 Screw, 1/4-20 x 3/4 Hex Head
18 61876B 1 Rod, Seat Prop
19 86004A 1 Screw, ¼-20 x 1.50 H.H. C.S.
20 30542A 1 Spacer, ¼ Id x ½ Od x ¼ Lg.
21 980205 1 Washer, .31 Id x 1.06 Od
[ ] 71015A 1 Label, Gases and Chemical
[ ] 41217A 1 Cable, Battery Series
[ ] 40896A 1 Cable, 32” Neg. Battery
[ ] 40895A 1 Cable, 24” Pos. Battery
[ ] 40882A 1 Cable, 200 Amp Fus. Battery
[ ] 40934A 1 Harness, Logic
[ ] = Not Shown
NOTE 1: Main Controller 53791A has been replaced by 56381788. When installing 56381788 in place of 53791A you will also need
to order Main Controller Kit 56381791.
NOTE 2: Main Controller 53792A has been replaced by 56381787. When installing 56381787 in place of 53792A you will also need
to order Main Controller Kit 56381791.
NOTE 3: Main Controller 53790B has been replaced by 56381789. When installing 56381789 in place of 53790B you will also need
to order Main Controller Kit 56381791.
Nilfi sk ALTO Operator’s Manual - SCRUBTEC R Manual Steering Form No. 71274A Page -65-
Page 66

Nilfi sk ALTO
SCRUBTEC R 571, 586, 571 C, BOOST® R
Electrical Connection Diagram 9/06
(pages 66-69)
Page -66- Form No. 71274A Nilfi sk ALTO Operator’s Manual - SCRUBTEC R Manual Steering
Page 67
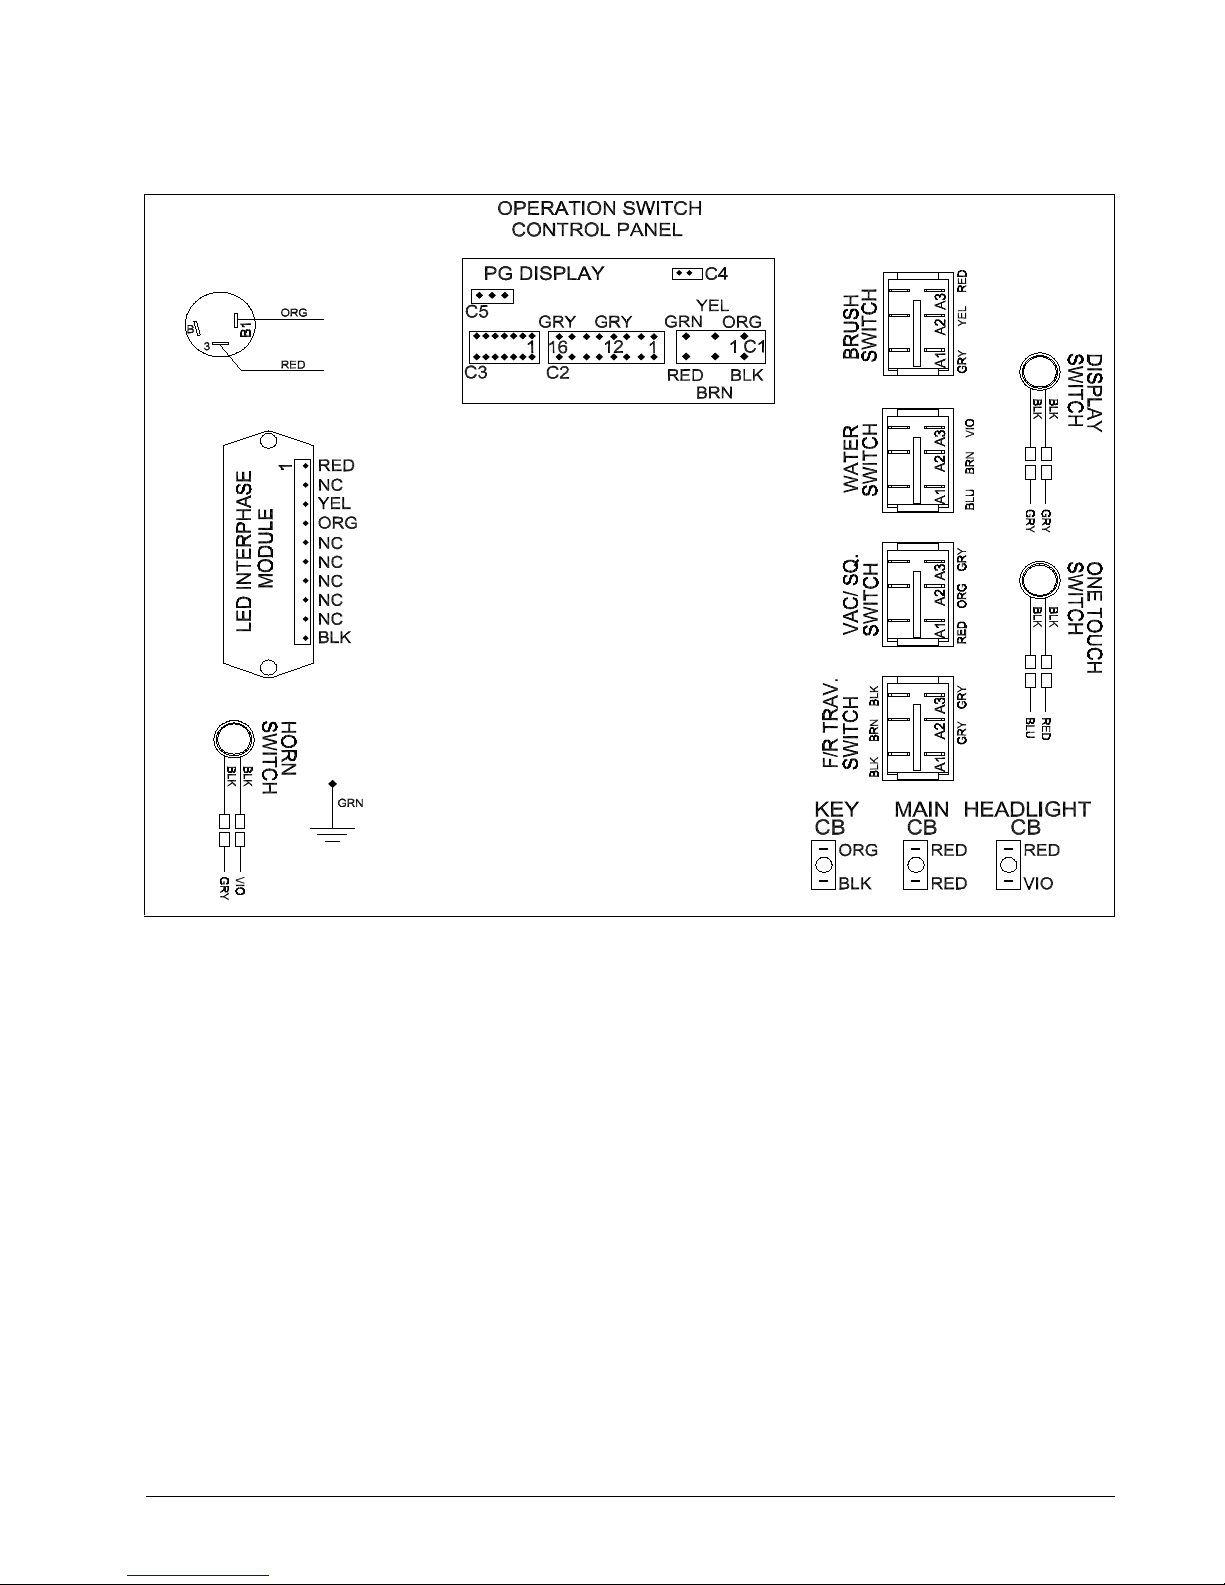
Nilfi sk ALTO
SCRUBTEC R 571, 586, 571 C, BOOST® R
Electrical Connection Diagram 9/06
(pages 66-69)
Nilfi sk ALTO Operator’s Manual - SCRUBTEC R Manual Steering Form No. 71274A Page -67-
Page 68

Nilfi sk ALTO
SCRUBTEC R 571, 586, 571 C, BOOST® R
Electrical Connection Diagram 9/06
(pages 66-69)
Page -68- Form No. 71274A Nilfi sk ALTO Operator’s Manual - SCRUBTEC R Manual Steering
Page 69

Nilfi sk ALTO
SCRUBTEC R 571, 586, 571 C, BOOST® R
Electrical Connection Diagram 9/06
(pages 66-69)
Nilfi sk ALTO Operator’s Manual - SCRUBTEC R Manual Steering Form No. 71274A Page -69-
Page 70

Nilfi sk ALTO
SCRUBTEC R 571, 586, 571 C, BOOST® R
Electrical Schematic 3/08
Page -70- Form No. 71274A Nilfi sk ALTO Operator’s Manual - SCRUBTEC R Manual Steering
Page 71

Nilfi sk ALTO
SCRUBTEC R 571, 586, 571 C, BOOST® R
Rider Electrical Options and Ground Connections 3/08
Nilfi sk ALTO Operator’s Manual - SCRUBTEC R Manual Steering Form No. 71274A Page -71-
Page 72

ACCESSORIES AND OPTIONS
BRUSHES AND PAD DRIVERS
SCRUBTEC R 571 Disc Model
PART NO. DESCRIPTION
38036A Pad Driver Assembly (2 req.)
10383A Lite Grit Disc Brush (2 req.)
11431B Clean Grit Abrasive (2 req.)
11426B Supergrit (2 req.)
11427B Polypropylene (2 req.)
10874A Nylon (2 req.)
SCRUBTEC R 586 Disc Model
PART NO. DESCRIPTION
38034A Pad Driver Assembly (2 req.)
10384A Lite Grit Disc Brush (2 req.)
11430B Clean Grit Abrasive (2 req.)
11425B Supergrit (2 req.)
11424B Polypropylene (2 req.)
10875A Nylon (2 req.)
SCRUBTEC R 571 C Cylindrical Model
PART NO. DESCRIPTION
30614A Polypropylene (2 req.)
30615A Nylon (2 req.)
30616A Clean Grit Abrasive (2 req.)
30617A Supergrit (2 req.)
30619A Lite Grit (2 req.)
SCRUBTEC R BOOST Model
PART NO. DESCRIPTION
997004 Pads, Red 14 x 32 (5 Pack)
997003 Pads, Black 14 x 32 (5 Pack)
997005 Pads, White 14 x 32 (5 Pack)
997007 Pads, Blue 14 x 32 (5 Pack)
SQUEEGEE BLADES
SCRUBTEC R 571 Disc Model
PART NO. DESCRIPTION
30556A Rear Squeegee, Back Gum Rubber Blade
30556L Rear Squeegee, Back Linatex Blade
30066A Rear Squeegee, Front Ribbed Urethane Blade
30764L1 Rear Squeegee, Front Linatex Blade
30540A Side Squeegee, Back Gum Rubber Blade
30540L Side Squeegee, Back Linatex Blade
30541A Side Squeegee, Front Ribbed Urethane Blade
SCRUBTEC R 586 Disc & 571 C Cylindrical Models
PART NO. DESCRIPTION
30557A Rear Squeegee, Back Gum Rubber Blade
30557L Rear Squeegee, Back Linatex Blade
30091A Rear Squeegee, Front Ribbed Urethane Blade
30717L1 Rear Squeegee, Front Linatex Blade
30540A Side Squeegee, Back Gum Rubber Blade
30540L Side Squeegee, Back Linatex Blade
30541A Side Squeegee, Front Ribbed Urethane Blade
SCRUBTEC R BOOST Model
PART NO. DESCRIPTION
30773L2 Rear Squeegee, Front Blade, Linatex 3/16
38727A Rear Squeegee, Front Blade, Urethane Ribbed
30774A Rear Squeegee, Back Blade, Gum Rubber
30774L Rear Squeegee, Back Blade, Linatex 3/16
FIELD INSTALLED OPTION KITS
PART NO. DESCRIPTION
# Deleted
# Deleted
10876A Solution and Recovery Tank Level Indicator Lights
10877A Caution Strobe Light (Amber)
10816A Recovery Tank Clean Out Port
10879A Head Light
53390A CBMS - Clarke Battery Maintenance System
53572A Seat Belt Kit
11079A Chemical Mixing System
11036A Chemical Mixing System Spare Tank
MISC.
PART NO. DESCRIPTION
# 11045A Literature Pack (Scrubtec)
# = Revised or new since last update
revised 8/11
Page -72- Form No. 71274A Nilfi sk ALTO Operator’s Manual - SCRUBTEC R Manual Steering
Page 73

Page 74

Page 75

Page 76

Nilfi sk-Advance A/S
Sognevej 25 • DK-2605 Brøndby • Denmark
Tel.: (+45) 72 18 21 00
Fax: (+45) 72 18 21 11
E-mail: salg@nilfi sk-alto.dk
E-mail: service@nilfi sk-alto.dk
www.nilfi sk-alto.com
 Loading...