

Page 1
I N S T A L L A T I O N G U I D E
FOR USE WITH NILES SW10JM JOIST MOUNT SUBWOOFER
AND NILE S SW 10WM WALL MOUN T SU B WOO F ER
SW10JM SW10WM
Page 2

CONGRATULATIONS!
Thank you for choosing Niles. This manual is for use with the Niles SW10JM Joist Mount
Subwoofer or the Niles SW10WM Wall Mount Subwoofer. The SW10JM/SW10WM are custom-
install passive subwoofers designed to blend seamlessly within a home’s interior. Combined with
the Niles SWA-500M subwoofer amplifier, the SW10JM/SW10WM provide superior sonic quality
in home theater and home audio bass reinforcement. Like all Niles products, the SW10JM and
SW10WM are built to the highest standards of quality and reliability, and with proper installation
and operation, you’ll enjoy years of trouble-free use.
Niles manufactures the industry’s most complete line of custom installation components and
accessories for audio/video systems. To see the complete Niles product assortment, visit us on
the Internet at: www.nilesaudio.com.
TABLE OF CONTENTS
Introduction 1
Features and Benefits 2
SW10JM (Joist-Mount) Subwoofer 3
SW10JM Placement 5
SW10JM In-ceiling/In-floor installation 6
SW10WM Installation – Floor Application 7
SW10WM Installation – Ceiling Application 13
Amplifier Requirements & Wiring 19
SW10WM (Wall-Mount) Subwoofer 21
SW10WM Placement 22
SW10WM In-wall Installation 23
Amplifier Requirements & Wiring 24
Specifications 28
Troubleshooting Guide 29
Notes 30
Page 3

INTRODUCTION
The Niles SW10JM Joist Mount Subwoofer is designed to fit discreetly in ceiling joists or subfloors. The Niles SW10WM Wall Mount Subwoofer is designed to fit discreetly in walls. When
properly installed, the SW10JM/SW10WM are virtually unnoticeable, visible only through the included
Microperf™ ceiling grille or floor/wall grille. You’ll hear deep, thunderous bass and save floor space.
When combined with the Niles SWA-500M power amplifier, the SW10JM/SW10WM will produce
robust bass reinforcement that makes movies and music so enjoyable.
SW10JM JOIST
MOUNT SUBWOOFER
SW10WM WALL
MOUNT SUBWOOFER
NILES AUDIO CORPORATION – 1-800-BUY-HIFI or 1-305-238-4373
1
Page 4

FEATURES AND BENEFITS
10-INCH WOOFER WITH INJECTION MOLDED TCC™
(SW10JM ONLY)
The SW10JM features a 10” injection molded TCC (Talc, Carbon and Ceramic) cone and ported
enclosure for maximum bass response.
10-INCH REINFORCED FIBERGLASS CONE WOOFER
(SW10WM ONLY)
The SW10WM features a 10” shallow-depth reinforced fiberglass cone woofer that is extremely
rigid to reduce break up, lower distortion, and provide enhanced bass response.
INSTALLATION FLEXIBILITY
The SW10JM mounts in ceiling joists or under floors and accommodates 16” and 24” on-center
joist construction. The SW10WM adapts to in-wall installations and is designed to fit standard 2 X
4 construction. Mounting hardware is included and each model includes one Microperf™ grille and
frame and one floor/cabinet grille (SW10JM only). You won’t see a bulky, space-hogging subwoofer,
but you’ll hear spine-tingling low frequency information.
HIGH QUALITY COMPONENTS
The SW10JM/SW10WM incorporate butyl rubber surrounds that damp resonance and provide
exceptional strength and durability. Gold-plated input terminals on the top and bottom support
wiring configuration from basement or attic and ensure the cleanest connection possible.
Additionally, spike feet further reduce unwanted bass response to the structure tune port design,
and isolation pads reduce unwanted drywall response. Paired with Niles SWA-500 subwoofer
amplifier, the SW10JM/SW10WM provide thrilling, yet remarkably smooth low frequency effects.
PAINTABLE MICROPERF™ GRILLE WITH FRAME
Blends easily into any room décor.
DOLBY DIGITAL® READY
The SW10JM/SW10WM subwoofer are expressly designed for superior sonic quality in home
theater applications. Each model exceeds the specifications set forth by Dolby Laboratories
for the accurate reproduction of Dolby Digital-Encoded Sources.INSTALLATION
CONSIDERATIONS
2
Page 5
QUALITY YOU CAN COUNT ON
Since 1978, Niles Audio has been a leading manufacturer of custom-installed home entertainment
products. Recognized around the world for designing and manufacturing reliable, durable,
application specific products, Niles has more than 500 individual products for whole-house
distribution and integration of audio/video systems, speakers, receivers, amplifiers, automation
devices, controls, and accessories.
The SW10JM/SW10WM were designed in the USA by Niles engineers. We use high quality
components and have thoroughly tested each product to ensure that it meets our high standards.
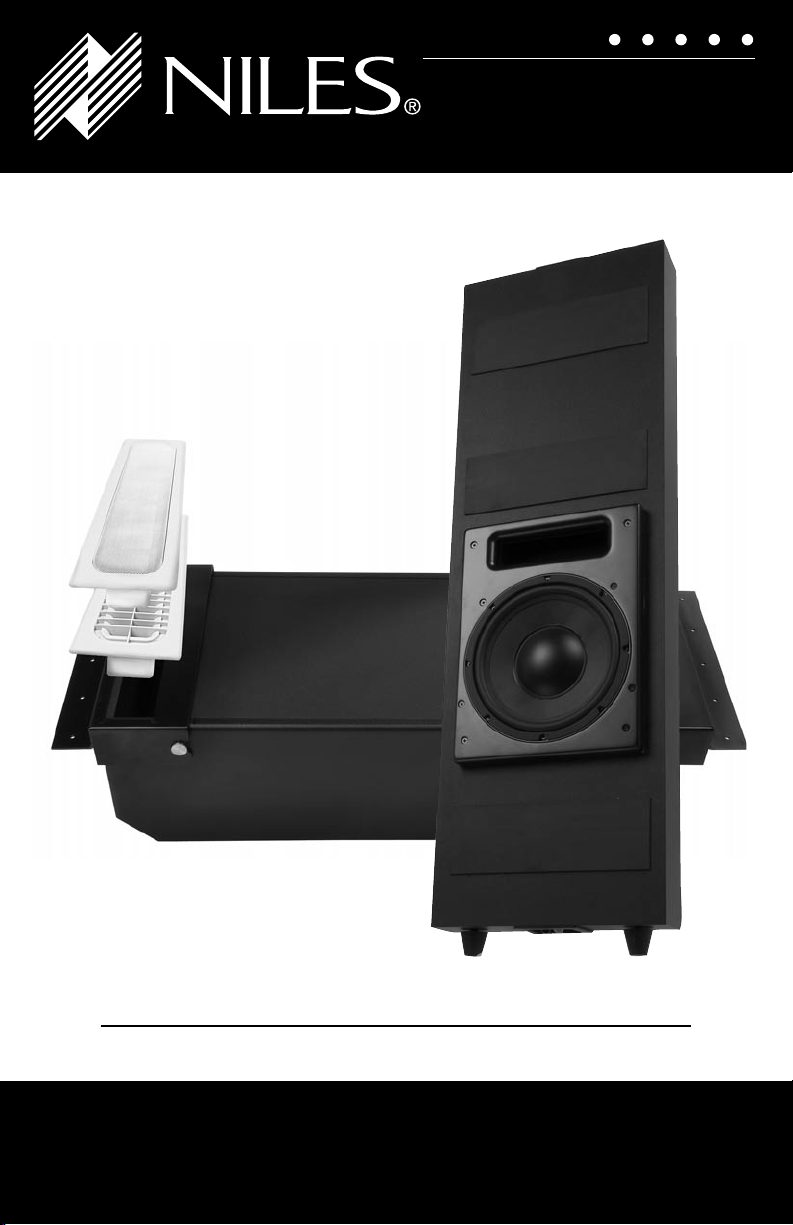
NILES SW10JM (JOIST MOUNT) SUBWOOFER
The SW10JM Joist Mount subwoofer includes the following items:
• 1 Passive Subwoofer
• 1 MicroPerf™ ceiling grille with frame
• 1 floor/cabinet grille
• 1 set of mounting brackets (front/rear)
• 1 cardboard placement template
• 1 Trim-out panel
• All necessary hardware
Figure 1. Niles SW10JM Joist Mount Subwoofer
NILES AUDIO CORPORATION – 1-800-BUY-HIFI or 1-305-238-4373
3
Page 6

TOOLS NEEDED:
• Pencil
• Drywall Saw
• Phillips Screwdriver
• Drill (and assorted Bits)
• Qty. 2; 2 x 4s (48” in length)
• Wire strippers
• Tape Measure
• Level (Optional)
• Awl (optional)
• Staple gun (optional)
• Protective safety gear
• Tools suitable for cutting opening in the applicable flooring/wall material
CAUTION: ALWAYS CHECK FOR ELECTRICAL, HEATING, PLUMBING, CONDUIT, ETC., BEFORE CUTTING
INTO CEILINGS OR FLOORS.
WARNING: ALWAYS TURN OFF THE AMPLIFIER WHEN CONNECTING THE SUBWOOFER AND ANY
OTHER COMPONENTS TO THE SYSTEM.
4
Page 7
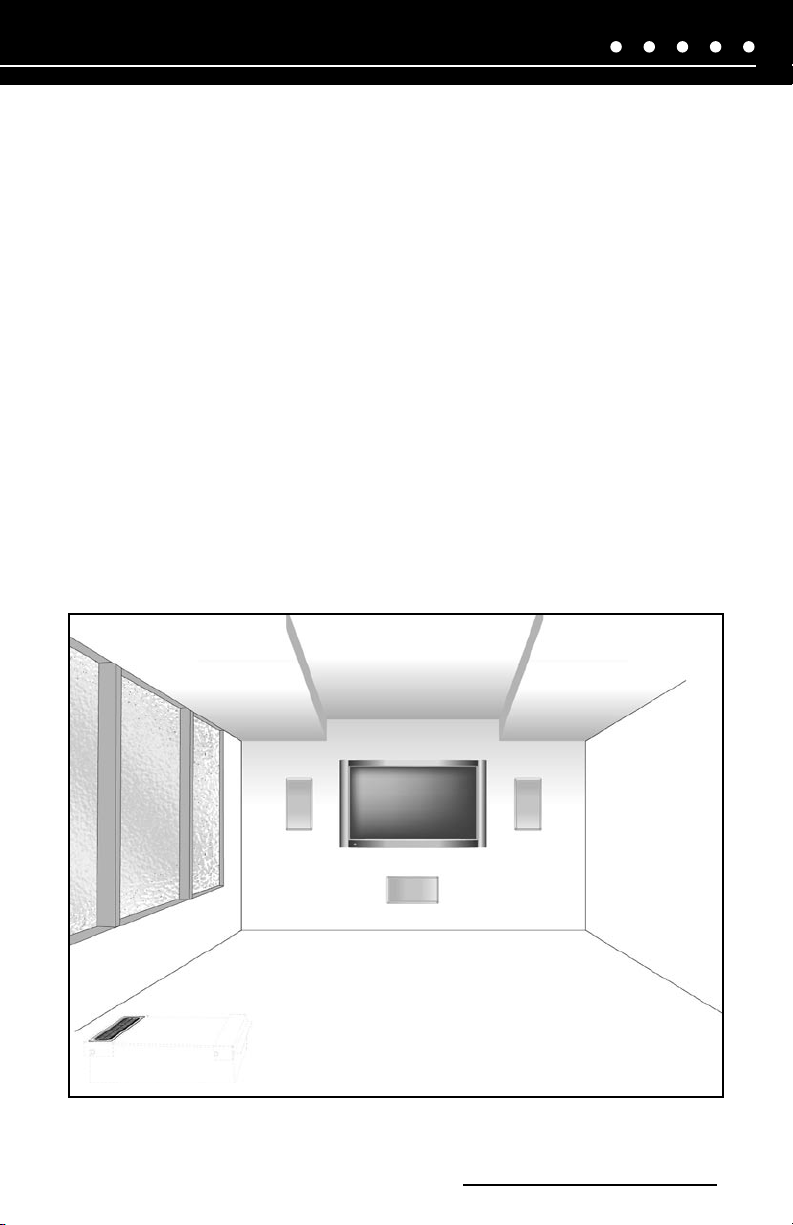
SW10JM PLACEMENT
Before you begin, carefully plan the location of the SW10JM, keeping in mind that the SW10JM
will be installed parallel with the rooms’ joist construction. For maximum bass performance, we
recommend positioning the SW10JM so that the grille/vent is near a corner or sidewall and is
as close to the main speakers as possible. Keep in mind that the SW10JM is not magneticallyshielded and could cause interference if placed near a video display.
Installing the SW10JM near a corner can maximize low frequency information; however, be
careful to avoid a “boomy” effect that can result from installing the sub in a corner. Also take into
consideration any unusual features of the room, such as archways, that can affect bass response.
Every room is different and we recommend experimenting with the SW10JM subwoofer before you
install this product. Experiment with a stand-alone subwoofer, placing it in different areas of the
room to test the bass in different areas.
Keep in mind that low-frequency information (bass) can vibrate objects. Care should be taken in
planning the installation of the in-floor/ceiling subwoofer to minimize the risk of room vibration and
noise. Do not locate the SW10JM subwoofer close to lamps or furniture that might rattle or vibrate.
Figure 2. Home Theater layout with SW10JM placement options
NILES AUDIO CORPORATION – 1-800-BUY-HIFI or 1-305-238-4373
5
Page 8

SW10JM IN-CEILING/IN-FLOOR INSTALLATION
The SW10JM subwoofer mounts directly to ceilings or sub-floors between joists and
accommodates both 16" and 24" on-center joist construction. The included cardboard template
matches the dimensions of the SW10JM and is used to position the subwoofer, the 2 X 4s that will
support the subwoofer, and for marking the 4 pilot holes for cutting out an opening for the grille.
Be sure to mount the SW10JM securely to the floor/ceiling, as the bass output could cause
unwanted vibration if the SW10JM is able to move. Be sure the joists to which the SW10JM
are mounted are securely braced against each other so that the distance between them does
not change and they are not able to move or shift. Always consult local building codes
before installation.
Installing the SW10JM will require cutting pieces of drywall or floor surfaces. If you are not
comfortable or experienced with precision drywall, we recommend consulting a professional
contractor or custom installation professional.
NOTE: IF THE SUBWOOFER GRILLES ARE TO BE PAINTED TO MATCH THE NEW CEILING OR FLOOR
COLOR, THEY MUST BE PAINTED BEFORE THE UNIT IS INSTALLED.
6
Page 9
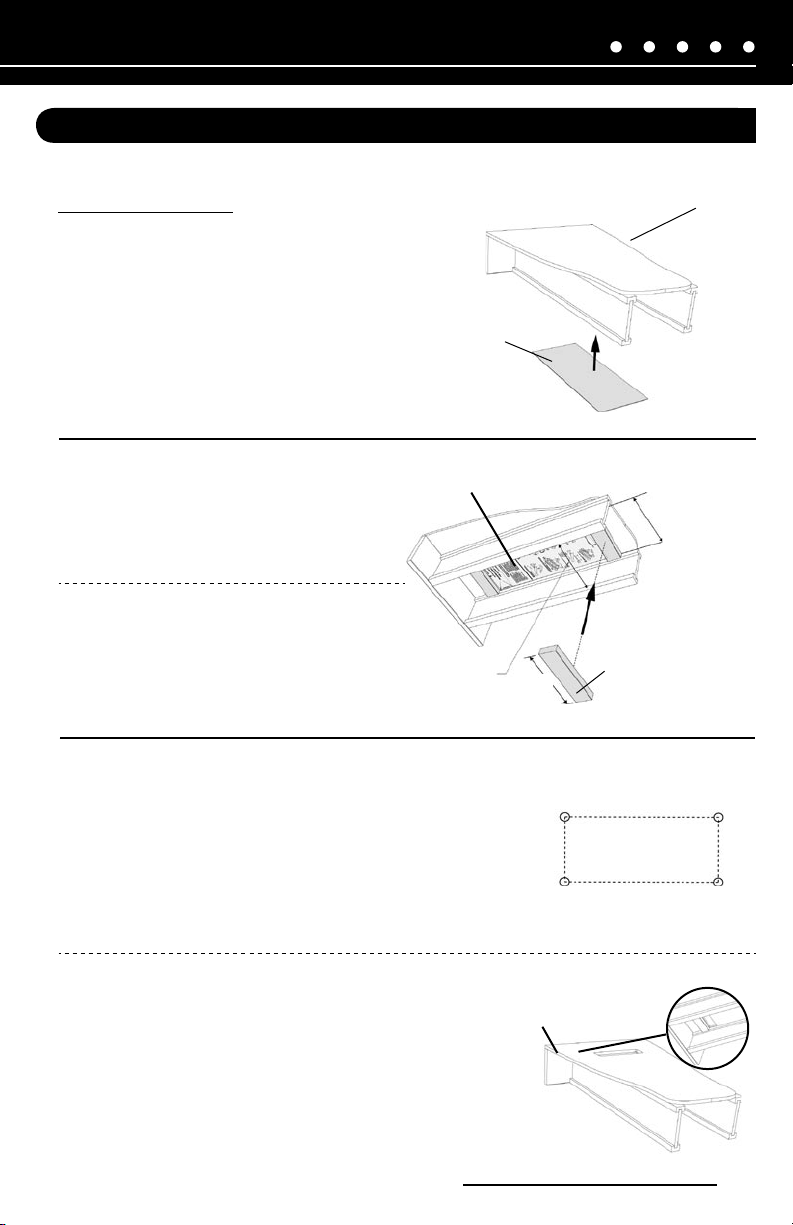
SW10JM INSTALLATION – FLOOR APPLICATION
FLOOR APPLICATION – BEFORE FINAL FLOORING APPLIED
Pre-Construction
1. Use template to determine a suitable
installation location. Place the SW10JM
cardboard template in the desired location
making sure the template is level and
Temp late
aligned correctly. You may want to staple
the template in place for added ease.
Floor
2a. Measure the width between the joists/
studs and cut two 2 X 4’s to match this
width. The 2 X 4’s will be used to cross
brace between joists.
2b. Position each 2 X 4 according to
template. Attach each 2 X 4 to the
floor joists using applicable local
building methods.
3a. Mark 4 hole locations from template. This
area will be used for the grille cutout.
3b. Cut thru sub-flooring (OSB, PLYWOOD,
ETC.) between marks using appropriate
tools.
Temp late
X Mini mum
Width Neede d
X
➊
➋
Hole C ut-ou t
X Minimum
Width Needed
2 x 4
Frame Cut-out
➌
➍
Bottom Vie w
NILES AUDIO CORPORATION – 1-800-BUY-HIFI or 1-305-238-4373
7
Page 10
4. Attach the supplied front and rear
brackets to the 2 x 4’s using the supplied
1.5" wood screws.
NOTE: REMOVE THE STOP BLOCK FROM THE
SW10JM PORT. THE STOP BLOCK IS INCLUDED
TO PREVENT THE SUBWOOFER FROM
DISENGAGING FROM BRACKETS UNTIL THE
GRILLE IS INSTALLED.
5. Place the SW10JM subwoofer into the
brackets aligning the attachment pins to
the slots in the brackets. Begin with the
ported end first.
2 x 4
Fro nt Br acket
Rear B racke t
2 x 4
Screws
Subwoofer
Front Bracket
Subwoofer
6. Install the stop block between the bracket
and cabinet at rear of cabinet as indicated
in drawing.
Screw
8
Rear Bracket
Stop Block
Subwoofer
Stop Block
Screw
(CONTINUED ON NEXT PAGE)
Page 11
SW10JM INSTALLATION – FLOOR APPLICATION (CONTINUED)
7. Install Trim Out Panel to protect cabinet
from debris until trim out using the
supplied screws.
8. For trim out, remove Trim Out Panel.
9. Install the included floor grille into the cut-
out opening using the same screws from
the Trim Out Panel.
OPTIONAL: The grille can be painted to match
most decors but should be painted before
installation. Additionally, paint the grille
separately from the loudspeaker frame. For
best results when painting the grille, use a spray
gun or airless sprayer. Thin the paint to prevent
clogging of the grille holes and apply several
light coats instead of one heavy one.
Floor
Floor
3" Screws
3" Screws
Cover
Hole Cut-out
Grille
Hole Cut-out
NILES AUDIO CORPORATION – 1-800-BUY-HIFI or 1-305-238-4373
9
Page 12

SW10JM INSTALLATION – FLOOR APPLICATION
FLOOR APPLICATION – COMPLETE INSTALLATION
New/Existing Construction
1. Use template to determine a suitable installation
location. Place the SW10JM cardboard template
in the desired location making sure the template
is level and aligned correctly. You may want to
Temp late
staple the template in place for added ease.
Floor
2a. Measure the width between the joists/studs and
cut two 2 X 4s to match this width. The 2 X 4s
will be used to cross brace between joists.
2b. Position each 2 X 4 according to
template. Attach each 2 X 4 to the
floor joists using applicable local
building methods.
3a. Mark 4 hole locations from template. This area
will be used for the grille cutout.
3b. Cut thru sub-flooring (OSB, PLYWOOD, ETC.)
between marks using appropriate tools.
Temp late
X Mini mum
Width Neede d
Hole C ut-ou t
➊
➋
X
2 x 4
Frame Cut-out
Bottom Vie w
X Minimum
Width Needed
➌
➍
10
(CONTINUED ON NEXT PAGE)
Page 13

SW10JM INSTALLATION – FLOOR APPLICATION (CONTINUED)
4. Attach the supplied front and rear brackets to the
2 x 4’s using the supplied 1.5" screws.
NOTE: REMOVE THE STOP BLOCK FROM THE SW10JM
PORT. THE STOP BLOCK IS INCLUDED TO PREVENT
THE SUBWOOFER FROM DISENGAGING FROM
BRACKETS UNTIL THE GRILLE IS INSTALLED.
2 x 4
Fro nt Br acket
Rear B racke t
Screws
5. Place the SW10JM subwoofer into the brackets
aligning the attachment pins to the slots in the
brackets. Begin with the ported end first.
2 x 4
Subwoofer
Front Bracket
Subwoofer
Rear Bracket
6. Install the stop block between the bracket
and cabinet at rear of cabinet as indicated
in drawing.
Screw
Stop Block
NILES AUDIO CORPORATION – 1-800-BUY-HIFI or 1-305-238-4373
Subwoofer
Stop Block
Screw
11
Page 14

7. Install the included floor grille into the
cut-out opening using the supplied screws.
OPTIONAL: The grille can be painted to match
most decors but should be painted before
installation. Additionally, paint the grille separately
from the loudspeaker frame. For best results
when painting the grille, use a spray gun or airless
sprayer. Thin the paint to prevent clogging of the
grille holes and apply several light coats instead
of one heavy one.
Floor
3" Screws
Grille
Hole Cut-out
12
Page 15

SW10JM INSTALLATION – CEILING APPLICATION
CEILING APPLICATION – BEFORE DRYWALL APPLIED
Pre-Construction
1. Use template to determine a suitable installation
location. Place the SW10JM cardboard template
in the desired location making sure the template
is level and aligned correctly. You may want to
Temp late
staple the template in place for added ease.
2a. Measure the width between the joists/studs and
cut two 2 X 4’s to match this width. The 2 X 4’s
will be used to cross brace between joists.
2b. Locate 2 x 4’s at end of template as shown.
Position each 2 x 4 and attach to trusses using
applicable local building methods.
3. Attach the supplied front and rear brackets to
the 2 x 4’s using the supplied 1.5" screws.
NOTE: REMOVE THE STOP BLOCK FROM THE SW10JM
PORT. THE STOP BLOCK IS INCLUDED TO PREVENT
THE SUBWOOFER FROM DISENGAGING FROM
BRACKETS UNTIL THE GRILLE IS INSTALLED.
X Mini mum
Width Neede d
Fro nt Br acket
2 x 4
Temp late
Rear B racke t
X
2 x 4
X Minimum
Width Needed
Screws
2 x 4
NILES AUDIO CORPORATION – 1-800-BUY-HIFI or 1-305-238-4373
13
Page 16

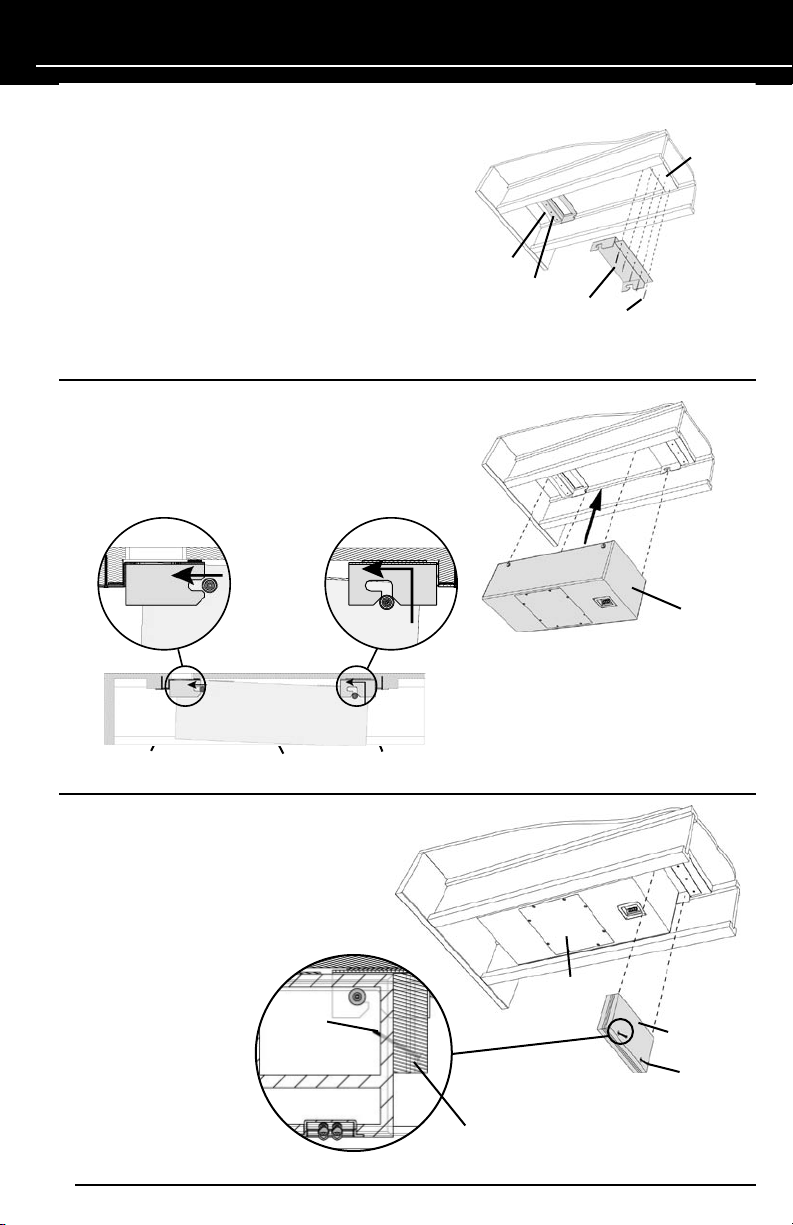
4. Place the SW10JM subwoofer into the brackets
aligning the attachment pins to the slots in the
brackets. Begin with the ported end first.
Front Bracket
Subwoofer
Rear Bracket
5. Install the stop block between the bracket
and cabinet at rear of cabinet as indicated
in drawing.
Screw
Subwoofer
Screw
Stop Block
Subwoofer
6. Install Trim Out Panel to allow drywall
installer exact location of cut-out.
14
Stop Block
(CONTINUED ON NEXT PAGE)
Page 17

SW10JM INSTALLATION – CEILING APPLICATION (CONTINUED)
7. For trim out, remove Trim Out Panel.
Hole Cut-out
8. Install the included ceiling grille frame into
the cut-out opening using the supplied
screws.
9. Install the included ceiling grille into
the frame.
OPTIONAL: The grille can be painted to match
most decors but should be painted before
installation. Additionally, paint the grille separately
from the loudspeaker frame. For best results
when painting the grille, use a spray gun or airless
sprayer. Thin the paint to prevent clogging of the
grille holes and apply several light coats instead of
one heavy one.
Ceiling
Ceiling
Cover
3" Screws
Hole Cut-out
Grille
3" Screws
NILES AUDIO CORPORATION – 1-800-BUY-HIFI or 1-305-238-4373
15
Page 18

SW10JM INSTALLATION – CEILING APPLICATION
CEILING APPLICATION – COMPLETE INSTALLATION
New/Existing Construction
1. Use template to determine a suitable installation
location. Place the SW10JM cardboard template
in the desired location making sure the template
is level and aligned correctly. You may want to
Temp lat e
staple the template in place for added ease.
2a. Measure the width between the joists/studs and
cut two 2 X 4’s to match this width. The 2 X 4’s
will be used to cross brace between joists.
2b. Locate 2 x 4’s at end of template as shown.
Position each 2 x 4 and attach to trusses using
applicable local building methods.
3a. Mark 4 hole locations from template. This area
will be used for the grille cutout.
3b. Cut thru ceiling between marks (drywall,
sheetrock, etc.) using appropriate tools
Width Neede d
Studs
Drywall Saw
X Mini mum
➊
➋
Hole C ut-ou t
Temp late
Frame Cut-out
X
2 x 4
X Minimum
Width Needed
➌
➍
Bottom Vie w
16
(CONTINUED ON NEXT PAGE)
Page 19

SW10JM INSTALLATION – CEILING APPLICATION (CONTINUED)
Screws
4. Attach the supplied front and rear brackets to
the 2 x 4’s using the supplied 1.5" screws.
NOTE: REMOVE THE STOP BLOCK FROM THE SW10JM
PORT THE STOP BLOCK IS INCLUDED TO PREVENT
THE SUBWOOFER FROM DISENGAGING FROM
BRACKETS UNTIL THE GRILLE IS INSTALLED.
Rear B racke t
Fro nt Br acket
2 x 4
5. Place the SW10JM subwoofer into the brackets
aligning the attachment pins to the slots in the
brackets. Begin with the ported end first.
Subwoofer
2 x 4
Front Bracket
Subwoofer
Rear Bracket
6. Install the stop block between the bracket
and cabinet at rear of cabinet as indicated
in drawing.
Screw
Screw
Stop Block
Subwoofer
Stop Block
NILES AUDIO CORPORATION – 1-800-BUY-HIFI or 1-305-238-4373
17
Page 20

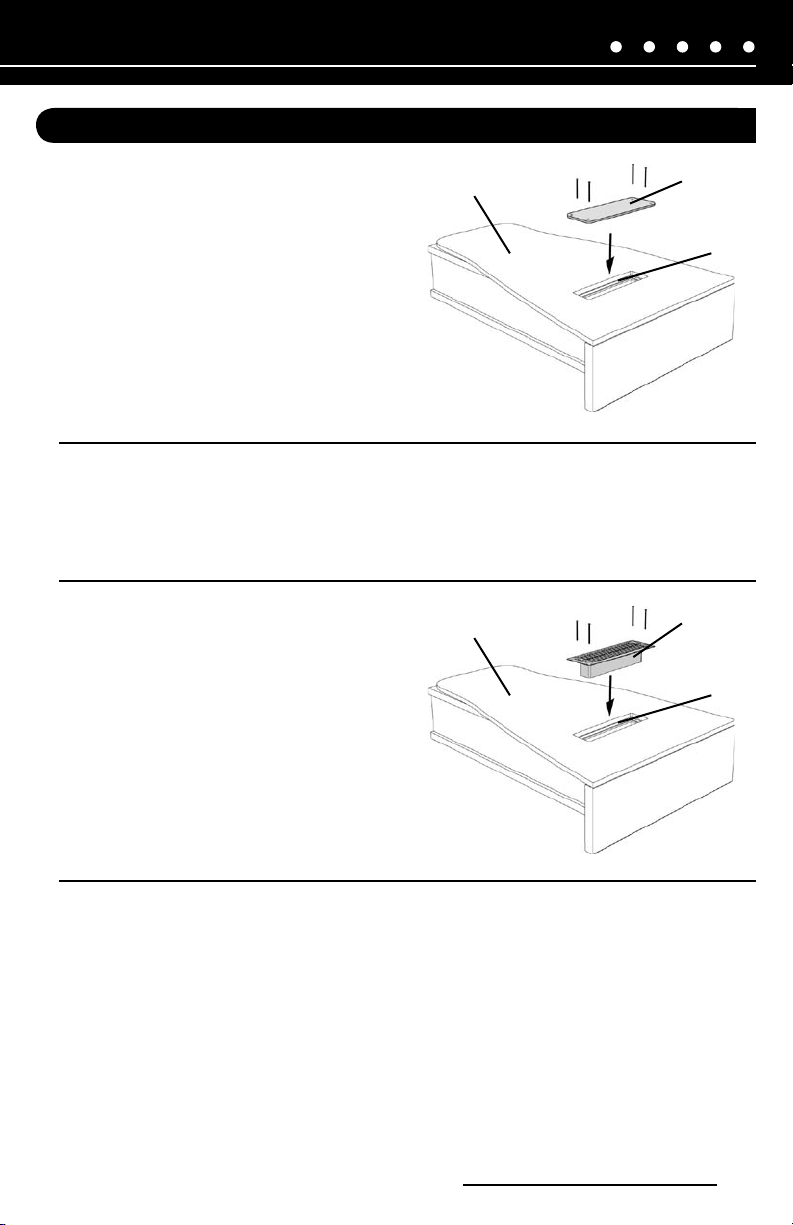
7. Install the included ceiling grille into the
cut-out opening using the supplied screws.
Hole Cut-out
Ceiling
3" Screws
Grille
8. Install the included ceiling grille into
the frame.
OPTIONAL: The grille can be painted to match most decors but should be painted before installation.
Additionally, paint the grille separately from the loudspeaker frame. For best results when painting the
grille, use a spray gun or airless sprayer. Thin the paint to prevent clogging of the grille holes and apply
several light coats instead of one heavy one.
18
Page 21

AMPLIFIER REQUIREMENTS & WIRING
The SW10JM is a passive (non-powered) subwoofer and must be used with a power amplifier. We
strongly recommend the Niles SWA-500 subwoofer amplifier. Use with any other amplifiers could
result in less than optimal performance.
Home Theater
Receiver
Left & Right Line-
Level Output
Optional
RL
SWA-500M Back
1st Subwoofer
2nd Subwoofer (Optional)
Figure 3. Line diagram showing 1 or more SW10JM connected to the SWA-500
We recommend 16 AWG 2-conductor speaker wire for runs up to 60 feet, with heavier high quality
speaker wire used for longer runs. When permanently installing wire inside walls, be sure to use
cable that is rated for in-wall use and has special jacketing for fire prevention. The wires should be
run in accordance with National Electrical Code and any applicable local building codes.
NILES AUDIO CORPORATION – 1-800-BUY-HIFI or 1-305-238-4373
19
Page 22

The SW10JM has 5-way binding posts that accept all
types of wire ends.
Be sure to wire the subwoofer “in-phase”— positive
(red) terminal on the amplifier output must be connected
to the corresponding positive (red) terminal on the
subwoofer and likewise negative (black). Most speaker
wires have markings along one or both conductors to
help you make the correct connections. Take care to wire
Figure 4. 5-way binding posts
the subwoofer correctly in-phase, before floors/ceiling
are sealed.
WIRING FOR NEW CONSTRUCTION
For best results, avoid running speaker wire near AC wiring, as it may induce a 60Hz hum in the
audio signal. It’s a good idea to run the speaker wire after the electrical wiring has already been
completed, so that you can route the speaker wire at least three feet away from the electrical
wiring. If speaker wire and AC wiring must run parallel, install the wire within a metal conduit.
NOTE: THE SW10JM IS DESIGNED FOR INTERIOR IN-FLOOR OR IN-CEILING INSTALLATIONS
BETWEEN STANDARD JOISTS 10” TALL OR GREATER. INSTALLATION IN OUTDOOR LOCATIONS OR
IN MOISTURE-PRONE INTERIOR ENVIRONMENTS SUCH AS INDOOR SWIMMING POOLS OR SAUNAS
IS NOT RECOMMENDED.
CAUTION: ALWAYS CHECK FOR ELECTICAL/HEATING/PLUMBLING APPARATUS BEFORE CUTTING INTO
CEILINGS OR FLOORS.
20
Page 23

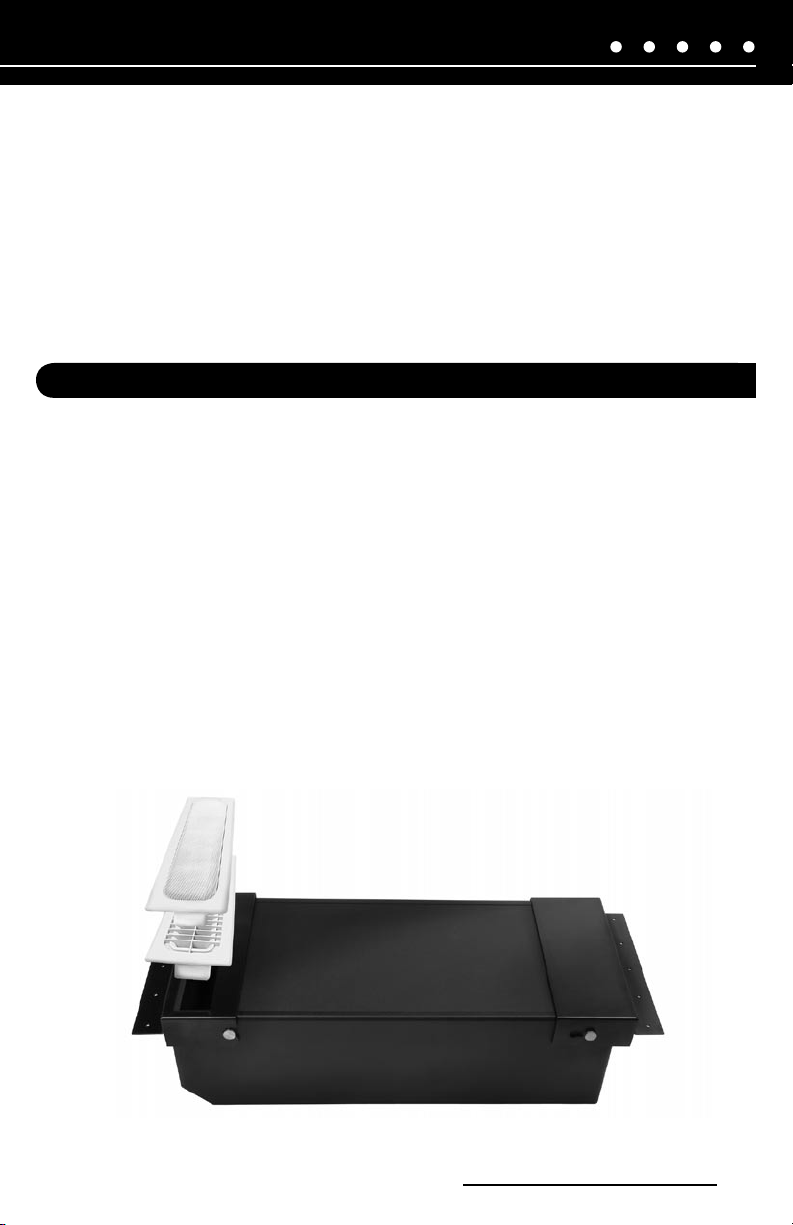
SW10WM (WALL MOUNT) SUBWOOFER
The SW10WM Wall Mount subwoofer includes the following items:
Preconstruction package:
• 1 Ported cabinet (back box) with trim-out panel
• 1 set of installation brackets with screws
• 1 set of rubber feet
Installation package:
• 1 Baffle mounted passive driver
• 1 MicroPerf™ grille with frame
• 1 Template for subwoofer placement
TOOLS NEEDED:
• Pencil
Figure 5.
• Drywall saw
Niles SW10WM Wall Mount Subwoofer
• Phillips screwdriver
• Drill (and assorted bits)
• Wire strippers
• Tape measure
• Level (optional)
• Awl (optional)
• Staple gun (optional)
• Protective safety gear
• Tools suitable for cutting opening in the applicable flooring/wall material
CAUTION: ALWAYS CHECK FOR ELECTRICAL, HEATING, PLUMBING, CONDUIT, ETC., BEFORE CUTTING
INTO CEILINGS OR FLOORS.
NILES AUDIO CORPORATION – 1-800-BUY-HIFI or 1-305-238-4373
21
Page 24

SW10WM PLACEMENT
Before you begin, carefully plan the location of the SW10WM subwoofer, keeping in mind that
the SW10WM will be installed parallel with the room’s stud construction. For maximum bass
performance, we recommend positioning the SW10WM so that the grille/frame is near a corner
or sidewall and is as close to the main speakers as possible. Keep in mind that the SW10WM
subwoofer is not magnetically-shielded and could cause interference if placed near a video display.
Installing the SW10WM near a corner can maximize low frequency information; however, be
careful to avoid a “boomy” effect that can result from installing the sub in a corner. Also take into
consideration any unusual features of the room, such as archways, that can affect bass response.
Figure 6. Possible home theater layout with SW10WM placement options
Every room is different and we recommend experimenting with the SW10WM subwoofer before
you install this product. Experiment with a stand-alone subwoofer, placing it in different areas of
the room to test the bass in different areas.
Keep in mind that low-frequency information (bass) can vibrate objects. Care should be taken
in planning the installation to minimize the risk of room vibration and noise. Do not locate the
SW10WM subwoofer close to lamps or furniture that might rattle or vibrate.
22
Page 25

SW10WM IN-WALL INSTALLATION
The SW10WM subwoofer mounts parallel within the room’s standard 2 X 4 stud construction.
The included cardboard template matches the dimensions of the SW10WM and is used to
position the subwoofer.
Be sure to mount the SW10WM securely, as the bass output could cause unwanted vibration if
the SW10WM is able to move. Be sure the studs to which the SW10WM is mounted are securely
braced so that the distance between them does not change and they are not able to move or shift.
Always consult local building codes before installation.
Installing the SW10WM will require cutting pieces of drywall. If you are not comfortable or
experienced with precision drywall, we recommend consulting a professional contractor or custom
installation professional. If the subwoofer grilles are to be painted to match the new ceiling or color,
they must be painted before the unit is installed.
The SW10WM subwoofer comes conveniently
packaged in two separate installation
packages. The first package is for preconstruction which contains all the necessary
components to install the cabinet located
inside the wall. These parts include the
cabinet itself, installation brackets, rubber
isolating feet and an installation template.
Pre-Construction
Packaging
Installation
Packaging
The second package is to be used in the final
Trim out phase. This package includes the
driver/baffle assembly, frame and grille.
Pre-Construction
1. Locate the Pre-Construction package to begin
installation of the product.
2a. Use the provided template to determine a
suitable installation location. The SW10WM
cardboard template represents the exact size of
the cabinet with feet upon installation. Ensure
this area is free of all obstructions.
NILES AUDIO CORPORATION – 1-800-BUY-HIFI or 1-305-238-4373
Placing The Template
23
Page 26

2b. Determine suitable wire routing method. The
SW10WM is provided with terminal cups at both
the bottom and top of the unit for convenience.
Preparing the cabinet
3a. Remove the large bolts located at the top of the
cabinet and flip the brackets over re-installing
brackets with the same bolts, leaving them
loose. Ensure the flange surface with 4 holes
is above the cabinet. Allow access for the
installation hardware.
3b. Locate the feet inside the pre-construction
package. Place feet on cabinet.
Top
Bottom
Installing the cabinet
4. Place subwoofer cabinet into stud bay and
adjust brackets to accommodate the exact width
of construction. Tighten the bolts.
24
(CONTINUED ON NEXT PAGE)
Page 27

SW10WM IN-WALL INSTALLATION (CONTINUED)
5. Secure the brackets to the studs using the
provided hardware.
6. Make necessary wire connections to
terminal cups
NOTE: THE SW10WM CABINET HAS THE
NECESSARY TRIMOUT PANEL ALREADY
INSTALLED. THIS WILL ALLOW SHEETROCK
INSTALLERS THE EXACT LOCATION FOR
CUTTING THE FRAME OPENING AND PREVENT
DEBRIS FROM ENTERING THE CABINET DURING
THE FINAL PHASES OF CONSTRUCTION.
Installation Package
8. Remove Trim Out Panel from the cabinet
and discard.
9. Remove the Baffle/Driver from its packaging.
10. Connect the appropriate speaker wires from
inside the cabinet to the Push terminal on the
back of the subwoofer basket. If using the
terminal cups at the top, use the top wires. If
using the terminal cups at the button, use the
button wires.
11. Insert the Baffle/Driver into the hole securing
the baffle in place with the supplied screws.
NILES AUDIO CORPORATION – 1-800-BUY-HIFI or 1-305-238-4373
25
Page 28

12. Insert the frame into the cut-out hole securing
the frame with the supplied 2" screws where
needed to ensure a snug fit against the wall.
13. Insert the metal grille into the frame pressing
firmly all the way around the perimeter.
TIP. If the grille does not stay flush in some areas,
remove grille, bending flange slightly outward
in those areas, then re-apply grille to frame.
OPTIONAL: The grille can be painted to match most
decors but should be painted before installation.
Additionally, paint the grille separately from the
loudspeaker frame. For best results when painting the
grille, use a spray gun or airless sprayer. Thin the paint
to prevent clogging of the grille holes and apply several
light coats instead of one heavy one.
26
Page 29

AMPLIFIER REQUIREMENTS & WIRING
The SW10WM is a passive (non-powered) subwoofer and must be used with a power amplifier. We
strongly recommend the Niles SWA-500 subwoofer amplifier. Use with any other amplifiers could
result in less than optimal performance.
Figure 7. 1 or more SW10WM connected to the SWA-500
The SW10WM has two 5-way binding posts that accept
all types of wire ends. Be sure to wire the subwoofer
“in-phase”—positive (red) terminal on the amplifier output
must be connected to the corresponding positive (red)
terminal on the subwoofer and likewise negative (black).
Most speaker wires have markings along one or both
conductors to help you make the correct connections.
Take care to wire the subwoofer correctly in-phase, before
floors/ceiling are sealed.
Figure 8. 5-way binding posts
NILES AUDIO CORPORATION – 1-800-BUY-HIFI or 1-305-238-4373
27
Page 30

WIRING FOR NEW CONSTRUCTION
For best results, avoid running speaker wire near AC wiring, as it may induce a 60Hz hum in the
audio signal. It’s a good idea to run the speaker wire after the electrical wiring has already been
completed, so that you can route the speaker wire at least three feet away from the electrical
wiring. If speaker wire and AC wiring must run parallel, install the wire within a metal conduit.
NOTE: THE SW10WM IS DESIGNED FOR INTERIOR INSTALLATIONS BETWEEN STANDARD STUD
CONSTRUCTION. INSTALLATION IN OUTDOOR LOCATIONS OR IN MOISTURE-PRONE INTERIOR
ENVIRONMENTS SUCH AS INDOOR SWIMMING POOLS OR SAUNAS IS NOT RECOMMENDED.
SPECIFICATIONS
Frequency Response:
SW10JM: 38Hz - 140Hz +/-3dB
SW10WM: 45Hz - 140Hz +/-3dB
Amplifier Power:
SW10JM: For use with SWA-500M only
SW10WM: For use with SWA-500M only
Overall Dimensions (with grille)
SW10JM Joist Mount Subwoofer: 30" W x 9" H x 13.81" D
76.2 cm W x 22.9 cm H x 35.1 cm D
SW10WM Wall Mount Subwoofer: 13.780" W x 46.298" H x 3.248" D
35 cm W x 117.6 cm H x 8.25 cm D
Weight
SW10JM Joist Mount Subwoofer: 57.3 lbs (25.8 kg) shipping weight
SW10WM Wall Mount Subwoofer: 47.8 lbs (21.7 kg) shipping weight
28
Page 31

TROUBLESHOOTING GUIDE
If you experience a problem operating the SW10JM or SW10WM, consult this guide first. The most
common problems relate to hook up. If the problem persists, or you have additional questions,
call your local Niles dealer or Niles Technical Support at 1-800-289-4434, 305-238-4373 or
techsupport@nilesaudio.com. Be sure to call from your telephone extension nearest the system.
PROBLEM
No Sound
SOLUTIONS
Short circuit or loose wire. Check that the connections are secure and that there are no loose
strands of wire crossing from the positive to the negative terminals at the back of the amplifier
and/or the speaker.
Short circuit or a break in the speaker wire. Disconnect the speaker wire at both ends, separate the
2 conductors at both ends and test with a meter for a short circuit. If there is no short, connect the
two conductors at one end and test with a meter for continuity.
Audio cable to input is bad. Connect another cable that is known to be good.
PROBLEM
Hum or buzz sound from the speakers
SOLUTIONS
Hum or buzz may be caused by a ground loop between two of the other components in the
system. To test for another ground loop, try reversing the AC plugs of each of the components in
the system.
PROBLEM
Bass sound is weak and the stereo image is “phasey” or “blurry”
SOLUTIONS
The subwoofer is wired out of phase. Reverse the connections at the back of one speaker
NILES AUDIO CORPORATION – 1-800-BUY-HIFI or 1-305-238-4373
29
Page 32

NOTES
30
Page 33

NOTES
NILES AUDIO CORPORATION – 1-800-BUY-HIFI or 1-305-238-4373
31
Page 34

B L E N D I N G H I G H F I D E L I T Y A N D A R C H I T E C T U R E
®
1 2 3 3 1 S . W . 1 3 0 S t r e e t M i a m i , F l o r i d a 3 3 1 8 6
1 - 8 0 0 - B U Y - H I F I – w w w . n i l e s a u d i o . c o m
©2 00 8 Ni le s Au di o Co rp or at io n. A ll r igh ts r es er ve d. N il es , th e Ni le s lo go s an d Bl en di ng Hi gh F id el it y an d Ar ch it ec tu re
ar e re gi st er ed t ra de ma rk s of N il es A udi o Co rp or at io n. T CC a nd Mi cr oP er f ar e tra de ma rk s of N il es A ud io C or po ra ti on .
Al l ot he r tr ad em ar ks a re t he p ro pe rt y o f th ei r re sp ec ti ve o wn er s. D S0 05 97 B
1 - 3 0 5 - 2 3 8 - 4 3 7 3
N i l e s A u d i o C o r p o r a t i o n
 Loading...