

Page 1

Pixagent
Engineered Workflow
TM
WT-2/WT-2A Setup Guide
Infrastructure Setup for Windows XP
Service Pack 2 or Later
First EditionWritten by Thomas Sapiano
www.pixagent.com
Page 2
Wireless Setup Guide
System Requirements
Operating System:
Windows XP
Service Pack 2 or later
Software:
Pixagent ITP 2.0
.NET Framework 1.1
Hardware:
IEEE802.11b or IEEE802.11g Card
Wireless Access Point/Router
Nikon D2Hs/D2X
Nikon WT-2/WT-2A
Internet Links
http://www.pixagent.com/itp20/
http://www.pixagent.com/support/
support@pixagent.com
Nikon WT-2/2A Transmitter Setup
Windows XP Service Pack 2 or Later
Guide for Windows XP SP2
This document provides step-by-step instructions on how
to congure your Nikon WT-2/WT-2A wireless transmitter
and computer to communicate with one another. Each
step is provided with a screenshot to make the setup
process as easy as possible.
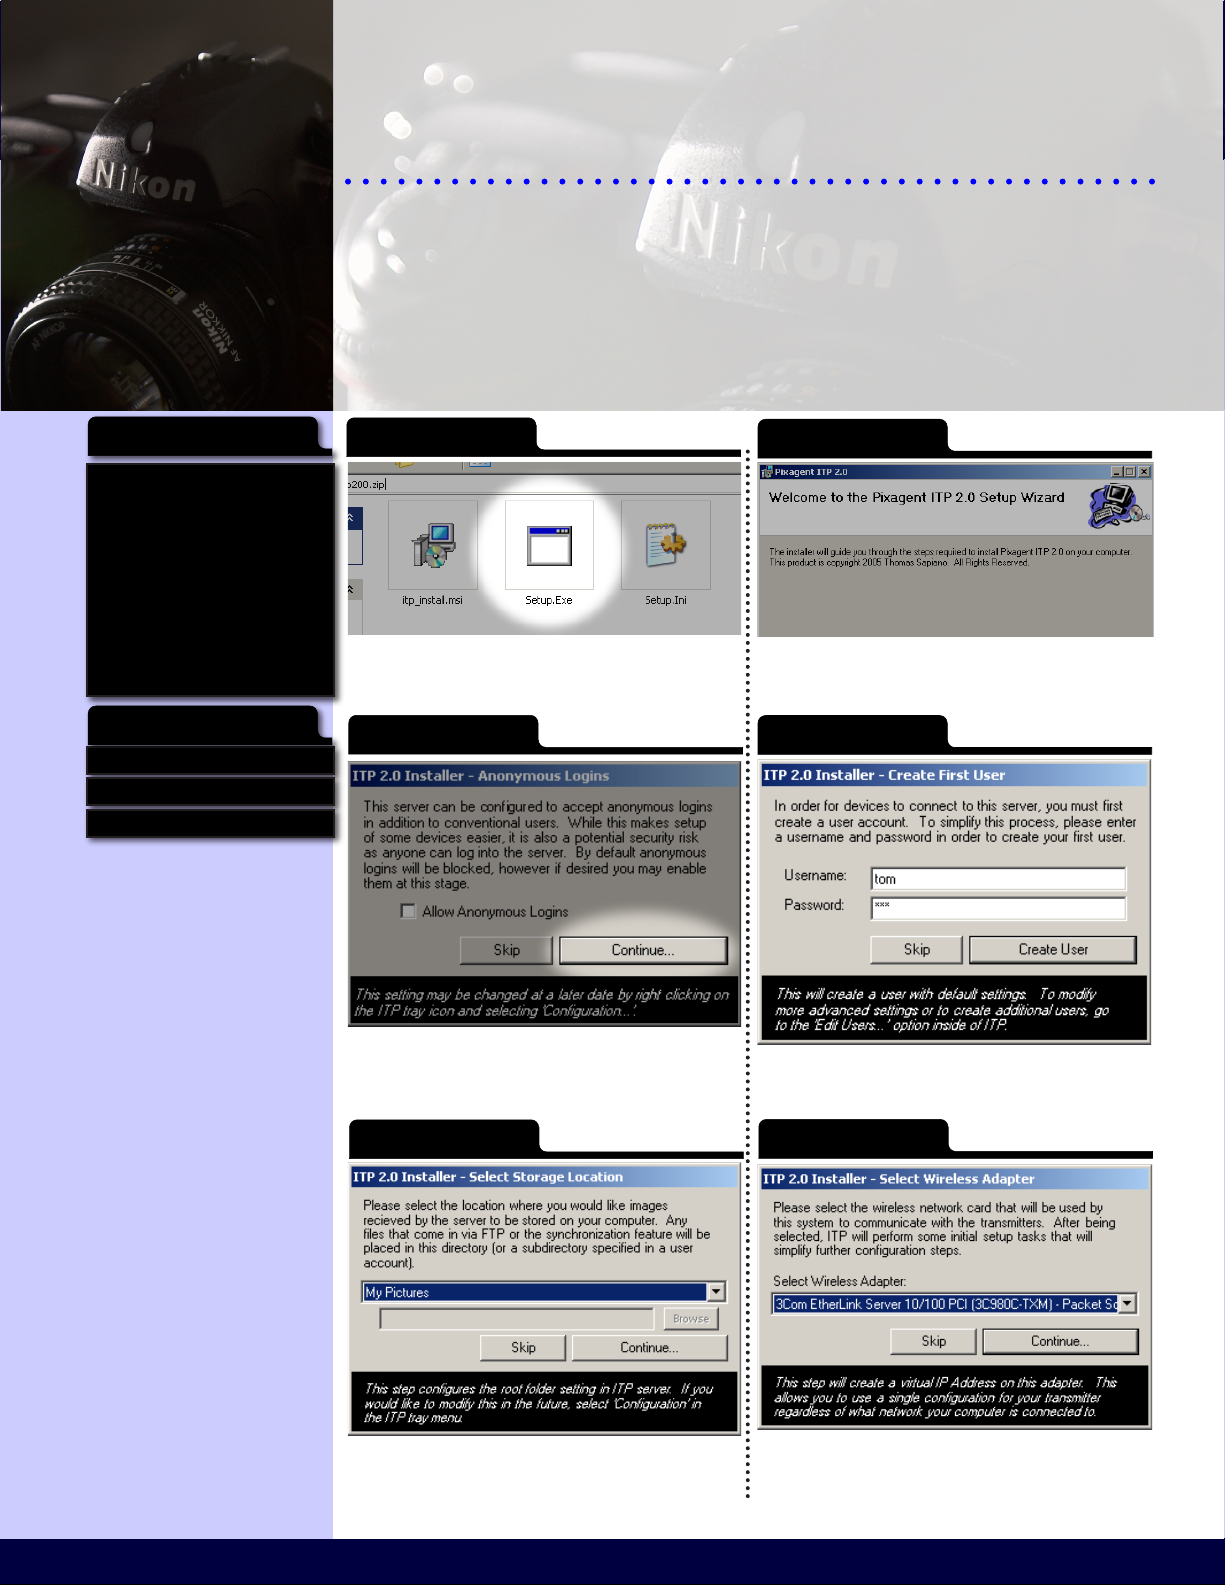
Step 1
After downloading ITP 2.0 from the Pixagent
website, open the compressed le and run ‘Setup.Exe’
to begin the install process.
Step 3
Step 2
Follow the directions in the installation wizard to
place the ITP 2.0 les on your computer.
Step 4
When prompted whether to allow anonymous
logins, leave the checkbox empty and click the
‘Continue...’ button to move on.
Step 5
Select the location where you would like ITP to
place the received image les on your computer.
Click the ‘Continue’ button when you are done.
When the ‘Create First User’ window pops up,
enter a new username and password pair and click
the Create User button.
Step 6
Select the network adapter that the wireless
transmitter will use to communicate with your
computer and click ‘Continue’.
2 3
Page 3
Wireless Setup Guide
Windows XP Service Pack 2 or Later
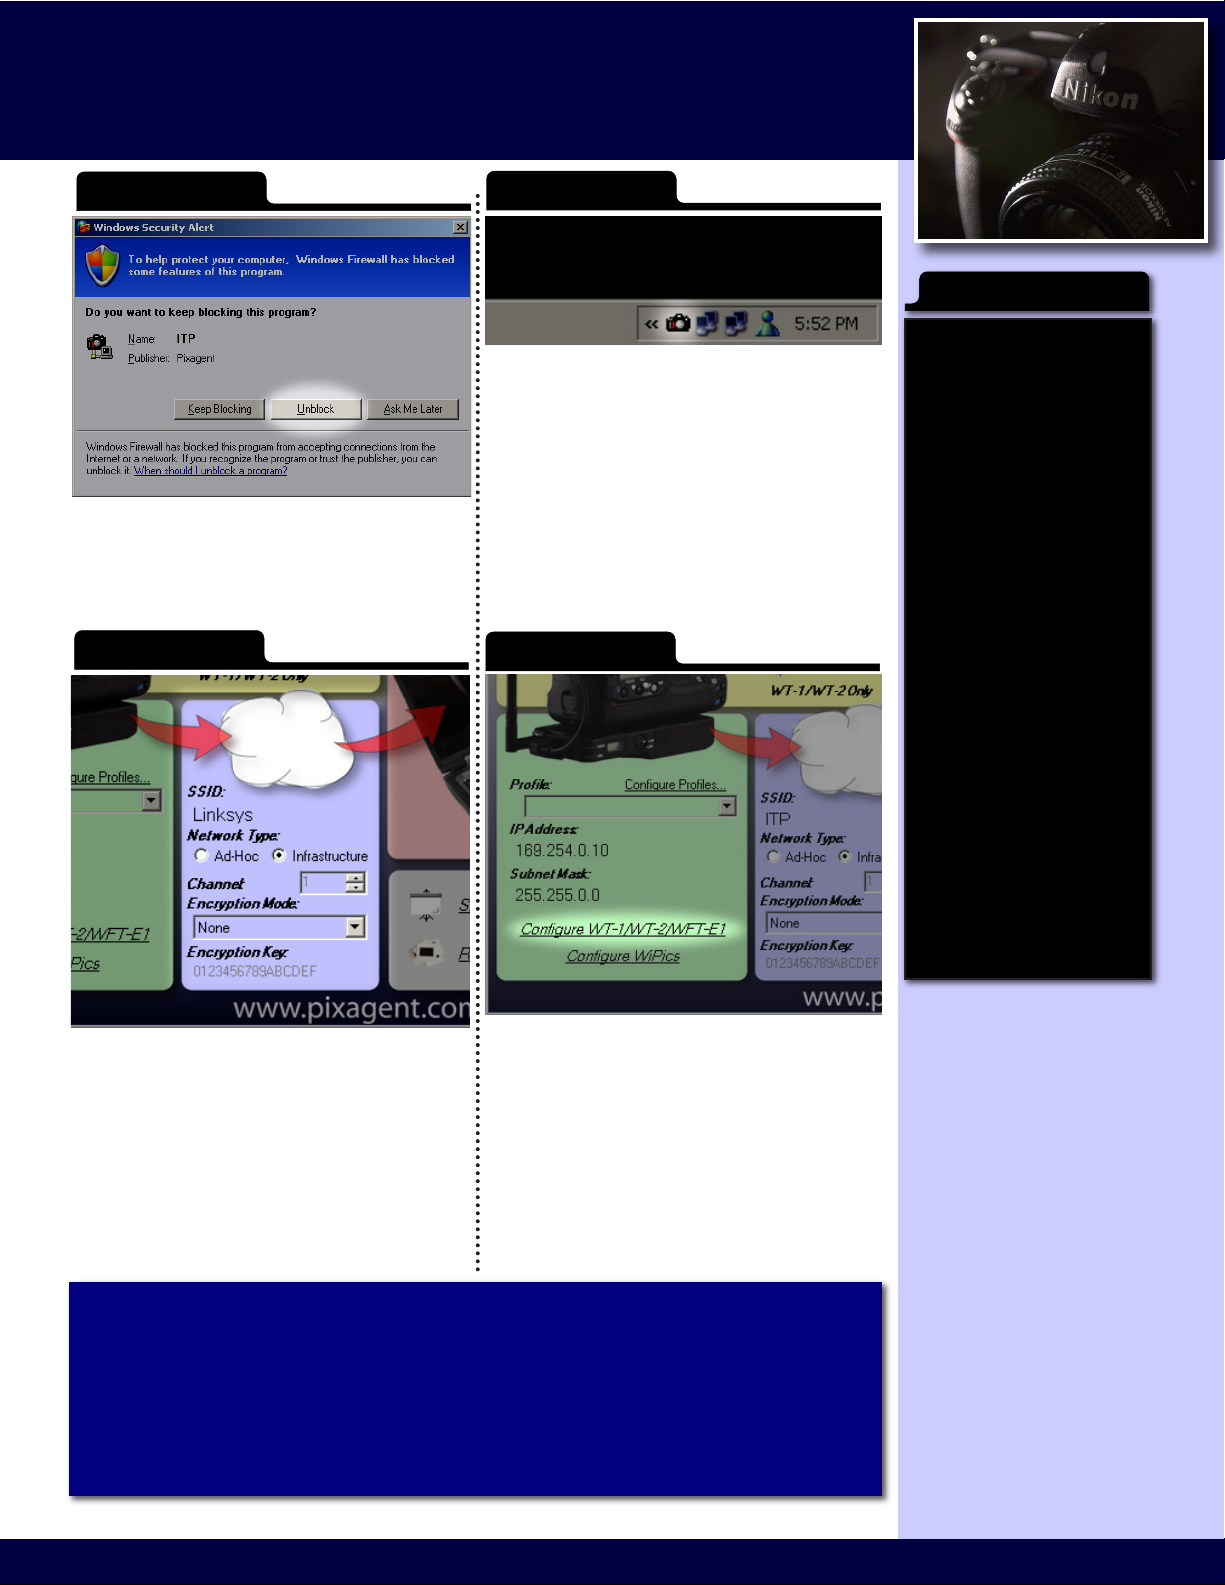
Step 7
If the Windows Firewall is enabled on your computer,
you will be prompted to continue blocking ITP. When
this dialog pops up, select the Unblock button to allow
ITP to receive connections from the camera. This is
necessary for proper operation of your system.
Step 9
Step 9
Step 8
Now that the installation process is complete, ITP
is now set up and opperational on your computer.
Your next task is to congure the camera so that it
knows how to communicate with your computer.
To begin this process, double click on the ITP tray
icon (shown above) in order to launch the Control
Centre interface.
Step 10
Firewalls
Firewalls are designed to protect
computers from outside threats.
One of the mechanisms used to
do this is to block any connection
that does not originate from the
computer/network. For normal
users this typically isn’t a problem
as the tasks they perform are
initiated by the user.
These image transmitters work
in a different manner, however.
When an image is ready to be
transmitted, the camera is the
one that initiates the connection.
As such, in their default configuration,
most rewalls will attempt to
prevent this action from taking
place. When that happens, the
camera will be unable to connect
to your computer.
If you are using rewall software
other than the one supplied
with Windows XP you may need
to perform additional steps. In
order for the camera to function
correctly, the rewall must be
congured to allow incoming
FTP trafc (TCP/IP port 21). The
way that you do this depends
on the rewall being used, so
please read the instructions
that came with it.
Once the Control Centre interface comes up,
enter the wireless settings that you are currently
using in the blue section. Please refer to the
settings used in your access point/router for the
correct values.
Once the specied settings have been selected,
click the Congure WT-1/WT-2/WFT-E1 link to
begin the process of conguring your camera.
Follow the provided directions to load these
settings onto a memory card.
Selecting your wireless network adapter.
During the installation process, you are prompted to select the network
adapter used for your transmitter. Whenever ITP is started, it will automatically
take steps to congure this adapter to operate with your transmitter. As such,
if you switch to using another adapter you should change your selection in the
‘Congure Adapter’ entry in the ITP tray menu to ensure that these features
continue to operate.
Page 4

Wireless Setup Guide
Windows XP Service Pack 2 or Later
Preferred Networks
Windows XP wireless networking
subsystem allows you to maintain
a list of preferred networks. This
list allows you to control the priority
of different access points that
you typically connect to. Once a
network has been added to this
list you can select it and move
it up and down with respect to
the other networks.
ITP User Accounts
In order to connect to an FTP server,
the camera must supply login
information to identify itself. The
installation process will create the
rst user for you, however if you
would like you can create more
users by clicking the Add User link
in the red section of the Control
Centre.
In addition to providing a basic
layer of security, user accounts
also allow you a greater degree
of control. For instance, the les
transmitted using each account
are saved in different locations.
This allows you to easily keep
images from different cameras
and/or shooters separate from
one another.
Step 11
Remove the CF card from your computer and insert
it into the camera with the WT-2 attached. Wait
for the green light to go out, then press the Menu
button. Navigate to the Set Up tab (the bottom tab)
and continue on to the next step...
Step 13
Once the Wireless LAN menu appears select the Wireless
LAN system entry and switch it to the OFF position.
Step 12
Select the Wireless LAN entry and press the
controller pad right to configure the WT-2
transmitter.
Step 14
Select the Load settings le entry and instruct the
camera to retrieve the settings from the card.
Step 15
Step 16
Complete
If e verythi ng has worked co rrectly, t he
transmitter will now be functional. If you haven’t
done so yet, take a picture to ensure that it is
transmitting correctly. If it is not working, please
see t h e troubl e s h ooting s e ction.
When the settings have been loaded, return to
the Wireless LAN menu. Return to the Wireless
LAN system entry and switch it back to ON.
4 5
Page 5

Wireless Setup Guide
Windows XP Service Pack 2 or Later
Wireless Network Settings
During step nine of the setup process, you were asked to enter the wireless
settings into the blue section of the control centre. In order for the WT-2 to
function properly, these values must be entered correctly and completely. If
you are unsure about any of these values, please read on for a quick summary
of the required information and how to obtain it.
SSID (Network Name)
The SSID (Service Set IDentier) is a unique
name that identies a wireless network. All
devices operating on your network use this
name to nd and connect to the correct access
point. It is important to note that this value
is case sensitive so make sure that you enter it
exactly as written.
If you are unsure of the name of your network,
simply right-click on your wireless network
adapter’s tray icon and select View Available
Wireless Networks. This will list all of the networks
in range, as well as tell you the name of the
network that your computer is currently
connected to.
Network Type
This eld selects the type of WiFi network that
you would like to connect to. Infrastructure
networks (the type covered in this guide) are
wireless networks based around dedicated
access points. Ad-Hoc networks are a simpler
form of wireless networking where devices can
communicate directly with one another.
Channel
Species the frequency at which the wireless
net wor k wil l ope rat e. W hen u sed wi th
Infr astr u cture n etwo rks, t he chan nel is
aut omati call y d eter mined s o this f i eld
ca nnot be modified in this mode.
Encryption Mode & Key
Wireless networks can optionally be congured
to encrypt data travelling over them to prevent
thi rd p a r ties from inte rcep ting p riva te
information. In order to use this, all devices on
the network must be congured with the same
encryption mode and key.
For instructions on configuring your network
to operate in this m ode, please se e t he
documentation that came with your wireless
access point/router.
Encryption
The Nikon WT-2/2A supports
both WEP and WPA encryption.
When enabled in both the camera
and the laptop, all transmitted
images will be encrypted to
prevent anyone from intercepting
them.
For simplicity sake, this guide
leaves this feature disabled. For
most people this encryption is
not necessary - however if you
are concerned about this you
can turn it on.
Page 6

Wireless Setup Guide
Troubleshooting
If the prole was not properly
loaded onto the card the
‘Load set tings file?’ entry will
be greyed out as shown in the
following screen capture:
Troubleshooting Guide
Windows XP Service Pack 2 or Later
The WT-2 is a complex device and problems may
arise when trying to set it up the rst time. This section is
designed to guide you through the process of identifying
those problems and rectifying them.
Step 1: Ensure settings have been loaded properly.
Sometimes the WT-2 will not properly load all of the
settings from the memory card. It can be very sensitive
to the manner in which you leave the menus after loading
the settings le. Please carefully repeat steps 12-15 in the
instructions in order to reload the settings.
If it is still not connecting properly, please check the
settings in the camera and compare them to the ones listed
in the instructions contained in this document.
If this happens, please replace
the Compactflash card back
into the computer. Return to
th e Contr ol Ce ntre and press
the Configure WT-1/WT-2/
WF T-E1 link to reload the
profile on the card.
Repeat steps 10 through 15,
taking special care to ensure
that the drive letter specified
in s tep 10 is correct. It is
advised that you verify your
selection in Windows Explorer
before going on.
If e ver yt hi ng was d on e
correctly this time, the entry
should be available and you
will be able to continue on.
Step 2: Use the Connection Wizard to isolate the problem.
The WT-2 offers a connection wizard to help simplify
the setup process. As you enter the settings into this
system, it will try them immediately. This allows you
to test each value and identify which setting is causing
the problem.
To initiate the connection wizard go to the top level of
the Wireless LAN menu in the camera, switch OFF the
Wireless LAN system and press the button. Open
the ITP Control Centre on your computer and use the
values provided there to configure the camera via this
interface.
Step 2A: Select the wireless network.
Once the connection wizard is started,
it will first show you a list of available
wireless networks. Select the appropriate
network and then press the Enter
button to move on to the next step. If
the selected network uses encryption,
you may be prompted for additional information.
6 7
Page 7

Wireless Setup Guide
Windows XP Service Pack 2 or Later
Step 2B: Enter network settings.
After the camera has connected to
the appropriate wireless network, the
next step is to specify the TCP/IP
properties. If the fields aren’t already
set, use the values specified in the
green section of the Control Centre.
Press the Enter button on the camera to commit the
settings. If you receive a TCP/IP Error message from the
camera, go back and verify that the values have been
entered correctly.
Step 2C: Specify the server address (your computer).
The next step in the wizard prompts
you to specify the server that you
would like the images transmitted to.
The IP Address value in the red section
of the Control Centre should be entered
at this stage. Press the enter button to
commit the selection and move on.
If the camera generates an Unable to Locate Server
error, then verify that you have entered the value correctly.
If that fails, go to the end of the address and press the
trashcan button several times to clear out any extra
whitespace characters (as the WT-2 is sensitive to this).
If the problem persists, verify that the correct adapter
is selected in the red section and try the other values
available in the IP Address dropdown.
Troubleshooting
If y ou a re h aving pr oblems,
th e three LEDs on the back of
th e WT-2 are th e bes t way to
di agnose th em. This le gen d
de scribes the va rious patterns
to help you troubleshoot the
so urce of the problem.
Transmitting
The WT-2 has successfully
connected to your computer,
and is currently transmitting
images.
Connected
The WT-2 has successfully
connected to your computer,
but is not currently transmitting
images.
Trying to Connect
The W T-2 is trying to connect
to the FTP ser ver but has not
been able to do so.
Step 2D: Provide login credentials.
Once the camera has successfully
connected to ITP, it needs a username
and password for authentication
purposes. If you have created a user
account, enter the username and
password here. If you have enabled
anonymous logins, simply check the appropriate box.
Press enter to test your settings and move on.
Connection Failure
The transmitter has run into
a problem that is preventing
the connection from being
formed.
Page 8

Connection Status
Connected
When the laptop has associated
with a network, this icon will be
shown beside its name in the
list of networks. This signals that
the computer is now ready to
communicate with other devices
using the same SSID.
Available
The laptop has detected the
presence of this network. It has
not associated with it, however it
is available to connect to.
Unavailable
This icon is displayed beside
networks that the laptop cannot
nd in the vicinity. You may be
out of range or the camera may
not be turned on.
Wireless Setup Guide
Windows XP Service Pack 2 or Later
Step 2E: Specify destination folder.
In this field you will generally want
to leave the Home folder box checked
and press Enter to move on. Use the
ITP interface to specify the destination
folder.
Step 3: Check software rewalls running on the laptop.
If you are running any software firewalls (other than the
Windows firewall) on your laptop, check the settings to
ensure that they are not blocking incoming FTP trac.
Each product works in a different way so detailed
directions are beyond the scope of this document.
Step 4: Verify you are connected to the network.
Return to the View
Available Wireless
Networks dialog
and make sure that you are connected to the network
that you created. If you are not connected, select the
network from the list and click the Connect button.
Step 5: Verify that ITP is running properly.
Right-click on the ITP icon (A)
in the system tray. If the Start
Server entry (B) is not greyed
out, select it. Try the WT-2
again to see if it is working.
If ITP is already running then
try to connect to 127.0.0.1 with
FTP client software. If you are
unable to connect then double
check your settings in ITP and
any firewall software you are
running.
8 9
Page 9

Wireless Setup Guide
Windows XP Service Pack 2 or Later
Still having problems...
If the above troubleshooters still have not resolved your problems, please feel free to contact us at support@pixagent.com.
Some problems need more complex debugging steps that will
require personal attention. You can also visit us at:
http://www.pixagent.com
ITP Registration
If you have not already done
so, please register your copy
of ITP 2 .0 so that we c an
no tify you of any fut ure
updates to the soft ware.
Our registration data is not
shared with any outside parties
and will only be used as you
specify on the registration
form.
This information helps us
keep our customers up to
date on any improvements
made in our products. If you
wish, you may also be placed on
the list of potential beta-testers
for u pcom ing versions of our
software.
Page 10

www.pixagent.com
© Copyright 2006 Thomas Sapiano. All rights reserved. This document is protected by Canadian copyright law and may not be
reproduced without the explicit consent of its author. IP networking can be a complex topic and no single setup will work in all situations.
These directions assume a standard conguration and may not function under all circumstances. As such, this document is provided on an
as-is basis without warranty - by using this document the reader accepts all responsibility for their actions. The author does not accept any
responsibility for problems that may occur while following these directions.
 Loading...