


Refer to the manual for use with your camera.
Communication Unit UT-1
D4-Series, D7000
D7100
D800, D800E
Other cameras
User's Manual (supplied with
the UT-1)
Communication Unit UT-1
Manual for Users of D7100
Digital Cameras
Communication Unit UT-1
Manual for Users of D800/
D800E Digital Cameras
Communication Unit UT-1
User's Manual Version 2
Communication Unit
User’s Manual
En
Communication Unit
Manual for Users
of D7100 Digital Cameras
En
What the UT-1 Can Do for You
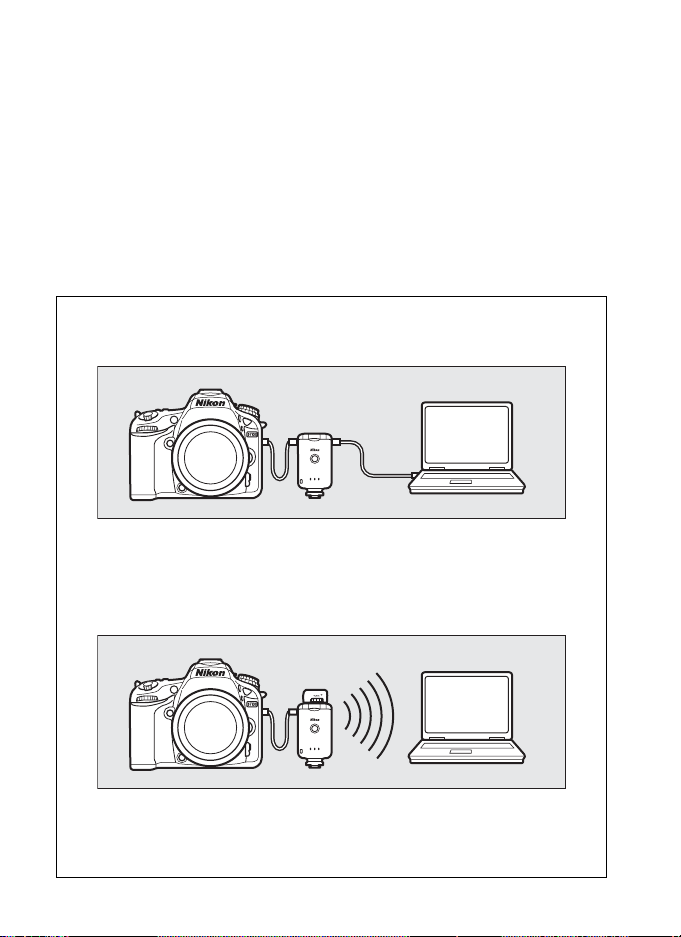
This manual describes how to connect to a network and upload
What the UT-1 Can Do for You
pictures to a computer or ftp server or control the camera
remotely using Camera Control Pro 2. Use the UT-1 to connect to
Ethernet networks, or connect to wireless networks by attaching a
WT-5 to the UT-1.
Before connecting the UT-1 to the D7100, update the UT-1 firmware to
version 1.1 or later. For more information, visit the websites listed on
page xii.
Connecting to a Network
Ethernet Networks
For information on connecting to a computer, see page 17.
For information on connecting to an ftp server, see page 45.
Wireless Networks
Connect to wireless networks using a WT-5 wireless transmitter (0 6).
For information on connecting to a computer, see page 17.
For information on connecting to an ftp server, see page 45.
ii
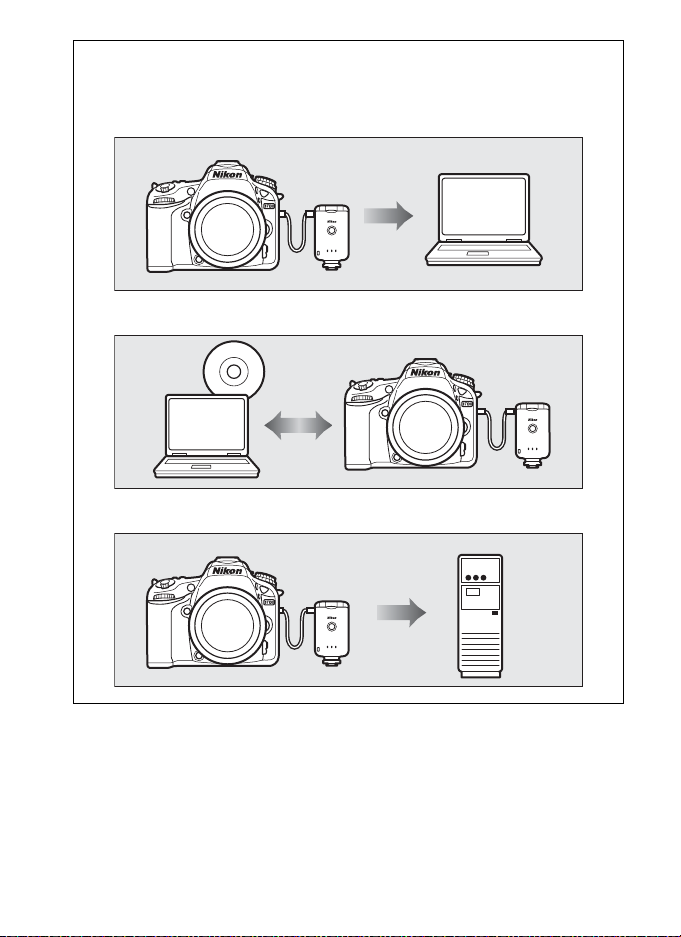
Network Connections
Once a network connection has been established, you can:
Upload existing pictures to a computer (034)
Control the camera remotely using Camera Control Pro 2 (0 41)
Upload pictures to an ftp server (045)
What the UT-1 Can Do for You
iii

Trademark Information
Mac OS is a trademark of Apple Computer, Inc. Microsoft, Windows, and
Windows Vista are registered trademarks of Microsoft Corporation. All
other trade names mentioned in this manual or the other documentation
What the UT-1 Can Do for You
provided with this Nikon product are trademarks or registered trademarks
of their respective holders.
Apple Public Source License
This product includes Apple mDNS source code that is subject to the
terms of the Apple Public Source License located at URL
http://developer.apple.com/opensource/.
Copyright © 2012 Apple Computer, Inc. All Rights Reserved.
This file contains Original Code and/or Modifications of Original Code as
defined in and that are subject to the Apple Public Source License Version
2.0 (the ‘License’). You may not use this file except in compliance with the
License. Please obtain a copy of the License at
http://www.opensource.apple.com/license/apsl/ and read it before
using this file.
The Original Code and all software distributed under the License are
distributed on an ‘AS IS’ basis, WITHOUT WARRANTY OF ANY KIND, EITHER
EXPRESS OR IMPLIED, AND APPLE HEREBY DISCLAIMS ALL SUCH
WARRANTIES, INCLUDING WITHOUT LIMITATION, ANY WARRANTIES OF
MERCHANTABILITY, FITNESS FOR A PARTICULAR PURPOSE, QUIET
ENJOYMENT OR NON-INFRINGEMENT. Please see the License for the
specific language governing rights and limitations under the License.
iv
For Your Safety
To prevent damage to your Nikon product or injury to yourself or to
others, read the following safety precautions in their entirety before using
this equipment. Keep these safety instructions where all those who use
the product will read them.
The consequences that could result from failure to observe the
precautions listed in this section are indicated by the following symbol:
This icon marks warnings, information that should be read before
using this Nikon product to prevent possible injury.
❏ WARNINGS
Do not disassemble
Failure to observe this precaution could result in fire, electric shock, or other
injury. Should the product break open as the result of a fall or other accident,
disconnect the camera power source and take the product to a Nikonauthorized service representative for inspection.
Cut power immediately in the event of malfunction
Should you notice smoke or an unusual smell coming from the equipment,
immediately unplug the AC adapter and remove the battery, taking care to
avoid burns. Continued operation could result in injury. After removing the
battery, take the equipment to a Nikon-authorized service representative for
inspection.
Do not use in the presence of flammable gas
Failure to observe this precaution could result in explosion or fire.
Keep dry
Do not immerse in or expose to water or rain. Failure to observe this
precaution could result in fire or electric shock.
Do not handle with wet hands
Failure to observe this precaution could result in electric shock.
Do not handle the power cable or go near the charger during thunderstorms
Failure to observe this precaution could result in electric shock.
Keep out of reach of children
Failure to observe this precaution could result in injury.
For Your Safety
v

Avoid extended contact
Do not remain in contact with the camera, communication unit, battery, or
charger for extended periods while the products are on or in use. Parts of the
product become hot; leaving the product in direct contact with the skin for
For Your Safety
extended periods may result in low-temperature burns.
Observe proper precautions when handling batteries
Batteries may leak or explode if improperly handled. Observe the following
precautions when handling batteries for use in this product:
• Be sure the product is off before replacing the battery. If you are using an AC
adapter, be sure it is unplugged.
• Use only batteries approved for use in this equipment.
• Do not attempt to insert the battery upside down or backwards.
• Do not short or disassemble the battery.
• Do not expose the battery to flame or to excessive heat.
• Do not immerse in or expose to water.
• Replace the terminal cover when transporting the battery. Do not transport
or store with metal objects such as necklaces or hairpins.
• Batteries are prone to leakage when fully discharged. To avoid damage to
the product, be sure to remove the battery when no charge remains.
• When the battery is not in use, attach the terminal cover and store in a cool
place.
• Immediately after use, or when the product is used on battery power for an
extended period, the battery may become hot. Before removing the battery,
turn the product off and allow the battery to cool.
• Discontinue use immediately should you notice any changes in the battery,
such as discoloration or deformation.
Do not expose to high temperatures
Do not leave the device in a closed vehicle under the sun or in other areas
subject to extremely high temperatures. Failure to observe this precaution
could result in fire or in damage to the casing or internal parts.
CD-ROMs
The CD-ROMs on which the software and manuals are distributed should not
be played back on audio CD equipment. Playing CD-ROMs on an audio CD
player could cause hearing loss or damage the equipment.
Follow the instructions of hospital and airline personnel
This product emits radio frequency radiation that could interfere with medical
or navigational equipment. Turn the product off during takeoff and landing
and when so directed by airline or hospital staff.
vi

Notices
• No part of the manuals included with this product may be reproduced,
transmitted, transcribed, stored in a retrieval system, or translated into
any language in any form, by any means, without Nikon’s prior written
permission.
• Nikon reserves the right to change the specifications of the hardware
and software described in these manuals at any time and without prior
notice.
• Nikon will not be held liable for any damages resulting from the use of
this product.
• While every effort has been made to ensure that the information in
these manuals is accurate and complete, we would appreciate it were
you to bring any errors or omissions to the attention of the Nikon
representative in your area (address provided separately).
This product, which contains encryption software developed in the
United States, is controlled by the United States Export Administration
Regulations and may not be exported or re-exported to any country to
which the United States embargoes goods. The following countries are
currently subject to embargo: Cuba, Iran, North Korea, Sudan, and Syria.
CAUTION
RISK OF EXPLOSION IF BATTERY IS REPLACED BY AN INCORRECT TYPE.
DISPOSE OF USED BATTERIES ACCORDING TO THE INSTRUCTIONS.
Notices
vii

Notice for Customers in the U.S.A.
❏ U.S.A. Federal Communications Commission (FCC)
Declaration of Conformity
Notices
FCC Radio Frequency Interference Statement
This equipment has been tested and
found to comply with the limits for a
Class B digital device, pursuant to Part
15 of the FCC rules. These limits are
designed to provide reasonable
protection against harmful interference in a residential installation. This
equipment generates, uses, and can radiate radio frequency energy and, if not
installed and used in accordance with the instructions, may cause harmful
interference to radio communications. However, there is no guarantee that
interference will not occur in a particular installation. If this equipment does
cause harmful interference to radio or television reception, which can be
determined by turning the equipment off and on, the user is encouraged to
try to correct the interference by one or more of the following measures:
• Reorient or relocate the receiving antenna.
• Increase the separation between the equipment and receiver.
• Connect the equipment into an outlet on a circuit different from that to
which the receiver is connected.
• Consult the dealer or an experienced radio/television technician for help.
CAUTIONS
Modifications
The FCC requires the user to be notified that any changes or modifications
made to this device that are not expressly approved by Nikon Corporation
may void the user’s authority to operate the equipment.
Interface Cables
Use the interface cables sold or provided by Nikon for your equipment. Using
other interface cables may exceed the limits of Class B Part 15 of the FCC rules.
Notice for Customers in the State of California, U.S.A.
WARNING : Handling the cord on this product will expose you to lead, a chemical
known to the State of California to cause birth defects or other reproductive
harm. Wash hands after handling.
Nikon Inc.,
1300 Walt Whitman Road, Melville, New York
11747-3064, U.S.A. Tel.: 631-547-4200
viii

Notices for Customers in Canada
CAUTION : This class B digital apparatus complies with Canadian ICES-003.
ATTENTION : Cet appareil numerique de la classe B est conforme a la norme
NMB-003 du Canada.
Notices for Customers in Europe
❏ Symbol for Separate Collection in European
Countries
This symbol indicates that electrical and electronic equipment is to be
collected separately.
The following apply only to users in European countries:
• This product is designated for separate collection at an
appropriate collection point. Do not dispose of as household
waste.
• Separate collection and recycling helps conserve natural resources
and prevent negative consequences for human health and the environment
that might result from incorrect disposal.
• For more information, contact the retailer or the local authorities in charge of
waste management.
Notice for Customers in Thailand
This telecommunication equipment conforms to NTC technical requirements.
Notices
ix

Table of Contents
What the UT-1 Can Do for You ................................................................................. ii
For Your Safety ............................................................................................................... v
Notices ............................................................................................................................ vii
Introduction........................................................................1
Parts of the UT-1............................................................................................................2
Attaching the UT-1 ....................................................................................................... 4
Connecting the WT-5 ....................................................................................................................6
Supported Modes ......................................................................................................... 7
Workflow..........................................................................................................................9
Using the UT-1 with a Computer .................................... 17
Copying Network Profiles to the Camera...........................................................18
Uploading Pictures to a Host Computer.............................................................31
Connecting the UT-1 ..................................................................................................................31
Uploading Images ........................................................................................................................34
Camera Control............................................................................................................39
Connecting to the Computer................................................................................................39
Controlling the Camera.............................................................................................................41
Uploading Pictures to an ftp Server............................... 45
Copying Network Profiles to the Camera...........................................................46
Connecting to the ftp Server ..................................................................................58
Uploading Images ......................................................................................................61
x

Menu Guide...................................................................... 67
Choose Hardware.......................................................................................................68
Network Settings........................................................................................................ 68
Choosing a Network Profile.................................................................................................... 68
Deleting Network Profiles........................................................................................................ 69
Editing ftp Server Profiles......................................................................................................... 69
Options........................................................................................................................... 73
Auto Send.......................................................................................................................................... 73
Delete After Send? ....................................................................................................................... 73
Send File As.......................................................................................................................................73
Overwrite If Same Name ..........................................................................................................74
Protect If Marked for Upload.................................................................................................. 74
Send Folder....................................................................................................................................... 74
Deselect All?..................................................................................................................................... 74
Battery Info........................................................................................................................................ 75
Auto Power off Delay.................................................................................................................. 75
MAC Address.................................................................................................................................... 75
Firmware Version........................................................................................................................... 75
Appendices ...................................................................... 77
Creating an FTP Server .............................................................................................77
Windows 8/Windows 7.............................................................................................................78
Windows Vista................................................................................................................................. 85
Windows XP ..................................................................................................................................... 92
Mac OS X 10.6.................................................................................................................................. 96
Creating ftp Profiles Using Camera Menus ....................................................... 98
Troubleshooting.......................................................................................................101
Specifications.............................................................................................................102
Index .............................................................................................................................105
xi

A Background Knowledge
This manual assumes basic knowledge of ftp servers and local area
networks (LANs). For more information on installing, configuring, and
using devices in a network, contact the manufacturer or network
administrator.
A Illustrations
Save where otherwise noted, all software and operating system dialogs,
messages, and displays are taken from Windows 8 Pro or Mac OS X. Their
actual appearance and content may vary with the operating system used.
For information on basic computer operations, see the documentation
provided with the computer or operating system.
A Life-Long Learning
As part of Nikon’s “Life-Long Learning” commitment to ongoing product
support and education, continually-updated information is available online at the following sites:
• For users in the U.S.A.: http://www.nikonusa.com/
• For users in Europe and Africa: http://www.europe-nikon.com/support/
• For users in Asia, Oceania, and the Middle East: http://www.nikon-asia.com/
Visit these sites to keep up-to-date with the latest product information,
tips, answers to frequently-asked questions (FAQs), and general advice on
digital imaging and photography. Additional information may be
available from the Nikon representative in your area. See the following
URL for contact information: http://imaging.nikon.com/
xii

Introduction
Thank you for your purchase of a UT-1 communication unit for
compatible Nikon digital cameras. This manual is intended for
users of D7100 digital cameras; please read it thoroughly and keep
it where all those who use the product can read it.
The following symbols and conventions are used throughout this
manual:
This icon marks cautions, information that should be read before
D
use to prevent damage to the product.
This icon marks notes, information that should be read before
A
using the device.
This icon marks references to other pages in this manual.
0
Introduction 1
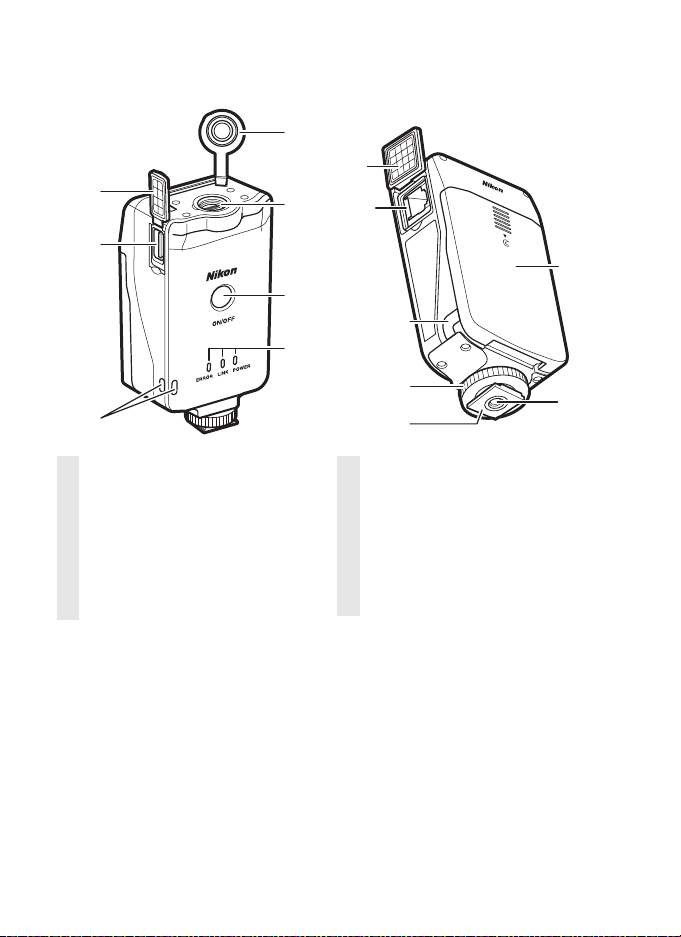
Parts of the UT-1
Parts of the UT-1
7
6
5
1 Peripheral connector cover
2 Peripheral connector
3 Power switch ................... 33, 40, 60
4 Status LEDs ............................... 3, 37
POWER (green/yellow),
LINK (green), ERROR (orange)
5 Eyelet for strap
6 USB connector.................. 4, 31, 58
1
8
2
3
4
9
10
11
12
7 USB connector cover ......4, 31, 58
8 Ethernet connector cover
9 Ethernet connector
10 Power connector cover............. 11
11 Locking screw
12 Feet
13 Tripod socket
14 Battery-chamber cover............. 10
14
13
2
Introduction

A The POWER LED
When the UT-1 is on, the POWER LED glows green to indicate that the
battery is fully charged or that an AC adapter is connected. At battery
levels below 10%, it will flash green to warn that the battery requires
charging. When the UT-1 is turned off, the POWER LED briefly turns yellow
as the product powers down.
A Supplied Accessories
The following accessories are supplied with the UT-1 (batteries such as the
EN-EL15 and the battery chargers such as the MH-25 are not supplied):
❏ User’s Manual (this manual)
❏ Warranty
❏ CD
❏ Case
❏ Communication unit USB cable A
(for use with D4 and D7000
cameras)
In addition, the following accessories are supplied when the UT-1 is
purchased as a set with the WT-5:
❏ WT-5 wireless transmitter
❏ WT-5 User’s Manual
❏ Communication unit USB cable B
(for use with D800 and D800E
cameras)
❏ UF3-RU14 USB cable gasket (for
use with D4, D800, and D800E
cameras)
❏ UF-3 USB cable connector cover
(for use with D800 and D800E
cameras)
❏ Going Wireless with a D4 Digital
SLR Camera and WT-5 Wireless
Transmitter
Parts of the UT-1
Introduction
3
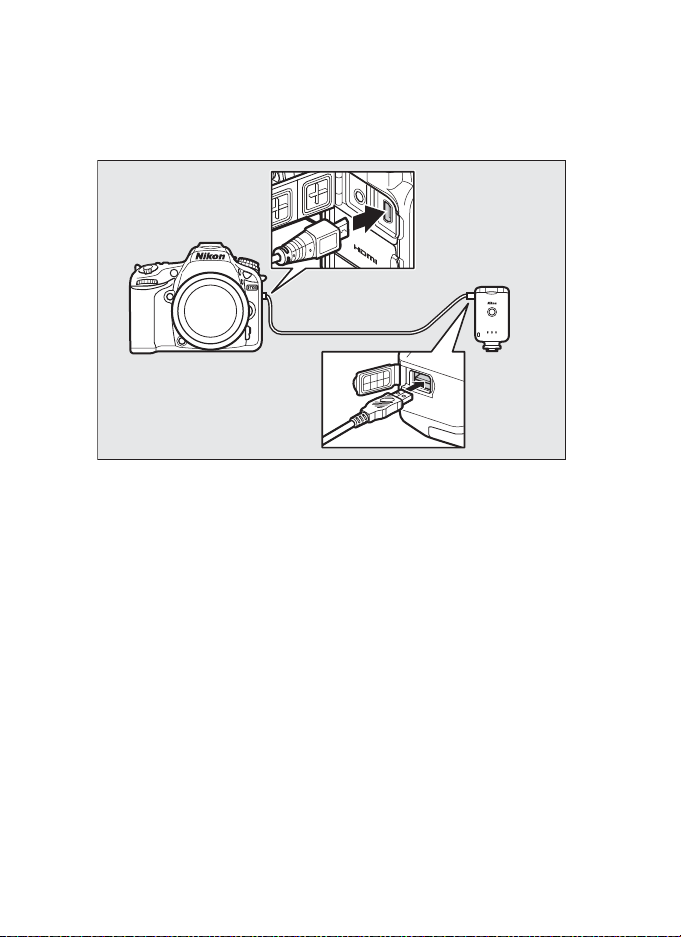
Attaching the UT-1
Connect the UT-1 to the D7100 using the UC-E6 cable supplied
Attaching the UT-1
with the camera.
4
Introduction
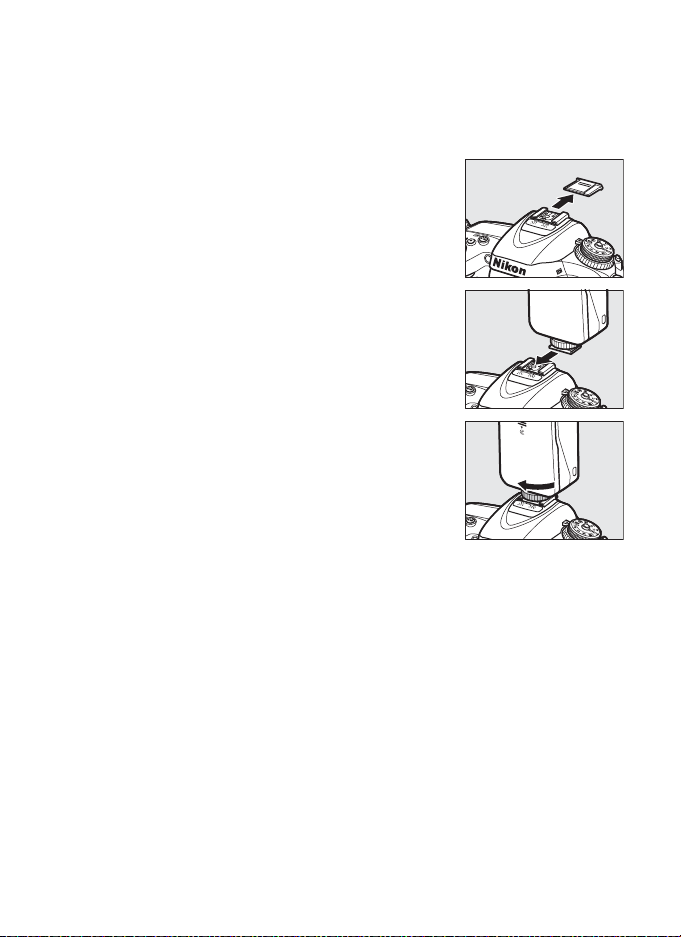
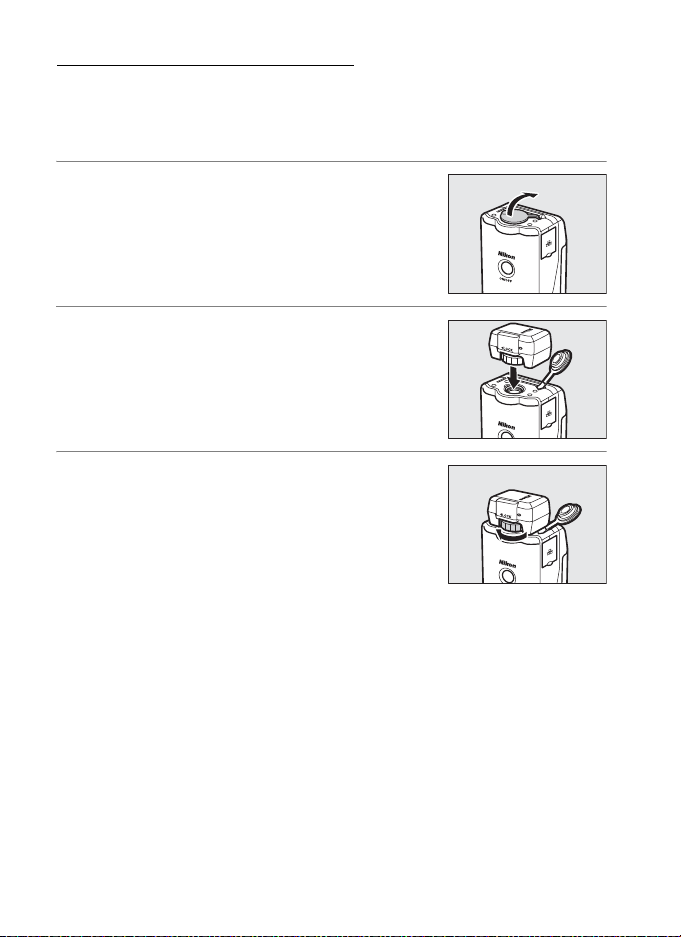
A Attaching the UT-1
The UT-1 can be mounted on a tripod or the camera accessory shoe. To
mount the UT-1 on the camera when a flash unit or other accessory is
mounted on the accessory shoe, use an optional SK-7 bracket.
To mount the UT-1 on the camera accessory shoe:
1 Remove the accessory shoe cover.
2 Slide the UT-1 onto the accessory shoe.
3 Tighten the locking screw.
Attaching the UT-1
Introduction
5
Connecting the WT-5
The UT-1 can be used in combination with the optional WT-5
wireless transmitter to connect to wireless LANs. The WT-5
Attaching the UT-1 / Connecting the WT-5
connects as described below.
1 Open the UT-1 peripheral connector
cover.
2 Fully insert the WT-5 connector into the
UT-1 peripheral connector.
3 Rotate the locking wheel to lock the WT-5
in place.
A MAC Address Filtering
If the network uses MAC address filtering and the UT-1 is connected to a
WT-5, the filter must be supplied with the MAC address of the WT-5. After
connecting the WT-5, choose Network > Options > MAC address (075)
from the camera setup menu and note the wireless and Ethernet MAC
addresses.
Introduction6

Supported Modes
The UT-1 connects the camera to Ethernet and, with the addition
of an optional WT-5 wireless transmitter, wireless networks.
Photographs on the camera can then be transmitted to a
computer ftp server and the camera controlled remotely from a
computer. The UT-1 supports the following functions:
FTP upload (045)
Image transfer (031)
Camera control (039)
Before data can be transferred over a wireless or Ethernet network,
the camera must be supplied with a network profile providing
information on the host computer or ftp server.
Upload new photographs or existing photographs
and movies to host.
Control camera from computer using optional
Camera Control Pro 2 software.
Supported Modes
Introduction
7

A FTP Servers
Servers can be configured using standard ftp services available with
supported operating systems, such as IIS (Internet Information Services).
Connection to computers on other networks via a router, Internet ftp
Supported Modes
connections and ftp servers running third-party software are not
supported.
A Ethernet Connection
No adjustments to wireless LAN settings are required when the camera is
connected to a LAN by an Ethernet cable.
A Routers
Connection to computers on other networks via a router is not supported.
A Firewall Settings
The UT-1 uses TCP ports 21 and 32768 through 61000 for ftp and TCP port
15740 and UDP port 5353 when connecting to a computer. Computer
firewalls must be configured to allow access to these ports, as otherwise
the computer may not be able to access the UT-1.
8
Introduction

Workflow
When using the UT-1 for the first time, follow the steps below to
set up the UT-1, install the required software and upload pictures
to the computer.
1 Set up the UT-1 and install software.
1-1 Preparing the UT-1 (010)
1-2 Installing the Wireless Transmitter Utility (012)
2 Upload pictures.
Uploading Pictures to a Host Computer (017).
2-1 Copying Network Profiles to the Camera
2-2 Connecting the UT-1
2-3 Uploading Images
Uploading Pictures to an ftp Server (045).
2-1 Copying Network Profiles to the Camera
2-2 Connecting to the ftp Server
2-3 Uploading Images
Workflow
Introduction
9
Preparing the UT-1
❏ Inserting the Battery
Workflow
To prevent loss of power during setup or upload, use a fullycharged battery or an optional AC adapter. The UT-1 takes one
EN-EL15 rechargeable Li-ion battery; other batteries can not be
used.
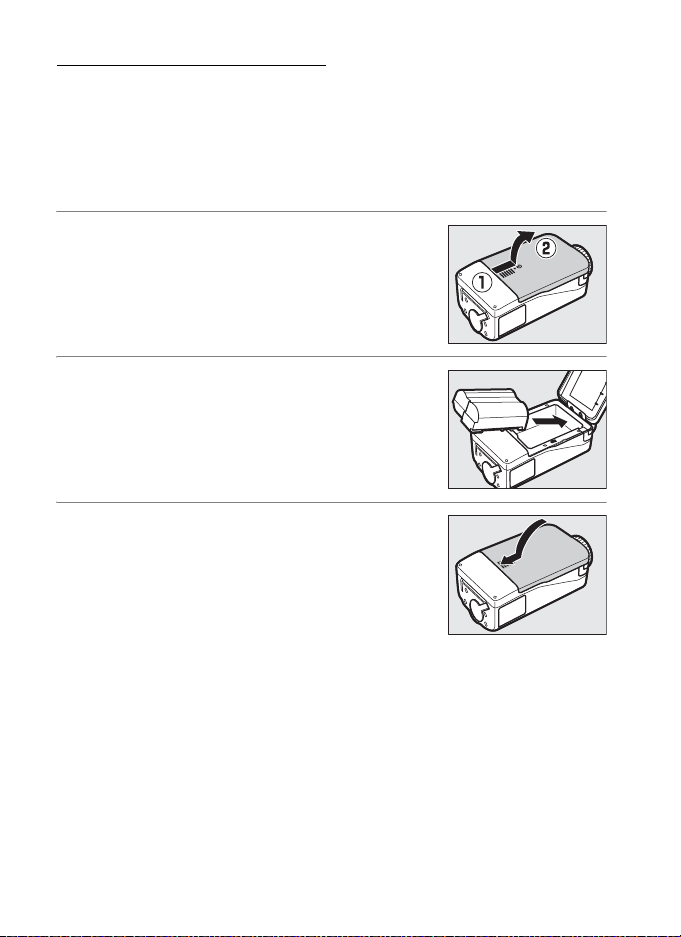
1 Slide (q) and open (w) the battery-
chamber cover.
2 Insert the battery in the orientation
shown. For safety precautions and
information on charging the battery, see
the battery and charger manuals.
3 Close the battery-chamber cover.
10
Introduction
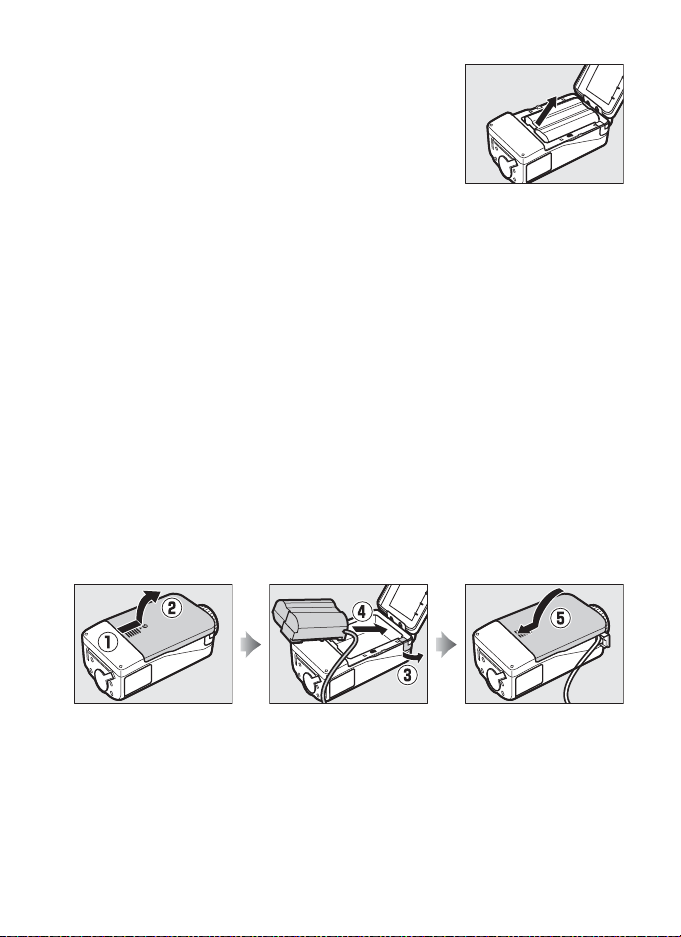
A Removing the Battery
Being careful not to drop the battery, open the
battery-chamber cover and remove the battery as
shown at right.
A Stand-By Mode
When disconnected from the camera, the UT-1 will turn off automatically
after the delay chosen for Option > Auto power off delay in the Network
menu (075), reducing the drain on the battery.
A Battery Level
The level of the battery inserted in the UT-1 can be determined by
connecting the UT-1 to the camera (031, 58) and checking the battery
level using the Battery info option (075) in the camera setup menu.
A Using an AC Adapter
An optional EP-5B power connector and EH-5b or EH-5/EH-5a AC adapter
can also be used to power the camera when the UT-1 is connected. Insert
the power connector as shown below.
Open the UT-1 battery-chamber (qw) and power connector (e) covers
and then insert the EP-5B power connector in the orientation shown (r).
Position the power connector so that it passes through the power
connector slot (t) and close the battery-chamber cover.
Workflow
Introduction
11

Installing the Wireless Transmitter
Utility
Workflow
This section describes how to install the Wireless Transmitter
Utility. The Wireless Transmitter Utility is used to copy network
profiles to the camera and is required when configuring the
camera for connection to a computer in image transfer and
camera control modes (either the Wireless Transmitter Utility or
the camera menus can be used for connection to ftp servers in ftp
upload mode; see page 98 for information on using the camera
menus for ftp).
Follow the steps below to install the Wireless Transmitter Utility
under Windows 8, Windows 7, Windows Vista, Windows XP, or Mac
OS X.
❏ System Requirements
Before using the UT-1, WT-5, or the Wireless Transmitter Utility,
confirm that your system meets the following requirements:
Nikon D4, D800, D800E, D7100, and D7000 digital
single-lens reflex cameras. For information on whether
OS
1
more recent models support the UT-1, see the camera
manual.
One EN-EL15 rechargeable Li-ion battery or EP-5B
power connector and EH-5b AC adapter (available
separately)
Pre-installed versions of Windows 8 (64- and 32-bit
versions), Windows 7 (Service Pack 1, 64- and 32-bit
versions), Windows Vista (Service Pack 2, 64- and 32-bit
2
versions), Windows XP (Service Pack 3, 32-bit version
only), or Mac OS X version 10.6, 10.7, or 10.8 (Intel CPUs
only).
Camera
Power source
12
Introduction

• Wireless: WT-5 wireless transmitter and wireless LAN
access point or computer with built-in or external
Network
wireless LAN adapter (IEEE 802.11n, 802.11b, 802.11g,
or 802.11a compliant).
• Ethernet: Ethernet cable and computer with built-in or
external Ethernet port (100 base-TX or 10 base-T)
• Wireless Transmitter Utility: required to copy computer
profiles to camera.
Miscellaneous
• USB: the supplied USB cable and a computer with built-
in USB port are required when copying network
profiles to camera.
1. Be sure to update to the latest versions of the UT-1 firmware and supplied
software. Users of the D7100 will need to update the UT-1 firmware to
version 1.1 or later and the Wireless Transmitter Utility to version 1.4.0 or
later.
2. For the latest information on supported operating systems, see the Nikon
website for your area (0xii).
3. Not required for connection to ftp servers.
4. Connect the camera directly to the computer. The camera may not function
as expected when connected via a hub, extension cable, or keyboard.
3
4
Workflow
Introduction
13
❏ Installing Software
Before connecting to a network, install the Wireless Transmitter
Utility. The Wireless Transmitter Utility can be used to create
Workflow
network profiles.
Before installing the software, confirm that your computer meets
the system requirements on page 12. Be sure to update to the
latest versions of the Wireless Transmitter Utility and camera and
UT-1 firmware. Users of the D7100 will need to update the UT-1
firmware to version 1.1 or later and the Wireless Transmitter Utility
to version 1.4.0 or later.
1 Double-click the installer icon.
Using the supplied CD, download the Wireless
Transmitter Utility from a Nikon website. When
download is complete, double-click the installer
icon.
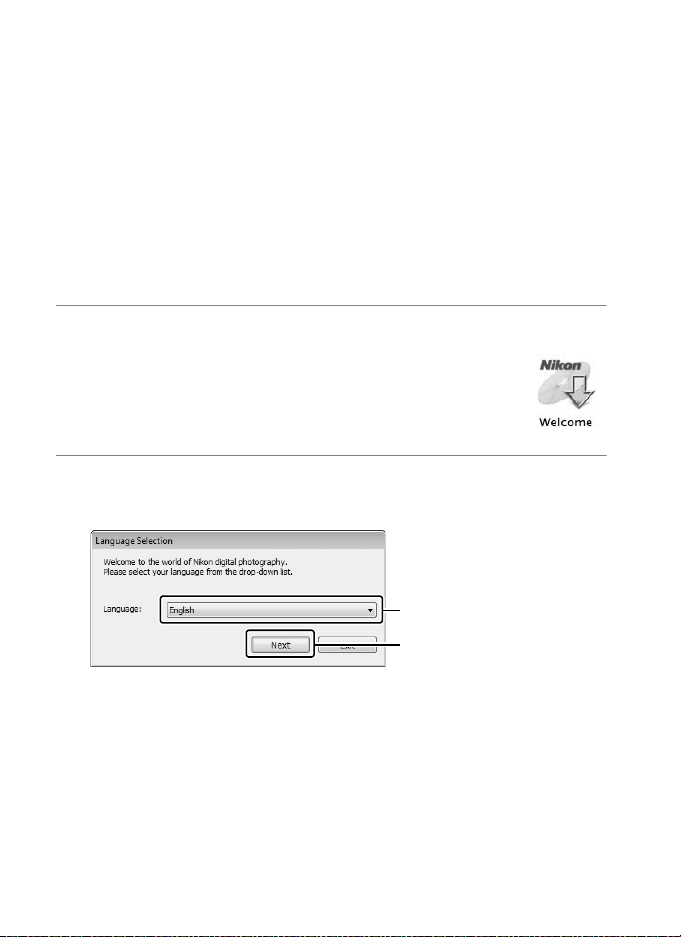
2 Select a language (Windows only).
Select a language and click Next.
q Select language
14
Introduction
w Click Next
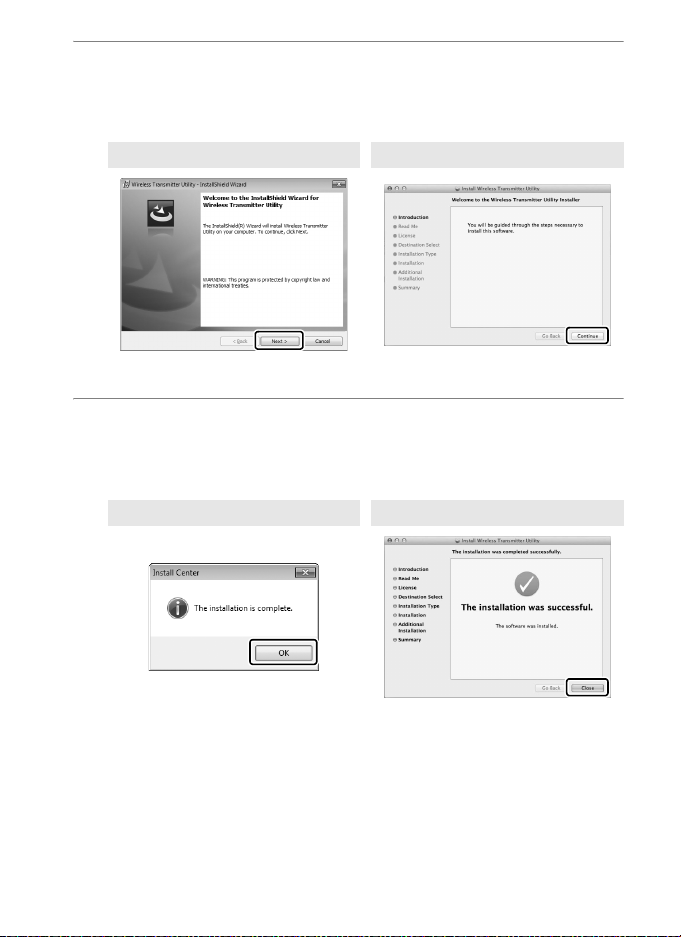
3 Start the installer.
Click Next (Windows) or Continue (Mac OS) and follow the
on-screen instructions.
Windows Mac OS
Click Next Click Continue
4 Exit the installer.
Click OK (Windows) or Close (Mac OS) when installation is
complete.
Windows Mac OS
Workflow
Click OK Click Close
A The WT-4 Setup Utility
The Wireless Transmitter Utility must be reinstalled if the WT-4 Setup
Utility or other Nikon software for wireless networks is installed after
installation is complete.
Introduction
15

Workflow
16
Introduction

Using the UT-1 with a Computer
The UT-1 can be used in the following modes:
• Image transfer: Upload images to a computer.
• Camera control: Control the camera from a computer using
Camera Control Pro 2 (available separately).
The workflow for each of these modes is shown below.
1 Copying Network Profiles to the Camera (018).
2 Upload pictures.
Uploading Pictures to a Host Computer (031–38).
2-1 Connecting the UT-1
2-2 Uploading Images
Camera Control (039–43).
2-1 Connecting to the Computer
2-2 Controlling the Camera
D Before Connecting
Complete network settings on the computer before connecting.
Using the UT-1 with a Computer 17