

Page 1
Slide Feeder
使用説明書
Reference Manual
Referenzhandbuch
Manuel de l'utilisateur
Manual de referencia
Handleiding
Manuale di riferimento
Jp
En
De
Fr
Es
Ck
Ch
Nl
It
Page 2

スライドフィーダ SF-210
目 次
安全上のご注意 ....................................................................................................................... 3
1.はじめに.............................................................................................................................. 4
2.各部の名称と付属品........................................................................................................... 5
3.SF-210 の取り付け.......................................................................................................... 6
4.SF-210 の使用方法.......................................................................................................... 8
5.メンテナンス ................................................................................................................... 16
6.主な仕様........................................................................................................................... 17
Jp
Page 3

・ この使用説明書の一部または全部を無断で転載することは、固くお断りいたします。
・ 仕様・性能は予告なく変更することがありますので、ご承知ください。
・ 本製品のご使用により、フィルムに損傷を与えた場合の補償はご容赦ください。
・ この使用説明書の誤りなどについての補償はご容赦ください。
・ この使用説明書では、次のマークを使用しています。
本機の故障を防ぐために、使用前に注意していただきたいことや守っていただき
たいことを記載しています。
本機をご使用になる前に知っておいていただきたいことを記載しています。
商標説明
・ Macintosh、MacOS は、米国およびその他の国で登録された米国 AppleComputer,Inc. の商標です。
・ Microsoft および Windows は米国 MicrosoftCorporation の米国およびその他の国における登録商標です。
・ その他の会社名、製品名は各社の商標、登録商標です。
スキャナの表記について
この使用説明書では、SUPER COOLSCAN 5000 ED および SUPER COOLSCAN 4000 ED を、スキャナまたはスキャナ本体
と表記している場合があります。
使用しているイラストについて
この使用説明書では、SUPERCOOLSCAN5000ED のイラストを使用して説明しています。
Jp-2
Page 4

安全上のご注意
ご使用の前に「安全上のご注意」をよくお読みの上、正しくお使いください。
この「安全上のご注意」は製品を安全に正しく使用していただき、あなたや他の人々への
危害や財産への損害を未然に防止するために、重要な内容を記載しています。
お読みになった後は、お使いになる方がいつでも見られるところに必ず保管してください。
表示と意味は次のようになっています。
警告
注意
お守りいただく内容の種類を、次の絵表示で区分し、説明しています。
この表示を無視して、誤った取り扱いをすると、人が死亡または重傷を負う可能性
が想定される内容を示しています。
この表示を無視して、誤った取り扱いをすると、人が傷害を負う可能性が想定され
る内容および物的損害の発生が想定される内容を示しています。
絵表示の例
記号は、注意(警告を含む)を促す内容を告げるものです。図の中や近くに具体的
な注意内容(左図の場合は感電注意)が描かれています。
記号は、禁止(してはいけないこと)の行為を告げるものです。図の中や近くに具
体的な禁止内容(左図の場合は分解禁止)が描かれています。
記号は、行為を強制すること(必ずすること)を告げるものです。図の中や近くに
具体的な強制内容(左図の場合はプラグをコンセントから抜く)が描かれています。
分解禁止
接触禁止
すぐに
修理依頼を
水かけ禁止
電源プラグ
を抜く
すぐに
修理依頼を
警告
分解したり修理・改造をしないこと
感電したり、異常動作をしてケガの原
因となります。
落下などによって破損し、内部が露出し
たときは、露出部に手を触れないこと
感電したり、破損部でケガをする原因
となります。
スキャナの電源を抜いて、販売店また
はスキャナの使用説明書裏面に記載さ
れているニコンサービスセンターに修
理を依頼してください。
水につけたり水をかけたり、雨にぬら
したりしないこと
発火したり感電の原因となります。
熱くなる、煙が出る、こげ臭いなどの
異常時は速やかにスキャナ本体の電源
スイッチを切り、スキャナ本体の電源
プラグをコンセントから抜くこと
そのまま使用すると火災、やけど、感
電の原因となります。
販売店またはスキャナの使用説明書裏
面に記載されているニコンサービスセ
ンターに修理を依頼してください。
禁止
保管注意
保管注意
感電注意
設置場所
注意
引火・爆発のおそれのある場所では使
用しないこと
プロパンガス、ガソリンなどの引火性
ガスや粉塵の発生する場所で使用する
と、爆発や火災の原因となります。
幼児の口に入る小さな付属品は、幼児
の手の届かないところに置くこと
幼児の飲み込みの原因となります。
万一飲み込んだ場合は直ちに医師にご
相談ください。
注意
製品は幼児の手の届かないところに置
くこと
ケガの原因になることがあります。
ぬれた手でさわらないこと
感電の原因になることがあります。
本機器を不安定な場所に置かないこと
倒れたり落下してケガの原因となるこ
とがあります。
3-Jp
Page 5

1.はじめに
このたびは、ニコンフィルムスキャナ SUPERCOOLSCAN 5000 ED および SUPER
COOLSCAN 4000 ED 用スライドフィーダ SF-210 をお買い上げいただき、ありがと
うございます。SF-210 は約 50 枚の 35mm スライドマウント(マウント厚約 1.5mm
の場合)をセットして、連続してスキャンすることができます。また他のアダプタと同様に、
スキャナ本体の電源を入れたまま取り付け/取りはずしができます。
この使用説明書は各部の名称やセットアップ、スキャナ本体への取り付け方法について
説明しています。次章「各部の名称と付属品」では同梱物と SF-210 各部の名称につい
て説明しています。また「SF-210 取り付け」ではスキャナ本体への取り付け方法が、
「SF-210 の使用方法」ではスライドマウントのセットアップや取り出しについて、最終
章の「メンテナンス」ではお手入れ方法や輸送時のご注意について説明しています。この
使用説明書を最後までお読みいただき、十分ご理解のうえ正しくご使用ください。
スキャン手順については、スキャナ本体に付属の使用説明書または NikonScan リファ
レンスマニュアルをご覧ください。
Jp-4
Page 6
2.各部の名称と付属品
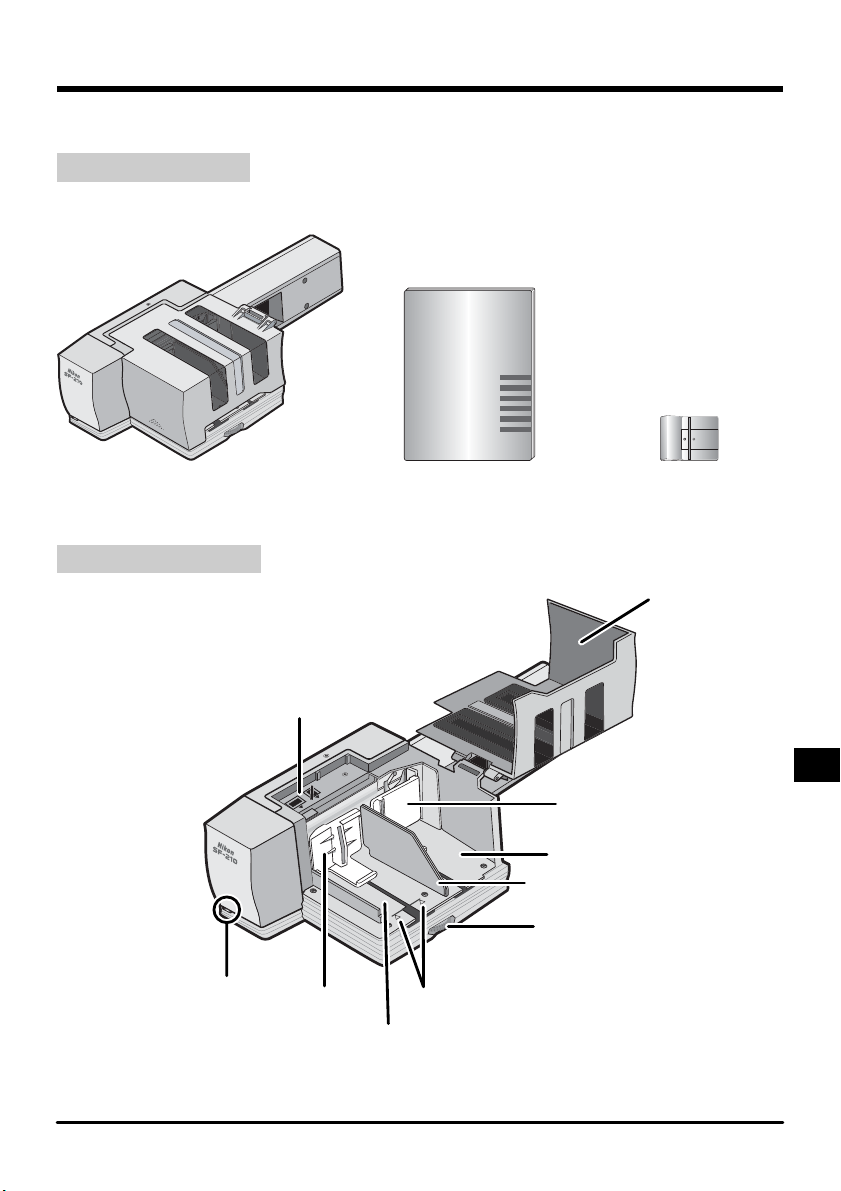
同梱の付属品と、SF-210 各部の名称について説明します。
2.1同梱物
お買い上げいただいた SF-210 には次のものが同梱されています。
SF-210
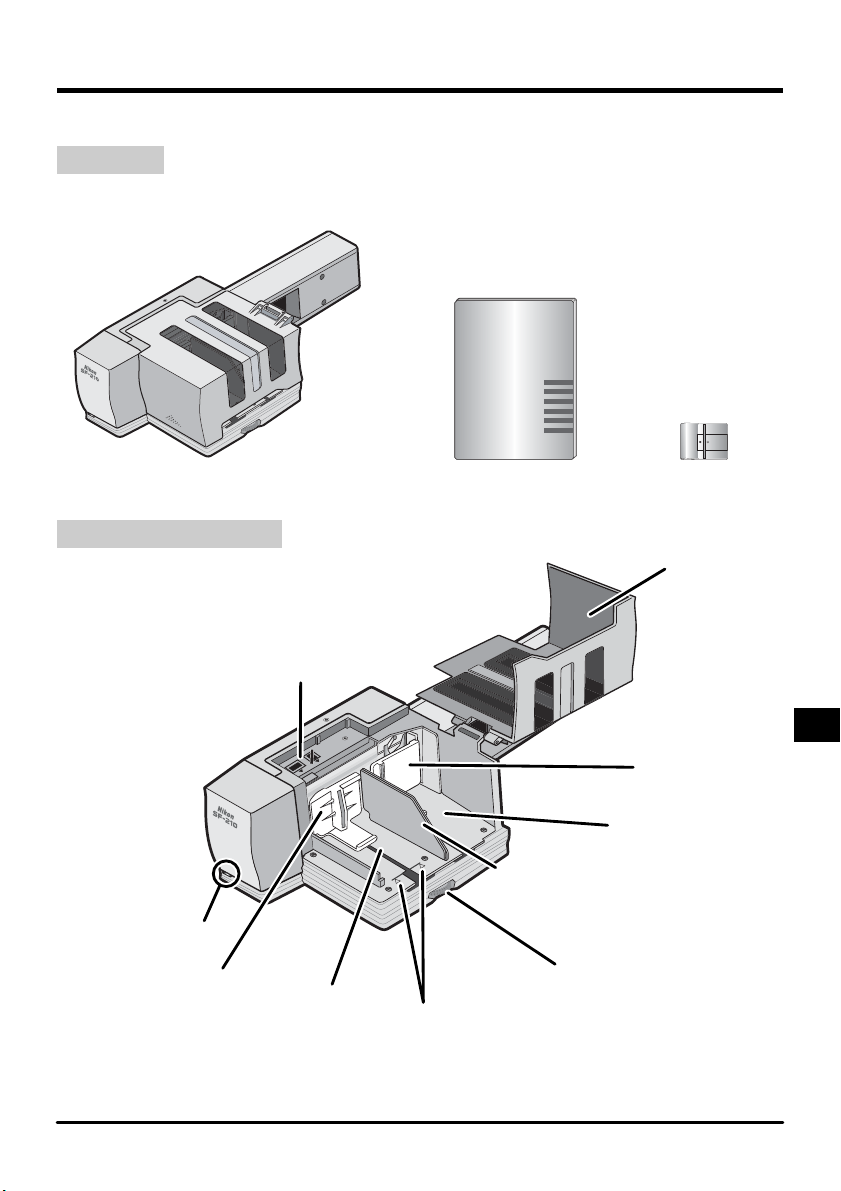
2.2SF-210 各部の名称
スライド挿入
表示 LED
挿入側スライド
押さえ板
方向表示
挿入側マガジン
使用説明書(本書)スライドフィーダ SF-210
FD 調整板
フィルム制限指標
アタッチメント
マガジンカバー
排出側スライド
押さえ板
排出側マガジン
調整ダイアル
5-Jp
Page 7
3.SF-210 の取り付け
SF-210 を取り付ける前に、スキャナ本体が適切な場所に設置されているか、ご確認くだ
さい。詳しくはスキャナ本体の使用説明書をご覧ください。
スライドフィーダ SF-210 は以下の環境でご使用ください。
・温度:+ 10℃〜+ 35℃
・急激な温度変化や結露がないこと
・湿度:20 〜 60%以下
・直射日光や反射光の影響のないこと
・振動や衝撃のないこと
・ほこりの多い場所でないこと
・電磁ノイズや磁気の影響がないこと
・加湿器などのある場所でないこと
・喫煙する場所でないこと
上記以外の環境で使用すると、故障や火災の原因となる場合があります。
注意
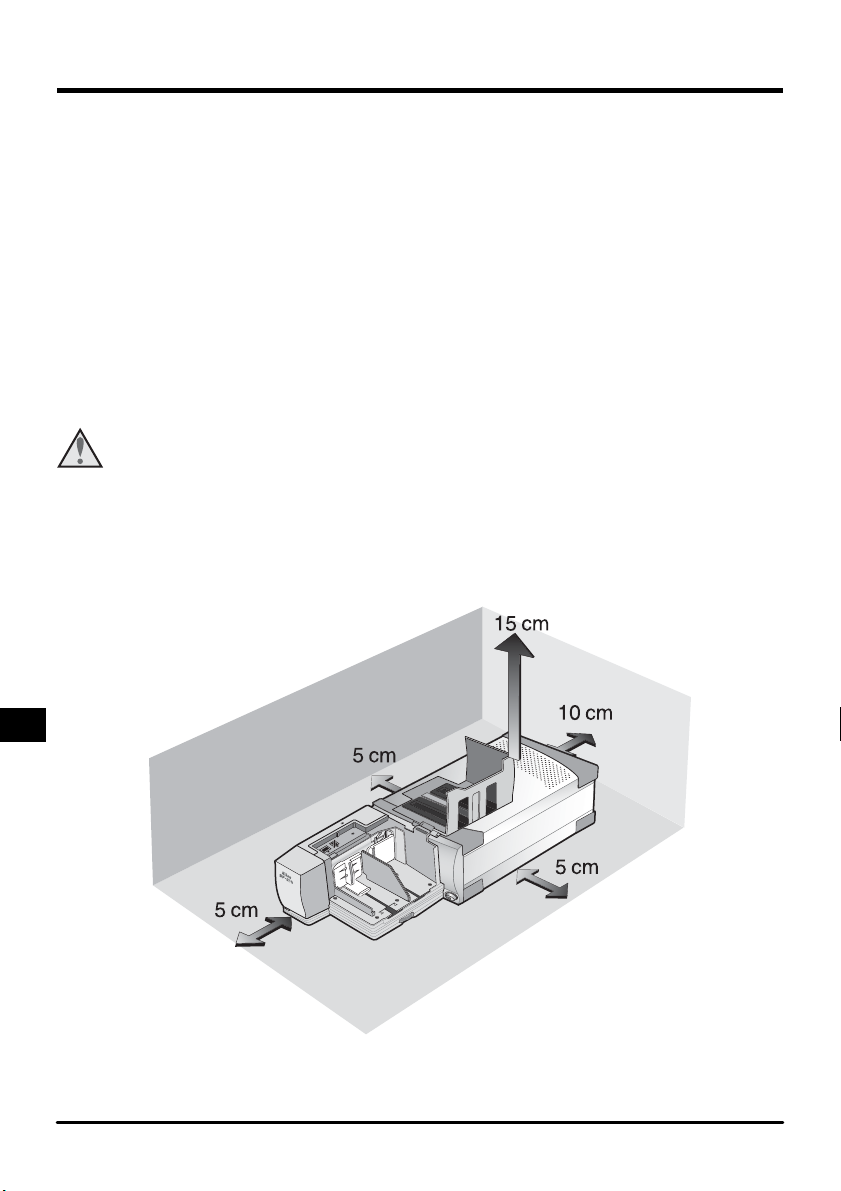
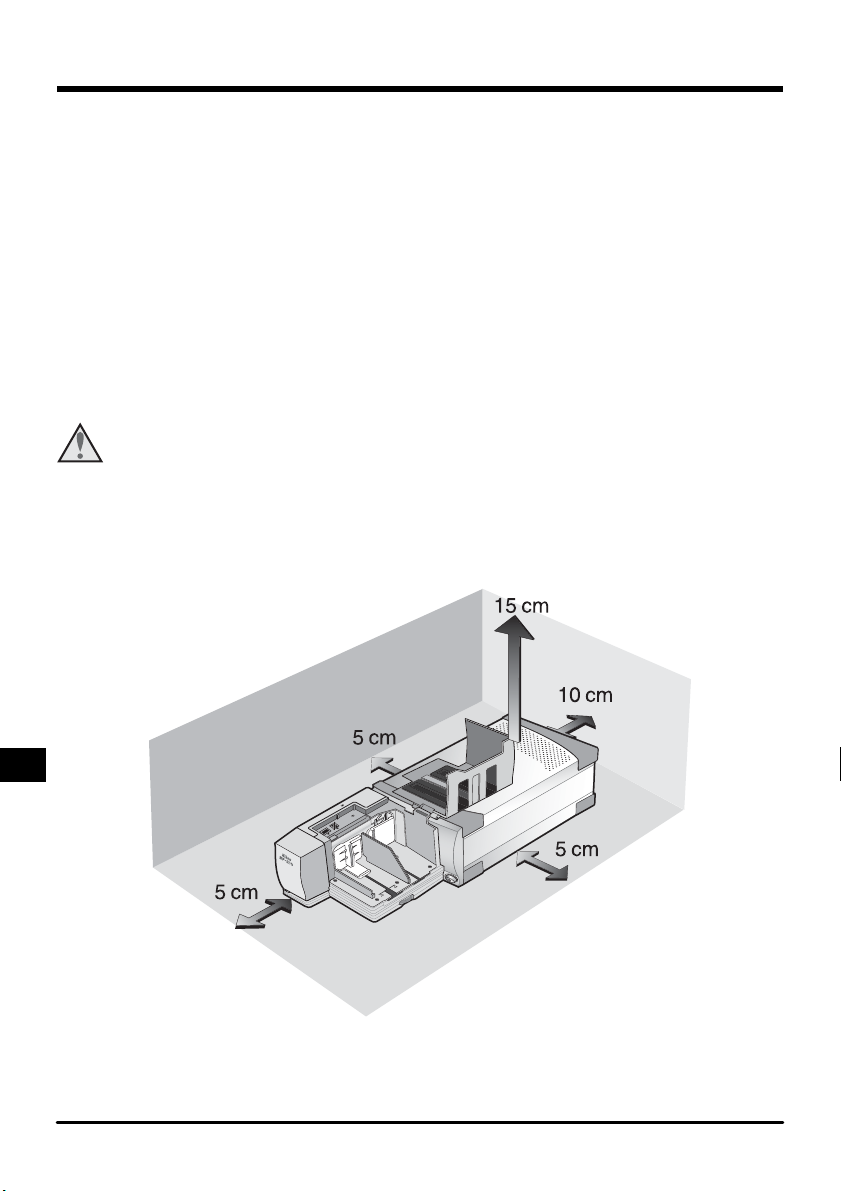
SF-210 を使用する場合は下図のように、スキャナの周囲に充分なスペースを確保してく
ださい。スキャナ最上部から 15cm 以上、スキャナ背面から 10cm 以上、アダプタ最前
部とスキャナの左右側面からそれぞれ 5cm 以上確保してください。
Jp-6
Page 8
SF-210 はスキャナ電源のオン/オフにかかわらずスキャナ本体に取り付けられます。ま
た、スキャナ本体がパソコンに接続されていてもかまいません。取り付ける場合は、スキャ
ナの L ED 表示が点滅していないことをご確認ください。点滅している場合は、点滅が終
了し、点灯に変わってから取り付けてください。
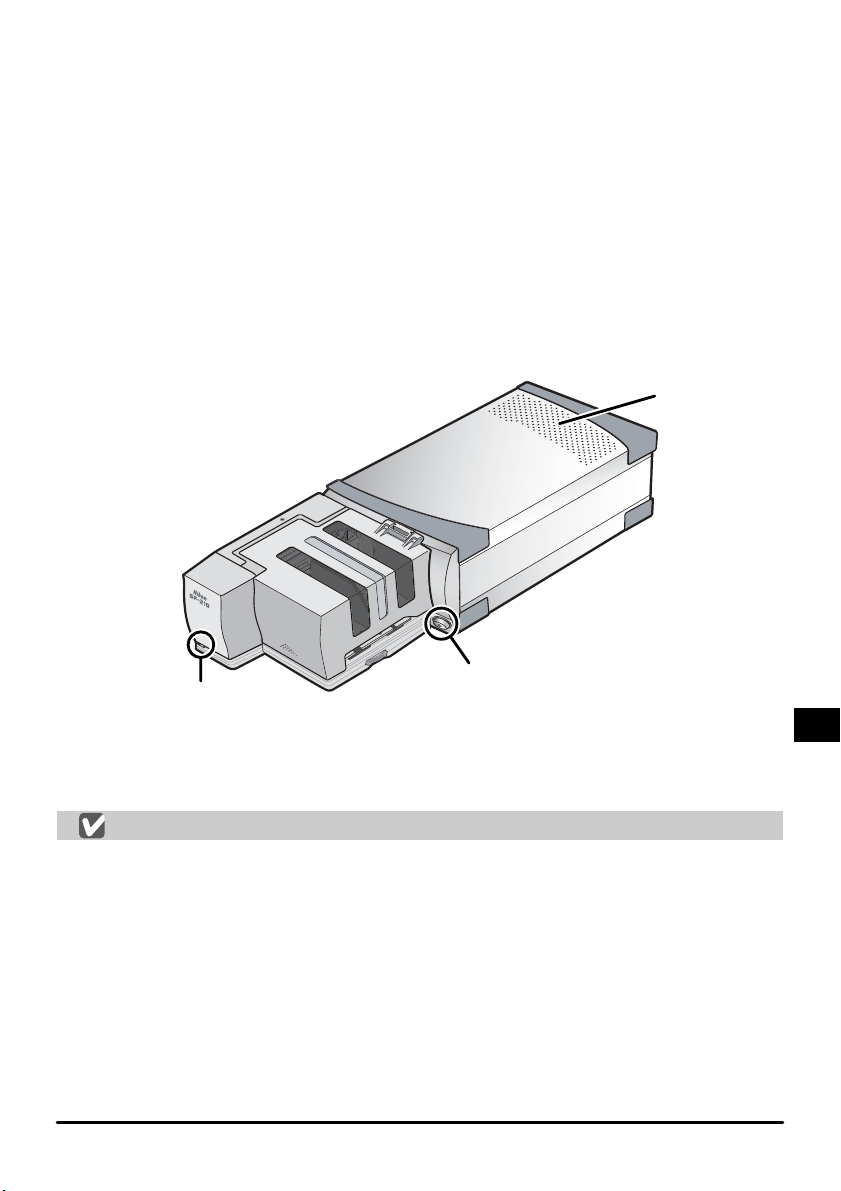
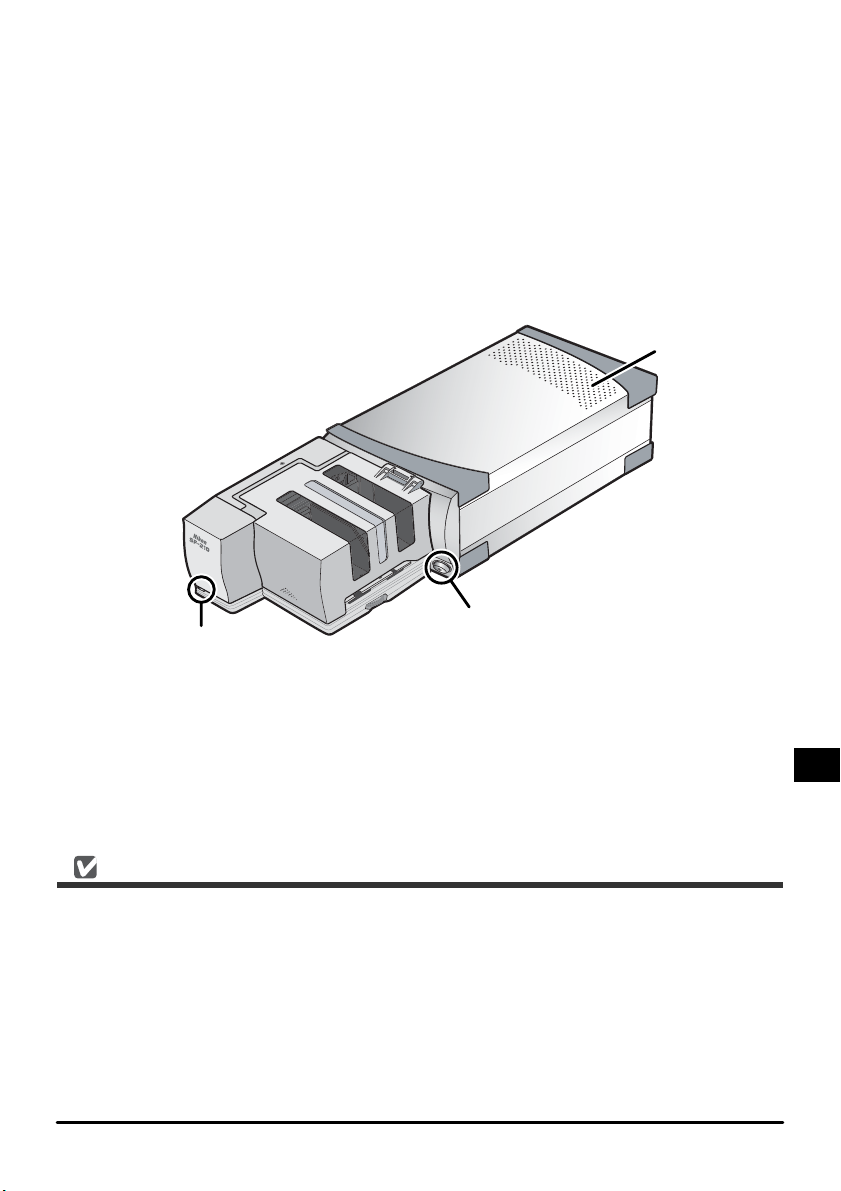
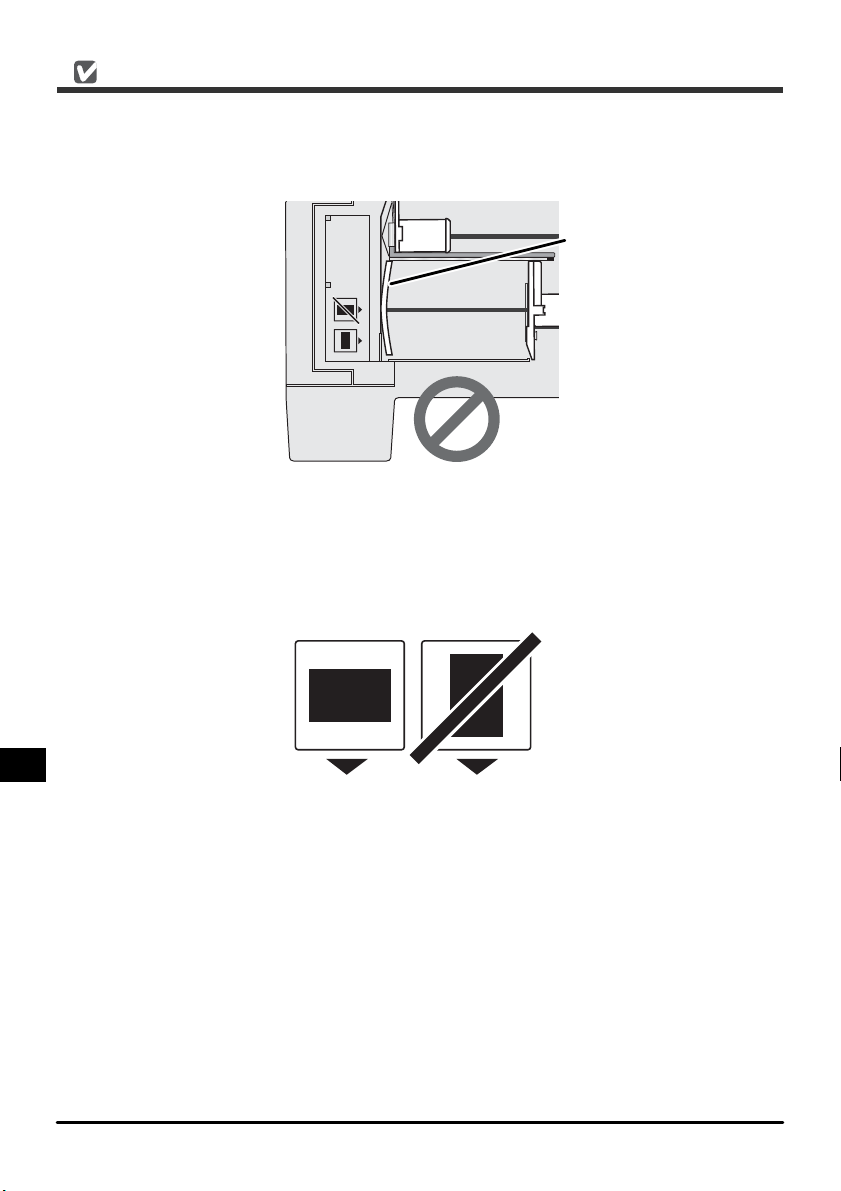
SF-210 を取り付ける前に、換気孔が上になるようにしてスキャナ本体を横向きに設置し
ます(下図)。横向きにすると電源スイッチが前面右下になります。
SF-210 の背面にあるコネクタ部から、スキャナのアダプタスロットに差し込みます。突
き当たってコネクタ部が差し込まれるまでゆっくりと挿入してください。
スキャナ本体の電源がオンの場合は、取り付け直後に SF-210 の表示 LED が数回点滅し
ます。点滅しない場合は正しく取り付けられているかをご確認ください。また、装着中は
スキャナ本体の表示 LED が隠れてしまうため、代わりに S F -210 の表示 LED が点灯し
ます(表示機能はスキャナ本体の表示 LED と同じです)。
換気孔
電源スイッチ
表示 LED
SF-210 内部のメカニズムが動作開始位置にない場合は、取り付けてから動作開始位置に
移動するまで数秒かかり、表示 LED が点滅します。表示 L E D の点滅中は SF-210 にス
ライドマウントをセットしないでください。
取り付け/取りはずし時の注意
・SF-210 をスキャナ本体に取り付け/取り外しする際やご使用の際は、スキャナ本体を
縦置きにしないでください。
・SF-210 のスキャナ本体への取り付け/取りはずしは、表示 LED の点滅が終了し、点
灯に変わってから行ってください。点滅中は絶対に取り付け/取りはずしをしないでく
ださい。
・スキャナが SF-210 を認識したときに、SF-210 内部のメカニズムが動作開始位置に
移動します。この動作中は前面の表示 LED が点滅します。点滅が終了するまで他の操
作をしないでください。
・SF-210 がアダプタスロットにスムーズに差し込めない場合は、一度取り出して再度差
し込んでください。絶対に強い力を加えないでください。
7-Jp
Page 9
4.SF-210 の使用方法
SF-210 にスライドをセットしたり取り出す方法のほか、スライドが詰まった場合の処置
について説明します。
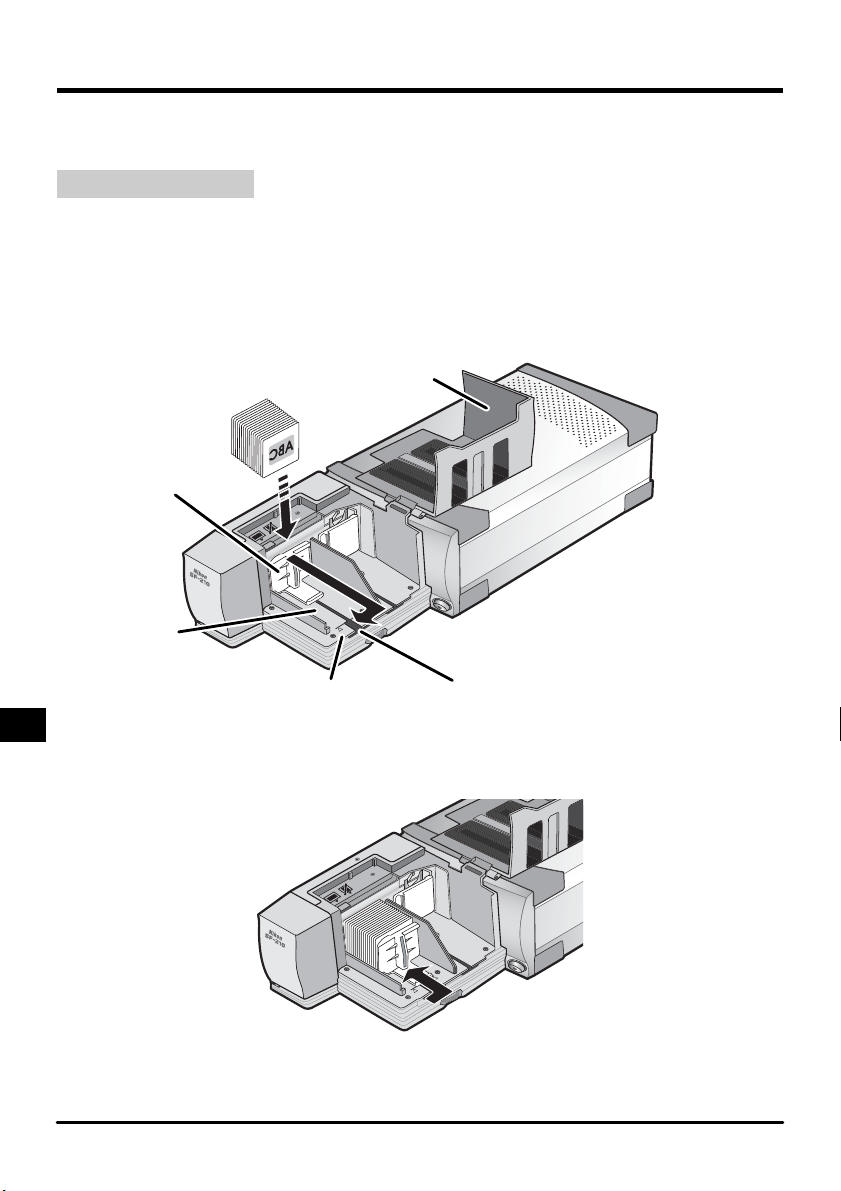
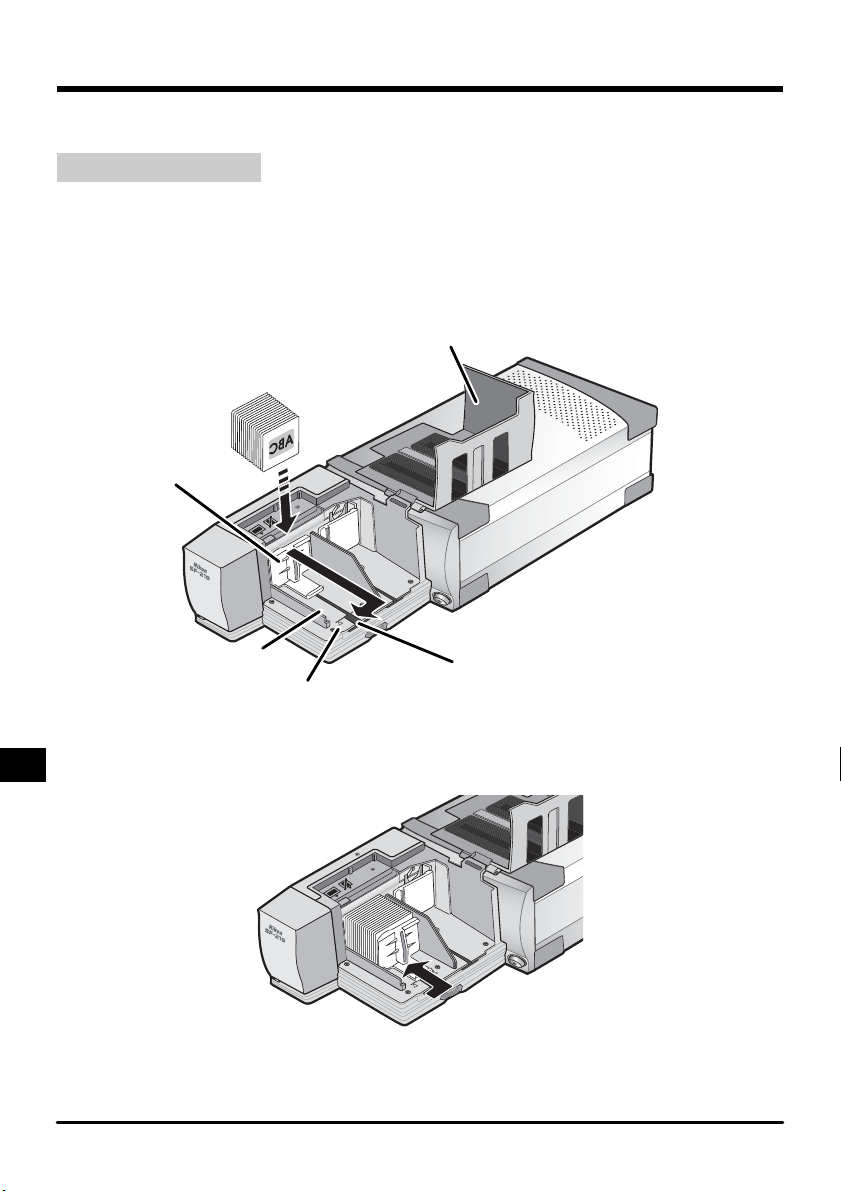
4.1スライドのセット
スライドは挿入側マガジンにセットします。
はじめにマガジンカバーを開きます。次に、挿入側スライド押さえ板を指でつまんで外側
へ引き出して手前へずらし、切り欠き溝にとめて戻らないようにロックしてください。ス
ライドマウントのアパーチャが水平方向に横長になるようにして、乳剤面をスライド押さ
え板に向けてセットします(スライド押さえ板側から見て、スライドの画像が左右反転し
ています)。
マガジンカバー
挿入側スライド
押さえ板
挿入側マガジン
フィルム制限指標
切り欠き溝
スライドはマガジンのフィルム制限指標の位置まで入れられます。スライドの挿入が完了
したら切り欠き溝にとめておいたスライド押さえ板をはずし、スライドを押さえるように
戻します(下図)。
マガジンカバーを閉じてセット完了です。スキャン操作の手順は、スキャナ本体に付属の
使用説明書または NikonScan リファレンスマニュアルをご覧ください。
Jp-8
Page 10
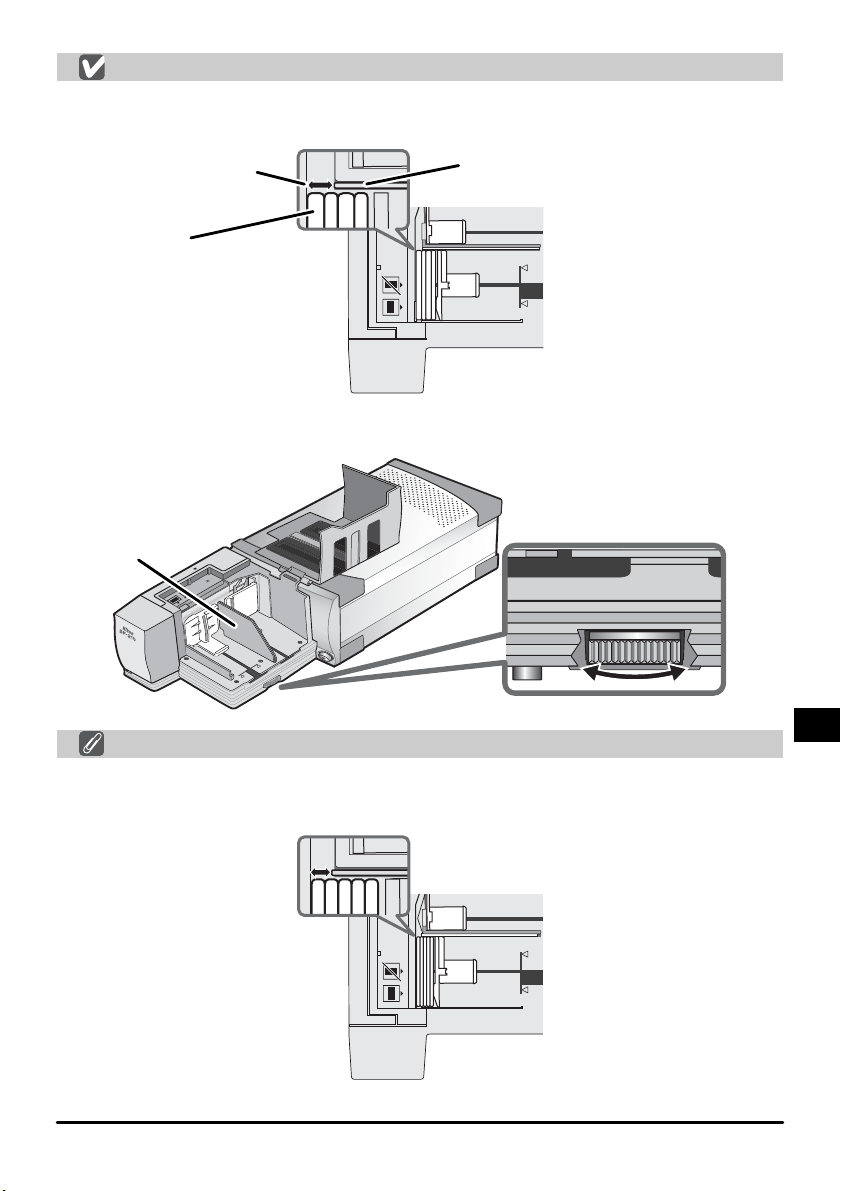
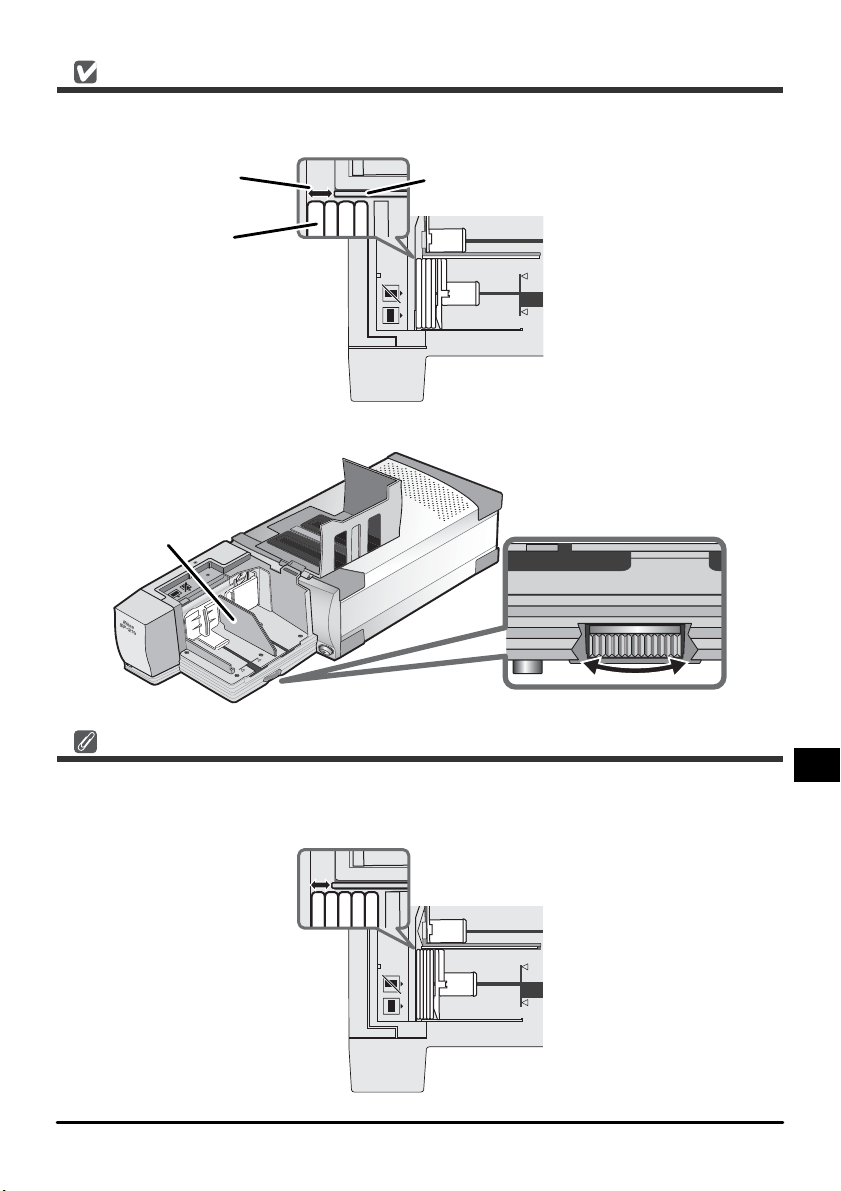
スライドの搬送について
通常(異なる厚さのスライドをセットする場合など)はFD調整板を最大に広げた位置にセッ
トしてください。
搬送口
スライド
FD 調整板
SF-210 上方向から
見た場合
・搬送口の広さは、調整ダイアルで FD 調整板の位置を動かして調整することができます。
FD 調整板
調整ダイアル
同じ厚さのスライドをセットする場合
・
同じ厚さのスライドをセットした場合、搬送口の広さをスライド 1 枚の厚さの約 1.5 倍
に調整すると、スライドの搬送詰まり(ジャム)や重送が起きにくくなります(下図)。
SF-210 上方向から
見た場合
9-Jp
Page 11
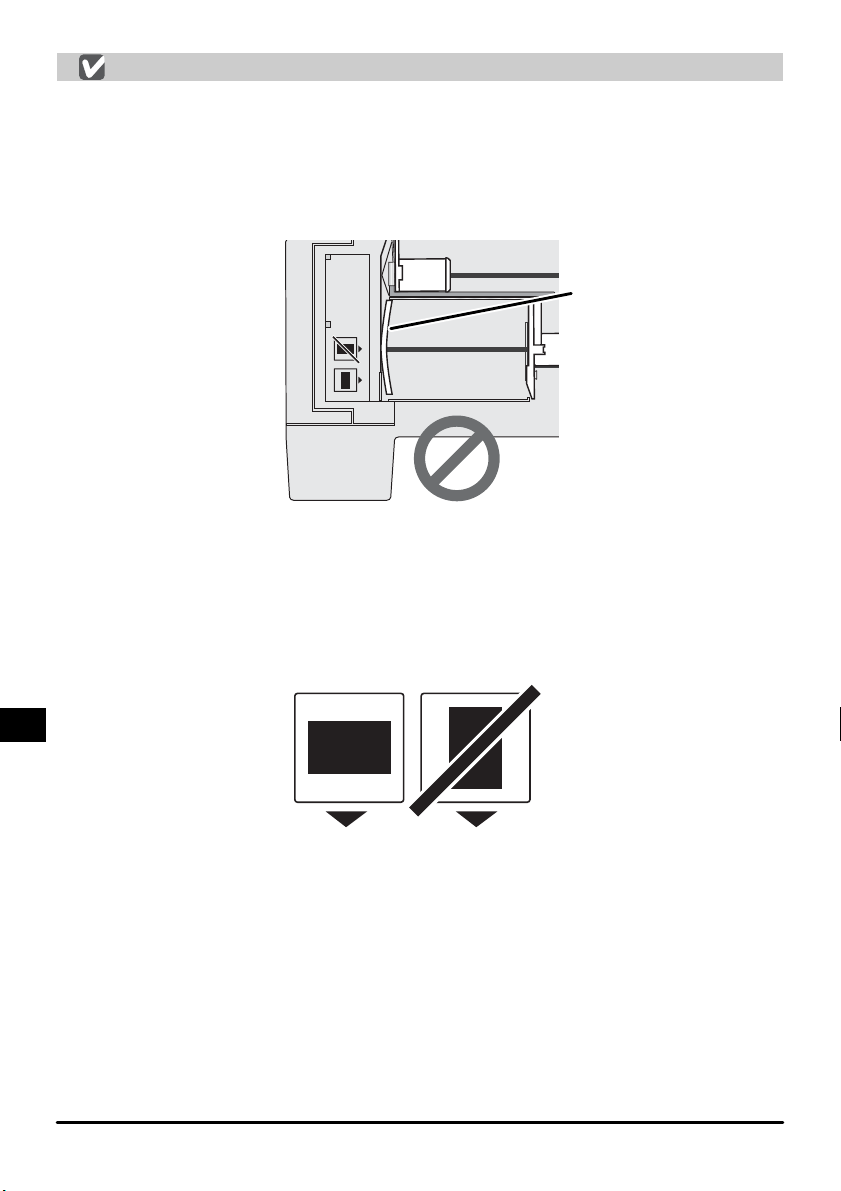
スライドセット時のご注意
・SF-210 は、マウントの厚さを含め、一部のスライドマウントには対応していません。
対応していないスライドマウントを使用すると詰まりの原因となります。
・使用できるスライドは厚さ 1.0 〜 3.2mm、幅49〜50.8mm の 35mm スライドフィ
ルムマウントに限られます。
・大きくそりのあるマウントは使用しないでください。詰まりの原因となります(下図)。
そりのあるスライドマウント
SF-210 上方向から
見た場合
・縁がめくれあがったスライド、表面が平らでないスライド、バリがあるスライド、シー
ル等を張り付けたスライドは使用しないでください。詰まり(ジャム)の原因となります。
・スライドをセットするときは、マウントのアパーチャが上下に縦長にならないようにし
てください。スライドを傷つけたり詰まりの原因となります。マガジン横のスライド挿
入方向表示を参考にしてください。
スライド挿入
方向表示
スキャナ本体 ➞
(フィルム搬送方向)
・マガジンのフィルム制限指標をこえてスライドをセットしないでください。詰まりの原
因となります。
・動作中のスキャナを移動しないでください。
・排出側マガジンにスライドがいっぱいになったままスキャンを続けると詰まりの原因と
なります。いっぱいになる前に取り出してください。
・スキャナの動作中は SF-210 を取りはずさないでください。
・スキャナの電源をオフにしたり SF-210 を取りはずす前に、全てのスライドマウントが
排出され、取り出していることを確認してください。
Jp-10
Page 12

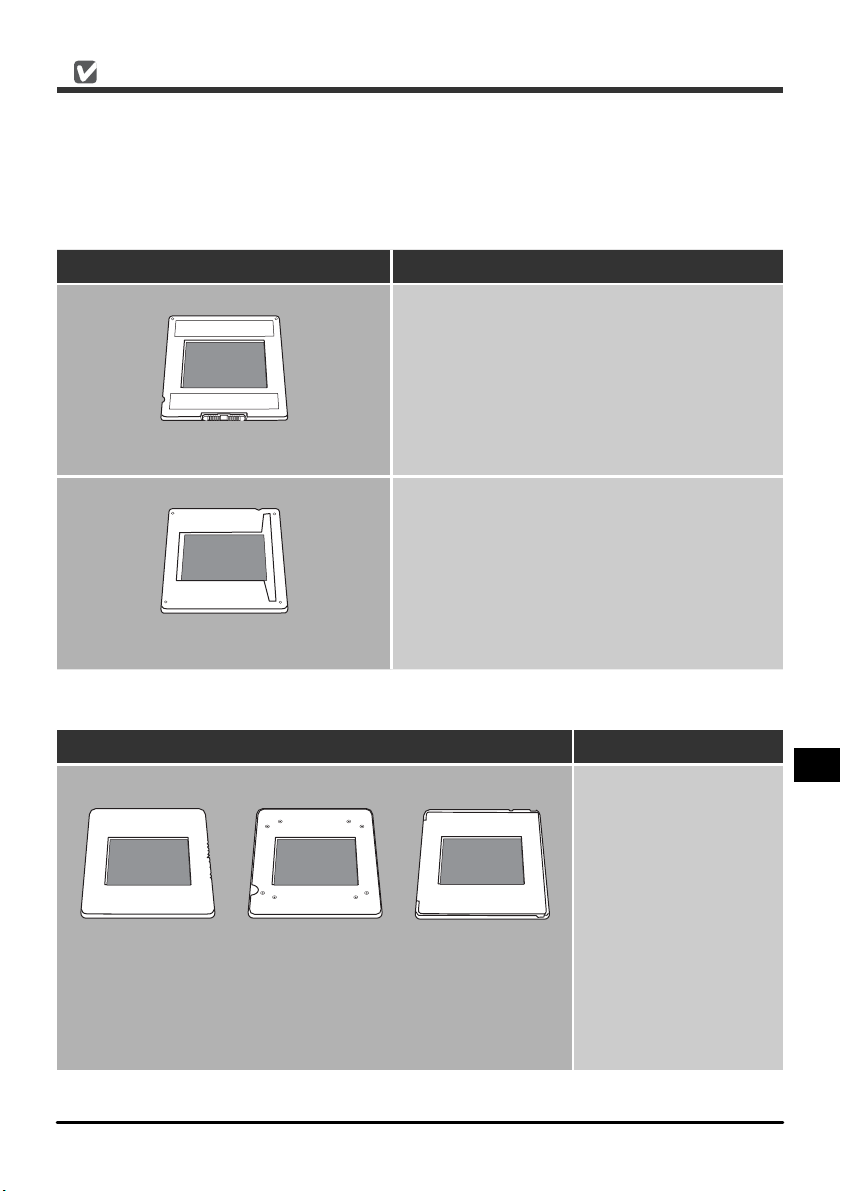
SF-210 で扱えるスライドマウント
・確認済みの推奨スライドマウント
FUJICHROME1.4mm 〜 1.5mm、KODACHROME(FUJI と同形状のプラスチック
マウント、角形紙マウント)、EKTACHROME(FUJI と同形状のプラスチックマウント、
角形紙マウント)、Ektachrome PROCESS、GEPE2mm、GEPE 3mm、AGFA
CS、reflectaCS(AGFA)、hamafix、KaiserUSA、REVUE
・セット方向に制限のあるもの
マウント名 対応
写真の面を SF-210 のスライド押さえ板側
にセットします。
アタッチメントを取り付けて使用する場合は
表裏いずれの方向でもセット可能です。
WESS
写真の面を SF-210 のスライド押さえ板側
にセットします。
hamaDSR
・搬送詰まりが起きやすいスライドマウント
マウント名 備考
KODACHROME / PLASTIMOUNTS PAKON
ECTACHROME
1.1mm 紙マウント、
(
角 R タイプ)
バリやめくれ、表面の
段差や凸凹などが詰ま
りの原因となります。
これらのスライドを
セットする場合は、スラ
イドの搬送口をスライ
ド1枚の厚さの約 1.5
倍に調整すると、詰ま
りや重送が起きにくく
なります。
11-Jp
Page 13
4.2スライドの取り出し
スキャンされたスライドは、排出側マガジンに搬送されます。排出側マガジンのスライド
を取り出す場合は排出側スライド押さえ板を引き出し、スライドを取り出してください。
排出側マガジンがいっぱいになる前にスライドを取り出してください。
4.3アタッチメントの使用
縁の丸みが大きく、厚さが 3mm近くあるスライドなどを、確実に搬送する場合に
SF-210 用アタッチメントを取り付けます。アタッチメントの取り付け/取りはずしをす
る場合は、Nikon Scan に付属のアタッチメントユーティリティを起動する必要がありま
す(NikonScan を起動していない状態で操作してください)。
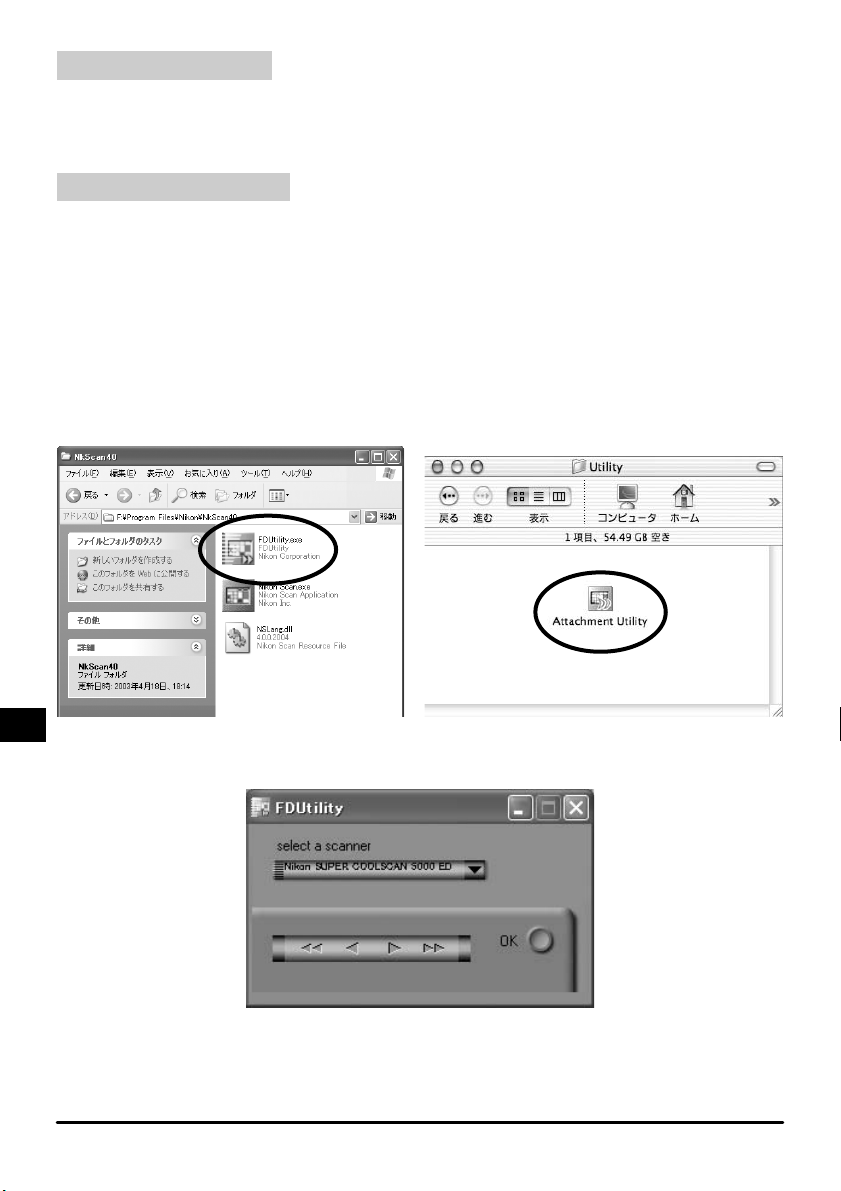
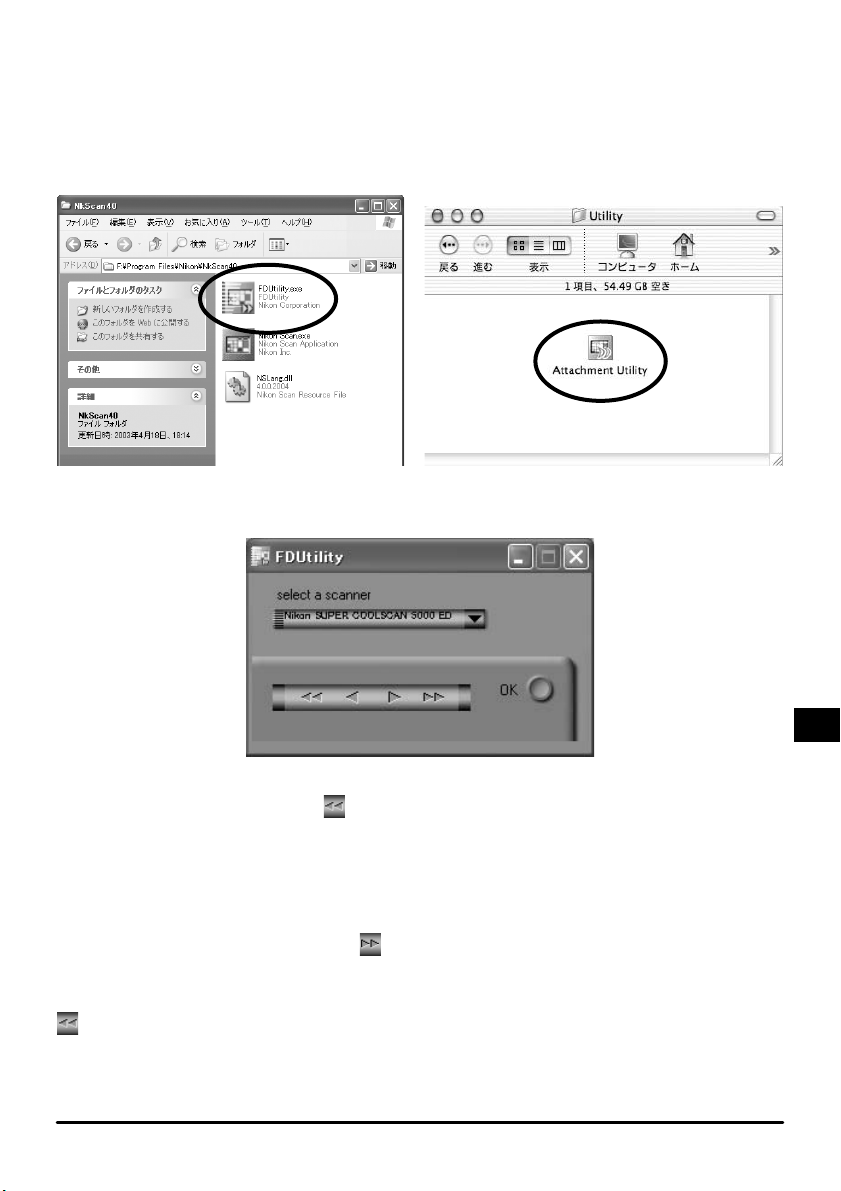
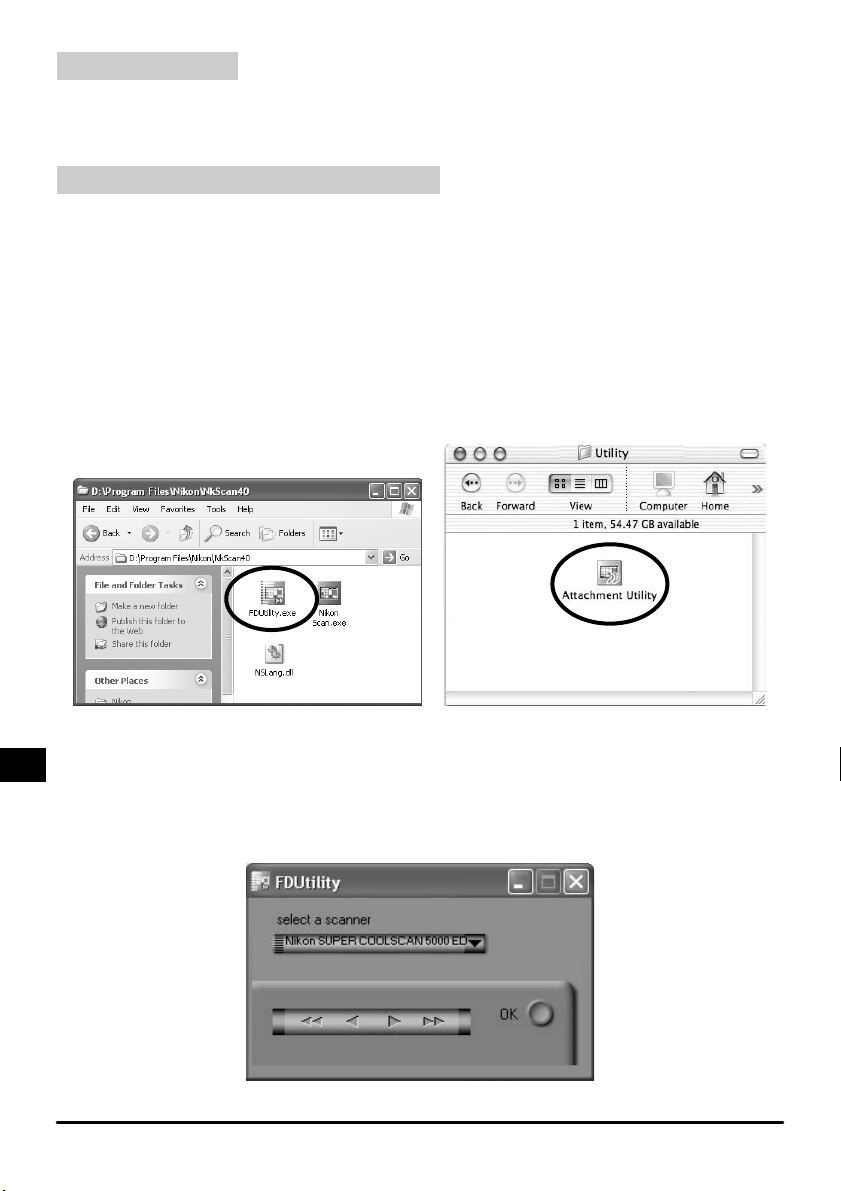
アタッチメントを取り付ける場合は、スキャナがパソコンに接続され、両方の電源が
入っていることを確認して、SF-210 をスキャナ本体に取り付けます。次にパソコンで、
NikonScan インストール先のフォルダから Windows では[FDUtility]アイコンを、
Macintosh では[Utility]フォルダから[AttachmentUtility]アイコンをダブルクリッ
クして起動してください。
Windows Macintosh
アタッチメントユーティリティ(FDUtility)画面が表示されます。
NikonScan ご使用時は、スキャナを 2 台以上同時に接続、動作させることはできません。
Jp-12
Page 14
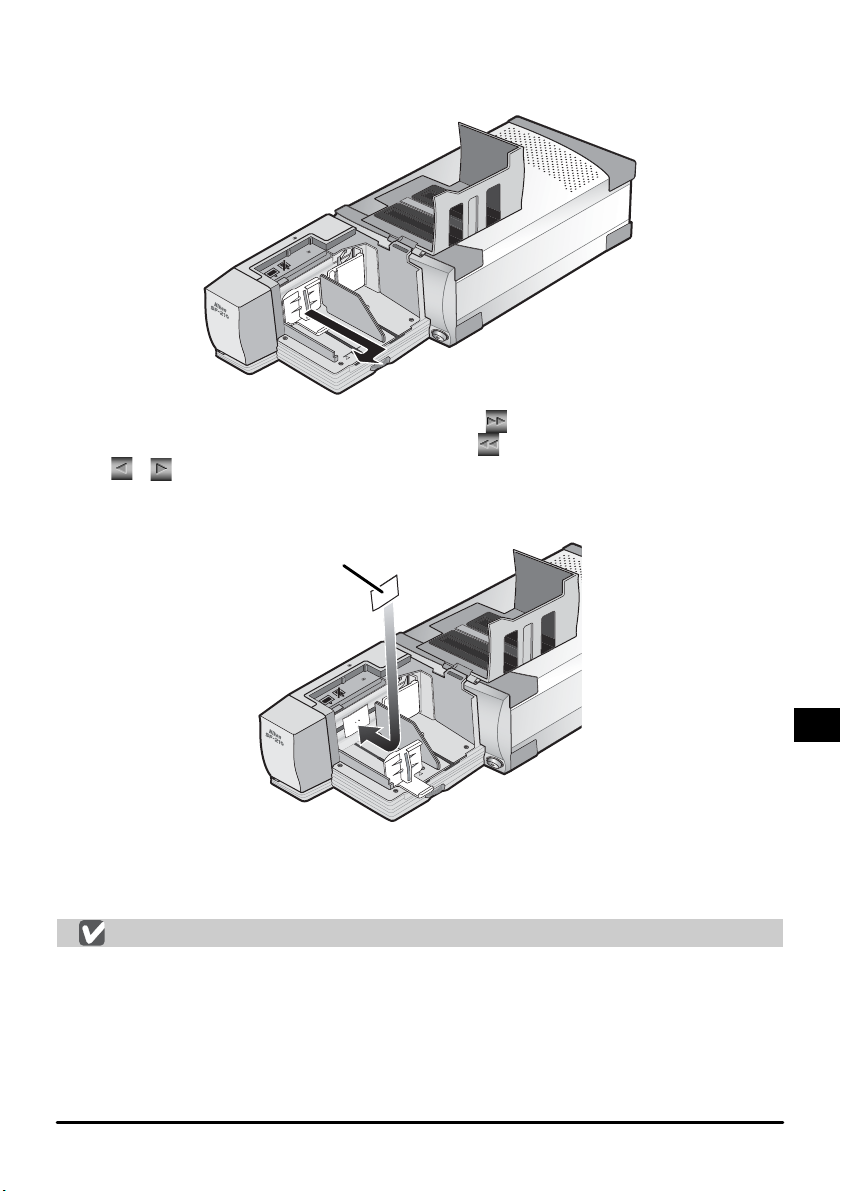
SF-210 のマガジンカバーを開きます。挿入側スライド押さえ板を指でつまんで引き出し
て左へずらし、切り欠き溝にとめて戻らないようにロックしてください。
アタッチメントユーティリティ(FDUtility)画面の
送り板を挿入側マガジンの中央付近に移動します。
左へ、
板全体が挿入側マガジンに入ったらアタッチメントを取り付けます。アタッチメントの突
起部分を送り板の取り付け穴に合わせて手で押し込みます。
アタッチメントユーティリティ(FDUtility)画面の[OK]ボタンをクリックしてスライ
ド送り板をもとの位置に戻します。これでアタッチメント取り付けは完了です。
アタッチメント取り付け時の注意
・アタッチメントはしっかりと取り付けてください。ゆるんでいるとスライドが正しく送
られません。また、SF-210 が破損する場合があります。
・アタッチメントを取り付けて同じ厚さのスライドマウントをセットする場合は、FD 調
整板の位置を、スライドマウント 1 枚の厚さの約 1.5 倍の隙間が空くように調整してく
ださい。隙間が狭いと、アタッチメントが FD 調整板に引っかかり、給送エラーの原因
となります。
ボタンではそれぞれ左右へ小さく移動するので、調整に使用します。送り
/
アタッチメント
ボタンをクリックして、スライド
ボタンをクリックすると送り板が
13-Jp
Page 15

4.4アタッチメントの取りはずし
厚さがおよそ 2mm 以下のスライドをスキャンする場合はアタッチメントを取りはずして
ください。上記の要領でスライド送り板を挿入側マガジンに移動し、アタッチメントを取
りはずした後、アタッチメントユーティリティ画面の[OK]ボタンをクリックしてスラ
イド送り板をもとの位置に戻します。
4.5スライドが詰まった場合の処置
スライドが S F-210 内部で詰まったら、マガジンカバーを開けてほかのスライドを取り
出します。このとき挿入側スライド押さえ板を引き出し、切り欠き溝に留めてください。
スライド詰まり時の処置は、詰まった箇所により異なります。
・ スライドがマガジン内の見える箇所で詰まり、スライド送り板がもとの格納位置へ戻っ
ている場合は、詰まったスライドを指で取り除きます。
・ スライドが搬送中に詰まり、スライド送り板が固定されている場合には、パソコンでア
タッチメントユーティリティを起動する必要があります。NikonScan をいったん終
了して次の操作を行います。
Jp-14
Page 16
アタッチメントユーティリティは NikonScan のインストール時に同時にインストール
されるユーティリティソフトウェアです。
アタッチメントユーティリティを起動するには、Nikon Scan インストール先のフォルダ
から Windows では[FDUtility]アイコンを、Macintosh では[Utility]フォルダから
[AttachmentUtility]アイコンをダブルクリックして起動してください。
Windows Macintosh
アタッチメントユーティリティ(FDUtility)画面が表示されます。
搬送中のスライドが詰まり、スライド送り板が固定されている場合は、アタッチメントユー
ティリティ(FDUtility)画面の
ボタンをクリックしてください。スライド送り板が手
前側(格納位置側)へ移動し、詰まったスライドが指で取り除けるようになります。
複数のスライドが重なって詰まっている場合には、まずマガジン側にあるスライドから指
で取り除きます。
排出されるスライドが排出側マガジンの入り口で詰まった場合には、まずアタッチメント
ユーティリティ(FDUtility)画面の
ボタンをクリックしてスライド送り板を別の場所
に移動します。それから詰まったスライドをゆっくりと傷つけないようにスキャナ側に押
し戻してください。
ボタンを使用するとスライド送り板がもとの格納位置に戻ります。 詰まったスライド
が戻せない場合には、スキャナの使用説明書裏面に記載されているニコンサービスセン
ターまでご相談ください。
15-Jp
Page 17
5.メンテナンス
SF-210 の清掃、保管、輸送方法について説明します。
5.1清掃
SF-210 の清掃をする場合は、スキャナ本体から SF-210 を取りはずしてください。
SF-210 の外装はプラスチックでできています。揮発性のクリーナー(アルコールやシン
ナーなど)は使用しないでください。
内部のほこりはブロア等で吹き飛ばしてください。
外装の汚れは乾いた布で拭いてください。十分に汚れが落ちない場合は、布に少量の中性
洗剤をしみこませて拭いてください。
汚れ落としに水や揮発性物質(アルコールやシンナー、ベンジンなど)を使用しな
いでください。機器の内部に侵入して火災や感電の原因となることがあります。ま
注意
た、揮発性物質は機器の外装を傷めます。
5.2保管
SF-210 を長期間使用しない場合はスキャナ本体から取りはずしてください。
取りはずした SF-210 は次の場所で保管しないようにご注意ください。
・ 換気の悪い場所や湿度の多い場所
・ 温度が 50℃以上、またはー 10℃以下の場所
・ 湿度が 60% を越える部屋
・ 急激な温度変化のある場所や結露の発生する場所
5.3輸送
SF-210 を輸送する場合はスキャナ本体から取りはずし、購入時の梱包材で梱包してくだ
さい。
Jp-16
Page 18

6.主な仕様
使用原稿 35mm スライドマウント(厚さ 1.0 〜 3.2mm /幅 49 〜 50.8mm)
収納枚数約50 枚(厚さ 1.5mm のマウントの場合)
収納スペース約78.5mm
使用形態 SUPERCOOLSCAN5000EDまたは SUPERCOOLSCAN4000ED
を横置きにしてアダプタスロット内コネクタに接続
原稿送り 内蔵モータによる自動搬送
フィルム搬送時間 挿入:1枚約6秒
排出:1枚約6秒
大きさ約142 × 85 × 325mm(W×H×D)
質量約820g
電源供給 本体より供給(5VDC、0.7A 以下)
動作環境 温度:+ 10℃〜+ 35℃
湿度:20%〜 60%(結露のないこと)
17-Jp
Page 19

Contents
Slide Feeder SF-210
En
Cautions........................................................................................................................... 2
1. Overview .....................................................................................................................4
2. Parts and Accessories.................................................................................................. 5
3. Installation ..................................................................................................................6
4. Using the SF-210 ......................................................................................................... 8
5. Maintenance ............................................................................................................. 16
6. Specifi cations ............................................................................................................17
Page 20

Cautions
• The reproduction of this ma nua l in whole or i n par t is prohibi ted save in c ases i n whi ch N ikon’s
prior permission has been obtained.
• The information contained in this manual is subject to change without notice.
• Nikon has made every effort to produce a perfect manual, but should you fi nd any mistakes,
we would be grateful if you would kindly let us know. The address of Nikon’s representative
in your area is provided sep a rate ly.
• Nikon is not liable for damages resulting from the use of this product.
To make it easier to fi nd the information you need, the following symbols and conventions are
used:
This icon marks warnings, information that should be read before using this Nikon product
to prevent serious injury or death.
This icon marks cautions, information that should be read before using the product to
prevent damage to the device.
This icon marks notes, information that should be read before using the product.
Trademark Information
All trade-names mentioned in this manual are the trademarks or registered trademarks of their
re spec tive holders.
Illustrations
The illustrations in this manual show the SUPER COOLSCAN 5000 ED.
En- 2
Page 21

Federal Communications Commission (FCC) Radio Frequency In ter fer ence Statement
This equipment has been tested and found to comply with the limits for a Class B digital device, pursuant
to Part 15 of the FCC Rules. These limits are designed to provide reasonable protection against harmful
in ter fer ence in a residential in stal la tion. This equipment generates, uses, and can radiate radio frequency
energy and, if not installed and used in accordance with the instructions, may cause harmful interference
to radio com mu ni ca tions. However, there is no guarantee that interference will not occur in a particular
in stal la tion. If this equipment does cause harmful interference to radio or television reception, which can
be de ter mined by turning the equipment off and on, the user is en cour aged to try to correct the interference by one or more of the following measures:
• Reorient or relocate the receiving antenna.
• Increase the separation between the equipment and receiver.
Connect the equipment into an outlet on a circuit different from that to which the receiver is connected.
•
• Consult the dealer or an experienced radio/television technician for help.
CAUTIONS
Modifi cations
The FCC requires the user to be notifi ed that any changes or modifi cations made to this device that are not
expressly approved by Nikon Corporation may void the user’s authority to operate the equipment.
Notice for customers in Canada
CAUTION
This class B digital apparatus meets all requirements of the Ca na di an Interference Causing Equipment
Reg u la tions.
ATTENTION
Cet appareil numérique de la classe B respecte toutes les exigences du Règlement sur le matériel brouilleur
du Canada.
Notice concerning prohibition of copying or re pro duc tion
Note that simply being in possession of material which has been copied or reproduced by means of a scanner may be punishable by law.
• Items prohibited by law from being copied or reproduced
Do not copy or reproduce paper money, coins, securities, government bonds, or local government bonds,
even if such copies or reproductions are stamped “Sam ple”.
The copying or reproduction of paper money, coins, or securities which are cir cu lat ed in a foreign country
is prohibited.
Unless the prior permission of the government has been ob tained, the copying or re pro duc tion of unused
postage stamps or post cards issued by the gov ern ment is prohibited.
The copying or reproduction of stamps issued by the gov ern ment and certifi ed documents stip u lat ed by
law is prohibited.
• Cautions on certain copies and reproductions
The government has issued cautions on copies or repro duc tion s of sec uri ties iss ued by p riv ate com pa nies
(shares, bills, checks, gift certifi cates, etc.), com mut er passes, or coupon tickets, except when a minimum
of necessary copies are to be provided for business use by a company. Also, do not copy or reproduce
passports issued by the government, licenses issued by public agencies and private groups, ID cards, and
tickets, such as passes and meal coupons.
• Comply with copyright notices
The copying or reproduction of copyrighted creative works such as books, music, paintings, woodcut
prints, maps, drawings, movies, and photographs is governed by national and international copyright
laws. Do not use this product for the purpose of making illegal copies or to infringe copyright laws.
3-En
Page 22

1. Overview
Thank you for your purchase of an SF-210 slide feeder for 5000 ED (SUPER COOLSCAN 5000
ED) and 4000 ED (SUPER COOLSCAN 4000 ED) Nikon fi lm scan ners (these models of scanner are
referred to below as “the scanner”). The SF-210, which can hold up to fi fty mounts 1.5 mm in
thickness, au to mates the scan ning of con sec u tive 35 mm slides. Like the other adapters for the
5000 ED, the SF-210 can be inserted while the scanner is on and con nect ed to a computer.
This manual describes the procedures for unpacking, setting up, and connecting the feeder to
your scanner. The next chapter, “Parts and Accessories,” details the contents of the package
and the parts of the feeder. This is fol lowed by “Installation,” whi ch de scribes how to connect
the feeder to the scanner. In “Using the SF-210,” the pro ce dures for loading and removing
slides are explained. The fi nal chap ter, “Main te nance,” gi ves in struc tions on how to care for
and transport the feeder. Please read all in struc tions thor ough ly to ensure that you can get the
most from your SF-210. Information on scanning slides may be found in the User’s Manual
and Nikon Scan Reference Manual provided with the scanner.
We hope that you fi nd this manual helpful.
En- 4
Page 23
2. Parts and Accessories
This chapter lists the items packaged with your slide feeder and iden ti fi es the parts of the SF-
210.
2.1 Package Contents
Purchasers of the SF-210 should fi nd that the package contains all the items listed below.
SF-210
2.2 Parts of the SF -210
Status LED
Slide insertion
guide
Push plate
Feed mag a zine
Reference manual (this man u al)SF-210 slide feeder
Push plate
Ejection magazine
Feeder adjustment plate
Feeder adjustment dial
Load mark
Feed-mechanism
attachment for round ed
slide mounts
Magazine
cover
5-En
Page 24
3. Installation
Before installing the SF-210, make sure that your scanner is set up in a suitable location, as
described in the documentation pro vid ed with the scanner. The SF - 210 should not be used
where:
• the temperature exceeds 35ºC (95ºF) or falls below 10ºC (50ºF)
• it would be subject to condensation or drastic changes in tem per a ture
• the humidity is less than 20% or exceeds 60%
• it would be exposed to direct or refl ected sunlight
• it might be subject to vibration or strong physical shocks
• there is a lot of dust
• it would be exposed to radio interference from other electronic devices
• it would be exposed to water vapor (e.g., from a humidifi er)
• it would be exposed to smoke
Warning: Failure to observe the above precautions could result in fi re or in scanner
malfunction.
When using the SF-210, install the scanner as shown below. There must be suffi cient space
around the scanner to allow the magazine cover to open and to ensure adequate ventilation.
There should be at least 15 cm (6”) of space above the unit and 10 cm (4”) open to the rear.
Space requirements when the SF-210 is attached are illustrated below.
En- 6
Page 25
The SF-210 can be mounted on the scanner whether the scanner is off or on and con nect ed to a
computer. If the scanner is on, before mount ing the feeder check that the status LED is glowing
steadily. The SF-210 should NOT be inserted or removed while the status LED is blinking.
Install the scanner as shown below, with the side vents uppermost. Slide the SF-210 into the
scanner’s adapter slot, stopping when the feeder contacts the back of the slot. The feeder
should be oriented as shown below when inserted. Push the feeder until the con nec tor on the
rear of the feeder is seated securely in the socket at the back of the slot. The feeder is prop er ly
inserted if the status LED on the front of the feeder lights when the scanner is turned on. If the
scanner is on when the feeder is inserted, the feeder’s status LED will blink to indicate that the
feeder has been inserted cor rect ly. In all other respects, the feeder LED functions in the same
way as the scanner status LED.
Vents
Power switch
Status LED
If the feed mechanism for the SF-210 is not in the initial position when the scanner is turned
on, you will need to wait a few seconds for the feed mechanism to return to initial position
before inserting slides.
Cautions
• Do not place the scanner upright when inserting, removing, or using the SF -210.
• Wait until the status LED glows steadily or the scanner is off before inserting or removing the
SF-210. Do not attempt to remove or insert the feeder while the scanner is operating.
• When the SF-210 is inserted with the power on, or the scanner turned on after the feeder
has been inserted with the power off, the feed mechanism will return to the initial position.
While this operation is in progress, the status LED on the front of the feeder will blink. Do
not perform any operations while the LED is blinking.
• If the feeder does not slide in smoothly, remove it from the adapter slot and try again. Do
not use force.
7-En
Page 26
4. Using the SF-210
This chapter describes how to load the SF-210, how to remove slides, and how to deal with
jams.
4.1 Loading the feeder
Slides to be scanned are inserted in the feed magazine. To load the magazine, open the magazine cover, pull back the feed push-plate to the end of its grove, and hook it in the notch so
that it does not spring back to its original position. Place the slides in the mag a zine with the
long end of the ap er ture up and the emul sion surface facing the push plate (the images in the
slides should be reversed when viewed from the magazine side). Scanning will be considerably
simplifi ed if the slides are all inserted in the same orientation.
Magazine cover
Push plate
Feed magazine
Load mark
Slides can be loaded into the feed magazine up to the load mark. Do not attempt to fi ll the
magazine past this point. Once the feed magazine is loaded, release the push plate from the
notch and slide it back until rests against the slides.
Close the magazine cover. You are now ready to begin scan ning. For details on automatic
consecutive scanning of multiple slides, refer to the User’s Manual and Nikon Scan Reference
Manual provided with the scanner.
Notch
En- 8
Page 27
The Slide Feed Slot
In most cases (for example, when scanning slides with mounts of different thicknesses), the slide
feeder works best with the slide feed slot fully open.
Slide feed slot
Slide
Feeder adjustment plate
SF-210 slide feeder
(viewed from above)
The width of the slide feed slot is controlled by the feeder adjustment dial.
Feeder adjustment
plate
Feeder adjustment dial
Scanning Slides of the Same Thickness
If the mounts are all the same thickness, the slide feed slot should be about one-and-a-half
times the thickness of the slide mount (see illustration below). This will help prevent the feeder
from jamming or feeding several slides at once
SF-210 slide feeder
(viewed from above)
9-En
Page 28
Cautions
• The SF-210 does not function equally well with all types of slide mount. Use 35 -mm slides
with mounts 1.0–3.2 mm thick and 49–50.8 mm wide. Other slides could cause the feeder
to jam.
• Slides with mounts that are heavily warped can cause the feeder to jam.
Warped slide mount
SF-210 (viewed
from above)
• Do not use mounts with peeling or burred edges, mounts to which seals or labels have been
affi xed, or mounts with uneven surfaces. Failure to observe this precaution could cause the
feeder to jam.
• Do not load slides into the feeder with the longer side of the aperture facing the scanner, as
this could damage the fi lm or slide mount or cause the feeder to jam. Insert slides as shown
by the insertion guide sticker next to the feed magazine.
Insertion
guide sticker
To scanner ⇒
• Do not load slides in the feed magazine past the load mark, as this may cause the feeder to
jam.
• Do not move the scanner while scanning is in progress.
• Remove scanned slides from the ejection magazine before the magazine is full. Continuing
scanning when there is no room left in the ejection magazine could jam the feeder.
• Do not remove the feeder while scanning is in progress.
• Before turning the scanner off or removing the feeder, make sure that all slides have been
removed from the magazine and that the last slide to be fed has been ejected.
En-10
Page 29
Slide Mounts That Can Be Used in the SF-210
• The following mounts have been tested and approved for use in the SF-210:
FUJICHROME 1.4–1.5 mm, plastic or square cardboard KODACHROME mounts the same
shape as FUJICHROME mounts, plastic or square cardboard EKTACHROME mounts the same
shape as FUJICHROME mounts, Ektachrome PROCESS, GEPE 2 mm, GEPE 3 mm, AGFA CS,
AGFA refl ecta CS, hama fi x, Kaiser USA, REVUE
• The following mounts can be used only in restricted orientations:
Mount Cautions
Insert with the photograph fac ing the push
plate. Slides can be inserted in either orientation if the feed mechanism attachment is
used.
WESS
Insert with the photograph fac ing the push
plate.
hama DSR
• The following mounts are known to cause jams:
Mount Notes
Kodachrome / PLASTIMOUNTS Pakon
Ektachrome
Cardboard mounts
1.1 m m thick with
rounded corners
Burred or peeling
mounts and mounts
with uneven or irregular surfaces can
cause the feeder to
jam. To help pre vent the feeder from
jamming or feeding
several slides at once,
open the slide feed
slot to about oneand-a-half times the
thickness of the slide
mounts.
11- En
Page 30
4.2 Removing slides
Slides will be sent to the ejection magazine after scanning. To remove slides from the ejection
magazine, pull back the push plate and remove the slides. Slides must be removed before the
ejection magazine fi lls up.
4.3 Using the Feed-Mechanism Attachment
Thick mounts (over 2 mm thick) with rounded edges may not feed properly when used with the
SF-210. A removable plastic part is pro vid ed for at tach ment to the feed mechanism, enabling
the scanner to feed such slides. A special attachment utility program, provided with the Nikon
Scan soft ware that came with your scan ner, is required both when attaching this part to and
removing it from the feed mechanism.
To attach the feed -mechanism attachment, the scanner must be connected to the computer.
Both the scanner and computer must be on and Nikon Scan must not be running. After inserting
the SF-210 into the scanner as described above, open the folder to which you installed Nikon
Scan and then double - click the FDUtility icon (Windows) or double-click the Attachment
Utility icon in the Utility sub-folder (Macintosh). The attachment utility will start.
Win dows Macintosh
The "attachment utility" (FDUtility) window will appear on the desktop. If more than one scanner is attached to your computer and powered on, select the scanner to which the SF-210 is
attached from the select a scanner pop-up menu.
Nikon Scan does not support simultaneous connection of more than one scanner.
En-12
Page 31

Open the SF-210’s magazine cover, pull back the feed push-plate to the end of its grove, and
hook it in the notch so that it does not spring back to its original position.
Click the double right-arrow button in the "attachment utility" (FDUtility) to move the feed
mechanism to where it is fully visible. If you move the feed mech a nism too far, click the leftarrow button to move it back. The single-arrow buttons can be used for fi ne adjustments.
Once the feed mech a nism is visible, insert the pegs on the at tach ment into the holes in the
feed mechanism.
Feed-mechanism
attachment
Click the OK button in the "attachment utility" (FDUtility) window to return the feed mech a nism
to its initial po si tion. You are now ready to begin scanning.
Caution
Be sure that the attachment is securely in place. If the attachment is loose, slides may not feed
properly and damage to the SF-210 could result.
When using the feed-mechanism attachment to scan slides with mounts of the same thickness,
open the slide feed slot to leave a gap about one-and-a- half times the thickness of the slide
mounts. If the slide feed slot is too narrow, the attachment may catch on the feeder adjustment
plate, causing feed errors.
13- En
Page 32

4.4 Removing attachment
When scanning slides with fl at mounts or slides less than 2 mm thick, you will need to remove
the attachment. Use the attachment utility as described above to move the feed mechanism
into the magazine, then remove the attachment and click OK to return the feed mechanism to
its initial po si tion.
4.5 What to do if the feeder jams
If a jam occurs, open the magazine cover and remove the slides remaining in the feed and eject
mag a zines. Pull back the feed push-plate and hook it in the notch so that it does not spring
back to its original position.
The method for resolving a jam depends on the position of the feed mechanism when the jam
occurred. If the jammed slide is visible in the magazine and the feed mechanism has returned
to its housing in the front of the unit, the jammed slide can be removed with your fi ngers. If the
feed mechanism has locked while feeding a slide, you will need to exit Nikon Scan and use the
attachment utility to resolve the jam (the attachment utility is a special program for the SF-210
distributed with the Nikon Scan software that came with your scanner).
En-14
Page 33

To star t the attachment utility, open the folder to which you installed Nikon Scan and then
double- click the FDUtility icon (Windows) or double-click the Attachment Utility icon in the
Utility sub-folder (Macintosh).
Win dows Macintosh
The "attachment utility" (FDUtility) window will appear on the desktop. If more than one scanner is attached to your computer and powered on, select the scanner to which the SF-210 is
attached from the select a scanner pop-up menu.
Nikon Scan does not support simultaneous connection of more than one scanner.
If the feed mechanism has locked while pushing a slide, click the double left-arrow button in
the "at tach ment utility" (FDUtility) window to move the feed mech a nism back to its housing,
then remove the jammed slide with your fi ngers. If two or more slides have jamm ed s o that they
overlap, remove the slide on the magazine side fi rst. If the mount has caught at the entrance to
the ejection magazine while being ejected from the feeder, click the right arrow button to move
the feed mechanism out of the way, then push the slide back gently back towards the scanner
to clear the jam. Using the left-arrow button, return the feed mechanism to its hous ing (if this
does not clear the jam, you will need to take the feeder to a Nikon service center for repairs).
15-En
Page 34

5. Maintenance
This chapter describes how to clean, store, and transport the SF-210.
5.1 Cleaning
Before cleaning the feeder, remove it from the scanner. The exterior of the feeder is made of
plastic, and should not be cleaned with volatile cleaners such as alcohol or paint thinner. Use a
blower to blow off dust or wipe the surface with a dry cloth. If this is not suffi cient to remove
all dirt, clean with a cloth that has been slightly dampened with a neutral detergent or liquid
soap.
Warning: Do not use water or a volatile liquid such as alcohol, benzine, or thinner.
Should any of these liquids enter the feeder, fi re or electric shock could result. Volatile
chemicals could also stain the plastic exterior of the feeder.
5.2 Storage
When you do not plan to use the feeder for an extended period of time, remove it from the
scanner. Store in a dry, well-ventilated en vi ron ment where the temperature is between –10 °C
(14 °F ) and +50 °C (+122 °F) and the humidity less than 60%. Do not store the feeder where it
would be subject to sudden temperature changes or condensation.
5.3 Transport
When transporting the scanner, remove the feeder from the scanner and pack it in the original
packing material.
En-16
Page 35

6. Specifi cations
Film: 35 mmslide mounts (1.0–3.2 mm thick, 49–50.8 mm wide)
Maximum Approx. 50 slides
number of slides: (assumes mounts 1.5 mm thick)
Housing space: Approx. 78.5 mm
Operating mode: Scanner (SUPER COOLSCAN 5000 ED / SUPER COOLSCAN 4000
ED) installed on its base, SF-210 con nect ed di rect ly to connector
at rear of scanner adapter slot
Feed mechansim: Automatic with built-in motor
Feed/eject time: Feed: approx. 6 seconds per slide
(reference) Eject: approx. 6 seconds per slide
Dimensions: 142 mm (W) × 325 mm (D) × 85 mm (H) (5.63” × 12.78” ×
3.37”)
Weight: Approx. 820 g (1 lb. 13 oz.)
Power supply: 5 VDC, 0.7 A or less, supplied from scanner
Operating environment: Temperature +10ºC to +35ºC
Humidity 20% to 60% (no condensation)
17- En
Page 36

Inhalt
Diamagazin SF-210
De
Wichtige Hinweise .......................................................................................................... 2
1. Einleitung ....................................................................................................................4
2. Das Diamagazin SF-210 in der Übersicht ..................................................................5
3. Montage und Inbetriebnahme..................................................................................6
4. Scannen mit dem Diamagazin SF-210....................................................................... 8
5. Pfl ege......................................................................................................................... 16
6. Technische Daten...................................................................................................... 17
Page 37

Wichtige Hinweise
• Die Reproduktion der Dokumentationen, auch das auszugsweise Vervielfältigen, bedarf der
ausdrücklichen Genehmigung durch Nikon. Dies gilt auch für die elektronische Erfassung und
die Übersetzung in eine andere Sprache.
• Änderungen jeglicher Art ohne Vorankündigung vorbehalten.
• Die Dokumentationen zu Ihrem Nikon-Produkt wurden mit größter Sorgfalt erstellt. Sollten
Sie jedoch Fehler in den Dokumentationen entdecken oder Verbesserungsvorschläge machen können, wäre Nikon für einen entsprechenden Hinweis sehr dankbar. (Die Adresse der
Nikon-Vertretung in Ihrer Nähe ist separat aufgeführt.)
• Nikon übernimmt keine Haftung für Schäden, die durch unsachgemäßen Gebrauch des
Produkts entstehen.
Damit Sie die gewünschten Informationen schnell fi nden, werden in diesem Handbuch folgende
Symbole und Konventionen verwendet:
Dieses Symbol kennzeichnet wichtige Warnhinweise, die Sie unbedingt vor Gebrauch
Ihres Nikon-Produkts lesen sollten, um möglichen Verletzungen vorzubeugen.
Dieses Symbol kennzeichnet wichtige Sicherheitshinweise. Sie sollten die Sicherheitshinweise vor Gebrauch des Scanners lesen, um Schäden am Gerät zu vermeiden.
Dieses Symbol kennzeichnet wichtige Hinweise und Tipps, die Sie vor Gebrauch des
Scanners ebenfalls lesen sollten.
Warenzeichennachweis
Alle Produkt- und Markennamen, die in diesem Handbuch genannt werden, sind Warenzeichen
oder eingetragene Warenzeichen der entsprechenden Rechtsinhaber.
Abbildungen
Die Abbildungen in diesem Handbuch zeigen den SUPER COOLSCAN 5000 ED.
De- 2
Page 38

Hinweise zum Urheberrecht
Bitte beachten Sie, dass das mit einem Scanner oder einer Digitalkamera digitalisierte Bildmaterial mög licherweise dem Urheberrechtsschutz unterliegt und die nicht-autorisierte Verwendung und Verbreitung
solchen Materials strafbar sein oder zivilrechtliche Ansprüche auf Unterlassen und/oder Schadensersatz
nach sich ziehen kann.
• Dinge, die nicht kopiert oder reproduziert werden dürfen
Bitte beachten Sie, dass Geldscheine, Münzen, Wertpapiere, Urkunden etc. nicht kopier t oder reproduziert
werden dürfen, selbst wenn Sie als Kopie gekennzeichnet werden.
Das Kopieren oder Reproduzieren von Geldscheinen, Münzen und Wertpapieren eines anderen Landes
ist ebenfalls nicht erlaubt.
Ohne ausdrückliche Genehmigung der Regierung dürfen Briefmarken, Postwertzeichen oder freigemachte
Postkarten nicht kopiert oder reproduziert werden.
Das Kopieren und Reproduzieren von Stempeln und Siegeln ist nicht erlaubt.
• Öffentliche und private Dokumente
Bitte beachten Sie das einschlägige Recht zum Kopieren und Reproduzieren von Wertpapieren privater
Unternehmen (z.B. Aktien oder Urkunden), Fahrausweisen, Gutscheinen etc. Es ist in der Regel nicht
erlaubt, diese zu vervielfältigen. In Ausnahmefällen kann jedoch für bestimmte Institutionen eine Sondergenehmigung vorliegen. Kopieren Sie keine Dokumente, die von öffentlichen Einrichtungen oder
privaten Unternehmen ausgegeben werden (z.B. Pässe, Führerscheine, Personalausweise, Eintrittskarten,
Firmenausweise, Essensgutscheine etc.).
• Urheberrechtlich geschützte Werke
Urheberrechtlich geschützte Werke wie Bücher, Musikaufzeichnungen, Gemälde, Drucke, Stadt- und
Landkarten, Zeichnungen, Filme und Fotografi en unterliegen dem Urheberrecht. Bitte beachten Sie, dass
auch Vervielfältigungen und Verwertungen geschützter Werke im privaten Bereich dem Urheberrechtsschutz unterliegen, sodass Sie ggf. die Genehmigung des Autors, Künstlers oder betreffenden Verlages
einholen müssen.
3-De
Page 39

1. Einleitung
Vielen Dank für Ihr Vertrauen in Nikon-Produkte. Dieses Handbuch enthält die vollständige
Bedienungsanleitung für das Diamagazin SF-210. Das Diamagazin SF-210 ist ein Zubehör für
die Nikon- Filmscanner SUPER COOLSCAN 5000 ED und COOLSCAN V ED (nachfolgend nur als
»Scanner« bezeichnet). Das SF-210 ermöglicht das automatisierte Scannen von Kleinbilddias und
nimmt bis zu 50 gerahmte Kleinbilddias (bei einer Rahmenstärke von 1,5 mm) auf. Wie andere
Vorlagenadapter auch lässt sich das Diamagazin SF-210 im laufenden Betrieb des Scanners
einsetzen und herausnehmen.
Dieses Handbuch beschreibt, wie Sie das Diamagazin SF-210 auspacken, zusammensetzen und
in Betrieb nehmen. Eine Übersicht über den Lieferumfang und die wichtigsten Bezeichnungen
des Diamagazins SF-210 fi nden Sie im Kapitel »Das Diamagazin SF-210 in der Übersicht«. Im
Kapitel »Montage und Inbetriebnahme« erfahren Sie, wie Sie das Diamagazin SF-210 in den
Scanner einsetzen. Das Kapitel »Scannen mit dem Diamagazin SF-210« erklärt ausführlich,
wie Sie Dias in das Magazin einlegen und nach dem Scannen wieder herausnehmen. Hinweise
zur Pfl ege und zum Transport des Diamagazins SF-210 entnehmen Sie bitte dem Kapitel »Pfl e-
ge«. Bitte lesen Sie dieses Handbuch vor Gebrauch des SF-210 aufmerksam durch und halten
Sie es für alle Personen griffbereit, die das Gerät nutzen werden. Weitere Informationen zum
Scannen von Kleinbilddias fi nden Sie in der Dokumentation zum Scanner und im Nikon-Scan-
Referenzhandbuch.
De- 4
Page 40

2. Das Diamagazin SF-210 in der Übersicht
Nachfolgend fi nden Sie eine Übersicht über den Lieferumfang und die wichtigsten Bezeichnungen
der Komponenten des Diamagazins.
2.1 Packungsinhalt
Bitte überprüfen Sie nach dem Auspacken des Diamagazins SF -210, ob alle unten aufgeführten
Teile vorhanden sind.
SF-210
Diamagazin SF-210 Bedienungsanleitung
(dieses Handbuch)
2.2 Die Komponenten des Diamagazins SF-210
Piktogramm für die
Ausrichtung der Dias
Status -
leuchte
Andruck-
schlitten
Zufuhrmagazin
Markierung für
maximale Beladung
Mitnehmerplatte für
Diarahmen mit
abgerundeten Kanten
Magazinabdeckung
Andruckschlitten
Auffangmagazin
Führung
Einstellrad
5-De
Page 41

3. Montage und Inbetriebnahme
Vor dem Einsetzen des Diamagazins SF-210 in den Scanner sollten Sie sicherstellen, dass der
Scanner an einem geeigneten Platz aufgestellt ist (nähere Informationen zum Aufstellen des
Scanners entnehmen Sie bitte der Dokumentation zu Ihrem Scanner). Nehmen Sie das Diamagazin
SF-210 nicht an einem Ort in Betrieb, an dem eine der folgenden ungünstigen Bedingungen
vorherrscht:
• Temperaturen über 35 °C oder unter 10 °C
• starke Temperaturschwankungen oder Änderungen der Luftfeuchtigkeit
• Luftfeuchtigkeit unter 20% oder über 60%
• Sonneneinstrahlung (direkt oder refl ektiert)
• Vibrationen oder starke Erschütterungen
• Staub- und Rauchentwicklung
• elektromagnetische Störungen (z.B. durch andere elektronische Geräte)
• Wasserdampf durch Luftbefeuchter oder ähnliche Geräte
Achtung: Die Nichtbeachtung der obigen Sicherheitshinweise kann zu einem Brand
oder einer Fehlfunktion des Scanners führen.
Für die Montage und die Nutzung des Diamagazins SF-210 muss der Scanner auf der Seite liegend
betrieben werden. Bitte orientieren Sie sich an der folgenden Abbildung. Achten Sie auf einen
ausreichenden Abstand zu anderen Gegenständen oder Wänden, um das Diamagazin SF-210
öffnen zu können und eine ausreichende Luftzirkulation sicherzustellen. Lassen Sie mindestens
15 cm Freiraum nach oben und 10 cm an der R ücksei te. Bitte beac hte n Si e, dass bei Ver wend ung
des Diamagazins SF-210 größere Abstände nötig sind, als in der Dokumentation des Scanners
angegeben ist (siehe Abbildung).
De- 6
Page 42

Beim Einsetzen des Diamagazins SF-210 spielt es keine Rolle, ob der Scanner eingeschaltet und
an den Computer angeschlossen ist oder ob er ausgeschaltet ist. Wenn der Scanner eingeschaltet ist, sollten Sie sich jedoch vor dem Einsetzen vergewissern, dass die Statusleuchte konstant
leuchtet. Während die Statusleuchte blinkt, darf das SF-210 oder ein anderer Vorlagenadapter
nicht in den Scanner eingeführt oder herausgenommen werden.
Legen Sie den Scanner auf die Seite, sodass die seitlichen Lüftungslöcher nach oben weisen.
Führen Sie das Diamagazin SF-210 in das Einschubfach ein. Schieben Sie das Diamagazin SF-210
vorsichtig bis zum Anschlag, damit es Kontakt mit den elektrischen Anschlüssen an der inneren
Rückwand des Einschubfachs bekommt. Wenn das Diamagazin SF-210 korrekt eingesetzt ist,
blinkt die Statusleuchte an der Frontseite des Diamagazins (sofern der Scanner eingeschaltet ist).
Die Statusleuchte des Diamagazins SF-210 verhält sich ansonsten genauso wie die Statusleuchte
des Scanners.
Lüftungslöcher
Ein-/Ausschalter
Statusleuchte
Falls sich der Einzugsmechanismus des Diamagazins SF-210 beim Einschalten des Scanners nicht
in der Ausgangsposition befi ndet, sollten Sie ein paar Sekunden warten, bevor Sie das Magazin
mit Dias füllen. Der Einzugsmechanismus wird automatisch in die Ausgangsposition bewegt.
Achtung
• Stellen Sie den Scanner nicht hochkant auf, wenn Sie das Diamagazin SF-210 einsetzen und
nutzen möchten.
• Wenn das Diamagazin SF-210 in einen eingeschalteten Scanner eingeführt wird oder der
Scanner nach dem Einsetzen des SF-210 eingeschaltet wird, wird der Einzugsmechanismus
automatisch in die Ausgangsposition bewegt. Währenddessen blinkt die Statusleuchte des
Diamagazins. Warten Sie, bis die Statusleuchte nicht mehr blinkt, bevor Sie weitere Bedie nungsschritte ausführen.
• Falls sich das Diamagazin SF-210 nicht widerstandslos in den Scanner einführen lässt, neh-
men Sie es wieder heraus und versuchen es erneut. Seien Sie beim Einsetzen vorsichtig und
wenden Sie keine Gewalt an.
7-De
Page 43

4. Scannen mit dem Diamagazin SF-210
Dieses Kapitel beschreibt, wie Sie Dias in das Diamagazin SF-210 einlegen und wieder herausnehmen und wie Sie Fehler beim automatischen Einzug beheben.
4.1 Beladen des Magazins
Setzen Sie die Dias, die Sie scannen möchten, in das Zufuhrmagazin ein. Öffnen Sie dazu die
Magazinabdeckung. Ziehen Sie den Andruckschlitten ans Fachende und haken Sie ihn in die
Arretierung ein, damit er nicht zurückschnellen kann. Stellen Sie die Dias in das Zufuhrfach
und achten Sie darauf, dass alle Dias im Querformat ausgerichtet sind. Die glänzende Seite des
Films sollte zum Einzugsmechanismus weisen (wenn Sie aus der in der Abbildung gezeigten
Blickrichtung auf das Diamagazin schauen, müssen die Dias seitenverkehrt eingesetzt werden).
Das korrekte Ausrichten der Dias vereinfacht den Scanvorgang wesentlich.
Magazinabdeckung
Andruck-
schlitten
Zufuhrmagazin
Markierung für maximale Beladung
Arretierung
Die maximale Anzahl von Dias, die in das Zufuhrmagazin passen, ist von der Rahmenstärke abhängig. Orientieren Sie sich beim Beladen des Zufuhrmagazins an der Markierung für maximale
Beladung. Stellen Sie nur so viele Dias ins Zufuhrmagazin, dass die Markierung nicht überschritten wird. Lösen Sie anschließend den Andruckschlitten aus der Arretierung und führen Sie ihn
vorsichtig an die Diarahmen heran, sodass diese in der aufrechten Position gehalten werden.
Schließen Sie die Magazinabdeckung. Damit sind alle Vorbereitungen zum Scannen getroffen.
Ausführlichere Informationen zum Scannen von Dias in einer Stapelverarbeitung fi nden Sie in
der Dokumentation zum Scanner und im Nikon-Scan- Referenzhandbuch.
De- 8
Page 44

Der automatische Diaeinzug
Der Einzugskanal des Diamagazins SF-210 verfügt über eine verstellbare Öffnung, deren Breite
an die verwendete Rahmenstärke angepasst werden kann. In den meisten Fällen (etwa wenn
Diarahmen mit unterschiedlicher Stärke eingesetzt sind) empfi ehlt es sich, den Einzugskanal auf
die maximale Breite zu öffnen.
Einzugskanal
Dias
Führung
Diamagazin SF-210
(Blick von oben)
Die Öffnungsbreite des Einzugskanals wird mit dem Einstellrad eingestellt.
Führung
Einstellrad
Diarahmen mit gleicher Stärke
Wenn die eingesetzten Diarahmen eine einheitliche Stärke besitzen, sollte die Öffnungsbreite
des Einzugskanals ungefähr dem Anderthalbfachen der Diarahmenstärke entsprechen (siehe
Abbildung). Diese Öffnungsbreite verhindert, dass mehrere Dias gleichzeitig eingezogen werden
oder Diarahmen im Einzug blockieren.
Diamagazin SF-210
(Blick von oben)
9-De
Page 45

Achtung
• Verwenden Sie nur Diarahmen mit einer Stärke von 1,0 bis 3,2 mm und einer Seitenlänge
von 49 bis 50,8 mm. Bei anderen Rahmengrößen und -stärken kann ein ordnungsgemäßer
Betrieb des Diamagazins SF-210 nicht garantiert werden und es besteht die Gefahr, dass die
Diarahmen im Einzug blockieren.
• Bei gebogenen Diarahmen besteht eine hohe Wahrscheinlichkeit, dass sie im Einzug blockieren
– sie sollten daher nicht verwendet werden.
Gebogener Diarahmen
Diamagazin SF-210
(Blick von oben)
• Verwenden Sie keine Diarahmen, deren Oberfl äche ungleichmäßig oder beschädigt ist,
deren Kanten Grate aufweisen oder auf denen Aufkleber oder Etiketten aufgebracht sind.
Andernfalls besteht die Gefahr, dass die Diarahmen im Einzug blockieren.
• Achten Sie darauf, die Diarahmen immer im Querformat in das Magazin einzusetzen. An-
dernfalls besteht die Gefahr, dass die Dias oder das Filmmaterial beschädigt werden oder
die Diarahmen im Einzug blockieren. Orientieren Sie sich beim Ausrichten der Diarahmen am
Piktogramm am Rande des Zufuhrmagazins.
Piktogramm
zur richtigen
Ausrichtung der
Diarahmen
Scanner ⇒
• Setzen Sie nur so viele Diarahmen ins Zufuhrmagazin ein, dass die Markierung für maximale
Beladung nicht überschritten wird. Andernfalls besteht die Gefahr, dass die Diarahmen im
Einzug blockieren.
• Während des Scanvorgangs dürfen Sie den Scanner nicht bewegen.
• Nehmen Sie die Diarahmen aus dem Auffangmagazin, wenn es voll ist. Wenn Sie bei vollem
Auffangmagazin weitere Dias scannen, verursachen Sie einen Diastau im Einzug.
• Nehmen Sie alle Dias aus dem Zufuhrmagazin und Auffangmagazin, bevor Sie den Scanner
ausschalten oder das Diamagazin SF-210 aus dem Scanner herausziehen. Achten Sie auch
darauf, dass sich kein Dia mehr im Einzug befi ndet.
De-10
Page 46

Verwendbare Diarahmen
• Folgende Rahmentypen wurden getestet und werden für die Verwendung mit dem
Diamagazin SF-210 empfohlen:
Fujichrome 1,4–1,5 mm; Kodachrome (Maße wie Fujichrome, Kunststoff oder Pappe); Ekta-
chrome (Maße wie Fujichrome, Kunststoff oder Pappe); Ektachrome Process, Gepe (2 mm
und 3 mm), Agfa GS, Agfa Refl ecta CS, Hama Fix, Kaiser USA, Revue.
• Die folgenden Diarahmentypen können nur in einer bestimmten Ausrichtung ver-
wendet werden:
Rahmentyp Besondere Hinweise
Die Seite mit dem Film muss zum Andruckschlitten weisen. Wenn die separate Mitnehmerplatte verwendet wird, besteht diese
Einschrä nkung nicht.
WESS
Die Seite mit dem Film muss zum Andruckschlitten weisen.
hama DSR
• Die folgenden Rahmentypen haben sich als anfällig für Diastaus erwiesen:
Rahmentyp Besondere Hinweise
Diarahmen, deren
Oberfl äche ungleichmäßig oder beschädigt ist oder deren
Kanten Grate aufweisen können im Einzug
blockieren. Um zu ver-
Kodachrome / PLASTIMOUNTS Pakon
Ektachrome
(Papprahmen mit
abgerundeten Ecken
und einer Stärke von
1,1 mm)
hindern, dass mehrere Dias gleichzeitig
eingezogen werden
oder Diarahmen im
Einzug blockieren,
sollte die Öffnungsbreite des Einzugskanals ungefähr dem
Anderthalbfachen
der Diarahmenstärke
entsprechen.
11- De
Page 47

4.2 Herausnehmen der Dias
Nach dem Scannen werden die Dias automatisch ins Auffangmagazin transportiert. Um die
Dias aus dem Auffangmagazin herauszunehmen, ziehen Sie den Andruckschlitten nach hinten
und entnehmen die Diarahmen mit der Hand. Achten Sie darauf, das Auffangmagazin stets
rechtzeitig zu leeren.
4.3 Verwenden der separaten Mitnehmerplatte
Diarahmen mit einer Stärke von mehr als 2 mm und mit abgerundeten Kanten lassen sich vom
Diamagazin SF-210 möglicherweise nicht fehlerfrei einziehen. Um solche Diarahmen dennoch
verwenden zu können, ist im Lieferumfang des Diamagazins SF-210 eine spezielle Mitnehmerplatte enthalten.
Zur Montage der Mitnehmerplatte an den Mitnehmer des automatischen Einzugs muss der Scanner
an den Computer angeschlossen und das Diamagazin SF -210 in den Scanner eingeführt sein. Vergewissern Sie sich, dass Scanner und Computer eingeschaltet sind und dass Nikon Scan nicht geöffnet
ist. Um die Mitnehmerplatte zu befestigen, muss der Mitnehmer an eine zugängliche Position bewegt
werden. Die Positionierung des Mitnehmers erfolgt mit dem Dienstprogramm FDUtility (Windows)
bzw. Attachment Utility (Mac OS), das bei der Installation von Nikon Scan automatisch mit installiert
wird. Sie fi nden das Dienstprogramm im Nikon-Scan-Ordner auf der Festplatte Ihres Computers
(Windows) bzw. innerhalb des Nikon-Scan-Ordners im Ordner »Utility« (Mac OS).
MacintoshWin dows
Nach einem Doppelklick auf das Symbol des Dienstprogramms wird das Fenster des Programms
geöffnet. Wenn mehrere Scanner an den Computer angeschlossen und eingeschaltet sind,
müssen Sie den Scanner, in den das Diamagazin SF-210 eingesetzt ist, aus einem Einblendmenü
auswählen.
Bitte beachten Sie, dass Nikon Scan nicht mehrere Scanner gleichzeitig ansteuern kann.
De-12
Page 48

Öffnen Sie die Magazinabdeckung und ziehen Sie den Andruckschlitten ans Fachende. Haken
Sie den Andruckschlitten in der Arretierung ein, damit er nicht zurückschnellen kann.
Mit den Pfeilschaltfl ächen in der Steuerleiste des Dienstprogramms FDUtility (Windows) bzw.
Attachment Utility (Mac OS) können Sie den Mitnehmer nach links oder rechts bewegen.
Klicken Sie auf den nach rechts weisenden Doppelpfeil, um den Mitnehmer aus der Ausgangsposition an eine gut zugängliche Position im Zufuhrmagazin zu bewegen. Falls der Mitnehmer
zu weit nach rechts bewegt wurde, klicken Sie auf den nach links weisenden Doppelpfeil, bis
der Mitnehmer an der richtigen Stelle steht. Mit den einfachen Pfeilen der Steuerleiste können
Sie den Mitnehmer zur »Feinjustierung« in kleinen Schritten nach links oder rechts bewegen.
Wenn der Mitnehmer an der richtigen Stelle steht, stecken Sie die Mitnehmerplatte auf den
Mitnehmer. Die Stifte auf der Rückseite der Mitnehmerplatte müssen dabei in die Löcher des
Mitnehmers geführt werden.
Mitnehmerplatte
Wenn Sie sich vom korrekten Sitz der Mitnehmerplatte überzeugt haben, klicken Sie im Dienstprogramm FDUtility (Windows) bzw. Attachment Utility (Mac OS) auf die Schaltfl äche »OK«. Der
Mitnehmer des automatischen Einzugs wird daraufhin in die Ausgangsposition zurückbewegt.
Damit sind alle Vorbereitungen zum Scannen von Diarahmen mit einer Stärke von mehr als 2
mm und mit abgerundeten Kanten abgeschlossen.
Achtung
Vergewissern Sie sich, dass die Mitnehmerplatte fest auf dem Mitnehmer sitzt. Falls die Mitnehmerplatte nicht richtig montiert wurde, werden die Dias möglicherweise nicht korrekt eingezogen. Eine lose angebrachte Mitnehmerplatte kann eine Beschädigung des Diamagazins
SF-210 verursachen.
Wenn die eingesetzten Diarahmen eine einheitliche Stärke besitzen, sollte die Öffnungsbreite
des Einzugskanals ungefähr dem Anderthalbfachen der Diarahmenstärke entsprechen. Wenn
die Öffnung zu schmal eingestellt ist, stößt die Mitnehmerplatte an die Kante der Führung und
die Dias werden nicht richtig eingezogen.
13- De
Page 49

4.4 Entfernen der Mitnehmerplatte
Die separate Mitnehmerplatte ist für Diarahmen mit einer Rahmenstärke von weniger als 2 mm
oder mit nicht-abgerundeten Kanten nicht geeignet. Um solche Diarahmen einziehen zu können,
müssen Sie die Mitnehmerplatte wieder entfernen. Gehen Sie wie oben beschrieben vor, um
den Mitnehmer des automatischen Einzugsmechanismus an eine gut zugängliche Position zu
bewegen, und ziehen Sie die Mitnehmerplatte vom Mitnehmer ab. Klicken Sie im Dienstprogramm
FDUtility (Windows) bzw. Attachment Utility (Mac OS) auf die Schaltfl äche »OK«. Der Mitnehmer
des automatischen Einzugs wird daraufhin in die Ausgangsposition zurückbewegt.
4.5 Beseitigen eines Diastaus
Falls einmal ein Dia im automatischen Einzug blockieren sollte, öffnen Sie die Magazinabdeckung
und nehmen alle Dias aus dem Zufuhrmagazin und aus dem Auffangmagazin heraus. Ziehen
Sie den Andruckschlitten ans Fachende und haken Sie ihn in der Arretierung ein, damit er nicht
zurückschnellen kann.
Die Vorgehensweise beim Beseitigen eines Diastaus hängt davon ab, an welcher Stelle im automatischen Einzug der Diastau auftritt. Wenn das blockierende Dia noch zu sehen ist und der
automatische Einzug nicht gesperrt ist, können Sie das Dia mit der Hand entnehmen. Wenn der
automatische Einzug jedoch gesperrt ist, müssen Sie Nikon Scan beenden und das Dia mit Hilfe
des Dienstprogramms FDUtility (Windows) bzw. Attachment Utility (Mac OS) aus dem Einzug
heraustransportieren. (Das Dienstprogramm FDUtility (Windows) bzw. Attachment Utility (Mac
OS) ist im Lieferumfang Ihres Scanners enthalten und wird bei der Installation von Nikon Scan
automatisch mit installiert.)
De-14
Page 50

Starten Sie das Dienstprogramm FDUtility (Windows) bzw. Attachment Utility (Mac OS). Sie
fi nden das Dienstprogramm im Nikon-Scan-Ordner auf der Festplatte Ihres Computers (Windows)
bzw. innerhalb des Nikon-Scan-Ordners im Ordner »Utility« (Mac OS).
MacintoshWin dows
Nach einem Doppelklick auf das Symbol des Dienstprogramms wird das Fenster des Programms
geöffnet. Wenn mehrere Scanner an den Computer angeschlossen und eingeschaltet sind,
müssen Sie den Scanner, in den das Diamagazin SF-210 eingesetzt ist, im oberen Einblendmenü
auswählen.
Bitte beachten Sie, dass Nikon Scan nicht mehrere Scanner gleichzeitig ansteuern kann.
Wenn das Dia beim Einziehen blockiert, klicken Sie im Dienstprogramm FDUtility (Windows) bzw.
Attachment Utility (Mac OS) auf den nach links weisenden Doppelpfeil, um den Mitnehmer des
automatischen Einzugsmechanismus zurückzubewegen. Anschließend können Sie das Dia mit
der Hand entnehmen. Wenn an dem Diastau zwei oder mehrere Dias beteiligt sind, die übereinander geschoben sind, entnehmen Sie zuerst das Dia, das sich auf der Magazinseite befi ndet.
Falls der Diastau beim Auswerfen am Eingang des Auffangmagazins auftrat, klicken Sie auf den
nach rechts weisenden Doppelpfeil, um den Mitnehmer des automatischen Einzugsmechanismus
aus dem Weg zu bewegen. Drücken Sie das Dia vorsichtig in Richtung Scanner, bis es wieder
freigegeben ist. Klicken Sie anschließend auf den nach links weisenden Doppelpfeil, um den
automatischen Einzug wieder zurückzubewegen. (Falls sich der Diastau auf diese Weise nicht
beheben lässt, wenden Sie sich bitte zwecks Reparatur an den Nikon- Kundendienst.)
15-De
Page 51

5. Pfl ege
Dieses Kapitel beschreibt, worauf Sie beim Reinigen, bei der Aufbewahrung und beim Transport
des Diamagazins SF-210 achten müssen.
5.1 Reinigung
Ziehen Sie das Diamagazin SF-210 aus dem Scanner heraus, bevor Sie mit dem Reinigen beginnen. Das Gehäuse des Diamagazins SF-210 besteht aus Kunststoff und darf nicht mit Alkohol,
Verdünner oder anderen scharfen Reinigungsmitteln in Berührung kommen. Entfernen Sie Staub
mit einem Blasebalg oder einem weichen, trockenen Tuch. Bei hartnäckigeren Flecken können
Sie ein angefeuchtetes Tuch mit etwas Neutralreiniger oder Flüssigseife verwenden.
Achtung: Verwenden Sie niemals Wasser oder lösungsmittelhaltige Reinigungsmittel
wie Verdünner, Reinigungsbenzin oder Alkohol. Wenn solche Flüssigkeiten ins Innere des
Gehäuses gelangen, können Sie einen Brand oder einen elektrischen Schlag verursachen.
Lösungsmittelhaltige Reinigungsmittel können das Kunststoffgehäuse des Diamagazins
SF-210 angreifen und dauerhaft beschädigen.
5.2 Aufbewahrung
Wenn Sie das Diamagazin SF-210 für einen längeren Zeitraum nicht nutzen wollen, sollten Sie
es aus dem Scanner herausnehmen. Bewahren Sie das Diamagazin SF-210 an einem Ort auf, an
dem die Temperatur zwischen –10 °C und +50 °C liegt und die Luftfeuchtigkeit nicht mehr als
60% beträgt (nicht kondensierend). Bewahren Sie das Diamagazin SF-210 nicht an Orten auf,
an denen plötzliche und starke Temperaturschwankungen auftreten können oder eine hohe
Luftfeuchtigkeit herrscht.
5.3 Transport
Für den Transport nehmen Sie das Diamagazin SF-210 aus dem Scanner und verpacken es in
der Originalverpackung.
De-16
Page 52

6. Technische Daten
Vorlagen: Gerahmte Kleinbilddias (Rahmenstärke: 1,0–3,2 mm; Seiten-
länge: 49–50,8 mm)
Max. Anzahl Dias: ca. 50 Dias (bei einer Rahmenstärke von 1,5 mm)
Magazingröße: ca. 78,5 mm
Betrieb: Scanner (SUPER COOLSCAN 5000 ED / SUPER COOLSCAN 4000
ED) in waagerechter Stellung
Einzug: Automatisch, mit eingebautem Motor
Referenzzeiten für Einziehen: ca. 6 Sekunden pro Dia
Einziehen/Auswerfen: Auswerfen: ca. 6 Sekunden pro Dia
Abmessungen: 85 × 142 × 325 mm (H × B × T)
Gewicht: ca. 820 g
Stromversorgung: Über Steckverbindung an der inneren Rückwand des Einschub-
fachs des Scanners (5 V; 0,7 A)
Betriebsbedingungen: Temperatur: +10 bis +35 °C
Luftfeuchtigkeit: 20 bis 60% (nicht kondensierend)
17- De
Page 53

Chargeur automatique de diapositives
SF-210
Table des matières
Avertissements................................................................................................................ 2
1. Présentation ................................................................................................................ 4
2. Pièces et accessoires ................................................................................................... 5
3. Installation ..................................................................................................................6
4. Utilisation du SF-210...................................................................................................8
5. Entretien....................................................................................................................16
6. Caractéristiques ........................................................................................................ 17
Fr
Page 54

Avertissements
• Toute reproduction, intégrale ou partielle, de ce manuel est strictement interdite sans l’auto-
risation préalable de Nikon Inc.
• Les informations contenues dans ce manuel pourront faire l’objet de modifi cations sans
préavis.
• Nous avons fait tout notre possible pour éditer un manuel sans faille, mais dans le cas où
vous rencontreriez la moindre erreur, veuillez nous en faire part.
• Nous déclinons toute responsabilité des conséquences résultant de l’utilisation de ce produit,
nonobstant les termes susmentionnés.
Pour trouver plus facilement les informations que vous recherchez, les conventions et symboles
suivants ont été utilisés :
Cette icône indique les avertissements et les informations dont vous devez avoir connaissance avant d’utiliser ce produit Nikon et ce, afi n d’éviter toute blessure grave ou fatale.
Cette icône signale les mesures de précaution dont vous devez avoir connaissance avant
d’utiliser ce produit pour ne pas risquer de l’endommager.
Cette icône indique les remarques et les informations dont vous devez avoir connaissance
avant d’utiliser ce produit.
Propriété industrielle
Tous les noms de marque mentionnés dans ce manuel sont les marques, déposées ou non, de
leurs détenteurs respectifs.
Illustrations
Les illustrations de ce manuel représentent le SUPER COOLSCAN 5000 ED.
Fr-2
Page 55

Federal Communications Commission (FCC) Radio Frequency Interference Statement
Cet équipement a été testé et trouvé conforme aux limites défi nies pour les appareils numériques de classe
B selon la partie 15 de la réglementation FCC. Ces limites assurent une protection raisonnable contre les
interférences dangereuses lorsque l’équipement est utilisé en environnement résidentiel. Cet équipement
génère, utilise et peut irradier des radiofréquences qui peuvent, en cas d’une installation et d’une utilisation
contraires aux instructions, provoquer des interférences nuisibles aux communications radio. Cependant, rien
ne permet d’assurer que ce matériel ne provoquera pas des interférences dans une installation particulière.
Si ce matériel provoque effectivement des interférences préjudiciables à la réception radio ou télévisée, ce
qui peut être déterminé en l’allumant et en l’éteignant, il est conseillé d’essayer de corriger ces interférences
à l’aide de l’une ou de plusieurs des mesures suivantes:
• Réorientez ou repositionnez l’antenne de réception.
• Augmentez la distance séparant l’équipement du récepteur.
• Connectez l’appareil photo à une prise reliée à un circuit différent de celui où est connecté le récep-
teur.
• Consultez un revendeur ou un technicien radio /télévision spécialisé
ATTENTION
Modifi cations
Le FCC demande qu’il soit notifi é à l’utilisateur que tout changement ou modifi cation sur cet appareil
qui n’aurait pas été expressément approuvé par Nikon Corporation peut annuler tout droit à l’utilisateur
d’utiliser l’équipement.
Notice à l’attention des utilisateurs canadiens
ATTENTION
Cet appareil numérique de la classe B respecte toutes les exigences du Règlement sur le matériel brouilleur
du Canada.
CAUTION
This class B digital apparatus meets all requirements of the Ca na di an Interference Causing Equipment
Reg u la tions.
Avis concernant l’interdiction de copie ou de reproduction
Sachez que la simple possession de matériel copié ou reproduit par un scanner peut être punie par la loi.
• Éléments dont la copie ou la reproduction sont interdites par la loi
Ne copiez ni ne reproduisez des billets de banque, des pièces, des titres, des obligations d’État ou d’auto-
rités locales, même si ces copies ou reproductions sont estampillées (Spécimen).
La copie ou la reproduction de billets de banque, de pièces ou de titres circulant à l’étranger sont inter-
dites.
La copie ou la reproduction de timbres postaux ou de cartes postales neufs émis par le gouvernement
sont interdites.
La copie ou la reproduction de timbres fi scaux émis par le gouvernement, et de documents authentifi és
stipulés par la loi, sont interdites.
• Avertissements sur certaines copies et reproductions
Le gouvernement a donné des avertissements concernant la copie ou la reproduction de titres émis par
des sociétés privées (actions, billets à ordre, chèques, chèques-cadeaux, etc.), de coupons de circulation,
ou de bons, sauf dans le cas où un minimum de copies indispensables doivent être fournies par une
société à des fi ns commerciales. Ne copiez ni ne reproduisez des papiers d’identité offi ciels, des licences
émises par les pouvoirs publics et par des groupes privés, des cartes d’identité, des tickets-restaurants,
et autre tickets monnayables.
• Respect de la propriété intellectuelle
La copie ou la reproduction de travaux créatifs soumis à un droit de reproduction comme les livres, la
musique, les peintures, les impressions sur bois, les cartes, les dessins, les fi lms et les photographies
est régie par des lois nationales et internationales de copyright. L’utilisation de ce produit à des fi ns de
reproduction illégale, ainsi que toute infraction aux lois de copyright sont interdites.
3-Fr
Page 56

1. Présentation
Merci d’avoir fait l’acquisition du chargeur diapositives SF-210 pour les scanners de fi lm Nikon
5000 ED (SUPER COOLSCAN 5000 ED) et 4000 ED (SUPER COOLSCAN 4000 ED) (dans les
pages suivantes, “ le scanner ” fait référence à ces deux modèles). Le SF-210, qui peut contenir
jusqu’à 50 diapositives de 1,5mm d’épaisseur, permet de numériser automatiquement une suite
de diapositives 24x36. Comme les autres adaptateurs destinés au 5000 ED, le SF-210 peut être
inséré même si le scanner est sous tension et raccordé à un ordinateur.
Ce manuel décrit le chargeur, les étapes nécessaires à sa confi guration et à son insertion dans
le scanner. Le premier chapitre, “ Descriptif et accessoires ” présente le contenu du lot et
les différentes parties du chargeur. Le deuxième, “ Installation ” indique comment insérer le
chargeur dans le scanner. Dans “ Utilisation du SF-210 ”, les opérations de chargement et de
retrait des diapositives sont décrites. Le dernier chapitre, “ Maintenance ” concerne l’entretien
et le transport du chargeur. Veuillez lire attentivement toutes les instructions pour tirer profi t
au maximum de votre SF-210. Vous pouvez également trouver des informations relatives à la
numérisation des diapositives dans le Manuel de l’utilisateur et dans le Manuel de référence
de Nikon Scan fournis avec le scanner.
Nous espérons que vous trouverez ce manuel utile.
Fr-4
Page 57

2. Pièces et accessoires
Cette section répertorie les éléments présents dans l’emballage de votre adaptateur et identifi e
les pièces du SF-210.
2.1 Contenu du lot
Après avoir acheté le SF-210, vérifi ez que votre lot contient tous les éléments indiqués ci-dessous.
SF-210
Chargeur automatique
de diapositives SF-210
2.2 Pièces du SF-210
Témoin DEL
Méthode d’insertion
des diapositives
Plateau pousseur
de diapositives
Manuel de l’utilisateur
(ce manuel)
Plateau de réglage
du chargeur
Marque de
référence
Accessoires d’aide au
chargement pour dia-
positives à bord arrondi
Couvercle du
magasin
Plateau pousseur
de diapositives
Magasin de sortie
Molette de réglage
du chargeur
Magasin d’entrée
5-Fr
Page 58

3. Installation
Avant d’installer le SF-210, assurez-vous que votre scanner est installé dans un emplacement
convenable, comme décrit dans le Guide d’utilisation et le manuel de référence fournis avec
votre scanner. Il est conseillé d’éviter d’utiliser le SF-210 où :
• la température est supérieure à 35ºC ou inférieure à 10ºC
• il serait soumis à la condensation due à des changements radicaux de température
• l’humidité est inférieure à 20% ou supérieure à 60%
• il serait exposé à la lumière directe ou réfl échie du soleil
• il pourrait être soumis à des vibrations excessives ou à de violents chocs physiques
• l’atmosphère est très poussiéreuse
• il serait exposé au brouillage radioélectrique d’autres dispositifs électroniques
• il serait exposé à de la vapeur d’eau (ex :d’un humidifi cateur)
• il serait exposé à de la fumée.
Attention : La non observation des précautions énoncées ci-dessus pourrait entraîner
un incendie ou un mauvais fonctionnement du scanner.
Lors de l’utilisation du SF-210, installez le scanner comme indiqué ci-dessous. Il faut laisser suffi samment d’espace autour du scanner pour permettre au couvercle du magasin de s’ouvrir et pour
assurer une ventilation convenable. Il doit y avoir au moins 15 cm d’espace au- dessus de l’unité
et 10 cm à l’arrière. L’espace nécessaire lorsque le SF-210 est monté, est indiqué ci- dessous.
Fr-6
Page 59

Le SF-210 peut être monté sur le scanner que celui-ci soit éteint ou allumé, et s’il est connecté
à un ordinateur. Si le scanner est allumé, avant de monter l’adaptateur, vérifi ez que le témoin
DEL est fi gé. Le SF-210 ne doit pas être inséré ou retiré lorsque le témoin DEL clignote.
Positionnez le scanner comme indiqué ci-dessous, les orifi ces de ventilation dirigés vers le haut.
Insérez le SF-210 dans la fente destinée à l’adaptateur jusqu’à ce que le chargeur soit complètement enfoncé. Le chargeur doit être orienté comme illustré ci -dessous. Poussez-le jusqu’à ce
que son connecteur arrière soit inséré convenablement dans la “ prise ” située au fond de la
fente. Le chargeur est inséré correctement si le témoin DEL situé à l’avant du chargeur s’allume
lors de la mise sous tension du scanner. Si le scanner est sous tension lorsque vous insérez le
chargeur, le témoin DEL du chargeur clignote afi n de signaler que le chargeur a été inséré correctement. Dans tous les autres cas, le témoin DEL du chargeur fonctionne de la même manière
que celui du scanner.
Orifi ces de
ventilation
Témoin DEL
Interrupteur marche / arrêt
Si le SF-210 n’est pas dans sa position initiale quand le scanner est allumé, il faudra attendre
quelques secondes pour que le cycle d’initialisation s’effectue avant de pouvoir insérer les diapositives.
Précautions
• Ne positionnez pas le scanner sur son socle lors de l’insertion, du retrait ou de l’utilisation du
SF-210.
• Attendez jusqu’à ce que le témoin DEL se fi ge ou que le scanner soit éteint avant d’insérer
ou de retirer l’adaptateur. N’essayez pas de retirer ou d’insérer l’adaptateur lorsque le scanner
est en marche.
• Quand le SF-210 est inséré dans le scanner en position allumé ou lorsque vous mettez sous
tension le scanner connecté avec le SF-210, le mécanisme de chargement se réinitialise et le
DEL clignote pendant cette opération. N’essayez pas de travailler pendant ce cycle de réinitialisation.
• Si l’adaptateur ne peut être inséré facilement, retirez-le de la fente du scanner et essayez à
nouveau. Ne forcez pas.
7-Fr
Page 60

4. Utilisation du SF-210
Cette section explique comment mettre en place le SF-210, comment retirer des diapositives, et
comment régler les problèmes de blocage de diapositives.
4.1 Mise en place du chargeur
Les diapositives à numériser doivent être insérées dans le magasin d’entrée. Pour charger le magasin, ouvrez le couvercle du magasin, poussez au maximum le plateau pousseur de diapositives
du magasin d’entrée, et bloquez-le dans l’encoche pour qu’il ne puisse pas revenir à sa position
première. Placez les diapositives dans le magasin avec leur ouverture orientée verticalement et
avec leur surface d’émulsion tournée vers le plateau pousse diapositives (les images sur les diapositives doivent être inversées lorsqu’elles sont vues depuis le côté du magasin). La numérisation
sera considérablement simplifi ée si les diapositives sont toutes insérées dans le même sens.
Couvercle du magasin
Plateau
pousseur
de diaposi-
tives
Magasin
d’entrée
Marque de référence
Encoche
Les diapositives peuvent être empilées dans le magasin d’entrée jusqu’aux marques de références. N’ajoutez pas de diapositives derrière ces marques. Une fois que le magasin d’entrée est
chargé, dégagez le plateau pousseur de diapositives de l’encoche et faites-le glisser jusqu’à ce
qu’il soit contre les diapositives.
Fermez le couvercle du magasin. Vous êtes maintenant prêt pour la numérisation. Pour des
informations détaillées sur la numérisation consécutive automatique de plusieurs diapositives,
reportez-vous au Manuel de l’utilisateur et au Manuel de référence de Nikon Scan fournis
avec le scanner.
Fr-8
Page 61

Passage pour diapo
Dans la plupart des cas (par exemple, lors de la numérisation de diapositives dont les caches ont
des épaisseurs différentes), le chargeur diapositives fonctionne de manière optimale lorsque le
passage pour diapo est entièrement ouvert.
Passage pour
diapo
Diapositive
Réglez la largeur du passage pour diapo à l’aide de la molette de réglage du chargeur.
Plateau de réglage
du chargeur
Plateau de réglage du chargeur
Chargeur diapositives
SF-210 (vu de dessus)
Molette de réglage du
chargeur
Numérisation de diapositives ayant la même épaisseur
Si les caches ont tous la même épaisseur, la largeur du passage pour diapo doit être égale
à l’épaisseur x1,5 de la diapositive (voir l’illustration ci- dessous). Cela permettra d’éviter que le
chargeur ne se bloque ou que plusieurs diapositives ne soient insérées à la fois.
Chargeur diapositives
SF-210 (vu de dessus)
9-Fr
Page 62

Précautions
• Le SF -210 ne fonctionne pas de la même manière avec les différents types de diapositives.
Insérez des diapositives 24x36 dont les caches ont une épaisseur de 1 à 3,2mm et une largeur
de 49 à 50,8mm. Avec d’autres diapositives, le chargeur risque de se bloquer.
Les diapositives dont les caches sont très gondolés peuvent provoquer le blocage du chargeur.
•
Diapositive gondolée
SF-210 (vu du dessus)
• N’insérez pas des caches dont les bords sont écaillés ou abîmés, des caches sur lesquels on
a apposé un cachet ou une étiquette, ni des caches dont la surface est inégale. Sinon, le
chargeur risque de se bloquer.
• Ne chargez pas de diapositives dans l’adaptateur avec le plus long côté de leur ouverture
face au scanner : cela pourrait endommager le fi lm ou le cache de la diapositive, ou encore
provoquer le blocage de l’adaptateur. Insérez les diapositives comme indiqué sur l’autocollant
indiquant la méthode d’insertion, situé à côté du magasin d’entrée.
Autocollant
du guide
d’insertion
Scanner ⇒
• N’ajoutez pas de diapositives dans le magasin d’entrée derrière les marques de référence :
cela peut provoquer le blocage du chargeur.
• Ne bougez pas le scanner lorsque la numérisation est en cours.
• Retirez les diapositives numérisées du magasin de sortie avant que celui-ci ne soit plein. Si
vous poursuivez la numérisation alors qu’il n’y a plus de place dans le magasin de sortie, vous
risquez de provoquer le blocage du chargeur.
• Ne retirez pas l’adaptateur lorsque la numérisation est en cours.
• Avant d’éteindre le scanner ou de retirer le chargeur automatique, assurez-vous que toutes
les diapositives sont retirées du logement et que la dernière diapositive est éjectée.
Fr-10
Page 63

Cache pouvant être utilisé avec le SF-210
• Les caches suivants ont été testés et approuvés pour une utilisation avec le SF-210 :
FUJICHROME 1,4–1,5 mm ; caches KODACHROME en plastique ou en carton (angles droits)
dont la forme est similaire aux caches FUJICHROME ; caches EKTACHROME en plastique ou en
carton (angles droits) dont la forme est similaire aux caches FUJICHROME ; Ektachrome PROCESS ;
GEPE 2 mm ; GEPE 3 mm ; AGFA CS ; AGFA refl ecta CS ; hama fi x ; Kaiser USA ; REVUE
• Les caches suivants ne peuvent être utilisés que dans certaines orientations :
Cache Remarques
Insérez la diapositive, surface d’émulsion faisant face au plateau pousseur de diapositives.
Si vous utilisez l’accessoire d’aide au chargement, vous pouvez insérer les diapositives dans
n’importe quel sens.
WESS
Insérez la diapositive, surface d’émulsion
faisant face au plateau pousseur de diapositives.
hama DSR
• Les caches suivants sont connus pour créer des blocages :
Cache Remarques
Caches Kodachrome/ PLASTIMOUNTS Pakon
Ektachrome en carton
de 1,1mm d’épaisseur,
avec coins arrondis
Les caches dont les
bords sont écaillés
ou abîmés, ou dont
la surface est inégale
ou irrégulière peuvent
provoquer le blocage
du chargeur. Afin
d’éviter que le chargeur ne se bloque ou
que plusieurs diapositives ne soient insé rées à la fois, réglez
le passage pour diapo
pour que sa largeur
soit égale à l’épaisseur x1,5 des caches
des diapositives.
11- Fr
Page 64

4.2 Retirer les diapositives
Une fois numérisées, les diapositives seront éjectées dans le magasin de sortie. Pour retirer les
diapositives du magasin de sortie, tirez le plateau pousseur de diapositives et retirez les diaposi tives. Vous devez retirer les diapositives avant que le magasin de sortie ne soit plein.
4.3 Utilisation de l’accessoire d’aide au chargement
Les caches épais (au delà de 2 mm) avec des bords arrondis ne sont pas pris en charge correctement par le chargeur automatique. L’accessoire d’aide au chargement en plastique fourni permet
de remédier à ce problème. Un programme spécial fourni avec le logiciel Nikon Scan permet
l’utilisation de cet accessoire lors de son introduction ou de son extraction du chargeur.
Pour pouvoir fi xer le mécanisme de chargement, vous devez raccorder le scanner à l’ordinateur.
Ces derniers doivent être tous les deux sous tension mais Nikon Scan ne doit pas être en cours
d’exécution. Après avoir inséré le SF-210 dans le scanner comme décrit ci-dessus, ouvrez le dossier
dans lequel vous avez installé Nikon Scan puis double-cliquez sur l’icône FDUtility (Windows)
ou sur l’icône Attachment Utility dans le sous-dossier Utility (Macintosh). Le programme
d’aide au chargement démarre.
MacintoshWin dows
La fenêtre du “ programme d’aide au chargement ” (FDUtility) apparaît sur le bureau. Si plusieurs
scanners sont raccordés à votre ordinateur et mis sous tension, sélectionnez le scanner dans lequel
le SF-210 est inséré, à partir du menu déroulant select a scanner (sélectionner un scanner).
Nikon Scan ne prend pas en charge la connexion simultanée de plusieurs scanners.
Fr-12
Page 65

Ouvrez le couvercle du SF-210, ramenez en arrière la plaque de pression du magasin de chargement et coincez-le dans l’encoche prévue à cet effet.
Cliquez sur les double-fl èches vers la droite dans le “ programme d’aide au chargement ” (FDUtility) pour faire bouger le mécanisme de chargement afi n qu’il soit entièrement visible. Si vous
le déplacez trop, utilisez les double-fl èches gauches pour ajuster sa position. Les fl èches simples
permettent d’effectuer des réglages précis. Une fois que le mécanisme est visible, insérez alors les
chevilles de l’accessoire d’aide au chargement dans les trous du mécanisme de chargement.
Chargement
Cliquez sur le bouton OK dans la fenêtre du “ programme d’aide au chargement ” (FD Utility)
pour replacer le mécanisme de chargement dans sa position initiale. Vous êtes maintenant prêt
pour la numérisation.
Attention
Attention : veillez à ce que l’accessoire soit bien fi xé sur la réglette: s'il se détache, il pourrait
alors empêcher le mécanisme de fonctionner et peut endommager le système.
Lors de l’utilisation de l’accessoire d’aide au chargement pour numériser des diapositives dont
l’épaisseur est la même, réglez le passage pour diapo afi n de laisser un espace égal à l’épaisseur
des caches des diapositives x1,5. Si le passage pour diapo est trop étroit, l’accessoire risque de
chevaucher le plateau de réglage du chargeur et provoquer ainsi des erreurs de chargement.
13- Fr
Page 66

4.4 Retirer l’accessoire d’aide au chargement
Pour numériser les diapositives fi nes où l’épaisseur ne dépasse pas 2 mm, vous êtes obligé de
retirer l’accessoire. Utilisez l’utilitaire logiciel pour faire déplacer le mécanisme de chargement
comme décrit ci-dessus puis retirez la pièce en plastique et cliquez sur OK pour renvoyer le
mécanisme de chargement vers sa position initiale.
4.5 Que faire si une diapositive bloque
La méthode à employer dans ce cas dépend de la position de la diapositive coincée. Lorsqu’une
diapositive bloque, ouvrez le couvercle et examinez le magasin. S’il vous est possible de voir dans
le magasin la diapositive coincée, vous pouvez la retirer avec vos doigts ou à l’aide d’une paire
de brucelles. Veillez à ne pas endommager le mécanisme de chargement ou la diapositive.
La méthode employée pour résoudre ce problème dépend de la position du mécanisme de
chargement au moment du blocage. Si la diapositive bloquée est visible dans le magasin et que
le mécanisme de chargement est revenu à sa position initiale, à l’avant de l’unité, vous pouvez
retirer la diapositive avec vos doigts. Si le mécanisme de chargement s’est bloqué au cours de
l’insertion d’une diapositive, vous devez quitter Nikon Scan et faire appel au programme d’aide
au chargement pour effectuer le déblocage (le programme d’aide au chargement est destiné
exclusivement au SF-210, distribué avec le logiciel Nikon Scan fourni avec le scanner).
Fr-14
Page 67

Pour lancer le programme d’aide au chargement, ouvrez le dossier dans lequel vous avez installé
Nikon Scan puis double-cliquez sur l’icône FDUtility (Windows) ou sur l’icône Attachment
Utility dans le sous-dossier Utility (Macintosh).
MacintoshWin dows
La fenêtre du programme apparaît sur le bureau. S'il y a plus de un scanner connecté à votre
ordinateur et en position allumé, sélectionnez alors celui qui travaille avec le SF-210.
Nikon Scan ne prend pas en charge la connexion simultanée de plusieurs scanners.
Si le mécanisme de chargement est bloqué lors de l’introduction d’une diapositive, cliquez sur
la double-fl èche gauche dans la fenêtre du “ programme d’aide au chargement ” pour replacer le mécanisme de chargement à sa position initiale, puis retirez la diapositive coincée avec
vos doigts. Si deux ou plus de deux diapositives se coincent en se superposant, retirez d’abord
celle du côté du magasin. Si le cache est bloqué à l’entrée du magasin lors de son éjection du
chargeur, cliquez sur la double-fl èche droite pour dégager le mécanisme de chargement puis
poussez doucement la diapositive en arrière dans la direction du scanner pour la débloquer.
Cliquez alors sur la double -fl èche gauche pour replacer le mécanisme à sa position initiale. (Si
le mécanisme reste bloqué, il est recommandé de faire parvenir le chargeur à un service de
maintenance Nikon, en vue de sa réparation).
15-Fr
Page 68

5. Entretien
Cette section explique comment nettoyer, stocker, et transporter le SF-210.
5.1 Nettoyage
Avant de nettoyer l’adaptateur, retirez-le du scanner. L’extérieur du scanner étant en plastique,
il ne faut pas le nettoyer avec des produits volatiles tels que l’alcool ou les dissolvants pour peinture. Utilisez un plumeau pour dépoussiérer l’adaptateur, ou nettoyez la surface à l’aide d’un
chiffon sec. Si cela ne suffi t pas à enlever toutes les impuretés, vous pouvez utiliser un chiffon
légèrement humecté d’un détergent neutre ou d’un savon liquide.
Attention : Évitez l’eau ou les liquides volatiles tels que l’alcool, la benzine ou les
dissolvants pour peinture. Si un tel liquide pénétrait à l’intérieur de l’adaptateur, cela
entraînerait un incendie ou une décharge électrique. Les produits chimiques volatiles
pourraient également tacher le plastique extérieur de l’adaptateur.
5.2 Stockage
Lorsque vous n’avez pas l’intention d’utiliser le scanner pendant une période prolongée, retirez-le
du scanner. Rangez-le dans un endroit sec, bien ventilé où la température est située entre –10°C
et +50°C et l’humidité inférieure à 60%. Ne rangez pas le chargeur dans un endroit où il serait
soumis à des changements brusques de températures ou à la condensation.
5.3 Transport
Lors du transport du scanner, retirez le chargeur du scanner et remettez-le dans son emballage
d’origine.
Fr-16
Page 69

6. Caractéristiques
Film : Diapositives 24×36 (épaisseur de 1 à 3,2mm ;
largeur de 49 à 50,8mm)
Nombre maximal de diapositives : Environ 50 diapositives (référence : caches de 1,5mm
d’épaisseur)
Espace magasin : Environ 78,5mm
Régime d’exploitation : Scanner (SUPER COOLSCAN 5000 ED / SUPER
COOLSCAN 4000 ED) posé sur son socle ; SF-210
raccordé directement au connecteur situé à l’arrière
de la fente de l’adaptateur du scanner
Mécanisme de chargement : Automatique avec moteur intégré
Temps de chargement/ d’éjection : Chargement : environ 6 secondes par diapositive
(référence) Ejection : environ 6 secondes par diapositive
Dimensions : 142 mm (L) × 325 mm (P) × 85 mm (H)
Poids : Environ 820 g
Alimentation électrique : 5 VDC, 0,7 A ou moins, fournie par le scanner
Milieu d’exploitation : Température +10°C à +35°C
Humidité 20% à 60% (sans condensation)
17- Fr
Page 70

Alimentador de diapositivas SF-210
Contenido
Advertencias ................................................................................................................... 2
1. Información general ................................................................................................... 4
2. Componentes y accesorios......................................................................................... 5
3. Instalación ................................................................................................................... 6
4. Utilización del SF -210................................................................................................. 8
5. Mantenimiento .........................................................................................................16
6. Especifi caciones ........................................................................................................ 17
Es
Page 71

Advertencias
• Queda prohibida la reproducción de todo o parte de este manual sin autorización salvo en
caso de previa autorización de Nikon Inc.
• La información que contiene este manual es susceptible de ser modifi cada sin necesidad de
aviso previo.
• Hemos hecho todo lo posible por elaborar un manual perfecto. No obstante, si encontrara
algún error, le agradeceríamos que nos lo comunicara.
• No nos hacemos responsables de las consecuencias que se deriven de una utilización que no
se atenga estrictamente a las instrucciones de este manual.
Para facilitarle la búsqueda de la información que necesite, se utilizan los siguientes símbolos
y convenciones:
Este símbolo indica un avi so, informa ción q ue debería leer antes de utilizar este producto
Nikon para evitar lesiones graves e incluso mortales.
Este símbolo indica una precaución, información que debería leer antes de utilizar el
producto para evitar dañarlo.
Este símbolo indica una observación, información que debería leer antes de utilizar el
producto.
Información sobre marcas comerciales
Todas las marcas mencionadas en este manual son marcas comerciales o registradas de sus
respectivos proprietarios.
Ilustraciones
En las ilustraciones de este manual aparece el SUPER COOLSCAN 5000 ED.
Es-2
Page 72

Declaración de interferencias con radiofrecuencias de la Comisión Federal de
Comunicaciones (FCC)
Este equipo ha sido probado y es conforme con los límites establecidos para los aparatos digitales de la
clase B, según la sección 15 de las normas de la FCC. Estos límites se han establecido para proporcionar una
protección razonable contra interferencias peligrosas en instalaciones residenciales. Este equipo genera,
utiliza y puede emitir radiofrecuencias y, si no se instala y utiliza como indican las instrucciones, puede causar
interferencias con las comunicaciones por radio. Sin embargo, no se puede garantizar que no se produzcan
interferencias en una instalación en concreto. Si este aparato causa interferencias en la recepción de la
televisión o la radio, lo cual puede comprobarse encendiendo y apagando el equipo, se ruega al usuario
que intente corregir las interferencias tomando una o varias de las siguientes medidas:
• Reorientar o colocar en otro lugar la antena de recepción.
• Aumentar la separación entre el equipo y el aparato receptor.
• Conectar el equipo a una toma de un circuito diferente al que está conectado el aparato receptor.
• Consultar al distribuidor o a un técnico experimentado de televisión / radio.
ADVERTENCIAS
Modifi caciones
La FCC exige que se notifi que al usuario que cualquier cambio o modifi cación realizados en este aparato
que no hayan sido aprobados expresamente por Nikon Corporation podría invalidar el derecho del usuario
a utilizar el equipo.
Aviso para los clientes de Canadá
AVISO
Este aparato digital de la clase B cumple los requisitos del reglamento canadiense sobre equipos que pro vocan interferencias.
ATTENTION
Cet appareil numérique de la classe B respecte toutes les exigences du Règlement sur le matériel brouilleur
du Canada.
Advertencia sobre la prohibición de copiar o reproducir
Tenga pres ente que el sinple hecho de estar en posesión de material que haya sido copiado o reproducido
mediante un escáner puede ser legalmente punible.
• Documentos cuya copia o reproducción está n legalmente prohibidas
No copie ni reproduzca billetes de banco, monedas, valores, ni bonos del Estado o regionales, aunque
las copias se identifi quen como tales.
La ley prohibe copiar o reproducir billetes de banco, monedas o valores que estén en circulación en países
ex tran je ros.
La ley prohibe copiar o reproducir sellos de correos sin usar o documentos postales emitidos por el Estado,
salvo previa autorización ofi cial.
La ley prohibe copiar o reproducir pólizas del Estado y documentos certifi cados por la propia ley.
• Precauciones sobre determinadas copias y reproducciones
Las autoridades han advertido sobre la copia o reproducción de valores emitidos por compañías privadas
(ac cio nes, cheques, facturas, cheques- regalo, etc.), títulos de transporte o cupones, con excepción del
mínimo necesario de copias que una empresa realice para uso comercial. Tampoco copie ni reproduzca
pasaportes, licencias o permisos expedidos por organismos públicos y privados, documentos de identidad
u otros como pases y tickets de comedor.
• Respeto a los derechos de autor
La copia o reproducción de trabajos creativos protegidos por derechos de autor como libros, música,
pinturas, grabados, mapas, dibujos, películas y fotografías se rige por las leyes nacionales e internacionales
sobre los derechos de autor. No utilice este producto para realizar copias ilegales o infringir las leyes.
3-Es
Page 73

1. Información general
Gracias por adquirir el alimentador de diapositivas SF-210 para los escáneres de película 5000 ED
(SUPER COOLSCAN 5000 ED) y 4000 ED (SUPER COOLSCAN 4000 ED) de Nikon (en adelante,
se hace referencia a estos modelos de escáner como “el escáner”). El SF-210, que acepta hasta
50 monturas de 1,5mm de grosor, permite escanear de forma automática varias diapositivas
consecutivas de 35mm. Igual que otros adaptadores para el 5000 ED, el SF-210 puede insertarse
con el escáner encendido y conectado a un ordenador.
Este manual describe los procesos para desempaquetar, instalar y conectar el alimentador al
escáner. En el siguiente capítulo, “Partes y accesorios”, se d et a l la el c o ntenido de la caja y
las partes del alimentador. A continuación, el capítulo “Instalación” describe cómo conectar
el alimentador al escáner. En “Utilización del SF-210” se explican los pasos para cargar y ex-
traer las diapositivas y, por último, en el capítulo “Mantenimiento” se dan instrucciones para
el cuidado y transporte del alimentador. Lea atentamente todas las instrucciones para sacar el
máximo partido al SF-210. Para obtener más información sobre el escaneado de diapositivas,
consulte el Manual de usuario y el Manual de consulta de Nikon Scan suministrados con
el escáner.
Esperamos que este manual le sea de utilidad.
Es- 4
Page 74

2. Componentes y accesorios
En este capítulo se enumeran los elementos embalados con el alimentador y se identifi can las
com po nen tes del SF-210.
2.1 Contenido del embalaje
En la caja del SF-210 deben estar incluidos todos los elementos que se detallan a continuación:
SF-210
Dispositivo de meca-
nismo de alimentación
Alimentador de diapositivas
SF-210
2.2 Teile der SF-210
Manual de referencia
(este manual)
para soportes redondos
de diapositivas
Tapa del
depósito
Guía de introducción
de las diapositivas
LED de estado
Placa de
empuje
Almacén de
ali men ta ción
Placa de empuje
Almacén de salida
Placa de ajuste del alimentador
Dial de ajuste del alimentador
Marca de carga
5-Es
Page 75

3. Instalación
Antes de instalar el SF-210, comprobar que el escáner se encuentra en un lugar adecuado, tal
como se explica en la Guía de detección rápida y el manual de consulta suministrados con el
escáner. El SF-210 no debe utilizarse en lugares donde:
• la temperatura supere los 35ºC o este por debajo de 10ºC
• pueda estar sometido a condensación o a cambios bruscos de temperatura
• la humedad sea superior al 60% o inferior al 20%
• pueda quedar expuesto a la luz solar directa o refl ejada
• pueda estar sometido a vibraciones o golpes fuertes
• haya mucho polvo
• pueda quedar expuesto a radiointerferencias de otros dispositivos electrónicos
• estaría expuesto al vapor de agua (e.g. de un humidifi cador)
• estaría expuesto al humo.
Advertencia:Si no se respetan las precauciones anteriores, existe riesgo de incendio o
de funicionamiento incorrecto del escáner.
Cuando vaya a usar el SF-210, instale el escáner como indica la ilustración. Debe haber sufi ciente
espacio alrededor del escáner para poder abrir la tapa del depósito y tener una ventilación adecuada. Como mínimo, debería haber 15cm libres por encima del aparato y 10cm por detrás. A
continuación, también se indican los requisitos de espacio necesarios con el SF-210 acoplado.
Es- 6
Page 76

El SF-210 puede montarse en el escáner tanto si éste e stá apag ado como si está encendid o, antes
de montar el aminentador comprobar que el LED de estado se enciende de forma continua. Si
el LED parpadea NO debe insertarse ni extraerse el alimentador.
Instale el escáner como se indica a continuación, con los orifi cios de ventilación hacia arriba.
Introduzca el SF-210 en la ranura para adaptador del escáner hasta que llegue al fi nal. Una vez
insertado, el alimentador deberá estar orientado como aparece en la ilustración siguiente. Empújelo hasta que el conector de la parte trasera esté fi rmemente acoplado a la parte posterior
de la ranura. El alimentador se ha introducido correctamente si el piloto de estado de la parte
delantera se ilumina al encender el escáner. Si el escáner está encendido cuando se inserta el
alimentador, el piloto de estado parpadeará para indicar que se ha insertado correctamente.
Por lo demás, el piloto de estado del alimentador funciona exactamente igual que el piloto de
estado del escáner.
Orifi cios de
ventilación
Interruptor principal
LED de estado
Si el mecanismo de alimentación del SF-210 no está en la posición inicial cuando se active el
escáner, tendrá que esperar unos segundos para que el mecanismo vuelva a la posición inicial
antes de insertar las diapositivas.
Precauciones
• No colocar el escáner en vertical cuando se introduzca, se extraiga o se utilice el SF-210.
• Antes de insertar o extraer el alimentador, esperar hasta que el LED de estado se encienda
de forma continua o el escáner esté apagado. No intentar extraer ni insertar el alimentador
con el escáner en funcionamiento.
• Cuando se inserte el SF-210 con la potencia encendida, o se encienda el escáner después
de insertar el alimentador con la potencia apagada, el mecanismo de alimentación volverá
a la posición inicial. Mientras se esté realizando esta operación, el LED de estado en la parte
frontal del ali men ta dor hará luces intermitentes. No realice ninguna operación mientras el
LED esté illuminado.
• Si el elimentador no se desliza suavemente, extraerlo de la ranura y volverlo a intentar. No
forzar la in ser ción.
7-Es
Page 77

4. Utilización del SF-210
En este capítulo se explica cómo cargar el SF-210, cómo extraer diapositivas y cómo actuar en
caso de atasco.
4.1 Carga del alimentador
Las diapositivas por escanear se in sertan en el depósit o de ali mentación. Para carg ar e l dep ósito,
abrir su tapa, tirar hacia atrás de la placa de empuje de alimentación hasta el extremo de su
ranura y engancharla en la hendidura de forma que no retorne a su posición original. Colocar
las diapositivas en el depósito, con el extremo largo de la abertura hacia arriba y la superfi cie
emulsionada hacia la placa de empuje (las imágenes de las diapositivas deben quedar invertidas
al mirarlas desde el lado del depósito). Si todas las diapositivas se insertan con la misma orientación, el escanco será mucho más sencillo.
Tapa del depósito
Placa de
empuje
Almacén de
ali men ta ción
Marca de carga
Hen di du ra
Pueden cargarse diapositivas hasta llegar a la marca de carga. No llena el depósito más allá de
este punto. Una vez cargado el depósito, soltar de la hendidura la placa de empuje y hacerla
deslizar hasta que descanse contra las diapositivas.
Cierre la tapa del depósito. Ya está todo listo para empezar a escanear. Para obtener más información sobre el escaneado automático de varias diapositivas consecutivas, consulte el Manual
del Usuario y el Manual de consulta de Nikon Scan suministrados con el escáner.
Es- 8
Page 78

La ranura para la carga de diapositivas
En muchas ocasiones (por ejemplo, al escanear dispositivas con monturas de grosores diferentes),
el alimentador de diapositivas funciona mejor con la ranura de carga totalmente abierta.
Ranura de carga
de diapositivas
Diapositiva
Placa de ajuste del alimentador
Alimentador de diapositivas
SF-210 (visto desde arriba)
La anchura de la ranura de carga se controla con el dial de ajuste del alimentador
Placa de ajuste del
alimentador
Dial de ajuste del alimentador
Escanear diapositivas del mismo grosor
Si todas las monturas tienen el mismo grosor, la abertura de la ranura de carga de diapositivas de berá ser equivalente a una vez y media el grosor de la montura de las diapositivas (ver ilustración).
De este modo se evita que el alimentador se atasque o cargue varias diapositivas a la vez.
Alimentador de diapositivas
SF-210 (visto desde arriba)
9-Es
Page 79

Precauciones
• El SF-210 no funciona igual de bien con todos los tipos de monturas. Utilice diapositivas
de 35mm con monturas entre 1,0-3,2mm de grosor y de 49 a 50,8mm de anchura. Otras
diapositivas podrían provocar atascos en el alimentador.
• Las monturas de diapositivas muy combadas pueden provocar un atasco en el alimentador.
soporte con canto
re don dea do
SF-210 (visto desde
arriba)
• No utilice monturas desconchadas ni con rebabas, con precintos o etiquetas, ni con la super-
fi cie irregular, ya que el alimentador podría atascarse.
• No cargue las diapositivas en el alimentador con el lado más largo de la abertura hacia el
escáner, ya que la película o la montura podrían resultar dañadas o el alimentador podría
atascarse. Introduzca las diapositivas como se indica en la pegatina guía de inserción situada
junto al depósito de alimentación.
Peganita guía
de inserción
Hacia el escáner ⇒
• No cargar las diapositivas en el depósito de alimentación m ás allá de la marca de carga, pues
podría provocar un atasco en el alimentador.
• No mover el escáner mientras esté escaneando.
•
Retirar las diapositivas escaneadas del depósito de salida antes de que esté lleno. Sise sigue
escaneando cuando no quede sitio en el depósito de salida el alimentador puede atascarse.
• No extraer el alimentador durante el escaneo.
• Antes de apagar el escáner o quitar el alimentador, quite todas las diapositivas del depósito
de salida y que la última diapositiva a alimentar se ha extraído.
Es-10
Page 80

Diapositivas que pueden usarse con el SF-210
• Los siguientes marquitos han sido probados y aceptados para su correcto uso con el
SF-210:
Monturas FUJICHROME de 1,4-1,5mm, KODACHROME de plástico o de cartón de la misma
forma que las FUJICHROME, EKTACHROME de la misma forma que las FUJICHROME, Ektachrome PROCESS, GEPE 2mm, GEPE 3mm, AGFA CS, AGFA refl ecta CS, hama fi x, Kaiser USA,
REVUE.
Las siguientes monturas sed pueden usar únicamente en orientaciones restringidas:
•
Montura Precauciones
Introduzca la diapositiva con la fotografía mirando hacia la placa de empuje. Si se utiliza el
adaptador de mecanismo de alimentación, no
importa el sentido en el que se introduzcan.
WESS
Introduzca la diapositiva con la fotografía
mirando hacia la placa de empuje.
hama DSR
• Se sabe que las siguientes monturas se encallan habitualmente:
Montura Notas
Las monturas desconchadas o con rebabas,
y las monturas de superfi cie irregular pueden provocar atascos
en el alimentador.
Monturas de cartón PLASTIMOUNTS Pakon
Kodachrome /
Ektachrome de
1,1mm de grosor
con las esquinas
redondeadas
Para evitar que se
atasque o se carguen
varias diapositivas a la
vez, abra la ranura de
carga de diapositivas
el equivalente a una
vez y media el grosor
de la montura, aproximadamente.
11- Es
Page 81

4.2 Extracción de las diapositivas
Duspués de escaneadas, las diapositivas pasan al depósito de salida. Para extraerlas del mismo,
tire hacia atrás de la placa de empuje y retírelas. Las diapositivas se han de extraer antes de que
se llene el depósito de salida.
4.3 Uso de los accesorios del Alimentador
Los marquitos gruesos (superiors a 2 mm de grosor) con los bordes redondeados pueden no ser
correctamente manejados por el SF-210. El alimentador incluye una pieza extraíble que se añade
al equipode forma que permita trabajar con ciertos tipos de diapositivas. Igualmente se incluye
un soft ware de utilidades en el Nikon Scan que es preciso que se utilice siempre que esta pieza
se instale en el alimentador y lo mismo cuando se retira.
Para acoplar el adaptador del mecanismo de alimentación, el escáner debe estar conectado al
ordenador. Tanto el escáner como el ordenador deben estar encendidos, pero Nikon Scan no
debe estar en funcionamiento. Después de insertar el SF-210 tal como se describe anteriormente, abra la carpeta en la que instaló Nikon Scan y, a continuación, haga doble clic en el icono
FDUtility (Windows) o en el icono Attachment Utility de la subcarpeta Utility (Macintosh)
para iniciar el programa.
MacintoshWin dows
En el escritorio aparecerá la ventana “attachment utility” (FDUtility). Si hay más de un escáner
encendido conectado al ordenador, seleccione el escáner al que está acoplado el SF-210 en el
menú desplegable select a scanner (Seleccionar escáner).
Nikon Scan no es compatible con la conexión simultánea de más de un escáner.
Es-12
Page 82

Abra la tapa del SF-210, tire del presor hasta el fi nal y bloquéelo de forma que no pueda volver
a su posición original.
Haga clic en el botó n de la doble fl echa derecha de “attachment utility” (FDUtility) para mover el
mecanismo de alimentación hasta que sea totalmente visible. Si el mecanismo se mueve demasiado, haga clic en el botón de la fl echa izquierda para moverlo hacia el otro lado. Los botones
de una sola fl echa se utilizan para el ajuste de precisión. Cuando el mecanismo de alimentación
sea visible, introduzca las puntas del adaptador en los orifi cios del mecanismo.
Accesorios del
Alimentador
Haga clic en el botón OK (Aceptar) de la ventana “attachment utility” (FDUtility) para volver
a situar el mecanismo de alimentación en su posición original. Ahora ya está todo listo para
empezar a escanear.
Precaución
Asegúrese de que el adaptator está perfectamente asegurado en su posición. Si queda suelto,
las diapositivas puede que ne sean introducidas correctamente perjudicándo el funcionamento
del SF-210 y el estado de las mismas.
Cuando utilice el adaptador del mecanismo de alimentación para escanear diapositivas con
monturas del mismo grosor, abra la ranura de carga de diapositivas el equivalente a una vez y
media el grosor de la montura. Si la ranura de carga de diapositivas es demasiado estrecha, el
adaptador puede encallarse con la placa de ajuste del alimentador y provocar incidencias en la
alimentación carga.
13- Es
Page 83

4.4 Extracción de los accesorios del Alimentador
Si precisa escanear diapositivas con marquitos planos o de grosor inferior a 2mm, tendrá que
retirar el adpatador. Utilice la utilidad de la misma forma que antes para colocar el mecanismo
en posición y retirar la pieza. Pulse OK una vez fi nalice la operación y el mecanismo volverá a
su posición original.
4.5 Qué hacer si el alimentador se atasca
Si se produce un atasco, abra la tapa del alimentador y retire las diapositivas restantes en ambas zonas del alimentador. Tire hacia atrás del presor de alimentación y bloquéelo para que no
retorne a su posición inicial.
La forma de arreglar un atasco depende de la posición en la que se encuentre el mecanismo de
alimentación. Si la diapositiva atascada se ve en el depósito y el mecanismo de alimentación ha
vuelto a su posición original en la parte delantera de la unidad, la diapositiva atascada puede
extraerse con la mano. Si el mecanismo de alimentación se ha bloqueado mientras se cargaba
una diapositiva, tendrá que salir de Nikon Scan y utilizar el "attachment utility" para remediar el
atasco ("attachment utility” es un programa especial para el SF -210 distribuido con el programa
Nikon Scan que acompaña al escáner).
Es-14
Page 84

Para iniciar el programa “Attachment utility”, abra la carpeta en la que instaló Nikon Scan y,
a continuación, haga doble clic en el icono FDUtility (Windows) o en el icono Attachment
Utility de la subcarpeta Utility (Macintosh).
MacintoshWin dows
La ventana de la aplicación aparecerá en el escritorio. Si hay mas de un escáner conectado a su
or de na dor y en marcha, select a scanner (seleccione qué escáner) tiene el alimentador SF-210
desde el menú des ple ga ble.
Nikon Scan no es compatible con la conexión simultánea de más de un escáner.
Si el mecanismo de alimentación se bloquea cuando se está cargando una diapositiva, haga clic
en la fl echa doble izquierda de la ventana “attachment utility” (FDUtility) para que el mecanismo
vuelva a su posición original. A continuación, extraiga la diapositiva atascada con la mano. Si se
han atascado dos o más diapositivas de forma que se solapan, extraiga primero la diapositiva del
lado del depósito. Si la montura se ha atascado en el depósito de salida mientras el alimentador la
expulsaba, haga clic en el botón de la fl echa derecha para mover el adaptador y, a continuación,
empuje suavemente la diapositiva hacia el escáner para eliminar el atasco. El botón de la fl echa
izquierda hace que el mecanismo de alimentación vuelva a su lugar original (si no se elimina el
atasco, tendrá que llevar a reparar el alimentador a un centro de servicio técnico Nikon).
15-Es
Page 85

5. Mantenimiento
En este capítulo se explica cómo limpiar, almacenar y transportar el SF-210.
5.1 Limpieza
Antes de limpiar el alimentador, extraerlo del escáner. El exterior del alimentador es de plástico
y no debe limpiarse con limpiadores volátiles como alcohol o disolvente. Utilizar una pistola
sopladora para quitar el polvo o limpiar la superfi cie con un trapo seco. Si esto no es sufi cente
para eliminar toda la suciedad, limpiar con un trapo ligeramente humedecido con un detergente
neutro o con jabón líquido.
Advertencia: No utilizar agua ni líquidos volátiles, como alcohol, gasolina o disolvente.
Si cualquiera de estos líquidos penetrara en el alimentador habría riesgo de incendios
o descargas eléctricas. Los productos químicos volátiles también podrían manchar el
exterior de plástico del alimentador.
5.2 Almacenamiento
Si no va a utilizar el alimentador durante un largo periodo de tiempo, extráigalo del escáner.
Guárdelo en un lugar seco y bien ventilado, con una temperatura entre -10 y +50ºC y una humedad inferior al 60%. No lo guarde en un lugar expuesto a cambios bruscos de temperatura
o a la condensación.
5.3 Transporte
Cuando transporte el escáner, quite el alimentador del escáner y guáderlo en el embalaje
original.
Es-16
Page 86

6. Especifi caciones
Película: Monturas de diapositiva de 35mm (1,0-3,2mm de
grosor; 49-50,8mm de anchura)
Número máximo de diapositivas: 50 diapositivas aprox. (con monturas de 1,5mm de
grosor)
Espacio de almacenamiento: 78,5mm aprox.
Modo operativo: Escáner (SUPER COOLSCAN 5000 ED / SUPER COOLS-
CAN 4000 ED) instalado sobre su base, y SF-210
conectado directamente al conector de detrás de la
ranura para adaptador del escáner
Mecanismo de alimentación: Automático con motor incorporado
Tiempo de carga/expulsión: Carga: 6 segundos por diapositiva aprox.
(referencia) Expulsión: 6 segundos por diapositiva aprox.
Dimensiones: 142mm (an) × 325mm (pr) × 85mm (al)
Peso: 820g aprox.
Corriente eléctrica: 5V CC; 0,7A o menos, suministrados desde el escáner
Entorno operativo: Temperatura: de +10 a +35ºC
Humedad del 20% al 60% (sin condensación)
17- Es
Page 87

目录
幻灯片传送装置SF-210
注意事项............................................................................................................... 2
1. 概要 ................................................................................................................. 4
2. 部件和配件........................................................................................................ 5
3. 安装 ................................................................................................................. 6
4. 使用SF-210 ................................................................................................................... 8
5. 维修 ................................................................................................................16
6. 规格 ................................................................................................................17
Ck
Page 88

注意事项
• 没有尼康的事先许可,不得擅自复制本手册的全部或部分内容。
• 本手册中的讯息有可能发生改变,恕不事先通知。
• 尼康努力编制完善的使用手册,但是,阁下万一发现有错误的话,希望及时与我们联系。
有关您所在地区的尼康代表处地址,将会另外提供。
• 尼康对于使用产品造成的损伤概不负任何责任。
为了帮助您简单地找到有关讯息,我们使用有下列标识和惯例。
此图标表示警告,应该在使用尼康产品之前仔细阅读有关讯息,以免发生重伤或死亡
事故。
此图标表示注意,应该在使用产品之前仔细阅读有关讯息,以免造成装置损伤。
此图标表示提示,应该在使用产品之前仔细阅读有关讯息。
商标讯息
本手册中的商标名称为相应厂家的商标或登录商标。
图示
本手册中的图示为SUPER COOLSCAN 5000 ED。
Ck-2
Page 89

有关禁止复制或仿造方面注意事项
注意对于本扫描仪进行复制或仿造加工的产品,将会受到法律的惩罚。
• 法律规定禁止复制或仿造项目
禁止复制或仿制纸币、硬币、证券、政府债券或者地方政府债权,以至于盖有“Sample”戳品。
禁止复制或仿造在外国流通的纸币、硬币、证券、政府债券或者地方政府债权,以至于盖有“Sam-
ple”戳品。
除非事先得到了政府的许可,禁止复制或仿造尚未使用的政府发行的邮政票据或明信片。
法律规定禁止复制或仿造政府发行邮票和批准的有关条约文件等。
• 复制和仿造时的注意事项
对于复制和仿造私人公司发行的证券(股票、债券、支票、奖券等等),月票、以及奖券等,政府发
出提醒,只容许该当公司为商务需要进行必要的最小限度的复制。此外,不得复制和仿造政府发行的
护照、公共机关和私人集团发行的执照、ID卡和通行证或食品券等票据。
• 遵循版权所有法
复制或仿造版权所有的创意工作,例如书籍、音乐、绘画、工艺品、地图、描绘、电影以及照片等国
家或者国际版权法规定项目。不得将本产品使用于违法复制或者违法仿造活动。
3-Ck
Page 90

1. 概要
感谢您购买用于尼康胶卷扫描仪(具体扫描仪的模式参照下列“the scanner”)5000
ED(SUPER COOLSCAN 5000 ED)和4000 ED(SUPER COOLSCAN 4000 ED)的SF-210幻
灯片传送装置。
SF-210可以装载1.5mm厚的幻灯片50张,自动持续扫描35mm幻灯片。与其他5000 ED的胶卷
盒一样,SF-210可以在扫描仪打开并与电脑连接时插入。
本手册说明开包、设置和与扫描仪接续的方法。在下一章“部件和配件”中详细说明包装中的
内容,和传送装置的部件。然后,是“安装”,说明怎样在扫描仪上接续传送装置。在“使用
SF-210”部分,说明了怎样 装载并取下幻灯片。在最后的一章“维修”里,说明怎样保护和
运送传送装置。请仔细阅读所有的指南,确认你可以从中得到有关SF-210的绝大部分讯息。关
于扫描幻灯片的讯息,可以在扫描仪提供的
我们希望本手册对您有所帮助。
使用说明书
和Nikon Scan
参考手册
中得到。
Ck-4
Page 91

2. 部件和配件
本章列出幻灯片传送装置包装内的各项内容,并且说明SF-210的部件。
2.1 包装内容
在购买SF-210后,请确认包装中包括下列内容。
SF-210
SF-210 幻灯片传送装置 使用说明书(本手册) 传送装置附件供圆盘式幻
灯片使用。
2.2 SF-210的部件
幻灯片盒盖子
幻灯片插入指南
推入盘
弹出幻灯片盒
传送装置调整盘
传送装置调整拨盘
状态显示灯
LED
推入盘
传送幻灯片盒
装载标记
5-Ck
Page 92

3. 安装
在安装SF-210之前,确认扫描仪已经根据扫描仪提供的文件要求放置在了合适的位置上。SF-
210不得在下列环境条件中使用:
• 温度高于35ºC(95ºF)或者低于10ºC(50ºF)
• 结霜或者温度急剧变化
• 湿度小于20%或者大于60%
• 阳光直射
• 振动或者物体撞击
• 灰尘较多地点
• 受到其他电子装置的电波干扰
• 水蒸气(例如:靠近加湿器)
• 多烟雾
警告∶不遵守上述注意事项,有可能引起火灾或者扫描仪故障。
使用SF-210时,请依照以下指示安装扫描仪∶四周必须留出一定的空间,让幻灯片盒盖可以
打开,并且确保埽SF-210四周空气流通。机组的上方应该至少留出15cm的空间,后部应该留
出10cm。当SF-210如下图安装的话,需要一定的空间。
Ck-6
Page 93

不论扫描仪打开还是关闭,或者,是否与电脑连接,SF-210都可以安装在扫描仪上。如果扫
描仪打开的话,在安装传送装置之前,应该检查状态显示灯LED呈稳定点亮状态。在状态显示
灯LED闪亮期间,不得插入或者拔出SF-210。
如下所示幻灯片口朝上安装扫描仪。滑入SF-210到扫描仪的胶卷盒槽上。当传送装置接触到
槽的后部时停止。插入时传送装置的方向应该如下图所示。推入传送装置直至后部的接头稳
定地插入槽后部的插座上。打开扫描仪时,如果传送装置前方状态显示灯LED点亮的话,说
明传送装置正确插入。插入传送装置时如果扫描仪呈打开状态的话,传送装置的状态显示灯
LED会闪亮表示传送装置已经正确插入。其他所有情况下,传送装置的状态显示灯LED功能与
扫描仪的状态显示灯LED相同。
开口
电源开关
状态显示灯LED
打开扫描仪时,如果SF-210的传送机能没有处于初始设定状态的话,则需要等待数秒钟,在
插入幻灯片之前,复原到初始设定状态。
注意事项
• 插入、取下或者正在使用SF-210时,不得把扫描仪垂直放置。
• 在插入或者取下SF-210之前,应该等待状态显示灯LED稳定点亮或者确认扫描仪呈关闭状
态。不得在扫描仪工作当中试图取下或者插入传送装置。
• 电源接通状态下插入SF-210时,或者电源切断状态下插入传送装置之后打开扫描仪电源时,
传送装置机能将复原到原始设定位置。操作开始时,传送装置前方的状态显示灯LED将会闪
亮。在状态显示灯LED闪亮时,不得进行任何操作。
• 如果传送装置不能够顺利地插入的话,应该从槽上卸下重新安装。不得用力强行。
7-Ck
Page 94

4. 使用SF-210
本章说明怎样装载SF-210,怎样取下幻灯片,以及怎样处理卡住故障。
4.1 装在传送装置
将需要进行扫描的幻灯片插入传送装置盒内。装载幻灯片盒,请先打开幻灯片传送装置盒盖,拉
出传送装置的推入盘至滑动槽最终端,卡在卡头上,以防反弹到原有位置上。插入幻灯片盒,
边孔朝上,无光乳化剂面朝向推入盘(幻灯片上的影像与在幻灯片盒侧看到的影像相反)。 如
果幻灯片插入相同方向的话,扫描将会比较简单。
幻灯片盒
推出盘
传送装置盒
装载标识
幻灯片可以装载在传送装置盒内装载标识处。装载时不得超过此界限。一旦传送装置盒装载
后,从卡头松开推入盘,向后滑动,直至挡块碰到滑动装置挡板。
关闭传送装置盒盖。便可以开始扫描。有关多张幻灯片自动持续扫描的更加详细内容请参照
扫描仪提供的
使用说明书
和Nikon Scan Reference Manual。
卡头
Ck-8
Page 95

幻灯片传送槽
大多数情况(例如:扫描不同厚度的幻灯片),传送装置盒工作时最好应该把幻灯片传送槽
全部打开状态。
幻灯片传送槽
幻灯片
传送盒调整盘
SF-210 幻灯片传送盒
(从上方看)
幻灯片传送槽的宽度可以通过传送盒调节拨盘调整控制。
传送盒调节盘
传送盒调节拨盘
进行相同厚度幻灯片的扫描
如果所有幻灯片的厚度相同,幻灯片传送槽厚度大约在幻灯片1.5倍左右(如下图所示)。这
将可以防止卡住现象或者同时传送多张幻灯片。
SF-210 幻灯片传送盒
(从上方看)
9-Ck
Page 96

注意事项
• SF-210根据幻灯片的形式不同而作用也不尽相同。应该使用1.0–3.2mm厚49–50.8mm宽的
35mm幻灯片,否则会发生卡住现象。
• 幻灯片的包边过厚的话,也会引起卡住现象。
幻灯片包边
SF-210(从上方看)
• 不得使用包边破旧或有缺陷,贴有封条或标签,表面不平整的幻灯片。不遵守此项事先注
意事项的话,会引起卡住故障。
• 不得把边孔长的一侧面对扫描仪,将幻灯片装载到传送装置中。否则会造成胶卷或者幻灯
片损伤,引起传送装置卡住。按照传送盒边上的插入指引标签所示插入幻灯片。
扫描 ⇒插入指引标签
• 装载幻灯片时不得超过传送装置的装载标识。以免引起卡住现象。
• 在扫描过程当中,不得移动扫描仪。
• 请在弹出幻灯片盒装满之前取下扫描完毕的幻灯片, 在弹出幻灯片盒已经没有剩余空间的情
况下,如果仍然持续进行扫描的话,则会引起卡住现象。
• 在扫描过程当中,不得取下幻灯片盒。
• 关闭扫描仪或者取下幻灯片盒之前,确认已经从幻灯片盒中取出所有的幻灯片,最后一张
幻灯片已经弹出。
Ck-10
Page 97

可用于SF-210的幻灯片
• 下列幻灯片经过测试并且承认,可以使用于SF-210:
FUJICHROME 1.4–1.5mm,塑料或者四方纸边的KODACHROME与FUJICHROME相同形状的
幻灯片,塑料或者四方纸边的EKTACHROME与FUJICHROME相同形状的幻灯片,Ektachrome
PROCESS, GEPE 2mm,GEPE 3mm,AGFA CS,AGFA refl ecta CS,hama fi x,Kaiser USA,
REVUE
• 下列幻灯片制片只能够使用于一定的方向。
幻灯片制片 注意事项
插入照片面向推入盘。如果使用传送机构附
件的话,幻灯片可以插入不同方向。
WESS
面向推入盘插入照片
hama DSR
• 下列幻灯片制片将会引起卡住现象:
幻灯片制片 提示
Kodachrome / PLASTIMOUNTS Pakon
Ektachrome
纸边1.1mm厚圆角
粗糙或者破损的包
边以及不平整或不
正常的表面均有可能
造成卡住。为了防止
卡住或者一次传送多
张幻灯片,应该打开
幻灯片传送槽,使之
呈幻灯片包边厚度的
1.5倍。
11- Ck
Page 98

4.2 取下幻灯片
扫描完毕之后,幻灯片将被送到弹出盒内。从弹出盒内取出时,拉出推入盘,取出幻灯片。
在弹出盒装满之前,必须取出幻灯片。
4.3 使用传送机能附件
使用SF-210时,厚包边(大于2mm厚度)可能容不下。我们提供可以随时装卸的塑料部件作
为传送装置的附件。把本附件安装或从传送装置取下的时候,需要使用随扫描仪提供的Nikon
Scan软件中特别附带的attachment utility软件。
安装传送机械装置附件的时候,扫描仪必须连接在电脑上。扫描仪和电脑均必须呈接通状态,而
Nikon Scan不得起动。如上所述,在把SF-210插入扫描仪之后,打开安装有Nikon Scan的文件夹,
双击FDUtility图标(Windows)或者双击Utility附文件夹(Macintosh)中的Attachment Utility图标。
于是,附件功能起动。
Win dows Macintosh
“attachment utility”(FDUtility)视窗将显示在屏幕上。如果不止一个扫描仪接续在电脑上
并且呈起动状态的话,应该从select a scanner的跳出菜单中选择SF-210连接的扫描仪。
Nikon Scan不支持同时接续一台以上扫描仪。
Ck-12
Page 99

打开SF-210幻灯片盒盖。拉出传送装置的推入盘至滑动槽最终端,卡在卡头上,保证不会反
弹到原有位置上。
点击“attachment utility”(FDUtility)上的双右箭头,移动传送功能到完全可以看到的地方。
如果移动传送功能过远的话,点击左箭头移动回来。单箭头钮可以用于细微调节。一旦移动传
送功能可以看到,插入附件卡头到移动传送功能的孔中。
传送功能附件
点击“attachment utility”(FDUtility)视窗内的OK钮,使得传送功能回到原始位置上。然
後可以开始扫描。
注意事项
确认附件安装稳定。如果附件松缓的话,幻灯片可能不会正确传送,并且,会损伤SF-210。
在使用传送功能附件扫描相同厚度的幻灯片时,打开幻灯片传送槽保持幻灯片1.5倍的间隙。
如果幻灯片传送槽过于狭窄的话,附件可能碰到调整盘,造成传送故障。
13- Ck
Page 100

4.4 取下附件
在进行平面幻灯片以及厚度小于2mm的幻灯片扫描时,需要取下附件。如上所述,使用attachment utility取下传送功能附件装入盒中。然后,取下附件点击OK返回传送功能到原始设
定位置上。
4.5 如果传送装置卡住了怎么办
如果发生了卡住现象,打开幻灯片盒盖,取出残留在幻灯片盒内的幻灯片,然后,弹出幻灯
片盒。拉出传送推进盘,卡在卡钩上,以防弹回到原有的位置上。
解决卡住的方法根据发生卡住故障传送装置的位置各不相同。如果卡住的幻灯片可以在幻灯
片盒中看得见,并且,传送装置返回到机组前方的主机位置时,可以用手指取出卡住的幻灯
片。如果传送装置在传送侧锁住的话,则需要退出Nikon Scan,使用attachment utility解决卡
住故障(attachment utility为扫描仪提供的与Nikon Scan软件配套的SF-210特殊程序)。
Ck-14
 Loading...