


P-400R Digital Microscope
Instructions
*M559EN01*
M559 E 10.11.NF.1

P-400R Digital Microscope Instructions
i
Preface
Preface
Thank you for purchasing the Nikon products.
This instruction manual has been prepared for users of the Nikon P-400R Digital
Microscope.
To ensure correct use, please read this manual carefully before use. Always keep
this manual at hand for future reference.
No part of this manual may be reproduced or transmitted in any form without prior
written permission from Nikon.
The content of this manual is subject to change without notice.
Although every effort has been made to ensure the accuracy of this manual,
errors or inconsistencies may remain. If you notice any points that are unclear or
incorrect, please contact your nearest Nikon representative.
Some of the devices described in this manual may not be included in the set you
have purchased.
If you intend to use any other products with this product, read the manual of such
products as well.
If you want to attach the P-400R Digital Microscope to a P-MFSC Motorized
Focusing Stand Controller for use with a P-TPM Touch Panel Monitor, see the
“ShuttlePix Digital Microscope Instructions”.
If this product is used in a manner not specified by the manufacturer, the
protection provided by this product may be impaired.
Symbols used in this manual
This manual uses the following symbols for special purposes.
This icon marks precautions, the information that should be observed for
safety. Depending on the severity of the risk, “WARNING” and “CAUTION”
are indicated together with this icon.
This icon marks cautions or information that should be read before use, to
prevent damage to this product and loss of data.
This icon marks notes or information that should be read before use. It also
marks tips or additional information that may be helpful when using this
product.
Trademarks in this manual
Microsoft and Windows are trademarks or registered trademarks of Microsoft
Corporation in the United States and/or other countries.
SD and SDHC Logos are trademarks of SD-3C, LLC.
All other company names and product names are trademarks or registered
trademarks of their respective holders.

P-400R Digital Microscope Instructions
ii
Features of This Product
Features of This Product
The Nikon P-400R is a digital microscope provided with a 20x optical zoom lens.
This product has a built-in CCD camera, and allows you to observe the image with
a monitor on the side of the product and the image can be played on the LCD
monitor of this system as well as an external monitor. The image being observed
can be recorded as a high-definition digital photo.
In addition to handheld use, you can use the P-400R with the optional P-MFCS
Motorized Focusing Stand Controller and the P-TPM Touch Panel Monitor.
All-in-one digital microscope
The battery-powered digital microscope equipped with an illuminator and a
monitor allows you to observe and capture images without cable connections.
20x optical zoom
The 20x high magnification zoom lens is adopted, which enables not only
capturing an image of an entire sample at low magnification but also capturing a
more detailed image at high magnification.
Internal LED illumination unit
LED ring illumination is installed inside the main unit. Oblique illumination is also
available by switching the illumination pattern.
Built-in LCD monitor
The 2.7-inch built-in LCD monitor enables live observation of a microscopic image,
playback of captured images, and specification of various settings from software
menus.
High-quality image capturing
The same image processing engine as used in the Nikon Compact Digital Camera
series is installed.
Vibration reduction
Slow shutter-speed limitation and the best-shot selector function prevent blurred
images from being saved.

P-400R Digital Microscope Instructions
iii
Contents
Contents
Preface.........................................................................................................................i
Features of This Product..........................................................................................ii
Contents ....................................................................................................................iii
Safety Precautions (Be sure to read the following before use) ..........................vi
1 Names of Components......................................................................................1
2 Preparing for Use ...............................................................................................6
2.1 Preparing a Battery........................................................................................... 6
2.1.1 Charging a battery .............................................................................. 6
2.1.2 Inserting a battery............................................................................... 8
2.1.3 Precautions for the battery and battery charger ............................... 10
2.2 Preparing the Recording Medium ....................................................................11
2.2.1 Preparing the SD card ...................................................................... 12
(1) Inserting the SD card..................................................................... 12
(2) Formatting the SD card ................................................................. 13
2.2.2 Specifying an Active Folder .............................................................. 14
2.3 Connecting an External Monitor (optional) ..................................................... 15
2.4 Connecting the AC Adapter (optional) ............................................................ 16
2.5 Setting the Display Language and the Date and Time (At Initial Power-On).. 17
3 Basic Operation................................................................................................18
(1) Turning on the power...................................................................................... 18
(2) Directing the P-400R to the object.................................................................. 18
(3) Obtaining optimal shooting conditions............................................................ 19
(4) Capturing an image ........................................................................................ 19
(5) Playing back the captured image ................................................................... 20
(6) Deleting captured image................................................................................. 21
4 Basic Operations for Capturing and Playing Back ......................................22
4.1 Turning On and Off the Power........................................................................ 22
4.2 Operating the LCD Monitor............................................................................. 24
4.2.1 Opening the LCD panel .................................................................... 24
4.2.2 Operating the LCD panel.................................................................. 24
4.3 Observing ....................................................................................................... 25
4.3.1 Starting shooting mode..................................................................... 25
4.3.2 Directing the P-400R to the object ................................................... 26
(1) Holding the microscope in hand .................................................... 26
(2) Using the microscope with a tripod ............................................... 26
(3) Using the microscope with the contact observation adapter......... 27
4.3.3 Operating the illumination................................................................. 28
(1) Switching the illumination area...................................................... 28
(2) Adjusting brightness of the illumination......................................... 29
4.3.4 Using zoom....................................................................................... 30
4.3.5 Checking the focus........................................................................... 31
4.3.6 Selecting a scene mode suitable to the specimen ........................... 32
4.3.7 Using custom settings ...................................................................... 34

P-400R Digital Microscope Instructions
iv
Contents
4.3.8 Changing the aperture mode............................................................ 35
4.3.9 Adjusting the exposure ..................................................................... 36
(1) Compensating the exposure ......................................................... 36
(2) Setting the shutter speed .............................................................. 37
(3) Setting the camera gain ................................................................ 38
(4) Using the AE lock .......................................................................... 39
4.3.10 Setting the white balance ................................................................. 40
4.4 Capturing the Image under Observation ........................................................ 41
4.4.1 Capturing an image .......................................................................... 41
4.5 Playing Back Captured Images ...................................................................... 43
4.5.1 Starting playback mode .................................................................... 43
4.5.2 Switching the image ......................................................................... 44
4.5.3 Displaying thumbnail images............................................................ 44
4.5.4 Enlarging an image........................................................................... 45
4.6 Deleting Captured Images.............................................................................. 46
4.6.1 Deleting the image that has just been captured ............................... 46
4.6.2 Deleting the currently displayed image ............................................ 47
5 Advanced Use of Capturing Functions .........................................................48
5.1 Registering a Custom Definition..................................................................... 50
5.2 Setting the Active Folder................................................................................. 51
5.2.1 Creating a new folder ....................................................................... 51
5.2.2 Setting an existing folder as the active folder................................... 52
5.3 Selecting the Image Quality Mode.................................................................. 53
5.4 Selecting the Image Size................................................................................ 54
5.5 Selecting the Exposure Mode......................................................................... 55
5.6 Program AE Settings ...................................................................................... 56
5.7 Setting the Quality of Images to be Captured ................................................ 58
5.8 Switching the Metering Method ...................................................................... 61
5.9 Switching the Metering Area........................................................................... 62
5.10 Using Continuous Shooting Mode.................................................................. 63
5.11 Using Shading Correction............................................................................... 65
5.12 Setting the Scale ............................................................................................ 66
6 Advanced Use of Playback Functions...........................................................67
6.1 Deleting Multiple Images All at One Time....................................................... 69
6.1.1 Deleting the selected images ........................................................... 69
6.1.2 Deleting a folder containing images ................................................. 70
6.2 Specifying the Playback Folder ...................................................................... 72
7 Changing Settings ...........................................................................................73
7.1 Adjusting the Brightness of the LCD Monitor.................................................. 75
7.2 Adjusting the Volume of the Operation Sound................................................ 75
7.3 Selecting the Video Output Signal Format ..................................................... 76
7.4 Selecting the Shutter Release Method........................................................... 76
7.5 Initializing an SD Card.................................................................................... 77
7.6 Setting the Automatic Power Save Function .................................................. 77
7.7 Selecting the Language.................................................................................. 78
7.8 Setting the Current Date and Time ................................................................. 78

P-400R Digital Microscope Instructions
v
Contents
7.9 Checking the Version Information................................................................... 79
7.10 Restoring the Initial Settings........................................................................... 80
8 Connecting to a PC ..........................................................................................81
8.1 About ShuttlePix Editor................................................................................... 82
9 Troubleshooting...............................................................................................83
9.1 About the Power Supply and Battery.............................................................. 83
9.2 About the Image Display ................................................................................ 84
9.3 About Operating This Product ........................................................................ 85
9.4 View of Microscopic Images ........................................................................... 85
9.5 Image Saving.................................................................................................. 87
9.6 System Operation........................................................................................... 87
9.7 Warning Messages ......................................................................................... 88
10 Daily Maintenance............................................................................................92
10.1 Cleaning the Lens........................................................................................... 92
10.2 Cleaning the LCD Panel ................................................................................. 92
10.3 Cleaning Painted, Printed, or Plastic Parts..................................................... 93
10.4 Storage ........................................................................................................... 93
10.5 Periodic Inspections (Charged) ...................................................................... 93
11 Major Specifications ........................................................................................94
11.1 P-400R Digital Microscope ............................................................................. 94
11.2 AC Adapter ..................................................................................................... 98
11.3 P-RELS Release ............................................................................................ 98
11.4 Supported Standards...................................................................................... 99

P-400R Digital Microscope Instructions
vi
Safety Instructions
Safety Precautions (Be sure to read the following before use)
For safe and proper use of this product, carefully read the following precautions.
WARNING and CAUTION symbols used in this manual
Although this product is designed and manufactured to be completely safe during
use, incorrect usage or failure to follow the safety instructions provided may cause
personal injury or property damage. To ensure correct usage, read this manual
carefully before using the product. Do not discard this manual and keep it at hand for
future reference.
Safety instructions in this manual are marked with the following symbols to make
them stand out. For your safety, always follow the instructions marked with these
symbols.
Symbol Meaning
DANGER
Disregarding instructions marked with this symbol will lead to
serious injury or death.
WARNING
Disregarding instructions marked with this symbol may lead to
serious injury or death.
CAUTION
Disregarding instructions marked with this symbol may lead to
injury or property damage.
WARNING (for the overall product)
1. Purpose of this product
This product is designed to be used for microscopic observation and
capturing, and for displaying the captured images. Do not attempt to use it
for any other purpose.
2. Read this manual carefully.
For your safety, read carefully this manual and other manuals supplied
with the products that will be used together with this product. Be sure to
read and observe the warnings and cautions described at the beginning o
f
each manual.
3. Do not disassemble, repair, or modify this product.
Do not attempt to disassemble, repair, or modify this product. Doing so
may result in electric shock or failure. Any failure or damage caused by
such action will not be covered under warranty. Never attempt to
disassemble, repair, and modify any part of this product which is not
described in this manual. If you notice any problems with this product,
contact your nearest Nikon representative.

P-400R Digital Microscope Instructions
vii
Safety Instructions
WARNING (for the overall product)
4. If the inside of this product is exposed due to breakage, never touch
the exposed area.
If this product is broken due to falling, etc. and the inside is exposed, do
not touch the exposed area. Doing so may cause an electric shock or
personal injury on the jagged broken edge. Remove the battery or AC
adapter cord, and ask your nearest Nikon representatives for repair.
5. Do not allow this product to become wet.
Do not allow this product to become wet. It may cause malfunction,
overheating, or electric shock. If this product becomes wet, immediately
turn off the power and remove the battery or AC adapter cord. Then dry it
well with a soft dry cloth.
6. Do not allow any foreign material to enter this product.
Do not allow foreign material to enter the inside of this product. It may
cause malfunction. If any foreign material enters inside, stop using this
product and contact your nearest Nikon representatives.
7. Never use this product in a flammable or combustible environment.
Using it in a combustible gas or dust environment may cause an explosion
or fire.
8. Do not place anything on the product or cover the product.
Do not place anything on the product or cover the product. Doing so might
result in damage to the product or a fire. This is because heat emission is
hindered and abnormal heat might be caused.
9. Use the specified AC adapter.
An optional AC adapter can be used as a power supply for the P-400R. Be
sure to connect the specified AC adapter to the microscope’s main unit. If
any other AC adapter is connected, it may cause malfunction or
overheating of this product or fire.
For details about the specified AC adapter, see “
11 Major
S
pecifications”.
Place the AC adapter in a well-ventilated location. Do not place
anything such as paper on the AC adapter. It will reduce cooling and
cause overheating.
Before connecting the AC adapter, be sure to turn off the power supply
of the P-400R without fail to prevent failure or malfunction.
10. Check the input voltage.
The P-CH01 P-BACH Battery Charger and the P-400R AC adapter
operate on 100 to 240 VAC, 50/60 Hz power supply. Before connecting the
power supply, confirm that the voltage and frequency of the power supply
line to use are within the above range. Using a power supply line that does
not satisfy the rating may cause failure or malfunction of this product or
fire.

P-400R Digital Microscope Instructions
viii
Safety Instructions
WARNING (for the overall product)
11. To connect to a PC, feed power from as near outlets as possible.
If you connect this product to a PC, connect each device to as near AC
outlets as possible. If you plug the units in AC outlets apart from each
other, difference of voltages may cause potential difference, resulting in
malfunction.
12. Use the specified power cords.
Make sure that the power cord connected to the P-400R AC adapter is the
power cord specific to the P-400R Digital Microscope. If any other power
cords are used, it may cause malfunction or overheating of the equipment
or fire.
For details about the specified power cords, see “11 Major
S
pecifications”.
To protect from electric shock, always turn off the power switch before
disconnecting and connecting power cords.
Because the P-400R AC adapter is a product in electrical shock
protection class I, always connect the adapter to a grounded outlet.
13. Precautions for illumination
The ring illumination using white LEDs is installed around the lens of the
P-400R. To prevent damage to the eyesight, be sure to observe the
following precautions.
Do not point the luminous section to a person.
Do not look into or look directly the luminous section.
When you observe a specimen with a high reflection rate, illumination
may be scattered around the specimen. Wear protective glasses or
goggles if necessary.
14. Precautions for handling flammable solvent
This product uses the following flammable solvents.
Absolute alcohol (ethyl or methyl alcohol used for cleaning optical
elements)
Never put these solvents close to fire. Before using the solvent, read
carefully the precautions specified by the manufacturer of the solvent to
use it safely. When you use the solvent on this product, observe the
following precautions.
Never put the solvent close to this product when you turn on/off the
power switch or plug in/out the power cord.
Handle the solvent with care not to spill it.

P-400R Digital Microscope Instructions
ix
Safety Instructions
CAUTION (for the overall product)
1. Handle this product with care.
This product is a precision optical device. Handle it with care not to give it
sudden shock.
2. Precautions for handling optical components
If there is a scratch or dirt such as fingerprint on the lens or other optical
components, image quality will be degraded. Handle the optical
components carefully not to scratch them. If dirt is attached, clean it
according to the procedure in “10 Daily Maintenance”.
3.
Precautions against electromagnetic interference
This product generates weak electromagnetic waves. Do not put any
precision electronic devices close to this product. Their accuracy may be
decreased. If the receiving status of a TV set or radio set is affected, put
them a little far from this product.
4. Turn off the power before plugging in/out cables and starting
maintenance work.
To prevent occurrence of possible accidents such as electrical shock and
fire, always turn off the power of the product, remove the battery, and
disconnect the power cord before installing the product, plugging in/out of
cables, and starting maintenance such as cleaning the lens.
5. Precautions for the LDC panel
Do not strike or push the LCD panel screen too hard. The surface glass
of the LCD panel may be broken and cause injury.
Do not expose the LCD panel to direct sunlight or strong ultraviolet
radiation. Doing so may cause the display characteristics to degrade.
6. Precautions for use of the strap
When you attach the strap to the P-400R, observe the following
precautions.
The P-400R weighs approximately 1.1 kg including the battery. Use a
strap strong enough to support the weight. Never use straps designed
for mobile phones.
When you carry the P-400R with the strap attached, be careful not to
let the strap to get caught on something. Otherwise, it may cause
unexpected injury or damage to this product.

P-400R Digital Microscope Instructions
x
Safety Instructions
CAUTION (for the overall product)
7. Precautions for usage environment and storage environment
This product is a precision optical device. Using or storing it under
improper environment may result in a failure or degraded precision. When
using or storing this product, observe the following conditions.
Usage environment
Use this product in a location where the temperature is from 0 to +40C
and a relative humidity is 60% or less (no condensation).
Storage environment
Select a location where the temperature is from -20 to +60C and a
relative humidity is 90% or less (no condensation).
When you install or store this product in a hot and humid place,
condensation or mold may appear on the lens, resulting in a
performance degradation or malfunction.
Use this product in a less dusty and dirty location.
Do not place and use this product in a closed space such as a locker o
r
a cabinet.
Do not place anything on this product.
During storage, place a cover over this product to avoid dust.
For details about the usage and storage environments for this product,
see “11 Major Specifications”.
8.
Precautions for disposal
When discarding this product, dispose of it according to the regulations o
r
rules of the municipality. Do not dispose of this product as household
waste.

P-400R Digital Microscope Instructions
xi
Safety Instructions
DANGER (for the battery)
1. Never throw the battery into fire or subject it to heat.
Doing so may cause the battery to leak, explode, or overheat. This could
result in burning, personal injury, or fire.
2. Do not disassemble or modify the battery.
Doing so may cause the battery to leak, explode, or overheat. This could
result in burning, personal injury, or fire.
3. Do not short the battery’s terminals.
Doing so may cause the battery to leak, explode, or overheat. This could
result in burning, personal injury, or fire.
4. Never transport or store the removed battery together with a metal
object.
Doing so may cause the battery to leak, explode, or overheat due to a
short circuit. This could result in burning, personal injury, or fire.
5. Use only the dedicated battery charger to charge the battery.
Otherwise, the battery may leak, explode, or overheat. This could result in
burning, personal injury, or fire.
6. Do not use the battery for any other equipment than the P-400R
Digital Microscope.
Doing so may cause the battery to leak, explode, or overheat. This could
result in burning, personal injury, or fire.
7. If battery fluid gets into your eyes, never rub your eyes and
immediately flush them with clean running water. Then consult the
physician promptly.
If this precaution is ignored, there is a risk of loss of vision or damage to
eyesight.

P-400R Digital Microscope Instructions
xii
Safety Instructions
WARNING (for the battery)
1. Do not throw the battery or subject the battery to strong impact.
Doing so may cause the battery to leak, explode, or overheat. This could
result in burning, personal injury, or fire.
2. Do not allow the battery to become wet.
Doing so may cause the battery to leak, explode, or overheat. This could
result in burning, personal injury, or fire.
3. Do not handle the battery when your hands are wet.
Doing so may cause the battery to leak, explode, or overheat. This could
result in burning, personal injury, or fire.
4. Keep the battery out of the reach of small children.
The battery can be mistakenly swallowed by young children. If you
suspect this has happened, consult your physician immediately.
5. If charging has not finished within the specified charging time, stop
charging.
Otherwise, the battery may leak, explode, or overheat. This could result in
burning, personal injury, or fire.
6. If you notice any abnormality of the battery, such as discoloration,
deformation, and unusual odor, stop using it.
Otherwise, the battery may leak, explode, or overheat. This could result in
burning, personal injury, or fire.
If you notice any abnormality of the battery, contact your nearest Nikon
representative.
7. When you recycle or discard the battery, insulates the battery’s
contacts with tape, etc.
This is to prevent them from contacting with other metallic objects, which
may result in battery leakage, explosion, or overheating.
8. If the battery fluid gets on your skin and clothing, immediately rinse
the affected area with clean water.
Otherwise, it will cause skin injury.

P-400R Digital Microscope Instructions
xiii
Safety Instructions
CAUTION (for the battery)
1. If this product is not used for a long time, remove the battery.
Otherwise, the battery may leak, explode, or overheat, which may cause
malfunction of this product, personal injury, burning, or fire.
2. When storing the battery, observe the following precautions.
Store the battery in the environment specified in “11. Major
S
pecifications”.
Never leave the battery in a location where it will be subject to high
temperature, such as a location exposed to direct sunlight, a location
exposed directly to a heater or stove, or a closed vehicle during
summer months.
Be careful not to short the contacts.
Store the battery in a location that is free of dirt and dust.
P-400R Digital Microscope Instructions
xiv
Safety Instructions
WARNING (for the battery charger)
1. Never disassemble, repair, or modify the battery charger.
Doing so may cause an electric shock or personal injury.
2. If the inside of the battery charger is exposed due to breakage, neve
r
touch the exposed area.
Doing so may cause an electric shock or personal injury on the jagged
broken edge. Disconnect the power cord from the outlet and ask your
nearest Nikon representatives for repair.
3. If you notice any abnormality such as overheating, smoke, or burnt
odor, immediately pull out the power cord from the outlet.
Otherwise, the battery charger may ignite, leading to fire. Be careful not to
burn yourself when you pull out the battery charger’s power cord from the
outlet. Ask your nearest Nikon representative for repair.
4. Do not allow the battery charger to become wet.
Doing so may cause electrical shock or fire.
5. Do not handle the battery charger when your hands are wet.
Doing so may cause malfunction or electrical shock.
6. Never use the battery charger in a flammable or combustible
environment.
Using it in a combustible gas or dust environment may cause an explosion
or fire.
7. Clean off any dust on and around the metallic part of the power plug
with a dry cloth.
Otherwise, continued use may cause fire.
8. Check the input voltage.
The battery charger operates on 100 to 240 VAC, 50/60 Hz power supply.
Before connecting the power supply, confirm that the voltage and
frequency of the power supply line to use are within the above range.
Using a power supply line that does not satisfy the rating may cause
failure or malfunction of the equipment or fire.
9. Use the power cord supplied with the battery charger.
Use the supplied power cord without fail. If any other power cords are
used, it may cause malfunction or overheating of the equipment or fire.
Do not connect the power cord supplied with the battery charger to any
other devices.
CAUTION (for the battery charger)
1. Never put a cloth over the battery charger during use.
Heat accumulated under the cloth may deform the case or cause fire.
2. Pull out the power cord when the battery charger is not used.
Otherwise, electric shock may occur.
P-400R Digital Microscope Instructions
1
1
Names of Components
1
Names of Components
This chapter describes the names of major components of the P-400R Digital
Microscope.
Before using P-400R for the first time, read this chapter to confirm the names of
individual components and their positions. Return to this chapter whenever you want
to confirm the names and positions of components.
Front/left side view
LCD panel
LCD panel (closed)
Connector for
the stand
Square dovetail fo
r
mounting the stand
Grip
LED ring illumination
Contact observation
adapter
Lens cover
Lens
Capture switch (shutter)
LCD panel (open)
LCD monitor
Light control buttons ( )
Zoom buttons ( )
Illumination area switching
button (
)
Delete button ( )
[MENU] button
Playback button ( )
Monitor button ( )
Multi selector
[OK] button
Focus adjusting ring
P-400R Digital Microscope Instructions
2
1
Names of Components
Right side/bottom/rear view
About recording images
To record images, a commercially available SD card is required. Prepare an SD
card by referring to “2.2 Preparing the Recording Medium”.
Operation when the product is attached to the stand
For operation when the P-400R is attached to the P-MFSC Motorized Focusing
Stand Controller, see the “P-400R Digital Microscope Instructions”.
About attaching a strap
A strap can be attached to the back of the
P-400R in order not to drop it.
Caution: About attaching a strap
The P-400R weighs approximately 1.1 kg including the battery. Make sure that
you use a camera strap or a similar strap that has adequate strength.
Do not use a thin strap like the one for a mobile phone. Such a strap might be
broken, resulting in damage to the product.
Video output/release switch
connecting terminal
SD card cover/SD card slot
DC input terminal
Power switch/indicator
Strap holder hole
Screw hole for
tripod mounting
Battery cove
r
Slide knob to open/close
the battery chamber
Strap usage example
P-400R Digital Microscope Instructions
3
1
Names of Components
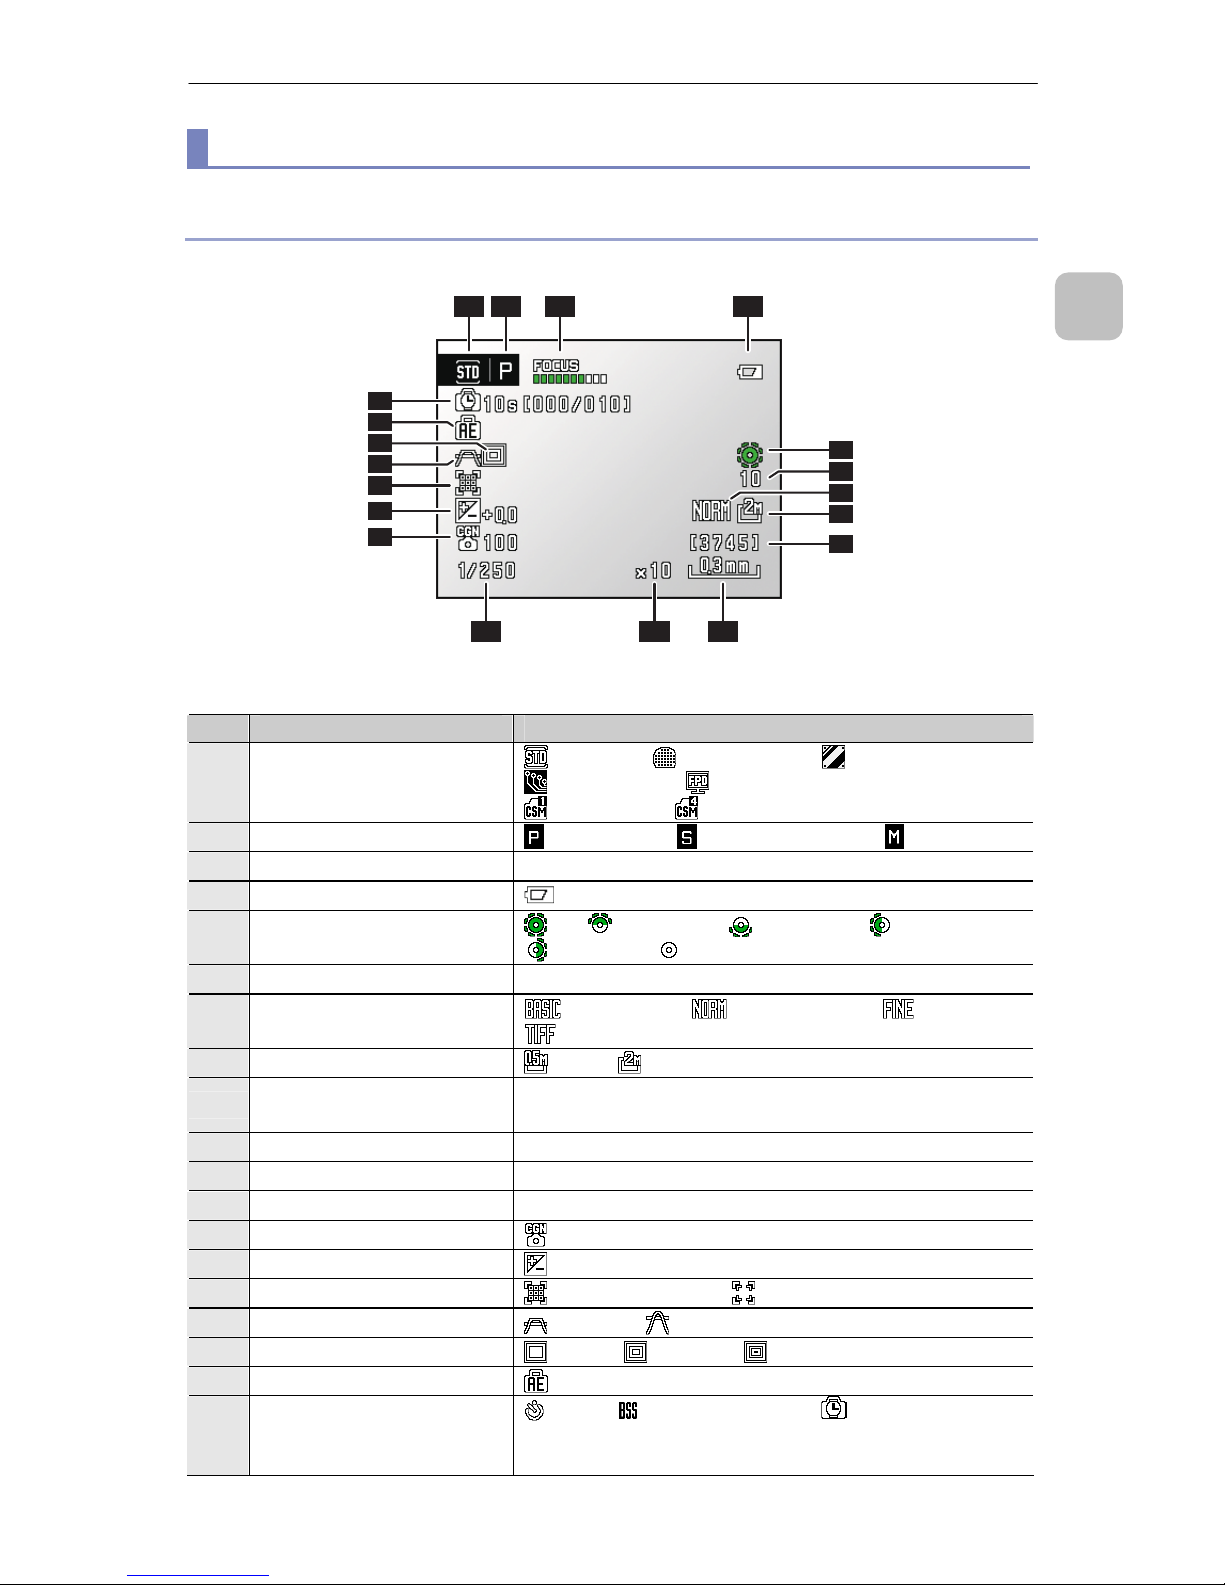
Information displayed in the monitor
Shooting mode
Items displayed during capturing are listed below.
34
1112 10
5
7
6
8
9
15
19
14
13
16
18
17
12
Table: Display in the shooting mode
No. Item Content
1 Scene mode
: Standard, : Wafer/IC chip, : Metal Ceramic,
: Circuit board, : FPD (Flat Panel Display),
: Custom 1 to : Custom 4
2 Shooting mode
: Program AE, : Shutter-priority AE, : Manual
3 Focus indicator
10 levels
4 Remaining battery level
: Displayed when the level is low
5 LED illumination area
: All : Upper half, : Lower half, : Left half,
: Right half, : Off
6 LED illumination level
1 to 10 (10 levels)
7 Image quality mode
:
JPG BASIC, : JPG NORMAL, : JPG FINE,
: TIFF
8 Size of saved image
: 0.5M, : 2M
9
Number of exposures
remaining
0 to 9999 (number of exposures remaining is also
displayed)
10 Scale
0.15 mm to 3 mm (On/Off/Embedded)
11 Zoom magnification
x1 to x20 (16 levels)
12 Shutter speed
1 to 1/1000 (21 levels)
13 Camera gain
: 100 to 2250 (10 levels)
14 Exposure compensation
: -2.0 to +2.0 (1/3 steps, 13 levels)
15 Aperture mode
: Resolution-priority, : DOF-priority
16 Metering method
: Average, : Peak
17 Metering area
: Large, : Medium, : Small
18 AE lock
: Lights during AE lock
19
Continuous shooting
mode
: Timer, : Best-shot selector, : Interval (Shooting
interval, number of current and specified exposures are
displayed.)

P-400R Digital Microscope Instructions
4
1
Names of Components
Playback mode
Items displayed during playback are listed below.
910
4
3
6
5
7
8
12
11
14
13
16
2
1
17
15
Table: Display in the playback mode
No. Item Content
1 Captured date and time
Date and time that the image was captured
2 File name
Name of the file
3 Remaining battery level
: Displayed when the level is low
4 LED illumination area
: All, : Upper half, : Lower half, : Left half,
: Right half, : Off
5 LED illumination level
1 to 10 (10 levels)
6 Image quality mode
: JPG BASIC, : JPG NORMAL, : JPG FINE,
: TIFF
7 Size of saved image
:0.5M, : 2M
8
Current exposure
number
n / total-number-of-exposures
9 Zoom magnification
x1 to x20 (16 levels)
10 Shutter speed
1 to 1/1000(21 levels)
11 Camera gain
: 100 to 2250 (10 levels)
12 Exposure compensation
: -2.0 to +2.0 (1/3 steps)
13 Aperture mode
: Resolution-priority, : DOF-priority
14 Metering method
: Average, : Peak
15 Metering area
: Large, : Medium, : Small
16 Scene mode
: Standard, : Wafer/IC chip, : Metal Ceramic,
: Circuit board, : FPD (Flat Panel Display),
: Custom 1 to : Custom 4
17 Exposure mode
: Program AE, : Shutter-priority AE, : Manual
P-400R Digital Microscope Instructions
5
1
Names of Components
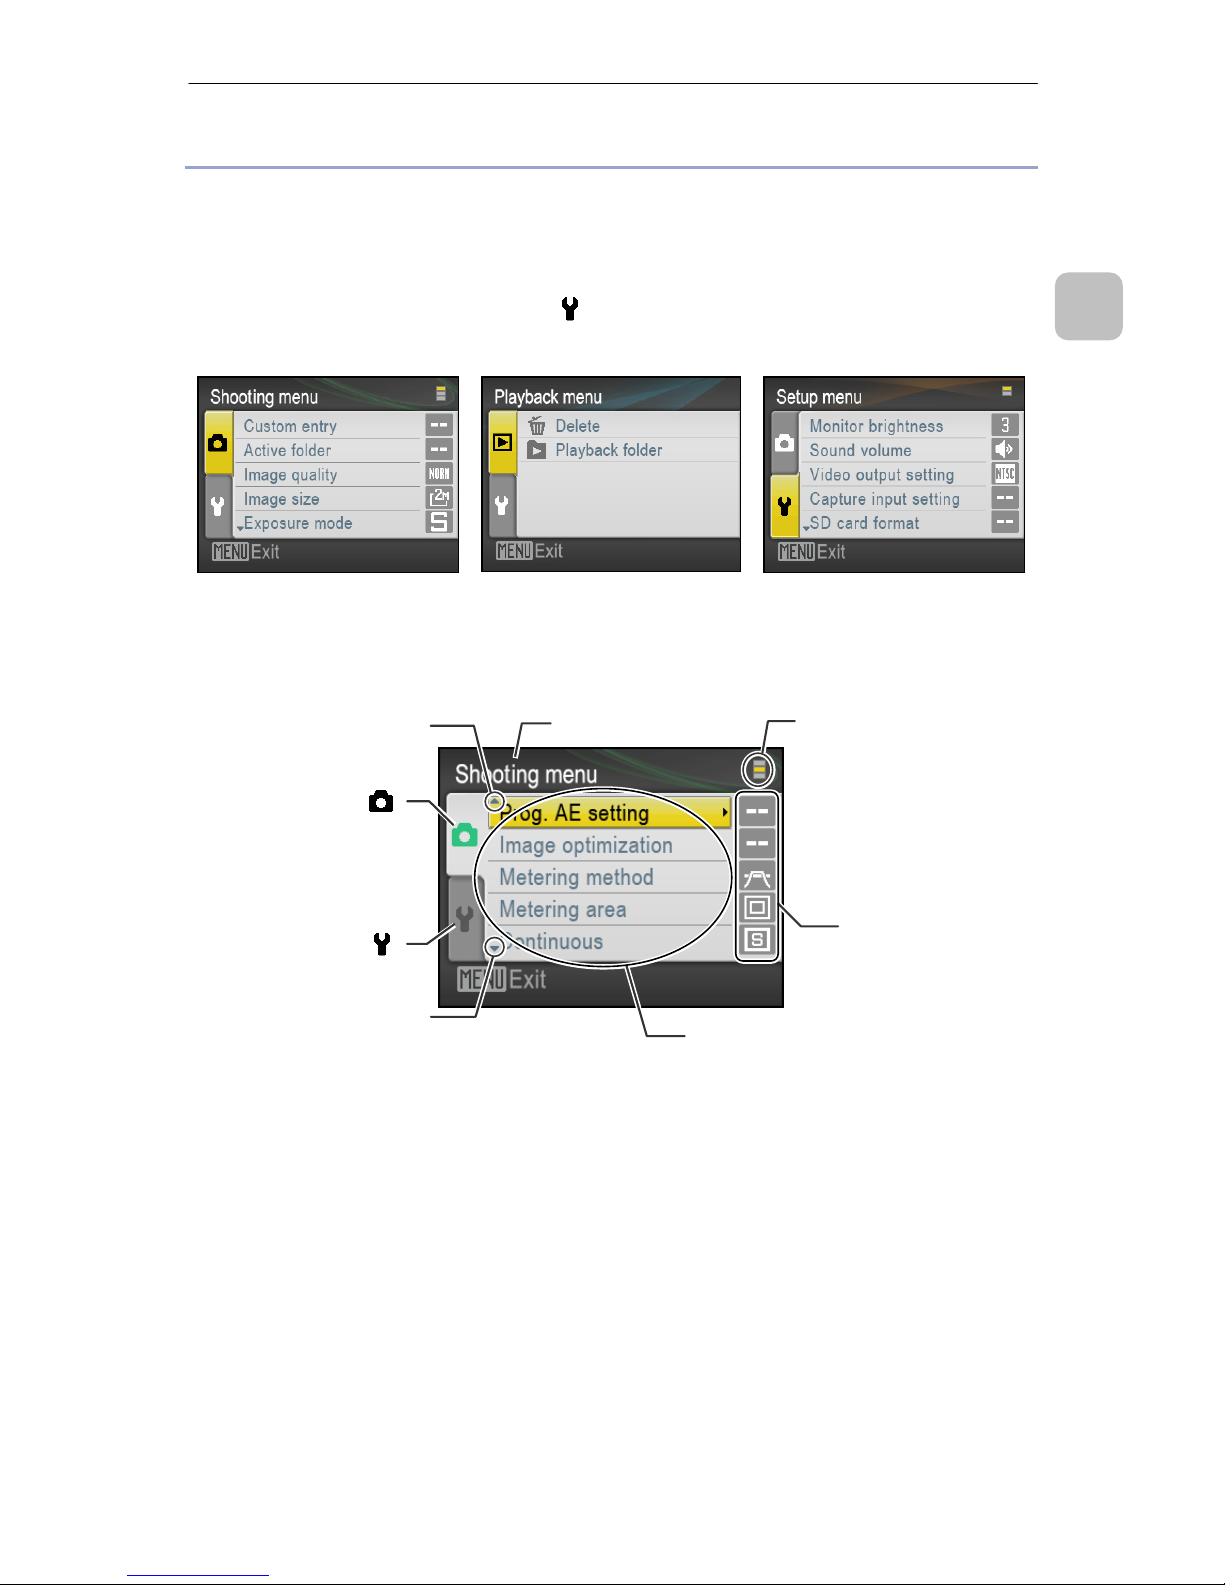
Menu screen
P-400R has three menus, [Shooting menu], [Playback menu] and [Setup menu], for
performing various settings.
When you press the [MENU] button in shooting mode, the [Shooting menu] appears
and in playback mode, the [Playback menu] appears. To display the [Setup menu]
screen, select the [Setup menu] tab (
) using the multi-selector in the shooting
menu or playback menu.
[Shooting menu] screen
[Playback menu] screen
[Setup menu] screen
The display items on the menu screen are as follows:
Example of the menu screen display (Shooting menu)
For details about how to operate in each menu screen, see “5 Advanced Use of
Capturing Functions”, “6 Advanced Use of Playback Functions”, and “7 Changing
S
ettings”.
It indicates that there
are more items below
It indicates the menu
screen page.
List of the setting items
Select an item with the top and bottom
buttons and decide it with the right button.
Pressing the left button returns to the
upper tier of the list.
It indicates that there
are more items above.
Current setting of each
item is displayed.
(Some items may not
be displayed.)
[Shooting menu] tab ( )
[Setup menu] tab ( )
Name of the screen
P-400R Digital Microscope Instructions
6
2
Preparing for Use
2
Preparing for Use
2.1
Preparing a Battery
The P-400R is a battery-powered digital microscope, which allows you to observe
and capture specimens or play back recorded images without any cable connections.
2.1.1
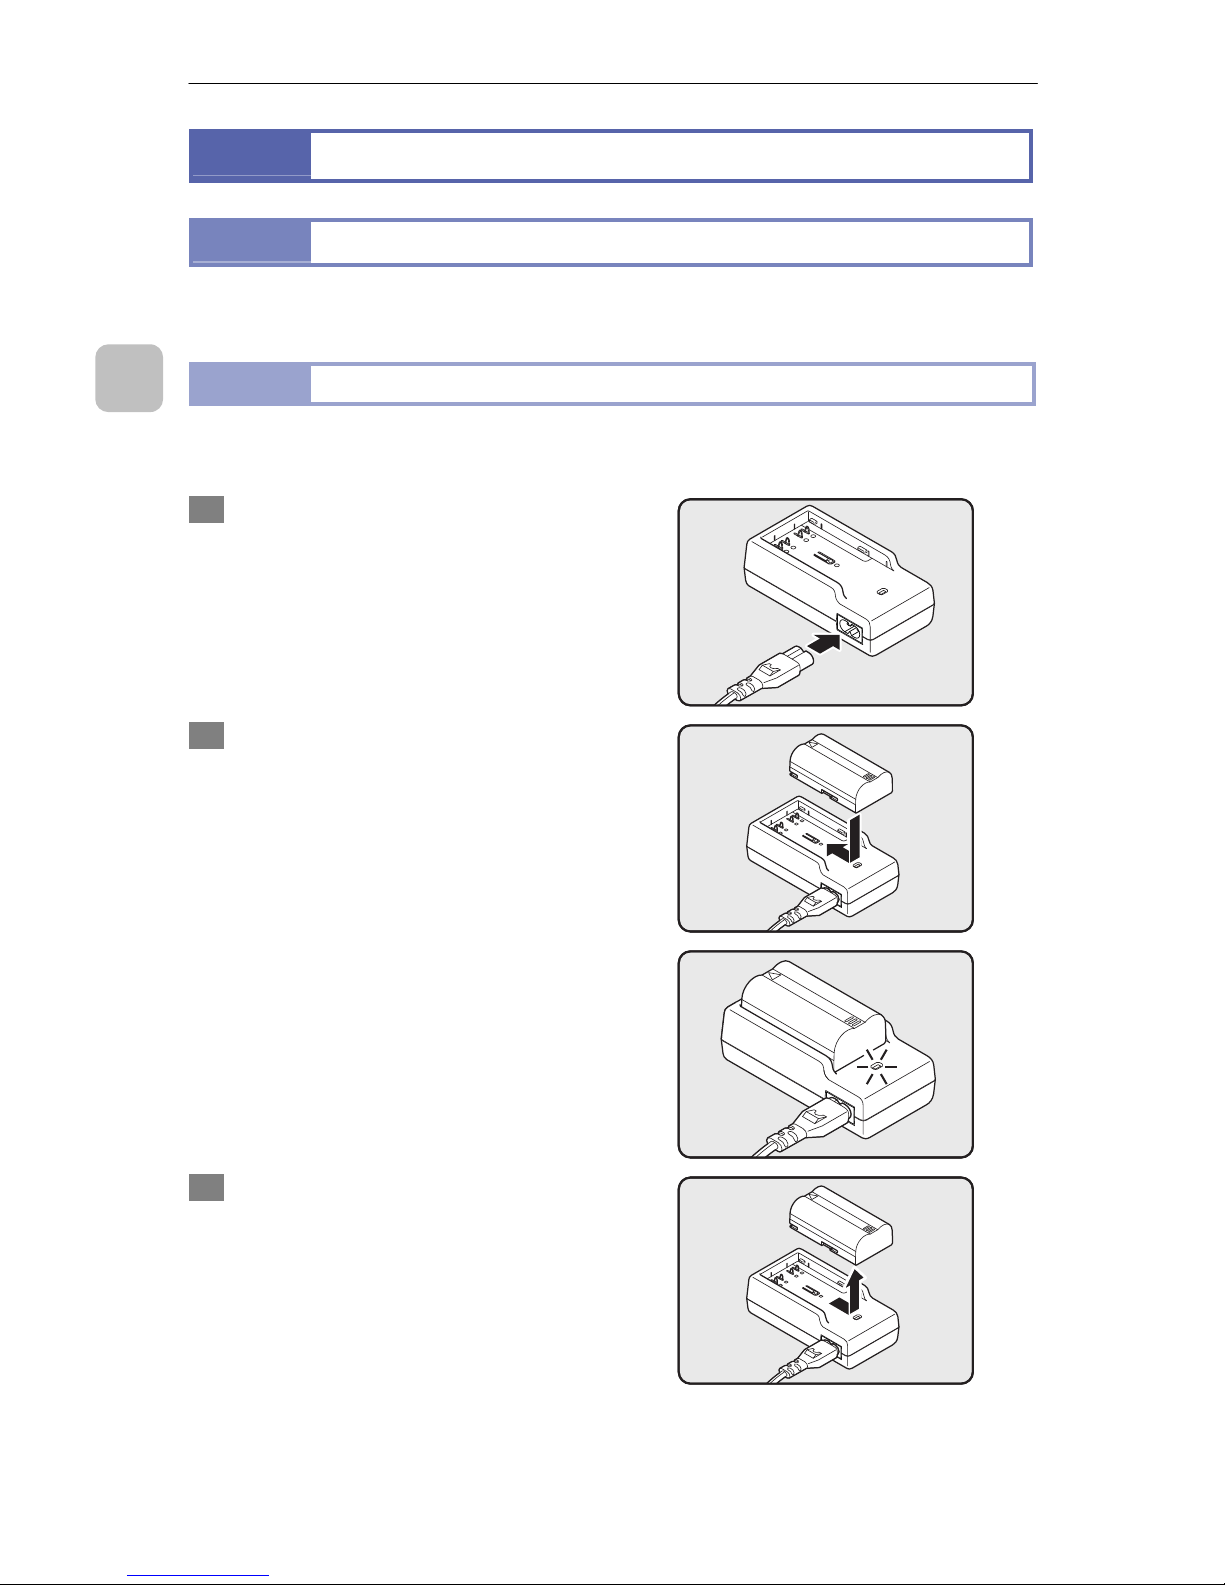
Charging a battery
Use the dedicated P-CH01 P-BACH Battery Charger to charge a P-Li01 P-Li-ion
Rechargeable Battery.
1 Connect the power cord to the
battery charger AC inlet, and
then connect the power plug to
an outlet.
2 Attach a battery to the battery
charger.
Make sure that you insert the
battery in the correct orientation as
shown in the illustration.
The CHARGE lamp is on while the
battery is being charged.
The charging is completed when
the CHARGE lamp is off. Charging
a completely discharged battery
requires about four hours.
3 When charging of the battery is
completed, remove it, and then
disconnect the power plug from
the outlet.
P-400R Digital Microscope Instructions
7
2
Preparing for Use
CHARGE lamp status
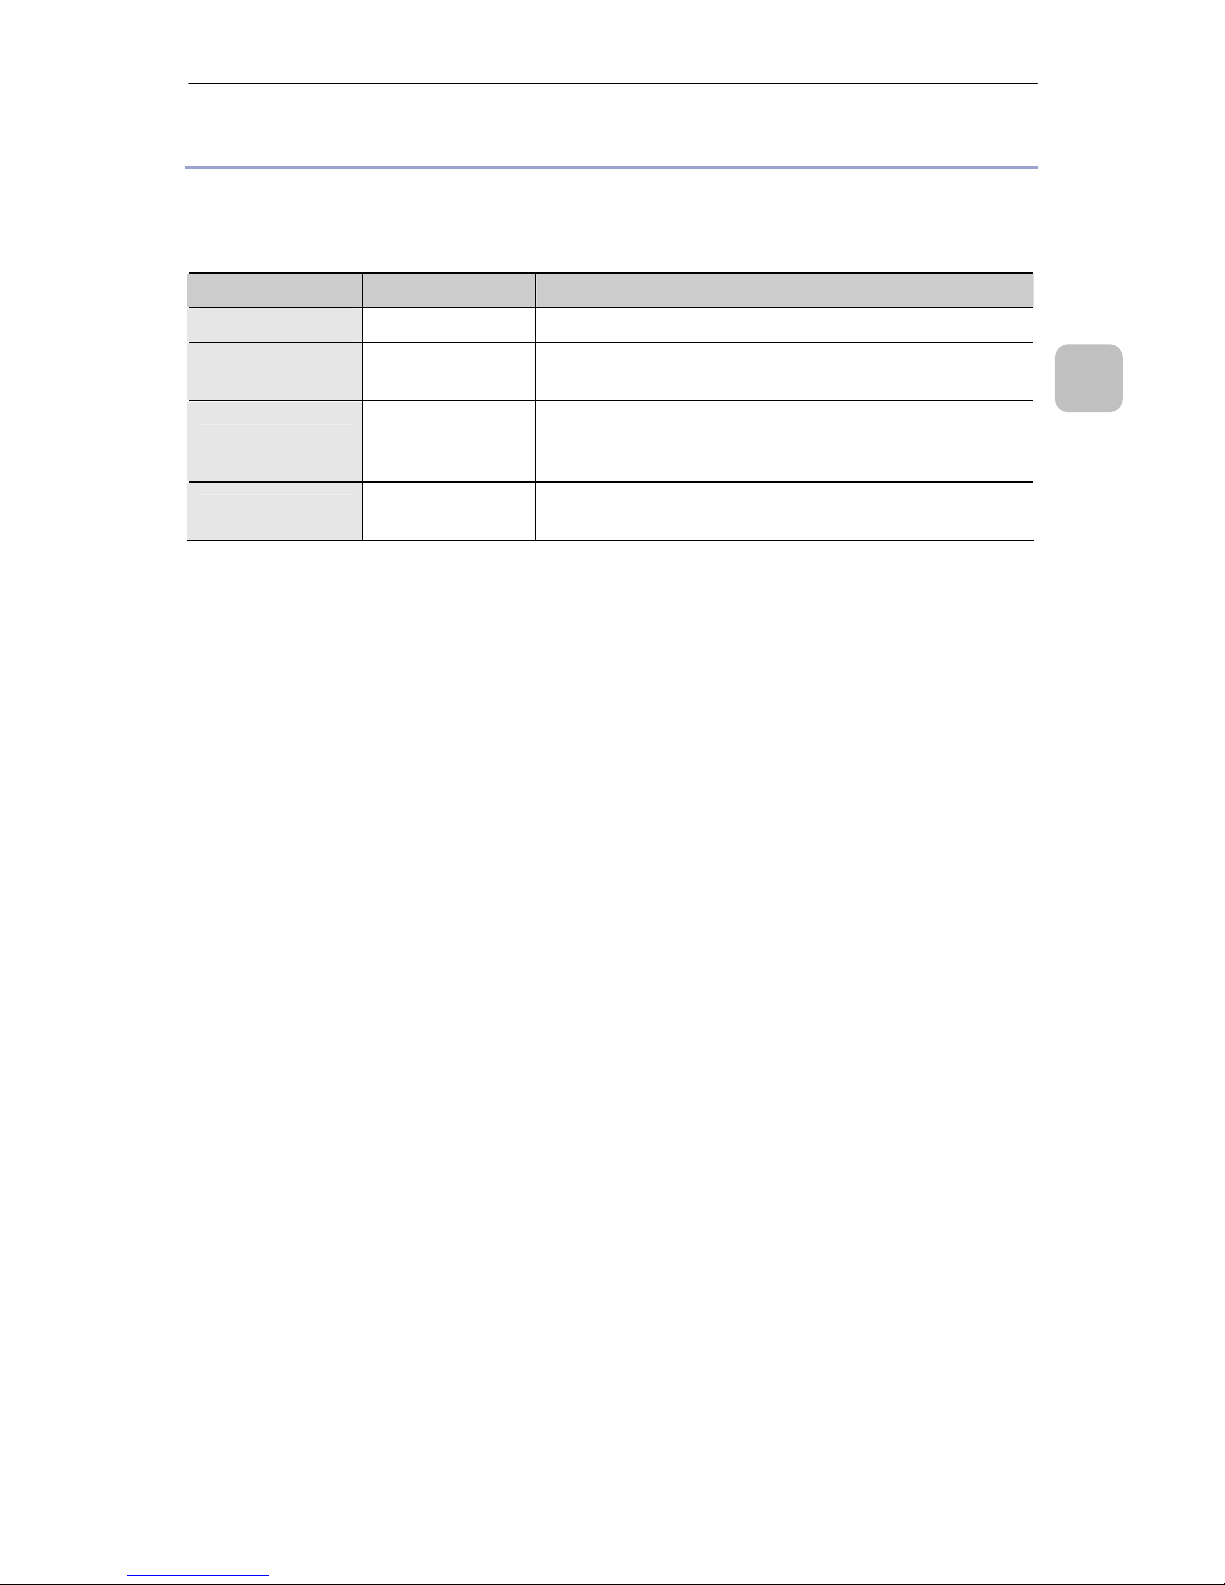
The following table describes the statuses of the CHARGE lamp of the P-CH01
P-BACH Battery Charger.
Table: CHARGE lamp statuses
Status Meaning Description
On Now charging
The battery is now being charged.
Off
Charging
completed
Charging of the battery is completed.
Slow blinking
Temperature is
too high or low
The temperature of the battery is too low (below 0C)
or too high (above 60C) to charge the battery.
Charge the battery at a temperature of 0 to 40C.
Fast blinking
Battery is
abnormal
Immediately disconnect the power plug from the outlet
to stop charging, and contact the product vendor.
P-400R Digital Microscope Instructions
8
2
Preparing for Use
2.1.2
Inserting a battery
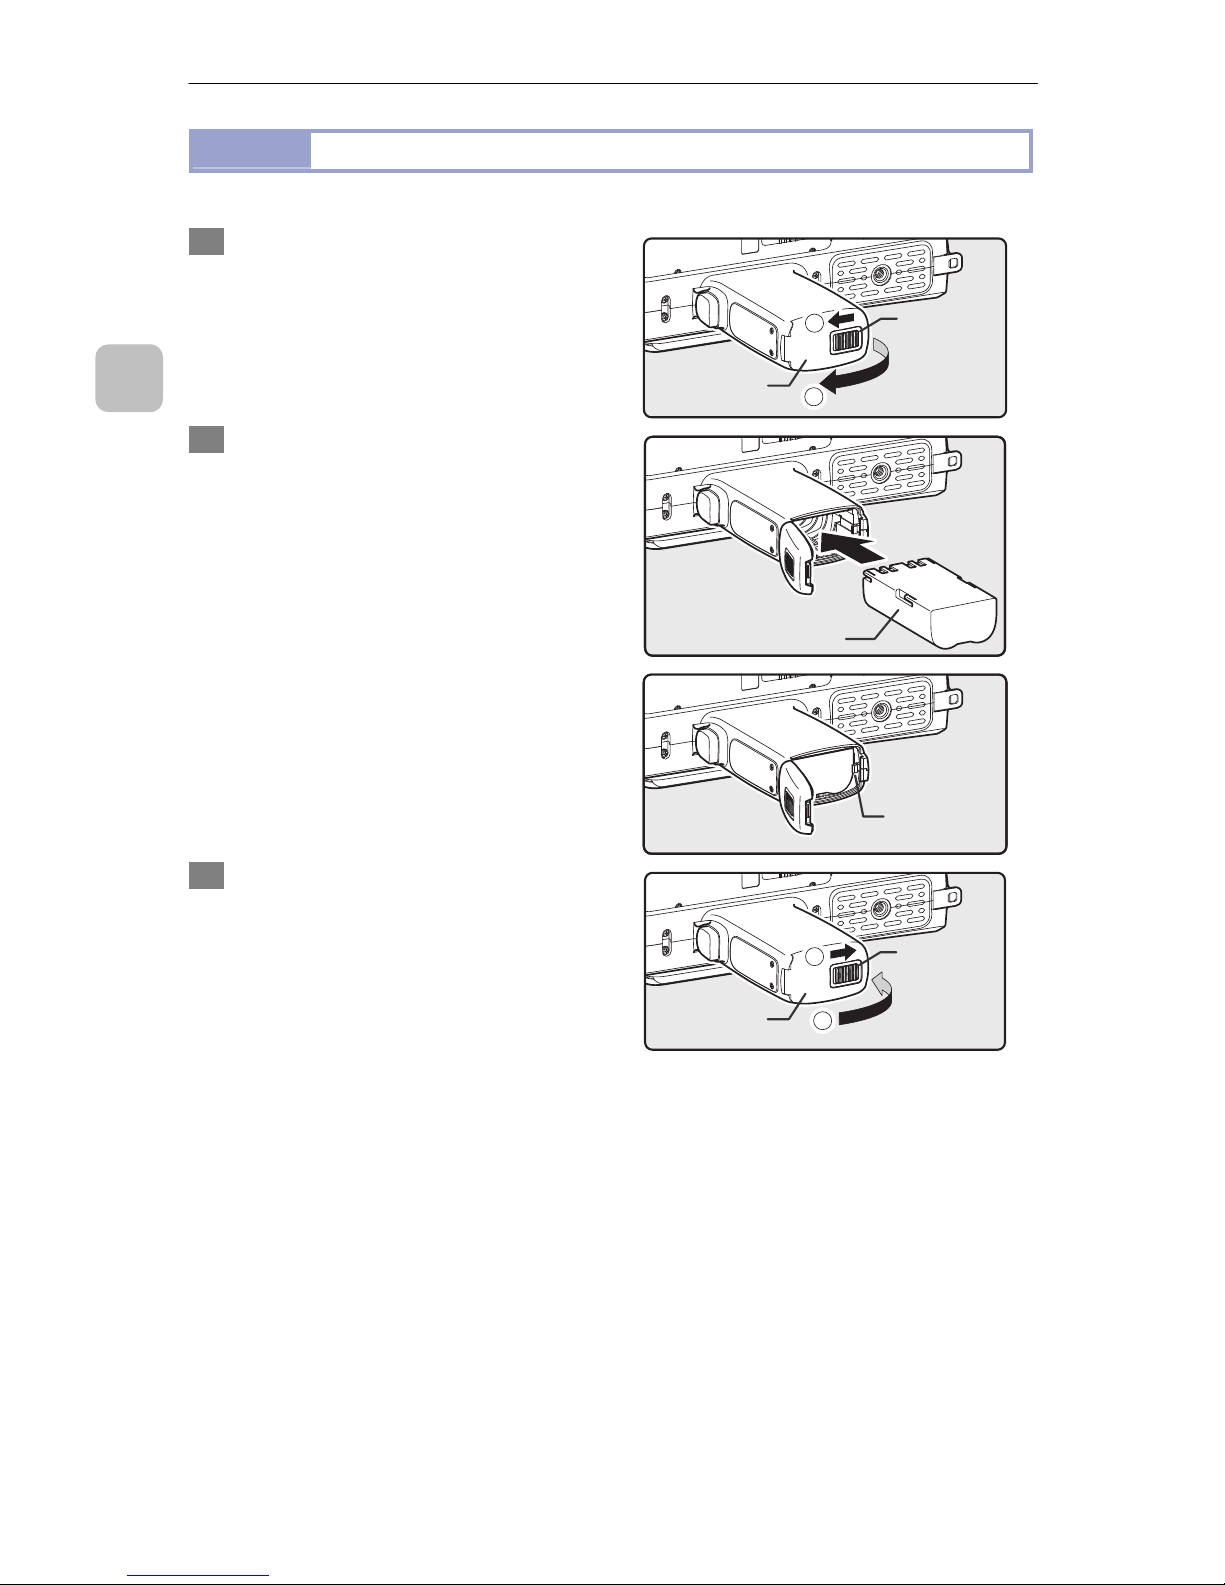
Insert a P-Li01 P-Li-ion Rechargeable Battery into the P-400R.
1 Open the battery cover at the
bottom of the grip.
Slide the battery chamber
open/close knob in the orientation
as indicated in the illustration (1) to
open the battery cover (2).
A/V
OUT
1
2
2 Insert a battery.
Insert a battery into the battery
chamber in the correct orientation
(terminal side first).
A/V
OUT
When the battery is completely
inserted, it is secured by a latch.
A/V
OUT
3 Close the battery cover.
Close the battery cover (1) and shift
the battery chamber open/close
knob in the direction of the arrow
(2) so that it returns to the original
position.
A/V
OUT
2
1
Battery
chamber
open/close
knob
Battery cove
r
Latch
P-Li01 P-Li-ion
Rechargeable Battery
Battery
chamber
open/close
knob
Battery cove
r
P-400R Digital Microscope Instructions
9
2
Preparing for Use
Removing the battery
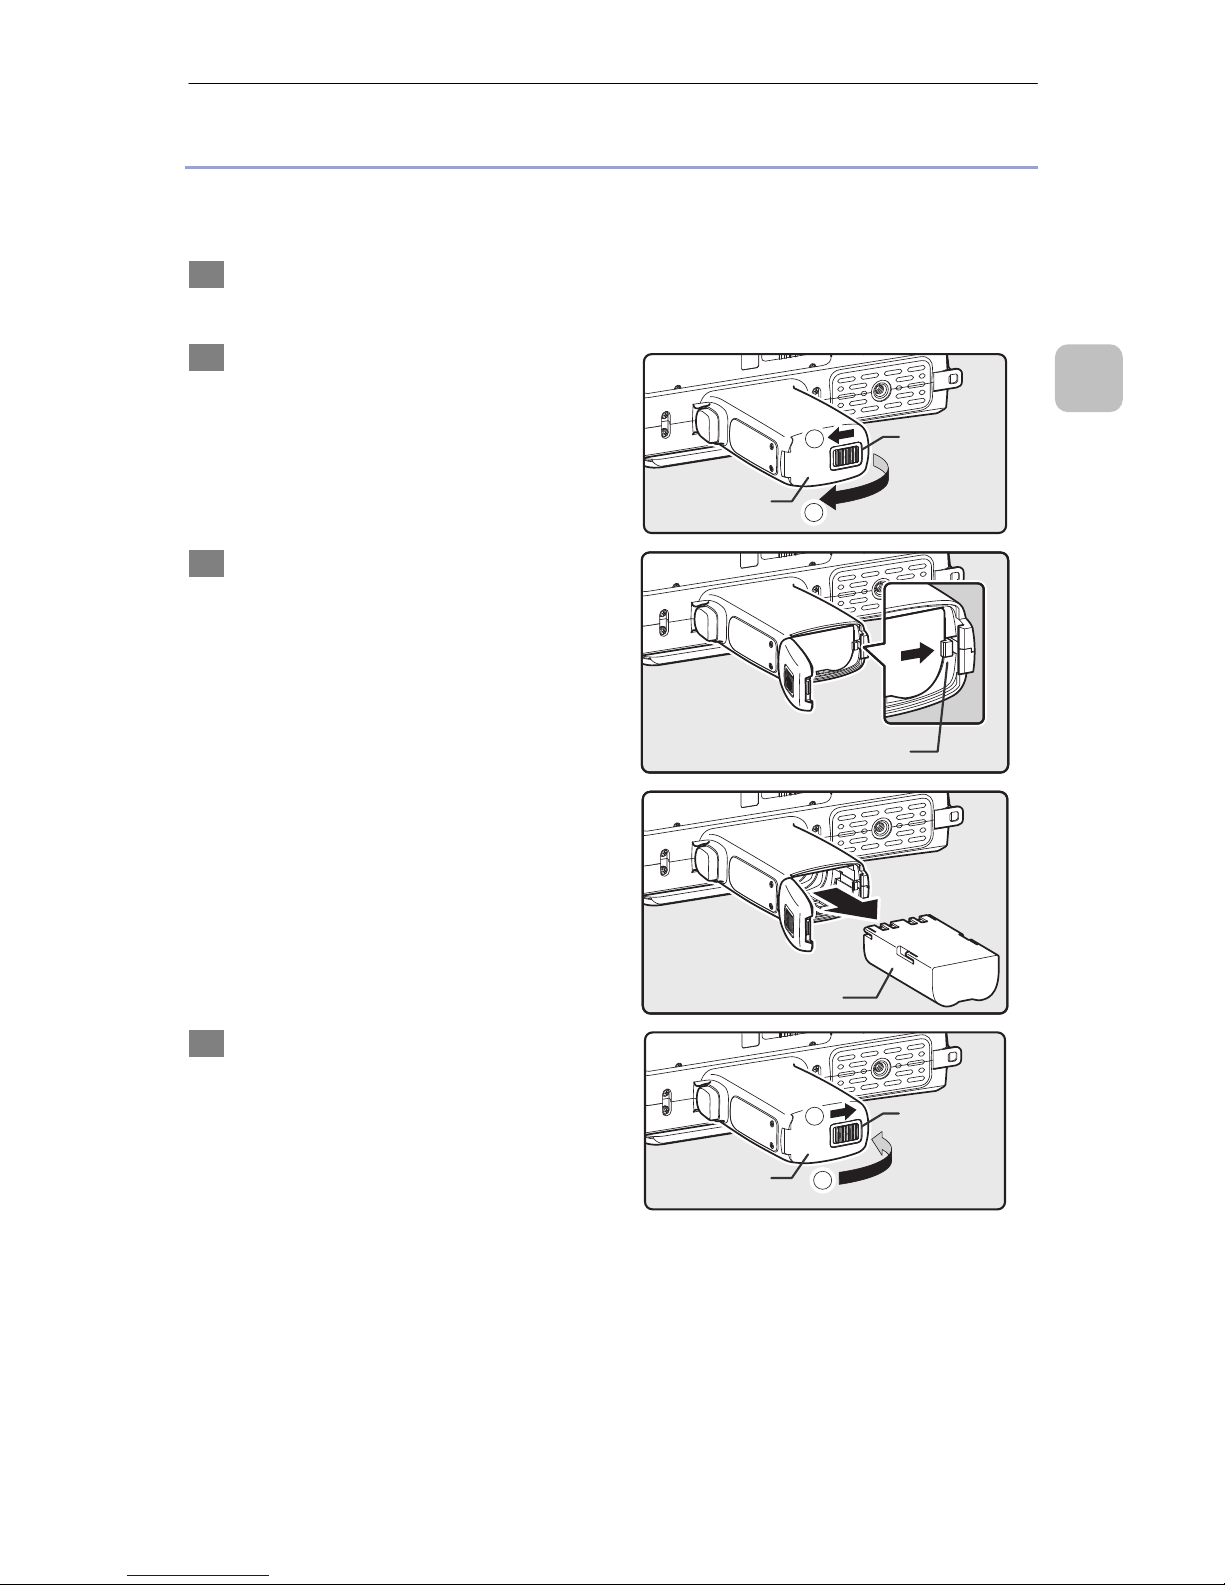
If a battery to be charged is in the P-400R Digital Microscope, remove the battery
from the microscope.
1 Turn off the power of the P-400R.
Check that the power indicator is off.
2 Open the battery cover at the
bottom of the grip.
Slide the battery chamber
open/close knob in the orientation
as indicated in the illustration (1) to
open the battery cover (2).
A/V
OUT
1
2
3 Release the latch that is
securing the battery, and then
remove the battery.
When the latch is released, the
battery is pushed out of the battery
chamber.
A/V
OUT
Pull out the battery straight.
A/V
OUT
4 Close the battery cover.
Close the battery cover (1) and shift
the battery chamber open/close
knob in the direction of the arrow
(2) so that it returns to the original
position.
A/V
OUT
2
1
Latch
Battery
chamber
open/close
knob
Battery cove
r
P-Li01 P-Li-ion
Rechargeable Battery
Battery
chamber
open/close
knob
Battery cove
r

P-400R Digital Microscope Instructions
10
2
Preparing for Use
2.1.3
Precautions for the battery and battery charger
Precautions for using the P-CH01 P-BACH Battery Charger
When the battery is charged completely, remove it from the battery charger.
Charge the battery in a room at a temperature of 0 to 40°C.
The battery is not charged when its temperature is below 0°C or above 60°C.
If the temperature of the battery is 0 to 15°C, charging might require a longer time.
If the temperature of the battery is 0 to 15°C or 45 to 60°C, the battery capacity
that can be charged might decrease.
When the battery charger is not used, disconnect the power plug from the outlet.
Do not shunt the battery charger terminals. Doing so may cause heat or damage.
Make sure that the side that has the CHARGE lamp is up. In addition, do not tilt
the battery charger while the battery is being charged.
Precautions for using the P-Li01 P-Li-ion Rechargeable Battery
Before you use the battery for the first time or after it has not been used for a long
time, always charge the battery with the P-CH01 P-BACH Battery Charger.
Do not use the battery at a place whose ambient temperature is beyond the range
from 0 to 40°C. Doing so might degrade battery performance or cause damage.
The internal temperature of the battery is high immediately after it has just been
used. In such a case, do not charge the battery until the battery cools down. If you
attempt to charge the battery when its internal temperature is high, not only the
charging is impossible or incomplete, but also the battery might be deteriorated.
Do not charge a completely charged battery again. Doing so deteriorates the
battery.
If you wave the battery charger or touch the battery during charging, the CHARGE
lamp might infrequently indicate that the charging has been completed although
the battery has not been charged completely because of vibration or static
electricity. In such a case, remove the battery, attach it again, and then restart
charging.
If an abnormal condition or a problem occurs, immediately stop the use, and ask
your nearest Nikon representative for repair.
P-400R Digital Microscope Instructions
11
2
Preparing for Use
2.2
Preparing the Recording Medium
Images captured by this product can be recorded on commercially available SD
memory cards (SD cards hereafter). This product supports SDHC, and can accept an
SD card whose capacity is a maximum of 16 GB.
miniSD cards and microSD cards cannot be used
A miniSD card and a micro SD card cannot be used via a commercially available
conversion adapter in P-400R. Use a full-size SD card.
About handling an SD card
Note the following when you use an SD card:
Carefully read the instructions attached to the SD card before use.
Do not format the SD card on a PC.
Insert the SD card in the correct orientation.
Do not remove the SD card or turn off the power while data is being written to
the card. This may cause loss of data or malfunction of the medium.
Some types of SD cards might not operate properly. Use the medium whose
operation has been proven by Nikon.
If the SD card is not recognized, remove the card, and then insert it again. If it
is still not recognized, replace the SD card with another one.
Do not touch the terminal of the SD card with your hand or a metal object.
Do not attach a label or sticker to the SD card.
About discarding or giving the recording medium
Note that deleting data or formatting the SD card using this product or the PC
does not completely erase the data. Deleted files can sometimes be recovered
from discarded recording media using commercially available software,
potentially resulting in the malicious use of important data.
Before discarding a recording medium or transferring ownership to another
person, erase all data using commercial deletion software, or initialize the
medium and then completely fill it with images containing no important
information (for example, pictures of empty sky).
When discarding the recording medium, you can also destroy it physically to
make the data unrecoverable. Care should be taken to avoid injury or damage to
property when physically destroying the recording medium.
P-400R Digital Microscope Instructions
12
2
Preparing for Use
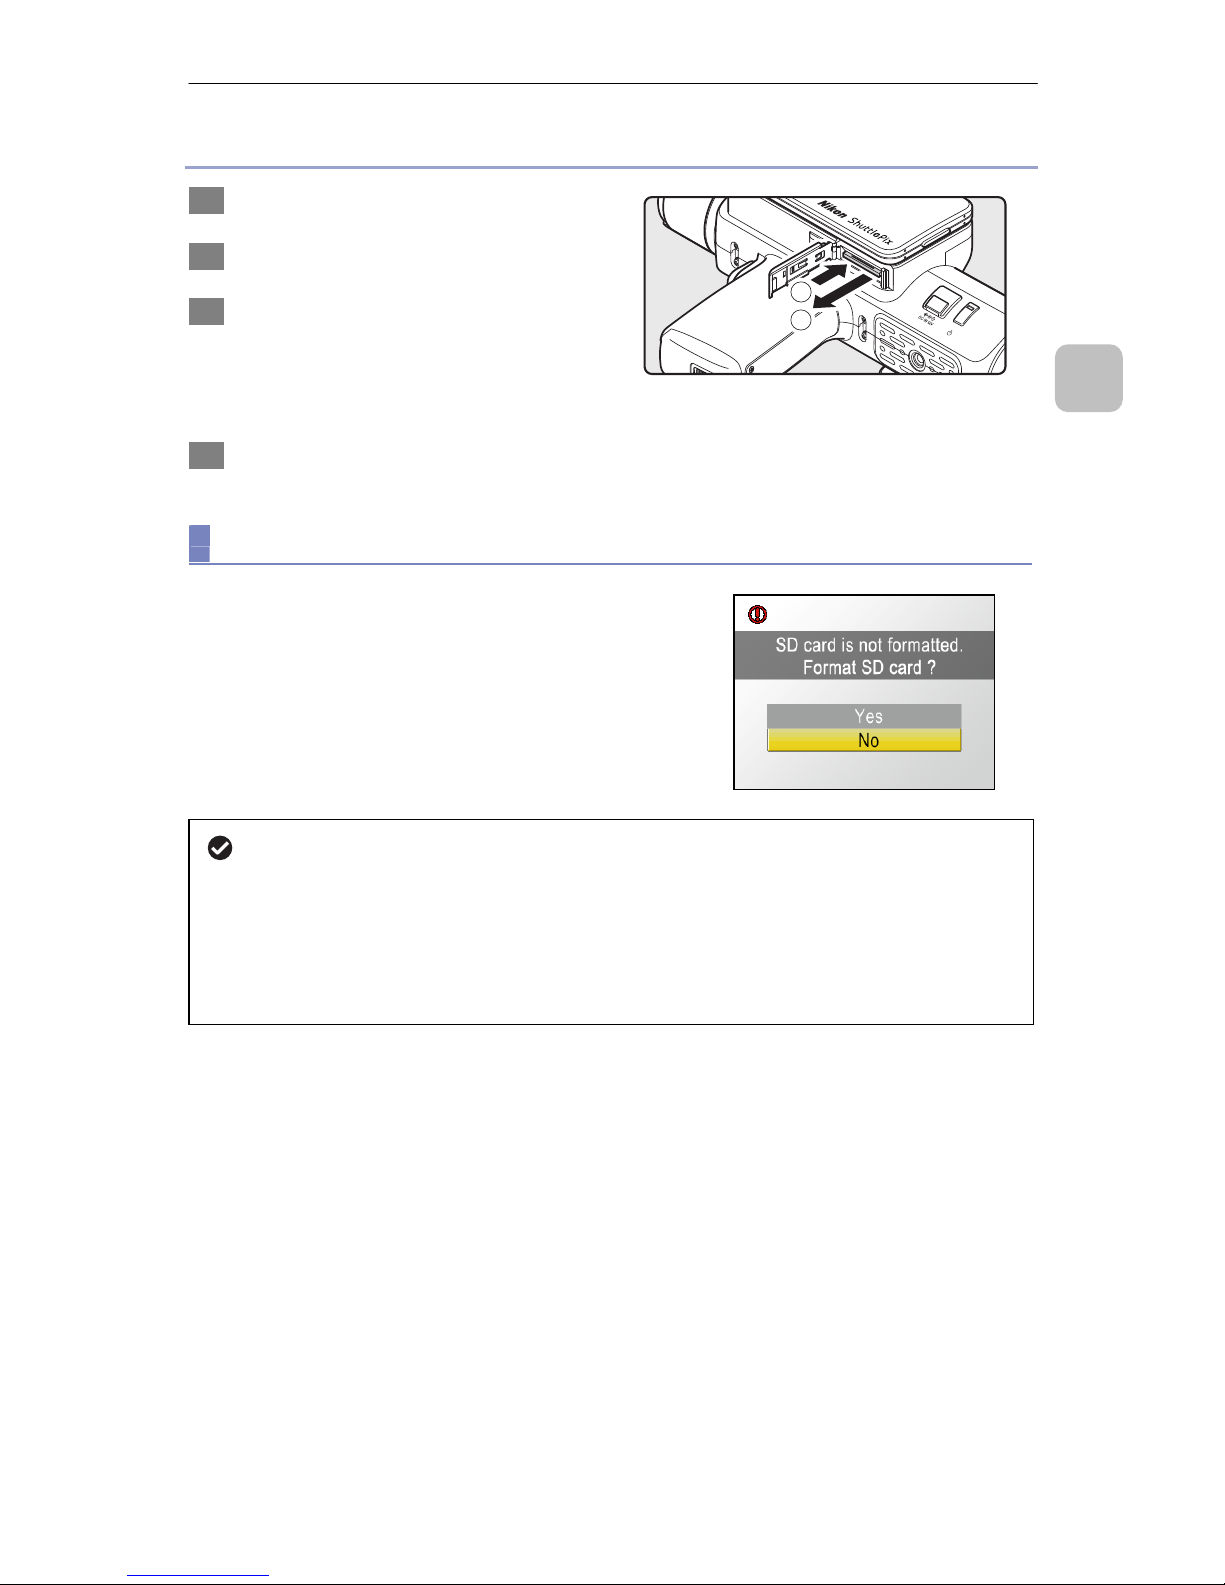
2.2.1
Preparing the SD card
Insert a commercially available SD card into in the SD card slot of the P-400R.
About preparing an SD card
If an SD card has not been inserted, a message to that effect is displayed in the
LCD panel when the product is turned on, and you cannot perform operations.
Before you start observation or capturing, make sure that an SD card has been
inserted.
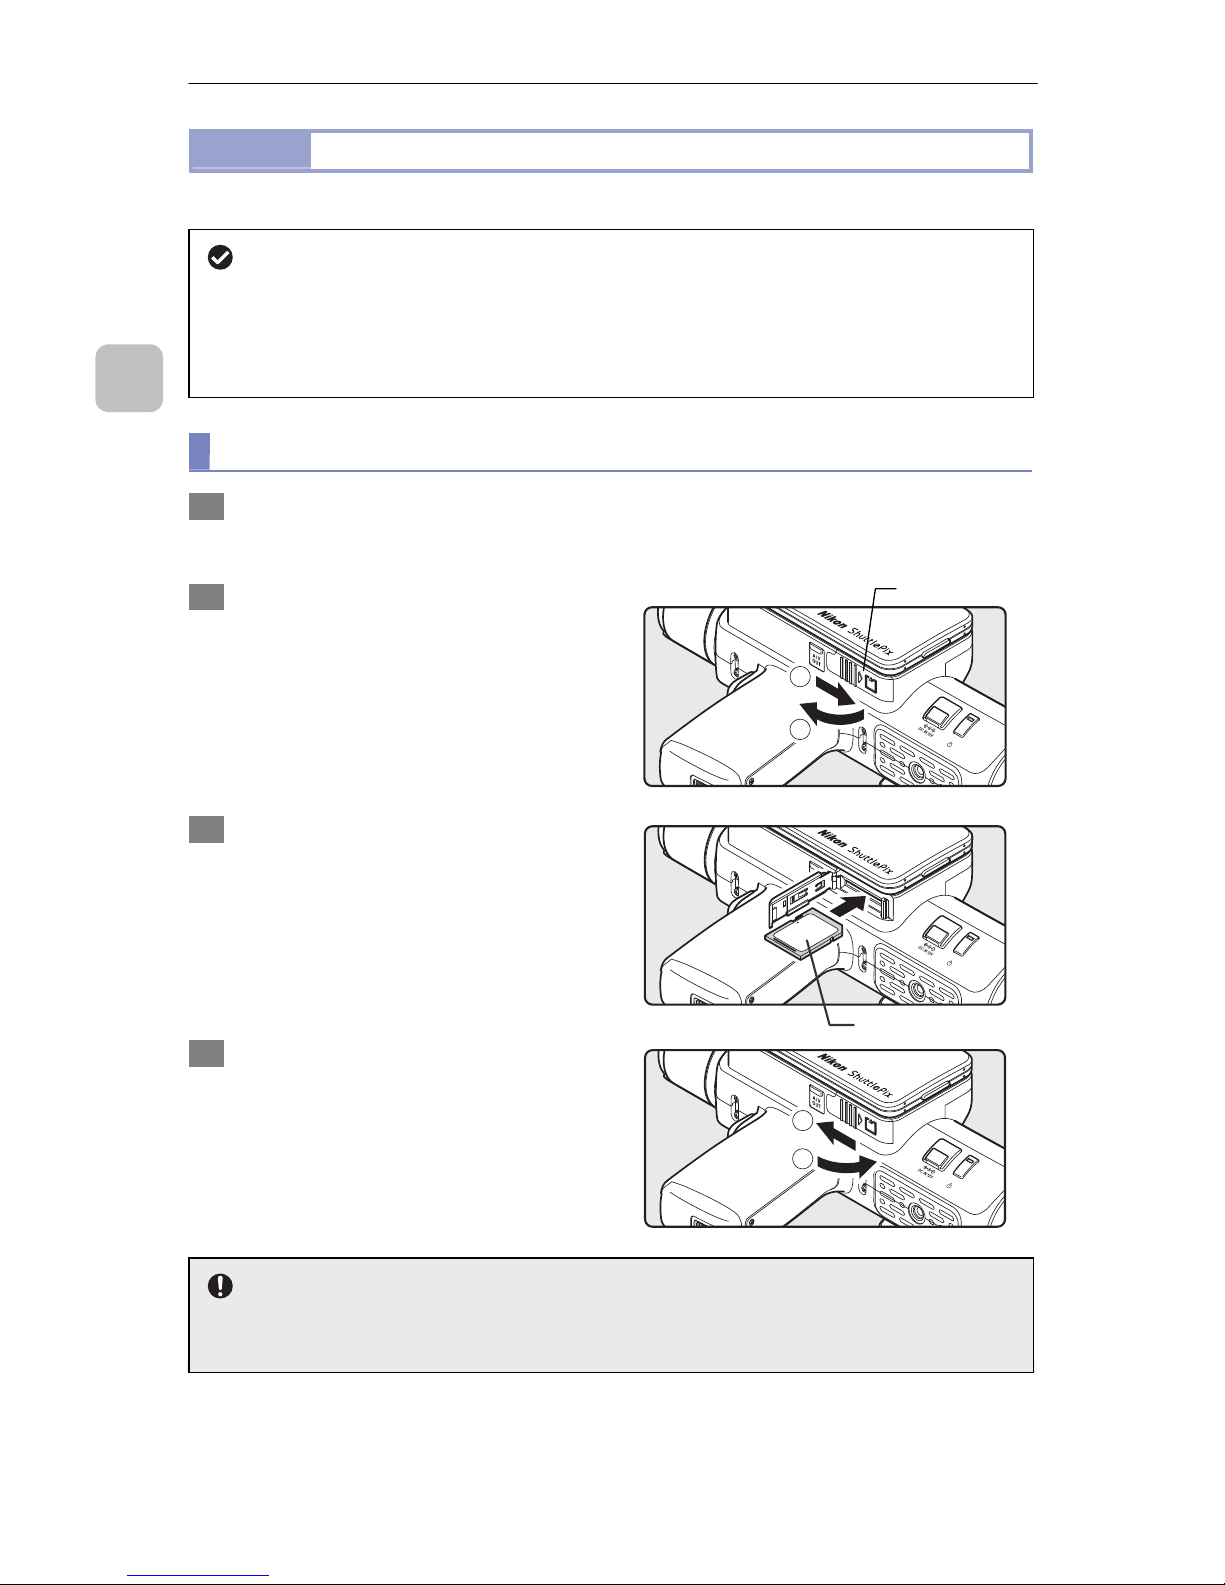
(1) Inserting the SD card
1 Turn off the power of the P-400R.
Check that the power indicator is off.
2 Open the cover of the SD card.
Slide the SD card cover to the
direction of (1) and open it to the
direction of (2).
1
2
3 Insert the SD card.
Insert the SD card in the correct
orientation as shown in the right
figure. Push forward until it clicks.
LOCK
4 Close the cover of the SD card.
Close the SD card cover to the
direction of (1) and slide it to the
direction of (2).
2
1
Pay attention to the inserting direction of the SD card
The SD card cannot be inserted in the opposite orientation. If you insert it forcibly
in the incorrect orientation, there is a risk to damage the SD card or the P-400R.
SD card cover
Label side
P-400R Digital Microscope Instructions
13
2
Preparing for Use
Removing the SD card
1 Turn off the power of the P-400R.
2 Open the cover of the SD card.
3 Remove the SD card.
Press the inserted SD card gently
(1) and the card will pop out from
the slot (2). Pull it out straight.
4 Close the cover of the SD card.
1
2
(2) Formatting the SD card
If the P-400R is turned on when the inserted SD
card has not been formatted, a confirmation
message is displayed on the LCD monitor.
This message prompts you to initialize the SD
card.
About initializing the SD card
Before using an SD card, which was used with any other device, on P-400R,
be sure to format it in P-400R.
After formatting, the data stored in the SD card will be all deleted. If some
important data is contained in the SD card, take the backup to the personal
computer, etc. before starting initialization.
P-400R Digital Microscope Instructions
14
2
Preparing for Use
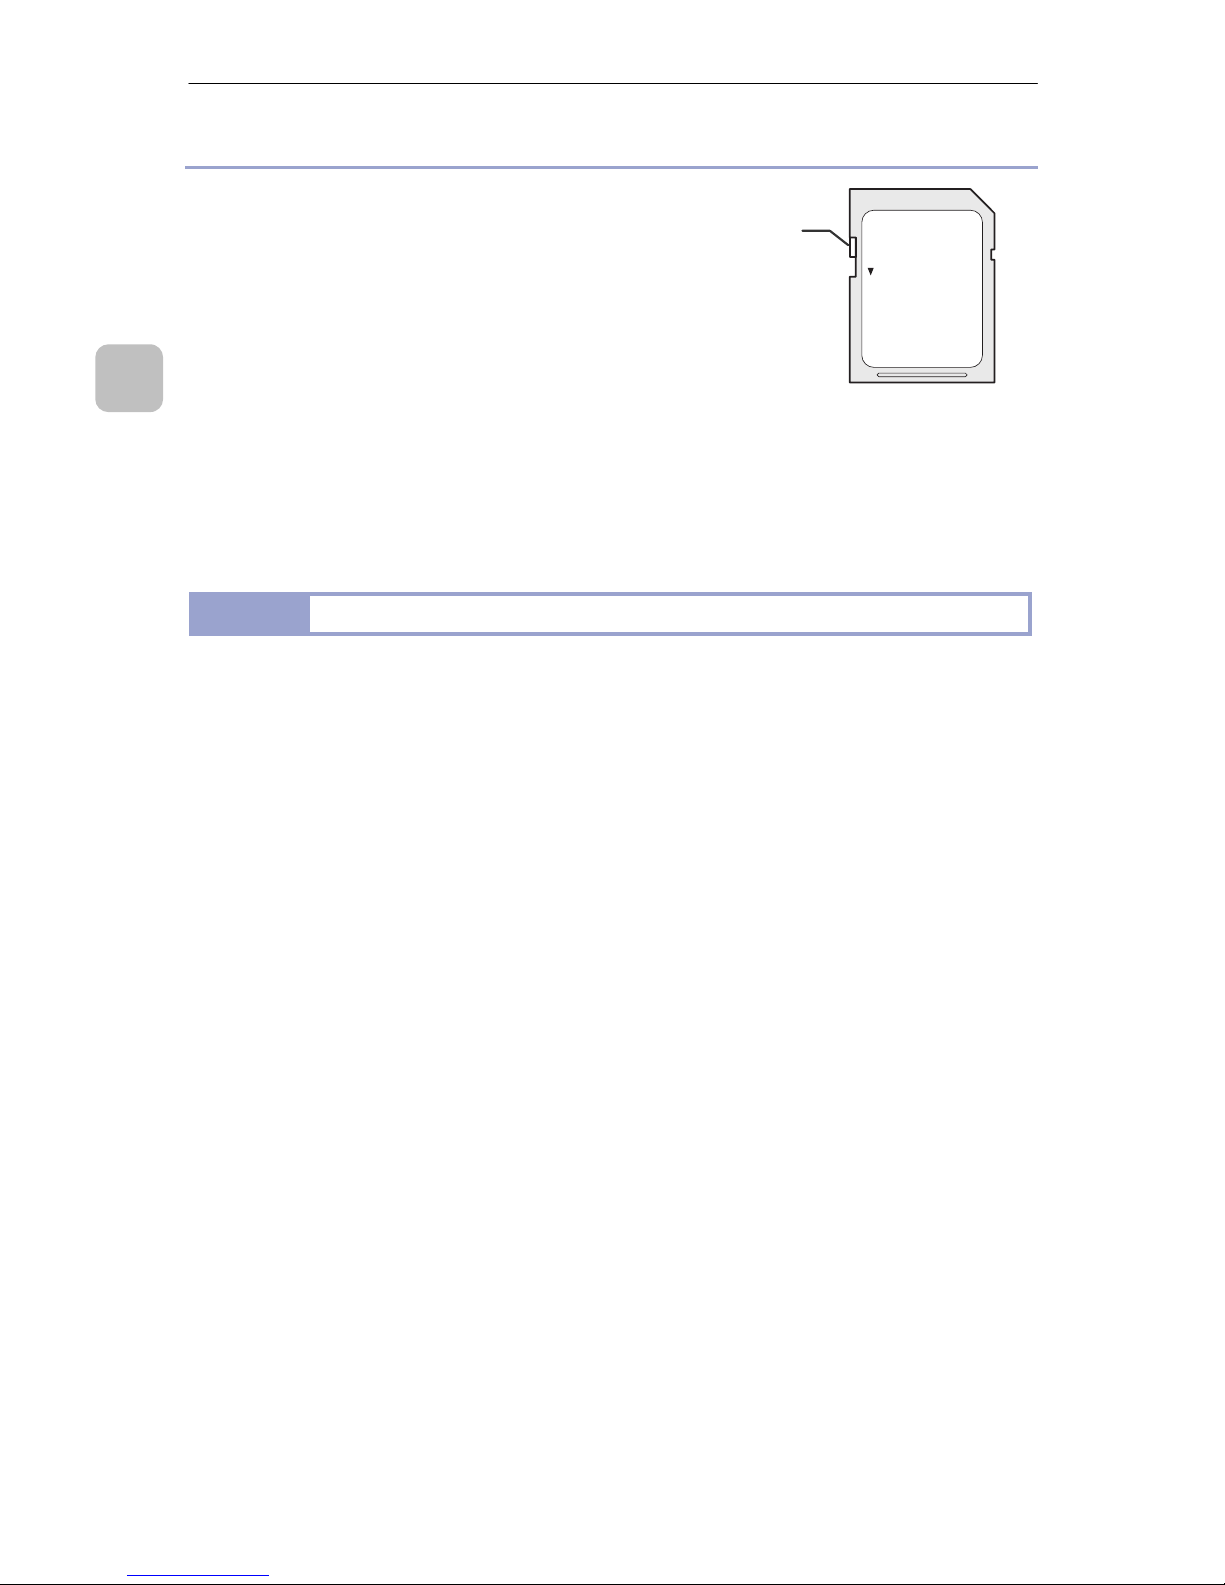
Precautions for handling the SD card
The SD card has a write protect
switch. Sliding this switch to the LOCK
position prohibits adding or deleting
the data, thus protecting images
saved in the SD card. When you save
or delete data to/from the SD card,
unlock the write protect switch.
Do not eject the SD card or turn off the
power of this product while the SD
card is being formatted or while data is
being written, deleted or loaded.
LOCK
2.2.2
Specifying an Active Folder
When you initialize an SD card in P-400R, a sub folder “100NIKON” is created in the
“DCIM” folder in the SD card, and it is automatically set as an image recording
destination (“active folder”).
For using other folders or an SD card previously used, specify a folder as needed.
For the operational procedure, see “5.2 Setting the Active Folder”.
Write protect
switch